


?  ZAN2300LCD

GB
IMPORTANT SAFETY INSTRUCTIONS
When using the sewing machine, basic safety precautions should always be followed, including the following: Read all instruction before using.
DANGER - To reduce the risk of electric shock:
•The sewing machine should never be left unattended when plugged in.
•Always unplug this sewing machine from the electrical outlet immediately after using and before cleaning.
•Always unplug before changing the light bulb. Replace bulb with same type rated 15 watts.
WARNING - To reduce the risk of burns, fire, electric shock, or injury to persons:
•Do not allow this machine to be used as a toy. Close attention is necessary when the sewing machine is used by or near children.
•Use this sewing machine only for its intended use as described in this manual.
Use only aceessories recommended by the manufacturer as contained in this manual.
Never operate this sewing machine if it has a damaged cord or plug, if it is not working properly, if it has been dropped or damaged, or dropped into water, Return the sewing machine to the nearest authorized dealer or service center for examination, repair, electrical or mechanical adjustment.
•Never operate the sewing machine with any of the air openings blocked. Keep the ventilation openings of the sewing machine and foot controller free from the accumulation of lint, dust and loose cloth.
•Never drop or insert any object into any openings.
•Do not use this machine outdoors.
•Do not operate this machine where areosol (spray) products are being usecl or where oxygen is being administered.
•To disconnect, turn the main switch to the symbol" O " position which represents off, then remove plug from outlet.
•Do not unplug by pulling on the cord. To unplug, grasp the plug and pull, not the cord.
•Keep fingers away from all moving parts. Special care is requirecl around the sewing machine needle.
•Always use the proper needle plate. The wrong plate can cause the needle to break.
•Do not use a bent needle.
•Do not pull or push the fabric while stitching. It may deflect the needle causing it to break.
•Cut off the power position when making and adjustments in the needle area. such as threading the needle, changing the needle, threading the bobbin, or changing the presser foot.
•Always unplug the sewing machine from the electrical outlet when removing covers, lubricating, or when making any other user service adjustments mentioned in this instruction manual.
SAVE THESE INSTRUCTIONS
This sewing machine is intended for household use.
1

CONTENTS |
A Brief Introduction |
Chapter I |
|
Imporatant Functions |
|
Name of parts: |
|
Chapter II |
|
Preparation before sewing |
3 |
Extendable |
|
Accessory |
3 |
Power supply |
4 |
Foot controller |
4 |
Sewinglamp |
4 |
Remove and attach presser foot |
4 |
Change the needle |
5 |
Thread and needle chart |
5 |
How to use spool holder |
5 |
Remove and attach the bobbin case |
6 |
Wind the bobbin |
6 |
Attach bobbin into bobbin case |
6 |
Machine threading |
7 |
Draw up lower threading |
7 |
Tension at adjustment of upper thread |
7 |
Pattern selection dial |
8 |
Select double action stitch |
8 |
Stitch length selection dial |
8 |
Stitch width selection dial |
8 |
Reverse sewing button |
8 |
Lower feed dog |
8 |
Presser foot pressure selection dia |
9 |
Chapter III |
|
Start sewing |
9 |
Straight sewing |
|
Change sewing direction |
9 |
Use leg wire on the needle plate |
10 |
Right-angle drive |
10 |
Zigzag sewing |
10 |
Chapter IV |
|
Join fabric |
10 |
Zigzag over-lock |
|
Triple zigzag stitching |
11 |
Triple stretch straight stitching |
11 |
Button sewing |
11 |
Make a buttonhole |
12 |
Buttonhole with decorative stitching |
12 |
Zipper insertion |
13 |
Blind hem |
13 |
Chapter V |
|
Decorative stitching |
13 |
Shell stitchin |
|
Double Action stitching |
14 |
Reticulate stitching |
14 |
Box-shaped elastic stitching |
14 |
Pad stitching |
15 |
Edge joining |
15 |
Chapter VI |
|
Maintainance of machine |
15 |
Remove the shuttle and its accessories |
|
Clean feed dog |
16 |
Oil the machine |
16 |
Obstacle avoidance |
17 |
2


POWER SUPPLY
It is to be determined that the voltage and frequency indicated on the machine should be identical to the supply prior to connected to the power.
1.Connect machine plug (5) to, machine interface (4) 2.Connect attaching plug (1) to recacle(3). 3.Switch on sewing lamp with switch button (2).
(1) Attachplug |
(2) |
Switchbutton |
|
(3) |
Receptacle |
(4) |
Machine interface |
(5) |
Machine plug |
(6) |
Foot controller |
Foot controller
Foot controller
may change speed of sewing. The tighter the switch is pressed, the faster stitching goes.
SEWING LAMP
Sewing lamp
Sewing lamp hulb stands at the back of top cover.Take the top cover when changing the bulb (front screw).
! Note
Switch off the power before replacing a bulb.
Take out a bulb:
Hold it and screw off to the left.
Fit over a bulb:
Hold it and screw on to the right.
REMOTE AND ATTACH PRESSER FOOT
Removing:
Turn forward the balance wheel while raising the needle to the highest position. Leveling up the presser foot. Hold back the lever on the
foot bearer while releasing the presser foot.
Installing:
Fit over the presser foot so that its plate dowel is just opposite to the groove. Lower the presser foot lever and its presser foot will be fixed
to the place.
4

CHANGING THE NEEDLE
Turn forward the balance wheel while raising the needle to the high level and lower the presser foot. Loosen the needle clamp bolt by turning it anti-clockwise.Remove the used needle and insert the new one with its flat side facing the back. While inserting the needle, the needle should be pressed as firmly as possible up into the needle clamp, which should he tightened with a screwdriver.
Note!
Regular checking should be done to ensure that the needle is never twisted or blunt.
Knitting materıals, lıne silk or silk fabrıcs may frequently encounter knots and skipping stitches, which are often caused by the damaged needles.
THEAD AND NEEDLE CHART
Needle size |
Material |
Cotton thread Specification |
Silk thread Specification |
|
|
|
|
|
|
Nr. 60 |
(#7) |
Fine silk |
70-80 |
100-140 |
Nr. 70 |
(#10) |
Crepe |
|
|
Nr. 80 |
(#12) |
Poplin Pure Silk |
50-60 |
80-lOO |
Nr. 80-9O (#12-14) |
Woolen, cloth Cotton |
40-50 |
60-70 |
|
Nr. 90-100 (#14-16) |
Wool |
30-40 |
50-60 |
|
Nr. 90-100 t#14-18) |
Jeans Materials |
30 |
45-50 |
|
Elastic stitching |
|
|
|
|
Nr. 70 |
(#10) |
Knitting Materials |
70-80 |
100-140 |
HOW TO USE SPOOL HOLDER
|
Spool holder is used lo hold spools.Pulling up the spool holder when |
|
|
sewing. |
|
|
Prees the spoolholder down, when the machine is packed |
|
|
Pressdown the machine when it is packed. |
|
|
(1) upper tread (2) hole (fig.1) |
|
|
Instruction: |
|
|
(fig.2) |
|
|
In case that the thread in use is easily tangled with spool holder or |
|
(fig.1) + (fig.2) |
knotted, you can pull the thread through the hole as shown in the |
|
illustration. While keeping the hole facing the spool. |
||
|
5

REMOVE AND LOAD THE BOBBIN CASE
Live the Cover
(1) Cover
Turn forward the balance wheel to raise the needle. Hold on to the bobbin exit and pull out the bobbin case.
(3) Bobbin case handle
WINDING
(3) Bobbin case handle
(2) Bobbin exit
Press the bobbin case handle to the innermost to ensure joining when loading it into the bobbin case.
(1) Pull out the balance wheel to the right so as to break contact with machine (2) Draw thread from the spool through the bobbin winder tension disc. (3) Pull thread through the hole in the bobbin and insert the bobbin into the bobbin shaft.
(4) Turn the bobbin to the right. (5) Hold the end of the thread and keep stepping down the foot controller. Stop the after several turns.Cut the excess thread close to the bobbin. (6) Stop down again the foot controller. Wind thread until the bobbin is full and stop the machine. Push the shaft to the left and cut the thread. (7) Push the balance wheel to the left to close contact
(to the original position).
Instruction: The bobbin shaft is to be pushed to the left when the winding finished.
PUT THREAD INTO THE BOBBIN CASE
Load bobbin in bobbin case. Make sure that the thread is pulled out in the direction indicated by the arrowhead (clockwise).
(2)Pull thread into the slit of bobbin case.
(3)And then, pull thread through bobbin tension regulator spring to the outlet hole.
Instruction: pull thread out about 10 cm.
6

MACHINE THREADING
Turning forward the balance wheel and move thread take-up lever to the highest positon. Raise presser foot and insert the spool into spoolholder (as shown in the illustration). Draw thread from the back side of the spool. (1) Lead the thread through the pretension. (2) Hold the thread and pull it into the thread tension disc and then past the thread plate. (3) Pull up the thread tightly and let it through the slit of thread take-up lever from the right side. (4) Then pull down thread and let it through the thread hook.
(5) Pull down thread and let it go through the catch the thread hook. (6) Pull thread through needle hole from the front to the back.
Instruction: Cut the thread with sharp scissors so as to make easy threading.ln.
DRAW UP LOWER THREAD
(1) Lift presser foot and hold the upper thread lightly with your left hand.
(2) Keep turning forward the balance wheel until thread take-up Iever is at its highest position.Pull the upper thread so as to pull up the lower thread.
TENSION ADJUSTMENT OF UPPER THREAD
(3) Leave about 5 cm of both threads and pull them under the presser foot then toward the back of the presser foot.
Leave 10 cm of both threads.
While doing straight stitching, both upper and lower threads must be knotted between the two layers of garment. Adjust selection dial of thread tension disc within the window. (1) Regulated indicator (2) The smaller the tension of upper thread is bigger, turn up the ındıcator. (3) The tension of upper thread ıs smaller, turn down the indicator.
The tension of upper thread in case of zigzag stitching.
In order to achieve good effect of zigzagging, the tension of upper thread should be less than that of straight stitching.
The upper thread should be visible from the reverse.
7

PATTERN SELECTION DIAL
Needle is pulled out from fabric and the desired size of stitching should he selected on the selection dial.
Select Double Action stitching
As for stitching Double Action stitching, its length should be adjusted into (1)-(8).
Wıth the following adjustment, the length of stitchcould be selected as you like.
"+ " refers to thick stitch in Iength.
"- " refers to sparse stitch in length.
Instruction: Width of stitch changes between selection dial 2 and 3 should be different.
SELECTION DIAL FOR LENGTH OF STITCH
-Turn the selection dial with help adjust stitch to its ideal length.
-The bigger the number is,the longer the stitch is.
…… ” is the correct range of adjustment for making buton holes -Range from 0.5 to 4 could be used for zigzag stitching
-The correct elastic stitch value should be (1)-(10).
How to make the elastic stitch better?
In case the elastic stitch turns out to be unsatisfactory, you may turn the selection dial to “ - " and in this way, stitches would be thicker while turning to “+" they would be more sparse.
Instruction: while turning the selection dial. The needle should be stopped at a rather high position above fabric.
REVERSE BUTTON
If the reverse button is always pressed down, the machine will do reverse stitching all the time.
Lower feed dog
1. Open the cover (1) Cover 2. Lower the feed dog by pulling down the shaft and moving it towards the direction inclicated by the arrow head as shown in the illustration. (2) Lower teeth lever 3. Raise the feed dog by pulling down the lower teeth lever and moving it towards the direction indicated and reach "A" by the arrowhead as shown in the illustration.
Instruction: for ordinary
sewing, all the feed dog shall be raised.
8
FOOT PRESSURE SELECTION DIAL
For ordinary sewing, selection dial is present
at " 3 ". And its pressure drops to " 2 " when sewing appliques, mesh fabrics and embroidery. As for chiffon, lace, yarn and other miscellaneous fine materials, you may put the dial to
" 3 ". Cotton flannel and braided stretch textile should be adjusted to " 1 ".
(1) Regulatory value indication
CHAPTER III START SEWING Straight stitching
(1) Pattern selection dial: 1 or 2 (2) stitch length: 1.5 - 4 (3) presser foot for needlework: zigzag (4) pressure of thread tension disc: 2-6
Raise presser foot and put cloth beside leg wire of needle plate.Turn forward the balance wheel and lower the needle down into the fabric. Lower presser foot and make sure that thread is placed backward. Step down fool controller. Fabric will go along leg wire and is carned forward automatically by feed dog. In order to make end of thread firm, please press the reverse stitch buton and do several reverse stitches. Raise presser foot extract fabric and pull the thread backward.
Clip both threads with a cutter. Leave certain length of thread for future use.
CHANGE SEWING DIRECTION
Stop the machine, and turn the balance wheel to bring the needle down into the fabric. Raise the presser foot. Turn the fabric to change direction as desired. Lower the presser foot to resume sewing.
9

THE STRIPS OF LEG WIRE ON THE NEEDLE PLATE
The Strips of leg wire on the needle plate is of great help to maintaining width between the needle and the thread.
Instruction: these data conforrn to the distance between strips of leg wire and the needle.
(1) Strips of leg wire (2) Comer (3) Needle plate (4) Hole of needle plate (5) The width of sewing to the center of needle
Figure on the needle plate |
10 |
15 |
20 |
3/8 |
4/8 |
5/8 |
6/8 |
Spacing in cm |
1.0 |
1.5 |
2.0 |
1.0 |
1.3 |
1.6 |
1.9 |
|
|
|
|
|
|
|
|
RIGHT-ANGLE STITCH
While doing right stitches, a space of 1.6 cm should bekept apart from the edge of fabric When the edge of fabric is aligned with the corner. stop the machine and turn (forward) the balance wheel to lower the needle. Raise the presser foot, turn the fabric around the needle to change direction until its edge is aligned with the strip of leg wire of 1.6 cm. Lower the presser foot and sew in the new direction.
(2) Thread from the corner
ZIGZAG STITCHING
(1)pattern selection dial:3), 3-5
(2)stitch length: 1 - 4
(3)presser foot: zigzag
(4)thread tension disc: 2-6
Simple zigzag stitches are often used for hemming.
Making button holes and elastic bends.
CHAPTER IV CLOTHES STITCHING Zigzag over-lock
(1)pattern selection dial:3, 3-8
(2)stitch length: M1-2
(3)presser foot: zigzag
(4)thread tension disc:4-6
The stitch is used for making over-lock so that thread at the edge of cloth shall not fall apart.
10

TRIPLE ZIGZAG
(1)pattern selection dial:3, 3-8 (
(2)stitch length: M 1-2
(3)presser foot: zigzag
(4)thread tension disc:4-6
The stitch is used for synthetic materials and other materials that get folds easily.
It also suits over-lock so as to avoid threads falling apart. It is fit for sewing elastic bends and darning. A strip of hemming-stitch with 1.5 cm is to be left.
Cut off the strip of hemming-stitching after sewing.
TRIPLE STRETCH STRAIGHT STRITCHING
(1)pattern selection dial: 1 or 2
(2)stitch length: (1)-(8)
(3)presser foot: zigzag
(4)thread tension disc: 4-6
Two stitches forward and then one stitch backward will make the stitching firm. Prior to stitching garment pıeces, make a sample by using pins. Such stitches are most suitable for sewing crotches.
BUTTON SEWING
(1) Stitch selection dial: 3); 3-5 (aslong as fit for button sewing) (2) Stitch length: could be adjusted to any figure (3) Stitch wide: making presser foot for button sewing (4) Presser foot: button sewing (5) Tread tension disk presser: 1-3
(6) Tape the button over the marked position (See page 11)
Align both holes of the button with groove slots while placing the left button hole directly under the needle point. Low presser foot
-Turn pattern selection dial -turn the stitch width just up to the top of right button hole. Make 5 stitches approximately and raise the needle.
To get a thicker button handle, cut the thread wıth 20 cm left. Bring the upper thread down through the button hole and wind it around the button handle for several turns. Draw the thread to the back and make a knot.
Instruction: raise the teed dog again after sewing buttons.
11

BUTTONHOLES
(1) satural pattern selection dial:
see the drawing 1 |
|
(2) stitch length: |
(0,5-1) |
(3)presser foot: making buttonholes
(4)thread tension disc tension: 3-5
Stitch width is to be chosen arbitranly with in  between 0 and 1 range according to variation of stitch length. (1) For thicker stitching, adjust selection dial to "O". Satin stitches suit lightweight material. (2) For thicker stitching, adjust selection dial to "1”.
Loose stitches suit heavyweıght material.
Instructron: Make trial stıtchıng on some small cloth so as to find out the optimum effect.
(1) Make the marks of buttonhole carefully on the material. (2) Pull forward slide (A),keep the mark (C)on it in conformity tothe initial mark (B),The mark on the presser foot should be aligned with that of the material Lower the presser foot.
Instruction: marks on the slide should be carved in cm. (3) Adjust stitch selection dial to. Keep stitching forward until come to the marks in front of the buttons and then stop sewing with needle pausing at top left. (4) Adjust stitch selection dial to Make 4-6 stitches before stopping sewing with needle pausing at top right. (5) Adjust stitch selection dial to Keep stitching backward until come to the marks at the back of buitons and then stop sewing with needle pausing at top right. (6) Adjust stitch selection dial to Make 4-6 stitches before stopping sewing with needle pausing at top left. (7) After sewing: buttonholes, take out fabrics. Insert a pin at the back hole of buttonhole so that the end of thread of buttonhole will not be cut off mis takely. Cut out the buttonhole carefully with a buttonhole cutter.
BUTTONHOLES WITH DECORATIVE STITCHING
(1)pattern selection dial:BH
(2)stitch length: IIIIIIIIII (0,5-1)
(3)presser foot: making buttonholes
(4)thread tension disc tension: 3-5
1. Raise the foot plate of buttonholes sewing hang the laid in threads on the cam at the back of presser foot, (1) Positioning cam 2. Draw forward the end of additional thread under the presser
foot and place it under the center of presser foot. 3. Hold tightly the additional thread and hook the fork in front of the presscr foot. 4. Bring the neddle into the fabrics before starting sewing and lower the presser foot.
5. Slowly step down foot controller buttonholes, with each face of buttonholes encasing the laid-in threads
6.Take out fabrics and clip sewing thread. 7. Pull the laid-in threads from left side and hold it tightly.
8.The end of thread should be wound to darning needle. Draw the thread to the back and clip.
Instruction: while cutting out buttonholes, pay attention to the instruction on Page 12.
12

ZIPPER SEWING
(1)pattern selection dial: 1
(2)stitch length: 1,5-4
(3)presser foot: zipper
(4)thread tension disc pressure: 4-6
Stick a zipper or needle it to the fabrics and place it under foot plate.
Draw the thread to be back and lower the presser foot. Sew on the left sıde of the zıpper by guıdıng the zipper teeth as close as possible to the needle drop.
Fabrics and zipper should be stitched tightly at the same time Pivot fabric to the opposite side and the way to stitch the other side of zipper should be identical to that of the left side.
BLIND HEMMING
(1)Pattern selection dial: 5-6
(2)stitch length: 1-3
(3)presser foot: zigzag plus guiding plate
(4)thread tension disc pressure: 4-6
1.Folding method for fabrics (1) Back side of fabrics (2) 0.4-0.7cm
2.Lower presser foot, release the screw of the fixed presser foot and push forward the guiding plate between the screw and foot plate groove. Fix the screw and make sure that the stopper of guilding plate should be installed in the middle of foot plate.
3.raisc the presser foot, place fabrics under the foot while keeping tucks facing the stopper of the guiding plate. Lower the presser foot and stitch slowly in order to command a better control.The needle on the left zlgzag should be brought just into
tucks. Pay attention to the tucks, which are to be placed at the side of stopper of guiding plate while sewing.
4. When rıght upper layer of cloth ıs ıroned upward, its stitches are hardly to be perceived.
CHAPTER V DECORATIVE STITCHING Shell stitching
(1)pattern selection dial: 9
(2)stitch length: 2
(3)presser foot: zigzag
(4)thread tension disc pressure: 6-8
Folded cloth lace should be placed beside the presser foot and needle on the right of the cloth so as to work out shell stitching.
13

DOUBLE ACTION STITCHING
(1)pattern selection dial: (1-10)
(2)stitch length: (1)-(10)
(3)presser foot: zigzag
(4)thread tension disc pressure: 2-6
With following adjustment, the stitch length could be selected as you like. Adjustment to " + " reters to thick stitch in length. Adjustment to " - " refers to sparse stitch in length.
RETICULATE STITCHING
(1)pattern selection dial: 6
(2)stitch length: 1-10
(3)presser foot: zigzag
(4)thread tension disc pressure: 4-6
Straight stitch the tucked side with spacing of 1 cm. Select "4” for its stitch length. Knot the thread on one side.Tighten lower thread and make tucks with even spaces. Fıx the thread on the other side. Make a reticulate and decoratıve stitching along the middle of tucks. Then, extract the tuck stitches.
Instruction: Decrease upper thread tension will make tuck decoration easy.
BOX SHAPED ELASTIC STITCHING
(1)pattern selection dial: 8
(2)stitch length: 1
(3)presser foot: zigzag
(4)thread tension disc pressure: 4-6
The stitches are most suitable to sewing the elastic cords over 3 mm of children's sleeves. Tighten the elastic cord after sewing. Such stitches are aiso good to sewing heavyweight Fold the two seamless fabrics and stitch them together.
14

PAD STITCHING
(1)pattern selection dial: 3
(2)stitch length: 0,5-1
(3)presser foot: zigzag
(4)thread tension disc pressure: 1-4
(5)presser foot presser: 2
Adhere tightly the decorative parts to the fabrics or iron it with solvable non-woven textiles.
Stitch around the decorative parts and make sure that suture beyond the decorative parts should disappear. Insert the needle into the cloth when encountering corner. Raise the presser foot and pivot the cloth to the left or right.
Instruction: After sewing, adjust the selecıion dial
EDGE JOINT
(1)pattern selection dial: 10
(2)stitch length: 1-10
(3)presser foot: zigzag
(4)thread tension disc pressure: 4-6
Fold in both sides with 1.5 cm each and iron it. The folded sides should be fixed to non-woven textiles with spacing of 0.3 cm. Slowly stitch and make sure that each stitch should reach the folding edges.
CHAPTER VI MAINTAINANCE OF MACHINE
Remove the pendular shuttle and its assemblies
Instruction: switch off lamp or pull plug out.Take out the pendular shuttle: Raise needle to its highest position and lift shuttle Gover. Remove the bobbin case from the machine, Uncover shuttle lever and draw out the shuffle retaining ring.
Instruction: clean the feed dog with a brush and soft and dry rag
(1) |
Bobbin case |
(2) Shuttle lever |
(3) |
Shuttle retaining ring |
(4) Pendular shuttle |
(5) |
Shuttle carrıer |
|
Installation of the pendular shuttle: hold shuttle center pin and fit carefully black into the shuttle carrier. Refit shuttle retaining ring and make sure that the following
Center pin is fixed in the Slot of the shuttle canier. Lock retaining ring by turning levers back into position. Refit bobbin case with bobbin
(6) Center pin |
(7) Slot |
15

CLEANING THE FEED DOG
Switch off lamp and pull plug out before cleaning the feed dog. Remove the needle and presser foot. Remove the screw on the left hand side of the needle plate with the screwdriver. Remove the needle plate.
Clean the feed dog teeth with a brush and refit the needle plate. Fit the presser foot and it is ready for sewing
Instruction: to obtain first rate effect of needlework. Frequent cleaning is required for frequent use.
ÖLEN DER MASCHINE
OIL THE WORKS
Instruction: Apply only
one or two drops of machine oil, or cloth will be stained. If the machine should not run well after being out of use for a long period, apply a few drops of oil before running it and the result will be the same as the well thumbed condition
OILING THE BACK OF TOP
Remove the cover, screw and top cover Oiling the parts as shown in the illustration.
(1) Cover (2) Screw (3) Top cover
OIL THE PENDULAR SHUTTLE
Oiling is required for the positions marked in the illustration (4) Cover
16

Obstacle avoidance
Malfunction |
Cause |
Explanation |
|
|
|
|
|
|
1.Upper thread is not correctly installed. |
See Page |
7 |
Upper thread breaks |
2.Upper thread tension is too tight. |
See Page |
7 |
|
3.Needle is bent or dull. |
See Page 5 |
|
|
4.Needle is misplaced. |
See Page 5 |
|
|
5.Fabrics are not pulled backward after sewing. |
See Page |
9 |
|
6.Thread is either too thick or too thin. |
See Page 5 |
|
|
1.Lower thread is not threaded properly in |
See Page 6 |
|
|
the shuttle hook. |
Clean the bobbin |
|
Lower thread breaks |
2.There is fine hair inside hook. |
case |
|
|
3.Bobbin is damaged. |
Replace bobbin |
|
|
1.Needle is not correctly installed. |
See Page 5 |
|
|
2.Needle is bent or dull. |
|
|
Needlebreaks |
3.Needle clamp screw goes loose. |
See Page 5 |
|
|
4.Upper thread tension is to tight. |
See Page |
7 |
|
5.Fabrics are not pulled backward after sewing. |
See Page |
9 |
|
6.Needle is too thin to the cloth to be stitched.. |
See Page |
5 |
|
7.Pattern selection dial is not turned |
See Page 8 |
|
|
properly. |
|
|
|
1.Needle is incorrectly installed. |
See Page 5 |
|
|
2.Needle is bent or dull. |
|
|
Skipping stitch |
3.Neither needle nor thread is fit for sewing. |
See Page |
5 |
|
4.Upper threading is not correct. |
See Page |
7 |
17

|
Malfunction |
Cause |
Explanation |
|
|
|
|
|
|
|
|
1. Upper thread tension is too tight. |
See Page |
7 |
|
|
2.Threading is not correct |
See Page 7 |
|
Fabric puckers |
3.Needle is too thick for the fabric |
See Page 5 |
||
|
|
4.Stitches are too big to the cloth to be sewn. |
See Page |
8 |
|
|
Non-woven lining under the cloth is required |
|
|
|
|
for very thin cloth to be stitched. |
|
|
|
|
1.Upper thread pressure it too weak. |
See Page |
7 |
Loop in seam. |
2.The combination of needle size / thread |
See Page 5 |
||
|
|
size / fabric is incorrect, either too thick or too thin. |
|
|
Fabric does not |
1.Feed dog is stained by fine hair. |
See Page 16 |
||
feed propertly |
2.Feed dog is not hoisted. |
See Page 8 |
||
|
|
3.Stitching is too small. |
See Page |
8 |
|
|
1.Main power switch is turned off. |
See Page 16 |
|
Machine does |
|
|
|
|
not work |
2.thread in the hook is tangled |
See Page 6 |
||
|
|
3.Clutch release switch ıs set at bobbin mark. |
See Page 16 |
|
Machine is noisy |
1.thread in the hook is tangled. |
See Page 16 |
||
and works slowly. |
2.feed dog is stained by fine hair. |
See Page 16 |
||
|
|
Insufficient oiling. |
|
|
18
SE
Viktig säkerhetsinformation
När symaskinen används skall grundläggande säkerhetsföreskrifter alltid följas, inklusive följande: Läs igenom alla instruktioner innan symaskinen används.
FARA – För att minska risken för en elektrisk stöt:
•Symaskinen skall aldrig lämnas obevakad när den är ansluten till vägguttaget.
•Drag alltid ur symaskinens el-sladd ur vägguttaget efter att den har använts och innan den rengörs.
•Drag alltid ur el-sladden innan den elektriska lampan byts ut. Byt lampan mot en av samma modell och styrka, 15 watt.
VARNING – För att minska risken för brännskador, eldsvåda, elektrisk stöt på människor:
•Tillåt inte att maskinen används som leksak.
Stor uppmärksamhet är viktig när symaskinen används av eller i närheten av barn.
•Använd den här symaskinen till vad den är avsedd för enligt denna handbok. Använd endast tillbehör som är rekommenderade av tillverkaren i denna handbok.
Använd inte symaskinen om dess el-sladd eller kontakten är skadad, om den inte fungerar korrekt, om den tappats eller skadats eller tappats i vatten. Returnera symaskinen till när maste auktoriserade återförsäljare eller servicecenter för genomgång, reparation, elektriska eller mekaniska justeringar.
•Använd aldrig symaskinen när något av luftintagen är tilltäppta. Håll symaskinens luftintag och fotpedal rena från tygrester, damm och lösa tygstycken.
•Tappa aldrig eller för in någonting i någon öppning.
•Använd inte symaskinen utomhus.
•Använd inte symaskinen där areosol-podukter (spray) används eller där syrgas tillförs.
•För att stänga av, ställ huvudströmbrytaren på symbolen " O " vilket innebär av, drag sedan ur stickproppen.
•Drag inte i el-sladden. Fatta tag i kontakten och drag, inte i sladden.
•Håll fingrarna borta från rörliga delar. Speciell försiktighet krävs i området omkring symaskinsnålen.
•Använd alltid lämplig nålplatta. Felaktig platta kan orsaka att nålen går av.
•Använd inte en böjd nål.
•Drag inte i eller skjut på tyget under sömnaden. Detta kan rubba nålen så att den går av.
•Stäng av strömmen när något utförs i nålens område som t.ex. trädning av nålen, byta nål, träda undertråd eller byta pressarfot.
•Drag alltid ur symaskinens el-sladd ur vägguttaget när höljet tas bort, vid smörjning eller när andra servicejusteringar utförs som beskrivs i denna handbok.
SPARA DESSA INSTRUKTIONER
Denna symaskin är avsedd för hemmabruk.
1

INNEHÅLL |
En kort introduktion |
Kapitel l |
|
Viktiga funktioner |
|
Delarnas namn |
|
Kapitel ll |
|
Förberedelser innan sömnaden påbörjas |
|
Justerbart sybord |
3 |
Tillbehör |
3 |
Strömförsörjning |
4 |
Fotpedal |
4 |
Sylampa |
4 |
Ta bort och montera pressarfot |
4 |
Byta nål |
5 |
Tråd och nåltabell |
5 |
Hur trådrullehållaren används |
5 |
Ta bort och montera spolkapseln |
6 |
Spolning |
6 |
Montera spolen i spolkapseln |
6 |
Träda maskinen |
7 |
Dra upp undertråden |
7 |
Stygnvalsknappen |
7 |
Välj elastisk söm |
8 |
Stygnlängdsvalknappen |
8 |
Stygnbreddsvalknappen |
8 |
Knapp för backmatning |
8 |
Sänka matartänderna |
8 |
Val av pressarfottrycket |
9 |
Kapitel lll |
|
Starta sömnad |
|
Raksöm |
9 |
Ändra sömnadsriktning |
9 |
Använda markeringarna på stygnplåten |
10 |
Sy i rät vinkel |
10 |
Sicksacksöm |
10 |
Kapitel lV |
|
Att sy i tyg |
|
Sicksack-kastsöm |
10 |
Trestegssicksacksöm |
11 |
Trestegs raksöm |
11 |
Sy i knappar |
11 |
Göra knapphål |
12 |
Knapphål med dekorationsstygn |
12 |
Sy i blixtlås |
13 |
Blindstygn |
13 |
Kapitel V |
|
Dekorationssömnad |
|
Bågstygn |
13 |
Elastiskt söm |
14 |
Gallersöm |
14 |
Elastiskt tvåstygnssöm |
14 |
Applikationssöm |
15 |
Sy ihop kant mot kant |
15 |
Kapitel Vl |
|
Ta bort skytteln och dess delar |
15 |
Rengöra matartänderna |
16 |
Smörja maskinen |
16 |
Avhjälpa fel |
17 |
2
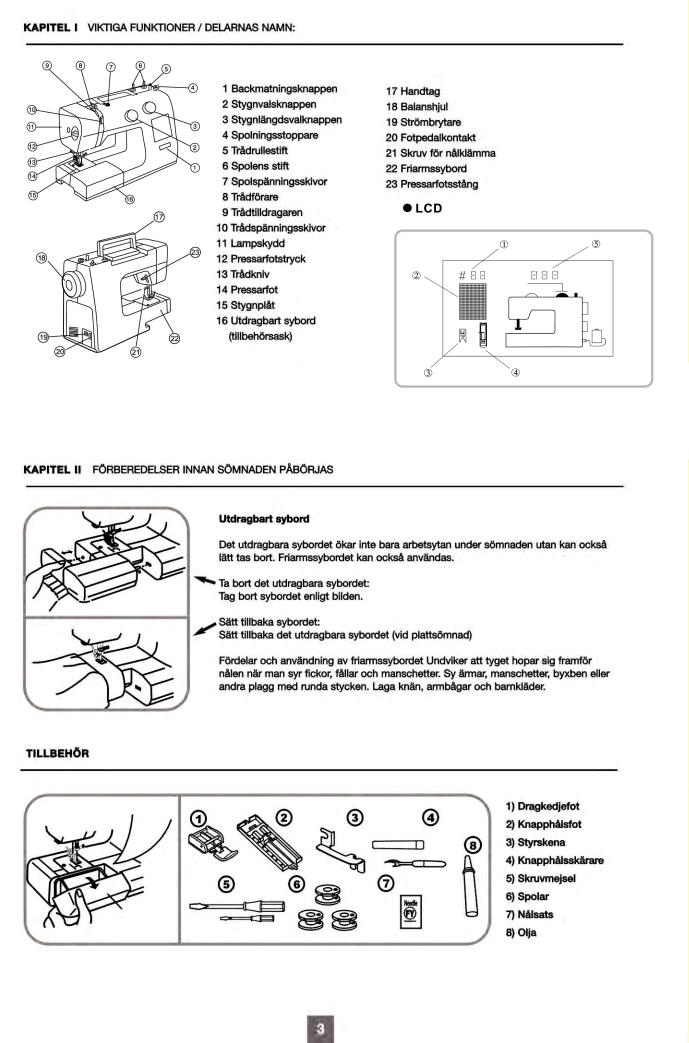
1.(1) Visar sömvalskoden, när väljarratten vrids kommer (2) visa olika sömmar.
2.(2) och (3) visar vilka olika pressarfötter som används vid olika sömmar.
3.(10) visar det föreslagna nålavståndet.
 Loading...