


EN
ET LV LT RU
UK
User manual |
2 |
Kasutusjuhend |
16 |
Lietošanas instrukcija |
30 |
Naudojimo instrukcija |
44 |
Инструкция по |
58 |
эксплуатации |
|
Інструкція |
75 |
Fridge-Freezer
Külmik-sügavkülmuti
Ledusskapis-saldētava Šaldytuvas-šaldiklis
Холодильник-морозильник Холодильник-морозильник
ZBB47460DA
Contents
Safety instructions _ _ _ _ _ _ _ _ _ _ _ _ _ _ |
2 |
Care and cleaning _ _ _ _ _ _ _ _ _ _ _ _ _ _ |
8 |
Control panel _ _ _ _ _ _ _ _ _ _ _ _ _ _ _ _ _ |
4 |
What to do if… _ _ _ _ _ _ _ _ _ _ _ _ _ _ _ _ 9 |
|
First use _ _ _ _ _ _ _ _ _ _ _ _ _ _ _ _ _ _ _ _ |
6 |
Technical data _ _ _ _ _ _ _ _ _ _ _ _ _ _ _ _ |
11 |
Daily use _ _ _ _ _ _ _ _ _ _ _ _ _ _ _ _ _ _ _ |
6 |
Installation _ _ _ _ _ _ _ _ _ _ _ _ _ _ _ _ _ _ |
11 |
Helpful hints and tips _ _ _ _ _ _ _ _ _ _ _ _ _ |
7 |
Environmental concerns _ _ _ _ _ _ _ _ _ _ |
15 |
Subject to change without notice.
Safety instructions
In the interest of your safety and to ensure the correct use, before installing and first using the appliance, read this user manual carefully, including its hints and warnings. To avoid unnecessary mistakes and accidents, it is important to ensure that all people using the appliance are thoroughly familiar with its operation and safety features. Save these instructions and make sure that they remain with the appliance if it is moved or sold, so that everyone using it through its life will be properly informed on appliance use and safety.
For the safety of life and property keep the precautions of these user's instructions as the manufacturer is not responsible for damages caused by omission.
Children and vulnerable people safety
•This appliance is not intended for use by persons (including children) with reduced physical, sensory or mental capabilities, or lack of experience and knowledge, unless they have been given supervision or instruction concerning use of the appliance by a person responsible for their safety.
Children should be supervised to ensure that they do not play with the appliance.
•Keep all packaging well away from children. There is risk of suffocation.
•If you are discarding the appliance pull the plug out of the socket, cut the connection cable (as close to the appliance as you can) and remove the door to prevent playing children to suffer electric shock or to close themselves into it.
•If this appliance featuring magnetic door seals is to replace an older appliance having a spring lock (latch) on the door or lid, be
2
sure to make that spring lock unusable before you discard the old appliance. This will prevent it from becoming a death trap for a child.
General safety
Warning!
Keep ventilation openings, in the appliance enclosure or in the built-in structure, clear of obstruction.
•The appliance is intended for keeping foodstuff and/or beverages in a normal household as explained in this instruction booklet.
•Do not use a mechanical device or any artificial means to speed up the thawing process.
•Do not use other electrical appliances (such as ice cream makers) inside of refrigerating appliances, unless they are approved for this purpose by the manufacturer.
•Do not damage the refrigerant circuit.
•The refrigerant isobutane (R600a) is contained within the refrigerant circuit of the appliance, a natural gas with a high level of environmental compatibility, which is nevertheless flammable.
During transportation and installation of the appliance, be certain that none of the components of the refrigerant circuit become damaged.
If the refrigerant circuit should become damaged:
–avoid open flames and sources of ignition
–thoroughly ventilate the room in which the appliance is situated
•It is dangerous to alter the specifications or modify this product in any way. Any damage
www.zanussi.com

to the cord may cause a short-circuit, fire and/or electric shock.
Warning! Any electrical component (power cord, plug, compressor) must be re-
placed by a certified service agent or qualified service personnel to avoid hazard.
1.Power cord must not be lengthened.
2.Make sure that the power plug is not squashed or damaged by the back of the appliance. A squashed or damaged power plug may overheat and cause a fire.
3.Make sure that you can come to the mains plug of the appliance.
4.Do not pull the mains cable.
5.If the power plug socket is loose, do not insert the power plug. There is a risk of electric shock or fire.
6.You must not operate the appliance without the lamp cover (if foreseen) of interior lighting.
•This appliance is heavy. Care should be taken when moving it.
•Do not remove nor touch items from the freezer compartment if your hands are damp/ wet, as this could cause skin abrasions or frost/freezer burns.
•Avoid prolonged exposure of the appliance to direct sunlight.
•Bulb lamps (if foreseen) used in this appliance are special purpose lamps selected for household appliances use only. They are not suitable for household room illumination.
Daily Use
•Do not put hot pot on the plastic parts in the appliance.
•Do not store flammable gas and liquid in the appliance, because they may explode.
•Do not place food products directly against the air outlet on the rear wall. (If the appliance is Frost Free)
•Frozen food must not be re-frozen once it has been thawed out.
•Store pre-packed frozen food in accordance with the frozen food manufacturer's instructions.
•Appliance's manufacturers storage recommendations should be strictly adhered to. Refer to relevant instructions.
•Do not place carbonated or fizzy drinks in the freezer compartment as it creates pressure on the container, which may cause it to explode, resulting in damage to the appliance.
•Ice lollies can cause frost burns if consumed straight from the appliance.
Care and cleaning
•Before maintenance, switch off the appliance and disconnect the mains plug from the mains socket.
•Do not clean the appliance with metal objects.
•Do not use sharp objects to remove frost from the appliance. Use a plastic scraper.
•Regularly examine the drain in the refrigerator for defrosted water. If necessary, clean the drain. If the drain is blocked, water will collect in the bottom of the appliance.
Installation
Important! For electrical connection carefully follow the instructions given in specific paragraphs.
•Unpack the appliance and check if there are damages on it. Do not connect the appliance if it is damaged. Report possible damages immediately to the place you bought it. In that case retain packing.
•It is advisable to wait at least four hours before connecting the appliance to allow the oil to flow back in the compressor.
•Adequate air circulation should be around the appliance, lacking this leads to overheating. To achieve sufficient ventilation follow the instructions relevant to installation.
•Wherever possible the back of the product should be against a wall to avoid touching or catching warm parts (compressor, condenser) to prevent possible burn.
www.zanussi.com |
3 |
|
•The appliance must not be located close to radiators or cookers.
•Make sure that the mains plug is accessible after the installation of the appliance.
•Connect to potable water supply only (If a water connection is foreseen).
Service
•Any electrical work required to do the servicing of the appliance should be carried out by a qualified electrician or competent person.
•This product must be serviced by an authorized Service Centre, and only genuine spare parts must be used.
Environment Protection
This appliance does not contain gasses which could damage the ozone layer, in ei-
ther its refrigerant circuit or insulation materials. The appliance shall not be discarded together with the urban refuse and rubbish. The insulation foam contains flammable gases: the appliance shall be disposed according to the applicable regulations to obtain from your local authorities. Avoid damaging the cooling unit, especially at the rear near the heat exchanger. The materials used on this appliance marked by the symbol  are recyclable.
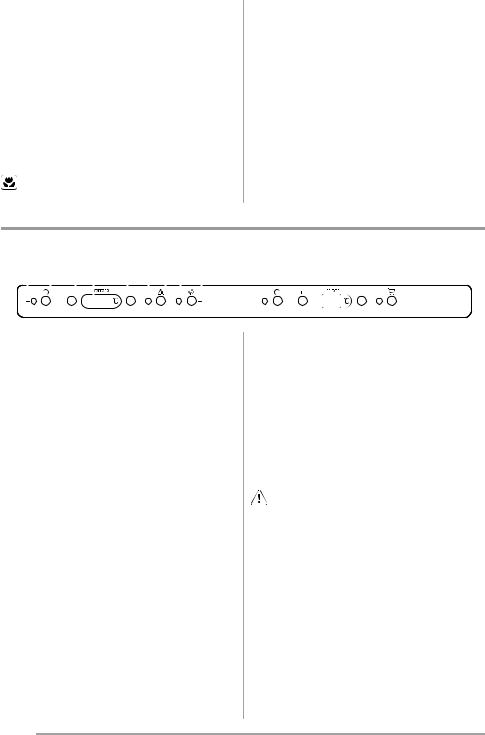
Control panel
Freezer Control panel
|
1 |
|
2 |
|
3 |
|
4 |
|
5 |
|
6 |
|
7 |
|
8 |
|
9 |
|
|||||||||
|
|
|
|
|
|
|
|
|
|
|
|
|
|
|
|
|
|
|
|
|
|
|
|
|
|
|
|
|
|
|
|
|
|
|
|
|
|
|
|
|
|
|
|
|
|
|
|
|
|
|
|
|
|
|
|
|
|
|
|
|
|
|
|
|
|
|
|
|
|
|
|
|
|
|
|
|
|
|
|
|
|
|
|
|
|
|
|
|
|
|
|
|
|
|
|
|
|
|
|
|
|
|
|
|
|
|
|
|
|
|
|
1.Pilot light
2.ON/OFF switch
3.Temperature regulator (warmest)
4.Temperature indicator
5.Temperature regulator (coldest)
6.Alarm light
7.Alarm reset switch
8.Action Freeze light
9.Action Freeze switch
Switching on
Insert the plug into the wall socket.
Press the ON/OFF switch .
The Pilot Light will light up.
Switching off
The freezer is shut off by pressing the ON/OFF switch until the Pilot light and the Temperature indicator switched off.
Temperature regulation
The temperature can be adjusted between -15°C and -24°C.
By pressing the Temperature regulators , the current temperature setting flashes on the Tem-
4
perature indicator. It is possible to modify the setting temperature only with flashed indicator. To set a warmer temperature, press warmest Temperature regulator . To set a colder temperature, press coldest Temperature regulator. The Temperature indicator displays the newly selected temperature for a few seconds and then shows again the inside compartment temperature.
The newly selected-temperature must be reached after 24 hours.
Caution! During the stability period by the first starting the temperature displayed can
not correspond to the setting temperature.
Temperature indicator
During normal functioning the Temperature indicator shows the temperature inside the freezer.
www.zanussi.com
Important! Difference between the temperature displayed and temperature setting is normal. Especially when:
•a new setting has recently been selected.
•the door has been left open for a long time.
•warm food has been placed in the compartment.
Excessive temperature alarm
In the event of an abnormal temperature rise inside the freezer (e.g. power cut) Alarm light will start to flash and a buzzer will sound.
After the temperature has returned to normal, the Alarm light will continue to flash, although the buzzer has stopped.
When the Alarm reset switch is pressed, the warmest temperature reached in the compartment flashes on the Temperature indicator .
If the power has been off for a long time, frozen food should be consumed as quickly as possible, or cooked and then re-frozen.
Action Freeze function
You can activate the Action Freeze function by pressing the Action Freeze switch.
The Action Freeze light will light up.
When this function is on, SP is shown on the dispay .
Important! This function stops automatically after 52 hours.
It is possible to deactivate the function at any time by pressing Action Freeze switch. The Action Freeze light will switch off.
Fridge Control panel
|
1 |
|
2 |
|
3 |
|
4 |
|
5 |
|
6 |
|
7 |
|
|||||||
|
|
|
|
|
|
|
|
|
|
|
|
|
|
|
|
|
|
|
|
|
|
|
|
|
|
|
|
|
|
|
|
|
|
|
|
|
|
|
|
|
|
|
|
|
|
|
|
|
|
|
|
|
|
|
|
|
|
|
|
|
|
|
|
|
|
|
|
|
|
|
|
|
|
|
|
|
|
|
|
|
|
|
|
|
|
|
|
1.Pilot light
2.ON/OFF switch
3.Temperature regulator (warmest)
4.Temperature indicator
5.Temperature regulator (coldest)
6.Action Cool light
7.Action Cool switch
Switching on
Insert the plug into the wall socket.
Press the ON/OFF switch .
The Pilot Light will light up.
Switching off
The fridge is shut off by pressing the ON/OFF switch until the Pilot light and the Temperature indicator switched off.
Temperature regulation
The temperature can be adjusted between +2°C and +8°C.
By pressing the Temperature regulators, the current temperature setting flashes on the Tem-
www.zanussi.com
perature indicator. It is possible to modify the setting temperature only with flashed indicator. To set a warmer temperature, press warmest Temperature regulator. To set a colder temperature, press coldest Temperature regulator. The Temperature indicator displays the newly selected temperature for a few seconds and then shows again the inside compartment temperature.
The newly selected-temperature must be reached after 24 hours.
Caution! During the stability period by the first starting the temperature displayed can
not correspond to the setting temperature. During this time it is possible that the temperature displayed is lower than the setting temperature.
Temperature indicator
During normal functioning the Temperature indicator shows the temperature inside the fridge.
5
Important! Difference between the temperature displayed and temperature setting is normal. Especially when:
•a new setting has recently been selected.
•the door has been left open for a long time.
•warm food has been placed in the compartment.
Action Cool function
The maximum performance is obtained by setting the Action Coolfunction. It’s recommended when loading large quantities of food.
First use
You can activate the Action Cool function by pressing the Action Cool switch.
The Action Cool light will light up.
Important! The internal temperature goes down to +2°C.
After about 6 hours the Action Cool function switches off automatically.
Cleaning the interior
Before using the appliance for the first time, wash the interior and all internal accessories with lukewarm water and some neutral soap so
as to remove the typical smell of a brand-new product, then dry thoroughly.
Important! Do not use detergents or abrasive powders, as these will damage the finish.
Daily use
Freezing fresh food
The freezer compartment is suitable for freezing fresh food and storing frozen and deep-frozen food for a long time.
Place the fresh food to be frozen in the left compartments, and, once frozen, moved to the storage baskets.
The maximum amount of food that can be frozen in 24 hours is specified on the rating plate, a label located on the inside of the appliance.
The freezing process lasts 24 hours: during this period do not add other food to be frozen.
6 |
www.zanussi.com |

Important! When use the Auto Freeze function:
about 6 |
|
Introducing small quantities of fresh |
hours before |
|
food (about 5 kg) |
about 24 |
|
Introducing the maximum quantity |
hours before |
|
of food (see rating plate) |
not needed |
|
Introducing frozen food |
not needed |
|
Introducing small quantities of fresh |
|
|
food daily 2 kg maximum |
|
|
|
Storage of frozen food
When first starting-up or after a period out of use, before putting the products in the compartment let the appliance run at least 2 hours on the higher setting.
Important! In the event of accidental defrosting, for example due to a power failure, if the power has been off for longer that the value shown in the technical characteristics chart under "rising time", the defrosted food must be consumed quickly or cooked immediately and then re-frozen (after cooling).
Ice-cube production
This appliance is equipped with one or more trays for the production of ice-cubes. Fill these trays with water, then put them in the freezer compartment.
Important! Do not use metallic instruments to remove the trays from the freezer.
Thawing
Deep-frozen or frozen food, prior to being used, can be thawed in the refrigerator compartment or at room temperature, depending on the time available for this operation.
Small pieces may even be cooked still frozen, directly from the freezer: in this case, cooking will take longer.
Movable shelves
The walls of the refrigerator are equipped with a series of runners so that the shelves can be positioned as desired.
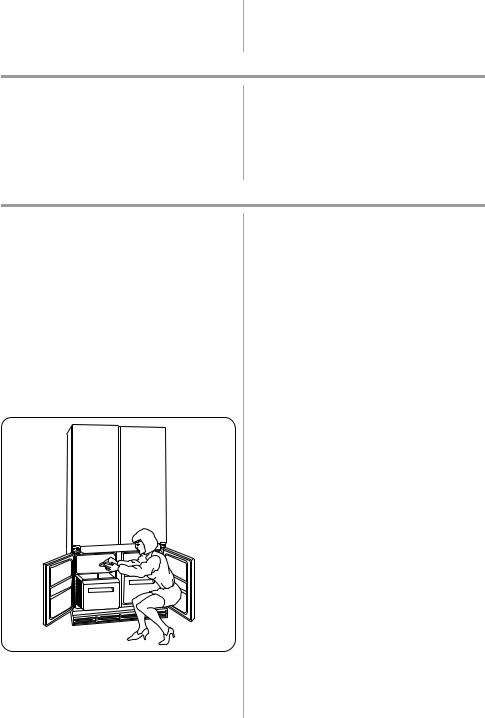
Fridge Doors
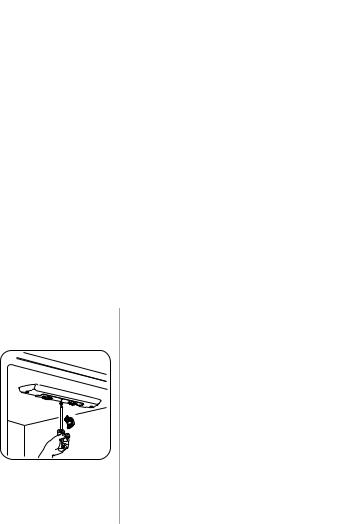
For proper opening and closing, it is advisable to act on both doors simultaneously (as shown in the figure).
Helpful hints and tips
Hints for fresh food refrigeration
To obtain the best performance:
•do not store warm food or evaporating liquids in the refrigerator
•do cover or wrap the food, particularly if it has a strong flavour
www.zanussi.com
•position food so that air can circulate freely around it
Hints for refrigeration
Useful hints:
Meat (all types) : wrap in polythene bags and place on the glass shelf above the vegetable drawer.
7

For safety, store in this way only one or two days at the most.
Cooked foods, cold dishes, etc..: these should be covered and may be placed on any shelf. Fruit and vegetables: these should be thoroughly cleaned and placed in the special drawer(s) provided.
Butter and cheese: these should be placed in special airtight containers or wrapped in aluminium foil or polythene bags to exclude as much air as possible.
Milk bottles: these should have a cap and should be stored in the bottle rack on the door. Bananas, potatoes, onions and garlic, if not packed, must not be kept in the refrigerator.
Hints for freezing
To help you make the most of the freezing process, here are some important hints:
•the maximum quantity of food which can be frozen in 24 hrs. is shown on the rating plate;
•the freezing process takes 24 hours. No further food to be frozen should be added during this period;
•only freeze top quality, fresh and thoroughly cleaned, foodstuffs;
•prepare food in small portions to enable it to be rapidly and completely frozen and to make it possible subsequently to thaw only the quantity required;
•wrap up the food in aluminium foil or polythene and make sure that the packages are airtight;
Care and cleaning
•do not allow fresh, unfrozen food to touch food which is already frozen, thus avoiding a rise in temperature of the latter;
•lean foods store better and longer than fatty ones; salt reduces the storage life of food;
•water ices, if consumed immediately after removal from the freezer compartment, can possibly cause the skin to be freeze burnt;
•it is advisable to show the freezing in date on each individual pack to enable you to keep tab of the storage time.
Hints for storage of frozen food
To obtain the best performance from this appliance, you should:
•make sure that the commercially frozen foodstuffs were adequately stored by the retailer;
•be sure that frozen foodstuffs are transferred from the foodstore to the freezer in the shortest possible time;
•not open the door frequently or leave it open longer than absolutely necessary.
•Once defrosted, food deteriorates rapidly and cannot be refrozen.
•Do not exceed the storage period indicated by the food manufacturer.
Caution! Unplug the appliance before carrying out any maintenance operation.
This appliance contains hydrocarbons in its cooling unit; maintenance and recharg-
ing must therefore only be carried out by authorized technicians.
Periodic cleaning
The equipment has to be cleaned regularly:
•clean the inside and accessories with lukewarm water and some neutral soap.
•regularly check the door seals and wipe clean to ensure they are clean and free from debris.
•rinse and dry thoroughly.
Important! Do not pull, move or damage any pipes and/or cables inside the cabinet.
Never use detergents, abrasive powders, highly perfumed cleaning products or wax polishes to clean the interior as this will damage the surface and leave a strong odour.
8 |
www.zanussi.com |
Clean the condenser (black grill) and the compressor at the back of the appliance with a brush. This operation will improve the performance of the appliance and save electricity consumption.
Important! Take care of not to damage the cooling system.
Many proprietary kitchen surface cleaners contain chemicals that can attack/damage the plastics used in this appliance. For this reason it is recommended that the outer casing of this appliance is only cleaned with warm water with a little washing-up liquid added.
After cleaning, reconnect the equipment to the mains supply.
Defrosting of the refrigerator
Frost is automatically eliminated from the evaporator of the refrigerator compartment every time the motor compressor stops, during normal use. The defrost water drains out through a trough into a special container at the back of the appliance, over the motor compressor, where it evaporates.
It is important to periodically clean the defrost water drain hole in the middle of the refrigerator compartment channel to prevent the water overflowing and dripping onto the food inside. Use the special cleaner provided, which you will find already inserted into the drain hole.
Defrosting of the freezer
The freezer compartment of this model, on the other hand, is a "no frost" type. This means that there is no buildup of frost when it is in operation, neither on the internal walls nor on the foods.
The absence of frost is due to the continuous circulation of cold air inside the compartment, driven by an automatically controlled fan.
Periods of non-operation
When the appliance is not in use for long periods, take the following precautions:
•disconnect the appliance from electricity supply
•remove all food
•defrost (if foreseen) and clean the appliance and all accessories
•leave the door/doors ajar to prevent unpleasant smells.
If the cabinet will be kept on, ask somebody to check it once in a while to prevent the food inside from spoiling in case of a power failure.
What to do if…
Warning! Before troubleshooting, disconnect the mains plug from the mains
socket.
Only a qualified electrician or competent person must do the troubleshooting that is not in this manual.
Important! There are some sounds during normal use (compressor, refrigerant circulation).
www.zanussi.com |
9 |
|

Problem |
|
Possible cause |
The appliance does not |
|
The appliance is switched off. |
operate. The lamp does |
|
|
not operate. |
|
|
|
|
The mains plug is not connected to |
|
|
the mains socket correctly. |
|
|
The appliance has no power. There |
|
|
is no voltage in the mains socket. |
|
|
|
The Alarm light flashes. |
|
The temperature in the freezer is |
|
|
too high. |
The lamp does not work. |
|
The lamp is in stand-by. |
|
|
The lamp is defective. |
The compressor operates |
|
The temperature is not set correct- |
continually. |
|
ly. |
|
|
The door is not closed correctly. |
|
|
The door has been opened too fre- |
|
|
quently. |
|
|
The product temperature is too |
|
|
high. |
|
|
|
|
|
The room temperature is too high. |
Water flows on the rear |
|
During the automatic defrosting |
plate of the refrigerator. |
|
process, frost defrosts on the rear |
|
|
plate. |
Water flows into the refrig- |
|
The water outlet is clogged. |
erator. |
|
|
|
|
Products prevent that water flows |
|
|
into the water collector. |
Water flows on the ground. |
|
The melting water outlet does not |
|
|
flow in the evaporative tray above |
|
|
the compressor. |
The temperature in the ap- |
|
The temperature regulator is not set |
pliance is too low. |
|
correctly. |
The temperature in the ap- |
|
Many products are stored at the |
pliance is too high. |
|
same time. |
The temperature in the re- |
|
There is no cold air circulation in |
frigerator is too high. |
|
the appliance. |
The temperature in the |
|
Products are too near to each oth- |
freezer is too high. |
|
er. |
|
|
|
Solution
Switch on the appliance.
Connect the mains plug to the mains socket correctly.
Connect a different electrical appliance to the mains socket.
Contact a qualified electrician.
Refer to "Excessive Temperature Alarm"
Close and open the door.
Refer to "Replacing the lamp".
Set a higher temperature.
Refer to "Closing the door".
Do not keep the door open longer than necessary.
Let the product temperature decrease to room temperature before storage.
Decrease the room temperature.
This is correct.
Clean the water outlet.
Make sure that products do not touch the rear plate.
Attach the melting water outlet to the evaporative tray.
Set a higher temperature.
Store less products at the same time.
Make sure that there is cold air circulation in the appliance.
Store products so that there is cold air circulation.
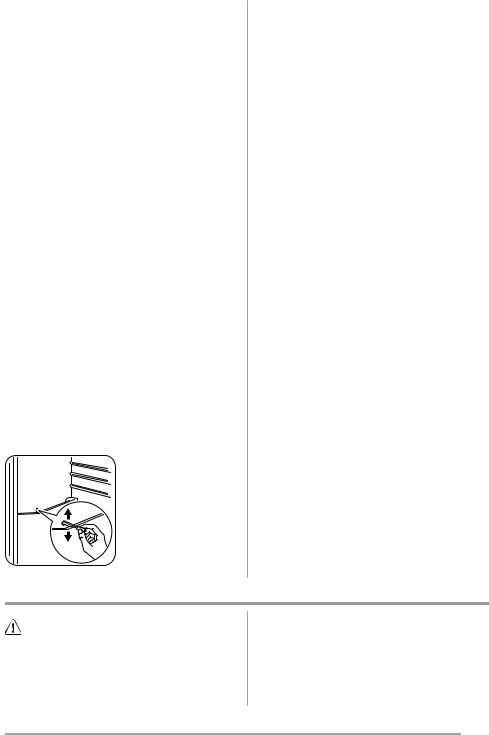
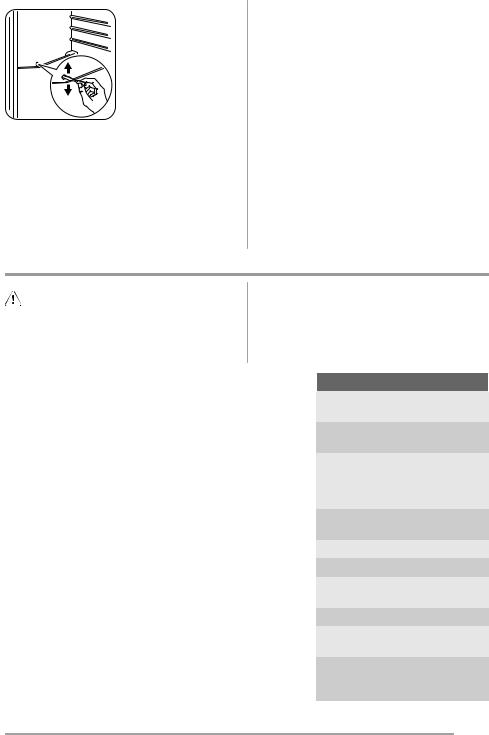
Replacing the lamp
1.Disconnect the mains plug from the mains socket.
10 |
www.zanussi.com |
2.Remove the lamp cover (refer to the il-
lustration).
3. Replace the used lamp with a new lamp of the
same power
and specifically designed for household appliances. (the maximum power is shown on the lamp cover).
4.Connect the mains plug to the mains socket.
5.Open the door. Make sure that the lamp comes on.
Closing the door
1.Clean the door gaskets.
2.If necessary, adjust the door. Refer to "Installation".
3.If necessary, replace the defective door gaskets. Contact the Service Center.
Technical data
|
|
|
|
Dimension of the recess |
|
|
|
|
|
Height |
1900 mm |
|
|
Width |
860 mm |
|
|
Depth |
550 mm |
Rising Time |
|
|
14 h |
Voltage |
|
|
230-240 V |
Frequency |
|
|
50 Hz |
|
|
|
|
The technical information are situated in the rating plate on the internal left side of the appliance and in the energy label.
Installation
Positioning
Install this appliance at a location where the ambient temperature corresponds to the climate class indicated on the rating plate of the appliance:
Climate |
Ambient temperature |
class |
|
SN |
+10°C to + 32°C |
|
|
N+16°C to + 32°C
ST |
+16°C to + 38°C |
T+16°C to + 43°C
Electrical connection
Before plugging in, ensure that the voltage and frequency shown on the rating plate correspond to your domestic power supply.
The appliance must be earthed. The power supply cable plug is provided with a contact for this purpose. If the domestic power supply socket is not earthed, connect the appliance to a separate earth in compliance with current regulations, consulting a qualified electrician. The manufacturer declines all responsibility if the above safety precautions are not observed. This appliance complies with the E.E.C. Directives.
www.zanussi.com |
11 |
|
Height adjustment
820
870
820 870
The height of the appliance is adjustable from 820 to 870 mm to fine up with existing kitchen units.
Before installing the appliance between units, adjust the height of the feet and rear wheels.
The wheels are factory set for a height of 820 mm.
To align the appliance to a height of 870 mm, raise it by adjusting the feet with a spanner, then remove the wheels and refit them in the lowest position.
12
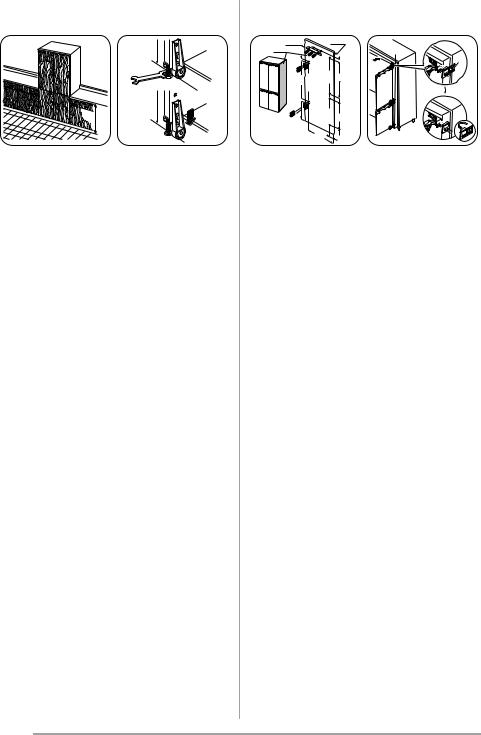
Fitting the side panels
3 |
1 |
2 |
|
D |
1a |
15 |
17,5 |
|
D |
||
|
2 |
|
|||
|
|
|
|
|
|
|
820 |
1015 |
|
|
|
|
|
|
|
|
|
|
15 |
64 |
|
|
1b |
|
280 |
|
|
|
|
|
|
|
|
|
|
|
|
539 |
|
|
|
|
541 |
260* |
|
|
|
|
30 |
|
|
|
|
• Fit the brackets on- |
• Apply spacers to |
||||
to the panels in the |
the hinges before |
||||
positions shown in |
installing the appli- |
||||
the diagram. The |
ance into the cabi- |
||||
dimension of 260* |
net . See picture. |
||||
mm is allowed for |
|
|
|
||
fitting a 100 mm |
|
|
|
||
plinth below the |
|
|
|
||
panel. For different |
|
|
|
||
plinth sizes, in- |
|
|
|
||
crease the dimen- |
|
|
|
||
sion of 260* mm accordingly.
1.Rear edge
2.Front edge
3.Right hand side panel
www.zanussi.com

2
|
L |
|
45 |
N |
|
1 |
||
|
||
|
L |
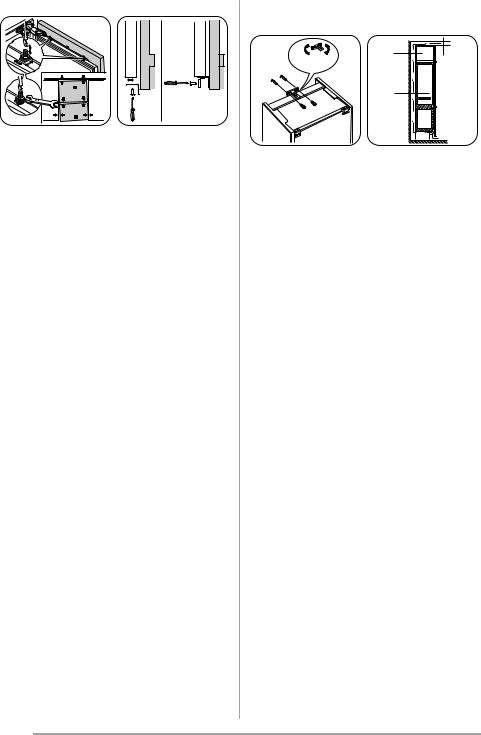
•Rest the panels against the appliance.
•Fit the rear brackets, taking into account the thickness of the panels (maximum width of unit 900 mm).
•For a correct alignment make sure that the distance between the appliance and the cabinet is of 45 mm.
•Secure the panels at the front.
•Fix the squares (contained in the bag) to the lower part of the door (references already provided).
•If necessary, door opening agle max 90° can be obtained by introducing the pivots supplied separately. See picture.
www.zanussi.com
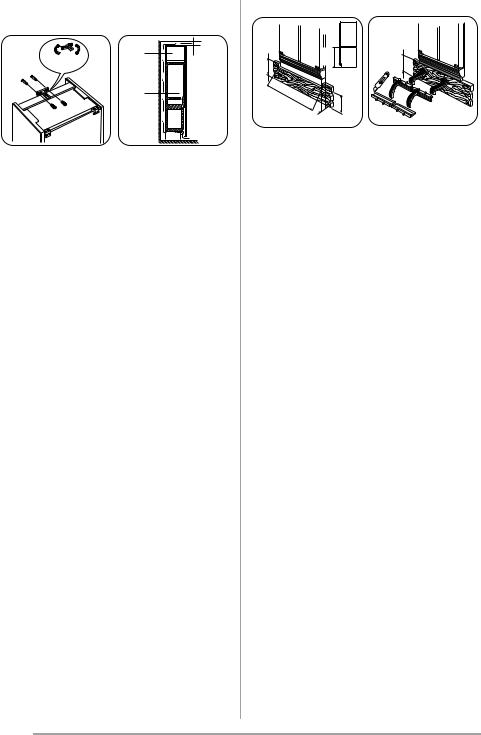
Fitting the door panels
|
|
|
|
|
214 214 |
|
|
|
|
|
|
193 |
193 193 |
193 |
|
1 |
2 |
1013 |
25 |
|
25 |
1013 |
|
|
|
||||||
|
|
4 |
5 |
||||
|
|
|
|
|
|
3MIN |
|
|
|
|
|
60 4 4 60 |
|
||
|
|
25 |
|
6 |
7 |
25 |
|
|
|
444MIN. |
444MIN. |
||||
|
|
|
|
||||
|
|
447MAX. |
|
|
447MAX. |
||
• Open a door a re- |
• |
Drill the small |
|
||||
move the bracket |
|
doors as shown in |
|||||
cover. |
|
|
the figure. |
|
|||
Undo the nuts with |
1. |
|
Top right-hand |
||||
washers and re- |
|
|
front panel |
|
|||
move the bracket |
2. |
|
Top left-hand |
||||
from the door. |
front panel |
|
90o |
1 |
2 |
|
||
|
3 |
|
• Fix the bracket to |
• Refit the bracket |
the door with the |
on the adjustment |
screws contained |
screws and screw |
in the bag. |
the nuts with |
|
washers without |
|
tightening them |
|
down. |
13
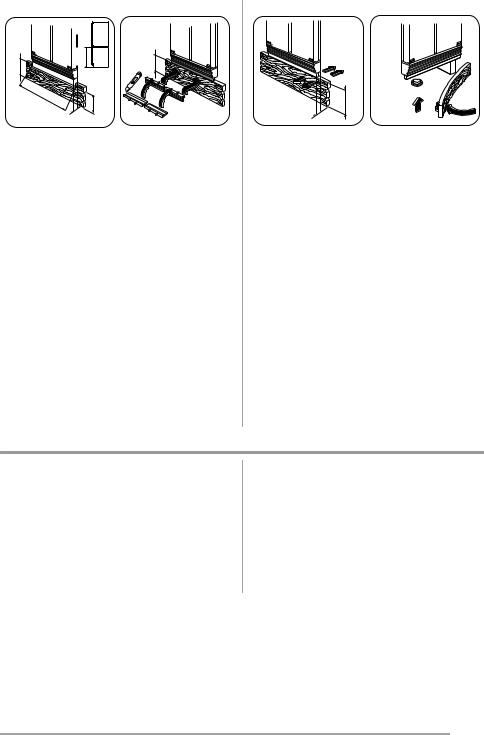
•Close the door and check that the small door is positioned at the required height, operating the adjustment screws if necessary.
•Use the same screws for vertical alignment of the small doors.
•If necessary, carry our horizontal alignment by shifting the small doors.
•After aligning the doors, tighten the nuts of the brackets and the screws of the small bracket.
•Fix the bracket located under the door to the panel with the two plastic washers contained in the box of accessories.
•Then refit the bracket cover.
14
Building the appliance in
1 |
50 |
50 |
2 
50
•Fit the appliance into the recess.
•Rotate the bracket of 180° in order to obtain the right position (2). The position (1) is on the delivery.
•Fix it to the wall with the appropriate bracket.
•The top of the appliance must be kept clear to allow better air circulation.
If a wall unit is fitted above the appliance, there must be a gap of 50 mm between this unit and the wall and it must be at least 50 mm below the ceiling.
Fitting the plinth
Alignment height of 820 mm
www.zanussi.com
|
820 |
170 |
870 |
220 |
|
900 |
140 |
|
30 |
190 |
100 |
|
• If using a 140 to 170 mm plinth, make a cut-out as shown.
140
190
•If using a plinth higher than 100 mm but less than 140 mm, cut the height compensation strip supplied with the appliance to the required depth and fit it between the plinth and the ventilation grille, pressing it into position below this grille.
•If using a 100 mm plinth, fit the complete height compensation strip.
Alignment height of 870 mm
100

 E
E
30
100
150
•If using a 190 to 220 mm plinth, make a shown.
•If using a plinth higher than 150 mm but less than 190 mm, cut the height compensation strip supplied with the appliance to the required depth and fit it between the plinth and the ventilation grille.
•If using a 150 mm plinth, fit the complete height compensation strip.
•If the appliance is installed at the end of a row of units, insert foot E to hold the plinth in place.
Environmental concerns
The symbol  on the product or on its packaging indicates that this product may not be treated as household waste. Instead it should be taken to the appropriate collection point for the recycling of electrical and electronic equipment. By ensuring this product is disposed of correctly, you will help prevent
potential negative consequences for the environment and human health, which could otherwise be caused by inappropriate waste handling of this product. For more detailed information about recycling of this product, please contact your local council, your household waste disposal service or the shop where you purchased the product.
www.zanussi.com |
15 |
|

Sisukord
Ohutusjuhised _ _ _ _ _ _ _ _ _ _ _ _ _ _ |
16 |
Puhastus ja hooldus _ _ _ _ _ _ _ _ _ _ _ |
22 |
Juhtpaneel _ _ _ _ _ _ _ _ _ _ _ _ _ _ _ _ |
18 |
Mida teha, kui... _ _ _ _ _ _ _ _ _ _ _ _ _ |
23 |
Esimene kasutamine _ _ _ _ _ _ _ _ _ _ _ 20 |
Tehnilised andmed _ _ _ _ _ _ _ _ _ _ _ _ 25 |
||
Igapäevane kasutamine _ _ _ _ _ _ _ _ _ |
20 |
Paigaldamine _ _ _ _ _ _ _ _ _ _ _ _ _ _ _ 25 |
|
Vihjeid ja näpunäiteid _ _ _ _ _ _ _ _ _ _ |
21 |
Keskkonnainfo _ _ _ _ _ _ _ _ _ _ _ _ _ _ |
29 |
Jäetakse õigus teha muutusi.
Ohutusjuhised
Teie turvalisuse huvides ning tagamaks õiget kasutamist lugege kasutusjuhend, sh näpunäited ja hoiatused, hoolikalt läbi, enne kui paigaldate masina ja kasutate seda esimest korda. Et vältida asjatuid vigu ja õnnetusi, on tähtis tagada, et kõik seadet kasutavad inimesed tunneksid põhjalikult selle käitamist ja ohutusseadiseid. Hoidke need juhised alles ja veenduge, et need oleksid alati seadmega kaasas, kui selle asukohta muudetakse või seadme müümise korral, nii et kõik kasutajad oleksid kogu seadme kasutusaja jooksul selle kasutamisest ja ohutusest põhjalikult informeeritud.
Elu ja materiaalse vara turvalisuse huvides tuleb kinni pidada selles kasutusjuhendis toodud ettevaatusabinõudest, sest mittejärgimisest tingitud kahjustuste eest tootja ei vastuta.
Laste ja riskirühma kuuluvate inimeste turvalisus
•See seade ei ole ette nähtud kasutamiseks isikute (sh laste) poolt, kelle füüsilised, sensoorsed või vaimsed võimed või kogemuse ja teadmiste puudus seda ei võimalda, v.a. juhul, kui nende üle teostab järelvalvet või neid juhendab seadme kasutamisel isik, kes nende turvalisuse eest vastutab.
Laste puhul tuleb jälgida, et nad seadmega mängima ei hakkaks.
•Hoidke kogu pakend lastele kättesaamatus kohas. Lämbumisoht.
•Seadme utiliseerimisel tõmmake pistik pesast välja, lõigake toitekaabel läbi (võimalikult seadme lähedalt) ja võtke ära uks, et mängivad lapsed ei saaks elektrilööki ega sulgeks end kappi.
16
•Juhul kui käesolev magnetiseeritud uksetihenditega versioon vahetab välja vanema vedrulukustussüsteemiga seadme, siis enne vana seadme äraviskamist veenduge, et lukustusmehhanismi poleks võimalik enam kasutada. Vastasel juhul võib seade muutuda lapse jaoks surmalõksuks.
Üldine ohutus
 Hoiatus
Hoidke ventilatsiooniavad vabad nii eraldiseisva kui ka sisseehitatud seadme puhul.
•Seade on mõeldud toiduainete ja/või jookide selles juhises kirjeldatud viisil koduseks säilitamiseks.
•Ärge kasutage sulatamise kiirendamiseks mehaanilisi seadmeid või muid kunstlikke vahendeid.
•Ärge kasutage külmikus muid elektriseadmeid (näiteks jäätisevalmistajaid), kui tootja ei ole vastavat sobivust otseselt kinnitanud.
•Vältige jahutusaine süsteemi kahjustamist.
•Külmiku jahutussüsteemis olev jahutusaine isobutaan (R600a) on üsna keskkonnaohutu, kuid siiski tuleohtlik looduslik gaas.
Seadme transpordi ja paigaldamise ajal tuleb vältida jahutusaine süsteemi komponentide kahjustamist.
Kui jahutusaine süsteem peaks viga saama:
–vältige tuleallikate lähedust,
–õhutage põhjalikult ruumi, milles seade paikneb.
•Seadme parameetrite muutmine või selle mis tahes viisil modifitseerimine on ohtlik.
www.zanussi.com

Toitejuhtme kahjustamine võib põhjustada lühiühenduse, tulekahju ja/või elektrilöögi.
Hoiatus Elektriliste komponentide (toitejuhe, pistik, kompressor) asendustööd
tuleb ohu vältimiseks tellida kvalifitseeritud tehnikult või teenusepakkujalt.
1.Toitejuhtme pikendamine on keelatud.
2.Veenduge, et toitepistik ei ole seadme tagakülje poolt muljutud ega kahjustatud. Muljutud või kahjustatud toitepistik võib üle kuumeneda ja põhjustada tulekahju.
3.Tagage juurdepääs seadme toitepistikule.
4.Ärge eemaldage pistikut juhtmest tõmbamise teel.
5.Kui toitepesa logiseb, siis ärge toitepistikut sisestage. Elektrilöögivõi tuleoht!
6.Seadet ei tohi kasutada ilma sisevalgusti katteta (kui see on ette nähtud).
•See seade on raske. Seda liigutades olge ettevaatlik.
•Ärge eemaldage ega puudutage sügavkülmas olevaid esemeid, kui teie käed on niisked/märjad, kuna see võib põhjustada nahamarrastusi või külmahaavandeid.
•Vältige seadme pikemaajalist kokkupuudet otsese päikesevalgusega.
•Selles seadmes kasutatavad lambid (kui need on ette nähtud) on mõeldud kasutamiseks üksnes kodumasinates. Need ei sobi ruumide valgustamiseks.
Igapäevane kasutamine
•Ärge asetage tuliseid nõusid seadme plastmassist osadele.
•Ärge hoidke seadmes kergestisüttivat gaasi või vedelikku, sest need võivad plahvatada.
•Ärge paigutage toiduaineid vastu tagaseinas asuvat õhu väljalaskeava. (Kui on tegemist härmatisevaba seadmega)
•Külmutatud toituaineid ei tohi pärast sulatamist uuesti külmutada.
•Säilitage eelpakendatud sügavkülmutatud
toitu vastavalt toidu tootja juhistele. www.zanussi.com
•Rangelt tuleb järgida seadme tootja poolseid hoiustamisnõuandeid. Vaadake vastavaid juhiseid.
•Ärge paigaldage külmikusse gaseeritud jooke, kuna see tekitab anumas rõhju, mis võib põhjustada plahvatuse, mis omakorda kahjustab seadet.
•Seadmega tehtud jää võib otse seadmest söömisel külmapõletust tekitada.
Hooldus ja puhastamine
•Enne hooldust lülitage seade välja ja eemaldage toitepistik seinakontaktist.
•Ärge puhastage masinat metallist esemetega.
•Ärge kasutage seadmest härmatise eemaldamiseks teravaid esemeid. Kasutage plastmassist kaabitsat.
•Kontrollige regulaarselt külmutuskapi sulamisvee äravoolu. Vajadusel puhastage äravooluava. Kui see on ummistunud, koguneb vesi seadme põhja.
Paigaldamine
Tähtis Elektriühenduse puhul jälgige hoolikalt vastavas alalõigus toodud juhiseid.
•Pakkige seade lahti ja kontrollige kahjustuste osas. Ärge ühendage seadet, kui see on viga saanud. Teatage võimalikest kahjustustest koheselt toote müüjale. Sel juhul jätke pakend alles.
•On soovitatav enne seadme taasühendamist oodata vähemalt kolm tundi, et õli saaks kompressorisse tagasi voolata.
•Seadme ümber peab olema küllaldane õhuringlus, selle puudumine toob kaasa ülekuumenemise. Et tagada küllaldane ventilatsioon, järgige paigaldamisjuhiseid.
•Kus võimalik, peaks seadme tagakülg olema vastu seina, et vältida soojade osade (kompressor, kondensaator) puudutamist ja võimalikke põletusi.
•Seade ei tohi asuda radiaatorite või pliitide lähedal.
•Pärast seadme paigaldamist veenduge, et toitepistikule oleks olemas juurdepääs.
17
•Ühendage ainult joogiveevarustusega (kui veeühendus on ette nähtud).
Teenindus
•Kõik masina hoolduseks vajalikud elektritööd peab teostama kvalifitseeritud elektrik või kompetentne isik.
•Käesolev toode tuleb teenindusse viia volitatud teeninduskeskussesse ja kasutada tohib ainult originaal varuosi.
Keskkonnakaitse
Käesolev seade ei sisalda osoonikihti kahjustada võivaid gaase ei selle külmu-
Juhtpaneel
tussüsteemis ega isolatsioonimaterjalides. Seadet ei tohi likvideerida koos muu olmeprügiga. Isolatsioonivaht sisaldab kergestisüttivaid gaase: seade tuleb utiliseerida vastavalt kohaldatavatele määrustele, mille saate oma kohalikust omavalitsusest. Vältige jahutusseadme kahjustamist, eriti taga soojusvaheti läheduses. Selles seadmes kasutatud materjalid, millel on sümbol  , on korduvkasutatavad.
Sügavkülmiku juhtpaneel
|
1 |
|
2 |
|
3 |
|
4 |
|
5 |
|
6 |
|
7 |
|
8 |
|
9 |
|
|||||||||
|
|
|
|
|
|
|
|
|
|
|
|
|
|
|
|
|
|
|
|
|
|
|
|
|
|
|
|
|
|
|
|
|
|
|
|
|
|
|
|
|
|
|
|
|
|
|
|
|
|
|
|
|
|
|
|
|
|
|
|
|
|
|
|
|
|
|
|
|
|
|
|
|
|
|
|
|
|
|
|
|
|
|
|
|
|
|
|
|
|
|
|
|
|
|
|
|
|
|
|
|
|
|
|
|
|
|
|
|
|
|
|
1.Märgutuli
2.SISSE/VÄLJA-lüliti
3.Temperatuuriregulaator (kõige soojem)
4.Temperatuuri indikaator
5.Temperatuuriregulaator (kõige külmem)
6.Hoiatustuli
7.Hoiatussignaali lähtestuslüliti
8.Action Freeze -tuli
9.Action Freeze -lüliti
Sisselülitamine
Sisestage toitepistik pistikupessa. Vajutage SISSE/VÄLJA-lülitit. Märgutuli süttib põlema.
Väljalülitamine
Sügavkülmiku väljalülitamiseks vajutage SIS- SE/VÄLJA-lülitit, kuni märgutuli ja temperatuuri indikaator kustuvad.
Temperatuuri reguleerimine
Temperatuuri saab reguleerida vahemikus -15°C kuni -24°C.
Temperaturiregulaatorite vajutamisel hakkab temperatuuri indikaatoril vilkuma olemasoleva temperatuuri näit. Temperatuuri on võimalik
18
reguleerida ainult indikaatori vilkumise ajal. Temperatuuri tõstmiseks vajutage temperatuuriregulaatori plussnuppu. Temperatuuri alandamiseks vajutage temperatuuriregulaatori miinusnuppu. Temperatuuri indikaator kuvab mõneks sekundiks uue määratud temperatuuri ning näitab seejärel taas sügavkülmiku sisetemperatuuri.
Uue määratud temperatuurini jõudmiseks kulub 24 tundi.
Ettevaatust Temperatuuri stabiliseerumisaja jooksul pärast
sügavkülmiku esmast käivitamist ei vasta kuvatav temperatuur valitud temperatuurile.
Temperatuuri indikaator
Tavarežiimis töötamisel näitab seade sügavkülmiku sisetemperatuuri.
Tähtis Erinevuse olemasolu kuvatava temperatuuri ja tegeliku temperatuuri vahel on normaalne. Eriti siis, kui:
•hiljuti on valitud uus seade,
•uks on pikka aega lahti olnud,
•seadmesse on pandud sooja toitu.
www.zanussi.com

Liiga kõrge temperatuuri signaal
Kui temperatuur sügavkülmikus liialt kõrgele tõuseb (nt pärast voolukatkestust), hakkab märgutuli vilkuma ja sisse lülitub helisignaal. Normaalse temperatuuri taastumisel helisignaal vaikib, kuid märgutule vilkumine jätkub. Pärast märgutule lähtestusnupu vajutamist hakkab näidikul vilkuma kõige kõrgema vahepeal mõõdetud temperatuuri näit.
Pärast pikemat voolukatkestust tuleb külmutatud toit võimalikult kiiresti ära tarvitada või siis läbi küpsetada ja uuesti külmutada.
Funktsioon Action Freeze
Funktsiooni Action Freeze sisselülitamiseks vajutage nuppu Action Freeze.
Funktsiooni Action Freeze tuli süttib. Funktsiooni sisselülitamisel kuvatakse näidikule SP .
Tähtis Funktsioon lülitub ligikaudu 52 tunni pärast automaatselt välja.
Funktsiooni saab igal ajal välja lülitada, vajutades nuppu Action Freeze. Funktsiooni Action Freeze tuli kustub.
Külmiku juhtpaneel
|
1 |
|
2 |
|
3 |
|
4 |
|
5 |
|
6 |
|
7 |
|
|||||||
|
|
|
|
|
|
|
|
|
|
|
|
|
|
|
|
|
|
|
|
|
|
|
|
|
|
|
|
|
|
|
|
|
|
|
|
|
|
|
|
|
|
|
|
|
|
|
|
|
|
|
|
|
|
|
|
|
|
|
|
|
|
|
|
|
|
|
|
|
|
|
|
|
|
|
|
|
|
|
|
|
|
|
|
|
|
|
|
1.Märgutuli
2.SISSE/VÄLJA-lüliti
3.Temperatuuriregulaator (kõige soojem)
4.Temperatuuri indikaator
5.Temperatuuriregulaator (kõige külmem)
6.Action Cool-tuli
7.Action Cool-lüliti
Sisselülitamine
Sisestage toitepistik pistikupessa. Vajutage SISSE/VÄLJA-lülitit. Märgutuli süttib põlema.
Väljalülitamine
Külmiku väljalülitamiseks vajutage SISSE/ VÄLJA-nuppu, kuni märgutuli ja temperatuuri indikaator kustuvad.
Temperatuuri reguleerimine
Temperatuuri saab reguleerida vahemikus +2°C kuni +8°C.
Temperaturiregulaatorite vajutamisel hakkab temperatuuri indikaatoril vilkuma olemasoleva temperatuuri näit. Temperatuuri on võimalik reguleerida ainult indikaatori vilkumise ajal. Temperatuuri tõstmiseks vajutage temperatuuriregulaatori plussnuppu. Temperatuuri alandamiseks vajutage temperatuuriregulaatori miinusnuppu. Temperatuuri indikaator ku-
www.zanussi.com
vab mõneks sekundiks uue määratud temperatuuri ning näitab seejärel taas külmiku sisetemperatuuri.
Uue määratud temperatuurini jõudmiseks kulub 24 tundi.
Ettevaatust Temperatuuri stabiliseerumisaja jooksul pärast külmiku
esmast käivitamist ei vasta kuvatav temperatuur valitud temperatuurile. Sel ajal võib näidatav temperatuur olla madalam, kui määratud temperatuur.
Temperatuuri indikaator
Tavarežiimis töötamisel näitab seade külmiku sisetemperatuuri.
Tähtis Erinevuse olemasolu kuvatava temperatuuri ja tegeliku temperatuuri vahel on normaalne. Eriti siis, kui:
•hiljuti on valitud uus seade,
•uks on pikka aega lahti olnud,
•seadmesse on pandud sooja toitu.
Funktsioon Action Cool
Maksimaalne jõudlus saavutatakse funktsiooni Action Cool abil. See funktsioon on mõeldud juhuks, kui külmikusse pannakse korraga palju toitu.
19
Funktsiooni Action Cool sisselülitamiseks vajutage nuppu Action Cool.
Funktsiooni Action Cool tuli süttib.
Tähtis Sisetemperatuur langeb +2°C-ni. Umbes 6 tunni möödudes lülitub funktsioon Action Cool automaatselt välja.
Esimene kasutamine
Sisemuse puhastamine
Enne seadme esmakordset kasutamist, peske seadme sisemus ja kõik lisatarvikud leige vee ja neutraalse seebiga eemaldamaks uutele toodetele omast lõhna ja kuivatage seade hoolikalt.
Tähtis Ärge kasutage pesuvahendeid ja abrasiivseid pulbreid, kuna need kahjustavad sisepindu.
Igapäevane kasutamine
Värske toidu külmutamine
Sügavkülmiku-osa sobib värske toidu külmutamiseks ning külmutatud ja sügavkülmutatud toidu pikaajaliseks säilitamiseks.
Pange värske külmutatav toit vasakule poole ja kui toit on külmunud, tõstke see ümber säilituskorvidesse.
24 tunni jooksul külmutatava toidu maksimaalne kogus on määratletud andmesildil, mis asub seadme siseküljel. Külmutusprotsess kestab 24 tundi: selle aja jooksul ärge muid toiduaineid külmutamiseks lisage.
Tähtis Funktsiooni Auto Freeze kasutamisel:
umbes 6 |
|
väikeste värske toidu koguste lisa- |
tundi enne |
|
mist (umbes 5 kg) |
umbes 24 |
|
maksimaalse toidukoguse lisamist |
tundi enne |
|
(vaadake andmesilti) |
pole vajalik |
|
külmutatud toidu lisamisel |
pole vajalik |
|
väikeste värske toidu koguste (ku- |
|
|
ni 2 kg) igapäevasel lisamisel |
|
|
|
Külmutatud toidu säilitamine
Esmakordsel käivitamisel või pärast pikemaajalist kasutuspausi laske seadmel vähemalt 2 tundi suuremal võimsusel töötada, enne kui sügavkülmikuosasse toiduaineid asetate.
Tähtis Sulatamisprotsessi tahtmatul käivitumisel, näiteks elektrikatkestuse tõttu, kui seade on olnud toiteta kauem kui tehniliste andmete tabelis toodud "tempreatuuri tõusu aeg" seda lubaks, tuleb sulatatud toit kiiresti ära tarvitada või koheselt küpsetada ja seejärel uuesti külmutada (pärast jahtumist).
Jääkuubikute valmistamine
Antud seade on varustatud ühe või mitme alusega jääkuubikute valmistamiseks. Täitke need alused veega, asetage need seejärel sügavkülmutusse.
Tähtis Ärge kasutage aluste sügavkülmutusest väljavõtmiseks metallist instrumente.
20 |
www.zanussi.com |
Sulatamine
Sügavkülmutatud või külmutatud toidu võib enne kasutamist külmikuvahes või toatemperatuuril üles sulatada, olenevalt sellest, kui palju selleks aega on.
Väikesi tükke võib valmistada ka külmutatult, otse sügavkülmikust: sel juhul kulub toiduvalmistamiseks rohkem aega.
Liigutavad riiulid
Külmiku seinad on varustatud mitmete juhikutega, nii et riiuleid võib soovikohaselt paigutada.
Külmikuuksed
Korralikuks avamiseks ja sulgemiseks on soovitav kahte ust korraga liigutada (vaadake joonist).
Vihjeid ja näpunäiteid
Soovitusi värske toidu külmikusse lisamiseks
Parima tööjõudluse tagamiseks:
•ärge pange külmikusse sooja toitu või auravaid vedelikke,
•katke toiduained kinni või mähkige sisse, eriti juhul, kui toiduaine on tugeva lõhnaga,
•pange toidud külmikusse nii, et õhk saaks nende ümber liikuda.
Näpunäiteid toidu külmikusse panemiseks
Näpunäited:
Liha (igasugune): mähkige polüetüleenkilesse ja pange juurviljasahtli kohal olevale klaasriiulile.
Sel viisil säilitage liha ainult üks või kaks päeva, mitte rohkem.
Läbiküpsenud toidud, külmad road jms: tuleks kinni katta; paigutada võib neid igale riiulile.
Puuja köögiviljad: puhastada korralikult ja panna vastava(te)sse sahtli(te)sse.
www.zanussi.com
Või ja juust: hoida sobivas hermeetilises pakendis või mähkida alumiiniumfooliumisse või polüetüleenkilesse, et õhk toiduainest eemal hoida.
Piimapudelid: sulgeda korgiga ja säilitada külmiku ukse küljes oleval alusel.
Pakkimata banaane, kartuleid, sibulaid, küüslauku ei tohi külmikus hoida.
Näpunäiteid sügavkülmutamiseks
Sügavkülmutamise kõige tõhusamaks kasutamiseks järgige paari olulist soovitust:
•toidu maksimaalne kogus, mida võib 24 tunni jooksul külmutada, on toodud seadme andmesildil,
•külmutamisprotsess kestab 24 tundi. Selle aja vältel ei tohi seadmesse toiduaineid lisada,
•külmutage ainult kvaliteetset, värsket ja korralikult puhastatud toitu,
•jagage toiduained väiksemateks portsjoniteks, et see kiiresti läbi külmuks ja et hiljem
21
saaksite ainult vajaliku koguse üles sulatada,
•mässige toit fooliumisse või polüetüleenkilesse ja veenduge, et pakend on õhukindel,
•ärge pange värsket külmutamata toitu külmutatud toidu vastu, kuna vastasel korral külmutatud toidu temperatuur tõuseb,
•lahjad toiduained säilivad paremini ja kauem kui rasvased toiduained, sool vähendab toidu säilitusaega,
•jäätükkide tarbimine kohe pärast sügavkülmikust väljavõtmist võib põhjustada naha külmakahjustusi,
•säilitusaja jälgimiseks on soovitav igale säilitatavale toidule märkida külmutamiskuupäev.
Puhastus ja hooldus
Nõuandeid külmutatud toidu säilitamiseks
Parima tööjõudluse tagamiseks peaksite:
•veenduma, et poest ostetud külmutatud toiduaineid säilitatakse juhiseid järgides,
•pange külmutatud toit pärast ostmist niipea kui võimalik sügavkülmikusse,
•ärge avage sügavkülmiku ust sageli ja ärge jätke ust lahti kauemaks, kui hädavajalik.
•Ülessulanud toit rikneb üsna ruttu ja seda ei tohi enam uuesti külmutada.
•Ärge ületage toidu tootja poolt määratletud säilitusaega.
Ettevaatust Enne mistahes hooldustegevust tõmmake seadme
toitejuhe seinast.
Käesoleva seadme jahutussüsteemis on süsivesinikku; seega peab hooldust ja
täitmist korraldama ainult volitatud tehnik.
Perioodiline puhastamine
Seadet tuleb regulaarselt puhastada:
•puhastage sisemus ja tarvikud leige veega ning neutraalse seebiga;
•kontrollige regulaarselt ukse tihendeid ja pühkige neid, et need oleksid puhtad;
•loputage ja kuivatage korralikult.
Tähtis Ärge tõmmake, liigutage ega vigastage kapis olevaid torusid ja/või juhtmeid.
Ärge kunagi kasutage pesuaineid, abrasiivseid pulbreid, tugevalt lõhnastatud puhastustooteid või vahapolituure sisemuses puhastamiseks, sest see rikub pindu ja jätab kappi tugeva lõhna.
Puhastage seadme tagaküljel asuv kondensaator (must võrestik) ja kompressor harjaga. See parandab seadme jõudlust ja vähendab elektritarbimist.
Tähtis Olge ettevaatlik, et mitte vigastada jahutussüsteemi.
Mitmed köögipindade puhastusvahendid sisaldavad kemikaale, mis võivad kahjustada selles seadmes kasutatud plastmasse. Seetõttu soovitatakse puhastada seda seadet väljast ainult sooja veega, millele on lisatud pisut nõudepesuvahendit.
Pärast puhastamist ühendage seade uuesti vooluvõrku.
Külmiku sulatamine
Jääkirme eemaldatakse külmiku aurustilt automaatselt normaalse töö käigus iga kord, kui mootori kompressor seiskub. Sulatamisest tekkinud vesi voolab seadme taga mootori kompressori kohal olevasse spetsiaalsesse anumasse, kust see aurustub.
On tähtis puhastada regulaarselt sulamisvee väljavooluava, mis asub külmikukanali keskel; nii väldite vee ülevoolamist ja külmikus olevale toidule tilkumist. Kasutage kaasasolevat spetsiaalset puhastit, mis on juba sisestatud äravooluavasse.
22 |
www.zanussi.com |
Sügavkülmuti sulatamine
Seevastu on selle mudeli sügavkülmiku osa "mittejäätuvat" tüüpi. See tähendab, et jääkirmet ei teki, kui seade töötab, ei sisemistele seintele ega toidule.
Jääkirme puudumine on tingitud automaatjuhitava ventilaatori poolt liikuma pandud külma õhu pidevast ringlemisest sügavkülmikus.
Töö vahepealsed ajad
Kui seade ei ole pikemat aega kasutusel, rakendage järgmisi abinõusid:
•ühendage seade vooluvõrgust lahti;
•võtke kogu toit välja;
•sulatage (kui see on ette nähtud) ja puhastage seade ning kõik tarvikud;
•jätke uks/uksed irvakile, et hoida ära ebameeldiva lõhna tekkimist.
Kui kapp jäetakse sisse, tuleb paluda kellelgi seda aeg-ajalt kontrollida, et sees olev toit voolukatkestuse korral ei rikneks.
Mida teha, kui...
Hoiatus Enne tõrkeotsingut eemaldage toitepistik pistikupesast.
Käesolevas kasutusjuhendis mitte leiduva tõrke kõrvaldamisega võib tegeleda ainult kvalifitseeritud elektrik või pädev isik.
Tähtis Tavakasutusel võib seade tuua kuuldavale mõningaid helisid (kompressor, külmutusagensi süsteem).
Probleem |
Võimalik põhjus |
Seade ei tööta. Valgusti ei |
Seade on välja lülitatud. |
põle. |
|
|
Toitepistik ei ole korralikult pistiku- |
|
pessa ühendatud. |
|
Seade ei saa toidet. Pistikupesas |
|
ei ole voolu. |
|
|
Alarmtuli vilgub. |
Temperatuur sügavkülmutiosas |
|
on liiga kõrge. |
Lamp ei põle. |
Lamp on ooterežiimis. |
|
Valgusti on rikkis. |
Kompressor töötab pide- |
Temperatuur ei ole õigesti seadis- |
valt. |
tatud. |
|
Uks ei ole korralikult suletud. |
|
Ust on avatud liiga tihti. |
|
|
|
Mõne toiduaine temperatuur on lii- |
|
ga kõrge. |
|
|
Lahendus
Lülitage seade sisse.
Ühendage toitepistik korralikult pistikupessa.
Ühendage pistikupessa mõni muu elektriseade.
Võtke ühendust kvalifitseeritud elektrikuga.
Vt jaotist "Liiga kõrge temperatuuri signaal"
Sulgege ja avage uks.
Vt jaotist "Lambi vahetamine".
Valige kõrgem temperatuur.
Vt jaotist "Ukse sulgemine".
Ärge hoidke ust lahti kauem kui vaja.
Laske toidul jahtuda toatemperatuurini, enne kui selle seadmesse panete.
www.zanussi.com |
23 |
|
Probleem |
|
Võimalik põhjus |
|
Lahendus |
|
|
Toa temperatuur on liiga kõrge. |
|
Alandage toa temperatuuri. |
Vesi voolab mööda külmu- |
|
Automaatse sulatamisprotsessi |
|
See on õige. |
tuskapi tagapaneeli. |
|
ajal sulab tagapaneelil olev här- |
|
|
|
|
matis. |
|
|
Vesi voolab külmutuskap- |
|
Vee väljavooluava on ummistu- |
|
Puhastage vee väljavooluava. |
pi. |
|
nud. |
|
|
|
|
Toiduained takistavad vee voola- |
|
Veenduge, et toiduained ei ole vas- |
|
|
mist veekogumisnõusse. |
|
tu tagapaneeli. |
Vesi voolab maha. |
|
Sulamisvesi ei voola kompressori |
|
Kinnitage sulamisvee väljavooluju- |
|
|
kohal asuvasse aurustumisrenni. |
|
hik aurustumisrenni. |
Temperatuur seadmes on |
|
Temperatuuri regulaator ei ole õi- |
|
Valige kõrgem temperatuur. |
liiga madal. |
|
gesti seadistatud. |
|
|
Temperatuur seadmes on |
|
Samaaegselt on külmikusse pan- |
|
Ärge pange külmikusse samaaeg- |
liiga kõrge. |
|
dud liiga palju toiduaineid. |
|
selt liiga palju toiduaineid. |
Temperatuur külmutuska- |
|
Seadmes ei ole külma õhu ring- |
|
Veenduge, et seadmes on tagatud |
pis on liiga kõrge. |
|
lust. |
|
külma õhu ringlus. |
Temperatuur sügavkülmu- |
|
Toiduained paiknevad üksteisele |
|
Paigutage toiduained nii, et on ta- |
tiosas on liiga kõrge. |
|
liiga lähedal. |
|
gatud külma õhu ringlus. |
Lambi asendamine
1.Tõmmake toitepistik pistikupesast välja.
2.Eemaldage lambikate (vt joonist).
3. Vahetage vana lamp uue vastu, mis on vanaga sarnase võimsu-
sega ja spet-
siaalselt kodumasinate jaoks ette nähtud (maksimumvõimsus on märgitud lambi kattele).
4.Lükake toitepistik pistikupessa.
5.Avage uks. Kontrollige, kas lamp läheb põlema.
Ukse sulgemine
1.Puhastage ukse tihendid.
2.Vajadusel reguleerige ust. Vt jaotist "Paigaldamine".
3.Vajadusel asendage katkised uksetihendid uutega. Pöörduge teeninduskeskusse.
24 |
www.zanussi.com |
Tehnilised andmed
|
|
|
|
Niši mõõtmed |
|
|
|
|
|
Kõrgus |
1900 mm |
|
|
Laius |
860 mm |
|
|
Sügavus |
550 mm |
Temperatuuri tõusu aeg |
|
|
14 h |
Elektripinge |
|
|
230-240 V |
Sagedus |
|
|
50 Hz |
|
|
|
|
Täiendavad tehnilised andmed on kirjas andmesildil, mis asub seadme vasakul siseküljel, ja energiasildil.
Paigaldamine
Paigutamine
Paigaldage seade kohta, kus ümbritsev temperatuur vastaks seadme andmeplaadil osutatud klliimaklassile:
Kliimak- |
Ümbritsev temperatuur |
lass |
|
SN |
+10°C kuni + 32°C |
N |
+16°C kuni + 32°C |
ST |
+16°C kuni + 38°C |
T |
+16°C kuni + 43°C |
|
|
Elektriühendus
Enne seadme vooluvõrku ühendamist kontrollige, et seadme andmeplaadil märgitud pinge ja sagedus vastaksid teie majapidamise omale.
See seade peab olema maandatud. Toitejuhtmel on olemas ka vastav kontakt. Juhul kui teie kodune seinapistik pole maandatud, maandage seade eraldi vastavalt elektrialastele nõudmistele pidades eelnevalt nõu kvalifitseeritud elektrikuga.
Tootja loobub igasugusest vastutusest kui ülaltoodud ettevaatusabinõusid pole tarvitusele võetud.
See seade on vastavuses EMÜ direktiividega.
www.zanussi.com
Kõrguse reguleerimine
|
820 |
|
870 |
820 870 |
|
Seadme kõrgus on |
Enne seadme pai- |
reguleeritav vahemi- |
galdamist muu si- |
kus 820 kuni 870 |
sustuse vahele regu- |
mm, kokku sobitami- |
leerige jalgade ja ta- |
seks köögimööbli |
garataste kõrgus so- |
kõrgusega. |
bivaks. |
|
Rattad on tehases |
|
reguleeritud kõrgu- |
|
sele 820 mm. |
|
Seadme kõrguse |
|
suurendamiseks 870 |
|
mm-ni tõstke seadet, |
|
reguleerides jalgade |
|
kõrgust mutrivõtme |
|
abil ning eemaldage |
|
seejärel rattad ja |
|
paigaldage need |
|
madalaimasse asen- |
|
disse. |
|
25 |
Külgpaneelide paigaldamine
3 |
1 |
2 |
D |
1a |
|
15 |
17,5 |
D |
|||
|
2 |
||||
|
|
|
|
||
|
820 |
1015 |
|
|
|
|
|
|
|
||
|
15 |
64 |
|
1b |
|
|
280 |
|
|
||
|
|
|
|
||
|
|
539 |
|
|
|
|
541 |
260* |
|
|
|
|
30 |
|
|
||
• Paigaldage kinni- |
• Enne seadme |
|
|||
tusnurgad paneeli- |
köögikappi paigal- |
||||
de külge, joonisel |
damist kinnitage |
||||
näidatud kohta- |
vahedetailid hin- |
||||
desse. Suurus |
gede külge. Vt pil- |
||||
260* mm on jäe- |
ti. |
|
|||
tud 100 mm kõr- |
|
|
|||
guse sokli kinnita- |
|
|
|||
miseks paneeli al- |
|
|
|||
la. Erineva kõrgu- |
|
|
|||
sega sokli puhul |
|
|
|||
suurendage vahemaad 260* mm vastavalt.
1.Tagaserv
2.Esiserv
3.Parem külgpaneel
26
45
•Toetage paneelid seadme vastu.
•Paigaldage tagumised kinnitusnurgad, arvestades paneelide paksust (maksimaalne seadme laius on 900 mm).
•Täpseks joondamiseks peab vahemaa seadme ja kapi vahel olema 45 mm.
•Kinnitage paneelid eestpoolt.
•Kinnitage ristkülikud (tarvikute kotist) ukse alumise osa külge (eelnevalt tähistatud kohta).
2
 L
L
N
1
L
•Vajadusel saab ukse maksimaalse avanemisnurga piirata 90°-ga, kasutades eraldi hangitavaid tappe. Vt pilti.
www.zanussi.com
Uksepaneelide paigaldamine
|
|
|
214 214 |
|
|
|
|
193 |
193 193 |
193 |
|
1 |
2 |
25 |
|
25 |
|
1013 |
|
1013 |
|||
|
4 |
5 |
|||
|
|
|
|
3MIN |
|
|
|
60 4 4 60 |
|
||
|
25 |
|
6 |
7 |
25 |
|
444MIN. |
444MIN. |
|||
|
|
|
|||
|
447MAX. |
|
|
447MAX. |
|
•Avage uks ja võtke ära paneelikinnituse kate.
Eemaldage mutrid ja seibid ning võtke kinnitus ukse küljest ära.
•Puurige väikeste uste sisse augud vastavalt joonisele.
1.Ülemine parem esipaneel
2.Ülemine vasak esipaneel
3.Alumine parem esipaneel
4.Alumine vasak esipaneel
90o |
1 |
2 |
|
 3
3
•Paigaldage kinnitus ukse külge tarvikute kotis olevate kruvidega.
•Asetage kinnitus reguleerimiskruvidele ja kruvige mutrid koos seibidega kohale, kuid ärge veel pingutage.
www.zanussi.com
•Sulgege uks ja veenduge, kas väike uks on sobival kõrgusel, tõmmates selle lahti ja vajadusel kruvisid reguleerides.
•Kasutage väikeste uste kõrguse reguleerimiseks samu kruvisid.
•Vajadusel reguleerige uksi ka rõhtsuunas.
•Kui uksed on korralikult kohakuti, pingutage kinnituste mutrid ja väikeste kinnitusnurkade kruvid.
•Kinnitage ukse all olev nurk paneeli külge kahe plastseibiga, mis on tarvikute kotis.
•Nüüd paigaldage kinnituste kate.
27
Seadme integreerimine
1 |
50 |
50 |
2 
50
•Paigaldage seade köögimööbli vahele.
•Pöörake nurka 180°, et see jääks sobivasse asendisse ( 2). Seadme tarnimise ajal on nurk asendis
(1).
•Kinnitage seade sobiva nurga abil seina külge.
•Seadme peale peab jääma vaba ruumi õhu liikumiseks.
Kui seadme peale asetatakse seinakapp, peab seadme ja seina vahele jääma vähemalt 50 mm ruumi ning kapi ja lae vahele vähemalt 50 mm vaba ruumi.
Sokli paigaldamine Paigalduskõrgus 820 mm
28
|
820 |
170 |
870 |
220 |
|
900 |
140 |
|
30 |
190 |
100 |
|
• Kui sokli kõrgus on 140 kuni 170 mm, tehke soklisse joonisel näidatud suurusega sisselõige.
140
190
•Sokli jaoks kõrgusega 100 mm kuni 140 mm lõigake parajaks seadmega kaasas olev sokli sobitusriba, mis asetatakse sokli ja ventilatsioonivõre vahele ning surutakse ventilatsioonivõre alla.
•Kui sokli kõrgus on 100 mm, kasutage tervet sobitusriba.
Paigalduskõrgus 870 mm
www.zanussi.com
 Loading...