


 Loading...
OWNER'S MANUAL
MODE D'EMPLOI BEDIENUNGSANLEITUNG BRUKSANVISNING MANUALE DI ISTRUZIONI MANUAL DE INSTRUCCIONES GEBRUIKSAANWIJZING
ИНСТРУКЦИЯ ПО ЭКСПЛУАТАЦИИ
Ru Nl Es It Sv De Fr En
G
CAUTION: READ THIS BEFORE OPERATING YOUR UNIT.
1To assure the finest performance, please read this manual carefully. Keep it in a safe place for future reference.
2Install this unit in a well ventilated, cool, dry, clean place - away from direct sunlight, heat sources, vibration, dust, moisture and cold. For proper ventilation, allow the following minimum clearances. Top: 15 cm (6 in)
Rear: 10 cm (4 in) Sides: 10 cm (4 in)
3Locate this unit away from other electrical appliances, motors, or transformers to avoid humming sounds.
4Do not expose this unit to sudden temperature changes from cold to hot, and do not locate this unit in an environment with high humidity (i.e. a room with a humidifier) to prevent condensation inside this unit, which may cause an electrical shock, fire, damage to this unit, and/or personal injury.
5Avoid installing this unit where foreign object may fall onto this unit and/or this unit may be exposed to liquid dripping or splashing. On the top of this unit, do not place:
–Other components, as they may cause damage and/or discoloration on the surface of this unit.
–Burning objects (i.e. candles), as they may cause fire, damage to this unit, and/or personal injury.
–Containers with liquid in them, as they may fall and liquid may cause electrical shock to the user and/or damage to this unit.
6Do not cover this unit with a newspaper, tablecloth, curtain, etc. in order not to obstruct heat radiation. If the temperature inside this unit rises, it may cause fire, damage to this unit, and/or personal injury.
7Do not plug in this unit to a wall outlet until all connections are complete.
8Do not operate this unit upside-down. It may overheat, possibly causing damage.
9Do not use force on switches, knobs and/or cords.
10When disconnecting the power cable from the wall outlet, grasp the plug; do not pull the cable.
11Do not clean this unit with chemical solvents; this might damage the finish. Use a clean, dry cloth.
12Only voltage specified on this unit must be used. Using this unit with a higher voltage than specified is dangerous and may cause fire, damage to this unit, and/or personal injury. Yamaha will not be held responsible for any damage resulting from use of this unit with a voltage other than specified.
13To prevent damage by lightning, keep the power cable disconnected from a wall outlet or this unit during a lightning storm.
14Do not attempt to modify or fix this unit. Contact qualified Yamaha service personnel when any service is needed. The cabinet should never be opened for any reasons.
15When not planning to use this unit for long periods of time (i.e. vacation), disconnect the AC power plug from the wall outlet.
16Be sure to read the “TROUBLESHOOTING” section on common operating errors before concluding that this unit is faulty.
17Before moving this unit, press  to set the system to off, and disconnect the AC power plug from the wall outlet.
18Condensation will form when the surrounding temperature changes suddenly. Disconnect the power cable from the outlet, then leave this unit alone.
19When using this unit for a long time, this unit may become warm. Turn the system off, then leave this unit alone for cooling.
20Install this unit near the wall outlet and where the AC power plug can be reached easily.
21Be sure to use the AC adaptor supplied with this unit. Using an AC adaptor other than the one provided may cause fire or damage to this unit.
This unit is not disconnected from the AC power source as long as it is connected to the wall outlet, even if this unit itself is turned off by  . In this state, this unit is designed to consume a very small quantity of power.
WARNING
TO REDUCE THE RISK OF FIRE OR ELECTRIC SHOCK, DO NOT EXPOSE THIS UNIT TO RAIN OR MOISTURE.
There is a chance that placing this unit too close to a CRT-based (Braun tube) TV set might impair picture color. Should this happen, move this unit away from the TV set.
Do not use this unit within 22 cm (9 inches) of persons with a heart pacemaker implant or defibrillator implant.
Radio waves may affect electro-medical devices. Do not use this unit near medical devices or inside medical facilities.
We, Yamaha Music Europe GmbH hereby declare that this unit is in compliance with the essential requirements and other relevant provisions of Directive 1999/5/EC.
Yamaha Music Europe GmbH
Siemensstr. 22-34 25462 Rellingen, Germany Tel: +49-4101-303-0
i En
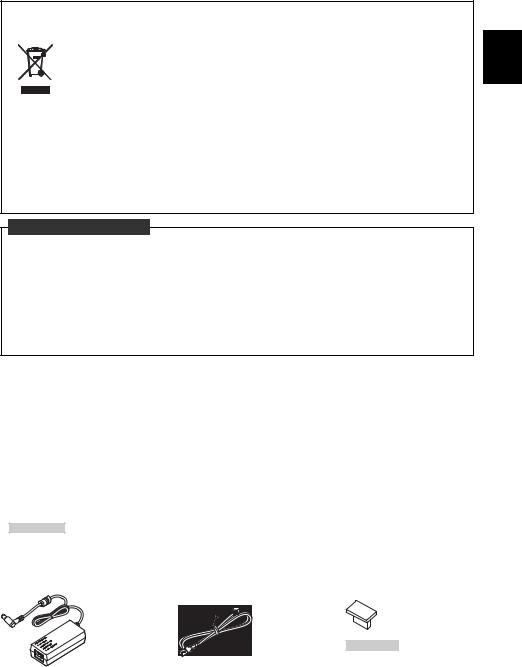
Information for Users on Collection and Disposal of Old Equipment
This symbol on the products, packaging, and/or accompanying documents means that used electrical and electronic products should not be mixed with general household waste.
For proper treatment, recovery and recycling of old products, please take them to applicable collection points, in accordance with your national legislation and the Directives 2002/96/EC.
By disposing of these products correctly, you will help to save valuable resources and prevent any potential negative effects on human health and the environment which could otherwise arise from inappropriate waste handling.
For more information about collection and recycling of old products, please contact your local municipality, your waste disposal service or the point of sale where you purchased the items.
[Information on Disposal in other Countries outside the European Union]
This symbol is only valid in the European Union. If you wish to discard these items, please contact your local authorities or dealer and ask for the correct method of disposal.
CONTENTS |
|
NAMES OF PARTS AND THEIR FUNCTIONS .................................................................................... |
2 |
BASIC FUNCTIONS................................................................................................................................... |
4 |
USING USEFUL FUNCTIONS ................................................................................................................. |
6 |
LISTENING TO RADIO STATIONS....................................................................................................... |
8 |
CHARGING WITH THE USB PORT ...................................................................................................... |
9 |
LISTENING TO EXTERNAL SOURCES ............................................................................................... |
9 |
LISTENING TO MUSIC FROM YOUR Bluetooth COMPONENT ................................................... |
10 |
TROUBLESHOOTING ............................................................................................................................ |
13 |
SPECIFICATIONS ................................................................................................................................... |
15 |
■Features
–High quality playback of Bluetooth enabled smartphone/tablet computer, and radio and external devices. One touch pairing enabled by NFC technology.
–Firm bass sound and spacious stereo sound from 2.1 ch powered speaker (tweeter × 2, woofer × 1), SR-Bass™ (Yamaha Swing Radiator Bass technology) and DSP in a compact unit.
–Easy user-intuitive interface by buttons with Guide LED and knob dials.
–Convenient operability enabled by using iPhone/Android smartphone as a remote control. Supports the dedicated application, “DTA CONTROLLER.”
–USB port for supplying power.
•Note indicates precautions for use of the unit and its feature limitations.
•y indicates supplementary explanations for better use.
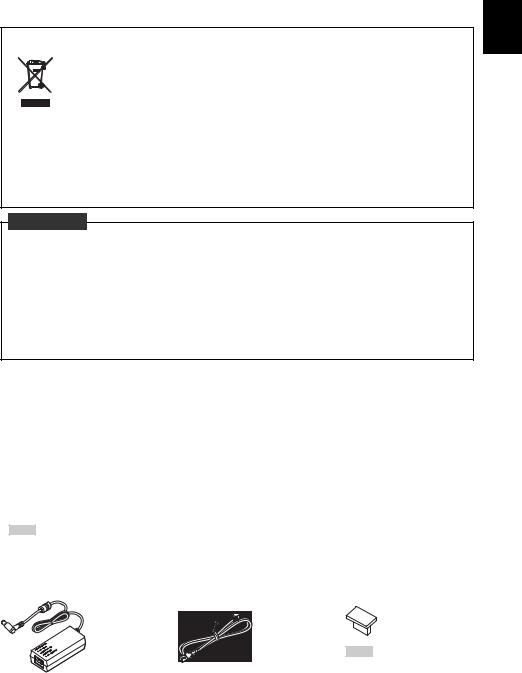
■ Supplied accessories
AC adaptor |
Power cable |
USB cap |
|
Note |
|
Keep the USB cap out of reach |
(DC 15 V, 2.56A, |
of children so as to ensure that |
it is not mistakenly swallowed. |
|
model number: |
|
EADP-38EB A) |
|
En
1 En
NAMES OF PARTS AND THEIR FUNCTIONS
■ Front panel
|
|
|
|
|
|
|
|
|
|
|
|
|
|
|
|
|
|
|
|
|
|
|
|
|
|
|
|
|
|
|
|
|
|
|
|
|
|
|
|
|
|
|
|
|
|
|
|
|
|
|
|
|
|
|
|
|
|
|
|
|
|
|
|
|
|
|
|
|
|
|
|
|
|
|
|
|
|
|
|
|
|
|
|
|
|
|
|
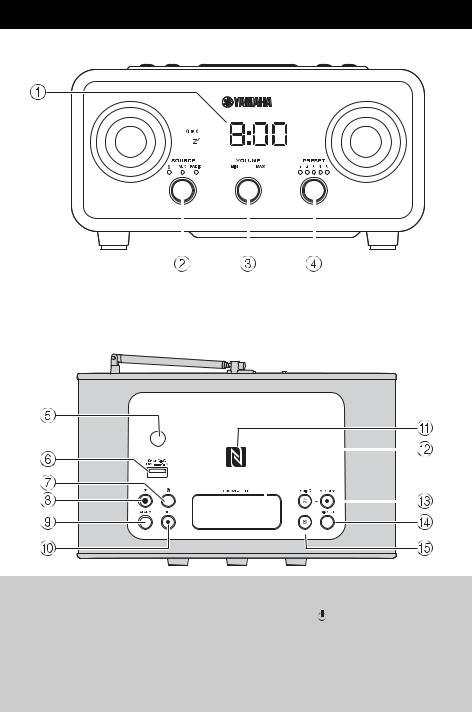
1 Front panel display |
|
4 PRESET: Stores up to five favorite FM radio |
|||||||||||||||||||
2 SOURCE: Bluetooth, AUX, RADIO |
|
|
|
stations ( P. 8). |
|||||||||||||||||
3 VOLUME: Volume control |
|
|
|
|
|
|
|
|
|
|
|
|
|
||||||||
■ Top panel |
|
|
|
|
|
|
|
|
|
|
|
|
|
||||||||
|
|
|
|
|
|
|
|
|
|
|
|
|
|
|
|
|
|
|
|
|
|
|
|
|
|
|
|
|
|
|
|
|
|
|
|
|
|
|
|
|
|
|
|
|
|
|
|
|
|
|
|
|
|
|
|
|
|
|
|
|
|
|
|
|
|
|
|
|
|
|
|
|
|
|
|
|
|
|
|
|
|
|
|
|
|
|
|
|
|
|
|
|
|
|
|
|
|
|
|
|
|
|
|
|
|
|
|
|
|
|
|
|
|
|
|
|
|
|
|
|
|
|
|
|
|
|
|
|
|
|
|
|
|
|
|
|
|
|
|
|
|
|
|
|
|
|
|
|
|
|
|
|
|
|
|
|
|
|
|
|
|
|
|
|
|
|
|
|
|
|
|
|
|
|
|
5Illumination sensor: Measures surrounding
illuminance. Do not cover this sensor when DIMMER (d) is set to A (auto).
6CHARGING: Supplies 5V/2.1A to a portable device, such as a smartphone, when it is connected with a USB cable ( P. 9).
7 (Bluetooth): Press this button:
–to terminate Bluetooth connection when it is established ( P. 12).
–to establish connection with the component that was most recently connected via Bluetooth
( P. 12).
8 : Press to turn the system on/off.
Time is displayed even when the system is off.
y
•Press and hold  for more than 3 seconds to set the system to standby mode. All the information on the front panel display is not displayed in standby mode.
This can reduce power consumption. To cancel standby mode, press  .
.
•Even in system off/standby mode, the alarm function is available.
2 En

9 ALARM: Alarm on/off ( P. 5)
0 SET: Alarm setting ( P. 4)
A NFC mark: Allows easy pairing with NFC technology ( P. 11).
BSNOOZE/SLEEP ( P. 5)
CMEMORY ( P. 8)
■Rear panel
15V 


 : Connect the supplied
  AC adaptor and power cable.
ALARM TYPE switch ( P. 4) 
CLOCK switch ( P. 4)
■ Extending rod antenna
Notes
•When you listen to FM, extend the antenna.
•If FM reception is poor, change the height or direction of the antenna, or relocate the unit.
FM Rod Antenna
NAMES OF PARTS AND THEIR FUNCTIONS
DDIMMER: Sets the brightness of the top and front panel
A (auto)  3 (brightest)
  2
2  1 (darkest)
  back to A
y
When A (auto) is set, the brightness of the top and front panel is adjusted automatically according to the brightness of the room.
E TUNING ( P. 8)
 FM Rod Antenna
(See below.)
 AUX: Connect an external device. ( P. 9)
En
3 En

BASIC FUNCTIONS
Adjusting the clock
Rear panel
Front panel display flashes.
ASet CLOCK to SET.
BSet the time with TUNING.
CSet CLOCK to LOCK.
Note
The time settings are lost approximately one week after unplugging the unit.
Alarm setting
This unit can play back radio and/or beep sound at the set time.
■ Setting the time and sound
Alarm indicator (

 ) flashes and the front panel display indicates alarm mode.
APress SET.
BSet the alarm time with
TUNING.
An alarm will sound only once at the specified time.
|
Rear panel |
|
|
|
|
CSet ALARM TYPE. |
|
|
|
|
|
|
• SOURCE+BEEP: radio (played |
||
|
|
|
|
|
|
||
|
|
|
|
|
|
|
back from 3 minutes before the |
|
|
|
|
|
|
|
|
|
|
|
|
|
|
|
alarm time) and beep sound (played |
|
|
|
|
|
|
|
back at the alarm time) |
|
|
|
|
|
|
• SOURCE: this unit plays back the |
|
|
|
|
|
|
|
|
radio station you listened to last |
|
|
|
|
|
|
|
time. |
|
|
|
|
|
|
• BEEP: beep sound only |
|
|
|
|
|
|
|
DSet the alarm volume. |
|
|
|
|
|
|
|
||
|
|
|
|
|
|
EPress SET. |
|
|
|
|
|
|
|
Alarm is set and the alarm indicator |
|
|
|
( |
) lights up. |
||||
4 En
BASIC FUNCTIONS
■ Switching the alarm on/off
Press ALARM.
When the alarm is on, the alarm indicator (

 ) lights up and alarm time is displayed for a while.
Operations during playing back alarm sound
At the set time, alarm sound plays back. During playback, operations below are available.
■ Using the snooze function
Press SNOOZE/SLEEP.
The alarm sound stops and resumes after 5 minutes.
y
• If SOURCE+BEEP is set as the alarm type, you can press SNOOZE/SLEEP once to stop the beep sound, and twice to stop the audio source. Five minutes after the audio source is stopped, it will start fading in again and the beep sound will resume.
• When the snooze function is activated, alarm indicator flashes.
■ Stopping the alarm
Press ALARM or  .
.
y
• Unless you stop the alarm, the alarm stops after 60 minutes automatically.
• When you stop the alarm, the alarm time setting, etc., is saved for convenient use next time.
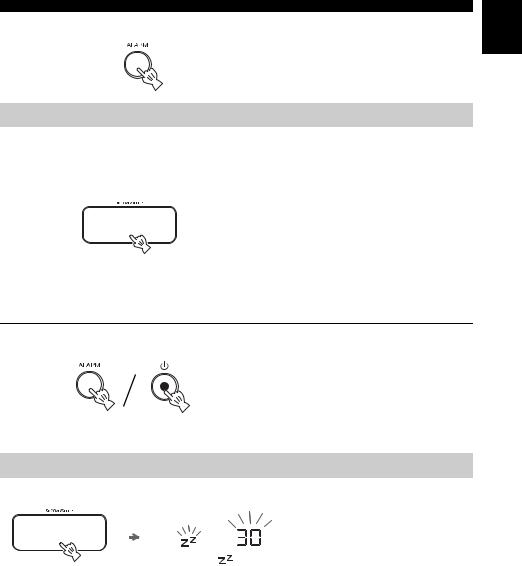
Sleep setting
You can set the time until the system turns off automatically when the sleep function is set to on.
Select the sleep time.
You can set 30, 60, 90 or 120 minutes. When the sleep function is on, the sleep indicator ( ) lights up.
|
Sleep indicator ( |
) and front |
Press repeatedly. |
panel display flash. |
y |
To cancel the sleep function, press SNOOZE/
SLEEP.
En
5 En
USING USEFUL FUNCTIONS
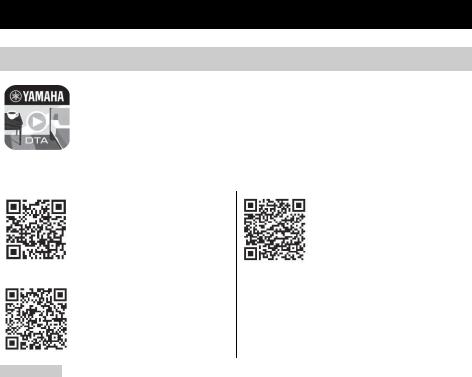
DTA CONTROLLER
With the DTA CONTROLLER application installed on your smartphone or tablet computer, you can use further convenient features of Yamaha desktop audio systems.
To download the application, or obtain the latest information on it, access App Store or Google Play via the QR codes listed below.
iPhone, iPad, iPod touch |
Android™ |
http://itunes.com/app/dtacontroller https://play.google.com/store/apps/ details?id=com.yamaha.av.dtacontr oller
(U.S.A.) https://itunes.apple.com/us/app/dta- controller-us/id549333293?mt=8
Notes
•If you cannot access the above information, search for “DTA CONTROLLER” on App Store or Google Play.
•iPad, iPhone, and iPod touch are trademarks of Apple Inc., registered in the U.S. and other countries.
•Android and Google Play are trademarks of Google, Inc.
6 En

USING USEFUL FUNCTIONS
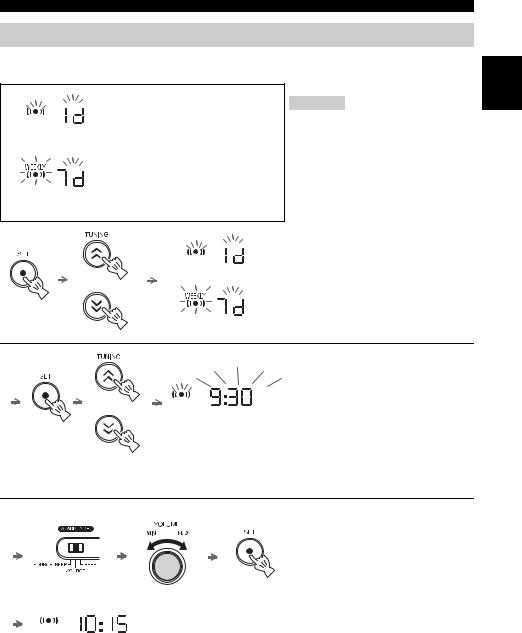
Alarm setting using DTA CONTROLLER
Once you have set Weekly Alarm by “DTA CONTROLLER”, you can select the Weekly Alarm mode in the alarm mode select display of this unit.
One Day Alarm
Weekly Alarm
1d (One Day Alarm mode):
An alarm that sounds only once at the specified time.
7d (Weekly Alarm mode):
An alarm whose time can be specified for each day of the week (settable only using “DTA CONTROLLER”).
Note
The Weekly Alarm mode cannot be selected when all the days of the Weekly Alarm setting are turned off. Turn on any day of the Weekly Alarm setting.
APress SET.
BSelect the alarm mode with
TUNING.
One Day Alarm
Weekly Alarm
Alarm indicator (

 ) flashes and the front panel display indicates alarm mode.
CPress SET.
•If you have chosen Weekly Alarm
mode, this completes the alarm setting. The alarm indicator (

 ) and the Weekly Alarm indicator
(

 ) will light up.
DSet the alarm time with
TUNING.
ESet ALARM TYPE.
Rear panel
FSet the alarm volume.
GPress SET.
Alarm is set and the alarm indicator (

 ) lights up.
y
The alarm setting will be saved even if the alarm is turned off.
If the alarm is turned on again by pressing ALARM, the alarm will sound with the previous alarm settings.
En
7 En
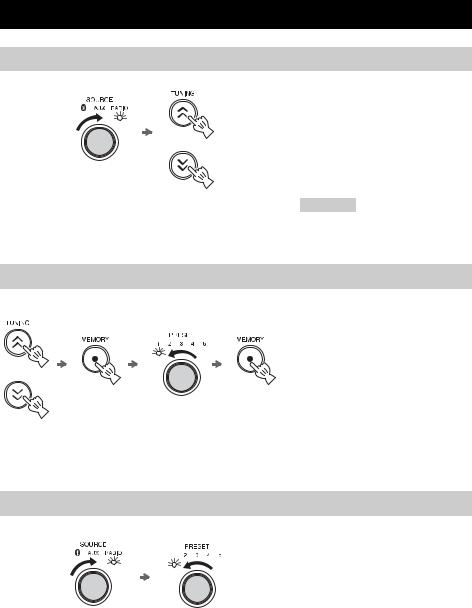
LISTENING TO RADIO STATIONS
Tuning radio stations
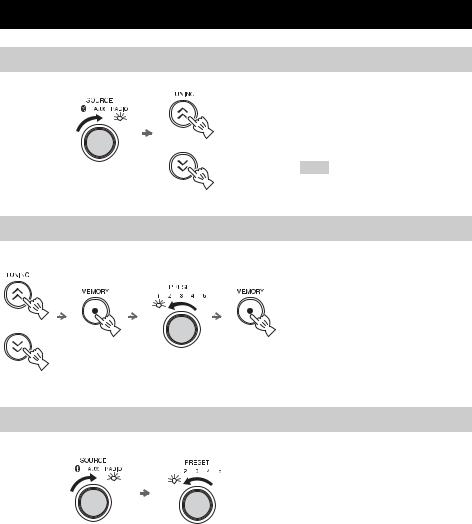
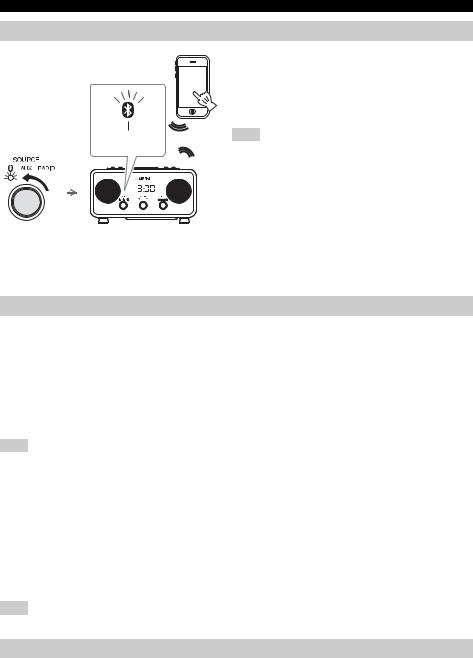
ASet SOURCE to RADIO.
BFor automatic tuning, press and hold TUNING.
For manual tuning, press TUNING repeatedly.
Note
If you tune to a station manually during FM reception, the sound is monaural.
Presetting radio stations
You can store up to five favorite FM radio stations with the preset function.
ATune into a favorite radio station.
BPress MEMORY.
CSelect the PRESET number you want to store to.
y
To cancel the preset, press TUNING again.
DPress MEMORY to complete.
Selecting preset radio stations
ASet SOURCE to RADIO.
BSelect the preset radio station with PRESET.
8 En
CHARGING WITH THE USB PORT
Connecting a portable device such as a smartphone or tablet computer to the USB port on this unit charges the connected device (power supply of up to 5V/2.1A is supported).
Prepare a USB cable that is compatible with the portable device and confirm that the device is supported for charging via USB connection before use. In addition, read the documentation provided with the portable device.
USB cable from portable device |
|
AConnect your portable device |
|
|
to the USB port on this unit |
|
|
using a commercially available |
|
|
USB cable. |
|
|
Charging automatically starts. |
|
|
BDisconnect the USB cable |
|
|
from the unit when charging |
|
|
completes. |
|
|
Check the charging status on the |
|
|
portable device. |
|
Top panel |
Notes |
|
|
• Charging may not be possible depending on the portable device.
• The USB port is for charging use only. The USB port does not support audio playback.
• In standby mode, power supply stops, and charging is not available.
• This unit does not function as memory storage.
• Yamaha will not be held responsible for any damage to the portable device or data loss occurred while using this unit.
• Disconnect the USB cable immediately after charging completes, since power continues to be supplied to the connected device.
LISTENING TO EXTERNAL SOURCES
Playing back external sources
■ Playing back
Rear panel
AConnect your portable audio device to AUX using a commercially available 3.5 mm (1/8 in) mini plug cable.
Note
Turn down the volume of this unit and your portable audio device before connection.
BSet SOURCE to AUX.
CStart playback on the connected portable audio device.
En
9 En
LISTENING TO MUSIC FROM YOUR Bluetooth COMPONENT
This unit provides Bluetooth functionality. You can enjoy wireless music playback from your Bluetooth component (smartphone, digital audio player, etc.). Please also refer to the owner’s manual of your Bluetooth component.
Installation
Install in a stable place, being careful of the following points:
•Do not place on top of steel or other metal plates.
•Do not cover with a cloth, etc.
•Install in the same room as the device with which signals are to be exchanged (Bluetooth profile A2DP compatible portable music player, mobile phone, etc.) within a direct, line-of-sight distance of 10 m (33 ft).
•Make sure there are no obstacles between this unit and the Bluetooth component.
Within 10 m (33 ft)
Pairing this unit with your Bluetooth component
Pairing is an operation that registers the communicating component (subsequently called “the other component”) with this unit. You will need to perform the pairing operation the first time you use your Bluetooth component with this unit, or if the pairing settings have been deleted. Once pairing has been completed, subsequent reconnection will be easy even after the Bluetooth connection is disconnected. If pairing is not successful, refer to the item “Bluetooth” in “TROUBLESHOOTING” ( P. 13).
y
•This unit can be paired with up to eight other components. When pairing with the ninth component has succeeded, pairing data for the component with the oldest connection date will be deleted.
•If this unit is connected via Bluetooth to another component, press  (Bluetooth) on this unit to disconnect the Bluetooth connection before you perform the pairing operation.
■ If using an iPhone/iPad/iPod touch
A B C
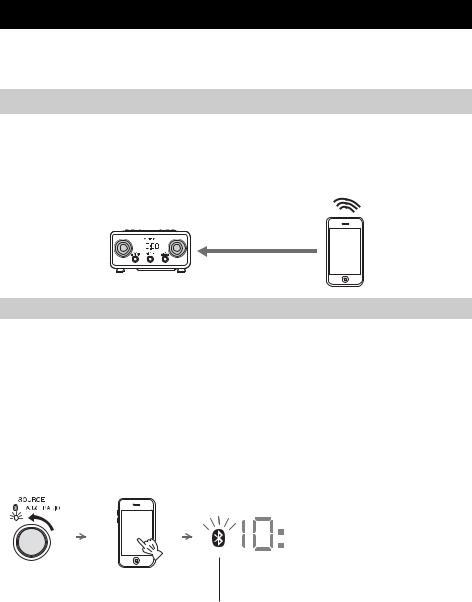
ASet SOURCE to  (Bluetooth).
BOn your iPhone/iPad/iPod touch, turn [Settings]  [Bluetooth] on.
The Bluetooth connection list will
appear in [Devices].
(This procedure or display may differ depending on the type of your iPhone/ iPad/iPod touch.)
CFrom the Bluetooth connection Bluetooth indicator list of the other component,
choose this unit (TSX-B72 Yamaha).
When pairing has been completed, your iPhone/iPad/iPod touch will indicate “Connected”.
The Bluetooth indicator on the front panel display of this unit will light.
10 En
LISTENING TO MUSIC FROM YOUR Bluetooth COMPONENT
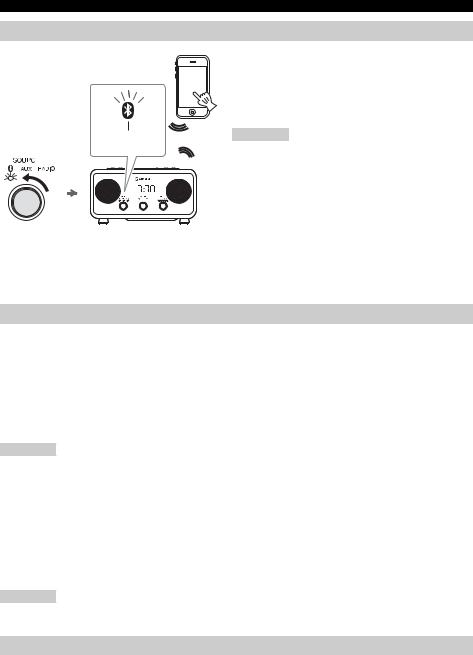
■ If using other than an iPhone/iPad/iPod touch
ASet SOURCE to  (Bluetooth).
BPerform Bluetooth pairing on the other component.
For details, refer to the owner’s manual of the other component.
CFrom the Bluetooth connection list of the other component, choose this unit (TSX-B72 Yamaha).
When pairing has been completed, the Bluetooth indicator on the front panel display of this unit will light for about 1 second.
y
If you are prompted for a passkey, enter the numerals “0000”.
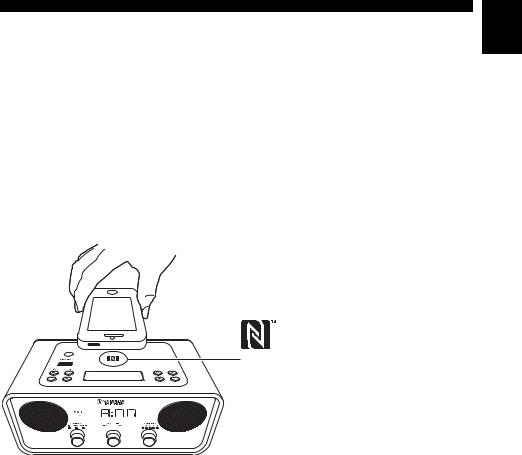
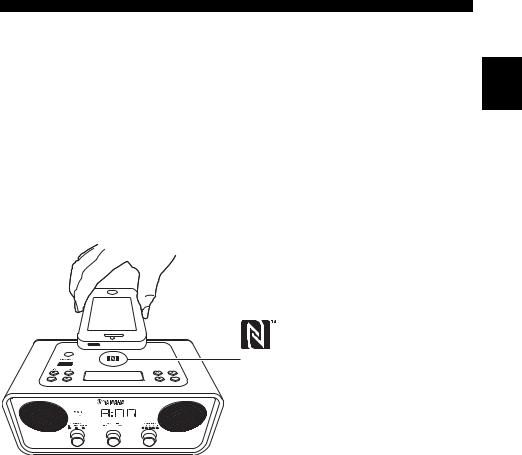
■ Easy pairing
For the smartphone with NFC (Near Field Communication) function, you can easily perform the pairing operation just by touching the NFC mark on this unit with your smartphone (you need to turn the system on and turn on the NFC function of the connecting component beforehand).
APress  to turn the system on.
BPerform the pairing operation at the connecting component (for details, please read the owner’s manual of the connecting component).
This unit is indicated as “TSX-B72 Yamaha” on the connecting
component.
NFC
mark y
• If you are prompted for a passkey, enter the numerals “0000”.
• If the connection fails, move the
smartphone slowly on the NFC mark.
• If the smartphone is equipped with a case, remove the case.
En
11 En
LISTENING TO MUSIC FROM YOUR Bluetooth COMPONENT
Listening to a Bluetooth component
Bluetooth indicator
ASet SOURCE to  (Bluetooth).
BConnect this unit and your other component via Bluetooth.
CPlay back music from your Bluetooth component.
Note
Take care that the volume setting of this unit is not too high. We recommend that you adjust the volume on the other component.
y
• While the system is turned off, if you connect a Bluetooth component to the unit and play back music, the system will automatically turn on.
•If you disconnect the Bluetooth connection from your other component while the playback source is set to Bluetooth, this unit will automatically turn off the system.
•If Bluetooth is selected as the playback source, this unit will automatically turn off the system when 60 minutes have elapsed without any Bluetooth connection nor any operation performed.
Connecting an already-paired component via Bluetooth
Once pairing with a component has been completed, connecting with that component via Bluetooth will be easy next time.
■ Connecting from this unit
Set SOURCE to  (Bluetooth).
The Bluetooth indicator will blink on the front panel display; this unit will search for the other component that was most recently connected via Bluetooth, and will then establish a connection (You must first turn on the Bluetooth setting of the other component).
When the Bluetooth connection has been established, the Bluetooth indicator will light.
Note
Yamaha does not guarantee all connections between this unit and Bluetooth component.
y
Pressing  (Bluetooth) on the top panel of this unit also establishes connection with the component that was most recently connected via Bluetooth; however, SOURCE is not automatically set to
  (Bluetooth).
■ Connecting from the other component
AIn the Bluetooth settings of the other component, turn Bluetooth on.
BFrom the Bluetooth connection list of the other component, choose this unit (TSX-B72 Yamaha).
The Bluetooth connection will be established, and the Bluetooth indicator on the front panel display of this unit will light.
Note
Bluetooth connections cannot be established from the other component when this unit is in standby mode. Turn the system on.
Disconnecting a Bluetooth connection
If any of the following operations are performed while a Bluetooth connection is being used, the Bluetooth connection will be disconnected.
•Press  (Bluetooth) on the top panel of this unit.
•Turn the system off.
•Turn off the Bluetooth setting of the other component.
12 En

TROUBLESHOOTING
Refer to the table below if the unit does not operate properly. If the problem you are experiencing is not listed below, or if the instruction below does not help, turn off the unit, disconnect the power cable, and contact the nearest authorized Yamaha dealer or service center.
General
Problem |
Cause |
Solution |
|
|
|
The speakers make no |
The volume may be set to the minimum |
Adjust the volume level. |
sound. |
level. |
|
|
The source may be incorrect. |
Select the correct source. |
|
|
|
Sound suddenly turns off. |
The sleep function ( P. 5) may be set. |
Turn on the system and play the source again. |
|
|
|
Sound is cracked/ |
Input source volume is excessive, or |
Adjust the volume with VOLUME, or adjust |
distorted or there is |
volume of this unit is excessive. |
the sound with the tone control of DTA |
abnormal noise. |
|
CONTROLLER. |
|
|
|
The unit does not operate |
The unit may have received a strong |
Set the system to off, and disconnect the |
properly. |
electrical shock such as lightning or |
power cable. Wait about 30 seconds, |
|
excessive static electricity, or power |
reconnect the power cable, and turn on the |
|
supply may have dropped. |
system. |
|
|
|
The system turns on but |
The power cable may be connected |
Make sure the power cable is plugged into the |
immediately shuts off. |
improperly. |
wall outlet firmly. |
|
The unit may have received a strong |
Set the system to off, and disconnect the |
|
electrical shock such as lightning or |
power cable. Wait about 30 seconds, |
|
excessive static electricity. |
reconnect the power cable, and turn on the |
|
|
system. |
|
|
|
A digital or high-frequency |
The unit may be placed too close to the |
Place the unit farther away from the |
equipment produces |
digital or high-frequency equipment. |
equipment. |
noises. |
|
|
|
|
|
The clock setting has been |
The unit is left more than one week after |
Plug the power cable into the wall outlet |
cleared. |
you disconnect the power cable from the |
firmly, and set the clock again ( P. 4). |
|
wall outlet. |
|
|
|
|
RADIO does not play at |
ALARM TYPE is set to BEEP. |
Set ALARM TYPE to SOURCE+BEEP or |
the alarm time. |
|
SOURCE ( P. 4). |
|
|
|
Clock flashes and the unit |
CLOCK on the rear panel is set to SET, |
Set CLOCK to LOCK. |
cannot be operated. |
and this unit is in clock setting mode. |
|
|
|
|
Radio reception
Problem |
Cause |
Solution |
|
|
|
Too much noise during |
The radio station you selected may be far |
Try manual tuning to improve the signal |
stereo broadcast. |
from your area, or the radio wave |
quality ( P. 8) or change the height or |
|
reception is weak in your area. |
direction of the antenna, or relocate the unit |
|
|
( P. 3). |
|
|
|
En
13 En

TROUBLESHOOTING
Bluetooth
Problem |
Cause |
Solution |
|
|
|
Cannot make this unit |
The other component does not support |
Perform pairing operations with a component |
paired with the other |
A2DP. |
which supports A2DP. |
component. |
|
|
A Bluetooth adaptor, etc. that you want to |
Use a Bluetooth adaptor, etc. whose password |
|
|
pair with this unit has a password other |
is “0000”. |
|
than “0000”. |
|
|
|
|
|
This unit and the other component are too |
Move the other component closer to this unit. |
|
far apart. |
|
|
|
|
|
There is a device (microwave oven, |
Move this unit away from the device that is |
|
wireless LAN, etc.) that outputs signals in |
emitting radio-frequency signals. |
|
the 2.4 GHz frequency band nearby. |
|
|
|
|
Cannot establish a |
This unit is not registered on the other |
Perform pairing operations again ( P. 10). |
Bluetooth connection. |
component’s Bluetooth connection list. |
|
|
|
|
No sound is produced or |
The Bluetooth connection of this unit with |
Perform Bluetooth connection operations |
the sound is interrupted |
the other component is disconnected. |
again ( P. 12). |
during playback. |
This unit and the other component are too |
Move the other component closer to this unit. |
|
far apart. |
|
|
|
|
|
There is a device (microwave oven, |
Move this unit away from the device that is |
|
wireless LAN, etc.) that outputs signals in |
emitting radio-frequency signals. |
|
the 2.4 GHz frequency band nearby. |
|
|
|
|
|
The other component’s Bluetooth |
Turn on the Bluetooth function of the other |
|
function is off. |
component. |
|
|
|
|
The other component is not set to send |
Check that the Bluetooth function of the other |
|
Bluetooth audio signals to this unit. |
component is set properly. |
|
|
|
|
The pairing setting of the other |
Set the pairing setting of the other component |
|
component is not set to this unit. |
to this unit. |
|
|
|
|
The other component’s volume is set to |
Increase the volume level. |
|
the minimum. |
|
|
|
|
USB port charging
Problem |
Cause |
Solution |
|
|
|
Cannot charge the |
An incompatible USB device is connected |
Turn off the system and reconnect the USB |
connected portable USB |
to the unit. Or the USB device is not |
device to the unit. If it does not resolve the |
device. |
connected to this unit properly. |
problem, the USB device is not chargeable |
|
|
with the unit. |
|
|
|
■ Resetting the unit
If the unit does not function properly, resetting the unit may solve the problem. To reset the unit, press and hold  for more than 10 seconds.
14 En

SPECIFICATIONS
■ PLAYER SECTION
AUX IN
• Input connector
............STEREO L/R: 3.5 mm (1/8 in) STEREO mini Jack
■ AMPLIFIER SECTION
• Maximum output power |
.......................... 4 W + 4 W + 8 W |
|
|
|
(6 Ω 1 kHz, 10% THD) |
• Driver unit |
...................4 cm (1 5/8 in) full-range driver × 2 |
|
|
5.5 cm (2 1/8 in) woofer + SR-Bass × 1 |
|
■ CHARGING CONNECTOR SECTION
• Connector type.................................................. |
USB type |
A |
• Output rating ......................................................... |
5 V/2.1 |
A |
■ NFC (Near Field Communication)
SECTION
• Supported model
.............................NFC-ready Android device Ver. 4.1, 4.2
*Some models may not work or be different in the required distance for connection.
■ Bluetooth SECTION |
|
■ GENERAL |
|
• Bluetooth version........................................... |
Ver. 2.1+EDR |
• Power Supply........................... |
AC 100 to 240 V, 50/60 Hz |
• Supported protocols..................................... |
A2DP, AVRCP |
• Power consumption ..................................................... |
22 W |
• Supported codecs................................................ |
SBC, AAC |
• System off consumption ............................................. |
1.9 W |
• Wireless output......................................... |
Bluetooth Class 2 |
• Standby consumption...................................... |
0.5 W or less |
• Maximum communication distance |
|
• Dimensions (W × H × D).................... |
210 × 110 × 144 mm |
...................................... 10 m (33 ft) (without obstructions) |
|
(8 1/4 × 4 3/8 × 5 5/8 in) |
|
• Supported contents protection .................. |
SCMS-T method |
• Weight......................................................... |
1.4 kg (3.1 lbs.) |
■ TUNER SECTION |
|
Specifications are subject to change without notice. |
|
• Tuning range |
|
||
|
|
|
|
FM.................................................... |
87.5 to 108.0 MHz |
|
|
En
Bluetooth
•Bluetooth is a technology for wireless communication between devices within an area of about 10 meters (33 ft) employing the 2.4 GHz frequency band, a band which can be used without a license.
•Bluetooth is a registered trademark of the Bluetooth SIG and is used by Yamaha in accordance with a license agreement.
Handling Bluetooth communications
•The 2.4 GHz band used by Bluetooth compatible devices is a radio band shared by many types of equipment. While Bluetooth compatible devices use a technology minimizing the influence of other components using the same radio band, such influence may reduce the speed or distance of communications and in some cases interrupt communications.
•The speed of signal transfer and the distance at which communication is possible differs according to the distance between the communicating devices, the presence of obstacles, radio wave conditions and the type of equipment.
•Yamaha does not guarantee all wireless connections between this unit and devices compatible with Bluetooth function.
■ For U.K. customers
If the socket outlets in the home are not suitable for the plug supplied with this appliance, it should be cut off and an appropriate 3 pin plug fitted. For details, refer to the instructions described below.
Note
The plug severed from the mains lead must be destroyed, as a plug with bared flexible cord is hazardous if engaged in a live socket outlet.
■Special Instructions for U.K. Model
IMPORTANT
THE WIRES IN MAINS LEAD ARE COLOURED IN ACCORDANCE WITH THE FOLLOWING CODE:
Blue: NEUTRAL Brown: LIVE
As the colours of the wires in the mains lead of this apparatus may not correspond with the coloured markings identifying the terminals in your plug, proceed as follows:
The wire which is coloured BLUE must be connected to the terminal which is marked with the letter N or coloured BLACK. The wire which is coloured BROWN must be connected to the terminal which is marked with the letter L or coloured RED.
Make sure that neither core is connected to the earth terminal of the three pin plug.
15 En
ATTENTION : VEUILLEZ LIRE CE QUI SUIT AVANT D’UTILISER
L’APPAREIL.
1Pour utiliser l’appareil au mieux de ses possibilités, lisez attentivement ce mode d’emploi. Conservez-le soigneusement pour référence.
2Installez cet appareil dans un endroit frais, bien aéré, sec et propre - à l’abri de la lumière du soleil, des sources de chaleur, des vibrations, des poussières, de l’humidité et du froid. Pour une aération correcte, tenez compte des distances minimales suivantes. Au-dessus : 15 cm
À l’arrière : 10 cm
Sur les côtés : 10 cm
3Placez l’appareil loin des équipements, moteurs et transformateurs électriques, pour éviter les ronflements parasites.
4N’exposez pas l’appareil à des variations brutales de température, ne le placez pas dans un environnement très humide (par exemple dans une pièce contenant un humidificateur) car cela peut entraîner la condensation d’humidité à l’intérieur de l’appareil qui elle-même peut être responsable de décharge électrique, d’incendie, de dommage à l’appareil ou de blessure corporelle.
5Evitez d’installer l’appareil dans un endroit où des objets peuvent tomber, ainsi que là où l’appareil pourrait être exposé à des éclaboussures ou des gouttes d’eau. Sur le dessus de l’appareil, ne placez pas :
–d’autres appareils qui peuvent endommager la surface de l’appareil ou provoquer sa décoloration.
–des objets se consumant (par exemple, une bougie) qui peuvent être responsables d’incendie, de dommage à l’appareil ou de blessure corporelle.
–des récipients contenant des liquides qui peuvent être à l’origine de décharge électrique ou de dommage à l’appareil.
6Ne couvrez pas l’appareil d’un journal, d’une nappe, d’un rideau, etc. car cela empêcherait l’évacuation de la chaleur. Toute augmentation de la température intérieure de l’appareil peut être responsable d’incendie, de dommage à l’appareil ou de blessure corporelle.
7Ne branchez pas la fiche du câble d’alimentation de l’appareil sur une prise secteur aussi longtemps que tous les raccordements n’ont pas été effectués.
8Ne pas faire fonctionner l’appareil à l’envers. Il risquerait de chauffer et d’être endommagé.
9N’exercez aucune force excessive sur les commutateurs, les boutons et les cordons.
10Pour débrancher la fiche du câble d’alimentation au niveau de la prise secteur, saisissez la fiche et ne tirez pas sur le cordon.
11Ne nettoyez pas l’appareil au moyen d’un solvant chimique, ce qui pourrait endommager la finition. Utilisez un chiffon sec et propre.
12N’alimentez l’appareil qu’à partir de la tension prescrite. Alimenter l’appareil sous une tension plus élevée est dangereux et peut être responsable d’incendie, de dommage à l’appareil ou de blessure corporelle. Yamaha ne saurait être tenue responsable
i Fr
des dommages résultant de l’alimentation de l’appareil sous une tension autre que celle prescrite.
13Pour empêcher tout dommage causé par les éclairs, déconnectez la câble d’alimentation et toute antenne extérieure de la prise murale pendant un orage.
14Ne tentez pas de modifier ni de réparer l’appareil. Consultez le service Yamaha compétent pour toute réparation qui serait requise. Le coffret de l’appareil ne doit jamais être ouvert, quelle que soit la raison.
15Si vous envisagez de ne pas vous servir de l’appareil pendant une longue période (par exemple, pendant les vacances), débranchez la fiche du câble d’alimentation au niveau de la prise secteur.
16Lisez la section intitulée « GUIDE DE DÉPANNAGE » où figurent une liste d’erreurs de manipulation communes avant de conclure que l’appareil présente une anomalie de fonctionnement.
17Avant de déplacer l’appareil, appuyez sur  pour éteindre le système puis débranchez la fiche du câble d’alimentation au niveau de la prise secteur.
18La condensation se forme lorsque la température ambiante change brusquement. En ce cas, débranchez la fiche du câble d’alimentation et laissez l’appareil reposer.
19La température de l’appareil peut augmenter en raison d’une utilisation prolongée. En ce cas, coupez l’alimentation de l’appareil et laissez-le au repos pour qu’il refroidisse.
20Installez cet appareil à proximité de la prise secteur et à un emplacement où la fiche du câble d’alimentation est facilement accessible.
21Utilisez l’adaptateur secteur fourni avec cet appareil. L’emploi de tout autre adaptateur secteur peut causer un incendie ou endommager l’appareil.
Cet appareil n’est pas déconnecté du secteur tant qu’il reste branché à la prise de courant, même si l’appareil en soi est éteint par la touche  . Dans cet état, l’appareil consomme une très faible quantité de courant.
AVERTISSEMENT
POUR RÉDUIRE LES RISQUES D’INCENDIE OU DE DÉCHARGE ÉLECTRIQUE, N’EXPOSEZ PAS CET APPAREIL À LA PLUIE OU À L’HUMIDITÉ.
Il y a un risque possible de création d’interférences, visibles sur les images en couleurs si cet appareil est placé à côté d’un téléviseur à tube cathodique (tube de Braun). Dans ce cas, éloigner l’unité du téléviseur.
Ne pas utiliser cet appareil à moins de 22 cm de personnes ayant un stimulateur cardiaque ou un défibrillateur.
Les ondes radio peuvent avoir une incidence sur les équipements électroniques médicaux.
N’utilisez pas cet appareil à proximité d’équipements médicaux ou à l’intérieur d’institutions médicales.
Information concernant la Collecte et le Traitement des déchets d’équipements électriques et électroniques
Le symbole sur les produits, l’emballage et/ou les documents joints signifie que les produits électriques ou électroniques usagés ne doivent pas être mélangés avec les déchets domestiques habituels.
Pour un traitement, une récupération et un recyclage appropriés des déchets d’équipements électriques et électroniques, veuillez les déposer aux points de collecte prévus à cet effet, conformément à la réglementation nationale et aux Directives 2002/96/EC.
En vous débarrassant correctement des déchets d’équipements électriques et électroniques, vous contribuerez à la sauvegarde de précieuses ressources et à la prévention de potentiels effets négatifs sur la santé humaine qui pourraient advenir lors d’un traitement inapproprié des déchets.
Pour plus d’informations à propos de la collecte et du recyclage des déchets d’équipements électriques et électroniques, veuillez contacter votre municipalité, votre service de traitement des déchets ou le point de vente où vous avez acheté les produits.
[Information sur le traitement dans d’autres pays en dehors de l’Union Européenne]
Ce symbole est seulement valables dans l’Union Européenne. Si vous souhaitez vous débarrasser de déchets d’équipements électriques et électroniques, veuillez contacter les autorités locales ou votre fournisseur et demander la méthode de traitement appropriée.
TABLE DES MATIÈRES |
|
NOM ET FONCTION DES PIÈCES......................................................................................................... |
2 |
FONCTIONS DE BASE.............................................................................................................................. |
4 |
UTILISATION DES FONCTIONS UTILES............................................................................................ |
6 |
ÉCOUTE DES STATIONS RADIO .......................................................................................................... |
8 |
CHARGE AVEC LE PORT USB .............................................................................................................. |
9 |
ÉCOUTE DE SOURCES EXTERNES...................................................................................................... |
9 |
ÉCOUTE DE MUSIQUE AVEC VOTRE PÉRIPHÉRIQUE Bluetooth ............................................. |
10 |
GUIDE DE DÉPANNAGE ....................................................................................................................... |
13 |
CARACTÉRISTIQUES TECHNIQUES ................................................................................................ |
15 |
■Caractéristiques
–Lecture de qualité supérieure du smartphone/de la tablette compatible Bluetooth et des dispositifs radio et externes.
Appariement par simple contact avec la technologie NFC.
–Son grave ferme et son stéréo spacieux depuis un haut-parleur à 2.1 canaux (haut-parleur d’aigus × 2, haut-parleur de graves × 1), SR-Bass™ (technologie Yamaha Swing Radiator Bass) et DSP dans un appareil compact.
–Interface à boutons facile et intuitive pour l’utilisateur avec DEL guides et molettes.
–Utilisation pratique activée par un smartphone iPhone/Android en guise de télécommande. Prend en charge l’application dédiée « DTA CONTROLLER ».
–Port USB pour l’alimentation.
•Remarque indique les précautions d’utilisation de l’appareil et ses limitations fonctionnelles.
•y donne des explications supplémentaires pour une meilleure utilisation.
■ Accessoires fournis
Adaptateur secteur |
Câble d’alimentation |
Capuchon USB |
Fr
(15 V CC, 2,56 A, numéro de modèle : EADP-38EB A)
Remarque
Tenez le capuchon USB hors de portée des enfants afin d’éviter toute ingestion accidentelle.
1 Fr

NOM ET FONCTION DES PIÈCES
■ Panneau avant
|
|
|
|
|
|
|
|
|
|
|
|
|
|
|
|
|
|
|
|
|
|
|
|
|
|
|
|
|
|
|
|
|
|
|
|
|
|
|
|
|
|
|
|
|
|
|
|
|
|
|
|
|
|
|
|
|
|
|
|
|
|
|
|
|
|
|
|
|
|
|
|
|
|
|
|
|
|
|
|
|
|
|
|
|
|
|
|
1 Afficheur |
|
4 PRESET : Mémorise jusqu’à cinq stations radio FM |
|||||||||||||||||||
2 SOURCE : Bluetooth, AUX, RADIO |
|
|
|
favorites ( P. 8). |
|||||||||||||||||
3 VOLUME : Réglage du volume |
|
|
|
|
|
|
|
|
|
|
|
|
|
||||||||
■ Panneau supérieur |
|
|
|
|
|
|
|
|
|
|
|
|
|
||||||||
|
|
|
|
|
|
|
|
|
|
|
|
|
|
|
|
|
|
|
|
|
|
|
|
|
|
|
|
|
|
|
|
|
|
|
|
|
|
|
|
|
|
|
|
|
|
|
|
|
|
|
|
|
|
|
|
|
|
|
|
|
|
|
|
|
|
|
|
|
|
|
|
|
|
|
|
|
|
|
|
|
|
|
|
|
|
|
|
|
|
|
|
|
|
|
|
|
|
|
|
|
|
|
|
|
|
|
|
|
|
|
|
|
|
|
|
|
|
|
|
|
|
|
|
|
|
|
|
|
|
|
|
|
|
|
|
|
|
|
|
|
|
|
|
|
|
|
|
|
|
|
|
|
|
|
|
|
|
|
|
|
|
|
|
|
|
|
|
|
|
|
|
|
|
|
|
5Capteur d’illumination : Mesure le niveau
d’illumination ambiante. Ne couvrez pas ce capteur lorsque DIMMER (d) est réglé sur A (auto).
6CHARGING : Alimente en 5 V/2,1 A un dispositif portable, comme un smartphone, lorsque celui-ci est branché avec un câble USB ( P. 9).
7 (Bluetooth) : Appuyez sur cette touche :
–pour mettre fin à la connexion Bluetooth une fois celle-ci établie ( P. 12).
–pour établir la connexion avec le dernier périphérique connecté via Bluetooth ( P. 12).
8  : Appuyez pour allumer/éteindre le système. L’heure est affichée même lorsque le système est éteint.
y
•Appuyez et maintenez  enfoncé pendant plus de 3 secondes pour mettre le système en mode veille. Toutes les informations de l’afficheur ne s’affichent
pas en mode veille. Cela peut réduire la consommation
d’électricité. Pour annuler le mode veille, appuyez sur  .
.
•Si le système est éteint/en mode veille, la fonction d’alarme est disponible.
2 Fr
9 ALARM : Alarme activée/désactivée ( P. 5)
0 SET : Paramètres de l’alarme ( P. 4)
A Repère NFC : Facilite l’appariement avec la technologie NFC ( P. 11).
BSNOOZE/SLEEP ( P. 5)
CMEMORY ( P. 8)
■Panneau arrière
15V 


 : Branchez l’adaptateur
  secteur et le câble d’alimentation fournis.
Commutateur ALARM TYPE ( P. 4) 
Commutateur CLOCK ( P. 4)
■ Déploiement de l’antenne tige
Remarques
•Pour écouter la bande FM, déployez l’antenne.
•Si la réception FM est mauvaise, changez la hauteur, le sens ou l’emplacement de l’appareil.
Antenne tige FM
NOM ET FONCTION DES PIÈCES
DDIMMER : Règle la luminosité du panneau supérieur et du panneau avant
A (auto)  3 (le plus lumineux)
  2
2  1 (le plus sombre)
  retour à A
y
Lorsqu’elle est réglée sur A (auto), la luminosité du panneau supérieur et du panneau avant s’ajuste automatiquement en fonction de la luminosité de la pièce.
E TUNING ( P. 8)
 Antenne tige FM
(voir ci-dessous.)
 AUX : Branchez un dispositif audio externe. ( P. 9)
Fr
3 Fr

FONCTIONS DE BASE
Réglage de l’horloge
Panneau arrière
L’afficheur clignote.
ARéglez CLOCK sur SET.
BRéglez l’heure avec TUNING. CRéglez CLOCK sur LOCK.
Remarque
Les paramètres de l’heure se perdent environ une semaine après avoir débranché l’appareil.
Réglage de l’alarme
Cet appareil peut lire la radio et/ou faire retentir le bip à l’heure que vous avez définie.
■ Réglage de l’heure et du son
L’indicateur d’alarme (

 ) clignote et l’afficheur indique le mode d’alarme.
AAppuyez sur SET.
BRéglez l’heure d’alarme avec
TUNING.
Une alarme retentira une seule fois à l’heure spécifiée.
|
Panneau arrière |
|
|
|
|
CRéglez ALARM TYPE. |
|
|
|
|
|
|
• SOURCE+BEEP : radio (lue |
||
|
|
|
|
|
|
||
|
|
|
|
|
|
jusqu’à 3 minutes avant l’heure |
|
|
|
|
|
|
|
||
|
|
|
|
|
|
d’alarme) et bip sonore (lu à l’heure |
|
|
|
|
|
|
|
d’alarme) |
|
|
|
|
|
|
|
• SOURCE : cet appareil lit la station |
|
|
|
|
|
|
|
radio que vous écoutiez la dernière |
|
|
|
|
|
|
|
fois. |
|
|
|
|
|
|
|
• BEEP : uniquement bip sonore |
|
|
|
|
|
|
|
DRéglez le volume de l’alarme. |
|
|
|
|
|
|
|
||
|
|
|
|
|
|
EAppuyez sur SET. |
|
|
|
|
|
|
|
L’alarme est réglée et l’indicateur |
|
|
|
|
|
|
|
d’alarme ( |
) s’allume. |
4 Fr

FONCTIONS DE BASE
■ Activer/désactiver l’alarme
Appuyez sur ALARM.
Lorsque l’alarme est activée, l’indicateur d’alarme (

 ) s’allume et l’heure d’alarme s’affiche pendant un moment.
Opérations durant la lecture du son d’alarme
À l’heure sélectionnée, le son d’alarme est lu. Pendant la lecture, les opérations suivantes sont disponibles.
■ Utilisation de la fonction snooze
Appuyez sur SNOOZE/SLEEP.
Le son de l’alarme s’arrête puis reprend au bout de 5 minutes.
y
• Si vous avez choisi SOURCE+BEEP comme type d’alarme, vous pouvez appuyer une fois sur SNOOZE/SLEEP pour arrêter le son d’alarme, et deux fois pour couper la source audio. Cinq minutes après l’arrêt de la source audio, l’appareil reprend la lecture de cette source en augmentant progressivement le volume et la sonnerie retentit de nouveau.
• Lorsque la fonction snooze est activée, le témoin d’alarme clignote.
■ Arrêter l’alarme
Appuyez sur ALARM ou  .
.
y
• Si vous n’arrêtez pas l’alarme, celle-ci s’arrête automatiquement au bout de 60 minutes.
• Lorsque vous arrêtez l’alarme, le réglage de l’heure d’alarme, etc., est enregistré afin de simplifier les prochaines utilisations.
Réglage de la mise en veille
Vous pouvez régler la durée devant s’écouler avant la mise hors tension automatique du système lorsque la mise en veille est activée.
L’indicateur de mise en veille Appuyez plusieurs fois ( ) et l’afficheur clignotent.
de suite.
Sélectionnez l’heure de mise en veille.
Vous pouvez sélectionner 30, 60, 90 ou 120 minutes.
Lorsque la fonction de mise en veille est activée, l’indicateur de mise en veille ( ) s’allume.
y
Pour annuler la fonction de mise en veille, appuyez sur SNOOZE/SLEEP.
Fr
5 Fr
UTILISATION DES FONCTIONS UTILES
DTA CONTROLLER
Lorsque l’application DTA CONTROLLER est installée sur votre smartphone ou tablette, vous pouvez utiliser les fonctions plus pratiques des systèmes audio de bureau Yamaha.
Pour télécharger l’application ou obtenir les dernières informations sur celle-ci, accédez à l’App Store ou à Google Play au moyen des codes QR répertoriés ci-dessous.
iPhone, iPad, iPod touch |
Android™ |
http://itunes.com/app/dtacontroller https://play.google.com/store/apps/ details?id=com.yamaha.av.dtacontr oller
(États-Unis) https://itunes.apple.com/us/app/dta- controller-us/id549333293?mt=8
Remarques
•Si vous ne parvenez pas à accéder aux informations ci-dessus, recherchez « DTA CONTROLLER » sur l’App Store ou sur Google Play.
•iPad, iPhone et iPod touch sont des marques d’Apple Inc., déposées aux États-Unis et dans d’autres pays.
•Android et Google Play sont des marques de commerce de Google, Inc.
6 Fr
UTILISATION DES FONCTIONS UTILES
Réglage de l’alarme avec DTA CONTROLLER
Lorsque vous avez défini Weekly Alarm avec « DTA CONTROLLER », vous pouvez sélectionner le mode Weekly Alarm sur l’afficheur de sélection du mode d’alarme de cet appareil.
One Day Alarm
Weekly Alarm
1d (mode One Day Alarm) :
L’alarme retentit une seule fois à l’heure spécifiée.
7d (mode Weekly Alarm) :
L’alarme retentit chaque jour de la semaine à l’heure spécifiée (réglable uniquement avec le « DTA CONTROLLER »).
Remarque
Le mode Weekly Alarm est indisponible lorsque tous les jours du réglage Weekly Alarm sont désactivés. Activez n’importe quel jour du réglage Weekly Alarm.
AAppuyez sur SET.
BRéglez le mode d’alarme avec
TUNING.
One Day Alarm
Weekly Alarm
L’indicateur d’alarme (

 ) clignote et l’afficheur indique le mode d’alarme.
CAppuyez sur SET.
•Si vous avez choisi le mode Weekly Alarm, alors le réglage de l’alarme est terminé. L’indicateur d’alarme (

 ) et l’indicateur de Weekly Alarm (

 ) s’allument.
DRéglez l’heure d’alarme avec
TUNING.
ERéglez ALARM TYPE.
Panneau arrière
FRéglez le volume de l’alarme. GAppuyez sur SET.
L’alarme est réglée et l’indicateur d’alarme (

 ) s’allume.
y
Le réglage de l’alarme est sauvegardé même si l’alarme est désactivée.
Si vous activez à nouveau l’alarme en appuyant sur ALARM, l’alarme retentit conformément aux réglages d’alarme précédents.
Fr
7 Fr
ÉCOUTE DES STATIONS RADIO
Syntonisation sur les stations radio
ARéglez SOURCE sur RADIO.
BPour une syntonisation automatique, appuyez et maintenez TUNING enfoncé.
Pour une syntonisation manuelle, appuyez sur TUNING plusieurs fois de suite.
Remarque
Si vous syntonisez manuellement sur une station pendant la réception FM, le son est en mono.
Présélection des stations radio
Vous pouvez mémoriser jusqu’à cinq stations radio FM favorites à l’aide de la fonction de présélection.
AChoisissez l’une de vos stations radio préférées.
BAppuyez sur MEMORY.
CSélectionnez le numéro PRESET sur lequel vous souhaitez mémoriser.
y
Pour annuler la présélection, appuyez à nouveau sur TUNING.
DAppuyez sur MEMORY pour terminer.
Sélection d’une station radio présélectionnée
ARéglez SOURCE sur RADIO.
BSélectionnez la station radio présélectionnée avec
PRESET.
8 Fr

CHARGE AVEC LE PORT USB
La connexion d’un dispositif portable tel qu’un smartphone ou une tablette au port USB de cet appareil permet de charger le dispositif raccordé (prise en charge d’une alimentation allant jusqu’à 5 V/2,1 A).
Préparez un câble USB compatible avec le dispositif portable et vérifiez que ce dernier est compatible avec la charge via le raccordement USB avant de l’utiliser. Par ailleurs, lisez la documentation accompagnant le dispositif portable.
Câble USB du dispositif portable
Panneau supérieur
ARaccordez votre dispositif portable au port USB de cet appareil en utilisant un câble USB disponible dans le commerce.
La charge commence automatiquement.
BDébranchez le câble USB de l’appareil une fois la charge terminée.
Vérifiez l’état de charge sur le dispositif portable.
Remarques
•Il se peut que la charge soit impossible selon le dispositif portable.
•Le port USB est uniquement destiné à la charge. Le port USB ne prend pas en charge la lecture audio.
•En mode veille, l’alimentation s’arrête et la charge est indisponible.
•Cet appareil ne fonctionne pas comme une mémoire de stockage.
•Yamaha ne saurait être tenue responsable des dommages au dispositif portable ou des pertes de données survenant lors de l’utilisation de cet appareil.
•Débranchez immédiatement le câble USB une fois la charge terminée, car le dispositif raccordé continue d’être alimenté.
ÉCOUTE DE SOURCES EXTERNES
Lecture de sources externes
■ Lecture
Panneau arrière
ARaccordez votre dispositif audio portable à AUX à l’aide d’un câble à mini fiche de 3,5 mm disponible dans le commerce.
Remarque
Baissez le volume de cet appareil et de votre dispositif audio portable avant le raccordement.
BRéglez SOURCE sur AUX.
CCommencez la lecture sur le dispositif audio portable raccordé.
Fr
9 Fr

ÉCOUTE DE MUSIQUE AVEC VOTRE PÉRIPHÉRIQUE Bluetooth
Cet appareil est doté d’une fonctionnalité Bluetooth. Vous pouvez écouter de la musique sans fil à partir de votre périphérique Bluetooth (smartphone, lecteur audio numérique, etc.). Voir également le mode d’emploi de votre périphérique Bluetooth.
Installation
Installez cet appareil à un emplacement stable, en vérifiant les points suivants :
•Ne posez pas cet appareil sur de l’acier ou d’autres plaques métalliques.
•Ne recouvrez pas cet appareil d’un tissu, etc.
•Installez cet appareil dans la même pièce que le dispositif avec lequel les signaux doivent être échangés (téléphone portable, lecteur de musique portable compatible avec le profil Bluetooth A2DP, etc.) à une distance de ligne de visée de 10 m au maximum.
•Assurez-vous qu’il n’y a aucun obstacle entre cet appareil et le périphérique Bluetooth.
10 m au maximum
Appariement de cet appareil avec votre périphérique Bluetooth
L’appariement est l’opération d’enregistrer le périphérique (ci-après désigné « l’autre périphérique ») qui communique avec cet appareil. Vous devez effectuer l’opération d’appariement lors de la première utilisation de votre périphérique Bluetooth avec cet appareil ou en cas de suppression des réglages d’appariement. Une fois l’appariement terminé, la reconnexion ultérieure est facile, même après la déconnexion de Bluetooth. En cas d’échec de l’appariement, voir l’option « Bluetooth » sous « GUIDE DE DÉPANNAGE » ( P. 13).
y
•Cet appareil peut être apparié avec huit autres périphériques au maximum. Une fois l’appariement avec le neuvième périphérique réussi, les données d’appariement du périphérique avec la plus ancienne date de connexion sont supprimées.
•Si cet appareil est connecté via Bluetooth à un autre périphérique, appuyez sur  (Bluetooth) sur cet appareil pour déconnecter Bluetooth avant d’effectuer l’opération d’appariement.
■ En cas d’utilisation d’un iPhone/iPad/iPod touch
A |
B |
C |
ARéglez SOURCE sur |
|
(Bluetooth). |
||||
|
|
|
||
|
|
|
BSur votre iPhone/iPad/iPod |
|
|
|
|
touch, activez [Réglages] |
|
|
|
|
[Bluetooth]. |
|
|
|
|
La liste des connexions Bluetooth |
|
|
|
|
apparaît sous [Appareils]. |
|
|
|
|
(Cette procédure ou l’affichage peut |
|
|
|
|
varier selon votre type d’iPhone/iPad/ |
|
|
|
|
iPod touch.) |
|
|
|
Indicateur Bluetooth CDans la liste des connexions |
||
|
|
|
Bluetooth de l’autre |
|
|
|
|
périphérique, choisissez cet |
|
|
|
|
appareil (TSX-B72 Yamaha). |
|
|
|
|
Une fois l’appariement terminé, votre |
|
|
|
|
iPhone/iPad/iPod touch, indique |
|
|
|
|
« Connecté ». |
|
|
|
|
L’indicateur Bluetooth de l’afficheur |
|
|
|
|
de cet appareil s’allume. |
|
10 Fr
ÉCOUTE DE MUSIQUE AVEC VOTRE PÉRIPHÉRIQUE Bluetooth
■ En cas d’utilisation d’un dispositif autre qu’un iPhone/iPad/iPod touch
ARéglez SOURCE sur  (Bluetooth).
BEffectuez l’appariement Bluetooth sur l’autre périphérique.
Pour plus de détails, voir le mode d’emploi de l’autre périphérique.
CDans la liste des connexions Bluetooth de l’autre périphérique, choisissez cet appareil (TSX-B72 Yamaha).
Une fois l’appariement terminé, l’indicateur Bluetooth de l’afficheur de cet appareil s’allume pendant environ 1 seconde.
y
Si l’on vous demande un code, saisissez les chiffres « 0000 ».
■ Appariement facile
Pour le smartphone doté de la fonction NFC (Near Field Communication), vous pouvez facilement effectuer l’opération d’appariement en touchant le repère NFC de cet appareil avec votre smartphone (au préalable, vous devez mettre le système sous tension et activer la fonction NFC du périphérique de connexion).
AAppuyez sur  pour mettre le système sous tension.
BEffectuez l’opération d’appariement sur le périphérique de connexion (pour plus de détails, lire le mode d’emploi du périphérique à connecter).
Repère |
Sur le périphérique de connexion, cet |
appareil est désigné comme suit : |
|
NFC |
« TSX-B72 Yamaha ». |
|
y
• Si l’on vous demande un code, saisissez les chiffres « 0000 ».
• En cas d’échec de la connexion, déplacez lentement le smartphone sur le repère NFC.
• Si le smartphone est équipé d’un étui, retirez ce dernier.
Fr
11 Fr
ÉCOUTE DE MUSIQUE AVEC VOTRE PÉRIPHÉRIQUE Bluetooth
Écoute d’un périphérique Bluetooth
Indicateur
Bluetooth
ARéglez SOURCE sur  (Bluetooth).
BConnectez cet appareil et votre autre périphérique via Bluetooth.
CÉcoutez de la musique avec votre périphérique Bluetooth.
Remarque
Veillez à ce que le volume de cet appareil ne soit pas réglé trop fort. Nous vous recommandons de régler le volume sur l’autre périphérique.
y
• Même si le système est hors tension, si vous connectez un périphérique Bluetooth à cet appareil et écoutez de la musique, le système se met automatiquement sous tension.
•Si vous déconnectez Bluetooth de votre autre périphérique alors que la source de lecture est réglée sur Bluetooth, cet appareil met automatiquement le système hors tension.
•Si Bluetooth est sélectionné comme source de lecture, cet appareil se met automatiquement le système hors tension lorsque 60 minutes se sont écoulées sans aucune connexion Bluetooth ni aucune opération réalisée.
Connexion d’un périphérique déjà apparié via Bluetooth
Une fois l’appariement avec un périphérique terminé, la reconnexion ultérieure avec ce périphérique via Bluetooth est facile.
■ Connexion à partir de cet appareil
Réglez SOURCE sur  (Bluetooth).
L’indicateur Bluetooth clignote sur l’afficheur, cet appareil recherche l’autre périphérique le plus récemment connecté via Bluetooth, puis établit une connexion (vous devez d’abord activer le réglage Bluetooth de l’autre périphérique).
Une fois la connexion Bluetooth établie, l’indicateur Bluetooth s’allume.
Remarque
Yamaha ne garantit pas la réussite de toutes les connexions entre cet appareil et le périphérique Bluetooth.
y
Une pression sur  (Bluetooth) sur le panneau supérieur de cet appareil permet également d’établir la connexion avec le dernier périphérique connecté via Bluetooth ; néanmoins, SOURCE n’est pas réglé automatiquement sur
  (Bluetooth).
■ Connexion à partir de l’autre périphérique
ADans les réglages Bluetooth de l’autre périphérique, activez Bluetooth.
BDans la liste des connexions Bluetooth de l’autre périphérique, choisissez cet appareil (TSX-B72 Yamaha).
La connexion Bluetooth est établie et l’indicateur Bluetooth de l’afficheur de cet appareil s’allume.
Remarque
Il est impossible d’établir des connexions Bluetooth à partir de l’autre périphérique lorsque cet appareil est en mode veille. Mettez le système sous tension.
Déconnexion de Bluetooth
Si l’une des opérations suivantes est exécutée pendant l’utilisation d’une connexion Bluetooth, Bluetooth se déconnecte.
•Appuyez sur  (Bluetooth) sur le panneau supérieur de cet appareil.
•Mettez le système hors tension.
•Désactivez le réglage Bluetooth de l’autre périphérique.
12 Fr
Loading...