


FTM-350 SERIES
APRS MANUAL
The FTM-350 series transceiver is equipped with a 1200/ 9600bps AX.25 Data Modem to enable APRS® (Automatic Packet Reporting System) operation. The Automatic Packet Reporting System (APRS®) is a software program and registered trademark of Bob Bruninga, WB4APR.
VERTEX STANDARD CO., LTD.
4-8-8 Nakameguro, Meguro-Ku, Tokyo 153-8644, Japan
VERTEX STANDARD
US Headquarters
10900 Walker Street, Cypress, CA 90630, U.S.A.
YAESU UK LTD.
Unit 12, Sun Valley Business Park, Winnall Close
Winchester, Hampshire, SO23 0LB, U.K.
VERTEX STANDARD HK LTD.
Unit 5, 20/F., Seaview Centre, 139-141 Hoi Bun Road,
Kwun Tong, Kowloon, Hong Kong
VERTEX STANDARD (AUSTRALIA) PTY., LTD.
Normanby Business Park, Unit 14/45 Normanby Road
Notting Hill 3168, Victoria, Australia
FTM-350 SERIES APRS® MANUAL |
1 |

PREPARATIONS
Before performing any APRS® operations, set your callsign, SSID (Secondary Station Identifier), and symbol into the FTM-350, and activate the AX.25 Data Modem via the Set Mode.
1.Press the [SET] key to enter the Set Mode.
2.Rotate the left side [DIAL] knob to select “APRS/PKT” group, then press the left side [DIAL] knob.
3.Rotate the left side [DIAL] knob to select Set Mode item “E28 MY CALLSIGN”, then press the left side [DIAL] knob twice.
4.Rotate the left side [DIAL] knob, or press
one of the microphone keypad buttons, to select the first letter or number in your callsign.
5.After selecting the first digit of the DTMF string, using the left side [DIAL] knob, press the [ ] key to move to the next digit.
6.Repeat steps 4 and 5 as many times as necessary to complete your call sign.
7.You may backspace the cursor by pressing the [ ] key.
8.When you have completed entering your callsign, press the [ ] key to move to the SSID slot.
9.Rotate the left side [DIAL] knob to select the SSID, then press the [ ] key to save the new setting.
10.Press the [ESC] key to exit from Set Mode item “E28 MY CALLSIGN”, then rotate the left side [DIAL] knob to select Set Mode item “E31 MY SYMBOL”.
11.Press the left side [DIAL] knob, then select the desired preset symbol by pressing one of the [ICON1] ~ [ICON3] or [USER] keys.
To choose another icon, rotate the left side [DIAL] knob to select the desired symbol after having pressed either key. You may choose 1 of 46 different symbols.
12.Press the [ESC] key to save the new setting and exit from Set Mode item “E31 MY SYMBOL”, then rotate the left side [DIAL] knob to select Set Mode item “E32 POSITION COMMENT”.
13.Press the left side [DIAL] knob, then rotate the left side [DIAL] knob to select the desired comment. You may choose 1 of 15 different comments.
14.Press the [ESC] key to save the new setting and exit from Set Mode item “E32 POSITION COMMENT”, then rotate the left side [DIAL] knob to select Set Mode item “E29 MY POSITION SET”.
15.Press the left side [DIAL] knob. When the optional GPS Antenna Unit is connected to the transceiver, select “GPS” by rotating the
2 |
FTM-350 SERIES APRS® MANUAL |
PREPARATIONS
left side [DIAL] knob then press the left side [DIAL] knob to save the new setting, and then skip to step 19. Otherwise, select “MANUAL” by rotating the left side [DIAL] knob and advance to the next step.
Note: You may choose your position from the “Point” memories stored on the GPS Point List.
16.Press the [ESC] key to save the new setting and exit from Set Mode item “E29 MY POSITION SET”, then rotate the left side [DIAL] knob to select Set Mode item “E30 MY POSITION”.
17.Press the left side [DIAL] knob twice, then enter your position (Longitude/Latitude) by using the left side [DIAL] knob (select the number/character) and [ ] / [ ] key (to move the cursor).
18.Press the [ENT] key to save the new setting, then press the [ESC] key to exit from Set Mode item “E30 MY POSITION”.
19.Rotate the left side [DIAL] knob to select Set Mode item “E05 APRS MODEM”.
20.Press the left side [DIAL] knob, then rotate the left side [DIAL] knob to select “ON”.
21.Press the left side [DIAL] knob to save the new setting, then press the [ESC] key twice to exit from Set Mode.
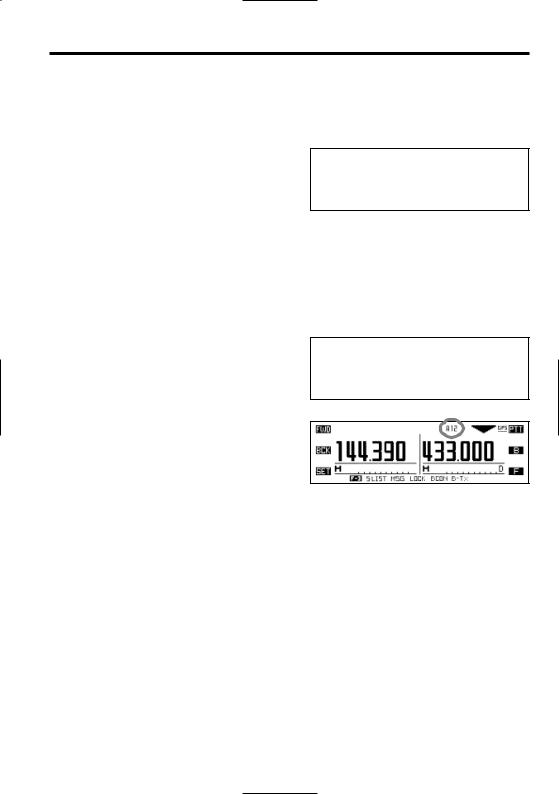
When the APRS modem is activated, an “A12” icon appears above the “Right” band frequency display.
The FTM-350 provides many convenient functions for APRS operation. Refer to the “APRS/ PKT Set Mode” chapter beginning with page 20 for details.
|
|
SSID LIST |
|
|
SSID |
DETAILS |
|
|
Non |
Home Station, Home Station IGate |
|
|
-1 |
Digipeater |
|
|
-2 |
Digipeater |
|
|
-3 |
Digipeater |
|
|
-4 |
HF to VHF Gateway |
|
|
-5 |
IGate (not Home Station) |
|
|
-6 |
Operation via Satellite |
|
|
-7 |
Hand-held Transceiver, such as VX-8R |
|
|
-8 |
Maritime Mobile |
|
|
-9 |
Mobile Transceiver, such as FTM-350R |
|
|
-10 |
Operation via Internet |
|
|
-11 |
APRS touch-tone User (and the Occasional Ballooes) |
|
|
-12 |
Portable Units, such as Laptops, Camp Sites etc. |
|
|
-13 |
Not Used |
|
|
-14 |
Trackers |
|
|
-15 |
HF Operation |
|
|
|
|
|
FTM-350 SERIES APRS® MANUAL |
3 |
||
RECEIVING AN APRS® BEACON
1.Set the “Sub” band to the APRS frequency. 144.390MHz is generally used in North America. If you don’t know the APRS frequency of your country, ask your dealer. Note: In the factory default, the APRS operation uses the “Sub” band (The “A” icon will appear at the right side of the “Sub” band S/PO meter). You may change the APRS operating band via Set Mode item “E16 DATA BAND SELECT” in the “APRS/PKT” group.
2.When another stations APRS beacon is received, the APRS pop-up window opens and an APRS alert beep is heard. After ten seconds, the APRS pop-up window closes automatically.
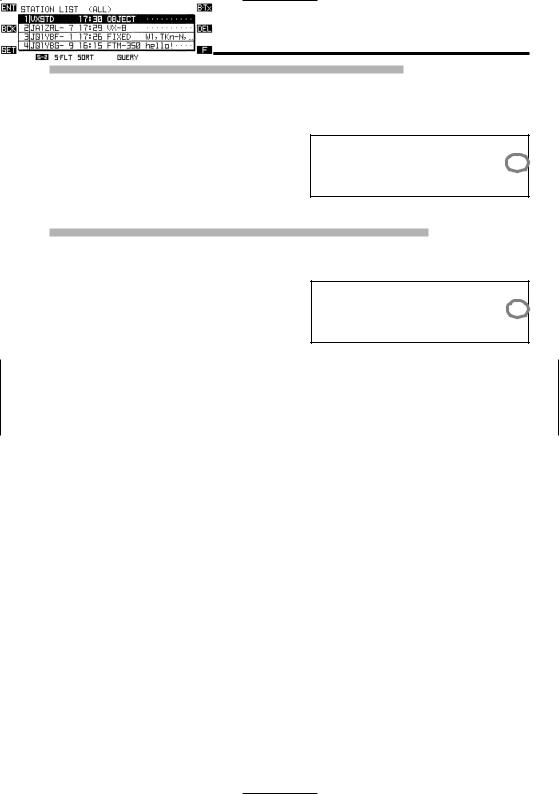
3.To confirm the details of the received beacon, press the [F] key repeatedly, until the [SMART FUNCTION] key’s category
changes to “F-3” mode, if necessary, then press the [SyLIST] key to open the “Station List” window.
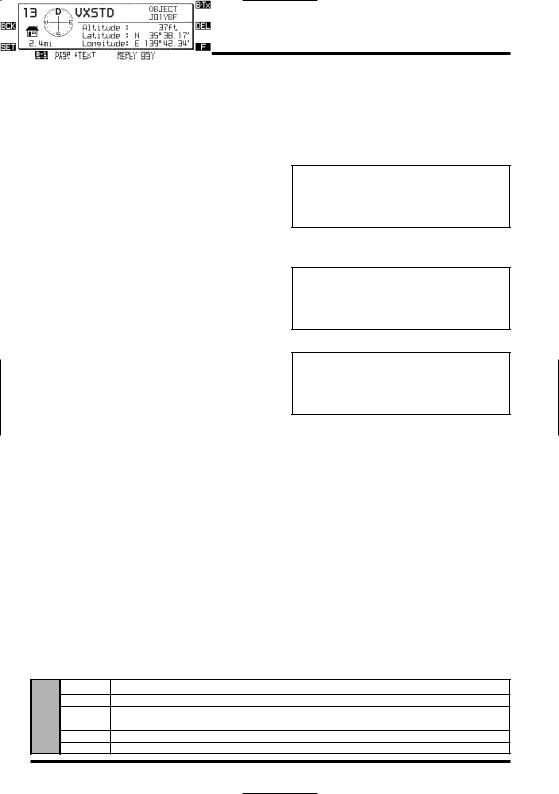
4.Rotate the left side [DIAL] knob to select the desired station, then press the [ENT] key to display its received data.
5.Rotate the left side [DIAL] knob to scroll through the additional lines or pages of the received information.
When the “Comment” or “Status Text” is included in the received data, you may jump to the head of the “Comment” or “Status Text” instantly by pressing the [ TEXT] key.
6.When the confirmation is finished, press the [BCK] key to return to the “Station List” window.
THE F-3 FUNCTION COMMANDS OF THE [SMART FUNCTION] KEY FOR APRS OPERATION
SyLIST Open the “Station List” window.
MSG Open the “Message List” window.
F-3 LOCK Toggles the key lockout feature “on and “off” by pressing the key.
Toggles the transceiver’s power “on and “off” by pressing and holding the key. BCON Changes the APRS beacon: ON, OFF or AUTO.
B-TX Transmit the APRS beacon.
4 |
FTM-350 SERIES APRS® MANUAL |
RECEIVING AN APRS® BEACON
DELETING A RECEIVED BEACON FROM THE “STATION LIST”
1.Press the [SyLIST] key to open the “Station List” window.
2.Rotate the left side [DIAL] knob to select the beacon station to be deleted.
3.Press the [ENT] key to display the received data, then confirm that you really want to erase this beacon data.
4.Press the [DEL] key, then press the [OK?] key to delete the selected beacon station from the “Station List”.
DELETING ALL RECEIVED BEACONS FROM THE “STATION LIST”
1.Press the [SyLIST] key to open the “Station List” window.
2.Press the [F] key repeatedly, until the [SMART FUNCTION] key’s category changes to “S-2” mode, if necessary.
3.Press and hold in the [DEL] key for two seconds, then press the [ALLOK?] key to delete all messages from the “Massage List”.
THE FUNCTION COMMAND OF THE [SMART FUNCTION] KEYS WHILE THE STATION LIST IS OPEN
|
FAST |
Enables scrolling of the station list using a fast stepping rate (4 rows/click). |
|
|
TOP |
Jump to the top column of the Station List. |
|
S-1 |
|
— |
|
REPLY |
Jump to the “TX MESSAGE EDIT” window (Reply operation). |
|
|
|
QSY |
An opposite bands frequency of the APRS operation band changes in accordance with the frequency |
|
|
information included in the received APRS beacon. |
|
|
|
|
|
|
|
|
|
|
|
SyFLT |
Jump to the “APRS/PKT” Set Mode item “E34 SORT FILTER”. |
|
S-2 |
SORT |
Initiates sorting. |
|
|
— |
|
|
|
QUERY |
Jump to the “TX MESSAGE EDIT” window with Query command (?APRSP). |
|
|
GPS |
Jump to the “GPS Information” page. |
|
|
|
|
|
|
|
— |
|
S-3 |
SyLIST |
Jump to the “Point List Mode” window. |
|
|
— |
|
|
|
POINT |
Stores the received position data (Lat/Log) to the “Point” memory. |
|
|
|
— |
|
|
|
|
|
|
DISP |
Toggles the compass display between “North Up” and “Heading Up”. |
|
|
¶TEXT |
¶TEXT: Jump to the top of the “Status Text Message”. |
|
B-1 |
µTOP |
µTOP: Jump to the top column of the received APRS beacon. |
|
|
— |
|
|
|
REPLY |
Jump to the “TX MESSAGE EDIT” window (Reply operation). |
|
|
QSY |
An opposite bands frequency of the APRS operation band changes in accordance with the frequency |
|
|
information included in the received APRS beacon. |
|
|
|
|
|
|
|
|
|
|
|
RAW |
Displays the “Raw” data of the received APRS beacon. |
|
B-2 |
|
— |
|
|
— |
|
|
|
QUERY |
Jump to the “TX MESSAGE EDIT” window with Query command (?APRSP). |
|
|
GPS |
Jump to the “GPS Information” page. |
|
|
|
|
|
FTM-350 SERIES APRS® MANUAL |
5 |
||

RECEIVING AN APRS® BEACON
APRS FILTER SETTING
The APRS filter option allows you to select the specific types of the data to receive.
1.Press the [SET] key to enter the Set Mode.
2.Rotate the left side [DIAL] knob to select “APRS/PKT” group, then press the left side [DIAL] knob.
3.Rotate the left side [DIAL] knob to select Set Mode item “E03 APRS FILTER”, then press the left side [DIAL] knob to enable modification of this Set Mode item.
4.Rotate the left side [DIAL] knob to select the “filter” you wish to exclude.
5.Press the left side [DIAL] knob, and then rotate the left side [DIAL] knob to select “OFF”.
6.Press the left side [DIAL] knob to save the new setting.
7.Repeat the above steps and select “OFF” for any other filters you wish exclude.
8.When you have completed your selection, press the [ESC] key several times to exit from Set Mode.
The FTM-350 provides many convenient functions for APRS operation. Refer to the “APRS/ PKT Set Mode” chapter beginning on page 20 for details.
|
APRS ALERT BEEP LIST |
|
EMERGENCY COMMENT Set |
BEACON Received (Duplicate Beacon) |
OWN MESSAGE Received |
x 3 times |
|
|
EMERGENCY BEACON Received |
OWN BEACON (MY POSITION) Received |
MESSAGE ACK Received |
x 12 times |
|
|
BEACON Received (APRS Filter “ON”) |
MESSAGE Received |
MESSAGE REJ Received |
BEACON Received (APRS Filter “OFF”) |
GROUP/BULLETIN MESSAGE Received |
BEACON Transmit |
BEACON Received (Range Ringer Station) |
MESSAGE Received (for Other Station) |
MESSAGE Transmit |
BEACON Received (Callsign Ringer Station) |
MESSAGE Received (Duplicate Message) |
MESSAGE REJ Transmit |
6 |
FTM-350 SERIES APRS® MANUAL |

RECEIVING AN APRS® BEACON
NOTE
FTM-350 SERIES APRS® MANUAL |
7 |
TRANSMIT AN APRS® BEACON
MANUAL TRANSMISSION
To transmit your APRS beacon manually, press the [F] key repeatedly, until the [SMART FUNCTION] keys category changes to “F-3” mode, if necessary, then press the [B-TX] key.
AUTOMATIC TRANSMISSION
The FTM-350 allows you to transmit your APRS beacon automatically and repeatedly.
1.Press the [F] key repeatedly, until the [SMART FUNCTION] keys category changes to “F-3” mode, if necessary.
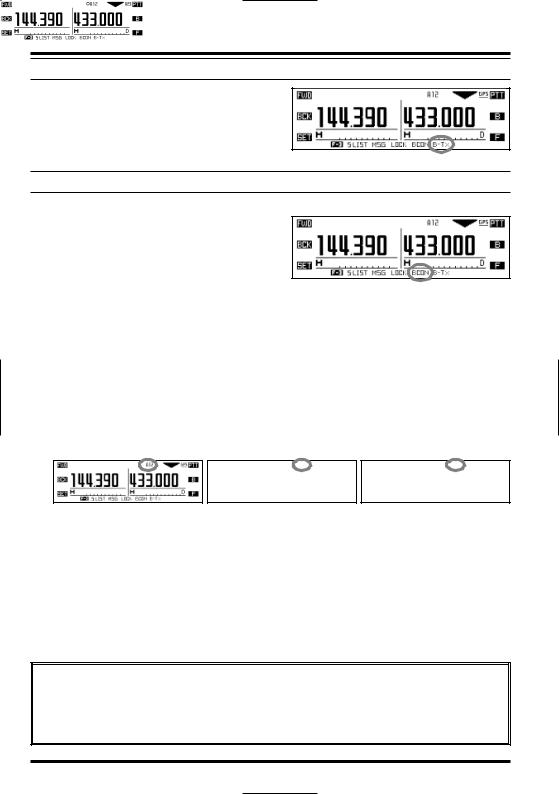
2.Press the [BCON] key repeatedly to select
the “Auto” beacon mode (“OFF”, “ON (FIX)” or “SMART”). OFF: Disables Automatic Transmission (no icon)
ON (FIX): Enables Automatic Transmission (“ ” icon appears at the left of the “A12” icon).
Transmits your APRS beacon in accordance with the interval determined by “2 INTERVAL” of the Set Mode item “E14 BEACON TX” in the “APRS/PKT” group.
SMART: Enables Automatic Transmission (“{” icon appears)
Transmits your APRS beacon in accordance with the interval determined by Set Mode item “E33 SmartBeaconingÚ” in the “APRS/PKT” group.
OFF |
ON (FIX) |
SMART |
When the APRS frequency is busy (squelch is open), the FTM-350 will not transmit an APRS beacon in manual or automatic modes. Insure that the squelch is closed.
You may transmit the APRS beacon manually by pressing the [B-TX] key, even if the FTM-350 is in automatic mode.
Ú: SmartBeaconingTM is an algorithm created by Tony Arnerich KD7TA and Steve Bragg KA9MVA of HamHUD for adjusting the transmit rate using the speed and heading changes of the vehicle.
Visit www.hamhud.net for more information about SmartBeaconingTM .
8 |
FTM-350 SERIES APRS® MANUAL |

TRANSMIT AN APRS® BEACON
OPTIONAL SETTINGS
DIGIPEATER PATH SETTING
The FTM-350 allows you to set up to eight digipeaters for the APRS packet path.
The FTM-350 is preset to “WIDE1-1” and “WIDE1-1, WIDE2-1” digi-path to insure that your transmitted APRS beacon is repeated by the New-N paradigm digipeaters. We recommend that you use this default setting.
1.Press the [SET] key to enter the Set Mode.
2.Rotate the left side [DIAL] knob to select “APRS/PKT” group, then press the left side [DIAL] knob.
3.Rotate the left side [DIAL] knob to select Set Mode item “E19 DIGI PATH SELECT”, then press the left side [DIAL] knob to enable selection of this Set Mode item.
4.Rotate the left side [DIAL] knob to select the desired path you wish to set, then press the left side [DIAL] knob.
5.When you have completed your selection, press the [ESC] key several times to exit from Set Mode.
THE F-3 FUNCTION COMMANDS OF THE [SMART FUNCTION] KEY FOR APRS OPERATION
SyLIST Open the “Station List” window.
MSG Open the “Message List” window.
F-3 LOCK Toggles the key lockout feature “on and “off” by pressing the key.
Toggles the transceiver’s power “on and “off” by pressing and holding the key. BCON Changes the APRS beacon: ON, OFF or AUTO.
B-TX Transmit the APRS beacon.
FTM-350 SERIES APRS® MANUAL |
9 |
TRANSMIT AN APRS® BEACON
OPTIONAL SETTINGS
STATUS TEXT MESSAGES
You may store five Status Text Messages (up to the 60 characters for each memory), and you may transmit one of these Status Text Messages with the APRS beacon.
1.Press the [SET] key to enter the Set Mode.
2.Rotate the left side [DIAL] knob to select “APRS/PKT” group, then press the left side [DIAL] knob.
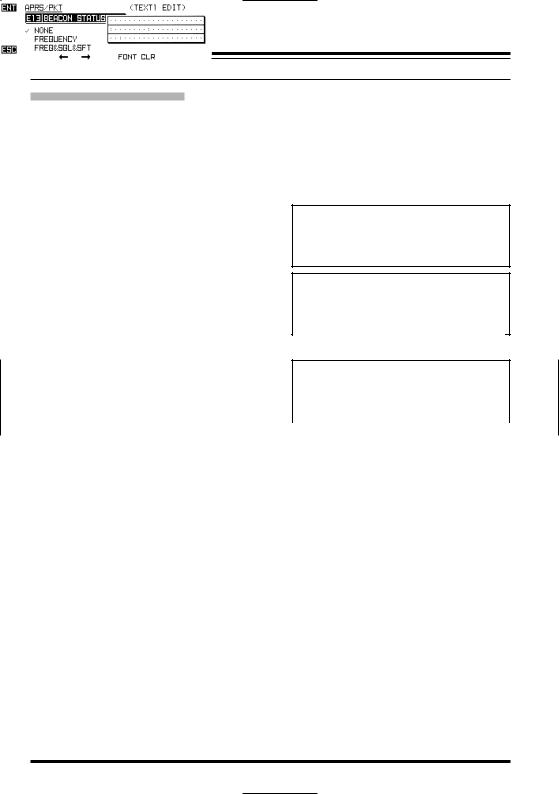
3.Rotate the left side [DIAL] knob to select Set Mode item “E13 BEACON STATUS TXT”, then press the left side [DIAL] knob to enable selection of this Set Mode item.
4.Rotate the left side [DIAL] knob to select the Status Text Resister (“3: TEXT 1” through “7: TEXT 5”) you wish to store the text message to.
5.Press the left side [DIAL] knob, then rotate the left side [DIAL] knob to select additional text to add to your message.
NONE: |
There is no addi- |
||
|
tional text in your |
||
FREQUENCY: |
message. |
|
|
Appends the opposite band frequency data of the APRS opera- |
|||
tion band into your message.
FREQ&SQL&SFT: Appends the opposite band frequency data of the APRS operation band, sub audio information (squelch type and its tone frequency/code), and repeater shift frequency data into your message.
6.Press the left side [DIAL] knob, then enter the desired comment (up to 60 characters) using the following examples.
Example 1: Press the one of the microphone keypad button. Press the [A] or [B] key to move the cursor forward or backward, and press the [C] key to delete all data after the cursor.
Example 2: Rotate the left side [DIAL] knob to select a character/number, and press the [ ] or [ ] key to move the cursor forward or backward. You may change the character (capital alphabet, small alphabet, numeric, and symbol) by pressing the [FONT] key.
7.When you have completed your entry, press the [ENT] key to save your message.
10 |
FTM-350 SERIES APRS® MANUAL |
TRANSMIT AN APRS® BEACON
OPTINAL SETTINGS
8.Rotate the left side [DIAL] knob to select “1: SELECT” item, then press the left side [DIAL] knob.
9.Rotate the left side [DIAL] knob to select
the Status Text resister (“TEXT 1” through “TEXT 5”) you wish to send, then press the left side [DIAL] knob.
10.Rotate the left side [DIAL] knob to select “2: TX RATE” item, then press the left side [DIAL] knob.
11.Rotate the left side [DIAL] knob to select the frequency whereyou want to transmit your Status Text Message (“1/1” through “1/8”). Then press the left side [DIAL] knob.
12.Press the [ESC] key several times to exit from Set Mode.
When the APRS beacon transmits, the Status Text Message is transmitted with the APRS beacon.
The FTM-350 provides many convenient functions for APRS operation. Refer to the “APRS/ PKT Set Mode” chapter beginning with page 20 for details.
FTM-350 SERIES APRS® MANUAL |
11 |
 Loading...