


 Loading...
Contents |
|
General Description......................... |
1 |
Safety Precautions........................... |
2 |
Controls & Connections.................. |
4 |
PTT key................................................. |
4 |
LOCK key.............................................. |
4 |
MIC........................................................ |
5 |
Angle adjustment knobs........................ |
5 |
Height adjustment ring........................... |
5 |
Display................................................... |
6 |
Graphic equalizer adjustment knobs..... |
6 |
DUAL key............................................... |
7 |
C/D key.................................................. |
7 |
Equalizer memory keys......................... |
8 |
Recording/Playback key........................ |
8 |
LC (Low Cut) key................................... |
9 |
THR (THRU) key................................... |
9 |
MIC GAIN adjustment knobs............... |
10 |
SCOPE key.......................................... |
10 |
MONITOR Volume knob...................... |
10 |
POWER Switch.................................... |
11 |
PHONES Jack..................................... |
11 |
RX AUDIO IN Jack............................... |
11 |
DC IN 5V Jack..................................... |
12 |
MIC Jack.............................................. |
13 |
Cannon (XLR) Microphone Connector... |
13 |
PTT key operation selector switch....... |
13 |
RX ATT switch..................................... |
13 |
Convenience Functions................. |
14 |
Setting the Display Contrast................ |
14 |
Reset................................................... |
15 |
Frequency characteristics |
|
of the microphone..... |
16 |
Specifications................................. |
16 |
Supplied Accessories |
|
Treble boost cowling........................................................................................... |
1 |
AC Adapter (SAD-22).......................................................................................... |
1 |
Power Code........................................................................................................ |
1 |
Microphone Cable............................................................................................... |
1 |
Dedicated Alignment Tool.................................................................................... |
2 |
Instruction Manual (this manual)......................................................................... |
1 |
Warranty Card..................................................................................................... |
1 |

General Description
Dual microphone configuration features
The M-1 features two built-in microphone elements, one dynamic and one condenser. The unique output signals may be individually crafted and then blended to produce a single rich voice signal. The condenser microphone responds to a broad frequency range including the distinctive crisp highs, while the dynamic microphone adds depth and warmth, providing the emotional subtext desirable for a genial “ragchew”. The M-1 lets you fine-tune and balance the two microphone sources to create a sound that will compliment your own voice.
Nine-band graphic equalizer for each microphone element
The nine-band graphic equalizer is applied to each microphone element independently, giving total flexibility to accentuate and enhance the frequency characteristics of both the dynamic and condenser microphone output signals. The individual frequency profiles are easily adjusted on the graphic equalizer, using the rotary encoders below the display. The built-in equalizer memories can store two different groups of settings for each microphone. Stored settings (Memories 1 and 2) can be accessed instantly.
A through (flat) preset is also provided. By blending the two microphone outputs together, you can create your own unique tonal quality. The M-1 adds a new level to the audio creative process.
Treble boost cowling produces a unique tonal texture
The simple clip-on cowling enhances the high-frequency response of both microphone elements, and can minimize the aural interference from either side. The cowling serves to concentrate the voice input with a peak at around 1 - 1.5 kHz, producing a unique tonal texture.
Air cylinder magnetic contactless PTT key
The PTT key with contactless triple air cylinder magnetic construction delivers smooth fingertip-sensitive operation over an extended stroke distance.
The key has been designed with optimal balance between key weight and stroke to provide the perfect tactile response. Meanwhile, the contactless switch provides years of fault-free operation with minimal mechanical degradation.
ρThe built-in record and playback feature provides monitoring your voice in the headphones to allow meticulous evaluation and adjustment.
ρFeatures a built-in, one-click DSP filter that is independent of the graphic equalizer.
ρConnect headphones directly to the M-1 and check the microphone audio in real time, listen to test recordings, or monitor the transceiver signal.
ρThe M-1 microphone outputs include a balanced XLR jack as used on professional sound equipment for superior audio quality and noise shielding.
M-1 Operating Manual |
1 |
Safety Precautions
Note beforehand that the company shall not be liable for any damages suffered by the customer or third parties in using this product, or for any failures and faults that occur during the use or misuse of this product, unless otherwise provided for under the law.
Type and meaning of the symbols
This symbol indicates the possibility of death or serious injury DANGER being inflicted on the user and the surrounding people when
these instructions are ignored and the product is mishandled.
This symbol indicates the possibility of death or serious injury WARNING being inflicted on the user and the surrounding people when
these instructions are ignored and the product is mishandled.
This symbol indicates the possibility of physical impediments
CAUTION occurring or impediments being inflicted on the user and the surrounding people when these instructions are ignored and the
product is mishandled.
Type and meaning of symbols
Prohibited actions that must not be attempted, in order to use this radio safely. For example,  signifies that disassembly is prohibited.
Precautions that must be adhered to in order to use this radio safely.
For example,  signifies that the power supply is to be disconnected.
 DANGER
Do not use this product while driving or riding a motorbike. This may result in accidents.
Make sure to stop the car in a safe location first before use if the device is going to be used by the driver.
Do not touch any liquid leaking from the liquid display with your bare hands.
There is a risk of chemical burns occurring when the liquid comes into contact with the skin or gets into the eyes. In this case, seek medical treatment immediately.
 WARNING
Do not dismantle or modify the device.
This may result in injury, electric shock and equipment failure.
When smoke or strange odors are emitted from the radio, turn off the power and dis-connect the power cord from the socket.
This may result in fire, liquid leak, overheating, damage, ignition and equipment failure. Please contact our company amateur customer support or the retail store where you purchased the device.
Do not handle the power plug and connector etc. with wet hands. Also do not plug and unplug the power plug with wet hands.
This may result in injury, liquid leak, electric shock and equipment failure.
Keep the power plug pins and the surrounding areas clean at all times.
This may result in fire, liquid leak, overheating, breakage, ignition etc.
2 |
M-1 Operating Manual |

Safety Precautions
Please do not use a voltage other than the specified power supply voltage.
Doing so could cause fire, electric shock or damage to the equipment.
Do not install in places where the unit risks getting wet (such as near a humidifier).
Doing so may result in fire, electric shock or damage.
Do not use a power supply cable other than the one provided.
Doing so could cause fire, electric shock or damage to the equipment.
Do not place heavy objects on the power supply cable or connection cable, forcibly bend, twist or pull on the cables, or heat or modify them.
Doing so may scratch or damage the cables, resulting in fire, electric shock or damage to the equipment.
Do not pull on the cable section when disconnecting the power supply cable or connection cable.
Doing so could cause fire, electric shock or damage to the equipment. Hold the plug or the connector when disconnecting the cable.
Do not use the power supply cable or connection cable if it is damaged or if the connection of the power connector is loose.
Doing so could cause fire, electric shock or damage to the equipment. Contact your dealer or our customer support.
 CAUTION
Do not place the unit on an unstable place or a place subject to much vibration.
The unit may fall or tip over, resulting in fire, injury or malfunction.
Do not place heavy objects on top of the unit.
The unit may fall or tip over, resulting in injury.
Do not place objects containing water, such as vases, cosmetics or cups, on top of the unit.
The water may spill and get inside the unit, resulting in fire or malfunction.
Do not place small metal objects such as clips on top of the unit.
The object may get inside, resulting in fire or malfunction.
Do not place the unit in humid or dusty places.
Doing so could cause fire or malfunction.
Do not use the headphones at high volume.
Listening to continuous loud sound over the headphones may the damage the ears.
When using the headphones, lower the volume to the minimum before turning on the power.
Failure to do so may cause hearing disorders.
Do not wipe the case with thinner or benzene.
Use a soft, dry cloth to wipe dirt off the case.
Do not drop the unit or subject it to strong shocks.
Doing so could cause injury or malfunction.
For the sake of safety, disconnect the power supply cable when not planning to use the unit for a prolonged period.
Do not lift the unit holding on to the dial or another knob.
Doing so could cause damage to knob, panel, substrate, etc.
Disconnect the power supply cable and all cables connecting the unit to the radio before moving the microphone.
Do not place the unit in places exposed to direct sunlight or near heating appliances.
Doing so could cause deformation, discoloration, etc.
Store in a place out of the reach of small children.
Failure to do so could result in injury, etc.
Do not use products other than those specified by Yaesu.
Doing so may result in malfunction.
M-1 Operating Manual |
3 |
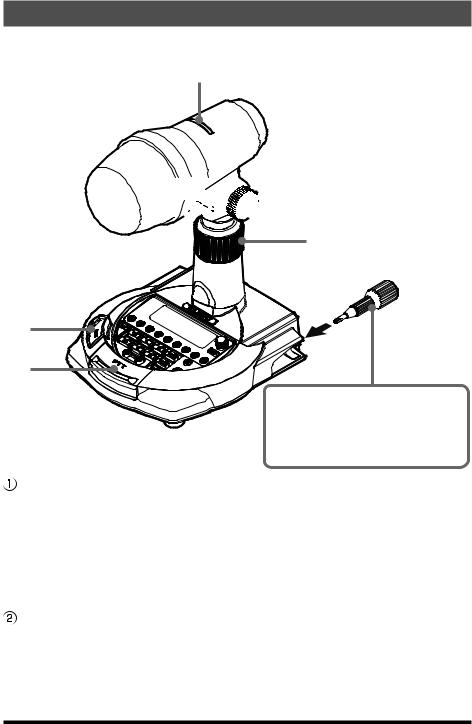
Controls & Connections
On Air Indicator
This illuminates in red when in TX mode.
The indicator is off when in RX mode.


Dedicated Adjustment Tools (2)
These are tools for turning the equalizer and microphone gain knobs.
The tools may be stored in the brackets on each side of the microphone base.
PTT key
Press and hold down this key to transmit, and release it to receive.
ρ The PTT key operating selector switch on the bottom of the base unit may be switched to the “HOLD” side. Then when the PTT key is pressed briefly, the TX mode will be held until the PTT key is pressed again.
Caution: The PTT key has a built in the magnetic sensor. Strong magnetic items, such as a speaker or a magnet, may affect this PTT key, resulting in malfunctions.
LOCK key
This is a one touch PTT key with a lock function.
When the LOCK key is pressed, the transmit mode is set and held, When the key is pressed again the transceiver returns to receive mode again.
ρOperation of the PTT key is disabled when the LOCK key is operated.
ρThe LOCK key indicator lights up red when the LOCK key is in operated.
4 |
M-1 Operating Manual |
Loading...