


ACM 446 IX ACM 566/1 IX PRODUCT DESCRIPTION SHEET |
GB FR PT AR |
COOKTOP
a. Rapid burner b-c. Semirapid burners d. Auxiliary burner e. Triple ring burner
OVEN
1. Control panel
2. Ventilation opening
3. Grill heating element
4. Rear lamp
5. Fan
6. Bottom heating element
7. Oven door
ACCESSORIES
Drip tray: |
Rear shelf: |
2 Wire shelves:
CONTROL PANEL
1 |
2 |
3 |
4 |
1.Cooking time selector knob
2.Thermostat selector knob
3.Thermostat orange indicator
4.Function selector knob
5 |
6 |
7 |
8 |
9 |
5.Front left burner control knob*
6.Rear left burner control knob*
7.Middle burner control knob*
8.Rear right burner control knob*
9.Front right burner control knob*
* The cooktop control knobs are not interchangeable. After cleaning or servicing, they must be returned to their original positions.
5019 310 66139
|
Function Description Table |
|
|
|
|
Function |
Description of Function |
|
|
|
|
CONVENTIONAL |
To cook any kind of dish on one shelf only. Use the 2nd level. Preheat the oven to the |
|
required temperature. the oven is ready for introducing food when the thermostat |
||
|
light goes off. |
|
|
|
|
MEDIUM GRILL |
To grill small pieces of meat, under the smaller grill. It is advisable to place food on the |
|
4th level at max. temperature. Preheat the oven for 3 - 5 min. The oven door must |
||
|
remain closed during cooking. |
|
|
|
|
|
To grill chops, kebabs and sausages using all the grill; to gratinate vegetables or toast |
|
GRILL |
bread. It is advisable to place food on the 4th level. When grilling meat, use the drip- |
|
tray to collect the cooking juices. Position it on the 3rd level, adding about half a litre |
||
|
of water. Preheat the oven for 3 - 5 min. The oven door must remain closed during |
|
|
cooking. |
|
|
|
|
|
To roast large pieces of meat (legs, roast beef, chickens). Position the food on the |
|
|
middle levels. Use a drip-tray to collect the cooking juices. Position it on the 1st/2nd |
|
TURBOGRILL |
level, adding about half a litre of water. The oven does not have to be preheated. It is |
|
advisable to turn the meat over during cooking, to obtain even browning on both sides. |
||
|
||
|
The oven door must remain closed during cooking. |
|
|
With this function it is possible to use the rotisserie, if provided. |
|
|
|
|
|
To cook different foods requiring the same cooking temperature on a maximum of two |
|
|
shelves at the same time (e.g. fish, vegetables, cakes). This function can be used to |
|
FORCED AIR |
cook different foods without odours being transferred from one food to another. Use |
|
|
the 2nd level to cook on one shelf only. To cook on two shelves, use the 2nd and 4th |
|
|
levels, preheating the oven first. |
|
|
|
|
BOTTOM HEATING |
To finish cooking food with a very liquid consistency and to obtain crisp, golden bases. |
|
Also useful for thickening sauces. |
||
ELEMENT + FAN |
||
It is advisable to place food on the 2nd cooking level. Preheat the oven. |
||
|
||
|
|
|
DEFROST |
To speed up defrosting of food. Place food on the middle level. It is advisable to leave |
|
food in its packaging to prevent it from drying out on the outside. |
||
|
|
HOW TO OPERATE THE OVEN
•Turn the selector knob to the required function. The oven light switches on.
•Turn the thermostat knob clockwise to the required temperature. The orange thermostat led lights up, switching off again when the oven reaches the selected temperature.
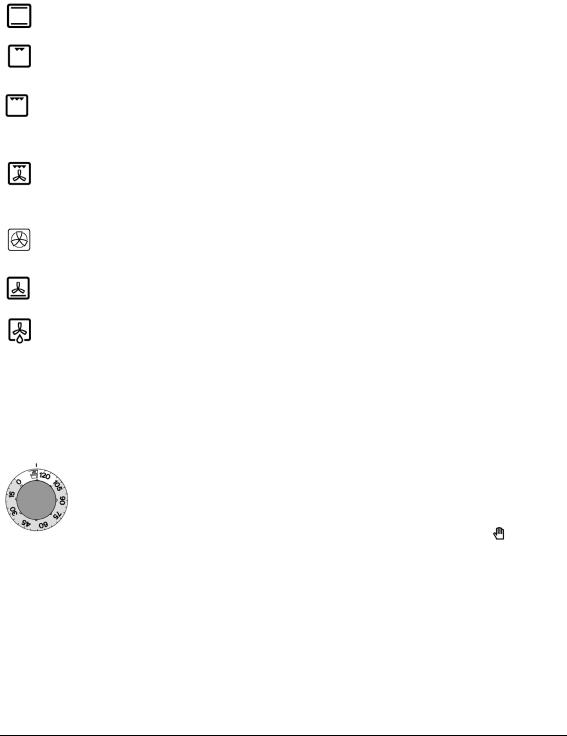
COOKING TIME SELECTOR
This selector can be used to set a cooking time of between 1 and 120 minutes.
To set cooking time, after selecting the required cooking function, turn the knob clockwise to the desired cooking time. At the end of the set cooking time the oven switches off and the selector remains positioned at “0”. To use the oven in manual mode, i.e. without setting a cooking time, make sure that the programme selector is turned to the symbol .
Important: When the selector is positioned at “0” the oven will not switch on. To switch the oven on, set the selector to the symbol  or set a cooking time.
At the end of cooking time:
• Turn the oven control knobs to “0”.
 Loading...