


ACQ082PS6
Whirlpool ACQ082PS6, ACQ082PS5, ACQ068PS7, ACQ068PS6, ACQ068PS3 Owner’s Manual
...
AIRCONDITIONER
For questions about features, operation/performance, parts,
accessories, or service call: 1-800-253-1301
In Canada, call for assistance 1-800-461-5681, for installation
and service, call: 1-800-807-6777
ACONDICIONADOR
Si tiene preguntas respecto alas caractedsticas, funcionamiento,
rendimiento, partes, accesorios o servicio tecnico,
Ilame al: 1-800-253-1301
CLIMATISEUR
66121330/Lit. 8209797
Au Canada, pour assistance compossz le : 1-800-461-6681, pour
Table of Contents/lndice/Table des matieres ....... 2
installation ou service, le : 1-800-807-6777

TABLEOF CONTENTS
AIR CONDITIONER SAFETY ......................................................... 3
INSTALLATION REQUIREMENTS ................................................ 3
Tools and Parts ............................................................................ 3
Location Requirements ................................................................ 4
Electrical Requirements ............................................................... 4
INSTALLATION INSTRUCTIONS .................................................. 5
Unpack the Air Conditioner .......................................................... 5
Prepare Air Conditioner for Installation ........................................ 5
Position the Air Conditioner ......................................................... 6
Complete Installation ................................................................... 7
AIR CONDITIONER USE................................................................ 8
Starting Your Air Conditioner--Digital Control ............................ 8
Starting Your Air Conditioner-- Rotary Control ......................... 10
iNDICE
SEGURIDAD DEL ACONDICIONADOR DEAIRE ...................... 15
REQUISITOS DE INSTALACION ................................................. 15
Herramientas y piezas ................................................................ 15
Requisites de ubicaci6n ............................................................. 16
Requisites electricos .................................................................. 16
INSTRUCCIONES DE INSTALACION ......................................... 17
Desempaque el acondicionador de aire .................................... 17
Prepare el acondicionador de aire para la instalacidn .............. 18
Colocaci6n del acondicionador de aire ..................................... 19
Complete la instalacidn .............................................................. 19
COMO USAR SU ACONDICIONADOR DE AIRE ....................... 20
C6mo poner en marcha su acondicionador de aire
--Control digital ......................................................................... 20
Changing Air Direction ............................................................... 11
Normal Sounds ........................................................................... 11
AIR CONDITIONER CARE ........................................................... 12
Cleaning the Air Filter ................................................................. 12
Cleaning the Front Panel ............................................................ 12
Repairing Paint Damage ............................................................ 12
Annual Maintenance ................................................................... 12
TROUBLESHOOTING .................................................................. 13
ASSISTANCE OR SERVICE ......................................................... 14
In the U.S.A................................................................................ 14
In Canada ................................................................................... 14
Accessories ................................................................................ 14
Cdmo poner en marcha su acondicionador de aire--
Control rotativo ........................................................................... 23
C6mo cambiar la direcci6n del aire ........................................... 24
Sonidos normales ....................................................................... 24
COMO CUIDAR SU ACONDICIONADOR DE AIRE ................... 25
Limpieza del filtro de aire ........................................................... 25
Limpieza del panel delantero ..................................................... 25
Reparaci6n de la pintura da_ada ............................................... 25
Mantenimiento anual .................................................................. 25
SOLUClON DE PROBLEMAS ...................................................... 26
AYUDA O SERVIClO TI_CNICO ................................................... 27
En los EE.UU .............................................................................. 27
Accesorios .................................................................................. 27
TABLEDESMATIERES
S¢:CURITE DU CLIMATISEUR .................................................... 28
SPECIFICATIONS D'INSTALLATION ......................................... 28
Outils et pieces ........................................................................... 28
Exigences d'emplacement ......................................................... 29
Specifications electriques .......................................................... 29
INSTRUCTIONS D'INSTALLATION ............................................ 31
Deballage du olimatiseur ............................................................ 31
Preparer le climatiseur pour I'installation ................................... 31
Positionnement du climatiseur ................................................... 32
Pour completer I'installation ...................................................... 32
UTIMSATION DU CMMATISEUR ................................................ 33
Mise en marche du climatiseur--
Module de commande numerique ............................................. 33
Mise en marche du climatiseur--
Module de commande rotatif ..................................................... 36
Changement de direction de I'air ............................................... 37
Sons normaux ............................................................................ 37
ENTRETIEN DU CLIMATISEUR .................................................. 37
Nettoyage du filtre a air.............................................................. 37
Nettoyage du panneau avant ..................................................... 38
Remise en etat de la peinture .................................................... 38
Entretien annuel .......................................................................... 38
DEPANNAGE ................................................................................. 38
ASSISTANCE OU SERVICE ......................................................... 39
Aux Ctats-Unis ............................................................................ 40
Au Canada .................................................................................. 40
Accessoires ................................................................................ 40

AIR CONDITIONERSAFETY
Your safety and the safety of others are very important.
We have provided many important safety messages in this manual and on your appliance. Always read and obey all
safety messages.
This symbol alerts you to potential hazards that can kill or hurt you and others.
All safety messages will follow the safety alert symbol and either the word "DANGER" or
This is the safety alert symbol.
"WARNING." These words mean:
You can be killed or seriously injured if you don't
immediately follow instructions.
You can be killed or seriously injured if you don't
follow instructions.
All safety messages will tell you what the potential hazard is, tell you how to reduce the chance of injury, and tell you
what can happen if the instructions are not followed.
IM PORTANT SAFETY iNSTRUCTiONS
WARN ING: To reduce the risk of fire, electrical shock or injury when using your air conditioner, follow these basic precautions:
m Plug into a grounded 3 prong outlet.
[] Do not use an extension cord.
[] Do not remove ground prong.
[] Do not use an adapter.
SAVE TH ESE iNSTRUCTiONS
INSTALLATIONREQUIREMENTS
so,,M%s @
Gather the required tools and parts before starting installation.
Read and follow the instructions provided with any tools listed
here.
Tools needed
• Flat-blade and Phillips • Tape measure
screwdrivers
• Scissors
• Level
• Drill and %2" or smaller bit
• Utility knife
[] Unplug air conditioner before servicing.
[] Use two or more people to move and install air conditioner.
Parts supplied
Check that all parts are included in parts package.
E
G
B C D
A. Window-lock bracket
B. #8 x _" round-head screws (6)
C. Foam adhesive sealer
D. #8 x _" wood screws (3)
E. Top channel
F. Foam seal
G. Side curtains (2)

IMPORTANT: Observe all governing codes and ordinances.
Check the location where the air conditioner will be installed.
Proper installation is your responsibility. Make sure you have
everything necessary for correct installation.
The location should provide:
• Grounded electrical outlet within 4 ft (122 cm) of where the
power cord exits the air conditioner.
NOTE: Do not use an extension cord,
• Free movement of air in room to be cooled,
• A large enough opening for the air conditioner. Installation
parts are supplied for double-hung windows,
• Adequate wall support for weight of air conditioner. Air
conditioner weighs 51 Ib (23 kg) to 65 Ib (29.5 kg).
NOTES:
• Cabinet louvers must not be obstructed. Air must be able to
pass freely through the cabinet louvers.
• Your model may differ from the one shown.
A_
\,
Electrical Shock Hazard
Plug into a grounded 3 prong outlet.
Do not remove ground prong.
Do not use an adapter.
Do not use an extension cord.
Failure to follow these instructions can result in
death, fire, or electrical shock.
The electrical ratings for your air conditioner are listed on the
model and serial number label. The model and serial number
label is located behind the front panel above the coil area,
Specific electrical requirements are listed in the chart below.
Follow the requirements for the type of plug on the power supply
cord,
A. Cabinet louvers
Window Installation
Window opening measurements:
• 25" (63.5 cm) minimum to 38" (96.5 cm) maximum opening
width
• 14" (35.6 cm) minimum opening height
!
--A -
B
L
L
A.25" (63.5 cm)minimum
B. 14" (35.6cm)minimum
T
I
Power supply cord Wiring requirements
• 115 volt (103,5 min. -
126.5 max.)
• 15-amp time-delay fuse or
circuit breaker
• 0-12 amps
• Use on single outlet circuit
only.

Recommended ground method
For your personal safety, this air conditioner must be grounded.
This air conditioner is equipped with a power supply cord having
a grounded 3 prong plug. Tominimize possible shock hazard, the
cord must be plugged into a mating, grounded 3 prong outlet,
grounded in accordance with all local codes and ordinances. If a
mating outlet is not available, it is the customer's responsibility to
have a properly grounded 3 prong outlet installed by a qualified
electrical installer.
It is the customer's responsibility:
• To contact a qualified electrical installer.
• To assure that the electrical installation is adequate and in
conformance with National Electrical Code, ANSl/NFPA 70 -
latest edition, and all local codes and ordinances.
Copies of the standards listed may be obtained from:
National Fire Protection Association
One Batterymarch Park
Quincy, Massachusetts 02269
Electrical Shock Hazard
Plug into a grounded 3 prong outlet.
Do not remove ground prong.
Do not use an adapter.
Do not use an extension cord.
Failure to follow these instructions can result in
death, fire, or electrical shock.
Power Supply Cord
NOTE: Your unit's device may differ from the one shown.
B
A. Reset button
B. Test button
This room air conditioner is equipped with a power supply cord
required by UL. This power supply cord contains state-of-the-art
electronics that sense leakage current. If the cord is crushed, the
electronics detect leakage current and power will be
disconnected in a fraction of a second.
INSTALLATIONINSTRUCTIONS
"" ," " Co sdlio se '
the A
To test your power supply cord:
1. Plug power supply cord into a grounded 3 prong outlet.
2. Press RESET (on some devices, a green light will turn on).
3. Press TEST (listen for click; Reset button will trip, and on
some devices, a green light will turn off).
4. Press and release RESET (listen for dick; Reset button will
latch, and on some devices, a green light will turn on). The
power supply cord is ready for operation.
NOTES:
• The Reset button must be pushed in for proper operation.
• The power supply cord must be replaced if it fails to trip when
the test button is pressed or fails to reset.
• Do not use the power supply cord as an off/on switch. The
power supply cord is designed as a protective device.
• A damaged power supply cord must be replaced with a new
power supply cord obtained from the product manufacturer
and must not be repaired.
• The power supply cord contains no user serviceable parts.
Opening the tamper-resistant case voids all warranty and
performance claims.
• Do not use sharp instruments, rubbing alcohol, flammable
fluids, or abrasive cleaners to remove tape or glue. These
products can damage the surface of your air conditioner.
• Handle air conditioner with care.
Excessive Weight Hazard
Use two or more people to move and install
air conditioner.
Failure to do so can result in back or other injury.
Remove packaging materials
• Remove and properly dispose of packaging materials.
Remove tape and glue residue from surfaces before turning
on the air conditioner. Rub a small amount of liquid dish soap
over the adhesive with your fingers. Wipe with warm water
and dry.
I. Locate providedbags ofscrews.
2. Place thetopchannelon topofthe airconditioner,liningup
theholesintop channelwiththe holeson top ofair
conditioner.
3. Using 2 - #8 x %" pan-head screws, attach top channel to air
conditioner.
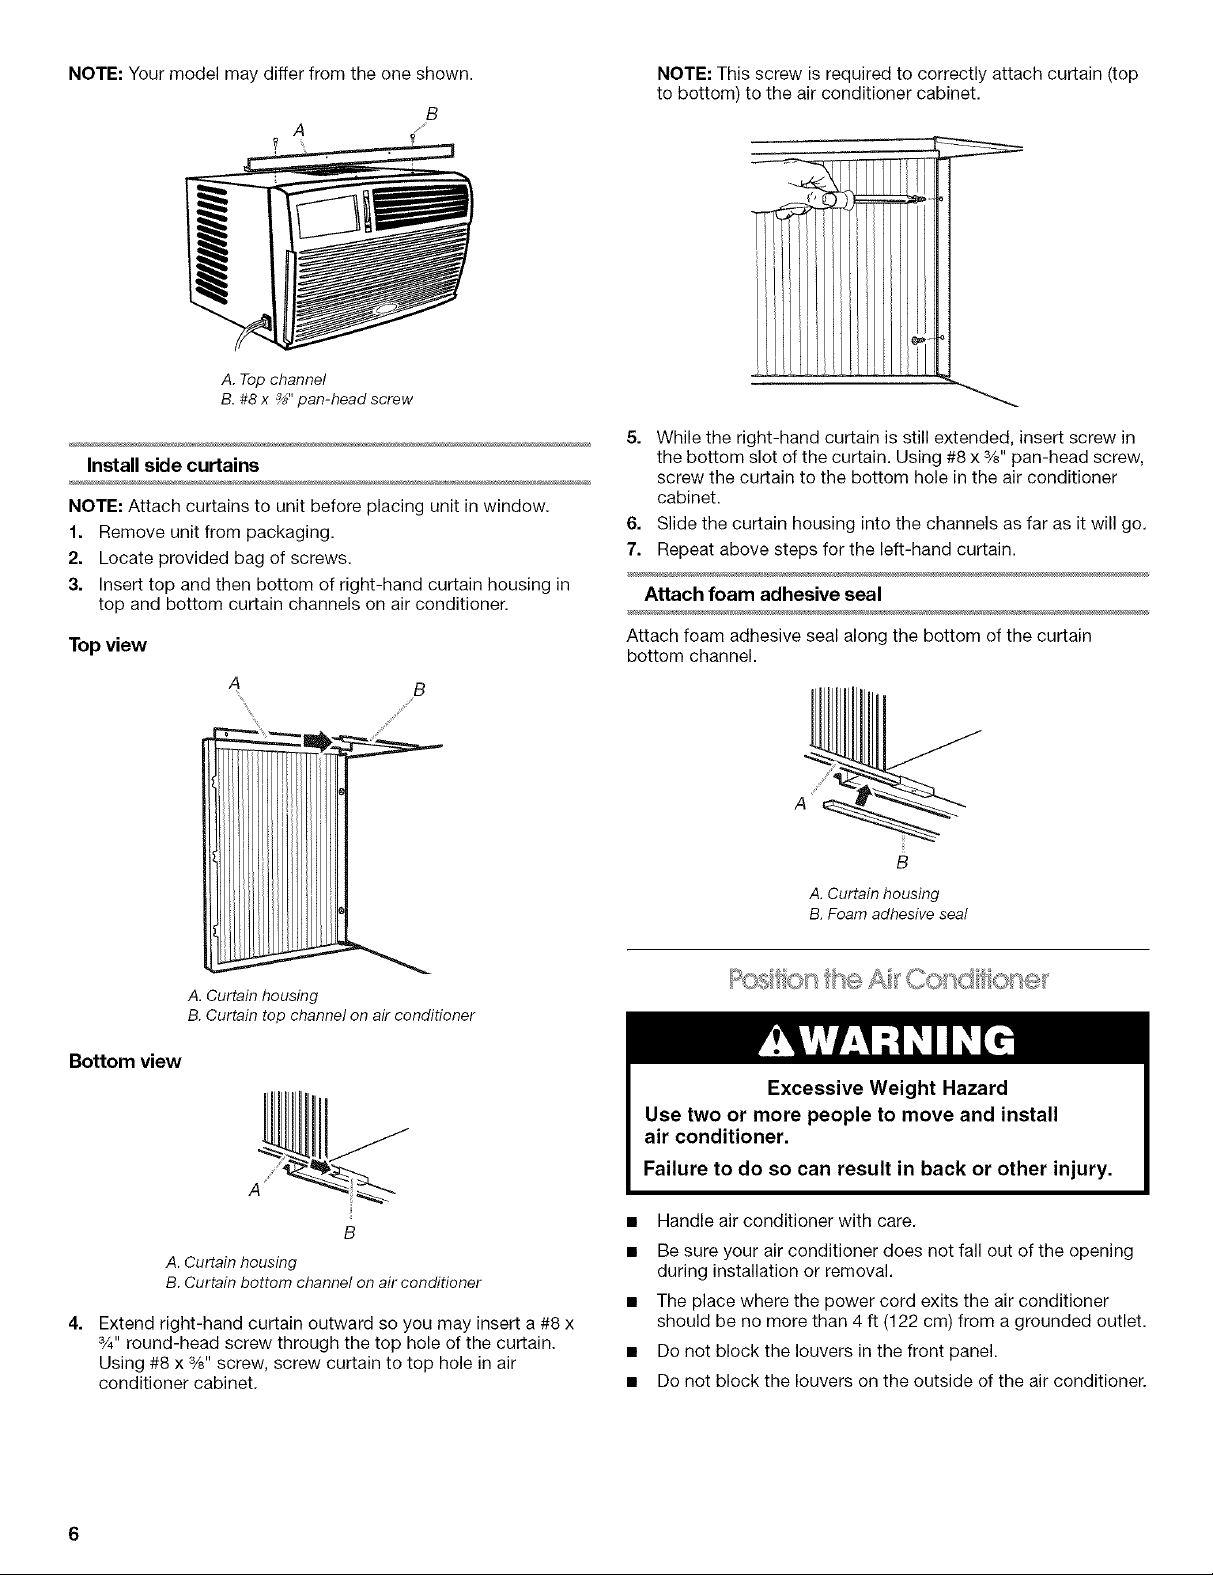
NOTE:Yourmodelmaydifferfromtheoneshown. NOTE:Thisscrewisrequiredtocorrectlyattachcurtain(top
tobottom)totheairconditionercabinet.
B
A. Top channel
B. #8 x _" pan-head screw
5. While the right-hand curtain is still extended, insert screw in
Install side curtains
NOTE: Attach curtains to unit before placing unit in window.
1. Remove unit from packaging.
2. Locate provided bag of screws.
3. Insert top and then bottom of right-hand curtain housing in
top and bottom curtain channels on air conditioner.
Topview
the bottom slot of the curtain. Using #8 x %" pan-head screw,
screw the curtain to the bottom hole in the air conditioner
cabinet.
6. Slide the curtain housing into the channels as far as it will go.
7. Repeat above steps for the left-hand curtain.
Attach foam adhesive seal
Attach foam adhesive seal along the bottom of the curtain
bottom channel.
A. Curtain housing
B. Curtain top channel on air conditioner
Bottom view
B
A. Curtain housing
B. Curtain bottom channel on air conditioner
4.
Extend right-hand curtain outward so you may insert a #8 x
3/4"round-head screw through the top hole of the curtain.
Using #8 x %" screw, screw curtain to top hole in air
conditioner cabinet.
A
B
A. Curtain housing
B. Foam adhesive seal
IIOQ 01 l'_,Iii_;" i=,I ==-_,I¢.t==
Excessive Weight Hazard
Use two or more people to move and install
air conditioner.
Failure to do so can result in back or other injury.
• Handle air conditioner with care.
• Be sure your air conditioner does not fall out of the opening
during installation or removal.
• The place where the power cord exits the air conditioner
should be no more than 4 ft (122 cm) from a grounded outlet.
• Do not block the louvers in the front panel.
• Do not block the louvers on the outside of the air conditioner.

1. Centerairconditionerinwindow.Checkthatlowerrailofair
conditionerisbehindandagainstbacksideofwindowsill.
Lowerwindowsashtoholdcabinetinplace.
NOTE:Yourmodelmaydifferfromtheoneshown.
Insert foam seal behind the top of the lower window sash and
against the glass of the upper window.
A
\
\
A. Top of lower window sash
B. Foam seal
A. Window sash
B. Lower rail behind back side of windowsill
C. Top channel
2. Pull left-hand curtain out until it fits into the window channel.
Repeat with right-hand curtain.
Attach side curtains to window
1. Insert one of the #8 x 3/4"slotted wood screws through left-
hand curtain and into the window channel to fasten the
curtain to the window sash.
2. Repeat for the right-hand curtain.
NOTE: Your model may differ from the one shown.
Front view
A
2. Place window-lock bracket on top of lower window and
against upper window sash.
3. Use a %2" drill bit to drill a starter hole though the hole in the
bracket.
4. Attach window-lock bracket to window sash with one of the
#8 x 3/4"slotted wood screws to secure window in place.
A....................................................................H
A. Upper window sash
B. Window-lock bracket
Topview
A. Hole in #8 x _" slotted wood screw
B. Side curtain
.........C
A. Side curtain against window channel
B. Window channel
C. #8 x _" slotted wood screw
Electrical Shock Hazard
Plug into a grounded 3 prong outlet.
Do not remove ground prong.
Do not use an adapter.
Do not use an extension cord.
Failure to follow these instructions can result in
death, fire, or electrical shock.
5. Plug into a grounded 3 prong outlet.
6. Press RESET on the power supply cord.
AIR CONDITIONERUSE
Operating your air conditioner properly helps you to obtain the
best possible results.
This section explains proper air conditioner operation.
IMPORTANT:
• If you turn off the air conditioner, wait at least 3 minutes
before turning it back on. This prevents the air conditioner
from blowing a fuse or tripping a circuit breaker.
Do not try to operate your air conditioner in the cooling mode
when outside temperature is below 65°F (18°C). The inside
evaporator coil will freeze up, and the air conditioner will
operate properly.
NOTE: In the event of a power failure, your air conditioner will
operate at the previous settings when the power is restored.
°'_ <" *" ,,M,3 }_;J
NOTE: When the air conditioner is off, the display will show the
current room temperature.
1. Press POWER to turn on air conditioner.
Power Saver--Fan and compressor run only when
cooling is needed. Compressor restarts in 3 minutes after
the unit stops. Compressor will not stop running for the
first 6 minutes after restarting unless unit is turned off.
( ooo
_700E F_nOnly_o_I_IS_r
NOTE: After 3 seconds, display will show the current room
temperature.
Fan Speed
1. Press FAN SPEED until you see the indicator light for the
desired setting.
2. Choose Turbo, High, Low or Auto.
• Turbo--for maximum cooling
• High--for normal cooling
• Low--for sleeping comfort
• Auto--automatically controls fan speed depending on
current room temperature and temperature control setting
NOTE: Auto fan speed cannot be selected in Fan Only
mode.
T@00
(_) ,_hO
r,_ S_ D LowO
A_t00
NOTE: After 3 seconds, display will show the current room
temperature.
Filter Reset
NOTE: When air conditioner is turned on for the first time
after it is plugged in, it will display the default settings: Cool
mode, Turbo fan speed, 72°F (22°C). When it is turned on at
all other times, it will default to the previous settings.
2. Select mode. See "Mode."
3. Select fan speed. See "Fan Speed."
4. Set temperature. See "Temperature."
Mode
1,
Press MODE until you see the indicator light come on for the
desired setting.
2.
Choose Cool, Fan Only or Power Saver.
• Cool--Cools room. You can select fan speed by pressing
FAN SPEED. You can then adjust the temperature by
pressing the up or down arrow buttons.
• Fan Only--Only the fan runs. You can select the fan
speed by pressing FAN SPEED, but you cannot adjust the
Temperature control setting. The display shows the
current room temperature.
NOTE: Auto fan speed cannot be selected in Fan Only
mode.
1. When FILTER indicator light glows, remove air filter and clean
or replace air filter. See "Cleaning the Air Filter."
2. Replace air filter.
3. Press and hold FILTER after replacing the air filter.
Temperature
Press the plus TEMP button to raise the temperature. The Set
indicator light will turn on. Each time you press or hold the
plus TEMP button, the temperature will go up 1° until it
reaches 86°F (30°C).
NOTE: After 3 seconds, the Set indicator light will turn off and
the display will show the current room temperature.
TEMP
;4
A. Set indicator light
Press the minus TEMP button to lower the temperature. The
Set indicator light will turn on. Each time you press or hold
the minus TEMP button, the temperature will go down 1° until
it reaches 64°F (18°C).
NOTE: After 3 seconds, the Set indicator light will turn off and
the display will show the current room temperature.
Timer Delay
To set the Timer for a 1- to 24-hour delay until the air
conditioner turns off (the air conditioner must be On):
1. Press TIMER. Indicator light will flash.
O
®
2. Press the plus or minus TEMP button to change the delay
time from 1 to 24 hours.
3. Press TIMER again or wait 10 seconds. Indicator light will
remain on.
To set the Timer to turn on the air conditioner, keeping
previous settings:
1. Turn off air conditioner.
2. Press TIMER. Indicator light will flash.
3. Press the plus or minus TEMP button to change delay time
(1 to 24 hours).
4. Press TIMER again or wait 10 seconds. Indicator light will
remain on.
To set the Timer to turn on the air conditioner, changing
the previous settings:
1. Turn air conditioner on.
2. Adjust Mode to Cool, Fan Only, or Power Saver.
3. Adjust Fan Speed to Turbo, High or Low, or Auto.
4. Adjust temperature between 64°F (18°C) and 86°F (30°C).
5. Turn off air conditioner.
6. Press TIMER. Indicator light will flash.
7. Press the plus or minus TEMP button to change delay time
(1 to 24 hours).
8. Press TIMER again or wait 10 seconds. Indicator light will
remain on.
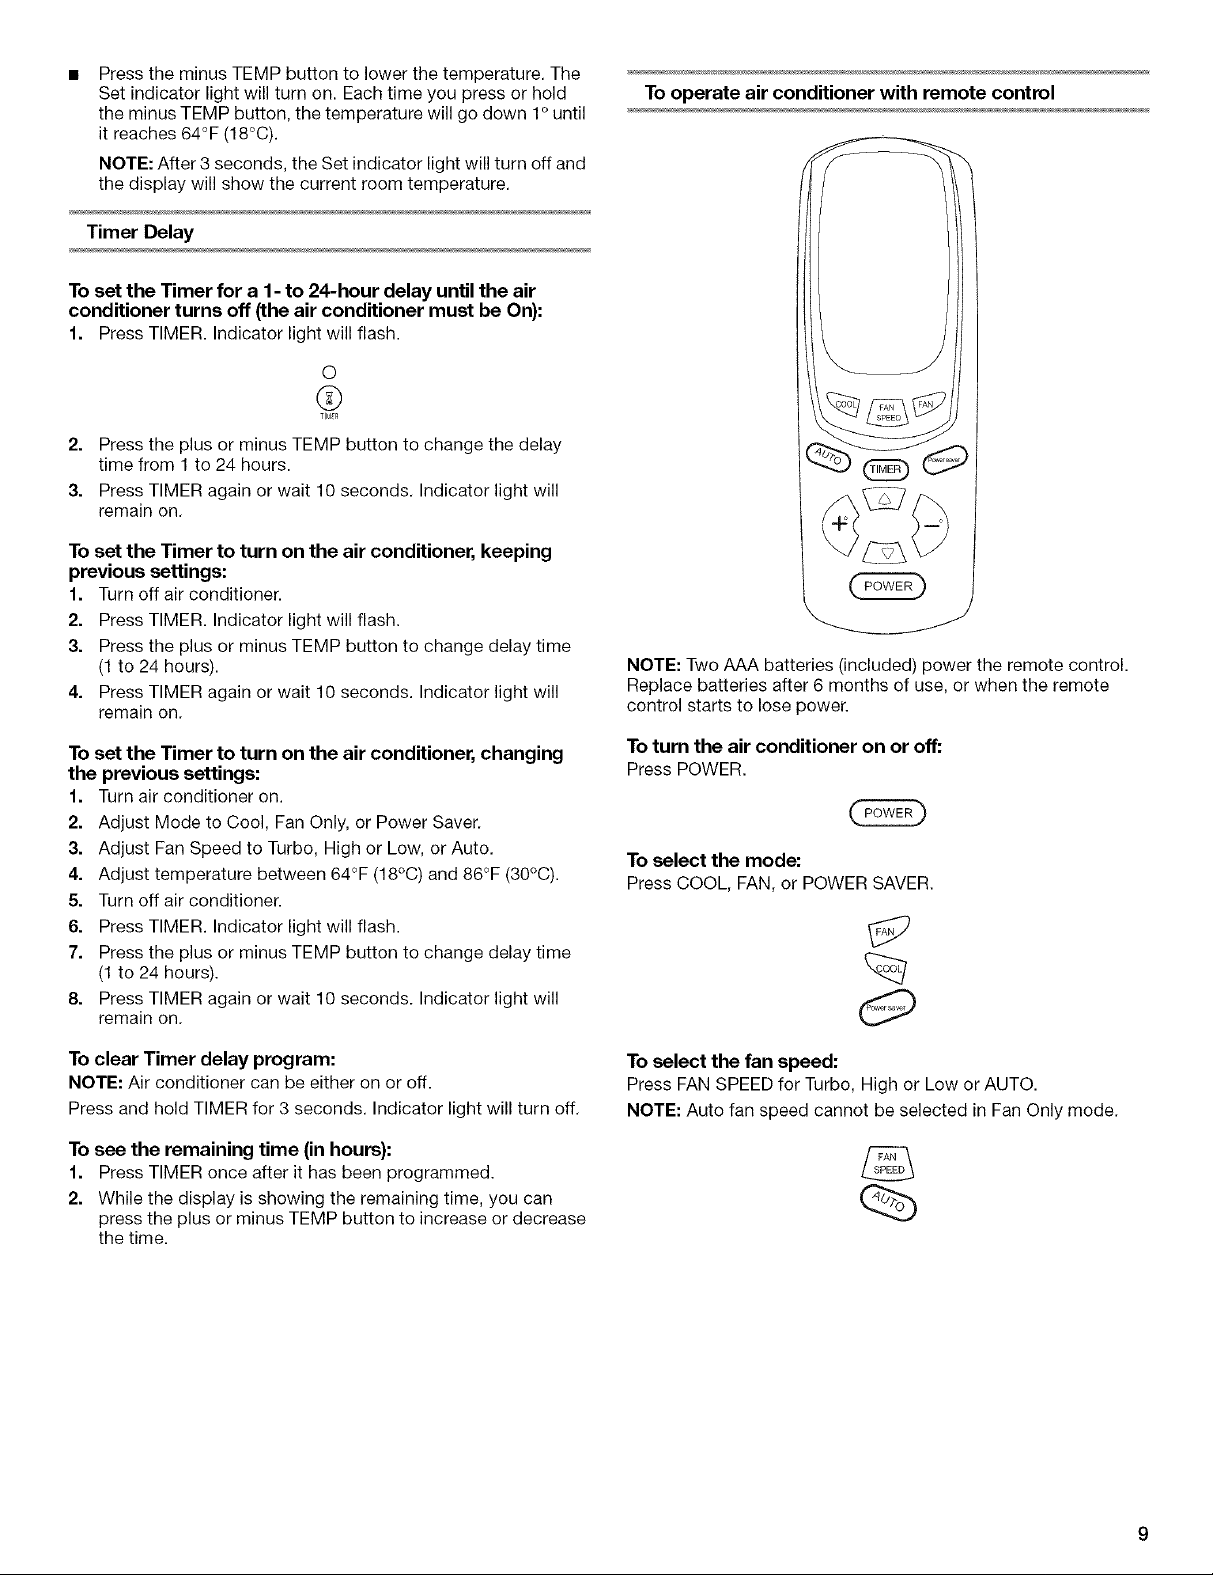
To operate air conditioner with remote control
NOTE: Two AAA batteries (included) power the remote control.
Replace batteries after 6 months of use, or when the remote
control starts to lose power.
To turn the air conditioner on or off:
Press POWER.
To select the mode:
Press COOL, FAN, or POWER SAVER.
To clear Timer delay program:
NOTE: Air conditioner can be either on or off.
Press and hold TIMER for 3 seconds. Indicator light will turn off.
To see the remaining time (in hours):
1. Press TIMER once after it has been programmed.
2. While the display is showing the remaining time, you can
press the plus or minus TEMP button to increase or decrease
the time.
To select the fan speed:
Press FAN SPEED for Turbo, High or Low or AUTO.
NOTE: Auto fan speed cannot be selected in Fan Only mode.

To raise the temperature:
Press the plus button to raise the temperature. Each time you
press or hold the plus button, the temperature will go up 1° until it
reaches 86°F (30°C).
To lower the temperature:
Press the minus button to lower the temperature. Each time you
press or hold the minus button, the temperature will go down 1°
until it reaches 64°F (18°C).
Tosot Timer for a 1- to 24-hour delay before air conditioner
isturned off (airconditioner must be On):
1. Press TIMER. Indicator light on air conditioner control panel
will flash.
2. Press the plus or minus button to change the delay time from
1 to 24 hours,
3. Press TIMER again or wait 10 seconds. Indicator light on air
conditioner control panel will remain on.
To set Timer to turn on air conditioner, keeping previous
settings:
1. Turn off air conditioner.
2. Press TIMER. Indicator light on air conditioner control panel
will flash.
3. Press the plus or minus button to change delay time (1 to
24 hours).
4. Press TIMER again or wait 10 seconds. Indicator light on air
conditioner control panel will remain on.
To set Timer to turn on air conditioner, changing the
previous sottings:
1. Turn on air conditioner.
2. Adjust Mode to Cool, Fan Only, or Power Saver.
3. Adjust Fan Speed to Turbo, High or Low, or Auto.
4. Adjust temperature between 64°F (18°C) and 86°F (30°C).
5. Turn off air conditioner.
6. Press TIMER. Indicator light on air conditioner control panel
will flash.
7. Press the plus or minus button to change delay time (1 to
24 hours).
8. Press TIMER again or wait 10 seconds. Indicator light on air
conditioner control panel will remain on.
Model 1
Cooler Warmer
I Closed
I
3
Cool
*,4ed 4
Cool
FAN
SPEED TEMPERATURE
Model 2
Cooler Warmer
FAN SPEED TEMPERATURE
Model 3
Cooler Warmer
Turbo 4
Cool
FAN SPEED TEMPERATURE
1. Set exhaust control. See "Exhaust Control (on some
models)."
2. Select the fan speed. See "Fan Speed."
3. Set temperature. See "Temperature."
Exhaust Control (on some models)
The Exhaust control CLOSED for maximum continuous cooling.
The Exhaust control set to OPEN allows you to draw stale or
smoky air from the room.
• Open--to exhaust room air to the outside.
• Closed--to circulate room air.
CLOSED
Open
1
I
10
OPEN
NOTE: The Exhaust control will function only when the Fan
Speed is operating.
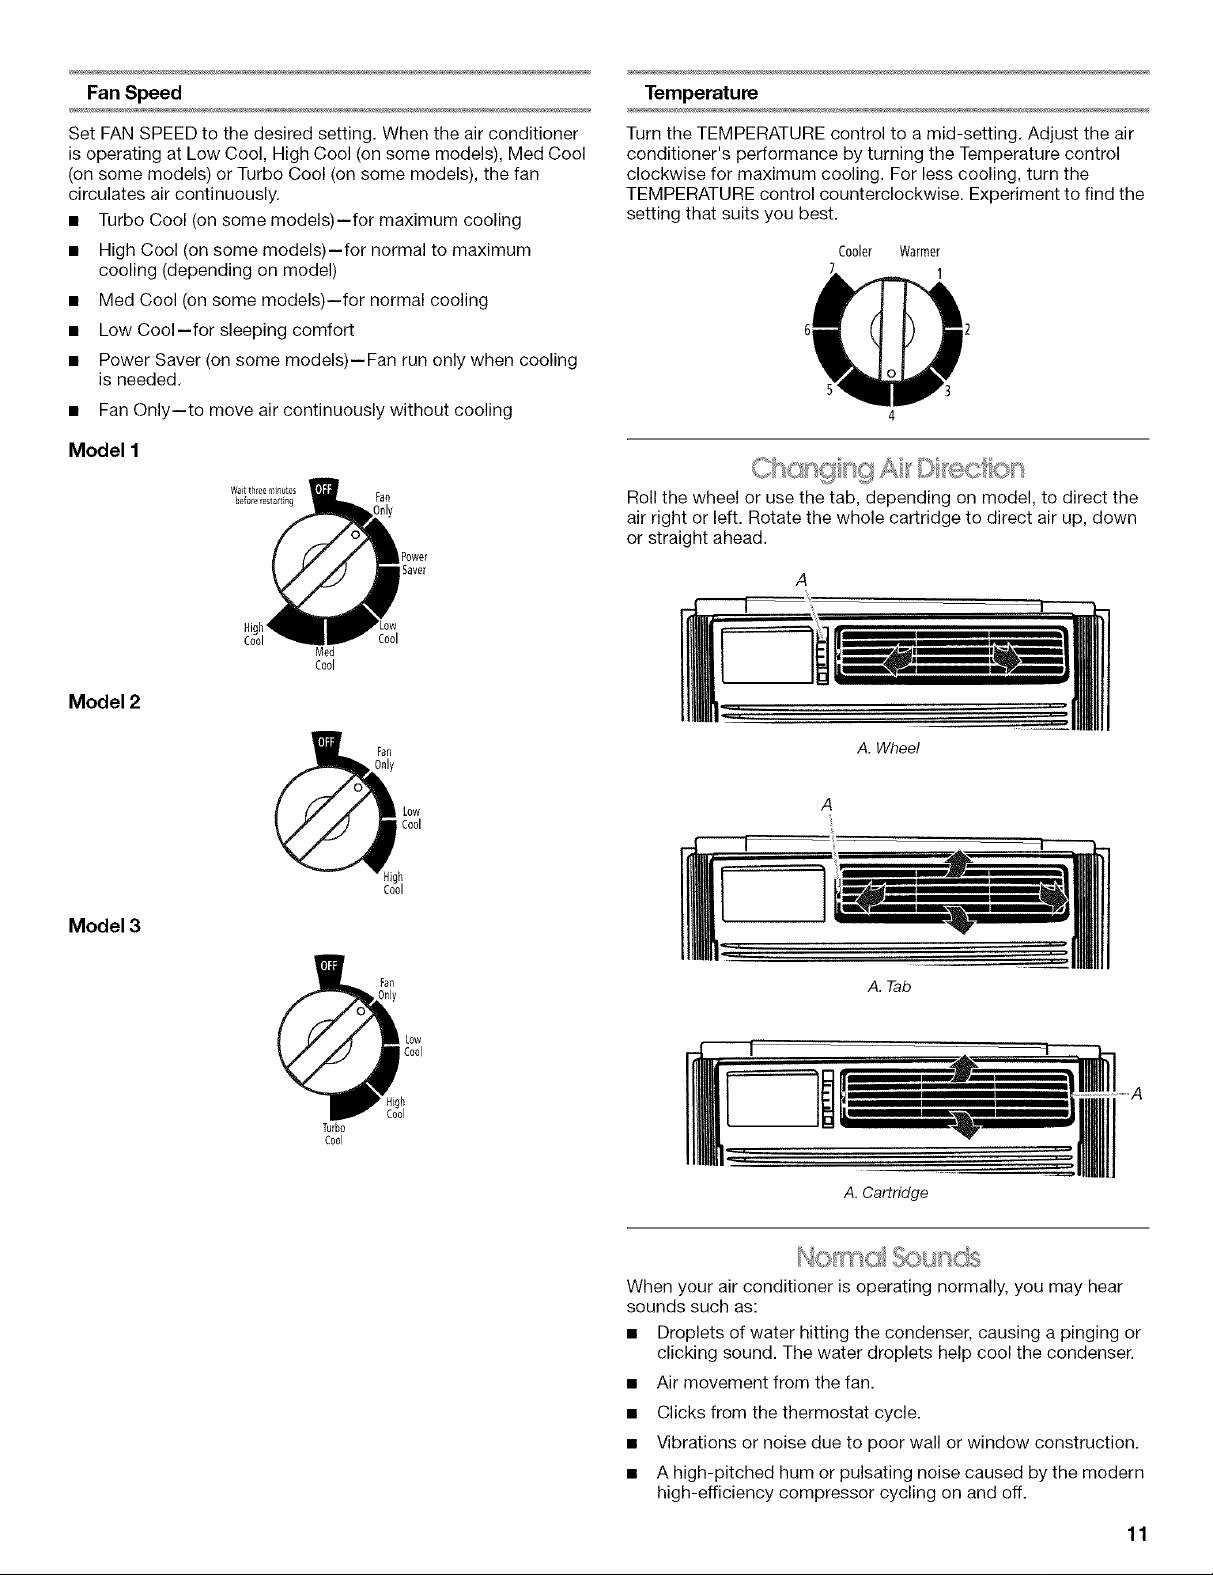
Fan Speed
Temperature
Set FAN SPEED to the desired setting. When the air conditioner
is operating at Low Cool, High Cool (on some models), Med Cool
(on some models) or Turbo Cool (on some models), the fan
circulates air continuously.
• Turbo Cool (on some models)--for maximum cooling
• High Cool (on some models)--for normal to maximum
cooling (depending on model)
• Med Cool (on some models)--for normal cooling
• Low Cool--for sleeping comfort
• Power Saver (on some models)--Fan run only when cooling
is needed.
• Fan Only--to move air continuously without cooling
Model I
Waitthree mip_tes
bef0relestarting ran
Power
Saver
Med
Cool
Cool
Model 2
Turn the TEMPERATURE control to a mid-setting. Adjust the air
conditioner's performance by turning the Temperature control
clockwise for maximum cooling. For less cooling, turn the
TEMPERATURE control counterclockwise. Experiment to find the
setting that suits you best.
Cooler Warmer
1
3
4
Roll the wheel or use the tab, depending on model, to direct the
air right or left. Rotate the whole cartridge to direct air up, down
or straight ahead.
Model 3
Turbo
Cool
Fan
)nly
Fan
High
Cool
_nly
High
Cod
Low
Cool
Low
Cool
A. Wheel
A
A. Tab
A. Cartridge
When your air conditioner is operating normally, you may hear
sounds such as:
• Droplets of water hitting the condenser, causing a pinging or
clicking sound. The water droplets help cool the condenser.
• Air movement from the fan.
• Clicks from the thermostat cycle.
• Vibrations or noise due to poor wall or window construction.
• A high-pitched hum or pulsating noise caused by the modern
high-efficiency compressor cycling on and off.
11

AIR CONDITIONERCARE
Your new air conditioner is designed to give you many years of
dependable service. This section tells you how to clean and care
for your air conditioner properly. Call your local authorized dealer
for an annual checkup. Remember... the cost of this service call
is your responsibility.
S _ _ _ ,_ _ =, "
The air filter is removable for easy cleaning. A clean filter helps
remove dust, lint, and other particles from the air and is important
for best cooling and operating efficiency. Check the filter every
2 weeks to see whether it needs cleaning.
NOTE: Do not operate the air conditioner without the filter in
place.
Style I
1. Turn off air conditioner.
2. Remove air filter by sliding filter out from either side of unit.
Filter may be removed from either side.
A
A. Indents
3. Use a vacuum cleaner to clean air filter. If air filter is very dirty,
wash it in warm water with a mild detergent. Do not wash air
filter in the dishwasher or use any chemical cleaners. Air dry
filter completely before replacing to ensure maximum
efficiency.
4. Replace air filter by sliding filter down into filter door and
closing filter door.
1. Unplug air conditioner or disconnect power.
2. Clean front panel with a soft, damp cloth.
3. Air dry front panel completely.
4. Plug in air conditioner or reconnect power.
3. Use a vacuum cleaner to clean air filter. If air filter is very dirty,
wash it in warm water with a mild detergent. Do not wash air
filter in the dishwasher or use any chemical cleaners. Air dry
filter completely before replacing to ensure maximum
efficiency.
4. Replace air filter by sliding filter back into either side of unit.
Style 2
1. Turn off air conditioner.
2. Remove air filter by pulling down on the indents in the top or
sides of filter door and sliding air filter up and out. Filter door
is not removable.
A
A.Indents
Check once or twice a year for paint damage. This is very
important, especially in areas near oceans or where rust is a
problem. If needed, touch up with a good grade enamel paint.
NOTE: To reduce paint damage during the winter, install a heavy-
duty cover over air conditioner cabinet. For information on
ordering a heavy-duty cover, see "Accessories."
Annu(x/M(:si nonce
Your air conditioner needs annual maintenance to help ensure
steady, top performance throughout the year. Call your local
authorized dealer to schedule an annual checkup. The expense
of an annual inspection is your responsibility.
12
 Loading...