


Golf Plus 2009
Table of contents
 Loading...
P
r
o
t
e
c
t
e
d
b
y
c
o
p
y
r
i
g
h
t
.
C
o
p
y
i
n
g
f
o
r
p
r
i
v
a
t
e
o
r
c
o
m
m
e
r
c
i
a
l
p
u
r
p
o
s
e
s
,
i
n
p
a
r
t
o
r
i
n
w
h
o
l
e
,
i
s
n
o
t
p
e
r
m
i
t
t
e
d
u
n
l
e
s
s
a
u
t
h
o
r
i
s
e
d
b
y
V
o
l
k
s
w
a
g
e
n
A
G
.
V
o
l
k
s
w
a
g
e
n
A
G
d
o
e
s
n
o
t
g
u
a
r
a
n
t
e
e
o
r
a
c
c
e
p
t
a
n
y
l
i
a
b
i
l
i
t
y
w
i
t
h
r
e
s
p
e
c
t
t
o
t
h
e
c
o
r
r
e
c
t
n
e
s
s
o
f
i
n
f
o
r
m
a
t
i
o
n
i
n
t
h
i
s
d
o
c
u
m
e
n
t
.
C
o
p
y
r
i
g
h
t
b
y
V
o
l
k
s
w
a
g
e
n
A
G
.
Service
Workshop Manual
Golf 2004 ➤ , Golf 2009 ➤ ,
Golf Plus 2005 ➤ , Golf Plus 2009 ➤ ,
Passat 2006 ➤
5-speed manual gearbox 0A4
Edition 04.2010
Service Department. Technical Information

P
r
o
t
e
c
t
e
d
b
y
c
o
p
y
r
i
g
h
t
.
C
o
p
y
i
n
g
f
o
r
p
r
i
v
a
t
e
o
r
c
o
m
m
e
r
c
i
a
l
p
u
r
p
o
s
e
s
,
i
n
p
a
r
t
o
r
i
n
w
h
o
l
e
,
i
s
n
o
t
p
e
r
m
i
t
t
e
d
u
n
l
e
s
s
a
u
t
h
o
r
i
s
e
d
b
y
V
o
l
k
s
w
a
g
e
n
A
G
.
V
o
l
k
s
w
a
g
e
n
A
G
d
o
e
s
n
o
t
g
u
a
r
a
n
t
e
e
o
r
a
c
c
e
p
t
a
n
y
l
i
a
b
i
l
i
t
y
w
i
t
h
r
e
s
p
e
c
t
t
o
t
h
e
c
o
r
r
e
c
t
n
e
s
s
o
f
i
n
f
o
r
m
a
t
i
o
n
i
n
t
h
i
s
d
o
c
u
m
e
n
t
.
C
o
p
y
r
i
g
h
t
b
y
V
o
l
k
s
w
a
g
e
n
A
G
.
List of Workshop Manual Repair GroupsList of Workshop Manual
Repair GroupsList of Workshop Manual Repair Groups
Re pa ir G ro up
00 - Technical data
30 - Clutch
34 - Controls, housing
35 - Gears, shafts
39 - Final drive - differential
Service
Technical information should always be available to the foremen and mechanics, because their
careful and constant adherence to the instructions is essential to ensure vehicle road-worthiness and
safety. In addition, the normal basic safety precautions for working on motor vehicles must, as a
matter of course, be observed.
All rights reserved.
No reproduction without prior agreement from publisher.
Copyright © 2010 Volkswagen AG, Wolfsburg K0058990420

P
r
o
t
e
c
t
e
d
b
y
c
o
p
y
r
i
g
h
t
.
C
o
p
y
i
n
g
f
o
r
p
r
i
v
a
t
e
o
r
c
o
m
m
e
r
c
i
a
l
p
u
r
p
o
s
e
s
,
i
n
p
a
r
t
o
r
i
n
w
h
o
l
e
,
i
s
n
o
t
p
e
r
m
i
t
t
e
d
u
n
l
e
s
s
a
u
t
h
o
r
i
s
e
d
b
y
V
o
l
k
s
w
a
g
e
n
A
G
.
V
o
l
k
s
w
a
g
e
n
A
G
d
o
e
s
n
o
t
g
u
a
r
a
n
t
e
e
o
r
a
c
c
e
p
t
a
n
y
l
i
a
b
i
l
i
t
y
w
i
t
h
r
e
s
p
e
c
t
t
o
t
h
e
c
o
r
r
e
c
t
n
e
s
s
o
f
i
n
f
o
r
m
a
t
i
o
n
i
n
t
h
i
s
d
o
c
u
m
e
n
t
.
C
o
p
y
r
i
g
h
t
b
y
V
o
l
k
s
w
a
g
e
n
A
G
.
Golf 2004 ➤ , Golf 2009 ➤ , Golf Plus 2005 ➤ , Golf Plus 2009 ➤ , Pass ...
00 - Technical data . . . . . . . . . . . . . . . . . . . . . . . . . . . . . . . . . . . . . . . . . . . . . . . . . . . . 1
1 Gearbox identification . . . . . . . . . . . . . . . . . . . . . . . . . . . . . . . . . . . . . . . . . . . . . . . . . . . . . . 1
1.1 Location on gearbox . . . . . . . . . . . . . . . . . . . . . . . . . . . . . . . . . . . . . . . . . . . . . . . . . . . . . . 1
1.2 Identification codes, assembly allocation, capacities, Golf 2004 ▸ . . . . . . . . . . . . . . . . . . 2
1.3 Identification codes, assembly allocation, capacities, Golf 2009 ▸ . . . . . . . . . . . . . . . . . . 4
1.4 Identification codes, assembly allocation, capacities, Golf Plus 2005 ▸ . . . . . . . . . . . . . . 5
1.5 Identification codes, assembly allocation, capacities, Golf Plus 2009 ▸ . . . . . . . . . . . . . . 6
1.6 Identification codes, assembly allocation and capacities, Passat 2006 ▸ . . . . . . . . . . . . . . 6
2 Overview - power transmission . . . . . . . . . . . . . . . . . . . . . . . . . . . . . . . . . . . . . . . . . . . . . . 9
3 Calculating overall gear ratio “i” . . . . . . . . . . . . . . . . . . . . . . . . . . . . . . . . . . . . . . . . . . . . . . 11
4 General repair notes . . . . . . . . . . . . . . . . . . . . . . . . . . . . . . . . . . . . . . . . . . . . . . . . . . . . . . 12
4.1 Components . . . . . . . . . . . . . . . . . . . . . . . . . . . . . . . . . . . . . . . . . . . . . . . . . . . . . . . . . . . . 12
30 - Clutch . . . . . . . . . . . . . . . . . . . . . . . . . . . . . . . . . . . . . . . . . . . . . . . . . . . . . . . . . . 15
1 Repairing clutch mechanism . . . . . . . . . . . . . . . . . . . . . . . . . . . . . . . . . . . . . . . . . . . . . . . . 15
1.1 Overview . . . . . . . . . . . . . . . . . . . . . . . . . . . . . . . . . . . . . . . . . . . . . . . . . . . . . . . . . . . . . . 15
1.2 Assembly overview - pedal cluster . . . . . . . . . . . . . . . . . . . . . . . . . . . . . . . . . . . . . . . . . . . . 16
1.3 Removing and installing over-centre spring, Golf 2004 ▸ . . . . . . . . . . . . . . . . . . . . . . . . . . 18
1.4 Removing and installing over-centre spring, Golf 2009 ▸ LHD . . . . . . . . . . . . . . . . . . . . . . 22
1.5 Removing and installing over-centre spring, Golf 2009 ▸ RHD . . . . . . . . . . . . . . . . . . . . . . 27
1.6 Removing and installing over-centre spring, Golf Plus . . . . . . . . . . . . . . . . . . . . . . . . . . . . 32
Contents
5-speed manual gearbox 0A4 - Edition 04.2010
1.7 Removing and installing over-centre spring, Passat . . . . . . . . . . . . . . . . . . . . . . . . . . . . . . 37
1.8 Removing and installing clutch pedal, Golf 2004 ▸ . . . . . . . . . . . . . . . . . . . . . . . . . . . . . . 38
1.9 Removing and installing clutch pedal, Golf 2009 ▸ LHD . . . . . . . . . . . . . . . . . . . . . . . . . . 44
1.10 Removing and installing clutch pedal, Golf 2009 ▸ RHD . . . . . . . . . . . . . . . . . . . . . . . . . . 49
1.11 Removing and installing clutch pedal, Golf Plus . . . . . . . . . . . . . . . . . . . . . . . . . . . . . . . . 54
1.12 Removing and installing clutch pedal, Passat . . . . . . . . . . . . . . . . . . . . . . . . . . . . . . . . . . 59
1.13 Removing and installing mounting bracket, Golf 2004 ▸ . . . . . . . . . . . . . . . . . . . . . . . . . . 61
1.14 Removing and installing mounting bracket, Golf 2009 ▸ LHD . . . . . . . . . . . . . . . . . . . . . . 67
1.15 Removing and installing mounting bracket, Golf 2009 ▸ right-hand drive and Golf Plus righthand drive . . . . . . . . . . . . . . . . . . . . . . . . . . . . . . . . . . . . . . . . . . . . . . . . . . . . . . . . . . . . . . 73
1.16 Removing and installing mounting bracket, Golf Plus left-hand drive . . . . . . . . . . . . . . . . 79
1.17 Removing and installing mounting bracket, Passat . . . . . . . . . . . . . . . . . . . . . . . . . . . . . . 84
1.18 Removing and installing master cylinder . . . . . . . . . . . . . . . . . . . . . . . . . . . . . . . . . . . . . . 88
1.19 Removing and installing clutch position sender G476 . . . . . . . . . . . . . . . . . . . . . . . . . . . . 90
1.20 Assembly overview - hydraulics (LHD) . . . . . . . . . . . . . . . . . . . . . . . . . . . . . . . . . . . . . . . . 94
1.21 Assembly overview - hydraulics (RHD) . . . . . . . . . . . . . . . . . . . . . . . . . . . . . . . . . . . . . . . . 96
2 Removing and installing slave cylinder . . . . . . . . . . . . . . . . . . . . . . . . . . . . . . . . . . . . . . . . 98
2.1 Removing . . . . . . . . . . . . . . . . . . . . . . . . . . . . . . . . . . . . . . . . . . . . . . . . . . . . . . . . . . . . . . 98
2.2 Installing . . . . . . . . . . . . . . . . . . . . . . . . . . . . . . . . . . . . . . . . . . . . . . . . . . . . . . . . . . . . . . . . 99
2.3 Torque settings . . . . . . . . . . . . . . . . . . . . . . . . . . . . . . . . . . . . . . . . . . . . . . . . . . . . . . . . . . 99
3 Bleeding clutch system . . . . . . . . . . . . . . . . . . . . . . . . . . . . . . . . . . . . . . . . . . . . . . . . . . . . 101
4 Repairing clutch release mechanism . . . . . . . . . . . . . . . . . . . . . . . . . . . . . . . . . . . . . . . . . . 103
5 Repairing clutch, in conjunction with dual-mass flywheel . . . . . . . . . . . . . . . . . . . . . . . . . . 105
5.1 Identifying make of clutch, vehicles with 1.9 l - 66 kW turbo diesel engine and vehicles with
1.9 l - 77 kW turbo diesel engine . . . . . . . . . . . . . . . . . . . . . . . . . . . . . . . . . . . . . . . . . . . . 105
5.2 Removing and installing Sachs clutch . . . . . . . . . . . . . . . . . . . . . . . . . . . . . . . . . . . . . . . . 107
5.3 Repairing Sachs clutch . . . . . . . . . . . . . . . . . . . . . . . . . . . . . . . . . . . . . . . . . . . . . . . . . . . . 109
5.4 Removing and installing LuK clutch . . . . . . . . . . . . . . . . . . . . . . . . . . . . . . . . . . . . . . . . . . 109
5.5 Repairing LuK clutch . . . . . . . . . . . . . . . . . . . . . . . . . . . . . . . . . . . . . . . . . . . . . . . . . . . . . . 112
6 Repairing clutch, in conjunction with one-piece flywheel . . . . . . . . . . . . . . . . . . . . . . . . . . 113
Contents i

P
r
o
t
e
c
t
e
d
b
y
c
o
p
y
r
i
g
h
t
.
C
o
p
y
i
n
g
f
o
r
p
r
i
v
a
t
e
o
r
c
o
m
m
e
r
c
i
a
l
p
u
r
p
o
s
e
s
,
i
n
p
a
r
t
o
r
i
n
w
h
o
l
e
,
i
s
n
o
t
p
e
r
m
i
t
t
e
d
u
n
l
e
s
s
a
u
t
h
o
r
i
s
e
d
b
y
V
o
l
k
s
w
a
g
e
n
A
G
.
V
o
l
k
s
w
a
g
e
n
A
G
d
o
e
s
n
o
t
g
u
a
r
a
n
t
e
e
o
r
a
c
c
e
p
t
a
n
y
l
i
a
b
i
l
i
t
y
w
i
t
h
r
e
s
p
e
c
t
t
o
t
h
e
c
o
r
r
e
c
t
n
e
s
s
o
f
i
n
f
o
r
m
a
t
i
o
n
i
n
t
h
i
s
d
o
c
u
m
e
n
t
.
C
o
p
y
r
i
g
h
t
b
y
V
o
l
k
s
w
a
g
e
n
A
G
.
Golf 2004 ➤ , Golf 2009 ➤ , Golf Plus 2005 ➤ , Golf Plus 2009 ➤ , Pass ...
5-speed manual gearbox 0A4 - Edition 04.2010
34 - Controls, housing . . . . . . . . . . . . . . . . . . . . . . . . . . . . . . . . . . . . . . . . . . . . . . . . . . 116
1 Repairing selector mechanism . . . . . . . . . . . . . . . . . . . . . . . . . . . . . . . . . . . . . . . . . . . . . . 116
1.1 Installation position of selector mechanism . . . . . . . . . . . . . . . . . . . . . . . . . . . . . . . . . . . . 116
1.2 Overview of selector mechanism . . . . . . . . . . . . . . . . . . . . . . . . . . . . . . . . . . . . . . . . . . . . 117
1.3 Removing and installing gear knob and cover . . . . . . . . . . . . . . . . . . . . . . . . . . . . . . . . . . 118
1.4 Removing and installing gaiter with gear knob and noise insulation, Golf . . . . . . . . . . . . . . 118
1.5 Removing and installing gaiter with gear knob and noise insulation, Golf Plus . . . . . . . . . . 120
1.6 Removing and installing gaiter with selector lever knob and noise insulation, Passat . . . . 121
1.7 Repairing gear lever and selector housing (through 10.06) . . . . . . . . . . . . . . . . . . . . . . . . 123
1.8 Repairing gear lever and selector housing (from 11.06) . . . . . . . . . . . . . . . . . . . . . . . . . . 125
1.9 Assembly overview - removing and installing selector cables . . . . . . . . . . . . . . . . . . . . . . 131
1.10 Plastic relay lever . . . . . . . . . . . . . . . . . . . . . . . . . . . . . . . . . . . . . . . . . . . . . . . . . . . . . . . . 134
1.11 Removing and installing selector mechanism . . . . . . . . . . . . . . . . . . . . . . . . . . . . . . . . . . 136
1.12 Adjusting selector mechanism . . . . . . . . . . . . . . . . . . . . . . . . . . . . . . . . . . . . . . . . . . . . . . 139
2 Removing and installing gearbox, Golf 2004 ▸ . . . . . . . . . . . . . . . . . . . . . . . . . . . . . . . . . . 143
2.1 Removing gearbox . . . . . . . . . . . . . . . . . . . . . . . . . . . . . . . . . . . . . . . . . . . . . . . . . . . . . . . . 144
2.2 Installing gearbox . . . . . . . . . . . . . . . . . . . . . . . . . . . . . . . . . . . . . . . . . . . . . . . . . . . . . . . . 150
3 Removing and installing gearbox, Golf 2009 ▸ with turbo diesel engine . . . . . . . . . . . . . . 156
3.1 Removing gearbox . . . . . . . . . . . . . . . . . . . . . . . . . . . . . . . . . . . . . . . . . . . . . . . . . . . . . . . . 157
3.2 Installing gearbox . . . . . . . . . . . . . . . . . . . . . . . . . . . . . . . . . . . . . . . . . . . . . . . . . . . . . . . . 163
4 Removing and installing gearbox, Golf 2009 ▸ with petrol engine . . . . . . . . . . . . . . . . . . . . 171
4.1 Removing gearbox . . . . . . . . . . . . . . . . . . . . . . . . . . . . . . . . . . . . . . . . . . . . . . . . . . . . . . . . 173
4.2 Installing gearbox . . . . . . . . . . . . . . . . . . . . . . . . . . . . . . . . . . . . . . . . . . . . . . . . . . . . . . . . 180
5 Removing and installing gearbox, Golf Plus . . . . . . . . . . . . . . . . . . . . . . . . . . . . . . . . . . . . 188
5.1 Removing gearbox . . . . . . . . . . . . . . . . . . . . . . . . . . . . . . . . . . . . . . . . . . . . . . . . . . . . . . . . 189
5.2 Installing gearbox . . . . . . . . . . . . . . . . . . . . . . . . . . . . . . . . . . . . . . . . . . . . . . . . . . . . . . . . 196
6 Removing and installing gearbox, Passat . . . . . . . . . . . . . . . . . . . . . . . . . . . . . . . . . . . . . . 205
6.1 Removing gearbox . . . . . . . . . . . . . . . . . . . . . . . . . . . . . . . . . . . . . . . . . . . . . . . . . . . . . . . . 207
6.2 Installing gearbox . . . . . . . . . . . . . . . . . . . . . . . . . . . . . . . . . . . . . . . . . . . . . . . . . . . . . . . . 212
7 Transporting gearbox . . . . . . . . . . . . . . . . . . . . . . . . . . . . . . . . . . . . . . . . . . . . . . . . . . . . . . 219
8 Checking and topping up gear oil . . . . . . . . . . . . . . . . . . . . . . . . . . . . . . . . . . . . . . . . . . . . 220
8.1 Preparation . . . . . . . . . . . . . . . . . . . . . . . . . . . . . . . . . . . . . . . . . . . . . . . . . . . . . . . . . . . . . . 220
8.2 Draining gear oil . . . . . . . . . . . . . . . . . . . . . . . . . . . . . . . . . . . . . . . . . . . . . . . . . . . . . . . . . . 221
8.3 Fill with gear oil . . . . . . . . . . . . . . . . . . . . . . . . . . . . . . . . . . . . . . . . . . . . . . . . . . . . . . . . . . 222
9 Dismantling and assembling gearbox . . . . . . . . . . . . . . . . . . . . . . . . . . . . . . . . . . . . . . . . 223
9.1 Overview - gearbox . . . . . . . . . . . . . . . . . . . . . . . . . . . . . . . . . . . . . . . . . . . . . . . . . . . . . . 223
9.2 Assembly overview . . . . . . . . . . . . . . . . . . . . . . . . . . . . . . . . . . . . . . . . . . . . . . . . . . . . . . . . 224
9.3 Removing and installing cover for gearbox housing and 5th gear . . . . . . . . . . . . . . . . . . . . 225
9.4 Removing and installing gearbox housing and selector mechanism . . . . . . . . . . . . . . . . . . 226
9.5 Removing and installing input shaft, output shaft, differential and selector forks . . . . . . . . 227
9.6 Assembly sequence - removing and installing cover for gearbox housing and 5th gear . . 228
9.7 Assembly sequence - Dismantling and assembling gearbox completely . . . . . . . . . . . . . . 234
10 Repairing gearbox housing and clutch housing . . . . . . . . . . . . . . . . . . . . . . . . . . . . . . . . . . 248
11 Repairing selector unit . . . . . . . . . . . . . . . . . . . . . . . . . . . . . . . . . . . . . . . . . . . . . . . . . . . . 255
12 Dismantling and assembling selector forks . . . . . . . . . . . . . . . . . . . . . . . . . . . . . . . . . . . . 258
35 - Gears, shafts . . . . . . . . . . . . . . . . . . . . . . . . . . . . . . . . . . . . . . . . . . . . . . . . . . . . 263
1 Input shaft . . . . . . . . . . . . . . . . . . . . . . . . . . . . . . . . . . . . . . . . . . . . . . . . . . . . . . . . . . . . . . 263
1.1 Dismantling and assembling input shaft . . . . . . . . . . . . . . . . . . . . . . . . . . . . . . . . . . . . . . . . 263
1.2 Adjusting input shaft . . . . . . . . . . . . . . . . . . . . . . . . . . . . . . . . . . . . . . . . . . . . . . . . . . . . . . 270
2 Output shaft . . . . . . . . . . . . . . . . . . . . . . . . . . . . . . . . . . . . . . . . . . . . . . . . . . . . . . . . . . . . 275
2.1 Dismantling and assembling output shaft . . . . . . . . . . . . . . . . . . . . . . . . . . . . . . . . . . . . . . 275
2.2 Adjusting output shaft . . . . . . . . . . . . . . . . . . . . . . . . . . . . . . . . . . . . . . . . . . . . . . . . . . . . . . 287
ii Contents

P
r
o
t
e
c
t
e
d
b
y
c
o
p
y
r
i
g
h
t
.
C
o
p
y
i
n
g
f
o
r
p
r
i
v
a
t
e
o
r
c
o
m
m
e
r
c
i
a
l
p
u
r
p
o
s
e
s
,
i
n
p
a
r
t
o
r
i
n
w
h
o
l
e
,
i
s
n
o
t
p
e
r
m
i
t
t
e
d
u
n
l
e
s
s
a
u
t
h
o
r
i
s
e
d
b
y
V
o
l
k
s
w
a
g
e
n
A
G
.
V
o
l
k
s
w
a
g
e
n
A
G
d
o
e
s
n
o
t
g
u
a
r
a
n
t
e
e
o
r
a
c
c
e
p
t
a
n
y
l
i
a
b
i
l
i
t
y
w
i
t
h
r
e
s
p
e
c
t
t
o
t
h
e
c
o
r
r
e
c
t
n
e
s
s
o
f
i
n
f
o
r
m
a
t
i
o
n
i
n
t
h
i
s
d
o
c
u
m
e
n
t
.
C
o
p
y
r
i
g
h
t
b
y
V
o
l
k
s
w
a
g
e
n
A
G
.
Golf 2004 ➤ , Golf 2009 ➤ , Golf Plus 2005 ➤ , Golf Plus 2009 ➤ , Pass ...
5-speed manual gearbox 0A4 - Edition 04.2010
3 Reverse shaft . . . . . . . . . . . . . . . . . . . . . . . . . . . . . . . . . . . . . . . . . . . . . . . . . . . . . . . . . . . . 291
3.1 Dismantling and assembling reverse shaft . . . . . . . . . . . . . . . . . . . . . . . . . . . . . . . . . . . . . . 291
39 - Final drive - differential . . . . . . . . . . . . . . . . . . . . . . . . . . . . . . . . . . . . . . . . . . . . . . 294
1 Renewing flange shaft oil seals with gearbox installed . . . . . . . . . . . . . . . . . . . . . . . . . . . . 294
1.1 Renewing oil seal for left flange shaft . . . . . . . . . . . . . . . . . . . . . . . . . . . . . . . . . . . . . . . . . . 294
1.2 Distinguishing seals for right flange shaft . . . . . . . . . . . . . . . . . . . . . . . . . . . . . . . . . . . . . . 295
1.3 Renewing seal (two-part seal and sleeve for right flange shaft) . . . . . . . . . . . . . . . . . . . . . . 296
1.4 Renewing seal and sleeve together (one-piece seal and sleeve for right flange shaft) . . . . 299
2 Adjustment overview . . . . . . . . . . . . . . . . . . . . . . . . . . . . . . . . . . . . . . . . . . . . . . . . . . . . . . 302
3 Differential . . . . . . . . . . . . . . . . . . . . . . . . . . . . . . . . . . . . . . . . . . . . . . . . . . . . . . . . . . . . . . 303
3.1 Dismantling and assembling differential . . . . . . . . . . . . . . . . . . . . . . . . . . . . . . . . . . . . . . . . 303
3.2 Adjusting differential . . . . . . . . . . . . . . . . . . . . . . . . . . . . . . . . . . . . . . . . . . . . . . . . . . . . . . 311
Contents iii

P
r
o
t
e
c
t
e
d
b
y
c
o
p
y
r
i
g
h
t
.
C
o
p
y
i
n
g
f
o
r
p
r
i
v
a
t
e
o
r
c
o
m
m
e
r
c
i
a
l
p
u
r
p
o
s
e
s
,
i
n
p
a
r
t
o
r
i
n
w
h
o
l
e
,
i
s
n
o
t
p
e
r
m
i
t
t
e
d
u
n
l
e
s
s
a
u
t
h
o
r
i
s
e
d
b
y
V
o
l
k
s
w
a
g
e
n
A
G
.
V
o
l
k
s
w
a
g
e
n
A
G
d
o
e
s
n
o
t
g
u
a
r
a
n
t
e
e
o
r
a
c
c
e
p
t
a
n
y
l
i
a
b
i
l
i
t
y
w
i
t
h
r
e
s
p
e
c
t
t
o
t
h
e
c
o
r
r
e
c
t
n
e
s
s
o
f
i
n
f
o
r
m
a
t
i
o
n
i
n
t
h
i
s
d
o
c
u
m
e
n
t
.
C
o
p
y
r
i
g
h
t
b
y
V
o
l
k
s
w
a
g
e
n
A
G
.
Golf 2004 ➤ , Golf 2009 ➤ , Golf Plus 2005 ➤ , Golf Plus 2009 ➤ , Pass ...
5-speed manual gearbox 0A4 - Edition 04.2010
iv Contents
P
r
o
t
e
c
t
e
d
b
y
c
o
p
y
r
i
g
h
t
.
C
o
p
y
i
n
g
f
o
r
p
r
i
v
a
t
e
o
r
c
o
m
m
e
r
c
i
a
l
p
u
r
p
o
s
e
s
,
i
n
p
a
r
t
o
r
i
n
w
h
o
l
e
,
i
s
n
o
t
p
e
r
m
i
t
t
e
d
u
n
l
e
s
s
a
u
t
h
o
r
i
s
e
d
b
y
V
o
l
k
s
w
a
g
e
n
A
G
.
V
o
l
k
s
w
a
g
e
n
A
G
d
o
e
s
n
o
t
g
u
a
r
a
n
t
e
e
o
r
a
c
c
e
p
t
a
n
y
l
i
a
b
i
l
i
t
y
w
i
t
h
r
e
s
p
e
c
t
t
o
t
h
e
c
o
r
r
e
c
t
n
e
s
s
o
f
i
n
f
o
r
m
a
t
i
o
n
i
n
t
h
i
s
d
o
c
u
m
e
n
t
.
C
o
p
y
r
i
g
h
t
b
y
V
o
l
k
s
w
a
g
e
n
A
G
.
Golf 2004 ➤ , Golf 2009 ➤ , Golf Plus 2005 ➤ , Golf Plus 2009 ➤ , Pass ...
5-speed manual gearbox 0A4 - Edition 04.2010
00 – Technical data
1 Gearbox identification
5-speed manual gearbox 0A4 is installed in following vehicles:
Allocation, Golf 2004 ▸ ⇒ page 2
Allocation, Golf 2009 ▸ ⇒ page 4
Allocation, Golf Plus 2005 ▸ ⇒ page 5
Allocation, Golf Plus 2009 ▸ ⇒ page 6
Allocation, Passat 2006 ▸ ⇒ page 6
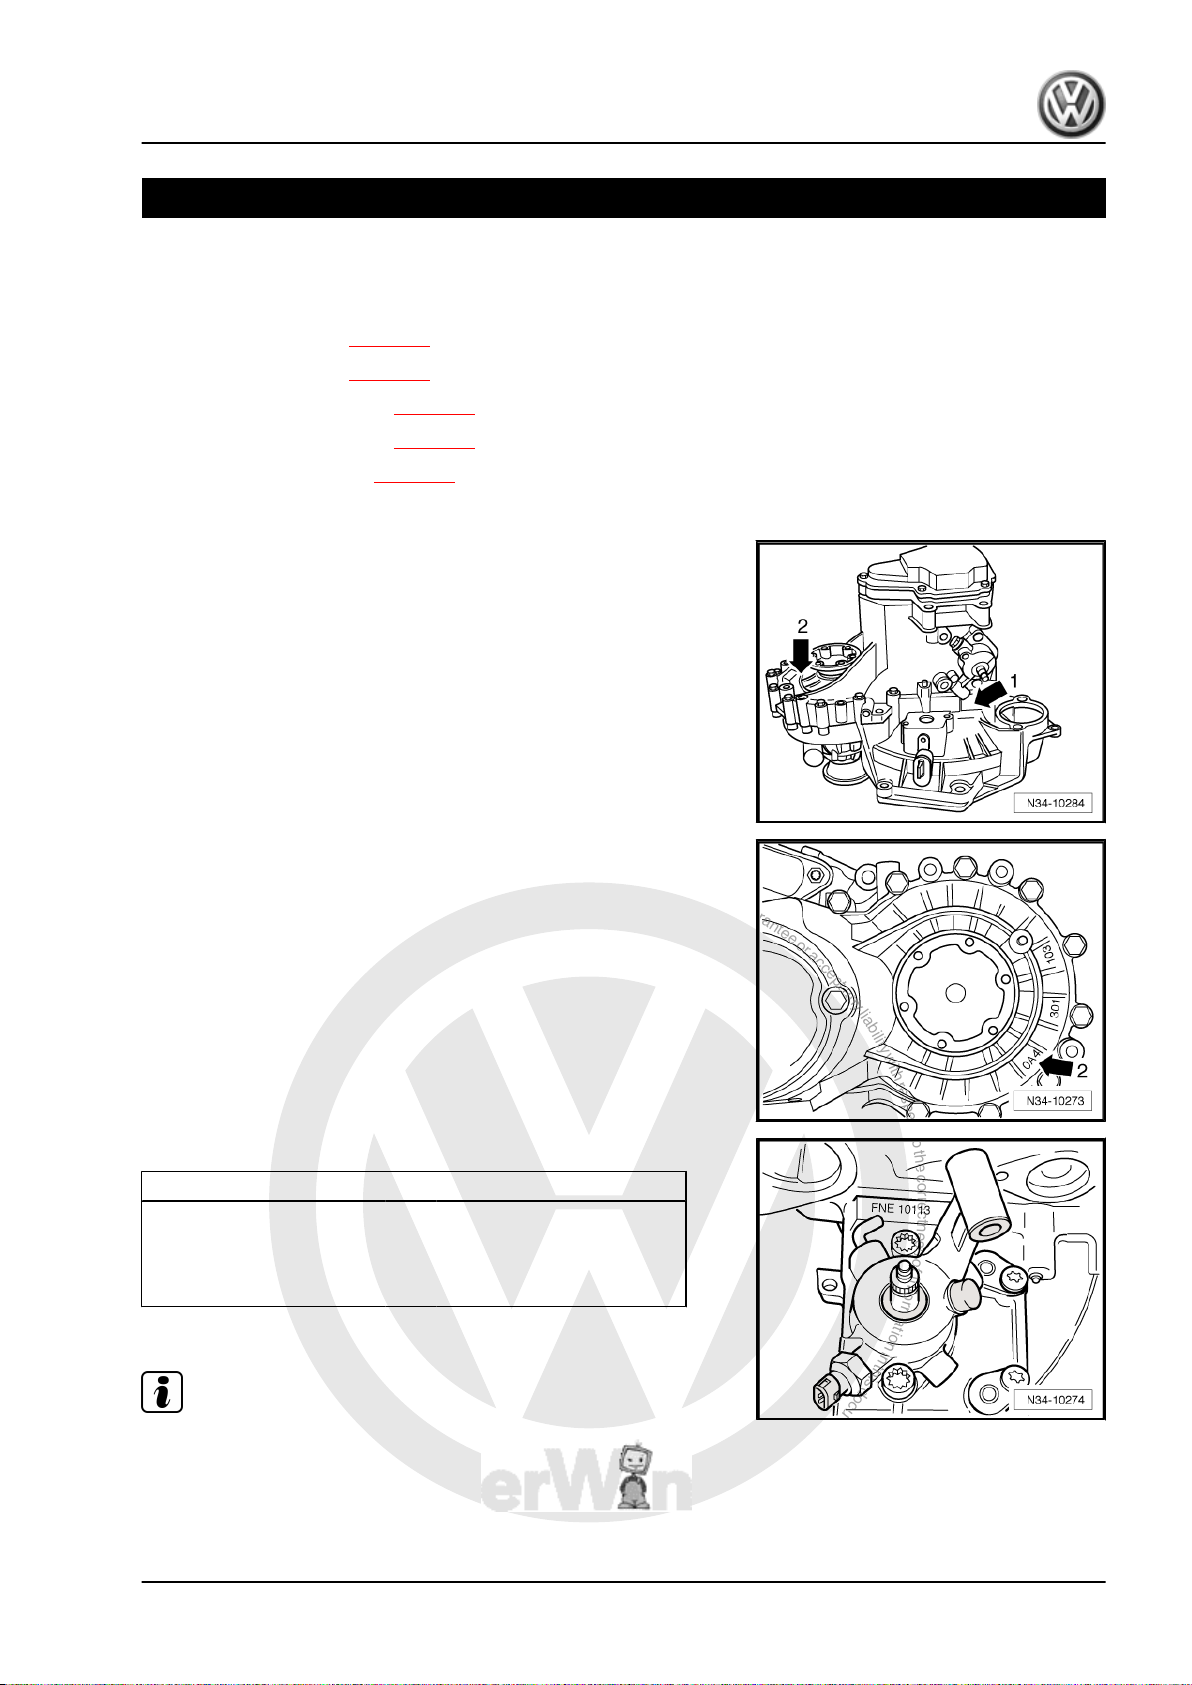
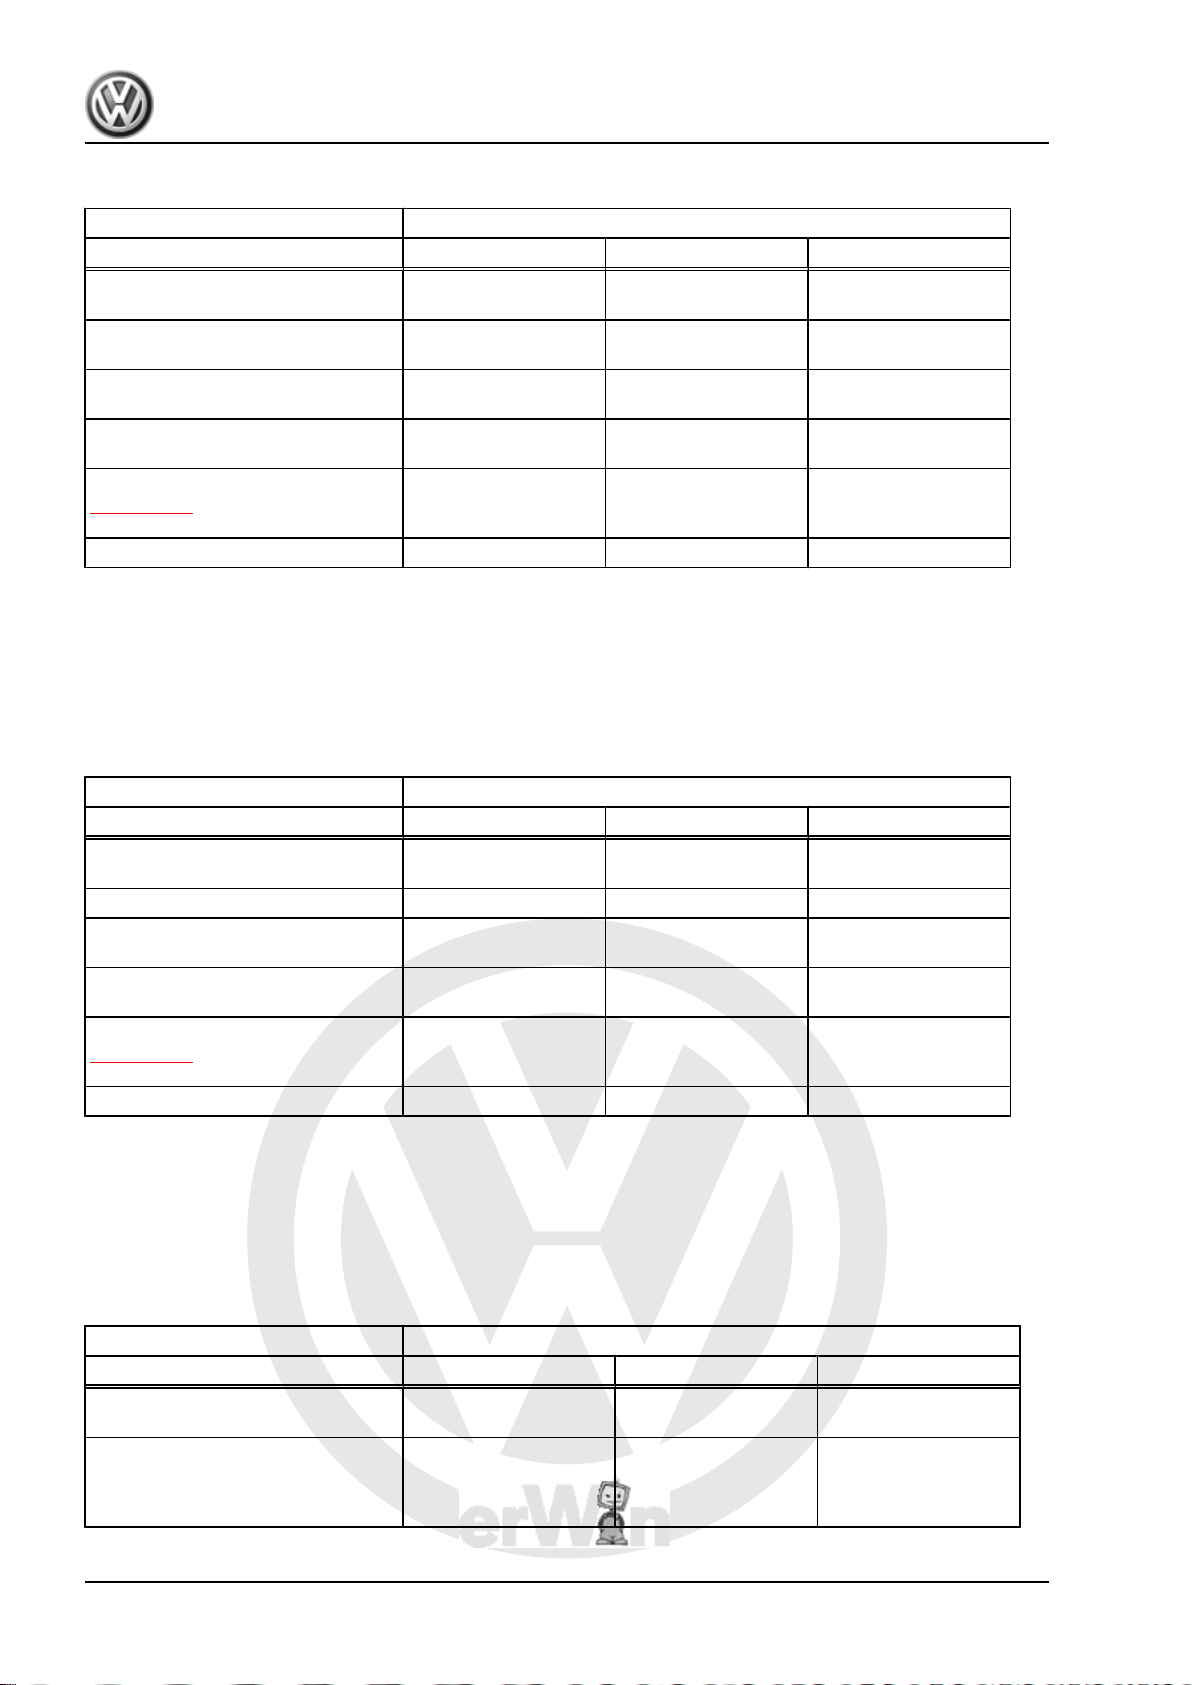
1.1 Location on gearbox
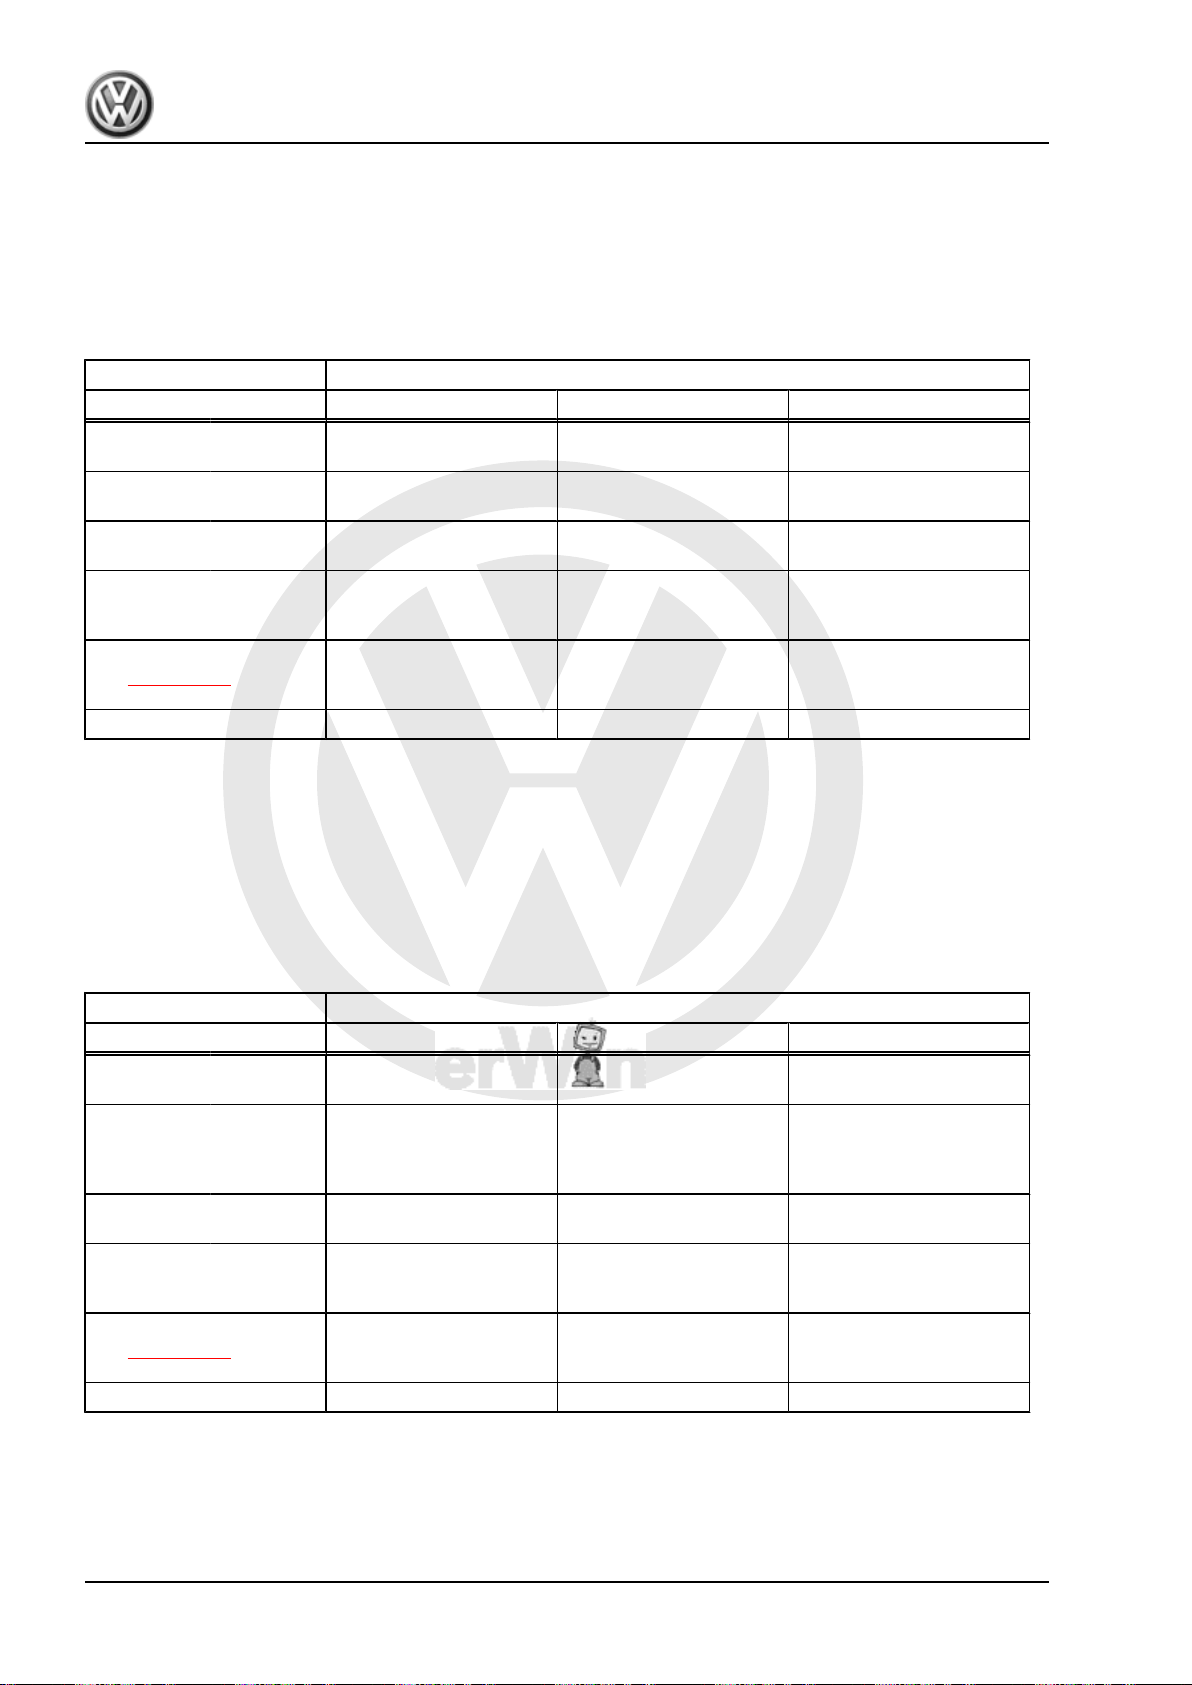
Codes and production date -arrow 1- manual gearbox 0A4
-arrow 2-
Manual gearbox 0A4 -arrow 2-
Codes and production date of gearbox
Example: FNE 10 11 3
Additional data provide information about the production facility.
Note
The gearbox code is also included on the vehicle data stickers.
I I I I
I I I I
Identification
code
Day Month Year (2003)
of manufacture
1. Gearbox identification 1
P
r
o
t
e
c
t
e
d
b
y
c
o
p
y
r
i
g
h
t
.
C
o
p
y
i
n
g
f
o
r
p
r
i
v
a
t
e
o
r
c
o
m
m
e
r
c
i
a
l
p
u
r
p
o
s
e
s
,
i
n
p
a
r
t
o
r
i
n
w
h
o
l
e
,
i
s
n
o
t
p
e
r
m
i
t
t
e
d
u
n
l
e
s
s
a
u
t
h
o
r
i
s
e
d
b
y
V
o
l
k
s
w
a
g
e
n
A
G
.
V
o
l
k
s
w
a
g
e
n
A
G
d
o
e
s
n
o
t
g
u
a
r
a
n
t
e
e
o
r
a
c
c
e
p
t
a
n
y
l
i
a
b
i
l
i
t
y
w
i
t
h
r
e
s
p
e
c
t
t
o
t
h
e
c
o
r
r
e
c
t
n
e
s
s
o
f
i
n
f
o
r
m
a
t
i
o
n
i
n
t
h
i
s
d
o
c
u
m
e
n
t
.
C
o
p
y
r
i
g
h
t
b
y
V
o
l
k
s
w
a
g
e
n
A
G
.
Golf 2004 ➤ , Golf 2009 ➤ , Golf Plus 2005 ➤ , Golf Plus 2009 ➤ , Pass ...
5-speed manual gearbox 0A4 - Edition 04.2010
1.2 Identification codes, assembly allocation, capacities, Golf 2004 ▸
Manual gearbox 5-speed 0A4
Identification code FNE GQQ HGR
Manufactured from
to
Allocation Engine 1.9 l - 77 kW
Ratio
Final drive 61 : 18 = 3.389 61 : 18 = 3.389 62 : 17 = 3.647
Z1 : Z2
Capacity of manual gearbox (gear‐
box completely dismantled)
Capacity of manual gearbox
⇒ page 220 (gearbox partially dis‐
mantled)
Drive shaft flange ∅ 100 mm 100 mm 100 mm
The following data can be found in the ⇒ Electronic parts cata‐
logue “ETKA” .
♦ Individual gear ratios
♦ Gear oil
♦ Clutch allocation
08.03
08.03
08.03
08.06
1.9 l - 77 kW
turbo diesel
turbo diesel
1.9 l 1.9 l 1.9 l
1.7 l 1.7 l 1.7 l
03.05
08.06
2.5 l - 110 kW
Manual gearbox 5-speed 0A4
Identification code HDR GTB JCT
Manufactured from
to
Allocation Engine 2.0 l - 85 kW 2.5 l - 110 kW 2.5 l - 110 kW
Ratio
Z1 : Z2
Capacity of manual gearbox (gear‐
box completely dismantled)
Capacity of manual gearbox
⇒ page 220 (gearbox partially dis‐
mantled)
Drive shaft flange ∅ 100 mm 108 mm 108 mm
The following data can be found in the ⇒ Electronic parts cata‐
logue “ETKA” .
♦ Individual gear ratios
♦ Gear oil
♦ Clutch allocation
Manual gearbox 5-speed 0A4
Identification code JCR JCU JCV
Manufactured from
Allocation Engine 1.9 l - 66 kW
Final drive 62 : 17 = 3.647 62 : 17 = 3.647 62 : 17 = 3.647
to
01.05
08.06
1.9 l 1.9 l 1.9 l
1.7 l 1.7 l 1.7 l
05.06
06.08
turbo diesel
1.9 l - 77 kW
turbo diesel
08.03
03.04
05.06
06.08
2.0 l - 85 kW 1.8 l - 110 kW
05.06
06.08
05.06
06.08
2 Rep. Gr.00 - Technical data

P
r
o
t
e
c
t
e
d
b
y
c
o
p
y
r
i
g
h
t
.
C
o
p
y
i
n
g
f
o
r
p
r
i
v
a
t
e
o
r
c
o
m
m
e
r
c
i
a
l
p
u
r
p
o
s
e
s
,
i
n
p
a
r
t
o
r
i
n
w
h
o
l
e
,
i
s
n
o
t
p
e
r
m
i
t
t
e
d
u
n
l
e
s
s
a
u
t
h
o
r
i
s
e
d
b
y
V
o
l
k
s
w
a
g
e
n
A
G
.
V
o
l
k
s
w
a
g
e
n
A
G
d
o
e
s
n
o
t
g
u
a
r
a
n
t
e
e
o
r
a
c
c
e
p
t
a
n
y
l
i
a
b
i
l
i
t
y
w
i
t
h
r
e
s
p
e
c
t
t
o
t
h
e
c
o
r
r
e
c
t
n
e
s
s
o
f
i
n
f
o
r
m
a
t
i
o
n
i
n
t
h
i
s
d
o
c
u
m
e
n
t
.
C
o
p
y
r
i
g
h
t
b
y
V
o
l
k
s
w
a
g
e
n
A
G
.
Golf 2004 ➤ , Golf 2009 ➤ , Golf Plus 2005 ➤ , Golf Plus 2009 ➤ , Pass ...
5-speed manual gearbox 0A4 - Edition 04.2010
Manual gearbox 5-speed 0A4
Identification code JCR JCU JCV
Ratio
Final drive 61 : 18 = 3.389 72 : 17 = 4.235 63 : 16 = 3.938
Z1 : Z2
Capacity of manual gearbox (gear‐
1.9 l 1.9 l 1.9 l
box completely dismantled)
Capacity of manual gearbox
1.7 l 1.7 l 1.7 l
⇒ page 220 (gearbox partially dis‐
mantled)
Drive shaft flange ∅ 108 mm 100 mm 108 mm
The following data can be found in the ⇒ Electronic parts cata‐
logue “ETKA” .
♦ Individual gear ratios
♦ Gear oil
♦ Clutch allocation
Manual gearbox 5-speed 0A4
Identification code FNC HJK KCL
Manufactured from
Allocation Engine 1.9 l - 77 kW
Ratio
Z1 : Z2
Capacity of manual gearbox (gear‐
box completely dismantled)
Capacity of manual gearbox
⇒ page 220 (gearbox partially dis‐
mantled)
Drive shaft flange ∅ 100 mm 100 mm 100 mm
Final drive 61 : 18 = 3.778 63 : 16 = 3.938 61 : 18 = 3.778
The following data can be found in the ⇒ Electronic parts cata‐
logue “ETKA” .
♦ Individual gear ratios
to
♦ Gear oil
turbo diesel
05.06
12.06
1.9 l 1.9 l 1.9 l
1.7 l 1.7 l 1.7 l
05.06
12.06
1.8 l - 110 kW 1.9 l - 77 kW
12.06
06.08
turbo diesel
♦ Clutch allocation
Manual gearbox 5-speed 0A4
Identification code KBL KCD JQP
Manufactured from
to
Allocation Engine 1.9 l - 77 kW
07.07
06.08
05.07
12.07
07.07
06.08
2.5 l - 125 kW 1.8 l - 118 kW
turbo diesel
Ratio
Final drive 61 : 18 = 3.778 62 : 17 = 3.647 62 : 17 = 3.647
Z1 : Z2
Capacity of manual gearbox (gear‐
1.9 l 1.9 l 1.9 l
box completely dismantled)
Capacity of manual gearbox
1.7 l 1.7 l 1.7 l
⇒ page 220 (gearbox partially dis‐
mantled)
Drive shaft flange ∅ 100 mm 100 mm 100 mm
1. Gearbox identification 3
P
r
o
t
e
c
t
e
d
b
y
c
o
p
y
r
i
g
h
t
.
C
o
p
y
i
n
g
f
o
r
p
r
i
v
a
t
e
o
r
c
o
m
m
e
r
c
i
a
l
p
u
r
p
o
s
e
s
,
i
n
p
a
r
t
o
r
i
n
w
h
o
l
e
,
i
s
n
o
t
p
e
r
m
i
t
t
e
d
u
n
l
e
s
s
a
u
t
h
o
r
i
s
e
d
b
y
V
o
l
k
s
w
a
g
e
n
A
G
.
V
o
l
k
s
w
a
g
e
n
A
G
d
o
e
s
n
o
t
g
u
a
r
a
n
t
e
e
o
r
a
c
c
e
p
t
a
n
y
l
i
a
b
i
l
i
t
y
w
i
t
h
r
e
s
p
e
c
t
t
o
t
h
e
c
o
r
r
e
c
t
n
e
s
s
o
f
i
n
f
o
r
m
a
t
i
o
n
i
n
t
h
i
s
d
o
c
u
m
e
n
t
.
C
o
p
y
r
i
g
h
t
b
y
V
o
l
k
s
w
a
g
e
n
A
G
.
Golf 2004 ➤ , Golf 2009 ➤ , Golf Plus 2005 ➤ , Golf Plus 2009 ➤ , Pass ...
5-speed manual gearbox 0A4 - Edition 04.2010
The following data can be found in the ⇒ Electronic parts cata‐
logue “ETKA” .
♦ Individual gear ratios
♦ Gear oil
♦ Clutch allocation
Manual gearbox 5-speed 0A4
Identification code KPF LHW
Manufac‐
tured
Allocation Engine 2.5 l - 125 kW 1.9 l - 77 kW
Ratio
Final drive 61 : 18 = 3.778 62 : 17 = 3.647
Z1 : Z2
Capacity of manual gear‐
box (gearbox completely
dismantled)
Capacity of manual gear‐
box ⇒ page 220 (gearbox
partially dismantled)
Drive shaft flange ∅ 100 mm 100 mm
The following data can be found in the ⇒ Electronic parts cata‐
logue “ETKA” .
♦ Individual gear ratios
♦ Gear oil
♦ Clutch allocation
1.3 Identification codes, assembly allocation, capacities, Golf 2009 ▸
Manual gearbox 5-speed 0A4
Identification code KQM LLL LHW
Manufac‐
tured
Allocation Engine 1.9 l - 81 kW
from
to
from
to
07.07
06.08
1.9 l 1.9 l
1.7 l 1.7 l
06.08
05.09
04.08
06.08
turbo diesel
08.08 05.09
2.0 l - 81 kW
turbo diesel
turbo diesel
1.6 l - 66 kW
turbo diesel
1.6 l - 77 kW
turbo diesel
Ratio
Final drive 61 : 18 = 3.778 61 : 18 = 3.778 62 : 17 = 3.647
Z1 : Z2
Capacity of manual gear‐
1.9 l 1.9 l 1.9 l
box (gearbox completely
dismantled)
Capacity of manual gear‐
1.7 l 1.7 l 1.7 l
box ⇒ page 220 (gearbox
partially dismantled)
Drive shaft flange ∅ 100 mm 100 mm 100 mm
The following data can be found in the ⇒ Electronic parts cata‐
logue “ETKA” .
♦ Individual gear ratios
♦ Gear oil
4 Rep. Gr.00 - Technical data
P
r
o
t
e
c
t
e
d
b
y
c
o
p
y
r
i
g
h
t
.
C
o
p
y
i
n
g
f
o
r
p
r
i
v
a
t
e
o
r
c
o
m
m
e
r
c
i
a
l
p
u
r
p
o
s
e
s
,
i
n
p
a
r
t
o
r
i
n
w
h
o
l
e
,
i
s
n
o
t
p
e
r
m
i
t
t
e
d
u
n
l
e
s
s
a
u
t
h
o
r
i
s
e
d
b
y
V
o
l
k
s
w
a
g
e
n
A
G
.
V
o
l
k
s
w
a
g
e
n
A
G
d
o
e
s
n
o
t
g
u
a
r
a
n
t
e
e
o
r
a
c
c
e
p
t
a
n
y
l
i
a
b
i
l
i
t
y
w
i
t
h
r
e
s
p
e
c
t
t
o
t
h
e
c
o
r
r
e
c
t
n
e
s
s
o
f
i
n
f
o
r
m
a
t
i
o
n
i
n
t
h
i
s
d
o
c
u
m
e
n
t
.
C
o
p
y
r
i
g
h
t
b
y
V
o
l
k
s
w
a
g
e
n
A
G
.
Golf 2004 ➤ , Golf 2009 ➤ , Golf Plus 2005 ➤ , Golf Plus 2009 ➤ , Pass ...
5-speed manual gearbox 0A4 - Edition 04.2010
♦ Clutch allocation
Manual gearbox 5-speed 0A4
Identification code LUB KCD KPF
Manufac‐
tured
Allocation Engine 1.9 l - 77 kW
from
to
05.09 08.09
09.09
2.5 l - 125 kW 2.5 l - 125 kW
08.09
05.10
turbo diesel
Ratio
Final drive 62 : 17 = 3.647 62 : 17 = 3.647 61 : 18 = 3.778
Z1 : Z2
Capacity of manual gear‐
1.9 l 1.9 l 1.9 l
box (gearbox completely
dismantled)
Capacity of manual gear‐
1.7 l 1.7 l 1.7 l
box ⇒ page 220 (gearbox
partially dismantled)
Drive shaft flange ∅ 100 mm 100 mm 100 mm
The following data can be found in the ⇒ Electronic parts cata‐
logue “ETKA” .
♦ Individual gear ratios
♦ Gear oil
♦ Clutch allocation
Manual gearbox 5-speed 0A4
Identification code MDZ LEA
Manufac‐
tured
Allocation Engine 1.9 l - 77 kW
Ratio
Z1 : Z2
Capacity of manual gear‐
box (gearbox completely
dismantled)
Capacity of manual gear‐
box ⇒ page 220 (gearbox
partially dismantled)
Drive shaft flange ∅ 100 mm 100 mm
The following data can be found in the ⇒ Electronic parts cata‐
logue “ETKA” .
♦ Individual gear ratios
♦ Gear oil
from
to
Final drive 61 : 18 = 3.778 61 : 18 = 3.778
11.09 05.10
turbo diesel
1.9 l 1.9 l
1.7 l 1.7 l
08.10
2.5 l - 125 kW
♦ Clutch allocation
1.4 Identification codes, assembly allocation, capacities, Golf Plus 2005 ▸
Manual gearbox 5-speed 0A4
Identification code HNV JCX KBL
Manufactured from
to
11.04
05.06
05.06
01.09
11.07
01.09
1. Gearbox identification 5
P
r
o
t
e
c
t
e
d
b
y
c
o
p
y
r
i
g
h
t
.
C
o
p
y
i
n
g
f
o
r
p
r
i
v
a
t
e
o
r
c
o
m
m
e
r
c
i
a
l
p
u
r
p
o
s
e
s
,
i
n
p
a
r
t
o
r
i
n
w
h
o
l
e
,
i
s
n
o
t
p
e
r
m
i
t
t
e
d
u
n
l
e
s
s
a
u
t
h
o
r
i
s
e
d
b
y
V
o
l
k
s
w
a
g
e
n
A
G
.
V
o
l
k
s
w
a
g
e
n
A
G
d
o
e
s
n
o
t
g
u
a
r
a
n
t
e
e
o
r
a
c
c
e
p
t
a
n
y
l
i
a
b
i
l
i
t
y
w
i
t
h
r
e
s
p
e
c
t
t
o
t
h
e
c
o
r
r
e
c
t
n
e
s
s
o
f
i
n
f
o
r
m
a
t
i
o
n
i
n
t
h
i
s
d
o
c
u
m
e
n
t
.
C
o
p
y
r
i
g
h
t
b
y
V
o
l
k
s
w
a
g
e
n
A
G
.
Golf 2004 ➤ , Golf 2009 ➤ , Golf Plus 2005 ➤ , Golf Plus 2009 ➤ , Pass ...
5-speed manual gearbox 0A4 - Edition 04.2010
Manual gearbox 5-speed 0A4
Identification code HNV JCX KBL
Allocation Engine 1.9 l - 66 kW
turbo diesel
1.9 l - 77 kW
turbo diesel
Ratio
Final drive 62 : 17 = 3.647 62 : 17 = 3.647 61 : 18 = 3.778
1.9 l - 66 kW
turbo diesel
1.9 l - 77 kW
turbo diesel
1.9 l - 77 kW
turbo diesel
Z1 : Z2
Capacity of manual gearbox 1.9 l 1.9 l 1.9 l
Capacity of manual gearbox
1.7 l 1.7 l 1.7 l
⇒ page 220 (gearbox partially dis‐
mantled)
Drive shaft flange ∅ 100 mm 100 mm 100 mm
The following data can be found in the ⇒ Electronic parts cata‐
logue “ETKA” .
♦ Individual gear ratios
♦ Gear oil
♦ Clutch allocation
1.5 Identification codes, assembly allocation, capacities, Golf Plus 2009 ▸
Manual gearbox 5-speed 0A4
Identification code KQM LHW LUB
Manufactured from
Allocation Engine 2.0 l - 81 kW
Ratio
Z1 : Z2
Capacity of manual gearbox 1.9 l 1.9 l 1.9 l
Final drive 61 : 18 = 3.778 62 : 17 = 3.647 62 : 17 = 3.647
Capacity of manual gearbox
⇒ page 220 (gearbox partially dis‐
mantled)
Drive shaft flange ∅ 100 mm 100 mm 100 mm
to
The following data can be found in the ⇒ Electronic parts cata‐
turbo diesel
logue “ETKA” .
01.09 02.09 05.09
1.7 l 1.7 l 1.7 l
1.6 l - 66 kW
turbo diesel
1.6 l - 77 kW
turbo diesel
1.9 l - 77 kW
turbo diesel
♦ Individual gear ratios
♦ Gear oil
♦ Clutch allocation
1.6 Identification codes, assembly allocation and capacities, Passat 2006 ▸
Manual gearbox 5-speed 0A4
Identification code HNV JCX JQP
Manufac‐
tured
from
to
01.05
05.06
05.06
11.08
05.07
11.08
6 Rep. Gr.00 - Technical data
P
r
o
t
e
c
t
e
d
b
y
c
o
p
y
r
i
g
h
t
.
C
o
p
y
i
n
g
f
o
r
p
r
i
v
a
t
e
o
r
c
o
m
m
e
r
c
i
a
l
p
u
r
p
o
s
e
s
,
i
n
p
a
r
t
o
r
i
n
w
h
o
l
e
,
i
s
n
o
t
p
e
r
m
i
t
t
e
d
u
n
l
e
s
s
a
u
t
h
o
r
i
s
e
d
b
y
V
o
l
k
s
w
a
g
e
n
A
G
.
V
o
l
k
s
w
a
g
e
n
A
G
d
o
e
s
n
o
t
g
u
a
r
a
n
t
e
e
o
r
a
c
c
e
p
t
a
n
y
l
i
a
b
i
l
i
t
y
w
i
t
h
r
e
s
p
e
c
t
t
o
t
h
e
c
o
r
r
e
c
t
n
e
s
s
o
f
i
n
f
o
r
m
a
t
i
o
n
i
n
t
h
i
s
d
o
c
u
m
e
n
t
.
C
o
p
y
r
i
g
h
t
b
y
V
o
l
k
s
w
a
g
e
n
A
G
.
Golf 2004 ➤ , Golf 2009 ➤ , Golf Plus 2005 ➤ , Golf Plus 2009 ➤ , Pass ...
5-speed manual gearbox 0A4 - Edition 04.2010
Manual gearbox 5-speed 0A4
Identification code HNV JCX JQP
Allocation Engine 1.9 l - 77 kW
turbo diesel
1.9 l - 66 kW
turbo diesel
1.8 l - 118 kW
1.9 l - 77 kW
turbo diesel
Ratio
Final drive 62 : 17 = 3.647 62 : 17 = 3.647 62 : 17 = 3.647
Z1 : Z2
Capacity of manual gear‐
1.9 l 1.9 l 1.9 l
box (gearbox completely
dismantled)
Capacity of manual gear‐
1.7 l 1.7 l 1.7 l
box ⇒ page 220 (gear‐
box partially dismantled)
Drive shaft flange ∅ 100 mm 100 mm 107 mm
The following data can be found in the ⇒ Electronic parts cata‐
logue “ETKA” .
♦ Individual gear ratios
♦ Gear oil
♦ Clutch allocation
Manual gearbox 5-speed 0A4
Identification code JVF KBM KJF
Manufac‐
tured
Allocation Engine 2.0 l - 85 kW 1.9 l - 77 kW
Ratio
Z1 : Z2
Capacity of manual
gearbox (gearbox com‐
pletely dismantled)
Capacity of manual
gearbox ⇒ page 220
(gearbox partially dis‐
mantled)
Drive shaft flange ∅ 100 mm 100 mm 100 mm
The following data can be found in the ⇒ Electronic parts cata‐
logue “ETKA” .
♦ Individual gear ratios
♦ Gear oil
♦ Clutch allocation
Final
drive
Manual gearbox 5-speed 0A4
from
to
Identification code KBL LHP MDM
Manufac‐
tured
from
to
03.07
11.08
72 : 17 = 4.235 62 : 17 = 3.647 62 : 17 = 3.647
1.9 l 1.9 l 1.9 l
1.7 l 1.7 l 1.7 l
01.08 11.08
Allocation Engine 1.9 l - 77 kW
turbo diesel
05.07
11.08
turbo diesel
12.07
2.0 l - 85 kW
turbo diesel
08.09
08.09
2.0 l - 81 kW
turbo diesel
1.6 l - 77 kW
turbo diesel
2.0 l - 81 kW
turbo diesel
1.6 l - 77 kW
turbo diesel
1. Gearbox identification 7

P
r
o
t
e
c
t
e
d
b
y
c
o
p
y
r
i
g
h
t
.
C
o
p
y
i
n
g
f
o
r
p
r
i
v
a
t
e
o
r
c
o
m
m
e
r
c
i
a
l
p
u
r
p
o
s
e
s
,
i
n
p
a
r
t
o
r
i
n
w
h
o
l
e
,
i
s
n
o
t
p
e
r
m
i
t
t
e
d
u
n
l
e
s
s
a
u
t
h
o
r
i
s
e
d
b
y
V
o
l
k
s
w
a
g
e
n
A
G
.
V
o
l
k
s
w
a
g
e
n
A
G
d
o
e
s
n
o
t
g
u
a
r
a
n
t
e
e
o
r
a
c
c
e
p
t
a
n
y
l
i
a
b
i
l
i
t
y
w
i
t
h
r
e
s
p
e
c
t
t
o
t
h
e
c
o
r
r
e
c
t
n
e
s
s
o
f
i
n
f
o
r
m
a
t
i
o
n
i
n
t
h
i
s
d
o
c
u
m
e
n
t
.
C
o
p
y
r
i
g
h
t
b
y
V
o
l
k
s
w
a
g
e
n
A
G
.
Golf 2004 ➤ , Golf 2009 ➤ , Golf Plus 2005 ➤ , Golf Plus 2009 ➤ , Pass ...
5-speed manual gearbox 0A4 - Edition 04.2010
Manual gearbox 5-speed 0A4
Identification code KBL LHP MDM
Ratio
Z1 : Z2
Capacity of manual
gearbox (gearbox com‐
pletely dismantled)
Capacity of manual
gearbox ⇒ page 220
(gearbox partially dis‐
mantled)
Drive shaft flange ∅ 100 mm 100 mm 100 mm
The following data can be found in the ⇒ Electronic parts cata‐
logue “ETKA” .
♦ Individual gear ratios
♦ Gear oil
♦ Clutch allocation
Final
drive
61 : 18 = 3.778 62 : 17 = 3.647 62 : 17 = 3.647
1.9 l 1.9 l 1.9 l
1.7 l 1.7 l 1.7 l
8 Rep. Gr.00 - Technical data
P
r
o
t
e
c
t
e
d
b
y
c
o
p
y
r
i
g
h
t
.
C
o
p
y
i
n
g
f
o
r
p
r
i
v
a
t
e
o
r
c
o
m
m
e
r
c
i
a
l
p
u
r
p
o
s
e
s
,
i
n
p
a
r
t
o
r
i
n
w
h
o
l
e
,
i
s
n
o
t
p
e
r
m
i
t
t
e
d
u
n
l
e
s
s
a
u
t
h
o
r
i
s
e
d
b
y
V
o
l
k
s
w
a
g
e
n
A
G
.
V
o
l
k
s
w
a
g
e
n
A
G
d
o
e
s
n
o
t
g
u
a
r
a
n
t
e
e
o
r
a
c
c
e
p
t
a
n
y
l
i
a
b
i
l
i
t
y
w
i
t
h
r
e
s
p
e
c
t
t
o
t
h
e
c
o
r
r
e
c
t
n
e
s
s
o
f
i
n
f
o
r
m
a
t
i
o
n
i
n
t
h
i
s
d
o
c
u
m
e
n
t
.
C
o
p
y
r
i
g
h
t
b
y
V
o
l
k
s
w
a
g
e
n
A
G
.
Golf 2004 ➤ , Golf 2009 ➤ , Golf Plus 2005 ➤ , Golf Plus 2009 ➤ , Pass ...
5-speed manual gearbox 0A4 - Edition 04.2010
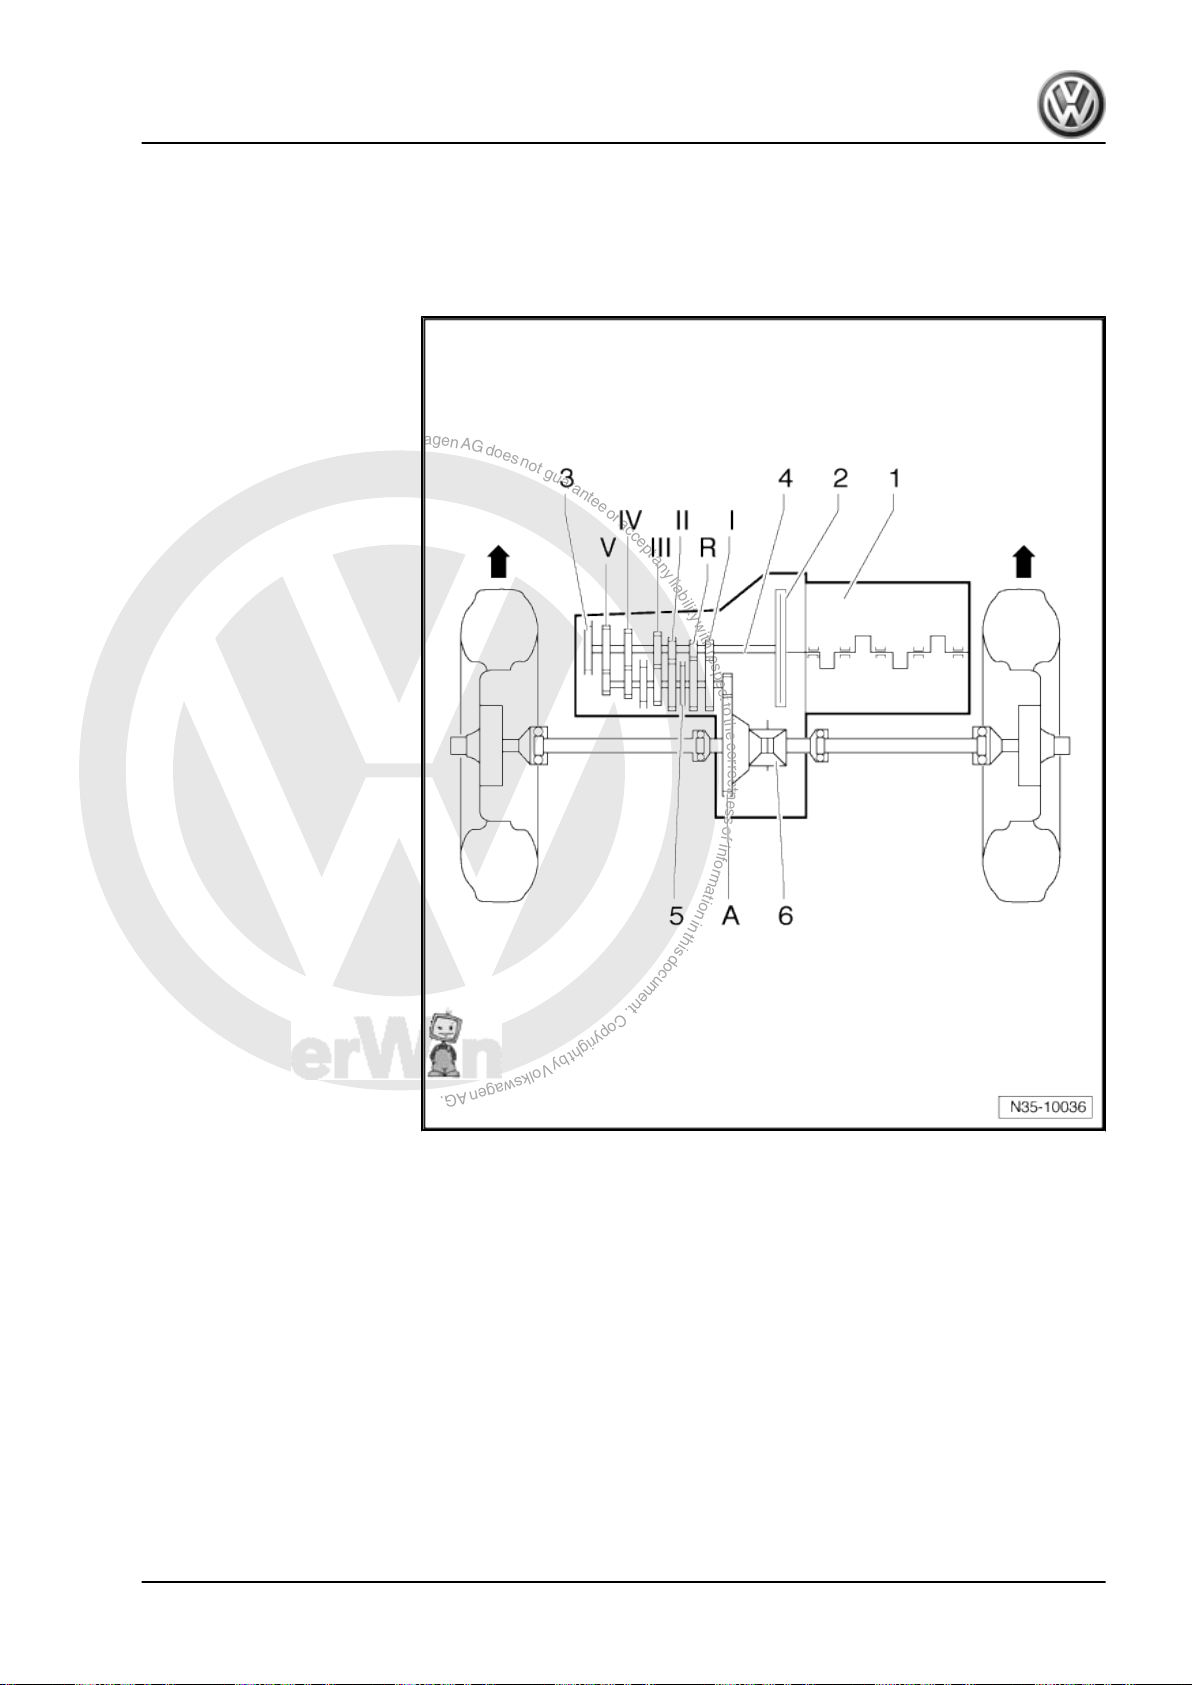
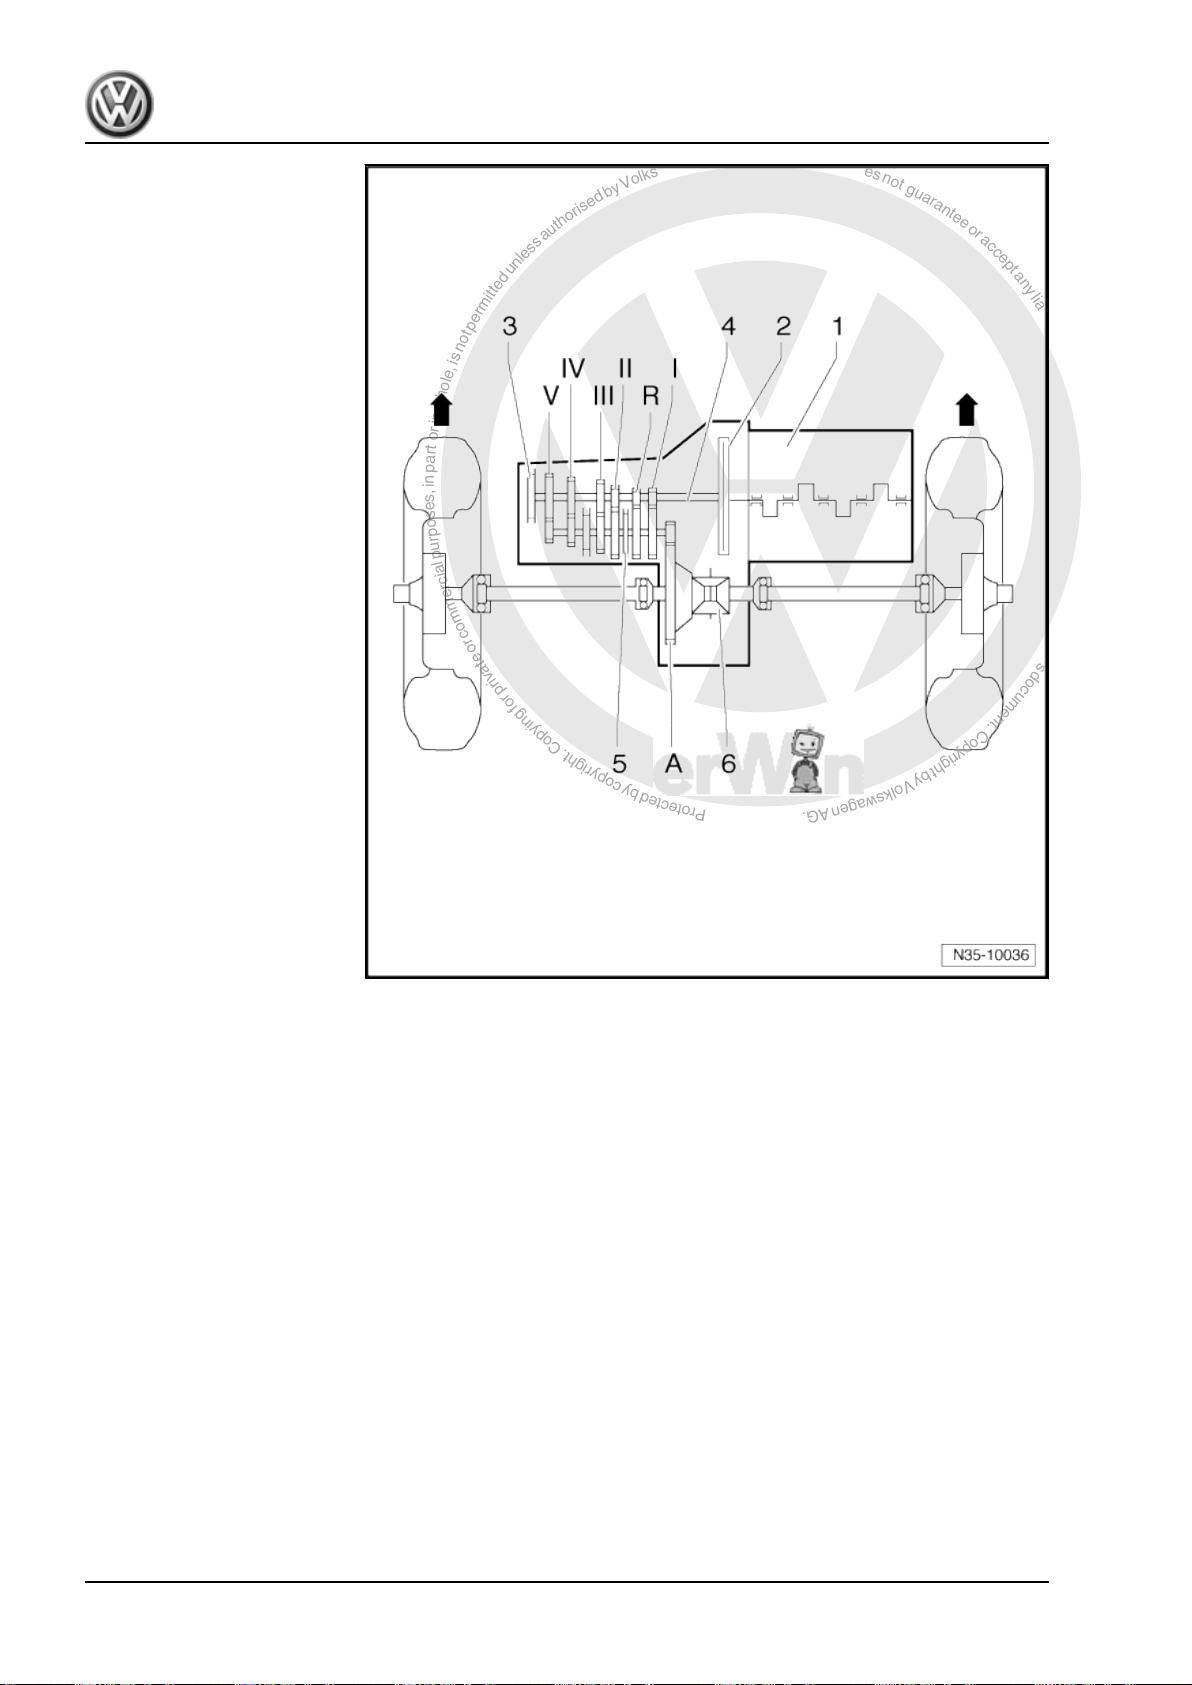
2 Overview - power transmission
Designation
-Arrows- indicate direction of travel.
1 - Engine
2 - Clutch
3 - Manual gearbox
4 - Input shaft
5 - Output shaft
6 - Differential
Gears
-Arrows- indicate direction of travel.
2. Overview - power transmission 9
P
r
o
t
e
c
t
e
d
b
y
c
o
p
y
r
i
g
h
t
.
C
o
p
y
i
n
g
f
o
r
p
r
i
v
a
t
e
o
r
c
o
m
m
e
r
c
i
a
l
p
u
r
p
o
s
e
s
,
i
n
p
a
r
t
o
r
i
n
w
h
o
l
e
,
i
s
n
o
t
p
e
r
m
i
t
t
e
d
u
n
l
e
s
s
a
u
t
h
o
r
i
s
e
d
b
y
V
o
l
k
s
w
a
g
e
n
A
G
.
V
o
l
k
s
w
a
g
e
n
A
G
d
o
e
s
n
o
t
g
u
a
r
a
n
t
e
e
o
r
a
c
c
e
p
t
a
n
y
l
i
a
b
i
l
i
t
y
w
i
t
h
r
e
s
p
e
c
t
t
o
t
h
e
c
o
r
r
e
c
t
n
e
s
s
o
f
i
n
f
o
r
m
a
t
i
o
n
i
n
t
h
i
s
d
o
c
u
m
e
n
t
.
C
o
p
y
r
i
g
h
t
b
y
V
o
l
k
s
w
a
g
e
n
A
G
.
Golf 2004 ➤ , Golf 2009 ➤ , Golf Plus 2005 ➤ , Golf Plus 2009 ➤ , Pass ...
5-speed manual gearbox 0A4 - Edition 04.2010
I - 1st gear
II - 2nd gear
III - 3rd gear
IV - 4th gear
V - 5th gear
R - Reverse gear
A - Final drive
10 Rep. Gr.00 - Technical data

P
r
o
t
e
c
t
e
d
b
y
c
o
p
y
r
i
g
h
t
.
C
o
p
y
i
n
g
f
o
r
p
r
i
v
a
t
e
o
r
c
o
m
m
e
r
c
i
a
l
p
u
r
p
o
s
e
s
,
i
n
p
a
r
t
o
r
i
n
w
h
o
l
e
,
i
s
n
o
t
p
e
r
m
i
t
t
e
d
u
n
l
e
s
s
a
u
t
h
o
r
i
s
e
d
b
y
V
o
l
k
s
w
a
g
e
n
A
G
.
V
o
l
k
s
w
a
g
e
n
A
G
d
o
e
s
n
o
t
g
u
a
r
a
n
t
e
e
o
r
a
c
c
e
p
t
a
n
y
l
i
a
b
i
l
i
t
y
w
i
t
h
r
e
s
p
e
c
t
t
o
t
h
e
c
o
r
r
e
c
t
n
e
s
s
o
f
i
n
f
o
r
m
a
t
i
o
n
i
n
t
h
i
s
d
o
c
u
m
e
n
t
.
C
o
p
y
r
i
g
h
t
b
y
V
o
l
k
s
w
a
g
e
n
A
G
.
Golf 2004 ➤ , Golf 2009 ➤ , Golf Plus 2005 ➤ , Golf Plus 2009 ➤ , Pass ...
5-speed manual gearbox 0A4 - Edition 04.2010
3 Calculating overall gear ratio “i”
Example:
5th gear Final drive
Drive gear ZG1 = 39 ZA1 = 18
Driven gear ZG2 = 29 ZA2 = 61
i = Z2 : Z1
iG = Gear ratio = ZG2 : ZG1= 29 : 39 = 0.744
iA = Final drive ratio = ZA2 : ZA1 = 61 : 18= 3.389
Overall ratio = total ratio = iG x iA = 0.744 x 3.389 = 2.521
1) Z1 = No. of teeth on driving gear, Z2 = No. of teeth on driven gear
1)
3. Calculating overall gear ratio “i” 11
P
r
o
t
e
c
t
e
d
b
y
c
o
p
y
r
i
g
h
t
.
C
o
p
y
i
n
g
f
o
r
p
r
i
v
a
t
e
o
r
c
o
m
m
e
r
c
i
a
l
p
u
r
p
o
s
e
s
,
i
n
p
a
r
t
o
r
i
n
w
h
o
l
e
,
i
s
n
o
t
p
e
r
m
i
t
t
e
d
u
n
l
e
s
s
a
u
t
h
o
r
i
s
e
d
b
y
V
o
l
k
s
w
a
g
e
n
A
G
.
V
o
l
k
s
w
a
g
e
n
A
G
d
o
e
s
n
o
t
g
u
a
r
a
n
t
e
e
o
r
a
c
c
e
p
t
a
n
y
l
i
a
b
i
l
i
t
y
w
i
t
h
r
e
s
p
e
c
t
t
o
t
h
e
c
o
r
r
e
c
t
n
e
s
s
o
f
i
n
f
o
r
m
a
t
i
o
n
i
n
t
h
i
s
d
o
c
u
m
e
n
t
.
C
o
p
y
r
i
g
h
t
b
y
V
o
l
k
s
w
a
g
e
n
A
G
.
Golf 2004 ➤ , Golf 2009 ➤ , Golf Plus 2005 ➤ , Golf Plus 2009 ➤ , Pass ...
5-speed manual gearbox 0A4 - Edition 04.2010
4 General repair notes
To ensure flawless and successful gearbox repairs, the greatest
care and cleanliness as well as the use of good and proper tools
are essential. Of course, the basic rules for safety also apply dur‐
ing repair work.
A number of instructions generally applicable to the various repair
procedures - which were previously repeated a number of times
at various places in the workshop manual are summarised under
the topic “components” ⇒ page 12 . They apply to this workshop
manual.
4.1 Components
4.1.1 Gearbox
♦ When installing the manual gearbox, ensure that the dowel
sleeves between the engine and gearbox are correctly seated.
♦ When installing mounting brackets or waxed components,
clean the contact surfaces. Contact surfaces must be free of
wax and grease.
♦ Allocate bolts and other components using ⇒ Electronic parts
catalogue “ETKA” .
♦ If the gearbox is repaired, fill with gear oil.
Capacity, gearbox completely
dismantled
Capacity, gearbox partially dis‐
mantled ⇒ page 220
1.9 l 1.7 l
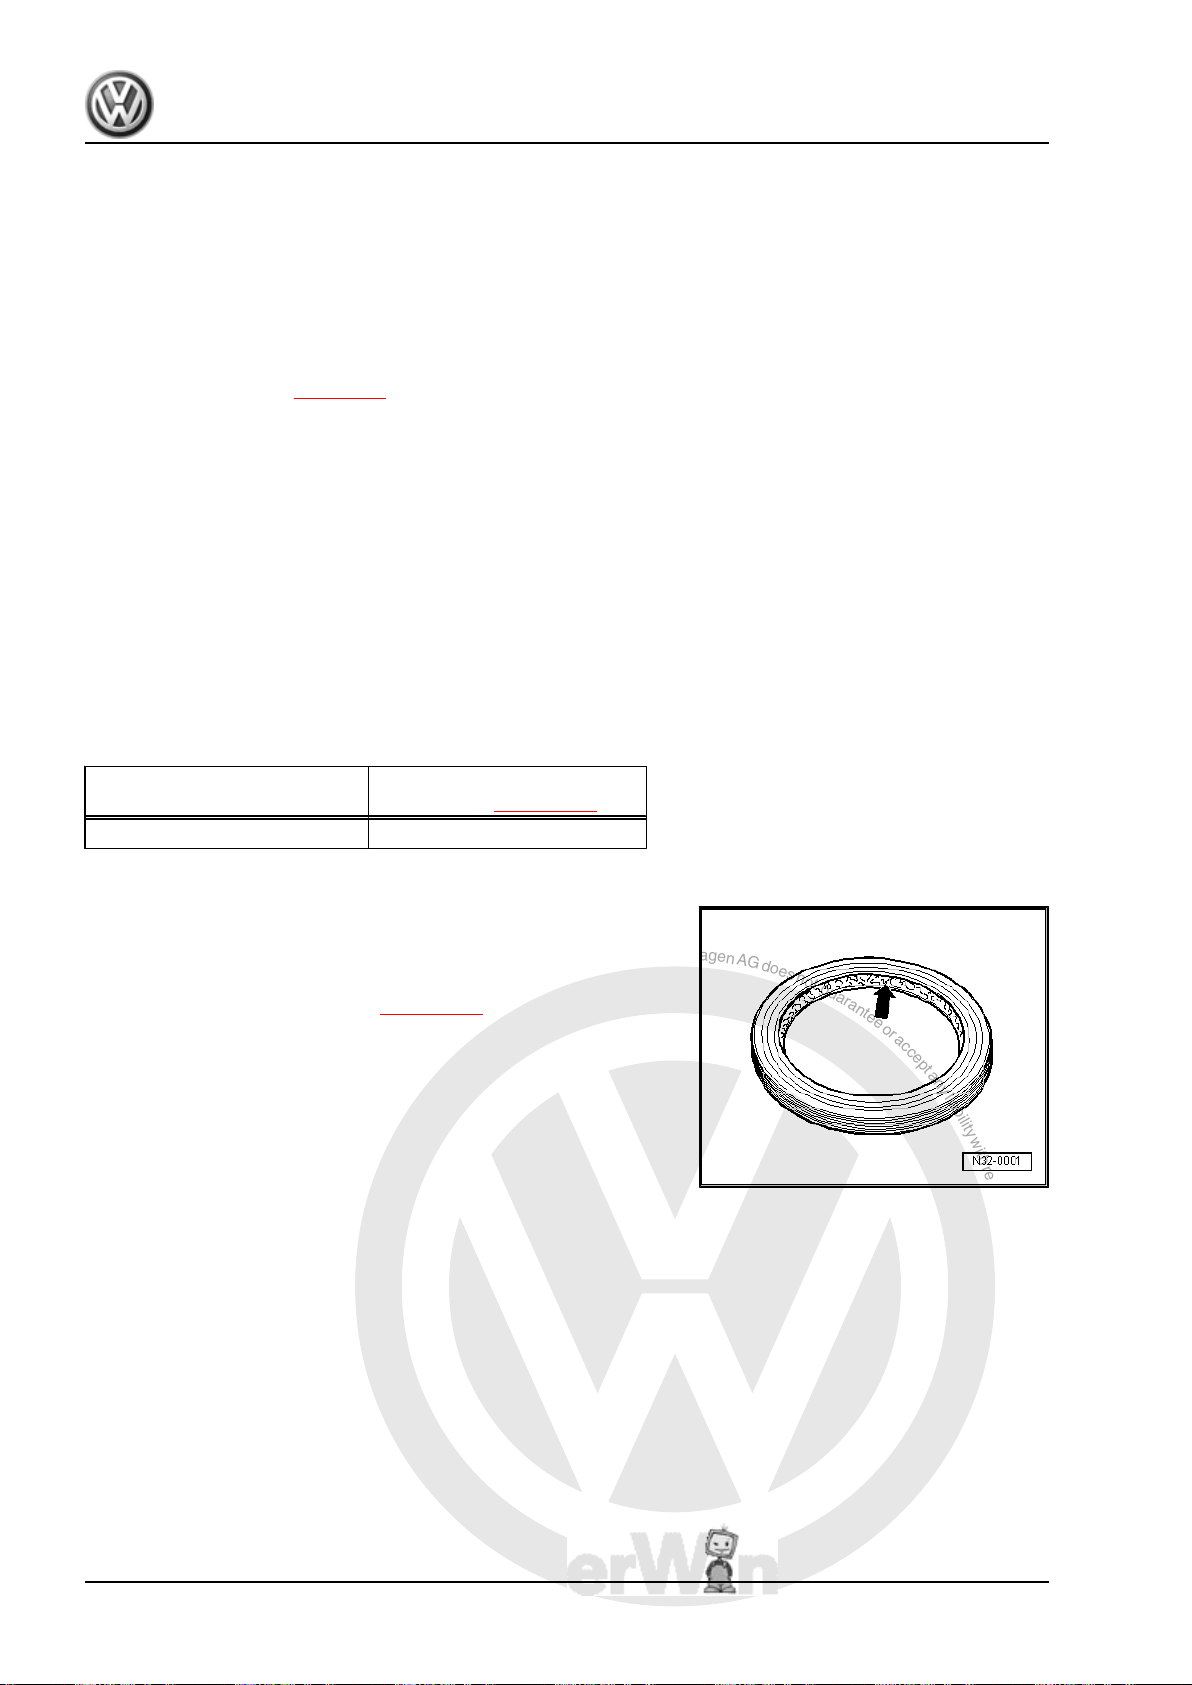
4.1.2 Seals and sealing rings
♦ Before installing oil seal, half-fill space between sealing lips
with sealing grease -G 052 128 A1- -arrow-.
♦ The open side of the oil seal faces the side with fluid filling.
♦ After installing, check oil level ⇒ page 220 .
♦ Lightly oil O-rings before installing; this prevents the rings be‐
ing crushed when inserted.
♦ Thoroughly clean parting surfaces and apply sealant -AMV
188 200 03- .
♦ Apply sealant uniformly but not too thick.
4.1.3 Sealant
♦ Thoroughly clean housing joint surfaces before applying seal‐
ing paste.
♦ Evenly apply a thin coat of sealing paste -AMV 188 200 03- .
♦ Breather holes must remain free of sealing paste.
12 Rep. Gr.00 - Technical data

P
r
o
t
e
c
t
e
d
b
y
c
o
p
y
r
i
g
h
t
.
C
o
p
y
i
n
g
f
o
r
p
r
i
v
a
t
e
o
r
c
o
m
m
e
r
c
i
a
l
p
u
r
p
o
s
e
s
,
i
n
p
a
r
t
o
r
i
n
w
h
o
l
e
,
i
s
n
o
t
p
e
r
m
i
t
t
e
d
u
n
l
e
s
s
a
u
t
h
o
r
i
s
e
d
b
y
V
o
l
k
s
w
a
g
e
n
A
G
.
V
o
l
k
s
w
a
g
e
n
A
G
d
o
e
s
n
o
t
g
u
a
r
a
n
t
e
e
o
r
a
c
c
e
p
t
a
n
y
l
i
a
b
i
l
i
t
y
w
i
t
h
r
e
s
p
e
c
t
t
o
t
h
e
c
o
r
r
e
c
t
n
e
s
s
o
f
i
n
f
o
r
m
a
t
i
o
n
i
n
t
h
i
s
d
o
c
u
m
e
n
t
.
C
o
p
y
r
i
g
h
t
b
y
V
o
l
k
s
w
a
g
e
n
A
G
.
Golf 2004 ➤ , Golf 2009 ➤ , Golf Plus 2005 ➤ , Golf Plus 2009 ➤ , Pass ...
5-speed manual gearbox 0A4 - Edition 04.2010
4.1.4 Locking devices
♦ Renew retaining rings.
♦ Do not overstretch retaining rings.
♦ Retaining rings must locate properly in grooves.
♦ Renew spring pins. Installation position: slot must be in line
with direction of force.
4.1.5 Nuts and bolts
♦ Loosen and tighten securing bolts and nuts for covers and
housings diagonally.
♦ Do not cant especially delicate parts, such as clutch pressure
plates. Loosen and tighten bolts and nuts in stages in a diag‐
onal sequence.
♦ Torque settings are specified for unoiled bolts and nuts.
♦ Always renew self-locking bolts and nuts.
♦ Ensure with threaded connections that contact surfaces as
well as nuts and bolts are rewaxed only after assembly, if nec‐
essary.
♦ Use a thread chaser to clear residual locking fluid from all
threaded holes into which self-locking bolts are to be screwed.
Otherwise there is a danger of bolts shearing when subse‐
quently being removed.
4.1.6 Bearings
♦ Install new tapered roller bearings as supplied and do not lu‐
bricate additionally.
♦ Install needle bearings with lettered side (thicker metal) to‐
wards fitting tool.
♦ Tapered roller bearings fitted to one shaft must be renewed as
a set. Use same make of bearings.
♦ Heat inner races to about 100 °C with the inductive heater -
VAS 6414- before installing.
♦ Do not interchange outer or inner races of bearings of the
same size. The bearings are matched in pairs.
4.1.7 Shims
♦ Measure shims at several points with a micrometer. The var‐
ious thicknesses make it possible to achieve the exact shim
thickness required.
♦ Check for burrs and damage.
♦ Install only flawless shims.
4. General repair notes 13
P
r
o
t
e
c
t
e
d
b
y
c
o
p
y
r
i
g
h
t
.
C
o
p
y
i
n
g
f
o
r
p
r
i
v
a
t
e
o
r
c
o
m
m
e
r
c
i
a
l
p
u
r
p
o
s
e
s
,
i
n
p
a
r
t
o
r
i
n
w
h
o
l
e
,
i
s
n
o
t
p
e
r
m
i
t
t
e
d
u
n
l
e
s
s
a
u
t
h
o
r
i
s
e
d
b
y
V
o
l
k
s
w
a
g
e
n
A
G
.
V
o
l
k
s
w
a
g
e
n
A
G
d
o
e
s
n
o
t
g
u
a
r
a
n
t
e
e
o
r
a
c
c
e
p
t
a
n
y
l
i
a
b
i
l
i
t
y
w
i
t
h
r
e
s
p
e
c
t
t
o
t
h
e
c
o
r
r
e
c
t
n
e
s
s
o
f
i
n
f
o
r
m
a
t
i
o
n
i
n
t
h
i
s
d
o
c
u
m
e
n
t
.
C
o
p
y
r
i
g
h
t
b
y
V
o
l
k
s
w
a
g
e
n
A
G
.
Golf 2004 ➤ , Golf 2009 ➤ , Golf Plus 2005 ➤ , Golf Plus 2009 ➤ , Pass ...
5-speed manual gearbox 0A4 - Edition 04.2010
4.1.8 Synchro-rings
♦ Do not interchange. When reusing synchro-rings, always fit to
the same synchromeshed gear.
♦ Check for wear and renew if necessary.
♦ Check grooves -arrow 1- of synchro-ring -A- and inner ring for
flat spots (worn grooves).
♦ If synchro-rings are coated, coating must not be damaged.
♦ If an intermediate ring -B- is installed, check the outer friction
surface -arrow 2- and inner friction surface -arrow 3- of this
intermediate ring for “scoring”, “signs of abnormal wear” and
“blue discolouration (due to overheating)”.
♦ Check cone of synchromeshed gear for “scoring” and “signs
of abnormal wear”.
♦ Moisten synchromesh mechanism with gear oil before instal‐
ling.
4.1.9 Gear wheels
♦ Before installing, clean and heat with the inductive heater -
VAS 6414- to maximum 100° C.
4.1.10 Synchromeshed gears
♦ After assembly, check synchromeshed gears for slight play, or
for freedom of movement.
4.1.11 Clutch
♦ Ensure that the pressure plate does not cant: loosen and tight‐
en bolts diagonally and in several gradual stages.
♦ If the clutch has burnt out, thoroughly clean the clutch housing
as well as the friction surface of flywheel with a cloth to reduce
the smell of burnt linings.
14 Rep. Gr.00 - Technical data
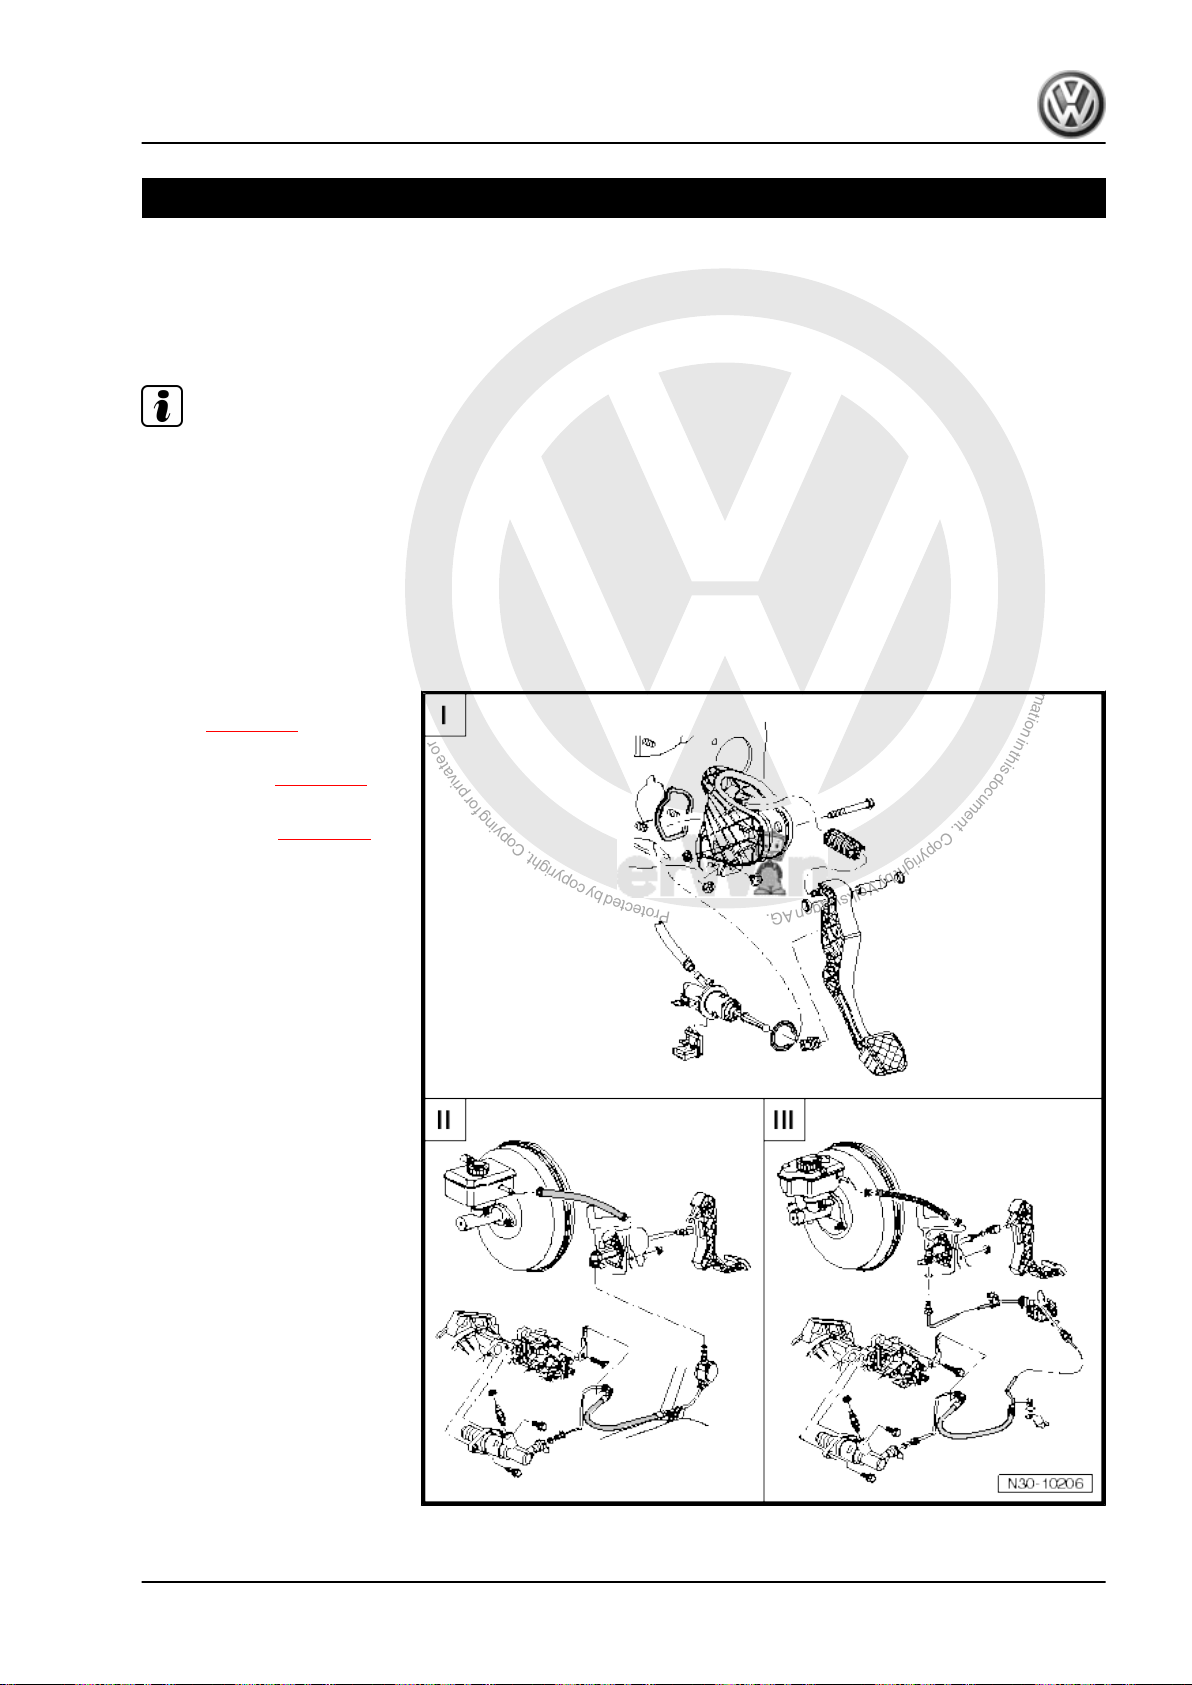
P
r
o
t
e
c
t
e
d
b
y
c
o
p
y
r
i
g
h
t
.
C
o
p
y
i
n
g
f
o
r
p
r
i
v
a
t
e
o
r
c
o
m
m
e
r
c
i
a
l
p
u
r
p
o
s
e
s
,
i
n
p
a
r
t
o
r
i
n
w
h
o
l
e
,
i
s
n
o
t
p
e
r
m
i
t
t
e
d
u
n
l
e
s
s
a
u
t
h
o
r
i
s
e
d
b
y
V
o
l
k
s
w
a
g
e
n
A
G
.
V
o
l
k
s
w
a
g
e
n
A
G
d
o
e
s
n
o
t
g
u
a
r
a
n
t
e
e
o
r
a
c
c
e
p
t
a
n
y
l
i
a
b
i
l
i
t
y
w
i
t
h
r
e
s
p
e
c
t
t
o
t
h
e
c
o
r
r
e
c
t
n
e
s
s
o
f
i
n
f
o
r
m
a
t
i
o
n
i
n
t
h
i
s
d
o
c
u
m
e
n
t
.
C
o
p
y
r
i
g
h
t
b
y
V
o
l
k
s
w
a
g
e
n
A
G
.
Golf 2004 ➤ , Golf 2009 ➤ , Golf Plus 2005 ➤ , Golf Plus 2009 ➤ , Pass ...
5-speed manual gearbox 0A4 - Edition 04.2010
30 – Clutch
1 Repairing clutch mechanism
1.1 Overview
Note
♦
Before disconnecting battery, obtain code for radio having anti-theft coding.
♦
With ignition switched off, disconnect battery ⇒ Electrical system; Rep. Gr. 27 ; Disconnecting and con‐
necting battery .
♦
When reconnecting battery, refer to ⇒ Electrical system; Rep. Gr. 27 ; Disconnecting and connecting
battery .
♦
Grease all bearing points and contact surfaces.
♦
Allocate grease using ⇒ Electronic parts catalogue (ETKA) .
I - Assembly overview - pedal
cluster ⇒ page 16
II - Assembly overview - hy‐
draulics (LHD) ⇒ page 94
III - Assembly overview - hy‐
draulics (RHD) ⇒ page 96
1. Repairing clutch mechanism 15
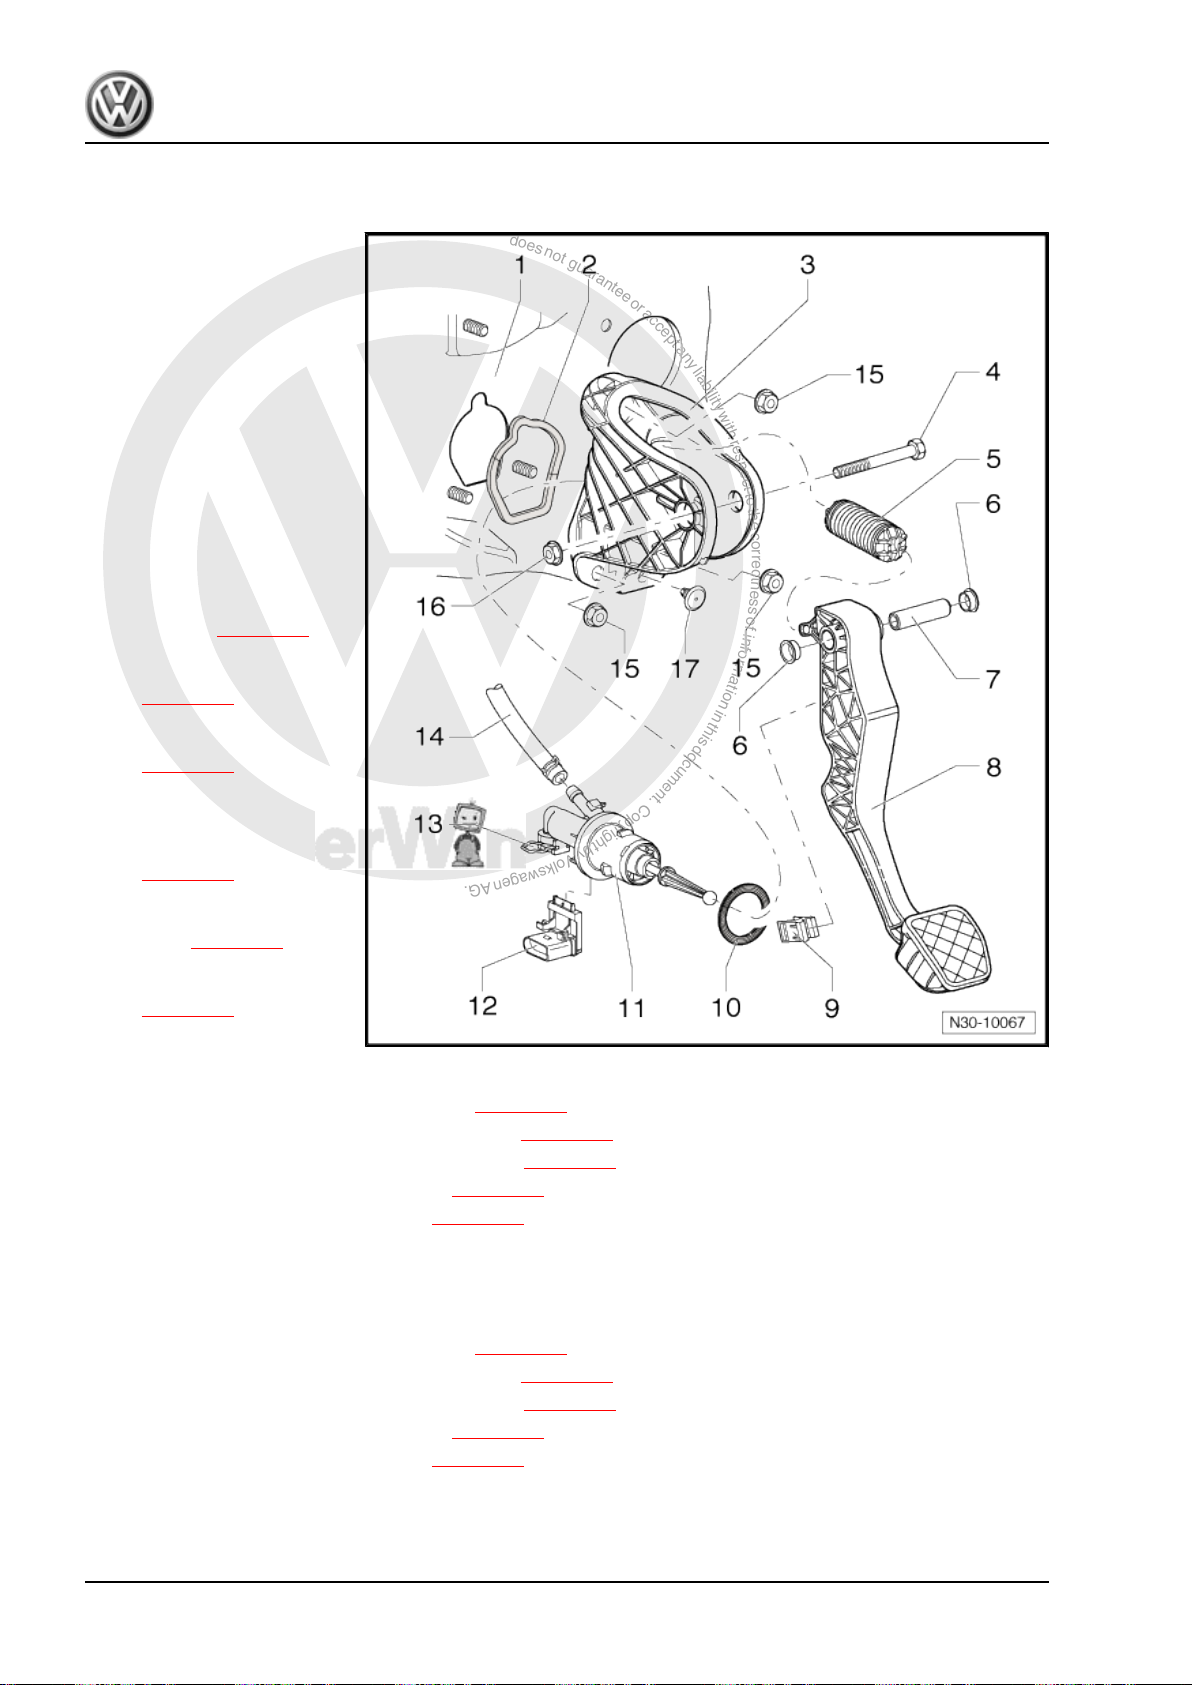
P
r
o
t
e
c
t
e
d
b
y
c
o
p
y
r
i
g
h
t
.
C
o
p
y
i
n
g
f
o
r
p
r
i
v
a
t
e
o
r
c
o
m
m
e
r
c
i
a
l
p
u
r
p
o
s
e
s
,
i
n
p
a
r
t
o
r
i
n
w
h
o
l
e
,
i
s
n
o
t
p
e
r
m
i
t
t
e
d
u
n
l
e
s
s
a
u
t
h
o
r
i
s
e
d
b
y
V
o
l
k
s
w
a
g
e
n
A
G
.
V
o
l
k
s
w
a
g
e
n
A
G
d
o
e
s
n
o
t
g
u
a
r
a
n
t
e
e
o
r
a
c
c
e
p
t
a
n
y
l
i
a
b
i
l
i
t
y
w
i
t
h
r
e
s
p
e
c
t
t
o
t
h
e
c
o
r
r
e
c
t
n
e
s
s
o
f
i
n
f
o
r
m
a
t
i
o
n
i
n
t
h
i
s
d
o
c
u
m
e
n
t
.
C
o
p
y
r
i
g
h
t
b
y
V
o
l
k
s
w
a
g
e
n
A
G
.
Golf 2004 ➤ , Golf 2009 ➤ , Golf Plus 2005 ➤ , Golf Plus 2009 ➤ , Pass ...
5-speed manual gearbox 0A4 - Edition 04.2010
1.2 Assembly overview - pedal cluster
1 - Bulkhead
❑ With support for mount‐
ing bracket
2 - Seal
❑ Always renew
❑ Between mounting
❑ Self-adhesive
❑ Bond to mounting
3 - Mounting bracket
❑ For mounting clutch
❑ Is provided with damp‐
❑ Removing and instal‐
❑ Removing and instal‐
❑ Removing and instal‐
bracket and bulkhead
bracket
pedal
ing in some equipment
variants ⇒ page 17
ling, Golf 2004 ▸
⇒ page 61
ling, Golf 2009 ▸ LHD
⇒ page 67
ling, Golf 2009 ▸ righthand drive, and Golf
Plus right-hand drive
⇒ page 73
❑ Removing and instal‐
ling, Golf Plus left-hand
drive ⇒ page 79
❑ Removing and instal‐
ling, Passat
⇒ page 84
4 - Bolt
5 - Over-centre spring
❑ Removing and installing, Golf 2004 ▸ ⇒ page 18
❑ Removing and installing, Golf 2009 ▸ LHD ⇒ page 22
❑ Removing and installing, Golf 2009 ▸ RHD ⇒ page 27
❑ Removing and installing, Golf Plus ⇒ page 32
❑ Removing and installing, Passat ⇒ page 37
6 - Bearing bush
7 - Pivot pin
8 - Clutch pedal
❑ Removing and installing, Golf 2004 ▸ ⇒ page 38
❑ Removing and installing, Golf 2009 ▸ LHD ⇒ page 44
❑ Removing and installing, Golf 2009 ▸ RHD ⇒ page 49
❑ Removing and installing, Golf Plus ⇒ page 54
❑ Removing and installing, Passat ⇒ page 59
9 - Retainer
❑ To remove and install, separate master cylinder from clutch pedal (⇒ Removing and installing clutch
pedal)
16 Rep. Gr.30 - Clutch
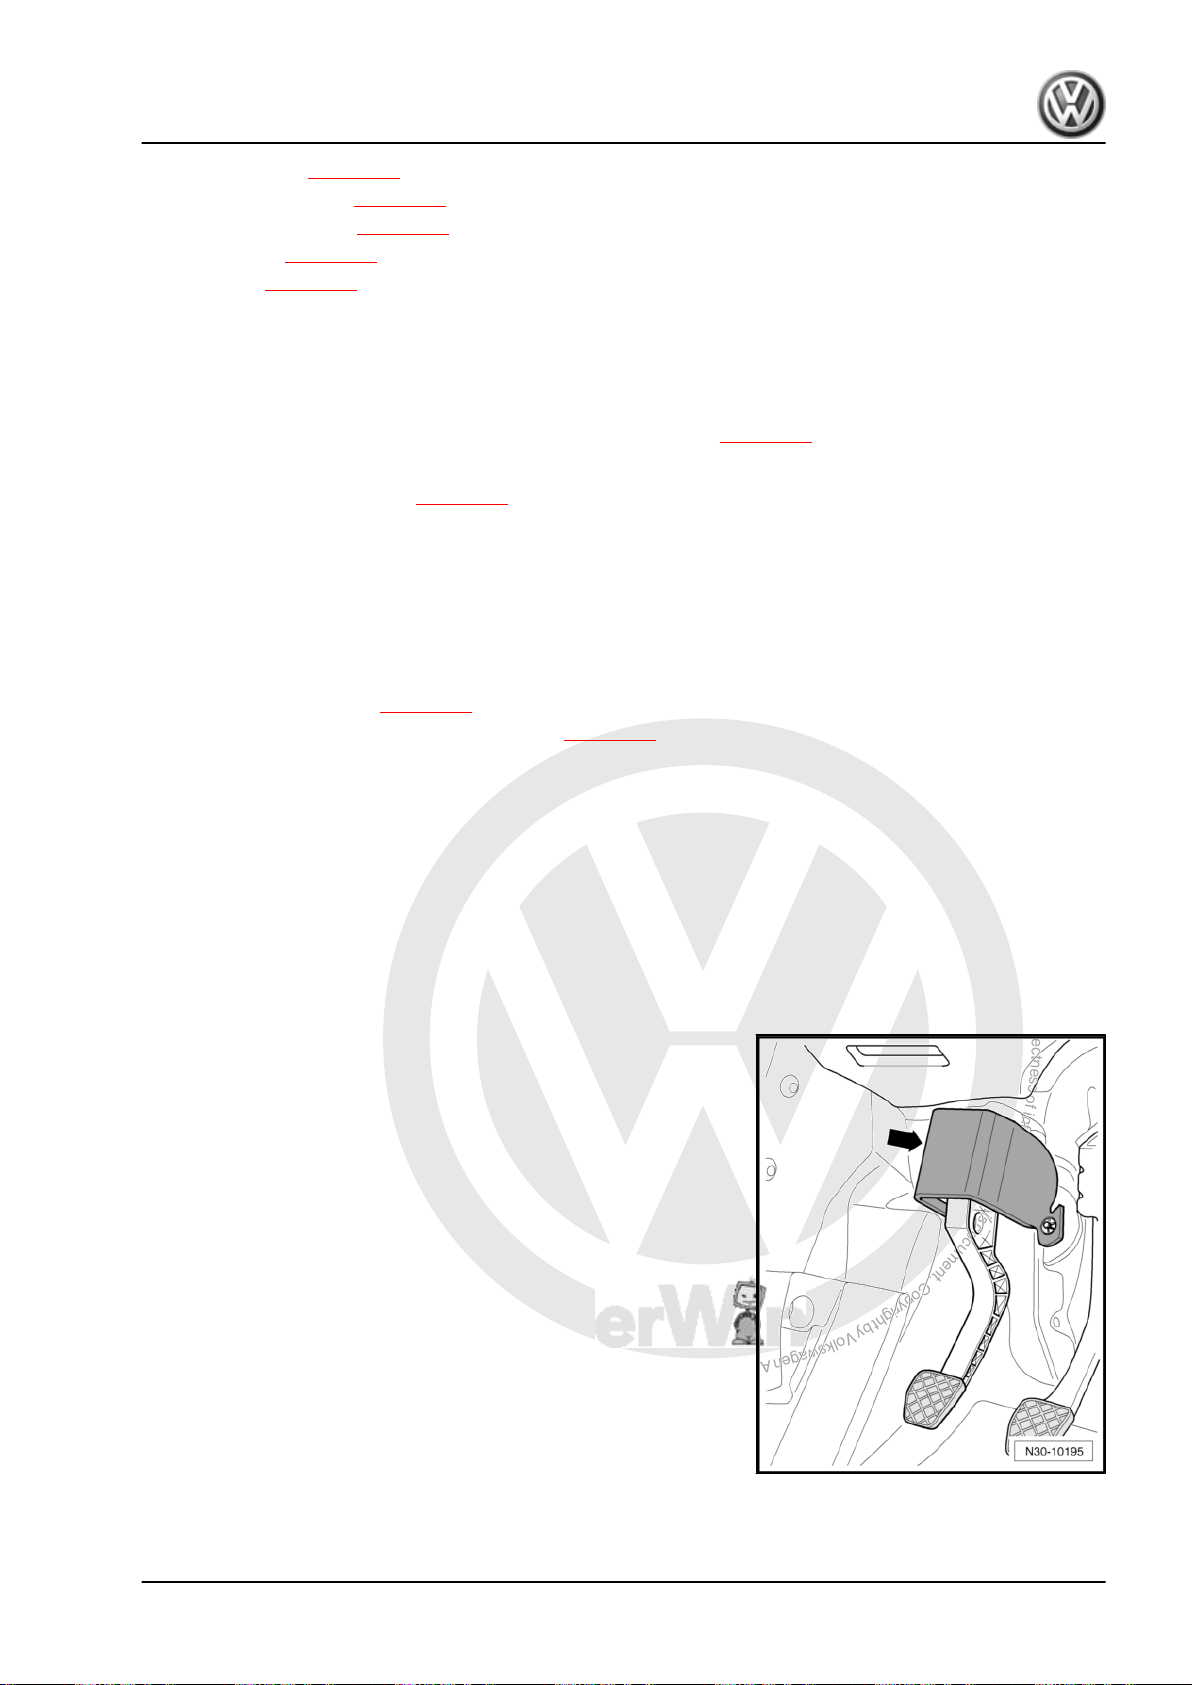
P
r
o
t
e
c
t
e
d
b
y
c
o
p
y
r
i
g
h
t
.
C
o
p
y
i
n
g
f
o
r
p
r
i
v
a
t
e
o
r
c
o
m
m
e
r
c
i
a
l
p
u
r
p
o
s
e
s
,
i
n
p
a
r
t
o
r
i
n
w
h
o
l
e
,
i
s
n
o
t
p
e
r
m
i
t
t
e
d
u
n
l
e
s
s
a
u
t
h
o
r
i
s
e
d
b
y
V
o
l
k
s
w
a
g
e
n
A
G
.
V
o
l
k
s
w
a
g
e
n
A
G
d
o
e
s
n
o
t
g
u
a
r
a
n
t
e
e
o
r
a
c
c
e
p
t
a
n
y
l
i
a
b
i
l
i
t
y
w
i
t
h
r
e
s
p
e
c
t
t
o
t
h
e
c
o
r
r
e
c
t
n
e
s
s
o
f
i
n
f
o
r
m
a
t
i
o
n
i
n
t
h
i
s
d
o
c
u
m
e
n
t
.
C
o
p
y
r
i
g
h
t
b
y
V
o
l
k
s
w
a
g
e
n
A
G
.
Golf 2004 ➤ , Golf 2009 ➤ , Golf Plus 2005 ➤ , Golf Plus 2009 ➤ , Pass ...
5-speed manual gearbox 0A4 - Edition 04.2010
❑ Golf 2004 ▸ ⇒ page 38
❑ Golf 2009 ▸ LHD ⇒ page 44
❑ Golf 2009 ▸ RHD ⇒ page 49
❑ Golf Plus ⇒ page 54 .
❑ Passat ⇒ page 59
10 - Seal
❑ Always renew
❑ Between master cylinder and mounting bracket
11 - Master cylinder
❑ Removing and installing after removal of mounting bracket ⇒ page 88
12 - Clutch position sender -G476-
❑ Removing and installing ⇒ page 90
❑ Can be checked in “guided fault finding” of vehicle diagnosis, testing and information system -VAS 5051- .
❑ The clutch position sender -G476- is identified as clutch pedal switch -F36- in “guided fault finding”.
13 - Clip
❑ Pull out clip to stop to remove and install pipe/hose line
14 - Supply hose
❑ Rubber
❑ From 12. 05, plastic ⇒ page 95
❑ Golf 2009 ▸ and Golf Plus 2009 ▸ plastic ⇒ page 95
15 - Self-locking hexagon nut, 25 Nm
❑ Qty. 3
❑ For mounting bracket to bulkhead
❑ Always renew
16 - Hexagon nut, 25 Nm
❑ Always renew
17 - Stop
❑ For clutch pedal
Mounting bracket with damping -arrows-
1. Repairing clutch mechanism 17
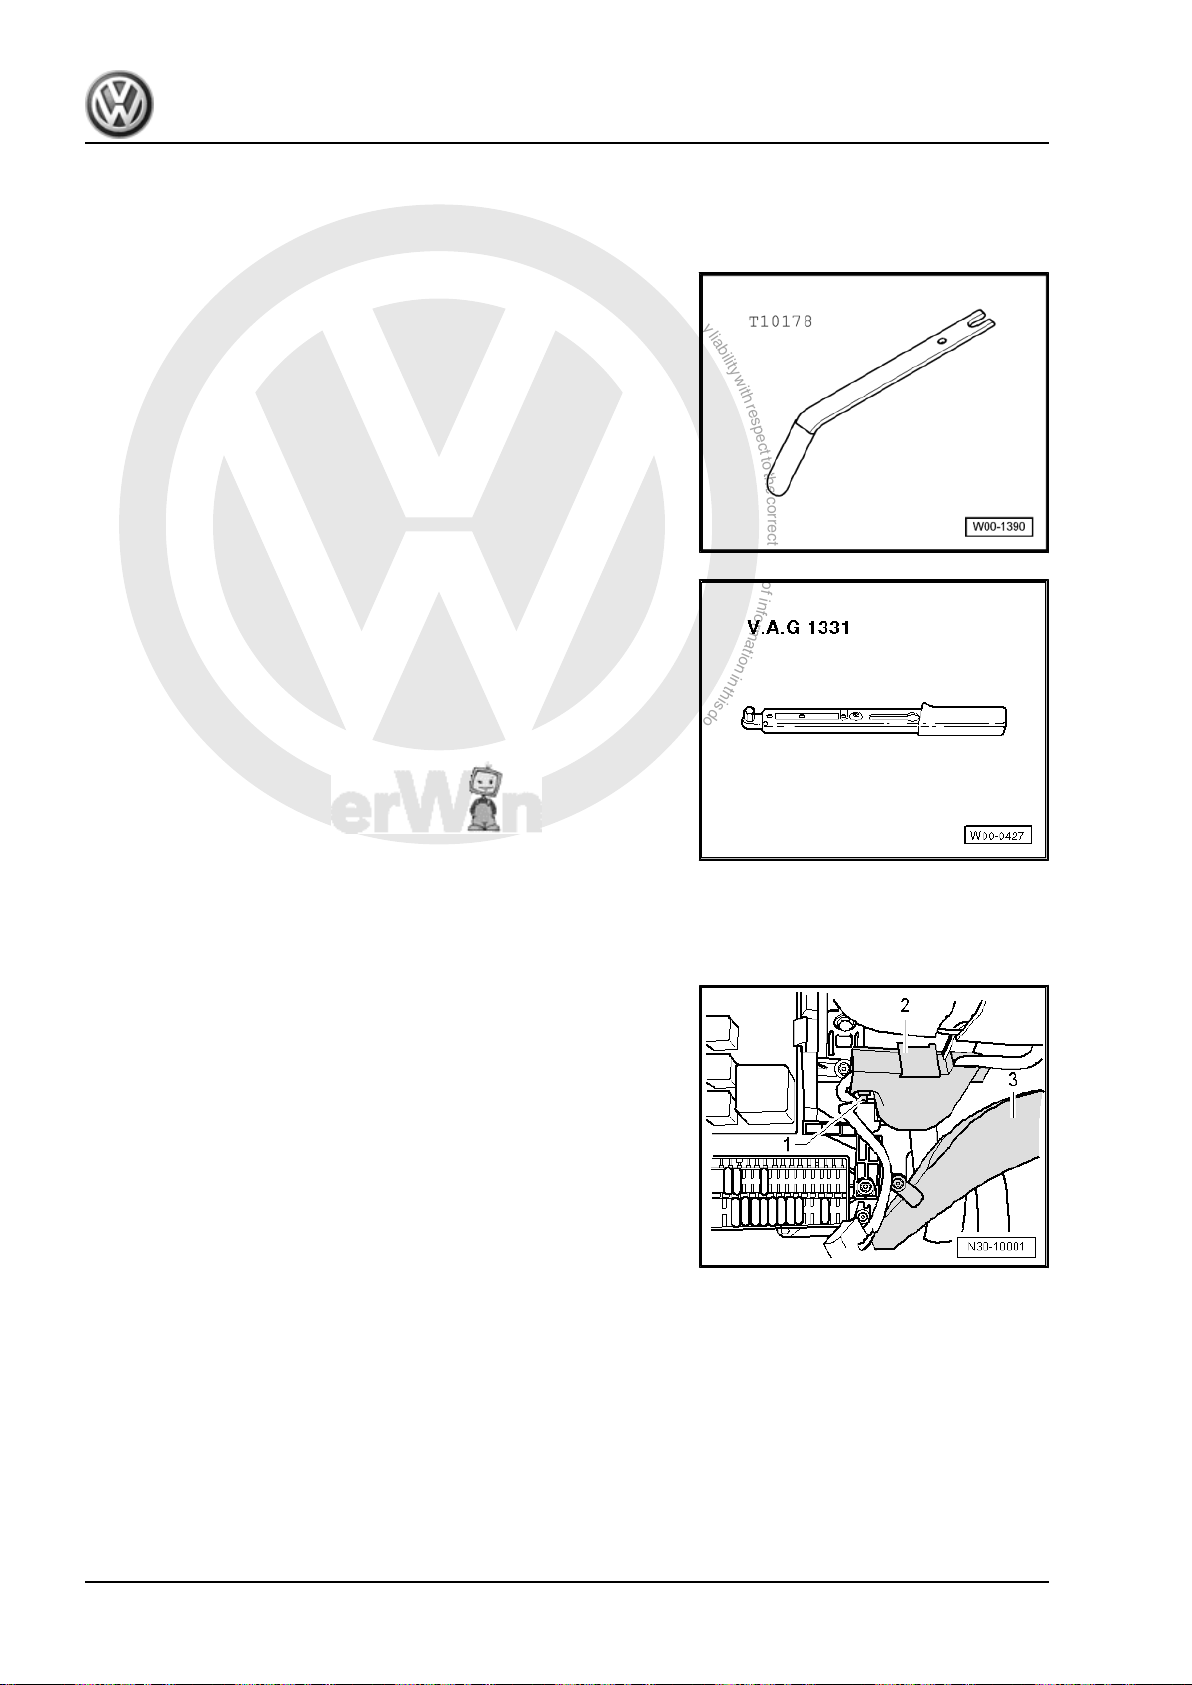
P
r
o
t
e
c
t
e
d
b
y
c
o
p
y
r
i
g
h
t
.
C
o
p
y
i
n
g
f
o
r
p
r
i
v
a
t
e
o
r
c
o
m
m
e
r
c
i
a
l
p
u
r
p
o
s
e
s
,
i
n
p
a
r
t
o
r
i
n
w
h
o
l
e
,
i
s
n
o
t
p
e
r
m
i
t
t
e
d
u
n
l
e
s
s
a
u
t
h
o
r
i
s
e
d
b
y
V
o
l
k
s
w
a
g
e
n
A
G
.
V
o
l
k
s
w
a
g
e
n
A
G
d
o
e
s
n
o
t
g
u
a
r
a
n
t
e
e
o
r
a
c
c
e
p
t
a
n
y
l
i
a
b
i
l
i
t
y
w
i
t
h
r
e
s
p
e
c
t
t
o
t
h
e
c
o
r
r
e
c
t
n
e
s
s
o
f
i
n
f
o
r
m
a
t
i
o
n
i
n
t
h
i
s
d
o
c
u
m
e
n
t
.
C
o
p
y
r
i
g
h
t
b
y
V
o
l
k
s
w
a
g
e
n
A
G
.
Golf 2004 ➤ , Golf 2009 ➤ , Golf Plus 2005 ➤ , Golf Plus 2009 ➤ , Pass ...
5-speed manual gearbox 0A4 - Edition 04.2010
1.3 Removing and installing over-centre spring, Golf 2004 ▸
Special tools and workshop equipment required
♦ Release tool -T10178-
♦ Torque wrench -V.A.G 1331-
1.3.1 Removing
– Push driver seat as far back as possible and put steering wheel
in highest position.
– Remove trim and cover below trim on drive side ⇒ General
body repairs, interior; Rep. Gr. 68 .
– Remove cable guide -2- from steering column.
– Remove footwell vent -3-.⇒ Heating, air conditioning; Rep.
Gr. 80 ; Repairing heating
The crash bar -1- in front of clutch pedal -2- may be secured in
different ways.
Attachment with 2 bolts
18 Rep. Gr.30 - Clutch
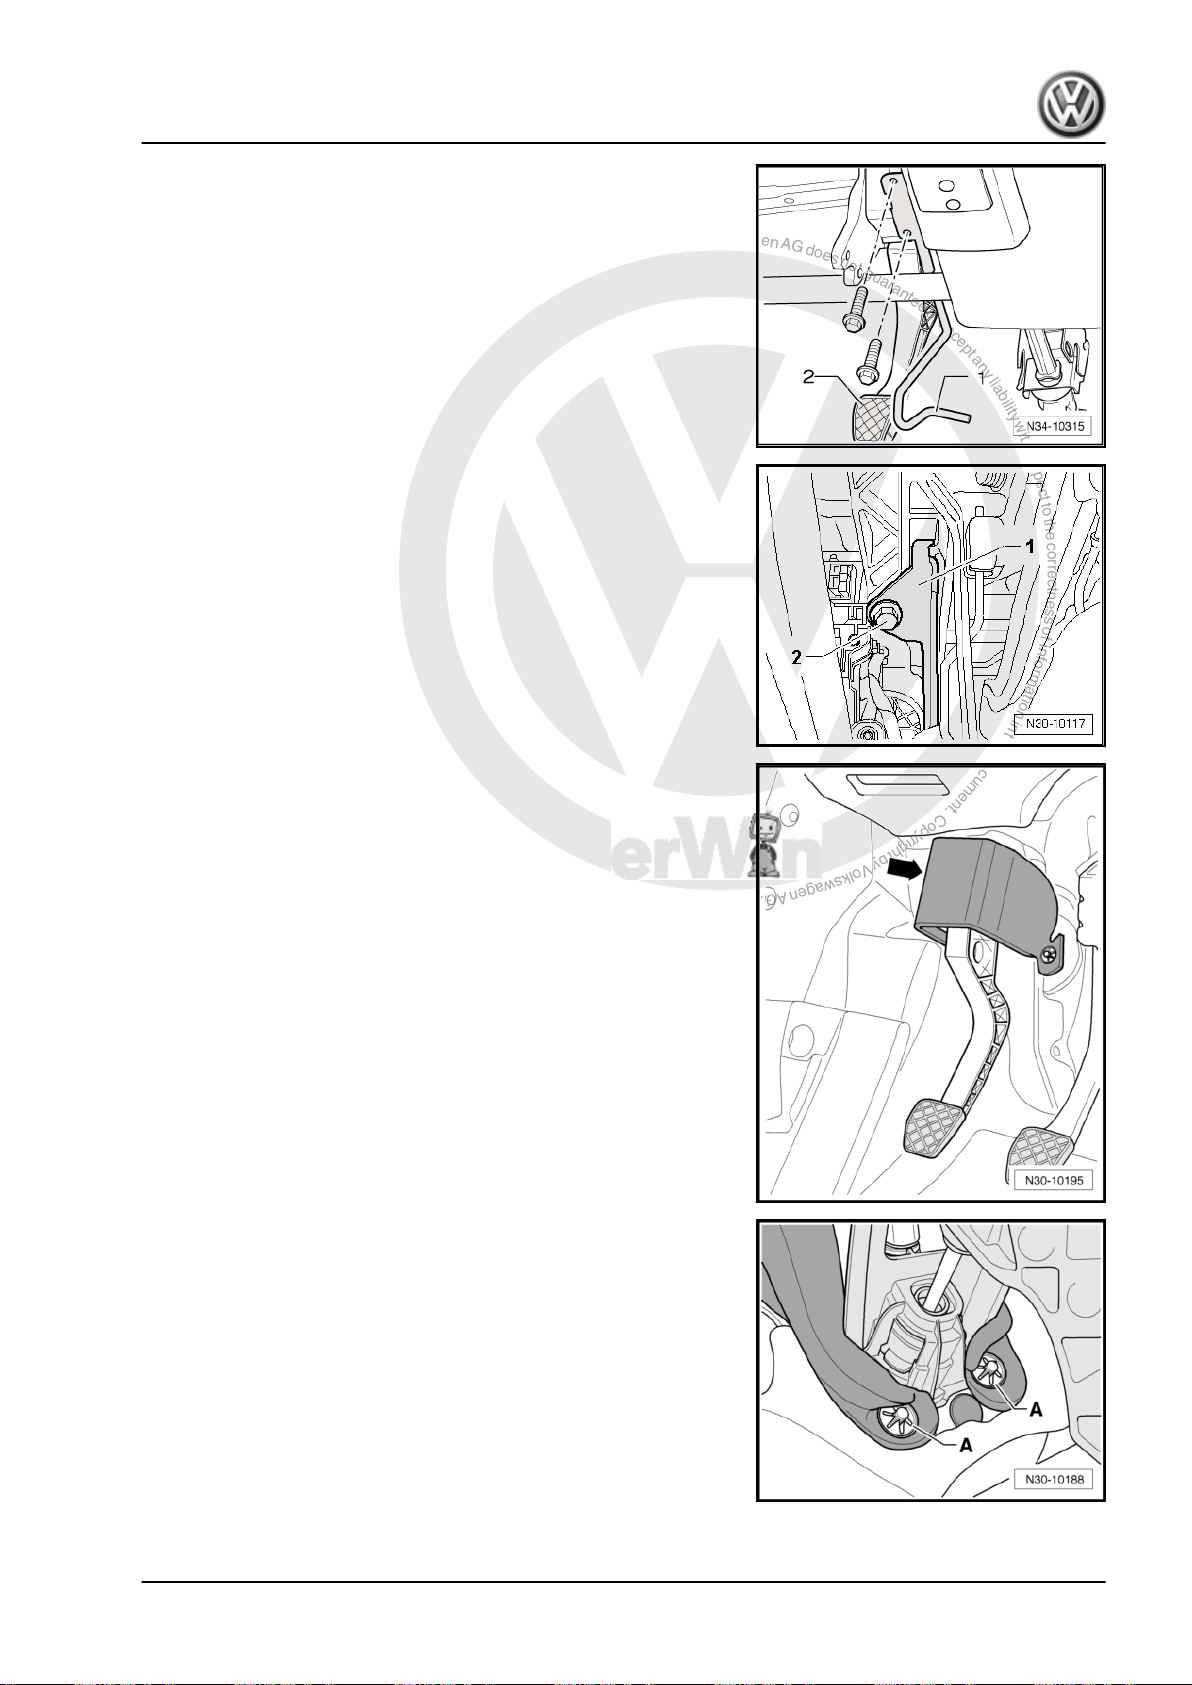
P
r
o
t
e
c
t
e
d
b
y
c
o
p
y
r
i
g
h
t
.
C
o
p
y
i
n
g
f
o
r
p
r
i
v
a
t
e
o
r
c
o
m
m
e
r
c
i
a
l
p
u
r
p
o
s
e
s
,
i
n
p
a
r
t
o
r
i
n
w
h
o
l
e
,
i
s
n
o
t
p
e
r
m
i
t
t
e
d
u
n
l
e
s
s
a
u
t
h
o
r
i
s
e
d
b
y
V
o
l
k
s
w
a
g
e
n
A
G
.
V
o
l
k
s
w
a
g
e
n
A
G
d
o
e
s
n
o
t
g
u
a
r
a
n
t
e
e
o
r
a
c
c
e
p
t
a
n
y
l
i
a
b
i
l
i
t
y
w
i
t
h
r
e
s
p
e
c
t
t
o
t
h
e
c
o
r
r
e
c
t
n
e
s
s
o
f
i
n
f
o
r
m
a
t
i
o
n
i
n
t
h
i
s
d
o
c
u
m
e
n
t
.
C
o
p
y
r
i
g
h
t
b
y
V
o
l
k
s
w
a
g
e
n
A
G
.
Golf 2004 ➤ , Golf 2009 ➤ , Golf Plus 2005 ➤ , Golf Plus 2009 ➤ , Pass ...
5-speed manual gearbox 0A4 - Edition 04.2010
– Remove crash bar -1- (2 bolts).
Attachment with 1 bolt
– Remove crash bar -1- (1 bolt -2-).
If fitted, remove damping -arrow- from lower area of clutch pedal
mounting bracket.
– To do this, remove lock washers -A- for damping.
– Pull off damping.
1. Repairing clutch mechanism 19
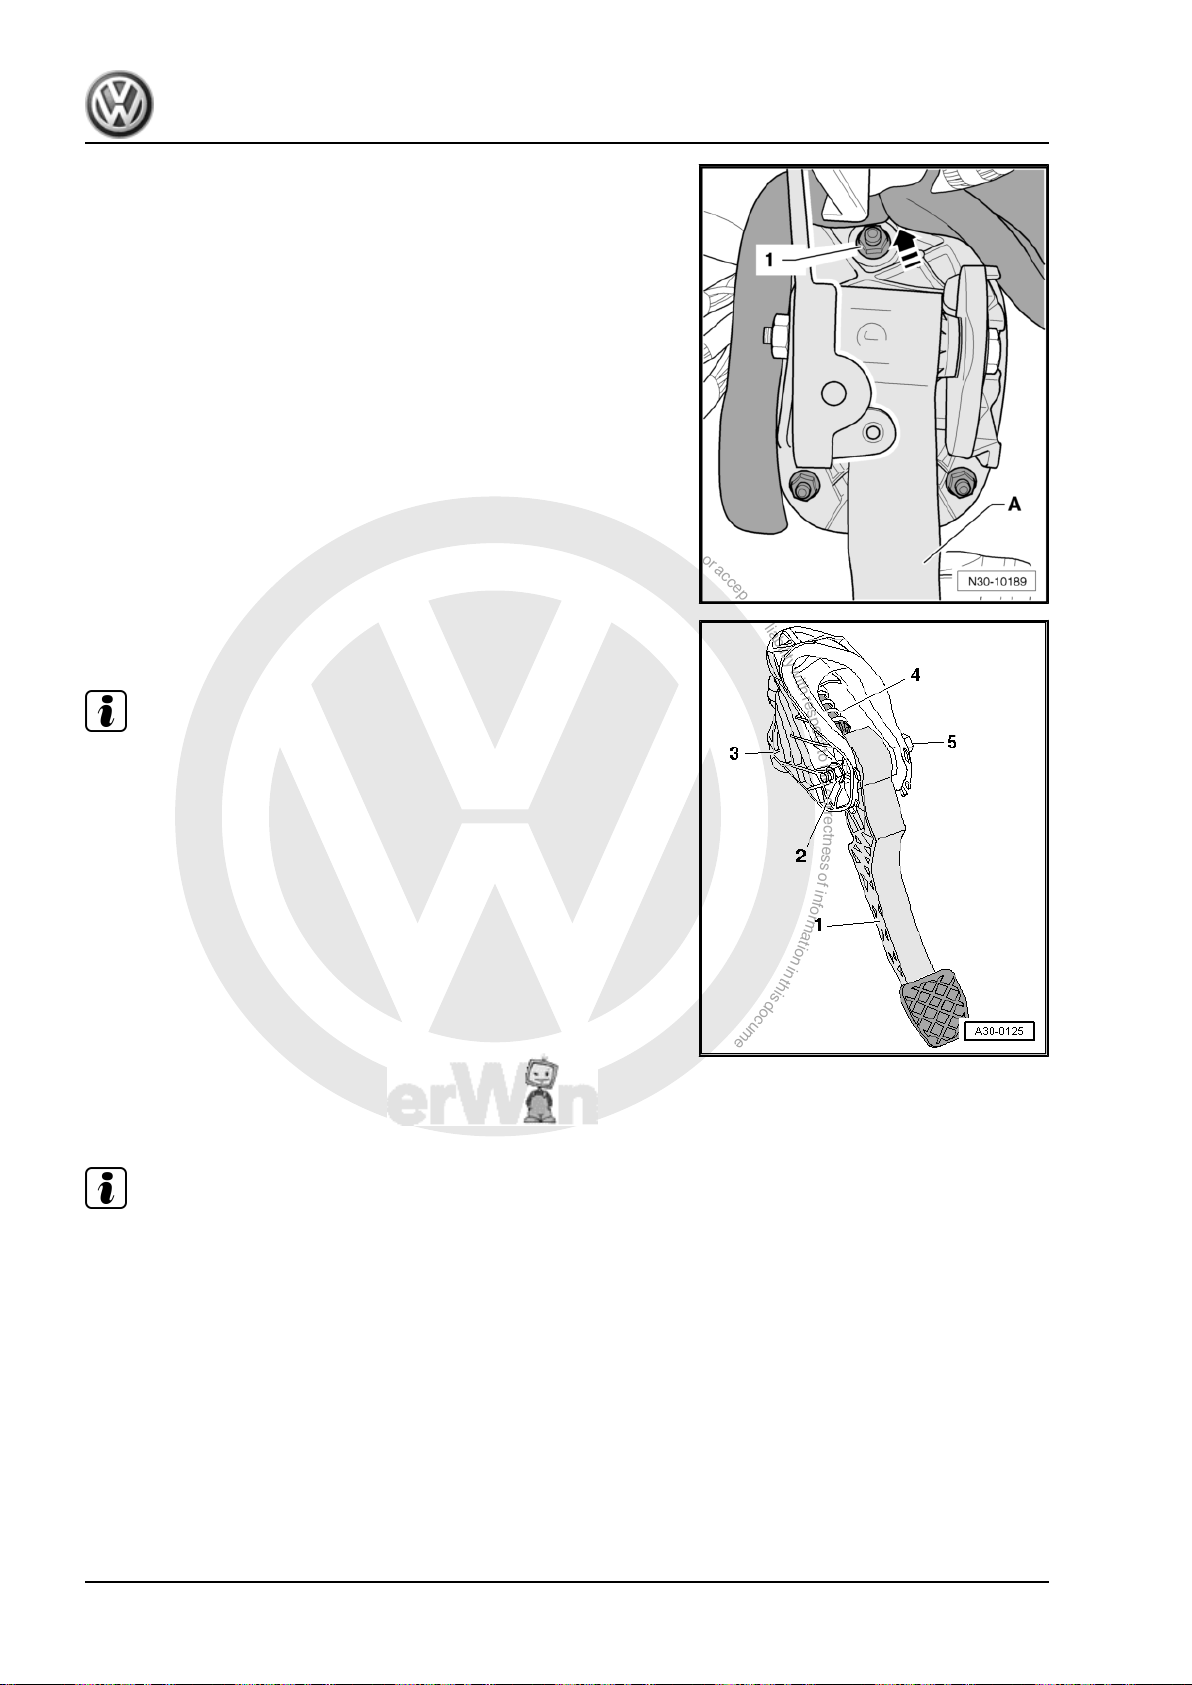
P
r
o
t
e
c
t
e
d
b
y
c
o
p
y
r
i
g
h
t
.
C
o
p
y
i
n
g
f
o
r
p
r
i
v
a
t
e
o
r
c
o
m
m
e
r
c
i
a
l
p
u
r
p
o
s
e
s
,
i
n
p
a
r
t
o
r
i
n
w
h
o
l
e
,
i
s
n
o
t
p
e
r
m
i
t
t
e
d
u
n
l
e
s
s
a
u
t
h
o
r
i
s
e
d
b
y
V
o
l
k
s
w
a
g
e
n
A
G
.
V
o
l
k
s
w
a
g
e
n
A
G
d
o
e
s
n
o
t
g
u
a
r
a
n
t
e
e
o
r
a
c
c
e
p
t
a
n
y
l
i
a
b
i
l
i
t
y
w
i
t
h
r
e
s
p
e
c
t
t
o
t
h
e
c
o
r
r
e
c
t
n
e
s
s
o
f
i
n
f
o
r
m
a
t
i
o
n
i
n
t
h
i
s
d
o
c
u
m
e
n
t
.
C
o
p
y
r
i
g
h
t
b
y
V
o
l
k
s
w
a
g
e
n
A
G
.
Golf 2004 ➤ , Golf 2009 ➤ , Golf Plus 2005 ➤ , Golf Plus 2009 ➤ , Pass ...
5-speed manual gearbox 0A4 - Edition 04.2010
– Push damping upwards in area of upper securing nut -1-
above clutch pedal -A- in -direction of arrow-.
– Unbolt clutch pedal -1- from mounting bracket -3- by removing
nut -2- and pulling out bolt -5-.
Note
The clutch pedal remains hooked to operating rod of master cyl‐
inder.
– Swing clutch pedal down slightly and remove over-centre
spring -4- from mounting bracket.
1.3.2 Installing
Install in the reverse order of removal, observing the following:
Note
Renew self-locking nuts.
20 Rep. Gr.30 - Clutch
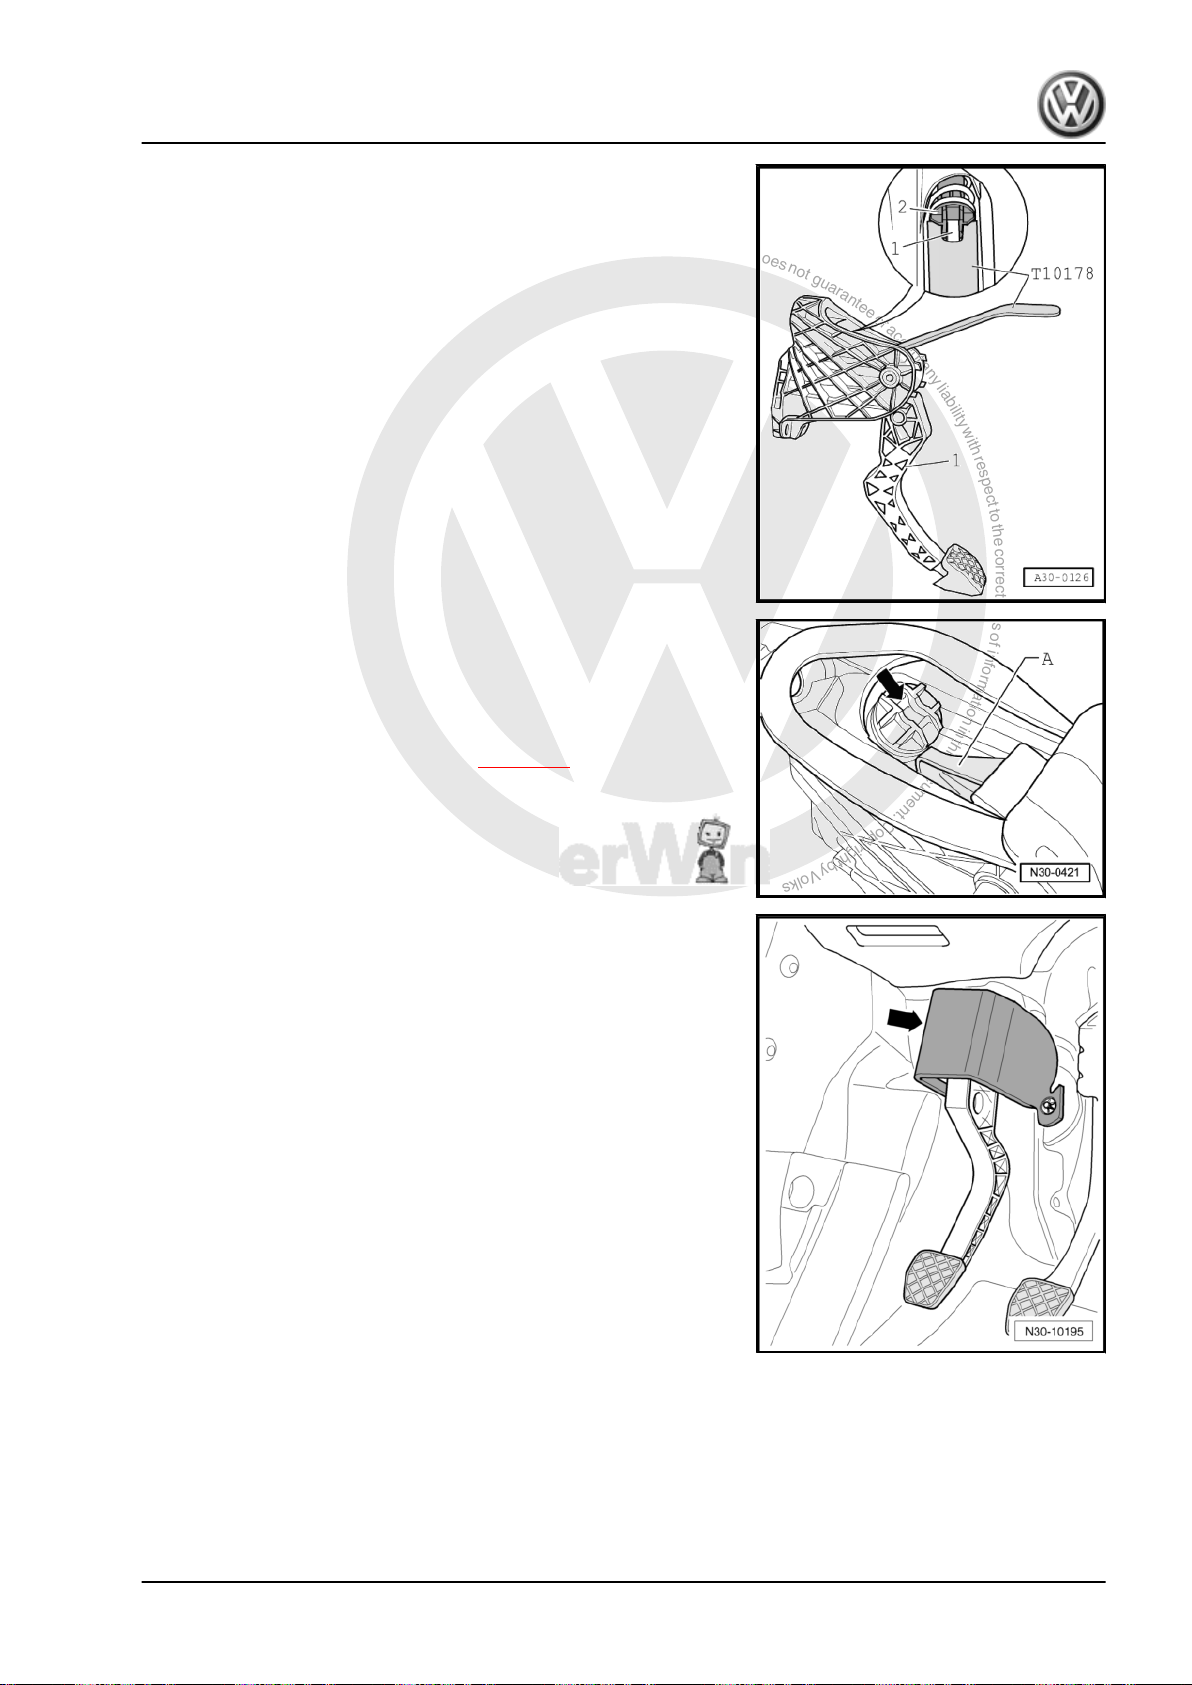
P
r
o
t
e
c
t
e
d
b
y
c
o
p
y
r
i
g
h
t
.
C
o
p
y
i
n
g
f
o
r
p
r
i
v
a
t
e
o
r
c
o
m
m
e
r
c
i
a
l
p
u
r
p
o
s
e
s
,
i
n
p
a
r
t
o
r
i
n
w
h
o
l
e
,
i
s
n
o
t
p
e
r
m
i
t
t
e
d
u
n
l
e
s
s
a
u
t
h
o
r
i
s
e
d
b
y
V
o
l
k
s
w
a
g
e
n
A
G
.
V
o
l
k
s
w
a
g
e
n
A
G
d
o
e
s
n
o
t
g
u
a
r
a
n
t
e
e
o
r
a
c
c
e
p
t
a
n
y
l
i
a
b
i
l
i
t
y
w
i
t
h
r
e
s
p
e
c
t
t
o
t
h
e
c
o
r
r
e
c
t
n
e
s
s
o
f
i
n
f
o
r
m
a
t
i
o
n
i
n
t
h
i
s
d
o
c
u
m
e
n
t
.
C
o
p
y
r
i
g
h
t
b
y
V
o
l
k
s
w
a
g
e
n
A
G
.
Golf 2004 ➤ , Golf 2009 ➤ , Golf Plus 2005 ➤ , Golf Plus 2009 ➤ , Pass ...
5-speed manual gearbox 0A4 - Edition 04.2010
– Insert over-centre spring -2- in mounting bracket from above
while holding end of spring with assembly tool -T10178- in in‐
stallation position.
– Receptacle -arrow- for tip -A- of clutch pedal must stand ver‐
tically.
– Insert tip of clutch pedal in bearing recess of over-centre
spring.
– Depress clutch pedal slightly, push bolt through and tighten
self-locking nut to specified torque ⇒ page 22 .
Some cars have damping -arrow- on the clutch pedal mounting
bracket.
– Return it to installation position.
The crash bar -1- in front of clutch pedal -2- may be secured in
different ways.
Attachment with 2 bolts
1. Repairing clutch mechanism 21
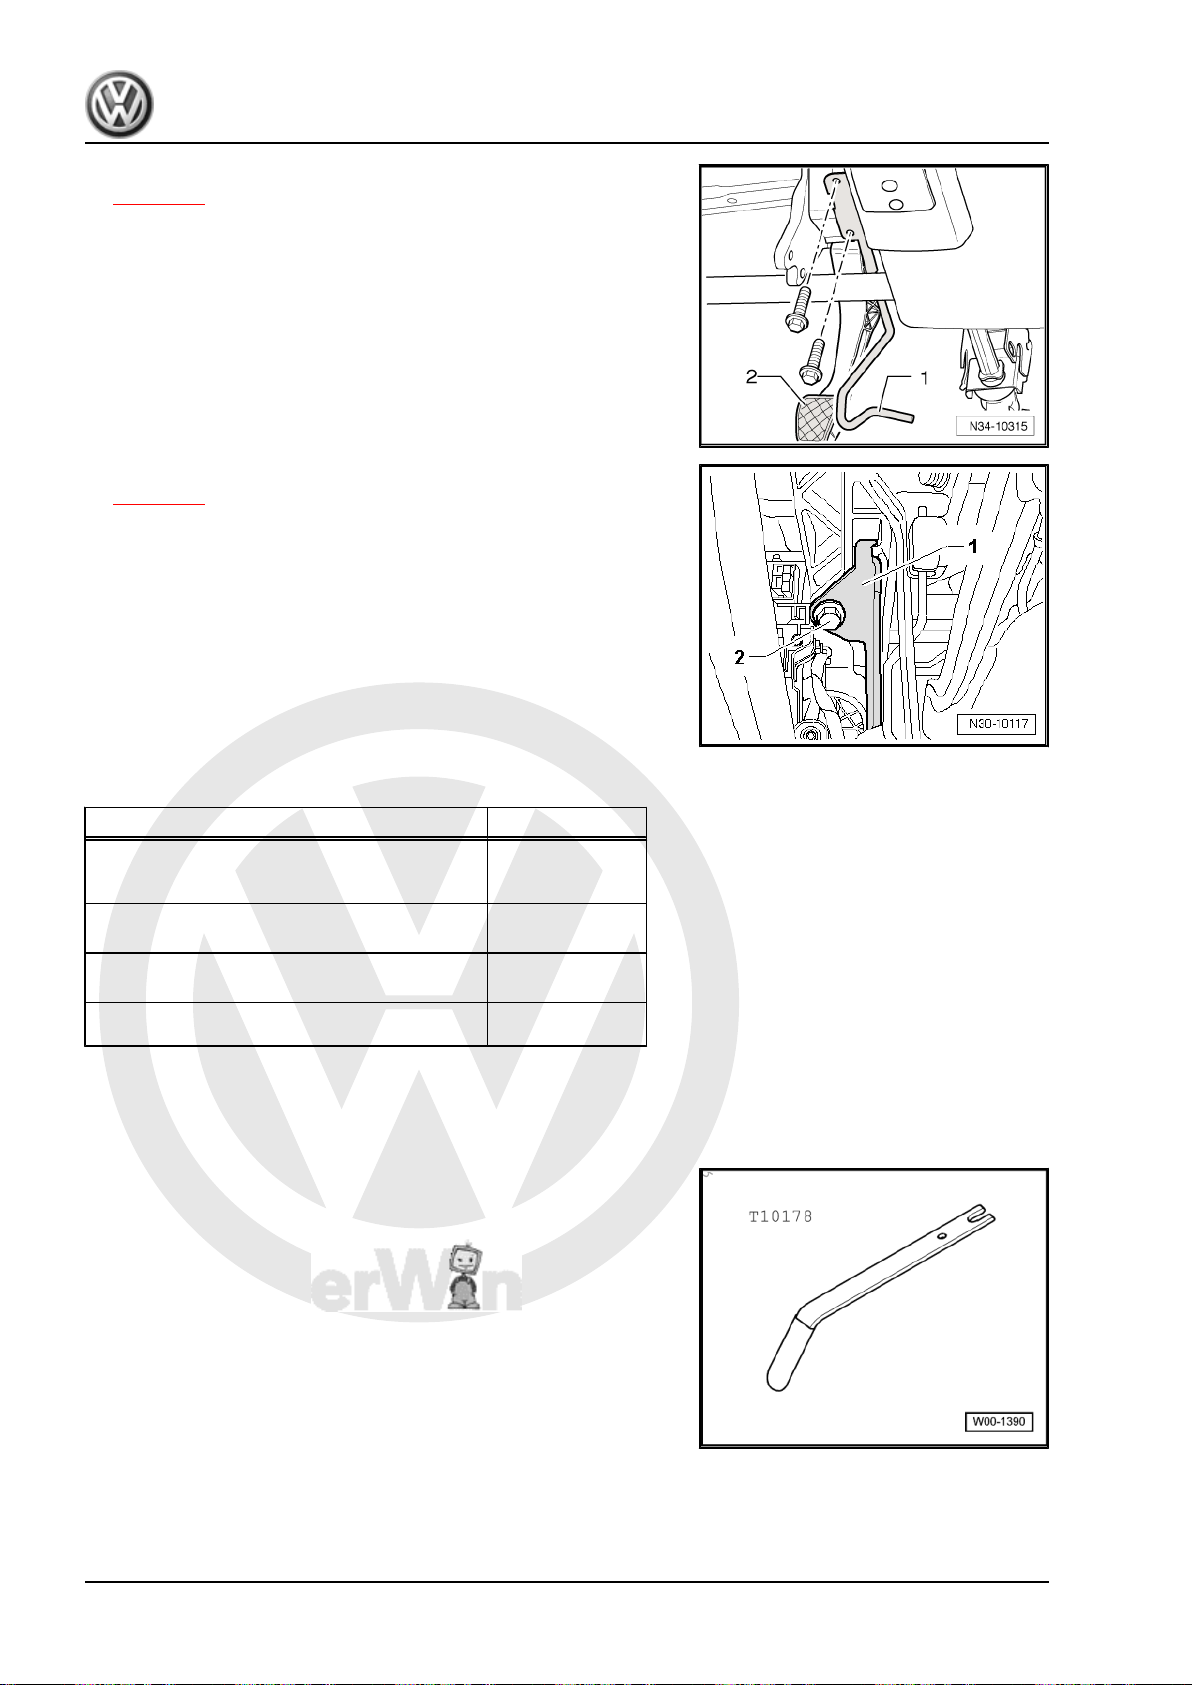
P
r
o
t
e
c
t
e
d
b
y
c
o
p
y
r
i
g
h
t
.
C
o
p
y
i
n
g
f
o
r
p
r
i
v
a
t
e
o
r
c
o
m
m
e
r
c
i
a
l
p
u
r
p
o
s
e
s
,
i
n
p
a
r
t
o
r
i
n
w
h
o
l
e
,
i
s
n
o
t
p
e
r
m
i
t
t
e
d
u
n
l
e
s
s
a
u
t
h
o
r
i
s
e
d
b
y
V
o
l
k
s
w
a
g
e
n
A
G
.
V
o
l
k
s
w
a
g
e
n
A
G
d
o
e
s
n
o
t
g
u
a
r
a
n
t
e
e
o
r
a
c
c
e
p
t
a
n
y
l
i
a
b
i
l
i
t
y
w
i
t
h
r
e
s
p
e
c
t
t
o
t
h
e
c
o
r
r
e
c
t
n
e
s
s
o
f
i
n
f
o
r
m
a
t
i
o
n
i
n
t
h
i
s
d
o
c
u
m
e
n
t
.
C
o
p
y
r
i
g
h
t
b
y
V
o
l
k
s
w
a
g
e
n
A
G
.
Golf 2004 ➤ , Golf 2009 ➤ , Golf Plus 2005 ➤ , Golf Plus 2009 ➤ , Pass ...
5-speed manual gearbox 0A4 - Edition 04.2010
– Install crash bar -1- and tighten the 2 bolts to specified torque
⇒ page 22 .
Attachment with 1 bolt
– Install crash bar -1- and tighten bolt -2- to specified torque
⇒ page 22 .
– Install trim and cover below trim on drive side ⇒ General body
repairs, interior; Rep. Gr. 68 .
1.3.3 Torque settings
Component Nm
Clutch pedal to mounting bracket
♦ Renew self-locking nuts.
Crash bar to steering column mounting
bracket (attachment with 2 bolts)
Crash bar to steering column mounting
bracket (attachment with 1 bolt)
♦ Renew bolts for crash bar
1.4 Removing and installing over-centre
Special tools and workshop equipment required
♦ Release tool -T10178-
spring, Golf 2009 ▸ LHD
25
10
20
22 Rep. Gr.30 - Clutch
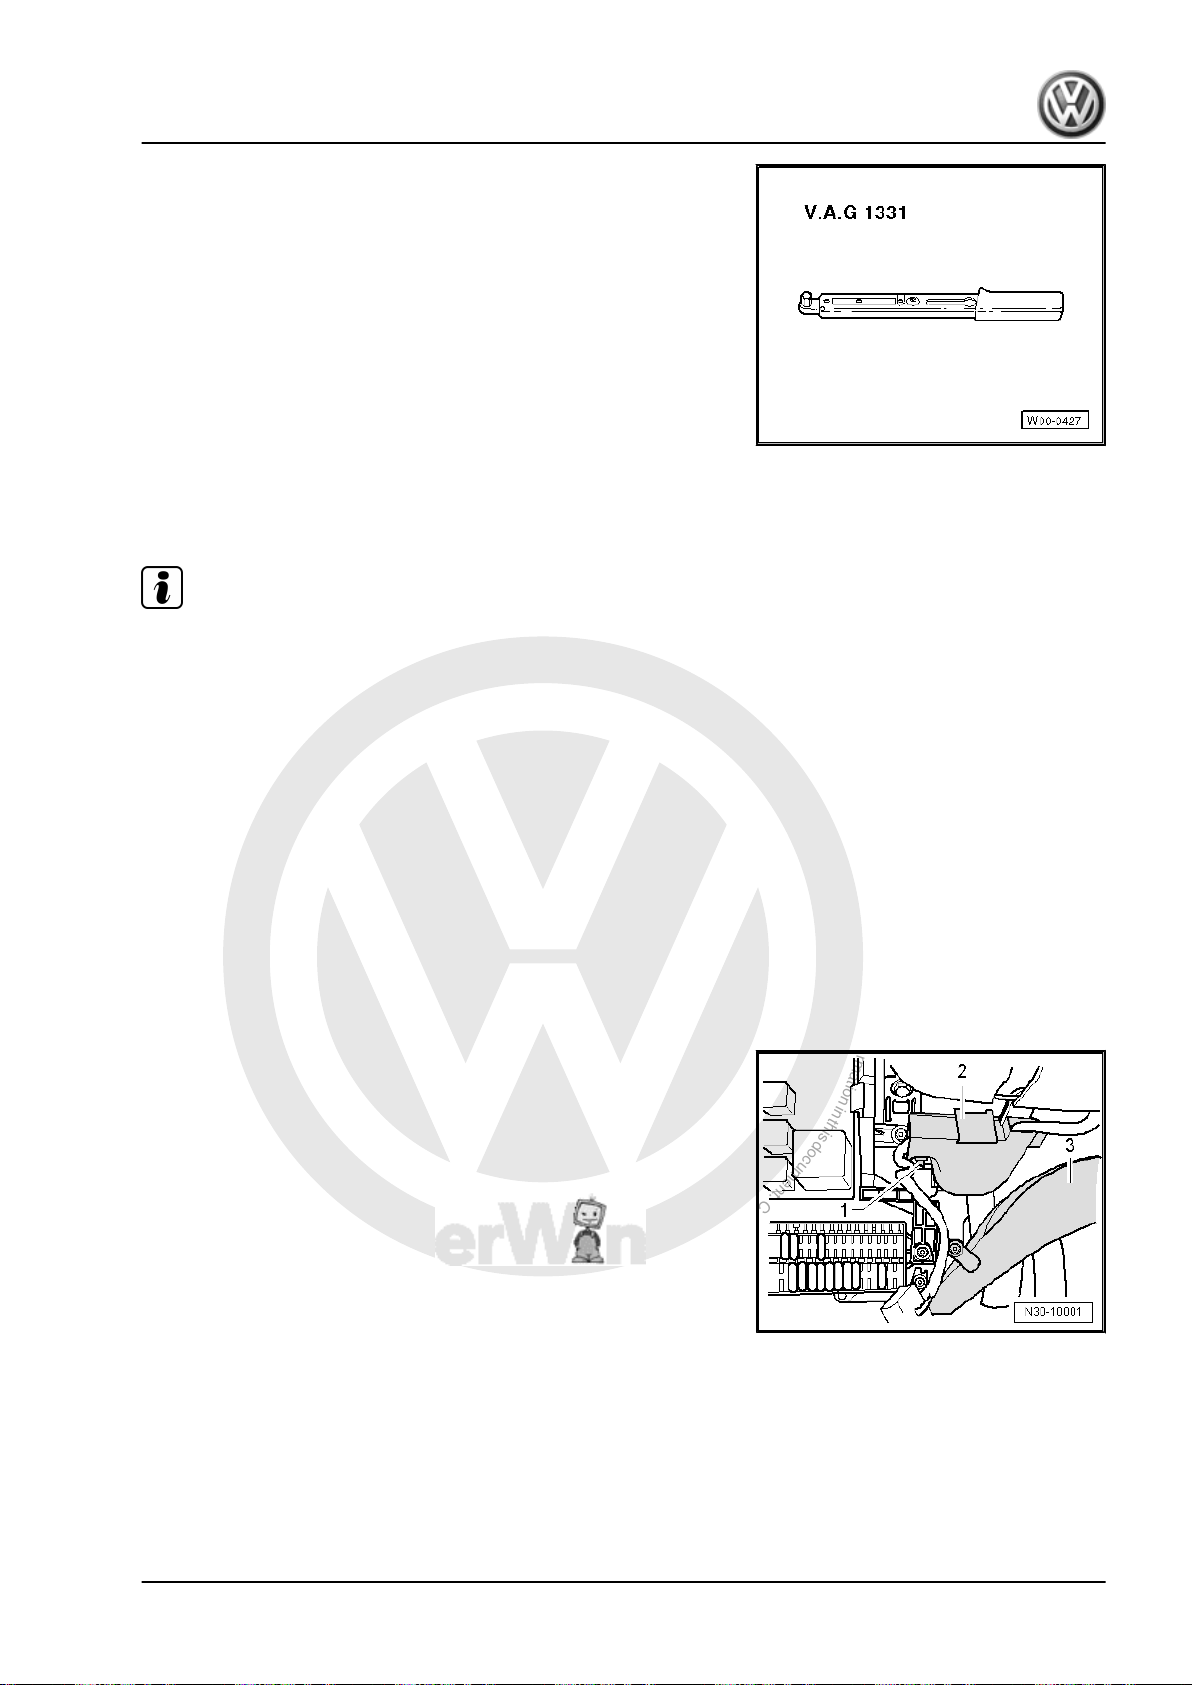
P
r
o
t
e
c
t
e
d
b
y
c
o
p
y
r
i
g
h
t
.
C
o
p
y
i
n
g
f
o
r
p
r
i
v
a
t
e
o
r
c
o
m
m
e
r
c
i
a
l
p
u
r
p
o
s
e
s
,
i
n
p
a
r
t
o
r
i
n
w
h
o
l
e
,
i
s
n
o
t
p
e
r
m
i
t
t
e
d
u
n
l
e
s
s
a
u
t
h
o
r
i
s
e
d
b
y
V
o
l
k
s
w
a
g
e
n
A
G
.
V
o
l
k
s
w
a
g
e
n
A
G
d
o
e
s
n
o
t
g
u
a
r
a
n
t
e
e
o
r
a
c
c
e
p
t
a
n
y
l
i
a
b
i
l
i
t
y
w
i
t
h
r
e
s
p
e
c
t
t
o
t
h
e
c
o
r
r
e
c
t
n
e
s
s
o
f
i
n
f
o
r
m
a
t
i
o
n
i
n
t
h
i
s
d
o
c
u
m
e
n
t
.
C
o
p
y
r
i
g
h
t
b
y
V
o
l
k
s
w
a
g
e
n
A
G
.
Golf 2004 ➤ , Golf 2009 ➤ , Golf Plus 2005 ➤ , Golf Plus 2009 ➤ , Pass ...
5-speed manual gearbox 0A4 - Edition 04.2010
♦ Torque wrench -V.A.G 1331-
1.4.1 Removing
Vehicles with knee airbag
Note
The installation location of the knee airbag is above the pedal
cluster.
– First check whether a coded radio is fitted. If so, obtain anti-
theft code.
– With ignition switched off, disconnect battery ⇒ Electrical sys‐
tem; Rep. Gr. 27 ; Disconnecting and connecting battery .
Continuation for all
– Push driver seat as far back as possible and put steering wheel
in highest position.
– Remove trim and cover below trim on drive side ⇒ General
body repairs, interior; Rep. Gr. 68 .
Vehicles with knee airbag
– Remove bracket for knee airbag together with crash bar ⇒
Interior equipment; Rep. Gr. 69 ; Airbag; Removing and in‐
stalling knee airbag bracket (Golf 2009 ▸) .
Continuation for all
– Remove cable guide -2- from steering column.
– Remove footwell vent -3-.⇒ Heating, air conditioning; Rep.
Gr. 80 ; Repairing heating
Vehicles without knee airbag
1. Repairing clutch mechanism 23
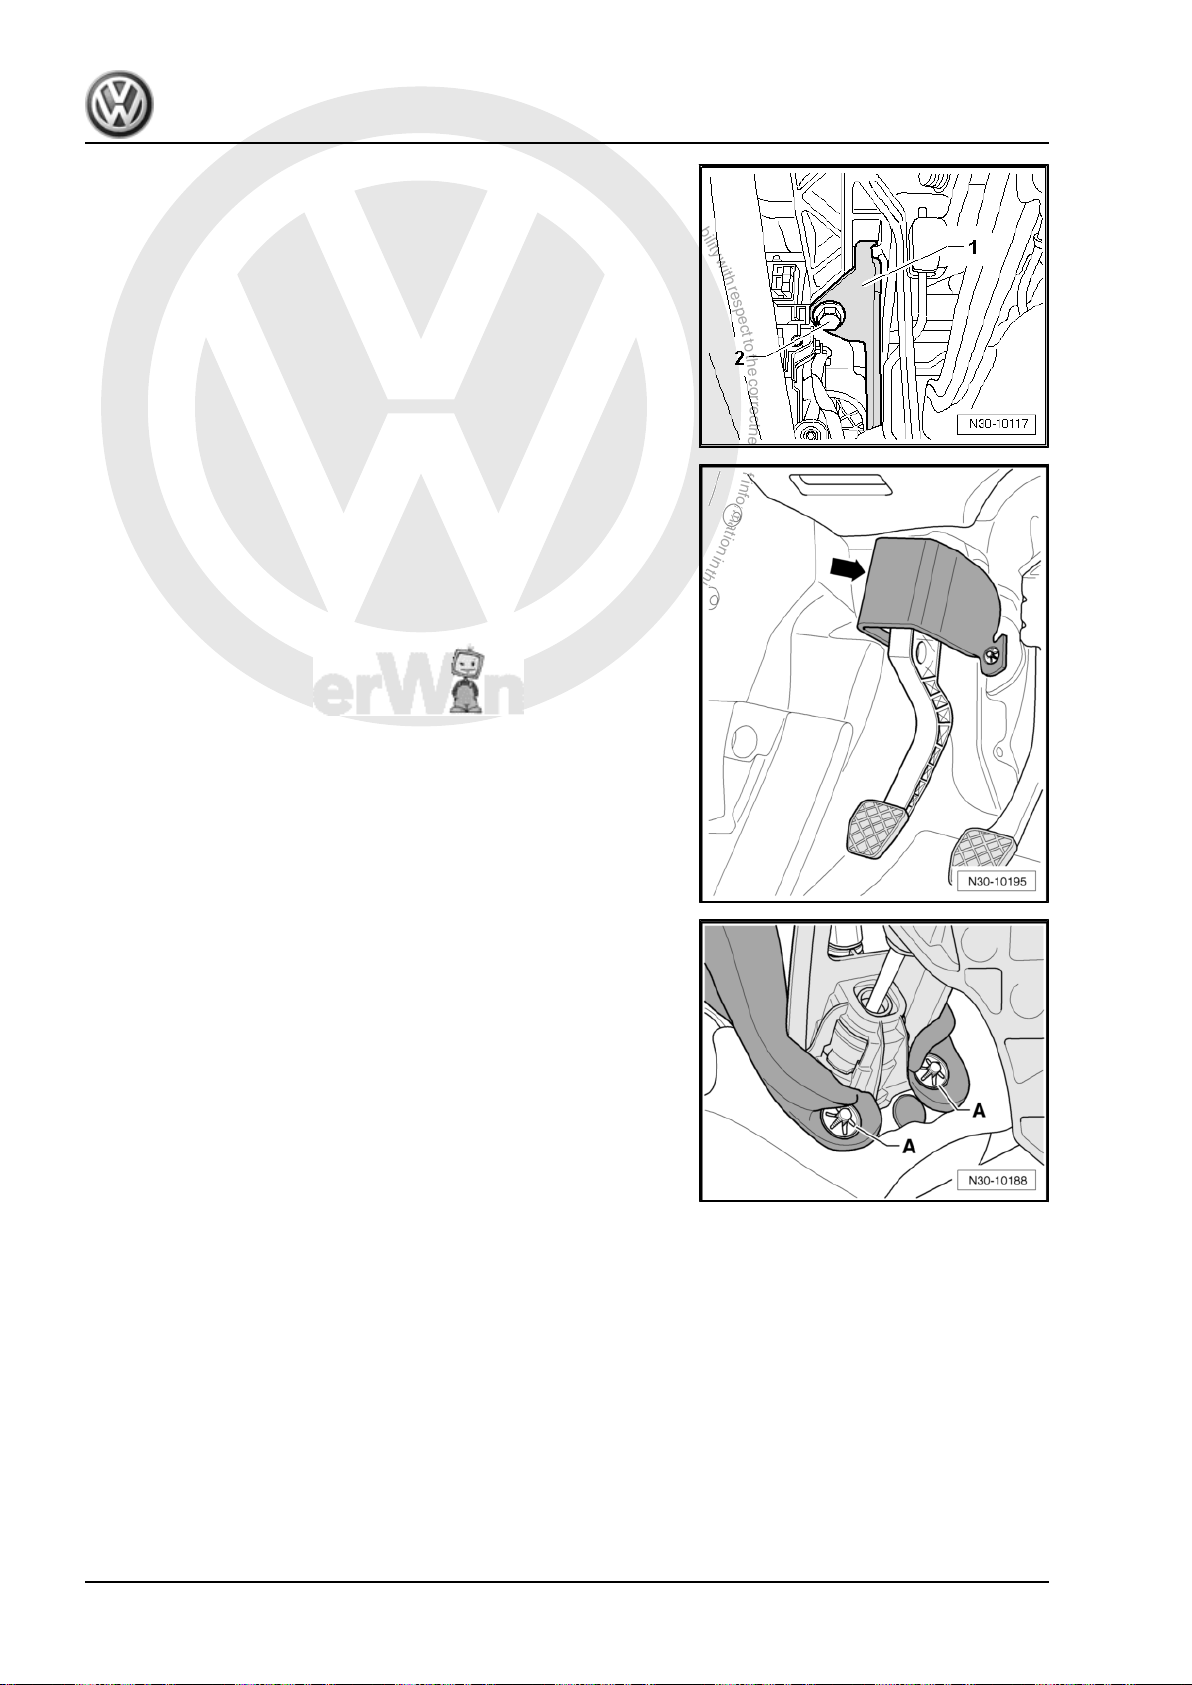
P
r
o
t
e
c
t
e
d
b
y
c
o
p
y
r
i
g
h
t
.
C
o
p
y
i
n
g
f
o
r
p
r
i
v
a
t
e
o
r
c
o
m
m
e
r
c
i
a
l
p
u
r
p
o
s
e
s
,
i
n
p
a
r
t
o
r
i
n
w
h
o
l
e
,
i
s
n
o
t
p
e
r
m
i
t
t
e
d
u
n
l
e
s
s
a
u
t
h
o
r
i
s
e
d
b
y
V
o
l
k
s
w
a
g
e
n
A
G
.
V
o
l
k
s
w
a
g
e
n
A
G
d
o
e
s
n
o
t
g
u
a
r
a
n
t
e
e
o
r
a
c
c
e
p
t
a
n
y
l
i
a
b
i
l
i
t
y
w
i
t
h
r
e
s
p
e
c
t
t
o
t
h
e
c
o
r
r
e
c
t
n
e
s
s
o
f
i
n
f
o
r
m
a
t
i
o
n
i
n
t
h
i
s
d
o
c
u
m
e
n
t
.
C
o
p
y
r
i
g
h
t
b
y
V
o
l
k
s
w
a
g
e
n
A
G
.
Golf 2004 ➤ , Golf 2009 ➤ , Golf Plus 2005 ➤ , Golf Plus 2009 ➤ , Pass ...
5-speed manual gearbox 0A4 - Edition 04.2010
– Remove crash bar -1- (bolt -2-).
Continuation for all
If fitted, remove damping -arrow- from lower area of clutch pedal
mounting bracket.
– To do this, remove lock washers -A- for damping.
– Pull off damping.
24 Rep. Gr.30 - Clutch
Loading...