Volkswagen E Golf 2015 Owner's Manual

Side view
Fig. 1 Vehicle side overview.
Key to fig. 1:
(1) Roof antenna (2) Battery charge port cover (3) Outside door handles (4) Outside mirror:
– Additional turn signal light
(5) Area for e-Golf emblem (6) Lift points for the jack
Front view
Fig. 2 Vehicle front overview.
Key to fig. 2:
(1) Windshield area:
– Windshield wipers – Rain sensor (if equipped)
– Low-light sensor (if equipped)
(2) Electric motor hood release (3) Area for e-Golf emblem (4) Headlights (on both left and right) (5) Park Distance Control (PDC) sensors (if equipped) (6) static cornering lights (on left and right) (7) Threaded hole for the front towing eye (behind cover)
Rear view
Fig. 3 Vehicle rear overview.
Key to fig. 3:
(1) High-mounted brake light (2) Rear window:
– Rear window defroster
– Rear windshield wiper
(3) Volkswagen emblem for opening the rear hatch (4) Taillights (on both left and right) (5) Area for e-Golf emblem (6) Area for the Rear View Camera system (if equipped) (7) Park Distance Control (PDC) sensors (if equipped) (8) License plate lights (9) Threaded hole for the rear towing eye (behind cover)
Driver door overview
Fig. 4 Overview of controls in the driver door.
Key to fig. 4:
(1) Door handle (2) Power locking button for locking and unlocking the vehicle  –  (3) Knob for adjusting the outside mirrors:
– Adjusting outside mirrors – Outside mirror heating
(4) Switches for operating the power windows:
– Power windows – Safety switch for rear power windows
(5) Indicator light for the power locking system (6) Lever for releasing the electric motor hood (7) Storage compartment (8) Bottle holder (9) Reflector
Driver side overview
Fig. 5 Driver side overview.
Key to fig. 5:
(1) Instrument cluster:
– Instruments
– Display
– Warning and indicator lights
(2) Headlight switch :
– Off position
– Automatic headlights  (if equipped)
– Parking lights (if equipped)
– Low beams
– Fog lights  (if equipped)
(3) Lever for:
– Turning high beams on or off
– Headlight flasher  x
– Turn signals
– Cruise control , 
(4) Windshield wiper and washer lever:
– Windshield wiper 
– Intermittent operation for the front windshield wipers 
– Interval settings for the wipers or sensitivity for the rain sensor
– Windshield wiper 
– “One-tap wiping” x
– Windshield wiper
– Automatic wipe/wash for windshield
– Rear window wiper
– Rear window automatic wipe/wash – Lever with buttons for the Volkswagen Information System (Basic version) ,  ... 17
(5) Multi-function steering wheel controls (if equipped): , ....................................................... 17, 284
– Volume setting for radio, navigation system notifications (if applicable), or telephone
calls
– Voice control activation – Display Phone main menu or accept telephone calls
– Audio, navigation
– Control buttons for the Volkswagen Information System (Premium version) #
, ,
– Cruise control buttons , , ,  , – -
(6) Ignition switch (vehicles without Keyless Access) (7) Dimmer control for the instrument and switch illumination (8) Lever for the adjustable steering wheel (9) Horn (only works when the ignition is switched on) (10) Pedals (11) Driver front airbag (12) Air vents  –  – (13) Storage compartment
Upper center console
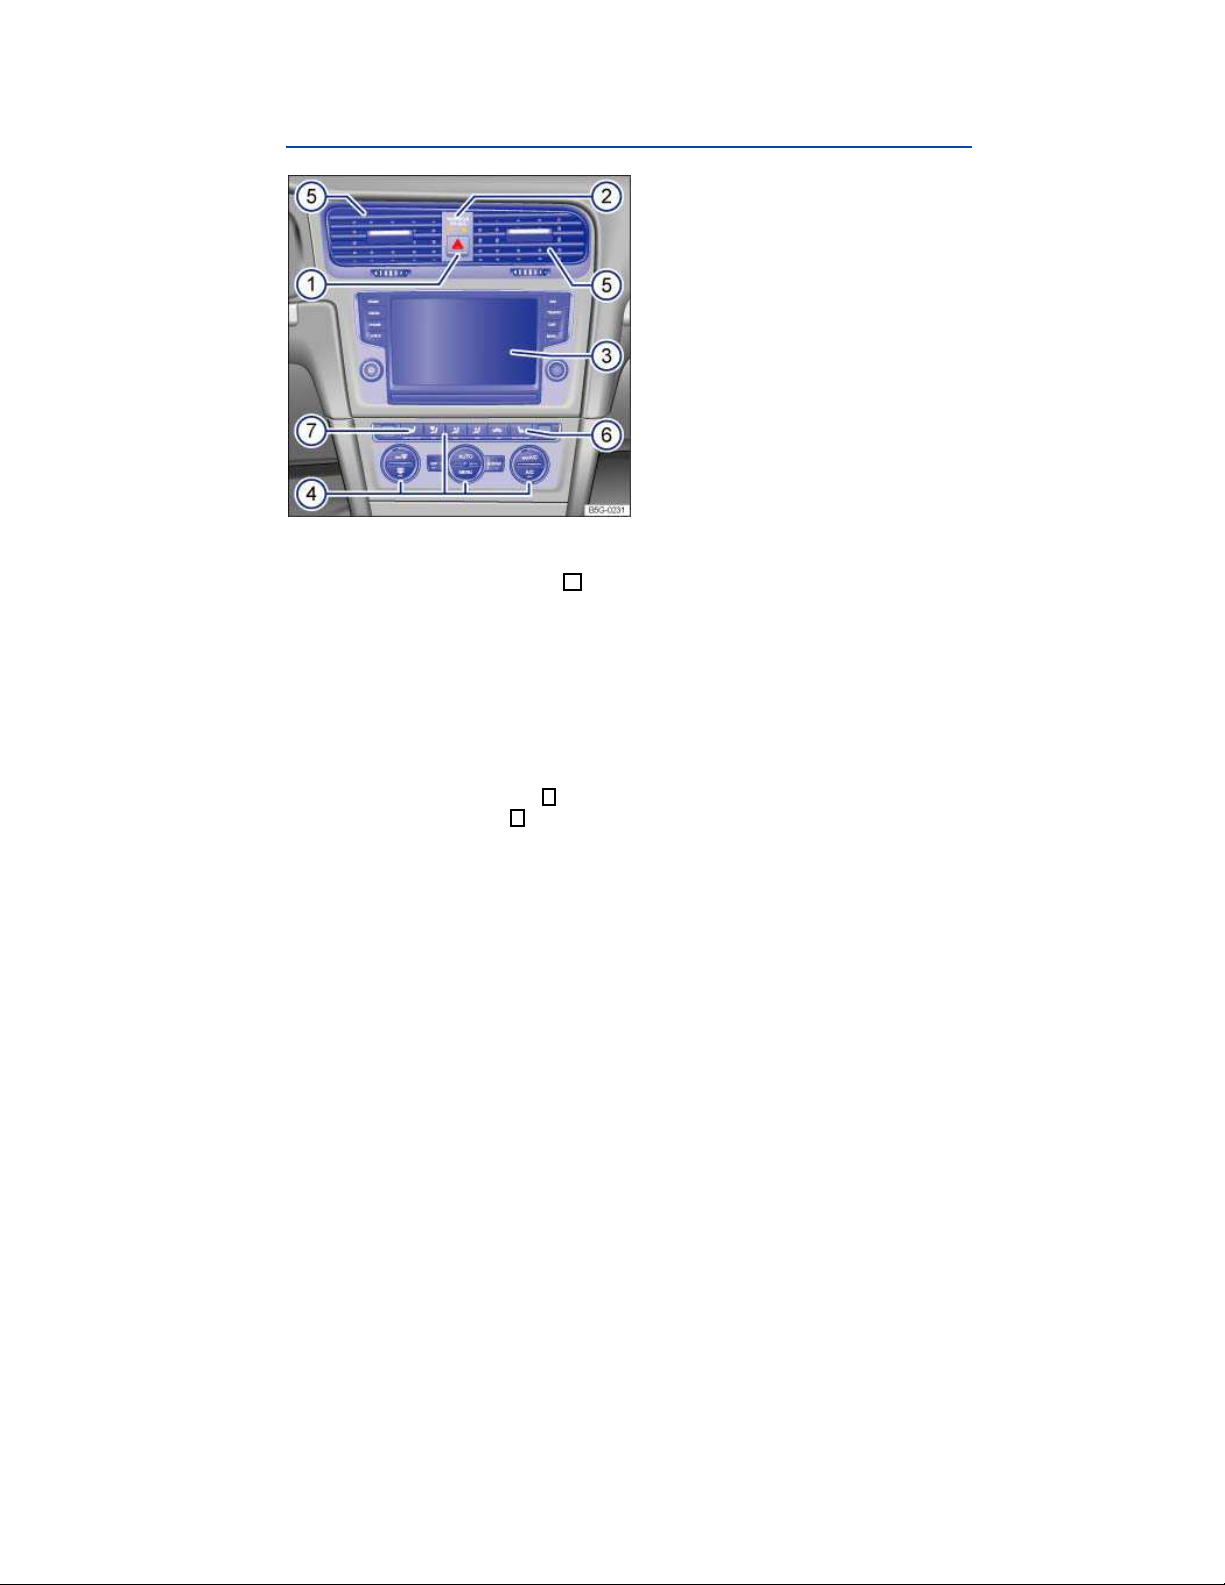
Fig. 6 Overview of the upper center console.
Key to fig. 6:
(1) Button for the emergency flashers (2) PASSENGER AIR BAG  light (front airbag for front seat passenger) (3) Infotainment system
– User information display
– Radio ⇒ Booklet
– Navigation system ⇒ Booklet
(4) Controls for:
– Manual air conditioning
– Climatronic
(5) Air vents  –  – (6) Passenger seat heating button (7) Driver seat heating button
Radio, Navigation System
Lower center console
Fig. 7 Overview of the lower center console.
Key to fig. 7:
(1) Lever for automatic transmission (2) Parking brake lever (3) Storage compartment with cup holders (4) Storage compartment
– With AUX-in jack or Media Device Interface (MDI)/(MEDIA-IN) ⇒ Booklet
gation System
(5) Starter button  –  –  (for vehicles with Keyless Access) (6) Center armrest:
– With storage compartment – With 12 Volt socket
(7) Button for Park Distance Control (if equipped) (8) 12 Volt socket (9) Card holder
Radio, Navi-
Instrument cluster
Introduction
In this section you’ll find information about:
Instrument overview Displays Service reminder display
More information:
Warning and indicator lights
Volkswagen Information System
Infotainment system
Shifting
Service reminder information ⇒ Booklet
WARNING
Driving on today's roads demands the full attention of the driver at all times. Driver distrac­tion causes accidents, collisions and serious personal injury!
Never use the buttons in the instrument cluster while driving.
Instrument overview
Warranty and Maintenance
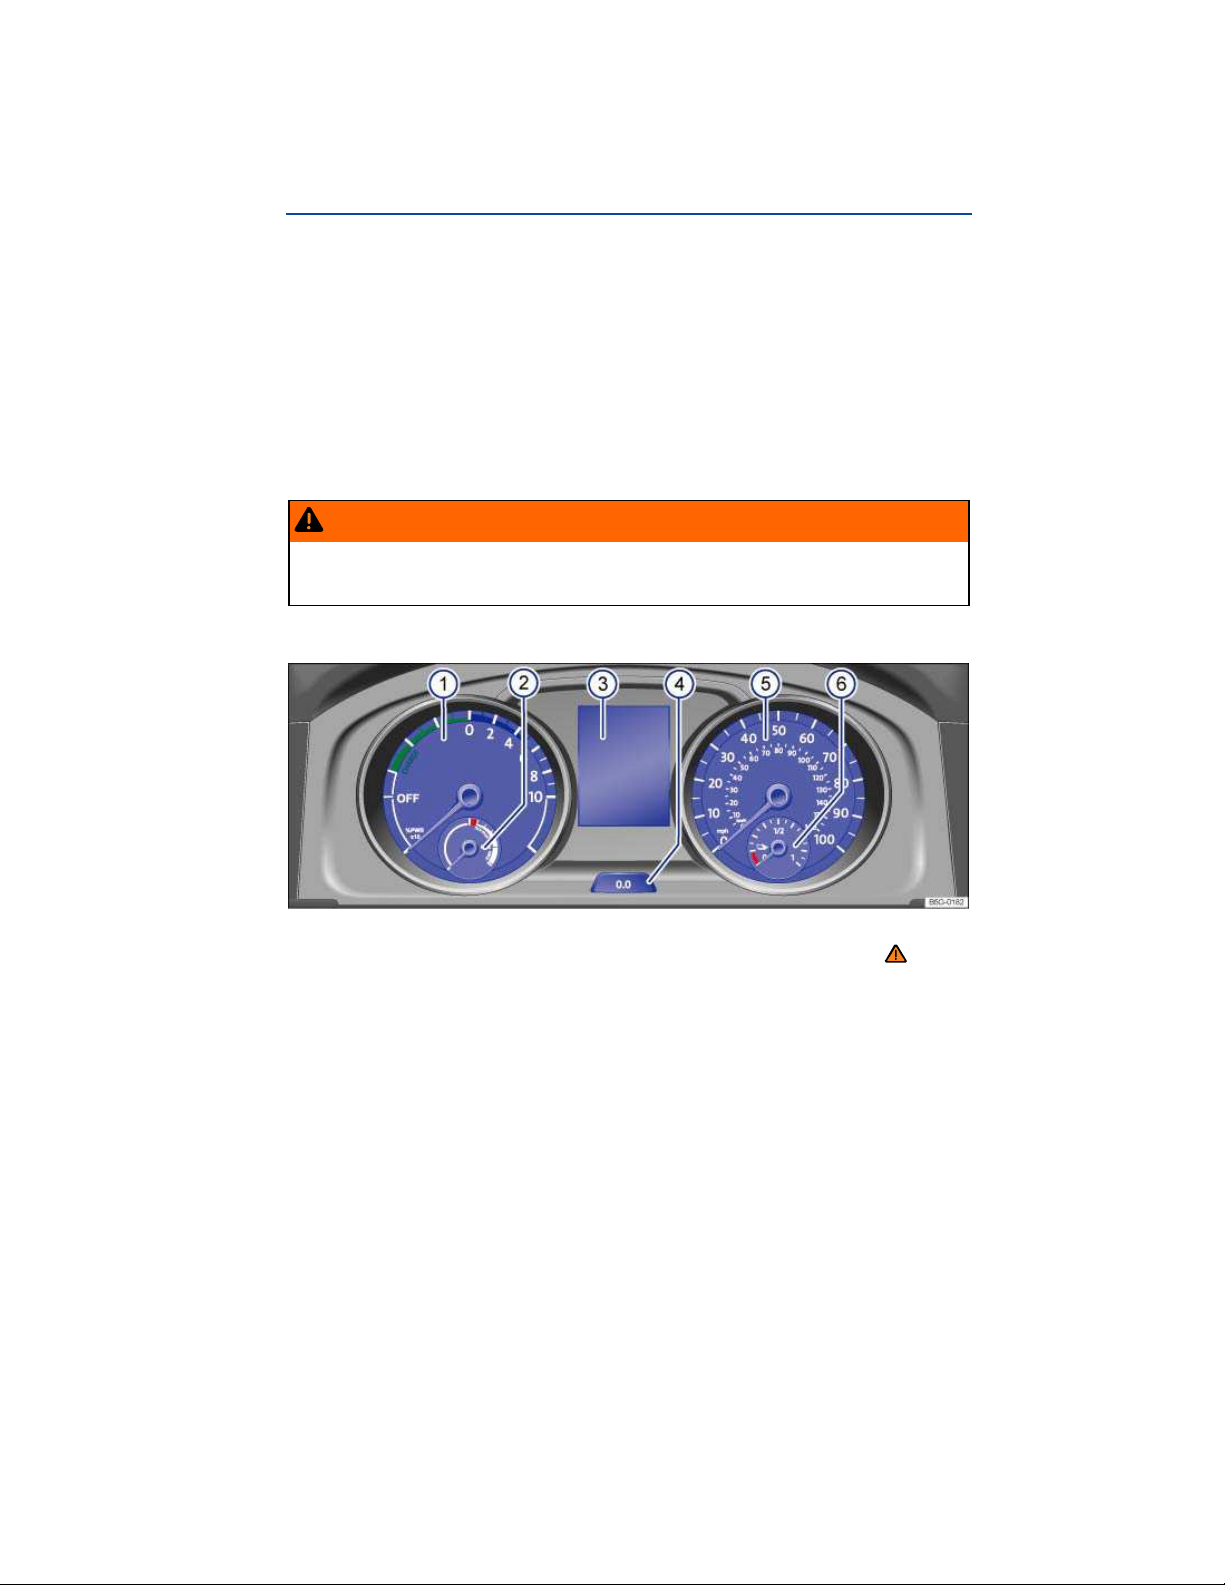
Fig. 9 Instrument cluster in the instrument panel.
Please first read and note the introductory information and heed the WARNINGS
Instrument explanations ⇒ fig. 9:
(1) Power display
The current power level is displayed in kilowatts (kW). When the electric drive is activated, the display changes from  to 
(2) Power availability display
Displays the current power availability.
(3) Displays (4) Reset, set, and display button (5) Speedometer (6) Charge level display
Displays the charge level of the high-voltage battery
Displays
Fig. 10 In the instrument cluster display: A: Open electric motor hood, B: Open rear hatch, C: Open front
driver side door, D: Open rear passenger side door.
Please first read and note the introductory information and heed the WARNINGS
Depending on the vehicle model and equipment level, different information may be shown in the instrument cluster display.
Open doors, electric motor hood, or rear hatch ⇒ 
Warning and information texts
Odometer displays
Time
Outside temperature
Compass display
Selector lever position
Driving data display and menus for different settings
Service reminder display
Radio and navigation information ⇒ Booklet
Telephone information ⇒ Booklet
Mobile phone package
Open doors, hood, and rear hatch
The instrument cluster display indicates if any doors, the electric motor hood, or rear hatch are open once the vehicle has been unlocked, and while the vehicle is in motion. There may also be an audible warning chime. Different models and equipment versions may have different displays.
fig. 10
Radio, Navigation System
Key to
⇒ fig. 10
See
Key to ⇒ fig. 10
See
Stop!
A
The electric motor hood is open or not properly closed.
Stop!
B
The rear hatch is open or not properly closed.
Stop!
C, D
Warning and information texts
The status of various vehicle functions and components is monitored when the ignition is switched on and while driving. Malfunctions are indicated by red and yellow warning symbols with text messages in
the instrument cluster display (⇒ page Error! Bookmark not defined., Warning and indicator lights). In some cases, they may also be signaled acoustically. The display can vary depending on the instru­ment cluster model.
One or more vehicle doors open or not properly closed.
Type of no­tification
Priority 1 warning message
Symbol
Explanation
color1
Red Symbol flashing or lit – sometimes with acoustic
warnings.
Stop! ⇒  !
Check malfunction and take corrective action. Contact an authorized Volkswagen dealer or an authorized Volkswagen Service Facility for assis­tance if necessary. Menus cannot be accessed when a priority 1 warning message is displayed. The warning message will turn off automatically after a few seconds. You can confirm and turn off some warning messages by pressing the  but­ton on the windshield wiper lever or the  button on the multi-function steering wheel.
1
Displayed in color on an instrument cluster with color display.
Type of no­tification
Symbol
color1
Explanation
Priority 2 warning message
Yellow Symbol flashing or continuously lit – sometimes
with acoustic warnings. Malfunctions or low operating fluid levels may cause vehicle damage and vehicle breakdown
⇒ 
. Check malfunction as soon as possible. Contact an authorized Volkswagen dealer or an author­ized Volkswagen Service Facility for assistance if necessary.
Information
Information about various vehicle situations.
text
Odometer displays
The odometer indicates the total distance driven by the vehicle.
The trip odometer (trip) shows the distance driven since the last time the trip odometer was reset. The last digit indicates 1/10 mile (100 meters).
Press the button in the instrument cluster briefly ⇒  Instrument overview to reset the trip odometer to 0.
Time
To set the time, press and hold the  button in the instrument cluster ⇒  Instrument overview until the word Time appears in the display. The doors must be closed.
Release the button. The time is shown in the display and the hour setting is highlighted.
Press the button repeatedly until the correct hour is displayed. Press and hold the button to
scroll through quickly.
Once you have set the hour, wait a few seconds until the minutes display is highlighted.
Press the button repeatedly until the correct minutes are displayed. Press and hold the button
to scroll through quickly.
Release the button to finish setting the clock.
On appropriately equipped vehicles, you can also set the time in the Infotainment system by pressing the
 button followed by the and Time and date function keys ⇒  Menu and system settings
(SETUP).
Outside temperature display
At outside temperatures below about +39 °F (+4 °C), a “snowflake symbol” appears in the display.
The symbol remains on until the outside temperature rises above +43 °F (+6 °C) ⇒ 
When the vehicle is not moving or when you are driving at very low speeds, the temperature displayed may be slightly higher than the actual outside temperature.
The measurement range is from -49 °F (-45 °C) to +169 °F (+76 ).
.
Compass display
On vehicles equipped with compass display, the current compass direction is indicated in the instru­ment cluster display when the ignition (or the navigation system, if equipped) is switched on.
Selector lever positions
The selector lever position is shown both on the side of the selector lever and in the instrument cluster
display ⇒  Shifting.
WARNING
Failure to heed warning lights and instrument cluster text messages can cause the vehicle to break down in traffic and result in a collision and serious personal injury.
Never ignore warning lights or text WARNINGS.
Always stop the vehicle as soon as it is safe to do so.
Park the vehicle at a safe distance from moving traffic and where no part of the hot cata-
lytic converter and exhaust system can come into contact with flammable materials under the vehicle, such as dry grass, brush, spilled fuel, etc.
A broken down vehicle presents a high accident risk for itself and others. Switch on emergency flashers and set up a warning triangle to warn oncoming traffic.
WARNING
Roads and bridges may be dangerously icy even if the outside air temperature is above freez­ing.
If you use the outside temperature display to tell you about frost conditions, remember that roads can even ice over at temperatures above +39 °F (+4 °C). Always remember: even if the “snowflake symbol” is not displayed, there could still be black ice on the road.
Never rely exclusively on the outside temperature display.
NOTICE
Failure to heed warning lights or text WARNINGS can result in vehicle damage.
The instrument cluster displays and their arrangement may vary depending on the vehicle model. For displays without warning and information messages, malfunctions are only signaled with indicator lights.
Depending on vehicle equipment, some settings and displays may also appear in the Infotain­ment system.
If there are multiple warning messages, the symbols are displayed for several seconds in order of importance. The symbols are displayed until the cause has been corrected.
If warning messages are displayed when the ignition is switched on, it may not be possible to adjust some settings as described, or the information display may appear differently. If this happens, take the vehicle to an authorized Volkswagen dealer or an authorized Volkswagen Service Facility for assistance.
Service reminder display
Fig. 11 In the instrument cluster display: Example of the service reminder when a service is due.
Fig. 12 In the Infotainment system display: Example of the service reminder.
Please first read and note the introductory information and heed the WARNINGS
The maintenance service reminder is shown in the instrument cluster display ⇒ 
Infotainment system ⇒  the Infotainment system version equipped with the vehicle.
Maintenance services take place at predefined intervals. The service reminder display provides infor­mation on the next inspection service. For information on maintenance service intervals, please see
the ⇒ Booklet
fig. 12. Versions and displays can vary depending on the instrument cluster or
Warranty and Maintenance
.
Service reminder
If maintenance service is due in the near future, a service reminder is displayed when the ignition is switched on.
The number of miles (km) or amount of time shown correspond to the maximum number of miles (km) or maximum time that can still be driven before the next service.
Service event
For a scheduled inspection there is an audible chime when the ignition is switched on. The wrench symbol also appears for several seconds in the instrument cluster display along with the following
message ⇒ 
fig. 11:
fig. 11 and in the
Inspection now!
Viewing service message
You can access the current service schedule when the ignition is switched on, the electric motor is not activated, and the vehicle is stationary:
Press and hold the button in the instrument cluster ⇒  Instrument overview until the word Ser- vice appears in the display.
Release the button. The current service message appears in the display.
You can also view service information ⇒  followed by the and Service function keys ⇒  Menu and system settings (SETUP).
fig. 12 in the Infotainment system by pressing the  button
Resetting the service reminder display
If the inspection service was not performed by an authorized Volkswagen dealer or an authorized Volkswagen Service Facility, the service reminder can be reset as follows:
Switch off the ignition.
Press and hold the button in the instrument cluster ⇒  Instrument overview.
Switch on the ignition.
Release the button.
If the following message appears in the display:
Do you really want to reset inspect. service?
Confirm the request by pressing the  button in the instrument cluster. A confirmation message appears in the display when the service reminder has been reset.
Do not reset the service reminder between service intervals; otherwise, incorrect information will be displayed.
The service reminder disappears after a few seconds when the electric motor is activated or after
the  button on the windshield wiper lever is pressed ⇒  Volkswagen Information System.
Volkswagen Information System
Introduction
In this section you’ll find information about:
Menu structure – overview Using the instrument cluster menus Main menu Driving data
When the ignition is switched on, you can display different types of information in the instrument cluster. The menu options vary depending on whether you have a Basic or Premium version of the Volkswagen Information System. With the Premium instrument cluster display, you can also control certain vehicle features.
Your vehicle is equipped with controls on the windshield wiper lever ⇒ 
The number of menus and information in the instrument cluster display depends on the electronics and equipment on the vehicle.
An authorized Volkswagen dealer or an authorized Volkswagen Service Facility may be able to add or modify functions depending on your vehicle's equipment.
As long as a priority 1 warning message is displayed, no menus can be accessed. To display menus, acknowledge the warning by pressing the  button on the windshield wiper lever or the  button on the multi-function steering wheel.
More information:
Infotainment system
Driver assistance systems
Radio or Navigation system ⇒ Booklet
Mobile phone package ⇒ Booklet
Radio, Navigation System
Mobile Phone Package
fig. 13 .
WARNING
Driving on today's roads demands the full attention of the driver at all times. Driver distrac­tion causes accidents, collisions and serious personal injury!
Never access menus when the vehicle is moving.
Menu structure – overview
Please first read and note the introductory information and heed the WARNINGS
The following list shows how the Volkswagen information system menus on the instrument cluster display are structured. The size and layout of the Volkswagen information system menu depends on the vehicle electronics and the vehicle equipment.
Driving data
Travel time
Range
Avg. consumption
Consumption
Speed warning
Digital speed display
Average speed
Distance
Navigation
Audio
Telephone
Vehicle status
⇒ Booklet
⇒ Booklet
⇒ Booklet
Radio, Navigation System
Mobile Phone Package
Using the instrument cluster menus
Fig. 13 On the right side of the steering column: Windshield wiper lever with controls for instrument cluster
menus and displays.
Please first read and note the introductory information and heed the WARNINGS
The instrument cluster menus are controlled with buttons on the end of the windshield wiper lever
fig. 13. .
⇒ 
Accessing the instrument cluster menus and information displays
Switch on the ignition. If a message or the vehicle icon is displayed, push the  button (
lever until a main menu appears in the instrument cluster display. For a list of main menus, see ⇒  Menu structure – overview.
To show the main menu or to go back to the main menu from another menu, press and hold the rocker switch
To open the menu or information display shown in the selection menu, press the (1) on the windshield wiper lever , or wait until the menu or information display opens automatically after a few seconds.
(2).
Selecting a setting
Use the rocker switch (2) on the windshield wiper to scroll through the available options, then press the  button
(1) to select a setting.
Returning to the main menu
Use the rocker switch (2) to select Back.
(1)) on the windshield wiper
If warning messages are displayed when the ignition is switched on, it may not be possible to adjust some settings as described, or the information display may appear differently. If this is the case, take the vehicle to an authorized Volkswagen dealer or an authorized Volkswagen Service Facility for assistance.
Main menu
 Please first read and note the introductory information and heed the WARNINGS
Menu Function See
Multifunction Display (MFD) infor-
Driving data
mation and settings.
Display of current warning or infor­mation messages and other system components depending on the equip­ment level.
Compass
Navigation
Audio
Telephone
Current driving direction (vehicles without navigation system).
Information displays for the navigation system (if equipped).
When route guidance is active, turn arrows and proximity bars similar to the symbols shown in the navigation system are displayed.
If route guidance is turned off, the di­rection of travel (compass) and the current street name are displayed.
Station display or station list in radio mode.
Track display in media mode.
Information about the connected tele­phone.
-
⇒ Booklet
Radio,
Navigation Sys-
tem
⇒ Booklet
Radio,
Navigation Sys-
tem
⇒ Booklet
Mobile
Menu Function See
Settings and information when using
Phone Package
the telephone.
Current warning and information mes­sages.
Vehicle status
This menu item only appears when warning or information messages are available.
Driving data
Please first read and note the introductory information and heed the WARNINGS
When the ignition is on, the Driving data menu provides a variety of travel and power consumption
data. Navigate through the data as described on ⇒  Using the instrument cluster menus
Switching between the displays
Press the rocker switch  in the windshield wiper lever ⇒ 
Trip memories
The display has 3 automatic memories:
Since startExtend. periodSince charge
The currently selected memory is shown in the display.
The trip memories are in addition to the trip odometer, which is displayed in the bottom part of the instrument cluster and controlled using the . button ⇒ 
fig. 13.
fig. 9 (4).
Press the
 button on the windshield wiper lever to toggle be-
tween the 3 memories when the ignition is on.
The memory accumulates and stores information about
1
Since start
distance driven and power consumption from the time the ignition was switched on until the time it was switched off.
Press the  button on the windshield wiper lever to toggle be­tween the 3 memories when the ignition is on.
If the ignition stays off for 2 hours or more, stored in­formation is automatically deleted. If the trip is contin­ued within 2 hours after the ignition was switched off, the new values are added.
Depending on the instrument cluster version, the memory displays and stores the accumulated driving and power consumption data of any number of single
Extend.
2
period
trips up to a total driving time of either 19 hours and 59 minutes 99 hours and 59 minutes, and up to a total distance of either 1,999 km or 9,999 km. If one of the maximum values
2
is exceeded, then the memory is
automatically cleared and starts again from 0.
The memory accumulates and stores information about
3
Since charge
distance driven and power consumption from the time the vehicle is charged. The memory is deleted automat­ically during charging.
Manually erasing a trip memory
Select the memory to be erased. Press and hold the  button in the windshield wiper lever for about 2 seconds.
Enabling and disabling displays
On appropriately equipped vehicles, you can set which displays should appear in the instrument cluster by pressing the
Infotainment system ⇒  Menu and system settings (SETUP). The units in which data is displayed can also be changed.
Possible driving data menu displays
 button followed by the and Multifunction display function keys in the
Display Function
Travel time
Driving time in hours (h) and minutes corresponding to trip memories 1, 2, and 3 (toggle).
2
May differ depending on the instrument cluster version.
Display Function
Estimated distance in miles (km) that the vehicle can
Range -- mi
go with the battery charge level the way you are cur­rently driving. Takes account of the current power consumption, among other things.
Average power consumption in miles per Kilowatt hours on trips per trip memories 1, 2, and 3 (toggle).
Avg. consump­tion
--.- mpkWh
For the since start trip memory, the value is dis­played once the vehicle has been driven about 330 feet (100 m). Until then, dashes appear instead of a number. The value displayed is updated every se­cond.
Consumption
--.- mpkWh
Speed warning
--- mph
--- mph
Average speed
-- mph
Distance --­mi
Current power consumption in miles per Kilowatt hours while driving.
When the set speed is exceeded, an acoustic warning sounds and a visual message may also appear in the instrument cluster display.
Digital display of the current vehicle speed.
Average speed on trips per trip memories 1, 2, and 3 (toggle). For the since start trip memory, the val­ue is displayed once the vehicle has been driven about 300 feet (100 m). The value displayed is updat­ed every 5 seconds.
Distance driven in miles (km) per trip memories 1, 2, and 3 (toggle).
Menu and system settings (SETUP)
Introduction
In this section you’ll find information about:
Vehicle settings menu
Additional information and warnings:
Instrument cluster
Volkswagen information system
Power locking system
Power windows
Lights and vision
Windshield wipers and washer
Mirrors
Tires and wheels
Tire Pressure Monitoring System (TPMS)
Brakes
Starting assistance systems
⇒ Booklet
General information on operating the unit
The following section contains information on the settings that can be adjusted in the Vehicle set­tings menu. You can find information on operating the Infotainment system as well as warning and
safety instructions in a separate manual. See ⇒ Booklet
Vehicle settings and information
After pressing the tainment screen to display information or adjust the following settings:
View (Vehicle information)
Driving data
Vehicle status
Radio or Media (Radio station or media selection)
Setup (Vehicle settings) ⇒  Vehicle settings menu
Radio, Navigation System
 Infotainment button, you can tap the corresponding function key on the Info-
Radio, Navigation System
.
WARNING
Driving on today's roads demands the full attention of the driver at all times. Driver distrac­tion causes accidents, collisions and serious personal injury!
Never let yourself be distracted when setting, adjusting, or using the Infotainment system.
Always drive attentively and responsibly. Use the Infotainment system only if road, traffic,
and weather conditions permit and you will not be distracted from your driving.
After starting the electric motor with a discharged vehicle battery, or after the battery has been changed, system settings (time, date, and programming) may have been changed or deleted. Check and correct the settings as necessary once the vehicle battery has been sufficiently charged.
Vehicle settings menu
 Please first read and note the introductory information and heed the WARNINGS
Opening the Vehicle settings menu
Switch on the ignition.
If necessary, switch on the Infotainment system.
Press the Tap the function key to open the Vehicle settings menu. Tap the corresponding function key to open additional menus in the Vehicle settings menu,
or to adjust settings in the menu points.
If the box in the function key is checked , the respective function is switched on.
Changes made in settings menus are automatically applied immediately after entry.
Tapping the function key takes you back to the previous menu.
Menu overview
The following menu overview is an example of the Infotainment system menu structure. The size and layout of the Volkswagen information system menu depends on the vehicle electronics and the level of vehicle equipment.
 Infotainment button.
Menu Submenu Setting options See
ESC system
Turn the Anti-slip
Tires Tire Pressure
Monitoring System
Snow tires
Parking aids ParkPilot
regulation (ASR) on or off.
Store the tire pres­sures (SET).
Turn the speed warning on or off.
Set the speed warn­ing.
Turn automatic ParkPilot (PDC) activation on or off (if equipped).
Menu Submenu Setting options See
Adjust the following: – Front volume – Front pitch – Rear volume – Rear pitch – Audio volume low­ering
Lights Light Assist
Interior lighting
Turn the following systems on or off: – Adaptive front lighting (AFS) (if equipped) – Automatic head­lights during rain (headlights turn on with rain sensor) – Convenience indi­cating (lane change feature)
Adjust the following feature: – Turn-on time for automatic headlights ()
Adjust the following features: – Door ambient light­ing – Footwell lighting
Coming/Leaving home function
Set the following: – Duration that the Coming Home fea­ture is switched on – Duration that the Leaving Home fea­ture is switched on
Menu Submenu Setting options See
Mirrors and wipers
Open and close
Windshield wipers
Window opera­tion
Central lock­ing
Turn the following features on or off: – Automatic wiping during rain (rain sensor) – Wipe rear window in reverse gear
Turn convenience opening feature for the power windows on or off (if applica­ble)
Set door unlocking.
Turn the following features on or off: – Lock automatically (Auto lock feature) – Acoustic confirma­tion (horn beep after the vehicle is locked from outside)
Multifunction display (MFD)
Display or hide the
following data in the Multifunction display: – Current consump­tion – Average consump­tion – Travel time – Distance traveled – Average speed – Digital speed dis­play – Speed warning
Menu Submenu Setting options See
Reset the following
data in the Multifunc­tion display: – Driving data for “Since start” trip memory – Driving data for “Extended period” trip memory
Time and date
Units
Service
Select and set the
following data: – Clock time source (manual, GPS) – Time – Daylight savings time – Time zone – Time format (12 hour, 24 hour) – Date – Date format
Set the units for the
following: – Distance – Speed – Temperature – Volume – Consumption – Pressure
Display the following
data: – Vehicle identifica­tion number (VIN) – Date of next in­spection service
Menu Submenu Setting options See
Factory set­tings
Reset the following
features: – All settings – Parking aids – Lights – Mirrors and wipers – Open and close – Multifunction dis­play
Volkswagen Car-Net: Connecting you and your vehicle
Introduction
In this section you’ll find information about:
Volkswagen Car-Net service Features Application software (“apps”) 3-button module
Volkswagen Car-Net services are provided by Verizon Telematics, Inc. (VzT) and are available only on select models. Automatic Crash Notification (ACN) may be engaged for up to 6 months without activat­ing a trial or paid subscription; Manual Emergency Call service and all other Volkswagen Car-Net services require a trial or paid subscription. Volkswagen Car-Net may collect location information. See applicable Terms of Service and Privacy Policy available at www.vw.com/carnet for details.
Data Collection and Privacy
Vehicle location information is transmitted to Volkswagen and our Volkswagen Car-Net service provid­er, Verizon Telematics, Inc. (VzT), anytime you press a Volkswagen Car-Net in-car button, when an ACN event occurs or periodically in connection with the operation of Volkswagen Car-Net.
Unless Volkswagen Car-Net equipment is disabled in the vehicle, it is possible for Volkswagen and VzT to determine the car’s location if required to do so by law, court order, subpoena or other legal requirement. For more information, please contact the Volkswagen Car-Net Response Center at 1­877-820-2290.
Calls may be monitored or recorded.
Volkswagen collects, processes, transmits, uses, and shares information about you and your vehicle in accordance with the Volkswagen Car-Net Terms of Service and Privacy Policy. See the Volkswagen Car-Net Terms of Service and Privacy Policy at (http://www.vw.com/carnet) for more details.
More information:
Declaration of Compliance
WARNING
Application software and Volkswagen Car-Net services that are unsuitable or improperly used can cause accidents, serious personal injury and vehicle damage.
Volkswagen Car-Net services can be used only where adequate cellular and GPS signals are available.
Volkswagen recommends using only services and application software that are provided by Volkswagen or Verizon Telematics, Inc. (VzT) specifically for your vehicle.
Protect the mobile device and its application software from misuse.
Never modify application software and Volkswagen Car-Net services.
Always read and heed the operating instructions for the mobile device.
WARNING
Driver distraction causes accidents, collisions and serious personal injury! Using application software and Volkswagen Car-Net services while driving can distract the driver from traffic.
Always drive attentively and responsibly.
Volkswagen Car-Net service
Please first read and note the introductory information and heed the WARNINGS
Your vehicle has equipment to enable Volkswagen Car-Net, a suite of connected vehicle services that makes driving and owning a Volkswagen vehicle more convenient. Volkswagen Car-Net allows you to seamlessly connect your car and your life by offering the following services:
Safe & Secure – Receive support and assistance in the moment of need.
Family Guardian – Keep track of family members driving your vehicle.
Remote Vehicle Access – Interact with your vehicle through your Volkswagen Car-Net iPhone® or
Android® app, computer or a Volkswagen Car-Net Customer Specialist (text and data rates apply).
Diagnostics & Maintenance – Manage your vehicle health with diagnostic checks and service scheduling.
You can access Volkswagen Car-Net services via your Volkswagen Car-Net iPhone (text and data rates apply) and the Volkswagen Car-Net website (http://www.vw.com/carnet). If you have a question or would like to subscribe, please either press the button in your vehicle or contact
the Volkswagen Car-Net Response Center at 1-877-820-2290. For more information or to log on to your Volkswagen Car-Net account, visit http://www.vw.com/carnet.
Note: Please review the Volkswagen Car-Net Terms of Service and Privacy Policy at http://www.vw.com/carnet.
Subscription required
Automatic Crash Notification (ACN) may be engaged for up to 6 months, starting from the date of new vehicle sale, without activating a trial or paid subscription.
The Manual Emergency Call service and all other Volkswagen Car-Net features require a trial or paid subscription. To begin your trial or paid subscription, authentication and activation are required. For more information, please visit the website (http://www.vw.com/carnet), press the button in the 3-
button module in your vehicle or contact the Volkswagen Car-Net Response Center at 1-877-820-
2290.
The LED light in the 3-button module will be green during the trial period and whenever you have an active subscription. The LED light will go off if the trial period is over and the customer has not sub­scribed to the Volkswagen Car-Net services. The LED light will be red only during a VW Car-Net
hardware malfunction or fault ⇒ , 3-button module.
Once a trial or paid Volkswagen Car-Net subscription has been activated, please advise all who use the vehicle that different kinds of data can be sent and received automatically by the vehi­cle, including speed, location and more.
®
or Android® app
WARNING
Vehicle health reports do not replace the information provided by the vehicle warning and indicator lights. Failure to heed warning lights and instrument cluster text messages can cause the vehicle to break down in traffic and result in a collision and serious personal injury.
Never ignore warning lights or text WARNINGS.
Always stop the vehicle as soon as it is safe to do so.
Park the vehicle at a safe distance from moving traffic and where no part of the hot cata-
lytic converter and exhaust system can come into contact with flammable materials under the vehicle, such as dry grass, brush, spilled fuel, etc.
A broken down vehicle presents a high accident risk for itself and others. Switch on emergency flashers and set up a warning triangle to warn oncoming traffic.
Before opening the electric motor hood, always switch off the electric motor.
Always be very careful when working in the electric motor compartment, which is a poten-
tially dangerous area in any motor vehicle and can cause serious personal injury.
NOTICE
Failure to heed warning lights or text WARNINGS can result in vehicle damage.
Volkswagen collects, processes, transmits, uses and shares information about you and your vehicle in accordance with the Volkswagen Car-Net Terms of Service and Privacy Policy. See the Volkswagen Car-Net Terms of Service and Privacy Policy at http://www.vw.com/carnet for more de­tails.
Volkswagen Car-Net services use a system based on a wireless communication network. If all technical and other conditions are met and Volkswagen Car-Net still does not work properly, please try using the service again later.
Features
Please first read and note the introductory information and heed the WARNINGS
The following listed features are available after Volkswagen Car-Net registration either through the 3-
button module 3-button module, a mobile device ⇒  Application software (“apps”), the Volkswagen Car-Net website (http://www.vw.com/carnet) or by contacting the Volkswagen Car-Net Response Center at 1-877-820-2290. They are divided into 4 categories: Safe & Secure, Family Guardian, Re­mote Vehicle Access and Diagnostics & Maintenance Services. Always refer to the Volkswagen Car­Net website for the most up-to-date information regarding Volkswagen Car-Net services.
Safe & Secure:
Feature Description
Safe & Secure:
Feature Description
Automatic Crash Notification is initiated in the event of airbag deployment or rollover. When the feature is activated the Volkswagen Car-Net Response Center
is notified of your location and contacts your vehicle Automatic Crash Notification (ACN)
to determine the risk of injury and to dispatch help.
Help is dispatched even if the Volkswagen Car-Net
Response Center does not connect to the vehicle's
occupants. Automatic Crash Notification may be
engaged for up to 6 months without activating a trial
or paid subscription.
Manual Emergency Call
Roadside Assis­tance
Stolen Vehicle Lo­cation Assistance
For use by law en­forcement authori­ties only. See Terms of Service at www.vw.com/carnet for details.
Family Guardian:
In the case of an emergency, press the
button in
the 3-button module: The Volkswagen Car-Net de-
vice initiates a connection to the Volkswagen Car-
Net Response Center. The location of the vehicle
and customer data for identification is sent at the
same time.
Press the button in the 3-button module: The
vehicle will connect directly to the Volkswagen
Roadside Assistance Call Center. The vehicle’s lo-
cation is also transmitted in order to more quickly
provide assistance.
After you have reported your vehicle as stolen to law
enforcement, you may provide the case information
to the Volkswagen Car-Net Response Center. Once
the information has been verified, the VW Car-Net
Customer Specialist will be able to provide law en-
forcement with vehicle location data sent by the VW
Car-Net module.
Feature Description
Family Guardian:
Feature Description
By logging on to your Volkswagen Car-Net account, you
Boundary Alert
can designate an area on a map as a “virtual fence.” The vehicle owner can then choose notification channels (text message or email) for receiving alerts when the vehicle crosses the defined boundary (texts and data rates apply).
Volkswagen Car-Net can be configured to inform the vehi­cle owner whenever the vehicle exceeds a speed set by
Speed Alert
the owner. The owner can select to be informed through multiple channels, including text messages and email (text and data rates apply).
Remote Vehicle Access:
Feature Description
Remote Door Unlock
Remote Honk and Flash
Last Parked Location
You can send a request to unlock the vehicle doors through your Volkswagen Car-Net iPhone
®
or Android® app, the Volkswagen Car-Net website or by calling the Volkswagen Car-Net Response Center (text and data rates apply). If none of the vehicle doors are opened within about 30 seconds, the car will lock again.
You can send a honk and flash signal to the car using the Volkswagen Car-Net website or the VW Car-Net iPhone
®
or Android® app (text and data rates apply). The car will honk the horn and blink the headlights and emergency flashers for up to 10 seconds.
You can locate your last parked location using your Volkswagen Car-Net iPhone
®
or Android® app (text and
data rates apply).
Remote Vehicle Access:
Feature Description
Destinations
Only applica­ble for vehi­cles equipped with a facto­ry-installed navigation
Points of Interest (POIs) or other destinations can be im­ported remotely into the factory-installed navigation system (if equipped) from a computer or the Volkswagen Car-Net iPhone
®
or Android® app (text and data rates apply). These destinations can be called up and used by the navigation system.
system.
Destination Download
Only applica­ble for vehi­cles equipped with a facto­ry-installed
Press the button in the 3-button module: The vehicle will
connect directly to the Volkswagen Car-Net Response Center where a Volkswagen Car-Net Customer Specialist will assist with destinations. The address of a dealer’s loca­tion can also be sent by the Customer Specialist to your factory-installed navigation system (if equipped).
navigation system.
Current information about the vehicle can be viewed through a computer or your Volkswagen Car-Net iPhone
Remote Sta­tus Check
or Android® app (text and data rates apply). You can find out if the doors, luggage compartment and electric motor hood are open or closed, whether the car lights are on or off, the high-voltage battery charge level, when the vehicle needs to be serviced next and more.
Diagnostics & Maintenance:
Feature Description
®
Diagnostics & Maintenance:
Feature Description
Press the button in the 3-button module: The vehicle will initiate a call to the Volkswagen Car-Net Response Center
where a Volkswagen Car-Net Customer Specialist will Dealer Scheduling
connect you with an authorized Volkswagen dealer to
schedule your service appointment. The address of the
dealer’s location can also be sent by the Customer Spe-
cialist to your factory-installed navigation system (if
equipped).
Vehicle Health Re­port
View a vehicle health report to proactively manage
maintenance and other services and to receive up-to-date
diagnostics in a monthly email report or by immediate re-
quest.
WARNING
Refer to your vehicle's warning and indicator lights for the most current diagnostic infor­mation. Always consult this manual for maintenance guidelines. Failure to heed warning lights and instrument cluster text messages can cause the vehicle to break down in traffic and result in a collision and serious personal injury.
Never ignore warning lights or text WARNINGS.
Always stop the vehicle as soon as it is safe to do so.
Park the vehicle at a safe distance from moving traffic and where no part of the hot cata-
lytic converter and exhaust system can come into contact with flammable materials under the vehicle, such as dry grass, brush, spilled fuel, etc.
A broken down vehicle presents a high accident risk for itself and others. Switch on emergency flashers and set up a warning triangle to warn oncoming traffic.
The Volkswagen Car-Net website (http:// www.vw.com/carnet) contains the most up-to-date
information and instructions about Volkswagen Car-Net services.
Please regularly visit the website to learn about changes to services and new features.
Volkswagen Car-Net features can be modified, discontinued, deactivated, reactivated or expanded
without any further notice.
Application software (“apps”)
Please first read and note the introductory information and heed the WARNINGS
Many mobile devices are equipped to load application software (“apps”) into the device. Apps can make it possible to display additional information on the factory-installed Radio or Navigation system or activate, control or deactivate specific vehicle features.
Application software, its usage and the wireless connection required to use application software may be billable services. Apps may be provided by third parties. Therefore you should refer to the terms of use and privacy statements associated with the apps for information about how the apps collect, use and share information about you, your vehicle or your mobile device.
The application software provided may be designed to be used for a variety of purposes and be spe-
cific to your vehicle and country ⇒  ware provider can vary. Some application software is also subject to the availability of services provid­ed by third parties. In order for some application software to work, wireless service reception must be strong enough to handle the data exchange involved (text and data rates apply).
Application software descriptions may be provided by the service provider.
Due to the multitude of mobile devices and fast pace of software development, the application soft­ware provided may not run on all mobile devices and their operating systems. This may even apply for the same model of a mobile device. For example, application software may run on version 2 of the device's operating system but not on version 3.
Application software can be modified, discontinued, deactivated, reactivated or expanded without any further notice.
In order for some application software to work, the wireless or cable connection between the factory­installed Radio or Navigation system and a compatible, functioning mobile device must be strong enough and uninterrupted.
. The content, range of software provided and application soft-
NOTICE
Volkswagen is not responsible for vehicle damage caused by inferior-quality or malicious application software, poorly programmed application software, insufficient wireless service reception, data loss during transmission or misuse of mobile devices.
3-button module
Fig. 14 In the roof console: 3-button module to access Volkswagen Car-Net service operators.
Please first read and note the introductory information and heed the WARNINGS
The buttons in the 3-button module provide access to several Volkswagen Car-Net features and pressing a button will initiate a connection to the Volkswagen Car-Net Response Center. Calls may be monitored or recorded. In general, the Volkswagen Car-Net Customer Specialist will end the call.
⇒ fig. 14
Function
⇒ fig. 14
Function
Press and hold for longer than 2 seconds: Connects to
the Volkswagen Car-Net Response Center and a Volkswagen Car-Net Customer Specialist.
Press again: End the call.
Press and hold for longer than 2 seconds: Assistance in
the event of a breakdown by connecting to the Volkswagen Roadside Provider.
Press again: End the call.
Press and hold for longer than 2 seconds: Activate
emergency call. Press again: End the call.
LED light in the 3-button module
The LED light in the 3-button module will be green during the trial period and whenever you have an active subscription. The LED light will go off if the trial period is over and the customer has not sub­scribed to the Volkswagen Car-Net Services. The LED light will be red only during a VW Car-Net hardware malfunction or fault.
WARNING
Application software and Volkswagen Car-Net services that are unsuitable or improperly used can cause accidents, serious personal injury and vehicle damage.
Volkswagen Car-Net services can be used only where adequate cellular and GPS signals are available
Volkswagen recommends using only services and application software that are provided by Volkswagen or Verizon Telematics, Inc. (VzT) specifically for your vehicle.
Protect the mobile device and its application software from misuse.
Never modify application software and Volkswagen Car-Net services.
Always read and heed the operating instructions for the mobile device.
WARNING
Driver distraction causes accidents, collisions and serious personal injury! Using application software and Volkswagen Car-Net services while driving can distract the driver from traffic.
Always drive attentively and responsibly.
NOTICE
The system does not support simultaneous Volkswagen Car-Net and mobile phone calls via the mobile phone package.
When a Volkswagen Car-Net service is accessed through the 3-button module call buttons any calls on a mobile device connected to the vehicle’s mobile phone package will be automat­ically disconnected.
Initiating or accepting a call on a mobile device connected to the vehicle's mobile phone package could end any connection to the Volkswagen Car-Net Response Center made through the ,
, or buttons.
Calls on a mobile device connected to the vehicle's mobile phone package cannot be ac­cepted or initiated during an automated emergency connection to the Volkswagen Car-Net Response Center; for example, because an airbag has deployed.
Technical data
Introduction
In this section you’ll find information about:
Important vehicle labels Dimensions
Your vehicle's electric motor type is shown on the vehicle identification label.
The specifications in this Manual refer to the base model. The stated values may vary, depending upon different equipment or models, as well as with respect to special vehicles and vehicles exported to different countries.
More information:
Transporting
Tires and wheels
Electric motor coolant
Consumer information
WARNING
Disregarding or exceeding stated values for weights, loads, dimensions and maximum speed may result in accidents and serious personal injuries.
Important vehicle labels
Fig. 15 Vehicle identification label: Shown in the example with engine identification code CBFA 3.
Fig. 16 Vehicle identification number (VIN).
Please first read and note the introductory information and heed the WARNINGS
Factory-installed safety certificates, stickers, and signs containing important information regarding vehicle operation can be found in the electric motor compartment and on certain vehicle components, such as on the passenger sun visor, in the driver door jamb, or on the luggage compartment floor.
Do not remove, alter, or render unusable or illegible any safety certificates, stickers, and labels.
If vehicle components bearing safety certificates, stickers, or labels are replaced, make certain that
the firm doing the work attaches new conforming certificates, stickers, or labels to the same part of the new components.
Vehicle identification number (VIN)
The vehicle identification number is on a plate on top of the instrument panel on the driver side, and is
visible from the outside through the windshield ⇒  bottom of the windshield. The vehicle identification number is also stamped into the top of the right drip channel in the electric motor compartment. The drip channel is between the spring strut tower and the
right fender. Open the electric motor hood to read the vehicle identification number the electric motor compartment.
The vehicle identification number can be displayed in the Infotainment system by pressing the button followed by the and Service function keys ⇒  Menu and system settings (SETUP).
fig. 16 (arrow). The view window is on the side at the
⇒  Working in

Vehicle identification label
The vehicle identification label ⇒  luggage compartment floor panel and contains the following information:
(1) Vehicle identification number (VIN) (2) Vehicle type, power output, and transmission
(3) Electric motor and transmission identification codes, paint number, and interior type ⇒ fig. 15. (4) Optional equipment and part numbers
fig. 15 is affixed to the area of the spare wheel well underneath the
Safety Compliance Certification Label
A safety certificate affixed to the door jamb in the driver door confirms that at time of production all necessary safety standards and requirements of the traffic safety agency of the respective country were met. The month and year of production as well as the vehicle identification number may be listed as well.
Radiator fan and high voltage warning sticker
A warning sticker about the radiator fan and the high voltage of the electrical system is located in the electric motor compartment next to the electric motor hood release. The vehicle ignition system com­plies with the Canadian standard ICES-002.
Tire inflation pressure label
A tire inflation pressure label is on the driver door jamb ⇒  Tires and wheels.
Dimensions
Please first read and note the introductory information and heed the WARNINGS
Length 168.1 inches (4270 mm)
Width (2-door) 70.5 inches (1790 mm)
Width (4-door) 70.8 inches (1799 mm)
Height (unloaded) 57.1 – 58.1 inches (1452 – 1477 mm)
Wheelbase 103.5 inches (2629 mm)
Minimum turning circle diame-
about 35 feet 9 inches (10.9 m)
ter (wall to wall)3
Track3, front 60.7 inches (1543 mm)
Track3, rear 59.5 inches (1512 mm)
Ground clearance (unloaded) about 5.6 inches (143 mm)4
NOTICE
Please be careful when parking your vehicle in areas with parking barriers or curbs. These vary in height and could damage your bumper and related parts if the front of your vehicle hits a barrier or curb that is too high while you are getting into or out of a parking spot.
Always be careful when you enter a driveway or drive up or down steep ramps or over curbs or other obstacles. Parts of the vehicle close to the ground may be damaged (such as bumper covers, spoilers, and parts of the electric motor, suspension, and exhaust systems).
3
Slight differences to these figures are possible, depending on wheel and tire size fitted and the level
selected.
4
Varies depending on your vehicle's equipment (electric motor, tires, wheels, tire inflation pressure, driving
situation and other factors).
Vehicle key set
Introduction
In this section you’ll find information about:
Remote control vehicle keys Indicator light in the remote control vehicle key Replacing the remote control vehicle key battery Synchronizing the remote control vehicle key
More information:
Volkswagen Information System
Power locking system
Starting and stopping the electric motor
Consumer information
Emergency closing and opening
DANGER
20 mm button cells and other lithium batteries will cause serious personal injury and even death within a short time if swallowed.
Always keep remote control vehicle key fobs with batteries, spare batteries, as well as dead button cell and larger 20 mm batteries out of the reach of children.
Get medical attention immediately if you suspect that a battery has been swallowed.
WARNING
Improper use of vehicle keys can result in serious personal injury.
Always take the key with you when you leave the vehicle. It can be used to start the elec­tric motor and operate vehicle systems such as the power windows, leading to serious per­sonal injury. Children or other unauthorized persons could also lock the doors and the lug­gage compartment.
Never leave children, disabled persons, or anyone who cannot help themselves in the vehicle. The doors can be locked with the remote control vehicle key. This could leave people trapped in the vehicle in an emergency. Depending on the time of year, people trapped in the vehicle can be exposed to very high or very low temperatures.
A closed vehicle can become very hot or very cold, depending on the season. Particularly in the summer, heat buildup in the passenger and luggage compartment of a parked vehicle can result in temperatures in the vehicle that are much higher than the outside temperatures. Temperatures can quickly reach levels that can cause unconsciousness and death, particu­larly to small children.
Never remove the key from the ignition switch while the vehicle is moving or rolling to a stop. The steering wheel will lock and you will not be able to steer or control the vehicle.
Remote control vehicle keys
Fig. 17 Remote control vehicle key with panic button.
 Please first read and note the introductory information and heed the WARNINGS
Remote control vehicle key
The remote control vehicle key can unlock and lock the vehicle from a distance ⇒  Power locking system.
The remote transmitter and battery are inside the remote control vehicle key. The receiver is inside the passenger compartment. The operating range of the remote control vehicle key for a fresh battery is several yards (meters) around the vehicle.
If the remote control vehicle key will not lock or unlock your vehicle, you probably need to replace the
battery in the remote control vehicle key ⇒  Replacing the remote control vehicle key battery. If this is not the problem, the key should be resynchronized by an authorized Volkswagen dealer, an author­ized Volkswagen Service Facility, or another authorized Volkswagen dealer or Volkswagen Service
Facility. See also ⇒  Synchronizing the remote control vehicle key.
Folding the key bit in or out
Pressing button ⇒ 
To fold the key bit in press button
Panic button
Press the panic button (2) only in emergencies! After pushing the panic button, the horn will sound and the turn signals will flash. Press the panic button again to switch off the panic feature.
Replacement vehicle keys
The vehicle identification number is required to get a replacement key or an additional remote control vehicle key.
Each new vehicle key contains a microchip and must be coded with the data from the vehicle's elec­tronic immobilizer. A vehicle key will not work if it does not contain a microchip or contains a chip that is not coded, even if the key bit was cut correctly.
You can obtain additional or duplicate remote control vehicle keys from authorized Volkswagen deal­ers, authorized Volkswagen Service Facilities, and from certain independent repair facilities and lock­smiths which are qualified to make remote control vehicle keys.
Each vehicle key must be programmed by an authorized Volkswagen dealer or an authorized Volkswagen Service Facility in order for it to work with your vehicle.
To find the nearest qualified independent repair facility, locksmith, or Volkswagen dealer which can cut and code replacement vehicle keys, call the VW Customer Care Hotline at 1-800-822-8987 or visit http://www.vw.com and search for “replacement keys.”
fig. 17 (1) releases the key bit and folds it out.
(1) while pressing the key bit back until it clicks.
Canadian customers can contact an authorized Volkswagen dealer or Volkswagen Service Facility or call the Volkswagen Canada Customer CARE Center at 1-800-822-8987.
NOTICE
The remote control vehicle keys contain electrical components. Protect them from damage, moisture and rough handling.
Do not press the buttons on the remote control vehicle key unless you actually want to use the function in question. Since terrain and conditions vary, pressing a button on the remote control vehicle key when it is not necessary may unlock the vehicle or set off the panic alarm, even if you think you are out of range.
Remote control vehicle key functions can be temporarily disrupted by interference from transmit­ters near the vehicle that use the same frequency range (such as radio equipment or mobile phones).
Things between the remote control vehicle key and vehicle, bad weather, as well as a weak battery can reduce the operating range.
If the remote control vehicle key buttons ⇒  Unlocking or locking the vehicle from the outside or
the power locking buttons ⇒  Unlocking or locking the vehicle from the inside are pushed repeatedly in quick succession, the power locking system is switched off for a brief period to help keep it from being overloaded. The vehicle is then unlocked for about 30 seconds. Unless a door or the rear hatch is opened in this span of time, the vehicle is automatically locked afterwards.
Indicator light in the remote control vehicle key
Fig. 18 Indicator light in the remote control vehicle key.
Please first read and note the introductory information and heed the WARNINGS
If a button on the remote control vehicle key is pressed briefly, the indicator light ⇒ fig. 18 (arrow) will flash once briefly. If you push and hold a button, it flashes repeatedly.
If the indicator light in the remote control vehicle key does not light up when the button is pressed, the
battery inside the key must be replaced ⇒  Replacing the remote control vehicle key battery.
A Declaration of Compliance with United States FCC and Industry Canada regulations is found in the
Consumer information section of this Manual ⇒  Consumer information.
Replacing the remote control vehicle key battery
Fig. 19 Remote control vehicle key: Open battery compartment cover.
Fig. 20 Remote control vehicle key: Remove old battery.
Please first read and note the introductory information and heed the WARNINGS
Volkswagen recommends having the battery in the remote control vehicle key changed by an author­ized Volkswagen dealer or an authorized Volkswagen Service Facility.
The battery is on the back of the remote control vehicle key under a cover ⇒ 
When changing the battery, pay attention to the correct polarity and use the same type of battery
⇒  .
Replacing the battery
Unfold the key bit on the remote control vehicle key ⇒  Remote control vehicle keys.
Remove the cover on the back of the remote control vehicle key in the direction of the arrow
fig. 19 using a suitable object such as a coin ⇒  .
⇒ 
Use a thin object to pry the battery out of the battery compartment ⇒ 
Position the new battery in as shown ⇒ fig. 20 and press it into the battery compartment (opposite
direction of the arrow) ⇒ 
Position the cover as shown ⇒  hear it click into place.
.
fig. 19 and press it down (opposite direction of the arrow) until you
fig. 19.
fig. 20.
NOTICE
Changing the battery improperly can damage the remote control vehicle key.
Using the wrong battery can damage the remote control vehicle key. Replace a dead battery
with a new one that has the same voltage, size, and specifications.
Make sure the plus and minus poles of the battery are correctly positioned.
Dispose of old batteries in an environmentally responsible manner and keep them out of the reach of children.
Batteries of the type used in your remote control vehicle key may contain Perchlorate Material. Special handling may apply – see http://www.dtsc.ca.gov/hazardouswaste/perchlorate. Obey all legal requirements regarding handling and disposal of these batteries. Authorized Volkswagen dealers and authorized Volkswagen Service Facilities are familiar with the requirements, and we recommend that you have them perform this service for you.
Synchronizing the remote control vehicle key
Please first read and note the introductory information and heed the WARNINGS
If the button is pressed often while outside the operating range, it is possible that the vehicle cannot be locked or unlocked anymore with the remote control vehicle key. Synchronize the vehicle key as follows:
Unfold the key bit on the remote control vehicle key ⇒  Remote control vehicle keys.
Remove the cap from the outside door handle on the driver door ⇒  Emergency closing and open-
ing.
Press the  button on the remote control vehicle key. Stand immediately next to vehicle while doing so.
Manually unlock the vehicle using the key bit within 1 minute. The synchronization is complete.
Reinstall the cap on the driver door handle.
Power locking system
Introduction
In this section you’ll find information about:
Indicator light in the driver door Description of the power locking system Unlocking or locking the vehicle from the outside Unlocking or locking the vehicle from the inside Unlocking or locking the vehicle with Keyless Access Anti-theft alarm system
The power locking system works properly only when all doors and the rear hatch are completely closed. When the driver door is open, the vehicle cannot be locked with the remote control vehicle key.
For vehicles equipped with Keyless Access with push-button start, the vehicle can be locked only if the ignition is switched off and the driver door is closed.
Leaving the vehicle unlocked for longer periods of non-use (for example, in your garage) can cause the vehicle battery to drain so that the electric motor can no longer be started.
More information:
Exterior views
Volkswagen Information System
Vehicle key set
Doors
Rear hatch
Power windows
Power sunroof
Emergency closing and opening
WARNING
Improper use of power locks can result in serious personal injury.
The power locking button locks all doors. Locking the doors from the inside can help prevent unintended door opening during a collision and can also prevent unwanted entry from the outside. Locked doors can, however, delay assistance to vehicle occupants and rescue from the outside in an accident or other emergency.
Never leave children or anyone who cannot help themselves behind in the vehicle. All doors can be locked from the inside with the power lock button. This could leave people trapped in the vehicle in an emergency. Depending on the time of year, people trapped in the vehicle can be exposed to very high or very low temperatures.
A closed vehicle can become very hot or very cold, depending on the season. Particularly in the summer, heat buildup in the passenger and luggage compartment of a parked vehicle can result in temperatures in the vehicle that are much higher than the outside temperatures. Temperatures can quickly reach levels that can cause unconsciousness and death, particu­larly to small children.
Never allow passengers to remain in a locked vehicle. In an emergency any person still inside the vehicle might not be able to get out.
Indicator light in the driver door
Please first read and note the introductory information and heed the WARNINGS
The indicator light for the power locking system is in the driver door ⇒  Passenger compartment.
After the vehicle is locked Meaning
The red LED light flashes for
The vehicle is locked. about 2 seconds in short intervals, then slower.
Red LED light flashes for about 2 seconds in short intervals, then lights up continuously for about 30 seconds.
NOTICE
Failure to heed warning lights or text WARNINGS can result in vehicle damage.
Locking system malfunction. See an
authorized Volkswagen dealer or an
authorized Volkswagen Service Facili-
ty.
Description of the power locking system
Please first read and note the introductory information and heed the WARNINGS
The power locking system lets you unlock and lock all doors and the rear hatch:
From the outside with the vehicle key ⇒  Unlocking or locking the vehicle from the outside.
From the outside with Keyless Access (if equipped) ⇒  Unlocking or locking the vehicle with Key-
less Access.
From the inside with the power locking button ⇒  Unlocking or locking the vehicle from the inside.
When the vehicle is locked from the outside, the battery charge port cover is also locked.
Certain central locking functions can be turned on and off in the Infotainment system by pressing the
 button followed by the and Open and close function keys ⇒  Menu and system settings (SET-
UP), or by an authorized Volkswagen dealer or authorized Volkswagen Service Facility.
The doors and the rear hatch can be locked manually if the remote control vehicle key or the power
locking system is not working ⇒  Emergency closing and opening.
Automatic locking (Auto lock)
The vehicle locks automatically when it reaches a speed of about 10 mph (15 km/h). When the vehicle is locked, the indicator light comes on in the power locking button ⇒ 
Automatic unlocking (Auto unlock)
All doors automatically unlock when you switch off the ignition or open a door from inside the vehicle. On vehicles with automatic transmission, the doors will also unlock when the selector lever is in Park (P) or the ignition is switched off. Auto unlock works only if the vehicle has been automatically locked
fig. 22.
with the Auto lock feature. The indicator light goes out in the power locking button when the doors
unlock ⇒ 
Locking the vehicle after airbag inflation
If the airbags are activated during a collision, the entire vehicle is unlocked. Depending on the severity of the damage, the vehicle can be locked after a collision when the airbags have deployed as follows:
fig. 22.
Function Action
Locking the vehicle
with the power lock­ing button:
– Switch the ignition off. – Open and close a door once. – Press the power locking button .
– Switch the ignition off.
Locking the vehicle
with the remote con­trol vehicle key:
OR: Remove the vehicle key from the ignition.
– Open a door once. – Lock the vehicle with the remote control vehicle key.
If the vehicle key buttons ⇒  Unlocking or locking the vehicle from the outside or the power lock-
ing buttons ⇒  Unlocking or locking the vehicle from the inside are pushed repeatedly in quick succes­sion, the power locking system is switched off for a brief period to help keep it from being overloaded. The vehicle is then unlocked for about 30 seconds. Unless a door or the rear hatch is opened during this time, the vehicle is automatically locked afterwards.
Unlocking or locking the vehicle from the outside
Fig. 21 Remote control vehicle key with panic button.
Please first read and note the introductory information and heed the WARNINGS
Function Using the buttons on the remote con-
trol vehicle key
⇒ fig. 21
Unlock the vehicle. Press the button.
Lock the vehicle. Press the button.
Unlock the rear hatch.
Note: Depending on the settings for the power locking system that have been set in the Infotainment system, it may be necessary to press the button on the remote control vehicle key twice to unlock
all doors and the rear hatch ⇒  Volkswagen Information System.
The vehicle key unlocks or locks the vehicle only when the battery in the remote control vehicle key has enough power, and the remote control vehicle key is within a few yards/meters of the vehicle.
All turn signals flash once and the horn beeps once to confirm that the vehicle has been locked. On appropriately equipped vehicles, the horn beep can be disabled in the Infotainment system by press-
ing the
 button followed by the and Open and close function keys ⇒  Menu and system settings
(SETUP).
All turn signals flash twice to confirm that the vehicle has been unlocked.
If the turn signals do not flash to confirm locking, one or more doors or the rear hatch is not locked.
If the driver door is open, the vehicle cannot be locked with the remote control vehicle key.
If the vehicle was unlocked with the remote control vehicle key and the door or the rear hatch has not been opened within a few seconds, the vehicle is automatically locked again. This feature helps pre­vent you from leaving the vehicle unlocked unintentionally.
Press the button
Unlocking or locking the vehicle from the inside
Fig. 22 In the driver and passenger doors: Power locking button.
Please first read and note the introductory information and heed the WARNINGS
Press button
⇒ fig. 22:
Press button ⇒ fig. 22:
Unlock the vehicle.
Lock the vehicle.
The power locking button works whether the ignition is switched on or off but only when all doors are closed.
If the vehicle is locked with the vehicle key, the power locking button is deactivated.
If the vehicle is locked with the power locking button:
The yellow indicator light  in the power locking button comes on to indicate that all doors are
locked ⇒ 
If the vehicle is equipped with an anti-theft alarm, the system is not turned on.
Opening doors or the rear hatch from the outside is not possible, at a traffic light, for example.
Doors can be unlocked and opened separately from inside the vehicle by pulling the door handle to
open the door. The indicator light goes out in all doors. The unopened doors and rear hatch remain locked and cannot be opened from the outside.
An open driver door will not be locked. This helps keep the driver from being locked out of the vehicle.
The vehicle is unlocked if you push the button while the vehicle is standing still. It is also unlocked when you switch off the ignition or open a door from inside the vehicle (Auto unlock). On vehicles with automatic transmission, the doors will also unlock when the selector lever is in Park (P) or the ignition is switched off.
fig. 22.
Unlocking or locking the vehicle with Keyless Access
Fig. 23 Ranges of the Keyless Access system. Outside the vehicle: Unlocking range. Inside the vehicle:
Starting range.
Fig. 24 Keyless Access system: Sensor for unlocking A on the inside of the front door handles. Sensor for locking B on the outside of the front door handles.
Please first read and note the introductory information and heed the WARNINGS
Your vehicle may be equipped with Keyless Access with push-button start, a keyless starting and locking system that unlocks and locks the vehicle without active use of a remote control vehicle key.
All you have to do is touch a sensor surface on one of the front outside door handles ⇒ 
the Volkswagen emblem on the rear hatch ⇒  Opening the rear hatch when a valid remote control
vehicle key is within range ⇒ 
.
fig. 24 or push
General information
When a valid vehicle key comes within range ⇒  vehicle entry request as soon as a door handle sensor is touched on the driver or front passenger door or the Volkswagen emblem on the rear hatch is pressed. The following functions are then ena­bled without active use of the remote control vehicle key:
Keyless Entry: Unlocking the vehicle with the sensor surfaces on the outside door handles of the
driver or front passenger door ⇒ 
Keyless Go: Start the electric motor and drive. For this, you just have to press the starter button
and a valid remote control vehicle key must be inside the vehicle ⇒  Starting and stopping the electric drive.
Keyless Exit: Locking the vehicle via the door handle sensor on the driver or front passenger door
(B).
The power locking system works like the standard unlocking and locking system. Only the way that the systems are operated is different.
All turn signals flash twice to confirm that the vehicle has been unlocked and once to confirm that it has been locked.
The vehicle will lock again in a few seconds if you do not open one of the doors or the rear hatch.
fig. 24 (A) or by using the Volkswagen emblem on the rear hatch.
fig. 23, the Keyless Access system recognizes a valid
Unlocking and opening doors (Keyless Entry)
Grasp the door handle of the driver or front passenger door so that you touch the unlocking sensor
(A).
surface
Open the door.
Closing and locking doors (Keyless Exit)
Switch the ignition off.
Close the driver door.
Touch the sensor surface in the door handle on the driver or front passenger door (B). The vehicle
is locked. The door being locked must be closed.
Unlocking and locking the rear hatch
If the vehicle is locked and a valid remote control vehicle key is within range ⇒  it unlocks automatically when opened.
Open and close the rear hatch as you would a standard rear hatch Rear hatch.
The rear hatch locks automatically when it is closed except in the following situations:
The vehicle is completely unlocked.
The most recently used vehicle key is inside the vehicle. All turn signals flash four times.
fig. 23 of the rear hatch,
Locking with a second vehicle key
If the vehicle is locked from the outside with a second valid vehicle key, any key located inside the
vehicle cannot start the electric motor ⇒  Starting and stopping the electric drive. A key that was inside the vehicle when it was locked from the outside can be reactivated by pressing the button on the
deactivated key ⇒ fig. 21.
Automatic deactivation of sensors
If a sensor on the door handle of a locked vehicle is activated too often, for instance by a bush or hedge that rubs against the vehicle, the sensors in the door handle on that side of the vehicle are switched off for a short time.
The door handle sensors become active again if one of the following events occurs:
A short time has passed. OR: The vehicle is unlocked using the button in the remote control vehicle key.
OR: The rear hatch is opened.
OR: The vehicle is mechanically unlocked with the vehicle key.
Convenience features
To use the convenience closing feature to close all power windows and the sunroof, hold your finger
on the lock sensor surface on the outside of the door handle ⇒  windows and sunroof close.
Remove your finger from the lock sensor surface to stop the function.
Pinch protection is active during convenience closing of the windows and the power sunroof.
On appropriately equipped vehicles, you can turn the convenience features on and off or select which doors unlock when the door handle unlocking surface is grasped in the Infotainment system by press-
 button followed by the and Open and close function keys Menu and system settings
ing the (SETUP).
fig. 24 (B) for a few seconds until the
NOTICE
The door handle sensor surfaces can be activated by a strong stream of water or steam if a valid vehicle key is within range of the vehicle.
All windows may open if you turn the spray of water or steam away from and then back onto the door handle sensor surface in quick succession. If at least one power window is opened and the sensor is continuously activated, convenience closing is started.
The door may not open if the outside and inside door handles are used at the same time.
If the vehicle battery or the battery in the remote control vehicle key is weak or dead, it might not
be possible to unlock and lock the vehicle using Keyless Access. The vehicle can still be manually
locked or unlocked with the key bit ⇒  Manually unlocking and locking the driver door.
A driver message appears in the instrument cluster display if there is no remote control vehicle key inside the vehicle or if the system does not recognize the remote control vehicle key. The key may not be recognized, for example, if it is covered by something that interferes with the signal (such as a briefcase), or if the remote control vehicle key battery is weak. Electronic devices such as mobile phones can also interfere with the signal.
Dirt on the door handles that contains a lot of salt (especially in winter) can affect the way the
door handle sensors work. Cleaning the door handles can help with this problem ⇒ page 334, Exterior care and cleaning.
If the automatic transmission is not in Park (P) position, the electronic steering column lock will not lock and the vehicle will not lock via sensors in the front door handles or the remote control vehicle key.
Anti-theft alarm system
Please first read and note the introductory information and heed the WARNINGS
Your vehicle may be equipped with an anti-theft alarm system or pre-equipped for anti-theft alarm system installation. If the vehicle is pre-equipped for installation of the anti-theft alarm system, the alarm system can be retrofitted by an authorized Volkswagen dealer or an authorized Volkswagen Service Facility.
The anti-theft alarm system makes it more difficult for someone to break into or steal the vehicle.
The anti-theft alarm system is automatically activated when the vehicle is locked by pressing the lock button on the remote control vehicle key.
When is the alarm triggered?
The anti-theft alarm system sounds for about 30 seconds and the turn signals flash for up to 5 minutes if the following occurs with respect to the locked vehicle:
In vehicles with an open lock cylinder: A door unlocked mechanically with the vehicle key bit is opened and the ignition is not switched on within about 15 seconds.
In vehicles with a covered lock cylinder: A door unlocked mechanically with the vehicle key bit is opened.
Forcibly opening a door.
Forcibly opening the electric motor hood.
Forcibly opening the rear hatch.
Switching on the ignition with an invalid key.
Disconnecting the vehicle battery.
Deactivating the alarm
Unlock the vehicle with the unlock button on the remote control vehicle key or switch on the ignition with a valid remote control vehicle key.
For vehicles with Keyless Access, the alarm can be deactivated by grasping one of the front door handles when a valid vehicle key is in range or by holding the remote control vehicle key to the right of
the steering column trim and pressing the starter button ⇒  Starter button.
After the alarm has stopped and the vehicle is opened again in the same or a different area that is protected by the alarm, the alarm is triggered again. For example, the alarm will sound again if the rear hatch is opened after one of the doors has been opened.
The anti-theft alarm system is not activated when the vehicle is locked with the power lock
switch on the inside of the driver or front passenger doors.
If the driver door is mechanically unlocked using the vehicle key bit, only the driver door is un­locked, not the entire vehicle. Switching on the ignition deactivates the anti-theft alarm system and activates the central locking button. To unlock the doors, use the central locking button or remote control vehicle key.
If the vehicle battery is dead or weak, the anti-theft alarm system will not work properly.
Doors
Introduction
In this section you’ll find information about:
Display Child safety lock
More information:
Instrument cluster
Exterior views
Vehicle key set
Power locking system
Power windows
Emergency closing and opening
WARNING
A door that is not closed properly may open suddenly when the vehicle is moving and cause severe injuries.
Stop immediately and close the door.
Make sure that the door is safely and completely latched when closed. The closed door
must be flush with the surrounding auto body parts.
Open or close doors only if no one is in the way.
WARNING
A door kept open w ith the door stop ma y close in strong winds or on inclines and cause inju­ries.
Always hold doors by the door handle while opening and closing.
Display
Please first read and note the introductory information and heed the WARNINGS
Lights up Possible cause Proper response
Icon ap­pears in
the dis-
At least one vehicle door is open or improperly closed.
Stop!
Open and close the door again.
play
When the ignition is switched on, several warning and indicator lights come on briefly for a function check. They go out after a few seconds.
If a door is not closed properly, the vehicle icon appears in the instrument cluster display showing an
open door ⇒ 
Depending on your vehicle's equipment and options, the icon may still be displayed even after the ignition is switched off as long as the key has not been taken out of the ignition. The icon in the in­strument cluster display goes out about 15 seconds after the vehicle has been locked.
fig. 10.
Child safety lock
Fig. 25 In the left rear door: Child safety lock A deactivated, B activated.
Fig. 26 In the right rear door: Child safety lock A deactivated, B activated.
Please first read and note the introductory information and heed the WARNINGS
The child safety lock keeps the rear doors from being opened from the inside, so that children cannot open them accidentally. When the child safety lock is engaged, the rear doors can only be opened from the outside.
Engaging or disengaging child safety lock
Unlock the vehicle and open the respective rear door.
Unfold the key bit from the remote control vehicle key.
Using the key bit, move the slot into the desired position.
Slot position ⇒ 
(A) Child safety lock disengaged. (B) Child safety lock engaged.
fig. 25 or ⇒ fig. 26:
WARNING
When the child safety lock is engaged, that rear door cannot be opened from the inside.
Never leave children, disabled persons, or anyone who cannot help themselves, in the vehicle when locking the doors. This could result in people being locked in the vehicle. This could result in people being trapped in the vehicle in an emergency. Depending on the time of year, people trapped in the vehicle can be exposed to very high or very low temperatures.
A closed vehicle can become very hot or very cold, depending on the season. Particularly in the summer, heat buildup in the passenger and luggage compartment of a parked vehicle can result in temperatures in the vehicle that are much higher than the outside temperatures. Temperatures can quickly reach levels that can cause unconsciousness and death, particu­larly to small children.
Rear hatch
Introduction
In this section you’ll find information about:
Display Opening the rear hatch Closing the rear hatch
More information:
Exterior views
Instrument cluster
Power locking system
Transporting
Emergency closing and opening
WARNING
Accidents and severe personal injuries can result if you unlock, open, or close the rear hatch when someone is in the way.
Only open or close the rear hatch if no one is in the way.
Never close the rear hatch by pushing on the rear window with your hand. The rear win-
dow could break and cause injuries.
After closing the rear hatch, always make sure that it is properly closed and locked so that it cannot open suddenly when the vehicle is moving. The closed rear hatch must be flush with the surrounding auto body parts.
Always keep the rear hatch closed while driving to help keep poisonous exhaust gas from being drawn into the vehicle.
Never open the rear hatch when a luggage rack is installed and loaded. If, for example, there are bicycles on a carrier on the rear hatch, it is possible that the rear hatch will be diffi­cult to open. An open rear hatch may fall on its own because of the additional weight. If nec­essary, prop open the rear hatch. Remove the weight from the luggage rack first.
Close and lock the rear hatch and all doors when the vehicle is not in use. First, make sure that no one is left inside the vehicle.
Never leave your vehicle unattended or let children play around your vehicle, especially when the rear hatch is open. A child could crawl into the vehicle and pull the rear hatch shut, becoming trapped and unable to get out. A closed vehicle can become very hot or very cold, depending on the season. Particularly in the summer, heat buildup in the passenger and luggage compartment of a parked vehicle can result in temperatures in the vehicle that are much higher than the outside temperatures. Temperatures can quickly reach levels that can cause unconsciousness and death, particularly to small children.
Never leave children or anyone who cannot help themselves behind in the vehicle. They may lock the vehicle with the vehicle key or the power locking button and lock themselves in.
NOTICE
Before opening or closing the rear hatch, make sure there is enough room to do so, for exam­ple, when the vehicle is in a garage.
NOTICE
Never use the gas strut to hold or clamp a load in place. This can damage the rear hatch and make it impossible to close.
Display
 Please first read and note the introductory information and heed the WARNINGS
Lights up Possible cause Proper response
Icon ap­pears in
the dis-
Rear hatch open or improp­erly closed.
play
When the ignition is switched on, several warning and indicator lights come on briefly for a function check. They go out after a few seconds.
If the rear hatch is not closed properly, the vehicle icon appears in the instrument cluster display
showing an open rear hatch ⇒ 
Depending on your vehicle's equipment and options, the icon may still be displayed even after the ignition is switched off as long as the key has not been taken out of the ignition. The icon in the in­strument cluster display goes out about 15 seconds after the vehicle has been locked.
fig. 10.
Stop!
Open the rear hatch and then close it again.
WARNING
If the rear hatch is not closed properly, it may open suddenly when the vehicle is moving and cause severe injuries.
Stop immediately and close the rear hatch.
Always make sure the rear hatch is securely latched after you close it.
Opening the rear hatch
Fig. 27 In the remote control vehicle key: Button to unlock the rear hatch.
Fig. 28 Opening rear hatch from the outside.
Please first read and note the introductory information and heed the WARNINGS
Always remove any item(s) being transported on the rear hatch before opening it ⇒ 
Unlocking with the vehicle key
Press the  button on the remote control vehicle key ⇒  the rear hatch using the Volkswagen emblem.
fig. 27 to unlock the rear hatch. Then open
Opening with the Volkswagen emblem
Unlock the vehicle or rear hatch, or open a door.
Using your thumb, press the top of the Volkswagen emblem ⇒ 
emblem down. Grasp the bottom part of the emblem and pull to lift the rear hatch.
fig. 28 and move the top of the
.
WARNING
Improper or unsupervised unlocking or opening of the rear hatch can cause severe injuries. Never open the rear hatch when someone is in the way.
If a bicycle or luggage rack is installed on the rear hatch, it may be hard to see that the rear hatch is unlatched. An unlatched rear hatch may open suddenly when the vehicle is moving.
At temperatures below +32 °F (0 °C), the rear hatch may be difficult to open after you unlock it.
Closing the rear hatch
Fig. 29 Opened rear hatch: Recessed grips for closing.
 Please first read and note the introductory information and heed the WARNINGS
Closing the rear hatch
Grasp one of the recessed grips in the rear hatch trim ⇒ 
Pull the rear hatch down and close it securely so that the latch engages.
Check the rear hatch to make sure it is securely latched.
Locking the rear hatch
If you unlock the vehicle with the vehicle key, but do not open a door or the rear hatch within several seconds, the vehicle is automatically locked again. This feature helps prevent you from leaving the vehicle unlocked unintentionally.
It is only possible to lock the rear hatch when it is securely closed and latched.
The power locking system also locks the rear hatch.
If the rear hatch of a locked vehicle is unlocked with the button ⇒ 
vehicle key, it will lock within a few seconds after it is closed. The anti-theft alarm system, if equipped,
is activated after the vehicle is locked ⇒  Power locking system.
A closed but unlocked rear hatch automatically locks at speeds above about 5 mph (10 km/h).
fig. 29 (arrows).
fig. 27 on the remote control
WARNING
Improper or unsupervised closing of the rear hatch can cause severe injuries. Never close the rear hatch when someone is in the way.
Never leave your vehicle unattended or let children play around your vehicle, especially with the rear hatch left open. A child could crawl into the vehicle and pull the rear hatch shut, becoming trapped and unable to get out. A closed vehicle can become very hot or very cold depending on the season. Temperatures can quickly reach levels that can cause uncon­sciousness or death, particularly to small children.
Make sure that the remote control vehicle key is not in the luggage compartment before closing
the rear hatch.
Power windows
Introduction
In this section you’ll find information about:
Opening or closing power windows Power windows – features Power window pinch protection
More information:
Volkswagen Information System
Infotainment system
Power locking system
WARNING
Improper use of power windows can result in serious personal injury.
Never let anyone get in the way of a power window when closing it.
When locking the vehicle from the outside, make sure that no one, especially children,
remains in the vehicle. The windows will not open in case of an emergency.
Always take the key with you when you leave the vehicle. You can still use the power win­dows for several minutes after the ignition is switched off as long as the driver or front pas­senger door has not been opened.
Always use the safety switch when children are in the back seat to disable the rear power windows and keep them from being opened and closed.
NOTICE
If you leave the windows open, rain or other precipitation may enter the vehicle from outside and can damage the vehicle interior.
Opening or closing power windows
Fig. 30 In the driver door: Switches for the front and rear power windows (4-door version shown).
Please first read and note the introductory information and heed the WARNINGS
Switches in the driver door
Key to ⇒ 
(1) For the windows in the front doors. (2) For the windows in the rear doors. (3) Safety switch.
Opening or closing windows
fig. 30:
Function Action
Opening Press the switch.
Closing Pull the switch.
Stopping
Press/pull the respective switch again. automatic movement
The safety switch
(3) deactivates the
power windows in the rear doors. The yellow indicator light in the switch lights up (4-door models only).
The power windows function only when the ignition is switched on.
You can still use the power windows for several minutes after the ignition is switched off as long as the driver or front passenger door has not been opened. When the vehicle key has been removed from the ignition and the driver door has been opened, the power windows cannot be opened or closed.
A separate button for controlling the passenger side window is located in the front passenger
door.
Power windows – features
Please first read and note the introductory information and heed the WARNINGS
One-touch opening and closing
The one-touch feature automatically opens/closes a power window all the way. The window switch does not have to be held down/up.
For one-touch opening: Press the switch for the window down briefly as far as it goes.
For one-touch closing: Pull the switch for the window up briefly as far as it goes.
Stopping automatic movement: Pull/press the switch again.
Reactivating the one-touch feature
If the vehicle battery is disconnected or dead and the windows are not completely closed, the one­touch feature will not work and must be reactivated:
Switch on the ignition.
Close all windows and doors.
Pull the switch for the respective window up and hold it for at least 2 seconds in this position.
Release the switch, pull up and hold again. The one-touch feature is now reactivated.
The one-touch feature can be reactivated for one or more windows at the same time.
Convenience closing
The convenience closing feature lets you close the windows and the power sunroof as follows:
From inside the vehicle: When the driver door is open, pull up and hold the switch for the driver window until all windows and the sunroof close.
Manual locking from outside the vehicle: Lock the vehicle with the vehicle key bit in the driver door
and keep the key turned in the locking position to close all windows and the power sunroof ⇒  Manual- ly unlocking and locking the driver door.
Vehicles with Keyless Access: Hold your finger on the lock sensor surface on the outside of the
door handle for a few seconds until the windows and power sunroof close ⇒  Unlocking or locking the vehicle with Keyless Access.
On appropriately equipped vehicles, a variety of settings related to window operation can be made and adjusted in the Infotainment system by pressing the
close function keys ⇒  Menu and system settings (SETUP).
 button followed by the and Open and
WARNING
Improper use of power windows can result in serious personal injury.
Never let anyone get in the way of a power window when closing it.
When locking the vehicle from the outside, make sure that no one, especially children,
remains in the vehicle. The windows will not open in case of an emergency.
Always take the key with you when you leave the vehicle. You can still use the power win­dows for several minutes after the ignition is switched off as long as the driver or front pas­senger door has not been opened.
Always use the safety switch when children are in the back seat to disable the rear power windows and keep them from being opened and closed.
If the power windows malfunction, the one-touch feature, as well as pinch protection may not work properly. See an authorized Volkswagen dealer or authorized Volkswagen Service Facility right away.
If convenience closing of the power windows from the outside requires removing the cover cap of
the lock cylinder on the driver door, the cover cap must be reinstalled after the vehicle is locked ⇒  Manually unlocking and locking the driver door.
Power window pinch protection
Please first read and note the introductory information and heed the WARNINGS
Pinch protection can help reduce the risk of pinching injuries when closing a power window ⇒  one-touch window closing meets resistance or there is something in the way, the window will stop and go down again.
Check why the window did not close.
. If
Try one-touch window closing again.
If the window meets resistance a second time, so that it stops and goes back down, one-touch
closing is deactivated for about 10 seconds.
If you pull the power window button up all the way and hold it during this 10 second interval, the
window will close without pinch protection ⇒ 
.
Closing the window without pinch protection
Try to close the window again within 10 seconds by holding the switch. Pinch protection is turned off for a short distance in the window track!
If closing takes longer than about 10 seconds, pinch protection is turned on again. The window stops again if there is resistance.
If the window still will not close, please see an authorized Volkswagen dealer or an authorized Volkswagen Service Facility.
WARNING
Without pinch protection, power windows will close with enough force to cause serious per­sonal injury.
Always be careful when closing power windows.
Always make sure that no one is in the way when overriding pinch protection to close
power windows!
Pinch protection cannot prevent fingers or other parts of the body from being pressed against the window frame; injuries may result.
Pinch protection is also active during convenience closing of the windows and the power sunroof
⇒  Power windows – features.
Power sunroof
Introduction
In this section you’ll find information about:
Opening or closing the power sunroof Power sunroof – convenience closing feature Pinch protection for the power sunroof
Depending on equipment, your vehicle may be equipped with a Panoramic sliding and tilting sunroof.
More information:
Infotainment System
Power locking system
Emergency closing and opening
WARNING
Improper use of the power sunroof can result in serious personal injury.
Always make sure that no one is in the way of the power sunroof when it is closing.
Always take the key with you when you leave the vehicle.
Never leave children or disabled persons in the vehicle – particularly if they have access
to the vehicle key. Unsupervised use of the remote control vehicle key makes it possible to lock the vehicle, start the electric motor, turn on the ignition and operate the sunroof.
You can still open or close the power sunroof for several minutes after you switch off the ignition, as long as the driver or front passenger door has not been opened.
NOTICE
To help prevent damage, remove ice and snow from the sunroof before opening or tilting it in winter weather.
Always close the sunroof before leaving the vehicle or if it begins raining. If the sunroof is open or tilted, rain could enter the vehicle interior and cause extensive damage to the electrical system. This could result in further vehicle damage.
Remove leaves and other objects from the sunroof guiderails regularly either by hand or using a vacuum cleaner.
If the power sunroof malfunctions, pinch protection may not function properly. See an authorized Volkswagen dealer or an authorized Volkswagen Service Facility.
Opening or closing the power sunroof
Fig. 31 In the headliner: Power sunroof switch.
Please first read and note the introductory information and heed the WARNINGS
The power sunroof roof works when the ignition is switched on. It can still be operated for a few minutes after the ignition has been switched off as long as the driver door or front passenger door are not opened.
The switch ⇒  scribed in the following table.
Press the switch to the first detent to completely or partially tilt, open, or close the sunroof. Press the switch briefly to the second detent to activate the one-touch feature (automatic operation). Press the switch again to stop the one-touch feature.
Tilting, opening, and closing the power sunroof
fig. 31 has 2 detents for each switch position ((A), (B), (C), and (D)), which are de-
Function
Tilt the power sunroof
Close the tilted sunroof
Stop the one-touch fea­ture during tilting/closing
Action
Press the rear area of the switch
⇒ fig. 31
(B) to the first
detent. Briefly press the switch to the second detent to activate the one-touch feature.
Press the front area of the switch
(A) to the first
detent. Briefly press the switch to the second detent to activate the one-touch feature.
Press the button again at position
(A) or (B).
Function
Action
⇒ fig. 31
Open the power sunroof
Press the switch rearward Briefly press the switch the second detent to open the roof to the comfort position with the
(C) to the first detent.
one-touch feature.
(D) to the first detent.
Close the power sunroof
Press the switch forward Briefly press the switch to the second detent to activate the one-touch feature.
Stop the one-touch fea­ture during open-
Press the switch again at
(C) or (D).
ing/closing
Opening and closing the sunshade
The sliding sunshade must be opened and closed manually. Use the handle at the front of the shade to slide it to the required position. It does not open or close automatically with the power sunroof.
Emergency closing of the power sunroof
If your power sunroof will not close properly, do not try to close it yourself, doing so can cause serious and expensive damage that will not be covered by any Volkswagen Limited Warranty. Special knowledge and tools are required to close the power sunroof if it will not close on its own. To help prevent damage to the sunroof, have an authorized Volkswagen dealer or an authorized Volkswagen Service Facility help you close and repair the power sunroof.
The comfort position provides sufficient ventilation without loud wind noise.
Power sunroof – convenience closing feature
Please first read and note the introductory information and heed the WARNINGS
Convenience closing
The convenience closing feature lets you close the power sunroof as follows:
Remove the cover cap from the concealed lock cylinder on the driver door (if necessary) ⇒  Manu- ally unlocking and locking the driver door.
Turn the vehicle key bit in the lock of the driver door to the closing position and hold it there. The windows and power sunroof close. Release the vehicle key to stop the process.
Vehicles with Keyless Access: Hold your finger on the lock sensor surface on the outside of the
door handle for a few seconds until the windows and power sunroof close ⇒  Unlocking or locking the vehicle with Keyless Access.
On appropriately equipped vehicles, a variety of settings related to window operation can be made and adjusted in the Infotainment system by pressing the
close function keys ⇒  Menu and system settings (SETUP).
 button followed by the and Open and
If convenience closing of the power sunroof requires removing the cover cap of the lock cylinder
on the driver door, the cover cap must be reinstalled after the vehicle is locked ⇒ page 373, Manually unlocking and locking the driver door.
Pinch protection for the power sunroof
Please first read and note the introductory information and heed the WARNINGS
Pinch protection can help reduce the risk of pinching injuries when closing the power sunroof ⇒  the power sunroof closing meets resistance or there is something in the way, the power sunroof opens again immediately.
Check why the power sunroof did not close.
Try to close the power sunroof again.
If the power sunroof still cannot close, the power sunroof will stop where the resistance is located.
The power sunroof will close the next time without pinch protection.
Closing the power sunroof without pinch protection
Press the  button ⇒  the direction of the arrow (D) at the second detent until the power sunroof closes completely.
The power sunroof will now close without pinch protection!
If the power sunroof still will not close, please see an authorized Volkswagen dealer or an author-
ized Volkswagen Service Facility.
fig. 31 within about 5 seconds after the sunroof has stopped and hold it in
WARNING
Without pinch protection, the power sunroof will close with enough force to cause serious personal injury.
Always be careful when closing the power sunroof.
Always make sure that no one is in the way when overriding the pinch protection to close
the power sunroof!
Pinch protection cannot prevent fingers or other parts of the body from being pressed against the edge of the roof; injuries may result.
. If
Pinch protection is also active during convenience closing of the windows and the power sunroof
⇒  Power sunroof – convenience closing feature.
If the power sunroof malfunctions, pinch protection may not function properly. See an authorized
Volkswagen dealer or an authorized Volkswagen Service Facility for assistance.
Adjusting the seating position
Introduction
In this section you’ll find information about:
Examples of improper seating positions Proper seating position Manual controls on the driver and front passenger seats Electrical controls on the driver and front passenger seats Adjusting the front and rear head restraints Removing and reinstalling the front head restraints Removing and reinstalling the rear head restraints Adjusting the steering wheel position Center armrest
Number of seats
The vehicle has a total of 5 seating positions: 2 in front and 3 in the rear. Each seating position has a safety belt.
More information:
Infotainment system
Seat functions
Safety belts
Airbag system
Child safety and child restraints
WARNING
Improper seating positions increase the risk of severe or fatal injuries in a crash or other accidents, especially when the airbag deploys.
All occupants must sit properly and be properly restrained at all times.
Never let more people ride in the vehicle than there are seating positions with safety belts
available.
Always secure children in the vehicle with an approved and suitable restraint system ap-
propriate for their age, weight, and height ⇒  Child safety and child restraints, ⇒  Airbag sys- tem.
Always keep your feet on the floor in front of the seat. Never rest them on the seat, in­strument panel, out of the window, etc. The airbag system and safety belt will not be able to protect you properly and can even increase the risk of injury in a crash.
WARNING
Alwa ys adjust seat, safety belts, and head restraints properly before driving and make sure that all passengers are properly restrained.
Push the passenger seat as far back as possible. Always be sure that there are at least 10 inches (25 cm) between the front passenger's breastbone and the instrument panel.
Always adjust the driver's seat and the steering wheel so that there are at least 10 inches (25 cm) between your breastbone and the steering wheel.
Adjust the driver's seat so that you can easily push the pedals all the way to the floor while keeping your knee(s) slightly bent.
If these requirements cannot be met for physical reasons, contact an authorized Volkswagen dealer or an authorized Volkswagen Service Facility to see whether adaptive equipment is available.
Always hold the steering wheel on the outside of the steering wheel rim with your hands at the 9 o'clock and 3 o'clock positions to help reduce the risk of personal injury if the driv­er's airbag inflates.
Never hold the steering wheel at the 12 o'clock position or with your hands at other places inside the steering wheel rim or on the steering wheel hub. Holding the steering wheel the wrong way can cause serious injuries to the hands, arms, and head if the driver's airbag in­flates.
Pointing the steering wheel toward your face decreases the ability of the driver's airbag to help protect you in a collision.
Never drive with backrests reclined or tilted back farther than necessary to drive comfort­ably. The farther back the backrests are tilted, the greater the risk of injury caused by incor­rect positioning of the safety belts and improper seating position.
Never drive with the front seat passenger backrest tilted forward. If the front airbag de­ploys, the front backrest can be forced backward and injure passengers on the rear seat.
Sit as far back as possible from the steering wheel and the instrument panel.
Always sit upright with your back against the backrest with the front seats properly ad-
justed. Never lean against or place any part of your body too close to the area where the air­bags are located.
Rear seat passengers who are not properly seated and restrained are more likely to be seriously injured in a crash.
WARNING
Improper adjustment of the seats can cause accidents and severe injuries.
Never adjust the seats while the vehicle is moving. Your seat may move unexpectedly and you could lose control of the vehicle. In addition, you will not be in the correct seating posi­tion while adjusting the seats.
Adjust the front seat height, angle and longitudinal direction only if the seat adjustment area is clear.
The adjustment of the front seats must not be restricted by things in the footwell in front or behind the seats.
WARNING
Some kinds of cigarette lighters can be lit unintentionally, or crushed causing a fire that can result in serious burns and vehicle damage.
Always make sure that there are no lighters in the seat tracks or near other moving parts before adjusting the seats.
Before closing a storage compartment, always make sure that no cigarette lighter can be activated, crushed, or otherwise damaged.
Never leave a cigarette lighter in a storage compartment, on the instrument panel, or in other places in the vehicle. Heat buildup in the passenger and luggage compartment of a parked vehicle can result in temperatures in the vehicle that are much higher than the outside temperatures, particularly in summer. High temperatures could cause the cigarette lighter to catch fire.
Examples of improper seating positions
Please first read and note the introductory information and heed the WARNINGS
Not wearing or improperly fastening safety belts increases the risk of severe or fatal injuries. Safety belts can work only when they are properly positioned on the body. An improper seating position significantly impairs the protection provided by safety belts. This can cause severe or even fatal inju­ries. Improper seating positions also increase the risk of serious injury or death when an airbag de­ploys and strikes an occupant who is not in the proper seating position. The driver is responsible for all passengers and especially children riding in the vehicle.
The following are only some examples of seating positions that will increase the risk of serious injury or death.
Therefore, whenever the vehicle is moving:
Never stand up in the vehicle.
Never stand on the seats.
Never kneel on the seats.
Never ride with the seat backrest reclined.
Never lean up against the instrument panel.
Never lie down on the rear seat.
Never sit on the edge of the seat.
Never sit sideways.
Never lean out the window.
Never put your feet out the window.
Never put feet on the instrument panel.
Never rest your feet on the seat cushion or back of the seat.
Never ride in the footwell.
Never sit or stand on an armrest.
Never ride without your safety belt properly fastened.
Never ride in the luggage compartment.
WARNING
Contact with parts of the vehicle interior can cause serious personal injury in a crash.
Always make sure that all vehicle occupants stay in a proper seating position and are properly restrained whenever the vehicle is moving.
Improper seating positions increase the risk of serious and fatal injury, especially when an airbag deploys and strikes a passenger in an improper seating position.
Proper seating position
Fig. 32 The driver should never sit closer than 10 inches (25 cm) of the steering wheel.
Fig. 33 Proper safety belt positioning and head restraint adjustment.
Please first read and note the introductory information and heed the WARNINGS
The following describes the proper seating positions for the driver and passengers.
If you have a physical impairment or condition that prevents you from sitting properly on the driver seat with the safety belt properly fastened and reaching the pedals, special modifications to your vehicle may be necessary. Only the proper seating position ensures optimum protection by the safety belt and airbag.
Contact your authorized Volkswagen dealer or authorized Volkswagen Service Facility or call the Volkswagen Customer CARE Center at 1-800-822-8987 for information about possible modifications to your vehicle.
For your own safety and to reduce injuries in the event of sudden braking maneuvers or accidents, Volkswagen recommends the following seating positions:
Applies to all vehicle occupants:
Adjust head restraints so that the upper edge of the head restraint is at least at eye level or higher.
Position the back of your head as close as possible to the head restraint ⇒ 
Push the head restraint completely down for short people, even if the top of the head is then below the upper edge of the head restraint.
Tall people should pull the head restraint all the way up.
Adjust the seat backrest angle to an upright position so that your back is in full contact with it when
the vehicle is moving.
Always keep both feet on the floor and in the footwell whenever the vehicle is moving.
Always adjust and fasten safety belts properly ⇒  Safety belts.
fig. 32 and ⇒ fig. 33.
Driver - seat and steering wheel adjustment:
Adjust the steering wheel so that there are at least 10 inches (25 cm) between the steering wheel
and your breast bone ⇒  top of the steering wheel with your elbows slightly bent.
Always hold the steering wheel on the outside of the steering wheel rim with your hands at the 9 o'clock and 3 o'clock positions to help reduce the risk of personal injury if the driver's airbag inflates.
Never hold the steering wheel at the 12 o'clock position or with your hands at other places inside the steering wheel rim or on the steering wheel hub. Holding the steering wheel the wrong way can cause serious injuries to the hands, arms, and head if the driver's airbag inflates.
Adjust the steering wheel so that the steering wheel cover points at your chest and not at your face. Pointing the steering wheel toward your face decreases the ability of the driver's airbag to help protect you in a collision.
Adjust the driver's seat so that you can easily push the pedals all the way to the floor while keeping your knee(s) slightly bent.
Adjust the seat height so that the top point of the steering wheel can be reached.
Always keep both feet in the footwell so that you are in control of the vehicle at all times.
fig. 32. When adjusting the proper distance to the steering wheel, grasp the
Passenger - front seat adjustment:
Push the passenger seat as far back as possible in order to ensure optimum protection if the airbag is deployed.
Manual controls on the driver and front passenger seats
Fig. 34 Driver seat: Manual seat adjustment controls.
Please first read and note the introductory information and heed the WARNINGS
The controls on the front passenger seat mirror those on the driver seat.
The illustration and information in this section describes all possible seat controls. The number of controls may vary depending on the version of the seat.
There may be manual and electrical controls on the same seat.
fig. 34 Function Action
Folding forward: Pull lever and fold seat backrest forward. Push the seat forward at the same time.
Fold the seat backrest
(1)
forward or back into place (2-door vehicles only)
Folding back into place: Slide the seat back as far as it will go until it clicks into place. The backrest releases automatically and can be folded backwards. Engage the seat backrest in an upright position.
(2)
Adjust the lumbar sup­port
Push the lever forward or pull it back­ward.
fig. 34 Function Action
Lean forward and turn the adjuster wheel forward or backward. If the vehicle has an electrical control for adjusting the backrest angle, see
⇒ 
fig. 35 (2).
(3)
Adjust the backrest an­gle.
(4) Adjust the seat height. Pull the lever up or push it down.
(5) Move the front seat for-
ward or back.
Pull the lever up and move the front seat. The front seat must lock in place after the lever is released!
Electrical controls on the driver and front passenger seats
Fig. 35 Driver seat: Electrical controls to move the seat backward or forward, and adjust seat cushion height
and backrest angle (if equipped).
Fig. 36 Lumbar support control (if equipped).
Please first read and note the introductory information and heed the WARNINGS
If your vehicle is equipped with electrical controls for the front seats, the controls on the front passen­ger seat either mirror those on the driver seat or there may be different combinations of electrical and manual controls.
There may be manual and electrical controls on the same seat.
Press the switch in the direction of the arrow
⇒ fig. 35:
(1) (A) Slide the seat forward or back.
(B) Adjust the seat cushion angle.
(C) Raise or lower the seat cushion.
(2) (D) Adjust the backrest angle.
Press the switch in the corresponding area ⇒ fig. 36:
(1) or (2) Adjust the curve of the lumbar support.
(3) or (4) Adjust the height of the lumbar support.
WARNING
Improper use of electrical seat controls can cause serious personal injuries.
The front seats in your vehicle can be electrically adjusted even when the vehicle key has been removed from the ignition or, on a vehicle with Keyless Access, even if there is no key in the vehicle.
Never leave children and persons who need help in the vehicle alone because the unsu­pervised use of the electric seat adjustments can result in serious personal injury.
Always make sure that no one is in the way while the front seats are being adjusted, or while calling up the stored memory settings for the front seats. In an emergency, stop auto­matic seat adjustment by pressing a seat adjustment switch.
NOTICE
To help prevent damage to electrical parts in the seat, do not kneel on the front seats or apply concentrated pressure to a small area of the seat or backrest.
If the vehicle battery is too weak, the electrical seat adjustment controls may not work.
Starting the electric motor may stop seat adjustment.
When entering and exiting the vehicle, be careful not to come into contact with any switches that
could change the seat adjustment.
Adjusting the front and rear head restraints
Fig. 37 Adjusting the front head restraints.
Fig. 38 Adjusting the rear head restraints.
Please first read and note the introductory information and heed the WARNINGS on page 75.
All seats are equipped with head restraints. The rear center head restraint is designed only for the center seat on the rear bench. Therefore, only install the center head restraint in the center position.
There are notches in the head restraint guide rods so that the head restraint can lock into place. Only properly installed head restraints can lock into place at the adjustment range notches. In order to prevent inadvertent removal of the head restraints after installation, there are stops at the top and bottom of the adjustment range.
Adjusting the height
Pull the head restraint up in the direction of the arrow, or push it down while pressing the button
fig. 37 (1) or ⇒ fig. 38 (1) ⇒  .
⇒ 
The head restraint must lock securely in the position selected.
Proper head restraint adjustment
Adjust head restraints so that the upper edge of the head restraint is at least at eye level or higher. Position the back of the head as close as possible to the head restraint.
Adjusting the head restraint for short people
Push the head restraint down as far as it will go, even if this means the person's head is still below the top edge of the head restraint. A small gap may remain between the head restraint and the backrest when the head restraint is all the way down.
Adjusting the head restraint for tall people
Pull the head restraint up as far as it will go.
WARNING
Driving without head restraints or with improperly adjusted head restraints increases the risk of serious injuries in a collision.
Always drive with the head restraints in place and properly adjusted to help minimize the risk of neck injury in a crash.
Every person in the vehicle must have a properly adjusted head restraint to minimize the risk of neck injury in a crash. Each head restraint must be adjusted according to the occu­pants' size so that the upper edge is even with the top of the person's head, but no lower than eye level. Always sit so that the back of your head is as close as possible to the head re­straint.
Never adjust head restraint while driving.
Removing and reinstalling the front head restraints
Fig. 39 Removing the front head restraints.
Please first read and note the introductory information and heed the WARNINGS
All seats are equipped with head restraints. For instructions on removing and reinstalling the rear head
restraints, see ⇒  Removing and reinstalling the rear head restraints.
Removing the front head restraints
Sit in the back seat behind the head restraint you want to remove. Pull the head restraint all the
way up ⇒  in Adjusting the front and rear head restraints . Recline the backrest with the head restraint so that there is enough overhead clearance to remove it.
Slide a flat object, such as a plastic credit card, underneath the right side of the cap (left side if
sitting behind the head restraint) on the right-hand seat guide rod ⇒  restraint.
Push the flat object (plastic card) in against the guide rod to depress a release button located under the cap (not visible).
Use one hand to hold the release button in with the flat object. With your other hand, lift the same guide rod slightly to expose a notch in the rod at the bottom (can be seen and felt with fingers). The right-hand guide rod is now released.
To release the left-hand guide rod, press the flat object in (towards guide rod) and hold.
Pull the head restraint out completely.
fig. 39 (1) to unlock the head
Installing the front head restraints
Position head restraint properly over the head restraint guides of the respective seat backrest and insert the head restraint into the guides.
Push the head restraint down ⇒ 
Adjust the head restraint according to the occupant's size ⇒  Adjusting the front and rear head
restraints.
fig. 39.
WARNING
Driving without head restraints or with improperly adjusted head restraints increases the risk of serious injuries in a collision.
Always drive with the head restraints in place and properly adjusted to help minimize the risk of neck injury in a crash.
Always reinstall head restraints as soon as possible so that vehicle occupants are proper­ly protected.
NOTICE
When removing or reinstalling the head restraint, take care that the head restraint does not strike the headliner or other parts of the vehicle. The headliner or other parts of the vehicle could otherwise be damaged.
Removing and reinstalling the rear head restraints
Fig. 40 Removing the rear head restraint (version A).
Fig. 41 Removing the rear head restraint (version B).
Please first read and note the introductory information and heed the WARNINGS
All seats are equipped with head restraints. The rear center head restraint is designed only for the center seat on the rear bench. Therefore, only install the center head restraint in the center position.
For instructions on removing and reinstalling the front head restraints, see ⇒  Removing and rein- stalling the front head restraints
Removing the rear head restraint (Version A)
Unlock the backrest of the rear seat bench and fold it forward ⇒  Luggage compartment.
Pull the head restraint all the way up ⇒  .
Push button ⇒ fig. 40 (1) in the direction of the arrow and hold it in this position.
At the same time press button
Fold the backrest of the rear seat bench back so that it locks securely.
(2) while a second person pulls out the head restraint completely.
Removing the rear head restraint (Version B)
Unlock the backrest of the rear seat bench and fold it forward ⇒  Luggage compartment.
Pull the head restraint all the way up ⇒  .
If necessary, press the flat blade of the screwdriver from the vehicle tool kit into the slit of the trim
fig. 41 (2) in the direction of the arrow and hold it in this position.
cap ⇒ 
At the same time press button
Fold the backrest of the rear seat bench back so that it locks securely.
(2) while a second person pulls out the head restraint completely.
Reinstalling the rear head restraint (both versions)
Unlock the backrest of the rear seat bench and fold it forward ⇒  Luggage compartment.
Position head restraint properly over the head restraint guides of the respective seat backrest and
insert the head restraint into the guides.
Push the head restraint down while pressing button ⇒ 
Fold the backrest of the rear seat bench back so that it locks securely.
Adjust the head restraint according to the occupant's size ⇒  Adjusting the front and rear head
restraints.
fig. 40 (2) or ⇒ fig. 41 (2).
WARNING
Driving without head restraints or with improperly adjusted head restraints increases the risk of serious injuries in a collision.
Always drive with the head restraints in place and properly adjusted to help minimize the risk of neck injury in a crash.
Always reinstall head restraints as soon as possible so that vehicle occupants are proper­ly protected.
NOTICE
When removing or reinstalling the head restraint, take care that the head restraint does not strike the headliner or other parts of the vehicle. The headliner or other parts of the vehicle could otherwise be damaged.
Adjusting the steering wheel position
Fig. 42 Manual adjustment for the steering wheel position.
Please first read and note the introductory information and heed the WARNINGS
Adjust the steering wheel only when the vehicle is not moving.
Push down on the lever ⇒ fig. 42 (1).
Adjust the steering wheel so that it can be held with hands at the 9 o'clock and 3 o'clock positions
on the outside of the steering wheel rim and with the arms slightly bent at the elbow.
Pull the lever up firmly until it is flush with the steering column ⇒ 
.
WARNING
Improper use of the steering column adjustment feature can result in serious personal injury and even death.
Always pull the lever (1) firmly upward after adjusting the steering column so that the steering wheel does not change position suddenly while the vehicle is moving.
Never adjust the steering column while the vehicle is moving. If you find that you need to adjust the steering wheel while driving, stop the vehicle in a safe place and make the proper adjustment.
Never adjust the steering wheel so that it points toward your face. Always make sure that the steering wheel points toward your chest. Otherwise, the airbag system cannot protect you properly in the event of a crash.
Always hold the steering wheel on the outside of the steering wheel rim with your hands at the 9 o'clock and 3 o'clock positions to help reduce the risk of serious personal injury if the driver's airbag inflates.
Never hold the steering wheel at the 12 o'clock position or with your hands anywhere inside the steering wheel or on the steering wheel hub. Holding the steering wheel the wrong way increases the risk of severe injury to the arms, hands, and head if the driver airbag de­ploys.
Center armrest
Fig. 43 Front center armrest.
Fig. 44 Folding down the rear center armrest (arrow).
 Please first read and note the introductory information and heed the WARNINGS
Front center armrest
There is a small storage compartment under the front center armrest ⇒  Storage areas.
To raise the center armrest, push the release button, pull the armrest up, and latch upward in the
direction of the arrow ⇒ 
To lower the center armrest, first lift it all the way up. Then you can push the center armrest down until it latches in place.
To move the center armrest forward and backward, pull it forward in the direction of the arrow slide it backward until it clicks into place.
fig. 43 (1).
(2) or
Rear center armrest
There may be a fold-down armrest in the backrest of the center rear seat ⇒ 
To fold down, pull the loop in the direction of the arrow ⇒ 
To fold up, push the center armrest up as far as it will go.
fig. 44.
fig. 44.
WARNING
The center armrest can restrict the driver's arm movement and cause crashes and serious personal injury.
Always keep storage compartments in the center armrest closed while driving.
Never let a passenger, especially a child, ride on the center armrest. Improper seating
position can increase the risk of serious personal injury in a crash.
Never put hot drinks or other liquids in the cup holders. Hot liquids can spill when the vehicle is moving as well as during braking or other sudden maneuvers.
Seat functions
Introduction
In this section you’ll find information about:
Seat heating
More information:
Adjusting the seating position
Safety belts
Airbag system
Child safety and child restraints
Climate control
WARNING
Improper use of seat adjustment controls can cause severe personal injuries.
Always sit properly at all times before starting to drive and while the vehicle is moving. Make sure all passengers, especially children, are properly seated whenever the vehicle is moving.
Keep hands, fingers, feet and other body parts away from moving parts and adjustment areas of the seats.
Seat heating
Fig. 45 In the center console: Seat heating buttons for the front seats.
Please first read and note the introductory information and heed the WARNINGS
Your vehicle may be equipped with a seat heating feature.
When the ignition is switched on, the front seats can be electrically heated by heating elements that warm the seat backrest and cushion.
Do not use the seat heating if any of the following conditions apply:
If the seat is not being used.
If there is a child restraint installed on the front passenger seat.
If there is a blanket or seat cover on the front passenger seat.
If the seat is damp or wet.
If the outside temperature or the temperature inside the passenger compartment is +77 °F (+25 °C)
or more.
Function
Action for seat heating ⇒ fig. 45
Switch on: Press the or button. Seat heating is switched on to
maximum.
Adjust the heat­ing level:
Press the or  button repeatedly until the desired heating level is set.
Switch off: Press the or button repeatedly until all indicator
lights in the button are off.
Special seat heating features
On the driver and the passenger side, the seat heating will resume at the setting that was set when the ignition was last switched off. However, this feature only works if the key is not taken out of the ignition switch, or, for vehicles with Keyless Access, the driver door is not opened or the vehicle is not locked.
People suffering from a low level of perceived pain or a lowered awareness of pain as from medica-
tion, paralysis, or chronic illness (e.g. diabetes) should NEVER use the seat heating feature ⇒ 
The use of seat heating by persons with these conditions could result in burns to the back, buttocks, and legs that may take a long time to heal and may never heal completely. If you have any of these conditions, you should take regular breaks and get out of the vehicle, particularly on long trips. Consult your doctor for advice regarding your specific condition.
WARNING
Certain medical conditions, such as paralysis and diabetes, and certain medications can increase the risk of serious burns when the seat heating feature is switched on.
Vehicle occupants who have a low level of perceived pain or a lowered awareness of pain can receive serious burns to the back, buttocks, and legs that take a long time to heal or may never heal completely.
Never use the seat heating feature if you or your passengers are at risk of being burned because of a medical condition. Take regular breaks and get out of the vehicle, particularly on long trips. Consult your doctor for advice regarding your specific condition.
Never let exposed skin remain in contact with the seat upholstery when the seat heating is being used.
!
WARNING
A wet seat can cause the seat heating to malfunction and increase the risk of serious burns.
Always make sure the seats are dry before using the seat heating.
Never sit on the seat with wet clothes.
Never put damp or wet things including clothes on the seat.
Never spill liquids on the seats.
NOTICE
To help prevent damage to electrical and other parts in the seat, do not kneel on the front seats or apply concentrated pressure to a small area of the seat or backrest.
Liquids, sharp objects and things that do not let the heat in the seat escape into the air, including, for example, a child restraint, a blanket, or seat covers on the seat can damage seat heating.
If you smell an odor, immediately shut off seat heating and have it checked by an authorized Volkswagen dealer or authorized Volkswagen Service Facility.
Never install leather upholstery on a vehicle with seat heating that originally had cloth upholstery. The seat heating elements for seats with cloth seats will overheat if the cloth up­holstery is replaced with leather upholstery.
Switch off seat heating when it is not needed to help reduce unnecessary power consumption.
Safety belts
Introduction
In this section you’ll find information about:
Warning light Frontal collisions and laws of physics What happens to passengers not wearing a safety belt Safety belts protect Using safety belts Fastening and unfastening safety belts Safety belt position Safety belt height adjusters Safety belt extender Safety belt retractor, pretensioner, load limiter Service and disposal of belt pretensioners
Properly worn safety belts are the single most effective means of reducing the risk of serious injury and death in a collision or other accident.
Damage to safety belts reduces their overall effectiveness and increases the risk of serious personal injury and death whenever the vehicle is being used.
Check the condition of all safety belts regularly.
If a safety belt shows damage to webbing, bindings, retractors or buckles, have the safety belt re-
placed by an authorized Volkswagen dealer or an authorized Volkswagen Service Facility ⇒ 
More information:
Adjusting the seating position
Airbag system
Child safety and child restraints
Interior care and cleaning
Parts, accessories, repairs, and modifications
.
WARNING
Not wearing a safety belt or wearing an improperly positioned safety belt increases the risk of severe personal injury or death. Safety belts offer optimum protection only when they are used properly.
Properly worn safety belts are the single most effective means of reducing the risk of serious injury and death in a collision or other accident. For this reason, always wear your safety belt properly and make sure all passengers wear their safety belts properly as well whenever the vehicle is moving.
The driver must always make sure that every person in the vehicle is properly seated on a seat of his or her own, properly fastens the safety belts belonging to that seat before the vehicle starts to move, and keeps the belts properly fastened while riding in the vehicle. This applies even when just driving around town. Therefore, always wear your safety belts and make sure that everybody in your vehicle is properly restrained.
Always secure children in the vehicle with a restraint system appropriate for their age,
weight and height ⇒  Child safety and child restraints.
Always fasten safety belts correctly before driving off and make sure that all passengers are properly restrained.
Never attach the safety belt to the buckle of another seat. Attaching the safety belt to the wrong buckle will reduce safety belt effectiveness and can cause serious personal injury.
Never let any objects or liquids get into the safety belt latch and prevent it from working properly.
Never remove a safety belt while the vehicle is moving. Doing so will increase your risk of being injured or killed.
Never strap more than one person, including small children, into any single safety belt.
Never let children or babies ride sitting on your lap, and never place a safety belt over a
child sitting on your lap.
Never wear belts over rigid or breakable objects in or on your clothing, such as eyeglass­es, pens, keys, etc., as these may cause injury.
Several layers of heavy clothing (such as a coat worn over top of a sports jacket) may interfere with proper positioning of the safety belt and reduce the overall effectiveness of the system.
Never use comfort clips or devices that create slack in the shoulder belt. However, special clips may be required for the correct use of some child restraint systems.
Safety belts offer optimum protection only when the seat backrest is upright and belts are correctly positioned on the body.
WARNING
Damage to safety belts reduces their overall effectiveness and increases the risk of serious personal injury and death whenever the vehicle is being used.
Never let safety belts become damaged by being caught in the door or seat hardware.
Torn or frayed safety belts can tear, and damaged safety belt hardware can break in an
accident.
Inspect belts regularly for damage. If webbing, bindings, buckles, or retractors are dam­aged, have the belts replaced immediately with the correct replacement belts approved by Volkswagen for your vehicle, model, and model year.
Safety belts that were subject to stress in an accident and stretched must be replaced with a correct, new safety belt, preferably by an authorized Volkswagen dealer or authorized Volkswagen Service Facility.
Replacement after a crash may be necessary even if a safety belt shows no visible dam­age. Anchorages that have been loaded must also be inspected.
Damaged safety belts must be replaced; they cannot be repaired.
Never try to repair a damaged safety belt yourself. Never remove or modify the safety belts
in any way.
Have safety belts, bindings, retractors and buckles replaced by an authorized Volkswagen dealer or authorized Volkswagen Service Facility.
Always keep the belts clean. Dirty belts may not work correctly and can impair the func­tion of the inertia reel.
Warning light
Fig. 46 Warning light in the instrument cluster.
 Please first read and note the introductory information and heed the WARNINGS
Lights
up or
Possible cause Proper response
flashes
Lights
up or
Possible cause Proper response
flashes
Driver and front passenger have not fastened their safety
belts, if front passenger seat
Fasten safety belts.
is occupied.
When the ignition is switched on, several warning and indicator lights come on briefly for a function check. They go out after a few seconds.
A warning chime also sounds.
The safety belt warning light  comes on for 6 seconds when the ignition is switched on. A warning chime also sounds for up to 6 seconds if the driver's safety belt is not buckled. The chime stops soon­er if the driver buckles his or her safety belt. The warning light and the chime go out when both driver and front passenger have buckled their safety belts.
If the driver and front seat passenger do not both fasten their safety belts within about 24 seconds after the chime stops and the vehicle is moving at a speed of more than about 15 mph (25 km/h), the chime will again sound for about 6 seconds, then go off for about 24 seconds, then sound again for about another 6 seconds. The same thing happens if one of the safety belts is fastened and then unfastened while the vehicle is moving. The safety belt warning light also flashes. The warning chime continues to sound at 24 second intervals for up to 2 minutes. No chime sounds at speeds of less than about 5 mph (8 km/h).
If the ignition is switched on, the safety belt warning light stays on until the driver and front passen­ger have both buckled their safety belts.
WARNING
Not wearing a safety belt or wearing an improperly positioned safety belt increases the risk of severe personal injury or death. Safety belts offer optimum protection only when used cor­rectly.
Frontal collisions and laws of physics
Fig. 47 A vehicle with passengers not wearing safety belts approaches a wall.
Fig. 48 A vehicle with passengers not wearing safety belts hits a wall.
Please first read and note the introductory information and heed the WARNINGS
The physical principles of a frontal collision are simple. Both the moving vehicle and the passenger
possess energy ⇒  “kinetic energy.”
The higher the speed of the vehicle and the greater the vehicle's weight, the more energy has to be “absorbed” in a crash.
Vehicle speed is the most significant factor. If your speed doubles (for example, from 15 mph to 30 mph – 25 km/h to 50 km/h), the energy increases 4 times!
Because the occupants of the vehicle in the above example are not using safety belts, they are not “attached” to the vehicle. In a frontal collision, they will keep moving at the same speed the vehicle was moving just before the crash, until something stops them - here, the inside of the passenger compartment. Because the occupants of the vehicle in the example are not wearing safety belts, their
entire kinetic energy will be absorbed by impact with the wall ⇒ fig. 48.
The same principles apply to people in a vehicle that is in a frontal collision on the highway. Even at city speeds of 20–30 mph (30–50 km/h), the forces acting on the body can reach one ton (2,000 lbs or 1,000 kg) or more. At greater speeds, these forces are even higher.
Of course, the laws of physics don't apply just to frontal collisions; they determine what happens in all kinds of accidents and collisions.
fig. 47, which varies with vehicle speed and body weight. Engineers call this energy
What happens to passengers not wearing a safety belt
Fig. 49 The unbelted driver is thrown forward.
Fig. 50 Unbelted passengers in the rear seats are thrown forward on top of the belted driver.
Please first read and note the introductory information and heed the WARNINGS
Many people believe that it is possible to resist the forces of an impact by holding tight or bracing themselves. That is simply not true!
Even at low collision speeds, the forces acting on the body are too much for the body to be held in the seat with the arms and hands. In a frontal collision, unrestrained occupants will slam violently into the
steering wheel, instrument panel, windshield or anything else in the way ⇒ 
fig. 49.
Never rely on airbags alone for protection. Even when they deploy, airbags provide only additional protection. Airbags are not supposed to deploy in all kinds of accidents. Even if your vehicle is equipped with airbags, all vehicle occupants, including the driver, must wear safety belts correctly in order to minimize the risk of severe injury or death in a crash, regardless of whether a seating position has an airbag or not.
An airbag will deploy only once. Safety belts are always there to offer protection in those accidents in which airbags are not supposed to deploy or when they have already deployed. Unbelted occupants can also be thrown out of the vehicle, causing even more severe injuries or death.
It is also important for occupants in the rear seats to wear their safety belts properly since they can be thrown violently forward through the vehicle in the event of an accident. Unbelted passengers in the rear seats endanger not only themselves but also the driver and other passengers in the vehicle
⇒ 
fig. 50.
Safety belts protect
Fig. 51 Belted driver secured by the correctly worn safety belt in the event of a sudden braking maneuver.
Please first read and note the introductory information and heed the WARNINGS
Used properly, safety belts can make a big difference. Safety belts help to keep passengers in their seats, gradually reduce energy levels applied to the body in a collision, and help prevent the uncon­trolled movement that can cause serious injuries. In addition, safety belts reduce the danger of being
thrown out of the vehicle ⇒ fig. 51.
Safety belts attach passengers to the car and give them the benefit of being slowed down more gently or “softly” through the “give” in the safety belts, crumple zones, and other safety features (such as airbags) engineered into today's vehicles. The front crumple zones and other passive safety features (such as the airbag system) are also designed to absorb kinetic energy. By “absorbing” the kinetic energy over a longer period of time, the forces on the body become more “tolerable” and less likely to cause injury.
Although these examples are based on a frontal collision, safety belts can also substantially reduce the risk of injury in other kinds of crashes. So, whether you're on a long trip or “just going to the corner store,” always buckle up and make sure that others do, too.
Accident statistics show that vehicle occupants properly wearing safety belts have a lower risk of being injured and a much better chance of surviving a collision. Properly using safety belts also greatly increases the ability of the supplemental airbags to do their job in a collision. For this reason, wearing a safety belt is required by law in most countries including the United States and Canada.
Although your Volkswagen is equipped with airbags, you still have to wear the safety belts provided. Front airbags, for example, are activated only in some frontal collisions. The front airbags are not activated in all frontal collisions, in side and rear collisions, in rollovers, or in cases when the condi­tions for deployment stored in the electronic control unit are not met. The same goes for the other airbag systems on your Volkswagen.
So always wear your safety belt and make sure that everybody in your vehicle is properly restrained!
Using safety belts
 Please first read and note the introductory information and heed the WARNINGS
Checklist
Using safety belts ⇒ 
Damage to safety belts reduces their overall effectiveness and increases the risk of serious per-
sonal injury and death whenever the vehicle is being used.
Check the condition of all safety belts regularly.
Keep safety belts clean.
Keep objects and liquids away from safety belt webbing, the safety belt buckle tongue, and the
safety belt buckle latch and opening.
Do not pinch or damage the safety belt or buckle tongue (for instance, when closing a door).
Never modify, disassemble or try to repair safety belts and safety belt anchorages.
Always fasten your safety belt properly before driving and keep it fastened whenever the vehicle is
moving.
Twisted safety belt
If it is difficult to pull the safety belt out of the belt guide, the belt may be twisted inside the side trim because the belt retracted too quickly when it was taken off.
Hold the safety belt tongue, slowly and carefully pull safety belt all the way out.
Untwist the safety belt and slowly return the belt by hand.
If you cannot untwist the safety belt, wear it anyway. Make sure that the safety belt is twisted in a spot where it does not come in direct contact with your body. Have the safety belt untwisted immediately by an authorized Volkswagen dealer or authorized Volkswagen Service Facility.
Lockable safety belt
The retractors for the rear seat safety belts and the front passenger safety belt have a switchable locking feature for child restraints in addition to the emergency locking feature. Whenever a child restraint is installed with a safety belt, the safety belt must be locked so that the safety belt webbing cannot unreel. The switchable locking feature lets you lock the belt so that a child restraint can be properly installed and, for example, so that it can't tip to the side when the vehicle goes around a
corner ⇒  Child safety and child restraints.
To see whether a safety belt is lockable, pull the safety belt all the way out of the safety belt retractor. You should then hear a “clicking” sound as the belt winds back into the retractor reel. Test the switch­able locking feature by pulling on the belt. When the switchable locking feature is active, you should no longer be able to pull the belt out of the retractor.
The locking feature must be deactivated when a vehicle occupant uses the safety belt.
WARNING
Improper use and care of safety belts increases the risk of severe personal injury or death.
Regularly check safety belts and related parts for damage.
Damaged safety belts must be replaced; they cannot be repaired.
Always keep safety belts clean.
Never catch, damage or chafe safety belt webbing on sharp edges.
Always keep objects and liquids away from the belt buckle and buckle opening.
Fastening and unfastening safety belts
Fig. 52 Inserting the buckle tongue into the belt buckle.
Fig. 53 Releasing the buckle tongue from the belt buckle.
Please first read and note the introductory information and heed the WARNINGS
Properly worn safety belts help to hold occupants in their seats and provide optimum protection during
braking or in a collision or other accident ⇒ 
The switchable locking feature makes a “clicking” sound when the safety belt is winding back onto the safety belt retractor wheel after being pulled all the way out. Whenever a child restraint is installed with a safety belt, the safety belt must be locked so that the safety belt webbing cannot unreel
⇒ page Error! Bookmark not defined., Child safety and child restraints. If active, deactivate the locking feature before using the safety belt to restrain a person without a child restraint system.
Fastening safety belts
Always buckle your safety belt before driving.
Adjust the front seat and head restraint correctly ⇒  Adjusting the seating position.
Make sure the seat backrest of the rear seat bench is in an upright position and securely latched in
place before using the safety belt ⇒  Hold the safety belt by the tongue and pull it slowly and evenly across the chest and pelvis. Do not
twist the safety belt webbing ⇒ 
Insert the tongue into the correct buckle for your seat until you hear it latch securely ⇒ fig. 52.
Pull on the safety belt to make sure that it is securely latched in the buckle.
.
Unfastening safety belts
Unfasten safety belts only when the vehicle is not moving ⇒ 
.
.
.
Press the red button on the buckle ⇒ fig. 53. The buckle tongue is ejected.
Let the belt wind up on the retractor as you guide the belt tongue to its stowed position to help
prevent the safety belt from twisting and to help avoid damage to the interior trim.
WARNING
Improperly positioned safety belts can cause serious personal injury or death in an accident.
Safety belts offer optimum protection only when the seat backrest is upright and belts are correctly positioned on the body.
A person who is not properly restrained can be seriously injured by the safety belt itself if it slips from the stronger parts of the body into sensitive areas like the abdomen.
Unfastening safety belts while the vehicle is in motion can cause severe personal injury or death in the event of an accident or braking maneuver!
Safety belt position
Fig. 54 Proper safety belt positioning and head restraint adjustment.
Fig. 55 Proper safety belt positioning for expectant mothers.
Please first read and note the introductory information and heed the WARNINGS
Wearing safety belts improperly can cause serious injury or death. Safety belts can only work when they are correctly positioned on the body. A properly worn safety belt also helps to position the occu-
pant so that an airbag can provide maximum protection when deployed. Therefore, always fasten your safety belt and make sure that it is properly positioned over your body.
Improper seating positions reduce the effectiveness of safety belts and even increase the risk of injury or death by moving the safety belt to critical areas of the body. Improper seating positions also in­crease the risk of severe injury or death when an airbag deploys and strikes an occupant who is not
seated properly ⇒  Adjusting the seating position.
Proper safety belt position
The shoulder portion of the safety belt must always run over the center of the shoulder and never over the throat, over the arm, under the arm or behind the back.
The lap portion of the safety belt must always run as low as possible over the pelvis and never over the abdomen.
Always wear the safety belt flat and snug against the body. Pull on the safety belt to tighten if necessary.
Expectant mothers must always wear the lap portion of the safety belt as low as possible across the pelvis and below the rounding of the abdomen – throughout the pregnancy. The safety belt must lie
flat against the body to avoid pressure against the abdomen ⇒ 
fig. 55.
Adjusting safety belt height
The safety belt position can be adjusted using the following features:
Safety belt height adjusters for the front seats.
Front seats with height adjustment.
WARNING
Improperly positioned safety belts can cause serious personal injury in an accident or a sud­den braking maneuver.
Always make sure that all vehicle occupants are correctly restrained and stay in a correct seating position whenever the vehicle is being used.
Safety belts offer optimum protection only when the seat backrest is upright and belts are correctly positioned on the body.
A loose-fitting safety belt can cause serious injuries by shifting its position on your body from the strong bones to more vulnerable soft tissue and cause serious injury.
The shoulder belt portion of the safety belt must be positioned over the middle of the occupant's shoulder and never across the neck or throat.
The safety belt must lie flat and snug on the occupant's upper body.
Never wear the shoulder part of the safety belt under your arm or otherwise out of posi-
tion.
The lap portion of the safety belt must be positioned as low as possible across the pelvis and never over the abdomen. Make sure the belt lies flat and snug against the pelvis. Pull on the safety belt to tighten if necessary.
Expectant mothers must always wear the lap portion of the safety belt as low as possible across the pelvis and below the rounding of the abdomen.
Do not twist the belt when attaching it. If you cannot untwist a twisted safety belt, wear it anyway, but make sure the twisted part is not in contact with your body. Have the problem corrected right away by an authorized Volkswagen dealer or authorized Volkswagen Service Facility.
Never hold the safety belt away from your body with your hand.
Never wear belts over rigid or breakable objects, such as eyeglasses, pens or keys.
Never modify the position of the belt using comfort clips, loops or similar devices.
If you have a physical impairment or condition that prevents you from sitting properly on the seat with the safety belt properly fastened, special modifications to your vehicle may be necessary. Contact your authorized Volkswagen dealer or authorized Volkswagen Service Facility or call the Volkswagen Customer CARE Center at 1-800-822-8987 for information about possible modifications to your vehi­cle.
Safety belt height adjusters
Fig. 56 Next to the front seats: Safety belt height adjuster.
Please first read and note the introductory information and heed the WARNINGS
Safety belt height adjusters for the front seats can be used to adjust the height of the shoulder portion of the safety belt so that it is positioned correctly:
Pinch the safety belt attachment together as indicated by the arrows and hold ⇒ 
Slide the belt and upper attachment up or down until the safety belt is positioned over the center of
the shoulder ⇒  Safety belt position.
Release the safety belt attachment.
Pull on the safety belt to make sure that the upper attachment is securely locked in place.
fig. 56.
WARNING
Never adjust the height of the safety belt while driving.
Safety belt extender
Fig. 57 A safety belt extender properly attached to the factory-installed safety belt.
Fig. 58 Positioning of the safety belt extender.
Please first read and note the introductory information and heed the WARNINGS
If a safety belt is too short to correctly fit you or one of your passengers, even when the safety belt is pulled out all the way, you can use a safety belt extender.
Never use the safety belt extender for any other purpose – including the attachment of a child re­straint.
The extender adds about 8 inches (20 cm) to the safety belt. Always remove the safety belt extender when it is not needed and stow it safely. Contact an authorized Volkswagen dealer or authorized Volkswagen Service Facility if you believe you may need an extender.
Key to fig. 57:
(1) Vehicle safety belt buckle. (2) Buckle tongue on the safety belt extender. (3) Safety belt buckle on the safety belt extender. (4) Safety belt buckle tongue on the factory-installed safety belt.
fig. 58:
Key to
(A) Safety belt buckle on the safety belt extender. (B) Distance between the safety belt buckle on the safety belt extender and the centerline of the
person using the safety belt extender. The distance must be more than 6 inches (15 cm)!
(C) Centerline of the person using the safety belt extender.
Loading...