


 Loading...
TRENDnetView
EVO
Administration
Guide
Friday, October 27, 2017
©TRENDnet

TRENDnetView EVO |
1 |
Table of Contents
1. |
Software Purpose and Use Cases |
3 |
2. |
Hardware Requirements |
4 |
3. |
Getting Started |
5 |
4. |
Free License |
6-7 |
5. |
Installation of TRENDnetView EVO |
8-10 |
6. |
Initialization of TRENDnetView EVO Server |
11 |
7. |
Server Setup Wizard |
12 |
8. |
Start & Stop Server Service |
13 |
9. |
Management Application Installation |
14-17 |
10. |
TRENDnetView EVO Console First Start |
18-19 |
11. |
Setup Wizard |
20-21 |
12. |
Interface Overview: Management Application |
22-25 |
13. |
Conventions and Keyboard Shortcuts |
26-28 |
14. |
Configuration Backup |
29-31 |
15. |
Migration From Previous Product Versions |
32-34 |
16. |
Server Settings |
35 |
17. |
Storage |
36-40 |
18. |
Watchdog |
41-43 |
19. |
Security Policy |
44-45 |
20. |
Overview of Devices and Channels |
46 |
21. |
Add Devices Manually |
47-51 |
22. |
Add Devices Using Autodiscovery |
52-56 |
23. |
Manage Devices and Device Groups |
57-59 |
24. |
Configure Channels |
60-62 |
25. |
Channel Settings |
63-66 |
26. |
Audio |
67-68 |
27. |
Dewarp For Fisheye Cameras |
69-70 |
28. |
Bulk Edit for Devices and Channels |
71-72 |
29. |
Configure Recording Profiles |
73-75 |
30. |
Assign Recording Configurations |
76 |

TRENDnetView EVO |
2 |
31. |
Add Users and User Groups |
77-80 |
32. |
Permissions and Membership |
81-82 |
33. |
Anonymous User |
83 |
34. |
Live Podcasts |
84-86 |
35. |
Layout Templates |
87 |
36. |
Data Sources |
88-90 |
37. |
Streaming Server Configuration |
91 |
38. |
Streaming Server User Interface |
92-95 |
39. |
Mobile Application for Streaming Server |
96-103 |
40. |
Event and Action Overview |
104-105 |
41. |
Rules |
106 |
42. |
Default Events |
107 |
43. |
Add Events |
108-111 |
44. |
Defaults Actions |
112 |
45. |
Add Actions |
113-122 |
46. |
Add Rules |
123-128 |
47. |
Understanding Conditions |
129-130 |
48. |
Manage Mail Servers |
131-132 |
49. |
Create Schedules |
133 |
50. |
Delay Timers |
134 |
51. |
Health Monitoring |
135-136 |
52. |
Audit |
137-139 |
53. |
Problem Report Wizard |
140-142 |
TRENDnetView EVO |
3 |
1 Software Purpose and Use Cases
About Software
TRENDnetView EVO is a free version of the new-generation TRENDnet video management software. Delivering an outstanding quality performance, this video management system is ideal for use at small installations with surveillance networks of sixteen cameras or fewer. The meticulously designed interface will allow any user to quickly understand the whole process of configuration and start using the software.
Free software version allows up to 16 video channels from TRENDnet brand cameras. Client application - TRENDnetView EVO Monitor - can only be connected to a single TRENDnetView EVO server, and streaming server (Web/mobile access), which is an integral part of the server, is limited to one connection at a time.
Additionally, an advanced feature of event and action management is offered with this software bundle. Free version upgrade is offered for TRENDnetView EVO.
Prerequisites
There are a number of requirements for the TRENDnetView EVO host system:
 Microsoft Windows operating system (7 SP1, 8, 8.1, 10, Server 2008 R2, Server 2012 R2)
 both .NET Framework 3.5 SP1 and 4.5 (4.6) installed
 all Windows updates should be installed (especially, this is critical for Windows 8 and newer editions and for pending updates)
 ports for remote connections should be enabled through the firewalls (default ports are 60554 for TRENDnetView EVO Monitor and TRENDnetView EVO Console and 8080 for the TRENDnetView EVO Streaming Server and external services)
 installation and recording directories should be added to antivirus exception list so that they are not scanned or interfered with in any other manner
 indexing and defragmentation services must be disabled for the storage locations
 for TRENDnetView EVO Monitor application, DirectX 10+ is required along with the latest stable graphics card drivers
For recording, the following recommendations apply:
 for >20MB/s total recorded stream, RAID 5/6/10 with high speed hardware controller is strongly advisable
 defragmentation and indexing must be disabled for all storages
 every recording location, regardless of its type, must have 10-15% of free space, not used by TRENDnetView EVO or any other software
 recording to the system disk is strongly not recommended
 antivirus software or any other scanners should be disabled for the storage locations
 no third-party VMS should be recording to the same location as TRENDnetView EVO

 Virtualised environment is not supported for this software.
 Antivirus scanning, defragmentation and indexing being enabled for TRENDnetView EVO files may result in dramatically decreased write speed, recording disturbances and, occasionally, database corruption. We strongly recommend that you make sure that storage locations are not affected by these processes.
 TRENDnet is not responsible for software failures and/or footage loss caused by underlying OS and/or hardware issues. It is the responsibility of the systems administrator to configure the server and provide maintenance, unless otherwise agreed (e.g., if server hardware has been shipped by TRENDnet).

TRENDnetView EVO |
4 |
2 Hardware Requirements
The table below details the minimum recommended hardware sets for TRENDnet software. Please note that these specific processor models are given only as examples and are not compulsory: you can use different CPU provided that it has the same number of threads and its performance is analogous.
Calculations are given for two major configuration examples: all streams in D1 or FullHD resolution; of course, intermediate and mixed cases may also exist. Please contact TRENDnet representatives if you require help with choosing hardware.
HARDWARE RECOMMENDATION TABLE
Installation specifications |
Recommended hardware per usage scenario |
Video
Stream
D1
30fps
FullHD
30fps
Number |
Motion |
Server only |
Monitor*** only |
Server + |
of cameras |
Detector |
|
|
Monitor*** |
Up to 9 |
None or camera- |
CPU: Intel |
CPU: Intel G4500; |
CPU: Intel i3-6300; |
|
side* |
G1840; RAM |
RAM 4GB |
RAM 8GB |
|
Software HP** |
4GB |
|
|
|
|
|
|
|
|
Software HA** |
CPU: Intel |
|
CPU: Intel i5-6600; |
Up to 16 |
None or camera- |
G4500; RAM |
CPU: Intel i3-6300; |
RAM 8GB |
4GB |
|
|||
|
side* |
|
RAM 4GB |
|
|
Software HP** |
|
|
|
|
Software HA** |
CPU: Intel i3- |
|
|
|
|
6300; RAM 8GB |
|
|
Up to 9 |
None or camera- |
CPU: Intel |
CPU: Intel i5-6600; |
|
|
side* |
G1840; RAM |
RAM 8GB |
|
|
|
4GB |
|
|
|
Software HP** |
CPU: Intel |
|
|
|
|
G4500; RAM |
|
|
|
|
4GB |
|
|
|
Software HA** |
CPU: Intel i5- |
|
CPU: Intel i7-6700; |
|
|
6600; RAM 8GB |
|
RAM 8GB |
Up to 16 |
None or camera- |
CPU: Intel |
CPU: Intel i7-6700; |
|
|
side* |
G4500; RAM |
RAM 8GB |
|
|
|
4GB |
|
|
Software HP** |
CPU: Intel i3- |
CPU: Intel i7-6700; |
|
6300; RAM 8GB |
RAM 16GB |
Software HA** |
CPU: Intel i7- |
CPU: Intel i7- |
|
6700; RAM 8GB |
5930K; RAM 16GB |
Notes:
 DDR4 RAM is strongly recommended
 *Please refer to the list of TRENDnet supported cameras for camera-side motion detector support
 **High Performance/High Accuracy mode
 ***System must provide:
 DirectX 10 support
 Graphics card with at least 256MB memory
  Latest graphics driver version
TRENDnetView EVO |
5 |
3 Getting Started
Before starting the installation, make sure that:
 you have downloaded the correct software package
 you have acquired the corresponding valid license key, see: Free License
 the host operating system is stable (functioning correctly) and has all the updates and drivers installed
 server hardware matches the project requirements, taking into account all used features and planned postdeployment modifications
 host system retains all the features and configuration required for software operation
 We strongly advise that you keep the software versions (e.g., 1.x.x) and subversions (e.g., 1.2.x) across your system match exactly. Software build numbers (e.g., 1.2.0.xxxxx) may differ slightly in case your are using 64bit and 32-bit editions.
 If you are not sure about what server hardware to choose, do not hesitate to use TRENDnet provided hardware calculators and/or contact TRENDnet representative for an accurate estimation.
We advise installing and activating the software on the ultimate server assembly, as extensive subsequent hardware changes are likely to cause software license activation failure. If this happens, undo these changes, if possible, or contact product support to find a solution.
TRENDnetView EVO is installed as a Windows service so please make sure that the Windows user you are logged in as has sufficient privileges; otherwise, software may not be installed correctly. Note that there is no option to install and run the software in application mode.
The following topics will guide you through the installation process, as well as providing details on product configuration. If you are using a TRENDnet product for the first time, we strongly advise you to carefully read and follow the instructions in this Adminstration Guide and related documentation.
 TRENDnet is not responsible for software failures and/or footage loss caused by underlying OS and/or hardware issues. It is the responsibility of the systems administrator to configure the server and provide maintenance, unless otherwise agreed (e.g., if server hardware has been shipped by TRENDnet).

TRENDnetView EVO |
6 |
4 Free License
When you have installed and initialized the TRENDnetView EVO software, you will be given the chance to request a free license in order to activate the software and continue using it.
The features and conditions of a free license are as follows:
 free software updates
 maximum 32 cameras
 maximum 1 (one) connected TRENDnetView EVO Monitor at a time
 TRENDnetView EVO Monitor can connect to maximum 1 (one) server with free license

 Internet connection is required for the license request.
  Activation is not possible on virtual machines!
Retrieve License
The Registration and Activation Wizard will pop up automatically after the software installation.
Free license request form
The wizard will automatically connect to TRENDnet activation server and retrieve the license details. If the request fails, check your Internet connection and try again.
License details retrieved
Congratulations! You are now ready to use TRENDnetView EVO. Click the Start Quick Setup Wizard button below to continue with server configuration.

TRENDnetView EVO |
7 |
Manage License
When a server already has a license key installed, you can retrieve that information in two ways:
 right-click server icon in the system tray and select About. The dialog box will contain basic information about the product version and license type
 run the TRENDnetView EVO Registration and Activation wizard from the Start menu Select Remove License if you wish to completely delete all the license information from the server.
TRENDnetView EVO |
8 |
5 Installation of TRENDnetView EVO
Start the installation process by double-clicking on the TRENDnetView EVO executable package file. The TRENDnetView EVO Setup Wizard will guide you through the installation process, providing available installationtime options depending on the chosen software package. Note that, depending on your Windows UAC configuration, you may have to confirm and/or provide administrative credentials.
We strongly advise that you stop all running third-party applications, as well as stopping antivirus scanning and Windows (and any other) updates during this phase, as these may interfere with the process and result in corrupt installation, which may cause unexpected behaviour and hard-to-track issues during further software operation.
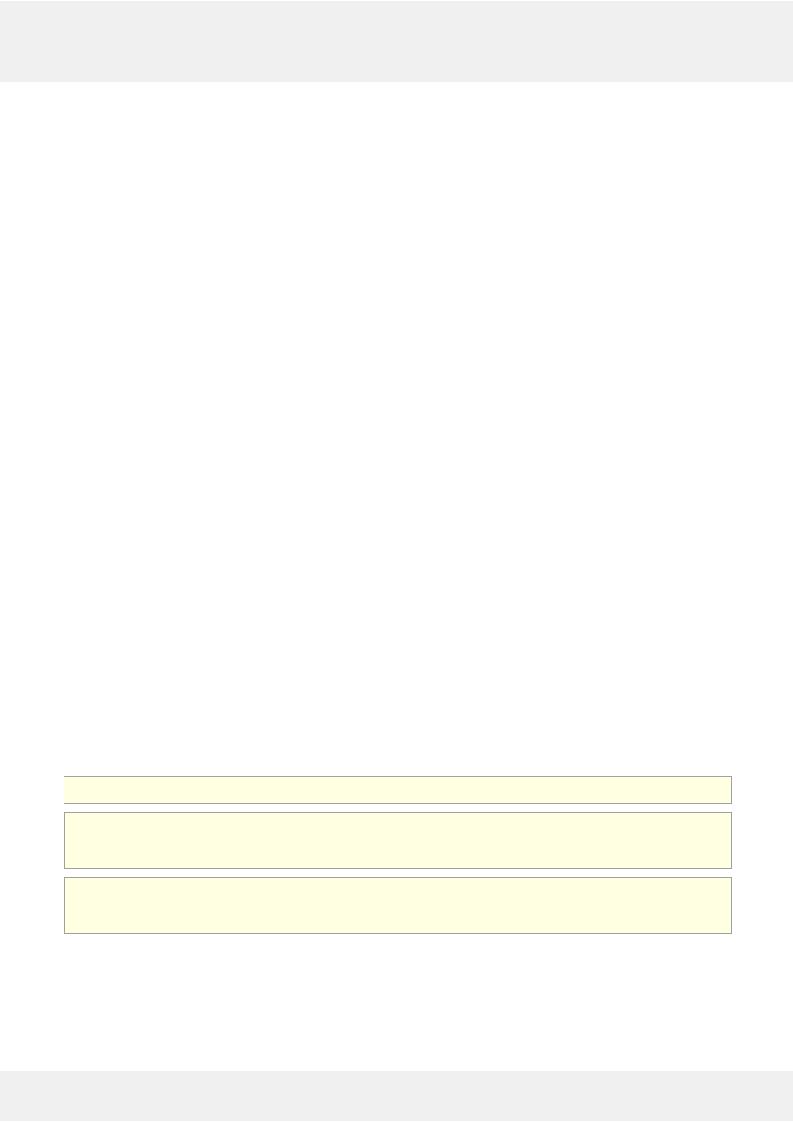
The TRENDnetView EVO Setup Wizard displays an overview of the process; also, you are able to select the installation language here. You will be prompted to select the TRENDnetView EVO interface language later.
TRENDnetView EVO Setup Wizard
Step 1
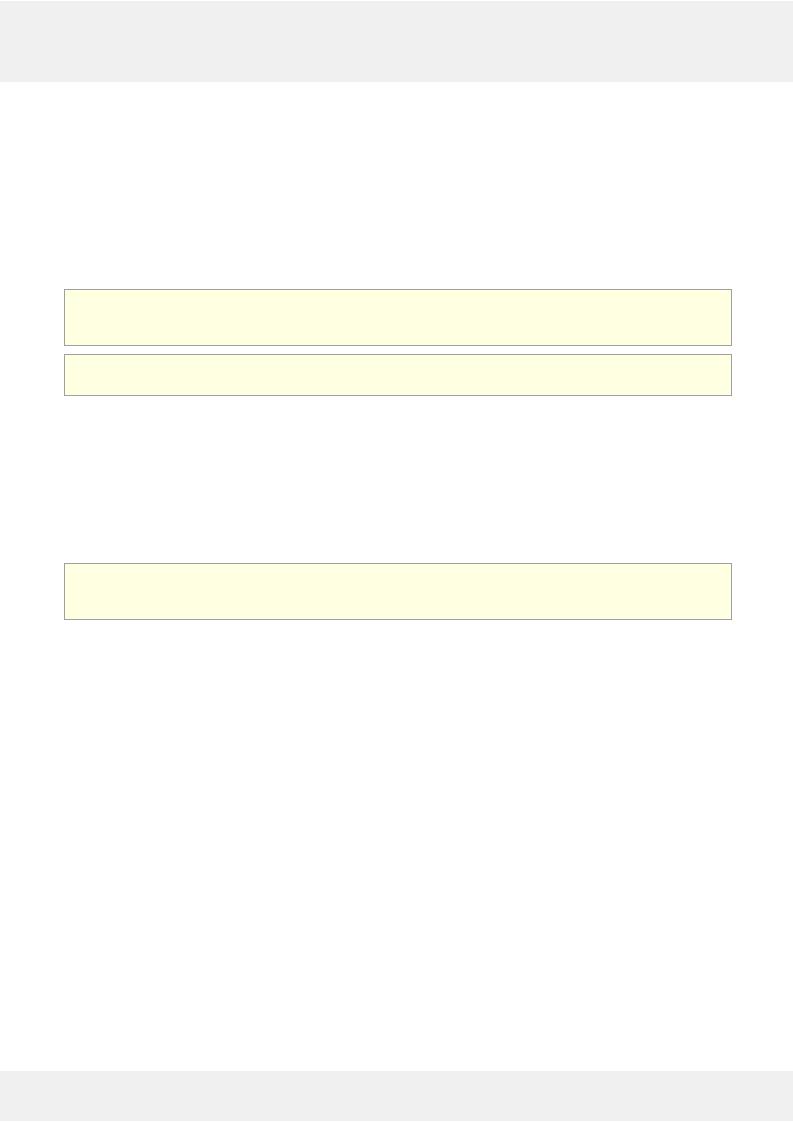
Carefully read the TRENDnet license agreement: you must agree to all parts of the given document in order to proceed. If you agree, select I agree... in order to continue; otherwise, terminate software installation. If you have any questions regarding the contents of the present license agreement, please contact a TRENDnet representative at http://www.trendnet.com/support
License Agreement

TRENDnetView EVO |
9 |
Step 2
Select the destination folder you want the software to be installed in. By default, TRENDnetView EVO is installed in: 32-bit: C:\Program Files (x86)\TRENDnetView EVO\TRENDnetView EVO
64-bit: C:\Program Files\TRENDnetView EVO\TRENDnetView EVO
If you are re-installing TRENDnetView EVO and previously selected a non-default location, make sure to select the same destination directory, or, alternatively, completely uninstall previous TRENDnetView EVO version. If unsure about this, ask for TRENDnet technical support team assistance. A full description of the software upgrade procedure is available in the corresponding section of the TRENDnetView EVO administration manual.
The TRENDnetView EVO Setup Wizard estimates how much disk space will be required. Make sure you have enough free space on the target disk. Note that low system disk space will dramatically decrease system performance and affect overall system stability.
Installation Directory
Step 3
Some components are optional and so you can choose not to install them. The main TRENDnetView EVO parts are obligatory and cannot be deselected (by default, these options are selected and greyed out). You may also select the TRENDnetView EVO interface language here.
If not chosen at this stage, TRENDnetView EVO Monitor can be installed separately later.
TRENDnetView EVO |
10 |
Select Software Components
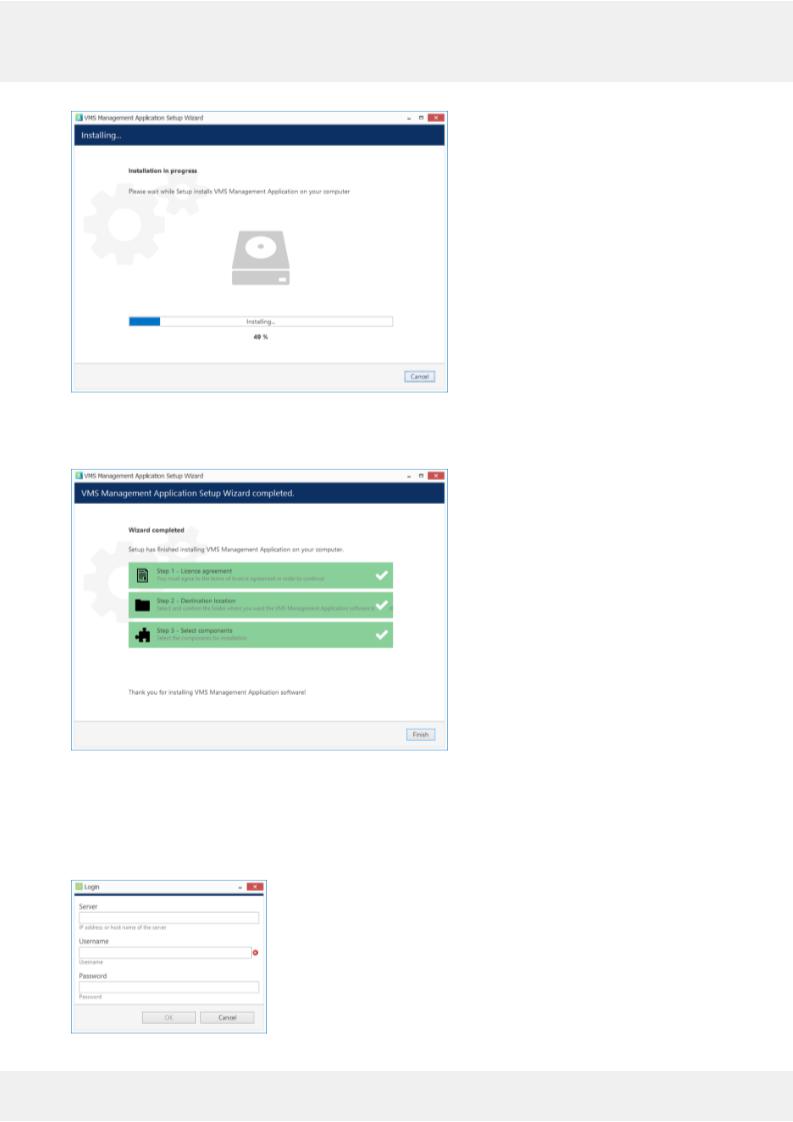
If you are ready to proceed, click Next to begin the installation. Depending on selected components and host system condition, the process may take some time to complete, so please be patient.
Installation Progress
Upon completion, the setup wizard will show you an installation summary. If all the steps have been fulfilled successfully, simply click Finish to close the wizard.
Installation Complete
After the installation has been completed, there are a few more steps necessary for you to begin using the software:
 apply server initialization settings via Server Setup Wizard - it will pop up automatically after the installation in case you are doing a clean or a new installation
 activate the software - if it is not activated, the Registration and Activation Wizard will also pop up automatically
 after you run the console for the first time, you will be offered to complete the Quick Setup Wizard to start the deployment, following the recommended configuration steps
All of these steps are described in details in the full version of the TRENDnetView EVO management manual, which is available right after the installation via your Start menu.

TRENDnetView EVO |
11 |
6 Initialization of TRENDnetView EVO Server
After completing the installation wizard, you will be offered to enter server setup. The settings selected during server setup can be changed later at any time via Server Setup Wizard, which will be available via your Start menu.
Choose Server Name and TCP port |
|
|
Setting |
Description |
Default |
|
|
Value |
Server name |
User defined server title |
Server |
|
|
Name |
|
|
or last |
|
|
used |
|
|
title |
Server port |
TCP port for incoming remote Client connections |
60554 |
Note that the port defined here will be used to retrieve the server data via local TRENDnetView EVO Monitor and TRENDnetView EVO Console connections. You will need to define the external (Internet) port for your TRENDnetView EVO via TRENDnetView EVO Console in order to be able to receive video streams from remote TRENDnetView EVO Monitor connections.
Setup Completed

TRENDnetView EVO |
12 |
7 Server Setup Wizard
The server setup wizard is available as a separate tool for any type of product installation, and is reachable via Start menu: Start -> All Apps -> TRENDnet -> Server Setup Wizard (in Windows 7 and older versions, use Start -> All Programs -> software installation folder -> Tools -> Server Setup Wizard); alternatively, use Search to locate Server Setup Wizard in the programs menu. This wizard allows you to quickly change basic server settings initially defined at Initialization stage.
Make sure you stop the TRENDnetView EVO server process before launching the wizard: this can be done either via Windows Services or using the TRENDnetView EVO service tray icon.
TRENDnetView EVO |
13 |
8 Start & Stop Server Service
After software installation (except for the TRENDnetView EVO Console or TRENDnetView EVO Monitor only installations), two components are registered as Windows services: VMSServer (TRENDnetView EVO Server) and the accompanying VMSWatchdog (TRENDnetView EVO Server Watchdog) service. Both these services are set to automatic start meaning that they will be launched straight after Windows start-up regardless of whether any user is logged in or not.
By default, the server will run in silent service mode, i.e., without any status indication other than that in the Windows Services management console; from there, both services can be stopped, started and restarted.
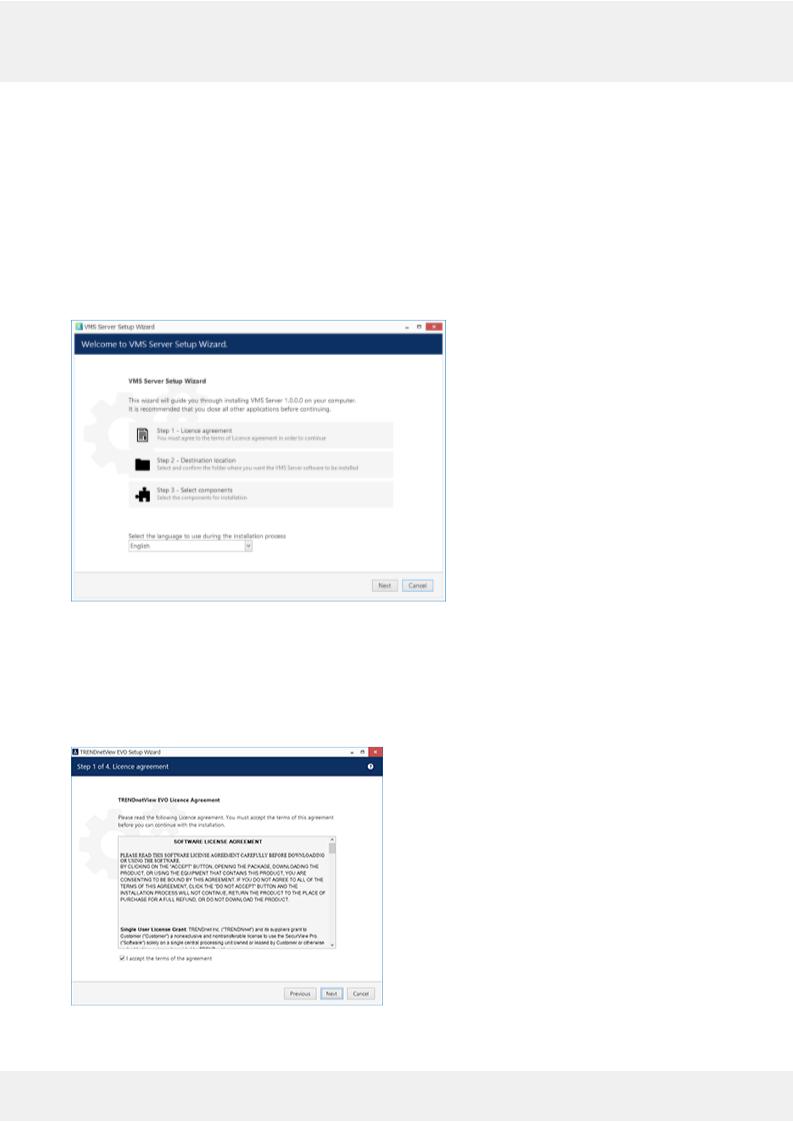
Double-click the server shortcut on your desktop to launch the system tray shell for the server: the server icon will appear in the system tray, allowing you to start and stop the service by right-clicking it and selecting your desired option. TRENDnetView EVO Watchdog service runs silently in background as an auxiliary service and has no user interface except for the settings' dialog box in TRENDnetView EVO Console.
Start and stop the server service from the system tray
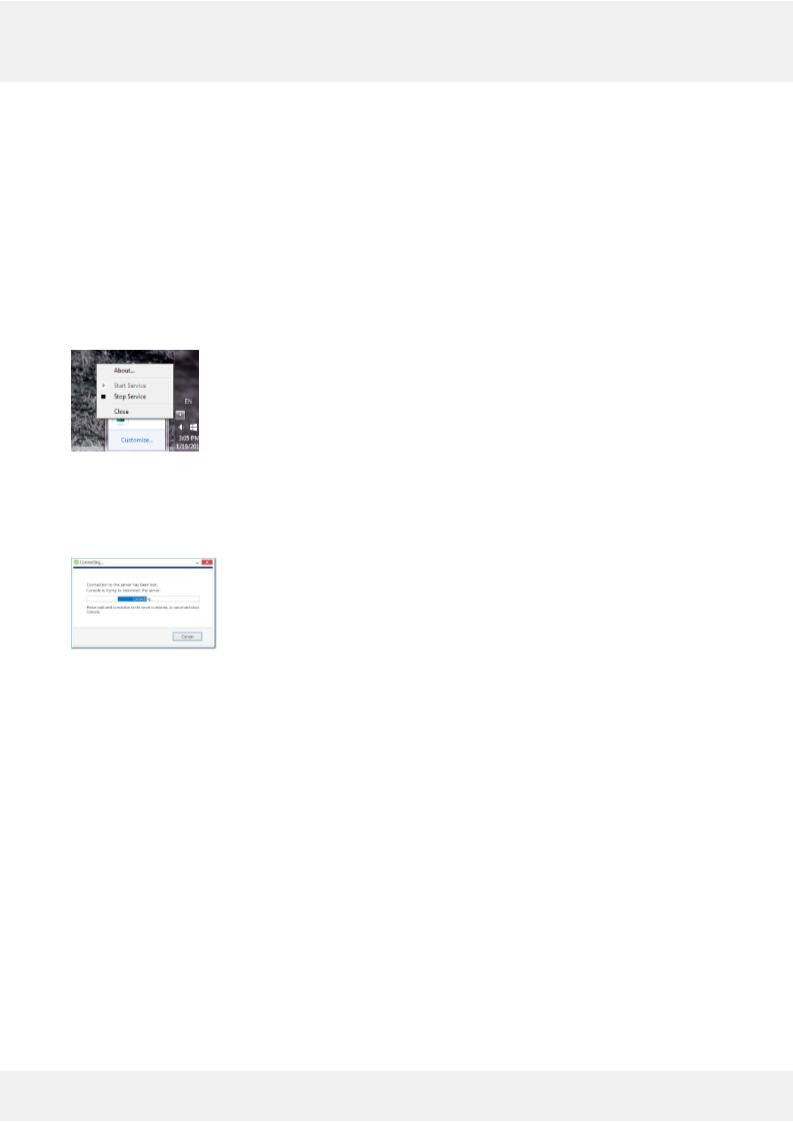
If the server service is stopped while TRENDnetView EVO Console connections are active, the wait-for-server- connection window will appear on top of TRENDnetView EVO Console, disabling any input. The same thing will happen if there are any problems with server connectivity. It will automatically disappear when the server is online again; alternatively, you can click Close to exit TRENDnetView EVO Console at this point and open it manually later.
Connection lost

TRENDnetView EVO |
14 |
9 Management Application Installation
All server configuration is conducted through a dedicated interface - the TRENDnetView EVO Console management application. The management interface has been intentionally separated from the TRENDnetView EVO Monitor application in order to concentrate all administrative utilities in one place and also to conceal the unnecessary menus from the TRENDnetView EVO Monitor operator.
The TRENDnetView EVO Console central server management application can be installed separately - either locally on one of the servers, or remotely, on a dedicated server management machine.
Start the installation by double-clicking on the TRENDnetView EVO Console executable package file. The TRENDnetView EVO Console Setup Wizard will guide you through the installation process, providing available installation-time options depending on the chosen software package.
The TRENDnetView EVO Console Setup Wizard shows you the process overview; also, you also have the opportunity to select the installation language here. You will be prompted to select TRENDnetView EVO interface language later.
TRENDnetView EVO Console Setup Wizard
Carefully read the TRENDnet, Inc. license agreement: you must agree to all parts of the given document in order to proceed. Select I agree... in order to continue, if you do; otherwise, terminate software installation. If you have questions regarding the contents of this license agreement, you can contact a TRENDnet Representative at http://www.trendnet.com/support

TRENDnetView EVO |
15 |
License agreement
Select destination folder for TRENDnetView EVO Console to be installed in.
Installation directory
The setup wizards will estimate the amount of disk space required for the installation. Make sure you have enough free space on the target disk. Note that low system disk space will dramatically decrease system performance and affect overall system stability.
Along with TRENDnetView EVO Console, this installation package also allows you to have TRENDnetView EVO Monitor application installed at the same time. If you do not wish to install TRENDnetView EVO Monitor at the moment, simply uncheck it in the components list.
Select software components
If you are ready to proceed, hit Next to begin the installation. Depending on selected components and host system condition, the process may take some time to complete, so please be patient.
TRENDnetView EVO |
16 |
Installation progress
Upon completion,the setup wizard will show you an installation summary. If all the steps have been fulfilled successfully, simply hit Finish to close the wizard.
Installation complete
After completing the TRENDnetView EVO Console installation, you will be given the option to enter the settings of server you wish to connect to. You can skip this step if you wish to configure your Global server later; you will be asked for the same information next time you run TRENDnetView EVO Console.
To log in, simply enter your server's local or remote address (IP or host name) and user information. Note that users must have corresponding permissions in order to connect. Default username and password are admin/[empty].

TRENDnetView EVO |
17 |
TRENDnetView EVO Console login window
After logging in for the first time with the default username and password, you will be reminded to change your password. For security reasons, we strongly recommend that you do so.
Password change reminder

TRENDnetView EVO |
18 |
10 TRENDnetView EVO Console First Start
All server configuration is conducted through a dedicated interface - the TRENDnetView EVO Console management application. The management interface has been intentionally separated from the TRENDnetView EVO Monitor application in order to concentrate all administrative utilities in once place and also to conceal the unnecessary menus from the TRENDnetView EVO Monitor operator. Applications are totally independent from each other and can be or not be installed on the same machine. TRENDnetView EVO Console for a single installation management can be installed on one or more computers, depending on the system administrator's needs.
Run the TRENDnetView EVO Console application by double-clicking the TRENDnetView EVO Console shortcut from the desktop or Start menu.
To log in, simply enter your TRENDnetView EVO server's local or remote address (IP or host name), TCP port and user information. Note that, if you already have pre-configured user accounts, the user must have corresponding permissions in order to connect.
The default username and password for the new installation is admin/[empty].
 If your server has default TCP port configured (which is 60554), you do not need to specify it when connecting: simply type the IP or hostname of the server to connect to. However, if the server TCP port has been altered, you need to specify the port explicitly, making the connection address look as follows:
<address>:<port>, e.g., 192.168.1.77:60555 or localhost:60887
Server TCP port can be changed via TRENDnetView EVO Server Setup Wizard.
If you are refused by the connection, make sure that the server is running and accessible over the network. (For more detailed information about what to do, please refer to the Troubleshooting section of this document: it is constantly updated with most common cases).
TRENDnetView EVO Console login
After logging in for the first time with default username and password, you will be reminded to change your password. For security reasons, we strongly recommend that you do so at once.
Change Password reminder
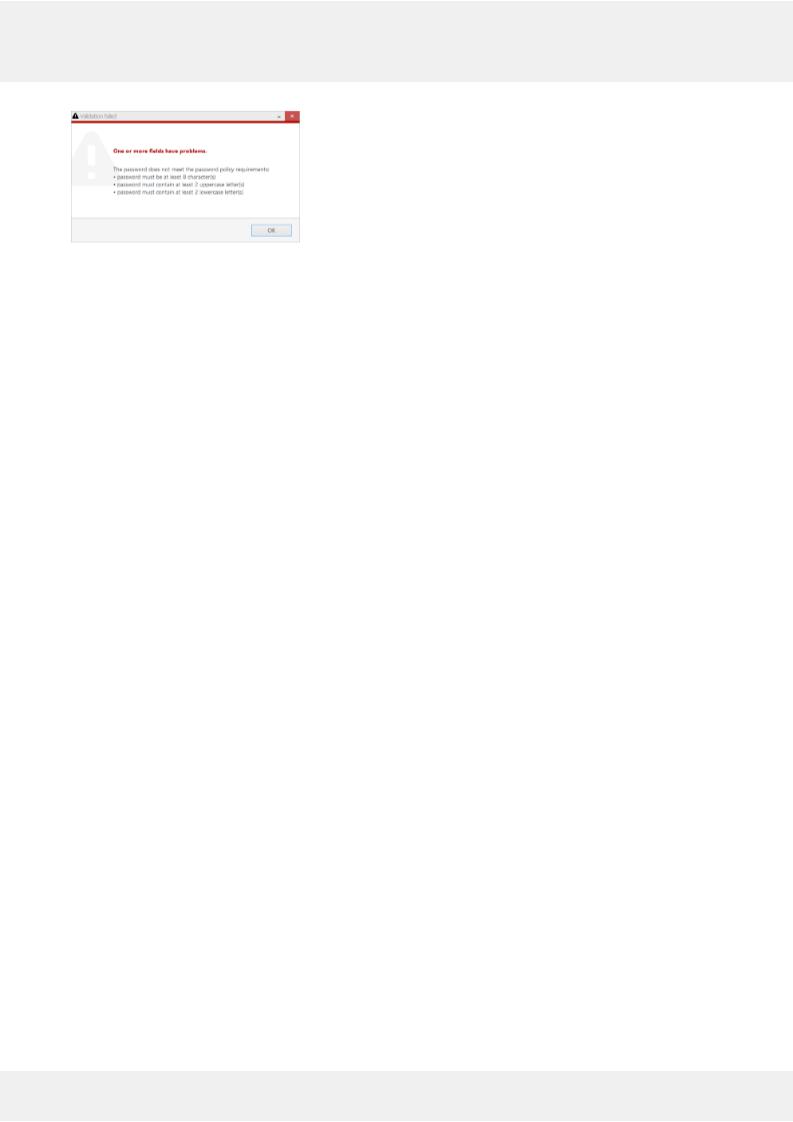
Immediately afterwards, you will be given the option to change the password using an additional dialog box. To change the password, enter your old password (initial, default password is empty so just leave the field empty), then enter your new administrative password for the current server, enter it for the second time to confirm, then click OK to save.
 The new password must comply with server policies, by default these are: minimum 8 characters total length, including at least 2 lowercase and 2 uppercase letters.
TRENDnetView EVO |
19 |
Password must meet the server policy requirements
After you are done with the password update, you will be given the opportunity to fill in the initial server settings using the Quick Setup Wizard. We recommend that for optimum configuration progression you follow the steps in the wizard.
TRENDnetView EVO |
20 |
11 Setup Wizard
The TRENDnetView EVO Console Setup Wizard is automatically started after product installation and activation is complete. You can skip the wizard at this point and launch it later anytime from the TRENDnetView EVO Console upper-right-hand corner menu:
Run Setup Wizard from TRENDnetView EVO Console
Setup Wizard will show you the process summary and guide you through the steps to configure the installation. To proceed with each next step, simply click the button below the step list; to exit the wizard prematurely, press either Exit or Launch TRENDnetView EVO Monitor button in the bottom-left-hand corner.
Setup wizard for TRENDnetView EVO consists of just one step that covers devices and channels. Make sure you connect all devices (IP cameras and/or other video sources) before launching the wizard: it will automatically scan the network for available video sources.
Step 1: Devices and Channels
This step will allow you to automatically search and add cameras and other video source devices into your server configuration. Press the Launch Step 1 button to begin.
Setup Wizard
First, select scan mode; the following options are available:
 scan IP address range: specify a continuous LAN segment to be scanned
 scan network adapter address range: select one or more network interfaces to be fully scanned
Use the Reset button below to discard all changes and start entering scan parameters again. When you are ready, press OK button below to begin scanning.
After scanning has been completed, you will be taken to the Device Autodiscovery dialog box, which will allow you to review the found devices and their channels, and enter/modify related settings. Use the Search field in the upper- right-hand corner to find a specific device by model, IP, port or hardware ID (for IP devices, ID includes MAC address).
Make sure you select all the devices you wish to add by putting a checkmark next to them. Devices with missing configuration (model and/or IP) are unchecked by default and will not be added to active server configuration.
Switch to Channels tab to review the detected video channels of the discovered devices: this is particularly important if you are using multichannel devices, e.g., capture boards and encoders. Use the Search field in the upper-right- hand corner to find specific channels by name or device name.
Here you can edit the channel name and assign recording configuration. By default, recording is enabled for all

TRENDnetView EVO |
21 |
channels: click the Change button near Recording settings to manage recording profiles and assign them to your channels. To add a new recording profile, click the + New recording configuration button below; you can find more details about recording profiles in the corresponding section. Click OK to save and return back to devices and channels; click Apply to save configuration changes.
When you have finished with configuration, click Add selected devices and channels to go back to the wizard.
Wizard completed successfully
You can now either restart the wizard to cover the rest of your devices, or close it. Press the Launch TRENDnetView EVO Monitor button to switch to the monitoring mode at once. You will be able to run this Setup Wizard again at any time via your TRENDnetView EVO Console application menu in the upper right corner.

TRENDnetView EVO |
22 |
12 Interface Overview: Management Application
TRENDnetView EVO Console is a straightforward graphics user interface tool with access to all possible server settings. To ensure comfortable and easy navigation, it is important that you become acquainted with its structure before starting to use it.
Note that TRENDnetView EVO Console appearance depends on your software package and license limitations. Sections unavailable due to license restrictions will be greyed out but still listed to get you acquainted with all available features, and smaller functions will be simply hidden.
TRENDnetView EVO Console management application interface
Navigation Panel
TRENDnetView EVO Console Navigation Panel
The blue panel on top serves as navigation bar and its usage is similar to that of Windows Explorer. Here are its main components (from left to right):
 Left and Right arrows enable navigation through your browsing history and allow you to switch between previous and next locations; you can also use Backspace on your keyboard to go back
 Your current directory is displayed right next to these arrows
 If you are in the Organizations view, an Exit button will appear
 Currently logged in User account button with options to view user profile or to log out
 Refresh button - reloads current item list
 Search field - only items matching the search criteria will be displayed in the list
Application Menu
Application Menu, position: top right
Application menu button in the upper-right-hand corner gives you the following options:
 launch the Setup Wizard
 import the configuration from an XML file
 import the configuration from another TRENDnetView EVO server database
 change TRENDnetView EVO Console settings
 set up automatic configuration backup
  remotely upgrade system components

TRENDnetView EVO |
23 |
 open the About section
Sections
Sections panel, position: bottom left
The bottom left panel allows you to switch between the four main TRENDnetView EVO Console sections: Configuration, Events & Actions, Monitoring and Audit. The contents of the components panel on the left will change depending on the selected section. If the TRENDnetView EVO Console windows is resized, the sections will be reduced to icons.
Components
The panel on the left will display the list of all available configuration components based on the selected section. As a result of license limitations, some of the items may be greyed out or unavailable. The list below shows maximum available items by category:
 Configuration
 Organizations, Networks, Servers, External Services, Failover clusters, Users, Devices, Channels, Recording, Maps, Layout templates, Layouts, Video Walls, User Buttons, Visual groups, Live Podcasts, Data Sources
 Events & Actions
 Rules, Events, Actions, Global Events, Conditions, Schedules, Mail servers
 Monitoring
 Servers, Devices, Channels, Streams, Archive Statistics, Storages, User Sessions, Video Walls, External Services
 Audit
Audit
 Servers, Users
Components panel, position: left
Item List
TRENDnetView EVO |
24 |
Item list, position: centre
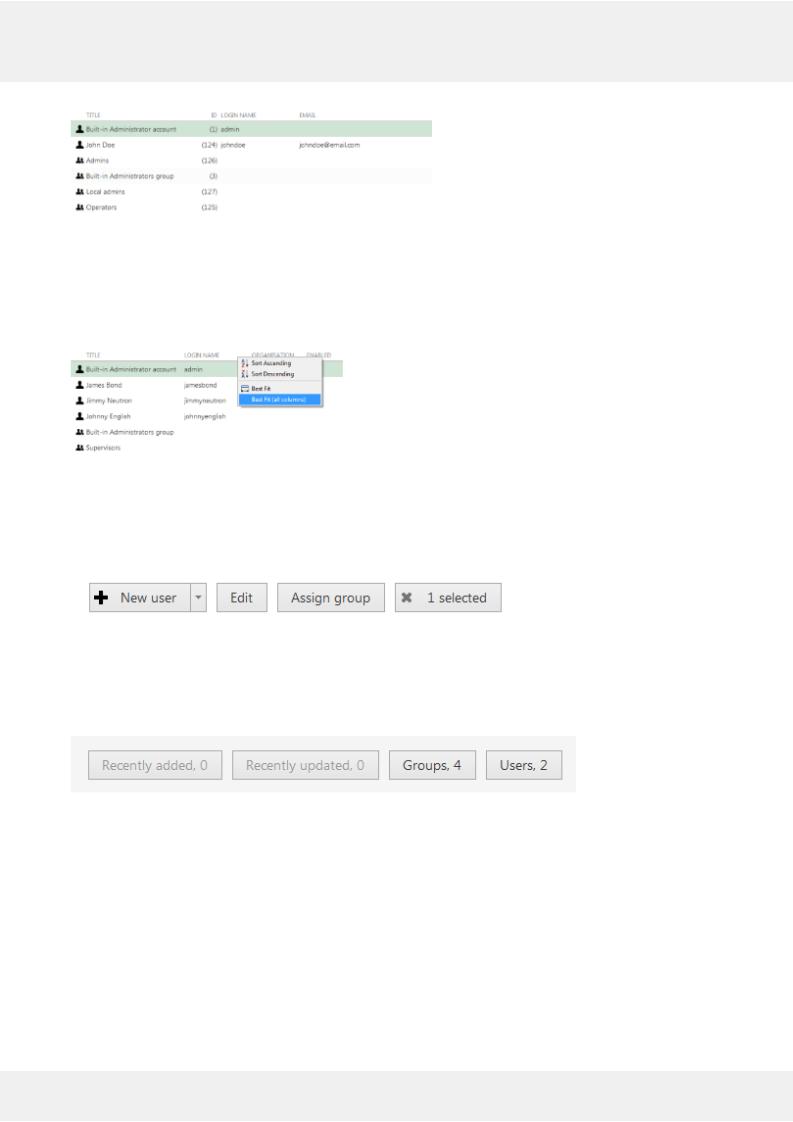
The main part of the TRENDnetView EVO Console window displays items in the selected category depending on the search and/or item filters. You can select one or more items at once using the Shift or CTRL button.
Click any column title to use is as a sorting basis for the whole item list; the little arrow near the column title indicates
that it is currently being used for arrangement - either  ascending or
  descending. Right-click item list header for sorting options and column fit settings.
Right-click header for additional options
If you choose to remove a column from presentation of the item list, the settings will remain in effect until the TRENDnetView EVO Console restart.
Item Actions
Item actions panel, position: top right, under Navigation panel
The panel above the item list displays the available actions, if applicable. Usually, the buttons here will allow you to create a new item, edit or delete existing ones, create or edit contiguous items, etc.
Item Filters
Item filters panel, position: bottom right
The bottom panel contains miscellaneous item filters, such as: recently added and updated, corresponding groups etc. Click any of the filters to apply them; use the X button to reset and display the full item list.
Application Settings
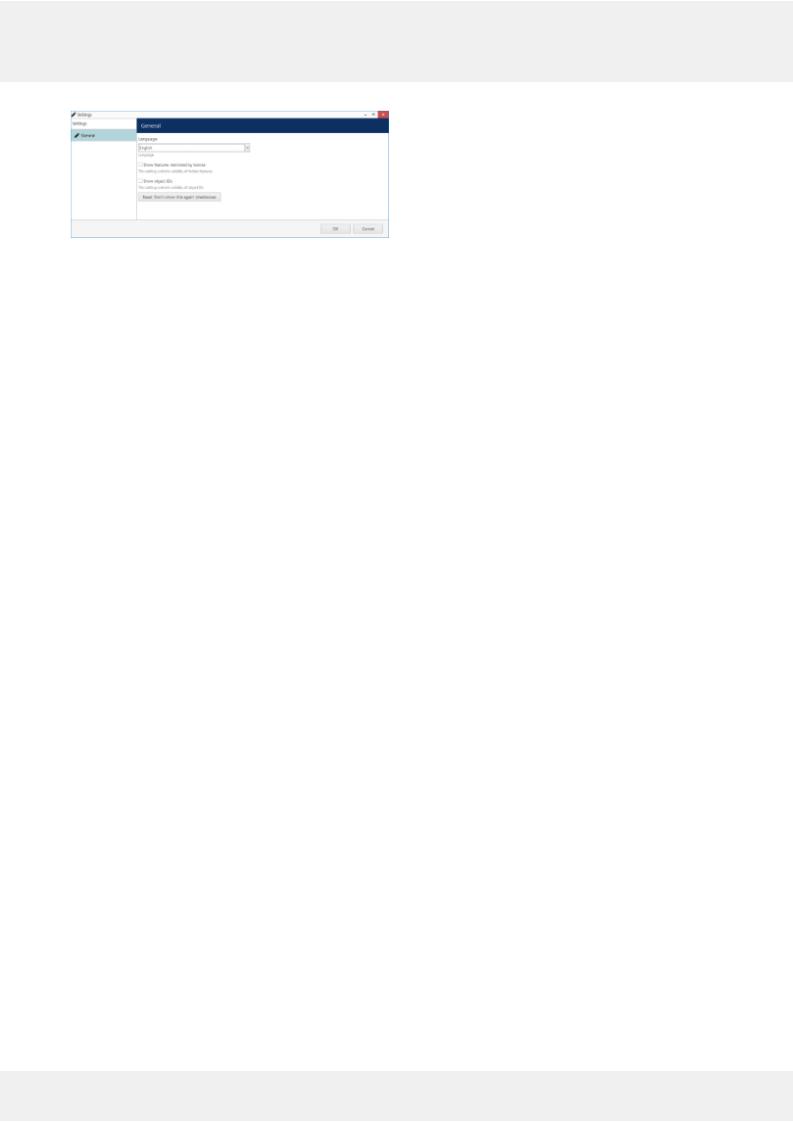
To change TRENDnetView EVO Console settings, go to the main application menu in the upper-right-hand corner and choose Settings.
TRENDnetView EVO |
25 |
TRENDnetView EVO Console application settings
Here, it is possible to:
 change application language (by default, the language chosen during installation is used)
 show or hide software features restricted by license
 show or hide object identifiers
 reset all Don't show this again checkboxes, which have been set so far

TRENDnetView EVO |
26 |
13 Conventions and Keyboard Shortcuts
Mouse Gestures
Double-click an item containing more entities (e.g., any group): opens item contents in the same window Double-click a non-expandable item (e.g., server, user): opens entity configuration dialog box CTRL+click: select multiple items in a list
Shift+click: select every item between previously selected item and item clicked Right-click on a text field: standard text edit menu
Right-click on a text field when creating an action: standard text edit plus text macros
Keyboard Shortcuts
Backspace: navigate to previous page in TRENDnetView EVO Console
CTRL+A: select all items
Visual Elements
General
 New item (click
  drop-down arrow to see available options)
 Remove item(s)
 Deselect item(s)
 Unacceptable filed value, hover mouse cursor for more information
 More information about the item, click to view the details
 Refresh item list
 Search
TRENDnetView EVO Console sections
 Configuration
 Events & Actions
 Health monitoring
 Audit log
Management
 Network (server connection), connection settings
 Server
 Server group
 External service
 External service group
 Failover cluster

TRENDnetView EVO |
27 |
 Software Watchdog
 Storage
 Resources (all or any type)
 User account/session
 User group
 General details
 Members of the current item
 Current item membership in other groups
 User and user group permissions for target item
 Device
 Device group
 Channel
 Channel group
 Recording profile (core recording settings)
 Recording schedule (recording itinerary based on core recording settings)
 Recording configuration (recording interface assignable to channels)
 Motion detector
 Layout Template
 Layout
 Layout group
 Map
Map
 Video wall
 User button
 Visual group
 Shared channel
 Audit Journal (software log)
  Set (period etc.)
Events & Actions
 Rules
Rules
 Events
 Actions
 Global events

TRENDnetView EVO |
28 |
 Conditions
 Event & Action schedules
 Mail servers
  Action delay timers

TRENDnetView EVO |
29 |
14 Configuration Backup
Server configuration is a time-consuming process and it is wise to save a copy of your TRENDnetView EVO database after certain changes so that you have something to start the server with in case the main database becomes corrupt because of a hard disk failure or some other reason. TRENDnetView EVO provides several options for database backup and we strongly recommend that you create configuration restore points to save the trouble of re-configuring the server from scratch.
Automatic Backup
Automated configuration backup allows you to save your TRENDnetView EVO database based on a schedule. To access the settings via TRENDnetView EVO Console, click the application menu button in the upper-right-hand corner and choose Automated backup configuration.
Set automatic database backup preferences
Automated backup is enabled by default with the following settings: a restore point is created every two days at 2AM, with a maximum of 15 files to be kept. You can either leave the default settings, including the default location, or define your own backup time and frequency in the Settings tab.
Backup status
In the Status tab, you can see the date of the last backup attempt and the next scheduled backup time.
Backup and Restore Wizard
Additionally to the automated backup, it is possible to create a configuration restore point manually at any time. The TRENDnetView EVO Server Backup and Restore Wizard provides an opportunity to start the TRENDnetView EVO with an earlier database version.
Run the TRENDnetView EVO Server Backup and Restore Wizard from your Windows Start menu: Start -> All Apps -> TRENDnetView EVO -> TRENDnetView EVO Server Backup and Restore Wizard. In Windows 7 and older versions, use Start -> All Programs -> software installation folder -> Tools -> TRENDnet, Inc. Server Backup and Restore Wizard; alternatively, use Cortana/Search to locate the wizard in the programs menu.
Loading...