


TRENDnet User’s Guide |
|
Contents |
|
Product Overview ................................................................................ |
2 |
Package Contents .......................................................................................................... |
2 |
Features ......................................................................................................................... |
2 |
Product Hardware Features........................................................................................... |
3 |
Application Diagram ...................................................................................................... |
4 |
Installation........................................................................................... |
5 |
Hardware Installation................................................................................................ |
5 |
Camera Installation ................................................................................................... |
6 |
Starting Camera Finder........................................................................ |
9 |
Configuration..................................................................................... |
11 |
Viewing Camera Basic Function................................................................................... |
11 |
Configuring the Camera Setting................................................................................... |
12 |
Smart Wizard ............................................................................................................... |
13 |
Basic............................................................................................................................. |
14 |
Network ....................................................................................................................... |
16 |
Video & Audio.............................................................................................................. |
19 |
Event Server................................................................................................................. |
22 |
Motion Detect ............................................................................................................. |
25 |
Event Config................................................................................................................. |
26 |
Tools ............................................................................................................................ |
28 |
SD Card ........................................................................................................................ |
28 |
Device Info ................................................................................................................... |
30 |
How to setup/access the camera behind a Router .............................. |
31 |
Technical Specifications...................................................................... |
34 |
Table of Contents
Troubleshooting ................................................................................. |
36 |
© Copyright 2012 TRENDnet. All Rights Reserved.
i
TRENDnet User’s Guide
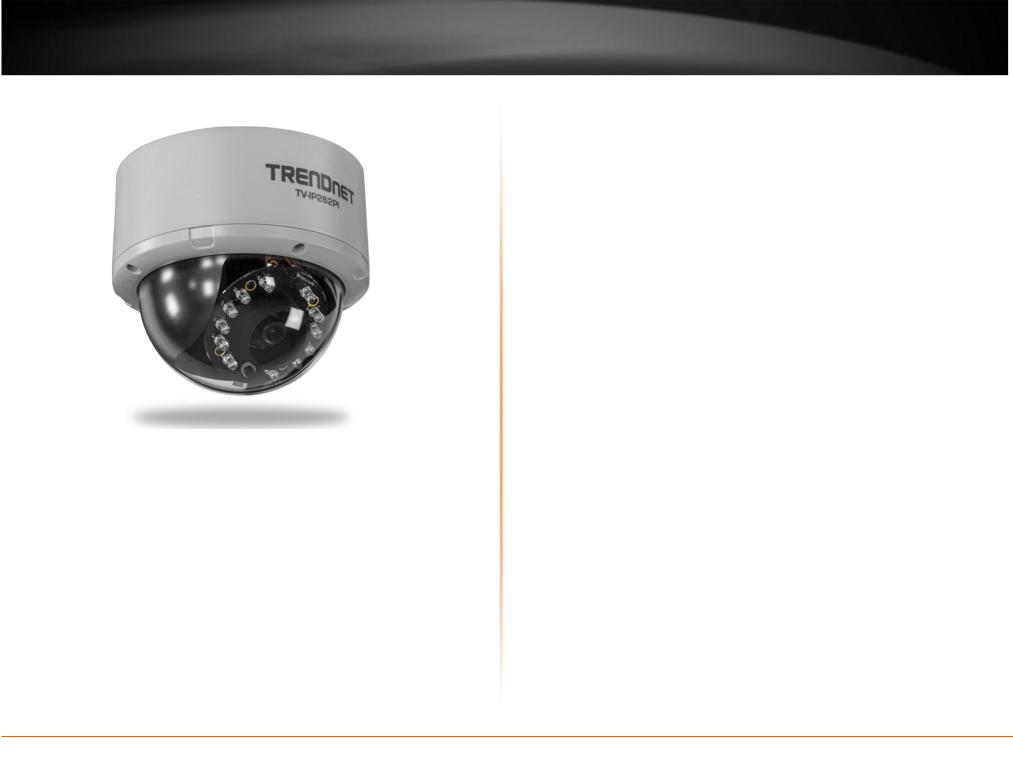
Product Overview
TV-IP262PI
Package Contents
TV-IP262PI
Multi-Language Quick Installation Guide
CD-ROM (Utility &User’s Guide)
Network cable (1.5m / 5ft)
Power adapter (12V DC, 1.5A)
Camera mounting kit
If any package contents are missing or damaged, please contact the retail store, online retailer, or reseller/distributor that the item was purchased.
TV-IP262PI
Features
The Megapixel PoE Dome Internet Camera with IR (model TV-IP262PI) is an indoor, enterprise class surveillance camera capable of transmitting H.264 video at up to 1280 x 1024 resolution. View and manage the tamper resistant dome IP camera from any computer with an internet connection.
Manually pan the camera side-to-side350 degrees and tilt it up-and-down 70 degrees to fix its final viewing position. No need to install this camera near a power source, power and data are received through a single Ethernet cable using Power over Ethernet (PoE) technology. View this camera on your mobile device with TRENDnet’s free mobile App*.
Manage up to 32 TRENDnet cameras with the included complimentary camera management software**. Define up to three motion detection windows with email alert, image snapshot, and continuous recording triggers. Scheduled recording sessions and define video storage location with Samba client support. Multiple video streaming support for H.264, MPEG-4, and MJPEG compression types. Other features include twoway audio support (mic and speaker sold separately), date/time text overlay, mask overlay to conceal sensitive areas, and image flip capabilities for upside down installations. Integrated cabling allows for easy wall/ceiling mounting and the off-white IP camera housing blends into most environments.
*TRENDnet’s Mobile APP supports iPhone®, iPad®, iPod® Touch and Android. Search for SecurView Mobile from iTunes® or Google Play™. For future updates, please check www.trendnet.com/App
for details.
** Monitoring multiple cameras may required a high performance CPU
© Copyright 2012 TRENDnet. All Rights Reserved.
2
TRENDnet User’s Guide
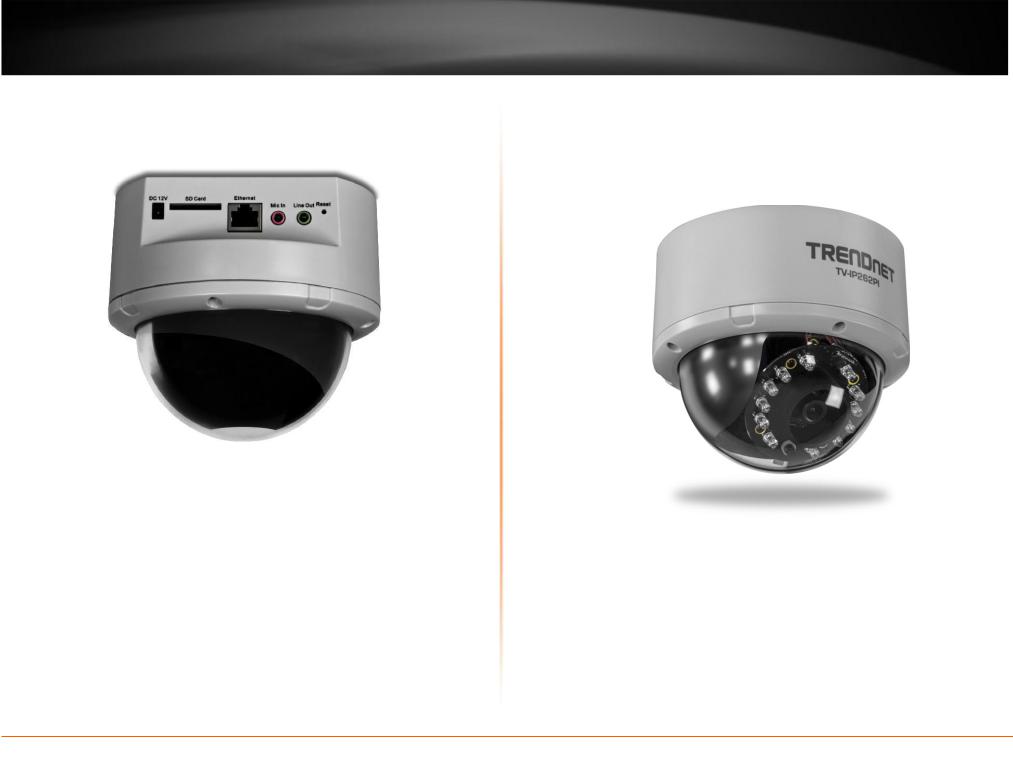
Product Hardware Features
Rear Panel View
Power Connector: Connect the provided power adapter to supply power to the camera for non-PoE installation.
SD Card Slot: Insert a memory card for expansion of storage.
Ethernet/PoE Connector: Connect the provided network cable (RJ-45 type) to Ethernet/PoE port for wire or PoE connection.
*The connector supports Power over Ethernet standard, enabling the camera to be powered by the Ethernet.
Mic In: Connect an external microphone .
Line Out: Connects an external active speaker.
TV-IP262PI
Reset: Press and hold the reset button for five seconds to reset the camera to factory default settings.
Front Panel View
© Copyright 2012 TRENDnet. All Rights Reserved.
3
TRENDnet User’s Guide |
TV-IP262PI |
Application Diagram
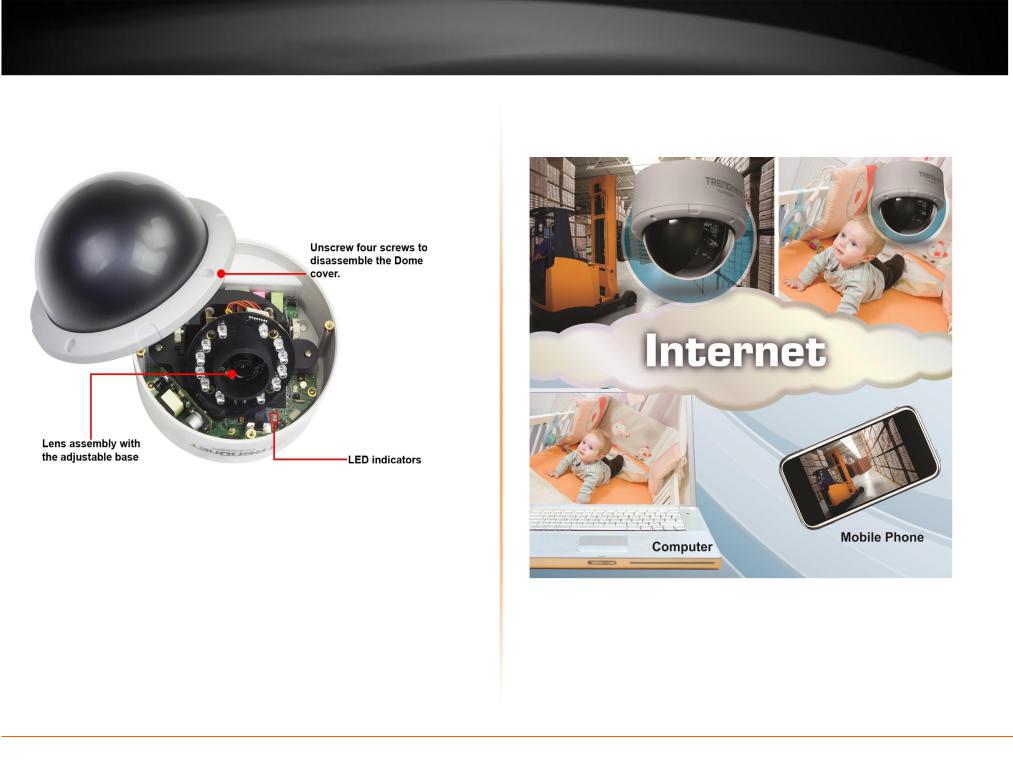
Inside Component
LED indicators
-Power: Indicate the camera is powered on with the steady amber light.
-Link: Indicate the camera’s network connectivity with the flashing green light.
© Copyright 2012 TRENDnet. All Rights Reserved.
4
TRENDnet User’s Guide
Installation
Hardware Installation
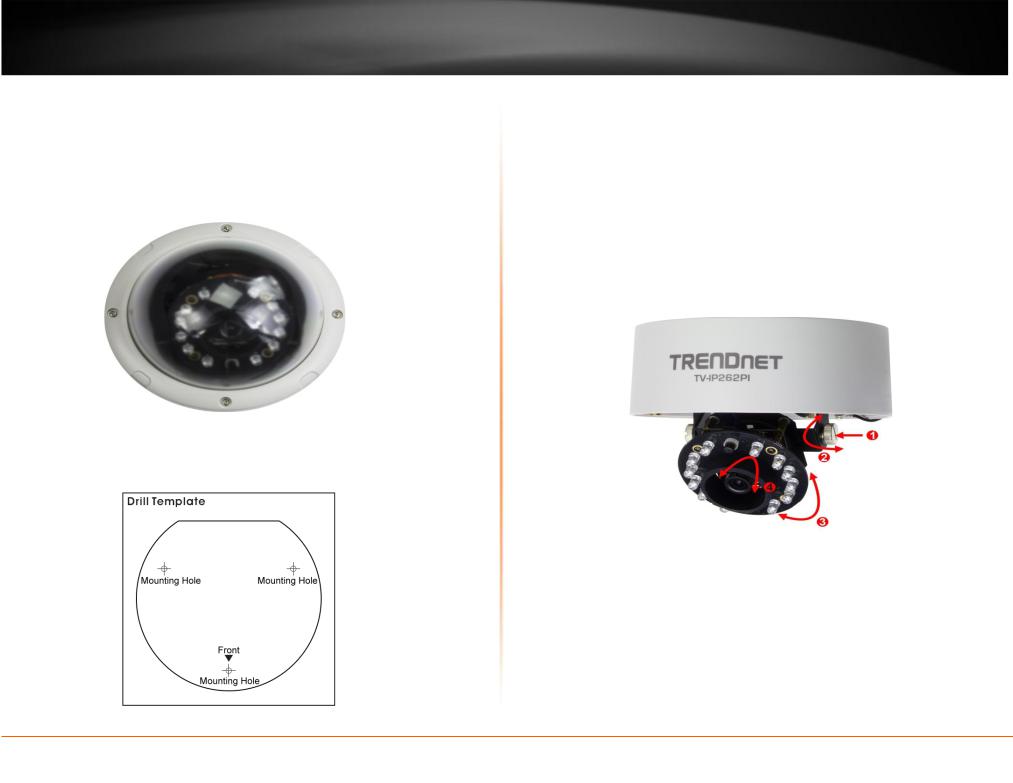
The camera can be mounted to the ceiling surface directly by following the steps below:
1.Remove the Dome cover by unscrewing the four screws.
2.Use the included drill template to drill three mounting holes on the desire location and hammer the plastic anchors into the holes.
TV-IP262PI
3.Secured the camera to the location with three screws.
4.Before put the Dome cover back, adjust the lens assembly by the following steps:
Tilt the camera lens to a proper position by losing the screws () and then swinging the adjustable base ().
Rotate the camera lens by turning the base pedestal () in either clockwise or counter clockwise direction.
Adjust the lens focus by turning the lens ring slowly () in either clockwise or counter clockwise direction.
NOTE: You can review the image quality from the Web browser when you complete the installation. If the image quality is poor, you have to disassemble the Dome cover to adjust the lens focus until the desired image appears clearly.
5.Put the Dome cover back and secure with four screws.
© Copyright 2012 TRENDnet. All Rights Reserved.
5

TRENDnet User’s Guide
Camera Installation
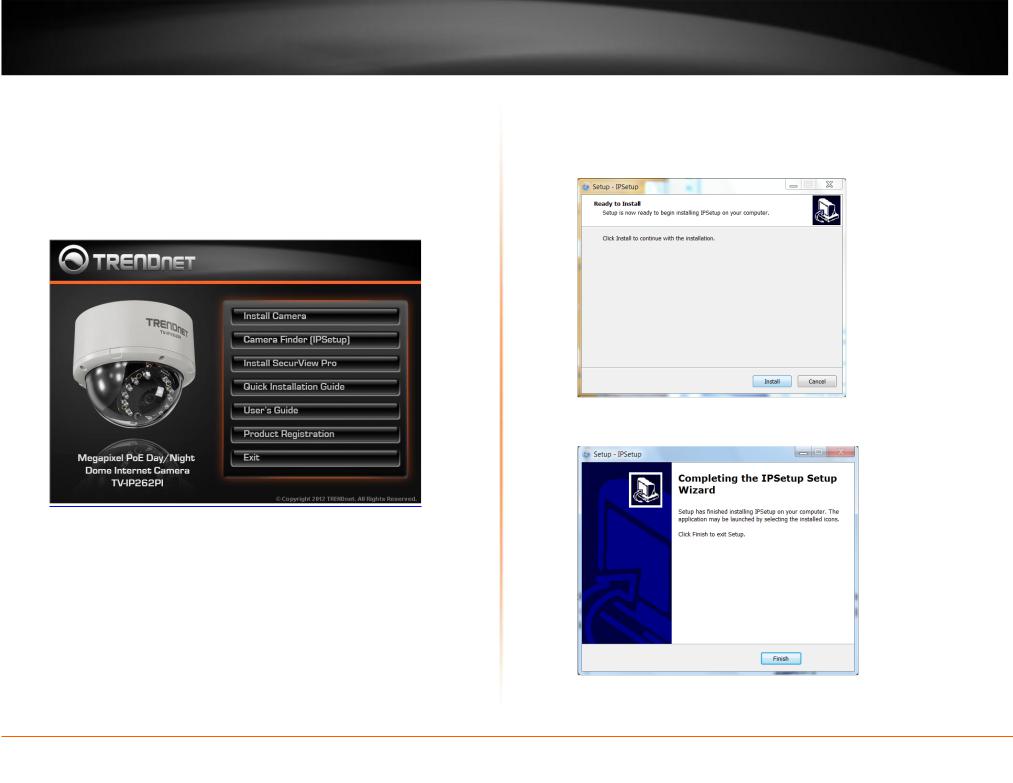
1.Insert the Installation CD-ROM into your computer’s CD-ROM drive to initiate the Auto-Run program.
2.lick the Install Camera.
TV-IP262PI
3.Write down the MAC ID of the camera
4.Connect one end of the power adapter into the Power Connector, then click on Next. Please click Next if you are using the PoE injector or switch.
© Copyright 2012 TRENDnet. All Rights Reserved.
6
TRENDnet User’s Guide
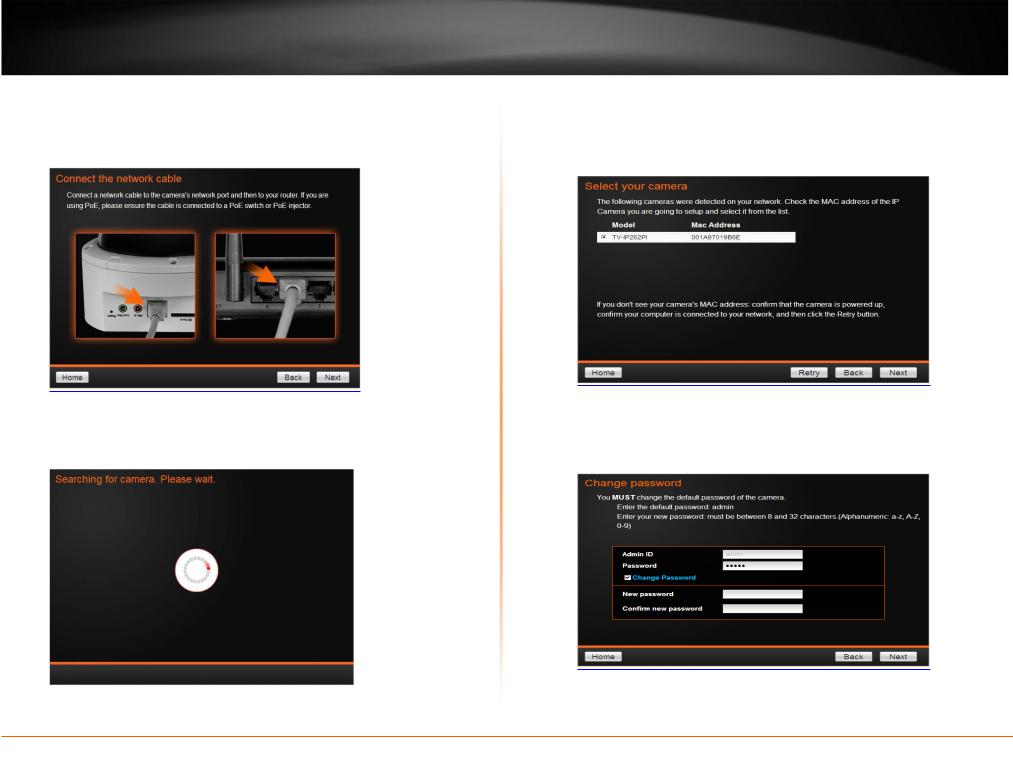
5.Connect a network cable to the camera’s network port and then to your router.
If you are using PoE, please ensure the cable is connected to a PoE switch or PoE injector.
6.Wait while camera is searching.
TV-IP262PI
7.The founded cameras will show on the screen. The camera already selected by default if you have only one camera installed. If you have more than one camera in the same Network, you will need to identify the camera by the MAC ID.
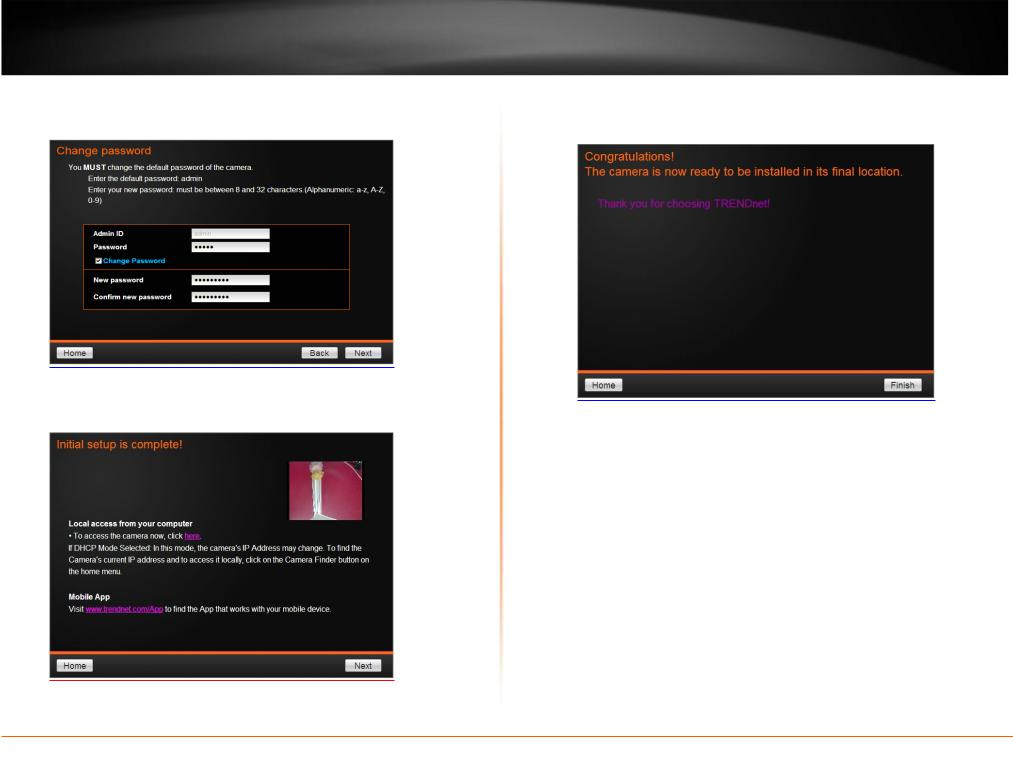
8.You MUST change the default password of the camera. Enter the default password: admin, Enter your new password: must be between 8 and 32 characters. (Alphanumeric: a-z, A-Z,0-9)
© Copyright 2012 TRENDnet. All Rights Reserved.
7
TRENDnet User’s Guide
9.Type in the new and confirm the new password by entering the password twice.
10. Click TV-IP262P to access to the camera web page.
TV-IP262PI
11.You can also click Finish to exit the program or click Home return to the main screen.
© Copyright 2012 TRENDnet. All Rights Reserved.
8
TRENDnet User’s Guide
Starting Camera Finder
The camera comes with a conveniently utility, IPSetup, which is included in the Installation CD-ROM, allowing you to search the camera on your network easily.
1.Insert the Installation CD-ROM into your computer’s CD-ROM drive to initiate the Auto-Run program.
TV-IP262PI
2.Click the Camera Finder (IPSetup) from the Auto-Run menu screen. Then the IPSetup Wizard will appear. Click Install to install the utility.
3.When the Completing the IPSetup Setup Wizard appears, click Finish.
© Copyright 2012 TRENDnet. All Rights Reserved.
9
TRENDnet User’s Guide
4.After installing the IPSetup utility, the application is automatically installed to your computer, and creates a folder in Start\Program\TRENDnet\IPSetup.
5.Click Start>Programs>TRENDnet>IPSetup, and then click IPSetup.
6.The IPSetup window will appear. It will search for the camera within the same network.
Camera Display Area
TV-IP262PI
-Access Camera: Open Web browser to view camera .
-Camera Display Area: By default, the IP setting on the Camera is set to DHCP. If you have DHCP server, the camera will automatic get the IP address from DHCP server. If you do not have DHCP server on your network, it will show the default IP as 192.168.10.30. Double click the IP address; it will link to Camera’s Web Configuration page.
Change IP: Click this button to bring up the following window. It allows you to change the IP Address. You can select either Static IP or click DHCP. Then, enter the Administrator ID & Password. By default the ID/Password is: admin. When complete, click Change.
Search: Click this button to search the connected camera in the same network
Exit: Click this button to exit the program.
© Copyright 2012 TRENDnet. All Rights Reserved.
10

TRENDnet User’s Guide
Configuration
Viewing Camera Basic Function
Open the Web browser on your computer (example showed in the User’s Guide is based on the Internet Explorer). Type the default IP address (192.168.10.30) or the IP address found by IPSetup in the Address bar, and then press [Enter].
When the login window appears, enter the default User name (admin) and Password (admin) and press OK to access to the main screen of the camera’s Web Configuration.
NOTE: If you are initially access to the camera, you will be ask to install a new plug-in for the camera. Permission request depends on the Internet security settings of your computer. Click Yes to proceed.
TV-IP262PI
After you login into the Web Configuration of the camera, the main page will appear as below:
The Main screen of the Web Configuration provides you with many useful information and functions, including:
© Copyright 2012 TRENDnet. All Rights Reserved.
11

TRENDnet User’s Guide
Live View/Setup Switch:
Click the  button to configure the camera.
Click the  button to return to the Main screen to view the live view image.
Compression Buttons: Select to transmit and record the video using H.264, MPEG4, or MJPEG compression.
Manual Record allows you manually record and save a video clip*.
Snapshot allows you to capture and save a still image*.
Browse allows you to assign the destination folder to store the video clips and still images*.
Talk allows you to speak out through the camera. Please note only one user is allowed to use this function at a time.
Listen allows you to receive the on-site sound and voice from the camera.
Multicast allows you to change the camera’s transmission type on multicast
Live View: The Live View Image window displays the real-time image of the connected camera.
The current compression mode of image is displayed above the Live View Image window.
Click the Zoom In buttons ( for SXGA ) or (
 for VGA/QVGA/QQVGA/720p) above the Live View Image window to zoom in the live view image by 1x, 2x, 3x, 1/2, 1/4, or full screen
Camera Information: Displays the camera’s location and the current date & time. The information can be modified in the Web Configuration.
TV-IP262PI
*If you are using Microsoft 7/Vista platform, you may not be able to find the recorded files by Snapshot or Manual Record. You will need to disable the protected mode of Security in the IE browser before recording a video file or taking a snapshot.
Please follow the below steps:
1.Open IE Browser
2.Select ToolsInternet Options
3.Select Security
4.Uncheck the ”Enable Protected Mode” then press OK
Configuring the Camera Setting
To configure the camera, click  on the Main screen of Web Configuration. The Web Configuration will start from the Basic page.
© Copyright 2012 TRENDnet. All Rights Reserved.
12
 Loading...