


TRENDnet User’s Guide |
|
Contents |
|
Product Overview ............................................................................ |
4 |
Features................................................................................................................... |
4 |
Hardware................................................................................................................. |
4 |
Package Contents .................................................................................................... |
5 |
Hardware................................................................................................................. |
6 |
Warnings.................................................................................................................. |
7 |
Cautions................................................................................................................... |
7 |
Plan for Installation ......................................................................... |
8 |
Viewing angle .......................................................................................................... |
8 |
Weather Conditions................................................................................................. |
8 |
Hardware Installation ...................................................................... |
9 |
Memory Card Installation........................................................................................ |
9 |
Mounting .............................................................................................................. |
10 |
Zoom and Focus.................................................................................................... |
11 |
Setup Your Camera with CD............................................................ |
12 |
Access your Camera with the Web Browser.................................... |
14 |
System Management and Default Settings .......................................................... |
14 |
Logging in to the Camera for the First Time (Windows) ...................................... |
14 |
Logging in to the Camera for the First Time (OS X) .............................................. |
17 |
Live View............................................................................................................... |
22 |
Playback................................................................................................................ |
23 |
Log ........................................................................................................................ |
26 |
System Information .............................................................................................. |
27 |
|
TV-IP340PI |
System Configuration..................................................................... |
28 |
Device Settings ..................................................................................................... |
28 |
User Accounts....................................................................................................... |
29 |
Time Settings ........................................................................................................ |
29 |
Daylight Savings.................................................................................................... |
30 |
Live View Settings................................................................................................. |
31 |
Maintenance......................................................................................................... |
32 |
Network Settings ........................................................................... |
33 |
TCP/IP ................................................................................................................... |
33 |
Port ....................................................................................................................... |
34 |
DDNS..................................................................................................................... |
34 |
PPPoE.................................................................................................................... |
35 |
SNMP .................................................................................................................... |
35 |
802.1X................................................................................................................... |
37 |
IP Address Filter.................................................................................................... |
37 |
Quality of Service (QoS)........................................................................................ |
38 |
UPnP ..................................................................................................................... |
38 |
Video Settings................................................................................ |
39 |
Video Format........................................................................................................ |
39 |
Display Settings..................................................................................................... |
40 |
On Screen Display Settings ................................................................................... |
42 |
Text Overlay.......................................................................................................... |
43 |
Privacy Mask......................................................................................................... |
43 |
Video Recording ................................................................................................... |
44 |
© Copyright 2016 TRENDnet. All Rights Reserved. |
2 |

TRENDnet User’s Guide |
TV-IP340PI |
Events............................................................................................. |
45 |
Motion Detection ................................................................................................. |
45 |
Video Tampering .................................................................................................. |
47 |
Notification........................................................................................................... |
48 |
Snapshot............................................................................................................... |
48 |
Email ..................................................................................................................... |
49 |
Alarm Input........................................................................................................... |
50 |
Alarm Output........................................................................................................ |
51 |
Network Storage............................................................................. |
52 |
Network Storage................................................................................................... |
52 |
Storage Management........................................................................................... |
53 |
FTP Server............................................................................................................. |
54 |
Regulations..................................................................................... |
56 |
Federal Communication Commission Interference Statement ................................ |
56 |
RoHS ..................................................................................................................... |
56 |
Europe – EU Declaration of Conformity ............................................................... |
57 |
Limited Warranty............................................................................ |
58 |
© Copyright 2016 TRENDnet. All Rights Reserved. |
3 |
TRENDnet User’s Guide
Product Overview
TV IP340PI
Features
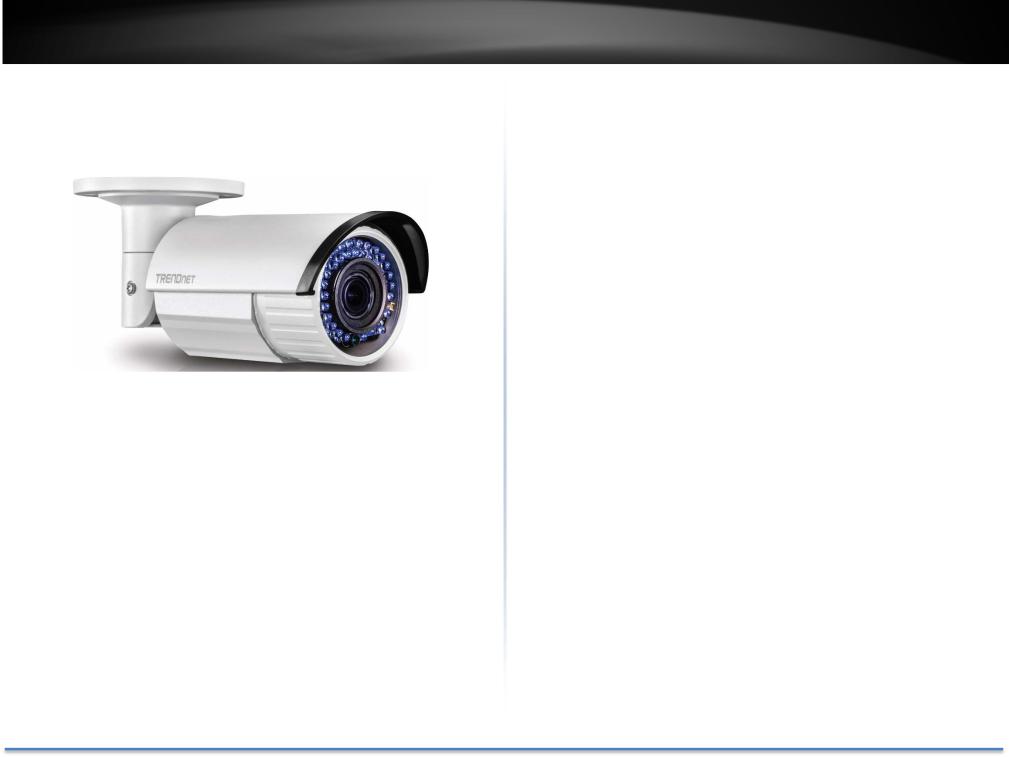
The Indoor/ Outdoor 2MP 1080p Varifocal PoE IR Network Camera, model TV IP340PI, provides day and night surveillance with a night vision range of up to 30 meters (98 ft.) This bullet style camera delivers year round surveillance with an IP66 weather rated housing to withstand extreme environments. A built in 2.8 – 12mm manual zoom varifocal lens allows you to adjust the field of view to meet your installation needs. Record 1080p video (1920 x 1080) at 30 fps in a space saving H.264 compression format. Manage up to 32 TRENDnet cameras with included complimentary software and mobile apps.
TV-IP340PI
Hardware
Varifocal Lens
A built in 2.8 – 12mm manual zoom varifocal lens allows you to adjust the field of view from 113° – 33.8° to achieve the perfect viewing field for your installation.
2 Megapixel
Record 1080p (1920 x 1080) HD video at 30 fps in the space saving H.264 compression format
Night Vision
Night vision up to 30 meters (98 ft.)
Smart IR
Dynamic IR adjustment optimizes night visibility
PoE
Save installation costs with Power over Ethernet (PoE)
IP66 Rating
Outdoor IP66 weather rated housing
Storage
Record video to a network storage device or to a Micro SD card (up to 64 GB sold separately).
© Copyright 2016 TRENDnet. All Rights Reserved. |
4 |
TRENDnet User’s Guide
Advanced Playback
Advanced in camera archived video review functionality
Motion Detection
Create custom motion detection zones to record video and send email notifications when a zone is triggered.
Tamper Detection
Create custom tamper detection zones to send an email notification when the camera view has been obstructed.
Digital Wide Dynamic Range (D WDR)
Adjustable D WDR setting Improves image quality and focusing when a camera is exposed to high contrast lighting environments by enhancing the dark areas of the image to make them more visible.
Recording Flexibility
Define custom schedules using continuous (24/7) and/or event based recording modes.
Audio Support
Audio input/output for third party microphone and speaker (sold separately)
Input/Output Alarm
Network to an alarm system with the alarm input/output connections
BNC Port
TV-IP340PI
BNC analog video out port to connect directly to a video display for installation flexibility
IPv6
IPv6 support
ONVIF/PSIA
ONVIF Profile S, Profile G and PSIA compliant
Complimentary Software
Complimentary pro grade software to manage up to 32 TRENDnet cameras
Complimentary Apps
Live video to a mobile device with free iOS® and Android™ apps
Package Contents
TV IP340PI package includes:
•TV IP340PI
•Quick Installation Guide
•CD ROM (Utility and User’s Guide)
•Camera mounting hardware
•(Optional power adapter not included)
|
|
|
|
|
|
|
|
|
|
|
|
|
|
|
|
|
|
|
|
|
|
|
|
Drilling Template |
Mounting Screws |
||||||||||
© Copyright 2016 TRENDnet. All Rights Reserved. |
5 |
TRENDnet User’s Guide
Hardware
1
8 |
11 12 |
6
4 5
1413
9
2 3
7 10
15
TV-IP340PI
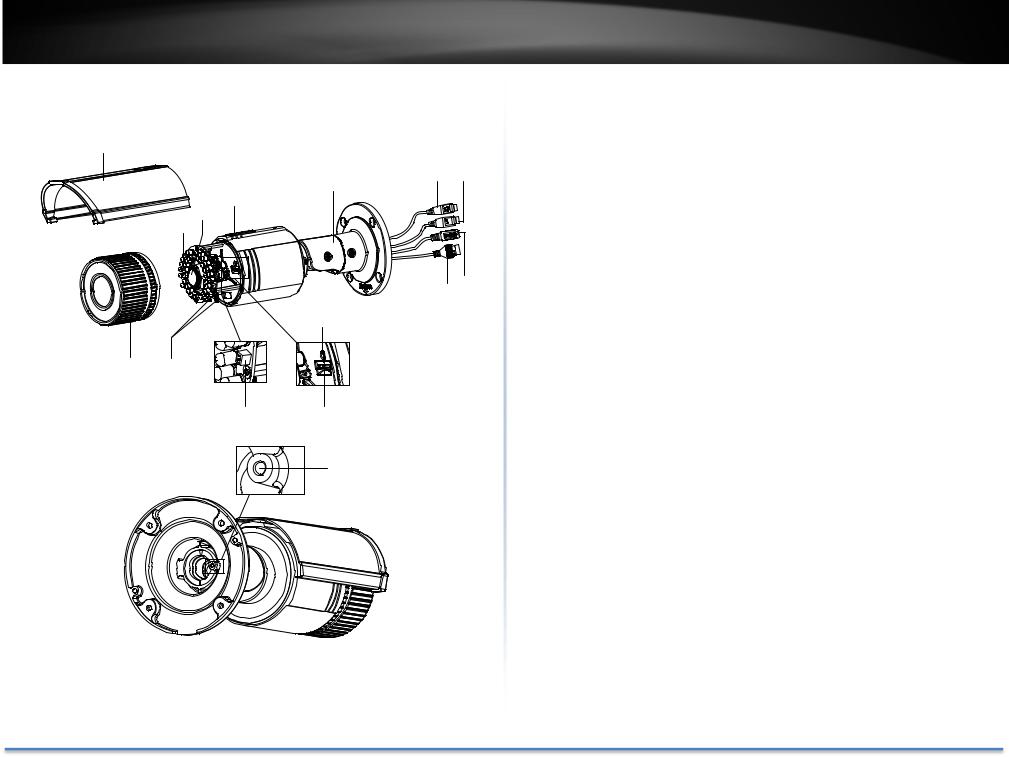
No. |
Description |
|
|
1 |
Sun Shield |
|
|
2 |
Front Cover |
|
|
3 |
Zoom and Focus Lever |
|
|
4 |
IR LED |
|
|
5 |
Lens |
|
|
6 |
Air Vent |
|
|
7 |
Video Output Interface |
|
|
8 |
Bracket |
|
|
9 |
Reset Button |
|
|
10 |
Memory Card Slot |
|
|
11 |
Audio I/O ports |
|
|
12 |
Alarm wires |
|
|
13 |
Power connector |
|
|
14 |
PoE network port |
|
|
15 |
Grounding |
|
|
The option power connector can work with 12V DC 1A power adapter.
© Copyright 2016 TRENDnet. All Rights Reserved. |
6 |

TRENDnet User’s Guide
Warnings
Serious injury or death may be caused if any of these warnings are neglected. Follow these safety guards to prevent serious injury or death.
•If using the power adapter, please choose the power adapter that meets the safety extra low voltage (SELV) standard and Limited Power Source standard.
•If the product does not work properly, please contact your dealer or the nearest service center. Never attempt to disassemble the camera yourself. Disassembling the product will void the warranty and may cause harm or injury.
•To reduce the risk of fire or electrical shock, do not expose this product to rain or water.
•The installation should be done by a qualified service person and should conform to all construction and electric regulations and other local codes.
TV-IP340PI
Cautions
Injury or equipment damage may be caused if any of these cautions are neglected. Follow these precautions to prevent potential injury or material damage.
•Make sure the power supply voltage is correct before using the Camera.
•Do not drop the camera or subject to physical shock.
•Do not touch sensor modules with fingers. If cleaning is necessary, use a clean cloth with a bit of ethanol and wipe it gently. If the camera will not be used for an extended period of time, put on the lens cap to protect the sensor from dirt.
•Do not aim the camera lens at the strong light such as the Sun or an incandescent lamp. Strong light can damage the camera sensor.
•The sensor may be burned out by a laser beam, so when any laser equipment is being used, make sure that the surface of the sensor will not be exposed to the laser beam.
•Do not place the camera in extremely hot, cold temperatures (the operating temperature should be between 10°C to 60°C), dusty or damp environment, and do not expose it to high electromagnetic radiation.
•To avoid heat accumulation, good ventilation is required for a proper operating environment.
•Keep out of water and any liquid.
•While shipping, the camera should be packed in its original packing.
© Copyright 2016 TRENDnet. All Rights Reserved. |
7 |

TRENDnet User’s Guide
Plan for Installation
There are number of factors involved in a successful camera installation. Follow the suggested installation steps and go through the check lists. This guide will help you make your camera installation smoothly and easily.
Viewing angle
The TV IP340PI is a bullet camera with a focused viewing angle (113° – 33.8°) that provides non distorted and detailed images. Choose the location where has good angle to shoot the image you expect to see. The motion detection area should also be considered when installing the camera.
Weather Conditions
The TV IP340PI is a small bullet camera, which fits most installations indoor and outdoor. The camera can work under a wide range of weather conditions. For severe weather conditions, a camera housing with temperature and moisture control is recommended. Using the camera in milder weather conditions will help extend the camera’s product life and preserve the quality of the video image.
•Moisture: Avoid damp or moist environments whenever you can. The TV IP340PI is an IP66 grade water proof camera, and it will work in moist environments. However, rain may affect the picture quality, especially at night, water may reflect the light from the infra red illumination and degrade picture quality.
TV-IP340PI
•Temperature: TV IP340PI works within a specified temperature range. Areas with severe temperatures should be avoided when installing the camera. It’s recommended that you use an enclosure with a heater and blower if you plan on using this camera outside of the specified temperature range.
•Sunlight: Avoid direct sun light exposure. Direct sun light will damage the image sensor. If sunlight is necessary for your viewing purposes, provide protection for the image sensor.
•Lighting: Consider installing your camera faces the same direction of the light sources. Shooting images with top down position outdoor or next to the existing light source are good choices. Avoid the light source if it creates a shade that darkens the viewing area.
© Copyright 2016 TRENDnet. All Rights Reserved. |
8 |
TRENDnet User’s Guide
Hardware Installation
Memory Card Installation
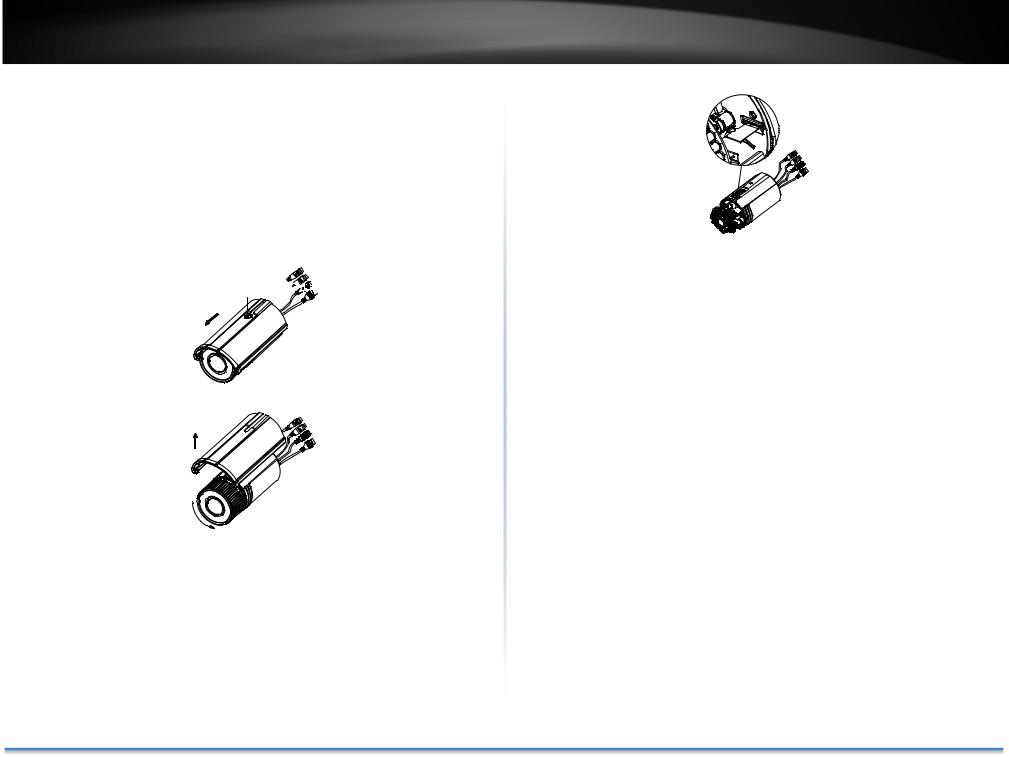
1.Rotate the lock screw counterclockwise to loosen it. Slide the sun shield according to the arrow direction as shown in below and remove the sun shield.
Lock Screw 


2.Remove the front cover by rotating it counterclockwise.
3.Insert the memory card into the memory card slot.
TV-IP340PI
4.Insert the Memory Card
5.Rotate the front cover clockwise back to the camera and install the sun shield back.
6.Tighten the lock screw clockwise to tighten the sun shield.
For water proof performance, align the rotating label on the front cover with that on the camera when you rotate the front cover clockwise.
© Copyright 2016 TRENDnet. All Rights Reserved. |
9 |
TRENDnet User’s Guide
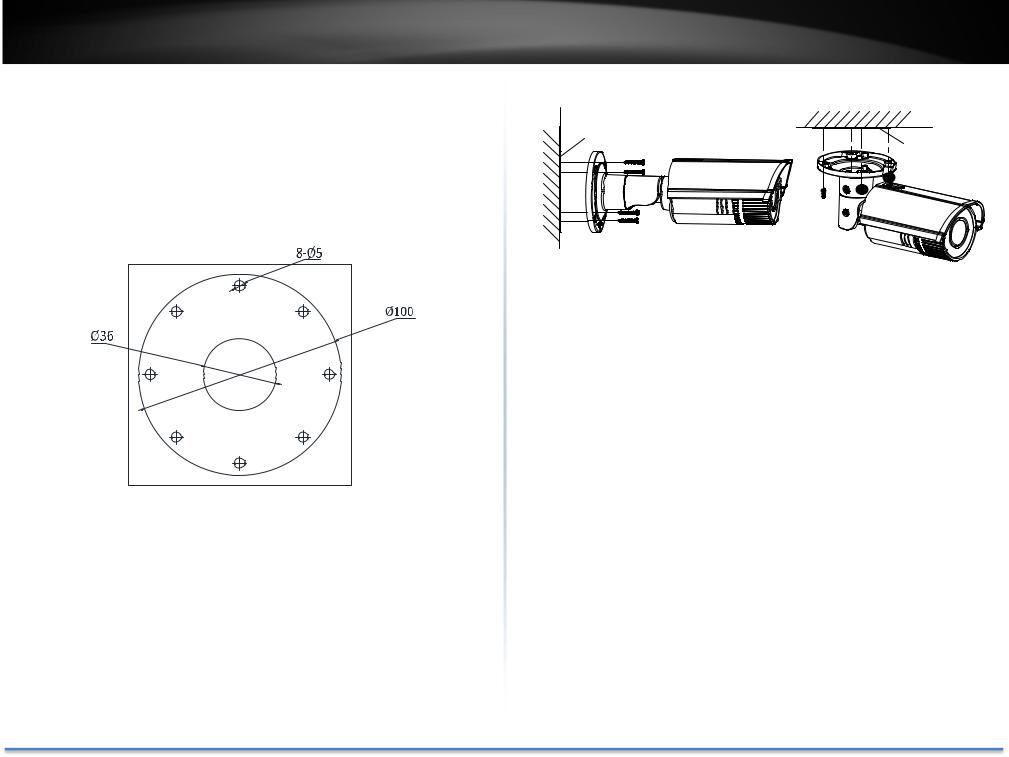
Mounting
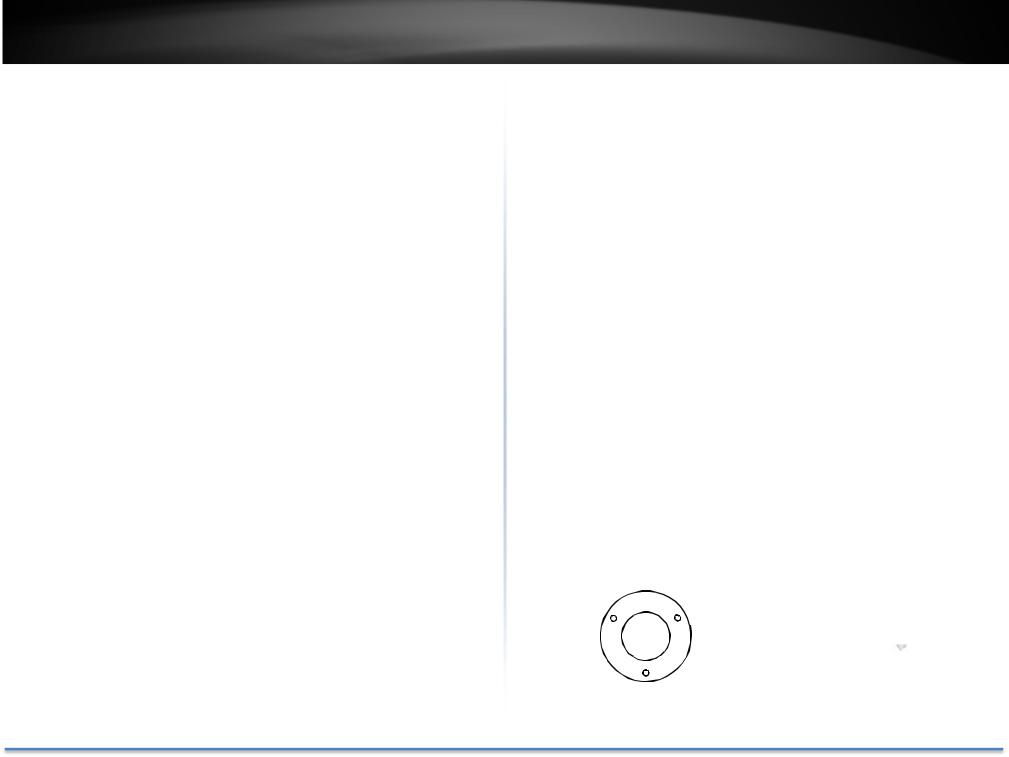
1.Attach the drill template (supplied) to the wall or the ceiling where the camera is to be mounted.
2.Drill screw holes in the wall or ceiling according to the Hole 1 on the drill template.
|
2 |
Ceiling Mounting |
|
1 |
1 |
2 |
2 |
1:Screw Hole for |
2:Screw Hole for |
Bracket |
Mounting Base |
1 |
1 |
|
2 |
3.If you need to route cables through the wall (or the ceiling), cut a cable hole according to the drill template. Skip this step, if you want to route the cables on the surface of the wall (or the ceiling).
4.Route the cables of the camera.
5.Secure the camera to the wall (or the ceiling) with expansion screws.
TV-IP340PI
Drill Template
Drill Template
6.Adjust the view angle.
3 axis (pan/tilt/rotation) adjusting allows adjustment for optimum camera rotation and placement. Follow the steps below to adjust the view angle.
Pan Adjustment
1). Loosen the lock screw 1.
2). Adjust the panning position of the camera. The adjusting range is from 0° to 360°.
3). Tighten the lock screw 1.
Tilt Adjustment
1). Loosen the lock screw 2.
2). Adjust the tilting position of the camera. The adjusting range is from 0° to 100°.
3). Tighten the lock screw 2.
© Copyright 2016 TRENDnet. All Rights Reserved. |
10 |
TRENDnet User’s Guide
Rotation Adjustment
1). Loosen the lock screw 3.
2). Rotate the rotation position to adjust the azimuth angle of the image. The adjusting range is from 0° to 360°.
3). Tighten the lock screw 3.
Panning |
1 |
|
0° to 360° |
Rotation |
|
|
|
|
2 |
|
|
1 Lock Screw 1 |
|
|
2 Lock Screw 2 |
3 |
0° to 360° |
3 Lock Screw 3 |
0° to 100° |
|
|
Tilting |
|
7. (Optional) Install the water proof jacket for network connector.
TV-IP340PI
Zoom and Focus
You can use the zoom lever and focus lever to adjust the zoom and focus level. Follow the steps below to adjust focus and zoom. We take Type II camera as an example to explain the adjusting steps.
1.Remove the sun shield and front cover to expose the zoom lever and the focus lever.
2.View the camera image on the monitoring screen.
3.Loosen the zoom lever and move the lever between T (Tele) and W (Wide) to obtain the desired angle of view.
4.Tighten the zoom lever.
5.Loosen the focus lever and move the lever between F (Far) and N (Near) to obtain the optimum focus.
6.Tighten the focus lever.
7.Install the sun shield and the front cover back to the camera.
Zoom/Focus Lever
© Copyright 2016 TRENDnet. All Rights Reserved. |
11 |
TRENDnet User’s Guide
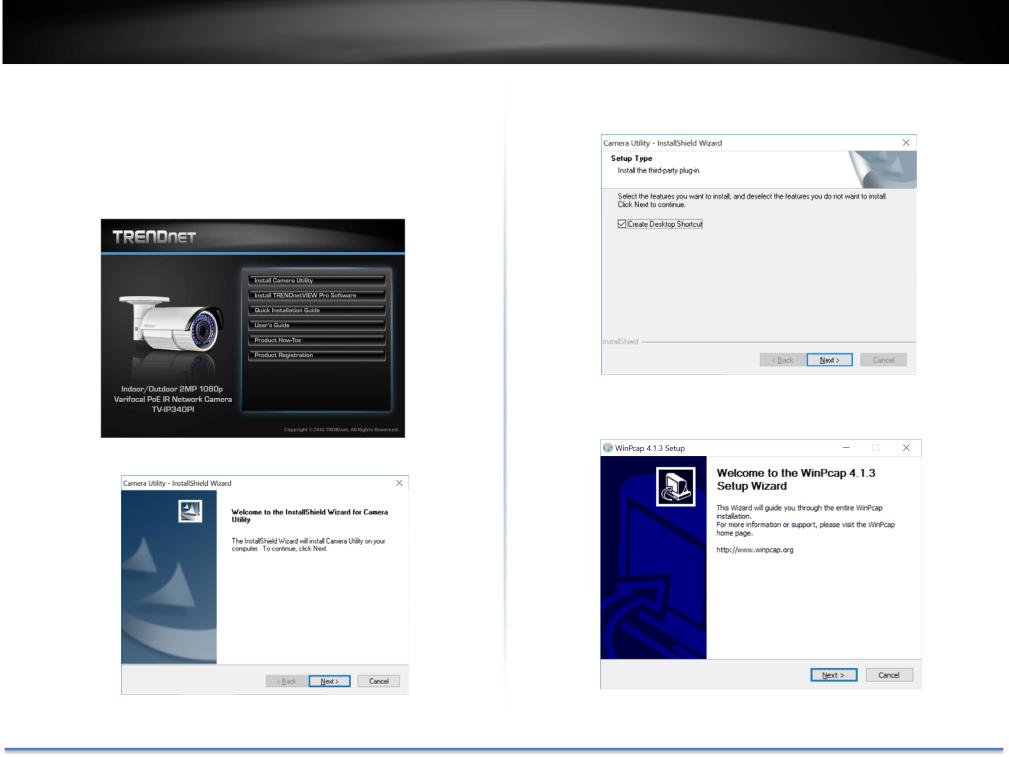
Setup Your Camera with CD
1.Insert the Installation CD ROM into your computer’s CD ROM drive to initiate the Auto Run program. Choose your preferred language and then click the Install Camera Utility.
2. Install the Camera Utility as instructed.
TV-IP340PI
3. Last, click Next to finish the installation
4.This will also require you to install WinPcap program if you don’t have this installed before, please follow the on screen instruction to install it.
© Copyright 2016 TRENDnet. All Rights Reserved. |
12 |
TRENDnet User’s Guide
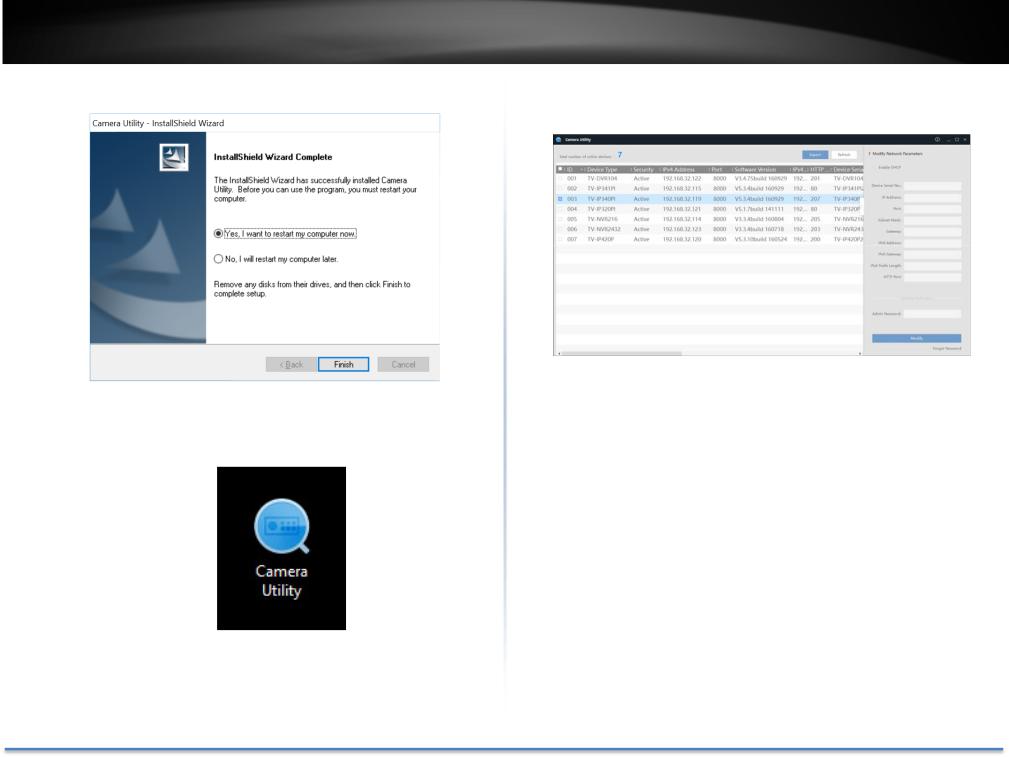
5. Restart the computer after the installations.
6.After computer is restarted, double click on the Camera Utility icon to launch the program.
TV-IP340PI
7.Find the camera you would like to access and configure then double click on the IP address.
8.Continue to the next section Access your Camera with the Web Browser for detail configurations of the camera.
© Copyright 2016 TRENDnet. All Rights Reserved. |
13 |

TRENDnet User’s Guide
Access your Camera with the Web Browser
System Management and Default Settings
It is recommended that you install your camera with the CD that comes with the package and use accompanying TRENDnetVIEW Pro software (version 2.5.8 or later) for Windows computers. The software is included on the CD comes with the package. If you do not have the CD with you, you can go to http://www.TRENDnet.com/support enter the model number “TV IP340PI” and download the software.
System Default
Management |
Dynamic assigned if there’s a DHCP server on the |
IP |
network or self assigned 192.168.10.30 |
Administrator |
admin |
name |
|
Administrator |
admin |
password |
|
If you want to access your camera directly instead of using software, you can follow the steps specified in this chapter to login to your camera. A web browser plug in must be installed to watch video smoothly.
For Windows system, please go to the next paragraph.
For OS X system, please go directly to page 17
TV-IP340PI
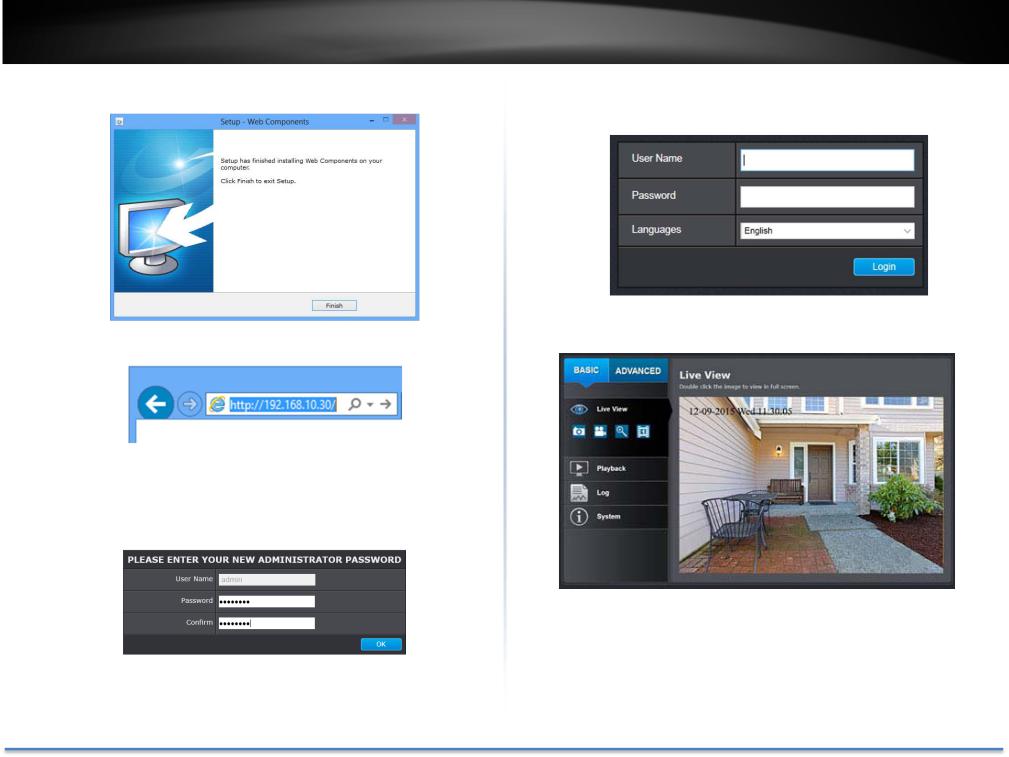
Logging in to the Camera for the First Time (Windows)
1.Open the web browser on your computer. In the address bar, enter the IP address you setup through the setup CD or 192.168.10.30.
(If you have a DHCP server on your network, the IP address will be assigned dynamically. For example, if you have a home gateway on your network and you plug in the camera on the same network, you can find the camera’s IP address on your home gateway.), and then press Enter.
2.Enter the user name, admin, and the password you setup through the setup CD or the default password, admin, and then click OK.
© Copyright 2016 TRENDnet. All Rights Reserved. |
14 |
TRENDnet User’s Guide
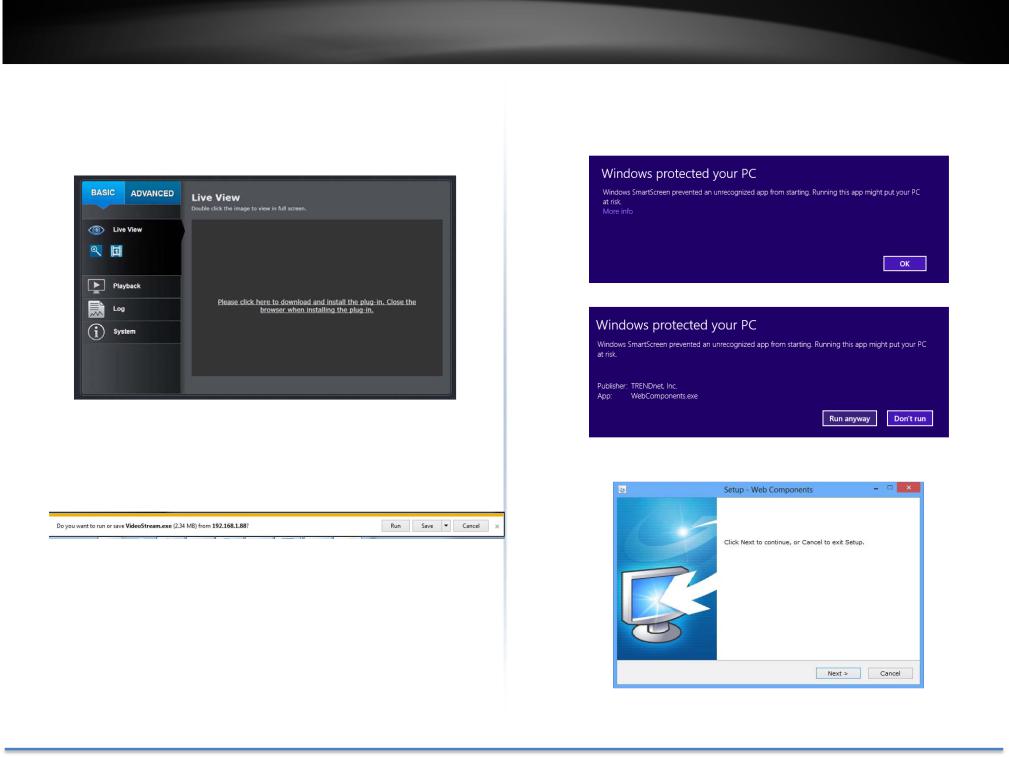
3.The camera management page will detect if you installed the camera video streaming plug in or not. Click the link to download the plug in from the TV IP340PI camera.
4.Download the plug in to your computer and then and close your browser. Launch the plug in installation to install the plug in.
TV-IP340PI
5.Permission request may show up depends on the Internet security settings on your computer. Click More Info and then Run anyway to install the plug in.
6. Click Next to install the plug in.
© Copyright 2016 TRENDnet. All Rights Reserved. |
15 |
TRENDnet User’s Guide |
TV-IP340PI |
7. Click Finish to finish the installation.
8. Open the browser and login again.
9.(Go to step 11 if you already changed your password with the setup CD). The TV IP340PI will ask you to change your password from default setting. Please enter the new password twice and click OK. The password must be between 8 and 16 characters. (Alphanumeric: a z, A Z, 0 9, !, @, #, $).
10.Enter the user name admin and new password again to start secured session.
11. The Live View page will show up and begin streaming video.
© Copyright 2016 TRENDnet. All Rights Reserved. |
16 |
TRENDnet User’s Guide
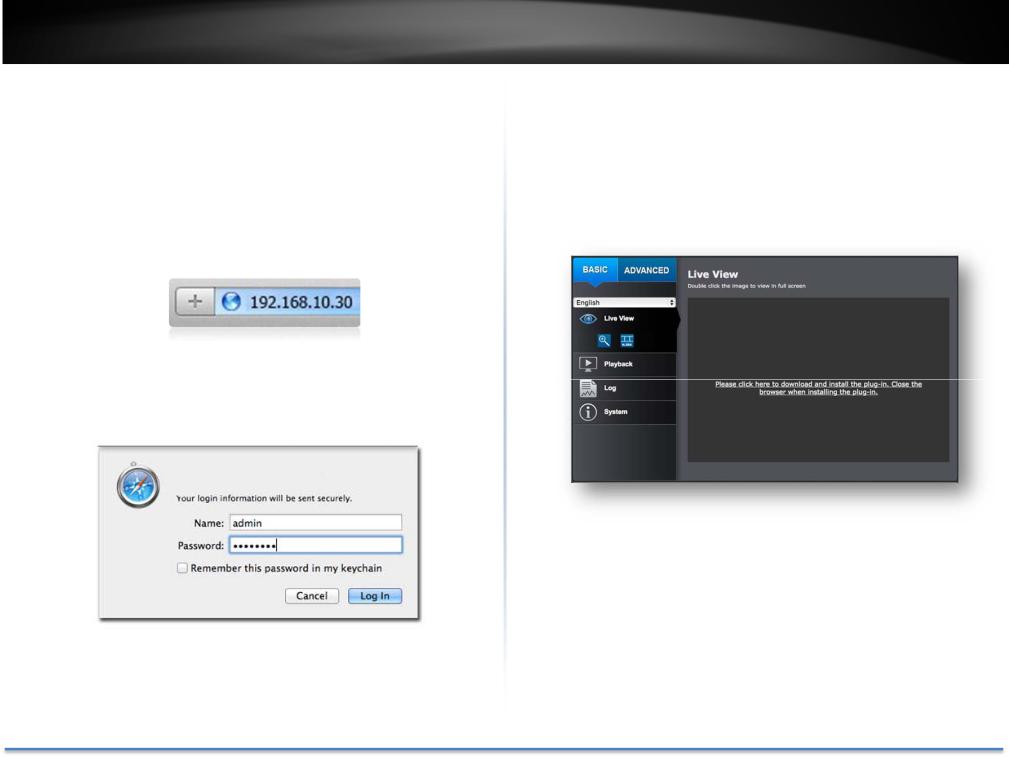
Logging in to the Camera for the First Time (OS X)
1.Open the web browser on your computer. In the address bar, enter the IP address of the camera 192.168.10.30. (If you have a DHCP server on your network, the IP address will be assigned dynamically. For example, if you have a home gateway on your network and you plug in the camera on the same network, then you can find the camera IP address on your home gateway), and then press Enter.
2.Enter the user name, admin, and the default password, admin, and then click OK.
TV-IP340PI
3.The camera management page will detect if you installed the camera video streaming plug in or not. Click the link to download the plug in from the TV IP340PI camera.
Note: Internet connection is required to download the plug in. If you do not have Internet access, you can find the plug in on the CD comes with the package under /Mac folder.
© Copyright 2016 TRENDnet. All Rights Reserved. |
17 |
TRENDnet User’s Guide
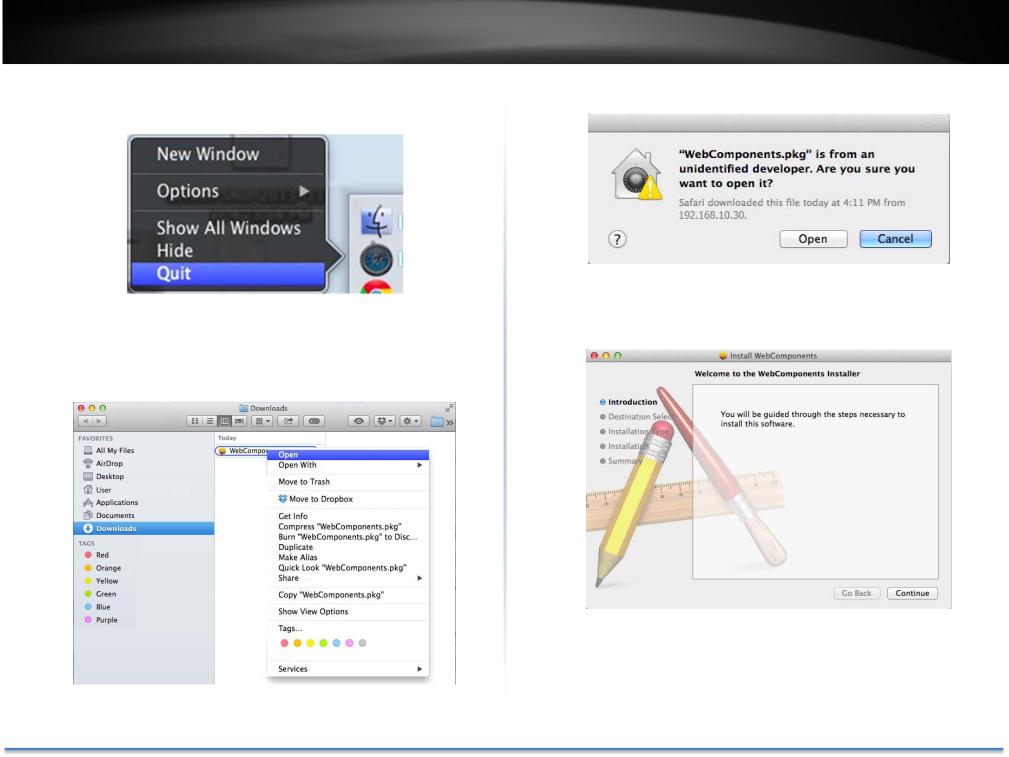
4.Quit your browser completely by command Click on the browser icon and then click Quit before installing the plug in.
5.Go to the Finder and navigate to the Download folder. Command Click the WebComponents.pkg and then click Open. (If you are install the plug in from the CD, just browse to /Mac folder and double click the
WebComponents.pkg file.)
TV-IP340PI
6. Click Open to start installation.
7. Click Continue to install the plug in.
© Copyright 2016 TRENDnet. All Rights Reserved. |
18 |
 Loading...