


TEW-711BR |
|
TRENDnet User’s Guide |
Cover Page |

TEW-711BR |
|
TRENDnet User’s Guide |
|
Contents |
|
Product Overview ........................................................................... |
1 |
Package Contents................................................................................................. |
1 |
Features .............................................................................................................. |
1 |
Rear Panel View ................................................................................................... |
2 |
Front Panel View .................................................................................................. |
3 |
Side Panel View.................................................................................................... |
4 |
Application Diagram ............................................................................................. |
4 |
Basic Router Setup .......................................................................... |
5 |
Creating a Home Network..................................................................................... |
5 |
Before you Install ................................................................................................. |
6 |
Installation........................................................................................................... |
7 |
Setup Wizard ....................................................................................................... |
8 |
How to connect additional wired devices to your network .................................... |
11 |
Advanced Router Setup................................................................. |
12 |
How to access your router management page ...................................................... |
12 |
How to manually configure your Internet connection............................................ |
12 |
How to clone a MAC address............................................................................... |
13 |
How to set your router date and time .................................................................. |
14 |
How to change your router login password .......................................................... |
15 |
How to change your router IP address ................................................................. |
16 |
How to set up the DHCP server on your router ..................................................... |
17 |
How to set up DHCP reservation.......................................................................... |
18 |
How to enable/disable UPnP on your router......................................................... |
19 |
How to allow/deny VPN connections through your router..................................... |
19 |
How to allow/deny multicast streaming ............................................................... |
20 |
How to identify your network on the Internet ...................................................... |
20 |
How to allow remote access to your router management page.............................. |
21 |
Table of Contents |
|
How to expose a device on your network to the Internet....................................... |
21 |
How to add static routes to your router................................................................ |
22 |
How to enable dynamic routing on your router ..................................................... |
23 |
Wireless Networking..................................................................... |
24 |
How to choose the type of security for your wireless network................................ |
24 |
How to secure your wireless network ................................................................... |
25 |
How to connect wireless devices using WPS.......................................................... |
27 |
© Copyright 2011 TRENDnet. All Rights Reserved. |
i |
|
TEW-711BR
TRENDnet User’s Guide
Product Overview
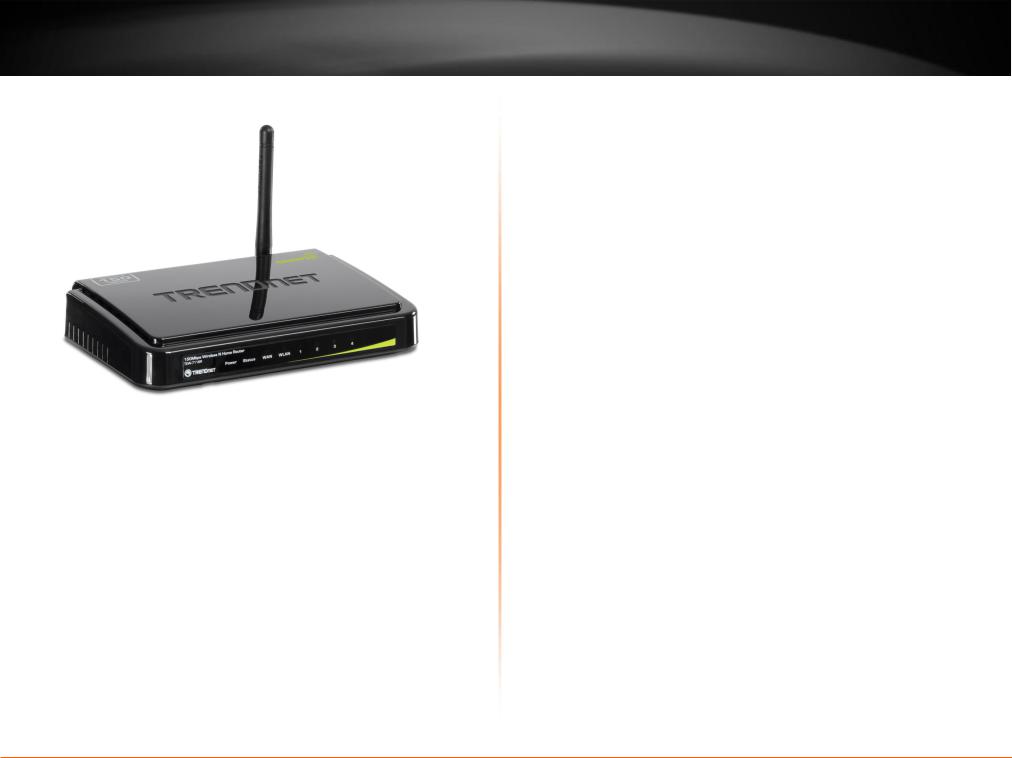
TEW-711BR
Package Contents
In addition to your router, the package includes:
Muti-Language Quick Installation Guide
CD-ROM (User’s Guide)
Network cable (1.5m / 5ft)
Power adapter (5V DC, 1A)
If any package contents are missing or damaged, please contact the retail store, online retailer, or reseller/distributor that the item was purchased.
Product Overview
Features
The 150Mbps Wireless N Home Router delivers the highest level of security with 6x the speed and 3x the coverage of wireless g products. Quickly install the router and use it with TRENDnet wireless n adapters to receive the full benefits of wireless n speed and coverage.
The latest in wireless encryption and a secure firewall protect your valuable data. Router setup is fast and intuitive. Wireless Protected Setup (WPS) integrates other WPS supported wireless adapters at the touch of a button. Seamlessly stream HD media, download files and surf online with wireless n speed.
6x the speed and 3x the coverage of wireless g
Seamlessly stream video, download files, talk online and play games
Advanced wireless encryption protects your valuable data
Intuitive installation process
© Copyright 2011 TRENDnet. All Rights Reserved. |
1 |
|
TEW-711BR
TRENDnet User’s Guide
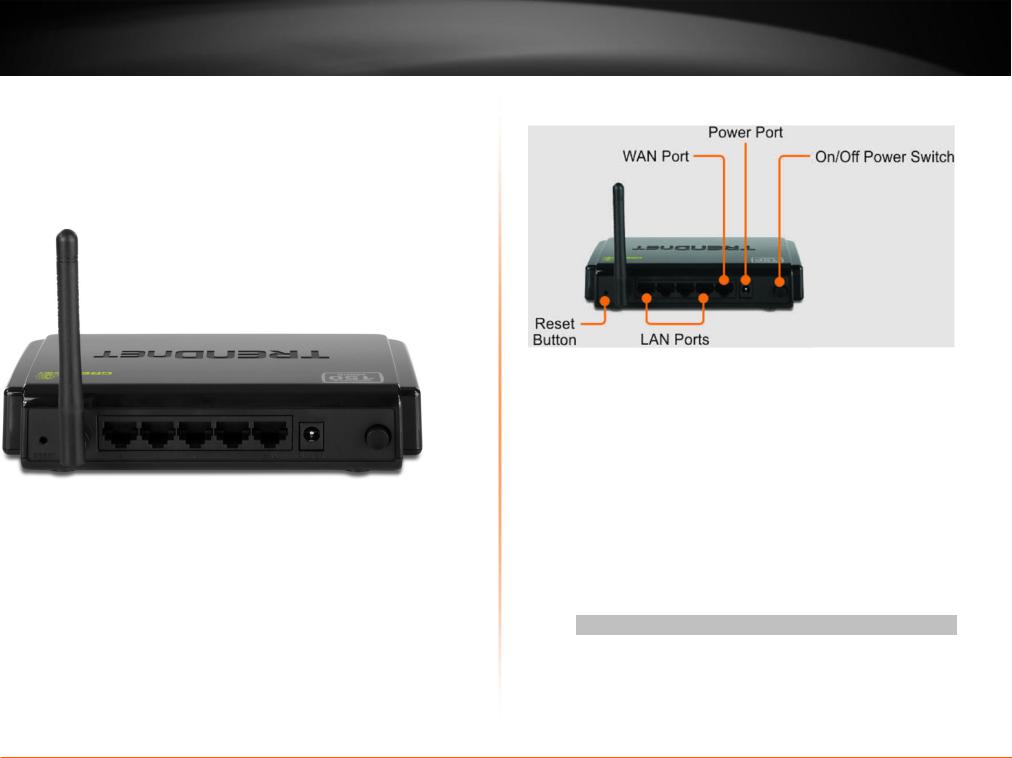
Rear Panel View
Product Overview
Reset Button – Use an item such as a paperclip to push and hold this button for 15 seconds and release to reset your router to its factory defaults.
LAN Ports – Connect Ethernet cables (also called network cables) from your router LAN ports and to your wired network devices.
WAN Port - Connect an Ethernet cable (also called network cable) from your router WAN port and to your xDSL/Cable modem.
Power Port – Connect the included power adapter from your router power port and to an available power outlet. Caution: Use only the adapter that came with your router.
On/Off Power Switch – Push your router On/Off push button power switch to turn your router “On” (Inner position) or “Off”
(Outer position).
© Copyright 2011 TRENDnet. All Rights Reserved. |
2 |
|
TEW-711BR
TRENDnet User’s Guide
Front Panel View
Product Overview
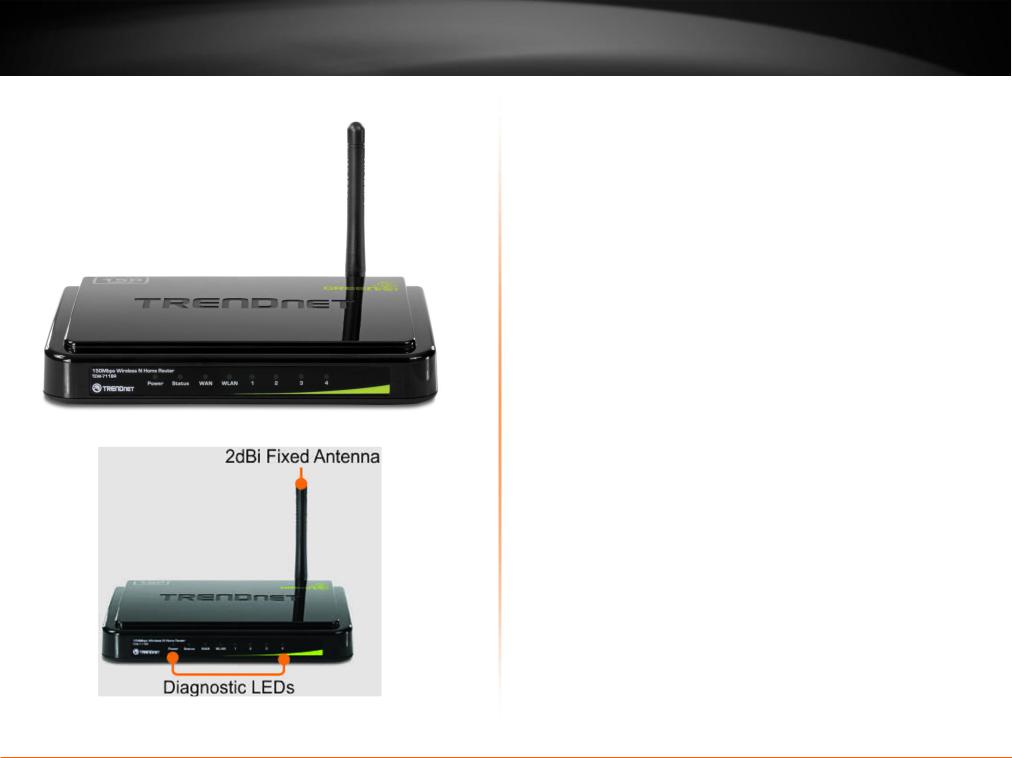
Power - This LED indicator is solid green when your router is powered on. Otherwise if this LED indicator is off, there is no power to your router.
Status - This LED indicator is blinking green when your router is ready and working successfully. If this LED indicator is solid green on or off, your router is not receiving power or not working properly.
WAN (Link/Activity) – This LED indicator is solid green when your router WAN port is physically connected to the xDSL/Cable modem Ethernet port (also called network port) successfully with an Ethernet cable (also called network cable). The LED indicator will be blinking green while data is transmitted or received through the WAN port of your router.
WLAN (Link/Activity) – This LED indicator is blinking green when the wireless is “On” and functioning properly on your router. This LED indicator will be blinking green rapidly while data is transmitted or received by your wireless clients or wireless network devices connected to your router.
LAN 1-4 (Link/Activity) – These LED indicators are solid green when the LAN ports are physically connected to your wired network devices successfully with an Ethernet cable (also called network cable). These LED indicators will be blinking green while data is transmitted or received through your router LAN ports.
Antenna – The antenna broadcasts wireless signals to allow your wireless clients and wireless network devices to connect to your router.
© Copyright 2011 TRENDnet. All Rights Reserved. |
3 |
|

TEW-711BR
TRENDnet User’s Guide
Side Panel View
WPS (Wi-Fi Protected Setup) – Push and hold this button for 3 seconds to activate WPS. The button LED is blinking blue when WPS is activated.
Product Overview
Application Diagram
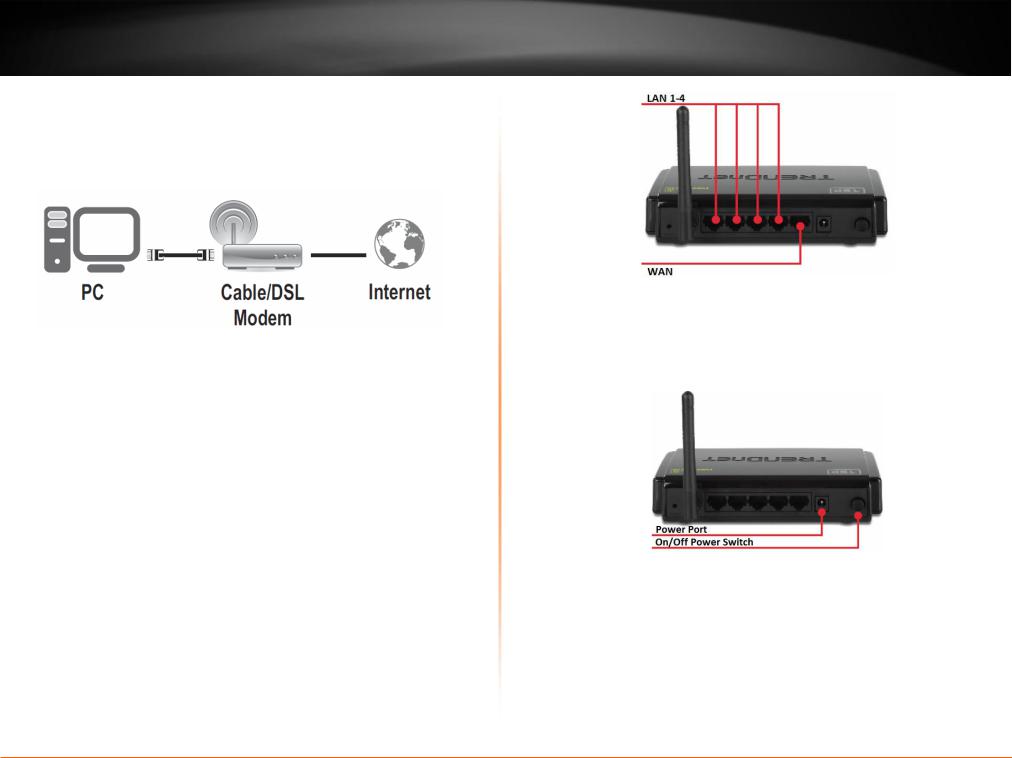
The router is installed in the room where the xDSL/Cable modem (typically supplied by your ISP “Internet Service Provider”) is located in order to physically connect an Ethernet cable (also called network cable) from the router WAN port to the modem network port which connects to the Internet. Wireless signals from the router are broadcasted to allow wireless clients such as laptops with wireless capability to discover and connect to the router providing wireless access to the local network and the Internet.
© Copyright 2011 TRENDnet. All Rights Reserved. |
4 |
|

TEW-711BR
TRENDnet User’s Guide
Basic Router Setup
Creating a Home Network
What is a network?
A network is a group of computers or devices that can communicate with each other. A home network of more than one computer or device also typically includes Internet access, which requires a router.
A typical home network may include multiple computers, a media player/server, a printer, a modem, and a router. A large home network may also have a switch, additional routers, access points, and many Internet-capable media devices such as TVs, game consoles, and web cameras.
Modem – Connects a computer or router to the Internet or ISP (Internet Service Provider).
Router – Connects your wireless and wired network devices to each other and to the modem.
Switch – Allows you to connect several wired network devices to your home network. Your router has a built-in network switch (the LAN port 1-4). If you have more wired network devices than available Ethernet ports on your router, you will need an additional switch to add more wired connections.
How to set up a home network
1.For a network that includes Internet access, you’ll need:
Computers/devices with an Ethernet port (also called network port) or wireless networking capabilities
Basic Router Setup
A modem and Internet service to your home, provided by your ISP (modem typically supplied by your ISP)
A router to connect your computers and devices and also connects to the modem.
2.Make sure that your modem is working. Your ISP can help you set up your modem and verify that it’s working correctly.
3.Set up your router. See “How to setup your router” below.
4.To connect additional wired computers or wired network devices to your network, see “How to connect additional wired devices to your network” on page 11.
5.To set up wireless networking on your router, see “Wireless Networking” on page 24.
How to setup your router
The easiest way and fastest way to follow the included Quick Installation
Guide or continue to the next section “Before you Install” on page 6, and complete the remaining sections of “Basic Router Setup”.
Where to find more help
In addition to this User’s Guide, you can find help below:
http://www.trendnet.com/support
(documentation, downloads, FAQs, how to contact technical support)
Internet service to your home, provided by an ISP (Internet Service Provider)
Autorun CD (Quick Installation Guide)
© Copyright 2011 TRENDnet. All Rights Reserved. |
5 |
|

TEW-711BR
TRENDnet User’s Guide
Before you Install
It is recommended, that you verify your Internet connection type with your ISP (Internet Service Provider) and ensure you have all the information for one of the following connection types below before proceeding with the router installation.
1.Obtain IP Address Automatically (DHCP)
Host Name (Optional)
Clone Mac Address (Optional)
2.Fixed IP address
WAN IP Address: _____. _____._____._____
(e.g. 215.24.24.129)
WAN Subnet Mask: _____. _____._____._____
WAN Gateway IP Address: _____. _____._____._____
DNS Server Address 1: _____. _____._____._____
DNS Server Address 2: _____. _____._____._____
3.PPPoE to obtain IP automatically
User Name: _________
Password: ________________
Verify Password: ________________
4.PPPoE with a fixed IP address
User Name: _________
Password: ________________
Verify Password: ________________
IP Address: ____. _____._____._____ (e.g. 215.24.24.129)
Basic Router Setup
5.PPTP or Russian PPTP
Type (Dynamic IP or Static IP )
My IP Address: _____. _____._____._____
(e.g. 215.24.24.129)
Subnet Mask:_____. _____._____._____
Gateway:_____. _____._____._____
Server IP: _____. _____._____._____
PPTP Account: ________________
PPTP Password: ________________
Retype Password: ________________
6.L2TP or Russia L2TP
Type (Dynamic IP or Static IP)
My IP Address: _____. _____._____._____
(e.g. 215.24.24.129)
Subnet Mask:_____. _____._____._____
Gateway:_____. _____._____._____
Server IP: _____. _____._____._____
L2TP Account: ________________
L2TP Password: ________________
Retype Password: ________________
7. Russia PPPoE
Type (Dynamic IP or Static IP) User Name: _________
Password: ________________
Verify Password: ________________
IP Address: ____. _____._____._____ (e.g. 215.24.24.129)
© Copyright 2011 TRENDnet. All Rights Reserved. |
6 |
|
TEW-711BR
TRENDnet User’s Guide
Installation
1. Verify that you have an Internet connection when connecting your computer directly to the xDSL/Cable modem.
2.Turn off your xDSL/Cable modem.
3.Disconnect the Ethernet cable (also called network cable) from your xDSL/Cable modem and your computer.
4.Connect one end of a network cable to one of your router LAN ports (1-4). Connect the other end of the network cable to the computer Ethernet port (also called network port).
5.Connect one end of a network cable to your router WAN port. Connect the other end of the network cable to your xDSL/Cable modem network port.
Basic Router Setup
6. Connect the included power adapter to your router Power Port and then to an available power outlet. Push the On/Off Power Switch on your router to the “On” (inner) position.
7.Turn on your xDSL/Cable modem.
8.Verify that the following front panel LED indicators on your router: Power (Solid Green), Status (Blinking Green), LAN 1, 2, 3, or 4 (Solid/Blinking Green), WAN (Solid/Blinking Green), and WLAN (Blinking Green)
© Copyright 2011 TRENDnet. All Rights Reserved. |
7 |
|
 Loading...