

Page 1
Quick Installation Guide
TV-IP110
TV-IP110W
Page 2

Table of Contents
Table of Contents
English ......................................................................................................
1. Before You Start
2. Hardware Installation .........................................................................
3. Configure the Internet Camera ..........................................................
Troubleshooting ........................................................................................
.................................................................................
1
1
3
4
8
Version 10.19.2007
Page 3
1. Before You Start
System Requirements
?
10/100Mbps Ethernet
?
CPU: Pentium 4 1GHz processor or above
?
Memory: 256MB RAM or above/ 512MB RAM or above (Windows Vista)
?
VGA Resolution: 800 x 600 or above
Web Brower: Internet Explorer (6.0 or higher)
?
Windows 2000/XP/Vista
?
Package Contents
TV-IP110/TV-IP110W
?
Quick Installation Guide
?
Utility CD-ROM
?
?AC Power Adapter (5V, 2.5A)
?1 x 2dBi Detachable Antenna
TV-IP110W)
(
1.8m (5.9 ft) Cat.5 Fast Ethernet
?
cable
1
English
Page 4
Application
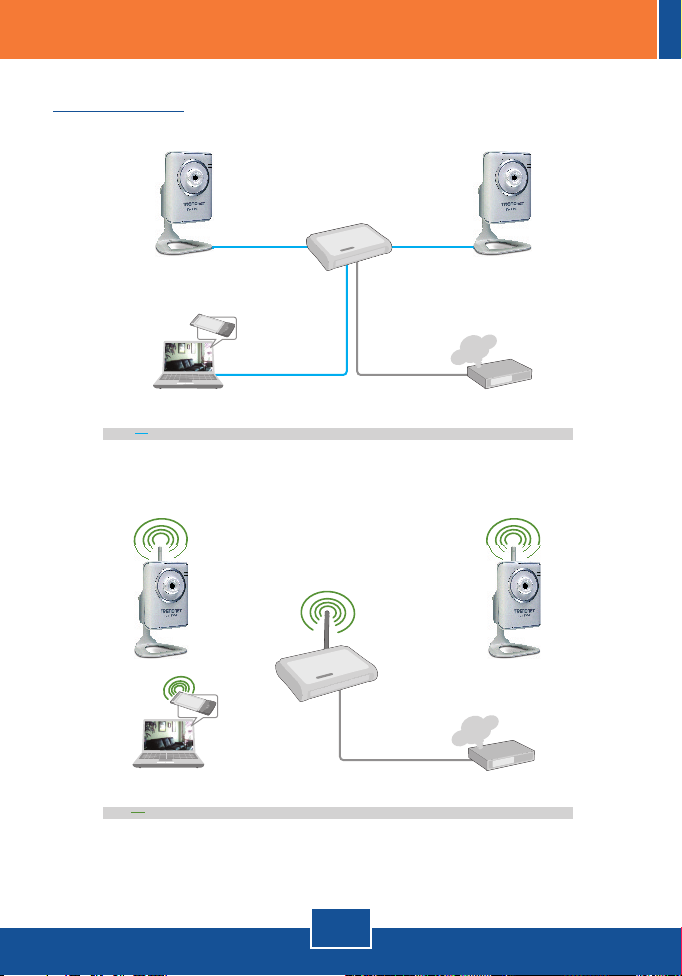
Notebook with PC Card
(TE100-PCBUSR)
10/100Mbps
Internet Camera Server
(TV-IP110)
(TW100-S4W1CA)
Wireless Internet Camera Server
(TV-IP110W)
Wireless G Firewall Router
Cable/DSL 4-Port
Broadband Router
(TEW-432BRP)
Internet
Modem
Internet
Notebook with
Wireless G PC Card
(TEW-421PC)
54Mbps
Modem
2
English
Page 5
2. Hardware Installation
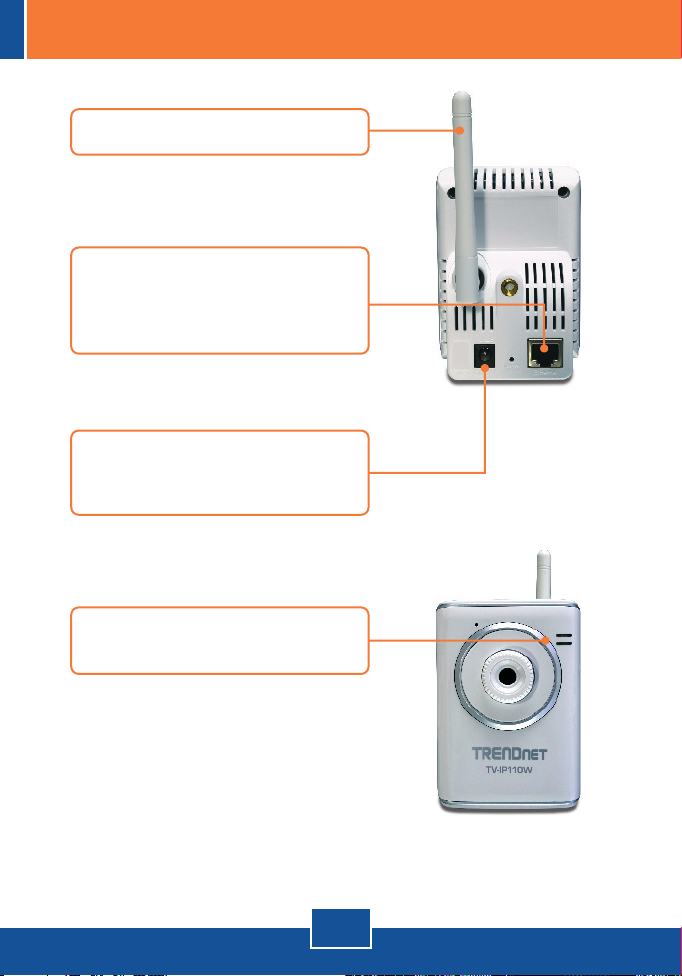
1. Attach the Antenna. (TV-IP110W)
2. Connect a RJ-45 network cable
from a Switch/Router to the
Ethernet port of the Internet
Camera.
3. Connect the AC Power Adapter to
the Internet Camera Server and
then to a power outlet.
4. Verify the Power and Link LEDs
are on. (TV-IP110W shown here)
English
3
Page 6
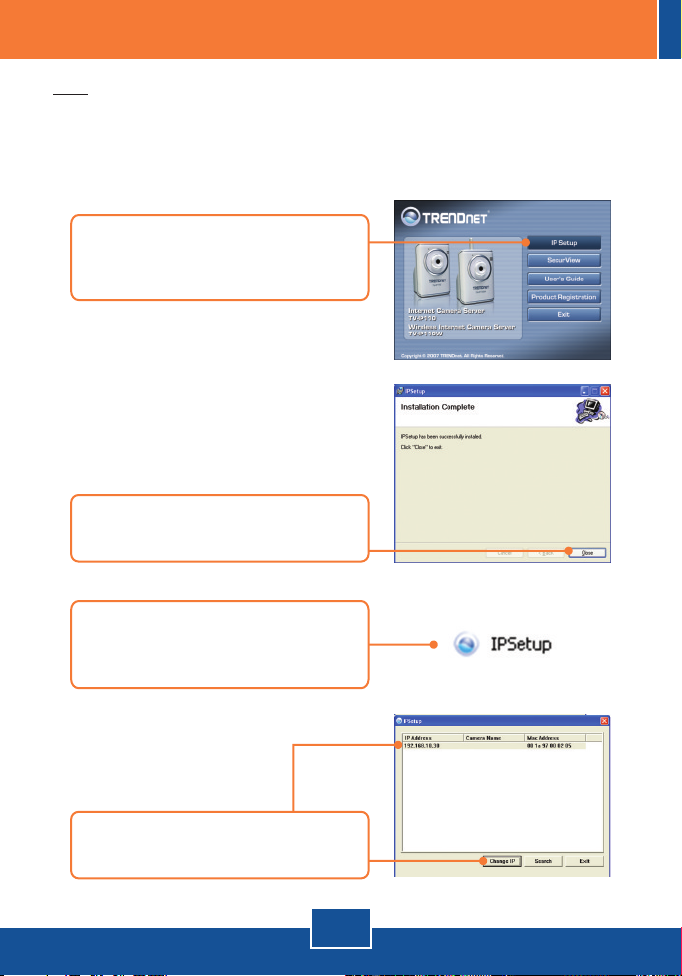
3. Configure the Internet Camera
Note: It is recommended that you configure the Internet Camera from a wired
computer. Since the Internet Camera's default IP address is 192.168.10.30,
make sure no other network devices are assigned an IP address of
192.168.10.30.
1. Insert the Utility CD-ROM into your
CD-ROM drive and then click IP
Setup.
2. Follow the Installation Wizard
instructions and then click Close.
3. Go to Start -> Programs ->
TRENDnet -> IPSetup and click
IPSetup.
4. Select the Internet Camera and
click Change IP.
English
4
Page 7

5. Configure the IP address to be in
the same subnet as your network,
type in the Administrator ID and
Password and click Change. By
default:
ID: admin
Password: admin
6. Click OK and wait 30 seconds.
7. Click OK.
8. Double click the Internet Camera to
access the browser configuration.
5
English
Page 8

9. Enter the User name and
Password, and then click OK.
User Name: admin
Password: admin
10. Right click and select Install
Active X Control.
11. Click Install.
12. Click Network and then click
Wireless. Configure your
wireless settings to match your
wireless network's settings and
then click Apply (Enable/Enter
the WEP/WPA key when your
wireless network is encrypted.
Contact your network
administrator for more
information). (TV-IP110W only)
6
English
Page 9
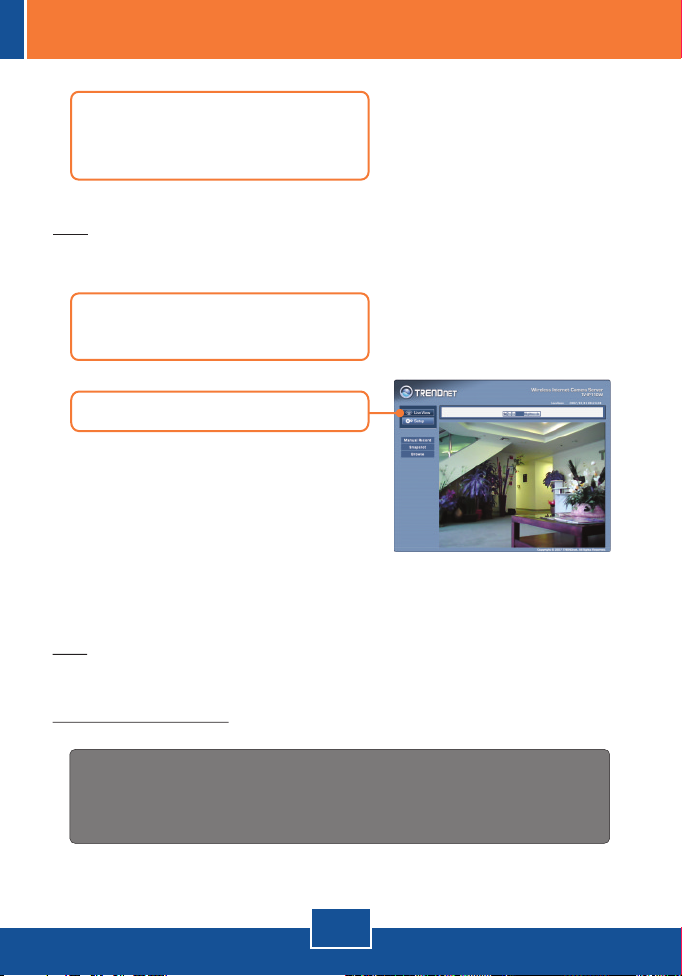
13. Disconnect the RJ-45 cable and
unplug the power. Then plug the
power back in (TV-IP110W).
Note: The TV-IP110W will not work wirelessly until you disconnect the Ethernet
cable from the back of the camera.
14. Verify the Power and Link LEDs
are on.
15. Click Live View.
Your installation is now complete.
Note: For detailed information regarding the TV-IP110/ 110W configuration
TV-IP
and advanced settings, please refer to the Troubleshooting section, User's
Guide on the Utility CD-ROM, or TRENDnet's website at
http://www.trendnet.com.
Register Your Product
To ensure the highest level of customer service and support, please take a moment to
register your product Online at: www.trendnet.com/register
Thank you for choosing TRENDnet
7
English
Page 10

Troubleshooting
How do I configure TCP/IP settings on my computer?
Q1:
1. Go into the Control Panel and double-click
the Network Connections icon, and then
right-click the Local Area Connection icon
and then click Properties.
2. Click Internet Protocol (TCP/IP) and then
click Properties. Then click on Use the
following IP address, and make sure you
assign your network adapter an IP address
in the subnet of 192.168.10.x.
The Image is blurry. How can I adjust the focus on the Internet camera?
Q2:
You can adjust the Internet Camera’s focus by rotating the lens.
A2:
When I click on Live View the image does not load?
Q3:
Q4:
First, make sure that you are using a browser that supports Java. Second, make sure
A3:
that Java is installed. Third, make sure that you added Active X. See step 10 and 11 in
Section 2: Configure the Internet Camera.
How do I connect the TV-IP110W to my wireless router or access point?
Make sure that you configure the camera to have the same SSID, encryption mode and
A4:
key (if enabled). Follow the instructions in section 2 to configure the camera with the SSID
and encryption key.
After I successfully configured the TV-IP110W to match my wireless network settings, I
Q5:
can not connect to the camera.
Q6:
If you still encounter problems or have any questions regarding the TV-IP110/TV-IP110W, please
contact TRENDnet’s Technical Support Department.
First, verify that the wireless settings match your wireless network settings. Second,
A5:
verify in the wireless section of the browser configuration that the Enable option is checked.
Third, make sure to disconnect the Ethernet cable from the camera and verify that the LINK
LED is blinking green.
I forgot my password. What should I do?
Take a pin or paperclip and press the reset button on the back of the unit for 15 seconds.
A6:
This will return settings back to factory defaults. The default IP address is 192.168.10.30.
The default administrator ID and password is admin.
8
Page 11

Certifications
This equipment has been tested and found to comply with FCC and CE Rules.
Operation is subject to the following two conditions:
(1) This device may not cause harmful interference.
(2) This device must accept any interference received. Including interference that may
cause undesired operation.
Waste electrical and electronic products must not
be disposed of with household waste. Please
recycle where facilities exist. Check with you Local
Authority or Retailer for recycling advice.
NOTE: THE MANUFACTURER IS NOT RESPONSIBLE FOR ANY RADIO OR TV
INTERFERENCE CAUSED BY UNAUTHORIZED MODIFICATIONS TO THIS
EQUIPMENT. SUCH MODIFICATIONS COULD VOID THE USER’S AUTHORITY TO
OPERATE THE EQUIPMENT.
ADVERTENCIA
En todos nuestros equipos se mencionan claramente las caracteristicas del adaptador de
alimentacón necesario para su funcionamiento. El uso de un adaptador distinto al
mencionado puede producir daños fisicos y/o daños al equipo conectado. El adaptador
de alimentación debe operar con voltaje y frecuencia de la energia electrica domiciliaria
existente en el pais o zona de instalación.
Page 12

TRENDnet Technical Support
.
US Canada
Toll Free Telephone: 1(866) 845-3673
24/7 Tech Support
Europe (Germany France Italy Spain Switzerland UK)
Toll Free Telephone: +00800 60 76 76 67
English/Espanol - 24/7
. . . . .
Worldwide
Telephone: +(31) (0) 20 504 05 35
English/Espanol - 24/7
Product Warranty Registration
Please take a moment to register your product online.
Go to TRENDnet’s website at http://www.trendnet.com/register
20675 Manhattan Place
Torrance, CA 90501
USA
Copyright ©2007. All Rights Reserved. TRENDnet.
 Loading...