


TEAC MC-D800 Owner's Manual

Z
77-20MD80002000
MC-D800
TURNTABLE AUDIO SYSTEM
OWNER'S MANUAL
MODE D’EMPLOI
ENGLISH FRANÇAIS
Z

IMPORTANT SAFETY INSTRUCTIONS
CAUTION: TO REDUCE THE RISK OF ELECTRIC SHOCK, DO NOT
REMOVE COVER (OR BACK). NO USER-SERVICEABLE PARTS
INSIDE. REFER SERVICING TO QUALIFIED SERVICE PERSONNEL.
The lightning flash with arrowhead in an equilateral
triangle is intended to alert the user to the presence of
M
V
uninsulated “dangerous voltage” within the product’s
enclosure that could be of sufficient magnitude to constitute a risk of electric shock to persons.
The exclamation point in an equilateral triangle is
intended to alert the user to the presence of important
operating and maintenance (servicing) instructions in
the literature accompanying the appliance.
WARNING: TO PREVENT FIRE OR SHOCK HAZARD,
DO NOT EXPOSE THIS APPLIANCE TO RAIN OR
MOISTURE.
CAUTION
o DO NOT REMOVE THE EXTERNAL CASES OR CABINETS TO EXPOSE
THE ELECTRONICS. NO USER SERVICEABLE PARTS ARE INSIDE.
o IF YOU ARE EXPERIENCING PROBLEMS WITH THIS PRODUCT,
CONTACT THE STORE WHERE YOU PURCHASED THE UNIT FOR
A SERVICE REFERRAL. DO NOT USE THE PRODUCT UNTIL IT HAS
BEEN REPAIRED.
o USE OF CONTROLS OR ADJUSTMENTS OR PERFORMANCE OF
PROCEDURES OTHER THAN THOSE SPECIFIED HEREIN MAY
RESULT IN HAZARDOUS RADIATION EXPOSURE.
IN USA/CANADA, USE ONLY ON 120 V SUPPLY.
2
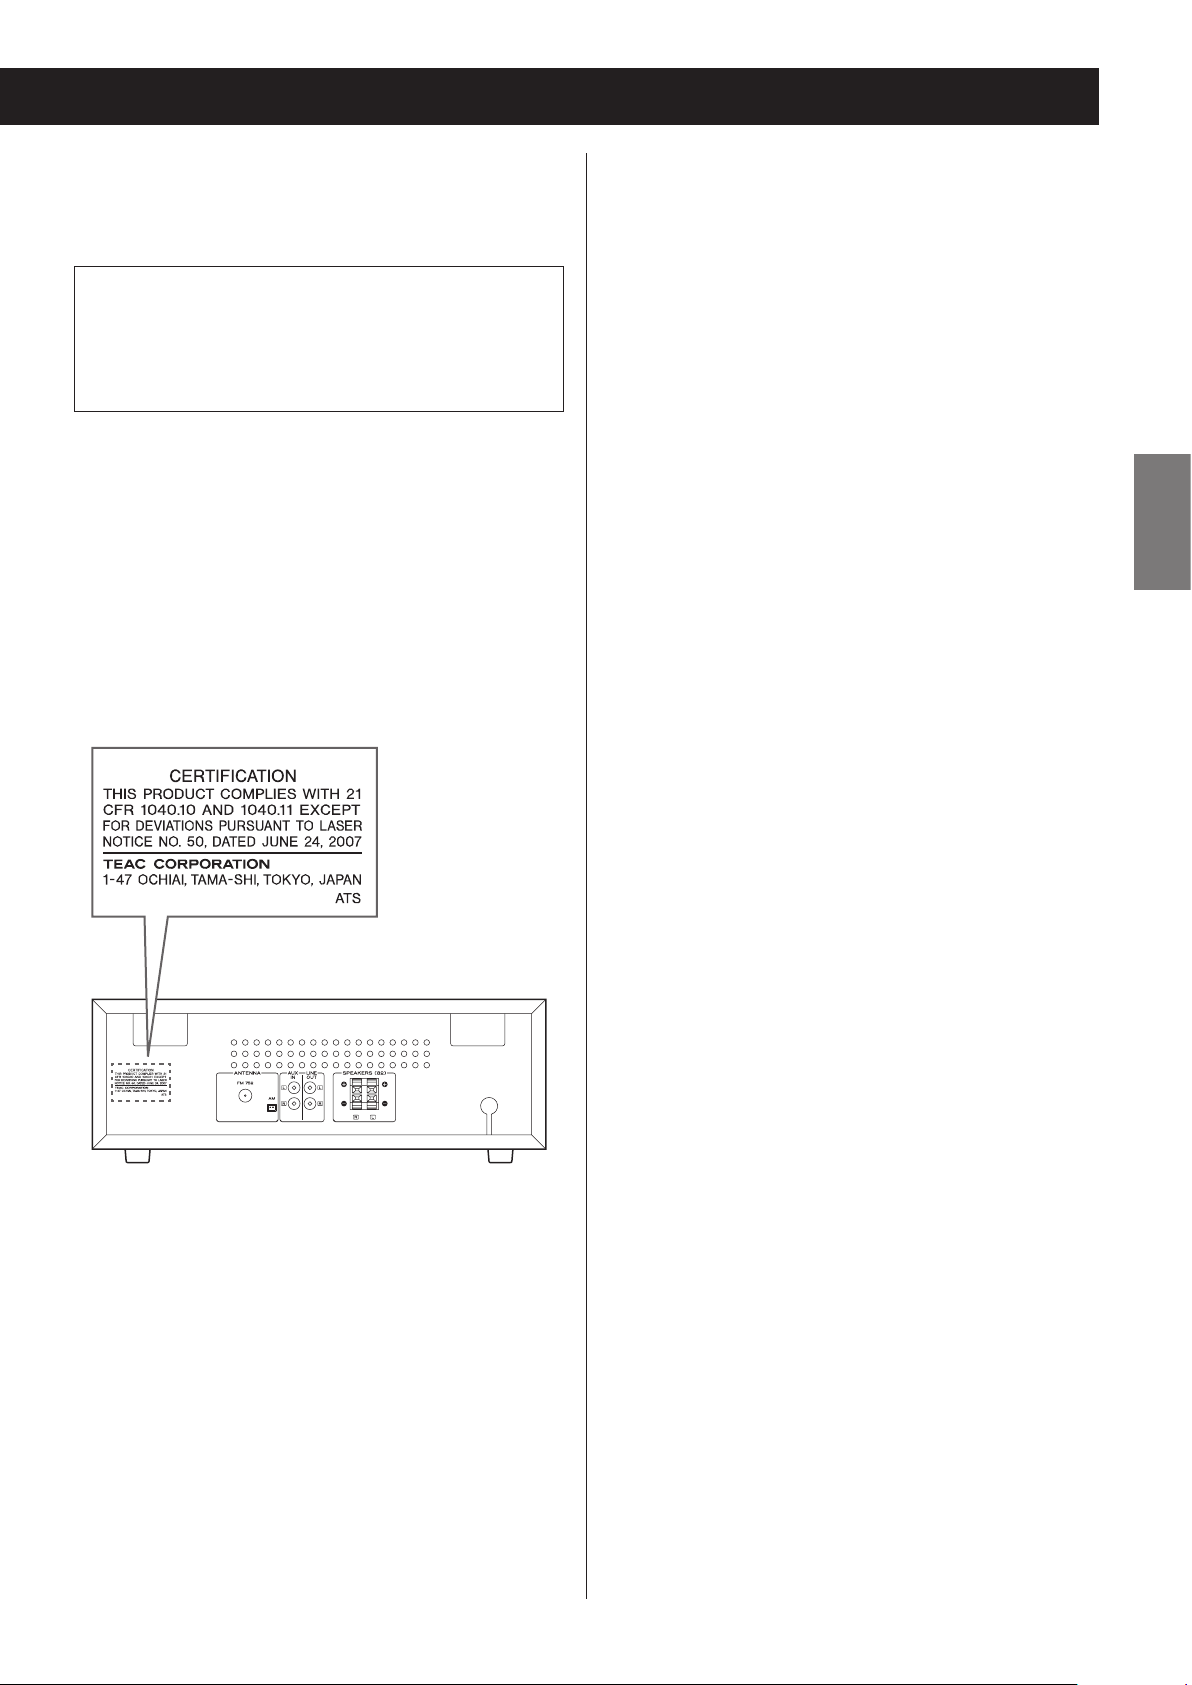
This product contains a semiconductor laser system inside the cabinet and is classified as a “CLASS 1 LASER PRODUCT”.
To prevent being exposed to the laser beam, do not try to open the
enclosure.
Laser:
Type: EP-C101
Manufacturer: GUANGDONG EVER BRIGHT GROUP CO.,LTD.
Laser output: Less than 0.5 mW
Wavelength: 790±25 nm
Model for USA
This product has been designed and manufactured according to
FDA regulations “title 21, CFR, chapter 1, subchapter J, based on the
Radiation Control for Health and Safety Act of 1968”, and is classified as class ! laser product. There is not hazardous invisible laser
radiation during operation because invisible laser radiation emitted inside of this product is completely confined in the protective
housings.
The label required in this regulation is as follows:
Q Precautions concerning batteries
Misuse of batteries could cause them to rupture or leak leading
to fire, injury or the staining of nearby things. Please read and
observe the following precautions carefully.
o Be sure to insert the batteries with correct positive (¥) and
negative (^) orientations.
o Use batteries of the same type. Never use different types of
batteries together.
o If the remote control is not used for a long time (more than a
month), remove the batteries to prevent them from leaking.
o If the batteries leak, wipe away the leakage inside the battery
compartment and replace the batteries with new ones.
o Do not use batteries of types other than those specified. Do
not mix new batteries with old ones or use different types of
batteries together.
o Do not heat or disassemble batteries. Never throw batteries
into fire or water.
o Do not carry or store batteries with other metallic objects.
The batteries could short circuit, leak or explode.
o Never recharge a battery unless it is confirmed to be a
rechargeable type.
ENGLISH
3

IMPORTANT SAFETY INSTRUCTIONS (continued)
1) Read these instructions.
2) Keep these instructions.
3) Heed all warnings.
4) Follow all instructions.
5) Do not use this apparatus near water.
6) Clean only with dry cloth.
7) Do not block any ventilation openings. Install in accordance with
the manufacturer's instructions.
8) Do not install near any heat sources such as radiators, heat
registers, stoves, or other apparatus (including amplifiers) that
produce heat.
9) Do not defeat the safety purpose of the polarized or groundingtype plug. A polarized plug has two blades with one wider than
the other. A grounding type plug has two blades and a third
grounding prong. The wide blade or the third prong are provided for your safety. If the provided plug does not fit into your
outlet, consult an electrician for replacement of the obsolete
outlet.
10) Protect the power cord from being walked on or pinched particularly at plugs, convenience receptacles, and the point where
they exit from the apparatus.
11) Only use attachments/accessories specified by the manufacturer.
12) Use only with the cart, stand, tripod,
bracket, or table specified by the manufacturer, or sold with the apparatus. When
a cart is used, use caution when moving
the cart/apparatus combination to avoid
injury from tip-over.
13) Unplug this apparatus during lightning
storms or when unused for long periods of time.
14) Refer all servicing to qualified service personnel. Servicing is
required when the apparatus has been damaged in any way,
such as power-supply cord or plug is damaged, liquid has been
spilled or objects have fallen into the apparatus, the apparatus
has been exposed to rain or moisture, does not operate normally,
or has been dropped.
o The apparatus draws nominal non-operating power from the
AC outlet with its POWER or STANDBY/ON switch not in the ON
position.
o The mains plug is used as the disconnect device, the disconnect
device shall remain readily operable.
o Caution should be taken when using earphones or headphones
with the product because excessive sound pressure (volume)
from earphones or headphones can cause hearing loss.
CAUTION
o Do not expose this apparatus to drips or splashes.
o Do not place any objects filled with liquids, such as vases, on
the apparatus.
o Do not install this apparatus in a confined space such as a
book case or similar unit.
o The apparatus should be located close enough to the AC
outlet so that you can easily reach the power cord plug at any
time.
o If the product uses batteries (including a battery pack or
installed batteries), they should not be exposed to sunshine,
fire or excessive heat.
o CAUTION for products that use replaceable lithium batter-
ies: there is danger of explosion if a battery is replaced with
an incorrect type of battery. Replace only with the same or
equivalent type.
The Bluetooth® word mark and logos are registered trademarks
owned by Bluetooth SIG, Inc. and any use of such marks by TEAC is
under license.
This product is protected by certain intellectual property rights of
Microsoft. Use or distribution of such technology outside of this
product is prohibited without a license from Microsoft.
Other company names and product names in this document are
the trademarks or registered trademarks of their respective owners.
4

Wireless equipment precautions
Compliance of radio transmitter and
interference
Model for USA
This device complies with Part.15 of FCC Rules.
Operation is subject to the following two conditions:
1) This device may not cause interference, and
2) This device must accept any interference, including
interference that may cause undesired operation.
Labeling of authorization
FCC ID: TZI-MCD800
Model for Canada
Compliance of radio transmitter
This device complies with Industry Canada licenceexempt RSS standard(s). Operation is subject to the
following two conditions: (1) this device may not
cause interference, and (2) this device must accept any
interference, including interference that may cause
undesired operation of the device.
CAUTION
Changes or modifications not expressly approved by
the party responsible for compliance could void the
user’s authority to operate the equipment.
CAUTION
Authorization of wireless devices are different in countries or regions. Please use only in the country where
you purchased the product.
o Depending on the country, restrictions on the use
of Bluetooth wireless technology might exist.
Radiation Exposure requirements
This equipment meets the regulation, which is recognized internationally, for the case of human exposure to
radio waves generated by the transmitter.
Statement of compliance
Model for USA
ENGLISH
Labeling of authorization
IC: 7234A-MCD800
This device complies with FCC radiation exposure limits set forth for an uncontrolled environment.
Model for Canada
The device meets the exemption from the routine
evaluation limits in section 2.5 of RSS 102 and compliance with RSS-102 RF exposure, users can obtain
Canadian information on RF exposure and compliance.
5

Wireless equipment precautions (cont'd)
Bluetooth® notes
Information for interference
(FCC requirements)
This equipment has been tested and found to comply
with the limits for a Class B digital device, pursuant to
Part 15 of the FCC Rules. These limits are designed to
provide reasonable protection against harmful interference in a residential installation.
This equipment generates, uses, and can radiate radio
frequency energy and, if not installed and used in
accordance with the instructions, may cause harmful
interference to radio communications.
However, there is no guarantee that interference will
not occur in a particular installation.
If this equipment does cause harmful interference to
radio or television reception, which can be determined by turning the equipment off and on, the user is
encouraged to try to correct the interference by one or
more of the following measures.
o Reorient or relocate the equipment and/or the
receiving antenna.
o Increase the separation between the equipment and
receiver.
o Connect the equipment into an outlet on a cir-
cuit different from that to which the receiver is
connected.
o Consult the dealer or an experienced radio/TV tech-
nician for help.
When using this unit with a mobile phone or other
Bluetooth devices, they should be no more than about
10 m (33 ft) apart. Depending on the circumstances of
use, however, the effective transmission distance might
be shorter.
Wireless communication with every device that supports Bluetooth wireless technology is not guaranteed.
To determine the compatibility between this unit
and another device that supports Bluetooth wireless
technology, refer to that device's operation manual or
contact the shop where you purchased it.
6

ENGLISH
7

Contents
Before use
Thank you for choosing TEAC. Read this manual carefully to get the best performance from this unit.
IMPORTANT SAFETY INSTRUCTIONS ..................2
Wireless equipment precautions ......................5
Bluetooth® notes .....................................6
Before use ............................................8
Discs ................................................10
MP3/WMA files ......................................12
Handling records ....................................13
Connections .........................................14
Replacing the stylus .................................17
Names and functions of parts (main unit) ............18
Names and functions of parts (remote control) .......20
Using the remote control ............................22
Names and functions of parts (turntable) ............23
Turntable cover ......................................24
Setting the clock. . . . . . . . . . . . . . . . . . . . . . . . . . . . . . . . . . . . . 25
Included items
Check to be sure the box includes all the supplied
accessories shown below. Please contact the store
where you purchased this unit if any of these accessories are missing or have been damaged during
transportation.
Speakers × 1 pair
Remote control (RC-1316) × 1
45 RPM adapter × 1
Sapphire stylus for LP and EP records (already
installed)
Turntable cover × 1
Hinges × 2
Batteries for remote control (AA) × 2
Basic operation ......................................27
Listening to a CD ....................................30
Listening files on a USB flash drive ...................32
Listening to a CD/files on a USB flash drive ...........33
Programmed playback (CD/USB) .....................34
Repeat and shuffle playback (CD/USB) ...............38
About MP3/WMA file playback .......................39
Listening to audio from a Bluetooth device ..........42
Pairing with another Bluetooth device ...............44
Listening to records. . . . . . . . . . . . . . . . . . . . . . . . . . . . . . . . . . 45
Listening to the radio ................................48
Preset tuning ........................................50
Wakeup timer .......................................52
Sleep timer ..........................................55
Listening to a connected device .....................56
Troubleshooting .....................................57
AM antenna × 1
FM antenna (wire type) × 1
Owner’s manual (this document) × 1
o Keep this manual in a safe place for future reference.
Warranty card × 1
Specifications ........................................59
8

Precautions for use
o Do not place anything on the turntable cover.
Objects on the cover might cause noise due to vibrations or fall off, especially during playback.
o Avoid placing the unit in direct sunlight, close to
a source of heat or in other similar conditions. Do
not place the unit on top of an amplifier or other
equipment that might generate heat that exceeds
the operating temperature range of this unit.
Doing so could cause discoloration, deformation or
malfunction.
o As the unit could become warm during operation,
always leave sufficient space around it for ventilation. When installing this unit, leave at least 20 cm
(8") between it and walls. To allow good heat dissipation, leave a little space between it and other
devices. When placing it in a rack, for example, leave
at least 40 cm (16") open above it and 10 cm (4")
open behind it. Failure to provide these gaps could
cause heat to build up inside and result in fire.
o Do not open the cabinet as this might result in dam-
age to the circuitry or electrical shock. If a foreign
object should get into the unit, contact your dealer.
o When removing the power plug from the wall outlet,
always pull directly on the plug, never yank on the
cord.
o If a TV is turned on while the unit is on, static might
appear on the TV screen depending on the characteristics of the TV broadcast signal. If this occurs, put
this unit into standby mode (off) when using the TV.
Product registration
Customers in the USA, please visit the following TEAC
website to register your TEAC product online.
http://audio.teac.com/support/registration/
ENGLISH
o DO NOT MOVE THE UNIT DURING PLAYBACK. During
playback, the disc or the record rotates. Do not lift or
move the unit during playback. Doing so may damage the disc, the record, the stylus, the cartridge or
the unit.
o Always remove the disc or the record before relocat-
ing or moving this unit. Moving the unit with a disc
inside or a record on the turntable could damage the
disc, the record, the stylus and the cartridge or could
cause a malfunction.
o The voltage supplied to the unit should match the
voltage as printed on the rear panel. If you are in any
doubt regarding this matter, consult an electrician.
Maintenance
If the surface of the unit gets dirty, wipe it with a soft
cloth or use diluted mild liquid soap. Allow the surface
of the unit to dry completely before using.
Do not use chemical cleaning cloths, thinner or similar
substances as they could damage the surface of the
unit.
V
CAUTION
For safety, disconnect the power cord from
the socket before cleaning.
9

Discs
Discs that can be played on this unit
CDs with the Compact disc Digital Audio logo
CD-R and CD-RW discs that have been created in
the audio CD format and finalized correctly.
CD-R and CD-RW discs that have been written
with MP3 or WMA files and finalized.
This unit can play the above types of discs (without
adapters). This unit cannot play any other types of discs.
V
CAUTION
If you try to play any other type of disc with
this unit, loud noises that damage speakers
or harm hearing could occur. Never try to
play any other type of disc with this unit.
CD-R/CD-RW discs
This unit can play back CD-R and CD-RW discs that have
been recorded in the audio CD format (CD-DA) and the
MP3 or WMA format.
o Discs created by a CD recorder must be finalized with
the CD recorder that was used to create the discs
before being used with this unit.
o Depending on disc quality and recording conditions,
playback of some discs might not be possible. Please
see the manual for the device that you used to create
the disc.
o If you are uncertain about the handling of a CD-R
or CD-RW disc, please contact the seller of the disc
directly.
Precautions for use
o This unit might not be able to properly play back
Copy Control CDs, Dual Discs and other special CDs
that do not conform to the Red Book CD standard.
Operation and sound quality cannot be guaranteed
when special discs are used in this unit. If playback of
a special disc should cause trouble, contact the seller
of the disc.
o Do not use cracked discs because they could dam-
age the unit.
o When writing something on the label side of a disc,
use a felt tip permanent marker. The use of a ballpoint pen or other pen with a hard tip could damage
the disc, making it unplayable.
o Never use commercially available CD stabilizers.
Doing so could make the disc unplayable or damage
the unit.
o Never use CDs with irregular shapes, including heart-
shaped and octagonal discs because such discs
could damage the unit.
10

Handling precautions
Storage precautions
o Always insert the disc into the disc tray with the label
side up. Only one side of a Compact Disc can be
played or used for recording.
o If the side of the disc that the signal is recorded on
(unlabeled side) has scratches, fingerprints or dirt on
it, for example, playback errors could occur. Please
handle discs with care.
o To remove a disc from its case, press down on the
center of the case and hold the disc by its edges.
Do not touch the side of the disc that has the data
encoded on it (unlabeled side).
Removal from case Holding by edges
o Discs should be stored in their cases when not being
used. Failure to do so could result in warping and
scratches.
o Do not leave discs in places that are exposed to direct
sunlight or that are very humid or hot. Long exposure
to such conditions could warp or degrade discs, making them unplayable.
o Since CD-R/CD-RW discs are more susceptible to the
effects of heat and ultraviolet rays compared to commercial CDs, do not leave them for long periods of
time in places that are, for example, exposed to direct
sunlight or near equipment that generate heat.
o Smudges on a disc might cause the sound to skip or
degrade the sound quality. Always clean discs before
storing them.
ENGLISH
Maintenance
o If the side of the disc that has the data encoded on
it (unlabeled side) becomes dirty with fingerprints
or dust, use a soft cloth to wipe the surface from the
center directly toward the edge.
o Never use record cleaners, antistatic treatments,
thinners or similar chemicals to clean discs. Such
chemicals could harm the surface of the disc.
11

MP3/WMA files
This unit can play MP3 and WMA files that are on CD-R/
CD-RW discs and USB flash drives.
o Audio file formats that can be played back
MP3 (file extension: .mp3)
Bit rate: 8 kbps to 320 kbps
Sampling frequency: 16 kHz to 48 kHz
WMA (file extension: .wma)
Bit rate: 8 kbps to 320 kbps
Sampling frequency: 32 kHz, 44.1 kHz, 48 kHz
Note: Digital Rights Management (DRM) is not
supported.
o Up to eight levels of folders supported
File information shown on the display
The display of this unit can only show single-byte alphanumeric characters.
o If the file information uses Japanese, Chinese or other
double-byte characters, playback is possible but the
name will not be shown correctly.
Precautions when creating MP3/WMA
files on a computer
o Only discs that have been recorded using the ISO
9660 standard can be played by this unit.
o MP3 and WMA files are recognized by their file exten-
sions (“.mp3” for MP3 files and “.wma” for WMA files.)
Always include the extension in the file name.
o Files without extensions cannot be recognized. A file
cannot be played back regardless of the file name
extension, if the data is not in the MP3 or WMA
format.
o After recording to a CD-R/CD-RW, always close the
session (complete disc creation). This unit cannot
play a disc if its session has not been closed.
o A maximum of 999 files and 99 folders on a disc can
be played. If the media has more than these maximums, this unit might not be able to correctly play
any file that is the 1000th or higher or any folder that
is the 100th or higher.
o Discs made with multi-session recording are not sup-
ported. Only the first session can be played back.
o Depending on the condition of the disc, playback
might not be possible or the sound might skip.
o This unit cannot play copyright-protected audio files.
12

Handling records
Holding records
When holding a record or removing it from its sleeve,
avoid touching the grooves by holding the record by
its label and edge with one hand or by holding it by its
edge with both hands.
Label Grooves
Outer edge
Cleaning
Precautions
o Do not leave records in places that are exposed to
direct sunlight or are very hot or very humid. Leaving
a record in such a condition for a long time could
result in warping or other damage.
o Do not stack multiple records or place heavy objects
on top of them. Do not leave records at an angle for
long amounts of time either. Doing so could result in
warping or other damage.
o Do not allow hard objects to directly touch the audio
grooves. Doing so could cause scratches.
o After you finish playing a record, always put it back
into its sleeve for storage. Leaving a record unprotected could result in warping or scratching.
o Do not use cracked records.
ENGLISH
o Fingerprints and dust on a record can cause noise
and the sound to skip, as well as damage the record
itself and the stylus. Use a commercially available
record cleaner to clean records. Do not use thinner or
anything other than a record cleaner. Such chemicals
could harm the surface of the record.
o When using a record cleaner, wipe the surface of the
record in a circular motion, following the grooves.
13

Connections
V
Precautions when making connections
o Do not turn the unit on until after making all connections.
o Carefully read the manuals of the devices that you are connecting and
follow their instructions when making connections.
A
D
B
LLR
Audio output
jacks
A
FM antenna connector
Extend the FM antenna and fix it in the position
where the reception is best (on a window frame or
wall, for example).
B
AM antenna connector
Assemble the included AM loop antenna and connect it to the AM antenna jack on the back of the
unit.
Place the antenna in the position that provides the
best AM reception.
C
Wall outlet
Audio input
jacks
Assembling the AM antenna
To assemble the AM antenna, turn the base in the direction of the arrow. Then, insert the hook at the bottom of
the loop into the slot in the base.
Recording device
Cassette deck, CD recorder, etc.
1
Antenna base Hook
2
14

C
Analog audio input and output jacks
(AUX IN/LINE OUT)
These input and output analog audio signals.
Use commercially available audio cables to connect
other equipment to the input and output jacks of
this unit.
White (L)
Red (R)
o To connect and use a cassette deck, CD recorder
or other recording device, connect that device’s
output jacks to this unit’s AUX IN jacks, and that
device’s input jacks to this unit’s LINE OUT jacks.
o Insert the plugs completely. Do not bundle these
cords with power cords or speaker cables. Doing
so could reduce the audio quality or cause noise.
White (L)
Red (R)
D
AC power cord
Confirm that the power plug is plugged into a
working outlet.
V
Be sure to connect the power cord to an AC
outlet that supplies the correct voltage.
Connection to an outlet that supplies incorrect voltage could cause fire or electric shock.
Hold the power plug when plugging it into an
outlet or unplugging it. Never pull or yank on
the power cord. Unplug the power cord from
the outlet when you are not planning to use
the unit for an extended period of time.
ENGLISH
15

Connections (continued)
Connecting the speakers
Connect the speaker cables that are already attached to
the included speakers to this unit's speaker terminals.
Right speaker Left speaker
While pressing the lever, insert the end of the cable
(where the wire is exposed). Release the lever to connect the speaker cable.
Connect the end of the ¥ speaker cable with the red
mark to the red speaker terminal of the unit.
Connect the end of the ^ speaker cable with no mark
to the black speaker terminal of the unit.
o Gently pull the cables to make sure they are con-
nected firmly.
o Confirm that only the exposed part of the wire is
inserted into the terminal and that the cable sheath
is not touching the terminal.
o A short could occur if the exposed core wire at the
tip of a speaker cable touches another cable or
terminal.
o Never let the speaker cables short.
o In order to avoid noise, do not bundle speaker cables
with power cords or other cables.
The included speakers have bass ports in their backs.
Place the speakers so that these ports are not blocked
by, for example, other objects or walls.
Bass port
Speaker cable
16

Replacing the stylus
o Record styluses are precision parts, so handle them
carefully to avoid bending or damaging their tips. If
a stylus becomes bent or damaged, it might not be
able to follow the audio groove precisely and could
damage records or cause other malfunction.
o If a stylus becomes dirty, use a commercially avail-
able stylus cleaner or similar product to clean it.
o Do not rub the stylus tip forcefully with anything
hard. Do not wipe the stylus with thinner or other
chemicals. Doing so could harm it.
Replacing the stylus
Using a record stylus wears it down, which could cause
the sound quality to worsen and possibly damage
records. Replace the stylus with a replacement stylus
specified by TEAC as soon as possible.
In general, you should replace a sapphire stylus for LP
and EP records after about 50 hours of use and a diamond stylus for SP records after about every 100 hours.
Removing the stylus (red part)
1 Press the STANDBY/ON button to put
the unit into standby.
2 Hold the cartridge with one hand, and
use a small screwdriver or other tool to
push the level difference at the front
of the stylus down in the “A” direction.
Then, pull it forward and o.
ENGLISH
Screwdriver
Attaching a new stylus
1 Insert it in the “B” direction so that the
end of the stylus ts into the cartridge.
CAUTION
o Since loud noises could suddenly occur, put the unit
into standby before changing the stylus.
o Be careful not to hurt your hand or the equipment.
o Be careful not to allow small children to accidentally
swallow styluses.
Replacement styluses (sold separately)
STL-103: Sapphire stylus for LP and EP records
(3 per set)
SPL-102: Diamond stylus for SP records
(2 per set)
For replacement styluses, contact your dealer.
2 Push in the “C” direction until it snaps
into place.
17
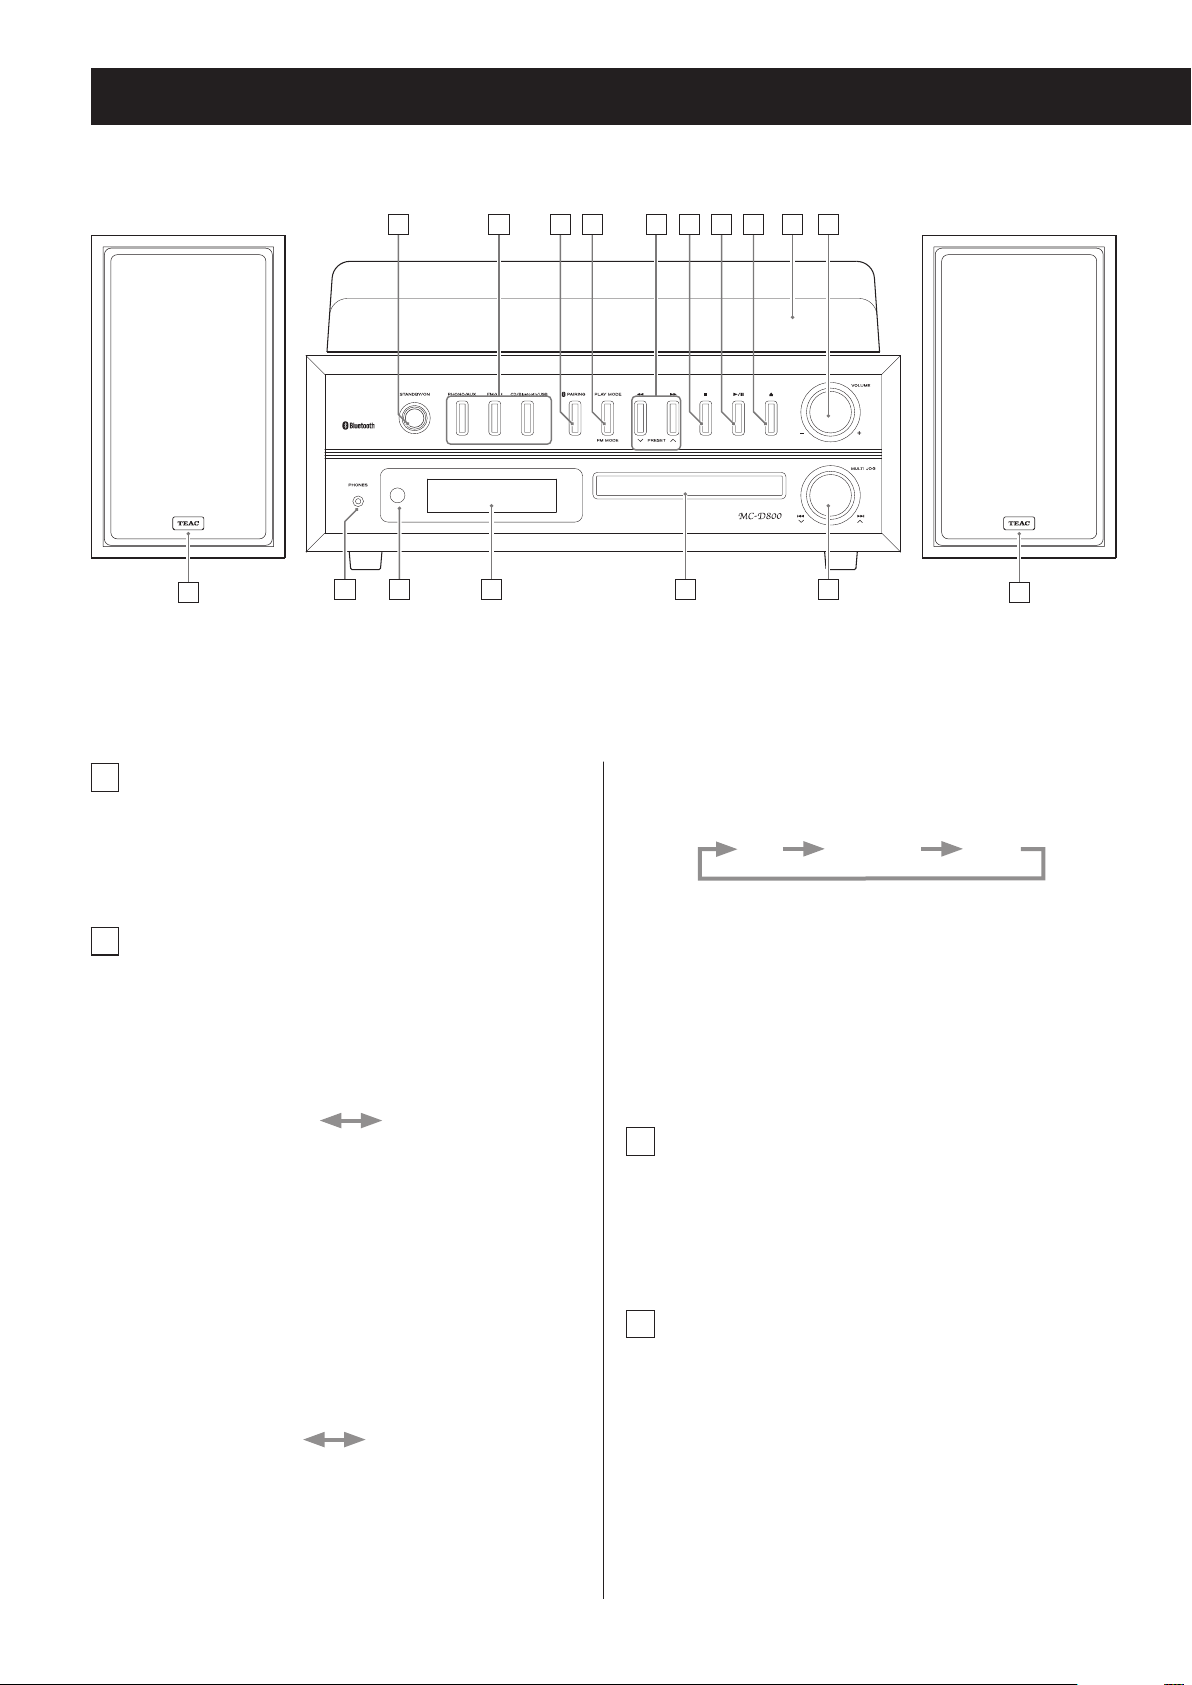
Names and functions of parts (main unit)
A B C D HE F G I J
Z
P P
A
STANDBY/ON button
Press this button to turn the unit on or put it in
standby.
B
FUNCTION buttons
K L M N O
(PHONO/AUX, FM/AM, CD/Bluetooth/
USB)
Press the PHONO/AUX button to switch between
PHONO and AUX as shown below.
PHONO AUX
To listen to a record, press the PHONO/AUX button
and select PHONO.
To listen to a device connected to the auxiliary
input (AUX IN) jacks, press the PHONO/AUX button
and select “AUX”.
Each time you press the FM/AM button, the unit will
switch between FM and AM broadcast reception as
shown below.
FM AM
To listen to an FM station, press the FM/AM button
and select “FM”.
To listen to an AM station, press the FM/AM button
and select “AM”.
Each time you press the CD/Bluetooth/USB button,
the function will change as shown below.
CD Bluetooth USB
To listen to a CD, press the CD/Bluetooth/USB button and select “CD”.
To listen to a Bluetooth device, press the CD/
Bluetooth/USB button and select “Bluetooth”.
To listen to a USB flash drive, press the CD/Bluetooth/
USB button and select “USB”.
C
PAIRING button
Use this when pairing with other Bluetooth devices
and when ending Bluetooth connections (pages
44 and 43).
D
PLAY MODE button
FM MODE button
When listening to an CD/MP3/WMA file, use to
change the play mode (normal, repeat, shuffle)
(page 38).
When listening to FM radio, use to switch between
stereo and mono (page 49).
18

E
Search (m/,) buttons
L
Remote control signal receiver
PRESET (j/k) buttons
Press and hold during CD or MP3/WMA file playback to search forward/backward (page 33).
When listening to the radio, use to select preset stations (page 51).
F
Stop (8) button
Press to stop CD/USB/Bluetooth playback.
G
Play/pause (y/9) button
Press when the CD, USB or a supported Bluetooth
device is stopped or paused to start playback.
Use this button to pause playback during playback.
H
Open/close button (-)
Press to open and close the disc tray.
Signals sent from the remote control are received
here. When using a remote, point it toward this
spot.
M
Display
This shows the track number, time, FM/AM frequency and other information.
N
Disc tray
O
Scroll/skip (MULTI JOG/. //j k)
knob
Use when tuning the radio to select stations (page
49).
Use this also to set the current time and the
wakeup timer (pages 25 and 52).
When listening to a CD or USB flash drive, use to
skip to the previous or next track/file (page 33).
ENGLISH
I
Turntable cover
J
VOLUME knob
Use to adjust the volume. Turn right to raise the
volume and left to lower it.
K
PHONES jack
When you use headphones, first reduce the volume
level to minimum. Then, insert the plug from your
headphones into the PHONES jack, and turn the
volume up gradually by turning the VOLUME knob.
o Do not turn the unit on and put it into standby
or connect and disconnect the headphones
plug while wearing headphones. (Doing so
could cause loud noise to be output from the
headphones.)
o When a plug is in the headphones jack, no sound
will be output from the speakers.
P
Right/left speakers
Place the speakers as desired.
19

b
d
g
h
Names and functions of parts (remote control)
a
STANDBY/ON button
b
DIMMER button
Use to adjust the display brightness (page 29).
c
TIMER button
m
n
o
p
l
Use to turn the wakeup timer on and off (pages
52 and 55).
d
SLEEP button
Use to set the sleep timer (page 55).
e
PRESET/MP3 (j/k) buttons
When listening to the radio, use to select preset
radio stations (page 51).
When listening to an MP3/WMA file, use to select
the folder number (page 34).
a
c
e
f
i
f
TUNING/TIME (j/k) buttons
Skip/search (.m/,/) buttons
j
q
k
When listening to the radio, use for manual and
auto station tuning (pages 49 and 48).
When listening to an MP3/WMA file, use to select
the file number (page 34).
When setting the clock and the wakeup timer, use
to set the time (pages 25 and 52).
When listening to a CD or USB flash drive, use to
skip to the previous or next track/file. Press and hold
during CD or MP3/WMA file playback to search forward/backward (page 33).
g
Stop (8) button
Press to stop playback.
h
Play/pause (y/9) button
Press when stopped or paused to start playback.
Use this button to pause playback during playback
(page 33).
When both the main unit and the remote control
have buttons with the same functions, the instructions in this manual refer to only one set of buttons,
but the other set of buttons can be used in the same
way.
20
i
Function buttons
(PHONO/AUX, FM/AM, CD/Bluetooth/
USB)
Press the PHONO/AUX button to switch between
PHONO and AUX.
To listen to a record, press the PHONO/AUX button
and select “PHONO”.

To listen to a device connected to the auxiliary
input (AUX IN) jacks, press the PHONO/AUX button
and select “AUX”.
Each time you press the FM/AM button, the unit will
switch between FM and AM broadcast reception.
To listen to an FM station, press the FM/AM button
and select “FM”.
To listen to an AM station, press the FM/AM button
and select “AM”.
Each time you press the CD/Bluetooth/USB button,
the function will change as shown below.
CD Bluetooth USB
To listen to a CD, press the CD/Bluetooth/USB button and select “CD”.
To listen to a Bluetooth device, press the CD/
Bluetooth/USB button and select “Bluetooth”.
To listen to a USB flash drive, press the CD/
Bluetooth/USB button and select “USB”.
p
PLAY MODE/FM MODE button
When listening to a CD or USB flash drive, use to
change the play mode (normal, repeat, shuffle)
(page 38).
When listening to FM radio, use to switch between
stereo and mono (page 49).
q
VOLUME (+/−) buttons
Use to adjust the volume. Press the + button to
raise the volume, and press the − button to lower
the volume.
ENGLISH
j
SOUND button
Use to adjust the bass and treble, as well as the leftright volume balance (page 28).
k
MUTE button
Use to temporarily silence the output (page 29).
l
PAIRING button
Use this when pairing with other Bluetooth devices
and when ending Bluetooth connections (pages
44 and 43).
m
DISPLAY button
Press when FM/AM or CD/Bluetooth/USB is selected
to show the current time.
n
INFO button
When listening to an MP3/WMA file, use to change
the information shown on the display (page 40).
o
MEMORY/CLOCK ADJ button
When listening to the radio, use when setting radio
station presets (pages 50 and 51).
Use this when programming tracks/files and checking programmed tracks/files (pages 34 to 37).
Use to adjust the clock (pages 25 and 26).
21

Using the remote control
Precautions for use
o When using the remote control, point it toward the
remote control signal receiver on the main unit from
a distance of 5 m (16 ft) or less. Do not place obstructions between the main unit and the remote control.
o The remote control might not work if the remote
control signal receiver on the main unit is exposed to
sunlight or bright lights. In this case, try moving the
main unit.
o Beware that use of this remote control could cause
the unintentional operation of other devices that can
be controlled by infrared rays.
Installing batteries
Remove the cover from the back of the remote control.
Insert two AA batteries into the compartment according to the +/− indications. Then, close the cover.
When to replace batteries
If the distance required between the remote and main
unit decreases or if the unit stops responding to the
remote buttons, replace both batteries with new ones.
Dispose of the used batteries according to the instructions on them or requirements set by your local
municipality.
V
CAUTION
Misuse of batteries could cause them to rupture or
leak, which might result in fire, injury or the staining of nearby materials. Please read and observe
the precautions on page 3 carefully.
22
Names and functions of parts (turntable)
a
a
b
c
a
Turntable
Place records centered on the turntable.
b
45 RPM adapter
d
e
f
g
h
Before use, remove the
needle cover (white
plastic part) by pulling
it in the direction of
the arrow.
e
Cue lever
Use this lever to lift the tone arm from the record.
f
Tone arm holder
ENGLISH
Use this when playing back records with large holes.
c
USB
Connect a USB flash drive to the unit.
d
Transport locking screw
Before using the record player, use a coin or other
tool to turn the transport locking screw clockwise
until it stops.
Side view of transport locking screw
Turn this way
Transport
position
(when shipped
from the factory)
Before transporting this unit (to move residences,
for example) turn the screw counterclockwise until
it stops to secure the turntable.
Use position
This is a rest for the tone arm. Gently push the clasp
to the right to release the tone arm before playing a
record.
g
Rotation speed selection switch
Set the rotation speed (RPM) suitable for the record.
h
Tone arm
When you move the tone arm toward the record,
the turntable will begin to turn.
Tone arm holder
Tone arm
h
Rotation speed selection
switch
g
f
Cue lever
e
23

Turntable cover
Attaching the turntable cover
Turntable cover
Main unit
Hinge
1 Insert the hinges completely into the
hinge holders at the left and right ends
of the back of the main unit.
2 Align the tops of the hinges with the
turntable cover hinge holders and
insert them.
Opening and closing the turntable cover
Open
Opening
Hold the front edge of the turntable cover and gently
lift it open completely until it stops.
The turntable cover will stay open in this position.
Closing
Gently lower the turntable cover until it is closed.
V
Be careful not to pinch your hand, for example, when opening and closing the turntable
cover.
Removing the turntable cover
Hold both edges of the turntable cover and lift it slowly
to remove it along with the hinges from the unit. Then,
remove the hinges from the turntable cover.
24

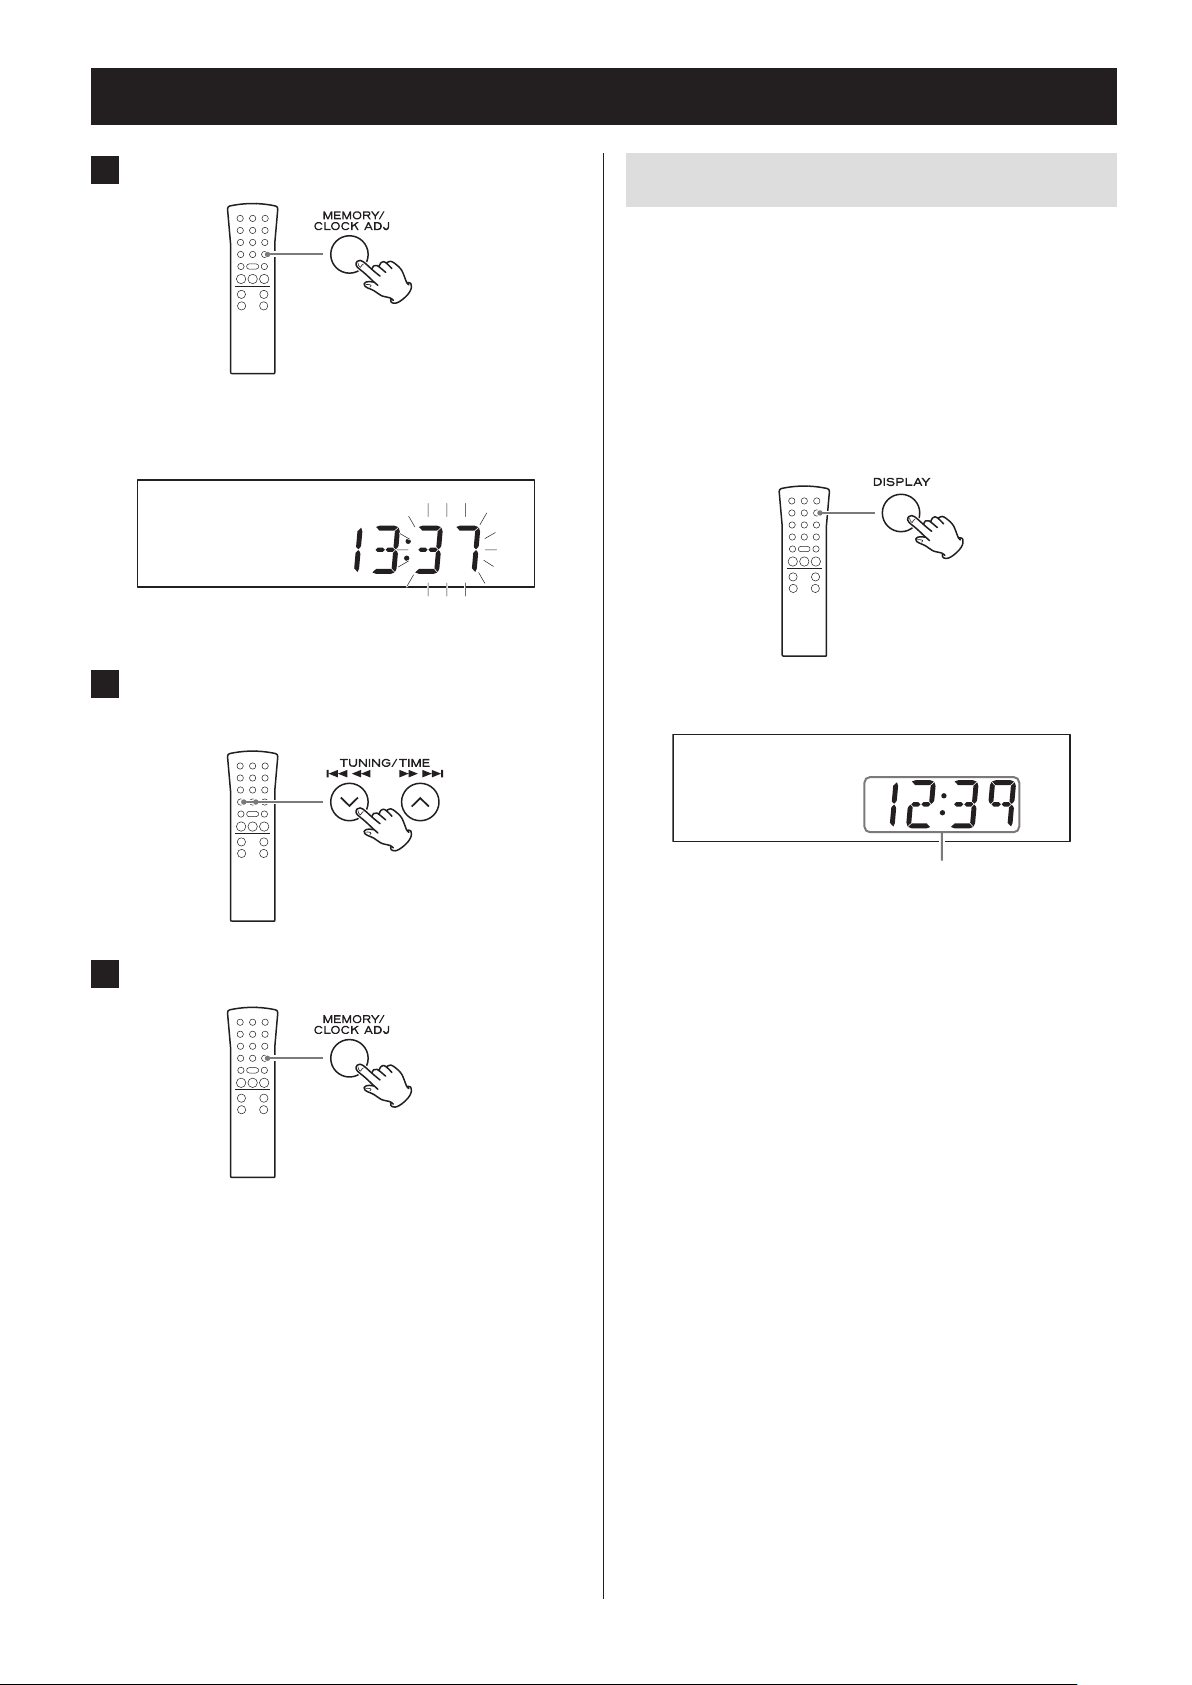
Setting the clock
Set the current time before using the unit.
1 Press the STANDBY/ON button to put
the unit into standby.
c3
NOTE
The clock can also be set when the unit is on, but
not when the unit is in radio, CD or USB mode.
2 Press and hold the CLOCK ADJUST but-
ton for at least two seconds.
Press and hold for at
least 2 seconds
“SET CLOCK” scrolls across the display.
o If a setting is left for more than 20 seconds, this
time setting mode will end.
4 Press the CLOCK ADJUST button again.
Display example
The “hour” value blinks.
5 Press the TIME (j/k) buttons to set
the current hour.
ENGLISH
3 Press the TIME (j /k ) buttons to
switch between 24 HOUR and 12 HOUR
(24-hour or 12-hour time display).
Continued on the next page
25
Setting the clock (continued)
6 Press the CLOCK ADJUST button.
Display example
The minute value blinks.
7 Press the TIME (j/k) buttons to set
the current minute.
Current time display
The clock is always shown when the unit is in standby
mode (off) and when the function is set to PHONO/
AUX.
Press the remote control's DISPLAY button to show the
clock on the display.
o The current time is shown for three seconds in CD/
USB and FM/AM modes.
Display example
8 Press the CLOCK ADJUST button.
This completes the procedures for setting the time.
The clock will start from the set minute at 0 seconds.
o The unit’s clock and wakeup timer settings will be
erased if a power outage occurs or the power cord is
unplugged from an outlet.
Current time
o The DISPLAY button does not function in AUX/
PHONO and Bluetooth modes.
o In Bluetooth mode, the current time is only shown
when paired.
26

Basic operation
1 Press the STANDBY/ON button to turn
the unit on.
Z
o Even when in standby (unit off ), pressing a func-
tion button will turn the unit on.
2 Press a function button to set the play-
back source.
Z
3 Turn the VOLUME knob to adjust the
volume.
Z
ENGLISH
MIN (0): minimum volume
MAX (40): maximum volume
Turn the VOLUME knob right to raise the volume
and left to lower it.
o The default value is 20.
When a playback source is selected, the corresponding indicator appears on the display.
Record
External input
CD
Bluetooth
Radio
USB
o When you turn the VOLUME knob, the volume
will be shown for about three seconds.
o When the volume is at minimum level, “MIN”
appears on the display. At maximum, “MAX”
appears.
V
Sudden loud noises could damage your hearing or cause other harm. Set the volume to
minimum. After sound output begins, adjust
the volume to a suitable level.
o When not using this unit, press the STANDBY/ON
button to put the unit into standby.
27

Basic operation (continued)
Adjusting the bass, treble and stereo
balance
1 Press the SOUND button to select the
item you want to adjust.
Pressing the SOUND button cycles through the
items in the following order.
BASS TREBLE BALANCE
Ordinary display
Setting items and ranges
BASS (low frequencies)
Use to adjust the bass.
Setting range: −5 to +5
Default value: 0
Display example
TREBLE (high frequencies)
Use to adjust the treble.
Setting range: −5 to +5
Default value: 0
Display example
2 Within three seconds, start using the
VOLUME (+/−) buttons to adjust the
setting.
o If three seconds pass without any adjustment,
the setting mode will end.
BALANCE
Use to adjust the left-right stereo balance.
Setting range: L+10 to R+10
Default value: CENTER
Display example
You should usually leave BALANCE set to CENTER.
28

Adjusting the brightness of the display
Muting the output
Press the DIMMER button to cycle through the following brightness settings.
Ordinary brightness Dim Very dim
o When the unit enters standby, the dimmer setting is
reset to ordinary brightness.
Press the MUTE button to temporarily silence the output. Press the MUTE button again to resume output at
the previously set volume level.
ENGLISH
o When the mute function is active, “MUTE” appears on
the display.
o When the mute function is active, adjusting the vol-
ume will unmute the output.
o When the mute function is active, changing the
source will unmute the output.
29
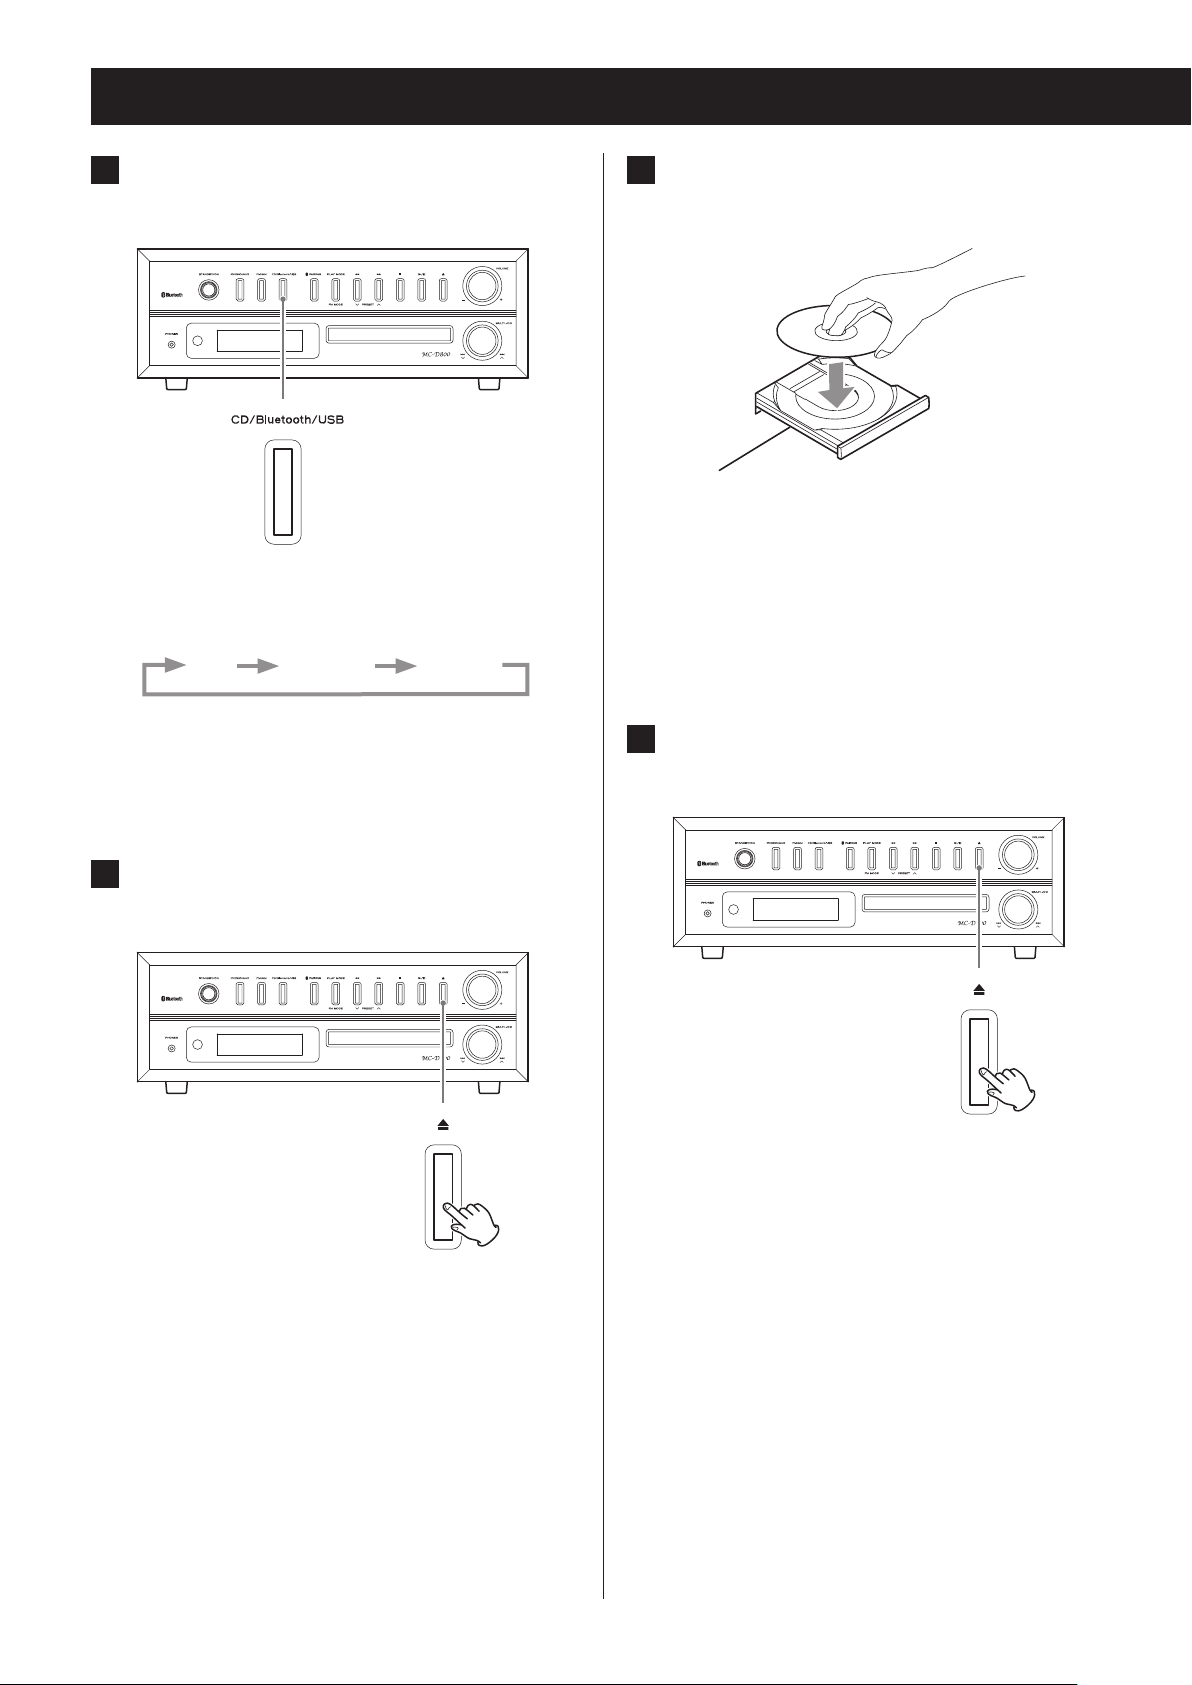
Listening to a CD
1 Press the CD/Bluetooth/USB button to
select “CD”.
Z
Each time you press the CD/Bluetooth/USB button,
the function will change as shown below.
CD Bluetooth USB
After switching to CD, “DISC” will appear, “READING”
will blink for several seconds, and then the CD will
be in a stopped state. If no disc is loaded, “NO DISC”
appears on the display.
3 Place a disc centered on the tray with
the labeled side up.
o Never place more than one disc on the tray.
o If the tray is closed while a disc is outside the center
guides, the disc might become stuck inside and the
tray might not open. Be sure to always place discs
within the guides at the center of the tray.
o Do not force the tray by hand when opening or
closing.
4 Press the open/close (-) button to
close the tray.
Z
2 Press the open/close (-) button to
open the tray.
Z
The disc tray opens forward.
Be careful not to let your fingers be pinched when
the tray closes.
o The unit takes a few seconds to load the disc. No
buttons will work when “READING” is displayed.
Wait until the disc information is displayed.
30
 Loading...