


77-20DX220I0621
Z
Micro Hi-Fi System
OWNER’S MANUAL
MANUEL DU PROPRIÉTAIRE
MANUAL DEL USUARIO
MC
-
DX222i
ENGLISH
FRANÇAIS ESPAÑOL
Includes adapters for:
iPod nano
iPod with video
iPod mini
iPod with Click Wheel
iPod with color display
Adapters sold separately:
iPod with dock connector
Comprend des adaptateurs pour:
iPod nano
iPod avec vidéo
iPod mini
iPod avec molette sensitive Click Wheel
iPod avec écran couleur
Adaptateurs vendus séparément:
iPod avec connecteur pour dock
Incluye adaptadores para:
iPod nano
iPod con vídeo
iPod mini
iPod con rueda de clic
iPod con pantalla en color
Adaptadores no incluidos:
iPod con conector para base

2
IMPORTANT SAFETY INSTRUCTIONS
1) Read these instructions.
2) Keep these instructions.
3) Heed all warnings.
4) Follow all instructions.
5) Do not use this apparatus near water.
6) Clean only with dry cloth.
7) Do not block any ventilation openings. Install in accordance
with the manufacturer’s instructions.
8) Do not install near any heat sources such as radiators, heat
registers, stoves, or other apparatus (including amplifiers) that
produce heat.
9) Do not defeat the safety purpose of the polarized or
grounding-type plug. A polarized plug has two blades with
one wider than the other. A grounding type plug has two
blades and a third grounding prong. The wide blade or the
third prong are provided for your safety. If the provided plug
does not fit into your outlet, consult an electrician for
replacement of the obsolete outlet.
10) Protect the power cord from being walked on or pinched
particularly at plugs, convenience receptacles, and the point
where they exit from the apparatus.
11) Only use attachments/accessories specified by the
manufacturer.
12) Use only with the cart, stand, tripod,
bracket, or table specified by the
manufacturer, or sold with the apparatus.
When a cart is used, use caution when
moving the cart/apparatus combination to
avoid injury from tip-over.
13) Unplug this apparatus during lightning storms or when
unused for long periods of time.
14) Refer all servicing to qualified service personnel. Servicing is
required when the apparatus has been damaged in any way,
such as power-supply cord or plug is damaged, liquid has
been spilled or objects have fallen into the apparatus, the
apparatus has been exposed to rain or moisture, does not
operate normally, or has been dropped.
CAUTION: TO REDUCE THE RISK OF ELECTRIC SHOCK,
DO NOT REMOVE COVER (OR BACK). NO USERSERVICEABLE PARTS INSIDE. REFER SERVICING TO
QUALIFIED SERVICE PERSONNEL.
The lightning flash with arrowhead symbol, within an
equilateral triangle, is intended to alert the user to the
presence of uninsulated “dangerous voltage” within
the product’s enclosure that may be of sufficient
magnitude to constitute a risk of electric shock to
persons.
The exclamation point within an equilateral triangle is
intended to alert the user to the presence of important
operating and maintenance (servicing) instructions in
the literature accompanying the appliance.
3
ENGLISH
Disposal of your old appliance
1. When this crossed-out wheeled bin
symbol is attached to a product it means
the product is covered by the European
Directive 2002/96/EC.
2. All electrical and electronic products
should be disposed of separately from
the municipal waste stream via designated collection
facilities appointed by the government or the local
authorities.
3. The correct disposal of your old appliance will help prevent
potential negative consequences for the environment and
human health.
4. For more detailed information about disposal of your old
appliance, please contact your city office, waste disposal
service or the shop where you purchased the product.
CAUTION
< DO NOT REMOVE THE EXTERNAL CASES OR CABINETS TO
EXPOSE THE ELECTRONICS. NO USER SERVICEABLE PARTS
ARE WITHIN!
< IF YOU ARE EXPERIENCING PROBLEMS WITH THIS PRODUCT,
CONTACT TEAC FOR A SERVICE REFERRAL. DO NOT USE THE
PRODUCT UNTIL IT HAS BEEN REPAIRED.
< USE OF CONTROLS OR ADJUSTMENTS OR PERFORMANCE OF
PROCEDURES OTHER THAN THOSE SPECIFIED HEREIN MAY
RESULT IN HAZARDOUS RADIATION EXPOSURE.
WARNING: TO PREVENT FIRE OR SHOCK
HAZARD, DO NOT EXPOSE THIS APPLIANCE
TO RAIN OR MOISTURE.
< Do not expose this apparatus to drips or splashes.
< Do not place any objects filled with liquids, such as vases, on
the apparatus.
< Do not install this apparatus in a confined space such as a
book case or similar unit.
< The apparatus draws nominal non-operating power from the
AC outlet with its POWER switch in the off position.
< The apparatus should be located close enough to the AC
outlet so that you can easily grasp the power cord plug at any
time.
< An apparatus with Class !construction shall be connected to
an AC outlet with a protective grounding connection.
< Batteries (battery pack or batteries installed) shall not be
exposed to excessive heat such as sunshine, fire or the like.
< Excessive sound pressure from earphones and headphones
can cause hearing loss.
Contents
Thank you for choosing TEAC. Read this manual carefully
to get the best performance from this unit.
Important Safety Instructions . . . . . . . . . . . . . . . . . . . . . . . . . . 2
Before Using the Unit . . . . . . . . . . . . . . . . . . . . . . . . . . . . . . . . 4
Remote Control Unit. . . . . . . . . . . . . . . . . . . . . . . . . . . . . . . . . 4
Discs. . . . . . . . . . . . . . . . . . . . . . . . . . . . . . . . . . . . . . . . . . . . . 5
Connection. . . . . . . . . . . . . . . . . . . . . . . . . . . . . . . . . . . . . . . . 6
Wall Mounting . . . . . . . . . . . . . . . . . . . . . . . . . . . . . . . . . . . . . 8
Getting started . . . . . . . . . . . . . . . . . . . . . . . . . . . . . . . . . . . . . 9
Unit Functions. . . . . . . . . . . . . . . . . . . . . . . . . . . . . . . . . . . . . 10
Basic Operation. . . . . . . . . . . . . . . . . . . . . . . . . . . . . . . . . . . . 12
iPod
Listening to iPod . . . . . . . . . . . . . . . . . . . . . . . . . . . . . . . . . . . 14
CD/MP3
Listening to CD/MP3. . . . . . . . . . . . . . . . . . . . . . . . . . . . . . . . 16
Search Mode (MP3 only). . . . . . . . . . . . . . . . . . . . . . . . . . . . . 18
Shuffle Playback . . . . . . . . . . . . . . . . . . . . . . . . . . . . . . . . . . . 19
Programmed Playback. . . . . . . . . . . . . . . . . . . . . . . . . . . . . . . 20
Repeat Playback . . . . . . . . . . . . . . . . . . . . . . . . . . . . . . . . . . . 21
TUNER
Listening to the Radio . . . . . . . . . . . . . . . . . . . . . . . . . . . . . . . 22
Preset Tuning . . . . . . . . . . . . . . . . . . . . . . . . . . . . . . . . . . . . . 23
RDS . . . . . . . . . . . . . . . . . . . . . . . . . . . . . . . . . . . . . . . . . . . . 24
RDS (PTY Search) . . . . . . . . . . . . . . . . . . . . . . . . . . . . . . . . . . 24
AUX
Listening to an External Source . . . . . . . . . . . . . . . . . . . . . . . . 25
Setting the Clock . . . . . . . . . . . . . . . . . . . . . . . . . . . . . . . . . . 26
Setting the Timer . . . . . . . . . . . . . . . . . . . . . . . . . . . . . . . . . . 27
Troubleshooting . . . . . . . . . . . . . . . . . . . . . . . . . . . . . . . . . . . 29
Specifications . . . . . . . . . . . . . . . . . . . . . . . . . . . . . . . . . . . . . 30

4
Before Using the Unit
Read this before operation
< As the unit may become warm during operation, always leave
sufficient space around the unit for ventilation.
The ventilation holes should not be covered. Make sure there
is at least 5 cm of space on each side of the unit. Do NOT
place anything on top of the unit.
< The voltage supplied to the unit should match the voltage as
printed on the rear panel. If you are in any doubt regarding
this matter, consult an electrician.
< Choose the installation location of your unit carefully. Avoid
placing it in direct sunlight or close to a source of heat. Avoid
locations subject to vibrations and excessive dust, heat, cold
or moisture.
< Do not place the unit on any other electronic components.
< Do not open the cabinet as this might result in damage to the
circuitry or electrical shock. If a foreign object should fall into
the unit, contact your dealer or service company as soon as
possible.
< When removing the power plug from a wall outlet, always
pull directly on the plug. Do not pull on the line cord.
< To keep the laser pickup clean, do not touch it and always
close the CD door after each use.
< Do not attempt to clean the unit with chemical solvents as
this might damage the finish. Use a clean, dry, lint-free cloth.
< Keep this manual in a safe place for future reference.
CAUTION: DO NOT MOVE THE UNIT DURING PLAYBACK
During playback, the disc rotates at high speeds. Do NOT lift
or move the unit during playback. Doing so may damage the
disc or the unit.
WHEN MOVING THIS UNIT
When changing places of installation or packing the unit for
moving, be sure to remove the disc. Moving this unit with the
disc loaded may result in malfunction or other damage.
NXT is a trademark of New Transducers Ltd.
Remote Control Unit
Remove the battery compartment cover.
Put in the lithium battery (CR2032, 3V).
Close the cover.
Battery Replacement
If the distance required between the remote control unit and
main unit decreases, the battery is exhausted. In this case,
replace the battery with a new one.
Precautions concerning batteries
Do not heat or disassemble batteries and never dispose of old
batteries by throwing them in a fire.
3
2
1
The provided Remote Control Unit allows the unit to be operated
from a distance.
When operating the remote control unit, point it towards the
remote sensor on the front panel of the unit.
< Even if the remote control unit is operated within the effective
range, remote control operation may be impossible if there
are any obstacles between the unit and the remote control.
< If the remote control unit is operated near other products
which generate infrared rays, or if other remote control
devices using infrared rays are used near the unit, it may
operate incorrectly. Conversely, the other products may also
operate incorrectly.
Battery Installation
1
2
3
5
ENGLISH
Discs
Discs which can be played on this unit:
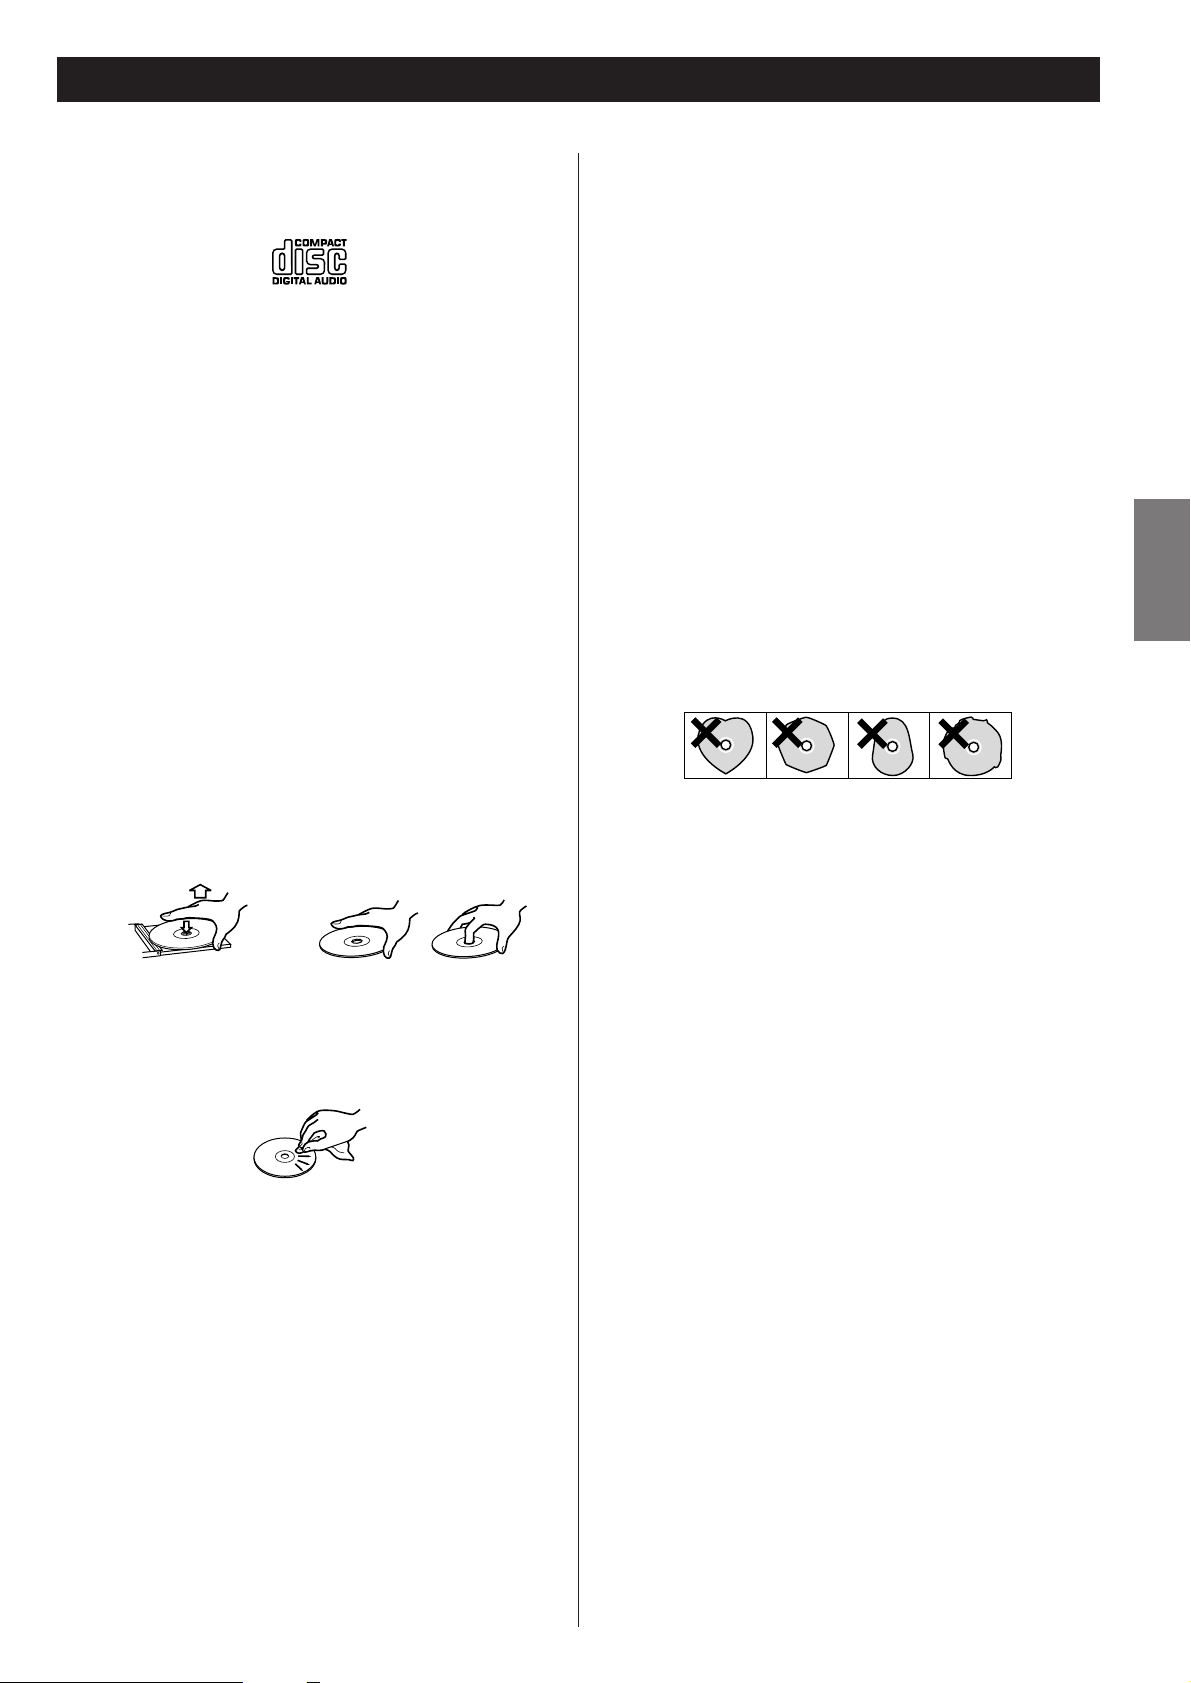
• Conventional audio CDs bearing the COMPACT DISC
DIGITAL AUDIO logo on the label:
• Properly finalized CD-R and CD-RW discs
• MP3 CDs
Note:
< Depending on the quality of the disc and/or the condition of
the recording, some CD-R/CD-RW discs may not be playable.
< Copy-protected discs and other discs that do not conform to
the CD standard may not play back correctly in this player. If
you use such discs in this unit, TEAC Corporation and its
subsidiaries cannot be responsible for any consequences or
guarantee the quality of reproduction. If you experience
problems with such non-standard discs, you should contact
the producers of the disc.
MP3 compatibility
< File names of MP3 should be alphanumeric characters. This
unit cannot display symbols and full-size or 2 bytes-wide
characters (such as Japanese, Chinese, etc.) correctly. Also, be
sure to use the file extension “.mp3”.
< The disc must be finalized in order to play.
< The CD-ROM must be ISO 9660 compatible.
< When more than 200 files or 50 folders are recorded on the
disc, the unit might not be able to play it correctly.
< The file must be mono or stereo MPEG-1 Audio Layer 3
format, 44.1 or 48 kHz, fixed bit-rate.
How to remove the disc How to hold the disc
< Always place the disc on the disc tray with the label side up.
(Compact discs can be played or recorded only on one side.)
< To remove a disc from its storage case, press down on the
center of the case and lift the disc out, holding it carefully by
the edges.
< CD-R and CD-RW discs are more sensitive to the effects of
heat and ultraviolet rays than ordinary CDs. It is important
that they are not stored in a location with direct sunlight and
keep your discs away from sources of heat such as radiators
or heat-generating electrical devices.
< Printable discs aren’t recommended because the label side
might be sticky (or contain glue), which will damage the unit.
< Do not stick papers or protective sheets on the discs and do
not use any protective coating spray.
< Use a soft oil-based felt-tipped pen to write information on
the label side of a disc. Never use a ball-point or hard-tipped
pen, as this may cause damage to the recorded side of the
disc.
< Never use a stabilizer. Using commercially available CD
stabilizers with this unit will damage the mechanisms and
cause them to malfunction.
< Do not use irregular shape CDs (octagonal, heart shaped,
business card size, etc.). CDs of this sort can damage the unit:
< If you are in any doubt as to the care and handling of any
disc, read the precautions supplied with the disc, or contact
the disc manufacturer directly.
< Should the disc become dirty, wipe the surface from the
center hole outward towards the outer edge with a soft, dry,
lint-free cloth:
< Never use chemicals such as record (LP) sprays, antistatic
sprays or fluids, benzine or thinner to clean the discs. Such
chemicals will do irreparable damage to the disc’s plastic
surface.
< Discs should be returned to their cases after each use to avoid
dust and scratches that may eventually cause your disc to
skip.
< Do not expose discs to direct sunlight, high humidity, or high
temperatures for extended periods. Long exposure to high
temperatures will warp the disc.
< Do not play any disc that is warped, scratched, deformed or
damaged. Playing such discs may cause irreparable harm to
the playback mechanism.
6
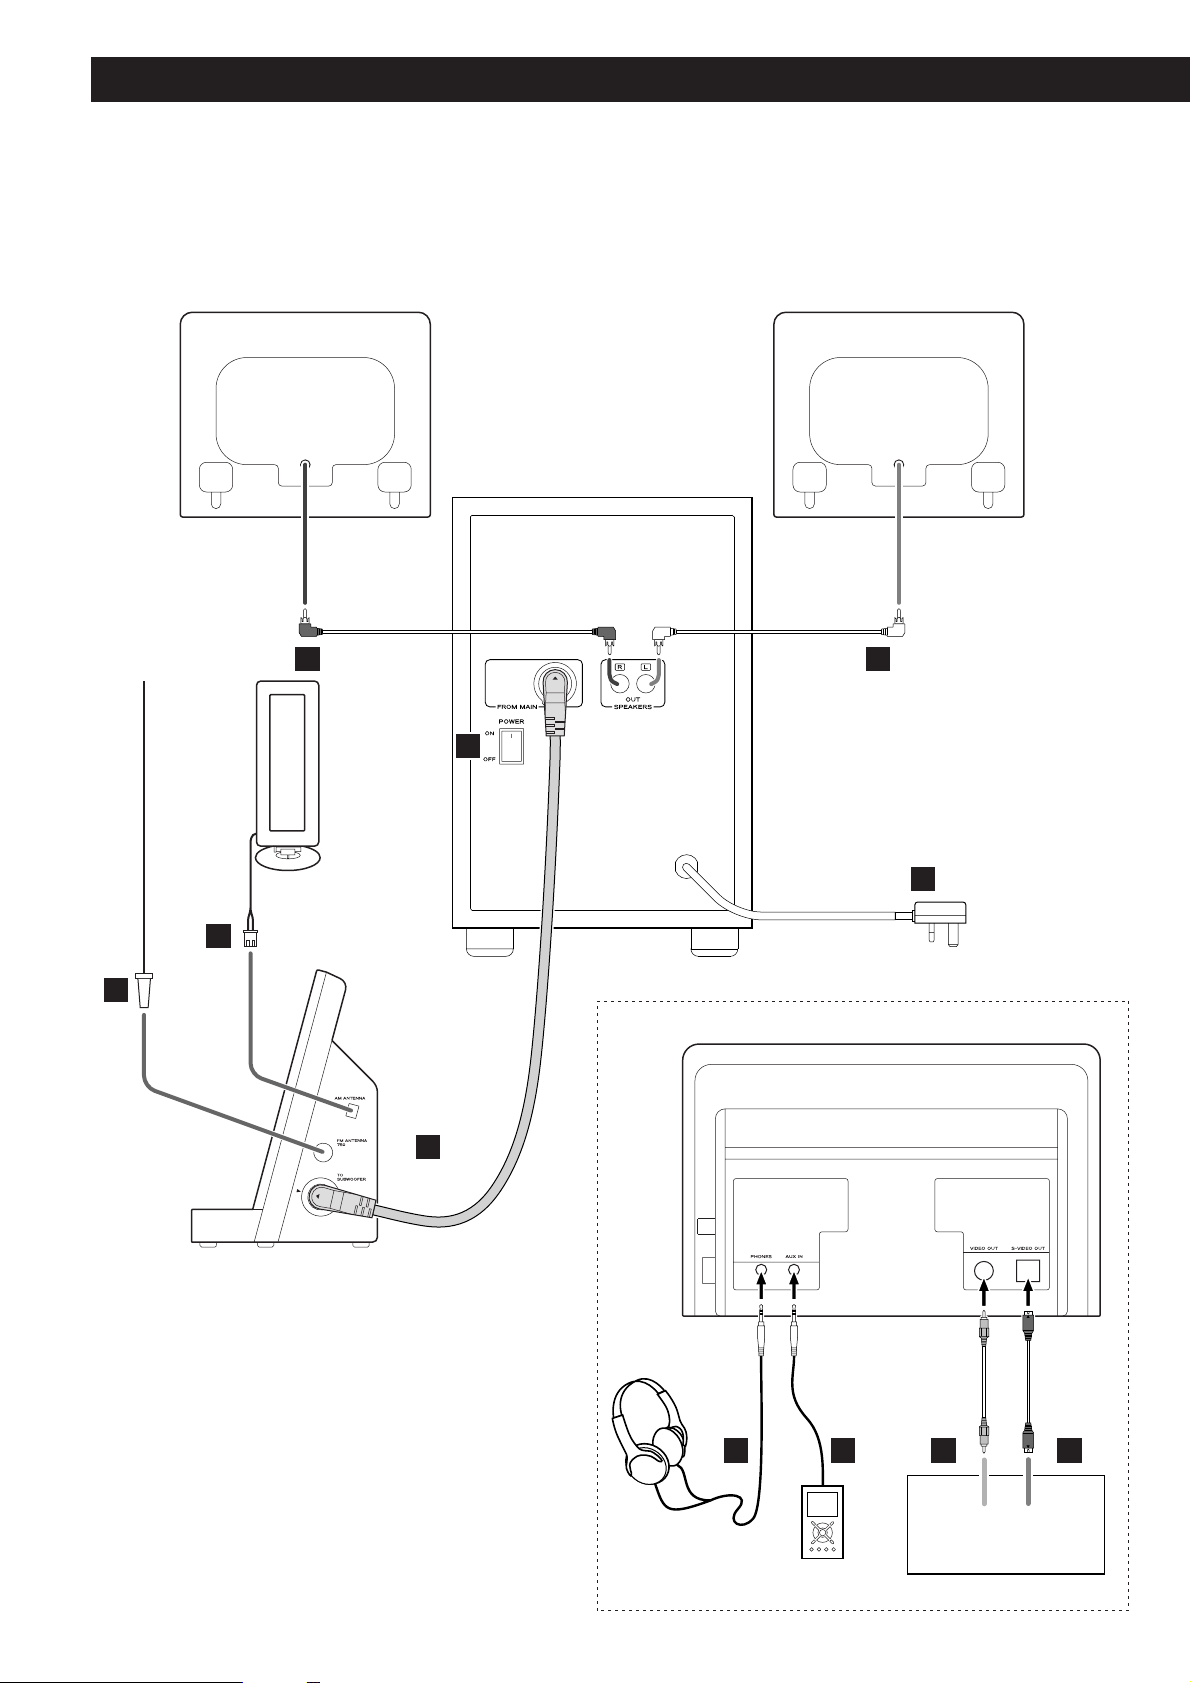
Connection
CAUTION
< Turn off the power of all the equipment before making connections.
< Read instructions of each component you intend to use with this unit.
< Be sure to insert each plug securely. To prevent hum and noise, do not bundle the connection
cords with the power cord.
B
A
C
G H I J
E
DD
F
S-VIDEO
IN
VIDEO
IN
Speaker (R) Speaker (L)
Side panel of the main unit
Subwoofer
TV (monitor)
Rear panel of the main unit
7
ENGLISH
Subwoofer
Connect the “TO SUBWOOFER” and the “FROM MAIN”
sockets using the supplied cable.
< Connect the Connectors in the direction as figured.
SPEAKERS
Connect the left speaker’s plug to L, and the right speaker’s
plug to R.
< If not using the included speakers, make sure the speakers
you use are at least 4 Ω impedance.
< Do not connect anything other than speakers to these
terminals.
D
C
AM loop antenna
Position the antenna for the best sound.
If you want, you can hook the AM antenna on a wall as
shown below:
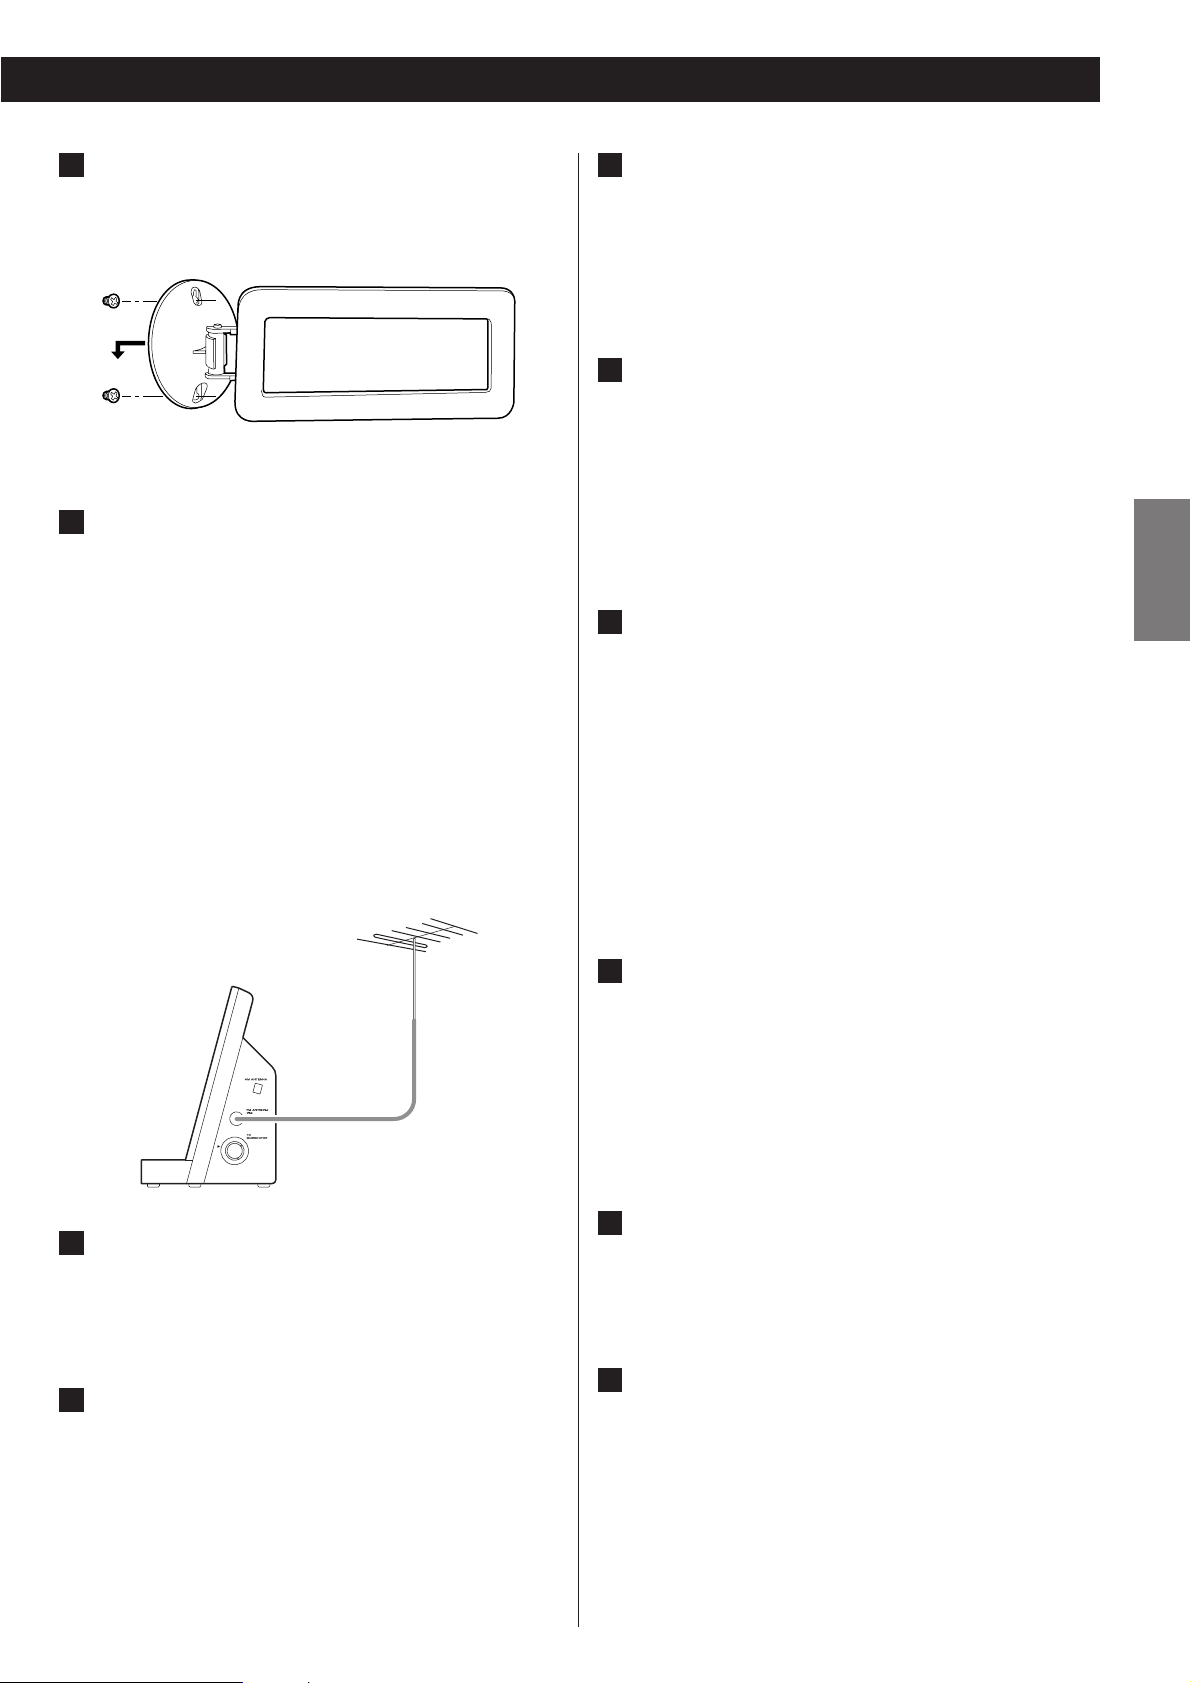
FM antenna
While in FM mode, tune in an FM station and extend the
lead to find the best position for reception. This antenna
may need to be repositioned if you move your unit to a new
location.
FM Outdoor Antenna
In an area where FM signals are weak, it will be necessary to
use a 75-ohm unbalanced-type outdoor FM antenna using
an optional (not supplied) matching transformer connected
to an external antenna. Generally, a 3-element antenna will
be sufficient; if you live in an area where the FM signals are
particularly weak, it may be necessary to use one with 5 or
more elements.
B
A
AC Power Cord
Be sure to connect the power cord to an AC outlet which
supplies the correct voltage.
Hold the power plug when plugging or unplugging the
power cord. Never pull or yank on the power cord.
POWER switch of the Subwoofer
Use this switch to turn the system on or off.
< If the power switch of the subwoofer turned off, the
settings kept in memory (clock, preset stations, timer
setting) will be erased.
To avoid loosing your settings, it is advisable to keep this
switch ON when not in use.
Headphones
For private listening, first reduce the volume level to
minimum. Then insert the plug from your headphones into
the PHONES jack, and adjust the volume using the VOLUME
buttons. The sound from the speakers is cut off while the
headphone jack is inserted.
CAUTION
Always lower the volume level prior to plugging in your
headphones. TO AVOID DAMAGING YOUR HEARING - Do
not place your headphones on your head until after you
have plugged them in.
AUX IN
You can connect a portable audio player to this jack.
Connect the LINE OUT or PHONES jack (audio output jack)
of the player using the supplied stereo mini plug cable.
When using the PHONES jack of your mini player, you must
adjust the volume of the mini-player or you may hear no
sound from your MC-DX222i.
VIDEO OUT terminal
This terminal outputs video signal from iPod.
Use an RCA (pin) video cable to connect the Dock to the
composite video connector of a television or monitor.
S-VIDEO OUT terminal
This terminal outputs video signal from iPod.
Use an S-Video cable to connect the Dock to the S-Video
input of a suitably equipped television or monitor. Use this
connection in preference to a composite video connection.
J
I
H
G
F
E
Outdoor FM Antenna (75Ω)
8
Wall Mounting
You can mount the left and right speakers on a wall.
Precautions
< Be aware that the length of the cables are approximately 3 m.
Do not attempt to mount the speakers too far from the
subwoofer.
< Drill holes into solid wall support, such as wooden frame or
concrete wall.
< TEAC supplies these brackets as a convenience to the product
owner. Consult your local building codes and exercise all
necessary caution when mounting these brackets. If you are
unsure how to use the supplied brackets, consult with a local
tradesmen or building supply expert.
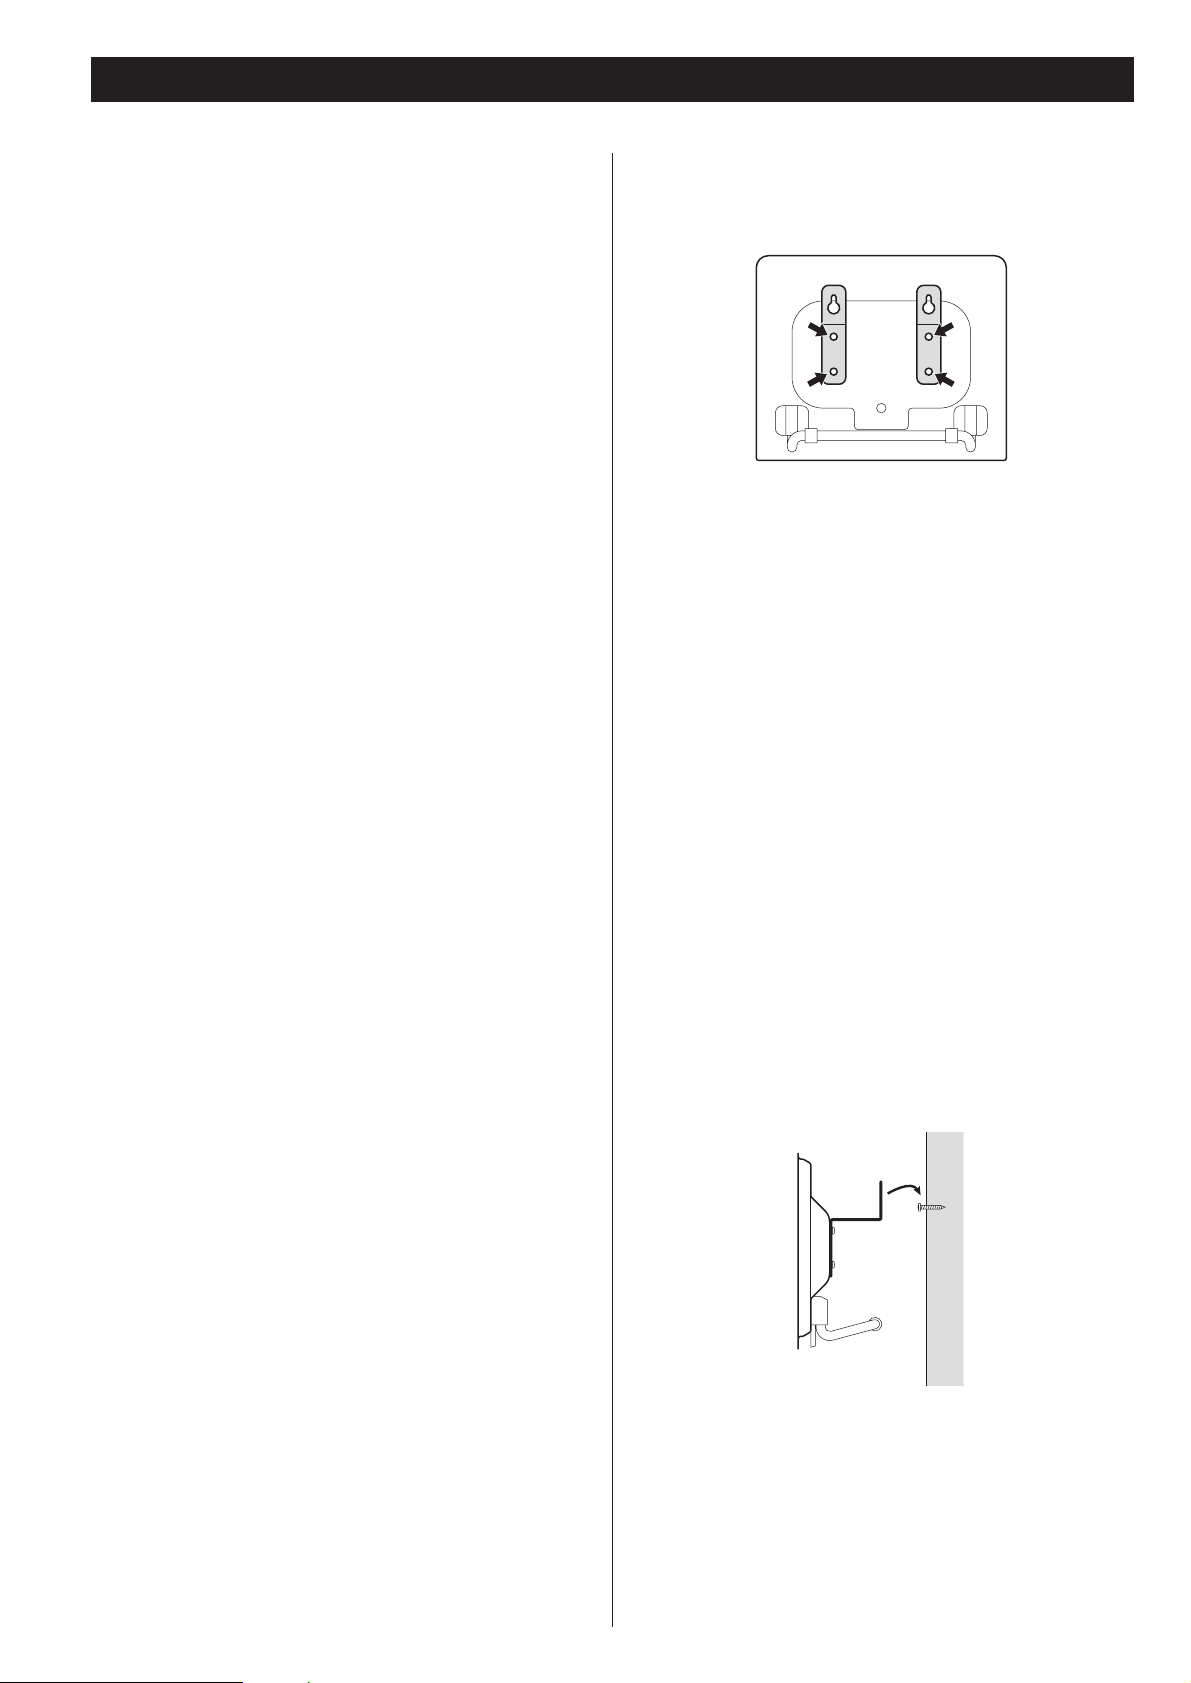
To hook on the wall
1. Fix the brackets on the rear panel of the speakers using
the supplied short screws.
2. Use the supplied guide sheet to mark the exact drilling
points on the wall.
3. Drill holes in the wall at the marked points.
4. Screw the supplied long screws into the wall.
Leave about 5 mm space between the screw’s head and the
wall.
< As a convenience, a set of tapered plastic anchors is supplied.
If you chose to use these anchors, drill a pilot hole using a 6
mm drill bit then tap the anchor into the pilot hole.
Only use these anchors if they are appropriate for the
materials onto which the unit is to be mounted. Consult your
local hardware store if you are uncertain.
5.Before going on, connect the speakers and the
subwoofer using the supplied speaker cables (see page
6-7).
6. Carefully hang the speakers onto the screws.
Note:
Ensure that the speaker locks onto the hooks and that the
hooks are strong enough to support the weight before
removing your hands.

9
ENGLISH
The MC-DX222i comes mounted with an adapter for iPod with
color display (40GB, 60GB), “60GB (color) + Photo 40GB/60GB”.
To play your iPod through the MC-DX222i, you have first to
check if the factory mounted adapter fits your model of iPod. If it
does not, you have to replace it with a correct one, as explained
below.
1. Remove the adapter from the Dock of the MC-DX222i.
Hold the left and right sides of the adapter and gently pull it
up.
2. Choose the Dock adapter that fits your iPod mobile
digital device.
“Video 30GB” for iPod with video (30 GB).
“Video 60GB/80GB” for iPod with video (60 GB, 80 GB).
“nano” for iPod nano.
“mini” for iPod mini.
“20GB (color) + Photo 30GB” for iPod with color display
(20GB, 30GB, U2 Special Edition).
“60GB (color) + Photo 40GB/60GB” for iPod with color
display (40GB, 60GB).
“20GB + U2” for iPod with Click Wheel (20 GB, U2 Special
Edition).
“40GB” for iPod with Click Wheel (40 GB).
< Use a commercially available adapter to play iPod with dock
connector (with four buttons under the display).
< When you need to remove the adapter, hold the left and
right sides of the adapter and gently pull it up.
< When you don’t use the Dock, use the supplied cover for the
Dock to prevent dust from settling on the Dock.
3. Insert the adapter into the Dock of the MC-DX222i.
Fit the front edge of the adapter into the Dock, and then
press the back edge of the adapter onto the Dock until a
slight “click” is heard indicating the adapter is inserted
correctly.
Compatible iPod Software
In case your iPod will not work with the MC-DX222i or with the
remote control unit, software update may solve the problem.
Visit the Apple website and download the latest iPod Software.
http://www.apple.com/uk/ipod/download/
iPod is a trademark of Apple, Inc., registered in the U.S. and
other countries.
Getting started
1
2
10
Note:
To simplify explanations, instructions in this manual refer to
the names of the buttons and controls on the front panel
only. Associated controls on the remote control will also
operate similarly.
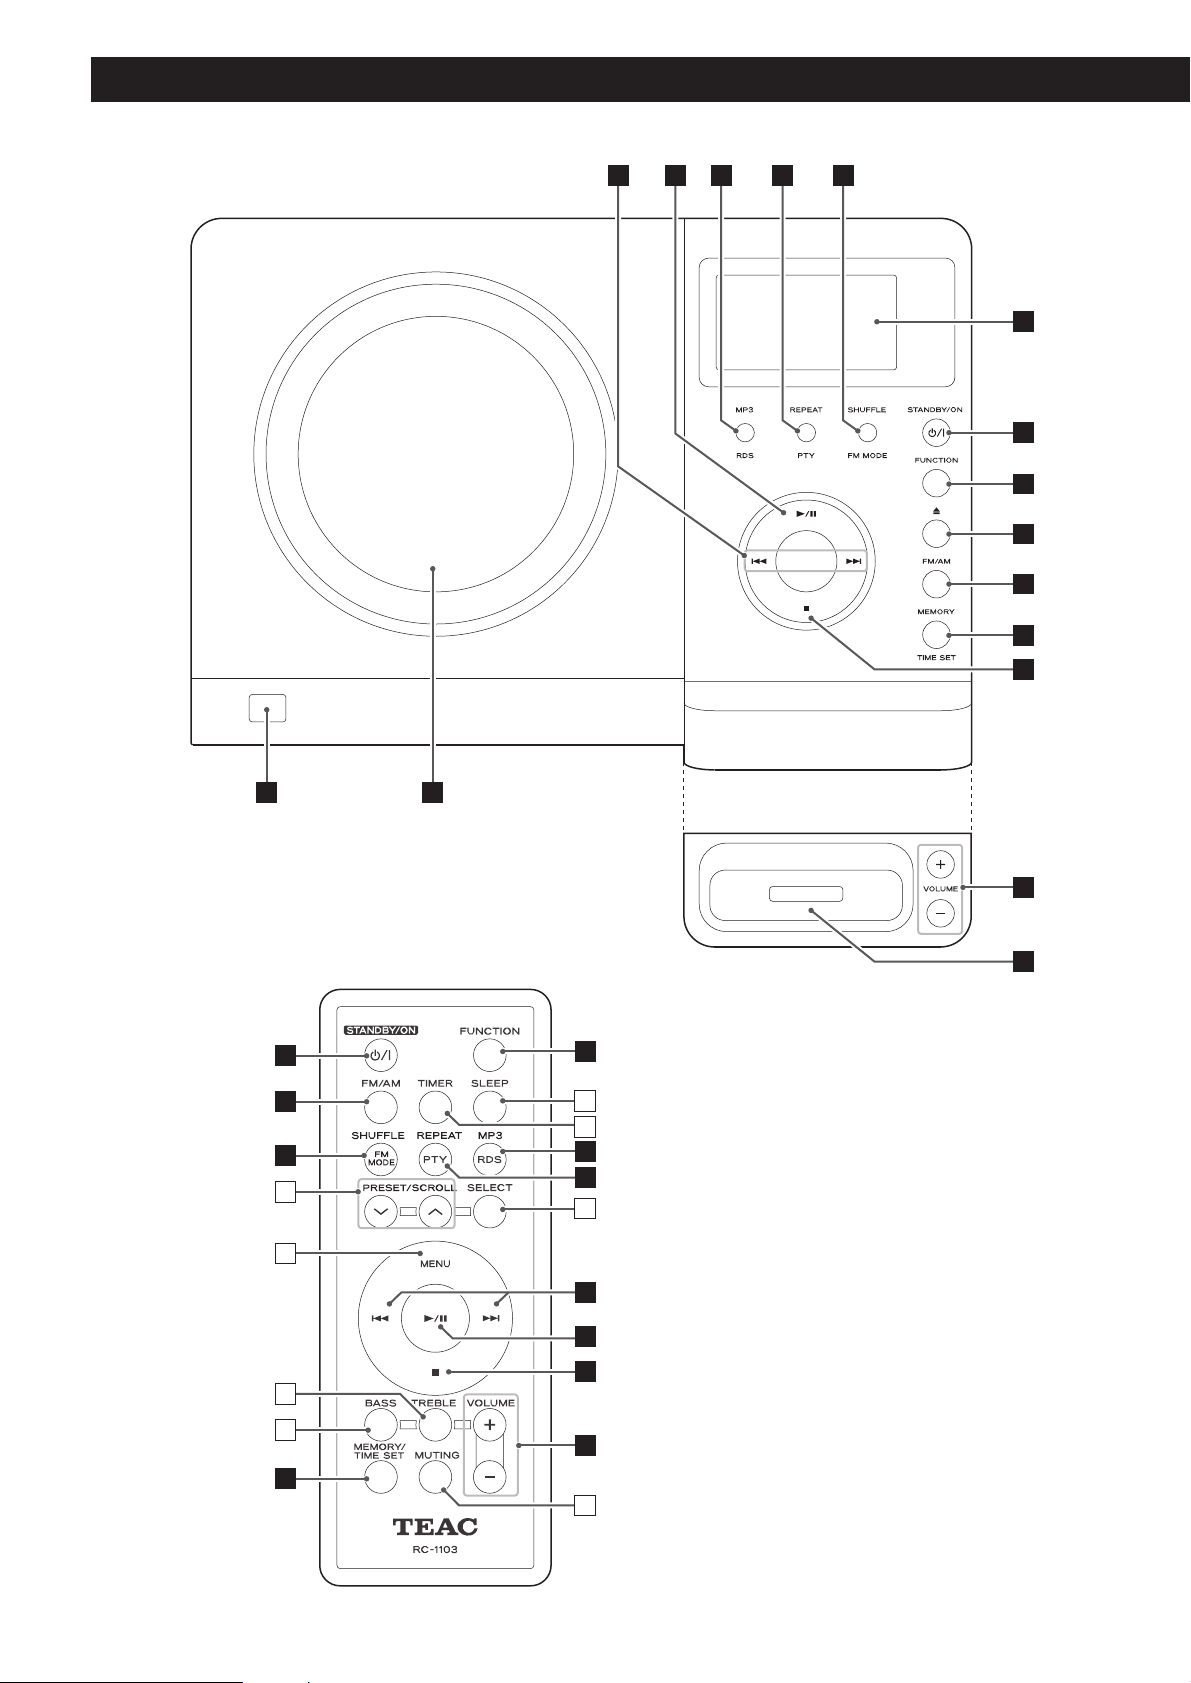
Unit Functions
CBA D E
F
G
H
I
J
K
G
Q
L
OP
M
N
H
J
U
V
E
C
D
W
R
A
B
L
S
T
K
M
X

11
ENGLISH
SKIP (.//) / TUNING
In iPod or CD mode, momentarily press this button to skip
tracks. Hold down this button to search for a part of a track.
In TUNER mode, momentarily press this button to tune in
stations.
In Standby mode, these buttons are used to set or adjust the
clock and the timer.
PLAY/PAUSE (y/J)
In iPod or CD mode, use this button to start or pause
playback.
MP3/RDS
During playback of a MP3 disc, use this button to search track
name.
In FM TUNER mode, use this button to select an RDS mode.
REPEAT/PTY
In iPod or CD mode, use this button to set the repeat
function.
In FM TUNER mode, use this button to start PTY search.
SHUFFLE/FM MODE
In iPod or CD mode, use this button to turn on and off the
shuffle playback.
In FM TUNER mode, use this button to select STEREO or
MONO.
Display
STANDBY/ON
Use this button to turn the unit on or standby.
The main unit is powered via the subwoofer. You need to first
turn on the subwoofer.
When the main unit is in the standby mode, the power
indicator of the Subwoofer is orange.
When the unit is turned on, the indicator turns blue.
FUNCTION
Use this button to select a source (iPod, CD, TUNER or AUX).
OPEN/CLOSE
In CD mode, use this button to open and close the CD door.
FM/AM
Use this button to select AM or FM.
MEMORY/TIME SET
In CD mode, use this button to program tracks.
In TUNER mode, use this button to preset stations.
This button is also used for clock adjustment.
STOP (H)
In CD mode, use this button to stop playback.
< This button doesn’t work in iPod mode.
L
K
J
I
H
G
F
E
D
C
B
A
VOLUME
Press the up “+” or the down “–” button to adjust the
volume.
Dock connector
Before use, insert an appropriate Dock adapter in the Dock
(see page 9).
Insert an iPod mobile digital device into this dock.
CD door
Remote Sensor
When operating the remote control unit, point it towards
here.
PRESET/SCROLL
In TUNER mode, use these buttons to select a preset station.
In iPod mode, use these buttons to scroll up and down the
menu.
During playback of a MP3 disc, use these buttons to select a
folder in the disc.
MENU
This button is equivalent to the MENU button on your iPod.
In iPod mode, use this button to go back to the previous
menu.
TREBLE
Use this button and the VOLUME buttons to adjust the level
of high frequency sound range.
BASS
Use this button and the VOLUME buttons to adjust the level
of low frequency sound range.
SLEEP
Use this button to set sleep timer.
TIMER
Use this button together with the SKIP buttons to set the
timer.
SELECT
This button is equivalent to the Center button on your iPod.
In iPod mode, use this button to confirm selection in menus.
MUTING
Use this button to mute the sound.
X
W
V
U
T
S
R
Q
P
O
N
M

12
Basic Operation
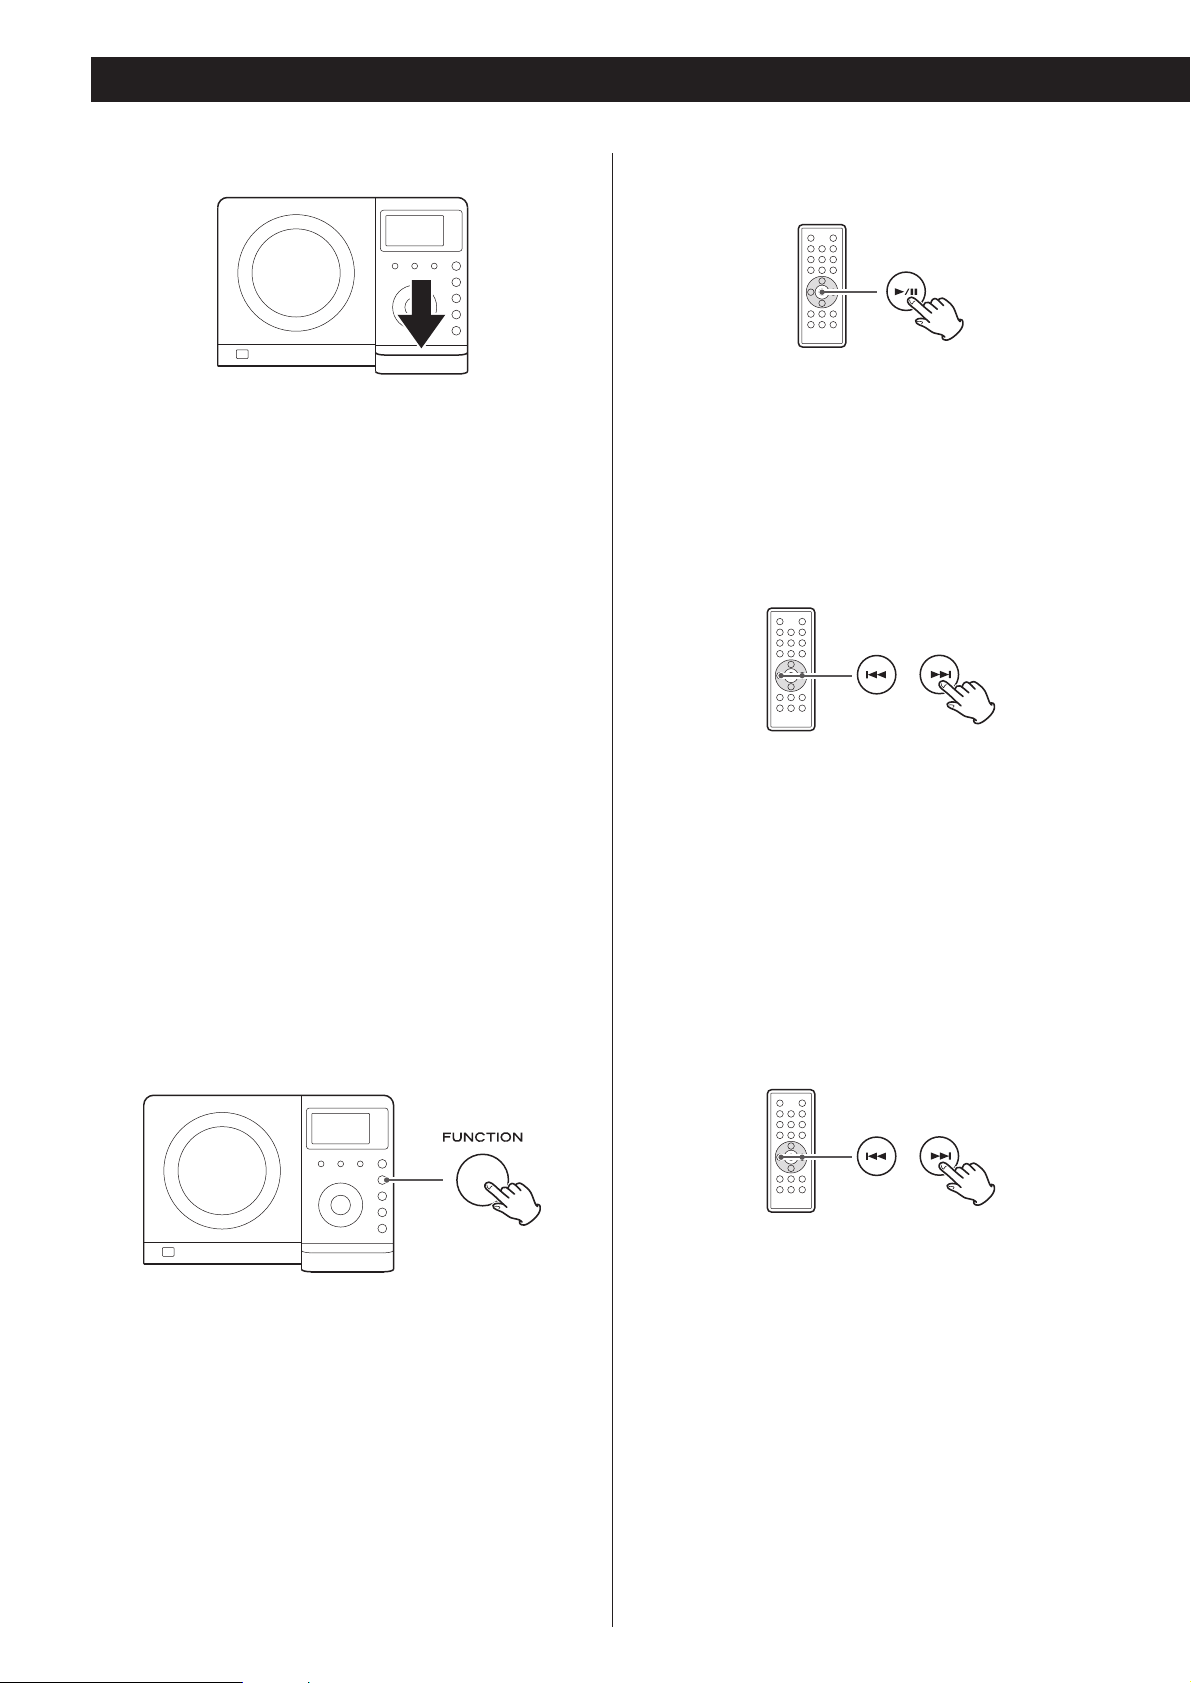
Select a source by pressing the FUNCTION button.
3
Play the source and adjust the volume using the
VOLUME buttons.
4
Turn on the subwoofer.
1
Press the STANDBY/ON switch on the main unit.
2
(Rear panel of the subwoofer)
< To listen to an external source connected to the AUX IN jack,
select AUX.
< In iPod and AUX modes, the display always shows the clock.
< If you press and hold the TIME SET button for 2 seconds in
CD or TUNER mode, the clock will be displayed for a few
seconds.
1
2
3
4

13
ENGLISH
Muting
To mute the sound temporarily, press the MUTING button.
Press the MUTING button again to restore the sound.
< While muting is engaged, “MUTING” blinks on the display.
< If you change the volume during the muting, the muting will
be canceled.
Headphones
For private listening, first reduce the volume level to
minimum. Then insert the plug from your headphones into
the PHONES jack, and adjust the volume using the VOLUME
buttons. The sound from the speakers is cut off while the
headphone jack is inserted.
Sleep Timer
Repeatedly pressing the SLEEP button permits setting an
interval (from 90 down to 10 minutes) after which you want
the unit to automatically turn off and shift into Standby
mode.
Each press of the SLEEP button changes the time indication by
10 minutes.
CAUTION
Always lower the volume level prior to plugging in your
headphones. TO AVOID DAMAGING YOUR HEARING - Do
not place your headphones on your head until after you have
plugged them in.
Tone Control
1. Press the BASS or TREBLE button.
To adjust the level of low frequency sound range, press the
bass button.
To adjust the level of high frequency sound range, press the
treble button.
2. Within 5 seconds, press the VOLUME buttons to change
the setting.
The level can be adjusted from –4 to +4.
(off)
90 80 10
………
14
Listening to iPod
Select “iPod” using the FUNCTION button. If an iPod is
already docked, playback will start.
When no iPod is docked, the iPod indicator on the display
blinks.
In iPod mode, press the Play/Pause button (G/J) to start or
pause playback.
Insert the iPod into the Dock of the MC-DX222i.
Then press the Play/Pause button (y/J) on the iPod. The
MC-DX222i will automatically turn on and start playback
from the iPod’s music list.
< If the iPod that is in playback mode is inserted into the Dock,
the MC-DX222i will automatically turn on and start playback
of the iPod.
< Make sure to use an appropriate Dock adapter (see “Getting
started” on page 9).
< The battery of the iPod is recharged to the full when the iPod
is docked and the MC-DX222i is ON.
In standby mode, MC-DX222i can not recharge iPod because
of minimised power consumption to meet the regulation of
IEA. If you need to recharge iPod, please power on the unit.
< When headphones are plugged into the iPod, sound comes
from both the speakers of the MC-DX222i and the
headphones.
< The Stop button (H) doesn’t work in iPod mode.
To select iPod mode
Press the Play/Pause button (G/J) during playback. Playback
stops at the current position. To resume playback, press the
Play/Pause button (G/J) again.
To skip to the next or a previous track
To suspend playback temporarily
(pause mode)
During playback, hold down the skip button (.or/) for
more than 2 seconds and release it when the part you want
to listen to is found.
During playback, press the skip button (. or/ )
repeatedly until the desired track is found. The selected track
will be played from the beginning.
< When the . button is pressed during playback, the track
being played will be played from the beginning. To return to
the beginning of the previous track, press the . button
twice.
Search for a part of a track
15
ENGLISH
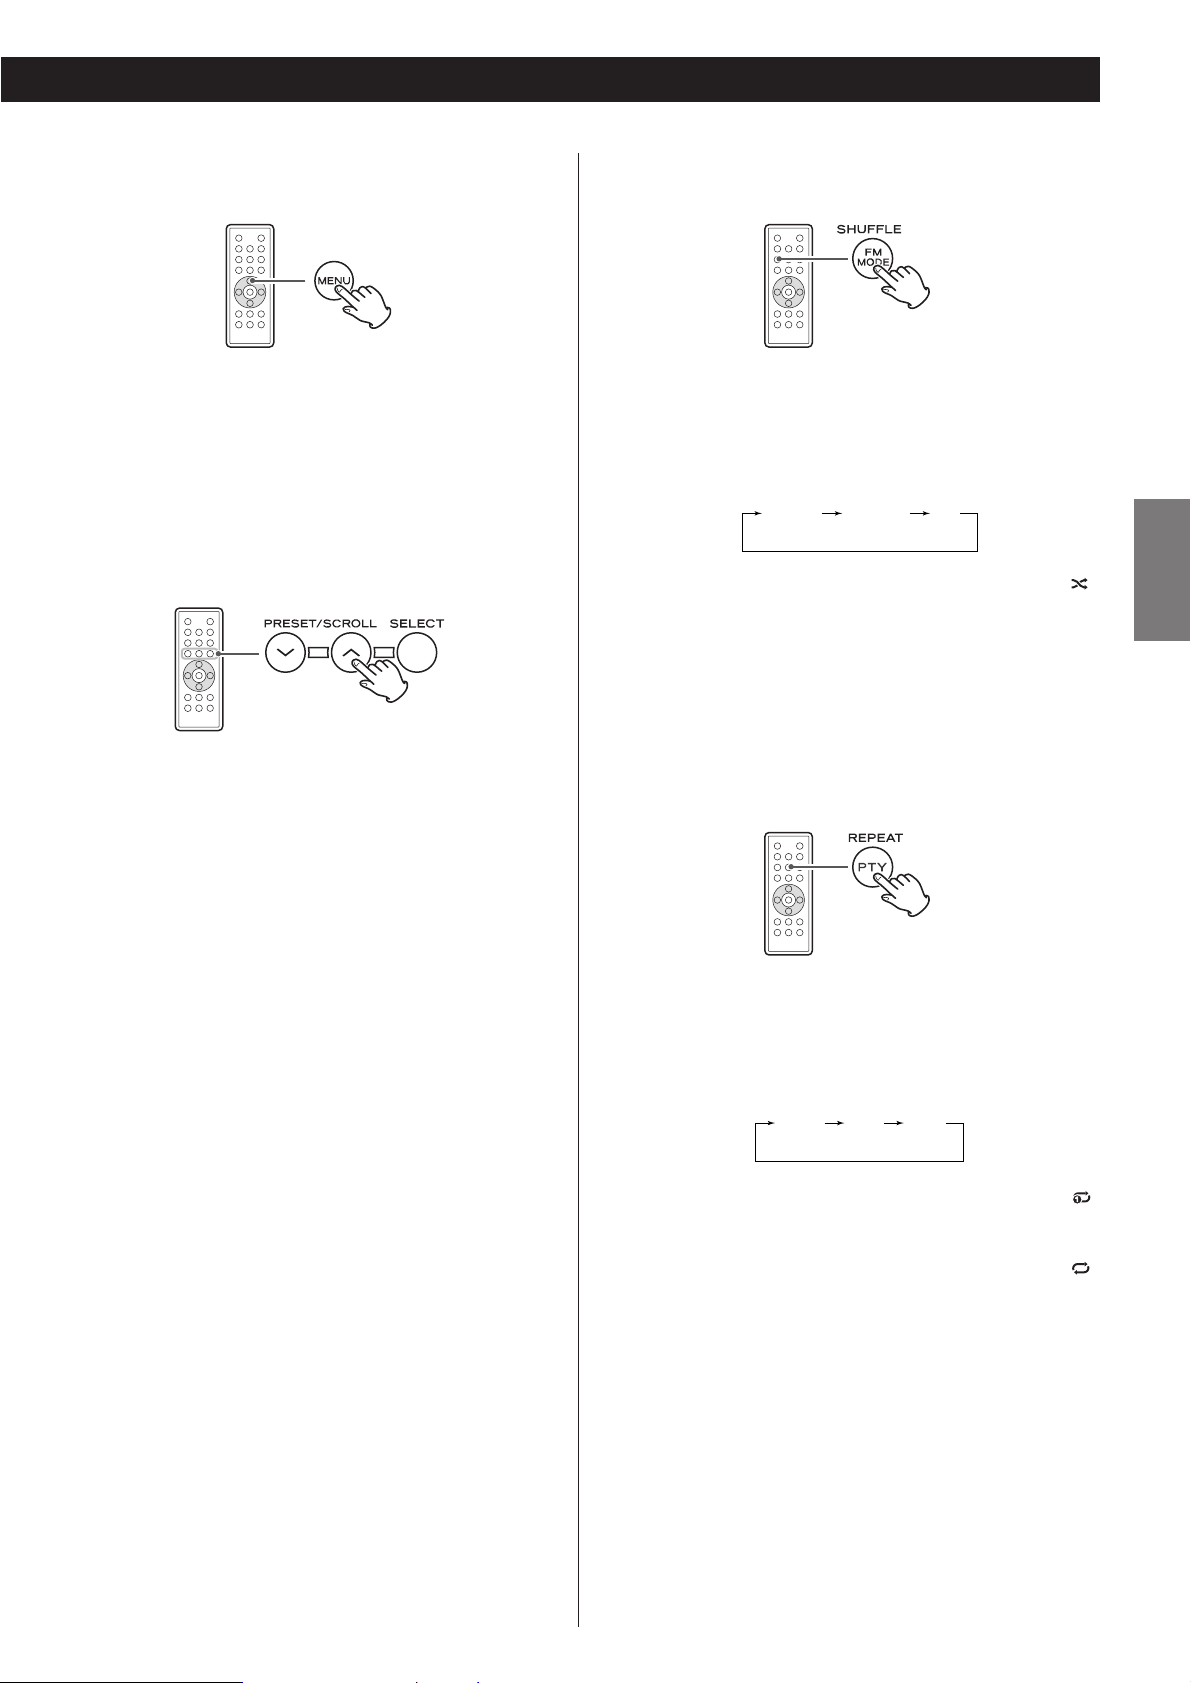
To activate the shuffle mode
During playback, press the SHUFFLE button to change the
shuffle mode.
Each time the SHUFFLE button is pressed, the SHUFFLE setting
of iPod is changed as follows:
If iPod is set to shuffle songs or albums, the Shuffle icon ( )
appears in the iPod’s display.
albumssongs off
Select the menu item
Press the PRESET/SCROLL buttons (‡/°) to scroll to the
menu item you want, and then press the SELECT button.
To activate the repeat mode
During playback, press the REPEAT button to change the
repeat mode.
Each time the REPEAT button is pressed, the REPEAT setting
of iPod is changed as follows:
If the iPod is set to repeat one song, the Repeat One icon
()
appears in the iPod’s display.
If the iPod is set to repeat all songs, the Repeat icon ( )
appears in the iPod’s display.
AllOne off
To go back to the previous menu
Press the MENU button to go back to the previous menu.
This button is equivalent to the MENU button on your iPod.
16
Listening to CD/MP3
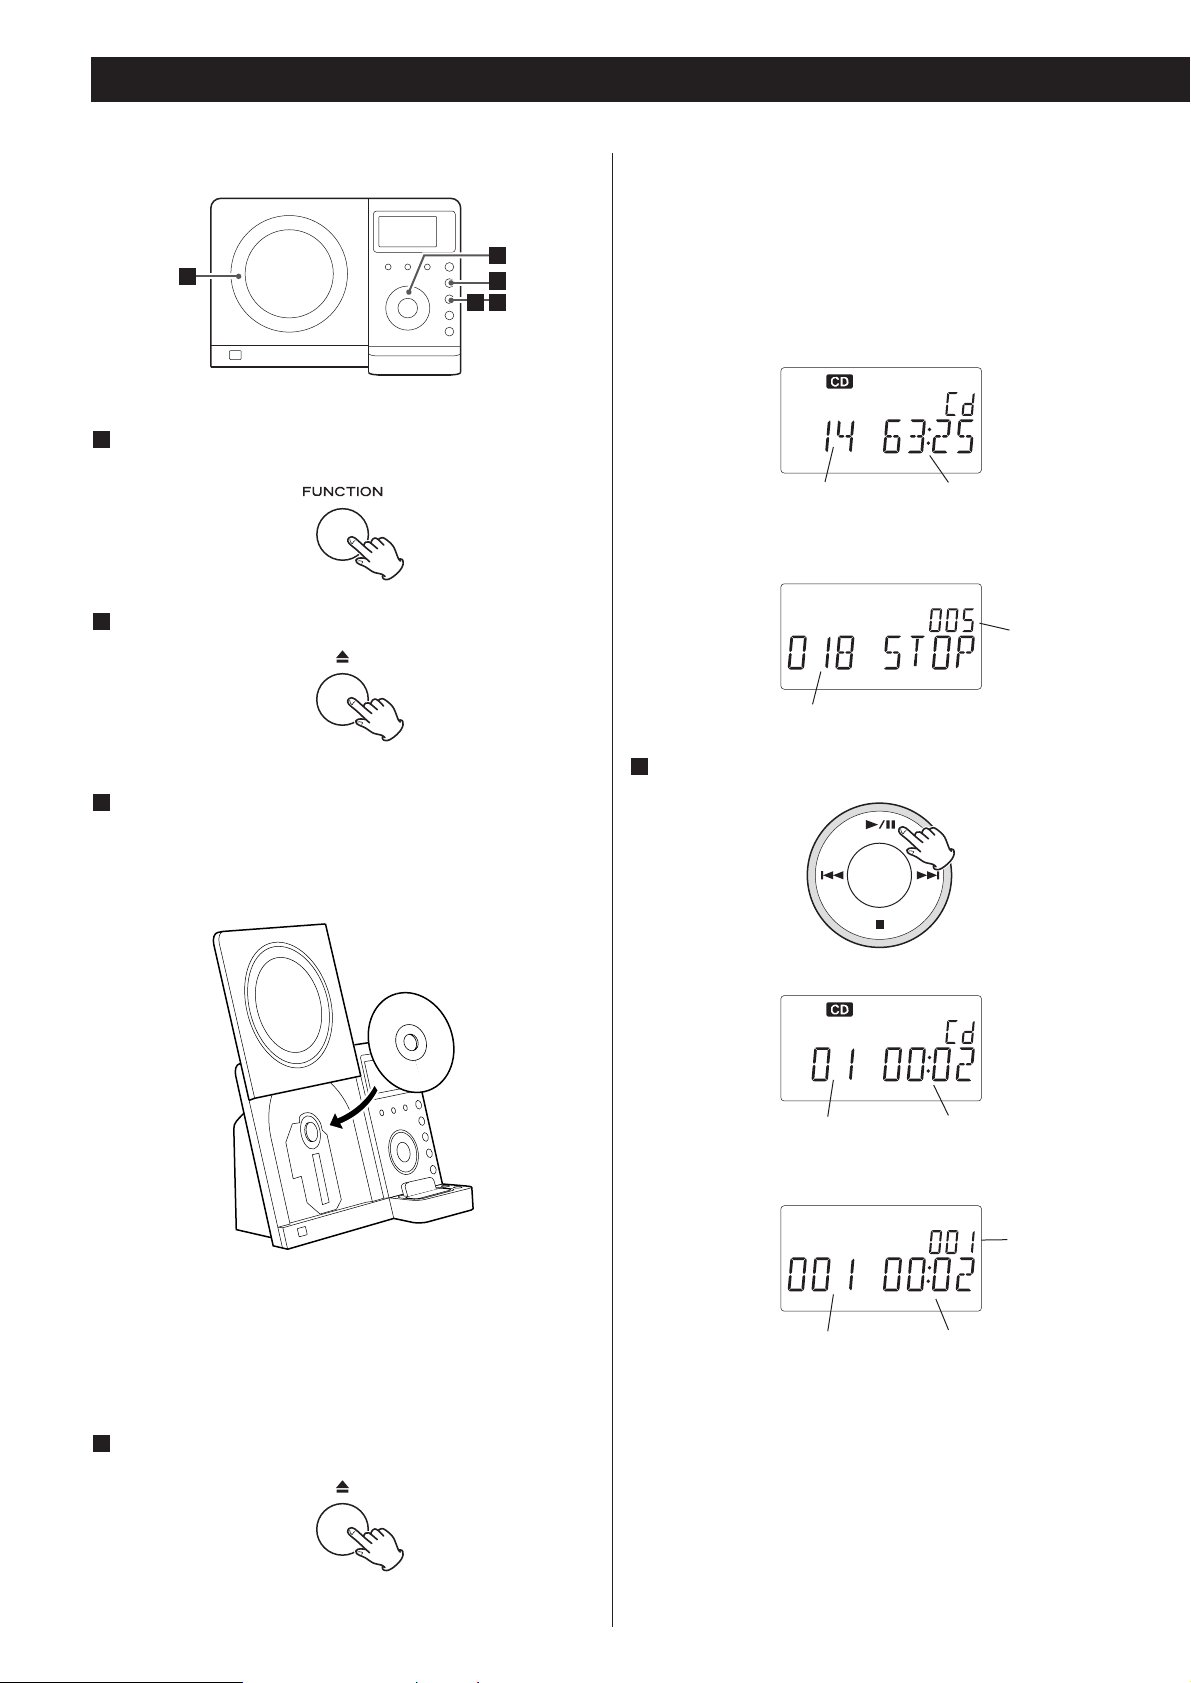
Press the FUNCTION button to select “CD”.
1
Press the OPEN/CLOSE button.
2
Put a disc onto the center spindle of the player with the
label side facing you.
Press the disc onto the spindle until a slight “click” is heard
indicating the disc is mounted correctly.
3
< Never put more than one disc in the mechanism at a time.
< Ensure that the disc is correctly mounted on the spindle and
locked in place.
Press the OPEN/CLOSE button to close the CD door.
4
< It takes a few seconds for the unit to load the disc. No
buttons will work during loading. Wait until the total number
of the tracks and the total play time of the disc are displayed.
< When no disc is loaded in the CD player, “NO DISC” is
displayed.
When a CD is loaded
Playback starts from the first track of the disc.
< MP3 tracks recorded out of folders are automatically put in
the “ROOT” folder, and playback starts from the first track of
the ROOT folder.
< When the playback of all the tracks has finished, the unit
stops automatically.
When a MP3 disc is loaded
total playing timetotal tracks
total number
of folders
total tracks
Press the Play/Pause button (y/J) to start playback.
5
elapsed time of current trackcurrent track number
current folder
number
elapsed time of current trackcurrent track number
5
3
1
42
CD
MP3
17
ENGLISH
To suspend playback temporarily
(pause mode)
Press the Play/Pause button (G/J) during playback. Playback
stops at the current position. To resume playback, press the
Play/Pause button (G/J) again.
To stop playback
Press the Stop button (H) to stop playback.
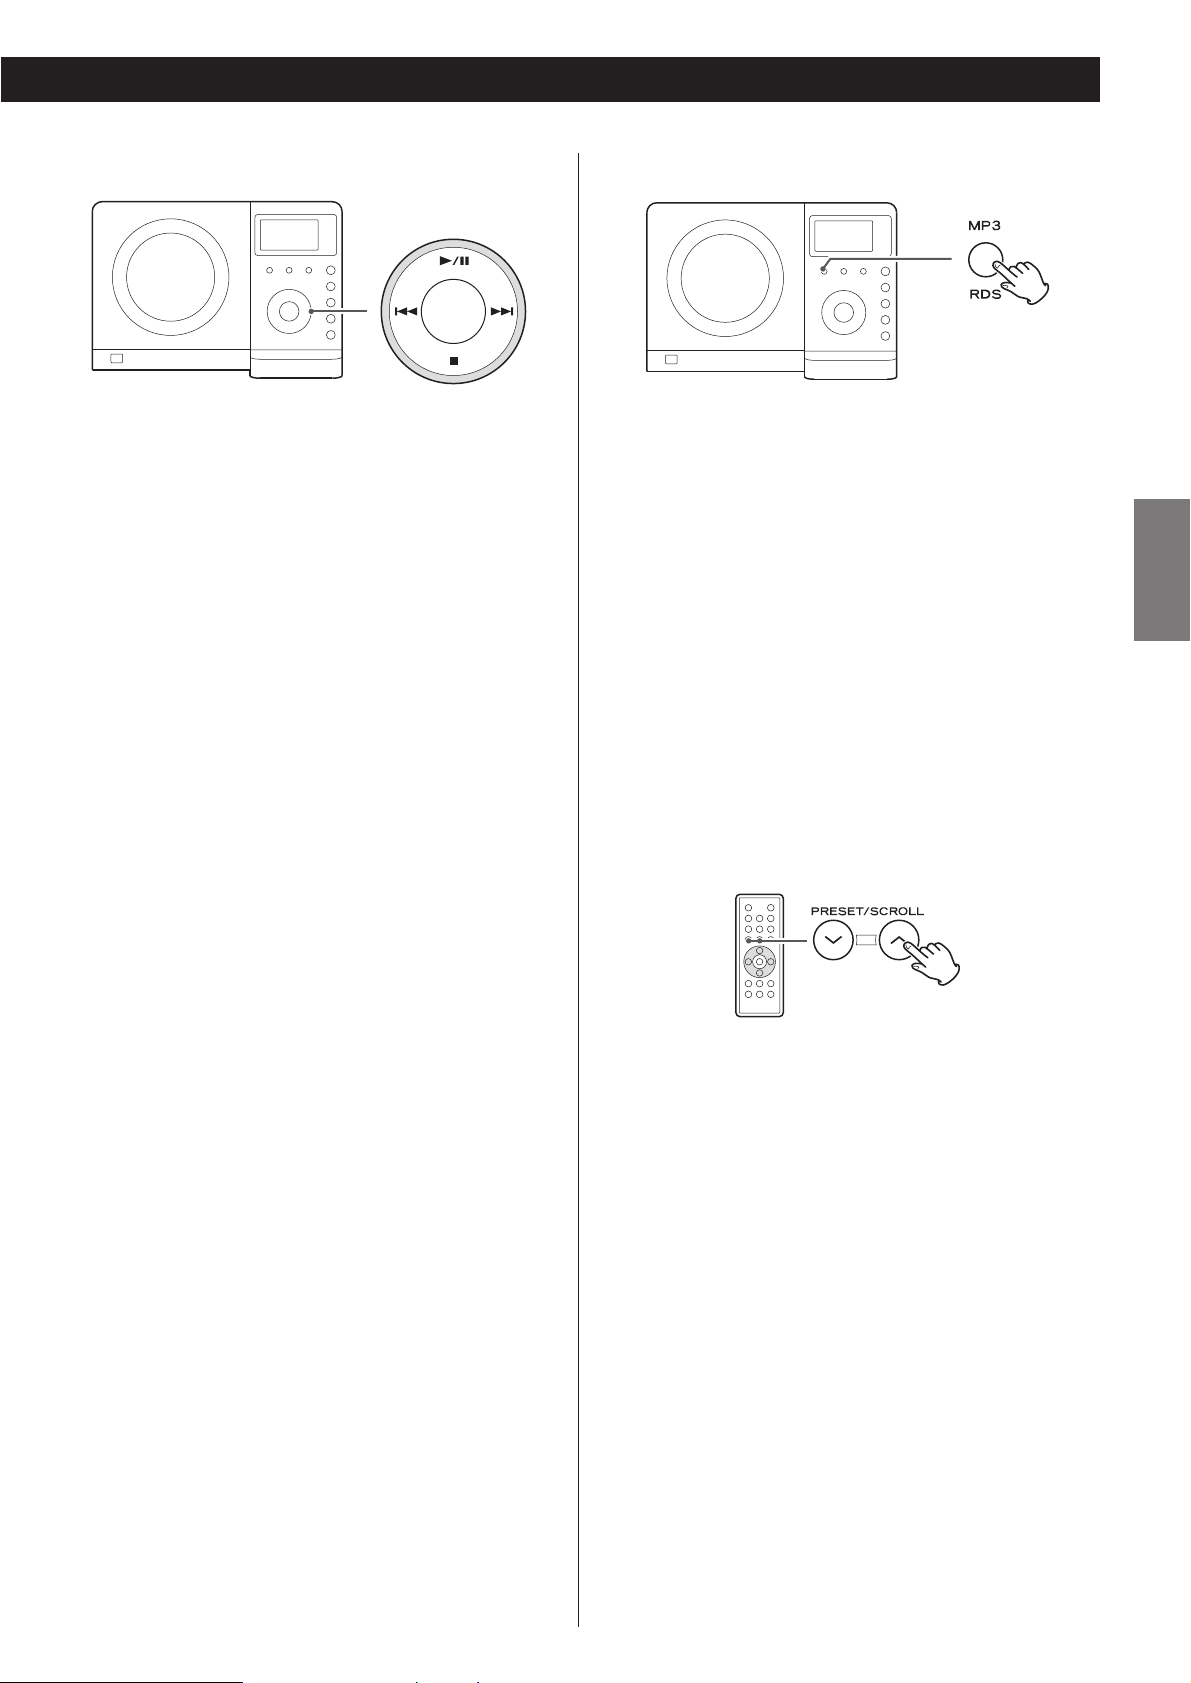
To skip to the next or a previous track
During playback, press the skip button (. or/ )
repeatedly until the desired track is found. The selected track
will be played from the beginning.
In the stop mode, press the skip button (. or/ )
repeatedly until the track you want to listen to is found. Press
the Play/Pause button (G /J) to start playback from the
selected track.
< When the . button is pressed during playback, the track
being played will be played from the beginning. To return to
the beginning of the previous track, press the . button
twice.
< During programmed playback, the next or previous track in
the program is played.
Search for a part of a track
During playback, hold down the skip button (.or/) and
release it when the part you want to listen to is found.
Select a folder on the MP3 disc
Press the PRESET/SCROLL button to select a folder.
To display MP3 information
During playback of an MP3 disc, press the MP3 button for
more than 1 second. The information about the current track
is displayed as follows:
Filename w Title w Artist w Album
< NONE appears when there is no information.
< UNKNOWN appears when the unit cannot read the
information.
Press the MP3 button for more than 1 second again to cancel
the MP3 information mode.
18
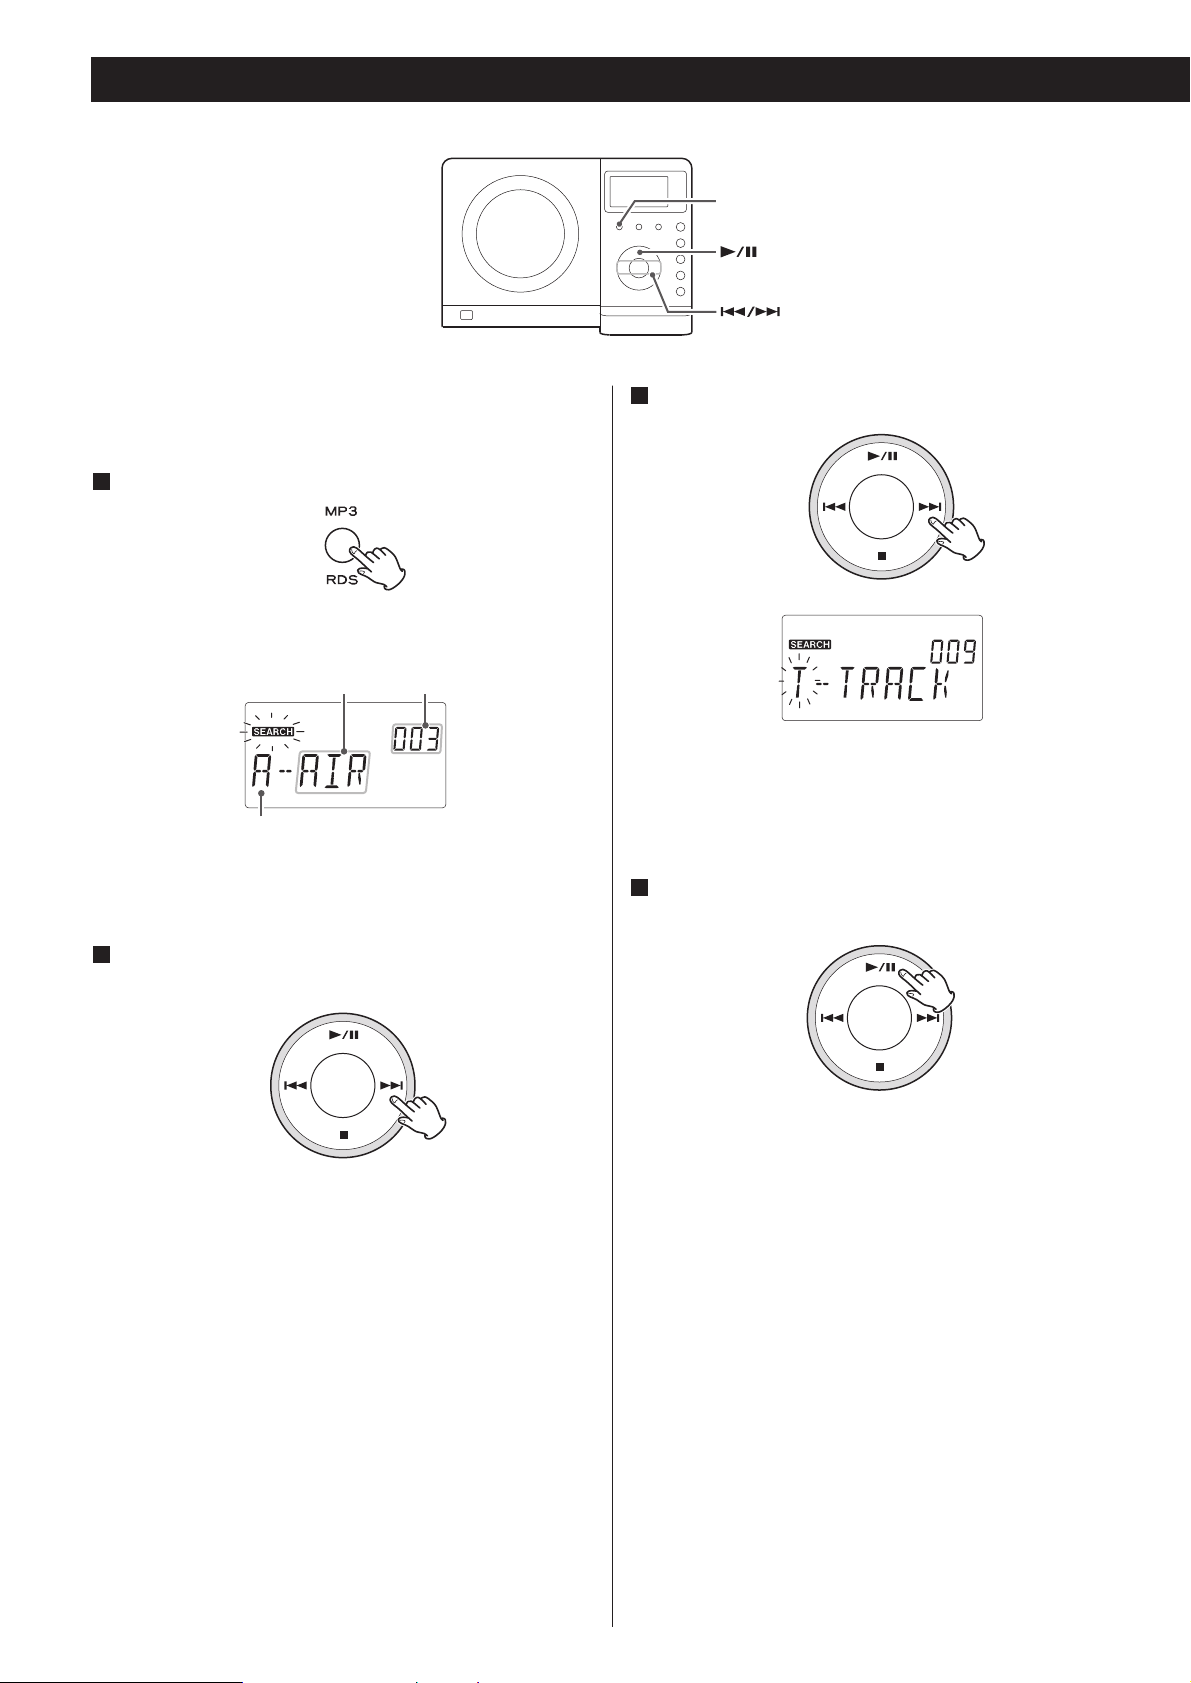
Search Mode (MP3 only)
Initial letter of track name
Track name
Search for a name of track
You can select the track by searching for its name.
Press the MP3 button once.
An alphabet (initial letter of a track name) and a track name
are displayed.
1
Press the PLAY/PAUSE button (G/J).
Playback starts from the selected track.
4
Track number
< To cancel the search mode, press the STOP button (H).
Select the initial letter of the track you want to listen to
by pressing the SKIP button (. or /).
2
Press and hold the SKIP button (. or /).
3
Then you can select the track that has same initial letter by
pressing the SKIP button (. or /).
MP3
19
ENGLISH
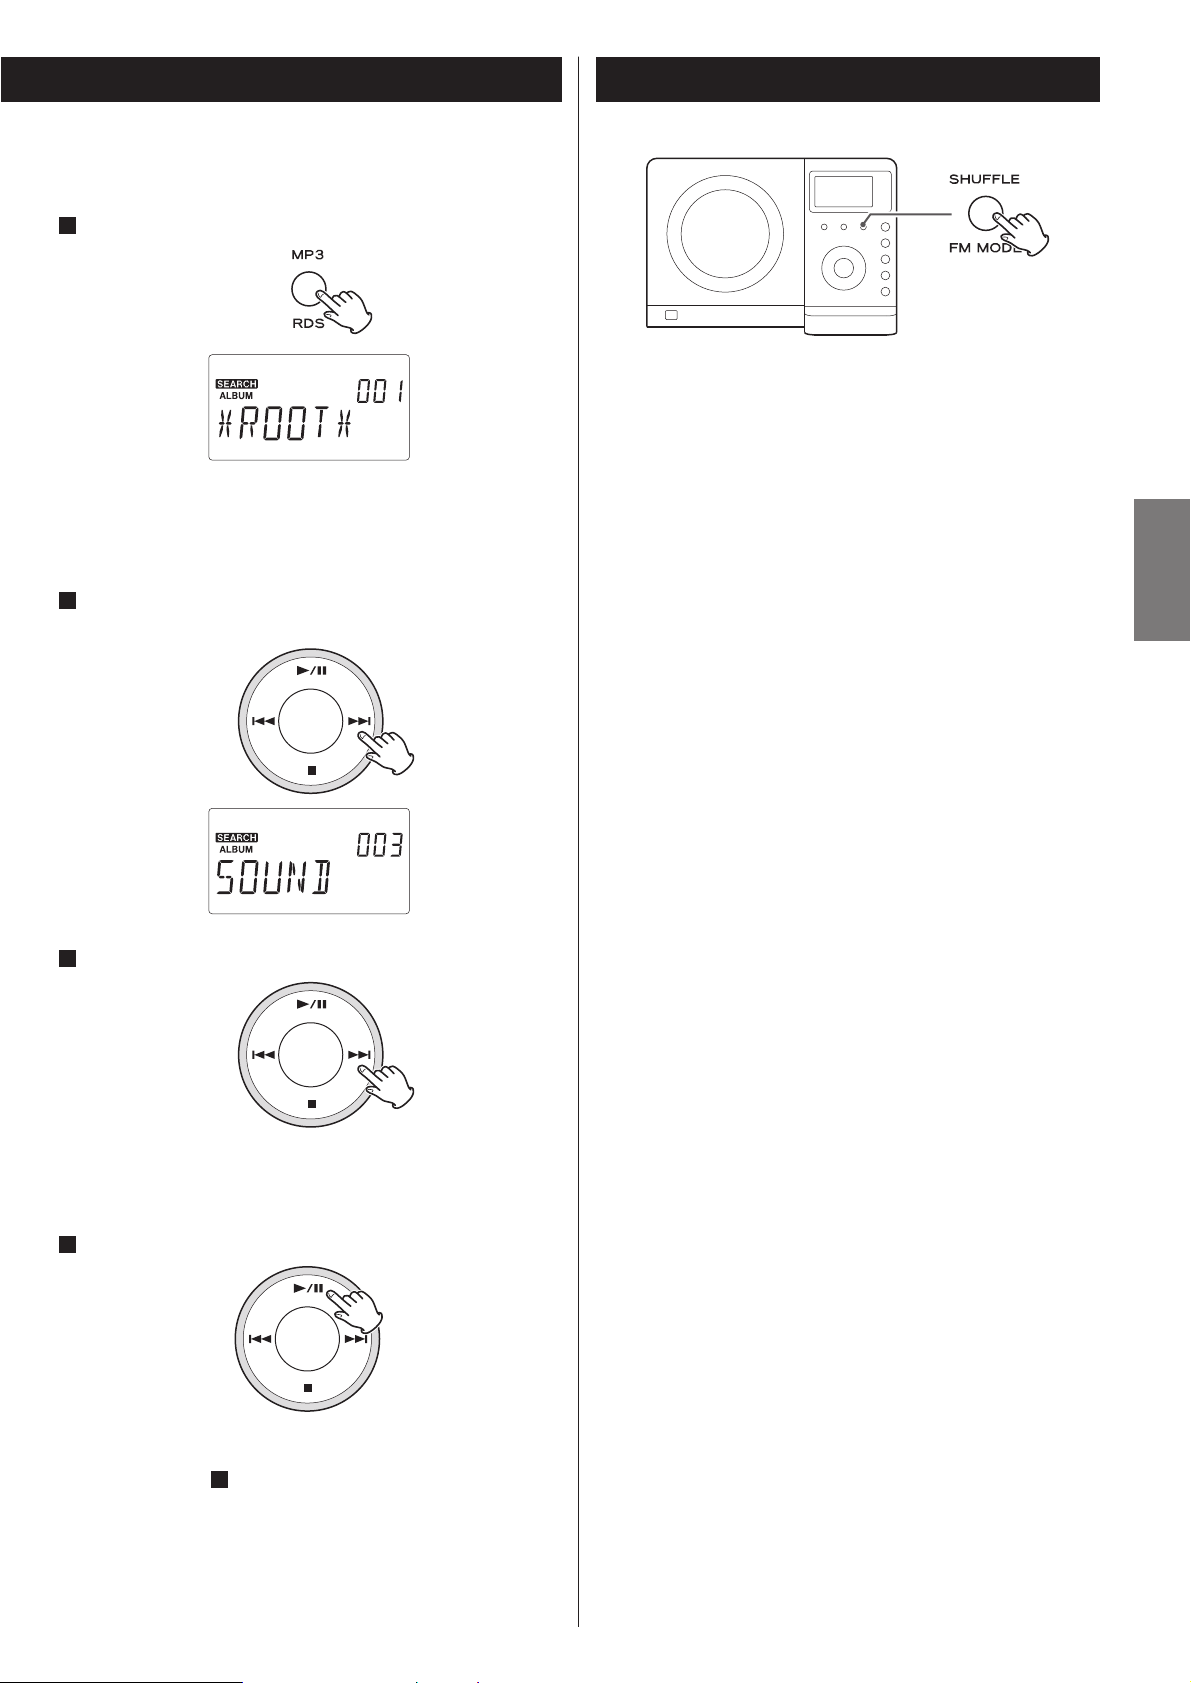
Search for a track in a folder
Press the MP3 button twice.
The name of folder is displayed.
< MP3 tracks recorded out of folders are in the “ROOT” folder.
Press the SKIP button (. or /) to find the folder
that the track you want to listen to is included.
Press and hold the SKIP button (. or /).
Then you can select the track in the folder by pressing the
SKIP button (. or /).
Press the PLAY/PAUSE button (G/J) to start playback.
Playback starts from the selected track.
< If you skip step , playback will start from the first track in
the selected folder.
3
4
3
2
1
Shuffle Playback
The tracks can be played randomly. Press the SHUFFLE button
during playback or when in the stop mode. “SHUFFLE” will
then light up in the display.
< If you press the / button during shuffle playback, next
track will be randomly selected and played.
If you press the . button, the currently played track will be
played from the beginning. If you press the . button twice
or more, next track will be randomly selected and played.
A track cannot be replayed during shuffle playback.
< Shuffle playback doesn’t work during programmed playback.
< If one of the following buttons is pressed, shuffle mode will
be cancelled:
SHUFFLE, STOP, FUNCTION, FM/AM
STANDBY/ON, OPEN/CLOSE
20
Up to 64 tracks can be programmed in the desired order.
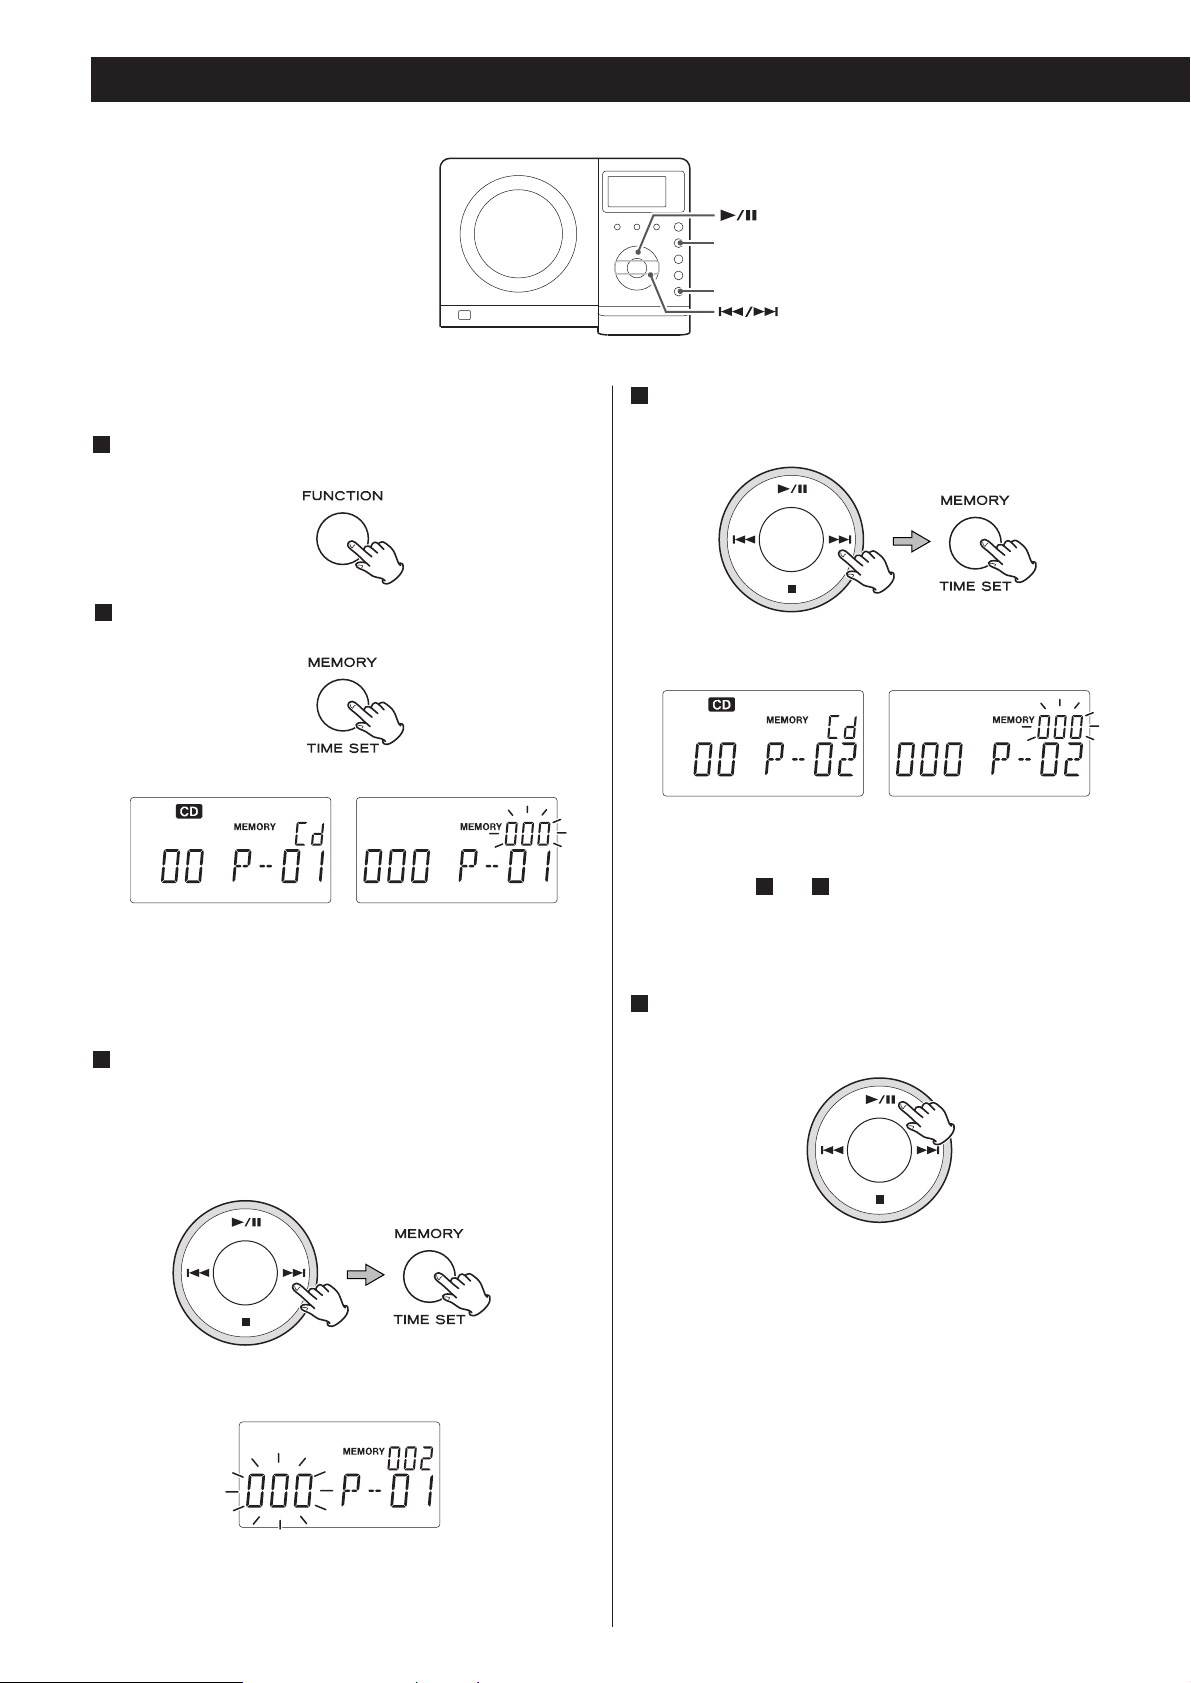
Press the FUNCTION button to select “CD”.
1
Press the MEMORY button.
2
“MEMORY” lights up in the display.
< To cancel the program mode, press the Stop button (H).
Press the Skip button (.or/) repeatedly to select a
folder of a MP3 disc, then press the MEMORY button.
< MP3 tracks recorded out of folders are in the “001” (ROOT)
folder.
< Skip this step when playing a CD.
3
The track is programmed, and “P-02” is displayed.
< Repeat steps and to program more tracks.
< You can program up to 64 tracks.
43
Programmed Playback
Press the Skip button (.or/) repeatedly to select a
track, then press the MEMORY button.
4
< When the playback of all the programmed tracks has finished,
or if you press the Stop button (H), the MEMORY indicator
will go off and the program mode will be cancelled. Still the
program is retained in memory.
You can return to the programmed playback by pressing the
MEMORY button and the Play/Pause button (G/J).
< Shuffle function doesn’t work during programmed playback.
When the selection of track numbers is completed,
press the Play/Pause button (G/J) to start program
playback.
5
FUNCTION
MEMORY
CD MP3
CD MP3
MP3
21
ENGLISH
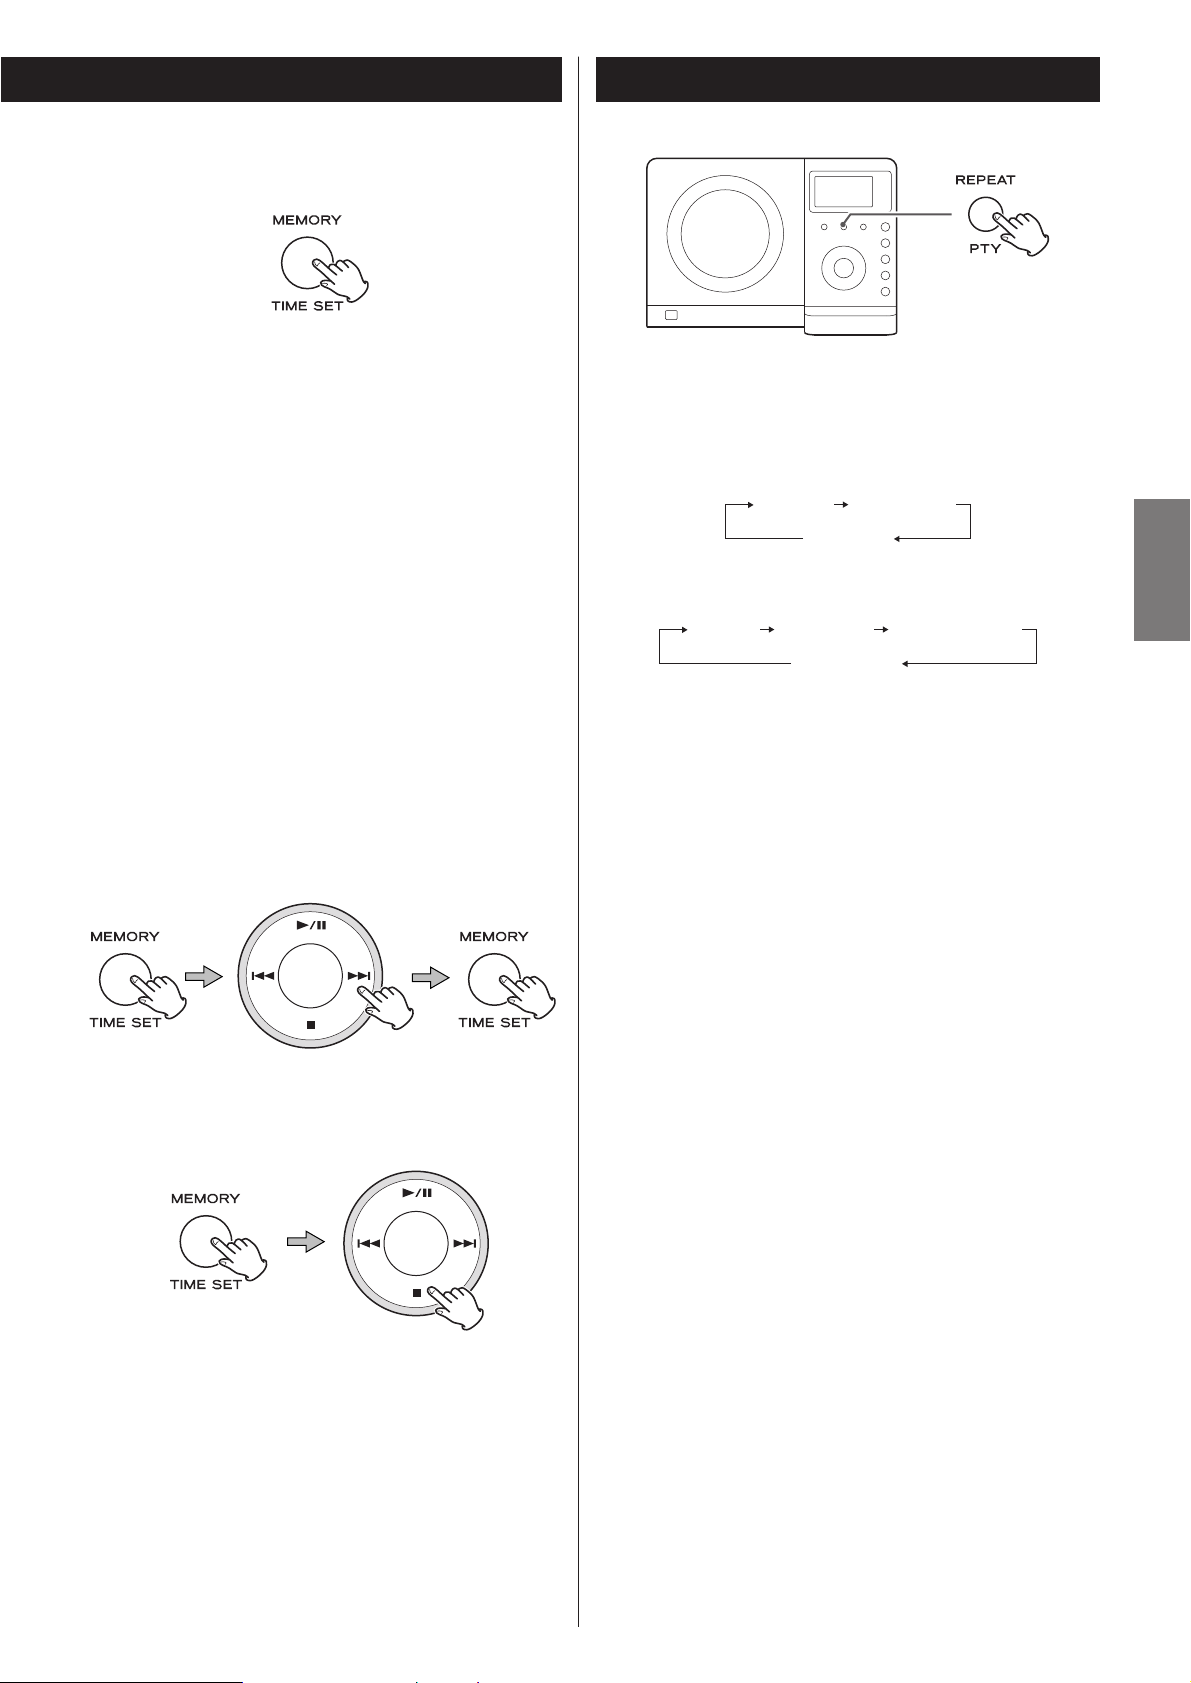
To check the programmed order
In the stop mode, press the MEMORY button repeatedly. The
track number and program number will be shown on the
display.
To add a track to the end of the program
In the stop mode, press the MEMORY button repeatedly until
“00” appears on the display. Select a track number using the
Skip button (. or/ ) and then press the MEMORY
button. The track is added to the end of the program.
To overwrite the program
In the stop mode, press the MEMORY button repeatedly until
the program number to be changed appears on the display.
Select a new track number using the Skip button (.or/)
and then press the MEMORY button.
To clear program
To clear the programmed contents, press the MEMORY and
the STOP button (H) in the stop mode.
< If one of the following buttons is pressed, the programmed
contents will also be cleared:
OPEN/CLOSE, FUNCTION, FM/AM, STANDBY/ON
< If the unit is disconnected from the power supply, the
programmed contents will be cleared.
Every time the REPEAT button is pressed, the mode is
changed as follows:
When a CD is loaded:
When a MP3 disc is loaded.
< If one of the following buttons is pressed, repeat mode will
be canceled:
STOP, FUNCTION, FM/AM, OPEN/CLOSE, STANDBY/ON
Repeat one track
Press the REPEAT button once during playback. “REPEAT”
lights.
The track being played will be played repeatedly. If you press
the Skip button (.or/) and select another track, the
track you selected will be played repeatedly.
It is also possible to select a track to be repeated in the stop
mode. Press the REPEAT button, select a track using the Skip
button (.or/), and then press the Play/Pause button
(G/J) to start playback.
Repeat all the tracks
All the tracks will be played repeatedly.
Press the REPEAT button twice. “REPEAT ALL” lights.
During programmed playback, programmed tracks will be
played repeatedly.
Repeat all the tracks in the folder (MP3)
All the tracks in the folder will be played repeatedly.
Press the REPEAT button three times. “REPEAT ALBUM”
lights.
Repeat Playback
(off)
(off)
REPEAT REPEAT ALL
REPEAT REPEAT ALL REPEAT ALBUM

22
Listening to the Radio
Press the FUNCTION button to select “TUNER”.
1
< You can also use the FM/AM button to select “TUNER”.
Press the FM/AM button to select a band.
2
Select the station you want to listen to (auto selection).
3
Hold down the TUNING Up or Down button until the
frequency display begins to change. When a station is tuned
in, the tuning process will stop automatically.
< Press the Up or Down button to stop the auto selection.
Selecting stations which cannot be tuned automatically
(manual selection)
When the Up or Down button is pressed momentarily, the
frequency changes by a fixed step.
Press the Up or Down button repeatedly until the station you
want to listen to is found.
FM MODE button
Pressing this button alternates between STEREO mode and
MONO mode.
STEREO
FM stereo broadcasts are received in stereo and the
“STEREO” indicator lights in the display.
< If the sound is distorted and the “STEREO” indicator flashes,
the signal is not strong enough for good stereo reception. In
this case, change to MONO mode.
MONO
To compensate for weak FM stereo reception, select this
mode. Reception will now be forced to monaural, reducing
unwanted noise.
If the reception is poor
AM broadcast
Rotate or relocate the AM antenna to find the best position
for AM stations.
FM broadcast
Extend and rotate the FM antenna until you receive the
stations clearly. You may need to relocate the unit.
1
2
3
ENGLISH
23
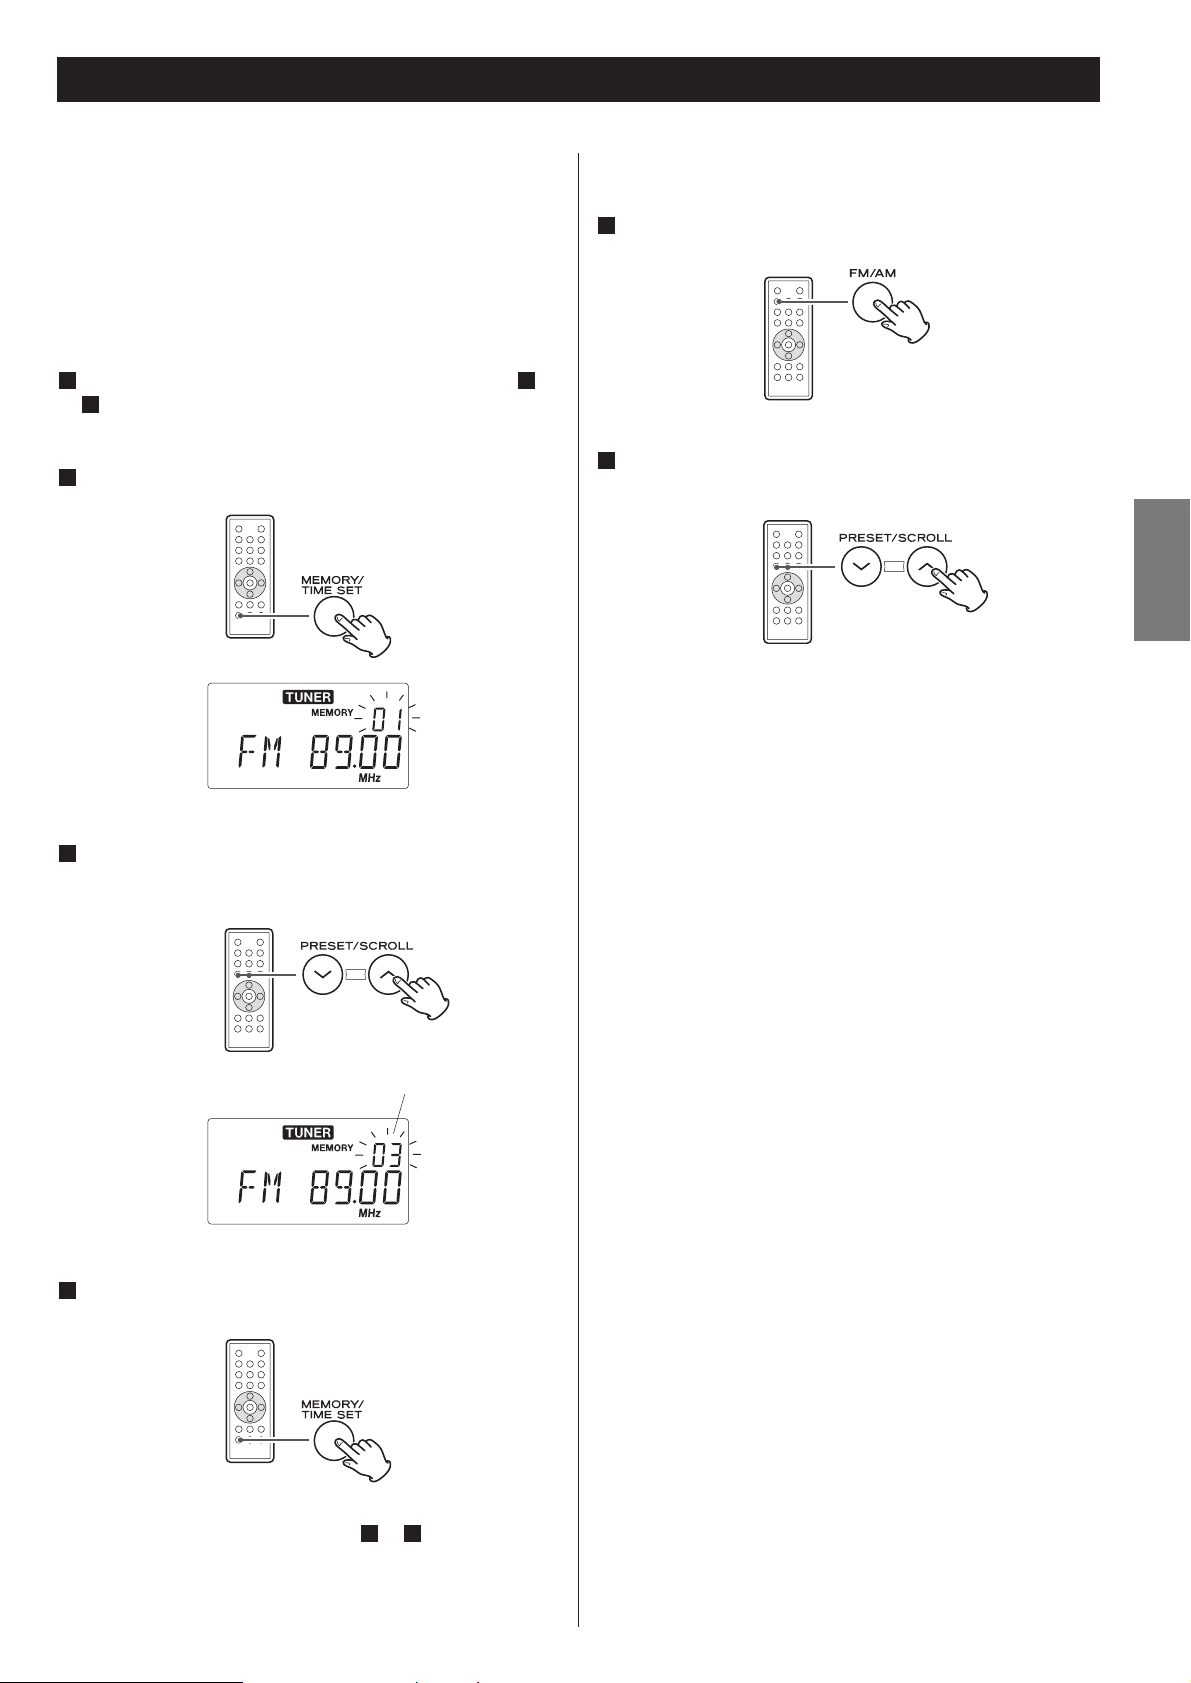
Preset Tuning
You can store FM and AM stations into preset channels 1 to 10
respectively.
If the power switch of the subwoofer turned off, the
settings kept in memory (clock, preset stations, timer
setting) will be erased.
Tune in a station you want to listen to (see steps to
of page 22).
3
11
Press the MEMORY button.
2
Within 5 seconds, press the MEMORY button.
4
The station is stored and the MEMORY indicator goes off.
To store more stations, repeat steps to .
41
Press the PRESET button repeatedly until the desired
preset station is found.
2
How to select preset stations
Press the FM/AM button to select a band.
1
preset channel
Within 5 seconds, select a preset channel to store the
station using the PRESET buttons of the remote control
unit.
3

24
The Radio Data System (RDS) is a broadcasting service which
allows stations to send additional information along with the
regular radio programme signal.
RDS works on the FM waveband in Europe only.
Tune in an FM RDS station (see steps to of page
22).
The Programme Service name (station’s name) appears on the
display.
Press the RDS button.
Each time the RDS button is pressed, the RDS mode is
changed as follows:
PS (Programme Service name)
When you select PS, the frequency will be displayed for 3
seconds, and then PS (station’s name) will be displayed. If
there is no PS data, “NO PS” will be displayed.
PTY (Programme Type)
When you select PTY, the programme type will be displayed.
If there is no PTY data, “NO PTY” will be displayed.
RT (Radio Text)
When you select RT, the news of stations composed of up
to 64 symbols will be displayed. If there is no RT data, “NO
RT” will be displayed.
2
311
RDS RDS (PTY Search)
A station can be searched by this function.
Select FM by pressing the FM/AM button.
Press the PTY button.
“PTY SEL” blinks on the display.
Within 10 seconds, select the desired PTY programme
using the SKIP button (.or/).
You can select from 31 kinds (see page 25).
Press the PTY button.
Searching will start.
< When the programme that you have selected is found,
searching will stop and the programme type will be displayed.
< If the same program type is not found during PTY Search, it
will stop at the beginning frequency.
< If you want to stop searching, press the PTY button.
4
3
2
1
PTY
FM/AM
25
ENGLISH
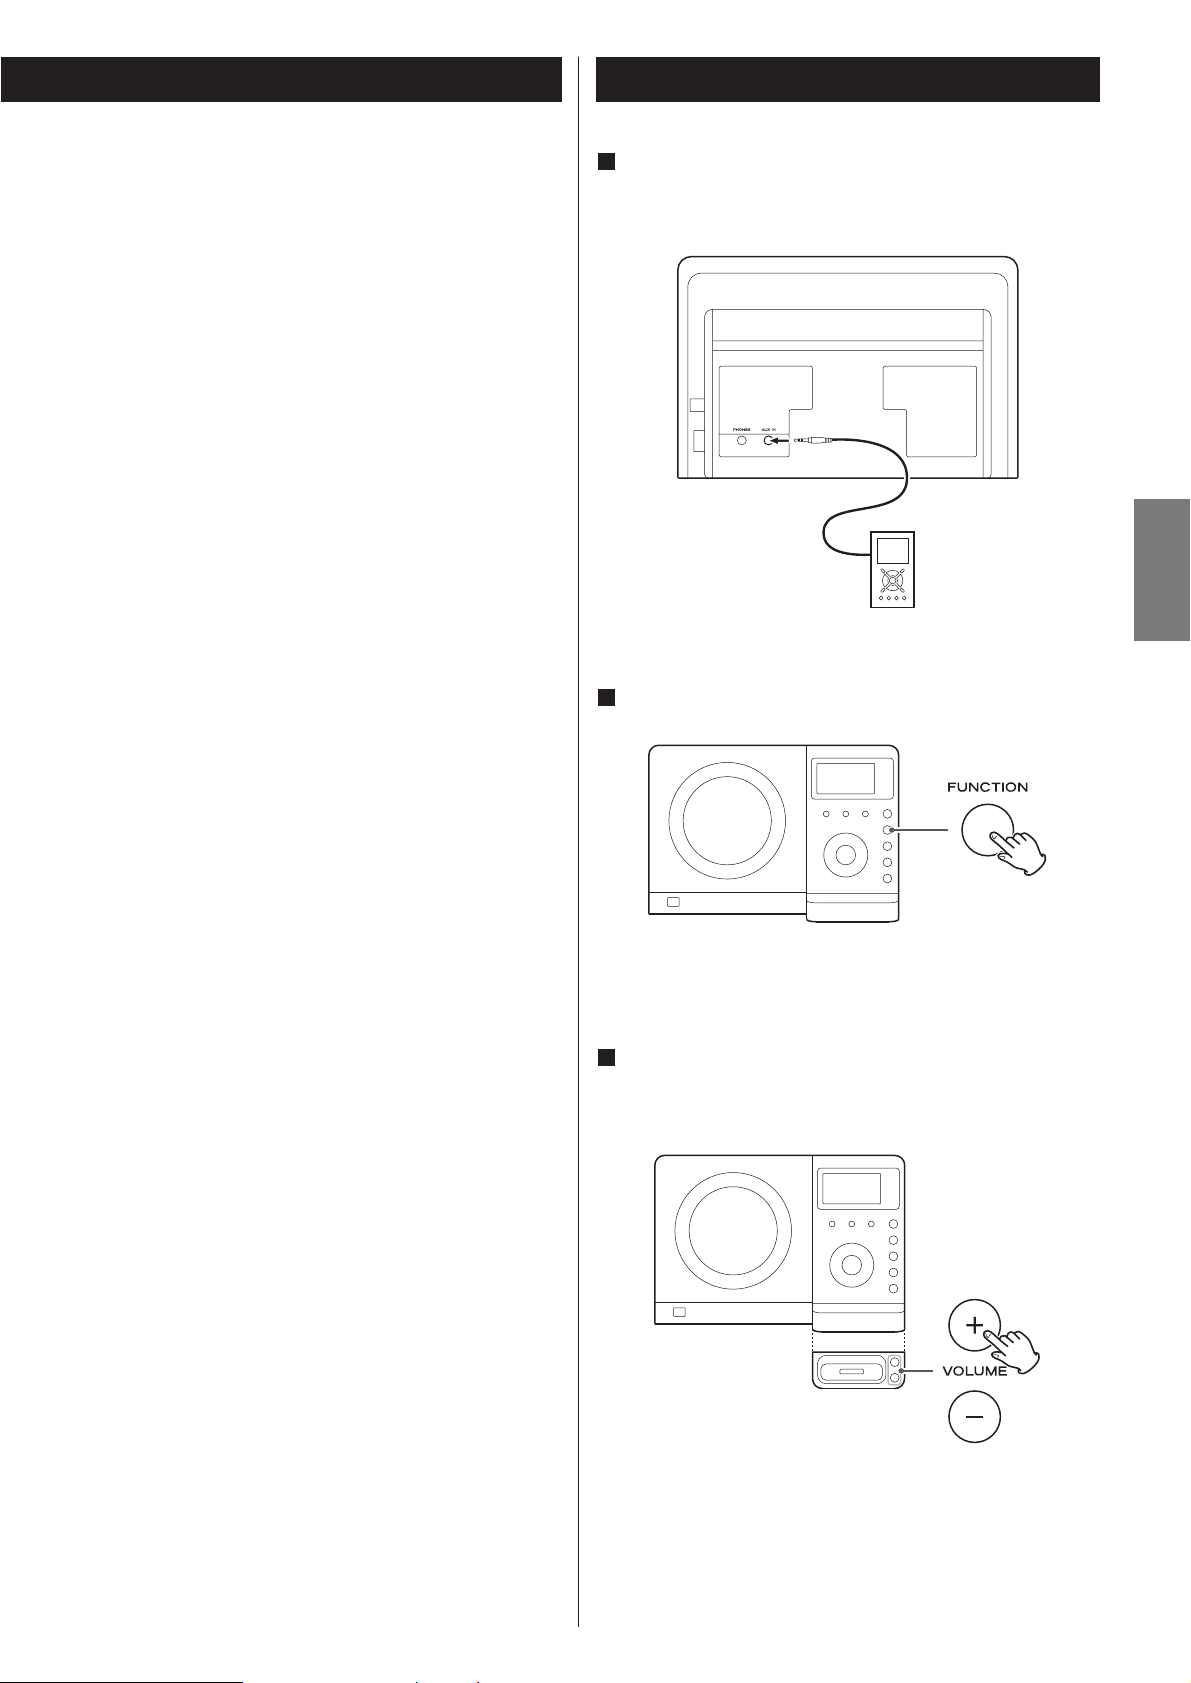
Connect the PHONES jack (audio output jack) of a
portable audio player to the AUX IN jack of the MCDX222i using the supplied stereo mini plug cable.
1
Listening to an External Source
Play the source, and adjust the volume using the
VOLUME buttons of the MC-DX222i and the audio
player.
3
Press the FUNCTION button to select “AUX”.
2
When using the PHONES jack of your mini player, you must
adjust the volume of the mini-player or you may hear no
sound from your MC-DX222i.
PTY (Programme Type)
NEWS : brief announcements, events, public opinion,
reports, actual situations.
AFFAIRS : a kind of suggestion including practical
announcements other than news, documents,
discussion, analysis and so on.
INFO : daily information or reference such as weather
forecast, consumer guide, medical assistance and
so on.
SPORT : sports related programs.
EDUCATE : educational and cultural information.
DRAMA : all kinds of radio concert and serial drama.
CULTURE : all aspects of national or local culture including
religious events, philosophy, social science,
language, theatre, and so on.
SCIENCE : programs on natural science and technology
VARIED : popular programs such as quiz, entertainment,
private interview, comedy, satire and so on.
POP M : program on commercial, practical and popular
songs, and sale volume of discs, etc.
ROCK M : practical modern music generally composed and
played by young musicians.
M O R M : popular music usually lasting for less than 5
minutes.
LIGHT M : classical music, instrumental music, chorus, and
light music favored by non-professionals.
CLASSICS : orchestra including great operas, symphony,
chamber music and so on.
OTHER M : other music styles(Rhythm & Blues, Reggae, etc.)
WEATHER : weather reports, forecast
FINANCE : financial reports, commerce, trading
CHILDREN : children’s programs
SOCIAL A : social affairs
RELIGION : religious programs
PHONE IN : program in which the public expresses its view by
phone.
TRAVEL : travel reports
LEISURE : programs concerning recreational activities
JAZZ : jazz music
COUNTRY : country music
NATIONAL : national music
OLDIES : music from the so-called golden of popular music
FOLK M : folk music
DOCUMENT: documentaries
TEST
ALARM : a program notifying an emergency or a natural
disaster.
26
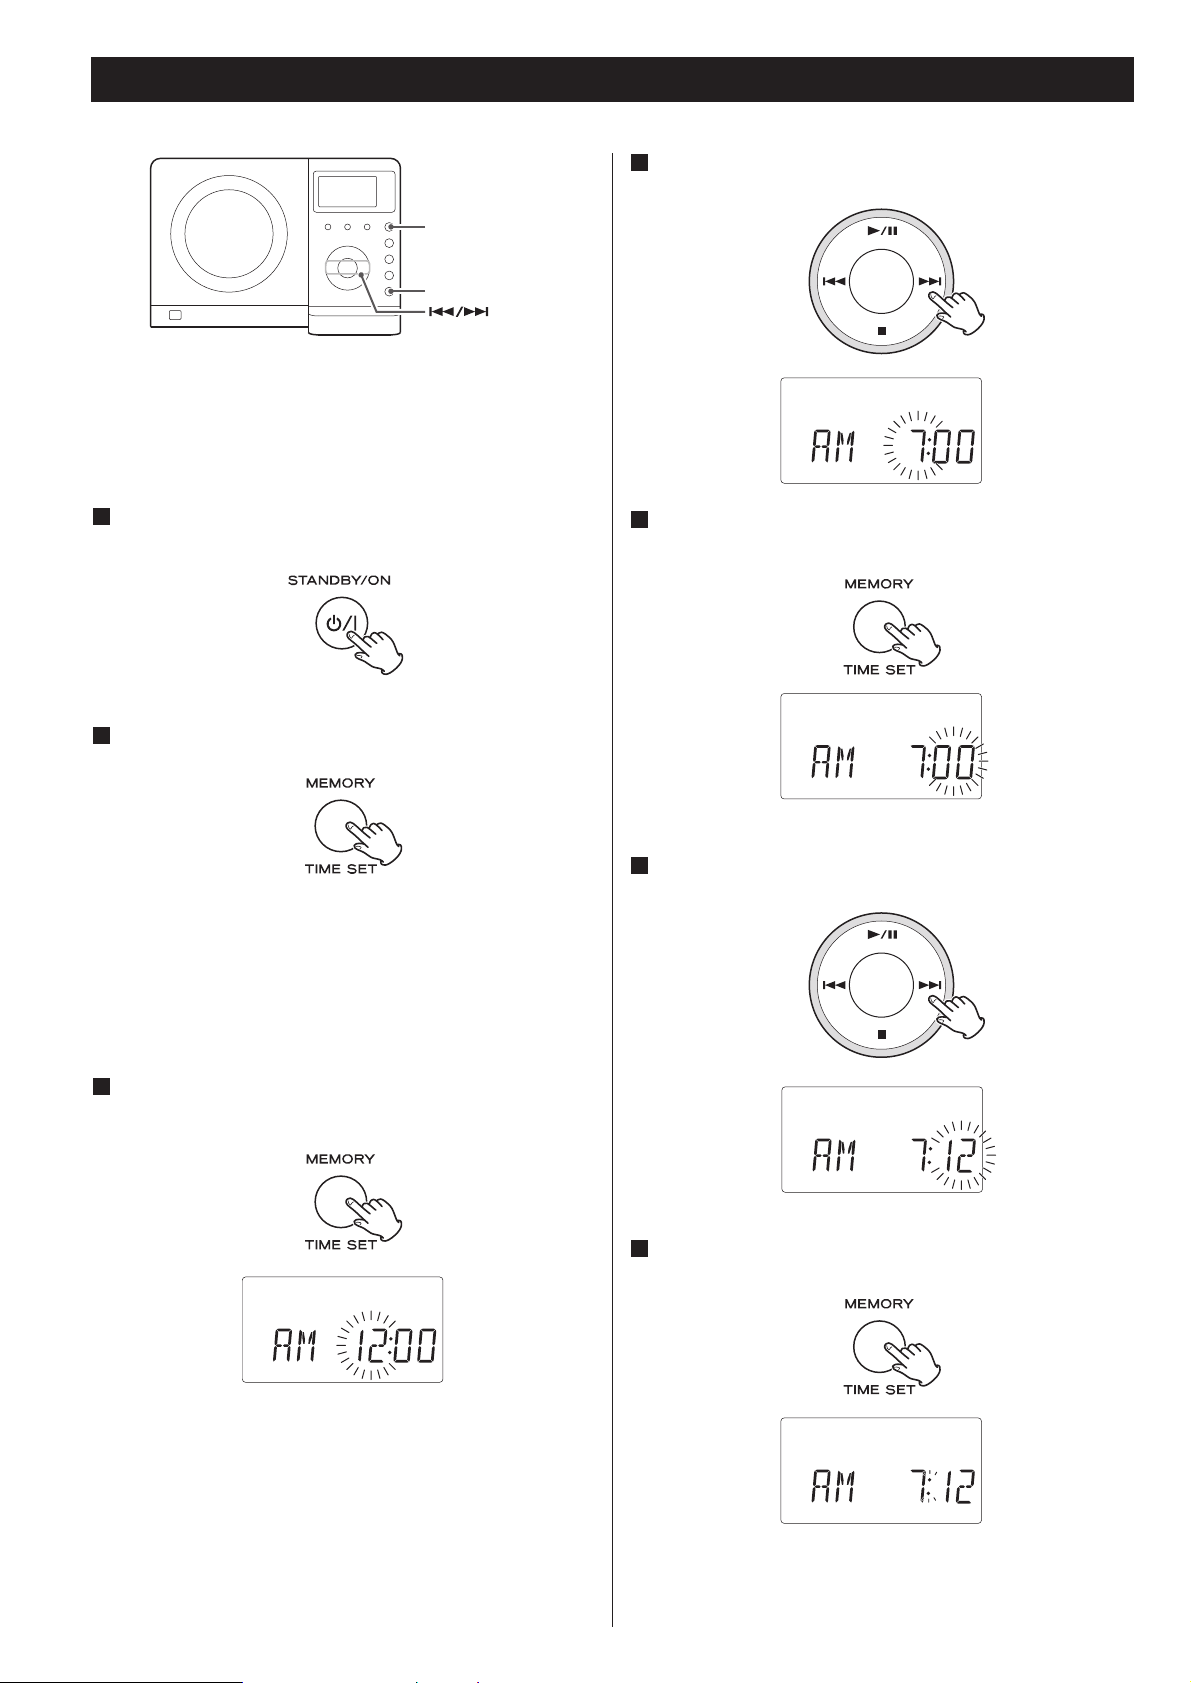
Setting the Clock
If the power switch of the subwoofer turned off, the
settings kept in memory (clock, preset stations, timer
setting) will be erased.
If the unit is on, press the STANDBY/ON switch to turn
it standby
1
Press the TIME SET button once more.
The “hour” value blinks.
3
Press the SKIP button (.// ) to set the current
hour.
4
Press the TIME SET button.
The “minute” value blinks.
5
Press the SKIP button (.// ) to set the current
minute.
6
Press the TIME SET button.
The clock starts.
7
Press and hold down the TIME SET button.
2
“12 HOUR” or “24 HOUR” blinks. If you want to change the
hour mode, press the .or/ button.
< If no button is pressed for 10 seconds, the time setting mode
will be cancelled.
STANDBY/ON
TIME SET

ENGLISH
27
Setting the Timer 1
< The unit can be programmed to turn on and off at a specified
time.
< Adjust the clock before setting the timer.
Press and hold the TIMER button until the TIMER
indicator and “ON” appear on the display.
1
The “hour” value starts flashing.
< When no button is pressed for 10 seconds, the timer setting
mode will be cancelled.
The “minutes” value starts flashing.
Press the SKIP button (.//) to set the start time
(minute), and then press the TIMER button.
3
“TIMER” and “OFF” indiactors appear on the display and the
“hour” value starts flashing.
Press the SKIP button (.//) to set the start time
(hour), and then press the TIMER button.
2
Press the SKIP button (.//) to set the stop time
(minute), and then press the TIMER button.
5
The “minutes” value starts flashing.
Press the SKIP button (.//) to set the stop time
(hour), and then press the TIMER button.
4
TIMER
/

28
Press the SKIP button (.// ) to select a source
(TUNER, CD or iPod), and then press the TIMER button.
6
Press the SKIP button (.//) to set the volume, and
then press the TIMER button.
7
The clock and the TIMER indicator are displayed.
The unit will turn on and off at the specified time every day.
Don’t forget to turn the unit off (standby), or the timer
won’t work.
If the power switch of the subwoofer turned off, the
settings kept in memory (clock, preset stations, timer
setting) will be erased.
< Playback volume will gradually increase up to your set volume
when the unit is turned on by timer.
< If the source is set to “iPod” but no iPod is set, the unit will
turn on into TUNER mode.
< If the source is set to “CD” but no disc is set, the unit will
turn on into TUNER mode.
< When the source is set to “TUNER” and the unit turns on, it
will tune in to the station you selected last time.
Prepare the source.
If you selected “TUNER” in step , tune in a station.
If you selected “CD” in step , set a disc.
If you selected “iPod” in step , insert an iPod.
6
6
6
8
When you don’t use the timer, press the TIMER button to
turn it off. (The TIMER indicator disappears from the display.)
Press the TIMER button again to turn it on.
< When the timer is turned on, the timer settings are displayed
one by one, and the TIMER indicator lights on the display.
Setting the timer is now completed and the timer is turned on.
Your timer setting is displayed one by one, and the TIMER
indicator lights on the display.
To turn on or off the timer
Press the STANDBY/ON button to turn the unit off
(standby).
9
Setting the Timer 2

29
ENGLISH
If you have problems with your system, look through this chart
and see if you can solve the problem yourself before calling your
dealer or TEAC service center.
General
No power
e Check the connection to the AC power supply. Check and
make sure the AC source is not a switched outlet and that,
if it is, the switch is turned on. Make sure there is power to
the AC outlet by plugging another item such as a lamp or
fan into the outlet.
No sound from speakers.
e Select the source by pressing the FUNCTION button.
e Check the connection to the speakers.
e Adjust the volume.
e Pull out the headphone’s plug from the PHONES jack.
e If “MUTING” is blinking, press the MUTING button.
The sound is noisy.
e The unit is too close to a TV or similar appliances. Install the
unit apart from them, or turn them off.
Remote control doesn’t work.
e Press the STANDBY/ON switch to turn the unit on.
e When the battery has run out, put in a new one.
e Use remote control unit within the range (5 m) and point at
the front panel.
e Clear obstacles between the remote control unit and the
main unit.
e If a strong light is near the unit, turn it off.
CD Player
Will not play.
e Load a disc with the playback side facing away.
e If the disc is dirty, clean the surface of the disc.
e A blank disc has been loaded. Load a prerecorded disc.
e Depending on the disc, etc. it may not be possible to play
back CD-R/RW discs. Try again with another disc.
e You cannot play back unfinalized CD-R/RW discs. Finalize
such a disc in a CD recorder and try again.
Sound skips.
e Place the unit on a stable place to avoid vibration and shock.
e If the disc is dirty, clean the surface of the disc.
e Don’t use scratched, damaged or warped discs.
iPod Player
Cannot insert the iPod.
e Check the dock adapter.
e Remove dust or obstacles from the Dock connector of the
MC-DX222i and the iPod, and insert the iPod again.
Will not play.
e Remove the iPod from the dock, wait a few seconds, and
insert it again.
e Software update may solve the problem. Visit the Apple
website and download the latest iPod Software.
Tuner
Cannot listen to any station, or signal is too weak.
e Tune in the station properly.
e Rotate the FM or AM antenna for the best reception
position.
Though the broadcast is stereo, it sounds monaural.
e Press the FM MODE button.
If normal operation cannot be recovered, unplug the
power cord from the outlet and plug it again.
If the power switch of the subwoofer turned off, the
settings kept in memory (clock, preset stations, timer
setting) will be erased.
Troubleshooting
Beware of condensation
When the unit (or a disc) is moved from a cold to a warm
place, or used after a sudden temperature change, there is a
danger of condensation; vapor in the air could condense on
the internal mechanism, making correct operation erratic or
impossible. To prevent this, or if this occurs, leave the unit for
one or two hours with the power turned on. The unit will
stabilize at the temperature of its surroundings.
Maintenance
If the surface of the unit gets dirty, wipe with a soft cloth or
use diluted mild liquid soap. Never spray liquid directly on this
unit. Apply your cleaner to your cleaning cloth and wipe
gently. Be sure to remove any excess completely. Do not use
thinner, benzene or alcohol as they may damage the surface
of the unit. Allow the surface of the unit to dry completely
before using.

30
Specifications
AMPLIFIER section
Output Power (L+R) . . . . . . . . . . . . . . . . . . . . . . . 5 W + 5 W
Output Power (Subwoofer) . . . . . . . . . . . . . . . . . . . . . . 15 W
Input Sensitivity. . . . . . . . . . . . . . . . . . . . . . . . . . . . . 300 mV
Frequency Response. . . . . . . . . . . . . . . . . . . 50 to 20,000 Hz
TUNER Section (FM)
Frequency Range . . . . . . . . . . . . . . . . . 87.50 to 108.00 MHz
Sensitivity (S/N30dB). . . . . . . . . . . . . . . . . . . . . . . 20 dBµV/m
TUNER Section (AM)
Frequency Range . . . . . . . . . . . . . . . . . . . . 522 to 1,620 kHz
Sensitivity (S/N20dB). . . . . . . . . . . . . . . . . . . . . . . 54 dBµV/m
CD PLAYER Section
Frequency Response . . . . . . . . . . . . . 20 to 20,000 Hz (±1 dB)
Signal-to-Noise Ratio . . . . . . . . . . . . . . . . . . . . . . . . . . 55 dB
Wow and Flutter . . . . . . . . . . . . . . . . . . . . . . . Unmeasurable
SPEAKER
Type . . . . . . . . . . . . . . . . . . . . . . . . . . . . . Full range flat type
Impedance. . . . . . . . . . . . . . . . . . . . . . . . . . . . . . . . . 4 ohms
SUBWOOFER
Impedance. . . . . . . . . . . . . . . . . . . . . . . . . . . . . . . . . 8 ohms
GENERAL
Power Requirements . . . . . . . . . . . . . . . . . . 230 V AC, 50 Hz
Power Consumption . . . . . . . . . . . . . . . . . . . . . . . . . . . 80 W
Dimension (W x H x D)
Main Unit . . . . . . . . . . . . . . . . . . . . 255 x 169.5 x 115 mm
L & R Speakers . . . . . . . . . . . . . . . . . 210 x 169.5 x 81 mm
Subwoofer. . . . . . . . . . . . . . . . . . . . . 160 x 245 x 335 mm
Weight (Net)
Main Unit . . . . . . . . . . . . . . . . . . . . . . . . . . . . . . . . 1.4 kg
L & R Speakers. . . . . . . . . . . . . . . . . . . . . . . . . 0.7 kg each
Subwoofer . . . . . . . . . . . . . . . . . . . . . . . . . . . . . . . 5.3 kg
Standard Accessories
Remote control unit (RC-1103) x 1
Battery for remote control unit x 1
Subwoofer cable x 1
Speaker cable x 2
FM antenna x 1
AM antenna x 1
Stereo mini plug cable x 1
Dock adapter x 8
(adapter “60GB (color) + Photo 40GB/60GB” premounted)
Cover for the Dock x 1
Wall mount brackets x 4
Screw (short) x 8
Screw (long) x 4
Tapered plastic wall anchor x 4
Guide sheet for wall mounting x 2
Owner’s manual x 1
Quick guide for connection x 1
Warranty card x 1
• Design and specifications are subject to change without
notice.
• Weight and dimensions are approximate.
• Illustrations may differ slightly from production models.

31
FRANÇAIS
Sommaire
Merci d’avoir choisi TEAC. Lisez attentivement ce manuel
pour obtenir les meilleures performances de cet appareil.
Avant d’utiliser l’appareil. . . . . . . . . . . . . . . . . . . . . . . . . . . . . 31
Télécommande . . . . . . . . . . . . . . . . . . . . . . . . . . . . . . . . . . . . 32
Disques. . . . . . . . . . . . . . . . . . . . . . . . . . . . . . . . . . . . . . . . . . 33
Connexion . . . . . . . . . . . . . . . . . . . . . . . . . . . . . . . . . . . . . . . 34
Montage mural. . . . . . . . . . . . . . . . . . . . . . . . . . . . . . . . . . . . 36
Démarrage . . . . . . . . . . . . . . . . . . . . . . . . . . . . . . . . . . . . . . . 37
Fonctions de l’unité. . . . . . . . . . . . . . . . . . . . . . . . . . . . . . . . . 38
Fonctionnement de base. . . . . . . . . . . . . . . . . . . . . . . . . . . . . 40
iPod
Écoute de iPod . . . . . . . . . . . . . . . . . . . . . . . . . . . . . . . . . . . . 42
CD/MP3
Ecoute de CD/MP3 . . . . . . . . . . . . . . . . . . . . . . . . . . . . . . . . . 44
Mode de recherche (MP3 seulement) . . . . . . . . . . . . . . . . . . . 46
Lecture aléatoire (Shuffle) . . . . . . . . . . . . . . . . . . . . . . . . . . . . 47
Lecture programmée. . . . . . . . . . . . . . . . . . . . . . . . . . . . . . . . 48
Lecture répétitive . . . . . . . . . . . . . . . . . . . . . . . . . . . . . . . . . . 49
TUNER
Ecoute de la radio. . . . . . . . . . . . . . . . . . . . . . . . . . . . . . . . . . 50
Mémorisation de stations (Presets) . . . . . . . . . . . . . . . . . . . . . 51
RDS . . . . . . . . . . . . . . . . . . . . . . . . . . . . . . . . . . . . . . . . . . . . 52
RDS (recherche de type de programme PTY) . . . . . . . . . . . . . . 52
AUX
Ecoute d’une source externe. . . . . . . . . . . . . . . . . . . . . . . . . . 53
Réglage de l’horloge. . . . . . . . . . . . . . . . . . . . . . . . . . . . . . . . 54
Réglage de la minuterie . . . . . . . . . . . . . . . . . . . . . . . . . . . . . 55
Guide de dépannage . . . . . . . . . . . . . . . . . . . . . . . . . . . . . . . 57
Caractéristiques . . . . . . . . . . . . . . . . . . . . . . . . . . . . . . . . . . . 58
A lire avant l’emploi
< Comme l’appareil peut chauffer en cours de fonctionnement,
laissez toujours assez d’espace autour de lui pour sa
ventilation.
Les orifices de ventilation ne doivent pas être obstrués.
Vérifiez qu’il y a au moins 5 cm d’espace de chaque côté de
l’appareil. Ne placez RIEN sur l’appareil.
< La tension électrique fournie à l’appareil doit correspondre à
celle imprimée sur sa face arrière. En cas de doute à ce sujet,
consultez un électricien.
< Choisissez soigneusement le lieu d’installation de votre
appareil. Evitez de l’exposer directement au soleil ou de le
placer près d’une source de chaleur. Evitez les lieux soumis à
des vibrations et à la poussière, à la chaleur, au froid et à
l’humidité de façon excessive.
< Ne placez l’appareil sur aucun autre composant électronique.
< N’ouvrez pas l’appareil car cela pourrait entraîner des
dommages pour le circuit ou une électrocution. Si un objet
étranger venait à pénétrer dans l’appareil, contactez dès que
possible votre revendeur ou le service après-vente.
< Lorsque vous débranchez le cordon d’alimentation de la prise
secteur, tirez toujours sur la fiche, jamais sur le cordon.
< Pour garder propre le capteur laser, ne le touchez pas et
gardez toujours la porte du lecteur de CD fermée après
chaque usage.
< N’essayez pas de nettoyer l’appareil avec des solvants
chimiques car cela pourrait endommager sa finition. Utilisez
un chiffon doux et sec, non pelucheux.
< Gardez ce manuel en lieu sûr pour vous y référer
ultérieurement.
ATTENTION : NE DEPLACEZ PAS L’APPAREIL DURANT LA
LECTURE
Durant la lecture, le disque tourne à haute vitesse. Ne
soulevez et ne déplacez PAS l’appareil durant la lecture. Cela
pourrait endommager le disque ou l’appareil.
QUAND VOUS DEPLACEZ CET APPAREIL
Quand vous changez l’appareil de place ou quand vous
l’emballez pour le transporter, veillez bien à retirer le disque.
Déplacer cet appareil avec un disque à l’intérieur peut
entraîner des mauvais fonctionnements ou d’autres
dommages.
Avant d’utiliser l’appareil

32
1
2
3
Télécommande
La télécommande fournie permet de contrôler l’appareil à
distance.
Quand vous utilisez la télécommande, pointez-la vers le capteur
situé en face avant de l’appareil.
< Même si la télécommande est employée dans la zone de
portée efficace, son utilisation peut être impossible s’il y a des
obstacles entre elle et l’appareil.
< Si la télécommande est employée près d’autres produits
émetteurs de rayons infrarouges, ou si d’autres
télécommandes à infrarouges sont employées près de
l’appareil, le fonctionnement peut être incorrect. De même,
les autres produits peuvent du coup aussi mal fonctionner.
Installation de la pile
1. Retirez le couvercle du compartiment de pile.
2. Placez la pile au lithium (CR2032, 3V).
3. Refermez le couvercle.
Remplacement de la pile
Si la portée de la télécommande vis-à-vis de l’appareil
diminue, la pile est déchargée. Dans ce cas, remplacez-la par
une neuve.
Précautions concernant les piles
Ne chauffez pas et ne démontez pas les piles et ne jetez
jamais les vieilles piles dans un feu.
ATTENTION
< N’exposez pas l’appareil à des éclaboussures ou à des
gouttes d’eau.
< Ne posez pas d’objet contenant du liquide, tel qu’un vase,
sur l’appareil.
< N’installez pas cet appareil dans un espace confiné,
dépourvu de ventilation, comme par exemple une
bibliothèque ou similaire.
< L’appareil tire un courant de veille nominal de la prise
secteur quand son interrupteur STANDBY/ON est en
position d’arrêt.
< L’appareil doit être placé suffisamment près de la prise
secteur pour que vous puissiez à tout moment saisir la fiche
du cordon d’alimentation.
< Un appareil de classe ! doit être connecté à une prise
secteur via une fiche avec mise à la terre.
< Les batteries (ou le pack de batteries ou les batteries
chargées) ne devront pas être exposées à la chaleur
excessive telle que le soleil, le feu ou analogues.
< Une pression acoustique excessive d’écouteurs ou d’un
casque peut provoquer une perte d’audition.
Mise au rebut de votre ancien appareil
1. Quand ce symbole de poubelle sur roues
barrée d’une croix est joint à un produit,
cela signifie que ce produit est couvert
par la Directive Européenne 2002/96/EC.
2. Tous les produits électriques et
électroniques doivent être jetés séparément des ordures
ménagères via des collecteurs désignés agréés par le
gouvernement ou les autorités locales.
3. La gestion correcte de l’élimination de votre ancien appareil
aide à prévenir les conséquences potentiellement négatives
pour l’environnement et la santé humaine.
4. Pour des informations plus détaillées sur la mise au rebut de
votre ancien appareil, veuillez contacter votre mairie, le
service de traitement des ordures ou le magasin dans lequel
vous avez acheté le produit.
NXT est une marque commerciale de New Transducers Ltd.

33
FRANÇAIS
Disques
Disques lisibles par cet appareil:
• CD audio conventionnels portant le logo COMPACT DISC
DIGITAL AUDIO:
• CD-R et CD-RW correctement finalisés
• CD de MP3
Note:
< Selon la qualité du disque et/ou les conditions de la gravure,
certains CD-R/CD-RW peuvent ne pas être lisibles.
< Les disques protégés contre la copie et les disques ne se
conformant pas au standard CD peuvent ne pas être lus
correctement par cet appareil. Si vous utilisez de tels disques
dans cet appareil, TEAC Corporation et ses filiales ne peuvent
être tenus pour responsables d’aucune conséquence et ne
garantissent pas la qualité de reproduction. Si vous rencontrez
des problèmes avec de tels disques non standards, vous devez
contacter les fabricants du disque.
Compatibilité MP3
< Le nom des fichiers MP3 ne doit contenir que des caractères
alphanumériques. Cet appareil ne peut pas afficher
correctement des symboles ou des caractères codés sur 2
octets (tels que les caractères Japonais, Chinois, etc.). Veillez
aussi à bien employer l’extension de fichier « .mp3 ».
< Le disque doit être finalisé pour pouvoir être lu.
< Le CD-ROM doit être compatible ISO 9660.
< Quand plus de 200 fichiers ou 50 dossiers sont enregistrés sur
le disque, l’appareil peut ne pas pouvoir correctement les lire.
< Format audio MPEG-1 Layer 3 mono ou stéréo, 44.1 ou 48
kHz, débit binaire constant (CBR).
Comment sortir le disque Comment tenir le disque
< Placez toujours le disque dans le lecteur avec ses inscriptions
sur le dessus. (Les Compact Discs ne peuvent être lus ou
enregistrés que sur une face.)
< Pour retirer un disque de son boîtier, appuyez sur la rosace au
centre du boîtier et sortez le disque, en le tenant
soigneusement par la tranche.
< Ne faites pas reproduire un disque gondolé, déformé ou
endommagé.
Faire reproduire de tels disques peut causer des dommages
irréparables aux mécanismes de lecture.
< Les CD-R et CD-RW sont plus sensibles aux effets de la
chaleur et des rayons ultraviolets que les CD ordinaires. Il est
important de ne pas les conserver dans un lieu soumis
directement aux rayons du soleil, et de les tenir éloignés de
sources de chaleur comme des radiateurs ou des appareils
électriques producteurs de chaleur.
< Les CD-R et CD-RW imprimables ne sont pas recommandés
car la face avec étiquette peut être collante et risque
d’endommager l’appareil.
< Ne collez pas de papiers ou de feuillets de protection sur les
disques et n’employez aucune bombe diffusant un
revêtement protecteur.
< Utilisez un stylo feutre doux à base d’huile pour inscrire les
informations du côté inscriptible. N’utilisez jamais de stylo
bille ou à pointe dure car cela pourrait endommager la face
enregistrée.
< N’employez jamais de stabilisateurs. L’emploi dans cet
appareil de stabilisateurs de CD disponibles dans le commerce
endommagera les mécanismes et conduira à leur mauvais
fonctionnement.
< N’employez pas de CD de forme particulière (octogonal, en
forme de cœur, de taille carte de visite, etc.). Ce type de CD
peut endommager l’appareil:
< En cas de doute sur l’entretien et le maniement d’un CD-
R/CD-RW, lisez les précautions données avec le disque, ou
contactez directement le fabricant du disque.
< En cas de salissure du disque, essuyez la surface de façon
radiale (du trou central vers l’extérieur) avec un chiffon sec et
doux:
< N’employez jamais de produits chimiques comme des bombes
pour disque, des bombes ou liquides antistatiques, de la
benzine ou du diluant pour nettoyer les disques. Ils
causeraient des dommages irréparables à la surface plastique
du disque.
< Les disques doivent être remis dans leur boîtier après usage
pour éviter la poussière et les rayures qui pourraient causer
des « sauts » du capteur laser.
< N’exposez pas les disques directement au soleil ou à une
humidité et température élevées durant des périodes
prolongées. Une longue exposition à de fortes températures
fera se gondoler le disque.

34
Connexion
ATTENTION
< Eteignez tous vos équipements avant de faire toute connexion.
< Lisez les instructions de chaque élément que vous envisagez d’utiliser avec cet appareil.
< Veillez à bien enfoncer chaque fiche de connexion. Pour éviter les bruits et les ronflements, ne
regroupez pas les câbles de modulation (pour le signal) et le cordon d’alimentation.
B
A
C
G H I J
E
DD
F
S-VIDEO
IN
VIDEO
IN
Enceinte (D) Enceinte (G)
Face latérale de l’unité centrale
Face arrière de l’unité centrale
Caisson de graves
TV (moniteur)

35
FRANÇAIS
Antenne cadre AM
Placez l’antenne pour obtenir la meilleure réception.
Si vous le désirez, vous pouvez fixer l’antenne AM au mur
comme représenté ci-dessous :
Antenne FM
En mode FM, réglez-vous sur une station FM et étendez le fil
d’antenne pour trouver la meilleure position de réception.
Cette antenne peut devoir être repositionnée si vous
déplacez votre appareil.
Antenne FM d’extérieur
Dans une zone où les signaux FM sont faibles, il sera
nécessaire d’utiliser une antenne FM 75 ohms de type
asymétrique pour l’extérieur avec un transformateur
d’adaptation optionnel (non fourni) connecté à une antenne
externe. Généralement, une antenne à 3 éléments suffira; si
vous vivez dans une zone où les signaux FM sont
particulièrement faibles, une antenne à 5 éléments ou plus
peut être nécessaire.
B
A
Cordon d’alimentation secteur
Veillez à brancher le cordon d’alimentation électrique dans
une prise secteur délivrant une tension correcte.
Saisissez la fiche du cordon pour le brancher ou le
débrancher. Ne tirez jamais sur le cordon.
Interrupteur d’alimentation POWER du
caisson
Utilisez cet interrupteur pour allumer ou éteindre le système.
< Si l’interrupteur d’alimentation du caisson de graves est
coupé, les réglages conservés en mémoire (réglages de
l’horloge, des stations préréglées ou « presets », de la
minuterie) sont effacés.
Pour éviter de perdre vos réglages, il est conseillé de laisser
cet interrupteur sur ON même hors utilisation.
Casque
Pour écouter en privé, réduisez d’abord le niveau de volume
au minimum. Puis insérez la fiche de votre casque dans la
prise PHONES, et réglez le volume à l’aide des touches
VOLUME. Le son des enceintes est coupé tant que la fiche
casque est insérée.
ATTENTION
Baissez toujours le niveau de volume avant de brancher votre
casque. POUR EVITER D’ENDOMMAGER VOTRE AUDITION Ne placez pas le casque sur votre tête avant de l’avoir branché.
Entrée auxiliaire AUX IN
Vous pouvez brancher un lecteur audio portable à cette prise.
Branchez à cette dernière la prise LINE OUT ou PHONES
(prise de sortie audio de niveau ligne ou pour casque) du
lecteur à l’aide du câble à mini-fiche stéréo fourni.
Si vous utilisez la prise casque (PHONES) de votre minilecteur, vous devez régler le volume du mini-lecteur ou vous
risquerez de ne rien entendre dans le MC-DX222i.
VIDEO OUT
Le signal vidéo en provenance de votre iPod est disponible
sur cette prise de sortie.
Utilisez un câble vidéo RCA pour brancher le Dock sur la prise
d’entrée vidéo composite d’une télévision ou d’un moniteur.
S-VIDEO OUT
Le signal vidéo en provenance de votre iPod est disponible
sur cette prise de sortie.
Utilisez un câble S-Video pour brancher le Dock sur l’entrée
S-Video d’une télévision ou d’un moniteur convenablement
équipé. Donnez la préférence à ce branchement sur celui de
vidéo composite.
J
I
H
G
F
E
Caisson de graves (Subwoofer)
Reliez les prises « TO SUBWOOFER » et « FROM MAIN » à
l’aide du câble fourni.
< Connectez les connecteurs dans la direction indiquée.
Enceintes
Branchez la fiche de l’enceinte gauche en prise L, et celle de
l’enceinte droite en prise R.
< Si vous n’utilisez pas les enceintes fournies, vérifiez que celles
que vous emploierez ont une impédance d’au moins 4 Ω.
< Ne connectez rien d’autre à ces prises que des enceintes.
D
C
Antenne FM d’extérieur (75 Ω)

36
Montage mural
Vous pouvez monter les enceintes gauche et droite au mur.
Précautions
< Sachez que la longueur des câbles est d’environ 3 m.
N’essayez pas de monter les enceintes trop loin du caisson de
graves.
< Percez des trous dans un mur solide, comme une charpente
en bois ou un mur en béton.
< TEAC fournit ces supports au propriétaire du produit pour
plus de commodités. Consultez le code local de construction
et prenez toutes les précautions nécessaires pour monter ces
supports. Si vous n’êtes pas sûr de la façon de les utiliser,
consultez un artisan qualifié ou un expert en matériaux de
construction.
Pour l’accrochage mural
1. Fixez les supports sur le panneau arrière des enceintes
en utilisant les vis courtes fournies.
2. Utilisez le gabarit fourni pour marquer l’emplacement
exact des perçages sur le mur.
3. Percez des trous dans le mur aux endroits marqués.
4. Vissez les longues vis fournies dans le mur.
Laissez un espace d’environ 5 mm entre la tête des vis et le
mur.
< Pour plus de commodités, un jeu de crochets coniques en
plastique est fourni. Si vous choisissez d’utiliser ces crochets,
percez un avant-trou à l’aide d’un foret de 6 mm puis
enfoncez le crochet dans l’avant-trou.
N’utilisez ces crochets que s’ils conviennent aux matériaux sur
lesquels l’appareil doit être monté. Consultez votre magasin
de bricolage local si vous n’êtes pas sûr.
5. Avant d’aller plus loin, connectez les enceintes et le
caisson de grave en utilisant les câbles d’enceinte
fournies (voir page 34-35).
6. Accrochez les enceintes sur les vis avec précaution.
Note:
Assurez-vous que les enceintes sont bien accrochées sur les
crochets et que les crochets sont suffisamment forts pour
supporter leur poids avant de retirer vos mains.

37
FRANÇAIS
Le MC-DX222i est fourni avec un adaptateur en place pour iPod
avec écran couleur (40 Go, 60 Go), « 60GB (color) + Photo
40GB/60GB ».
Pour reproduire votre iPod à travers le MC-DX222i, vous devez
d’abord vérifier si l’adaptateur monté à l’usine correspond à
votre modèle de iPod. Sinon, vous devez le remplacer par
l’adaptateur correct, de la façon expliquée ci-dessous.
1. Retirez l’adaptateur du Dock du MC-DX222i.
Tenez les côtés gauche et droit de l’adaptateur et tirez
doucement vers le haut.
2. Choisissez l’adaptateur de Dock qui correspond à votre
appareil numérique mobile iPod.
« Video 30GB » pour iPod avec vidéo (30 Go).
« Video 60GB/80GB » pour iPod avec vidéo (60 Go, 80 Go).
« nano » pour iPod nano.
« mini » pour iPod mini.
« 20GB (color) + Photo 30GB » pour iPod avec écran couleur
(20 Go, 30 Go, U2 Special Edition).
« 60GB (color) + Photo 40GB/60GB » pour iPod avec écran
couleur (40 Go, 60 Go).
« 20GB + U2 » pour iPod avec molette sensitive Click Wheel
(20 Go, U2 Special Edition).
« 40GB » pour iPod avec molette sensitive Click Wheel (40
Go).
< Utilisez un adaptateur en vente dans le commerce pour
reproduire iPod avec connecteur pour dock (avec quatre
touches sous l’écran).
< Quand vous avez besoin de retirer l’adaptateur, tenez les
côtés gauche et droit de l’adaptateur et tirez doucement vers
le haut.
< Quand vous n’utilisez pas le Dock, utilisez le couvercle fourni
pour le Dock pour empêcher que de la poussière ne
s’accumule sur le Dock.
3. Insérez l’adaptateur dans le Dock du MC-DX222i.
Faites coïncider le bord avant de l’adaptateur dans le Dock et
poussez doucement sur le bord arrière de l’adaptateur jusqu’à
ce que vous entendiez un léger clic indiquant que
l’adaptateur a été inséré correctement.
Logiciel iPod Compatible
Si votre iPod ne fonctionnait pas avec le MC-DX222i ou avec la
télécommande, mettre à jour le logiciel peut résoudre le
problème.
Consultez le site web Apple et téléchargez le dernier logiciel
pour iPod.
http://www.apple.com/fr/ipod/download/
iPod est une marque déposée d’Apple, Inc., enregistré aux ÉtatsUnis et à d'autres pays.
Démarrage
1
2

38
Fonctions de l’unité
Note:
Pour simplifier les explications, les instructions de ce manuel
se réfèrent exclusivement aux noms des touches et
commandes de la face avant. Les commandes qui y sont
associées sur la télécommande fonctionneront de façon
similaire.
CBA D E
F
G
H
I
J
K
G
Q
L
OP
M
N
H
J
U
V
E
C
D
W
R
A
B
L
S
T
K
M
X

39
FRANÇAIS
SAUT (.//) / SYNTONISATION
En mode iPod ou CD, appuyez brièvement sur cette touche
pour sauter les plages. Maintenez cette touche pressée pour
un passage d’une plage.
En mode TUNER, appuyez brièvement sur cette touche pour
syntoniser des stations.
En mode de veille (Standby), ces touches sont utilisées pour
régler ou ajuster l’horloge et la minuterie.
LECTURE/PAUSE (y/J)
En mode iPod ou CD, utilisez cette touche pour démarrer ou
suspendre temporairement la lecture.
MP3/RDS
Pendant la lecture d’un disque MP3, utilisez cette touche pour
rechercher le nom d’une plage.
En mode FM TUNER, utilisez cette touche pour sélectionner le
mode RDS.
REPEAT/PTY
En mode iPod ou CD, utilisez cette touche pour régler la
fonction de répétition.
En mode FM TUNER, utilisez cette touche pour démarrer la
recherche PTY.
SHUFFLE/FM MODE
En mode iPod ou CD, utilisez cette touche pour mettre en ou
hors service la lecture aléatoire.
En mode FM TUNER, utilisez cette touche pour sélectionner
STEREO ou MONO.
Écran
STANDBY/ON
Utilisez sur cette touche pour mettre l’appareil sous tension
ou en veille (Standby).
L’unité centrale est alimentée par le caisson de grave. Vous
devez mettre d’abord le caisson de grave sous tension.
Quand l’unité centrale est en mode de veille (Standby),
l’indicateur d’alimentation du caisson de grave est orange.
Quand l’unité est mise sous tension, l’indicateur devient bleu.
FUNCTION
Utilisez cette touche pour sélectionner une source (iPod, CD,
TUNER ou AUX).
OUVERTURE/FERMETURE
En mode CD, utilisez cette touche pour ouvrir ou fermer la
porte du lecteur de CD.
FM/AM
Utilisez cette touche pour sélectionner AM ou FM.
MEMORY/TIME SET
En mode CD, utilisez cette touche pour programmer des
plages. En mode TUNER, utilisez cette touche pour prérégler
des stations.
Cette touche est aussi utilisée pour le réglage de l’horloge.
K
J
I
H
G
F
E
D
C
B
A
ARRÊT (H)
En mode CD, utilisez cette touche pour arrêter la lecture.
< Cette touche ne fonctionne pas en mode iPod.
VOLUME
Appuyez sur la touche « + » ou « – » pour régler le volume.
Connecteur pour Dock
Avant de l’utiliser, insérez l’adaptateur de Dock approprié
dans le Dock (voir page 37).
Insérez un appareil numérique mobile iPod dans ce Dock.
Porte du lecteur de CD
Capteur de télécommande
Lors de l’utilisation de la télécommander, dirigez-la vers lui.
PRESET/SCROLL
En mode TUNER, utilisez ces touches pour sélectionner une
station préréglée.
En mode iPod, utilisez ces touches pour faire défiler le menu
vers le haut ou le bas.
Pendant la lecture d’un disque MP3, utilisez ces touches pour
sélectionner un dossier dans le disque.
MENU
Cette touche est équivalente à la touche MENU de votre iPod.
En mode iPod, utilisez cette touche pour revenir au menu
précédent.
TREBLE
Utilisez cette touche et les touches VOLUME pour régler le
niveau de la plage des sons haute fréquence.
BASS
Utilisez cette touche et les touches VOLUME pour régler le
niveau de la plage des sons basse fréquence.
SLEEP
Utilisez cette touche pour régler la minuterie d’extinction.
TIMER
Utilisez cette touche en même temps que les touches de saut
pour régler la minuterie.
SELECT
Cette touche est équivalente à la touche centrale de votre
iPod.
En mode iPod, utilisez cette touche pour valider une sélection
dans un menu.
MUTING
Utilisez cette touche pour couper le son.
X
W
V
U
T
S
R
Q
P
O
N
M
L

40
Fonctionnement de base
< Pour écouter une source extérieur connectée à la prise AUX
IN, sélectionnez AUX.
< En mode iPod et AUX, l’écran indique toujours l’horloge.
< Si vous maintenez pressée la touche TIMER SET pendant plus
de 2 secondes en mode CD ou TUNER, l’horloge est affichée
pendant quelques secondes.
Sélectionnez une source en appuyant sur la touche
FUNCTION.
3
Faites reproduire la source et réglez le volume avec les
touches VOLUME.
4
Allumez le caisson de graves.
1
(Face arrière du caisson de graves)
Appuyez sur le commutateur STANDBY/ON de l’unité
centrale.
2
1
2
3
4

41
FRANÇAIS
< Quand le son est coupé, « MUTING » clignote à l’écran.
< Si vous changez le volume quand le son est coupé, le son est
rétabli.
Commande de tonalité
1. Appuyez sur la touche BASS ou TREBLE.
Pour régler le niveau de la plage sonore des basses
fréquences, appuyez sur la touche BASS.
Pour régler le niveau de la plage sonore des hautes
fréquences, appuyez sur la touche TREBLE.
2. Dans les 5 secondes qui suivent, appuyez sur les
touches VOLUME pour modifier le réglage.
Le niveau peut réglé entre –4 et +4.
Coupure du son (Muting)
Pour temporairement couper le son, appuyez sur la touche
MUTING.
Appuyez à nouveau sur la touche MUTING pour restaurer le
son.
Casque
Pour écouter en privé, réduisez d’abord le niveau de volume
au minimum. Puis insérez la fiche de votre casque dans la
prise PHONES, et réglez le volume à l’aide des touches
VOLUME. Le son des enceintes est coupé tant que la fiche
casque est insérée.
Minuterie d’extinction
Appuyer répétitivement sur la touche SLEEP permet de
programmer un intervalle (de 90 à 10 minutes) après lequel
vous voulez que l’unité s’éteigne automatiquement pour
passer en mode veille (Standby).
Chaque pression de la touche SLEEP change la période de
temps de 10 minutes.
ATTENTION
Baissez toujours le niveau de volume avant de brancher votre
casque. POUR EVITER D’ENDOMMAGER VOTRE AUDITION Ne placez pas le casque sur votre tête avant de l’avoir
branché.
(off)
90 80 10
………

42
Écoute de iPod
Sélectionnez « iPod » en utilisant la touche FUNCTION. Si iPod
est déjà dans le Dock, la lecture démarre.
Quand aucun iPod ne se trouve dans le Dock, l’indicateur
d’iPod clignote sur l’écran.
En mode iPod, maintenez la touche Lecture/Pause (G/J)
pressée pour démarrer ou suspendre temporairement la
lecture.
Insérez iPod dans le Dock du MC-DX222i.
Puis appuyez sur la touche Lecture/Pause (y/J) sur iPod.
Le MC-DX222i se met automatiquement sous tension et
démarre la lecture de la liste de musique de iPod.
< Si un iPod en mode de lecture est inséré dans le Dock, le MC-
DX222i se met automatiquement sous tension et démarre la
lecture sur iPod.
< Assurez-vous d’utiliser l’adaptateur de Dock approprié (voir
« Démarrage » à la page 37).
< La batterie de l’iPod se recharge complètement quand l’iPod
et placé dans le dock du MC-DX222i en position ON.
En position stand-by, le MC-DX222i ne sais pas rechargé
l’iPod, ceci parce que selon la régulation IEA l’énergie est
minimisé. Donc si vous voulez recharger votre iPod, veillez
allumez l’unité.
< Quand un casque est branché sur iPod, le son sort des deux
enceintes du MC-DX222i ainsi que du casque.
< La touche d’arrêt (H) ne fonctionne pas en mode iPod.
Pour sélectionner le mode iPod
Appuyez sur la touche Lecture/Pause (G/J ) pendant la
lecture. La lecture est interrompue à la position actuelle. Pour
reprendre la lecture, appuyez de nouveau sur la touche
Lecture/Pause (G/J).
Pour sauter à la plage suivante ou
précédente
Pour suspendre la lecture temporairement
(mode de pause)
Pendant la lecture, maintenez pressée la touche de saut
(.ou/) pendant plus de 2 secondes, puis relâchez-la
quand vous avez atteint le passage que vous souhaitez
écouter.
Pendant la lecture, appuyez répétitivement sur la touche de
saut (. ou/ ) jusqu’à ce que la plage désirée soit
trouvée. La plage sélectionnée est reproduite à partir du
début.
< Si vous appuyez sur la touche . pendant la lecture, la
plage en cours de lecture est reproduite de nouveau à partir
du début. Pour revenir au début de la plage précédente,
appuyez deux fois de suite sur la touche ..
Recherche d’un passage sur une plage

43
FRANÇAIS
Pour activer le mode de lecture aléatoire
(Shuffle)
Pendant la lecture, appuyez sur la touche SHUFFLE pour
change le mode de lecture aléatoire.
Chaque fois que vous appuyez sur la touche SHUFFLE, le
réglage SHUFFLE de iPod change comme suit:
Si iPod est régler sur la lecture aléatoire de chansons ou
d’albums, l’icône de la lecture aléatoire ( ) apparaît sur
l’écran de iPod.
albumssongs off
Sélection d’un article de menu
Appuyez sur les touches PRESET/SCROLL (‡/°) pour faire
défiler le menu jusqu’à l’article souhaité et appuyez sur la
touche SELECT.
Pour activer le mode de lecture répétitive
Pendant la lecture, appuyez sur la touche REPEAT pour
change le mode de lecture répétitive.
Chaque fois que vous appuyez sur la touche REPEAT, le
réglage REPEAT de iPod change comme suit:
Si iPod est régler sur la lecture répétitive d’une chanson,
l’icône de la lecture répétitive d’une chanson ( ) apparaît
sur l’écran de iPod.
Si iPod est régler sur la lecture répétitive de toutes les
chansons, l’icône de la lecture répétitive de toutes les
chansons ( ) apparaît sur l’écran de iPod.
AllOne off
Pour retourner au menu précédent
Appuyez sur la touche MENU pour retourner au menu
précédent. Cette touche est équivalente à la touche MENU de
votre iPod.

44
Ecoute de CD/MP3
nombre total
de dossiers
temps écoulé sur la
plage actuelle
numéro de la plage actuelle
numéro du
dossier actuel
temps écoulé sur la plage
actuelle
numéro de la plage actuelle
Appuyez sur la touche FUNCTION pour sélectionner
«CD».
1
Appuyez sur la touche OPEN/CLOSE.
2
Placez un disque sur le moyeu central du lecteur avec
son côté imprimé face à vous.
Pressez le disque contre le moyeu jusqu’à ce qu’un léger
« clic » se fasse entendre, indiquant que le disque est
correctement monté.
3
< Ne mettez jamais plus d’un disque à la fois dans le
mécanisme.
< Vérifiez que le disque est correctement monté sur le moyeu et
qu’il tient bien en place.
Appuyez sur la touche OPEN/CLOSE pour fermer la
porte du lecteur de CD.
4
< Il faut quelques secondes à l’unité pour charger le disque.
Aucune touche ne fonctionnera durant cette période de
chargement. Attendez que le nombre total de plages et la
durée totale de lecture du disque soient affichés.
< Quand aucun disque n’est chargé dans le lecteur de CD, « NO
DISC » s’affiche.
Quand un CD est chargé
Appuyez sur la touche Play/Pause (y/J) pour lancer la
lecture.
5
La lecture démarre par la première plage du disque.
< Les morceaux MP3 enregistrés hors des dossiers sont
automatiquement placés dans le dossier racine (ROOT), et la
lecture démarre par le premier morceau du dossier ROOT.
< Une fois la lecture de tous les morceaux terminée, l’unité
s’arrête automatiquement.
Quand un disque de MP3 est chargé
durée totale de lecturenombre total de plages
nombre total de morceaux
5
3
1
42
CD
MP3

45
FRANÇAIS
Pour suspendre temporairement la lecture
(mode pause)
Appuyez sur la touche Play/Pause (G/J) durant la lecture. La
lecture s’arrête sur la position actuelle. Pour reprendre la
lecture, appuyez à nouveau sur la touche Play/Pause (G/J).
Pour arrêter la lecture
Appuyez sur la touche Stop (H) pour arrêter la lecture.
Pour sauter à la plage précédente ou
suivante
Durant la lecture, appuyez répétitivement sur la touche Skip
(.ou/) jusqu’à obtention de la plage désirée. La plage
sélectionnée sera lue depuis son début.
En mode stop, appuyez répétitivement sur la touche Skip
(.ou/) jusqu’à obtention de la plage que vous voulez
écouter. Appuyez sur la touche Play/Pause (G/J) pour lancer
la lecture depuis la plage sélectionnée.
< Si vous appuyez sur la touche . pendant la lecture, la
plage en cours est relue depuis son début. Pour revenir au
début de la plage précédente, appuyez deux fois sur la touche
..
< Durant la lecture programmée, c’est la plage précédente ou
suivante du programme qui est lue.
Recherche d’une partie de plage
Durant la lecture, maintenez enfoncée la touche Skip
(.ou/) et relâchez-la quand vous avez rejoint la partie
que vous voulez écouter.
Sélection d’un dossier du disque de MP3
Appuyez sur la touche PRESET/SCROLL pour sélectionner un
dossier.
Pour afficher les informations de MP3
Durant la lecture d’un disque de MP3, appuyez sur la touche
MP3 durant plus d’1 seconde. Les informations concernant le
morceau actuel seront affichées dans l’ordre suivant :
Nom du fichier w Titre w Artiste w Album
< NONE apparaît s’il n’y a pas d’informations.
< UNKNOWN apparaît si l’unité ne peut pas lire les
informations.
Appuyez à nouveau sur la touche MP3 durant plus d’1
seconde pour annuler le mode d’informations MP3.

46
Mode de recherche (MP3 seulement)
Recherche d’un nom de morceau
Vous pouvez sélectionner un morceau en le recherchant par son
nom.
Appuyez une fois sur la touche MP3.
Une lettre de l’alphabet (initiale de nom de morceau) et un
nom de morceau s’affichent.
1
Initiale du nom de morceau
Nom de morceau
Appuyez sur la touche PLAY/PAUSE (G/J).
La lecture démarre depuis le morceau sélectionné.
4
Numéro de morceau
< Pour annuler le mode de recherche, appuyez sur la touche
STOP (H).
Sélectionnez l’initiale du morceau que vous voulez
écouter en appuyant sur la touche SKIP (. ou /).
2
Appuyez sur la touche SKIP (. ou /) et maintenezla.
3
Vous pouvez alors sélectionner un morceau ayant la même
initiale en appuyant sur la touche SKIP (. ou /).
MP3

47
FRANÇAIS
Recherche d’un morceau dans un dossier
Appuyez deux fois sur la touche MP3.
Le nom de dossier est affiché.
< Les morceaux MP3 enregistrés hors des dossiers se trouvent
dans le dossier racine (ROOT).
Appuyez sur la touche SKIP (. ou /) pour trouver
le dossier où se trouve le morceau que vous voulez
écouter.
Appuyez sur la touche SKIP (. ou /) et maintenezla.
Vous pouvez alors sélectionner un morceau dans le dossier en
appuyant sur la touche SKIP (.ou /).
Appuyez sur la touche PLAY/PAUSE (G/J) pour lancer
la lecture.
La lecture démarre depuis le morceau sélectionné.
< Si vous sautez l’étape , la lecture commencera à partir du
premier morceau du dossier sélectionné.
3
4
3
2
1
Lecture aléatoire (Shuffle)
Les plages peuvent être lues en ordre aléatoire. Appuyez sur
la touche SHUFFLE durant la lecture ou à l’arrêt. « SHUFFLE »
s’allumera alors dans l’écran.
< Si vous appuyez sur la touche / durant la lecture aléatoire,
la plage suivante sera aléatoirement sélectionnée puis lue. Si
vous appuyez sur la touche ., la plage actuellement lue
sera reprise depuis son début. Si vous appuyez deux fois ou
plus sur la touche ., la plage suivante est sélectionnée de
façon aléatoire et reproduite.
La lecture aléatoire ne peut pas revenir deux fois sur la même
plage.
< La lecture aléatoire ne fonctionne pas en mode de lecture
programmée.
< Si on appuie sur une des touches suivantes, le mode de
lecture aléatoire est annulé:
SHUFFLE, STOP, FUNCTION, FM/AM,
STANDBY/ON, OPEN/CLOSE

48
Lecture programmée
< Quand la lecture de toutes les plages programmées est
terminée, ou si vous appuyez sur al touche d’arrêt (H),
l’indicateur MEMORY s’éteint et le mode de programmation
est annulé. Le programme reste quand même en mémoire.
Vous pouvez retourner à la lecture programmée en appuyant
sur la touche MEMORY et sur la touche Lecture/Pause (G/J).
< La fonction aléatoire (Shuffle) ne fonctionne pas durant la
lecture programmée.
Vous pouvez programmer jusqu’à 64 plages dans l’ordre désiré.
Appuyez sur la touche FUNCTION pour sélectionner
«CD».
1
Appuyez sur la touche MEMORY.
2
« MEMORY » s’allume dans l’écran.
< Pour annuler le mode programme, appuyez sur la touche
Stop (H).
Appuyez répétitivement sur la touche Skip (. ou
/) pour sélectionner un dossier de disque MP3, puis
appuyez sur la touche MEMORY.
< Les morceaux MP3 enregistrés hors des dossiers sont dans le
dossier « 001 » (racine ou ROOT).
< Sautez cette étape quand vous reproduisez un CD standard.
3
La plage est programmée, et « P-02 » est affiché.
< Répétez les étapes et pour programmer d’autres plages.
< Vous pouvez programmer jusqu’à 64 plages.
Une fois la sélection des numéros de plage terminée,
appuyez sur la touche Play/Pause (G/J) pour lancer la
lecture du programme.
5
43
Appuyez répétitivement sur la touche Skip (. ou
/) pour sélectionner une plage, puis appuyez sur la
touche MEMORY.
4
FUNCTION
MEMORY
CD MP3
CD MP3
MP3

49
FRANÇAIS
Pour contrôler l’ordre de programmation
A l’arrêt, appuyez répétitivement sur la touche MEMORY. Le
numéro de plage et son rang dans le programme
s’afficheront.
Pour ajouter une plage à la fin du programme
A l’arrêt, appuyez répétitivement sur la touche MEMORY
jusqu’à ce que “00” s’affiche. Sélectionnez un numéro de
plage avec la touche Skip (. ou /) puis appuyez sur la
touche MEMORY. La plage est ajoutée à la fin du
programme.
Pour modifier le programme
A l’arrêt, appuyez répétitivement sur la touche MEMORY
jusqu’à ce que le numéro de programme à changer s’affiche.
Sélectionnez un nouveau numéro de plage avec la touche
Skip (. ou /) puis appuyez sur la touche MEMORY.
Pour effacer le programme
Pour effacer le contenu programmé, appuyez à l’arrêt sur les
touches MEMORY et STOP (H).
< Si vous appuyez sur une des touches suivantes, le contenu
programmé est aussi annulé.
OPEN/CLOSE, FUNCTION, FM/AM, STANDBY/ON
< Si l’alimentation de l’appareil est coupée, le contenu
programmé sera effacé.
Chaque fois que vous appuyez sur la touche REPEAT, le mode
change comme suit :
Quand un CD est chargé :
Quand un disque de MP3 est chargé :
< Si on appuie sur une des touches suivantes, le mode de
répétition est annulé :
STOP, FUNCTION, FM/AM, OPEN/CLOSE, STANDBY/ON
Répétition d’une plage (Repeat 1)
Appuyez une fois sur la touche REPEAT durant la lecture.
« REPEAT » s’allume.
La plage en cours de lecture sera lue en boucle. Si vous
appuyez sur une touche Skip (.ou/) et sélectionnez
une autre plage, c’est cette plage sélectionnée qui sera lue en
boucle.
Il est aussi possible de sélectionner à l’arrêt une plage à
répéter. Appuyez sur la touche REPEAT, sélectionnez une
plage avec les touches Skip (.ou/), puis appuyez sur la
touche Play/Pause (G/J) pour lancer la lecture.
Répétition de toutes les plages (Repeat all)
Toutes les plages seront lues répétitivement (en boucle).
Appuyez deux fois sur la touche REPEAT. « REPEAT ALL »
s’allume.
Durant la lecture programmée, les plages programmées
seront lues en boucle.
Répétition de toutes les plages d’un dossier
MP3 (Repeat Album)
Tous les morceaux du dossier seront lus répétitivement (en
boucle).
Appuyez trois fois sur la touche REPEAT. « REPEAT ALBUM »
s’allume.
Lecture répétitive
(off)
(off)
REPEAT REPEAT ALL
REPEAT REPEAT ALL REPEAT ALBUM

50
Ecoute de la radio
Appuyez sur la touche FUNCTION pour sélectionner
« TUNER ».
1
< Vous pouvez aussi utiliser la touche FM/AM pour sélectionner
« TUNER ».
Appuyez sur la touche FM/AM pour sélectionner une
bande de fréquences.
2
Sélectionnez la station que vous voulez entendre
(sélection automatique).
3
Maintenez enfoncée la touche TUNING Haut ou Bas jusqu’à
ce que l’affichage de fréquence commence à changer. Quand
une station est trouvée, le processus de syntonisation s’arrête
automatiquement.
< Appuyez sur la touche Haut ou Bas pour arrêter la sélection
automatique.
Sélection des stations qui ne peuvent pas être trouvées
automatiquement (sélection manuelle)
Quand on appuie fugitivement sur la touche Haut ou Bas, la
fréquence se déplace d’une valeur fixe.
Appuyez répétitivement sur la touche Haut ou Bas jusqu’à ce
que la station que vous voulez écouter soit trouvée.
Touche FM MODE
Appuyer sur cette touche fait alterner entre les modes
STEREO et MONO.
STEREO
Les émissions FM stéréo sont reçues en stéréo et le témoin
« STEREO » s’allume à l’écran.
< Si le son souffre de distorsion et si le témoin « STEREO »
clignote, c’est que le signal n’est pas assez fort pour une
bonne réception stéréo. Dans ce cas, passez en mode MONO.
MONO
Pour compenser une faible réception FM stéréo, sélectionnez
ce mode. La réception sera forcée en mono, réduisant les
parasites indésirables.
Si la réception est mauvaise
Réception AM
Tournez ou déplacez l’antenne AM pour trouver la meilleure
position de réception des stations AM.
Réception FM
Etirez et tournez l’antenne FM jusqu’à réception claire des
stations. Vous pouvez avoir à déplacer l’appareil.
1
2
3

FRANÇAIS
51
Mémorisation de stations (Presets)
Vous pouvez mémoriser des stations FM et AM dans leurs
presets respectifs 1 à 10.
Si l’interrupteur d’alimentation du caisson de graves est
coupé, les réglages conservés en mémoire (réglages
d’horloge, des stations préréglées ou « presets », de la
minuterie) seront effacés.
Réglez-vous sur une station que vous désirez écouter
(voir pour cela les étapes à en page 50).
31
1
Appuyez sur la touche MEMORY.
2
Dans les 5 secondes, appuyez sur la touche MEMORY.
4
La station est mémorisée et le témoin MEMORY s’éteint.
Pour mémoriser plus de stations, répétez les étapes à .
41
Appuyez répétitivement sur la touche PRESET jusqu’à ce
que la station préréglée désirée soit trouvée.
2
Comment rappeler les stations préréglées
(presets)
Appuyez sur la touche FM/AM pour sélectionner une
bande de fréquences.
1
mémoire preset
Dans les 5 secondes sélectionnez, à l’aide des touches
PRESET de la télécommande, une mémoire preset où
conserver la station.
3

52
Le Radio Data System (système de données radio RDS) est un
service de diffusion qui permet aux stations d’émettre des
informations supplémentaires en même temps que le signal
normal du programme radio.
Le RDS ne fonctionne que sur la bande FM en Europe.
Réglez-vous sur une station FM RDS (voir pour cela les
étapes à en page 50).
Le nom du service de programme (nom de la station)
s’affiche.
Appuyez sur la touche RDS.
Chaque fois que l’on appuie sur la touche RDS, le mode RDS
change comme suit :
PS (Nom du programme de service)
Quand vous sélectionnez PS, la fréquence est affichée
durant 3 secondes, et le nom de la station (PS) est affiché.
S’il n’y a pas de données PS, « NO PS » s’affiche.
PTY (Type de programme)
Quand vous sélectionnez PTY, le type de programme
s’affiche. S’il n’y a pas de données PTY, « NO PTY »
s’affiche.
RT (Radio Texte)
Quand vous sélectionnez RT, les actualités des stations,
composées de jusqu’à 64 symboles, sont affichées. S’il n’y a
pas de données RT, « NO RT » s’affiche.
2
31
1
RDS
RDS (recherche de type de programme PTY)
Une station peut être recherchée par le biais de cette fonction.
Sélectionnez FM en appuyant sur la touche FM/AM.
Appuyez sur la touche PTY.
« PTY SEL » clignote à l’écran.
Dans les 10 secondes, sélectionnez le type de
programme (PTY) désiré avec les touches SKIP.
Vous avez le choix entre 31 types de programme (voir page
53).
Appuyez sur la touche PTY.
La recherche commencera.
< Quand le type de programme sélectionné est trouvé, la
recherche s’arrête et le type de programme s’affiche.
< Si ce type de programme n’est pas trouvé par la recherche
PTY, celle-ci s’arrête sur la fréquence de départ.
< Si vous voulez arrêter la recherche, appuyez sur la touche
PTY.
4
3
2
1
PTY
FM/AM

53
FRANÇAIS
PTY (Type de programme)
NEWS : annonces brèves, événements, opinion publique,
enquêtes, situations réelles
AFFAIRS : genre de conseils incluant des annonces pratiques
autres que des actualités, des documents,
discussions, analyses etc
INFO : informations quotidiennes ou de référence telles
que bulletin météo, guide de consommation, aide
médicale etc
SPORT : programme relatif aux sports
EDUCATE : informations éducatives et culturelles
DRAMA : tous types de concerts et fictions radiodiffusés
CULTURE : tous les aspects de la culture nationale ou locale
dont les événements religieux, la philosophie, les
sciences sociales, la langue, le théâtre, etc
SCIENCE : programmes techniques et scientifiques
VARIED : programmes populaires tels que des jeux,
divertissements, interviews privées, comédies,
satires etc
POP M : programme sur le domaine commercial des
chansons populaires, le volume des ventes de
disques, etc
ROCK M : musique moderne actuelle généralement composée
et jouée par de jeunes musiciens
M O R M : musique populaire durant généralement moins de
5 minutes
LIGHT M : musique classique, instrumentale, vocale, et
musique légère appréciée des non professionnels
CLASSICS : musique orchestrale incluant les grands opéras, les
symphonies, la musique de chambre etc
OTHER M : autres styles musicaux (Rhythm & Blues, Reggae,
etc.)
WEATHER : bulletins et prévisions météorologiques
FINANCE : comptes-rendus financiers, commerciaux, affaires
CHILDREN : programme pour enfants
SOCIAL A : affaires sociales
RELIGION : programme religieux
PHONE IN : programme où le public intervient par téléphone
TRAVEL : dossiers voyage
LEISURE : programme concernant des activités récréatives
JAZZ : musique jazz
COUNTRY : musique country
NATIONAL : musique nationale
OLDIES : musique de l’âge d’or de la pop music
FOLK M : musique folklorique
DOCUMENT: documentaires
TEST (tonalité d’essai)
ALARM : avis d’alerte ou de catastrophe naturelle
Branchez la prise PHONES (prise de sortie audio) d’un
lecteur audio portable à la prise AUX IN du MC-DX222i à
l’aide du câble à mini-fiche stéréo fourni.
1
Ecoute d’une source externe
Faites jouer la source et réglez le volume avec les
touches VOLUME du MC-DX222i et du lecteur audio.
3
Appuyez sur la touche FUNCTION pour sélectionner
« AUX ».
2
Si vous utilisez la prise de sortie casque (PHONES) de votre
mini-lecteur, vous devez régler le volume du mini-lecteur ou
vous n’entendrez rien dans le MC-DX222i.

54
Réglage de l’horloge
Si l’interrupteur d’alimentation du caisson de graves est
coupé, les réglages conservés en mémoire (réglages
d’horloge, des stations préréglées ou « presets », de la
minuterie) seront effacés.
Si l’appareil est en service, appuyez sur la touche
STANDBY/ON pour le mettre en veille.
1
Appuyez une fois encore sur la touche TIME SET.
La valeur des « heures » clignote.
3
Appuyez sur la touche SKIP (.// ) pour régler
l’heure.
4
Appuyez sur la touche TIME SET.
La valeur des « minutes » clignote.
5
Appuyez sur la touche SKIP (.//)pour régler les
minutes.
6
Appuyez sur la touche TIME SET.
L’horloge démarre.
7
Appuyez sur la touche TIME SET et maintenez-la.
« 12 HOUR » ou « 24 HOUR » clignote. Pour changer de
mode horaire (12/24 h), appuyez sur la touche . ou /.
2
< Si aucune touche n’est pressée durant 10 secondes, le mode
de réglage d’horloge est annulé.
STANDBY/ON
TIME SET

FRANÇAIS
55
Réglage de la minuterie 1
< L’appareil peut être programmé pour s’allumer et s’éteindre à
une heure donnée.
< Réglez l’horloge avant de régler la minuterie.
Maintenez pressée la touche TIMER jusqu’à ce que
l’indicateur TIMER et « ON » apparaissent sur l’écran.
1
La valeur des « heures » commencera à clignoter.
< Si aucune touche n’est pressée durant 10 secondes, le mode
de réglage de minuterie est annulé.
La valeur des « minutes » commencera à clignoter.
Appuyez sur la touche SKIP (.// ) pour régler
l’heure de démarrage (unité : minutes), puis appuyez
sur la touche TIMER.
3
Les témoins « TIMER » et « OFF » apparaissent à l’écran et la
valeur des « heures » commence à clignoter.
Appuyez sur la touche SKIP (.// ) pour régler
l’heure de démarrage (unité : heures), puis appuyez sur
la touche TIMER.
2
Appuyez sur la touche SKIP (.// ) pour régler
l’heure d’arrêt (unité : minutes), puis appuyez sur la
touche TIMER.
5
La valeur des « minutes » commencera à clignoter.
Appuyez sur la touche SKIP (.// ) pour régler
l’heure d’arrêt (unité : heures), puis appuyez sur la
touche TIMER.
4
TIMER
/

56
< Le volume de lecture augmente graduellement jusqu’au
volume réglé quand l’unité est mise sous tension par la
minuterie.
< Si la source est réglée sur « iPod » mais qu’aucun iPod n’est
en place, l’unité se met sous tension en mode TUNER.
< Si la source est réglée sur « CD » mais qu’aucun CD n’est en
place, l’unité se met sous tension en mode TUNER.
< Quand la source est réglée sur « TUNER » et que l’unité est
mise sous tension, elle syntonise la station que vous avez
sélectionnée en dernier.
Réglage de la minuterie 2
Appuyez sur la touche SKIP (. // ) pour
sélectionner une source (TUNER, CD ou iPod), puis
appuyez sur la touche TIMER.
6
Appuyez sur la touche SKIP (.//) pour régler le
volume, puis appuyez sur la touche TIMER.
7
L’horloge et le témoin TIMER sont affichés.
L’appareil s’allumera et s’éteindra chaque jour aux heures
spécifiées.
N’oubliez pas de mettre l’appareil en veille (standby) ou
la minuterie ne fonctionnera pas.
Si l’interrupteur d’alimentation du caisson de graves est
coupé, les réglages conservés en mémoire (réglages
d’horloge, des stations préréglées ou « presets », de la
minuterie) seront effacés.
Préparez la source.
Si vous avez sélectionné « TUNER » à l’étape , réglez une
station.
Si vous avez sélectionné « CD » à l’étape , installez un
disque.
Si vous avez sélectionné « iPod » à l’étape , insérez un iPod.
6
6
6
8
Si vous n’utilisez pas la minuterie, appuyez sur la touche
TIMER pour la couper (le témoin TIMER disparaît de l’écran).
Appuyez à nouveau sur la touche TIMER pour la remettre en
service.
< Quand la minuterie est activée, ses réglages sont affichés un
par un, et le témoin TIMER est allumé à l’écran.
Le réglage de la minuterie est maintenant terminé et la
minuterie est activée.
Vos réglages de minuterie sont affichés un par un, et le
témoin TIMER est allumé à l’écran.
Pour activer ou désactiver la minuterie
Appuyez sur la touche STANDBY/ON pour mettre
l’appareil en veille (standby).
9

57
FRANÇAIS
Si vous avez des problèmes avec votre système, veuillez lire ce
qui suit et voyez si vous pouvez résoudre le problème vousmême avant d’appeler votre revendeur ou le centre de
maintenance TEAC.
Généralités
Pas d’alimentation
e Vérifiez la connexion au secteur. Contrôlez et assurez-vous
que la prise secteur n’a pas d’interrupteur et, si elle en a un,
qu’elle est en service. Vérifiez qu’il y a du courant dans la
prise en y branchant un autre appareil comme une lampe ou
un ventilateur.
Pas de son dans les enceintes.
e Sélectionnez la bonne source en appuyant sur la touche
FUNCTION.
e Vérifiez le branchement des enceintes.
e Réglez le volume.
e Retirez la fiche de casque de la prise PHONES.
e Si l’indicateur « MUTING » clignote, appuyez sur la touche
MUTING.
Le son est parasité.
e L’appareil est trop proche d’un téléviseur TV ou de
dispositifs similaires. Installez l’appareil plus loin, ou éteignez
ces dispositifs.
La télécommande ne fonctionne pas.
e Appuyez sur la touche STANDBY/ON pour allumer l’appareil.
e Si la pile est épuisée, changez-la.
e Utilisez la télécommande dans le rayon prévu (5 m) et
pointez-la vers la face avant.
e Eliminez les obstacles entre la télécommande et l’unité
centrale.
e Si une lumière forte se trouve près de l’appareil, éteignez-la.
Lecteur de CD
La lecture ne fonctionne pas.
e Réinsérez le disque avec sa surface imprimée vers l’extérieur.
e Si le disque est sale, nettoyez sa surface.
e Un disque vierge a été chargé. Chargez un disque
préenregistré.
e Selon le disque, etc. il peut être impossible de reproduire des
CD-R/RW. Réessayez avec un autre disque.
e Vous ne pouvez pas reproduire de CD-R/RW non finalisé.
Finalisez un tel disque dans un enregistreur de CD et
réessayez.
Le son saute.
e Placez l’appareil sur une surface stable pour éviter les
vibrations et les chocs.
e Si le disque est sale, nettoyez sa surface.
e N’employez pas de disques rayés, endommagés ou
gondolés.
Lecteur iPod
Impossible d’insérer iPod.
e Vérifiez l’adaptateur de Dock.
e Retirez la poussière ou tout obstacle du connecteur pour
Dock du MC-DX222i de iPod, et insérez de nouveau iPod.
Pas de lecture.
e Retirez iPod du Dock, attendez quelques secondes et
insérez-le de nouveau.
e Une mise à jour du logiciel peut résoudre le problème.
Consultez le site web Apple et téléchargez le dernier logiciel
pour iPod.
Syntoniseur (Tuner)
Aucune station ne peut être entendue, ou le signal est
trop faible.
e Réglez correctement la station.
e Tournez l’antenne FM ou AM pour la meilleure position de
réception.
Bien que la diffusion soit en stéréo, le son est mono.
e Appuyez sur la touche FM MODE.
Si un fonctionnement normal ne peut pas être obtenu,
débranchez le cordon d’alimentation de la prise secteur et
rebranchez-le.
Si l’interrupteur d’alimentation du caisson de graves est
coupé, les réglages conservés en mémoire (réglages
d’horloge, des stations préréglées ou « presets », de la
minuterie) seront effacés.
Guide de dépannage
Faites attention à la condensation
Quand l’appareil (ou un disque) est déplacé d’un lieu froid à
un lieu chaud, ou utilisé après un changement soudain de
température, il y a un risque de condensation; la vapeur de
l’air peut se condenser sur le mécanisme interne, rendant le
fonctionnement correct erratique voire impossible. Pour
empêcher cela, ou si cela se produit, laissez l’appareil allumé
durant une ou deux heures. L’appareil s’acclimatera à la
température de son environnement.
Maintenance
Si la surface de l’appareil est sale, essuyez-la avec un chiffon
doux ou utilisez un détergent liquide léger dilué. Veillez à
totalement enlever tout liquide excédentaire. N’utilisez pas de
diluant, de benzine ou d’alcool car cela peut endommager la
surface de l’appareil. Laissez totalement sécher la surface de
l’appareil avant utilisation.

58
Caractéristiques
Section AMPLIFICATEUR
Puissance de sortie (G+D) . . . . . . . . . . . . . . . . . . . 5 W + 5 W
Puissance de sortie (Caisson de graves) . . . . . . . . . . . . . 15 W
Sensibilité d’entrée. . . . . . . . . . . . . . . . . . . . . . . . . . . 300 mV
Réponse en fréquence . . . . . . . . . . . . . . . . . . 50 à 20 000 Hz
Section TUNER (FM)
Plage de fréquences . . . . . . . . . . . . . . . 87,50 à 108,00 MHz
Sensibilité (S/B30 dB). . . . . . . . . . . . . . . . . . . . . . . 20 dBµV/m
Section TUNER (AM)
Plage de fréquences . . . . . . . . . . . . . . . . . . 522 à 1 620 kHz
Sensibilité (S/B 20 dB) . . . . . . . . . . . . . . . . . . . . . . 54 dBµV/m
Section LECTEUR DE CD
Réponse en fréquence . . . . . . . . . . . . 20 à 20 000 Hz (±1 dB)
Rapport signal/bruit. . . . . . . . . . . . . . . . . . . . . . . . . . . . 55 dB
Pleurage et scintillement . . . . . . . . . . . . . . . . . Non mesurable
ENCEINTES
Type . . . . . . . . . . . . . . . . . . . . . . . Réponse plate large bande
Impédance . . . . . . . . . . . . . . . . . . . . . . . . . . . . . . . . . 4 ohms
CAISSON DE GRAVES
Impédance . . . . . . . . . . . . . . . . . . . . . . . . . . . . . . . . . 8 ohms
GENERALES
Alimentation électrique . . . . . . . . . . . . . . . . CA 230 V, 50 Hz
Consommation électrique . . . . . . . . . . . . . . . . . . . . . . . 80 W
Dimensions (L x H x P)
Unité centrale . . . . . . . . . . . . . . . . . . . 255 x 169,5 x 115 mm
Enceintes G& D . . . . . . . . . . . . . . . . . . . 210 x 169,5 x 81 mm
Caisson de graves . . . . . . . . . . . . . . . . . 160 x 245 x 335 mm
Poids
Unité centrale. . . . . . . . . . . . . . . . . . . . . . . . . . . . . . . . 1,4 kg
Enceintes G& D. . . . . . . . . . . . . . . . . . . . . . . . 0,7 kg chacune
Caisson de graves. . . . . . . . . . . . . . . . . . . . . . . . . . . . . 5,3 kg
Pays d’origine . . . . . . . . . . . . . . . . . . . . . . . . . . . . . . . . Chine
Accessoires en standard
Télécommande (RC-1103) x 1
Pile pour télécommande x 1
Câble de caisson de graves x 1
Câble d’enceinte x 2
Antenne FM x 1
Antenne AM x 1
Câble à mini-fiche stéréo x 1
Adaptateur de Dock x 8
(adaptateur « 60GB (color) + Photo 40GB/60GB » prémonté)
Couvercle pour le Dock x 1
Support de montage mural x 4
Vis (courte) x 8
Vis (longue) x 4
Crochet mural conique en plastique x 4
Gabarit pour montage mural x 2
Manuel du propriétaire x 1
Guide rapide de connexion x 1
Carte de garantie x 1
• Conception et caractéristiques sont sujettes à modifications
sans préavis.
• Le poids et les dimensions sont des valeurs approchées.
• Les illustrations peuvent légèrement différer des modèles de
production.

59
ESPAÑOL
Índice
Gracias por confiar en TEAC. Lea atentamente este manual
para obtener el mejor rendimiento de la unidad.
Antes de utilizar la unidad. . . . . . . . . . . . . . . . . . . . . . . . . . . . 59
Mando a distancia . . . . . . . . . . . . . . . . . . . . . . . . . . . . . . . . . 60
Discos. . . . . . . . . . . . . . . . . . . . . . . . . . . . . . . . . . . . . . . . . . . 61
Conexión . . . . . . . . . . . . . . . . . . . . . . . . . . . . . . . . . . . . . . . . 62
Montaje mural . . . . . . . . . . . . . . . . . . . . . . . . . . . . . . . . . . . . 64
Preparación. . . . . . . . . . . . . . . . . . . . . . . . . . . . . . . . . . . . . . . 65
Funciones . . . . . . . . . . . . . . . . . . . . . . . . . . . . . . . . . . . . . . . . 66
Funcionamiento básico . . . . . . . . . . . . . . . . . . . . . . . . . . . . . . 68
iPod
Escuchar el iPod . . . . . . . . . . . . . . . . . . . . . . . . . . . . . . . . . . . 70
CD/MP3
Audición de CD/MP3 . . . . . . . . . . . . . . . . . . . . . . . . . . . . . . . 72
Modo de búsqueda (sólo MP3) . . . . . . . . . . . . . . . . . . . . . . . . 74
Reproducción al azar. . . . . . . . . . . . . . . . . . . . . . . . . . . . . . . . 75
Reproducción programada . . . . . . . . . . . . . . . . . . . . . . . . . . . 76
Repetición. . . . . . . . . . . . . . . . . . . . . . . . . . . . . . . . . . . . . . . . 78
TUNER
Escucha de la radio . . . . . . . . . . . . . . . . . . . . . . . . . . . . . . . . . 79
Presintonías . . . . . . . . . . . . . . . . . . . . . . . . . . . . . . . . . . . . . . 80
RDS . . . . . . . . . . . . . . . . . . . . . . . . . . . . . . . . . . . . . . . . . . . . 81
RDS PTY (búsqueda por tipo de programa) . . . . . . . . . . . . . . . 81
AUX
Audición de una fuente externa . . . . . . . . . . . . . . . . . . . . . . . 82
Puesta en hora del reloj. . . . . . . . . . . . . . . . . . . . . . . . . . . . . . 83
Ajuste del temporizador . . . . . . . . . . . . . . . . . . . . . . . . . . . . . 84
Solución de problemas . . . . . . . . . . . . . . . . . . . . . . . . . . . . . . 86
Especificaciones . . . . . . . . . . . . . . . . . . . . . . . . . . . . . . . . . . . 87
Antes de utilizar la unidad
Léase antes de continuar
< La unidad puede calentarse durante su funcionamiento, por
lo que habrá que dejar espacio suficiente alrededor para su
ventilación.
Los orificios de ventilación no deberán obstruirse. Deje al
menos 5 cm de espacio libre a ambos laterales de la unidad.
NO coloque ningún objeto encima de la unidad.
< La tensión suministrada a la unidad deberá coincidir con el
valor indicado en el panel posterior. En caso de duda,
consulte a un electricista.
< Elija cuidadosamente el emplazamiento de la unidad. No
coloque la unidad a la luz solar directa ni cerca de fuentes de
calor. Evite los lugares expuestos a vibraciones o a un exceso
de suciedad, frío, calor o humedad.
< No coloque la unidad encima de otros componentes
electrónicos.
< No abra la carcasa de la unidad, ya que podrían dañarse los
circuitos o producirse descargas eléctricas. Si entra algún
cuerpo extraño en la unidad, póngase en contacto con su
distribuidor o empresa de servicios lo antes posible.
< Cuando desconecte el cable de la toma mural, sostenga
únicamente el conector y nunca el propio cable.
< Para mantener limpio el lector láser, no lo toque y cierre
siempre la compuerta del CD cuando termine.
< No intente limpiar la unidad con disolventes químicos, ya que
podrían dañar el acabado. Utilice un paño limpio y seco que
no se deshilache.
< Conserve el manual en un lugar seguro para futuras
consultas.
PRECAUCIÓN: NO MUEVA LA UNIDAD DURANTE LA
REPRODUCCIÓN
Durante la reproducción, el disco gira a altas velocidades. No
levante ni mueva la unidad durante la reproducción. Podrían
resultar dañados el disco o la unidad.
TRASLADO DE LA UNIDAD
Si tiene que cambiar de sitio la unidad o embalarla para su
traslado, no olvide extraer el disco. Si traslada la unidad con el
disco insertado, podrían ocasionarse anomalías operativas u
otros daños.

60
1
2
3
Reciclaje de su producto viejo
1. Cuando se adjunta a un producto este
símbolo tachado de un contenedor con
ruedas, significa que el producto está
cubierto por la Directiva Europea
2002/96/EC.
2. Todos los productos eléctricos y electrónicos se deben
reciclar de un modo separado del sistema municipal de
basura, a través de las instalaciones de recogida señaladas
por el gobierno o las autoridades locales.
3. El reciclaje correcto de su producto viejo ayudará a prevenir
las consecuencias negativas potenciales para el ambiente y
la salud humana.
4. Para una información más detallada sobre el reciclaje de su
producto viejo, contacte por favor con su ayuntamiento,
servicio de basuras o la tienda en donde usted compró el
producto.
NXT es una marca comercial de New Transducers Ltd.
PRECAUCIÓN
< No permita que ningún líquido se derrame o salpique este
aparato.
< No coloque objetos que contengan líquidos, como jarrones,
encima de este aparato.
< No instale este aparato confinado en un espacio reducido,
como podría ser encastrado en una estantería o lugar
similar.
< Este aparato recibe corriente nominal no operativa de la
salida de corriente AC aun cuando su interruptor
STANDBY/ON esté en la posición STANDBY.
< El aparato debe estar colocado lo suficientemente cerca de
la salida de corriente como para poder acceder al enchufe
en cualquier momento.
< Conecte siempre los aparatos de clase ! como este a salidas
de corriente con toma de tierra.
< Las baterías (paquete de baterías o baterías instaladas) no se
deben exponer al calor excesivo tal como sol, fuego o
similares.
< Un exceso de presión de sonido desde los audífonos y
auriculares puede originar pérdida auditiva.
Mando a distancia
El mando a distancia suministrado permite el control remoto de
la unidad.
Cuando utilice el mando a distancia, apunte al sensor remoto del
panel frontal.
< Aunque el mando a distancia se utilice dentro del radio de
acción adecuado, es posible que no funcione si hay algún
obstáculo entre la unidad y el mando.
< Si el mando a distancia se utiliza cerca de otros productos que
generen rayos infrarrojos, o se utilizan otros dispositivos de
control remoto que emitan rayos infrarrojos, es posible que no
funcione correctamente. Y a la inversa, los otros productos
también podrían funcionar de manera anómala.
Instalación de las pilas
1. Retire la tapa del compartimento de las pilas.
2. Introduzca la pila de litio (CR2032, 3 V).
3. Cierre el compartimento.
Sustitución de la pila
Si observa que cada vez tiene que acercar más el mando a la
unidad principal para que reciba la orden, significa que la pila
se está agotando. En tal caso, sustituya la pila por una nueva.
Precauciones con las pilas
No caliente ni desarme las pilas, ni se deshaga de ellas
arrojándolas al fuego.

61
ESPAÑOL
Discos
Cómo retirar el disco Cómo sostener el disco
< No reproduzca ningún disco que esté curvado, deformado o
dañado.
La reproducción de estos discos puede causar daños
irreparables en los mecanismos de lectura.
< Los discos CD-R y CD-RW son más sensibles al calor y a los
rayos ultravioleta que los CD normales. Convendrá guardarlos
en un lugar donde no incida la luz solar directa, y alejados de
fuentes de calor (radiadores, etc.) o dispositivos eléctricos que
generen calor.
< No se recomiendan los discos CD-R y CD-RW imprimibles, ya
que la cara de la etiqueta podría adherirse y dañar la unidad.
< No adhiera papeles ni láminas de protección a los discos, ni
aplique ningún tipo de aerosol de revestimiento.
< Utilice un rotulador de punta blanda para escribir en el lado
de la etiqueta.
No emplee nunca bolígrafos ni lápices de punta dura, ya que
podría dañar la cara grabada del disco.
< No utilice nunca estabilizadores. Los estabilizadores de CD
existentes en el mercado producirán daños en los mecanismos
y anomalías en su funcionamiento.
< No utilice discos de diseño irregular (octogonales, forma de
corazón, tamaño tarjeta, etc.), ya que pueden dañar la
unidad.
< Si tiene alguna duda sobre el cuidado y manipulación de un
disco CD-R/RW, lea las instrucciones facilitadas con el disco o
póngase directamente en contacto con el fabricante.
Compatibilidad MP3
< Los nombres de los archivos MP3 sólo utilizan caracteres
alfanuméricos. Esta unidad no puede mostrar correctamente
ni símbolos ni caracteres de tamaño completo o 2 bytes de
anchura (japonés, chino, etc.). Asegúrese de usar la extensión
de archivo “.mp3”.
< El disco deberá tener cerrada la sesión de grabación para
poderse reproducir.
< El CD-ROM deberá ser compatible con ISO 9660.
< Si hay más de 200 carpetas o 50 archivos grabados en el
disco, es posible que la unidad no pueda reproducirlos
correctamente.
< El archivo debe tener formato MPEG-1 Audio Layer 3 mono o
estéreo, 44,1 ó 48 kHz, velocidad de transferencia fija.
Discos utilizables:
• CD-Audio convencionales con el logotipo COMPACT DISC
DIGITAL AUDIO en la etiqueta:
• Discos CD-R y CD-RW con la sesión correctamente cerrada
• CD-MP3
Observación:
< Dependiendo de la calidad del disco o del estado de la
grabación, algunos CD-R y CD-RW es posible que no puedan
reproducirse.
< Los discos protegidos contra copia y otros que no se ajustan
al estándar de CD es posible que no se reproduzcan
correctamente en esta unidad. Si utiliza discos de éstos con la
unidad, TEAC Corporation y sus filiales no asumen
responsabilidades por las posibles consecuencias ni garantizan
la calidad de la reproducción. Si tiene problemas con tales
discos, póngase en contacto con sus fabricantes.
< Coloque el disco en la bandeja siempre con la cara de la
etiqueta hacia arriba. (Los discos compactos sólo se graban y
reproducen por una cara.)
< Para extraer un disco de su estuche, presione en el centro de la
caja, levante el disco y sosténgalo con cuidado por los bordes.
< Si se ensucia el disco, limpie la superficie en sentido radial (del
orificio central hacia fuera) con un paño suave y seco:
< No utilice nunca productos químicos, como aerosoles para
vinilo, líquidos o aerosoles antiestáticos, bencina o aguarrás
para limpiar los discos. Estos productos químicos ocasionarán
daños irreparables en la superficie de plástico del disco.
< Los discos deberán devolverse a sus estuches después de
usarlos. De lo contrario podrían ensuciarse o rayarse y
provocar “saltos” del lector láser.
< No exponga los discos a la luz solar directa o a elevados
niveles de temperatura o humedad durante periodos
prolongados. La exposición prolongada a temperaturas
elevadas deformará el disco.

62
Conexión
B
A
C
G H I J
E
DD
F
S-VIDEO
IN
VIDEO
IN
PRECAUCIÓN
< Apague todos los equipos antes de realizar ninguna conexión.
< Lea las instrucciones de cada uno de los componentes que tiene intención de usar con esta unidad.
< Inserte correctamente los conectores. Para evitar zumbidos y ruidos, no tienda los cables de conexión en el mismo mazo del cable
de alimentación.
Altavoz derecho (R) Altavoz derecho (L)
Panel lateral de la unidad principal
Subwoofer
Televisor/Monitor
Panel posterior de la unidad principal

63
ESPAÑOL
Antena de cuadro de AM
Oriente la antena para optimizar la recepción.
Si lo desea, puede anclar la antena de AM a una pared
como se indica en la ilustración:
Antena de FM
En el modo FM, sintonice una emisora de frecuencia
modulada y despliegue el cable hasta lograr la mejor
recepción. La antena quizá deba reorientarse si cambia la
unidad de emplazamiento.
Antena de FM exterior
Si está en una zona donde las señales de FM son débiles,
deberá usar una antena de FM exterior de 75 ohmios de
tipo no balanceado y un transformador opcional apropiado
(no incluido). Por lo general valdrá con una de 3 elementos.
Si la recepción de FM es especialmente débil, quizá sea
preciso utilizar una antena de 5 o más elementos.
B
A
Cable de alimentación
Asegúrese de conectar el cable de alimentación a una toma
de red que suministre la tensión adecuada.
Sostenga siempre el cable de alimentación por el conector.
No tire nunca del propio cable de corriente.
Interruptor de encendido (POWER) del
subwoofer
Use este interruptor para encender o apagar el sistema.
< Si se apaga el interruptor del subwoofer, se borrarán los
ajustes guardados en la memoria (reloj, presintonías,
temporizador).
Para no perder los ajustes, se recomienda mantener este
interruptor activado (ON) aunque no se esté utilizando.
Auriculares
Para escuchar de forma individual, reduzca primero el nivel
del volumen al mínimo. A continuación, introduzca el
enchufe de los auriculares en la clavija PHONES y ajuste el
volumen utilizando los botones VOLUME. El sonido de los
altavoces se corta cuando se introduce la clavija de los
auriculares.
ATENCIÓN
Baje siempre el nivel del volumen antes de enchufar los
auriculares. PARA EVITAR DAÑARSE EL OÍDO – No se
coloque los auriculares en la cabeza hasta que los haya
enchufado.
Entrada auxiliar AUX IN
En esta entrada puede conectar un reproductor de audio
portátil.
Conecte la salida de línea LINE OUT o de audio PHONES (jack
de salida de audio) del reproductor utilizando el cable con
miniconector estéreo suministrado.
Cuando use el jack PHONES del mini reproductor, deberá
ajustar su volumen o es posible que no oiga el sonido del
MC-DX222i.
Terminal VIDEO OUT
Este terminal reproduce señal de vido desde iPod.
Utilice un cable de video RCA (pin) para conectar la base
Dock al conector de video compuesto de una televisión o un
monitor.
Terminal S-VIDEO OUT
Este terminal reproduce señal de video desde iPod.
Utilice un cable de S-Video para conectar la base Dock a la
entrada S-Video de una televisión o un monitor
correctamente equipado. Utilice esta conexión
preferentemente a una conexión de video compuesta.
J
I
H
G
F
E
Antena de FM exterior (75 Ω)
Subwoofer
Conecte los terminales “TO SUBWOOFER” y “FROM MAIN”
con el cable suministrado.
< Realice la conexión en la dirección que se muestra en la
ilustración.
ALTAVOCES
Conecte el altavoz izquierdo a L y el derecho a R.
< Si va a usar unos altavoces distintos de los incluidos,
asegúrese de que su impedancia es como mínimo de 4 Ω.
< Estos terminales sólo están preparados para conectar
altavoces.
D
C

64
Montaje mural
Los altavoces derecho e izquierdo se pueden montar en la pared.
Precauciones
< Procure que la longitud de los cables sea aproximadamente
de 3 m.
No intente montar los altavoces demasiado lejos del
subwoofer.
< Taladre los orificios en un material sólido y fiable (viga de
madera, muro de hormigón).
< TEAC suministra estos soportes para facilitar la tarea al
usuario. Consulte los reglamentos de construcción y extreme
las precauciones cuando monte estos soportes. Si tiene
alguna duda sobre la forma de usar los soportes facilitados,
consulte en un establecimiento o tienda de materiales de su
zona.
Anclaje a la pared
1. Fije los soportes en el panel trasero de los altavoces con
los tornillos cortos que se suministran.
2. Emplee la plantilla suministrada para marcar en la pared
los puntos exactos para taladrar.
3. Taladre en la pared los orificios en los puntos que se
han marcado.
4. Atornille en la pared los tornillos largos que se
suministran.
Deje unos 5 milímetros de espacio entre la cabeza del tornillo
y la pared.
< Para mayor comodidad, se incluye un juego de tacos de
plástico. Si decide usar estos tacos, taladre un orificio de
referencia usando una broca de 6 mm e inserte el taco.
Únicamente utilice estos tacos si son apropiados para el
material sobre el que se va a montar la unidad. En caso de
duda, consulte en una ferretería.
5. Conecte ahora los altavoces y el subwoofer con los
cables de altavoces que se suministran (consulte las
páginas 62-63).
6. Cuelgue con cuidado los altavoces de los tornillos.
Nota:
Antes de dejar de sostener los altavoces compruebe que los
anclajes pueden resistir el peso de los altavoces y que éstos
están bien fijados en los anclajes.

65
ESPAÑOL
El MC-DX222i viene equipado con un adaptador para el iPod
con pantalla en color (40GB, 60GB), “60GB (color) + Photo
40GB/60GB”.
Para reproducir su iPod con el MC-DX222i, tiene que comprobar
primero que el adaptador que viene de fábrica se adapta a su
modelo de iPod. Si no es así, deberá reemplazarlo por uno que
se ajuste a su modelo como se explica más adelante.
1. Retire el adaptador de la base Dock del MC-DX222i.
Sostenga el adaptador por los lados derecho e izquierdo y tire
de él hacia arriba con suavidad.
2. Elija el adaptador de base Dock que se ajuste a su
dispositivo móvil digital iPod.
“Vídeo 30GB” para el iPod con vídeo (30 GB).
“Vídeo 60GBL/80GB” para el iPod con vídeo (60 GB, 80 GB).
“nano” para el iPod nano.
“mini” para el iPod mini.
“20GB (color) + Photo 30GB” para el iPod con pantalla en
color (20GB, 30GB, U2 Special Edition).
“60GB (color) + Photo 40GB/60GB” para el iPod con pantalla
en color (40GB, 60GB).
“20GB + U2” para el iPod con rueda de clic (20 GB, U2
Special Edition).
“40GB” para el iPod con rueda de clic (40 GB).
< Utilice un adaptador comercial para reproducir el iPod con
conector para base (con cuatro botones debajo de la
pantalla).
< Cuando necesite retirar el adaptador, sosténgalo por los lados
derecho e izquierdo y tire de él hacia arriba con suavidad.
< Cubra la base Dock con la funda que se suministra para que
no se acumule polvo cuando no la utilice.
3. Coloque el adaptador en la base Dock del MC-DX222i.
Encaje el borde delantero del adaptador en la base Dock y,
después, presione el borde trasero del adaptador en la base
Dock hasta que se oiga un leve “clic” que indica que el
adaptador se ha insertado correctamente.
Software compatible con el iPod
Si su iPod no funciona con el MC-DX222i o con el mando a
distancia es posible que una actualización del software resuelva
el problema.
Visite la página Web de Apple y descargue la última versión del
software para iPod.
http://www.apple.com/es/ipod/download/
iPod es una marca comercial de Apple Inc., registrada en Estados
Unidos y otros países.
Preparación
1
2

66
Observación:
Para simplificar las explicaciones, las instrucciones del manual
se refieren únicamente a los nombres de los botones y
controles del panel frontal. Los botones y controles
correspondientes del mando a distancia funcionan de la
misma manera.
Funciones
CBA D E
F
G
H
I
J
K
G
Q
L
OP
M
N
H
J
U
V
E
C
D
W
R
A
B
L
S
T
K
M
X

67
ESPAÑOL
SALTO (.//) / TUNING
En el modo iPod o CD, pulse brevemente este botón para
saltar de pista. Manténgalo pulsado para buscar una parte
específica en una pista.
En el modo TUNER, pulse brevemente este botón para
sintonizar las emisoras de radio.
En el modo Standby, pulse estos botones para ajustar o fijar el
reloj y el temporizador.
PLAY/PAUSE (y/J)
En el modo iPod o CD, pulse este botón para iniciar o
interrumpir la reproducción.
MP3/RDS
Pulse este botón durante la reproducción de un disco MP3
para buscar el nombre de una pista.
Pulse este botón en el modo FM TUNER para seleccionar un
modo RDS.
REPEAT/PTY
En el modo iPod o CD, pulse este botón para establecer la
función de repetición.
En el modo FM TUNER, pulse este botón para iniciar la
búsqueda PTY.
SHUFFLE/FM MODE
En el modo iPod o CD, pulse esté botón para activar o
desactivar la reproducción al azar.
En el modo FM TUNER, pulse este botón para seleccionar
STEREO o MONO.
Pantalla
STANDBY/ON
Pulse este botón para encender o apagar (standby) la unidad.
La unidad principal se alimenta por medio del subwoofer. En
primer lugar necesita encender el subwoofer.
Cuando la unidad principal está apagada (standby), el
indicador de corriente del subwoofer se ilumina en naranja.
El indicador se vuelve azul al encender la unidad.
FUNCTION
Pulse este botón para seleccionar una de las fuentes (iPod,
CD, TUNER o AUX).
OPEN/CLOSE
Pulse este botón en el modo CD para abrir y cerrar la puerta
del CD.
FM/AM
Pulse este botón para seleccionar AM o FM.
MEMORY/TIME SET
En el modo CD, pulse este botón para programar las pistas.
En el modo TUNER, pulse este botón para presintonizar las
emisoras de radio.
Este botón también se emplea para ajustar el reloj.
K
J
I
H
G
F
E
D
C
B
A
PARADA (H)
En el modo CD, pulse este botón para interrumpir la
reproducción.
< Este botón no funciona en el modo iPod.
VOLUME
Pulse las teclas “+” o “–” para regular el volumen.
Conector de la base Dock
Antes de usarla, introduzca en la base Dock un adaptador
adecuado (consulte la página 65).
Coloque el dispositivo móvil digital iPod en esta base Dock.
Puerta del CD
Sensor a distancia
Cuando utilice el mando a distancia, oriéntelo hacia este
punto.
PRESET/SCROLL
En el modo TUNER, pulse estas teclas para seleccionar una
emisora presintonizada.
En el modo iPod, pulse estas teclas para desplazarse por el
menú.
Pulse estas teclas durante la reproducción de un disco MP3
para seleccionar una de las carpetas del disco.
MENU
Este botón es equivalente al botón MENU del iPod.
Pulse este botón en el modo iPod para regresar al menú
anterior.
TREBLE
Pulse este botón y los botones de VOLUME para regular el
nivel de la gama de sonidos de alta frecuencia (agudos).
BASS
Pulse este botón y los botones de VOLUME para regular el
nivel de la gama de sonidos de baja frecuencia (bajos).
SLEEP
Pulse este botón para establecer el temporizador de apagado
automático.
TIMER
Pulse este botón en combinación con los botones SKIP para
establecer el temporizador.
SELECT
Este botón es equivalente al botón Center del iPod.
Pulse este botón en el modo iPod para confirmar la selección
en los menús.
MUTING
Pulse este botón para silenciar el sonido.
X
W
V
U
T
S
R
Q
P
O
N
M
L

68
Funcionamiento básico
< Seleccione AUX para escuchar una fuente externa conectada
en la clavija AUX IN.
< En los modos iPod y AUX la pantalla siempre muestra el reloj.
< En el modo CD o TUNER, si pulsa y mantiene pulsado durante
2 segundos el botón TIME SET, el reloj se mostrará durante
unos segundos.
Seleccione la fuente de sonido con el botón FUNCTION.
3
Ponga en marcha la fuente y regule el volumen con los
botones VOLUME.
4
Encienda el subwoofer.
1
(panel posterior del subwoofer)
Pulse el interruptor STANDBY/ON de la unidad principal.
2
1
2
3
4

69
ESPAÑOL
< La pantalla parpadeará y mostrará “MUTING” cuando está
activado el silenciador.
< Si regula el volumen cuando el silenciador esté activado, está
función se cancelará.
Control del tono
1. Pulse el botón BASS o TREBLE.
Pulse el botón de bajos (BASS) para regular el nivel de la
gama de sonidos de baja frecuencia.
Pulse el botón de agudos (TREBLE) para regular el nivel de la
gama de sonidos de alta frecuencia.
2. Pulse los botones VOLUME antes de que pasen 5
segundos para cambiar la configuración.
El nivel se puede regular desde –4 hasta +4.
Silenciamiento
Par silenciar el sonido momentáneamente, pulse el botón
MUTING. Pulse de nuevo MUTING para restablecer el sonido.
Auriculares
Para la escucha en privado, primero reduzca el volumen al
nivel mínimo. A continuación, conecte los auriculares a la
toma PHONES y regule el volumen con los botones VOLUME.
El sonido de los altavoces se suspende mientras están
conectados los auriculares.
Desconexión programada
Si pulsa repetidas veces el botón SLEEP, puede establecer un
intervalo (descendiendo de 90 a 10 minutos) para que, una
vez transcurrido, la unidad se apague automáticamente
(Standby).
Cada pulsación de SLEEP reduce el valor en 10 minutos.
PRECAUCIÓN
Reduzca siempre el nivel de volumen antes de conectar los
auriculares. PARA EVITAR DAÑOS EN EL SISTEMA AUDITIVO,
no se coloque los auriculares antes de conectarlos.
(desactivado)
90 80 10
………

70
Escuchar el iPod
Seleccione “iPod” con el botón FUNCTION. La reproducción
se iniciará si ya hay un iPod en la base Dock.
El indicador iPod parpadeará en la pantalla si todavía no hay
un iPod en la base Dock.
En el modo iPod, pulse el botón PLAY/PAUSE (G/J) para
iniciar o interrumpir la reproducción.
Coloque el iPod en el Dock del MC-DX222i.
Pulse después el botón PLAY/PAUSE (y/J) del iPod. El
MC-DX222i se encenderá automáticamente y se iniciará la
reproducción de la lista de música del iPod.
< Si se coloca en la base Dock un iPod que está en el modo
reproducción, el MC-DX222i se encenderá automáticamente
e iniciará la reproducción del iPod.
< Compruebe que está empleando un adaptador de base Dock
adecuado (consulte “Preparación” en la página 65).
< La batería del iPod se recarga por completo con el iPod en la
base y el MC-DX222i encendido.
El MC-DX222i apagado no puede recargar el iPod de
conformidad con la normativa de IEA sobre el consumo
mínimo de corriente.
Si necesita recargar el iPod, deberá encender la unidad.
< Si se conectan los auriculares en el iPod, el sonido saldrá por
los altavoces del MC-DX222i y por los auriculares.
< El botón de parada (H) no funciona en el modo iPod.
Para seleccionar el modo iPod
Pulse el botón PLAY/PAUSE (G/J) durante la reproducción.
La reproducción se interrumpe en la posición actual. Pulse de
nuevo el botón PLAY/PAUSE (G /J ) para reiniciar la
reproducción.
Para saltar a la anterior o a la siguiente
pista
Para interrumpir momentáneamente la
reproducción (modo pausa)
Durante la reproducción, mantenga pulsado el botón de salto
(.o/) durante más de 2 segundos y suéltelo cuando
encuentre el fragmento que está buscando.
Durante la reproducción, pulse repetidamente el botón
(.o/) hasta que encuentre la pista deseada. La pista
seleccionada se reproducirá desde el principio.
< Si durante la reproducción se pulsa el botón ., la pista que
se está reproduciendo se reproducirá de nuevo desde el
principio. Pulse dos veces el botón . para regresar al
comienzo de la pista anterior.
Búsqueda de un fragmento de una pista

71
ESPAÑOL
Para activar el modo de al azar
Pulse el botón SHUFFLE durante la reproducción para cambiar
al modo de al azar.
Cada vez que se pulsa el botón SHUFFLE, el ajuste al azar
(SHUFFLE) del iPod cambia de la siguiente manera:
El icono Shuffle ( ) se mostrará en la pantalla si el iPod está
en el modo de reproducir álbumes o canciones al azar.
albumssongs (desactivado)
Para seleccionar un el elemento del menú
Pulse los botones PRESET/SCROLL (‡/°) para desplazarse
por el menú hasta el elemento que desea y, después, pulse el
botón SELECT.
Para activar la función de repetición
Pulse el botón REPEAT durante la reproducción para cambiar
al modo de repetición.
Cada vez que se pulsa el botón REPEAT, la función de
repetición (REPEAT) del iPod cambia de la siguiente manera:
El ícono Repeat One ( ) se muestra en la pantalla del iPod si
éste está en el modo de repetir una canción.
El ícono Repeat All ( ) se muestra en la pantalla del iPod si
éste está en el modo de repetir todas las canciones.
AllOne (desactivado)
Para regresar al menú anterior
Pulse el botón MENU para regresar al menú anterior.
Este botón es equivalente al botón MENU del iPod.

72
Audición de CD/MP3
número total
de carpetas
tiempo transcurrido de la
pista actual
número de pista actual
número de la
carpeta actual
tiempo transcurrido de la
pista actual
número de pista actual
Pulse el botón FUNCTION para seleccionar el modo CD.
1
Pulse el botón de apertura/cierre.
2
Coloque un disco en el pivote central del reproductor,
con la cara de la etiqueta hacia fuera.
Presione el disco en el centro hasta que oiga un clic, señal de
que está bien encajado.
3
< No coloque más de un disco al mismo tiempo en el
mecanismo de carga.
< Compruebe que el disco está perfectamente centrado y
encajado.
< La unidad tarda unos instantes en cargar el disco. Durante la
operación de carga, no funcionará ningún botón. Espere a
que aparezcan en la pantalla el número total de pistas y el
tiempo total de reproducción del disco.
< Si no hay un disco cargado en el reproductor, la pantalla
indicará “NO DISC”.
Si el disco es un CD
Pulse el botón PLAY/PAUSE (y/J) para dar comienzo a
la reproducción.
5
Si el disco es MP3
duración totaltotal pistas
total pistas
Pulse el botón de apertura/cierre para cerrar el
compartimento de CD.
4
La reproducción se inicia desde la primera pista del disco.
< Las pistas MP3 grabadas fuera de carpetas se situarán
automáticamente en la carpeta raíz, y la reproducción
comenzará en la primera pista de dicha carpeta.
< Una vez concluida la reproducción de todas las pistas, la
unidad se detendrá automáticamente.
5
3
1
42
CD
MP3

73
ESPAÑOL
Para interrumpir momentáneamente la
reproducción (pausa)
Pulse el botón G/J durante la reproducción. La reproducción
se detiene en la posición actual. Para reanudarla, pulse de
nuevo el botón G/J.
Para detener la reproducción
Pulse el botón de parada (H) para detener la reproducción.
Para saltar a la pista siguiente o anterior
Durante la reproducción, pulse el botón de salto (.o/)
varias veces hasta localizar la pista deseada. La pista
seleccionada se reproducirá desde el principio.
Desde parada, pulse los botones de salto (. o/ )
repetidas veces hasta localizar la pista que desea oír. Pulse el
botón G/J para iniciar la reproducción desde la pista
seleccionada.
< Si pulsa el botón . durante la reproducción, la pista en
curso se reproducirá desde el principio. Para retroceder al
principio de la pista anterior, pulse dos veces el botón ..
< Durante la reproducción programada, se saltará a la pista
siguiente o anterior del programa.
Búsqueda de un fragmento de la pista
Durante la reproducción, mantenga pulsado el botón de salto
(.o/) y libérelo cuando localice la parte que desea oír.
Selección de carpeta en un disco MP3
Pulse el botón PRESET/SCROLL para seleccionar una carpeta.
Información MP3
Durante la reproducción de un disco MP3, pulse el botón
MP3 durante más de 1 segundo. La información de la pista
actual se visualiza en el siguiente orden:
Nombre de archivo w Título w Intérprete w Álbum
< Si no existe información, se visualiza NONE.
< Si la unidad no puede leer la información, se visualiza
UNKNOWN (desconocido).
Pulse de nuevo el botón MP3 durante más de 1 segundo para
cancelar el modo de información de MP3.

74
Modo de búsqueda (sólo MP3)
Primera letra del nombre de pista
Nombre de pista
Búsqueda de nombre de pista
Puede seleccionar la pista buscándola por su nombre.
Pulse una vez el botón MP3.
En la pantalla aparecerá una letra del alfabeto (primera letra
de un nombre de pista) y un nombre de pista.
1
Pulse el botón G/J.
La reproducción comenzará desde la pista seleccionada.
4
Número de pista
< Para cancelar el modo de búsqueda, pulse el botón de parada
(H).
Seleccione la primera letra del nombre de la pista que
desea oír, pulsando el botón de salto (. o /).
2
Mantenga pulsado el botón de salto (. o /).
3
A continuación podrá seleccionar la pista que empiece por
esa letra pulsando el botón de salto (. o /).
MP3

75
ESPAÑOL
Búsqueda de pista en una carpeta
Pulse dos veces el botón MP3.
Se visualizará el nombre de la carpeta.
< Las pistas MP3 grabadas fuera de carpetas se situarán en la
carpeta raíz.
Pulse el botón de salto (. o /) para comprobar
que la pista que quiere oír se encuentra en la carpeta.
Mantenga pulsado el botón de salto (. o /).
A continuación podrá seleccionar la pista de la carpeta
pulsando el botón de salto (. o /).
Pulse el botón G /J para dar comienzo a la
reproducción.
La reproducción comenzará desde la pista seleccionada.
< Si omite el paso , la reproducción comenzará en la primera
pista de la carpeta seleccionada.
3
4
3
2
1
Reproducción al azar
Las pistas se pueden reproducir en un orden aleatorio. Pulse
el botón SHUFFLE durante la reproducción o desde la posición
de parada. “SHUFFLE” se iluminará en la pantalla.
< Si pulsa el botón / durante la reproducción al azar, se
seleccionará y reproducirá al azar la siguiente pista. Si pulsa el
botón . , la pista en curso se reproducirá desde el
principio. Si pulsa dos o más veces el botón ., la siguiente
pista se seleccionará y se reproducirá al azar.
No se puede repetir una pista durante la reproducción al azar.
< La reproducción al azar no funciona en el modo de
reproducción programada.
< Si pulsa uno de los siguientes botones, el modo de
reproducción al azar quedará cancelado:
SHUFFLE, STOP, FUNCTION, FM/AM,
STANDBY/ON, OPEN/CLOSE

76
Reproducción programada
< Cuando se haya terminado la reproducción de todas las pistas
o si pulsa el botón de parada (H), el indicador MEMORY se
apagará y se cancelará el modo de programa. El programa se
conserva en la memoria
Puede regresar a la lista de reproducción programada
pulsando los botones MEMORY y PLAY/PAUSE (G/J).
< La reproducción al azar no funciona en el modo de
reproducción programada.
Se pueden programar hasta 64 pistas en el orden deseado.
Pulse el botón FUNCTION para seleccionar el modo CD.
1
Pulse el botón MEMORY.
2
“MEMORY” se ilumina en la pantalla.
< Para cancelar el modo de programa, pulse el botón de parada
(H).
Pulse el botón de salto (.o/|) repetidas veces para
seleccionar una carpeta del disco MP3, y después pulse
MEMORY.
< Las pistas MP3 grabadas fuera de carpetas se situarán en la
carpeta raíz “001”.
< Omita este paso cuando reproduzca un CD.
3
La pista queda incluida en el programa, y “P-02” se visualiza
en la pantalla.
< Repita los pasos y para programar otras pistas.
< Se pueden programar un total de 64 pistas.
Una vez completada la selección de los números de
pista, pulse el botón G /J para dar comienzo a la
reproducción programada.
5
43
Pulse el botón de salto (.o/) repetidas veces para
seleccionar una pista, y después pulse MEMORY.
4
FUNCTION
MEMORY
CD MP3
CD MP3
MP3

77
ESPAÑOL
Para borrar el contenido del programa, pulse MEMORY y H
desde la posición de parada.
< Los contenidos programados se eliminarán si pulsa uno de los
siguientes botones:
OPEN/CLOSE, FUNCTION, FM/AM, STANDBY/ON
< Si la unidad se desconecta de la toma de alimentación, el
contenido del programa se borrará.
Para comprobar el orden programado
Desde la posición de parada, pulse el botón MEMORY
repetidas veces. En la pantalla aparecerán el número de pista
y el número de programa.
Para añadir una pista al final del programa
Desde la posición de parada, pulse MEMORY repetidas veces
hasta que “00” aparezca en la pantalla. Seleccione un
número de pista con los botones de salto (.o/ ) y
después pulse MEMORY. La pista se incorpora al final del
programa.
Para cambiar un programa
Desde la posición de parada, pulse el botón MEMORY
repetidas veces hasta que aparezca en la pantalla el número
de programa que desea cambiar.
Seleccione un nuevo número de pista con los botones de
salto (.o/) y después pulse MEMORY.
Para borrar un programa

78
Cada vez que pulse el botón REPEAT, el modo cambiará en el
siguiente orden:
Si el disco es un CD:
Si el disco es MP3:
< El modo de repetición quedará cancelado si pulsa uno de los
siguientes botones:
STOP, FUNCTION, FM/AM, OPEN/CLOSE, STANDBY/ON
Repetición
Repetición de una pista
Pulse una vez el botón REPEAT durante la reproducción.
“REPEAT” se ilumina.
La pista actual se reproducirá de forma continua. Si pulsa el
botón de salto (.o/) y selecciona otra pista, la pista
seleccionada se reproducirá de forma ininterrumpida.
También es posible seleccionar una pista para la repetición
desde la posición de parada. Pulse el botón REPEAT,
seleccione una pista con el botón de salto (.o/) y pulse
G/J para iniciar la reproducción.
Repetición de todas las pistas
Todas las pistas se reproducirán de forma repetida.
Pulse dos veces el botón REPEAT. “REPEAT ALL” se ilumina.
Durante la reproducción programada, las pistas incluidas en el
programa se reproducirán de forma continua.
Repetición de todas las pistas de una
carpeta (MP3)
Todas las pistas de la carpeta se reproducirán
ininterrumpidamente.
Pulse tres veces el botón REPEAT. “REPEAT ALBUM” se
ilumina.
(desactivado)
(desactivado)
REPEAT REPEAT ALL
REPEAT REPEAT ALL REPEAT ALBUM

ESPAÑOL
79
< También puede utilizar el botón FM/AM para seleccionar el
sintonizador (TUNER).
Pulse el botón FM/AM para seleccionar una banda.
2
Escucha de la radio
Pulse el botón FUNCTION para seleccionar el modo
TUNER.
1
Selección automática de una emisora.
3
Mantenga pulsado TUNING arriba o abajo hasta que la lectura
de frecuencia empiece a cambiar. Cuando sintoniza una
emisora, la búsqueda se detiene automáticamente.
< Pulse el botón de sintonización arriba/abajo para detener la
selección automática.
Selección manual de emisoras que no se pueden sintonizar
automáticamente
Si el botón Tuning arriba/abajo se pulsa brevemente, la
frecuencia cambia en pasos fijos.
Pulse el botón Tuning arriba/abajo repetidas veces hasta
localizar la emisora deseada.
Botón FM MODE
Pulse este botón para conmutar entre los modos estéreo y
monofónico.
STEREO (estéreo):
Las emisiones de FM estéreo se reciben en estéreo y el
indicador “STEREO” se ilumina en la pantalla.
< Si el sonido se recibe distorsionado y el indicador “STEREO”
luce intermitente, significa que la señal no tiene suficiente
intensidad para una correcta recepción estéreo. En tal caso,
seleccione el modo MONO.
MONO
Seleccione este modo si la recepción de FM estéreo es débil.
El sonido será monofónico y con menos ruido.
Si la recepción es de baja calidad
Emisión en AM
Gire o reposicione la antena de AM para optimizar la
recepción.
Emisión en FM
Despliegue y gire la antena de FM hasta que reciba
nítidamente la emisión. Es posible que tenga que reposicionar
la unidad.
1
2
3

80
Presintonías
Puede almacenar emisoras de FM y AM en las presintonías 1 a
10.
Si se apaga el interruptor del subwoofer, se borrarán los
ajustes guardados en la memoria (reloj, presintonías,
temporizador).
Sintonice una emisora (pasos a en página 79).
311
Pulse el botón MEMORY.
2
Antes de 5 segundos, pulse el botón MEMORY.
4
La emisora queda memorizada y el indicador MEMORY se
apaga.
Para almacenar otras emisoras, repita los pasos a .
41
Pulse el botón PRESET repetidas veces hasta localizar la
presintonía deseada.
2
Cómo seleccionar presintonías
Pulse el botón FM/AM para seleccionar una banda.
1
presintonía
Antes de 5 segundos, seleccione con los botones PRESET
del mando a distancia un número de presintonía para
asignarle la emisora.
3

81
ESPAÑOL
El sistema RDS es un servicio que permite a las emisoras enviar
información adicional junto con la señal habitual de la
programación de radio.
RDS funciona en la banda FM únicamente en Europa.
Sintonice una emisora de FM con RDS (véanse pasos
a en la página 79).
El nombre del servicio de programación (nombre de emisora)
aparece en la pantalla.
Pulse el botón RDS.
Cada vez que pulse el botón RDS, el modo cambiará en el
siguiente orden:
PS (nombre del servicio de programación)
Cuando seleccione PS, la frecuencia se mostrará durante 3
segundos y después el nombre del servicio (emisora). Si no
hay datos PS, se visualizará “NO PS”.
PTY (tipo de programa)
Cuando seleccione PTY, se visualizará el tipo de programa.
Si no hay datos PTY, se visualizará “NO PTY”.
RT (radiotexto)
Cuando seleccione RT, se visualizarán las noticias de las
emisoras mediante un juego de 64 símbolos. Si no hay datos
RT, se visualizará “NO RT”.
2
3
11
RDS
RDS PTY (búsqueda por tipo de programa 1)
Esta función permite buscar emisoras por tipo de programa.
Seleccione FM con el botón FM/AM.
Pulse el botón PTY.
“PTY SEL” parpadeará en la pantalla.
Antes de 10 segundos, seleccione el tipo de programa
deseado con los botones de salto.
Se pueden seleccionar 31 tipos de programa (véase página
82).
Pulse el botón PTY.
Se inicia la búsqueda.
< Cuando se localiza el programa seleccionado, la búsqueda se
interrumpe y el tipo de programa se visualiza en la pantalla.
< Si no se encuentra el mismo tipo de programa durante la
búsqueda PTY, se detendrá en la frecuencia inicial.
< Si quiere detener la búsqueda, pulse el botón PTY.
4
3
2
1
PTY
FM/AM

82
PTY (tipo de programa)
NEWS : noticias, convocatorias, opinión pública, informes,
actualidad.
AFFAIRS : oferta variada, temas de actualidad, debates, análisis,
etc.
INFO : información o referencias cotidianas, previsión
meteorológica, guía de consumo, temas sanitarios,
etc.
SPORT : programas relacionados con el mundo del deporte.
EDUCATE : información educativa y cultural.
DRAMA : series dramáticas, conciertos, etc.
CULTURE : programación cultural de ámbito nacional o local,
actos religiosos, filosofía, ciencias sociales, lenguaje,
cine, etc.
SCIENCE : ciencias naturales, tecnología, etc.
VARIED : programas populares, concursos, entretenimiento,
entrevistas, comedia, sátira, etc.
POP M : programación sobre música comercial, popular,
volumen de ventas de discos, etc.
ROCK M : música moderna generalmente compuesta e
interpretada por jóvenes.
M O R M : temas populares que normalmente duran menos de
cinco minutos.
LIGHT M : música clásica, instrumental, coral, ligera,
interpretada por no profesionales.
CLASSICS : música orquestal, grandes óperas, sinfónica, cámara,
etc.
OTHER M : otros estilos musicales (rhythm & blues, reggae, etc.).
WEATHER : información meteorológica, previsiones…
FINANCE : información financiera, comercial, bursátil, etc.
CHILDREN : programas infantiles.
SOCIAL A : temas sociales.
RELIGION : programas religiosos.
PHONE IN : programas en los que los oyentes participan por
teléfono.
TRAVEL :información sobre viajes.
LEISURE : programas sobre actividades recreativas y de ocio.
JAZZ : música de jazz.
COUNTRY : música country
NATIONAL: música nacional.
OLDIES : música de la llamada época dorada.
FOLK M : música folk
DOCUMENT: documentales.
TEST
ALARM : mensajes urgentes, información sobre desastres
naturales, etc.
RDS PTY (búsqueda por tipo de programa 2)
Conecte el jack PHONES (salida de audio) de un
reproductor de audio portátil a la entrada AUX IN del
MC-DX222i utilizando el cable con miniconector estéreo
suministrado.
1
Audición de una fuente externa
Ponga en marcha la fuente externa, y regule el volumen
con los botones VOLUME del MC-DX222i y el
reproductor de audio.
3
Pulse el botón FUNCTION para seleccionar AUX.
2
Cuando use el jack PHONES del mini reproductor, deberá
ajustar su volumen o es posible que no oiga el sonido del MCDX222i.

ESPAÑOL
83
Puesta en hora del reloj
Si se apaga el interruptor del subwoofer, se borrarán los
ajustes guardados en la memoria (reloj, presintonías,
temporizador).
Si la unidad está encendida, pulse el interruptor
STANDBY/ON para apagarla.
1
Pulse una vez el botón TIME SET.
Parpadeará la cifra de las horas.
3
Utilice los botones de salto (.//) para ajustar la
cifra de las horas.
4
Pulse el botón TIME SET.
Parpadeará la cifra de los minutos.
5
Utilice los botones de salto (.//) para ajustar la
cifra de los minutos.
6
Pulse el botón TIME SET.
El reloj empieza a funcionar.
7
Mantenga pulsado el botón TIME SET.
Aparecerá intermitente el sistema de 12 horas (12 HOUR) o
de 24 horas (24 HOUR). Si desea cambiarlo, utilice los
botones .o/.
2
< Si no pulsa ningún botón en 10 segundos, el modo de puesta
en hora quedará cancelado.
STANDBY/ON
TIME SET

84
Ajuste del temporizador
< La unidad puede programarse para que se encienda o apague
a una hora determinada.
< Ponga el reloj en hora antes de programar el temporizador.
Pulse y mantenga pulsado el botón TIMER hasta que se
muestren en la pantalla los indicadores TIMER y “ON”.
1
La cifra de las horas comenzará a parpadear.
< Si no pulsa ningún botón en 10 segundos, el modo de ajuste
del temporizador quedará cancelado.
La cifra de los minutos comenzará a parpadear.
Utilice los botones de salto (.//) para ajustar la
hora de inicio (cifra de los minutos), y después pulse
TIMER.
3
En la pantalla aparecen los indicadores “TIMER” y “OFF”, y la
cifra de las horas intermitente.
Utilice los botones de salto (.//) para ajustar la
hora de inicio (cifra de las horas), y después pulse
TIMER.
2
Utilice los botones de salto (.//) para ajustar la
hora de parada (cifra de los minutos), y después pulse
TIMER.
5
La cifra de los minutos comenzará a parpadear.
Utilice los botones de salto (.//) para ajustar la
hora de parada (cifra de las horas), y después pulse
TIMER.
4
TIMER
/

85
ESPAÑOL
Utilice los botones de salto (.//) para seleccionar
una fuente de sonido (TUNER, CD o iPod), y después
pulse TIMER.
6
Utilice los botones de salto (.//) para ajustar el
volumen, y después pulse TIMER.
7
En la pantalla se visualizarán el reloj y el indicador TIMER.
La unidad se encenderá y apagará todos los días a las horas
especificadas.
No olvide apagar la unidad (standby), porque de lo
contrario el temporizador no funcionaría.
Si se apaga el interruptor del subwoofer, se borrarán
los ajustes guardados en la memoria (reloj, presintonías,
temporizador).
< Cuando el temporizador encienda la unidad, el volumen de la
reproducción se incrementará gradualmente hasta alcanzar el
volumen fijado con anterioridad.
< Si se ha seleccionado “iPod” como fuente pero no hay un
iPod en la base, la unidad se encenderá en el modo
sintonizador (TUNER).
< Si se ha seleccionado “CD” como fuente pero no hay un
disco en la bandeja, la unidad se encenderá en el modo
sintonizador (TUNER).
< Si se ha seleccionado “TUNER” como fuente y se enciende la
unidad, se sintonizará la emisora seleccionada en la última
ocasión.
Prepare la fuente de sonido.
Si ha seleccionado la radio (TUNER) en el paso , sintonice
una emisora.
Si ha seleccionado “CD” en el paso , inserte un disco.
Si ha seleccionado “iPod” en el paso , coloque el iPod.
6
6
6
8
Si no desea utilizar el temporizador, pulse el botón TIMER
para desactivarlo. (El indicador TIMER desaparece de la
pantalla.)
Pulse de nuevo el botón TIMER para activar el temporizador.
< Cuando active el temporizador, los valores programados se
visualizarán uno a uno y el indicador TIMER se iluminará en la
pantalla.
El temporizador queda programado y activado.
Los ajustes del temporizador se visualizan uno a uno, y el
indicador TIMER se ilumina en la pantalla.
Para activar o desactivar el temporizador
Pulse STANDBY/ON para apagar la unidad.
9

86
Si tiene algún problema con el equipo, repase la siguiente tabla
para ver si puede resolverlo por su cuenta antes de llamar a su
distribuidor o al centro de asistencia técnica de TEAC.
General
No hay corriente
e Revise la conexión a la toma de alimentación. Compruebe
que la alimentación no procede de una toma conmutada, y
en caso de que sea así, que el interruptor está activado.
Asegúrese de que la toma de corriente está activa
conectando otro dispositivo (lámpara, ventilador, etc.) para
ver si funciona.
No hay sonido en los altavoces.
e Seleccione la fuente de sonido con el botón FUNCTION.
e Compruebe la conexión de los altavoces.
e Ajuste el volumen.
e Desconecte los auriculares de la toma PHONES.
e Si el indicador “MUTING” parpadea, pulse el botón
MUTING.
Sonido con ruido.
e La unidad está demasiado cerca de un televisor o aparato
similar. Aleje la unidad o apague el dispositivo que interfiere.
No funciona el mando a distancia.
e Pulse el interruptor STANDBY/ON para encender la unidad.
e Si se ha agotado la batería, sustitúyala por una nueva.
e Utilice el mando a distancia dentro del radio de acción (5 m)
y apunte al panel frontal de la unidad.
e Retire cualquier obstáculo existente entre el mando a
distancia y la unidad principal.
e Apague cualquier fuente luminosa intensa que haya en las
proximidades de la unidad.
Reproductor de CD
No se inicia la reproducción.
e Inserte el disco con la cara grabada hacia el lado contrario.
e Si el disco está sucio, limpie su superficie.
e Puede haber insertado un disco vacío. Pruebe con uno
pregrabado.
e Dependiendo del formato, etc., quizá no sea posible
reproducir discos CD-R/RW. Vuelva a intentarlo con otro
disco.
e No se pueden reproducir discos CD-R/CD-RW que no tengan
la sesión cerrada. Cierre la sesión del disco en una
grabadora de CD e inténtelo de nuevo.
Intermitencias en el sonido.
e Coloque la unidad sobre una superficie estable, sin riesgos
de vibraciones o impactos.
e Si el disco está sucio, limpie su superficie.
e No utilice discos rayados, dañados o deformados.
Reproductor iPod
No se puede colocar el iPod.
e Revise la base Dock del adaptador.
e Elimine las partículas de polvo y los obstáculos del conector
de la base Dock del MC-DX222i y del iPod, y coloque de
nuevo el iPod en la base.
No reproduce.
e Retire el iPod de la base Dock, espere unos segundos y
vuelva a colocarlo de nuevo.
e Es posible que una actualización del software resuelva el
problema. Visite la página Web de Apple y descargue la
última versión del software para iPod.
Sintonizador
No se recibe ninguna emisora o la señal es muy débil.
e Sintonice bien la emisora.
e Gire la antena de FM o AM en la dirección que ofrezca la
mejor recepción.
La emisión es estéreo pero se recibe en monofónico.
e Pulse el botón FM MODE.
Si no puede resolver el problema, desconecte el cable de
alimentación de la toma de red y vuélvalo a conectar.
Si se apaga el interruptor del subwoofer, se borrarán los
ajustes guardados en la memoria (reloj, presintonías,
temporizador).
Solución de problemas
Atención a la condensación
Si la unidad (o un disco) se traslada de un entorno frío a uno
cálido, o se utiliza después de un cambio repentino de
temperatura, existe el riesgo de condensación: el vapor del
aire se podría condensar en el mecanismo interno y provocar
errores de funcionamiento. Para evitarlo, o en caso de que
suceda, deje la unidad encendida una o dos horas. Así se
estabilizará a la temperatura ambiental.
Mantenimiento
Si se ensucia la superficie del equipo, pase un paño suave o
utilice jabón líquido normal diluido. Limpie cualquier resto
líquido que pueda quedar en la unidad. No utilice aguarrás,
bencina ni alcohol, ya que podría dañar el acabado de la
unidad. Espere a que se seque por completo la superficie de
la unidad antes de utilizarla.

87
ESPAÑOL
Especificaciones
Sección de amplificador
Salida de potencia (I+D) . . . . . . . . . . . . . . . . . . . . 5 W + 5 W
Salida de potencia (subwoofer) . . . . . . . . . . . . . . . . . . . 15 W
Sensibilidad de entrada . . . . . . . . . . . . . . . . . . . . . . . 300 mV
Respuesta en frecuencia . . . . . . . . . . . . . . . . . 50 a 20.000 Hz
Sección de sintonizador (TUNER) (FM)
Margen de frecuencias . . . . . . . . . . . . . . 87.50 a 108.00 MHz
Sensibilidad (S/R 30 dB) . . . . . . . . . . . . . . . . . . . . . 20 dBµV/m
Sección de sintonizador (TUNER) (AM)
Margen de frecuencias . . . . . . . . . . . . . . . . . 522 a 1.620 kHz
Sensibilidad (S/R 20 dB) . . . . . . . . . . . . . . . . . . . . . 54 dBµV/m
Sección de reproductor de CD
Respuesta en frecuencia . . . . . . . . . . . 20 a 20.000 Hz (±1 dB)
Relación señal/ruido . . . . . . . . . . . . . . . . . . . . . . . . . . . 55 dB
Fluctuación de velocidad . . . . . . . . . . . . . . . . . . . Inapreciable
Altavoz
Tipo . . . . . . . . . . . . . . . . . . . . . . . . . Plano de gama completa
Impedancia . . . . . . . . . . . . . . . . . . . . . . . . . . . . . . . 4 ohmios
Subwoofer
Impedancia . . . . . . . . . . . . . . . . . . . . . . . . . . . . . . . 8 ohmios
GENERAL
Alimentación . . . . . . . . . . . . . . . . . . . . . . . . 230 V c.a., 50 Hz
Consumo. . . . . . . . . . . . . . . . . . . . . . . . . . . . . . . . . . . . 80 W
Dimensiones (anch. x alt. x prof.)
Unidad principal . . . . . . . . . . . . . . . . . 255 x 169,5 x 115 mm
Altavoces I y D . . . . . . . . . . . . . . . . . . . 210 x 169,5 x 81 mm
Subwoofer . . . . . . . . . . . . . . . . . . . . . . . 160 x 245 x 335 mm
Peso
Unidad principal . . . . . . . . . . . . . . . . . . . . . . . . . . . . . . 1,4 kg
Altavoces I y D. . . . . . . . . . . . . . . . . . . . . . . . 0,7 kg cada uno
Subwoofer . . . . . . . . . . . . . . . . . . . . . . . . . . . . . . . . . . 5,3 kg
Accesorios estándar
Mando a distancia (RC-1103) x 1
Batería del mando a distancia x 1
Cable de subwoofer x 1
Cable de altavoz x 2
Antena de FM x 1
Antena de AM x 1
Cable con mini conector estéreo x 1
Adaptador de base Dock x 8
(adaptador “60GB (color) + Photo 40GB/60GB” preequipado)
Funda para la base Dock x 1
Soportes para montaje mural x 4
Tornillos (cortos) x 8
Tornillos (largos) x 4
Tacos de plástico x 4
Plantilla para montaje mural x 2
Manual del usuario x 1
Guía rápida para conexión x 1
Tarjeta de garantía x 1
• El diseño y las especificaciones están sujetos a modificación
sin previo aviso.
• El peso y las dimensiones se expresan como valores
aproximados.
• Las ilustraciones pueden diferir ligeramente de los modelos
fabricados.

Z
This appliance has a serial number located on the rear panel. Please record
the model number and serial number and retain them for your records.
Model number Serial number
0907.MA-1253B
TEAC CORPORATION
3-7-3, Nakacho, Musashino-shi, Tokyo 180-8550, Japan Phone: (0422) 52-5081
TEAC AMERICA, INC. 7733 Telegraph Road, Montebello, California 90640 Phone: (323) 726-0303
TEAC CANADA LTD. 5939 Wallace Street, Mississauga, Ontario L4Z 1Z8, Canada Phone: (905) 890-8008
TEAC MEXICO, S.A. De C.V Campesinos N°184, Colonia Granjas Esmeralda, Delegacion Iztapalapa, CP 09810, México DF Phone: (525) 581-5500
TEAC UK LIMITED Unit 19 & 20, The Courtyards, Hatters Lane, Watford, Hertfordshire, WD18 8TE, U.K. Phone: (0845) 130-2511
TEAC EUROPE GmbH Bahnstrasse 12, 65205 Wiesbaden-Erbenheim, Germany Phone: 0611-71580
 Loading...