


Teac FW-1884 Quick Start
FW-1884
Quick Start Guide
This guide is designed to quickly get you started using the FW-1884. If you have any
problems or questions during setup, the Owner’s Manual covers this in much more detail.
Installing the Drivers – Windows
08/08/03
Page 1 of 2
1. Plug the included FireWire cable into the FW-1884’s
FireWire port and your computer’s FireWire port.
Don’t turn on the power yet.
2. Insert the FW-1884 Software and Documentation
CD-ROM into your computer’s CD-ROM drive. The
installer will automatically launch. Click OK on the
screen. If the installer asks you where it should look
for drivers, select the installation CD-ROM. Follow
the on screen instructions.
3. Restart your computer. When it has restarted, turn
on the FW-1884 using the power switch on the back
right side of the unit.
Installing the Drivers – Mac
1. Insert the FW-1884 Software and Documentation
CD-ROM into your computer’s CD-ROM drive. Follow
the instructions below for your computer platform
and then move on to step 2.
a. Mac OS X Users: Double-click the Mac OS X in-
staller fi le on the installer CD, ending with the
suffi x “.dmg”. Disk Copy should automatically
mount the disk image. Select this new “disk” and
double click the FW-1884 Installer. Enter your
administrator’s password and then follow the
instructions.
b. Mac OS 9 Users: If OMS is not installed on your
Mac, run the OMS 2.3.8 Installer fi rst. Next, select
4. The New Hardware Wizard will launch when it sees
your new hardware. Click “Next” on the fi rst screen.
If you see any messages telling you that the product
hasn’t passed Windows Logo Testing, click “Continue
Anyway.” After the fi rst driver is installed, the New
Hardware Wizard will fi nd new hardware and walk
you through the installation process two more times.
5. Open the “DAW Plugins” folder. Find the ASIO plugin for your DAW recording software. If none exists,
check the TASCAM website for a new driver.
the “Driver Installers” folder on the CD and open
the “Mac OS 9” folder inside of that. Double
click the FW-1884 Installer and then follow the
instructions. When you’re fi nished, launch OMS
Setup and follow the instructions.
2. Plug the FireWire cable into the FW-1884 ’s FireWire
port and your computer’s FireWire port.
3. Open the “DAW Plugins” folder. Find the plug-in for
your DAW recording software. If none exists, check
the TASCAM website for a new driver.
FW-1884
Using the Control Panel
Quick Start Guide
08/08/03
Page 2 of 2
1. First, install the FW-1884 software as explained in
the previous section.
2. After the software has been installed and your
computer restarts, you should see that the “FireWire”
light on the top right corner of the FW-1884 is on. (If
it isn’t, you may need to restart again or check your
connections.)
3. Press the “Control Panel” button on the left side of the
unit to launch the FW-1884 Manager application.
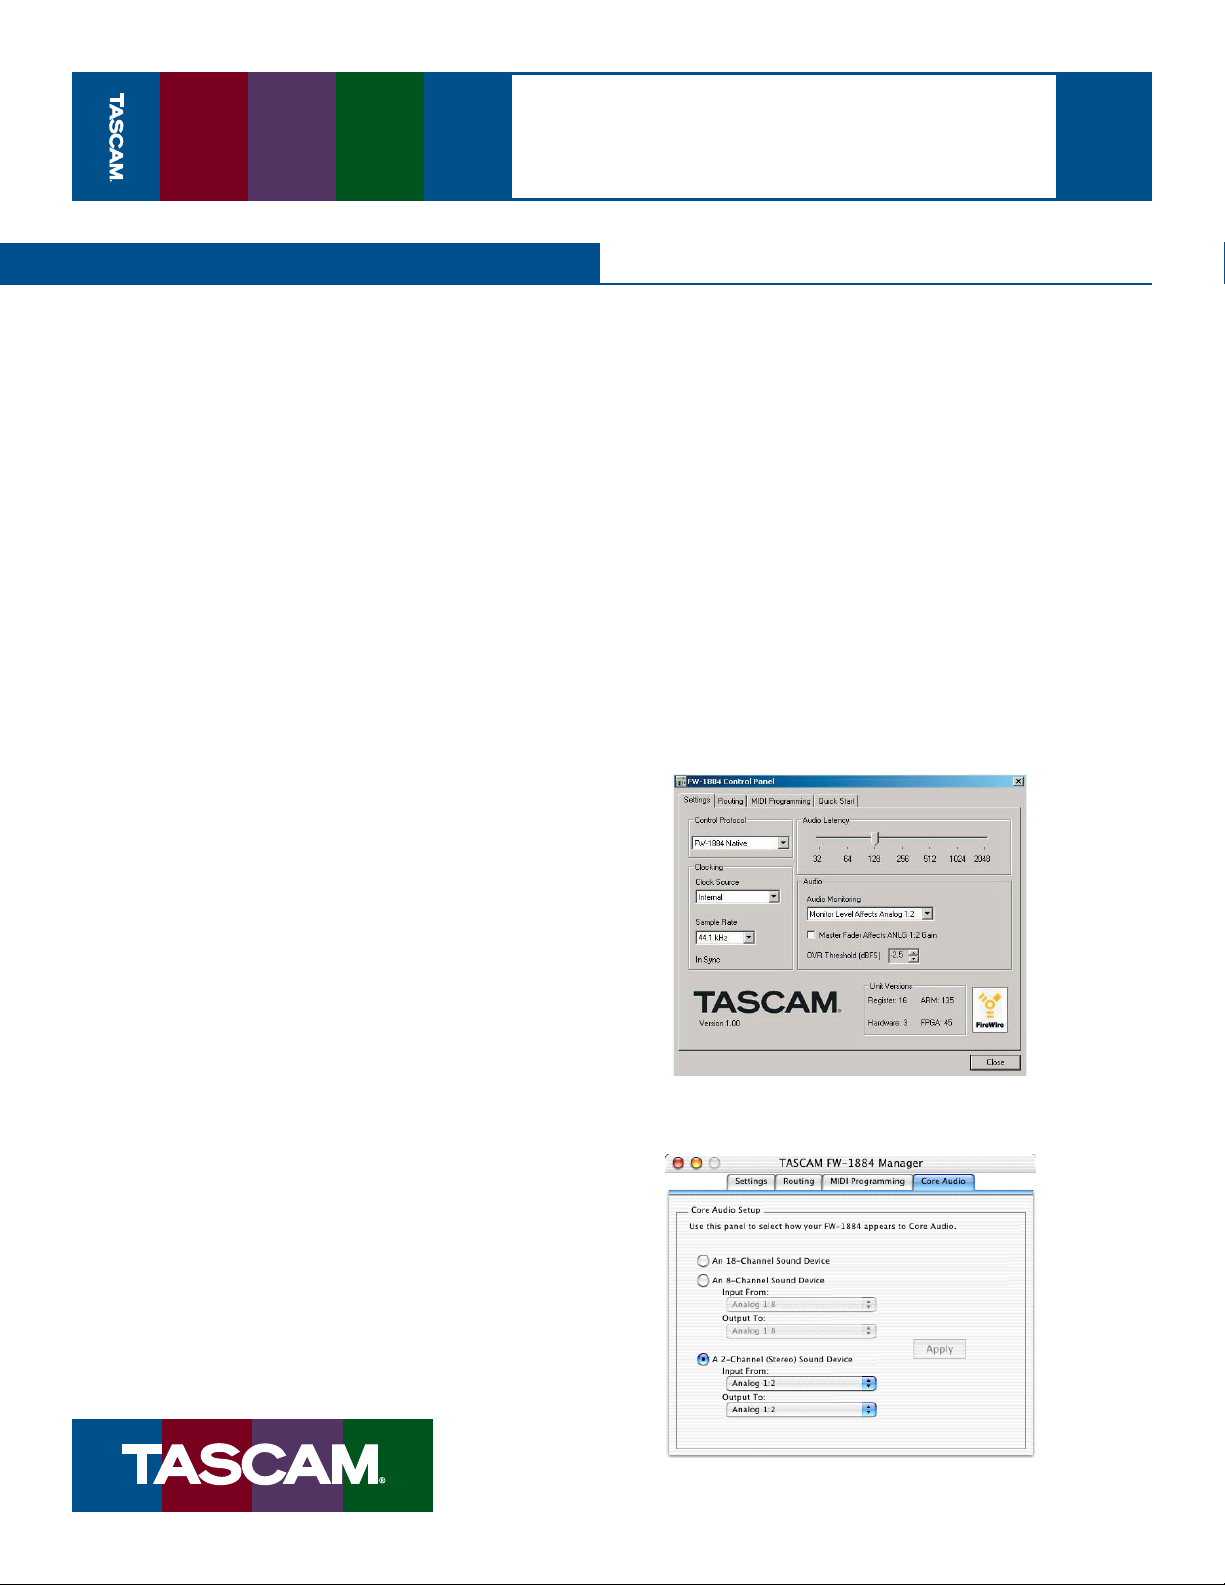
4. When the FW-1884 Control Panel opens, it will de-
fault to the Settings tab (see below). Set the Control
Protocol to either FW-1884 Native, HUI Emulation or
Mackie Control Emulation, depending on the needs
of your software.
5. The Clock Source and Sample Rate can be set from this
control panel or from the front panel of the FW-1884.
6. The Audio Latency should be raised if you hear clicks
in the audio playback, especially on machines with
relatively slow processors.
7. The Audio Monitoring control selects if the Monitor
knob on the FW-1884 front panel changes the output
level of analog outputs 1 and 2 or 1 through 8. Use the
1:2 setting if you’re monitoring in Stereo, use the 1:
8 setting if you’re monitoring in surround. In most
DAW software, you should leave the “Master Fader
Affects ANLG 1:2” box unchecked, so that you don’t
attenuate the master level twice.
8. Select the Routing tab to change the functionality of
the digital inputs and outputs.
9. Mac OS X: Click on the “Core Audio” tab to select how
many inputs and outputs you’ll have available to
your audio applications. On slower systems, such as
a Mac with a G3 processor, you may need to select
less channels for the audio to record and playback
without glitches.
Mac OS 9: Select which pair of inputs & outputs Sound
Manager will use for stereo I/O in the Settings tab.
Windows: Select which pair of inputs and outputs
Windows will use for stereo I/O in the Sound and
Audio Devices control panel.
10. To use the FW-1884 with your DAW software, you’ll
need to open your DAW and choose the “Audio
Setup...” or similar menu item. Set the audio device
to FW-1884. There should also be menus for adding
a MIDI interface and Control Suface. Since every
DAW program and sequencer handles this differently, check the Software Application Notes found
on your Installation CD.
Refer to the FW-1884 Setup Guide and User’s Manual
for more information on setting up the FW-1884 in
your studio.
The FW-1884 Settings tab in Windows XP
The FW-1884 Core Audio tab in Mac OS X
 Loading...