

Z
D01323020B
ENGLISH
NT-505
USB DAC/ Network Player
For information about this unit’s network functions,
see the TEAC HR Streamer User’s Manual.
The Owner’s Manual and TEAC HR Streamer User’s
Manual can be downloaded from the TEAC Global
Site (http://www.teac-global.com/).
To use network functions and USB flash drive playback, you must also use a tablet or smartphone that
has the TEAC HR Streamer app (free) installed and is
connected to the same network as the unit.
MANUAL DEL USUARIO
FRANÇAIS
ESPAÑOL
OWNER’S MANUAL
MODE D’EMPLOI

IMPORTANT SAFETY INSTRUCTIONS
CAUTION: TO REDUCE THE RISK OF ELECTRIC SHOCK,
DO NOT REMOVE COVER (OR BACK). NO USERSERVICEABLE PARTS INSIDE. REFER SERVICING TO
QUALIFIED SERVICE PERSONNEL.
The lightning flash with arrowhead symbol, within an
<
B
WARNING: TO PREVENT FIRE OR SHOCK HAZARD,
DO NOT EXPOSE THIS APPLIANCE TO RAIN OR
MOISTURE.
CAUTION
o DO NOT REMOVE THE EXTERNAL CASES OR CABINETS TO EXPOSE
THE ELECTRONICS. NO USER SERVICEABLE PARTS ARE INSIDE.
o IF YOU ARE EXPERIENCING PROBLEMS WITH THIS PRODUCT,
CONTACT THE STORE WHERE YOU PURCHASED THE UNIT FOR
A SERVICE REFERRAL. DO NOT USE THE PRODUCT UNTIL IT HAS
BEEN REPAIRED.
o USE OF CONTROLS OR ADJUSTMENTS OR PERFORMANCE OF
PROCEDURES OTHER THAN THOSE SPECIFIED HEREIN MAY RESULT
IN HAZARDOUS RADIATION EXPOSURE.
equilateral triangle, is intended to alert the user to the
presence of uninsulated “dangerous voltage” within the
product’s enclosure that may be of sufficient magnitude to constitute a risk of electric shock to persons.
The exclamation point within an equilateral triangle is
intended to alert the user to the presence of important
operating and maintenance (servicing) instructions in
the literature accompanying the appliance.
1) Read these instructions.
2) Keep these instructions.
3) Heed all warnings.
4) Follow all instructions.
5) Do not use this apparatus near water.
6) Clean only with dry cloth.
7) Do not block any ventilation openings. Install in accordance
with the manufacturer’s instructions.
8) Do not install near any heat sources such as radiators, heat
registers, stoves, or other apparatus (including amplifiers) that
produce heat.
9) Do not defeat the safety purpose of the polarized or groundingtype plug. A polarized plug has two blades with one wider than
the other. A grounding type plug has two blades and a third
grounding prong. The wide blade or the third prong are provided for your safety. If the provided plug does not fit into your
outlet, consult an electrician for replacement of the obsolete
outlet.
10) Protect the power cord from being walked on or pinched particularly at plugs, convenience receptacles, and the point where
they exit from the apparatus.
11) Only use attachments/accessories specified by the manufacturer.
12) Use only with the cart, stand, tripod,
bracket, or table specified by the manufacturer, or sold with the apparatus. When a
cart is used, use caution when moving the
cart/apparatus combination to avoid injury
from tip-over.
13) Unplug this apparatus during lightning storms or when unused
for long periods of time.
14) Refer all servicing to qualified service personnel. Servicing is
required when the apparatus has been damaged in any way,
such as power-supply cord or plug is damaged, liquid has been
spilled or objects have fallen into the apparatus, the apparatus
has been exposed to rain or moisture, does not operate normally, or has been dropped.
o The apparatus draws nominal non-operating power from the
AC outlet with its POWER or STANDBY/ON switch not in the ON
position.
o The mains plug is used as the disconnect device; the disconnect
device shall remain readily operable.
o Caution should be taken when using earphones or headphones
with the product because excessive sound pressure (volume)
from earphones or headphones can cause hearing loss.
2
CAUTION
o Do not expose this apparatus to drips or splashes.
o Do not place any objects filled with liquids, such as vases, on
the apparatus.
o Do not install this apparatus in a confined space such as a
book case or similar unit.
o The apparatus should be located close enough to the AC
outlet so that you can easily reach the power cord plug at any
time.
o If the product uses batteries (including a battery pack or
installed batteries), they should not be exposed to sunshine,
fire or excessive heat.
o CAUTION for products that use replaceable lithium batter-
ies: there is danger of explosion if a battery is replaced with
an incorrect type of battery. Replace only with the same or
equivalent type.
WARNING
Products with Class ! construction are equipped with a power
supply cord that has a grounding plug. The cord of such a product must be plugged into an AC outlet that has a protective
grounding connection.
IN USA/CANADA, USE ONLY ON 120 V SUPPLY.
For European Customers
Disposal of electrical and electronic equipment
and batteries and/or accumulators
a) All electrical/electronic equipment and waste batteries/
accumulators should be disposed of separately from the
municipal waste stream via collection facilities designated by
the government or local authorities.
b) By disposing of electrical/electronic equipment and waste
batteries/accumulators correctly, you will help save valuable
resources and prevent any potential negative effects on
human health and the environment.
c) Improper disposal of waste electrical/electronic equipment
and batteries/accumulators can have serious effects on the
environment and human health because of the presence of
hazardous substances in the equipment.
d) The Waste Electrical and Electronic Equipment (WEEE)
symbols, which show wheeled bins that have been
crossed out, indicate that electrical/electronic equipment and batteries/accumulators must be collected
and disposed of separately from household waste.
If a battery or accumulator contains more than the
specified values of lead (Pb), mercury (Hg), and/or
cadmium (Cd) as defined in the Battery Directive
(2006/66/EC), then the chemical symbols for those
elements will be indicated beneath the WEEE symbol.
e) Return and collection systems are available to end users. For
more detailed information about the disposal of old electrical/electronic equipment and waste batteries/accumulators,
please contact your city office, waste disposal service or the
shop where you purchased the equipment.
Pb, Hg, Cd
EN
V
Precautions concerning batteries
Misuse of batteries could cause them to rupture or leak leading to
fire, injury or the staining of nearby things. Please read and observe
the following precautions carefully.
o Be sure to insert the batteries with correct positive (¥) and
negative (^) orientations.
o Use batteries of the same type. Never use different types of bat-
teries together.
o If the remote control is not used for a long time (more than a
month), remove the batteries to prevent them from leaking.
o If the batteries leak, wipe away the leakage inside the battery
compartment and replace the batteries with new ones.
o Do not use batteries of types other than those specified. Do not
mix new batteries with old ones or use different types of batteries together.
o Do not heat or disassemble batteries. Never throw batteries into
fire or water.
o Do not carry or store batteries with other metallic objects. The
batteries could short circuit, leak or explode.
o Never recharge a battery unless it is confirmed to be a recharge-
able type.
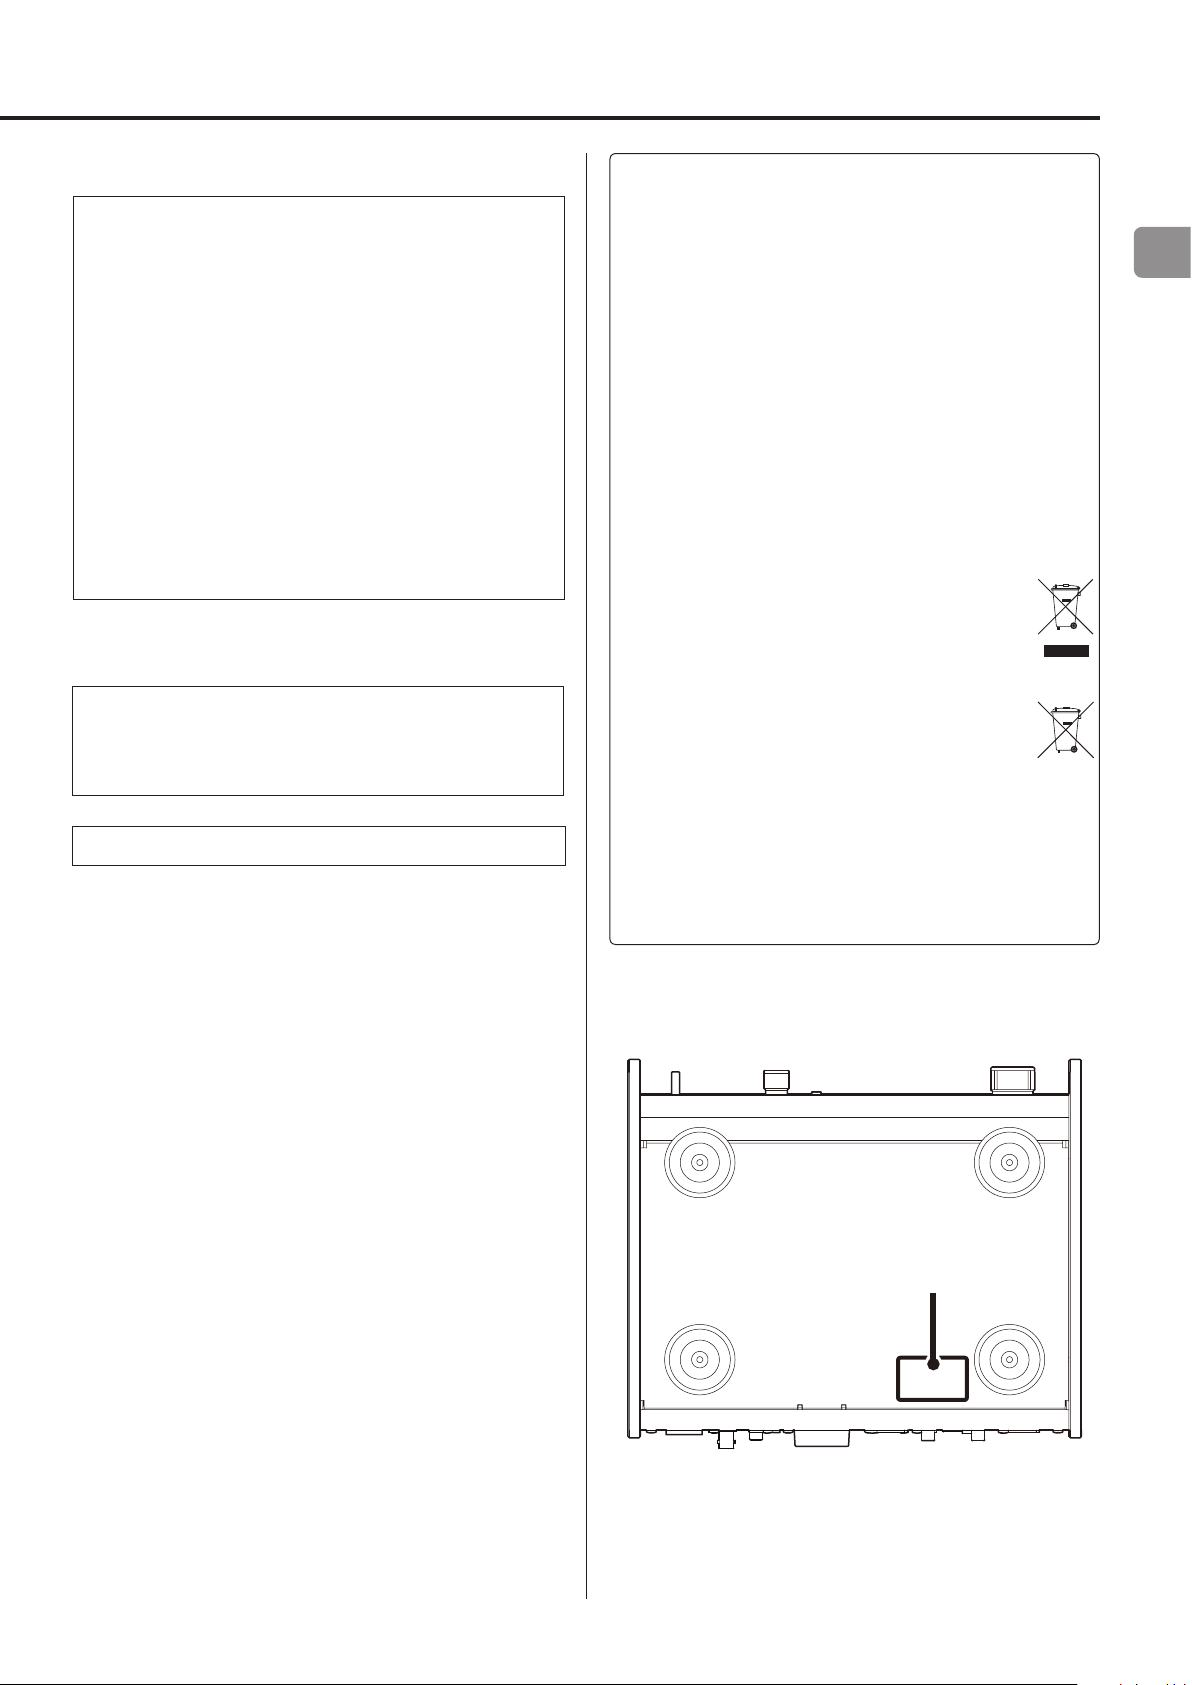
The nameplate is located on the bottom of the unit as shown below.
Front side
Nameplate
3

Wireless equipment precautions
Compliance of radio transmitter and
interference
Model for USA
Declaration of Conformity
Responsible party: TEAC AMERICA, INC.
Address: 1834 Gage Road, Montebello, California, U.S.A.
Telephone number : 1-323-726-0303
This device complies with Part.15 of FCC Rules. Operation is
subject to the following two conditions: (1) this device may not
cause harmful interference, and (2) this device must accept any
interference received, including interference that may cause
undesired operation.
Labeling of authorization
FCC ID: XEG-NT505
Model for Canada
Compliance of radio transmitter
This device complies with Industry Canada’s licence-exempt RSSs.
Operation is subject to the following two conditions:
1) This device may not cause interference; and
2) This device must accept any interference, including interference
that may cause undesired operation of the device.
Labeling of authorization
IC: 1559C-NT505
CAUTION
Authorization of wireless devices are different in countries or regions.
Please use only in the country where you purchased the product.
o Depending on the country, restrictions on the use of Bluetooth
wireless technology might exist.
Confirm the laws and regulations of the country or region where
you want to use the unit before use.
Radiation Exposure requirements
This equipment meets the regulation, which is recognized internationally, for the case of human exposure to radio waves generated
by the transmitter.
Statement of compliance
Model for USA
This equipment complies with FCC radiation exposure limits set
forth for an uncontrolled environment and meets the FCC radio frequency Exposure Guidelines.
Model for Canada
This equipment complies with IC RSS-102 radiation exposure limits set
forth for an uncontrolled environment.
Model for EEA (European Economic Area)
This equipment complies with EN.62311; Assessment of electronic and
electrical equipment related to human exposure restrictions for electromagnetic fields; the harmonised standard of DIRECTIVE 2014/53/EU.
Compliance of interference
This Class B digital apparatus complies with Canadian ICES-003.
This equipment complies with FCC/IC radiation exposure limits set
forth for an uncontrolled environment and meets the FCC radio
frequency (RF) Exposure Guidelines and RSS-102 of the IC radio
frequency (RF) Exposure rules. This equipment has very low levels
of RF energy that it deemed to comply without maximum permissive exposure evaluation (MPE). But it is desirable that it should be
installed and operated keeping the radiator at least 20cm or more
away from person’s body (excluding extremities: hands, wrists, feet
and ankles).
Model for EEA (European Economic Area)
This product has the function of broadband transmitter using
2.4GHz Band.
Use frequency range: 2400MHz – 2480MHz
Maximum output power: Bluetooth® Class 2 (less than 2.5 mW)
Hereby, TEAC Corporation declares that the radio
equipment type is in compliance with Directive
2014/53/EU., and the other Directives, and
Commission Regulations.
The full text of the EU declaration of conformity is available at the
following internet address. Please contact us by e-mail.
http://www.teac-audio.eu/en/
TEAC Corporation
1-47 Ochiai, Tama-shi, Tokyo, 206-8530, Japan
CAUTION
Changes or modifications not expressly approved by the party
responsible for compliance could void the user’s authority to
operate the equipment.
Information for interference
(FCC requirements)
This equipment has been tested and found to comply with the limits for a Class B digital device, pursuant to Part 15 of the FCC Rules.
These limits are designed to provide reasonable protection against
harmful interference in a residential installation.
This equipment generates, uses, and can radiate radio frequency
energy and, if not installed and used in accordance with the instructions, may cause harmful interference to radio communications.
However, there is no guarantee that interference will not occur in a
particular installation.
If this equipment does cause harmful interference to radio or television reception, which can be determined by turning the equipment
off and on, the user is encouraged to try to correct the interference
by one or more of the following measures.
o Reorient or relocate the equipment and/or the receiving
antenna.
o Increase the separation between the equipment and receiver.
o Connect the equipment into an outlet on a circuit different from
that to which the receiver is connected.
o Consult the dealer or an experienced radio/TV technician for
help.
4

Trademarks and copyrights
Contents
“DSD” is a registered trademark.
The Bluetooth® word mark and logos are registered trademarks
owned by Bluetooth SIG, Inc. and any use of such marks by TEAC
CORPORATION is under license.
Qualcomm aptX is a product of Qualcomm Technologies International,
Ltd.
Qualcomm is a trademark of Qualcomm Incorporated, registered in
the United States and other countries, used with permission. aptX is
a trademark of Qualcomm Technologies International, Ltd., registered
in the United States and other countries, used with permission.
Microsoft and Windows are either registered trademarks or trademarks of Microsoft Corporation in the United States and/or other
countries.
Apple, Mac, OS X, macOS, iPad, iPhone and iPod touch are trademarks
of Apple Inc., registered in the U.S. and other countries.
App Store is a service mark of Apple Inc.
Android is a trademark of Google Inc.
LDAC™ and LDAC logo are trademarks of Sony Corporation.
Bulk Pet is a registered trademark of INTERFACE CO., LTD.
Thank you for choosing TEAC.
Read this manual carefully to get the best performance from this
unit. After reading it, keep it in a safe place for future reference.
EN
ATTENTION
o For information about this unit’s network functions, see the TEAC
HR Streamer User’s Manual.
o The Owner’s Manual and TEAC HR Streamer User’s Manual can be
downloaded from the TEAC Global Site (http://www.teac-global.
com/).
o To use network functions and USB flash drive playback, you must
also use a tablet or smartphone that has the TEAC HR Streamer
app (free) installed and is connected to the same network as the
unit.
IMPORTANT SAFETY INSTRUCTIONS ...............................2
Wireless equipment precautions ...................................4
Trademarks and copyrights ........................................5
Included accessories ...............................................6
Before use .........................................................6
Other company names, product names and logos in this document
are the trademarks or registered trademarks of their respective
owners.
Information about copyrights and licensing related to open-source
software is provided in the separate “Important Notice Regarding
Software” document.
Using the TEAC Global Site .........................................6
Product registration ...............................................6
Downloading the remote app .....................................6
Maintenance ......................................................6
Network connections ..............................................7
Connections (rear panel) ...........................................8
Connections (front panel) .........................................10
Connecting headphones .........................................11
Using the remote control .........................................11
Names and functions of parts (main unit) .........................12
Upconversion ....................................................13
Names and functions of parts (remote control) ....................14
Display ...........................................................15
Basic operation ...................................................17
Bluetooth® wireless technology ...................................18
Settings ..........................................................21
Playing back music on a computer ................................25
Troubleshooting ..................................................27
Specifications .....................................................28
5

Included accessories Maintenance
Check to be sure the box contains all the included items shown
below.
Please contact the store where you purchased this unit if any of these
items are missing or have been damaged during transportation.
Power cord × 1
RCA conversion (RCA to mini plug) cable × 1
Remote control (RC-1330) × 1
Batteries for remote control (AAA) × 2
Owner’s manual (this document, including warranty) × 1
o For information about the warranty, users living in the USA and
Canada should see pages 86–87 and the back cover (warranty document). Users living in Europe and other regions should
see page87.
o The TEAC HR Streamer User’s Manual can be downloaded from
the TEAC Global Site (http://www.teac-global.com/).
Before use
V
Placement precautions
o Do not install this unit in a location that could become hot.
This includes places that are exposed to direct sunlight or near
a radiator, heater, stove or other heating equipment. Moreover,
do not place it on top of an amplifier or other equipment that
generates heat. Doing so could cause discoloration, deformation
or malfunction.
Wipe dirt from the top cover and other panel surfaces using a soft
cloth that has been slightly dampened with a diluted neutral cleanser.
Do not wipe with chemical cleaning cloths, thinner or other chemical agents. Doing so could damage the surface.
V
For your safety, disconnect the power cord from
the outlet before cleaning.
Using the TEAC Global Site
You can download updates for this unit from the TEAC Global Site:
http://teac-global.com/
1) Open the TEAC Global Site.
2) In the TEAC Downloads section, click the desired language to
open the Downloads website page for that language.
NOTE
If the desired language does not appear, click Other Languages.
3) Click the “Search by Model Name” section to open the Downloads
page for that product. (Users in Europe should click the product
name in the “Products” section instead.)
4) Select and download the updates that are needed.
Product registration
o Avoid locations that are extremely cold or exposed to excessive
humidity or dust.
o When installing this unit, leave a little space (at least 3 cm or 1")
between it and walls and other devices in order to allow good
heat dissipation. If you put it in a rack, for example, leave at least
5 cm (2") open above it and at least 10 cm (4") open behind it.
Failure to provide these gaps could cause heat to build up inside
and result in fire.
o The voltage supplied to the unit should match the voltage
printed on the rear panel. If you are in any doubt regarding this
matter, consult an electrician.
o Do not move the unit during use.
o Do not open the body of the unit because this could result in
damage to the circuitry or cause electric shock. If a foreign object
should enter the unit, contact your dealer.
o When removing the power plug from the wall outlet, always pull
directly on the plug; never yank on the cord.
Customers in the USA, please visit the following TEAC website to
register your TEAC product online.
http://audio.teac.com/support/registration/
Downloading the remote app
To use the network functions and USB flash drive playback functions
of this unit, you must also use a smartphone or tablet that has the
TEAC HR Streamer app (free) installed and is connected to the same
network as the unit.
o For details, see the TEAC HR Streamer User’s Manual.
The TEAC HR Streamer User’s Manual can be downloaded from
the TEAC Global Site (http://www.teac-global.com/).
How to download the iPad/iPhone/iPod touch app
Search for “TEAC HR Streamer” in the App Store.
o Release is planned for an Android version (as of January 2018).
See the product website for details.
6

Network connections
Connection example
NAS
a
NT-505
d
To Internet
LAN cable
Wi-Fi™ router
b
o The Wi-Fi router must be connected to the
Internet when installing apps on the iPad, iPhone
or other device, when updating the NET firmware
of this unit, and when listening to Internet radio.
iPad, iPhone, etc.
c
EN
a NAS (Network Attached Storage)
Use to store audio files.
Operation as a UPnP server is necessary to use it as a media
server. MinimServer is the media server recommended for use
with this unit.
b Wi-Fi™ router
Use Wi-Fi to connect the iPad, iPhone or other device to this
unit and the NAS.
c iPad, iPhone, etc.
Install the app to control this unit.
d NT-505
This unit. The IP address is acquired from the DHCP server.
7
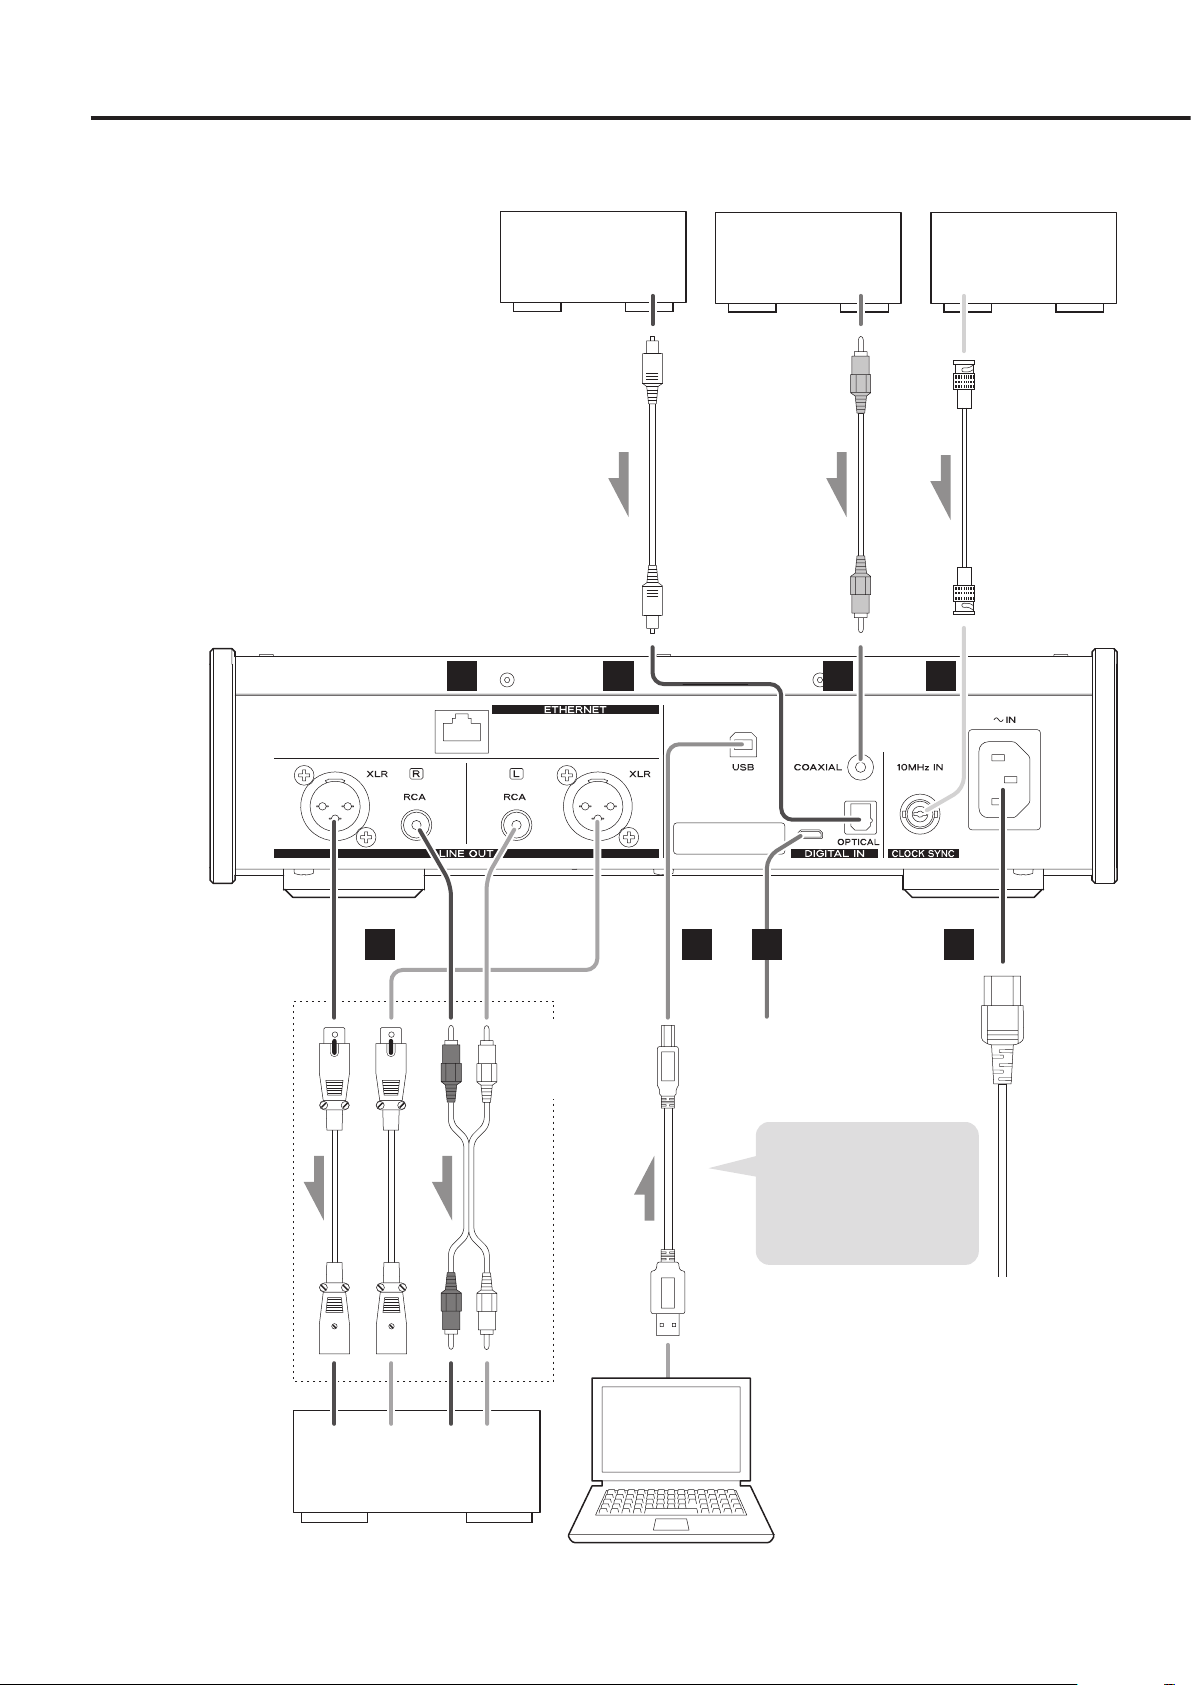
Digital audio output
device
Digital audio output
device
Device that outputs
clock signal
Digital output
(OPTICAL)
A B
Optical digital cable
CLOCK SYNC OUTDigital output
(COAXIAL)
RCA coaxial digital cable
BNC coaxial cable
C D
Connect cables for the pair set
for line output (page23).
Sound will only be output
from the selected pair.
If headphones are connected,
sound will stop being output
from the rear panel connectors.
The polarity of the XLR connectors can be set so that either 2
or 3 is HOT (page23).
If you want to be able to
control the volume from the
amplifier, set LINE OUT LEVEL
to “FIXED 0dB” or “FIXED +6dB”
(page23).
XLR cables
LRLR
Audio input
(LINE IN, etc.)
Stereo amplifier or
powered speakers
Connect a set
of cables of one
type or the other.
RCA audio cables
FE G
USB cable
Computer
H
Included power cord
Install the dedicated driver
on the computer before
connecting this unit to it
(page25).
c
Wall outlet
8
A ETHERNET port
Connect a commercially-available LAN cable to this port
when you want to connect this unit to a wired network or the
Internet.
o When switching input sources, this port is labeled “NET”.
B OPTICAL digital audio input connector
Use this to input digital audio. Connect the optical digital audio
output connector of an audio device to it.
Use a commercially-available optical digital cable with a
square connector (TOSLINK) for connection.
C RCA COAXIAL digital audio input connector
Use this to input digital audio. Connect the coaxial digital audio
output connector of an audio device to it.
Use a commercially-available RCA coaxial digital cable
for connection.
D CLOCK SYNC input (10MHz IN) connector
Use this to input a synchronization signal (clock sync).
To input a 10MHz oscillator signal, connect the oscillator output
here (page29).
Use a commercially available BNC coaxial cable for
connection.
o Clock sync is only possible when the input source is USB or
NET (including USB flash drives).
F USB port (rear)
Use this to input digital audio from a computer. Connect it to a
computer’s USB port.
Use a commercially-available USB2.0 cable (A-B type) for
this connection.
ATTENTION
Before connecting a computer that is running a Windows
OS, you must install the dedicated driver on the computer
(page25).
Proper connection is not possible with a computer that does
not have this driver installed.
G Maintenance port
This is used for maintenance. Do not connect anything to this
port unless instructed to do so by our service department.
H Power inlet (~IN)
Connect the supplied power cord here.
After all other connections are complete, connect the power
cord’s plug to a wall outlet.
V
Do not use any power cord other than the one
included with this unit. Use of other power cords
could result in fire or electric shock.
V
Unplug the cord from the outlet when not using
the unit for a long time.
EN
E Analog audio output (LINE OUT) connectors
These output 2 channels of analog audio. Connect these XLR or
RCA connectors to a stereo amplifier or powered speakers.
Use commercially available cables for connections.
XLR: balanced XLR cables
RCA: RCA audio cables
Connect this unit’s R connector to the R connector of the
amplifier and its L connector to the L connector of the amplifier.
o See “Line output” on page23 for analog output settings.
V
Complete all other connections before turning the unit on.
o Carefully read the manuals of the devices that you are
connecting and follow their instructions when making
connections.
o Do not bundle connecting cables with power cords.
Doing so could cause noise.
o Connect all plugs completely.
9
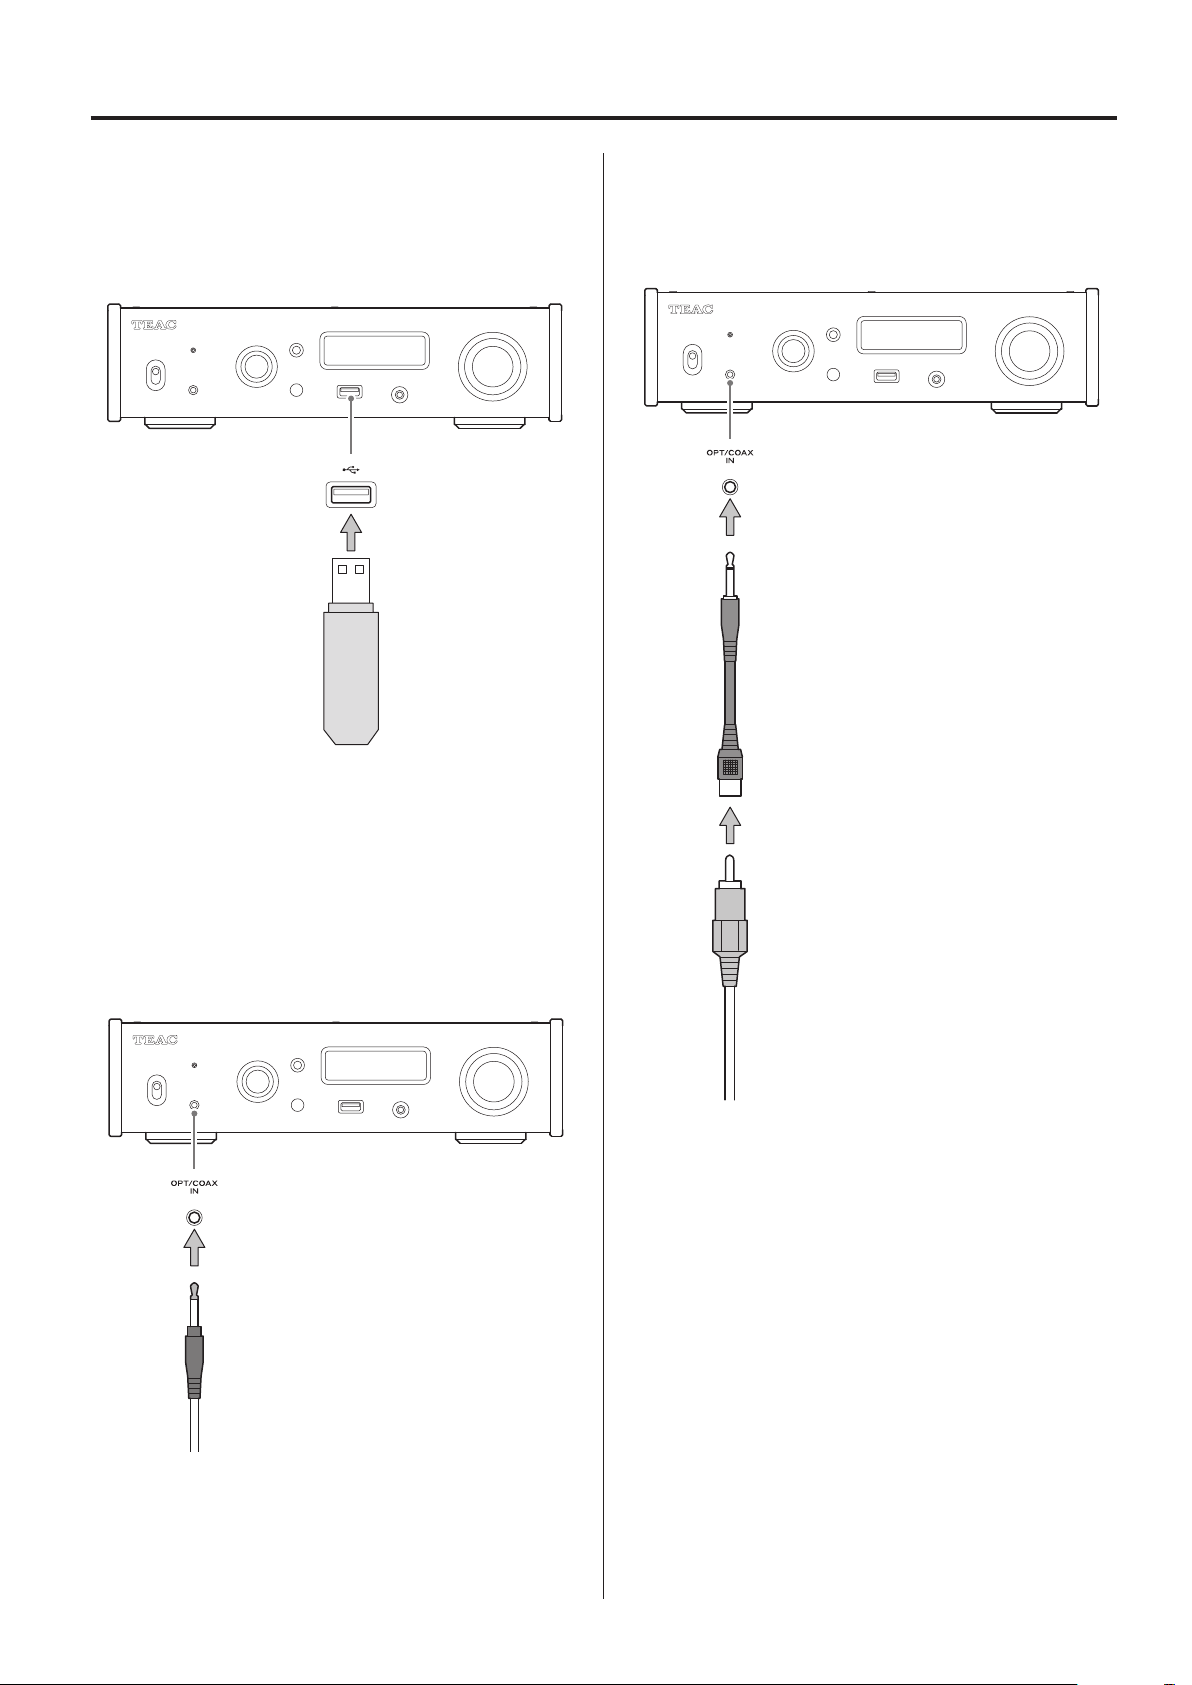
Connections (front panel)
USB flash drives
Connect USB flash drives to the USB port on the front of the unit.
To play music files on a USB flash drive, set the input source to NET
and use the app for playback.
o For details, see the TEAC HR Streamer User’s Manual.
Coaxial (COAX) connection
Use the included RCA conversion cable and a commerciallyavailable RCA coaxial digital cable.
To enable this input, turn the SOURCE knob to select COAXIAL2.
RCA conversion cable
Digital audio input (OPT/COAX IN)
This input connector can be used for both optical (OPT) and coaxial
(COAX) connections.
Optical (OPT) connection
Use a commercially-available optical cable with a mini plug.
To enable this input, turn the SOURCE knob to select OPTICAL2.
Optical mini plug
RCA coaxial digital cable
10
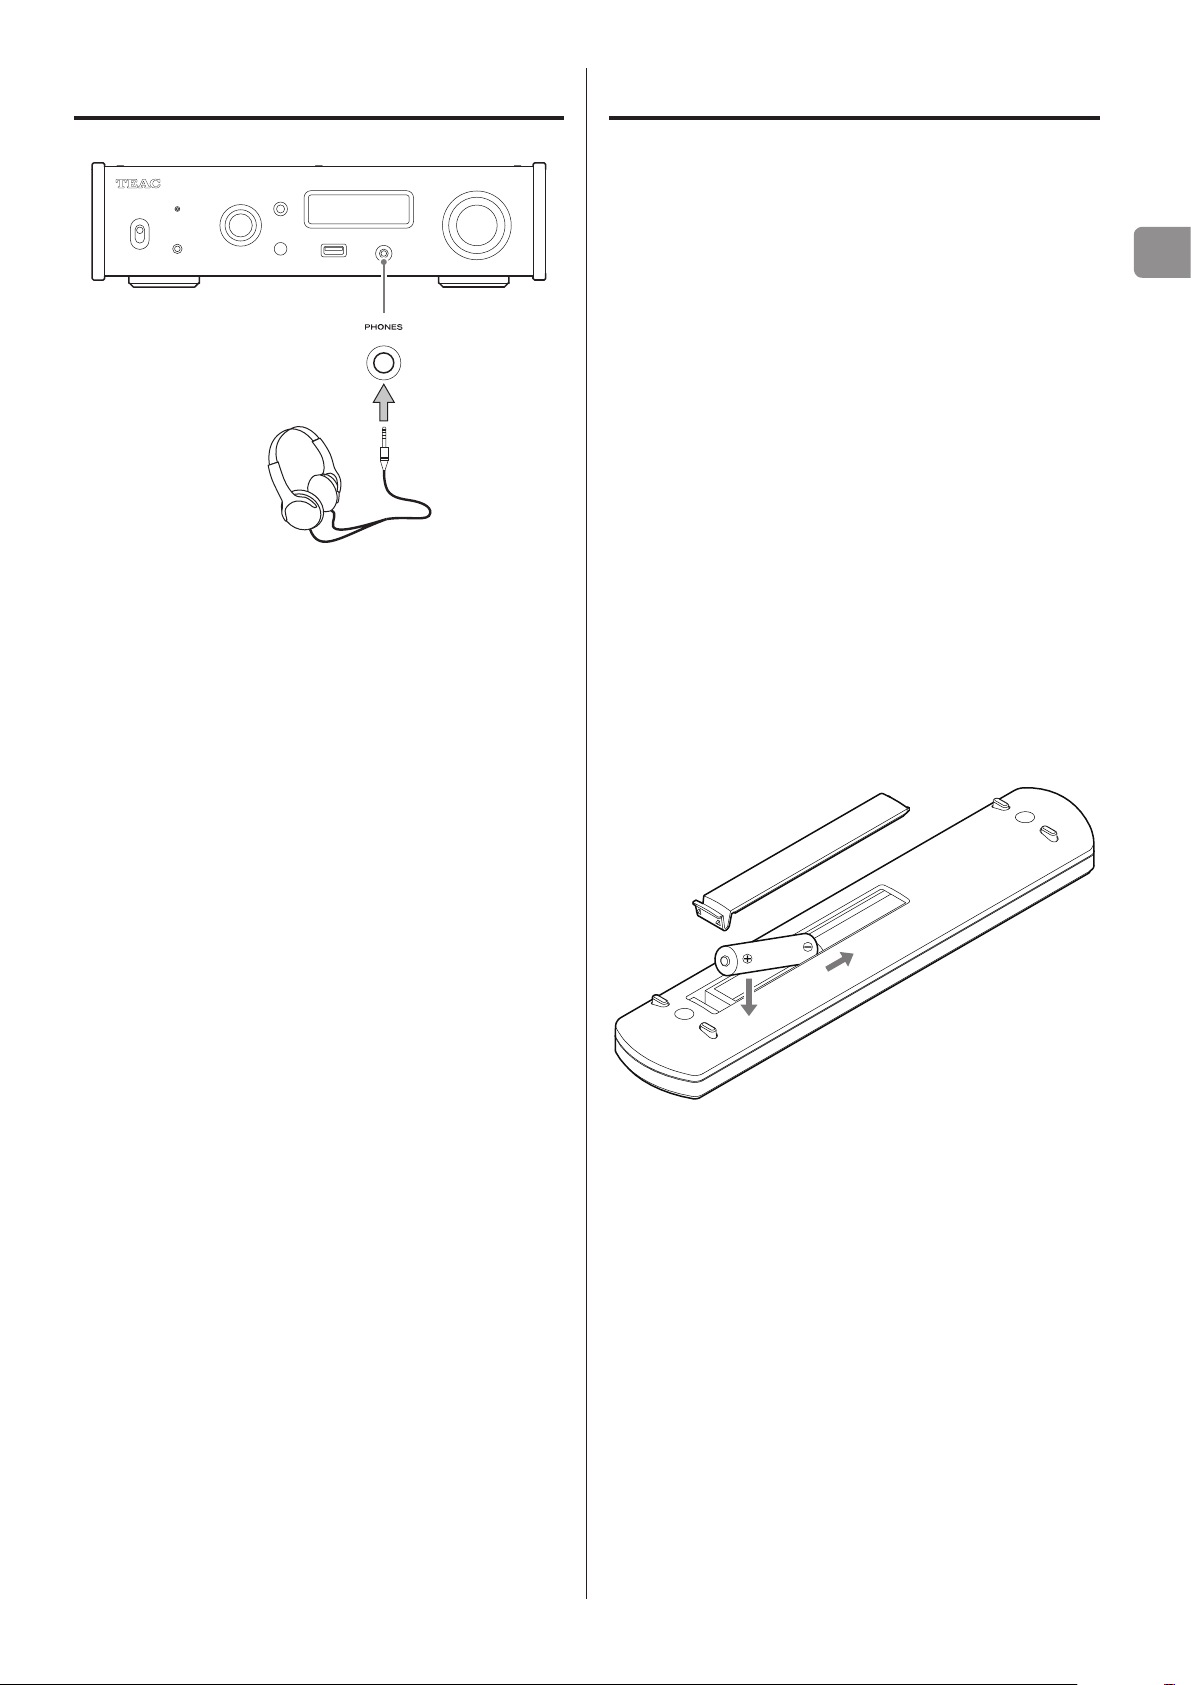
Connecting headphones
V
CAUTION
While wearing headphones, do not connect or disconnect them or
turn the unit on or off.
Doing so could result in a sudden loud noise that could harm your
hearing.
Before putting headphones on, always set the volume to
minimum (display should show “0” when set to “STEP (0-99)”
or “−∞ dB” when set to “dB”) (page17).
Using the remote control
Precautions for use
V
Misuse of batteries could cause them to rupture
or leak, which might result in fire, injury or the
staining of nearby materials. Please carefully read
and observe the precautions on page3.
o When using the remote control, point it toward the remote con-
trol signal receiver on the main unit from a distance of 5 m (16 ft)
or less. Do not place obstructions between the main unit and the
remote control.
o The remote control might not work if the remote control signal
receiver on the unit is exposed to direct sunlight or bright light. If
this occurs, try moving the unit.
o Beware that use of this remote control could cause the unin-
tentional operation of other devices that can be controlled by
infrared rays.
Installing batteries
Remove the cover from the back of the remote control and insert
two AAA batteries with their ¥/^ oriented as shown in the case.
Replace the cover.
EN
When to replace batteries
If the distance required between the remote and the main unit
decreases or if the unit stops responding to the remote buttons,
replace both batteries with new ones.
Dispose of the used batteries according to the instructions on them
or requirements set by your local municipality.
11
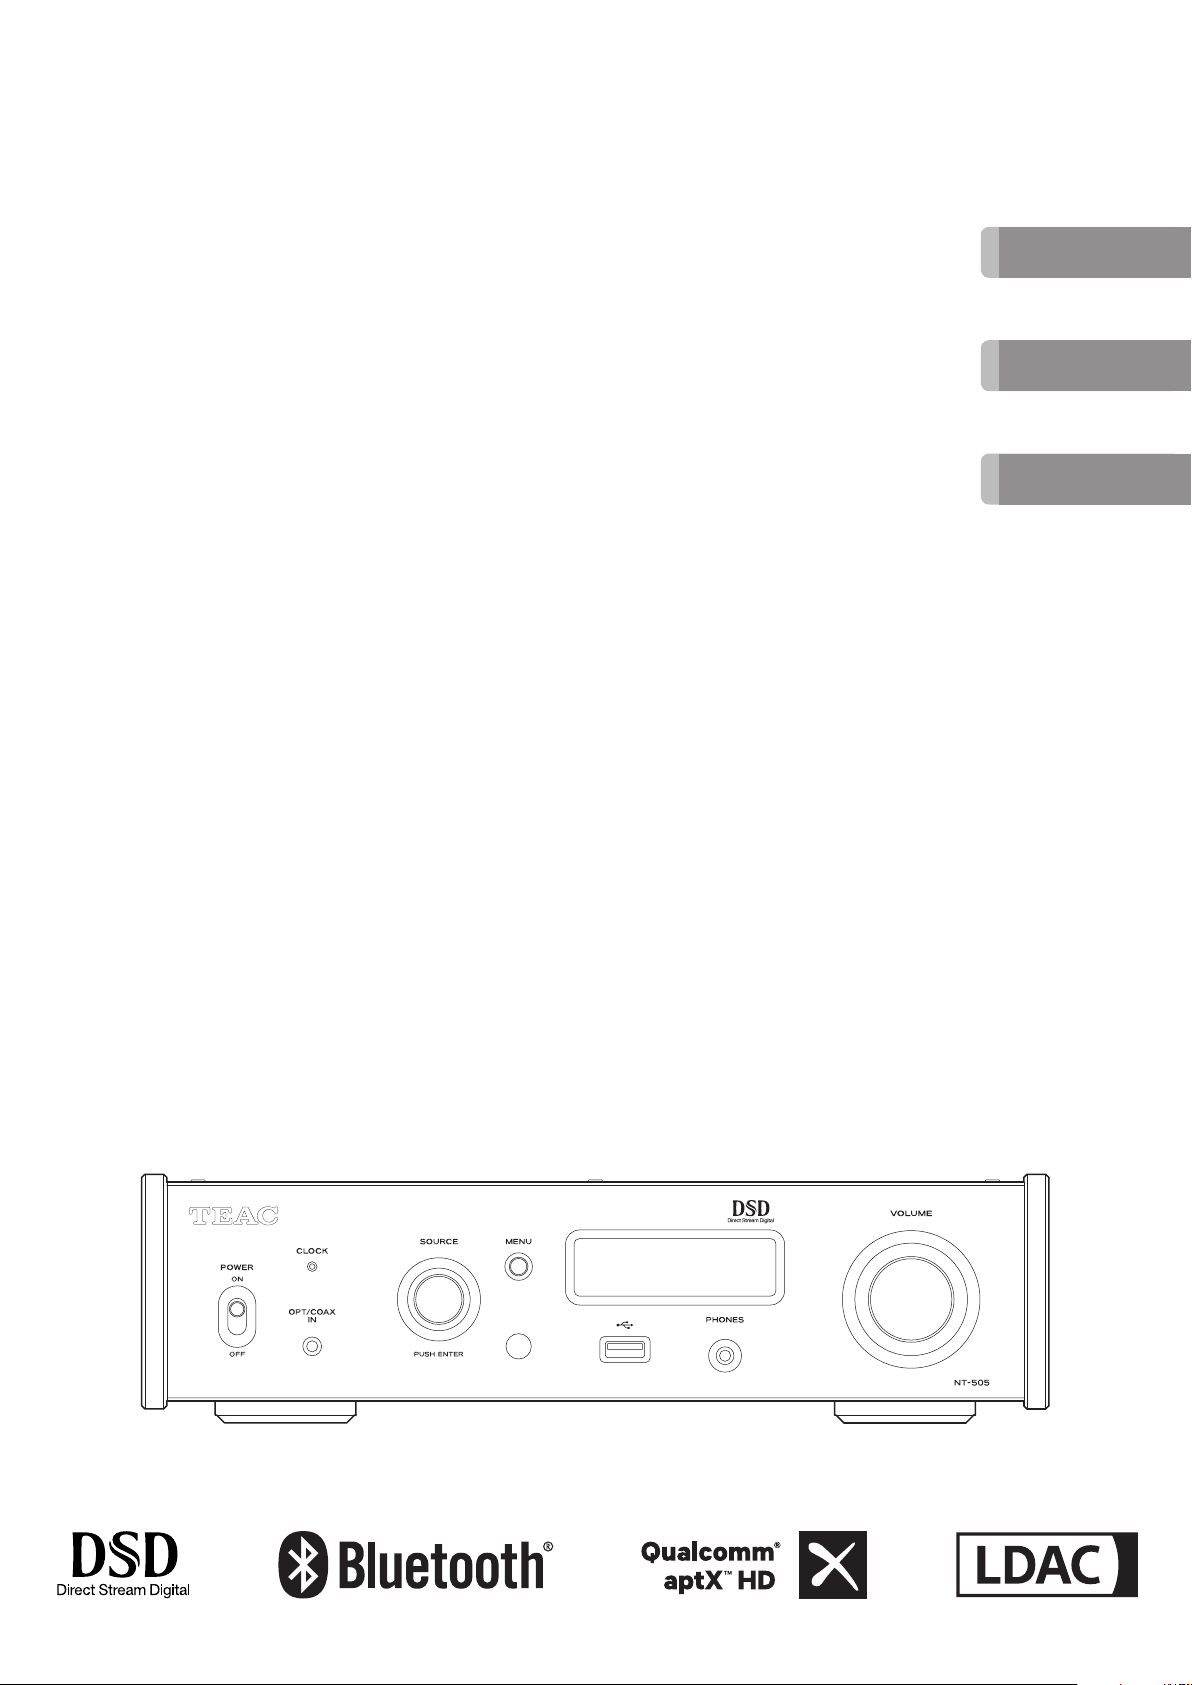
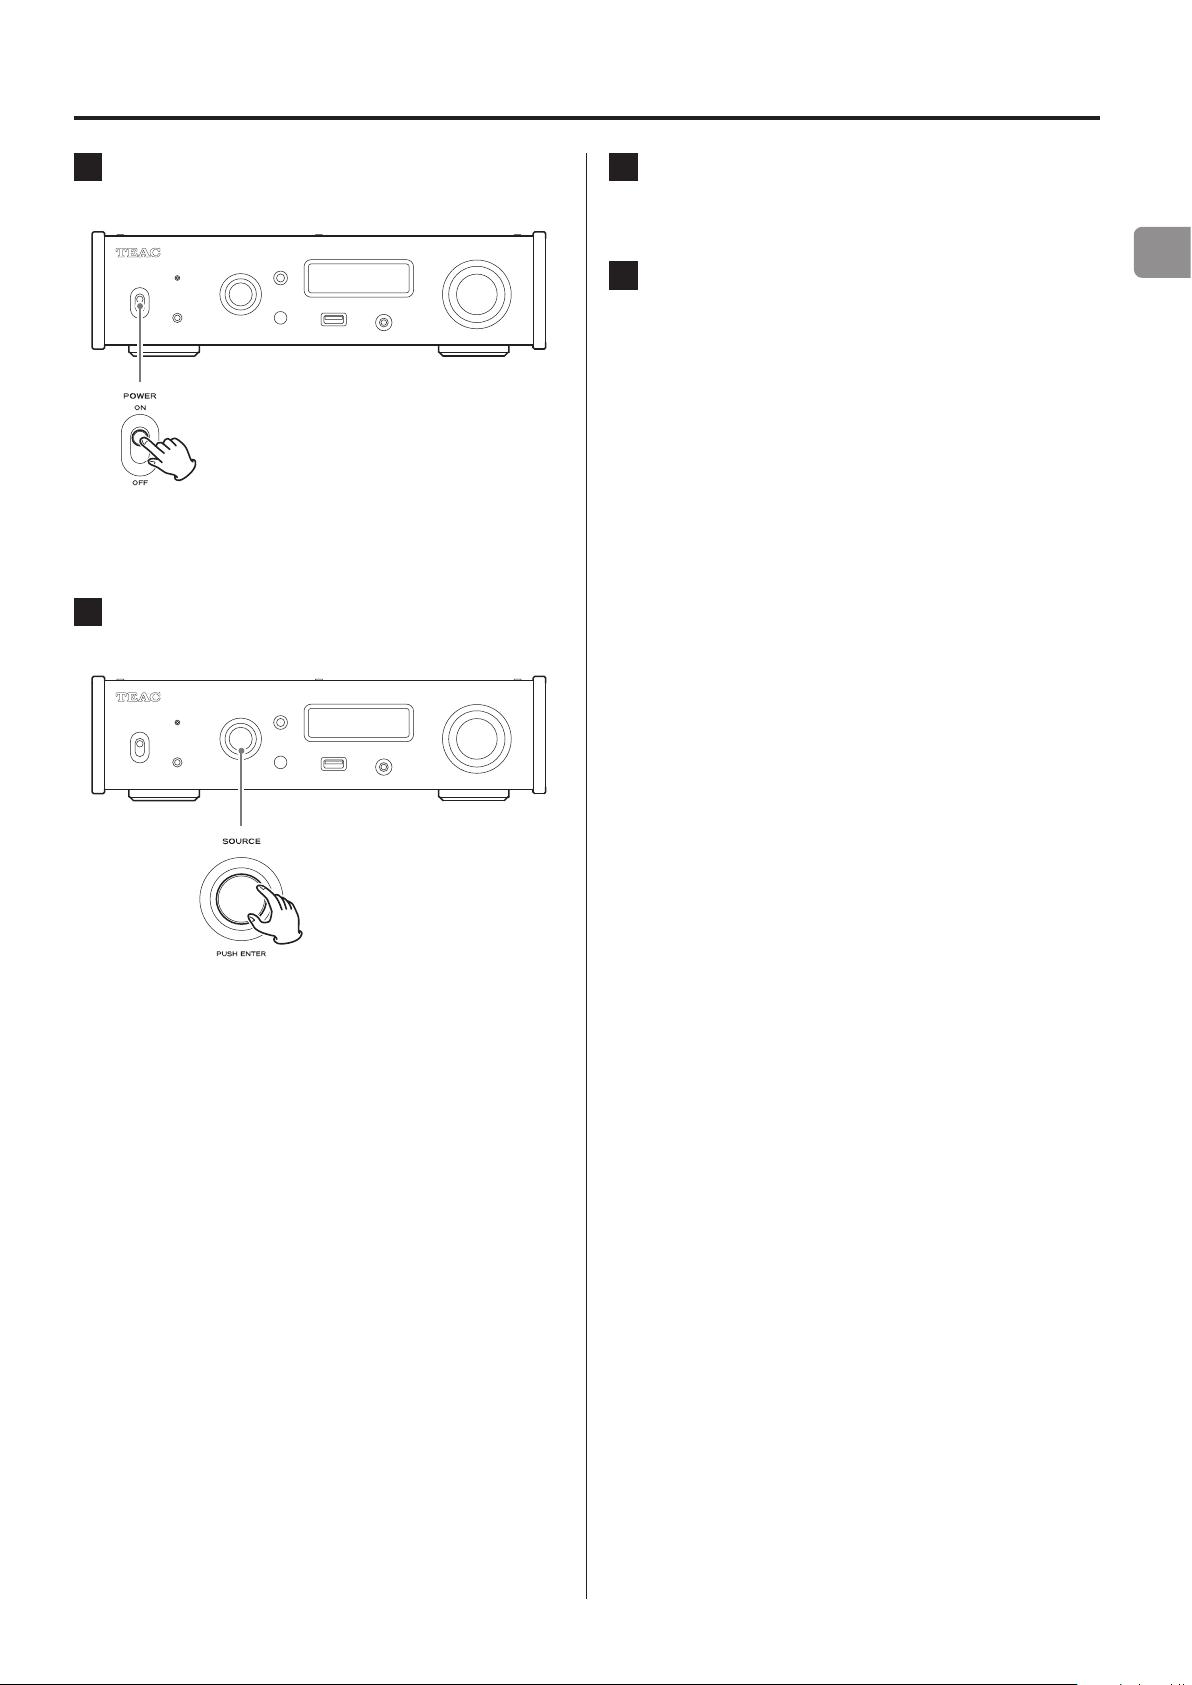
Names and functions of parts (main unit)
A B C D E F G H I J
A POWER switch
Use to turn the unit on and off.
o If the display is dark even though the POWER switch is set to
ON, the cause is usually one of the following.
o The power is on, but DIMMER (display brightness) is set
to OFF (page24).
o The automatic power saving function has put the unit
into standby.
o The power cord is disconnected.
To turn the unit on, press the STANDBY/ON button on the
remote control, or set the POWER switch to OFF once and
then back to ON.
B CLOCK indicator
This shows the clock synchronization status.
Lit: The unit is synchronized with the clock from the
CLOCK SYNC input (10MHz IN) connector.
Blinking: No clock is being input or the unit is not being
synchronized.
Unlit: No clock sync is occurring.
o Clock sync is only possible when the input source is USB or
NET (including USB flash drives).
o See page23 for clock sync settings.
D SOURCE knob
Use to select the input source.
Use to change setting values when a menu item is shown.
Press to use as an ENTER button.
Turn when the menu is open to change the item shown or the
setting value.
E MENU button
Press to enter setting mode (page21).
Press when in setting mode to return to the previous screen.
F Remote control signal receiver
This receives signals from the remote control. When operating
the remote control, point it at the remote control signal receiver.
G USB port (front)
Connect USB flash drives here.
o To play music files on a USB flash drive, set the input source
to NET and use the app for playback.
o Do not connect a computer to the USB port on the front of
the unit. To input audio from a computer, connect it to the
USB port on the back of the unit.
o For details, see the TEAC HR Streamer User’s Manual.
C Digital audio input (OPT/COAX IN) connector
Use to input digital audio (page10).
Optical connection: Use an optical cable with a mini plug.
Coaxial connection: Use the included RCA conversion cable.
12
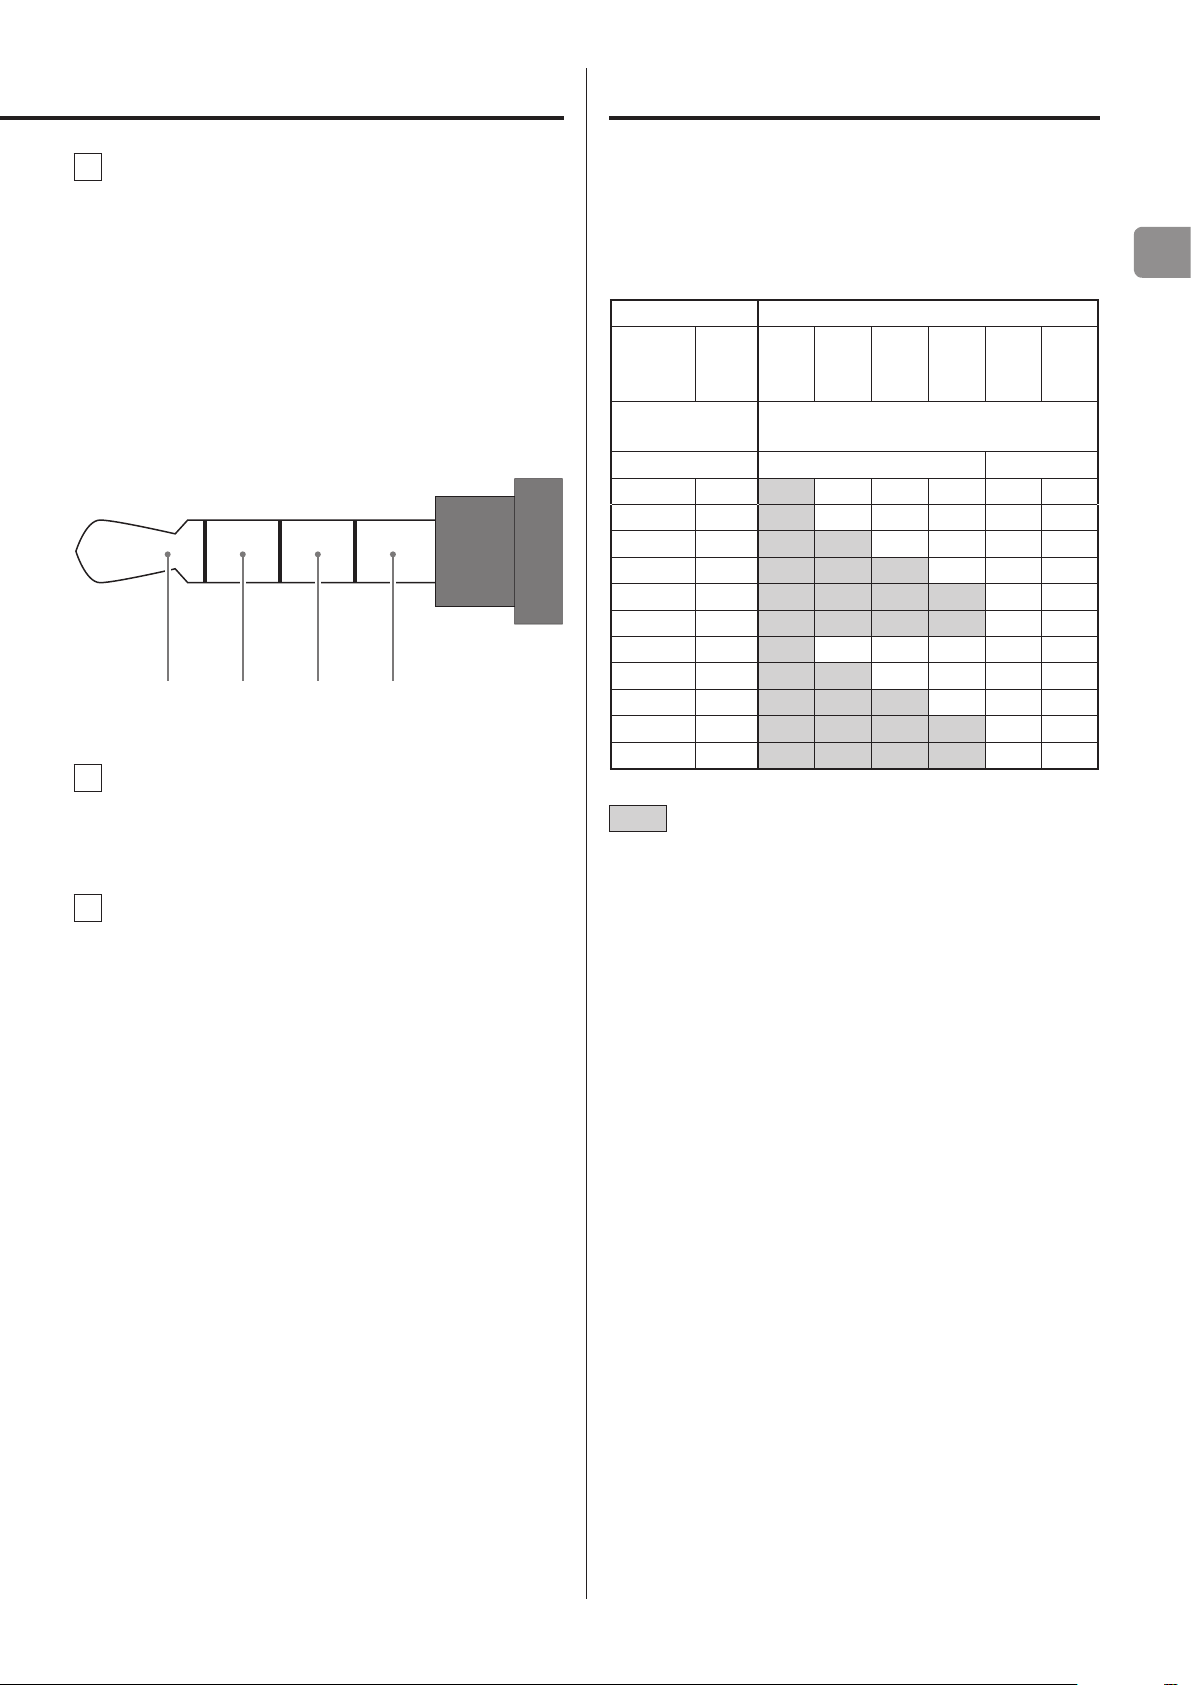
Upconversion
H PHONES jack
Connect headphones with a 3.5mm (1/8") stereo mini plug here
(page11).
o This headphone amp circuit uses a four-pole connector with
independent left and right for grounding. Ordinary plugs
with 3 or 4 poles can be used.
o When headphones are connected to this unit, headphone
output will be turned on and audio will stop being output
from the analog audio output (LINE OUT) connectors on the
rear panel.
Wiring illustration
L+ R+ L− R−
I Display
You can use the upconversion function with all input sources
(page22).
The relationships between input sampling frequencies and sampling
frequencies after upconversion are as follows.
Input source Upconversion setting
Digital
audio
input
Input sampling
frequency
32 − 32 64 128 256 8.1 16.3
44.1 44.1 44.1 88.2 176.4 352.8 11.2 22.5
88.2 88.2 88.2 88.2 176.4 352.8 11.2 22.5
176.4 176.4 176.4 176.4 176.4 352.8 11.2 22.5
− 352.8 352.8 352.8 352.8 352.8 11.2 22.5
− 705.6 705.6 705.6 705.6 705.6 11.2 22.5
48 48 48 96 192 384 12.2 24.5
96 96 96 96 192 384 12.2 24.5
192 192 192 192 192 384 12.2 24.5
− 384 384 384 384 384 12.2 24.5
− 768 768 768 768 768 12.2 24.5
USB OFF 2Fs 4Fs 8Fs
Sampling frequency after upconversion
[kHz] [kHz] [MHz]
DSD
256
DSD
512
EN
This display shows information about the audio playing back
and menu screens.
J VOLUME knob
Use to adjust the volume. Turn right to increase and left to
decrease the volume.
o To enable adjustment of this unit’s analog audio output
volume, set LINE OUT LEVEL to VARIABLE (“Line output level”
on page23). This will enable adjustment of the analog
output level using this unit’s VOLUME knob.
o Volume settings are retained separately for analog audio
output and headphone output.
These values are not converted.
o The maximum upconversion is 8Fs.
o Upconversion is not possible when the input is DSD.
13
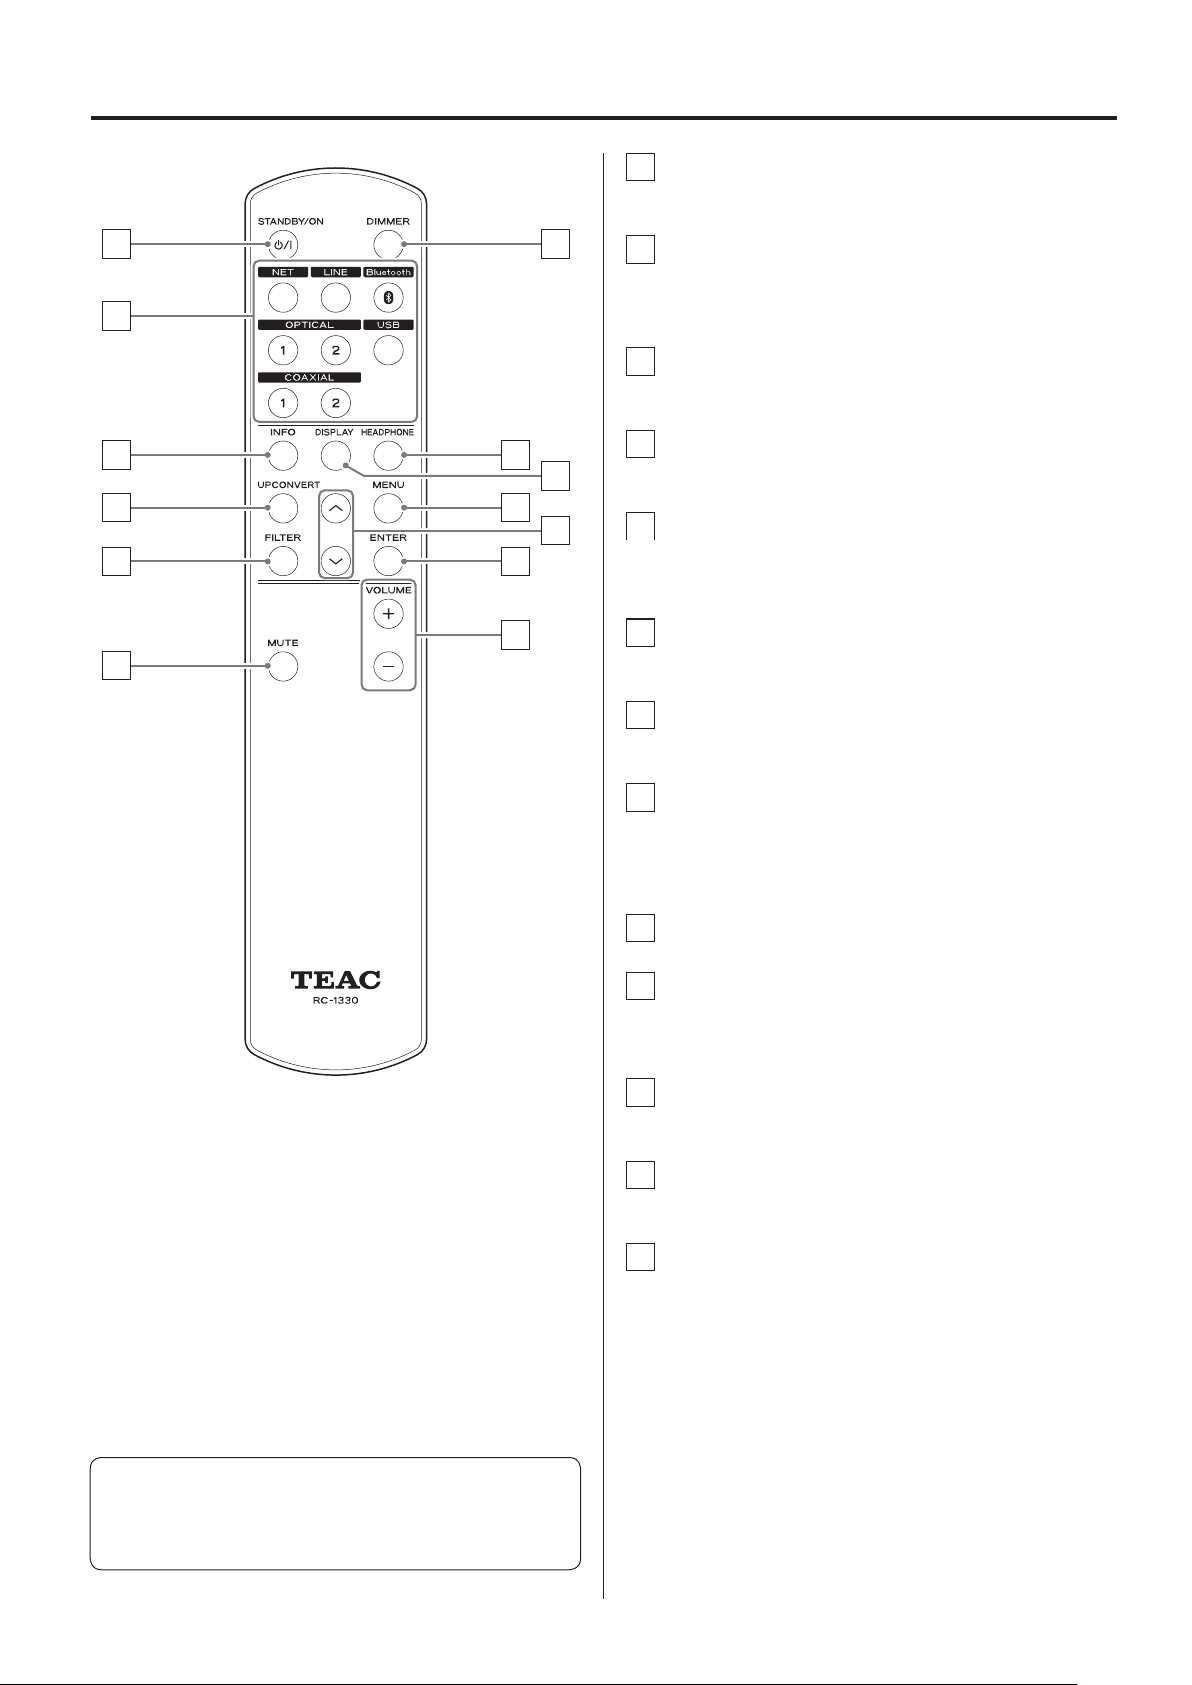
Names and functions of parts (remote control)
a STANDBY/ON button
Press to put the unit into standby mode or turn it on.
a
b
d
e
g
b Input selection buttons
Use to select the playback source.
o The LINE button has no function.
c INFO button
Press to show information, including upconversion (page16).
c
h
i
d UPCONVERT button
Press to change the upconversion setting.
j
k
l
m
f
e FILTER button
Press to change the filter setting.
This changes the filter according to the input (PCM or DSD).
f MUTE button
Press to minimize the volume.
g DIMMER button
Press to adjust the brightness of the main unit’s display.
h HEADPHONE button
Press to turn headphone output on and off.
When headphone output is turned off, sound is output from
the analog audio output (LINE OUT) connectors.
i DISPLAY button
j MENU button
Press to enter setting mode (page21).
Press when in setting mode to return to the previous screen.
k Up/down (k/j) buttons
Use to select setting items.
l ENTER button
Press to confirm the selected item.
m VOLUME (+/−) buttons
Use to adjust the volume.
When the main unit and the remote control both have buttons
with the same functions, this manual explains how to use one of
the buttons. The other corresponding button can be used in the
same manner.
14
Display
When on
Z
c
NT-505
NETWORK PLAYER
After the above messages appear, the input source will be shown on
the display.
Playback source information
The playback source information display will appear after turning
the unit on as well as after about 7 seconds pass without operation
when a setting screen is open.
The input signal format or volume is shown to the right of the playback
source. Press the DISPLAY button on the remote control to change
what is shown.
Playback source name
This shows the name of the selected source.
The names on the display correspond to the selected connectors as
follows.
The names in parentheses appear when switching.
USB (USB)
USB port on the rear panel
COAX1 (COAXIAL 1)
RCA COAXIAL digital audio input connector on the rear panel
COAX2 (COAXIAL 2)
Coaxial connection with the digital audio input (OPT/COAX IN)
on the front panel
OPT1 (OPTICAL 1)
OPTICAL digital audio input connector on the rear panel
OPT2 (OPTICAL 2)
Optical connection with the digital audio input (OPT/COAX IN)
on the front panel
NET (NETWORK)
ETHERNET port
Bluetooth (Bluetooth)
Bluetooth device
EN
Display example
Playback source information displayed
Stopped
Playback source
USB
Shown when the connection is being checked
Playing back
Input signal format
PCM
USB
Press the DISPLAY button on the remote control.
Volume display
44.1k
Sampling frequency
check
Input signal status
This shows the input source signal status.
Check
The connection is being checked.
PCM 32kHz
PCM 44.1kHz
PCM 48kHz
PCM 88.2kHz
PCM 96kHz
PCM 128kHz
PCM 176.4kHz
PCM 192kHz
PCM 256kHz
PCM 352.8kHz
PCM 384kHz
PCM 705.6kHz
PCM 768kHz
DSD 2.8MHz
DSD 5.6MHz
DSD 11.2MHz
DSD 22.5MHz
These show the input signal type and sampling frequency.
USB
−45.5dB
Volume
15
36
Display (continued)
-62
Upconversion information displayed
Press the INFO button during playback to show input signal upconversion information.
o The input signal and playback signal displays will be the same
when the upconversion setting is “OFF”.
Example when the playback source is USB, COAX1, COAX2,
OPT1, OPT2 or NET
Input signal
format
PCM DSD
44. 1kHz
Input signal sampling
frequency
Example when the playback source is Bluetooth
Codec
LDAC PCM
44. 1kHz
Playback signal
format
11. 2MHz
Playback sampling
frequency
Playback signal
format
352. 8kHz
VOLUME TYPE set to “dB”
Display example
VOL.
The maximum volume level is 0 and the minimum level is −∞
(negative infinity). Before connecting headphones, set the
VOLUME knob to its minimum value (−∞). Failure to do so might
cause sudden loud noises, which could harm your hearing or
result in other trouble.
The set output level is shown when LINE OUT LEVEL is set to “FIXED
0dB” or “FIXED +6dB”.
Example when VOLUME TYPE set to “dB”
USB
o If VOLUME TYPE is set to “STEP (0-99)”, “VOL. 85” will be shown
when set to “FIXED 0dB” and “VOL. 89” will be shown when set to
“FIXED +6dB”.
When headphones are not connected and LINE OUT LEVEL is set to
“OFF”, “VOL. 0” or “−∞ dB” will be shown.
.0dB
+ 0.0
dB
Input signal sampling
frequency
Playback sampling
frequency
Volume display
Two types of volume can be shown: STEP and dB.
This is set by the VOLUME TYPE setting (page24).
The volume setting shown will be enlarged when you turn this unit’s
VOLUME knob.
VOLUME TYPE set to “STEP (0-99)”
Display example
VOL.
The maximum volume level is 99 and the minimum level is 0.
Before connecting headphones, set the VOLUME knob to its
minimum value (0). Failure to do so might cause sudden loud
noises, which could harm your hearing or result in other trouble.
Example when VOLUME TYPE set to “dB”
USB
When headphones are not connected and LINE OUT LEVEL is
set to FIXED or OFF
Turning the VOLUME knob will cause the following to be displayed.
LINE OUT LEVEL set to FIXED
VOL.
LINE OUT LEVEL set to OFF
VOL.
− ∞ dB
FIXED
OFF
16
Basic operation
1 Shift the POWER switch to its ON position to
turn the unit on.
o If a stereo amplifier is connected to this unit, always turn its
power ON very last.
2 Turn the SOURCE knob to select the input
source.
3 Operate the playback device.
Refer to the operation manual of that device.
EN
4 Adjust the volume.
When using the line outputs
When LINE OUT LEVEL is set to VARIABLE, turn this unit’s VOLUME
knob to adjust the volume.
When LINE OUT LEVEL is set to any other setting, the volume
cannot be adjusted from this unit. Use the stereo amplifier or
other device connected to this unit to adjust the volume.
When headphones are connected to this unit
Turn this unit’s VOLUME knob to adjust the volume.
o When this unit’s VOLUME knob is enabled, the volume set-
ting will be shown.
The selected source appears on the display.
o You can also use the input selection buttons on the remote
control.
o If the input signal is not a digital audio signal or is an audio
signal format that is not supported by this unit, such as
Dolby Digital or DTS, no audio will be output. Set the digital
output of the connected device to PCM audio output.
o To play back audio files when this unit is set to USB, you
must first install a dedicated driver on the computer before
connecting them (page25).
o DSD data can only be played back when the input source is
USB or NET (including USB flash drives) or when using DoP
format digital input.
o To use NET or the front USB port, install the TEAC HR Streamer
(free) on a smartphone or tablet, and connect it to the same
network as the unit.
17
Bluetooth® notes
When using this unit with a mobile phone or other Bluetooth
devices, they should be no more than about 10 m (33 ft) apart.
Depending on the circumstances of use, however, the effective
transmission distance might be shorter.
Wireless communication with every device that supports Bluetooth
wireless technology is not guaranteed.
To determine the compatibility between this unit and another device
that supports Bluetooth wireless technology, refer to that device’s
operation manual or contact the shop where you purchased it.
NOTE
o You cannot select the codec to be used by pressing a button, for
example.
o Due to characteristics of Bluetooth wireless technology, playback
from a Bluetooth device will be slightly delayed compared to
playback from this unit.
Content protection
This unit supports SCMS-T as a form of content protection when
transmitting audio, so it can play protected audio.
Profiles
This unit supports the following Bluetooth profiles.
o A2DP (Advanced Audio Distribution Profile)
o AVRCP (Audio/Video Remote Control Profile)
In order to transfer audio using Bluetooth wireless transmission, the
Bluetooth device must support A2DP.
In order to control playback on the Bluetooth device, it must support
AVRCP.
Even if a Bluetooth device supports the same profiles, though, its
functions might differ according to its specifications.
Codecs
This unit supports the following codecs. It will automatically select
one of them during audio transfer.
o SBC
o AAC
o Qualcomm® aptX™
o Qualcomm® aptX™ HD
o LDAC
The unit will select the appropriate codec to use according to the
codec compatibility of the other Bluetooth device and communication conditions.
Transmission security
This unit supports security functions during Bluetooth wireless
transmission in accordance with the Bluetooth standard specifications, but it does not guarantee the privacy of such transmissions.
TEAC CORPORATION will bear no responsibility should an information leak occur during Bluetooth wireless transmission.
LDAC is an audio coding technology developed by Sony that enables
the transmission of High-Resolution (Hi-Res) Audio content, even over
a Bluetooth connection.
Unlike other Bluetooth compatible coding technologies such as SBC, it
operates without any down-conversion of the Hi-Res Audio content*,
and allows approximately three times more data** than those other
technologies to be transmitted over a Bluetooth wireless network with
unprecedented sound quality, by means of efficient coding and optimized packetization.
* excluding DSD format contents
** in comparison with SBC (Subband Coding) when the bitrate of
990kbps (96/48 kHz) or 909kbps (88.2/44.1 kHz) is selected
18
Pairing with another Bluetooth device
Pairing this unit with another Bluetooth device is necessary the first
time it is used and when connecting to a different Bluetooth device
for the first time.
1 Turn the SOURCE knob to select Bluetooth.
Bluetooth
check
2 Enable Bluetooth transmission on the other
Bluetooth device.
3 Press and hold the SOURCE knob to enter pair-
ing mode.
PAIRING. . .
Playback from a Bluetooth device
o Pair this unit the first time you use it and when you want to
connect it with a different Bluetooth device for the first time
(page19).
o When pairing or connecting with another Bluetooth device,
they should be within a few meters of each other. If they are
too far apart, pairing and connection afterwards might become
impossible.
1 Enable Bluetooth transmission on the other
Bluetooth device.
2 Turn the SOURCE knob to select Bluetooth.
This sets the source to Bluetooth.
o You can also use the Bluetooth button on the remote control.
Display example
Bluetooth
check
EN
o “PAIRING…” blinks when pairing.
4 On the other Bluetooth device, select “NT-505”
(this unit).
After this unit enters pairing mode, pair with it from the other
Bluetooth device.
For details, refer to the operation manual of that Bluetooth
device.
After connection, the display will show the name of the connected device, followed by the input source.
Display example
CONNECTED TO
iPhone 001
c
Bluetooth
VOL. 6
c
CONNECTED TO
iPhone 001
c
Bluetooth
This unit will search for paired devices and automatically connect to one if found.
ATTENTION
Depending on the source device, you might also need to conduct connection operations on it.
If you are unable to connect it successfully, refer to the operation manual of the source device.
VOL. 6
19
Bluetooth® wireless technology (continued)
Changing the connected device
1 Press the SOURCE knob to show DEVICE SELECT.
The bottom line of the display shows the name of the last connected device.
Display example
MENU
DEVICE SELECT
Player_1
Name of last connected device
2 Turn the SOURCE knob to show already paired
Bluetooth devices.
o The unit can remember a maximum of eight device pairings.
o If no paired device is available, the display will appear as
follows.
MENU
DEVICE SELECT
NO PAIRED DEVICE
4 Start playback on the other Bluetooth device.
o Confirm that the volume is turned up on the other Bluetooth
device. If you do not turn up the volume on the playback
device, no sound might be output from this unit.
NOTE
Press and hold the MENU button to clear a paired device.
o Press and hold the ENTER button to enter pairing mode
(page19).
o The first 16 characters of the device name are shown.
o If characters other than English letters and numbers are
included in the device name, it will not be shown properly.
3 Press the SOURCE knob to connect.
After connection, the display will show the input source.
ATTENTION
Regardless of the connection status of this unit and the other
Bluetooth device, if the input source is not shown, restart both
this unit and the other device and then connect them again.
NOTE
Depending on the source device, you might also need to conduct connection operations on it.
If you are unable to connect it successfully, refer to the operation manual of the source device.
20
Settings
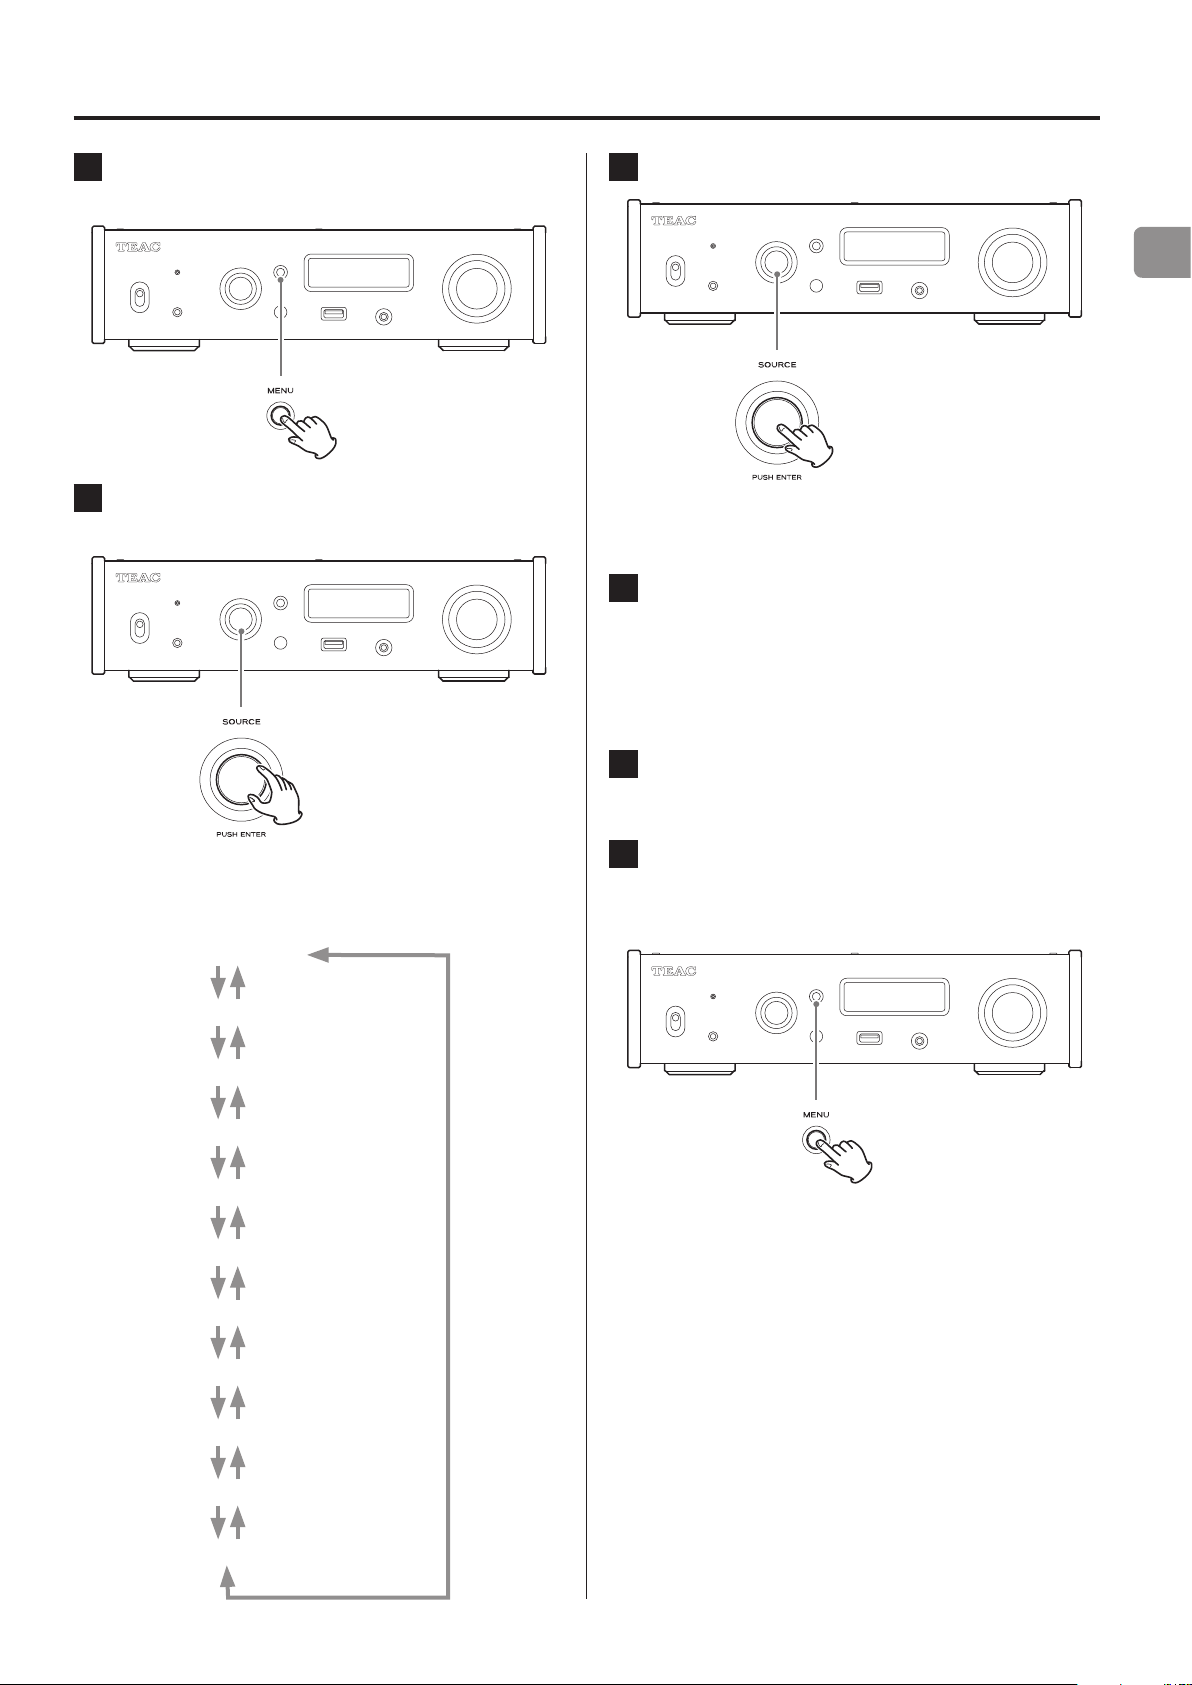
1 Press the MENU button to open the menu
screen.
2 Turn the SOURCE knob to show the item that
you want to set.
3 Press the SOURCE knob.
EN
o You can also press the ENTER button on the remote control.
o The currently set value is shown on the display.
4 Turn the SOURCE knob to change the setting
value.
o You can also use the up and down (k, j) buttons on the
remote control.
o Press the MENU button to return to setting item selection.
o You can also use the up and down (k, j) buttons on the
remote control.
The menu items appear in the following order.
UPCONVERT
DIGITAL FILTER(PCM)
DIGITAL FILTER(DSD)
CLOCK SYNC
LINE OUT SELECT
LINE OUT LEVEL
DIMMER
5 Press the SOURCE knob.
o You can also press the ENTER button on the remote control.
6 When you are done changing settings, press
the MENU button to show the input source status again.
o If you do not do anything for about 7 seconds, the display
will return to showing the input source status.
VOLUME TYPE
DISPLAY TYPE
AUTO POWER SAVING
Version info
21
Settings (continued)
Upconversion
Use to activate the upconversion circuit when receiving PCM signals.
o See page 13 for the relationships between input sampling fre-
quencies and sampling frequencies after upconversion.
MENU
UPCONVERT
OFF
OFF
The original input signal is sent directly to the D/A converter
without upconversion.
2× Fs
If the input audio signal is less than 2× a standard sampling frequency, it is upconverted 2× and then sent to the D/A converter.
4× Fs
If the input audio signal is less than 4× a standard sampling frequency, it is upconverted 4× and then sent to the D/A converter.
8× Fs
If the input audio signal is less than 8× a standard sampling frequency, it is upconverted 8× and then sent to the D/A converter.
DSD 256
DSD 512
The input source is converted to DSD digital format, and then sent
to the D/A converter.
PCM digital filter
This sets the type of digital filter used when converting PCM signals
from digital to analog.
MENU
DIGITAL FILTER(PCM)
OFF
Slow roll off
An FIR filter with a slow roll-off is used to gently cut signals outside the audio band.
Sharp roll off
An FIR filter with a steep roll-off is used to sharply cut signals outside the audio band.
Short Delay Slow
A short delay filter with a slow roll-off is used to gently cut signals
outside the audio band.
Short Delay Sharp
A short delay filter with a steep roll-off is used to sharply cut signals outside the audio band.
Low dispersion
A short delay filter with low dispersion that improves lag characteristics in high frequencies is used.
OFF
No digital filter is used.
o When receiving signals at 352.8kHz, 384kHz, 705.6kHz or 768kHz,
the digital filter will be disabled during playback regardless of this
setting.
Note about the digital filter during PCM playback
FIR-type digital filters
This type of filter has an established reputation for sound quality
and features tonal quality with both dense, rich sound reverberations and crisp sound transients.
Short Delay-type digital filters
This type of filter has no pre-echo in the impulse response and
features natural sound attack and reverberation for a tonal quality that is close to the original.
22
DSD digital filter
This sets the type of digital filter used when converting DSD signals
from digital to analog.
MENU
DIGITAL FILTER(DSD)
WIDE
NARROW
The cutoff frequency will be set according to the DSD signal as
follows.
DSD signal Cutoff frequency
2.8 MHz 39 kHz
5.6 MHz 78 kHz
11.2 MHz 156 kHz
22.5 MHz 312 kHz
WIDE
The cutoff frequency will be set according to the DSD signal as
follows.
DSD signal Cutoff frequency
2.8 MHz 76 kHz
5.6 MHz 152 kHz
11.2 MHz 304 kHz
22.5 MHz 608 kHz
Line output
Use to select the connectors that output analog audio.
o Output through both the RCA connectors and the XLR connec-
tors at the same time is not possible.
MENU
LINE OUT SELECT
RCA
RCA
Output through the RCA connectors.
XLR (HOT 2)
Output through the XLR connectors with 2: HOT polarity.
XLR (HOT 3)
Output through the XLR connectors with 3: HOT polarity.
Line output level
Use to select audio level output from the analog audio output (LINE
OUT) connectors.
MENU
LINE OUT LEVEL
FIXED 0dB
EN
Clock sync
o Clock sync is only possible when the input source is USB or NET
(including USB flash drives).
MENU
CLOCK SYNC
OFF
OFF
No clock sync is used.
ON
This unit’s master clock will be synchronized to the 10MHz clock
input through the CLCOK SYNC input (10MHz IN) connector.
FIXED 0dB
A maximum of 2 Vrms is output. Select this if you want to adjust
the volume using an amplifier.
o No sound will be output if headphones are connected.
FIXED +6dB
A maximum of 4 Vrms is output. Select this if you want to adjust
the volume using an amplifier.
o No sound will be output if headphones are connected.
o If the sound distorts, set this to FIXED 0dB.
VARIABLE
This will enable adjustment of the analog output level using the
VOLUME knob. Select this if you want to adjust the volume using
this unit.
o No sound will be output if headphones are connected.
OFF
No sound is ever output.
23

Settings (continued)
Display brightness
MENU
DIMMER
BRIGHT
DARK
Dark
SLIGHTLY BRIGHT
Lit dimly
BRIGHT
Lit brightly
AUTO OFF
Unlit automatically
o The display stays unlit even when the unit is on.
Volume display
This sets how the volume is shown.
MENU
VOLUME TYPE
STEP (0-99)
STEP (0-99)
This shows the volume in steps from 0 (minimum) to 99
(maximum).
dB
This shows the volume in decibels (dB).
Automatic power saving function
This unit has an automatic power saving function.
o The automatic power saving function is on when the unit is
shipped new from the factory.
MENU
AUTO POWER SAVING
ON
OFF
The automatic power saving function is disabled.
ON
The unit will automatically enter standby mode if no audio is output and no operation is conducted for about 30 minutes.
Information display
This shows the version of the firmware used by the unit.
MENU
Version info
SYSTEM
SYSTEM
The firmware version of the microcomputer
USB
The firmware version of the USB module
Bluetooth
The firmware version of the Bluetooth module
NETWORK
The firmware version of the network module
Screen indication
Select the information shown to the right of the playback source.
MENU
DISPLAY TYPE
volume
volume
The volume will be shown.
sampling freq.
Information about the playback source will be shown.
24

Playing back music on a computer
Installing the driver
This unit can be connected with computers running the following
operating systems. Operation with other operating systems is not
guaranteed (as of November, 2017).
When using Mac
The driver works with the following versions.
OS X Lion (10.7)
OS X Mountain Lion (10.8)
OS X Mavericks (10.9)
OS X Yosemite (10.10)
OS X El Capitan (10.11)
macOS Sierra (10.12)
macOS High Sierra (10.13)
This unit will run with the standard OS driver, so there is no need to
install a special driver.
A dedicated driver must be installed on the computer, however, to
use Bulk Pet.
When using Windows
The driver works with the following versions.
Windows 7 (32/64-bit)
Windows 8 (32/64-bit)
Windows 8.1 (32/64-bit)
Windows 10 (32/64-bit)
About transmission mode
Data can be transferred using Isochronous or Bulk Pet mode.
The sampling frequencies that can be transmitted are 44.1, 48, 88.2,
96, 176.4, 192, 352.8, 384, 705.6 and 768 kHz.
When properly connected, you will be able to select “TEAC USB
AUDIO DEVICE” as an audio output from the computer OS.
o During data transfer, the audio data sent from the computer will
be processed using this unit’s clock, enabling the amount of jitter
that occurs during data transmission to be reduced.
Downloading playback application TEAC
HR Audio Player
You can download Mac and Windows versions of our free TEAC HR
Audio Player application that supports playback of DSD files from
the TEAC Global Site (http://teac-global.com/).
TEAC HR Audio Player setting note
To play 22.5MHz DSD recordings with TEAC HR Audio Player, open
the Configure window and set the “Decode mode” to “DSD Native.”
To play formats other than 22.5MHz DSD, you can set this to either
“DSD over PCM” or “DSD Native” as you like.
EN
Installing the driver on the computer
In order to play audio files stored on a computer through this unit,
you must install a dedicated driver on that computer beforehand.
Download the dedicated driver from the TEAC Global Site.
TEAC Global Site
http://www.teac-global.com/
ATTENTION
Install the dedicated driver before connecting the unit with
the computer by USB.
If you connect this unit with a computer before installing the driver,
it will not work properly.
o For instructions about driver installation procedures, access the
Downloads page from the TEAC Global site (http://teac-global.
com/).
o Depending on the combination of hardware and software, proper
operation might not be possible even with the above operating
systems.
For details, see “Selecting DSD decoding mode” in the TEAC HR Audio
Player Owner’s Manual.
25

Playing back music on a computer (continued)
Playing back audio files from a computer
1 Connect the USB port on the back of this unit
to the computer using a USB cable.
USB cable
o Use a cable with a connector that matches that of this unit.
2 Turn the computer on.
o Confirm that the operating system has started properly.
3 Shift the POWER switch to its ON position to
turn the unit on.
5 Start playback of an audio le on the computer.
By maximizing the output volume from the computer and
adjusting the volume output from the stereo amplifier, better
sound quality can be achieved.
Minimize the stereo amplifier volume before beginning playback. Then, gradually increase it.
When using headphones connected to this unit, turn the
VOLUME knob counterclockwise to minimize the volume before
putting them on. Then, gradually increase it.
o The computer and this unit cannot control each other.
o Do not do any of the following when playing back an audio file
via USB. Doing so could cause the computer to malfunction.
Always quit the audio playback software before doing any of the
following.
o Unplugging the USB cable
o Turning the unit off or putting it into standby mode
o Changing the current input selection
o When playing back an audio file via USB, computer operation
sounds will also be output. If you do not want these sounds to
be output, make appropriate settings on the computer to turn
them off.
o If you connect this unit with the computer or change its input to
USB after starting the audio playback software, audio files might
not play back correctly. If this should occur, restart the audio
playback software or restart the computer.
4 Turn the SOURCE knob to select USB.
26

Troubleshooting
If you experience a problem with the unit, please take a moment to
review the following information before requesting service. If it still
does not operate correctly, contact the retailer where you purchased
the unit.
General
The unit does not turn on.
e Check that the power cord is completely plugged into the
power outlet. If the outlet is switched, confirm that the switch
is in the ON position.
e Connect a different electrical device to the outlet to confirm
that it is supplying power.
e If the automatic power saving function has caused the unit to
enter standby, press the remote control STANDBY/ON button
to turn the unit on again.
No sound is output.
e If a stereo amplifier is connected to this unit, adjust its volume.
e If you are using headphones connected to this unit, use the
VOLUME knob to adjust the volume.
e Use the SOURCE knob to select the input that is connected to
the source that you want to hear.
e Reconfirm the connections with other equipment.
Connections with a computer
Computer does not recognize this unit.
e See page25 for information about supported operating
systems. Operation with unsupported operating systems is not
guaranteed.
Noise occurs.
e Starting other applications during playback of an audio file
may interrupt playback or cause noise. Do not start other
applications during playback.
e When the unit is connected to a computer via a USB hub, for
example, noise might be heard. If this occurs, connect the unit
directly to the computer.
Audio files cannot be played back.
e Connect this unit to the computer, and set this unit’s input to
USB before launching audio playback software.
If you connect this unit to the computer or set its input to USB
after launching audio playback software, audio files might not
play back properly.
Bluetooth function
EN
There is a humming noise.
e If a connecting cable is near a power cord, fluorescent light or
similar cause of interference, increase the distance between
them as much as possible.
There is no sound from one side of the headphones.
e Confirm that the headphones plug is inserted completely.
Clock sync
The CLOCK indicator does not stop blinking.
e Set clock synchronization to OFF when not using it.
e Synchronization with the clock signal being input might not
be possible. Check the connections of the clock sync connectors and the settings of the connected device.
Cannot show device name.
e This unit does not support the display of symbols or double-
byte characters, including Japanese and Chinese.
Use only English letters and numbers for the names of
Bluetooth devices connected to this unit.
Cannot change connected Bluetooth device.
e This unit cannot have Bluetooth connections to multiple
Bluetooth devices at the same time.
To change the device connected with this unit by Bluetooth,
end the connection with the currently connected Bluetooth
device before connecting to another Bluetooth device.
Since this unit uses a microcontroller, external noise and other interference can cause the unit to malfunction. If this occurs, unplug the
power cord, wait for a while, and then turn the unit on again and
restart operations.
Continued on the next page e
27

Troubleshooting (continued) Specifications
Restoring default settings
1 While pressing and holding the MENU button,
set the POWER switch to ON.
2 Release the MENU button when the FACTORY
RESET menu appears.
MENU
FACTORY RESET
ARE YOU SURE?
Analog audio outputs
Connectors
XLR connectors. . . . . . . . . . . . . . . . . . . . . . . . . . . . . . . . . . . . . . . 1 pair (L/R)
RCA connectors ...................................... 1 pair (L/R)
Output impedance ...................................... XLR: 188 Ω
RCA: 150 Ω
Maximum output level (1 kHz/full-scale, into 10 kΩ)
FIXED 0dB .................................... XLR/RCA: 2.0 Vrms
FIXED +6dB .................................. XLR/RCA: 4.0 Vrms
VARIABLE ........................................... XLR: 12 Vrms
RCA: 6 Vrms
Frequency response* .................. 5 Hz – 80 kHz (+1 dB/−5 dB)
S/N ratio* .................................. 110 dB (A-Weight, 1 kHz)
Distortion* .................... 0.0015% (1 kHz, LPF: 20 Hz – 20 kHz)
*Measurement conditions
Input signal: 192kH 24-bit PCM
Measurement output: RCA
PCM digital filter: off
Headphones output
Connector ....................... 3.5mm 4-pole stereo mini jack × 1
Maximum effective output .......... 500 mW + 500 mW (into 32 Ω)
Compatible impedance range ............................ 16–600 Ω
3 Press the SOURCE knob.
Resetting begins when “Please wait!” appears.
Please wait!
The playback source display screen will appear after resetting
completes.
Display example
USB
ATTENTION
o Do not put the unit in standby until the playback source
display screen appears.
o This operation will restore all settings, including network set-
tings, to their default values.
−45.5dB
Digital audio inputs**
COAXIAL digital .................................. RCA connector × 1
3.5mm mini jack*** × 1
(3.5mm mini plug connection also possible using RCA-mini plug
adapter cable)
(0.5 Vp-p, 75 Ω)
OPTICAL digital ............................... Square connector × 1
Round connector*** × 1
(−24.0 to −14.5dBm peak)
USB flash drive ...........................USB Type A port (front) × 1
(USB 2.0 compliant)
USB ...................................... USB Type B port (rear) × 1
(USB 2.0 compliant)
LAN ..................................................... 100BASE-T
PCM data sampling frequency
COAXIAL digital
32 kHz, 44.1 kHz, 48 kHz, 88.2 kHz, 96 kHz, 176.4 kHz, 192 kHz
OPTICAL digital
32 kHz, 44.1 kHz, 48 kHz, 88.2 kHz, 96 kHz, 176.4 kHz, 192 kHz
USB ....... 44.1 kHz, 48 kHz, 88.2 kHz, 96 kHz, 176.4 kHz, 192 kHz,
352.8 kHz, 384 kHz, 705.6 kHz, 768 kHz
o The factory default settings are the setting values shown in the
screen images used in the explanations in this manual.
28

Quantization bit depth
COAXIAL digital/OPTICAL digital ........................16/24-bit
USB ................................................ 16/24/32-bit
DSD data sampling frequency
COAXIAL digital/OPTICAL digital .........................2.8 MHz
(supported using 176.4kHz/24-bit DoP transmission)
USB ....................... 2.8 MHz, 5.6 MHz, 11.2 MHz, 22.5 MHz
**See the TEAC HR Streamer User’s Manual for details about USB flash drives
and networks.
***This input connector can be used for both optical and coaxial connections.
Bluetooth function
Bluetooth version ................................................ 4.0
Output class ..................................................Class 2
(transmission distance without obstructions**** .............. 10 m)
Supported profiles ..................................... A2DP, AVRCP
Supported A2DP codecs
SBC, AAC, Qualcomm® aptX™, Qualcomm® aptX™ HD, LDAC
Supported A2DP content protection .........................SCMS-T
Maximum number of stored pairings ..............................8
****The transmission distance is approximate. The transmission distance
could vary depending on the surrounding environment and electromagnetic waves.
Included accessories
Power cord × 1
RCA conversion (RCA to mini plug) cable × 1
Remote control (RC-1330) × 1
Batteries for remote control (AAA) × 2
Owner’s manual (this document, including warranty) × 1
o For information about the warranty, users living in the USA and
Canada should see pages 86–87 and the back cover (warranty
document). Users living in Europe and other regions should see
page87.
o The TEAC HR Streamer User’s Manual can be downloaded from
the TEAC Global Site (http://www.teac-global.com/).
o Design and specifications are subject to change without notice.
o Weight and dimensions are approximate.
o Illustrations in this manual might differ slightly from production
models.
EN
Clock sync input
Connector ......................................................BNC
Input sampling frequency .................................. 10 MHz
Input impedance .............................................. 50 Ω
Input level ..................Rectangle wave: equivalent to TTL levels
Sine wave: 0.5 to 1.0 Vrms
General
Power supply
Model for Europe ........................ AC 220–240 V, 50/60 Hz
Model for U.S.A./Canada ......................... AC 120 V, 60 Hz
Power consumption ........................................... 18 W
Standby power ............................ 0.4 W (in standby mode)
External dimensions (W × H × D including protrusions)
290 mm × 81.2 mm × 248.7 mm
(11 1/2" × 3 1/4" × 9 7/8")
Weight ............................................. 3.9 kg (8 5/8 lb)
Operating temperature .............................. +5°C to +35°C
Operating humidity range ............ 5% to 85% (no condensation)
Storage temperature range ......................... −20°C to +55°C
29

INSTRUCTIONS DE SÉCURITÉ IMPORTANTES
1) Lisez ces instructions.
2) Conservez ces instructions.
3) Tenez compte de tous les avertissements.
ATTENTION : POUR RÉDUIRE LE RISQUE
D’ÉLECTROCUTION, NE RETIREZ PAS LE CAPOT
(OU L’ARRIÈRE). AUCUNE PIÈCE INTERNE N’EST
RÉPARABLE PAR L’UTILISATEUR. CONFIEZ TOUTE
RÉPARATION À UN SERVICE APRÈS-VENTE QUALIFIÉ.
Le symbole d’éclair à tête de flèche dans un triangle
<
B
équilatéral sert à prévenir l’utilisateur de la présence
dans l’enceinte du produit d’une «tension dangereuse»
non isolée d’une grandeur suffisante pour constituer un
risque d’électrocution pour les personnes.
Le point d’exclamation dans un triangle équilatéral
sert à prévenir l’utilisateur de la présence d’instructions
importantes de fonctionnement et de maintenance
(entretien) dans les documents accompagnant l’appareil.
AVERTISSEMENT: POUR PRÉVENIR LES RISQUES
D’INCENDIE ET D’ÉLECTROCUTION, N’EXPOSEZ
PAS CET APPAREIL À LA PLUIE NI À L’HUMIDITÉ.
ATTENTION
o NE RETIREZ PAS LES CAPOTS EXTERNES OU BOÎTIERS POUR
EXPOSER L’ÉLECTRONIQUE. AUCUNE PIÈCE INTERNE N’EST
RÉPARABLE PAR L’UTILISATEUR.
o SI VOUS RENCONTREZ DES PROBLÈMES AVEC CE PRODUIT,
CONTACTEZ LE MAGASIN OÙ VOUS AVEZ ACHETÉ L’UNITÉ.
N’UTILISEZ PAS LE PRODUIT TANT QU’IL N’A PAS ÉTÉ RÉPARÉ.
o L’UTILISATION DE COMMANDES, DE RÉGLAGES OU LE SUIVI
DE PROCÉDURES AUTRES QUE CE QUI EST DÉCRIT DANS CE
DOCUMENT PEUT PROVOQUER UNE EXPOSITION À UN
RAYONNEMENT DANGEREUX.
4) Suivez toutes les instructions.
5) N’utilisez pas cet appareil avec de l’eau à proximité.
6) Ne nettoyez l’appareil qu’avec un chiffon sec.
7) Ne bloquez aucune ouverture de ventilation. Installez-le conformément aux instructions du fabricant.
8) N’installez pas l’appareil près de sources de chaleur telles que
des radiateurs, bouches de chauffage, poêles ou autres appareils
(y compris des amplificateurs) dégageant de la chaleur.
9) Ne neutralisez pas la fonction de sécurité de la fiche polarisée
ou de terre. Une fiche polarisée a deux broches, l’une plus large
que l’autre. Une fiche de terre a deux broches identiques et une
troisième broche pour la mise à la terre. La broche plus large ou
la troisième broche servent à votre sécurité. Si la fiche fournie
n’entre pas dans votre prise, consultez un électricien pour le
remplacement de la prise obsolète.
10) Évitez de marcher sur le cordon d’alimentation et de le pincer,
en particulier au niveau des fiches, des prises secteur, et du
point de sortie de l’appareil.
11) N’utilisez que des fixations/accessoires spécifiés par le fabricant.
12) Utilisez-le uniquement avec des chariots, socles, trépieds, supports ou tables
spécifiés par le fabricant ou vendus avec
l’appareil. Si un chariot est utilisé, faites
attention à ne pas être blessé par un
renversement lors du déplacement de
l’ensemble chariot/appareil.
13) Débranchez cet appareil en cas d’orage ou de non utilisation
prolongée.
14) Confiez toute réparation à des techniciens de maintenance qualifiés. Une réparation est nécessaire si l’appareil a été endommagé
d’une quelconque façon, par exemple si le cordon ou la fiche
d’alimentation est endommagé, si du liquide a été renversé sur
l’appareil ou si des objets sont tombés dedans, si l’appareil a été
exposé à la pluie ou à l’humidité, s’il ne fonctionne pas normalement, ou s’il est tombé.
o L’appareil tire un courant nominal de veille de la prise secteur
quand son interrupteur POWER ou STANDBY/ON n’est pas en
position ON.
o La fiche secteur est utilisée comme dispositif de déconnexion et
doit donc toujours rester disponible.
o Des précautions doivent être prises en cas d’utilisation d’écou-
teurs ou d’un casque avec le produit car une pression sonore
excessive (volume trop fort) dans les écouteurs ou dans le casque
peut causer une perte auditive.
30

ATTENTION
o N’exposez pas cet appareil aux gouttes ni aux éclaboussures.
o Ne placez pas d’objet rempli de liquide sur l’appareil, comme
par exemple un vase.
o N’installez pas cet appareil dans un espace confiné comme
une bibliothèque ou un meuble similaire.
o L’appareil doit être placé suffisamment près de la prise de
courant pour que vous puissiez à tout moment attraper facilement la fiche du cordon d’alimentation.
o Si le produit utilise des piles/batteries (y compris un pack de
batteries ou des piles installées), elles ne doivent pas être
exposées au soleil, au feu ou à une chaleur excessive.
o PRÉCAUTION pour les produits qui utilisent des batteries rem-
plaçables au lithium: remplacer une batterie par un modèle
incorrect entraîne un risque d’explosion. Remplacez-les uniquement par un type identique ou équivalent.
AVERTISSEMENT
Les produits ayant une construction de Classe ! sont équipés d’un
cordon d’alimentation avec une fiche de terre. Le cordon d’un tel
produit doit être branché dans une prise secteur avec terre de
sécurité.
AUX USA/CANADA, UTILISEZ UNIQUEMENT UNE TENSION
D’ALIMENTATION DE 120 V.
V
Précautions concernant les piles
Un mauvais emploi des piles peut entraîner leur rupture ou leur
fuite, avec pour conséquence un incendie, des blessures ou la
salissure des objets proches. Veuillez lire et suivre attentivement les
précautions suivantes.
o Veillez à insérer les piles avec leurs pôles positif (¥) et négatif
(^) correctement orientés.
o Utilisez des piles du même type. N’utilisez jamais des types de
pile différents ensemble.
o Si la télécommande doit rester inutilisée durant une période
prolongée (plus d’un mois), retirez ses piles pour éviter qu’elles
ne coulent.
o Si les piles coulent, essuyez le liquide dans le compartiment des
piles et remplacez les piles par des neuves.
o N’utilisez pas de piles d’un type autre que celui spécifié. Ne
mélangez pas des piles neuves avec des anciennes et n’utilisez
pas ensemble des types de pile différents.
o Ne chauffez pas et ne démontez pas les piles. Ne jetez jamais les
piles dans un feu ou dans de l’eau.
o Ne conservez et ne transportez pas les piles avec d’autres objets
métalliques. Les piles pourraient entrer en court-circuit, couler ou
exploser.
o Ne rechargez jamais une batterie sans avoir vérifié qu’elle peut
l’être.
Pour les consommateurs européens
Mise au rebut des équipements électriques et
électroniques et des piles et/ou accumulateurs
a) Tout équipement électrique/électronique et pile/accumula-
teur hors d’usage doit être traité séparément de la collecte
municipale d’ordures ménagères dans des points de collecte
désignés par le gouvernement ou les autorités locales.
b) En vous débarrassant correctement des équipements élec-
triques/électroniques et piles/accumulateurs hors d’usage,
vous contribuerez à la sauvegarde de précieuses ressources
et à la prévention de potentiels effets négatifs sur la santé
humaine et l’environnement.
c) Le traitement incorrect des équipements électriques/électro-
niques et piles/accumulateurs hors d’usage peut avoir des
effets graves sur l’environnement et la santé humaine en raison de la présence de substances dangereuses dans les
équipements.
d) Le symbole de déchets d’équipements électriques et
électroniques (DEEE), qui représente une poubelle à
roulettes barrée d’une croix, indique que les équipements électriques/électroniques et piles/accumulateurs
doivent être collectés et traités séparément des déchets
ménagers.
Si une pile ou un accumulateur contient plus que les
valeurs de plomb (Pb), mercure (Hg) et/ou cadmium
(Cd) spécifiées dans la directive sur les piles et accumulateurs (2006/66/CE), alors les symboles chimiques
de ces éléments seront indiqués sous le symbole DEEE.
e) Des systèmes de retour et de collecte sont disponibles
pour l’utilisateur final. Pour des informations plus détaillées
sur la mise au rebut des vieux équipements électriques/
électroniques et piles/accumulateurs hors d’usage, veuillez
contacter votre mairie, le service d’ordures ménagères ou le
magasin dans lequel vous avez acquis l’équipement.
La plaque signalétique se trouve sous l’unité comme représenté
ci-dessous.
Façade
Plaque signalétique
Pb, Hg, Cd
FR
31

Précautions pour les équipements sans fil
Conformité de l’émetteur radio et
brouillage
Modèle pour le Canada
Conformité de l’émetteur radio
Le présent appareil est conforme aux CNR d’Industrie Canada applicables aux appareils radio exempts de licence.
L’exploitation est autorisée aux deux conditions suivantes:
1) l’appareil ne doit pas produire de brouillage;
2) l’appareil doit accepter tout brouillage radioélectrique subi,
même si le brouillage est susceptible d’en compromettre le
fonctionnement.
Étiquetage d’autorisation
IC: 1559C-NT505
Conformité de brouillage
CET APPAREIL NUMÉRIQUE DE LA CLASSE B EST CONFORME À LA
NORME NMB-003 DU CANADA
Cet équipement est conforme aux limites d’exposition aux rayonnements énoncées pour un environnement non contrôlé et respecte
les règles les radioélectriques (RF) de la FCC lignes directrices
d’exposition et d’exposition aux fréquences radioélectriques (RF)
CNR-102 de l’IC. Cet équipement émet une énergie RF très faible qui
est considérée conforme sans évaluation de l’exposition maximale
autorisée. Cependant, cet équipement doit être installé et utilisé en
gardant une distance de 20 cm ou plus entre le dispositif rayonnant
et le corps (à l’exception des extrémités : mains, poignets, pieds et
chevilles).
Modèle pour l’EEE (Espace Économique
Européen)
Ce produit fait fonction d’émetteur large bande sur la bande des
2,4GHz.
ATTENTION
L’autorisation des dispositifs sans fil varie avec les pays ou régions.
Veuillez n’utiliser cet appareil que dans le pays où il a été acheté.
o Selon le pays, des restrictions d’usage de la technologie sans fil
Bluetooth peuvent exister.
Vérifiez avant utilisation les lois et réglementations en vigueur dans
le pays ou la région dans lequel vous voulez employer l’unité.
Exigences pour l’exposition aux
rayonnements
Cet équipement est conforme à la réglementation reconnue internationalement en matière d’exposition humaine aux ondes radio
générées par l’émetteur.
Déclaration de conformité
Modèle pour le Canada
Cet équipement est conforme avec les limites d’exposition aux
radiofréquences établies pour un environnement non contrôlé par
le CNR-102 de l’IC.
Modèle pour l’EEE (Espace Économique
Européen)
Cet équipement est conforme à la norme EN.62311: Évaluation des
équipements électroniques et électriques en relation avec les restrictions d’exposition humaine aux champs électromagnétiques; la
norme harmonisée de la Directive 2014/53/UE.
Plage de fréquences utilisée: 2400MHz – 2480MHz
Puissance maximale de sortie: Bluetooth® classe 2 (moins de 2,5mW)
Par la présente, TEAC Corporation déclare que cet
équipement radio est en conformité avec la directive 2014/53/UE ainsi qu’avec les autres directives
et règlements de la Commission.
Le texte intégral de la déclaration de conformité pour l’UE est disponible à l’adresse internet suivante : veuillez nous contacter par
e-mail.
http://www.teac-audio.eu/en/
TEAC Corporation
1-47 Ochiai, Tama-shi, Tokyo, 206-8530, Japon
32
ATTENTION
Les changements ou modifications non expressément approuvés par la partie responsable de la conformité peuvent invalider
le droit de l’utilisateur à faire fonctionner l’équipement.

Marques déposées et copyrights
Sommaire
“DSD” is a registered trademark.
The Bluetooth® word mark and logos are registered trademarks
owned by Bluetooth SIG, Inc. and any use of such marks by TEAC
CORPORATION is under license.
Qualcomm aptX is a product of Qualcomm Technologies International,
Ltd.
Qualcomm is a trademark of Qualcomm Incorporated, registered in
the United States and other countries, used with permission. aptX is
a trademark of Qualcomm Technologies International, Ltd., registered
in the United States and other countries, used with permission.
Microsoft and Windows are either registered trademarks or trademarks of Microsoft Corporation in the United States and/or other
countries.
Apple, Mac, OS X, macOS, iPad, iPhone and iPod touch are trademarks
of Apple Inc., registered in the U.S. and other countries.
App Store is a service mark of Apple Inc.
Android is a trademark of Google Inc.
LDAC™ and LDAC logo are trademarks of Sony Corporation.
Bulk Pet is a registered trademark of INTERFACE CO., LTD.
Les autres noms de société, noms de produit et logos présents dans
ce document sont des marques commerciales ou déposées de leurs
détenteurs respectifs.
Nous vous remercions d’avoir choisi TEAC.
Lisez ce mode d’emploi avec attention pour tirer les meilleures performances de cette unité. Après l’avoir lu, gardez-le en lieu sûr pour
vous y référer ultérieurement.
ATTENTION
o Pour plus d’informations sur les fonctions en réseau de cette
unité, voir le mode d’emploi de TEAC HR Streamer.
o Ce mode d’emploi et celui de TEAC HR Streamer peuvent être
téléchargés depuis le site mondial TEAC (http://www.teac-global.
com/).
o Pour utiliser les fonctions réseau et la lecture de clés USB, vous
devez également faire appel à une tablette ou à un smartphone
sur lequel est installée l’appli TEAC HR Streamer (gratuite) et qui
est connecté au même réseau que l’unité.
INSTRUCTIONS DE SÉCURITÉ IMPORTANTES .......................30
Précautions pour les équipements sans fil .........................32
Marques déposées et copyrights. . . . . . . . . . . . . . . . . . . . . . . . . . . . . . . . . . 33
Accessoires fournis ...............................................34
Avant l’utilisation .................................................34
Utilisation du site mondial TEAC ..................................34
Téléchargement de l’appli de télécommande .....................34
FR
Des informations sur les droits d’auteur et les licences en rapport
avec les logiciels libres (« Open source ») sont fournies dans le
document « Important Notice Regarding Software » (en anglais
uniquement).
Entretien .........................................................34
Connexions réseau ...............................................35
Branchements (face arrière) .......................................36
Branchements (face avant) ........................................38
Branchement d’un casque ........................................39
Emploi de la télécommande ......................................39
Nomenclature et fonctions des parties (unité principale) ..........40
Conversion ascendante ...........................................41
Nomenclature et fonctions des parties (télécommande) ..........42
Écran .............................................................43
Fonctionnement de base .........................................45
Technologie sans fil Bluetooth® ...................................46
Réglages .........................................................49
Lecture de musique sur un ordinateur ............................53
Guide de dépannage .............................................55
Caractéristiques techniques. . . . . . . . . . . . . . . . . . . . . . . . . . . . . . . . . . . . . . . 56
33

Accessoires fournis Entretien
Vérifiez que l’emballage contient bien tous les éléments indiqués
ci-dessous.
Veuillez contacter le magasin dans lequel vous avez acheté cette
unité si l’un de ces éléments manque ou a été endommagé durant
le transport.
Cordon d’alimentation × 1
Câble de conversion (RCA vers mini-jack) × 1
Télécommande (RC-1330) × 1
Piles pour télécommande (AAA) × 2
Mode d’emploi (ce document, y compris la garantie) × 1
o Pour plus d’informations sur la garantie, les utilisateurs vivant aux
États Unis et au Canada doivent consulter les pages 86–87
et le dos de la couverture (document de garantie). Les utilisateurs
vivant en Europe et dans d’autres régions doivent consulter
page87.
o Le mode d’emploi de TEAC HR Streamer peut être téléchargé
depuis le site mondial TEAC (http://www.teac-global.com/).
Essuyez les saletés du capot supérieur et des autres surfaces au
moyen d’un chiffon doux légèrement humidifié avec un nettoyant
neutre dilué.
N’utilisez pas de lingettes de nettoyage imbibées de produit
chimique, de diluant ou d’autres agents chimiques. Cela pourrait
endommager la surface.
V
Pour votre sécurité, débranchez le cordon d’alimentation de la prise secteur avant tout nettoyage.
Utilisation du site mondial TEAC
Vous pouvez télécharger des mises à jour pour cette unité depuis le
site mondial TEAC:
http://teac-global.com/
1) Allez sur le site mondial TEAC.
2) Dans la section TEAC Downloads (téléchargements TEAC),
cliquez sur la langue souhaitée afin d’ouvrir la page de téléchargement du site web pour cette langue.
Avant l’utilisation
V
Précautions concernant l’emplacement
o N’installez pas cette unité dans un lieu qui pourrait chauffer.
Cela comprend les endroits exposés directement au soleil ou
près d’un radiateur, d’un chauffage, d’une cuisinière ou d’autres
appareils chauffants. En outre, ne la placez pas au-dessus d’un
amplificateur ou autre équipement dégageant de la chaleur. Cela
pourrait causer une décoloration, une déformation ou un mauvais fonctionnement.
o Évitez les lieux extrêmement froids ou exposés à une humidité
ou poussière excessive.
o Quand vous installez cette unité, laissez un peu d’espace (au
moins 3cm) entre elle et les murs et d’autres appareils afin de
permettre une bonne dissipation thermique. Si vous la placez par
exemple dans un rack, laissez au moins 5cm de libre au-dessus
de l’unité et 10cm derrière elle.
Ne pas laisser ces espaces peut faire monter la température au
risque d’entraîner un incendie.
o La tension d’alimentation de l’unité doit correspondre à la ten-
sion imprimée sur son panneau arrière. Si vous avez des doutes à
ce sujet, consultez un électricien.
o Ne déplacez pas l’unité durant l’utilisation.
o N’ouvrez pas le boîtier de l’unité car cela pourrait endommager le
circuit ou causer un choc électrique. Si un objet étranger pénètre
dans l’unité, consultez votre revendeur.
o Quand vous débranchez le cordon d’alimentation de la prise sec-
teur, tirez toujours sur sa fiche, jamais sur le cordon.
NOTE
Si la langue désirée n’apparaît pas, cliquez sur Other Languages
(autres langues).
3) Cliquez sur la section «Search by Model Name» (recherche par
nom de modèle) afin d’ouvrir la page Downloads (téléchargements) pour ce produit (les utilisateurs en Europe doivent cliquer
sur le nom du produit dans la section «Products» (produits)).
4) Sélectionnez et téléchargez les mises à jour nécessaires.
Téléchargement de l’appli de télécommande
Pour utiliser les fonctions réseau et de lecture de clés USB de cette
unité, vous devez également faire appel à un smartphone ou à une
tablette sur lequel est installée l’appli TEAC HR Streamer (gratuite) et
qui est connecté au même réseau que l’unité.
o Pour des détails, voir le mode d’emploi de TEAC HR Streamer.
Le mode d’emploi de TEAC HR Streamer peut être téléchargé
depuis le site mondial TEAC (http://www.teac-global.com/).
Comment télécharger l’appli pour iPad/iPhone/
iPod touch
Recherchez «TEAC HR Streamer» sur l’App Store.
o La sortie d’une version pour Android est prévue (en date de jan-
vier 2018). Voir le site web du produit pour des détails.
34

Connexions réseau
Exemple de connexion
NAS
a
NT-505
d
Vers Internet
Câble réseau local (LAN)
Routeur Wi-Fi™
b
o Le routeur Wi-Fi doit être connecté à Internet lors
de l’installation des applis sur un iPad, iPhone ou
autre appareil, lors de la mise à jour du firmware
NET de cette unité et lors de l’écoute de la radio
par Internet.
iPad, iPhone, etc.
c
FR
a Serveur NAS (Network-Attached Storage) de stockage
en réseau
Sert à stocker les fichiers audio.
Pour qu’il puisse servir de serveur de médias, il doit fonctionner
comme serveur UPnP. MinimServer est le serveur de média
recommandé pour l’emploi avec cette unité.
b Routeur Wi-Fi™
Utilisez le Wi-Fi pour connecter un iPad, iPhone ou autre appareil à cette unité et au NAS.
c iPad, iPhone, etc.
Installez l’appli pour contrôler cette unité.
d NT-505
Cette unité. L’adresse IP est obtenue auprès du serveur DHCP.
35

Appareil à sortie audio
numérique
Appareil à sortie audio
numérique
Appareil qui produit le
signal d’horloge
Sortie numérique
(OPTICAL)
A B
Sortie numérique
(COAXIAL)
Câble numérique
optique
Câble numérique
coaxial RCA
C D
Sortie de
synchronisation
d’horloge
Câble coaxial
BNC
Branchez les câbles à la paire
choisie pour la sortie ligne
(page51).
Le son ne sera produit que
par la paire sélectionnée.
Si un casque est connecté,
le son n’est plus produit par
les prises de sortie de la face
arrière.
La polarité des prises XLR peut
être réglée pour avoir comme
point chaud la broche 2 ou 3
(page51).
Si vous voulez pouvoir
contrôler le volume depuis
l’amplificateur, réglez le
paramètre LINE OUT LEVEL
sur «FIXED 0dB» ou «FIXED
+6dB» (page51).
Câbles XLR
LRLR
Entrée audio
(LINE IN, etc)
Amplificateur stéréo ou
enceintes amplifiées
Branchez un jeu
de câbles de l’un
ou l’autre des
types.
Câbles audio RCA
FE G
Câble USB
Ordinateur
H
Cordon d’alimentation
secteur fourni
Installez le pilote dédié
sur l’ordinateur avant de
lui brancher cette unité
(page53).
c
Prise secteur
36

A Port ETHERNET
Connectez un câble réseau local (LAN) du commerce à ce port
si vous souhaitez raccorder cette unité à un réseau filaire ou à
Internet.
o Lorsque vous passez en revue les sources d’entrée, ce port
apparaît sous le nom «NET».
B Prise d’entrée audio numérique optique (OPTICAL)
Sert à faire entrer le signal audio numérique. Branchez-y la prise de
sortie audio numérique optique d’un appareil audio numérique.
Pour le branchement, utilisez un câble numérique
optique du commerce à connecteur carrés (TOSLINK).
C Prise d’entrée audio numérique coaxiale RCA
(COAXIAL)
Sert à faire entrer le signal audio numérique. Branchez-y la prise de
sortie audio numérique coaxiale d’un appareil audio numérique.
Pour le branchement, utilisez un câble numérique
coaxial RCA du commerce.
F Port USB (arrière)
Sert à recevoir le signal audio numérique d’un ordinateur.
Reliez-le au port USB d’un ordinateur.
Pour le branchement, utilisez un câble USB 2.0 (type A-B)
du commerce.
ATTENTION
Avant de brancher un ordinateur fonctionnant sous un système
d’exploitation Windows, vous devez installer le pilote dédié sur
l’ordinateur (page53).
Une connexion correcte n’est pas possible avec un ordinateur
sur lequel ce pilote n’a pas été installé.
G Port de maintenance
Sert à la maintenance. N’y branchez rien sauf si vous êtes invité
à le faire par notre service après-vente.
H Prise d’entrée d’alimentation (~IN)
Branchez ici le cordon d’alimentation fourni.
Une fois tous les autres branchements terminés, branchez la
fiche du cordon d’alimentation dans une prise secteur.
FR
D Connecteur d’entrée CLOCK SYNC (10MHz IN)
Sert à faire entrer un signal de synchronisation (horloge de
synchro).
Pour recevoir le signal d’un oscillateur à 10MHz, branchez ici la
sortie de l’oscillateur (page57).
Pour le branchement, utilisez un câble coaxial BNC du
commerce.
o La synchronisation d’horloge n’est possible qu’avec la source
d’entrée réglée sur USB ou NET (y compris les clés USB).
E Prises de sortie audio analogique (LINE OUT)
Elles produisent 2 canaux audio analogiques. Reliez ces prises XLR
ou RCA à un amplificateur stéréo ou à des enceintes amplifiées.
Utilisez des câbles du commerce pour les branchements.
XLR: câbles XLR symétriques
RCA: câbles audio RCA
Reliez la prise R (droite) de cette unité à la prise R de l’amplificateur et sa prise L (gauche) à la prise L de l’amplificateur.
o Voir «Sortie ligne» en page51 pour les réglages de sortie
analogique.
V
N’utilisez aucun cordon d’alimentation autre que
celui fourni avec cette unité. L’utilisation d’autres
cordons d’alimentation peut entraîner un incendie ou un choc électrique.
V
Débranchez le cordon de la prise secteur en cas de
non-utilisation prolongée de l’unité.
V
Terminez tous les branchements avant de
mettre l’unité sous tension.
o Lisez attentivement les modes d’emploi des appareils que
vous branchez et suivez leurs instructions quand vous
faites les branchements.
o Ne regroupez pas les câbles de connexion avec des cor-
dons d’alimentation. Cela pourrait entraîner des bruits.
o Branchez à fond toutes les fiches.
37

Branchements (face avant)
Clés USB
Branchez les clés USB au port USB en face avant de l’unité.
Pour lire les fichiers musicaux d’une clé USB, réglez la source d’entrée sur NET et utilisez l’appli pour la lecture.
o Pour des détails, voir le mode d’emploi de TEAC HR Streamer.
Connexion coaxiale (COAX)
Utilisez le câble de conversion RCA fourni et un câble numérique
coaxial RCA du commerce.
Pour activer cette entrée, tournez le sélecteur SOURCE afin de sélectionner COAXIAL2.
Câble de conversion RCA
Entrée audio numérique (OPT/COAX IN)
Cette prise d’entrée peut être utilisée aussi bien pour la connexion
optique (OPT) que coaxiale (COAX).
Connexion optique (OPT)
Utilisez un câble optique à mini-fiche du commerce.
Pour activer cette entrée, tournez le sélecteur SOURCE afin de sélectionner OPTICAL2.
Mini-fiche optique
Câble numérique coaxial RCA
38

Branchement d’un casque
V
ATTENTION
N’allumez/n’éteignez pas l’unité et ne branchez/débranchez pas le
casque quand vous portez ce dernier.
Cela pourrait entraîner un bruit fort et soudain risquant d’endommager votre audition.
Emploi de la télécommande
Précautions d’emploi
V
Un mauvais emploi des piles peut entraîner leur
rupture ou leur fuite, avec pour conséquence un
incendie, des blessures ou la salissure des objets
proches. Veuillez attentivement lire et respecter
les précautions en page31.
o Pour utiliser la télécommande, pointez-la vers le capteur de
télécommande de l’unité principale dans un rayon maximal
de 5m. Ne placez pas d’obstacles entre l’unité principale et la
télécommande.
o La télécommande peut ne pas fonctionner si le capteur de signal
de télécommande de l’unité est exposé à la lumière du soleil
ou à une forte source lumineuse. Si cela se produit, essayez de
déplacer l’unité.
o Sachez que l’emploi de cette télécommande peut entraîner le
déclenchement involontaire d’opérations sur d’autres appareils
contrôlables par rayons infrarouges.
FR
Avant de mettre le casque, baissez toujours le volume au
minimum (l’écran doit afficher «0» avec un réglage sur «STEP
(0-99)» ou «−∞ dB» avec un réglage sur «dB») (page45).
Installation des piles
Ouvrez l’arrière de la télécommande et insérez deux piles AAA avec
leurs pôles ¥/^ orientés comme indiqué dans le boîtier. Replacez
le couvercle.
Quand faut-il remplacer les piles?
Si la portée d’action de la télécommande diminue ou si l’unité
principale cesse de répondre aux touches de la télécommande,
remplacez les deux piles par des neuves.
Jetez les piles usagées conformément à leurs instructions ou aux
directives établies par votre municipalité.
39

Nomenclature et fonctions des parties (unité principale)
A B C D E F G H I J
A Interrupteur d’alimentation POWER
Sert à mettre l’unité sous et hors tension.
o Si l’écran reste sombre même après mise sous tension avec
l’interrupteur d’alimentation POWER, une des raisons suivantes en est généralement la cause.
o L’unité est sous tension, mais la luminosité de l’écran
(DIMMER) est réglée sur OFF (page52).
o La fonction d’économie automatique d’énergie a fait pas-
ser l’unité en veille.
o Le cordon d’alimentation est débranché.
Pour allumer l’unité, appuyez sur la touche STANDBY/ON de
la télécommande, ou faites passer l’interrupteur d’alimentation POWER sur OFF avant de le ramener sur ON.
B Voyant CLOCK
Indique le statut de synchronisation d’horloge.
Allumé: L’unité est synchronisée avec le signal d’horloge
reçu par la prise d’entrée CLOCK SYNC (10MHz
IN).
Clignotant: Aucune horloge n’est reçue ou l’unité n’est pas
en cours de synchronisation.
Éteint: Il n’y a aucune synchronisation d’horloge.
o La synchronisation d’horloge n’est possible qu’avec la source
d’entrée réglée sur USB ou NET (y compris les clés USB).
o Voir page51 les réglages de synchronisation d’horloge.
C Prise d’entrée audio numérique (OPT/COAX IN)
D Sélecteur SOURCE
Sert à sélectionner la source d’entrée.
Sert à changer les valeurs de réglage quand un paramètre de
menu est affiché.
Pressez-le pour l’utiliser comme touche de validation (ENTER).
Tournez-le lorsque le menu est ouvert pour changer de paramètre affiché ou pour modifier la valeur de réglage.
E Touche MENU
Appuyez sur cette touche pour passer en mode de réglage
(page49).
Appuyez sur cette touche en mode de réglage pour revenir à
l’écran précédent.
F Capteur de signal de télécommande
Reçoit les signaux de la télécommande. Pour utiliser la télécommande, pointez-la vers le capteur de signal de télécommande.
G Port USB (avant)
Branchez ici les clés USB.
o Pour lire les fichiers musicaux d’une clé USB, réglez la source
d’entrée sur NET et utilisez l’appli pour la lecture.
o Ne branchez pas un ordinateur au port USB en face avant de
l’unité. Pour recevoir le signal audio d’un ordinateur, connectez ce dernier au port USB de la face arrière de l’unité.
o Pour des détails, voir le mode d’emploi de TEAC HR Streamer.
Sert à recevoir l’audio numérique (page38).
Connexion optique: utilisez un câble optique à mini-fiche.
Connexion coaxiale: utilisez le câble de conversion RCA
fourni.
40

Conversion ascendante
H Prise casque (PHONES)
Branchez ici un casque à fiche mini-jack 3,5 mm stéréo (page39).
o Ce circuit d’amplification pour casque utilise un connec-
teur à 4points avec mise à la masse indépendante pour
la gauche et la droite. Des fiches ordinaires à 3 ou 4points
peuvent être utilisées.
o Quand un casque est connecté à cette unité, la sortie casque
est activée et le son cesse d’être produit par les prises de sortie audio analogique (LINE OUT) de la face arrière.
Schéma de câblage
L+ R+ L− R−
I Écran
Cet écran affiche des informations sur le signal audio lu et les
pages du menu.
Vous pouvez utiliser la fonction de conversion ascendante avec
toutes les sources d’entrée (page50).
Les relations entre les fréquences d’échantillonnage en entrée et
celles après conversion ascendante sont les suivantes.
Source d’entrée Réglage de conversion ascendante
Entrée
audio
numérique
Fréquence
d’échantillonnage
32 − 32 64 128 256 8,1 16,3
44,1 44,1 44,1 88,2 176,4 352,8 11,2 22,5
88,2 88,2 88,2 88,2 176,4 352,8 11,2 22,5
176,4 176,4 176,4 176,4 176,4 352,8 11,2 22,5
− 352,8 352,8 352,8 352,8 352,8 11,2 22,5
− 705,6 705,6 705,6 705,6 705,6 11,2 22,5
48 48 48 96 192 384 12,2 24,5
96 96 96 96 192 384 12,2 24,5
192 192 192 192 192 384 12,2 24,5
− 384 384 384 384 384 12,2 24,5
− 768 768 768 768 768 12,2 24,5
USB OFF 2Fs 4Fs 8Fs
Fréquence d’échantillonnage après
d’entrée
[kHz] [kHz] [MHz]
Ces valeurs ne sont pas converties.
conversion ascendante
DSD
256
DSD
512
FR
J Bouton VOLUME
Sert à régler le volume. Tournez-le vers la droite pour monter le
volume et vers la gauche pour le baisser.
o Pour permettre le réglage du volume de sortie audio ana-
logique de cette unité, réglez LINE OUT LEVEL (niveau de
sortie ligne) sur VARIABLE (« Niveau de sortie ligne» en
page51). Cela permettra d’utiliser le bouton VOLUME de
cette unité pour régler le niveau de sortie analogique.
o Les réglages de volume sont conservés séparément pour la
sortie audio analogique et la sortie casque.
o La conversion ascendante maximale est de 8fois la fréquence
d’échantillonnage (Fs).
o La conversion ascendante n’est pas possible avec une entrée DSD.
41

Nomenclature et fonctions des parties (télécommande)
a Touche STANDBY/ON
Appuyez sur cette touche pour mettre l’unité en veille ou pour
a
g
l’allumer.
b Touches de sélection d’entrée
b
d
e
Servent à sélectionner la source de lecture.
o La touche LINE n’a pas de fonction.
c Touche INFO
Affiche des informations, dont la conversion ascendante
c
h
(page44).
i
j
k
l
m
f
d Touche UPCONVERT
Appuyez sur cette touche pour changer le réglage de conversion ascendante.
e Touche FILTER
Appuyez sur cette touche pour changer le réglage du filtre.
Cela modifie le filtre en fonction de l’entrée (PCM ou DSD).
f Touche MUTE
Sert à couper le son.
g Touche DIMMER
Appuyez sur cette touche pour régler la luminosité de l’écran de
l’unité principale.
h Touche HEADPHONE
Appuyez sur cette touche pour activer/désactiver la sortie casque.
Lorsque la sortie casque est désactivée, le son est produit par
les prises de sortie audio analogique (LINE OUT).
i Touche DISPLAY
j Touche MENU
Appuyez sur cette touche pour passer en mode de réglage
(page49).
Appuyez sur cette touche en mode de réglage pour revenir à
l’écran précédent.
k Touches Haut/Bas (k/j)
Servent à sélectionner les paramètres de réglage.
l Touche ENTER
Appuyez sur cette touche pour valider la sélection du paramètre.
m Touches VOLUME (+/−)
Servent à régler le volume.
Quand l’unité principale et la télécommande ont toutes les
deux des touches ayant les mêmes fonctions, ce mode d’emploi
explique comment utiliser l’une ou l’autre. La touche homologue
peut s’utiliser de la même façon.
42

Écran
À la mise sous tension
Z
c
NT-505
NETWORK PLAYER
Après l’apparition des messages ci-dessus, la source d’entrée s’affiche à l’écran.
Informations sur la source de lecture
L’affichage d’informations sur la source de lecture apparaîtra après la
mise sous tension de l’unité ainsi qu’après environ 7secondes sans
action alors qu’un écran de réglage est ouvert.
Le format ou le volume du signal entrant sont affichés à droite de
la source de lecture. Appuyez sur la touche DISPLAY de la télécommande pour changer ce qui est affiché.
Nom de la source de lecture
Affiche le nom de la source sélectionnée.
Les noms affichés correspondent aux prises sélectionnées comme
suit:
Les noms entre parenthèses apparaissent lors du changement.
USB (USB)
Port USB de la face arrière
COAX1 (COAXIAL 1)
Prise d’entrée audio numérique coaxiale RCA (COAXIAL) de la
face arrière
COAX2 (COAXIAL 2)
Connexion coaxiale à la prise d’entrée audio numérique (OPT/
COAX IN) de la face avant
OPT1 (OPTICAL 1)
Prise d’entrée audio numérique optique (OPTICAL) de la face
arrière
OPT2 (OPTICAL 2)
Connexion optique à la prise d’entrée audio numérique (OPT/
COAX IN) de la face avant
NET (NETWORK)
Port ETHERNET
Bluetooth (Bluetooth)
Appareil Bluetooth
FR
Exemple d’affichage
Affichage d’informations sur la source de lecture
À l’arrêt
Source de lecture
USB
Affiché pendant la vérification de la connexion
En lecture
Format du signal d’entrée
PCM
USB
Appuyez sur la touche DISPLAY de la télécommande.
Affichage du volume
USB
44.1k
Fréquence d’échantillonnage
−45.5dB
check
Statut du signal d’entrée
Affiche le statut du signal de la source d’entrée.
Check
La connexion est en cours de vérification.
PCM 32kHz
PCM 44.1kHz
PCM 48kHz
PCM 88.2kHz
PCM 96kHz
PCM 128kHz
PCM 176.4kHz
PCM 192kHz
PCM 256kHz
PCM 352.8kHz
PCM 384kHz
PCM 705.6kHz
PCM 768kHz
DSD 2.8MHz
DSD 5.6MHz
DSD 11.2MHz
DSD 22.5MHz
Ces indications donnent le type et la fréquence d’échantillonnage du signal entrant.
Volume
43

36
Affichage (suite)
-62
Informations de conversion ascendante
affichées
Appuyez sur la touche INFO durant la lecture pour afficher des informations sur la conversion ascendante du signal entrant.
o Les affichages de signal entrant et de signal de lecture seront les
mêmes si la conversion ascendante est réglée sur «OFF».
Exemple avec la source de lecture réglée sur USB, COAX1,
COAX2, OPT1, OPT2 ou NET
Format du signal
d’entrée
PCM DSD
44. 1kHz
Fréquence
d’échantillonnage
du signal entrant
Exemple avec la source de lecture réglée sur Bluetooth
Codec
LDAC PCM
44. 1kHz
Format du signal
de lecture
11. 2MHz
Fréquence
d’échantillonnage en
lecture
Format du signal
de lecture
352. 8kHz
VOLUME TYPE réglé sur «dB»
Exemple d’affichage
VOL.
Le niveau maximal de volume est 0, et le niveau minimal −∞
(moins l’infini). Avant de brancher un casque, réglez le bouton
VOLUME au minimum (−∞). Ne pas le faire pourrait causer des
bruits forts et soudains qui risqueraient d’endommager votre
audition ou d’entraîner d’autres problèmes.
Le niveau de sortie réglé s’affiche quand LINE OUT LEVEL est réglé
sur «FIXED 0dB» ou «FIXED +6 dB».
Exemple avec VOLUME TYPE réglé sur «dB»
USB
o Si VOLUME TYPE est réglé sur «STEP (0-99)», «VOL. 85» s’affiche
pour un réglage «FIXED 0dB» et «VOL. 89» s’affiche pour un
réglage «FIXED +6dB».
S’il n’y a pas de casque branché et si LINE OUT LEVEL est réglé sur
«OFF», «VOL. 0» ou «−∞ dB» s’affiche.
Exemple avec VOLUME TYPE réglé sur «dB»
.0dB
+ 0.0
dB
Fréquence
d’échantillonnage du
signal entrant
Fréquences
d’échantillonnage en
lecture
Affichage du volume
Deux types d’unité de volume peuvent être utilisés: STEP (paliers)
et dB.
Le choix se fait au moyen du paramètre VOLUME TYPE (page52).
Le réglage de volume s’affiche en grand quand vous tournez le bouton VOLUME de cette unité.
VOLUME TYPE réglé sur «STEP (0-99)»
Exemple d’affichage
VOL.
Le niveau maximal de volume est 99, et le niveau minimal 0.
Avant de brancher un casque, réglez le bouton VOLUME au
minimum (0). Ne pas le faire pourrait causer des bruits forts et
soudains qui risqueraient d’endommager votre audition ou d’entraîner d’autres problèmes.
USB
S’il n’y a pas de casque branché et si LINE OUT LEVEL est réglé
sur FIXED ou sur OFF
Tourner le bouton VOLUME entraîne l’affichage suivant.
LINE OUT LEVEL réglé sur FIXED
VOL.
LINE OUT LEVEL réglé sur OFF
VOL.
− ∞ dB
FIXED
OFF
44

Fonctionnement de base
1 Basculez l’interrupteur d’alimentation POWER
en position ON pour allumer l’unité.
o Si un amplificateur stéréo est connecté à cette unité, allu-
mez-le toujours en dernier.
2 Tournez le sélecteur SOURCE pour choisir la
source d’entrée.
3 Lancez la lecture sur l’appareil source.
Référez-vous au mode d’emploi de cet appareil.
4 Réglez le volume.
Quand on utilise les sorties ligne
Quand LINE OUT LEVEL (niveau de sortie ligne) est réglé sur
VARIABLE, tournez le bouton VOLUME de cette unité pour régler
le volume.
Si LINE OUT LEVEL est réglé différemment, le volume ne peut pas
être contrôlé depuis cette unité. Utilisez l’amplificateur stéréo ou
un autre appareil connecté à cette unité pour régler le volume.
Quand un casque est connecté à cette unité
Tournez le bouton VOLUME de cette unité pour régler le volume.
o Quand le bouton VOLUME de cette unité est employé, le
réglage de volume s’affiche.
FR
La source sélectionnée s’affiche à l’écran.
o Vous pouvez aussi utiliser les touches de sélection d’entrée
de la télécommande.
o Si le signal entrant n’est pas un signal audio numérique ou
est à un format non pris en charge par cette unité, comme
du Dolby Digital ou du DTS, aucun signal audio n’est produit.
Réglez la sortie numérique de l’appareil connecté pour produire un signal audio PCM.
o Pour lire des fichiers audio quand cette unité est réglée sur
USB, vous devez préalablement installer un pilote dédié sur
l’ordinateur avant de les relier (page53).
o Les données DSD ne peuvent être lues que si la source d’en-
trée est réglée sur USB ou NET (y compris les clés USB) ou si
vous utilisez une entrée numérique au format DoP.
o Pour utiliser l’entrée NET ou le port USB de la face avant, ins-
tallez l’appli TEAC HR Streamer (gratuite) sur un smartphone
et une tablette et connectez ce dernier au même réseau
que l’unité.
45

Notes pour la technologie sans fil
Bluetooth®
Si vous utilisez cette unité avec un téléphone mobile ou d’autres
dispositifs à technologie sans fil Bluetooth, ils ne doivent pas être
éloignés l’un de l’autre de plus de 10m.
Toutefois, selon les conditions d’utilisation, la distance effective de
transmission peut être réduite.
La communication sans fil ne peut pas être garantie pour tous les
appareils à technologie sans fil Bluetooth.
Pour déterminer la compatibilité entre cette unité et un autre appareil
à technologie sans fil Bluetooth, reportez-vous au mode d’emploi de
cet appareil ou contactez le magasin dans lequel vous l’avez acheté.
NOTE
o Vous ne pouvez pas sélectionner le codec à utiliser, par exemple
en appuyant sur un bouton.
o De par les caractéristiques de la technologie sans fil Bluetooth, la
lecture depuis un appareil Bluetooth sera légèrement en retard
par rapport à la lecture depuis cette unité.
Protection de contenu
Cette unité prend en charge la protection de contenu SCMS-T lors
de la transmission audio, afin de pouvoir reproduire un signal audio
protégé.
Profils
Cet unité prend en charge les profils Bluetooth suivants.
o Profil de distribution audio avancée A2DP (Advanced Audio
Distribution Profile)
o Profil de télécommande audio/vidéo AVRCP (Audio/Video Remote
Control Profile)
Pour qu’un signal audio passe par transmission sans fil Bluetooth,
l’appareil Bluetooth doit prendre en charge l’A2DP.
Pour contrôler la lecture sur l’appareil Bluetooth, celui-ci doit
prendre en charge l’AVRCP.
Même si des appareils Bluetooth prennent en charge les mêmes
profils, leurs fonctions peuvent différer en fonction de leurs
spécifications.
Codecs
Cette unité prend en charge les codecs suivants. Elle sélectionne
automatiquement l’un d’eux pour le transfert audio.
o SBC
o AAC
o Qualcomm® aptX™
o Qualcomm® aptX™ HD
o LDAC
Sécurité de transmission
Durant la transmission sans fil Bluetooth, cette unité prend en
charge les fonctions de sécurité conformément aux spécifications
de la norme Bluetooth, mais elle ne garantit pas la confidentialité de
ces transmissions.
TEAC Corporation décline toute responsabilité en cas de fuite d’informations au cours de la transmission sans fil Bluetooth.
L’unité sélectionnera le codec approprié à utiliser en fonction de la
compatibilité de codec de l’autre appareil Bluetooth et des conditions de communication.
Le LDAC est une technologie de codage audio mise au point par Sony
qui permet la transmission de contenu audio en haute résolution
(Hi-Res), même par connexion Bluetooth.
Contrairement aux autres technologies de codage compatibles
Bluetooth telles que le SBC, il fonctionne sans conversion descendante
du contenu audio Hi-Res*, et permet de transmettre sur un réseau sans
fil Bluetooth environ trois fois plus de données** que ces autres technologies avec une qualité sonore sans précédent grâce à un codage
efficace et une optimisation en paquets.
*À l’exclusion des contenus au format DSD.
** Par rapport au SBC (Subband Coding) quand on sélectionne le débit
binaire de 990kbit/s (96/48kHz) ou 909kbit/s (88,2/44,1kHz)
46

Appairage avec un autre appareil
Bluetooth
L’appairage de cette unité avec un autre appareil Bluetooth est
nécessaire la première fois que vous l’utilisez et la première fois que
vous la connectez à un autre appareil Bluetooth.
1 Tournez le bouton SOURCE pour choisir
Bluetooth.
Bluetooth
check
2 Activez la transmission Bluetooth sur l’autre
appareil Bluetooth.
3 Maintenez pressé le sélecteur SOURCE pour
passer en mode d’appairage.
PAIRING. . .
Lecture depuis un appareil Bluetooth
o Appairez cette unité la première fois que vous l’utilisez et lorsque
vous souhaitez la connecter pour la première fois à un nouvel
appareil Bluetooth (page47).
o Lors de l’appairage ou de la connexion avec un autre appareil
Bluetooth, ceux-ci doivent être à quelques mètres l’un de l’autre.
S’ils sont trop éloignés, l’appairage et la connexion peuvent s’avérer impossibles.
1 Activez la transmission Bluetooth sur l’autre
appareil Bluetooth.
2 Tournez le bouton SOURCE pour choisir
Bluetooth.
Cela règle la source sur Bluetooth.
o Vous pouvez aussi utiliser la touche Bluetooth de la
télécommande.
Exemple d’affichage
Bluetooth
check
FR
o «PAIRING…» clignote lors de l’appairage.
4 Sur l’autre appareil Bluetooth, sélectionnez
«NT-505» (cette unité).
Après passage de cette unité en mode d’appairage, appairez-la
depuis l’autre appareil Bluetooth.
Pour des détails, référez-vous au mode d’emploi de cet appareil
Bluetooth.
Après connexion, l’écran affiche le nom de l’appareil connecté,
suivi de la source d’entrée.
Exemple d’affichage
CONNECTED TO
iPhone 001
c
Bluetooth
VOL. 6
c
CONNECTED TO
iPhone 001
c
Bluetooth
Cette unité va rechercher les appareils appairés et automatiquement s’y connecter si elle en trouve un.
ATTENTION
Selon l’appareil source, vous pouvez également avoir à effectuer
des opérations de connexion sur celui-ci.
Si vous ne parvenez pas à établir la connexion, consultez le
mode d’emploi de l’appareil source.
VOL. 6
47

Technologie sans fil Bluetooth® (suite)
Changement d’appareil connecté
1 Tournez le sélecteur SOURCE pour afficher
DEVICE SELECT (sélection d’appareil).
La ligne du bas de l’écran affiche le nom du dernier appareil
connecté.
Exemple d’affichage
MENU
DEVICE SELECT
Player_1
Nom du dernier appareil connecté
2 Tournez le sélecteur SOURCE pour acher les
appareils Bluetooth déjà appairés.
o L’unité peut mémoriser un maximum de huit appairages
d’appareil.
o Si aucun appareil appairé n’est disponible, l’affichage est le
suivant.
MENU
DEVICE SELECT
NO PAIRED DEVICE
4 Lancez la lecture sur l’autre appareil Bluetooth.
o Vérifiez que le volume est monté sur l’autre appareil
Bluetooth. Si vous ne montez pas le volume sur l’appareil de
lecture, aucun son ne pourra sortir de cette unité.
NOTE
Maintenez pressée la touche MENU pour effacer un appareil appairé.
o Maintenez pressée la touche ENTER pour passer en mode
d’appairage (page47).
o Les 16 premiers caractères du nom de l’appareil sont affichés.
o Si le nom de l’appareil contient des caractères autres que
des chiffres et des lettres anglaises, il ne s’affichera pas
correctement.
3 Appuyez sur le sélecteur SOURCE pour établir
la connexion.
Après connexion, l’écran affiche la source d’entrée.
ATTENTION
Quel que soit l’état de la connexion de cette unité avec l’autre
appareil Bluetooth, si la source d’entrée n’est pas affichée,
faites redémarrer à la fois cette unité et l’autre appareil et
reconnectez-les.
NOTE
Selon l’appareil source, vous pouvez également avoir à effectuer des opérations de connexion sur celui-ci.
Si vous ne parvenez pas à établir la connexion, consultez le
mode d’emploi de l’appareil source.
48

Réglages
1 Appuyez sur la touche MENU pour ouvrir
l’écran de menu.
2 Tournez le sélecteur SOURCE pour choisir le
paramètre que vous souhaitez régler.
3 Appuyez sur le sélecteur SOURCE.
FR
o Vous pouvez aussi appuyer sur la touche ENTER de la
télécommande.
o La valeur actuellement réglée s’affiche à l’écran.
4 Tournez le sélecteur SOURCE pour changer la
valeur de réglage.
o Vous pouvez aussi utiliser les touches Haut et Bas (k, j) de
la télécommande.
o Appuyez sur la touche MENU pour revenir à la sélection de
paramètres de réglage.
o Vous pouvez aussi utiliser les touches Haut et Bas (k, j) de
la télécommande.
Les paramètres de menus apparaissent dans l’ordre suivant.
UPCONVERT
DIGITAL FILTER(PCM)
DIGITAL FILTER(DSD)
CLOCK SYNC
LINE OUT SELECT
LINE OUT LEVEL
DIMMER
VOLUME TYPE
5 Appuyez sur le sélecteur SOURCE.
o Vous pouvez aussi appuyer sur la touche ENTER de la
télécommande.
6 Quand vous avez fini vos réglages, appuyez
sur la touche MENU pour réacher le statut de
source d’entrée.
o Si vous ne faites rien durant 7secondes, l’écran retourne à
l’affichage du statut de source d’entrée.
DISPLAY TYPE
AUTO POWER SAVING
Version info
49

Réglages (suite)
Conversion ascendante
Sert à activer le circuit de conversion ascendante quand des signaux
PCM sont reçus.
o Voir page41 pour les relations entre les fréquences d’échantil-
lonnage en entrée et celles après conversion ascendante.
MENU
UPCONVERT
OFF
OFF
Le signal entrant d’origine est directement transmis au convertisseur N/A sans conversion ascendante.
2× Fs
Si la fréquence d’échantillonnage du signal audio entrant est
inférieure à 2 fois une valeur standard, elle bénéficie d’une
conversion ascendante 2× avant l’envoi au convertisseur N/A.
4× Fs
Si la fréquence d’échantillonnage du signal audio entrant est
inférieure à 4 fois une valeur standard, elle bénéficie d’une
conversion ascendante 4× avant l’envoi au convertisseur N/A.
8× Fs
Si la fréquence d’échantillonnage du signal audio entrant est
inférieure à 8 fois une valeur standard, elle bénéficie d’une
conversion ascendante 8× avant l’envoi au convertisseur N/A.
DSD 256
DSD 512
La source d’entrée est convertie au format numérique DSD avant
d’être envoyée au convertisseur N/A.
Filtre numérique PCM
Détermine le type de filtre numérique utilisé lors de la conversion de
signaux numériques PCM en analogique.
MENU
DIGITAL FILTER(PCM)
OFF
Slow roll off
Un filtre FIR (RIF en français) à pente douce est utilisé pour réduire
progressivement les signaux extérieurs à la bande audio.
Sharp roll off
Un filtre FIR (RIF en français) à forte pente est utilisé pour réduire
brutalement les signaux extérieurs à la bande audio.
Short Delay Slow
Un filtre à court retard et à pente douce est utilisé pour réduire
progressivement les signaux extérieurs à la bande audio.
Short Delay Sharp
Un filtre à court retard et à forte pente est utilisé pour réduire
brutalement les signaux extérieurs à la bande audio.
Low dispersion
Un filtre à court retard et à faible dispersion est utilisé pour améliorer les caractéristiques de latence des hautes fréquences.
OFF
Aucun filtre numérique n’est utilisé.
o Quand des signaux à 352,8kHz, 384kHz, 705,6 kHz ou 768 kHz
sont reçus, le filtre numérique est désactivé durant la lecture quel
que soit ce réglage.
Note concernant le filtre numérique durant la
lecture PCM
Filtres numériques RIF
Ce type de filtre a une solide réputation de qualité sonore et présente un son ayant à la fois des réverbérations riches et denses
et des transitoires vives.
Filtres numériques à retard court
Ce type de filtre n’a pas de pré-écho dans la réponse impulsionnelle et possède une attaque du son et une réverbération
naturelles pour une qualité tonale proche de celle de l’original.
50

Filtre numérique DSD
Détermine le type de filtre numérique utilisé lors de la conversion de
signaux numériques DSD en analogique.
MENU
DIGITAL FILTER(DSD)
WIDE
NARROW
La fréquence de coupure sera définie en fonction du signal DSD
comme suit.
Signal DSD Fréquence de coupure
2,8 MHz 39 kHz
5,6 MHz 78 kHz
11,2 MHz 156 kHz
22,5 MHz 312 kHz
WIDE
La fréquence de coupure sera définie en fonction du signal DSD
comme suit.
Signal DSD Fréquence de coupure
2,8 MHz 76 kHz
5,6 MHz 152 kHz
11,2 MHz 304 kHz
22,5 MHz 608 kHz
Sortie ligne
Sert à sélectionner les prises d’où sortira le signal audio analogique.
o La sortie ne peut pas se faire en même temps par les prises RCA
et les prises XLR.
MENU
LINE OUT SELECT
RCA
FR
RCA
Sortie par les prises RCA.
XLR (HOT 2)
Sortie par les prises XLR avec le point chaud sur la broche 2.
XLR (HOT 3)
Sortie par les prises XLR avec le point chaud sur la broche 3.
Niveau de sortie ligne
Sert à sélectionner le niveau du signal audio produit par les prises
de sortie audio analogique (LINE OUT).
MENU
LINE OUT LEVEL
FIXED 0dB
Synchronisation d’horloge
o La synchronisation d’horloge (Clock sync) n’est possible que si
USB ou NET est choisi comme source d’entrée (y compris les clés
USB).
MENU
CLOCK SYNC
OFF
OFF
Aucune synchronisation d’horloge n’est utilisée.
ON
L’horloge maître de cette unité sera synchronisée sur l’horloge
10MHz reçue par la prise d’entrée CLOCK SYNC (10MHz IN).
FIXED 0dB
La sortie maximale est de 2Vrms. Choisissez ce réglage si vous
souhaitez régler le volume à l’aide d’un amplificateur.
o Aucun son ne sortira si un casque est branché.
FIXED +6dB
La sortie maximale est de 4Vrms. Choisissez ce réglage si vous
souhaitez régler le volume à l’aide d’un amplificateur.
o Aucun son ne sortira si un casque est branché.
o En cas de distorsion du son, choisissez le réglage FIXED 0dB.
VARIABLE
Cela permettra d’utiliser le bouton VOLUME pour régler le niveau
de sortie analogique. Optez pour ce réglage si vous souhaitez
utiliser cette unité pour régler le volume.
o Aucun son ne sortira si un casque est branché.
OFF
Aucun son n’est produit.
51

Réglages (suite)
Luminosité de l’écran
MENU
DIMMER
BRIGHT
DARK
Sombre
SLIGHTLY BRIGHT
Faiblement éclairé
BRIGHT
Brillamment éclairé
AUTO OFF
S’éteint automatiquement
o L’écran reste éteint même quand l’unité est allumée.
Affichage du volume
Détermine la façon dont s’affiche le volume.
MENU
VOLUME TYPE
STEP (0-99)
Fonction d’économie automatique
d’énergie
Cette unité a une fonction d’économie automatique d’énergie.
o La fonction d’économie automatique d’énergie est activée lorsque
l’unité quitte l’usine.
MENU
AUTO POWER SAVING
ON
OFF
La fonction d’économie automatique d’énergie est désactivée.
ON
L’unité bascule automatiquement en mode de veille si aucun signal
audio n’est produit et si aucune opération n’est effectuée durant
environ 30minutes.
Affichage d’informations
Affiche la version de firmware utilisée par l’unité.
MENU
Version info
SYSTEM
STEP (0-99)
Le volume est indiqué en paliers allant de 0 (minimum) à 99
(maximum).
dB
Indique le volume en décibels (dB).
Affichage à l’écran
Sélectionne l’information affichée à droite de la source de lecture.
MENU
DISPLAY TYPE
volume
volume
Le volume sera indiqué.
sampling freq.
Des informations sur la source de lecture seront affichées.
SYSTEM
Version de firmware du micro-ordinateur interne
USB
Version de firmware du module USB
Bluetooth
Version de firmware du module Bluetooth
NETWORK
Version de firmware du module réseau
52

Lecture de musique sur un ordinateur
Installation du pilote
Cette unité peut être branchée à des ordinateurs ayant les systèmes
d’exploitation suivants. Le fonctionnement avec d’autres systèmes
d’exploitation n’est pas garanti (en date de novembre 2017).
Avec un Mac
Le pilote fonctionne avec les versions de système d’exploitation
suivantes.
OS X Lion (10.7)
OS X Mountain Lion (10.8)
OS X Mavericks (10.9)
OS X Yosemite (10.10)
OS X El Capitan (10.11)
macOS Sierra (10.12)
macOS High Sierra (10.13)
Cette unité fonctionnera avec le pilote standard du système d’exploitation (OS), donc il n’y a pas besoin d’installer un pilote spécial.
Un pilote dédié doit toutefois être installé sur l’ordinateur pour utiliser Bulk Pet.
Avec Windows
Le pilote fonctionne avec les versions de système d’exploitation
suivantes.
Windows 7 (32/64bits)
Windows 8 (32/64bits)
Windows 8.1 (32/64bits)
Windows 10 (32/64bits)
Installation du pilote sur l’ordinateur
Pour lire au travers de cette unité des fichiers audio stockés sur un
ordinateur, vous devez au préalable installer un pilote dédié sur
l’ordinateur. Téléchargez le pilote dédié depuis le site mondial TEAC.
Site mondial TEAC
http://www.teac-global.com/
À propos du mode de transmission
Les données peuvent être transférées en mode isochrone ou Bulk
Pet.
Les fréquences d’échantillonnage qui peuvent être transmises sont
44,1, 48, 88,2, 96, 176,4, 192, 352,8, 384, 705,6 et 768kHz.
Quand la connexion est correcte, vous pouvez sélectionner «TEAC
USB AUDIO DEVICE» comme sortie audio dans le système d’exploitation de l’ordinateur.
o Durant le transfert, les données audio envoyées par l’ordinateur
seront traitées à l’aide de l’horloge de cette unité, ce qui permet de
réduire la gigue qui survient lors de la transmission des données.
Téléchargement de l’application de
lecture TEAC HR Audio Player
Vous pouvez télécharger depuis le site mondial TEAC (http://
teac-global.com/) des versions pour Mac et Windows de notre application gratuite TEAC HR Audio Player qui assure la lecture de fichiers
DSD.
Note concernant le réglage de TEAC HR Audio Player
Pour lire des enregistrements DSD à 22,5MHz avec TEAC HR Audio
Player, ouvrez la fenêtre «Configure» (configurer) et réglez «Decode
mode» (mode de décodage) sur «DSD Native».
Pour lire des formats autres que le DSD à 22,5MHz, vous pouvez
régler ce paramètre comme vous le souhaitez sur «DSD over PCM»
ou «DSD Native».
Pour plus de détails, reportez-vous à la section «Selecting DSD
decoding mode» (sélection du mode de décodage DSD) dans le
mode d’emploi du TEAC HR Audio Player.
FR
ATTENTION
Installez le pilote dédié avant de relier l’unité à l’ordinateur
par USB.
Si vous connectez cette unité à l’ordinateur avant d’installer le pilote,
elle ne fonctionnera pas correctement.
o Pour des instructions sur les procédures d’installation des pilotes,
accédez à la page Downloads (téléchargements) du site mondial
TEAC (http://teac-global.com/).
o Selon la combinaison ordinateur et logiciel, un bon fonction-
nement peut ne pas être possible même avec les systèmes
d’exploitation ci-dessus.
53

Lecture de musique sur un ordinateur (suite)
Lecture de fichiers audio depuis un
ordinateur
1 Reliez le port USB de la face arrière de cette
unité à l’ordinateur au moyen d’un câble USB.
Câble USB
o Utilisez un câble ayant une fiche qui correspond à la prise de
cette unité.
2 Mettez l’ordinateur sous tension.
o Vérifiez que son système d’exploitation a normalement
démarré.
3 Basculez l’interrupteur d’alimentation POWER
en position ON pour allumer l’unité.
5 Lancez la lecture d’un chier audio sur
l’ordinateur.
En réglant au maximum le volume de sortie de l’ordinateur et
en ajustant le volume de sortie depuis l’amplificateur stéréo,
une meilleure qualité sonore peut être obtenue.
Réduisez au minimum le volume de l’amplificateur stéréo avant
de commencer la lecture. Ensuite, montez-le progressivement.
Si vous avez branché un casque à cette unité, tournez le bouton VOLUME dans le sens antihoraire pour réduire le volume
au minimum avant de mettre le casque. Ensuite, montez-le
progressivement.
o L’ordinateur et cette unité ne peuvent pas se contrôler l’un l’autre.
o N’essayez aucune des opérations suivantes pendant la lecture
d’un fichier audio par USB. Cela pourrait entraîner un mauvais
fonctionnement de l’ordinateur. Quittez toujours le logiciel de
lecture audio avant d’entamer une des actions suivantes.
o Débrancher le câble USB
o Éteindre l’unité ou la mettre en veille
o Changer la sélection d’entrée actuelle
o Lors de la lecture d’un fichier audio par USB, les sons du système
de l’ordinateur seront aussi produits. Si vous ne souhaitez pas
que ces sons soient produits, faites les réglages appropriés sur
l’ordinateur pour les couper.
o Si vous branchez cette unité à l’ordinateur ou si vous réglez son
entrée sur USB après avoir lancé le logiciel de lecture audio,
les fichiers audio peuvent ne pas être lus correctement. Si cela
se produit, faites redémarrer le logiciel de lecture audio ou
l’ordinateur.
4 Tournez le sélecteur SOURCE an de sélection-
ner USB.
54

Guide de dépannage
Si vous rencontrez un problème avec l’unité, veuillez prendre un
moment pour lire les informations suivantes avant de solliciter une
réparation. Si cette unité ne fonctionne toujours pas correctement,
contactez le revendeur chez qui vous l’avez achetée.
Générales
L’unité ne s’allume pas.
e Vérifiez que le cordon d’alimentation est enfoncé à fond dans
la prise secteur. Si la prise a un commutateur, vérifiez que
celui-ci est en position ON.
e Branchez un autre appareil électrique à la prise pour vérifier
qu’elle fournit bien du courant.
e Si la fonction d’économie automatique d’énergie a fait passer
l’unité en veille, appuyez sur la touche STANDBY/ON de la
télécommande pour rallumer l’unité.
Aucun son n’est produit.
e Si un amplificateur stéréo est branché à cette unité, réglez son
volume.
e Si vous utilisez un casque branché à cette unité, employez le
bouton VOLUME pour régler le volume.
e Avec le sélecteur SOURCE, sélectionnez l’entrée à laquelle est
branchée la source que vous désirez entendre.
e Re-vérifiez les branchements aux autres équipements.
Branchements à un ordinateur
L’ordinateur ne reconnaît pas cette unité.
e Voir page53 pour plus d’informations sur les systèmes
d’exploitation pris en charge. Le fonctionnement avec des
systèmes d’exploitation non pris en charge n’est pas garanti.
Du bruit se produit.
e Lancer d’autres applications durant la lecture d’un fichier
audio peut interrompre la lecture ou causer du bruit. Ne lancez pas d’autres applications durant la lecture.
e Quand l’unité est branchée à un ordinateur via un concen-
trateur (hub) USB, par exemple, du bruit peut être entendu.
Si cela se produit, branchez l’unité directement à l’ordinateur.
Les fichiers audio ne peuvent pas être lus.
e Branchez cette unité à l’ordinateur et réglez son entrée sur
USB avant de lancer le logiciel de lecture audio.
Si vous branchez cette unité à l’ordinateur ou si vous réglez
son entrée sur USB après avoir lancé le logiciel de lecture audio, les fichiers musicaux peuvent ne pas être lus
correctement.
Fonction Bluetooth
FR
Il y a un bruit de ronflement.
e Si un câble de liaison est proche d’un cordon d’alimentation,
d’un éclairage fluorescent ou d’une cause de parasites similaire,
écartez-les autant que possible l’un de l’autre.
Il n’y a pas de son d’un côté du casque.
e Vérifiez que la fiche du casque est enfoncée à fond.
Synchronisation d’horloge
Le voyant CLOCK ne cesse pas de clignoter.
e Réglez l’horloge de synchronisation sur OFF lorsque vous ne
l’utilisez pas.
e La synchronisation avec le signal d’horloge entrant peut ne
pas être possible. Vérifiez les connexions des prises de synchro
d’horloge et les réglages de l’appareil connecté.
Impossible d’afficher le nom de l’appareil.
e Cette unité ne prend pas en charge l’affichage des symboles
ou caractères à double octet, comme les caractères japonais
ou chinois.
N’utilisez que des chiffres et des lettres anglaises pour les
noms des appareils Bluetooth connectés à cette unité.
Impossible de changer d’appareil Bluetooth
connecté.
e Cette unité ne peut pas avoir plusieurs appareils Bluetooth
connectés en même temps.
Pour changer l’appareil connecté à cette unité par Bluetooth,
mettez fin à la connexion actuelle avant de connecter un autre
appareil Bluetooth.
Comme cette unité utilise un microcontrôleur, du bruit ou d’autres
interférences externes peuvent entraîner son mauvais fonctionnement. Si cela se produit, débranchez le cordon d’alimentation,
attendez un instant puis rallumez l’unité et relancez les opérations.
Suite à la prochaine page e
55

Guide de dépannage (suite) Caractéristiques techniques
Restauration des réglages par défaut
1 En maintenant pressée la touche MENU, bas-
culez l’interrupteur d’alimentation POWER sur
ON.
2 Relâchez la touche MENU lorsque FACTORY
RESET (réinitialisation d’usine) apparaît.
MENU
FACTORY RESET
ARE YOU SURE?
Sorties audio analogiques
Prises
Prises XLR ........................................... 1 paire (L/R)
Prises RCA ........................................... 1 paire (L/R)
Impédance de sortie .................................... XLR: 188Ω
RCA: 150Ω
Niveau maximal de sortie (1kHz/pleine échelle, sous 10kΩ)
FIXED 0dB .................................... XLR/RCA: 2,0Vrms
FIXED +6dB .................................. XLR/RCA: 4,0Vrms
VARIABLE .......................................... XLR: 12Vrms
RCA: 6Vrms
Réponse en fréquence* ................. 5 Hz – 80 kHz (+1 dB/−5 dB)
Rapport signal/bruit* ................. 110dB (pondération A, 1kHz)
Distorsion* ........ 0,0015% (1kHz, filtre passe-bas: 20 Hz – 20 kHz)
*Conditions de mesure
Signal entrant: PCM 192kHz 24bits
Sortie mesurée: RCA
Filtre numérique PCM: désactivé
Sortie casque
Prise ............................ Mini-jack 3,5mm stéréo 4points × 1
Sortie efficace maximale ............ 500 mW + 500 mW (sous 32Ω)
Plage d’impédance compatible .......................... 16 – 600Ω
3 Appuyez sur le sélecteur SOURCE.
La réinitialisation commence quand «Please wait!» (veuillez
patienter) apparaît.
Please wait!
L’écran d’affichage de source de lecture apparaît une fois la
réinitialisation terminée.
Exemple d’affichage
USB
ATTENTION
o Ne faites pas passer l’unité en veille tant que l’écran d’affi-
chage de source de lecture n’est pas revenu.
o Cette opération restaurera tous les réglages par défaut, y
compris ceux des paramètres de réseau.
−45.5dB
Entrées audio numériques**
Numérique COAXIAL ................................. Prise RCA × 1
Mini-jack*** 3,5mm stéréo × 1
(Connexion par fiche mini-jack 3,5mm possible
avec câble adaptateur RCA/mini-jack 3,5mm)
(0,5Vc-c, 75Ω)
Numérique OPTICAL ................................ Prise carrée × 1
Connecteur rond*** × 1
(−24,0 à −14,5dBm en crête)
Clé USB .............................. Port USB (avant) de type A × 1
(conforme USB 2.0)
USB ................................. Port USB (arrière) de type B × 1
(conforme USB 2.0)
LAN (réseau local) ....................................... 100BASE-T
Fréquence d’échantillonnage des données PCM
Numérique COAXIAL
32 kHz, 44,1 kHz, 48 kHz, 88,2 kHz, 96 kHz, 176,4 kHz, 192 kHz
Numérique OPTICAL
32 kHz, 44,1 kHz, 48 kHz, 88,2 kHz, 96 kHz, 176,4 kHz, 192 kHz
USB ........ 44,1kHz, 48kHz, 88,2kHz, 96kHz, 176,4kHz, 192kHz
352,8 kHz, 384 kHz, 705,6 kHz, 768 kHz
o Les réglages d’usine par défaut sont les valeurs de réglage qui
apparaissent dans les images d’écran employées par ce mode
d’emploi.
56

Résolution de quantification en bits
Numérique COAXIAL/numérique OPTICAL ............. 16/24bits
USB ............................................... 16/24/32bits
Fréquence d’échantillonnage des données DSD
Numérique COAXIAL/numérique OPTICAL ............... 2,8MHz
(pris en charge par transmission DoP 176,4kHz/24bits)
USB ....................... 2,8MHz, 5,6MHz, 11,2MHz, 22,5MHz
**Voir le mode d’emploi de TEAC HR Streamer pour des détails sur les clés
USB et les réseaux.
***Cette prise d’entrée peut servir à la fois aux connexions optiques et
coaxiales.
Fonction Bluetooth
Version de Bluetooth ............................................ 4.0
Classe de sortie ............................................. Classe 2
(distance de transmission sans obstacles**** .................. 10 m)
Profils pris en charge ................................... A2DP, AVRCP
Codecs A2DP pris en charge
SBC, AAC, Qualcomm® aptX™, Qualcomm® aptX™ HD, LDAC
Protection de contenu A2DP prise en charge ............... SCMS-T
Nombre maximal d’appairages mémorisés ......................... 8
****La distance de transmission est une approximation. Elle peut varier en
fonction de l’environnement et des ondes électromagnétiques.
Accessoires fournis
Cordon d’alimentation × 1
Câble de conversion (RCA vers mini-jack) × 1
Télécommande (RC-1330) × 1
Piles pour télécommande (AAA) × 2
Mode d’emploi (ce document, y compris la garantie) × 1
o Pour plus d’informations sur la garantie, les utilisateurs vivant aux
États Unis et au Canada doivent consulter les pages 86–87
et le dos de la couverture (document de garantie). Les utilisateurs
vivant en Europe et dans d’autres régions doivent consulter
page87.
o Le mode d’emploi de TEAC HR Streamer peut être téléchargé
depuis le site mondial TEAC (http://www.teac-global.com/).
o Conception et caractéristiques techniques sont sujettes à modifi-
cations sans préavis.
o Le poids et les dimensions sont des valeurs approchées.
o Les illustrations de ce mode d’emploi peuvent légèrement différer
des modèles de production.
FR
Entrée d’horloge de synchronisation
Connecteur. . . . . . . . . . . . . . . . . . . . . . . . . . . . . . . . . . . . . . . . . . . . . . . . . . . . BNC
Fréquence d’échantillonnage d’entrée ...................... 10 MHz
Impédance d’entrée ........................................... 50Ω
Niveau d’entrée .... Onde rectangulaire: équivalent aux niveaux TTL
Onde sinusoïdale: 0,5 à 1,0 Vrms
Générales
Alimentation électrique
Modèle Europe ......................... CA 220 – 240V, 50/60 Hz
Modèle USA/Canada ............................ CA 120 V, 60Hz
Consommation électrique ..................................... 18 W
Consommation en veille .................. 0,4W (en mode de veille)
Dimensions externes (L × H × P) (saillies incluses)
290 mm × 81,2 mm × 248,7 mm
Poids ......................................................... 3,9 kg
Température de fonctionnement .................... +5°C à +35°C
Hygrométrie de fonctionnement ... 5% à 85% (sans condensation)
Température de stockage ........................... −20°C à +55°C
57

INSTRUCCIONES IMPORTANTES DE SEGURIDAD
1) Lea estas instrucciones.
2) Conserve estas instrucciones.
3) Cumpla con lo indicado en los avisos.
PRECAUCIÓN: PARA REDUCIR EL RIESGO DE
DESCARGA ELÉCTRICA, NO QUITE LA CUBIERTA (NI
EL PANEL POSTERIOR). NO HAY PIEZAS INTERNAS QUE
EL USUARIO PUEDA REPARAR. PARA REPARACIONES,
REMÍTASE A UN SERVICIO TÉCNICO CUALIFICADO.
El símbolo del rayo acabado en flecha dentro de un
<
B
triángulo equilátero alerta al usuario de la presencia
de un “voltaje peligroso” sin aislar dentro de la carcasa
del producto que puede ser de magnitud suficiente
como para constituir riesgo de descarga eléctrica para
las personas.
El signo de exclamación dentro de un triángulo equilátero alerta al usuario de la presencia de importantes
instrucciones de funcionamiento y mantenimiento en
la literatura que acompaña al aparato.
AVISO: PARA EVITAR RIESGO DE INCENDIO O
DESCARGAS ELÉCTRICAS, NO EXPONGA ESTE
APARATO A LA LLUVIA NI A LA HUMEDAD.
PRECAUCIÓN
o NO QUITE LAS CARCASAS EXTERNAS NI DEJE AL AIRE LA
ELECTRÓNICA. ¡EN EL INTERIOR NO HAY PIEZAS QUE EL USUARIO
PUEDA MANIPULAR!
o SI EXPERIMENTA PROBLEMAS CON ESTE PRODUCTO, PÓNGASE
EN CONTACTO CON EL ESTABLECIMIENTO DONDE ADQUIRIÓ
LA UNIDAD PARA SOLICITAR SERVICIO TÉCNICO. NO UTILICE EL
APARATO HASTA QUE HAYA SIDO REPARADO.
o EL USO DE CONTROLES, AJUSTES O PROCEDIMIENTOS QUE NO
SEAN LOS ESPECIFICADOS EN ESTE MANUAL PUEDE CAUSAR
EXPOSICIÓN A RADIACIONES PELIGROSAS.
4) Siga todas las instrucciones.
5) No utilice este aparato cerca del agua.
6) Límpielo solo con un trapo seco.
7) No bloquee ninguna de las ranuras de ventilación. Instale este
aparato de acuerdo con las instrucciones del fabricante.
8) No instale este aparato cerca de fuentes de calor como radiadores, calentadores, hornos u otros aparatos (incluyendo
amplificadores) que produzcan calor.
9) No elimine el sistema de seguridad que supone el enchufe
polarizado o con toma de tierra. Un enchufe polarizado tiene
dos bornes, uno más ancho que el otro. Uno con toma de tierra
tiene dos bornes iguales y una tercera lámina para la conexión a
tierra. El borne ancho o la lámina se incluyen para su seguridad.
Si el enchufe que venga con la unidad no encaja en su salida de
corriente, haga que un electricista cambie su salida anticuada.
10) Evite que el cable de corriente quede de forma que pueda
ser pisado o quedar retorcido o aplastado, especialmente en
los enchufes, receptáculos o en el punto en el que salen del
aparato.
11) Use solo accesorios / complementos especificados por el
fabricante.
12) Utilice este aparato solo con un soporte,
trípode o bastidor especificado por el
fabricante o que se venda con el propio
aparato. Cuando utilice un bastidor con
ruedas, tenga cuidado al mover la combinación de aparato/bastidor para evitar
que vuelque y puedan producirse daños.
13) Desconecte este aparato de la corriente durante las tormentas
eléctricas o cuando no lo vaya a usar durante un periodo de
tiempo largo.
14) Dirija cualquier posible reparación solo al servicio técnico oficial.
Este aparato deberá ser reparado si se ha dañado de alguna
forma, como por ejemplo si el cable de corriente o el enchufe
están rotos, si ha sido derramado algún líquido sobre la unidad o algún objeto ha sido introducido en ella, si ha quedado
expuesto a la lluvia o la humedad, si no funciona normalmente
o si ha caído al suelo en algún momento.
o Este aparato libera corriente nominal no válida para el fun-
cionamiento a través de la toma de corriente, aún cuando el
interruptor de encendido y activación (POWER o STANDBY/ON)
no esté en la posición de encendido (ON).
o El enchufe que se conecta a la red es el dispositivo de desco-
nexión, por lo que deberá permanecer siempre en prefecto
estado de uso.
o Deberá llevar cuidado si utiliza auriculares con este producto, ya
que una excesiva presión sonora (volumen) procedente de los
mismos puede causar perdidas de audición.
58

PRECAUCIÓN
o No exponga este aparato a salpicaduras ni goteras.
o No coloque objetos que contengan líquidos, como por ejem-
plo jarrones, sobre el aparato.
o No instale este aparato en lugares cerrados tales como estan-
terías o similares.
o Este aparato debe situarse lo suficientemente cerca de una
toma de electricidad como para poder alcanzar fácilmente el
cable de corriente en cualquier momento.
o Si el producto utiliza pilas (esto incluye las pilas instaladas y
los “packs” de pilas), se evitará su exposición directa al sol, al
fuego o a cualquier otra fuente de calor excesivo.
o PRECAUCIÓN con los productos que emplean baterías de
litio reemplazables: existe peligro de explosión si la batería se
reemplaza por otra de tipo incorrecto. Reemplácela sólo por
otra igual o de tipo equivalente.
AVISO
Los productos con construcción de Clase ! están equipados con
un cable de alimentación que tiene conexión de tierra. El cable
de estos productos deberá conectarse a una toma de corriente
que tenga conexión de protección de tierra.
EN EE. UU./CANADÁ, UTILICE SOLO ALIMENTACIÓN CON
CORRIENTE DE 120 V.
V
Precauciones con respecto a las pilas
Un mal uso de las pilas puede hacer que se rompan o que tengan fugas y ello causar fuego, lesiones u oxidación en los objetos
cercanos. Por favor, lea y observe las siguientes precauciones
cuidadosamente.
Para consumidores europeos
Deshacerse de aparatos eléctricos, electrónicos,
pilas/baterías y acumuladores
a) Todos los aparatos eléctricos y electrónicos, y pilas/baterías y
acumuladores gastados, deben ser eliminados separados del
resto de basura común y únicamente en los “puntos limpios”
o bajo los procedimientos especificados por el gobierno o
autoridades municipales locales.
b) Con la eliminación correcta de los equipos eléctricos y elec-
trónicos, y de pilas/baterías y acumuladores gastados, estará
ayudando a conservar recursos muy valiosos y a evitar los
posibles efectos negativos en la salud humana y en el medio
ambiente.
c) La eliminación incorrecta de los equipos eléctricos y electró-
nicos, y pilas/baterías y acumuladores, puede producir
efectos muy dañinos en el medio ambiente y en la salud
humana a causa de las sustancias peligrosas que pueden
encontrarse en estos equipos.
d) El símbolo de Eliminación de Aparatos Eléctricos y
Electrónicos (WEEE en inglés), identificado por cubos
de basura con ruedas tachados, indican que los equipos eléctricos y electrónicos, y las pilas/baterías y
acumuladores, deben ser eliminados de forma totalmente independiente con respecto a la basura doméstica.
Si una pila/batería o un acumulador contienen más
cantidad de los valores especificados de plomo (Pb),
mercurio (Hg), y/o cadmio (Cd) según está definido
en la Directiva relativa a las pilas (2006/66/EC), entonces los símbolos químicos correspondientes a estos
elementos estarán indicados debajo del símbolo WEEE.
e) Existen sistemas para la eliminación y recogida a disposición
del usuario final. Si necesita más información sobre cómo
deshacerse de aparatos eléctricos y electrónicos antiguos, así
como de pilas/baterías y acumuladores, póngase en contacto
con su ayuntamiento, con la correspondiente empresa del
servicio de recogida de residuos o con el establecimiento
donde adquirió ese aparato.
Pb, Hg, Cd
ES
o Asegúrese de introducir las pilas siempre con la correcta orienta-
ción de los polos positivo (¥) y negativo (^).
o Use pilas del mismo tipo. Nunca utilice juntas pilas de tipos
diferentes.
o Si no va a utilizar el mando a distancia durante mucho tiempo
(más de un mes), quite las pilas para evitar que se sulfaten y tengan fugas.
o Si las pilas presentan fugas, limpie el líquido que haya caído en el
compartimento y sustituya las pilas por otras nuevas.
o No utilice pilas que no sean del tipo especificado. No mezcle
pilas nuevas con viejas ni utilice juntas pilas de tipos distintos.
o No caliente ni desarme las pilas. Nunca tire pilas al fuego ni al
agua.
o No transporte ni almacene pilas con otros objetos metálicos. Las
pilas podrían producir cortocircuitos, perder líquido o explotar.
o Nunca recargue una pila si no está completamente seguro de
que es una pila recargable.
La placa de identificación está situada en la parte inferior de la unidad como muestra la ilustración.
Frontal
Placa de identificación
59

Precauciones con los equipos inalámbricos
Cumplimiento de las normas de interferencias y transmisión de radio
Modelo para EE. UU.
Declaración de conformidad
Parte responsable: TEAC AMERICA, INC.
Dirección: 1834 Gage Road, Montebello, California, U.S.A.
Número de teléfono: 1-323-726-0303
Este dispositivo cumple con el apartado 15 de las Normas de
la FCC. Su funcionamiento está sujeto a las dos siguientes condiciones: (1) este dispositivo no puede causar interferencias
perjudiciales y (2) este dispositivo debe aceptar cualquier interferencia recibida, incluidas interferencias que puedan causar
anomalías de funcionamiento.
Etiquetado de autorización
ID de la FCC: XEG-NT505
Cumplimiento con la normativa sobre
interferencias
Este equipo cumple con los límites de exposición a radiaciones
establecidos por la FCC/IC para entornos no controlados, con las
directrices de exposición a radiofrecuencia (RF) de la FCC y con la
normativa RSS-102 de exposición a radiofrecuencia (RF) de la IC. Este
equipo tiene unos niveles muy bajos de energía de RF, por lo que se
estima que cumple con la normativa sin necesidad de efectuar una
evaluación de exposición al máximo permitido (MPE). No obstante,
lo mejor es instalarlo y utilizarlo manteniendo el radiador al menos
a 20cm o más de distancia del cuerpo de cualquier persona (excluidas extremidades: manos, muñecas, pies y tobillos).
PRECAUCIÓN
La autorización de dispositivos inalámbricos son diferentes según
los países o regiones. Por favor, utilice el producto solamente en el
país donde lo adquirió.
o Dependiendo del país, podrían existir restricciones para el uso de
la tecnología inalámbrica Bluetooth.
Verifique las leyes y regulaciones del país o región donde vaya a utilizar la unidad antes de hacerlo.
Requerimientos acerca de la exposición
a radiaciones
Este equipo cumple con la regulación internacionalmente reconocida para los casos de exposición humana a ondas de radio
generadas por un transmisor.
Declaración de cumplimiento
Modelo para EE. UU.
Este equipo cumple con los límites de exposición a radiación establecidos por la FCC para entornos no controlados y cumple las
directrices de la FCC en materia de exposición a radiofrecuencia.
Modelo para el Espacio Económico Europeo (EEE)
Este equipo cumple con la valoración EN.62311 de equipos electrónicos y eléctricos relativa a las restricciones de exposición humana a
campos electromagnéticos, el estándar armonizado de la DIRECTIVA
2014/53/UE.
PRECAUCIÓN
Cualquier cambio o modificación efectuada en este equipo que
no haya sido expresamente aprobada por la parte responsable
del cumplimiento de los requisitos exigidos podría invalidar el
derecho del usuario a utilizar el equipo.
Modelo para el Espacio Económico Europeo
(EEE)
La función de transmisor de banda ancha de este producto opera
en la banda de los 2,4 GHz.
Rango de frecuencia de uso: 2400MHz – 2480MHz
Potencia de salida máxima: Bluetooth® clase 2 (inferior a 2,5 mW).
Por la presente comunicación, TEAC Corporation
declara que este tipo de equipo de radio cumple
con los requisitos de la Directiva 2014/53/UE y
de las restantes directivas de la Unión Europea y
reglamentos de la Comisión.
El texto completo de la declaración de conformidad con la normativa de la UE está disponible en la siguiente dirección de Internet
(por favor, utilice el correo electrónico para ponerse en contacto con
nosotros):
http://www.teac-audio.eu/en/
TEAC Corporation
1-47 Ochiai, Tama-shi, Tokyo, 206-8530, Japan
Información sobre interferencias
(requerimientos de la FCC)
Se ha comprobado que este equipo cumple con los límites establecidos para los dispositivos digitales de Clase B, de acuerdo con el
apartado 15 de las Normas de la FCC. Estos límites están diseñados
para proporcionar una protección razonable contra interferencias
perjudiciales en instalaciones residenciales.
Este equipo genera, utiliza y puede irradiar energía de radiofrecuencia
y, si no se instala y se utiliza de acuerdo con las instrucciones, puede
causar interferencias perjudiciales en las comunicaciones por radio.
Sin embargo, no se puede garantizar que dichas interferencias no se
produzcan en instalaciones particulares.
Si este equipo causa interferencias perjudiciales en la recepción de
radio o televisión, que se comprueban apagando y encendiendo el
equipo, se recomienda al usuario que intente corregirla mediante
una o varias de las siguientes medidas.
o Reoriente o recoloque el equipo y/o la antena receptora.
o Aumente la separación entre el equipo y el receptor.
o Conecte el equipo a una toma de electricidad situada en un cir-
cuito eléctrico diferente al del receptor.
o Consulte al distribuidor o solicite ayuda a un técnico de radio/TV
con experiencia.
60

Marcas y derechos
Índice
“DSD” is a registered trademark.
The Bluetooth® word mark and logos are registered trademarks
owned by Bluetooth SIG, Inc. and any use of such marks by TEAC
CORPORATION is under license.
Qualcomm aptX is a product of Qualcomm Technologies International,
Ltd.
Qualcomm is a trademark of Qualcomm Incorporated, registered
in the United States and other countries, used with permission.
aptX is a trademark of Qualcomm Technologies International, Ltd.,
registered in the United States and other countries, used with
permission.
Microsoft and Windows are either registered trademarks or trademarks of Microsoft Corporation in the United States and/or other
countries.
Apple, Mac, OS X, macOS, iPad, iPhone and iPod touch are trademarks of Apple Inc., registered in the U.S. and other countries.
App Store is a service mark of Apple Inc.
Android is a trademark of Google Inc.
LDAC™ and LDAC logo are trademarks of Sony Corporation.
Bulk Pet is a registered trademark of INTERFACE CO., LTD.
Gracias por elegir TEAC.
Lea este manual atentamente para obtener el mejor rendimiento de
esta unidad. Después de leerlo, guárdelo en un lugar seguro para
futuras consultas.
ATENCIÓN
o Para más información sobre las funciones de red de esta unidad,
consulte el Manual del usuario de TEAC HR Streamer.
o El Manual del usuario y el Manual del usuario de TEAC HR
Streamer pueden descargarse desde la web global de TEAC
(http://www.teac-global.com/).
o Para utilizar las funciones de red y reproducir archivos de unida-
des flash USB, debe utilizar también una tablet o smartphone
que tenga instalada la app (gratuita) TEAC HR Streamer y que
esté conectada a la misma red que esta unidad.
INSTRUCCIONES IMPORTANTES DE SEGURIDAD ...................58
Precauciones con los equipos inalámbricos .......................60
Marcas y derechos ................................................61
Accesorios incluidos ..............................................62
ES
Los nombres de otras compañías, nombres de productos y logos
que aparecen en este documento son marcas comerciales o registradas de sus respectivos propietarios.
La información sobre derechos de autor (copyright) y licencias relacionados con software de código abierto figuran en el documento
“Important Notice Regarding Software” (notificación importante
acerca del software) que se proporciona por separado (solo en
inglés).
Antes de su utilización ............................................62
Web global de TEAC ..............................................62
Registro del producto. . . . . . . . . . . . . . . . . . . . . . . . . . . . . . . . . . . . . . . . . . . . .62
Descarga de la app de control remoto ............................62
Mantenimiento ...................................................62
Conexiones de red ................................................63
Conexiones (panel posterior) .....................................64
Conexiones (panel frontal) ........................................66
Conexión de unos auriculares .....................................67
Uso del mando a distancia ........................................67
Nombres y funciones de las partes (unidad principal) .............68
Sobreconversión .................................................69
Nombres y funciones de las partes (mando a distancia) ...........70
Pantalla ...........................................................71
Funcionamiento básico ...........................................73
Tecnología inalámbrica Bluetooth® ...............................74
Ajustes de configuración .........................................77
Reproducción de música en un ordenador ........................81
Solución de problemas ...........................................83
Especificaciones ..................................................84
61

Accesorios incluidos Mantenimiento
Compruebe que la caja contiene todos los accesorios incluidos que
se indican a continuación.
Por favor, póngase en contacto con el establecimiento donde
adquirió esta unidad si falta cualquiera de estos accesorios o si
alguno ha sufrido desperfectos durante el transporte.
Cable de corriente × 1
Cable de conversión RCA (de RCA a miniconector) × 1
Mando a distancia (RC-1330) × 1
Pilas para el mando a distancia (AAA) × 2
Manual del usuario (este documento, incluida la garantía) × 1
o Los usuarios que vivan en EE. UU. y Canadá encontrarán infor-
mación sobre la garantía en las páginas 86–87 y en la
contraportada (documento de garantía). Los usuarios que vivan
en Europa y otras áreas deben consultar la página87.
o El Manual del usuario de TEAC HR Streamer pueden descargarse
desde la web global de TEAC (http://www.teac-global.com/).
Antes de su utilización
V
Precauciones de emplazamiento
o No instale esta unidad donde pueda calentarse. Esto incluye
lugares que estén expuestos a la luz solar directa o cercanos
a un radiador, calefactor, estufa u otro aparato de calefacción.
Tampoco coloque esta unidad encima de un amplificador u otro
equipo que genere calor. Si lo hace, la unidad podría decolorarse,
deformarse o estropearse.
Limpie la cubierta y los demás paneles con un paño suave ligeramente humedecido con un líquido limpiador neutro diluido.
No utilice gamuzas ni paños impregnados con productos químicos,
ni disolvente u otras sustancias químicas, ya que pueden dañar la
superficie de la unidad.
V
Por seguridad, desenchufe el cable de corriente de
la toma de corriente antes de proceder a la limpieza.
Web global de TEAC
Las actualizaciones correspondientes a esta unidad se pueden descargar desde el sitio web global de TEAC:
http://teac-global.com/
1) Entre en el sitio web global de TEAC.
2) En la sección de descargas (downloads) de TEAC, haga clic en el
idioma que desee para abrir la página web de descargas correspondiente a dicho idioma.
NOTA
Si no aparece el idioma que desea, haga clic en “Other Languages”
(otros idiomas).
3) Haga clic en la sección “Search by Model Name” (buscar
por nombre de modelo) para abrir la página de descargas
correspondiente a ese producto. Los usuarios de Europa, sin
embargo, tienen que hacer clic en el nombre del producto en
la sección “Products” (productos).
4) Seleccione y descargue las actualizaciones que necesite.
Registro del producto
o Evite ubicaciones donde haga mucho frío o expuestas a una
humedad o polvo excesivos.
o Para permitir una buena disipación del calor, deje un poco de
espacio (al menos 3 cm) entre esta unidad y las paredes u otros
dispositivos cuando la instale. Si se coloca en un rack, deje libres
al menos 5 cm por encima de la unidad y 10 cm por detrás. Si no
deja estos márgenes de seguridad, el calor podría acumularse en
el interior y provocar un incendio.
o El voltaje suministrado a la unidad deberá ser el mismo que está
impreso en el panel posterior. Si tiene dudas al respecto, consulte
a un electricista.
o No mueva la unidad durante su utilización.
o No abra la carcasa de la unidad porque podría causar daños
en los circuitos o una descarga eléctrica. En caso de que se
introduzca un objeto extraño en la unidad, contacte con su
distribuidor.
o Cuando desenchufe el cable de corriente de la toma de electrici-
dad, tire siempre directamente del conector, nunca tire del cable.
Los clientes de EE. UU., por favor visiten el siguiente sitio web de
TEAC para registrar su producto TEAC en línea:
http://audio.teac.com/support/registration/
Descarga de la app de control remoto
Para utilizar las funciones de red y de reproducción de archivos de
unidades flash USB, debe utilizar también un smartphone o una
tablet que tenga instalada la app (gratuita) TEAC HR Streamer y que
esté conectada a la misma red que esta unidad.
o Para más información, consulte el Manual del usuario de TEAC HR
Streamer.
El Manual del usuario de TEAC HR Streamer pueden descargarse
desde la web global de TEAC (http://www.teac-global.com/).
Cómo descargar la app para iPad/iPhone/iPod touch
Busque “TEAC HR Streamer” en el App Store.
o Está prevista una versión para Android para enero de 2018.
Consulte el sitio web de productos para más información.
62

Conexiones de red
Ejemplo de conexión
NAS
a
NT-505
d
A Internet
Cable LAN
Router Wi-Fi™
b
o El router wi-fi debe estar conectado a Internet
cuando se instalen las apps en un iPad, iPhone u
otro dispositivo, cuando se actualice el firmware
NET (de red) de esta unidad y cuando se escuche la radio por Internet.
iPad, iPhone, etc.
c
ES
a NAS (dispositivo de almacenamiento conectado en
red)
Se utiliza para almacenar los archivos de audio.
Es necesario que funcione como servidor UPnP para poder
utilizarlo como servidor multimedia. MinimServer es el servidor
multimedia recomendado para utilizar con esta unidad.
b Router Wi-Fi™
Utilice una conexión Wi-Fi para conectar un iPad, iPhone u otro
dispositivo a esta unidad y al NAS.
c iPad, iPhone, etc.
Instale la app para controlar esta unidad.
d NT-505
Esta unidad. La dirección IP se adquiere desde el servidor DHCP.
63

Dispositivo que emite
audio digital
Dispositivo que emite
audio digital
Dispositivo que emite
señal de reloj
Salida digital
(ÓPTICA)
A B
Salida digital
(COAXIAL)
Cable digital coaxial RCA
Cable digital óptico
SALIDA DE
SINCRONIZACIÓN DE
RELOJ
Cable coaxial BNC
C D
Conecte los cables que correspondan a la pareja fijada como
salida de línea (página79).
El sonido solo saldrá por la
pareja seleccionada.
Si se conectan unos auriculares,
dejará de salir sonido por los
terminales del panel posterior.
La polaridad de los terminales
XLR puede ajustarse para que
el VIVO (POSITIVO) sea el pin 2
o el 3 (página79).
Si desea poder controlar el
volumen desde el amplificador, ajuste LINE OUT LEVEL en
“FIXED 0dB” o “FIXED +6dB”
(página79).
Cables de audio RCA
Cables XLR
LRLR
Entrada de audio
(ENTRADA DE LÍNEA, etc.)
Amplificador estéreo o
altavoces autoamplificados
Conecte un
juego de cables
de un tipo o del
otro.
FE G
Cable USB
Ordenador
H
Cable de corriente incluido
Instale el controlador
(driver) específico en
el ordenador antes de
conectarlo a esta unidad
(página81).
c
Toma de
electricidad
64

A Puerto ETHERNET
Conecte en este puerto a un cable LAN de los que se venden
en establecimientos comerciales cuando desee conectar esta
unidad a una red cableada o a Internet.
o Al cambiar de fuente de entrada, este puerto se identifica
como “NET”.
B Terminal de entrada de audio digital óptico (OPTICAL)
Se utiliza para introducir audio digital. Conecte aquí el terminal
de salida de audio digital óptico de un dispositivo de audio.
Para la conexión, utilice un cable digital óptico con
conector cuadrado (TOSLINK) de los que se pueden
adquirir en establecimientos comerciales.
C Terminal de entrada de audio digital coaxial RCA
(COAXIAL)
Se utiliza para introducir audio digital. Conecte aquí el terminal
de salida de audio digital coaxial de un dispositivo de audio.
Para la conexión, utilice un cable digital coaxial RCA de
los que se venden en establecimientos comerciales.
F Puerto USB (posterior)
Se utiliza para introducir audio digital procedente de un ordenador. Conéctelo al puerto USB del ordenador.
Para esta conexión, utilice un cable USB 2.0 (tipo A-B) de
los que se venden en establecimientos comerciales.
ATENCIÓN
Antes de conectar un ordenador que funcione con un sistema
operativo Windows, es necesario instalar el controlador (driver)
específico en el ordenador (página81).
No es posible una conexión correcta con un ordenador si este
no tiene dicho controlador instalado.
ES
G Puerto de mantenimiento
Se utiliza para mantenimiento. No conecte nada a este puerto
a menos que reciba instrucciones para hacerlo por parte de
nuestro servicio técnico.
H Entrada para el cable de corriente (~IN)
Aquí se conecta el cable de corriente suministrado.
No conecte el cable de corriente a una toma de electricidad
hasta que haya terminado todas las demás conexiones.
D Terminal de entrada de sincronización de reloj
CLOCK SYNC (10MHz IN)
Por este terminal se introduce una señal de sincronización (sincronización de reloj).
Para introducir una señal de oscilador de 10 MHz, conecte aquí
la salida del oscilador (página85).
Utilice un cable coaxial BNC de los disponibles en establecimientos comerciales para la conexión.
o La sincronización de reloj solo es posible cuando la fuente
de entrada es USB o NET (incluidas unidades flash USB).
E Terminales de salida de audio analógico (LINE OUT)
Por estos terminales salen 2 canales de audio analógico. Conecte
estos terminales XLR o RCA a un amplificador estéreo o a unos
altavoces autoamplificados.
Utilice cables de los disponibles en establecimientos
comerciales para las conexiones.
XLR: cables XLR balanceados
RCA: cables de audio RCA
Conecte el terminal R (derecha) de esta unidad al terminal R
del amplificador y el terminal L (izquierda) al terminal L del
amplificador.
o Consulte “Salida de línea (LINE OUT SELECT)” en la página79
para más información sobre los ajustes de las salidas analógicas.
V
No utilice ningún cable de corriente que no sea el
incluido con esta unidad. El uso de otros cables de
corriente puede ser causa de incendio o descargas
eléctricas.
V
Desenchufe el cable de corriente de la toma de
electricidad cuando no utilice la unidad durante
un largo periodo de tiempo.
V
Termine de realizar todas las conexiones
antes de encender la unidad.
o Lea atentamente todos los manuales de los dispositivos
que esté conectando y siga sus instrucciones para hacer
las conexiones.
o No mezcle ni agrupe los cables de las conexiones con los
cables de corriente. Si lo hace, puede originarse ruido.
o Inserte todos los conectores completamente.
65

Conexiones (panel frontal)
Unidades flash USB
Puede conectar unidades flash USB al puerto USB del frontal de esta
unidad.
Para reproducir archivos de música de una unidad flash USB, ajuste
la fuente de entrada en NET y utilice la app para la reproducción.
o Para más información, consulte el Manual del usuario de TEAC HR
Streamer.
Conexión coaxial (COAX)
Utilice el cable de conversión RCA incluido y un cable digital coaxial RCA de los que se pueden adquirir en establecimientos
comerciales.
Para activar esta entrada, gire el mando SOURCE para seleccionar
COAXIAL2.
Cable de conversión RCA
Entrada de audio digital (OPT/COAX IN)
Este terminal de entrada se puede utilizar tanto para conexión óptica
(OPT) como coaxial (COAX).
Conexión óptica (OPT)
Utilice un cable óptico con miniconector de los que se pueden adquirir en establecimientos comerciales.
Para activar esta entrada, gire el mando SOURCE para seleccionar
OPTICAL2.
Miniconector óptico
Cable digital coaxial RCA
66

Conexión de unos auriculares
V
PRECAUCIÓN
Nunca conecte o desconecte los auriculares ni encienda o apague
la unidad con los auriculares puestos.
Si lo hace, puede causar ruido repentino a alto volumen capaz de
lesionar sus oídos.
Uso del mando a distancia
Precauciones de uso
V
Un mal uso de la pilas podría hacer que se rompan o se sulfaten (pierdan líquido), lo que podría
originar fuego, lesiones o la oxidación de materiales cercanos. Por favor, lea atentamente y
observe las instrucciones de las precauciones de la
página59.
o Cuando utilice el mando a distancia, apunte con él hacia el
receptor de la señal del mando a distancia que hay en la unidad
principal, a una distancia de 5 m o menos. No coloque obstáculos entre la unidad principal y el mando a distancia.
o El mando a distancia podría no funcionar si el receptor de la
señal del mando a distancia que hay en la unidad principal está
expuesto a la luz solar directamente o a una luz intensa. Si esto
ocurre, intente mover de sitio la unidad.
o Lleve cuidado, ya que el uso de este mando a distancia podría
causar el funcionamiento involuntario de otros dispositivos que
pueden ser controlados por rayos infrarrojos.
ES
Antes de ponerse los auriculares, ponga siempre el volumen
al mínimo (la pantalla debe mostrar “0” cuando la unidad
esté configurada en “STEP (0-99)” o “−∞ dB” cuando esté configurada en “dB”) (página73).
Instalación de las pilas
Quite la tapa de la parte posterior del mando a distancia e introduzca en el compartimento dos pilas AAA con su polos ¥/^
orientados como se muestra. Vuelva a colocar la tapa.
Cuándo sustituir las pilas
Si la distancia requerida entre el mando a distancia y la unidad principal disminuye o si la unidad deja de responder a los botones del
mando a distancia, cambie ambas pilas por otras nuevas.
Deshágase de las pilas usadas según las instrucciones que figuren
en las mismas o los requisitos establecidos por las autoridades
locales.
67

Nombres y funciones de las partes (unidad principal)
A B C D E F G H I J
A Interruptor POWER
Se utiliza para encender y apagar la unidad.
o Si la pantalla permanece oscura aunque el interruptor
POWER esté en ON (activado), normalmente la causa es una
de las siguientes:
o La unidad está encendida, pero DIMMER (brillo de la pan-
talla) está ajustado en OFF (página80).
o La función de ahorro de energía automático ha puesto la
unidad en reposo (standby).
o El cable de corriente está desconectado.
Para encender la unidad, pulse el botón STANDBY/ON del
mando a distancia o ponga el interruptor POWER en OFF
(desactivado) y vuelva a ponerlo en ON (activado).
B Indicador CLOCK
Muestra el estado de la sincronización de reloj.
Iluminado: La unidad está sincronizada con el reloj del
terminal de entrada CLOCK SYNC (10MHz IN).
Parpadeando: No está entrando ningún reloj o la unidad no
se está sincronizando.
Apagado: No hay sincronización de reloj.
o La sincronización de reloj solo es posible cuando la fuente
de entrada es USB o NET (incluidas unidades flash USB).
o Consulte la página79 para más información sobre los
ajustes de sincronización de reloj.
C Terminal de entrada de audio digital (OPT/COAX IN)
Se utiliza para introducir audio digital (página66).
Conexión óptica: Use un cable óptico con miniconector.
Conexión coaxial: Use el cable de conversión RCA incluido.
D Mando SOURCE
Se utiliza para seleccionar la fuente de entrada.
Se utiliza para cambiar los valores de los ajustes cuando se
muestra un apartado de un menú.
Púlselo para utilizarlo a modo de botón “Intro” (ENTER).
Gírelo cuando el menú esté abierto para cambiar el apartado en
pantalla o el valor de ajuste.
E Botón MENU
Púlselo para acceder al modo de ajustes de configuración
(página77).
Dentro del modo de ajustes de configuración, púlselo para volver a la pantalla anterior.
F Receptor de señales del mando a distancia
Recibe las señales del mando a distancia. Cuando utilice el
mando a distancia, apunte con él hacia este receptor de señal.
G Puerto USB (frontal)
Aquí se conectan las unidades flash USB.
o Para reproducir archivos de música de una unidad flash USB,
ajuste la fuente de entrada en NET y utilice la app para la
reproducción.
o No conecte ningún ordenador al puerto USB frontal de esta
unidad. Para introducir audio desde un ordenador, conéctelo al puerto USB situado en la parte posterior de esta
unidad.
o Para más información, consulte el Manual del usuario de TEAC
HR Streamer.
68

Sobreconversión
H Salida de auriculares PHONES
Conecte aquí unos auriculares con un minijack estéreo de 3,5mm
(página67).
o Este circuito amplificador de auriculares utiliza un terminal
de cuatro polos, con masas de tierra independientes para el
canal izquierdo y el derecho. Se pueden utilizar jacks normales con 3 o 4 polos.
o Cuando se conectan unos auriculares a esta unidad, se activa
el circuito de salida de auriculares y deja de salir audio por las
salidas de audio analógico del panel posterior (LINE OUT).
Ilustración del cableado
Izda. + Dcha. + Izda. − Dcha. −
(L+) (R+) (L−) (R−)
I Pantalla
Se puede utilizar la función de sobreconversión con todas las fuentes de entrada (página78).
Las relaciones entre las frecuencias de muestreo de entrada y las
frecuencias de muestreo después de la sobreconversión son las
siguientes:
Fuente de entrada Ajuste de sobreconversión
Entrada
de audio
digital
Frecuencia de
muestreo de
32 − 32 64 128 256 8,1 16,3
44,1 44,1 44,1 88,2 176,4 352,8 11,2 22,5
88,2 88,2 88,2 88,2 176,4 352,8 11,2 22,5
176,4 176,4 176,4 176,4 176,4 352,8 11,2 22,5
− 352,8 352,8 352,8 352,8 352,8 11,2 22,5
− 705,6 705,6 705,6 705,6 705,6 11,2 22,5
48 48 48 96 192 384 12,2 24,5
96 96 96 96 192 384 12,2 24,5
192 192 192 192 192 384 12,2 24,5
− 384 384 384 384 384 12,2 24,5
− 768 768 768 768 768 12,2 24,5
USB OFF 2Fs 4Fs 8Fs
Frecuencia de muestreo después de la
entrada
[kHz] [kHz] [MHz]
sobreconversión
DSD
256
DSD
512
ES
Aquí se visualiza la información sobre la reproducción de audio
y las pantallas del menú.
J Mando VOLUME
Se utiliza para ajustar el volumen. Gírelo a la derecha para
aumentar el volumen y hacia la izquierda para disminuirlo.
o Para poder ajustar el volumen de salida del audio analógico
de esta unidad, ajuste LINE OUT LEVEL en VARIABLE (“Nivel
de salida de línea (LINE OUT LEVEL)” en la página 79). Esto
permitirá ajustar el nivel de salida del audio analógico utilizando el mando VOLUME de esta unidad.
o Los ajustes de volumen se mantienen independientes para
la salida de audio analógico y para la salida de auriculares.
Los valores sombreados en gris no están sobreconvertidos.
o La máxima sobreconversión es 8Fs (8 veces).
o La sobreconversión no es posible cuando la entrada es DSD.
69

Nombres y funciones de las partes (mando a distancia)
a Botón STANDBY/ON
Púlselo para poner la unidad en modo de reposo (standby) o
a
g
encenderla (on).
b Botones de selección de entrada
b
d
e
Se utilizan para seleccionar la fuente de reproducción.
o El botón LINE no tiene ninguna función.
c Botón INFO
Púlselo para mostrar información, incluyendo sobreconversión
c
h
(página72).
i
j
k
l
m
f
d Botón UPCONVERT
Púlselo para cambiar el ajuste de sobreconversión.
e Botón FILTER
Púlselo para cambiar el ajuste de filtro.
Este botón cambia el filtro en consonancia con la entrada (PCM
o DSD).
f Botón MUTE
Púlselo para minimizar el volumen.
g Botón DIMMER
Púlselo para ajustar el brillo de la pantalla de la unidad principal.
h Botón HEADPHONE
Cuando la unidad principal y el mando a distancia tengan botones con las mismas funciones, este manual explica cómo utilizar
uno de ellos. El otro botón correspondiente puede utilizarse de
la misma manera.
Púlselo para activar o desactivar la salida de auriculares.
Cuando la salida de auriculares está desactivada, el sonido sale
por los terminales de salida de audio analógico (LINE OUT).
i Botón DISPLAY
j Botón MENU
Púlselo para acceder al modo de ajustes de configuración
(página77).
Dentro del modo de ajustes de configuración, púlselo para volver a la pantalla anterior.
k Botones arriba/abajo (k/j)
Se utilizan para seleccionar apartados de configuración.
l Botón ENTER
Púlselo para confirmar el apartado seleccionado.
m Botones VOLUME (+/−)
Se utilizan para ajustar el volumen.
70

Pantalla
Al encender
Z
c
NT-505
NETWORK PLAYER
Después de que aparezcan mensajes como los de arriba, en la pantalla se mostrará la fuente de entrada.
Información de la fuente de reproducción
La pantalla de información de fuente de reproducción aparecerá
después de encender la unidad y también después de que transcurran aproximadamente 7 segundos sin ninguna operación en una
pantalla de ajustes de configuración.
Nombre de la fuente de reproducción
Muestra el nombre de la fuente seleccionada.
Los nombres que aparecen en la pantalla se corresponden con los
terminales seleccionados como sigue:
Los nombres entre paréntesis aparecen al cambiar.
USB (USB)
Puerto USB del panel posterior
COAX1 (COAXIAL 1)
Terminal de entrada de audio digital coaxial RCA (COAXIAL) del
panel posterior.
COAX2 (COAXIAL 2)
Conexión coaxial con la entrada de audio digital (OPT/COAX IN)
del panel frontal.
OPT1 (OPTICAL 1)
Terminal de entrada de audio digital óptico (OPTICAL) del panel
posterior.
OPT2 (OPTICAL 2)
Conexión óptica con la entrada de audio digital (OPT/COAX IN)
del panel frontal.
NET (NETWORK)
Puerto ETHERNET
ES
A la derecha de la fuente de reproducción se muestra el formato o el
volumen de la señal de entrada. Pulse el botón DISPLAY del mando a
distancia para cambiar la información mostrada.
Ejemplo de pantalla
Información de la fuente de reproducción mostrada
Con la reproducción parada
Fuente de reproducción
USB
Aparece cuando se está comprobando la conexión
Con la reproducción en marcha
Formato de señal de entrada
check
PCM
USB
Pulse el botón DISPLAY del mando a distancia.
Pantalla de volumen
44.1k
Frecuencia de muestreo
Bluetooth (Bluetooth)
Dispositivo Bluetooth
Estado de la señal de entrada
Muestra el estado de la señal de la fuente de entrada.
Check
La conexión está siendo comprobada.
PCM 32kHz
PCM 44.1kHz
PCM 48kHz
PCM 88.2kHz
PCM 96kHz
PCM 128kHz
PCM 176.4kHz
PCM 192kHz
PCM 256kHz
PCM 352.8kHz
PCM 384kHz
PCM 705.6kHz
PCM 768kHz
DSD 2.8MHz
DSD 5.6MHz
DSD 11.2MHz
DSD 22.5MHz
Muestran el tipo de señal de entrada y la frecuencia de muestreo.
USB
−45.5dB
Volumen
71

36
Pantalla (continuación)
-62
Información de sobreconversión
mostrada
Pulse el botón INFO durante la reproducción para mostrar la información de sobreconversión de la señal de entrada.
o Las pantallas de información de la señal de entrada y de la señal
reproducida serán iguales si el ajuste de sobreconversión es “OFF”
(desactivada).
Ejemplo cuando la fuente de reproducción es USB, COAX1,
COAX2, OPT1, OPT2 o NET
Formato de la señal
de entrada
PCM DSD
44. 1kHz
Frecuencia de muestreo
de la señal de entrada
Ejemplo cuando la fuente de reproducción es Bluetooth
Códec
LDAC PCM
44. 1kHz
Formato de la señal
de reproducción
11. 2MHz
Frecuencia de muestreo
de reproducción
Formato de la señal
de reproducción
352. 8kHz
VOLUME TYPE ajustado en “dB”
Ejemplo de pantalla
VOL.
El nivel de volumen máximo es 0 y el mínimo −∞ (infinito
negativo). Antes de conectar unos auriculares, ajuste el mando
VOLUME al mínimo (−∞). Si no lo hace, pueden originarse ruidos
repentinos a alto volumen capaces de lesionar sus oídos o causar
otros problemas.
El nivel de salida ajustado se muestra cuando LINE OUT LEVEL está
ajustado en “FIXED 0dB” o “FIXED +6dB”.
Ejemplo cuando VOLUME TYPE está ajustado en “dB”
USB
o Si VOLUME TYPE está ajustado en “STEP (0-99)”, en la pantalla se
mostrará “VOL. 85” cuando el ajuste sea “FIXED 0dB” y “VOL. 89”
cuando el ajuste sea “FIXED +6dB”.
Cuando no haya conectados unos auriculares y LINE OUT LEVEL esté
ajustado en “OFF”, se mostrará “VOL. 0” o “−∞ dB”.
Ejemplo cuando VOLUME TYPE está ajustado en “dB”
.0dB
+ 0.0
dB
Frecuencia de muestreo
de la señal de entrada
Frecuencia de muestreo
de reproducción
Pantalla de volumen
Se pueden mostrar dos tipos de volumen: pasos (STEP) o dB.
Esto se establece mediante el ajuste de configuración del tipo de
volumen (VOLUME TYPE) (página80).
El ajuste de volumen mostrado se agrandará si se gira el mando
VOLUME de esta unidad.
VOLUME TYPE ajustado en “STEP (0-99)”
Ejemplo de pantalla
VOL.
El nivel de volumen máximo es 99 y el mínimo 0. Antes de
conectar unos auriculares, ajuste el mando VOLUME al mínimo
(0). Si no lo hace, pueden originarse ruidos repentinos a alto
volumen capaces de lesionar sus oídos o causar otros problemas.
USB
Cuando no hay conectados unos auriculares y LINE OUT LEVEL
está ajustado en “FIXED” u “OFF”
Al girar el mando VOLUME aparecerá la siguiente pantalla:
LINE OUT LEVEL ajustado en “FIXED”
VOL.
LINE OUT LEVEL ajustado en “OFF”
VOL.
− ∞ dB
FIXED
OFF
72

Funcionamiento básico
1 Ponga el interruptor POWER en su posición ON
para encender la unidad.
o Si hay un amplificador estéreo conectado a esta unidad,
enciéndalo lo último.
2 Gire el mando SOURCE para seleccionar la
fuente de entrada.
3 Ponga en marcha el dispositivo de reproducción.
Consulte el manual de instrucciones de dicho dispositivo.
4 Ajuste el volumen.
Cuando utilice las salidas de línea
Cuando LINE OUT LEVEL esté ajustado en VARIABLE, gire el
mando VOLUME de esta unidad para ajustar el volumen.
Cuando LINE OUT LEVEL esté ajustado en cualquier otra
opción, no podrá ajustar el volumen desde esta unidad. Utilice
el amplificador estéreo u otro dispositivo conectado a esta unidad para ajustar el volumen.
ES
Cuando haya unos auriculares conectados a esta unidad
Gire el mando VOLUME de esta unidad para ajustar el volumen.
o Cuando el mando VOLUME de esta unidad esté activo, se
mostrará el ajuste de volumen.
La fuente seleccionada aparecerá en la pantalla.
o También puede utilizar los botones de selección de entrada
del mando a distancia.
o Si la señal de entrada no es una señal de audio digital o es
un formato de señal de audio que esta unidad no admite,
como por ejemplo Dolby Digital o DTS, no se emitirá audio.
Configure la salida digital del dispositivo conectado como
salida de audio PCM.
o Para reproducir archivos de audio cuando en esta unidad
está seleccionada la fuente USB, primero debe instalar un
controlador (driver) específico en el ordenador antes de
conectarlo a la unidad (página81).
o Los datos DSD solo pueden reproducirse cuando la fuente
de entrada es USB o NET (incluidas unidades flash USB) o
cuando se utiliza entrada digital en formato DoP.
o Para utilizar NET o el puerto USB frontal, instale la app TEAC
HR Streamer (gratuita) en un smartphone o tablet y conecte
dicho dispositivo a la misma red que la unidad.
73

Notas sobre Bluetooth®
Cuando utilice esta unidad con un teléfono móvil u otros dispositivos Bluetooth, ambos no deberán estar alejados uno de otro más de
10 metros.
Dependiendo de las circunstancias de utilización, sin embargo, la
distancia de transmisión efectiva podría ser inferior.
No está garantizada la comunicación inalámbrica con todos los dispositivos compatibles con la tecnología inalámbrica Bluetooth.
Para determinar la compatibilidad entre esta unidad y otro dispositivo compatible con la tecnología inalámbrica Bluetooth, remítase
al manual de instrucciones de dicho dispositivo o póngase en contacto con el establecimiento donde lo adquirió.
NOTA
o No se puede seleccionar el códec que se va a utilizar pulsando un
botón, por ejemplo.
o Debido a las características de la tecnología inalámbrica Bluetooth,
la reproducción desde un dispositivo Bluetooth tendrá un ligero
retardo comparada con la reproducción desde esta unidad.
Protección de contenido
Esta unidad es compatible con SCMS-T, un método de protección
de contenido cuando se transmite audio, de forma que puede
reproducir audio protegido.
Perfiles
Esta unidad es compatible con los siguientes perfiles Bluetooth:
o A2DP (Advanced Audio Distribution Profile, “Perfil de distribución
de audio avanzado” en español).
o AVRCP (Audio/Video Remote Control Profile, “Perfil de control
remoto de audio/vídeo” en español).
Para transferir audio mediante una transmisión inalámbrica Bluetooth,
el dispositivo Bluetooth ha de ser compatible con A2DP.
Para controlar la reproducción del dispositivo Bluetooth, este tiene
que ser compatible con AVRCP.
Aunque un dispositivo Bluetooth sea compatible con estos mismos
perfiles, sus funciones podrían diferir según sus especificaciones.
Códecs
Esta unidad es compatible con los siguientes códecs y seleccionará
uno de ellos automáticamente durante la transferencia de audio:
o SBC
o AAC
o Qualcomm® aptX™
o Qualcomm® aptX™ HD
o LDAC
Seguridad de transmisión
Esta unidad admite funciones de seguridad durante la transmisión
inalámbrica Bluetooth de acuerdo con las especificaciones Bluetooth
estándar, pero no garantiza la privacidad de dichas transmisiones.
TEAC CORPORATION no asumirá ninguna responsabilidad en caso de
que se produzca una fuga o pérdida de información durante la transmisión inalámbrica Bluetooth.
La unidad seleccionará el códec apropiado según la compatibilidad
del otro dispositivo Bluetooth y las condiciones de comunicación.
LDAC es una tecnología de codificación de audio desarrollada por Sony
que permite la transmisión de contenido de audio de alta resolución
(Hi-Res) incluso a través de una conexión Bluetooth.
A diferencia de otras tecnologías de codificación compatibles con
Bluetooth, como SBC, funciona sin realizar conversión descendente
sobre el contenido de audio de alta resolución* y permite transmitir a
través de una red inalámbrica Bluetooth aproximadamente tres veces
más de datos** que otras tecnologías con una calidad de sonido sin
precedentes, y esto es posible gracias a una codificación eficiente y a
una paquetización optimizada.
* Excluidos contenidos en formato DSD.
** En comparación con la tecnología SBC (Subband Coding) cuando se
selecciona una velocidad de bits de 990kbps (96/48 kHz) o 909 kbps
(88,2/44,1 kHz).
74

Emparejamiento con otro dispositivo
Bluetooth
El emparejamiento de esta unidad con otro dispositivo Bluetooth
es necesario la primera vez que se utiliza y cuando se conecta a un
dispositivo Bluetooth diferente por primera vez.
1 Gire el mando SOURCE para seleccionar
Bluetooth.
Bluetooth
check
2 Active la transmisión Bluetooth en el otro dis-
positivo Bluetooth.
3 Pulse y mantenga pulsado el mando SOURCE
para entrar en el modo de emparejamiento.
PAIRING. . .
Reproducción desde un dispositivo
Bluetooth
o Empareje esta unidad la primera vez que la utilice y cuando quiera
conectarla con un nuevo dispositivo Bluetooth (página75).
o Cuando empareje o conecte esta unidad con otro dispositivo
Bluetooth, ambos deberán estar separados pocos metros el uno
del otro. Si están demasiado separados, el emparejamiento y la
posterior conexión podrían resultar imposibles.
1 Active la transmisión Bluetooth en el otro dis-
positivo Bluetooth.
2 Gire el mando SOURCE para seleccionar
Bluetooth.
Así se pondrá la fuente de entrada en Bluetooth.
o También puede utilizar el botón Bluetooth del mando a
distancia.
Ejemplo de pantalla
Bluetooth
check
ES
o “PAIRING…” (emparejando) parpadeará en la pantalla.
4 En el otro dispositivo Bluetooth, seleccione
“NT-505” (esta unidad).
Después de que esta unidad haya entrado en modo de emparejamiento, emparéjela desde el otro dispositivo Bluetooth.
Para más información, remítase al manual de instrucciones del
otro dispositivo Bluetooth.
Después de la conexión, la pantalla mostrará el nombre del dispositivo conectado seguido de la fuente de entrada.
Ejemplo de pantalla
CONNECTED TO
iPhone 001
c
Bluetooth
VOL. 6
c
CONNECTED TO
iPhone 001
c
Bluetooth
Esta unidad buscará dispositivos emparejados y se conectará
automáticamente con uno si lo encuentra.
ATENCIÓN
Dependiendo del dispositivo fuente, es posible que también
sea necesario efectuar operaciones de conexión en él.
Si no se puede efectuar la conexión correctamente, consulte el
manual de instrucciones del dispositivo fuente.
VOL. 6
75

Tecnología inalámbrica Bluetooth® (continuación)
Cambiar el dispositivo conectado
1 Pulse el mando SOURCE para mostrar en pan-
talla DEVICE SELECT.
La línea inferior de la pantalla mostrará el nombre del último
dispositivo conectado.
Ejemplo de pantalla
MENU
DEVICE SELECT
Player_1
Nombre del último dispositivo conectado
2 Gire el mando SOURCE para mostrar en panta-
lla los dispositivos Bluetooth ya emparejados.
o La unidad puede recordar un máximo de ocho empareja-
mientos de dispositivos.
o Si no hay ningún emparejamiento disponible, la pantalla
aparecerá como sigue:
4 Comience la reproducción en el otro disposi-
tivo Bluetooth.
o Confirme que el volumen está subido en el otro dispositivo
Bluetooth. Si no sube el volumen en el dispositivo de reproducción, esta unidad podría no emitir sonido.
NOTA
Pulse y mantenga pulsado el botón MENU para borrar un dispositivo
emparejado.
MENU
DEVICE SELECT
NO PAIRED DEVICE
o Pulse y mantenga pulsado el mando ENTER para entrar en el
modo de emparejamiento (página75).
o Se muestran los primeros 16 caracteres del nombre del
dispositivo.
o Si el nombre del dispositivo contiene caracteres que no
sean letras o números del idioma inglés, no se mostrará
correctamente.
3 Pulse el mando SOURCE para establecer la
conexión.
Después de la conexión, la pantalla mostrará la fuente de
entrada.
ATENCIÓN
Independientemente del estado de la conexión entre esta
unidad y el otro dispositivo Bluetooth, si no aparece en pantalla
la fuente de entrada, reinicie tanto esta unidad como el otro
dispositivo y después vuelva a conectarlos.
NOTA
Dependiendo del dispositivo fuente, es posible que también
sea necesario efectuar operaciones de conexión en él.
Si no se puede efectuar la conexión correctamente, consulte el
manual de instrucciones del dispositivo fuente.
76

Ajustes de configuración
1 Pulse el botón MENU para abrir la pantalla del
menú.
2 Gire el mando SOURCE para mostrar el apar-
tado que quiera ajustar.
3 Pulse el mando SOURCE.
ES
o También puede pulsar el botón ENTER del mando a distancia.
o El valor seleccionado en ese momento se muestra en la
pantalla.
4 Gire el mando SOURCE para cambiar el valor
del ajuste.
o También puede utilizar los botones arriba y abajo (k, j)
del mando a distancia.
o Pulse el botón MENU para volver a la selección de apartados
de configuración.
o También puede utilizar los botones arriba y abajo (k, j)
del mando a distancia.
Los apartados del menú aparecen en el siguiente orden:
UPCONVERT
DIGITAL FILTER(PCM)
DIGITAL FILTER(DSD)
CLOCK SYNC
LINE OUT SELECT
LINE OUT LEVEL
DIMMER
VOLUME TYPE
5 Pulse el mando SOURCE.
o También puede pulsar el botón ENTER del mando a distancia.
6 Cuando haya terminado de cambiar los ajus-
tes, pulse el botón MENU para mostrar de
nuevo el estado de la fuente de entrada.
o Si no efectúa ninguna operación durante aproximadamente
7segundos, la pantalla volverá a mostrar el estado de la fuente
de entrada.
DISPLAY TYPE
AUTO POWER SAVING
Version info
77

Ajustes de configuración (continuación)
Sobreconversión (UPCONVERT)
Se utiliza para activar el circuito de sobreconversión cuando se reciben señales PCM.
o Consulte la página69 para más información sobre las relaciones
entre las frecuencias de muestreo de entrada y las frecuencias de
muestreo después de la sobreconversión.
MENU
UPCONVERT
OFF
OFF
La señal de entrada original es enviada directamente al converti-
dor D/A sin sobreconversión.
2× Fs
Si la señal de audio de entrada es inferior a una frecuencia de
muestreo estándar multiplicada por 2, se sobreconvierte multipli-
cándose por 2 y después se envía al convertidor D/A.
4× Fs
Si la señal de audio de entrada es inferior a una frecuencia de
muestreo estándar multiplicada por 4, se sobreconvierte multipli-
cándose por 4 y después se envía al convertidor D/A.
8× Fs
Si la señal de audio de entrada es inferior a una frecuencia de
muestreo estándar multiplicada por 8, se sobreconvierte multipli-
cándose por 8 y después se envía al convertidor D/A.
DSD 256
DSD 512
La fuente de entrada se convierte a formato digital DSD y después
se envía al convertidor D/A.
Filtro digital PCM (DIGITAL FILTER (PCM))
Establece el tipo de filtro digital utilizado al convertir señales PCM de
digitales a analógicas.
MENU
DIGITAL FILTER(PCM)
OFF
Slow roll off
Se utiliza un filtro FIR con pendiente de caída lenta para cortar
suavemente las señales que queden fuera de la banda de audio.
Sharp roll off
Se utiliza un filtro FIR con pendiente de caída pronunciada para
cortar bruscamente las señales que queden fuera de la banda de
audio.
Short Delay Slow
Se utiliza un filtro de retardo corto con una pendiente de caída
lenta para cortar suavemente las señales que queden fuera de la
banda de audio.
Short Delay Sharp
Se utiliza un filtro de retardo corto con pendiente de caída pronunciada para cortar bruscamente las señales que queden fuera
de la banda de audio.
Low dispersion
Se utiliza un filtro de retardo corto con baja dispersión que mejora
las características de desfase de las altas frecuencias.
OFF
No se utiliza filtro digital.
o Cuando se reciban señales a 352,8kHz, 384kHz, 705,6 kHz o
768kHz, el filtro digital se desactivará durante la reproducción
independientemente de su ajuste.
78
Nota sobre el filtro digital durante la reproducción PCM
Filtros digitales de tipo FIR
Este tipo de filtro tiene fama bien ganada por su calidad de sonido
y sus prestaciones de calidad tonal, tanto por sus reverberaciones
de gran densidad y riqueza sonora como por sus transitorios de
gran nitidez.
Filtros digitales de tipo “retardo corto”
Este tipo de filtro no tiene pre-eco en la respuesta de impulsos
y se caracteriza por la naturalidad del ataque del sonido y de la
reverberación para obtener una calidad tonal cercana al original.

Filtro digital DSD (DIGITAL FILTER (DSD))
Establece el tipo de filtro digital utilizado al convertir señales DSD de
digitales a analógicas.
MENU
DIGITAL FILTER(DSD)
WIDE
NARROW
La frecuencia de corte se ajustará de acuerdo a la señal DSD como
sigue:
Señal DSD Frecuencia de corte
2,8 MHz 39 kHz
5,6 MHz 78 kHz
11,2 MHz 156 kHz
22,5 MHz 312 kHz
WIDE
La frecuencia de corte se ajustará de acuerdo a la señal DSD como
sigue:
Señal DSD Frecuencia de corte
2,8 MHz 76 kHz
5,6 MHz 152 kHz
11,2 MHz 304 kHz
22,5 MHz 608 kHz
Salida de línea (LINE OUT SELECT)
Se utiliza para seleccionar los terminales por los que va a salir el audio
analógico.
o No es posible la salida por los terminales RCA y XLR a la vez.
MENU
LINE OUT SELECT
RCA
RCA
La salida es a través de los terminales RCA.
XLR (HOT 2)
La salida es a través de los terminales XLR con polaridad 2 = VIVO
(POSITIVO).
XLR (HOT 3)
La salida es a través de los terminales XLR con polaridad 3 = VIVO
(POSITIVO).
Nivel de salida de línea (LINE OUT LEVEL)
Se utiliza para seleccionar el nivel del audio que se envía a los terminales de salida de audio analógico (LINE OUT).
MENU
LINE OUT LEVEL
FIXED 0dB
ES
Sincronización de reloj (CLOCK SYNC)
o La sincronización de reloj solo es posible cuando la fuente de
entrada es USB o NET (incluyendo unidades flash USB).
MENU
CLOCK SYNC
OFF
OFF
No se utiliza sincronización de reloj.
ON
El reloj maestro de esta unidad se sincronizará con la entrada de
reloj de 10 MHz a través del terminal de entrada de sincronización de reloj CLOCK SYNC (10MHz IN).
FIXED 0dB
El nivel de salida máximo es 2 Vrms. Seleccione esa opción si desea
ajustar el volumen mediante un amplificador.
o No saldrá sonido si hay unos auriculares conectados.
FIXED +6dB
El nivel de salida máximo es 4 Vrms. Seleccione esa opción si desea
ajustar el volumen mediante un amplificador.
o No saldrá sonido si hay unos auriculares conectados.
o Si el sonido distorsiona, cambie el ajuste a FIXED 0dB.
VARIABLE
Esta opción permitirá el ajuste del nivel de la salida analógica
mediante el mando VOLUME. Selecciónela si desea ajustar el
volumen utilizando esta unidad.
o No saldrá sonido si hay unos auriculares conectados.
OFF
No saldará sonido en ningún caso.
79

Ajustes de configuración (continuación)
Brillo de la pantalla (DIMMER)
MENU
DIMMER
BRIGHT
DARK
Pantalla oscura.
SLIGHTLY BRIGHT
Iluminación atenuada.
BRIGHT
Iluminación brillante.
AUTO OFF
Se apaga automáticamente.
o La pantalla permanece apagada incluso aunque la unidad esté
encendida.
Pantalla de volumen (VOLUME TYPE)
Establece cómo se muestra el volumen.
MENU
VOLUME TYPE
STEP (0-99)
Función de ahorro de energía automático (AUTO POWER SAVING)
Esta unidad tiene una función de ahorro de energía automático.
o La función de ahorro de energía automático viene activada de
fábrica.
MENU
AUTO POWER SAVING
ON
OFF
La función de ahorro de energía automático está desactivada.
ON
La unidad entra en modo de reposo (standby) automáticamente
si no se emite audio ni se realiza ninguna operación durante
aproximadamente 30 minutos.
Pantalla de información (Version info)
Muestra la versión del firmware utilizado por la unidad.
MENU
Version info
SYSTEM
STEP (0-99)
Muestra el volumen en pasos de 0 (mínimo) a 99 (máximo).
dB
Muestra el volumen en decibelios (dB).
Indicación de pantalla (DISPLAY TYPE)
Selecciona la información mostrada a la derecha de la fuente de
reproducción.
MENU
DISPLAY TYPE
volume
volume
Se muestra el volumen.
sampling freq.
Se muestra información sobre la fuente de reproducción.
SYSTEM
La versión de firmware del microordenador.
USB
La versión de firmware del módulo USB.
Bluetooth
La versión de firmware del módulo Bluetooth.
NETWORK
La versión de firmware del módulo de red.
80

Reproducción de música en un ordenador
Instalación del controlador (driver)
Esta unidad puede conectarse a ordenadores que funcionen con
los sistemas operativos indicados a continuación. No se garantiza el
funcionamiento con otros sistemas operativos (a noviembre de 2017).
Si se utiliza Mac
El controlador funciona con las siguientes versiones:
OS X Lion (10.7)
OS X Mountain Lion (10.8)
OS X Mavericks (10.9)
OS X Yosemite (10.10)
OS X El Capitan (10.11)
macOS Sierra (10.12)
macOS High Sierra (10.13)
Esta unidad funcionará con el software controlador (driver) estándar
del sistema operativo, por lo que no hace falta instalar ningún software controlador especial.
Sin embargo, para utilizar Bulk Pet es necesario instalar un controlador (driver) específico.
Si se utiliza Windows
El controlador funciona con las siguientes versiones:
Windows 7 (32/64 bits)
Windows 8 (32/64 bits)
Windows 8.1 (32/64 bits)
Windows 10 (32/64 bits)
Instalación del software controlador (driver) en el ordenador
Para poder reproducir a través de esta unidad los archivos de audio
almacenados en un ordenador, debe instalar antes un software controlador (driver) específico en el ordenador. Descárguelo desde la
web global de TEAC.
Acerca del modo de transmisión
La transferencia de datos se puede hacer mediante modo Isochronous
(isócrono) o Bulk Pet.
Las frecuencias de muestreo que se pueden transmitir son 44,1, 48,
88,2, 96, 176,4, 192, 352,8, 384, 705,6 y 768 kHz.
Cuando se haya realizado la conexión correctamente, se podrá
seleccionar “TEAC USB AUDIO DEVICE” como salida de audio en el
sistema operativo del ordenador.
o Durante la transferencia de datos, los datos de audio enviados
desde el ordenador se procesarán utilizando el reloj de esta unidad, reduciéndose así las fluctuaciones que se producen durante
la transmisión de datos.
ES
Descarga de la aplicación de reproducción de audio TEAC HR Audio Player
Puede descargar las versiones para Mac y Windows de nuestra
aplicación de reproducción de audio gratuita TEAC HR Audio Player,
compatible con la reproducción de archivos DSD, desde la web global de TEAC (http://teac-global.com/).
Nota sobre la configuración de TEAC HR Audio
Player
Para reproducir grabaciones DSD a 22,5 MHz con TEAC HR Audio
Player, abra la ventana “Configure” (Configuración) y ajuste “Decode
mode” (Modo de decodificación) en “DSD Native” (DSD nativo).
Para reproducir otros formatos que no sean DSD a 22,5 MHz, la configuración puede ser indistintamente “DSD over PCM” (DSD sobre
PCM) o “DSD Native” (DSD nativo), como prefiera.
Web global de TEAC
http://www.teac-global.com/
ATENCIÓN
Instale el software controlador (driver) específico antes de
conectar la unidad a un ordenador mediante USB.
Si conecta esta unidad a un ordenador antes de haber instalado el
software controlador, no funcionará correctamente.
o Para obtener instrucciones acerca del procedimiento de instala-
ción del software controlador, acceda a la página de descargas
(Downloads) de la web global de TEAC (http://teac-global.com/).
o Dependiendo de la combinación de hardware y software, podría
darse el caso de que el funcionamiento no sea posible incluso
con los sistemas operativos antes mencionados.
Para más información, consulte “Selecting DSD decoding mode”
(Seleccionar el modo de decodificación DSD) en el Manual del usuario de TEAC HR Audio Player.
81

Reproducción de música en un ordenador (continuación)
Reproducción de archivos de audio
desde un ordenador
1 Conecte el puerto USB de la parte posterior de
esta unidad al ordenador con un cable USB.
Cable USB
o Use un cable con el conector adecuado para esta unidad.
2 Encienda el ordenador.
o Confirme que el sistema operativo se ha iniciado
correctamente.
3 Ponga el interruptor POWER en su posición ON
para encender la unidad.
5 Comience a reproducir un archivo de audio en
el ordenador.
Conseguirá mejor calidad de sonido si pone al máximo el volumen de salida del ordenador y ajusta el volumen de escucha
desde el amplificador estéreo.
Ponga al mínimo el volumen del amplificador estéreo antes de
empezar la reproducción y luego súbalo gradualmente.
Cuando vaya a utilizar unos auriculares conectados a esta unidad,
gire el mando VOLUME hacia la izquierda para bajar el volumen
al mínimo antes de ponérselos y luego súbalo gradualmente.
o El ordenador y esta unidad no pueden controlarse el uno al otro.
o No lleve a cabo ninguna de las acciones indicadas a continua-
ción cuando reproduzca archivos de audio mediante USB. Si lo
hace, podría causar anomalías de funcionamiento en el ordenador. Salga siempre del software de reproducción de audio antes
de llevar a cabo cualquiera de las siguientes acciones:
o Desconectar el cable USB.
o Apagar la unidad o ponerla en modo de reposo (standby).
o Cambiar la selección de entrada actual.
o Al reproducir archivos de audio mediante USB, también sonarán
los sonidos propios del funcionamiento del ordenador. Si no
desea que se escuchen estos sonidos, realice los ajustes adecuados en el ordenador para silenciarlos.
o Si conecta esta unidad al ordenador o cambia la entrada a USB
después de haber iniciado el software de reproducción de audio,
puede que los archivos de audio no se reproduzcan correctamente. Si esto ocurre, reinicie el software de reproducción de
audio o reinicie el ordenador.
4 Gire el mando SOURCE para seleccionar USB.
82

Solución de problemas
Si tiene un problema con esta unidad, por favor dedique un momento
a revisar la información que le proporcionamos a continuación antes
de solicitar servicio técnico. Si aun así no funciona correctamente,
póngase en contacto con el distribuidor donde compró la unidad.
General
La unidad no se enciende.
e Compruebe que el cable de corriente está bien conectado
en la toma de electricidad. Si la toma de electricidad tiene un
interruptor, confirme que este se encuentra en la posición de
activado.
e Conecte un dispositivo eléctrico diferente en la toma de elec-
tricidad para confirmar que suministra corriente.
e Si la función de ahorro de energía automático ha hecho que
la unidad entre en reposo (standby), pulse el botón STANDBY/
ON del mando a distancia para volver a encender la unidad.
No sale sonido.
e Si hay un amplificador estéreo conectado a esta unidad, ajuste
su volumen.
e Si está utilizando unos auriculares conectados a esta unidad,
utilice el mando VOLUME para ajustar el volumen.
e Utilice el mando SOURCE para seleccionar la entrada que esté
conectada a la fuente que desee escuchar.
e Reconfirme las conexiones con los demás componentes del
equipo.
Conexiones con un ordenador
El ordenador no reconoce esta unidad.
e Consulte la página81 para más información sobre los sistemas
operativos compatibles. No está garantizado el funcionamiento
con sistemas operativos no compatibles.
Se produce ruido.
e Iniciar otras aplicaciones durante la reproducción de un archivo
de audio puede interrumpir la reproducción o causar ruido. No
inicie otras aplicaciones durante la reproducción.
e Si la unidad se conecta a un ordenador a través de un “hub”
(concentrador) USB, por ejemplo, puede oírse ruido. Si es el
caso, conecte la unidad directamente al ordenador.
No se pueden reproducir archivos de audio.
e Conecte esta unidad al ordenador y seleccione USB como
entrada de esta unidad antes de iniciar el software de reproducción de audio.
Si conecta esta unidad al ordenador o selecciona la entrada
USB después de haber iniciado el software de reproducción
de audio, puede que los archivos de música no se reproduzcan correctamente.
Función Bluetooth
ES
Se escucha un zumbido.
e Si hay un cable de conexión cerca de un cable de corriente,
de un fluorescente o de otra causa de interferencias similar,
aumente la distancia entre ellos tanto como sea posible.
No se oye sonido por un lado de los auriculares.
e Compruebe que el jack de los auriculares está bien insertado
hasta el fondo.
Sincronización de reloj
El indicador CLOCK no deja de parpadear.
e Configure la sincronización de reloj en OFF (desactivada)
cuando no se utilice.
e No es posible la sincronización con la señal de reloj que está
entrando. Compruebe las conexiones de los terminales de
sincronización de reloj y los ajustes del dispositivo conectado.
No se puede mostrar el nombre del dispositivo.
e Esta unidad no puede mostrar en pantalla símbolos o caracte-
res de doble byte, incluidos los japoneses y chinos.
Utilice solo números y letras del idioma inglés para los nombres de los dispositivos Bluetooth conectados a esta unidad.
No se puede cambiar el dispositivo Bluetooth
conectado.
e Esta unidad no puede tener conexiones Bluetooth con múlti-
ples dispositivos Bluetooth al mismo tiempo.
Para cambiar el dispositivo conectado a esta unidad por
Bluetooth, finalice la conexión con el dispositivo Bluetooth
conectado en ese momento antes de establecer la conexión
con otro dispositivo Bluetooth.
Dado que esta unidad utiliza un microcontrolador, ruidos externos y
otras interferencias pueden producir anomalías de funcionamiento
en la unidad. Si esto ocurre, desenchufe el cable de corriente, espere
un rato y después vuelva a encender la unidad para restablecer el
funcionamiento.
Continúa en la página siguiente e
83

Solución de problemas (cont.) Especificaciones
Restablecer los ajustes predeterminados
1 Mientras mantiene pulsado el botón MENU,
ponga el interruptor POWER en ON (activado).
2 Suelte el botón MENU cuando aparezca el
menú FACTORY RESET (restablecer los valores
de fábrica).
MENU
FACTORY RESET
ARE YOU SURE?
Salidas de audio analógico
Terminales
Terminales XLR ................................ 1 par (izda./dcha.)
Terminales RCA .................................1 par (izda./dcha.)
Impedancia de salida .................................... XLR: 188 Ω
RCA: 150 Ω
Nivel de salida máximo (1 kHz/escala completa, a 10 kΩ)
FIXED 0dB ...................................... XLR/RCA: 2 Vrms
FIXED +6dB .................................... XLR/RCA: 4 Vrms
VARIABLE ........................................... XLR: 12 Vrms
RCA: 6 Vrms
Respuesta de frecuencias* ............. 5 Hz – 80kHz (+1dB/−5 dB)
Relación señal/ruido* .................. 110 dB (ponderado A, 1 kHz)
Distorsión* .................... 0,0015 % (1 kHz, LPF: 20 Hz – 20 kHz)
* Condiciones de medición
Señal de entrada: 192 kHz/24 bits PCM
Salida de medición: RCA
Filtro digital PCM: off (desactivado)
Salida de auriculares
Terminal .................... Minijack estéreo de 4 polos, 3,5 mm × 1
Potencia de salida efectiva máx. ......... 500 mW + 500 mW (a 32 Ω)
Rango de impedancia compatible ........................ 16–600 Ω
3 Pulse el mando SOURCE.
El restablecimiento empezará cuando aparezca “Please wait!”
(por favor, espere).
Please wait!
La pantalla de fuente de reproducción aparecerá después
de que haya terminado el restablecimiento de los valores
predeterminados.
Ejemplo de pantalla
USB
ATENCIÓN
o No ponga la unidad en reposo (standby) hasta que aparezca
la pantalla de fuente de reproducción.
o Esta operación restablecerá todos los ajustes, incluidos los
ajustes de red, a sus valores predeterminados de fábrica.
−45.5dB
Entradas de audio digital**
Digital COAXIAL ................................... Terminal RCA × 1
Minijack de 3,5 mm*** × 1
(también es posible la conexión con miniconector de 3,5 mm
mediante un cable adaptador de RCA a miniconector).
(0,5 Vp-p, 75 Ω)
Digital OPTICAL ............................. Conector cuadrado × 1
Conector redondo*** × 1
(de −24 a −14,5 dBm en picos)
Unidad flash USB .....................Puerto USB tipo A (frontal) × 1
(conforme normativa USB 2.0)
USB ............................... Puerto USB tipo B (posterior) × 1
(conforme normativa USB 2.0)
LAN ..................................................... 100BASE-T
Frecuencia de muestreo de datos PCM
Digital COAXIAL
32 kHz, 44,1 kHz, 48 kHz, 88,2 kHz, 96 kHz, 176,4 kHz, 192 kHz
Digital OPTICAL
32 kHz, 44,1 kHz, 48 kHz, 88,2 kHz, 96 kHz, 176,4 kHz, 192 kHz
USB ........ 44,1 kHz, 48 kHz, 88,2 kHz, 96 kHz, 176,4 kHz, 192 kHz
352,8 kHz, 384 kHz, 705,6 kHz, 768 kHz
o Los ajustes predeterminados de fábrica son los valores de los
ajustes mostrados en las imágenes de pantallas utilizadas en las
explicaciones de este manual.
84

Profundidad de bits de cuantización
Digital COAXIAL/digital OPTICAL .......................16/24 bits
USB ............................................... 16/24/32 bits
Frecuencia de muestreo de datos DSD
Digital COAXIAL/digital OPTICAL .........................2,8 MHz
(admitida con transmisión DoP a 176,4 kHz/24 bits)
USB ....................... 2,8 MHz, 5,6 MHz, 11,2 MHz, 22,5 MHz
** Consulte el Manual del usuario de TEAC HR Streamer para más informa-
ción sobre unidades flash USB y redes.
*** Este terminal de entrada se puede utilizar tanto para conexión óptica
como coaxial.
Función Bluetooth
Versión Bluetooth. . . . . . . . . . . . . . . . . . . . . . . . . . . . . . . . . . . . . . . . . . . . . . . . 4.0
Clase de salida ............................................... Clase 2
(distancia de transmisión sin obstáculos**** .................. 10 m)
Perfiles compatibles ................................... A2DP, AVRCP
Códecs A2DP compatibles
SBC, AAC, Qualcomm® aptX™, Qualcomm® aptX™ HD, LDAC
Protección de contenidos A2DP compatible .................SCMS-T
Número máximo de emparejamientos almacenados ...............8
**** La distancia de transmisión es aproximada. La distancia de transmisión
puede variar dependiendo del entorno medioambiental y las ondas
electromagnéticas de las inmediaciones.
Accesorios incluidos
Cable de corriente × 1
Cable de conversión RCA (de RCA a miniconector) × 1
Mando a distancia (RC-1330) × 1
Pilas para el mando a distancia (AAA) × 2
Manual del usuario (este documento, incluida la garantía) × 1
o Los usuarios que vivan en EE. UU. y Canadá encontrarán información
sobre la garantía en las páginas 86–87 y en la contraportada
(documento de garantía). Los usuarios que vivan en Europa y otras
áreas deben consultar la página87.
ES
o El Manual del usuario de TEAC HR Streamer pueden descargarse
desde la web global de TEAC (http://www.teac-global.com/).
o El diseño y las especificaciones están sujetos a cambios sin previo
aviso.
o El peso y las dimensiones son aproximados.
o Las ilustraciones de este manual pueden diferir ligeramente de
los modelos de producción.
Entrada de sincronización de reloj
Terminal ........................................................BNC
Frecuencia de muestreo de entrada ......................... 10 MHz
Impedancia de entrada ........................................ 50Ω
Nivel de entrada ........ Onda rectangular: equivalente a niveles TTL
Onda senoidal: de 0,5 a 1Vrms
General
Alimentación
Modelo para Europa ..................... CA 220–240 V, 50/60 Hz
Modelo para EE. UU./Canadá .................... CA 120 V, 60 Hz
Consumo de corriente ......................................... 18 W
Corriente en reposo ..................... 0,4 W (en modo “standby”)
Dimensiones externas (ancho × alto × profundo, salientes incluidos)
290 mm × 81,2 mm × 248,7 mm
Peso .......................................................... 3,9 kg
Temperatura de funcionamiento .................. de +5 °C a +35 °C
Humedad de funcionamiento .... de 5 % a 85 % (sin condensación)
Temperatura de almacenamiento ................ de −20 °C a +55 °C
85

WARRANTY/GARANTIE/GARANTÍA
Warranty provisions (United States and
Canada only)
Length of Warranty
The parts and labor warranty will be effective for one (1) year from
the date of the original purchase for products not used for commercial purposes. For products used commercially, the warranty
is ninety (90) days for magnetic heads and optical pickups, one (1)
year for all other parts and ninety (90) days for labor.
Who Is Covered Under This Warranty
This warranty is valid only in the United States or Canada, dependent upon the country in which original purchase was made, and
enforceable only by the original purchaser within the country in
which the purchase was made.
This warranty is not valid if the product was purchased through an
unauthorized dealer.
What Is Not Covered Under This Warranty
o Damage to or deterioration of the external cabinet.
o Damage resulting from accident, misuse, abuse, or neglect.
o Damage resulting from failure to follow instructions contained
in the products owners’ manual or otherwise provided with the
product.
o Damage occurring during shipment of the product (Claims must
be presented to the carrier).
o Damage resulting from the repair or attempted repair by anyone
other than TEAC or an authorized TEAC service station.
o Damage resulting from modification or attempted modification
of product not authorized by TEAC.
o Damage resulting from causes other than product defects,
including lack of technical skills, competence, or experience of
the user.
o Damage to any unit that has been altered or which the serial
number has been defaced, modified or removed.
What TEAC Will Pay For
TEAC will pay all labor and material expenses for items covered by
the warranty. Payment of shipping charges is covered in the next
section.
How To Obtain Warranty Service
Your unit must be serviced by an authorized TEAC service station
within the country in which the product was purchased. If you are
unable to locate an authorized service station in your area, please
contact TEAC at the applicable address shown at the end of this
warranty statement. PLEASE DO NOT RETURN YOUR UNIT TO TEAC
WITHOUT OUR PRIOR AUTHORIZATION. You must pay shipping
charges if it is necessary to ship the product for service. However, if
the necessary repairs are covered by warranty, we will pay the return
shipping charges to any destination within the country in which the
product was purchased. Whenever warranty service is required, you
must present the original dated sales receipt, or other proof indicating the purchase place and date, as proof of warranty coverage.
LIMITATION OF IMPLIED WARRANTIES
ALL IMPLIED WARRANTIES, INCLUDING WARRANTIES OF
MERCHANTABILITY AND FITNESS FOR A PARTICULAR PURPOSE, ARE
LIMITED IN DURATION TO THE LENGTH OF THIS WARRANTY.
EXCLUSION OF DAMAGES
TEAC’S LIABILITY FOR ANY DEFECTIVE PRODUCT IS LIMITED TO
REPAIR OR REPLACEMENT OF THE PRODUCT, AT TEAC’S OPTION.
TEAC SHALL NOT BE LIABLE FOR DAMAGE BASED UPON
INCONVENIENCE, LOSS OF USE OF THE PRODUCT, INTERRUPTED
OPERATION, COMMERCIAL LOSS OR LOST PROFITS, OR ANY OTHER
DAMAGES, WHETHER INCIDENTAL, CONSEQUENTIAL, PUNITIVE OR
OTHERWISE.
SOME STATES OR PROVINCES DO NOT ALLOW LIMITATIONS ON
HOW LONG AN IMPLIED WARRANTY LASTS AND/OR DO NOT
ALLOW THE EXCLUSION OR LIMITATION OF INCIDENTAL OR
CONSEQUENTIAL DAMAGES, SO THE ABOVE LIMITATIONS AND
EXCLUSIONS MAY NOT APPLY TO YOU.
THIS WARRANTY GIVES YOU SPECIFIC RIGHTS, AND MAY VARY FROM
SOME OF THE RIGHTS PROVIDED BY LAW. THESE RIGHTS MAY VARY
FROM STATE TO STATE OR PROVINCE TO PROVINCE.
Conditions de garantie (États-Unis et
Canada uniquement)
Durée de la garantie
La garantie pièces et main d’oeuvre sera valable un (1) an à compter
de la date d’achat initial des produits non utilisés dans un but commercial. Pour les produits à utilisation commerciale, la garantie des
têtes magnétiques et capteurs optiques est de quatre-vingt dix (90)
jours, elle est d’un (1) an pour les autres pièces et quatre-vingt dix
(90) jours pour la main d’oeuvre.
Bénéficiaire de la garantie
Cette garantie n’est valable qu’aux États-Unis et au Canada, selon le pays
d’achat initial, et ne s’applique qu’à l’acquéreur initial dans le pays d’achat.
Cette garantie n’est pas valable si le produit a été acheté auprès d’un
revendeur non autorisé.
Ce qui n’est pas couvert par cette garantie
o Les dommages ou détériorations du boîtier externe.
o Les dommages résultant d’un accident, d’une mauvaise utilisa-
tion, d’un abus ou d’une négligence.
o Les dommages résultant du non-respect des instructions conte-
nues dans le mode d’emploi du produit ou fournies avec le produit.
o Les dommages survenus durant le transport du produit (les
réclamations doivent être adressées au transporteur).
o Les dommages résultant d’une réparation ou tentative de
réparation effectuée par toute personne extérieure au service
après-vente TEAC ou agréé par TEAC.
o Les dommages résultant d’une modification ou tentative de
modification de produit non autorisée par TEAC.
86

o Les dommages résultant de causes autres que des défauts de
produit, y compris le manque d’aptitude technique, de compétence ou d’expérience de l’utilisateur.
o Les dommages de toute unité ayant été modifiée ou dont le
numéro de série a été effacé, modifié ou retiré.
Frais pris en charge par TEAC
TEAC prendra en charge tous les frais de pièces et main d’oeuvre
pour les articles couverts par la garantie. Les frais d’expédition sont
évoqués dans la section suivante.
Comment obtenir une intervention sous garantie
Votre unité doit être réparée par un service après-vente agréé par
TEAC dans le pays d’achat du produit. Si vous ne trouvez pas de service après-vente agréé dans votre région, veuillez contacter TEAC à
l’adresse appropriée donnée à la fin de cette garantie. VEUILLEZ NE
PAS RENVOYER VOTRE UNITÉ CHEZ TEAC SANS NOTRE AUTORISATION
PRÉALABLE. Si le produit doit être renvoyé pour réparation, les frais
d’expédition sont à votre charge. Toutefois, si les réparations nécessaires
sont couvertes par la garantie, nous prendrons à notre charge les frais de
retour vers toute destination dans le pays d’achat du produit. Lorsqu’une
réparation sous garantie est requise, vous devez présenter comme
preuve de couverture par la garantie la facture d’achat originale datée
ou une autre preuve d’achat mentionnant le lieu et la date d’achat.
LIMITATION DES GARANTIES IMPLICITES
TOUTES LES GARANTIES IMPLICITES, Y COMPRIS LES GARANTIES
DE QUALITÉ MARCHANDE ET D’ADÉQUATION À UN USAGE
PARTICULIER, SONT LIMITÉES À LA DURÉE DE CETTE GARANTIE.
Europe/Europa
This product is subject to the legal warranty regulations of the country of purchase. In case of a defect or a problem, please contact the
dealer where you bought the product.
Ce produit est sujet aux réglementations concernant la garantie
légale dans le pays d’achat. En cas de défaut ou de problème, veuillez contacter le revendeur chez qui vous avez acheté le produit.
Las condiciones de garantía de este aparato están sujetas a las
disposiciones legales sobre garantía del país en el que ha sido
adquirido. En caso de garantía, debe dirigirse al establecimiento
donde adquirió el aparato.
In countries/regions other than the USA,
Canada and Europe
This warranty gives you specific legal rights, and you may also have
other rights that vary by country, state or province.
If you have a warranty claim or request, please contact the dealer
where you bought the product.
该保证书赋予了顾客特定的合法权利,并且因国家,州或省等
地域的不同,顾客可能拥有其他权利。如需申请或要求保修,
请与购买本产品的销售店进行联系。
EXCLUSION DE DOMMAGES
LA RESPONSABILITÉ DE TEAC VIS-À-VIS DE TOUT PRODUIT
DÉFECTUEUX EST LIMITÉE À LA RÉPARATION OU AU REMPLACEMENT
DU PRODUIT, AU GRÉ DE TEAC. TEAC NE POURRA ÊTRE TENU POUR
RESPONSABLE DE QUELCONQUES DOMMAGES SE RAPPORTANT
AU DÉRANGEMENT, À LA PERTE D’USAGE DU PRODUIT, À
L’INTERRUPTION DE L’UTILISATION, AUX PERTES COMMERCIALES OU
DE PROFITS, NI D’AUCUN AUTRE DOMMAGE, QU’IL SOIT ACCESSOIRE,
INDIRECT, PUNITIF OU AUTRE.
CERTAINS ÉTATS OU PROVINCES N’AUTORISENT PAS DE LIMITATIONS
DE DURÉE D’UNE GARANTIE IMPLICITE ET/OU N’AUTORISENT PAS
L’EXCLUSION OU LA LIMITATION DES DOMMAGES ACCESSOIRES
OU INDIRECTS, AUQUEL CAS LES LIMITATIONS ET EXCLUSIONS
CI-DESSUS PEUVENT NE PAS VOUS ÊTRE APPLICABLES.
CETTE GARANTIE VOUS DONNE DES DROITS SPÉCIFIQUES QUI
PEUVENT ÊTRE DIFFÉRENTS DE CERTAINS DROITS OCTROYÉS PAR LA
LOI. CES DROITS PEUVENT VARIER D’UN ÉTAT À L’AUTRE OU D’UNE
PROVINCE À L’AUTRE.
87

WARRANTY/GARANTIE (United States and Canada only/États-Unis et Canada uniquement)
Model/Modèle: NT-505
Serial No./N° de série
Date of purchase/Date de l’achat
Owner’s name/Nom du propriétaire
Owner’s address/Adresse du propriétaire
Dealer’s name/Nom du détaillant
Dealer’s address/Adresse du détaillant
Z
TEAC CORPORATION 1-47 Ochiai, Tama-shi, Tokyo 206-8530 Japan Phone: +81-42-356-9156
TEAC AMERICA, INC. 1834 Gage Road, Montebello, California 90640 U.S.A. Phone: +1-323-726-0303
TEAC AUDIO EUROPE Gutenbergstr. 3, 82178 Puchheim, Germany Phone: +49-8142-4208-141
This product has a serial number located on the rear panel. Please write it here and retain
this for your records.
Model name: NT-505 Serial number:
0218.MA-2433B
 Loading...