

9A10069401
OWNER’S MANUAL
MANUEL DU PROPRIÉTAIRE
MANUAL DEL USUARIO
Micro Hi-Fi System
Z
MC-DX20
ENGLISH FRANÇAIS ESPAÑOL

2
Contents
Thank you for choosing TEAC. Read this manual carefully
to get the best performance from this unit.
Before Use . . . . . . . . . . . . . . . . . . . . . . . . . . . . . . . . . . . . . . . . 2
Discs. . . . . . . . . . . . . . . . . . . . . . . . . . . . . . . . . . . . . . . . . . . . . 3
Connection. . . . . . . . . . . . . . . . . . . . . . . . . . . . . . . . . . . . . . . . 4
Wall Mounting . . . . . . . . . . . . . . . . . . . . . . . . . . . . . . . . . . . . . 5
Names of Each Control . . . . . . . . . . . . . . . . . . . . . . . . . . . . . . . 6
Remote Control Unit. . . . . . . . . . . . . . . . . . . . . . . . . . . . . . . . . 7
Basic Operation. . . . . . . . . . . . . . . . . . . . . . . . . . . . . . . . . . . . . 8
Listening to CD/MP3. . . . . . . . . . . . . . . . . . . . . . . . . . . . . . . . . 9
Search Mode (MP3 only). . . . . . . . . . . . . . . . . . . . . . . . . . . . . 11
Programmed Playback. . . . . . . . . . . . . . . . . . . . . . . . . . . . . . . 12
Repeat Playback . . . . . . . . . . . . . . . . . . . . . . . . . . . . . . . . . . . 14
Shuffle Playback . . . . . . . . . . . . . . . . . . . . . . . . . . . . . . . . . . . 14
Listening to the Radio . . . . . . . . . . . . . . . . . . . . . . . . . . . . . . . 15
Preset Tuning . . . . . . . . . . . . . . . . . . . . . . . . . . . . . . . . . . . . . 16
RDS . . . . . . . . . . . . . . . . . . . . . . . . . . . . . . . . . . . . . . . . . . . . 17
RDS (PTY Search) . . . . . . . . . . . . . . . . . . . . . . . . . . . . . . . . . . 18
Setting the Clock . . . . . . . . . . . . . . . . . . . . . . . . . . . . . . . . . . 19
Setting the Timer . . . . . . . . . . . . . . . . . . . . . . . . . . . . . . . . . . 20
Troubleshooting . . . . . . . . . . . . . . . . . . . . . . . . . . . . . . . . . . . 22
Specifications . . . . . . . . . . . . . . . . . . . . . . . . . . . . . . . . . . . . . 23
Before Use
Read this before operation
<
As the unit may become warm during operation, always leave
sufficient space around the unit for ventilation.
The ventilation holes should not be covered. Make sure there
is at least 20 cm of space above and at least 5 cm of space on
each side of the unit. Do NOT place anything on top of the
unit.
<
The voltage supplied to the unit should match the voltage as
printed on the rear panel of the supplied subwoofer. If you
are in any doubt regarding this matter, consult an electrician.
<
Choose the installation location of your unit carefully. Avoid
placing it in direct sunlight or close to a source of heat. Also
avoid locations subject to vibrations and excessive dust, heat,
cold or moisture.
<
Do not place the unit on an amplifier/receiver or any other
electronic device that generates heat.
< Do not open the sealed cabinet as this might result in damage
to the circuitry or electrical shock. If a foreign object should
get inside the unit, contact your dealer or service agency.
<
When removing the power plug from the wall outlet, always
pull directly on the plug, never yank the cord.
< To keep the laser pickup clean, do not touch it, and always
close the CD door.
< Do not attempt to clean the unit with chemical solvents as
this might damage the finish. Use a clean, dry cloth.
< Keep this manual in a safe place for future reference.
DO NOT MOVE THE UNIT DURING PLAYBACK
During playback, the disc rotates at high speed. Do NOT lift or
move the unit during playback. Doing so may damage the
disc or the laser assembly.
WHEN MOVING THIS UNIT
When relocating or packing the unit for moving, be sure to
remove the disc. Moving this unit with the disc loaded may
result in damage to this unit.
CAUTION
Do not expose this unit to liquids of any kind. Keep any
objects containing liquids such as vases, water glasses, potted
plants, et cetera off the top of this unit.
Do not install this equipment in a confined space such as a
bookcase or similar unit.
trademark of New Transducers Ltd.
VARING: APPARATEN INNEHÅLLER LASER KOMPONENT MED
STRÅLNING ÖVERSTIGANDE KLASS 1.
“ADVARSEL: USYNLIG LASERSTRÅLING VED ÅBNING NAR
SIKKERHEDSAFBRYDERE ER UDE AF FUNKTION. UNDGÅ
UDSAETTELSE FOR STRÅLING”
“VAROITUS! SUOJAKOTELOA EI SAA AVATA. LAITE SISÄLTÄÄ
LASERDIODIN. JOKA LÄHETTÄ (NÄKYMÄTÖNTÄ) SILMILLE
VAARALLISTA LASERSÄTEILYÄ”.
ADVARSEL: USYNLIG LASERBESTRÅLING NÅR DENNE DELEN ER
ÅPEN OG SIKKERHETSSPERREN ER UTKOBLET UNNGÅ
UTSETTELSE FOR STRÅLING.

3
ENGLISH
Discs
< Printable CD-R discs aren’t recommended, as the label side
might be sticky and damage the unit.
< Do not stick papers or protective sheets on the discs and do
not use any protective coating spray.
< Use a soft oil-based felt-tipped pen to write the information
on the label side. Never use a ball-point or hard-tipped pen,
as this may cause damage to the recorded side.
<
Never use a stabilizer. Using commercially available CD
stabilizers with this unit will damage the mechanisms and
cause them to malfunction.
<
Do not use irregular shape CDs (octagonal, heart-shape, etc.).
CDs of this sort can damage the unit.
Discs that can be played on this unit:
• Commercial audio CD’s bearing the “Compact Disc Digital
Audio” logo:
• Properly finalized CD-R discs
Note:
<
Depending on the quality of the disc and/or the condition of
the recording, some CD-R discs may not be playable.
<
CD-RW discs cannot be played on this unit.
<
Copy-protected discs and other discs which do not conform
to the CD standard may not play back correctly in this player.
If you use such discs in this unit, TEAC Corporation and its
subsidiaries cannot be responsible for any consequences or
guarantee the quality of reproduction. If you experience
problems with such non-standard discs, you should contact
the producers of the disc.
< Always load the disc with the label side facing you. (Compact
discs can be played or recorded only on one side.)
< To remove a disc from its storage case, press down on the
center of the case and lift the disc out, holding it carefully by
the edges.
How to remove the disc How to hold the disc
<
Should the disc become dirty, wipe the surface radially with a
soft, dry cloth. Never clean the disc using a circular motion.
< If you are in any doubt as to the care and handling of a CD-R
disc, read the precautions supplied with the disc, or contact
the disc manufacturer directly.
<
Never use such chemicals as record sprays, antistatic sprays or
fluid, benzene or thinner to clean the discs. Such chemicals
will do irreparable damage to the disc’s plastic surface.
<
Discs should be returned to their cases after use to avoid dust
and scratches that could cause the laser pickup to “skip.”
< Do not expose discs to direct sunlight or high humidity and
temperature for extended periods. Long exposure to high
temperatures will warp the disc.
<
CD-R discs are more sensitive to the effects of heat and
ultraviolet rays than ordinary CDs. It is important that they are
not stored in a location where direct sunlight will fall on them
and which is away from sources of heat such as radiators or
heat-generating electrical devices.
MP3 compatibility
< File names of MP3 should be alphanumeric characters. This
unit cannot display symbols and full-size or 2 bytes-wide
characters (such as Japanese, Chinese, etc.) correctly. Also, be
sure to use the file extension “.mp3”.
<
The disc must be finalized in order to play.
<
The CD-ROM must be ISO 9660 compatible.
<
When more than 200 files or folders are recorded on the disc,
the unit might not be able to play it correctly.
< Mono or stereo MPEG-1 Audio Layer 3 format, 44.1 or
48 kHz, fixed bit-rate.
< Audio encoded at 128 Kbps should sound close to regular
audio CD quality. Although this player will play lower bit-rate
MP3 tracks, the sound quality becomes noticeably worse at
lower bit-rates.

4
Connection
AM loop antenna
Position the antenna for the best sound.
If you want, you can hook the AM antenna on a wall as
shown below:
A
CAUTION
Turn off the power of all the equipment before making
connections.
Read instructions of each component you intend to use with
this unit.
<
Be sure to insert each plug securely. To prevent hum and
noise, do not bundle the connection cords with the power
cord.
FM antenna
While in FM mode, tune in an FM station and extend the
lead to find the best position for reception. This antenna
may need to be repositioned if you move your unit to a new
location.
B
Outdoor FM Antenna (75Ω)
FM Outdoor Antenna
In an area where FM signals are weak, it will be necessary to
use a 75-ohm unbalanced-type outdoor FM antenna using
an optional (not supplied) matching transformer connected
to an external antenna. Generally, a 3-element antenna will
be sufficient; if you live in an area where the FM signals are
particularly weak, it may be necessary to use one with 5 or
more elements.
E
D
C
B
A
F
Speaker (R) Speaker (L)
Main Unit
DVD, CD-R, etc.
Subwoofer
LINE OUT
RL
5
ENGLISH
Wall Mounting
You can mount the main unit and/or the left and right speakers
on a wall.
Precautions
<
Be aware that the length of the cables are approximately 3 m.
Do not attempt to mount the main unit and the speakers too
far from the subwoofer.
<
Drill holes into solid wall support, such as wooden frame or
concrete wall.
< TEAC supplies these brackets as a convenience to the product
owner. Consult your local building codes and exercise all
necessary caution when mounting these brackets. If you are
unsure how to use the supplied brackets, consult with a local
tradesmen or building supply expert.
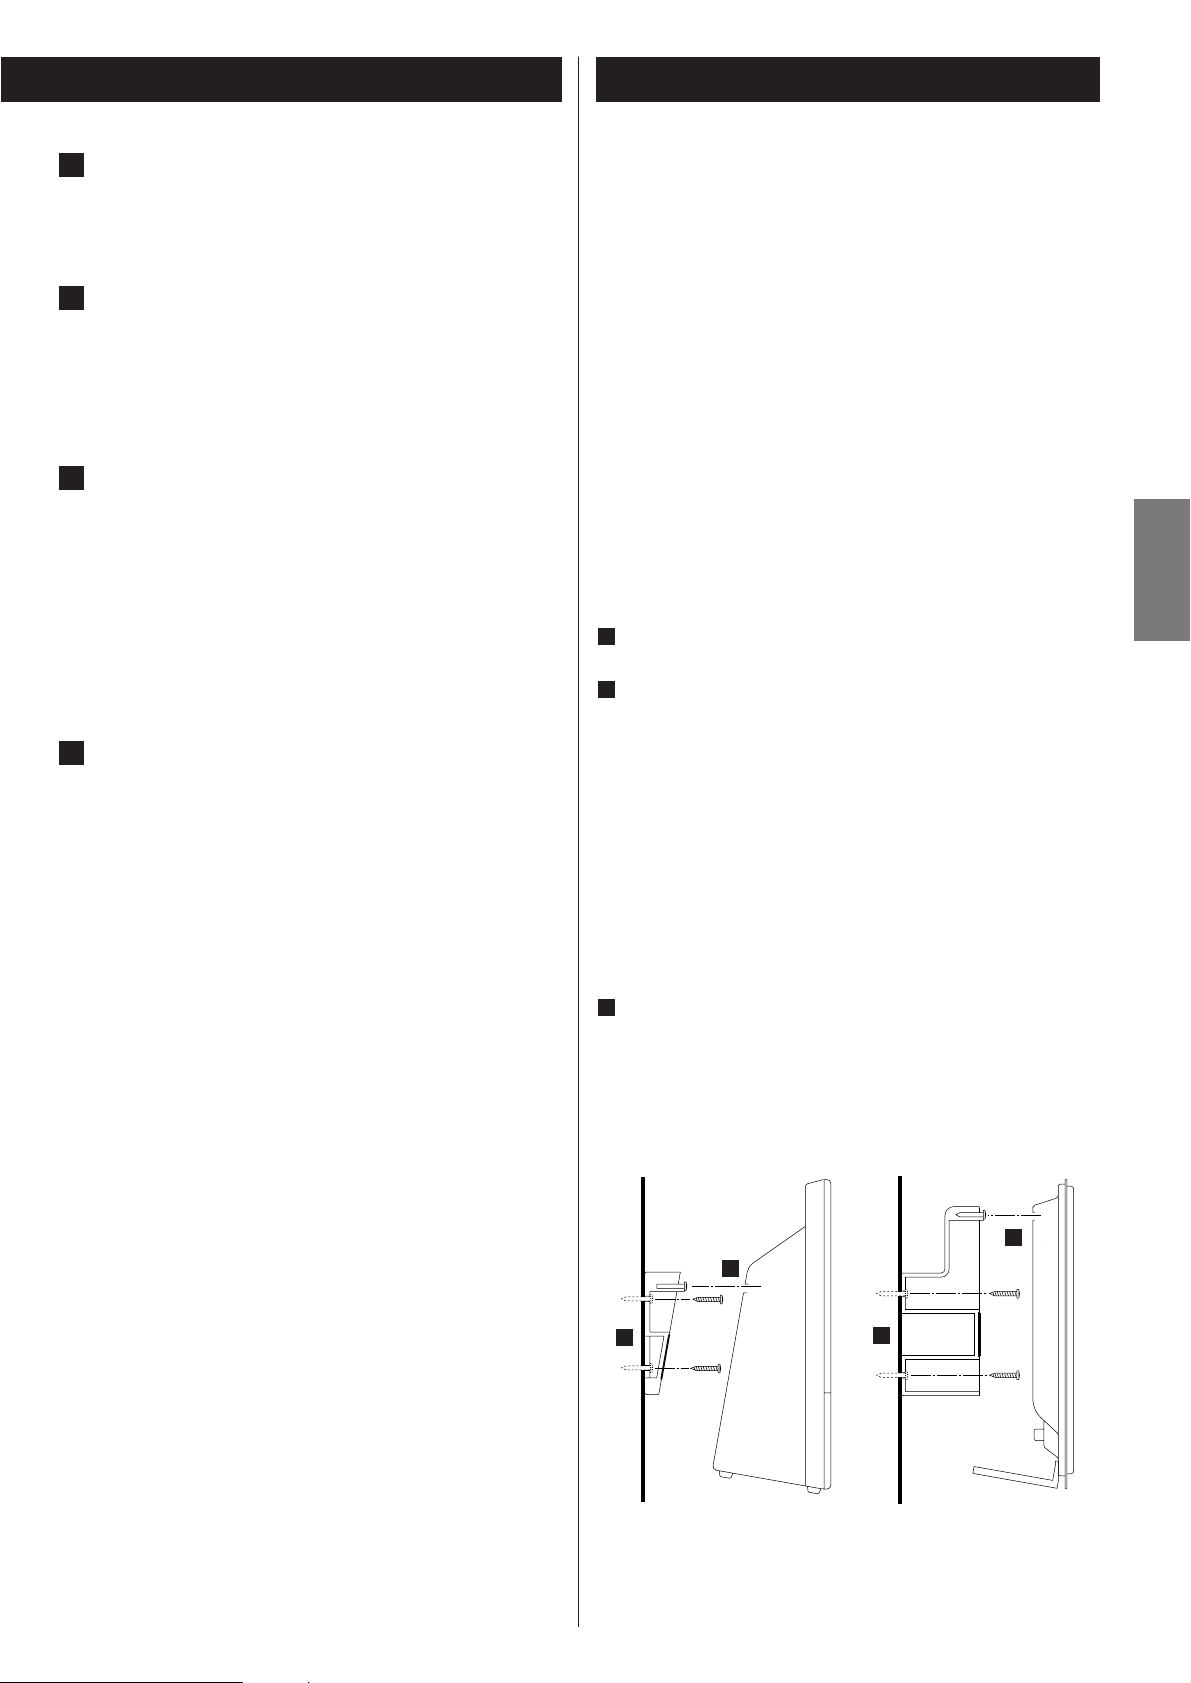
To hook on the wall
Use the supplied template to determine drilling points.
Secure the brackets on the wall using the supplied screws.
<
As a convenience, a set of tapered plastic anchors is supplied.
If you chose to use these anchors, drill a pilot hole using a
6mm drill bit then tap the anchor into the pilot hole.
Only use these anchors if they are appropriate for the
materials onto which the unit is to be mounted. Consult your
local hardware store if you are uncertain.
Note:
Before going on, make connections between the main unit
and the speakers by referring to page 4.
Hang the main unit and/or the speakers to the mounting
tabs.
3
2
1
Speaker
Main Unit
2
3
3
2
Subwoofer
Make the connection between the “TO SUBWOOFER” and
“FROM MAIN” sockets using the supplied cable.
AUX IN
You can connect a DVD player, VCR etc. to this unit.
Connect the component with RCA pin cords.
Make sure to connect the white plug to the white jacks
(Left) and the red plug to the red jacks (Right).
SPEAKERS
Connect the left speaker’s plug to L, and the right speaker’s
plug to R.
<
When using speakers other than those supplied with the
system, the impedance should be 3 ohms or more.
< Do not connect anything other than speakers to these
terminals.
AC Power Cord
Plug this AC power cord into an AC wall socket.
F
E
D
C
6
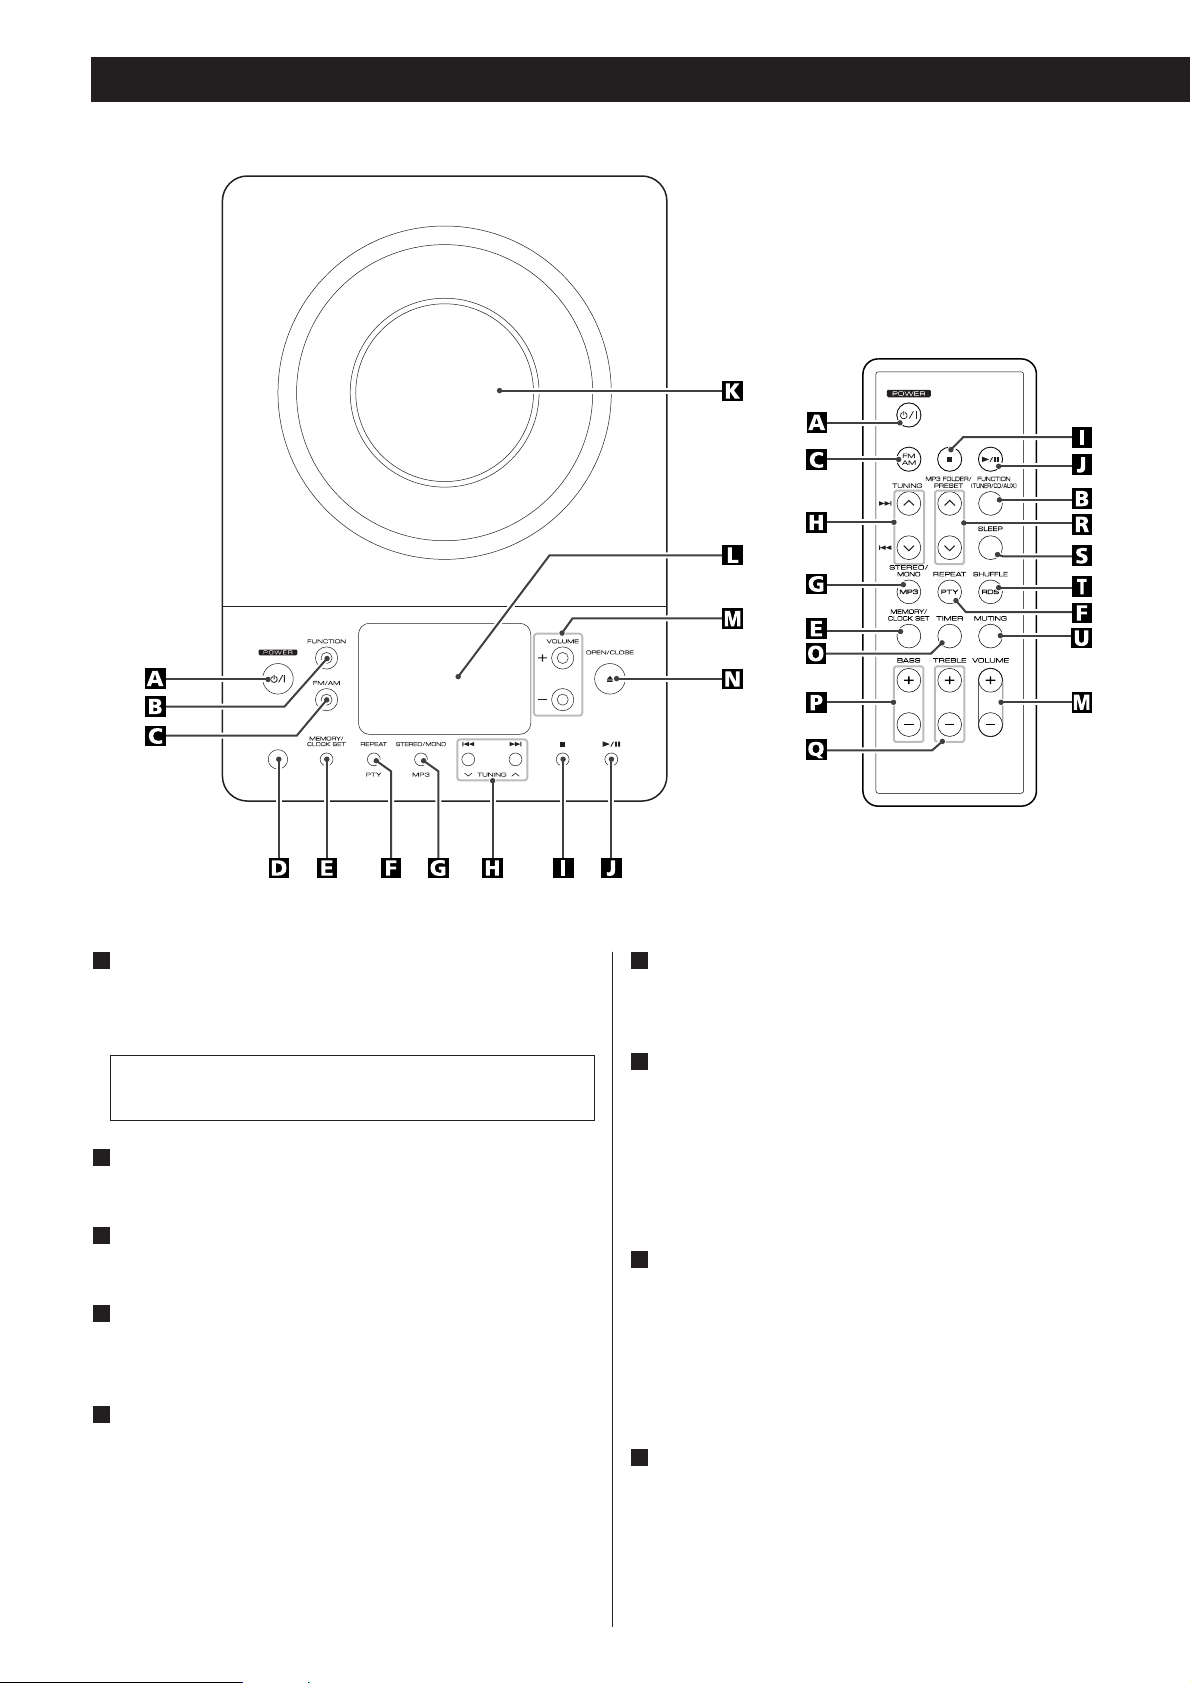
POWER
Press this switch to turn the unit on or off (standby).
The main unit is powered via the subwoofer. You need to first
turn on the subwoofer.
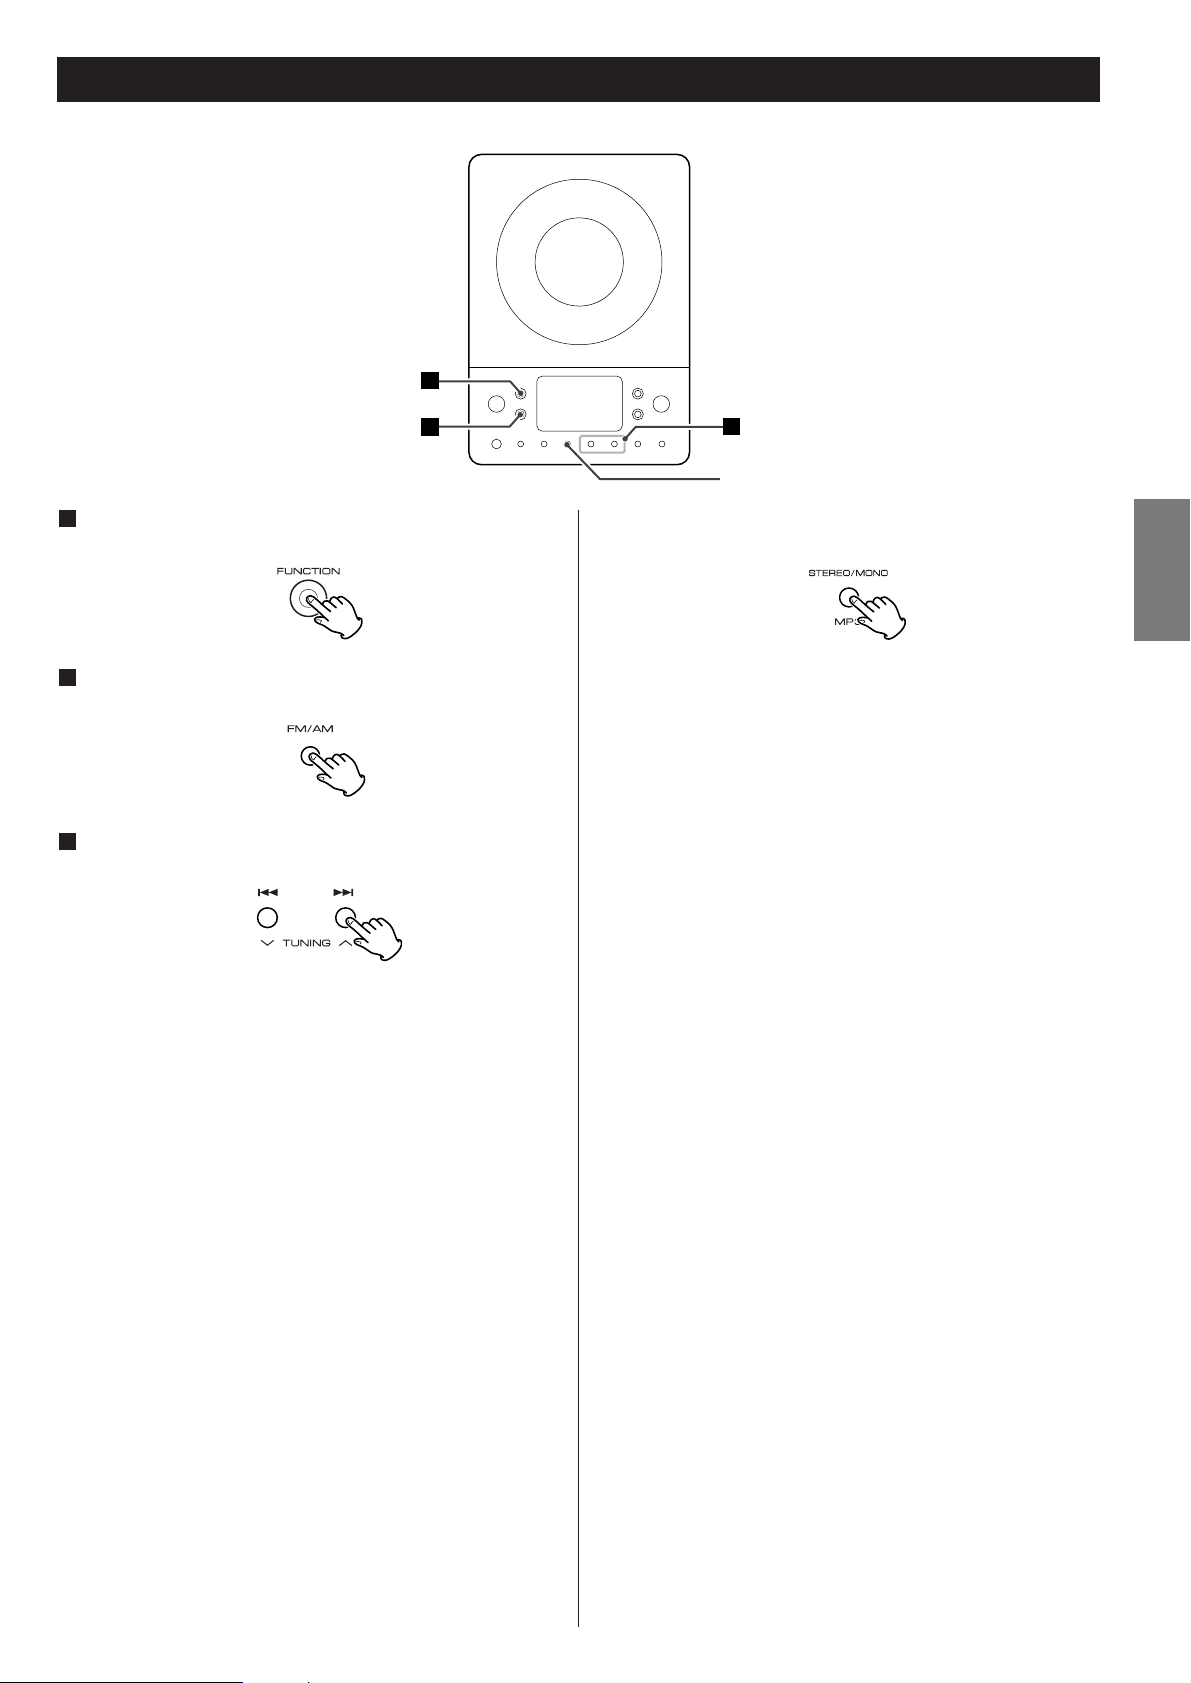
FUNCTION
Use this button to select a source (CD, AUX or TUNER).
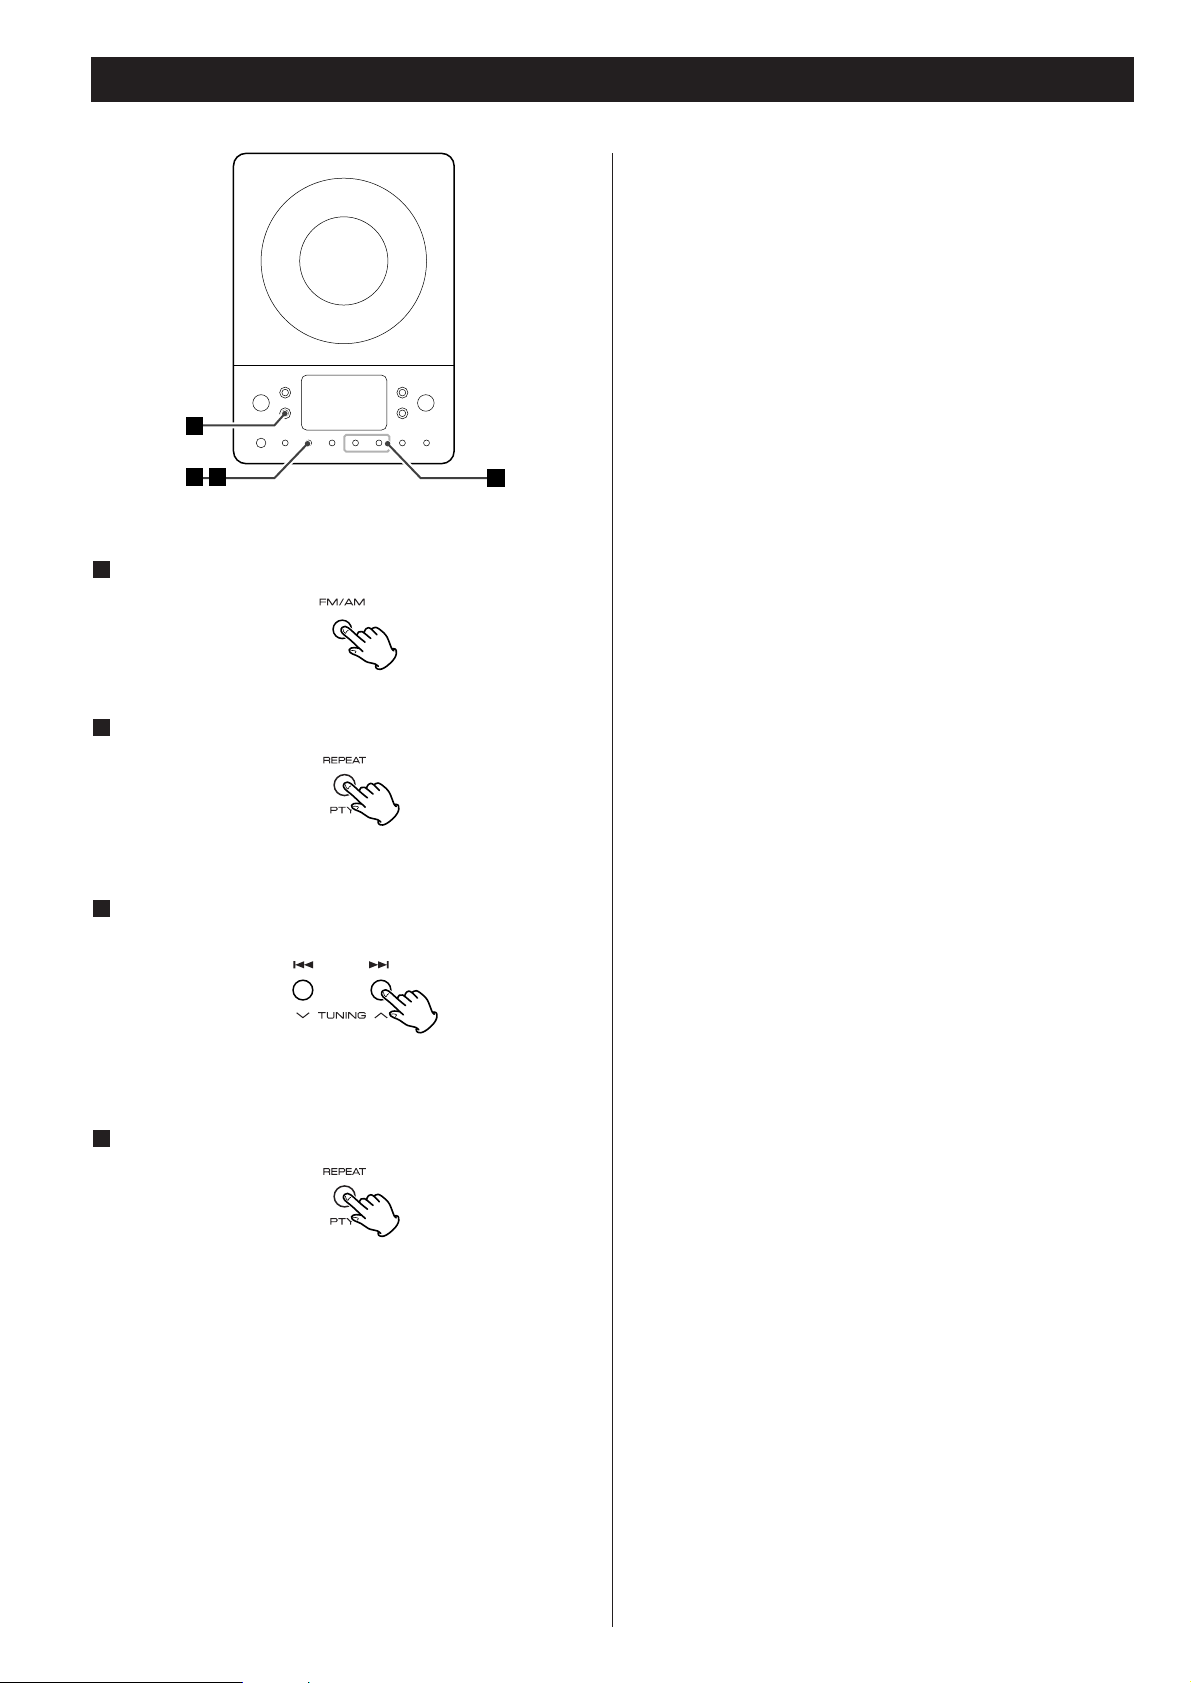
FM/AM
Use this button to select AM or FM.
Remote Sensor
When operating the remote control unit, point it towards
here.
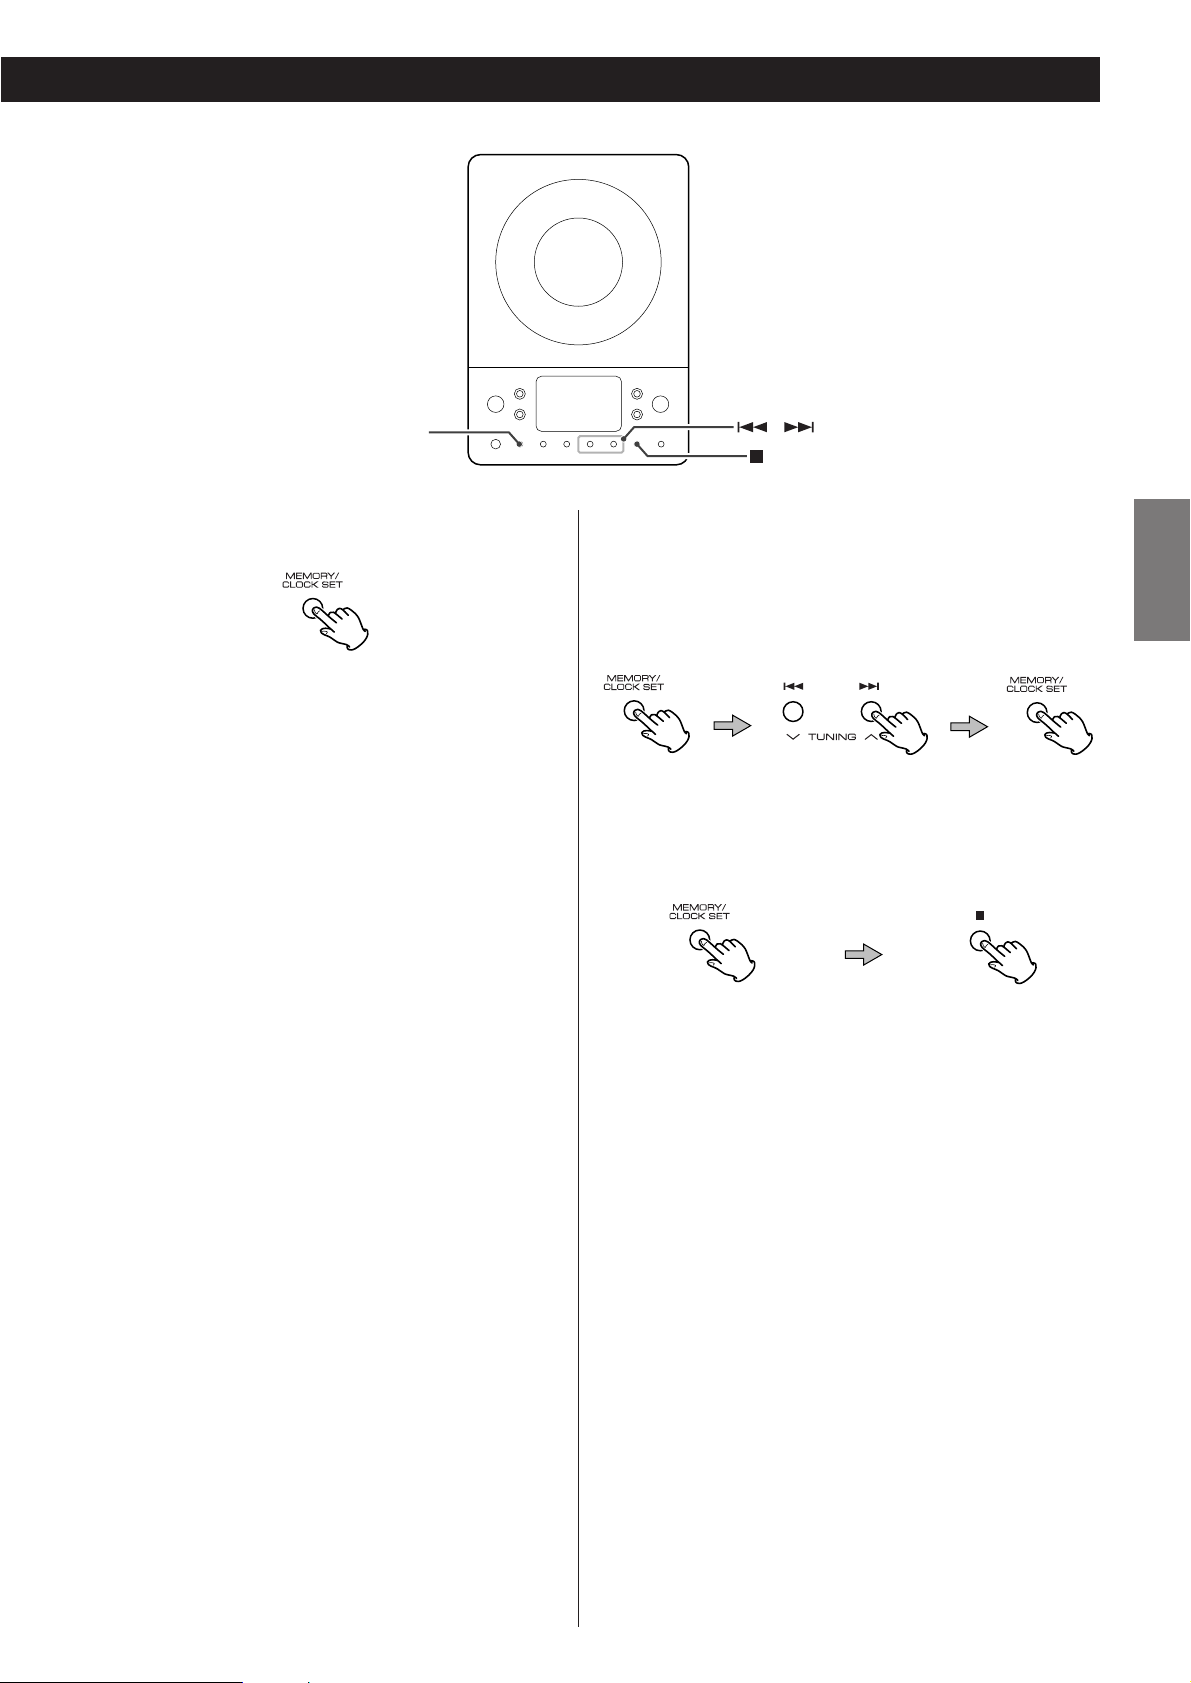
MEMORY/CLOCK SET
In CD mode, use this button to program tracks.
In TUNER mode, use this button to store preset channels into
memory.
This button is also used for clock adjustment.
E
D
C
B
A
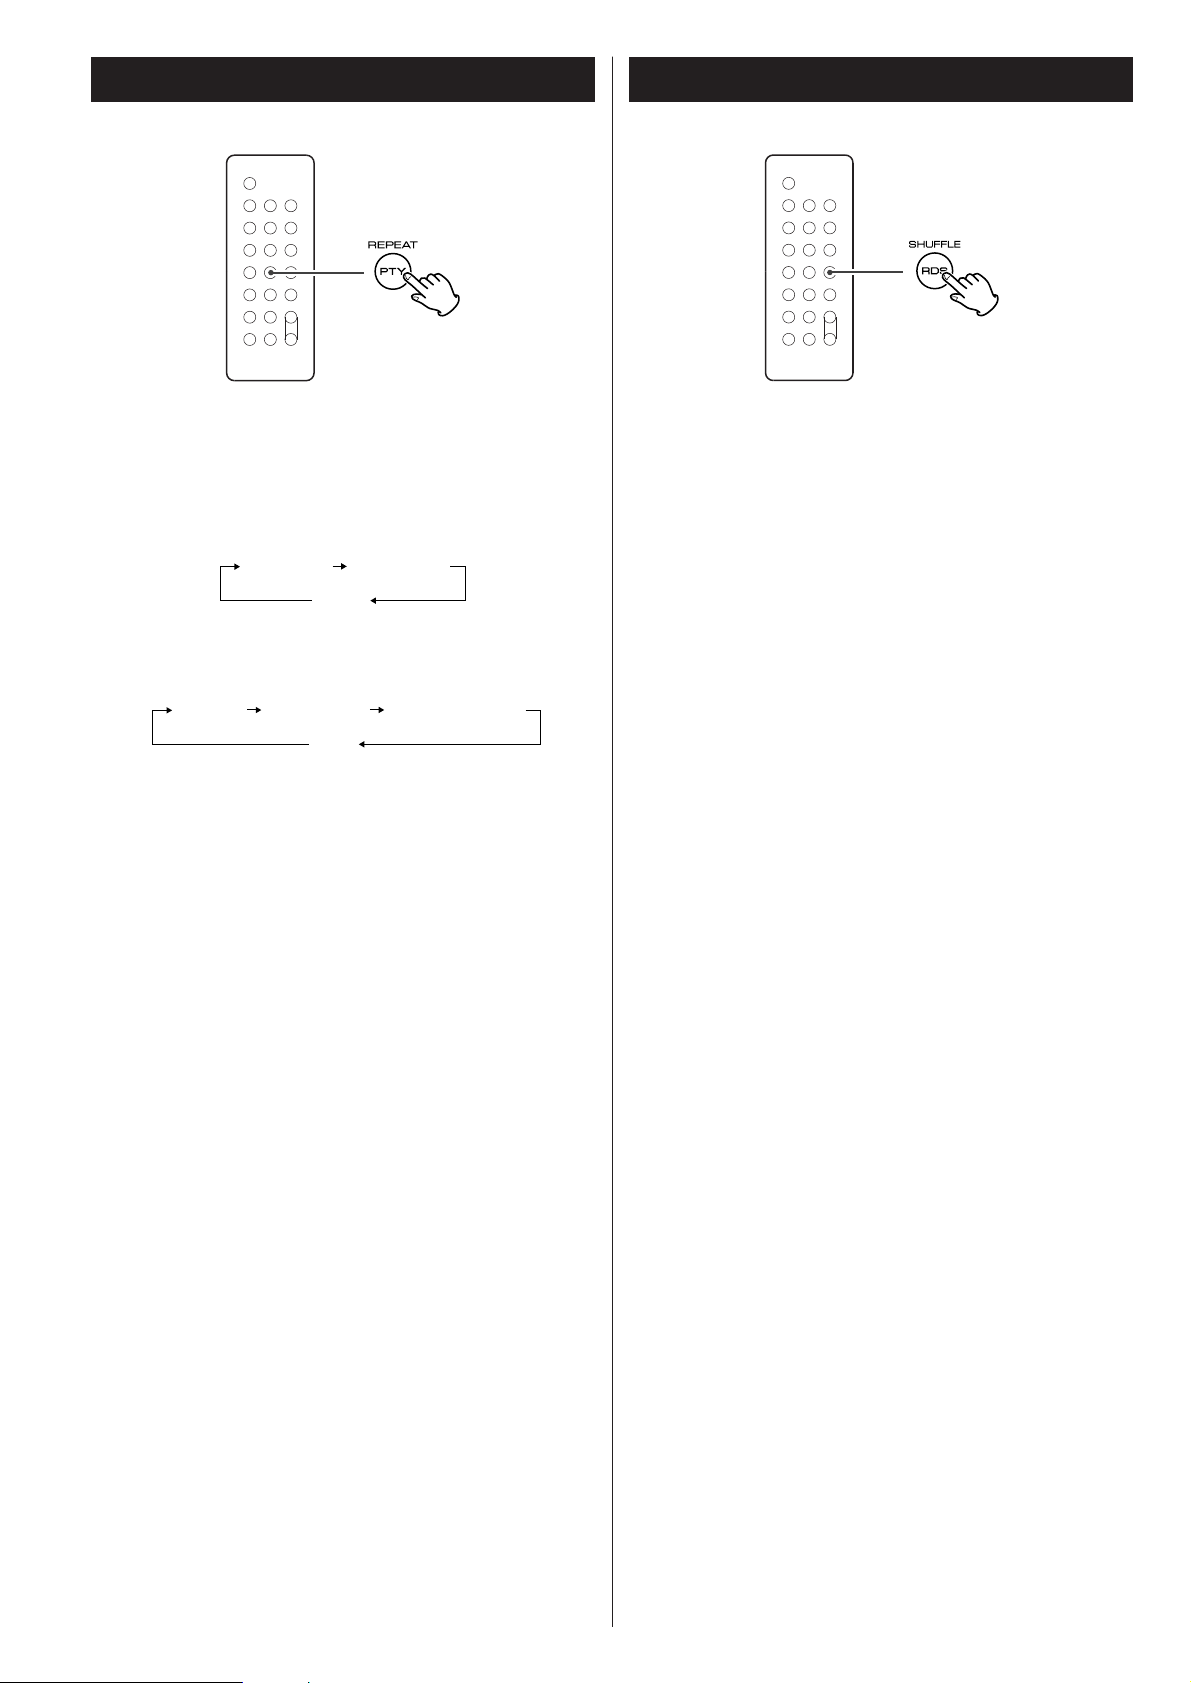
REPEAT/PTY
In CD mode, use this button for repeat playback.
In FM TUNER mode, use this button to start PTY search.
STEREO/MONO/MP3
In FM TUNER mode, use this button to select stereo or
monaural.
During playback of a MP3 disc, use this button to search track
name.
During playback of CD, use this button to switch the ESP
function on or off.
SKIP (.//) / TUNING
In CD mode, momentarily press this button to skip tracks.
Hold down this button to search for a part of a track.
In TUNER mode, momentarily press this button to tune in
stations.
In Standby mode, these buttons are used to set or adjust the
clock and the timer.
STOP (H)
Use this button to stop playback of CD/MP3.
I
H
G
F
The equipment draws a nominal amount of power from the
AC outlet even with its POWER switch in the OFF position.
Names of Each Control
7
ENGLISH
PLAY/PAUSE (y/J)
Use this button to start or pause playback of CD/MP3.
CD door
Display
VOLUME
Press the up “+” or the down “–” button to adjust the
volume.
OPEN/CLOSE
Use this button to open and close the CD door.
TIMER
Use this button together with the SKIP buttons to set the
timer.
BASS
Use these buttons to adjust the bass sound up or down.
TREBLE
Use these buttons to adjust the treble sounds up and down.
MP3 FOLDER/PRESET
In TUNER mode, use this button to select preset stations.
During playback of a MP3 disc, use this button to select a
folder in the disc.
SLEEP
Use this button to set sleep timer.
SHUFFLE/RDS
Use this button for shuffle playback.
In FM TUNER mode, use this button to select an RDS mode.
MUTING
Use this button to mute the sound.
U
T
S
R
Q
P
O
N
M
L
K
J
Note:
To simplify explanations, instructions refer to names of
buttons and controls on the front panel, making no mention
of the use of remote control unit.
Remote Control Unit
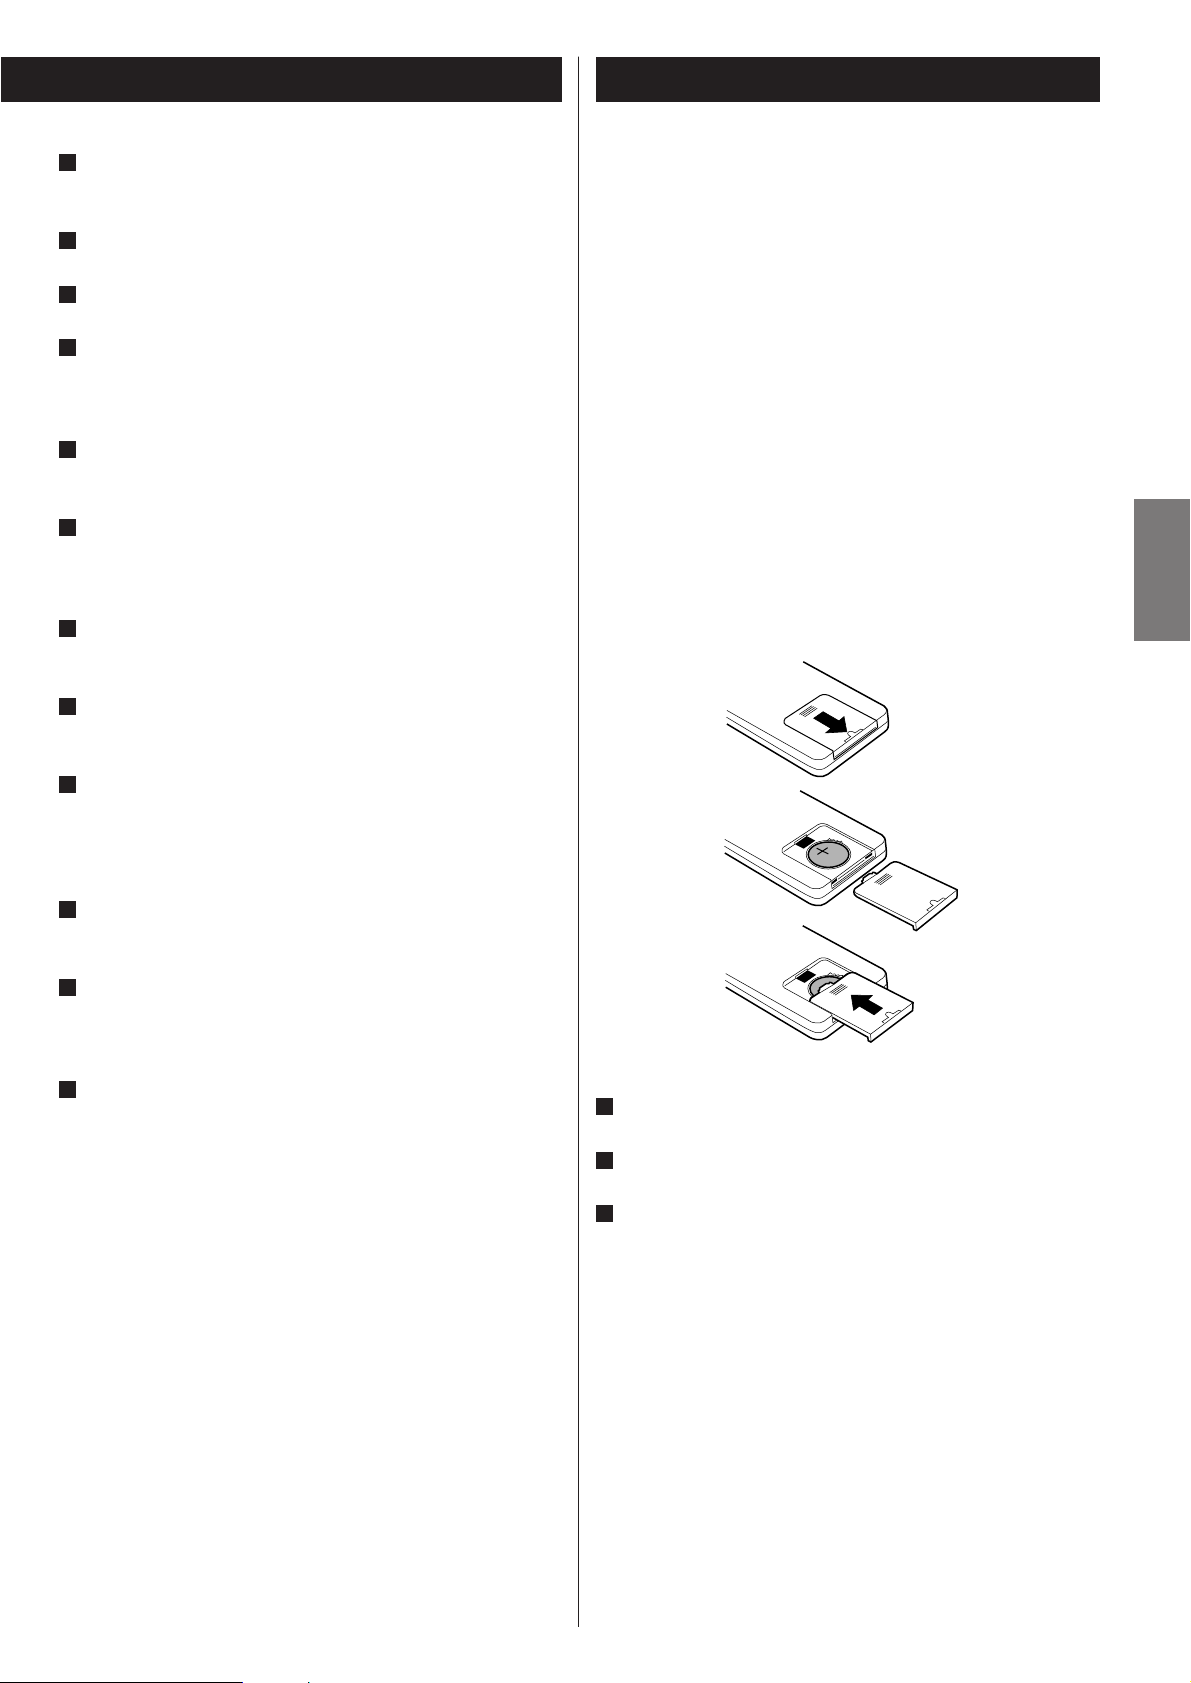
Remove the battery compartment cover.
Put in the lithium battery (CR2032, 3V).
Close the cover.
Battery Replacement
If the distance required between the remote control unit and
main unit decreases, the battery is exhausted. In this case,
replace the battery with a new one.
Precautions concerning batteries
Do not heat or disassemble batteries and never dispose of old
batteries by throwing them in a fire.
3
2
1
The provided Remote Control Unit allows the unit to be operated
from a distance.
When operating the remote control unit, point it towards the
remote sensor on the front panel of the unit.
<
Even if the remote control unit is operated within the effective
range, remote control operation may be impossible if there
are any obstacles between the unit and the remote control.
<
If the remote control unit is operated near other products
which generate infrared rays, or if other remote control
devices using infrared rays are used near the unit, it may
operate incorrectly. Conversely, the other products may also
operate incorrectly.
Battery Installation
1
2
3
8
Basic Operation
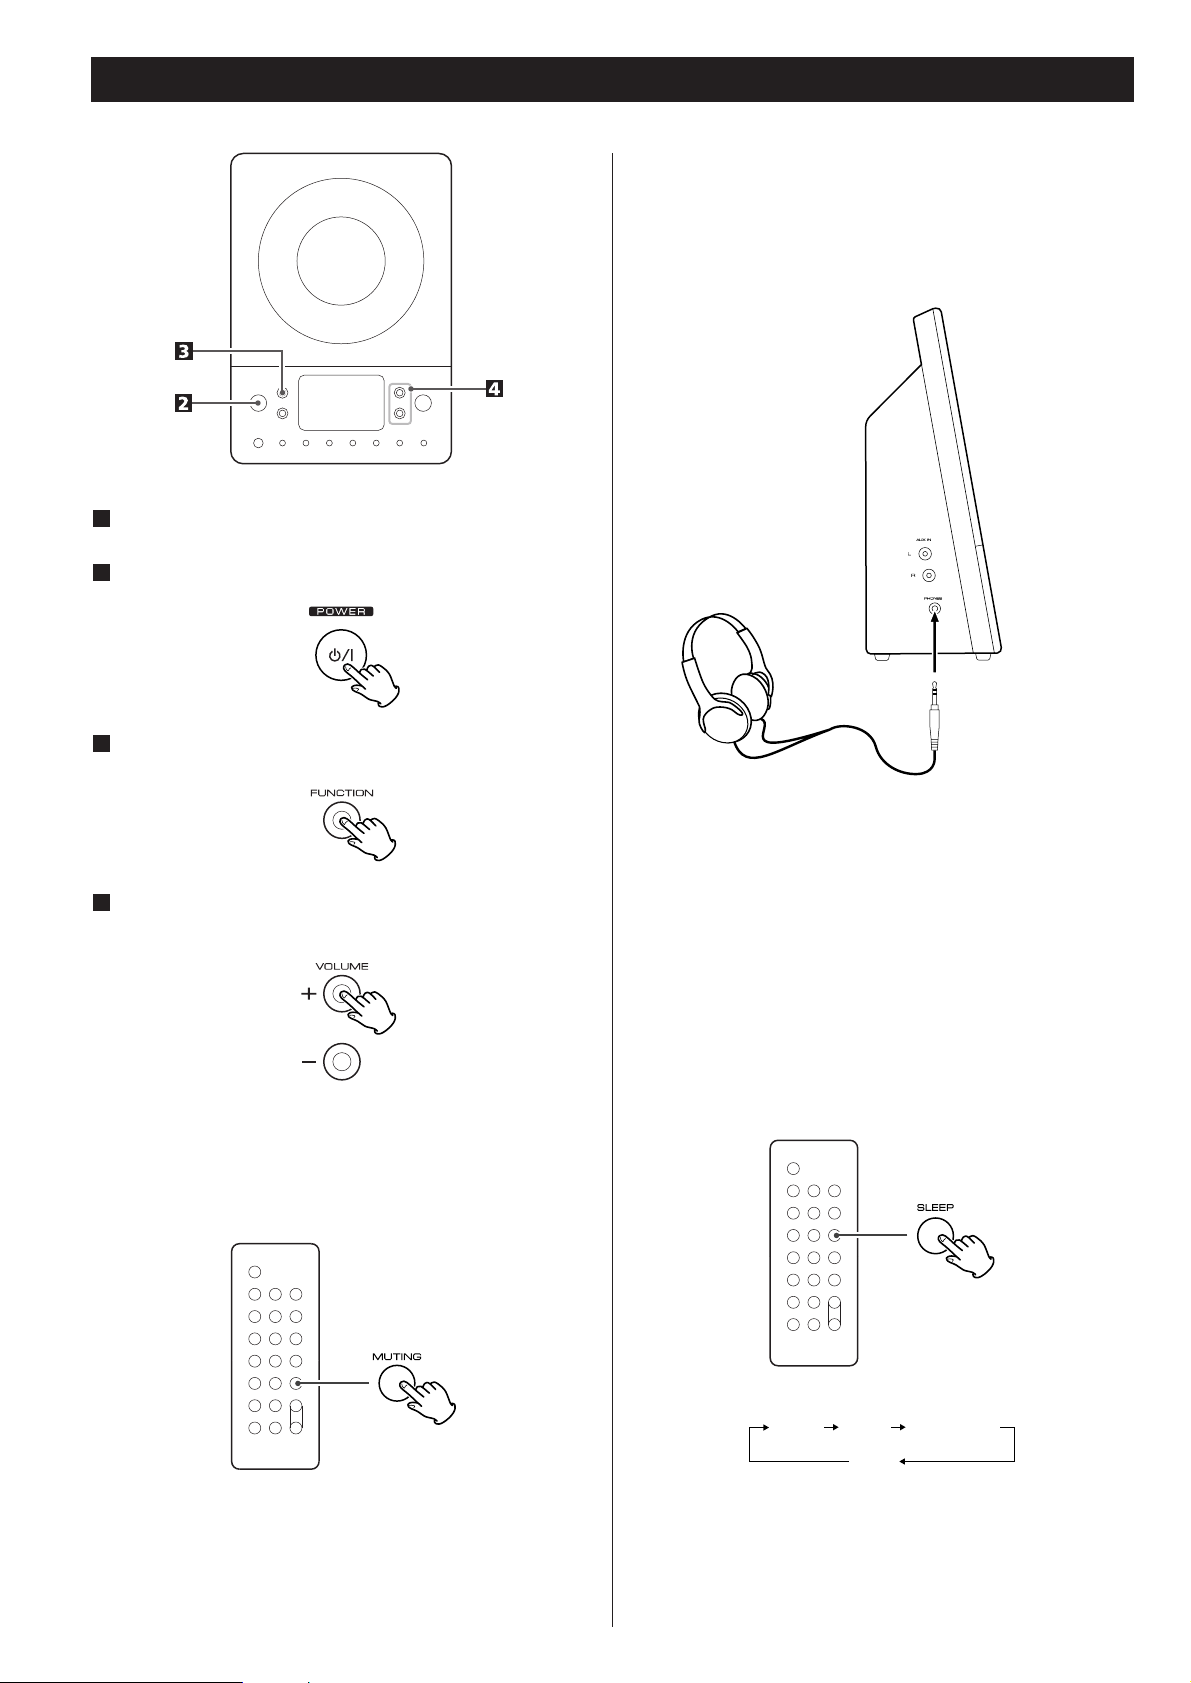
Select a source by pressing the FUNCTION button.
3
Play the source and adjust the volume using the
VOLUME buttons.
4
Muting
To mute the sound temporarily, press the MUTING button.
Press the MUTING button again to restore the sound.
<
While muting is engaged, the VOLUME level indicators blink.
Headphones
For private listening, insert the headphones plug into the
PHONES jack, and adjust the volume using the VOLUME
buttons. The sound from the speakers is cut off while the
headphone jack is inserted.
Sleep Timer
Repeatedly pressing the SLEEP button permits setting an
interval (from 90 down to 10 minutes) after which you want
the unit to automatically turn off and shift into Standby
mode.
Each press of the SLEEP button changes the time indication by
10 minutes.
90 80 10
………
Off
Turn on the subwoofer.
Press the POWER switch on the main unit.
2
1
9
ENGLISH
Listening to CD/MP3 (1)
3
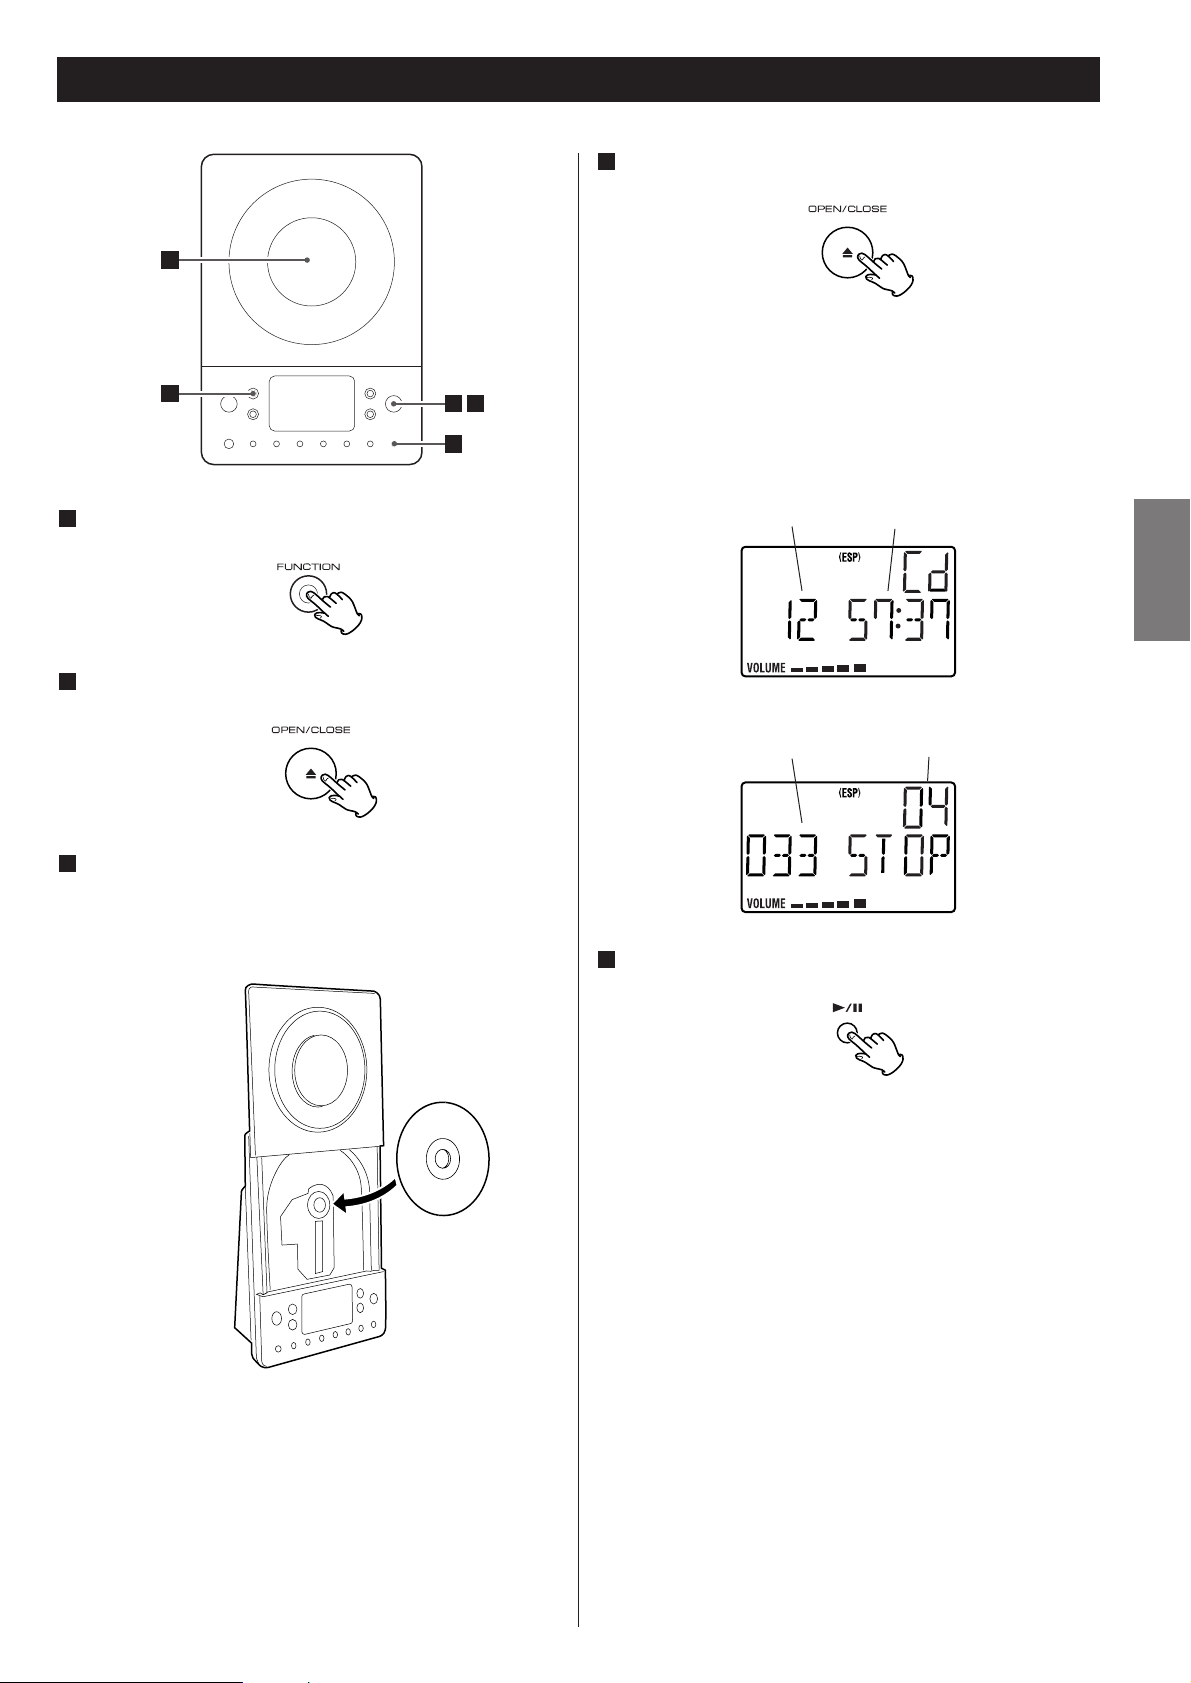
Press the FUNCTION button to select “CD”.
1
Press the OPEN/CLOSE button.
2
Put a disc onto the center spindle of the player with the
label side facing you.
Press the disc onto the spindle until a slight “click” is heard
indicating the disc is mounted correctly.
3
< Never put more than one disc in the mechanism at a time.
<
Ensure that the disc is correctly mounted on the spindle and
locked in place.
Press the OPEN/CLOSE button to close the CD door.
4
< It takes a few seconds for the unit to load the disc. No
buttons will work during loading. Wait until the total number
of the tracks and the total play time of the disc are displayed.
<
When no disc is loaded in the CD player, “NO DISC” is
displayed.
When a CD is loaded
Press the Play/Pause button (y
/J) to start playback.
5
Playback starts from the first track of the disc.
<
MP3 tracks recorded out of folders are automatically put in
the “ROOT” folder,.and playback starts from the first track of
the ROOT folder.
<
When the playback of all the tracks has finished, the unit
stops automatically.
When a MP3 disc is loaded
total playing timetotal tracks
total number of folderstotal tracks
1
2 4
5
10
MP3
Listening to CD/MP3 (2)
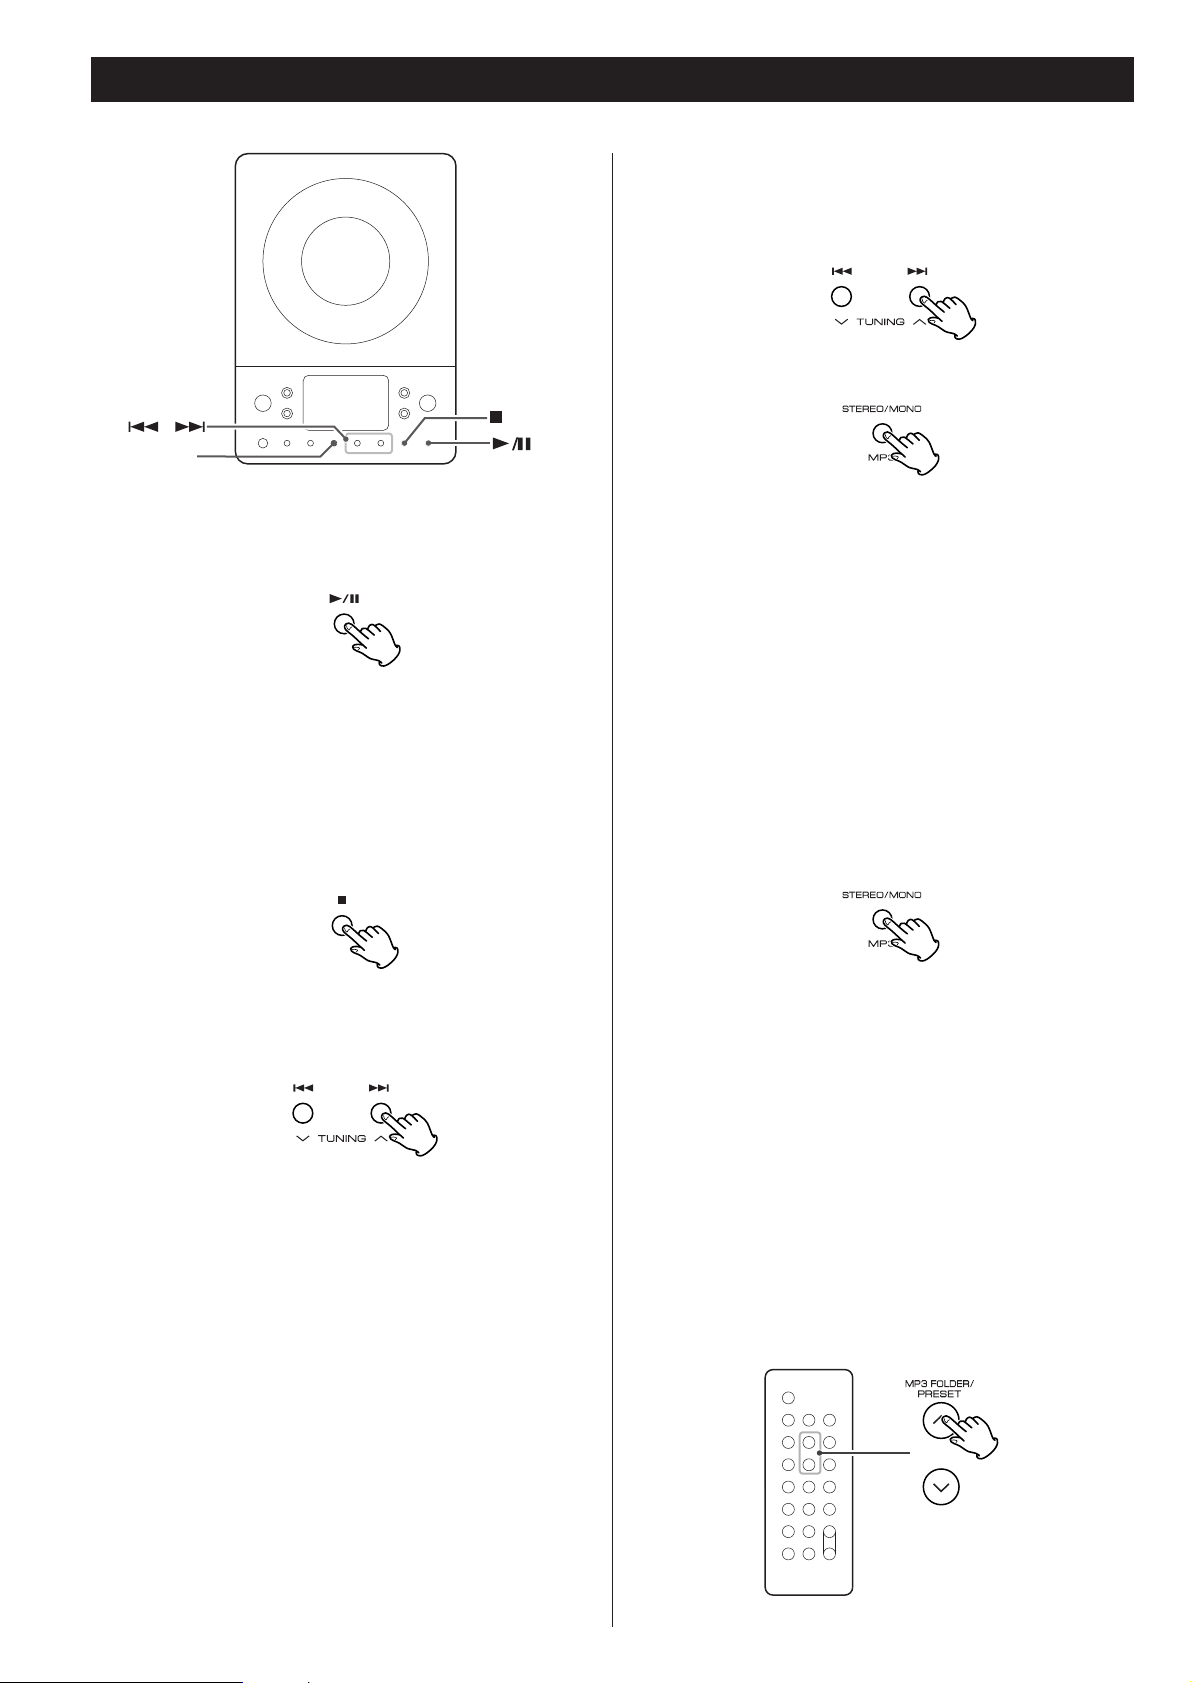
To suspend playback temporarily
(pause mode)
To stop playback
Press the Stop button (H) to stop playback.
To skip to the next or a previous track
Press the Play/Pause button (G/J) during playback. Playback
stops at the current position. To resume playback, press the
Play/Pause button (G
/J) again.
During playback, press the skip button (.
or/ )
repeatedly until the desired track is found. The selected track
will be played from the beginning.
In the stop mode, press the skip button (.
or/ )
repeatedly until the track you want to listen to is found. Press
the Play/Pause button (G
/J) to start playback from the
selected track.
< When the . button is pressed during playback, the track
being played will be played from the beginning. To return to
the beginning of the previous track, press the .
button
twice.
<
During programmed playback, the next or previous track in
the program is played.
Search for a part of a track
During playback, hold down the skip button (.or/) and
release it when the part you want to listen to is found.
Skip to the next folder (MP3)
Press the MP3 FOLDER button to skip to next folder.
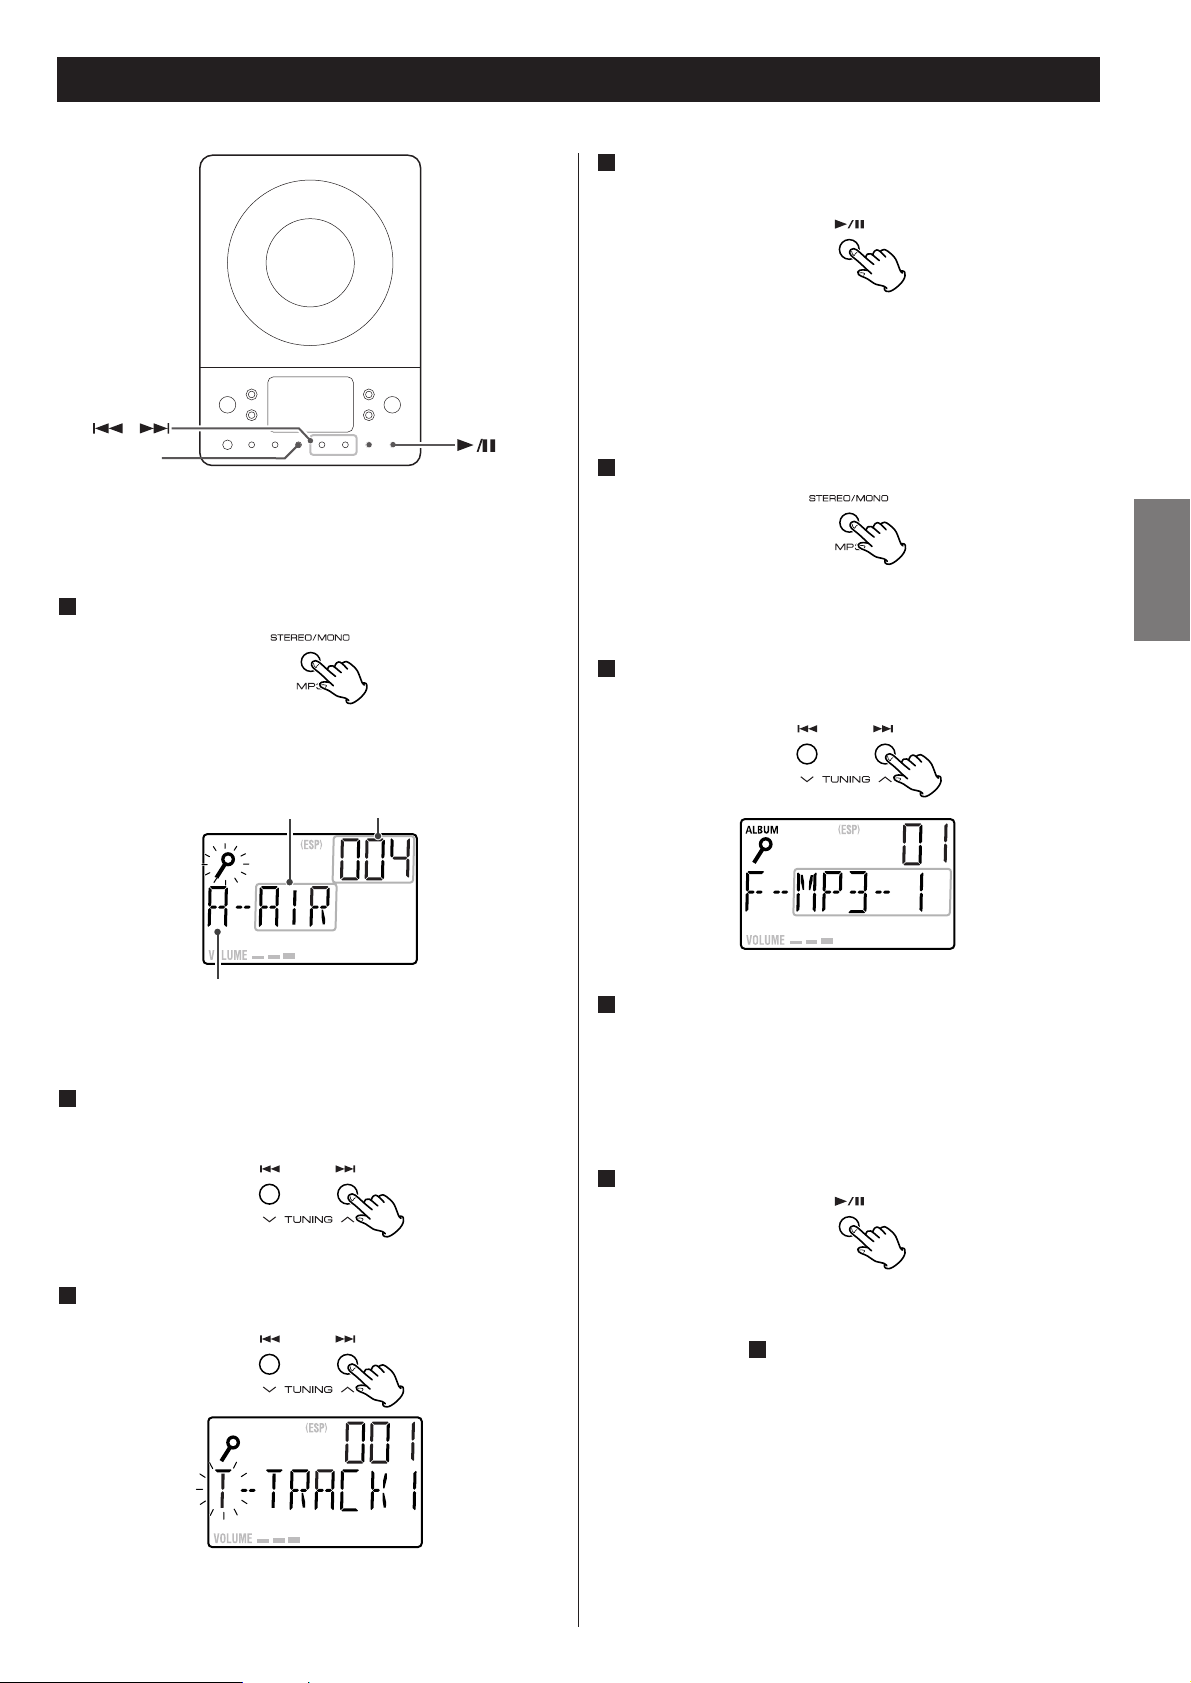
To display the MP3 information
During playback of MP3 disc, press the MP3 button for more
than 1 second. The information about the current track is
displayed as follows:
FILE (folder name)w
TITLE (*)wARTIST (*)wALBUM (*)
*: track information
Press the MP3 button for more than 1 second again to cancel
the MP3 information mode.
The 40-second ESP stores the music in the buffer to prevent
sound from skipping.
During playback of a CD, press the MP3 button to turn the
ESP on or off. When you turn the ESP on, “40 SEC (40
seconds)” briefly appears, and the (ESP) indicator lights on the
display.
<
The (ESP) indicator blinks while the unit is filling the buffer.
<
When the unit is on the stable place and free from
mechanical shocks, you can turn this function off.
<
During playback of MP3, this function is always ON.
ESP (Electronic Shock Protection)
11
ENGLISH
Search Mode (MP3 only)
Search for a track in a folder
Press the MP3 button twice.
The name of folder is displayed.
Press the SKIP button (. or /) to find the folder
that the track you want to listen to is included.
Press and hold the SKIP button (.
or /).
Then you can select the track in the folder by pressing the
SKIP button (.
or /).
<
MP3 tracks recorded out of folders are in the “ROOT” folder.
Press the PLAY/PAUSE button (G/J) to start playback.
Playback starts from the selected track.
<
If you skip step , playback will start from the first track in
the selected folder.
3
4
3
2
1
Initial letter of track name
Track name
Search for a name of track
You can select the track by searching for its name.
Press the MP3 button once.
An alphabet (initial letter of a track name) and a track name
are displayed.
1
Press the PLAY/PAUSE button (G/J).
Playback starts from the selected track.
4
Track number
<
To cancel the search mode, press the STOP button (H).
Select the initial letter of the track you want to listen to
by pressing the SKIP button (.
or /).
2
Press and hold the SKIP button (. or /).
3
Then you can select the track that has same initial letter by
pressing the SKIP button (.
or /).
MP3

12
FUNCTION
MEMORY/
CLOCK SET
Up to 64 tracks can be programmed in the desired order.
Shuffle and Repeat functions don’t work during programmed
playback.
Press the FUNCTION button to select “CD”.
1
Press the MEMORY button.
2
“MEMORY” lights up in the display.
<
To cancel the program mode, press the Stop button (H).
Press the Skip button (.or/) repeatedly to select a
folder of a MP3 disc, then press the MEMORY button.
<
MP3 tracks recorded out of folders are in the “01” (ROOT)
folder.
<
Skip this step when playing a CD.
3
Press the Skip button (.or/) repeatedly to select a
track, then press the MEMORY button.
The track is programmed, and “P-02” is displayed.
<
Repeat steps and to program more tracks.
<
You can program up to 64 tracks.
When the selection of track numbers is completed,
press the Play/Pause button (G
/J) to start program
playback.
5
43
4
< When the playback of all the programmed tracks has finished,
or if one of the following buttons is pressed, the MEMORY
indicator will go off and the program mode will be cancelled:
STOP, FUNCTION, POWER
The program is retained in memory until the OPEN/CLOSE
button is pressed or the power is interrupted. You can return
to the programmed playback by pressing the MEMORY
button and the Play/Pause button (G
/J). (If another source
was selected, select the CD mode by pressing the FUNCTION
button beforehand.)
Programmed Playback
13
ENGLISH
To check the programmed order
In the stop mode, press the MEMORY button repeatedly. The
track number and program number will be shown on the
display.
To add a track to the end of the program
In the stop mode, press the MEMORY button repeatedly until
“00” appears on the display. Select a track number using the
Skip button (.
or/) and then press the MEMORY
button. The track is added to the end of the program.
To overwrite the program
In the stop mode, press the MEMORY button repeatedly until
the program number to be changed appears on the display.
Select a new track number using the Skip button (.or/)
and then press the MEMORY button.
To clear program
To clear the programmed contents, press the MEMORY and
the STOP button (H
) in the stop mode.
<
If the OPEN/CLOSE button is pressed, the programmed
contents will also be cleared.
< If the unit is disconnected from the power supply, the
programmed contents will be cleared.
MEMORY/
CLOCK SET
14
Shuffle Playback
The tracks can be played randomly. Press the SHUFFLE button
during playback or when in the stop mode. “SHUFFLE” will
then light up in the display.
<
If you press the / button during shuffle playback, next
track will be randomly selected and played. If you press the
.
button, the currently played track will be played from
the beginning. A track cannot be replayed during shuffle
playback.
<
Shuffle playback doesn’t work during programmed playback.
<
If one of the following buttons is pressed, shuffle mode will
be cancelled:
SHUFFLE, STOP, FUNCTION, POWER, OPEN/CLOSE
Every time the REPEAT button is pressed, the mode is
changed as follows:
< If one of the following buttons is pressed, repeat mode will
be canceled:
STOP, FUNCTION, OPEN/CLOSE, POWER
Repeat one track
Press the REPEAT button once during playback. “REPEAT”
lights.
The track being played will be played repeatedly. If you press
the Skip button (.
or/) and select another track, the
track you selected will be played repeatedly.
It is also possible to select a track to be repeated in the stop
mode. Press the REPEAT button, select a track using the Skip
button (.
or/), and then press the Play/Pause button
(G
/J) to start playback.
Repeat all the tracks
All the tracks will be played repeatedly.
Press the REPEAT button twice. “REPEAT ALL” lights.
During programmed playback, programmed tracks will be
played repeatedly.
Repeat all the tracks in the folder (MP3)
All the tracks in the folder will be played repeatedly.
Press the REPEAT button three times. “REPEAT ALBUM”
lights.
When a CD is loaded.
When a MP3 disc is loaded.
REPEAT REPEAT ALL
(off)
REPEAT REPEAT ALL
(off)
REPEAT ALBUM
Repeat Playback
15
ENGLISH
Listening to the Radio
3
2
1
STEREO/MONO
Press the FUNCTION button to select “TUNER”.
1
Press the FM/AM button to select a band.
2
Select the station you want to listen to (auto selection).
3
Hold down the TUNING Up or Down button until the
frequency display begins to change. When a station is tuned
in, the tuning process will stop automatically.
<
Press the Up or Down button to stop the auto selection.
Selecting stations which cannot be tuned automatically
(manual selection)
When the Up or Down button is pressed momentarily, the
frequency changes by a fixed step.
Press the Up or Down button repeatedly until the station you
want to listen to is found.
STEREO/MONO button
Pressing this button alternates between STEREO mode and
MONO mode.
STEREO
FM stereo broadcasts are received in stereo and the
“STEREO” indicator will light.
MONO
In weak FM stereo reception areas, select this mode.
Reception will now be forced to monaural, reducing
unwanted noise.
If the reception is poor
Reposition the AM or FM antenna for the best possible
reception. It may also be necessary to connect an external
antenna in extremely weak reception areas (see page 4).
16
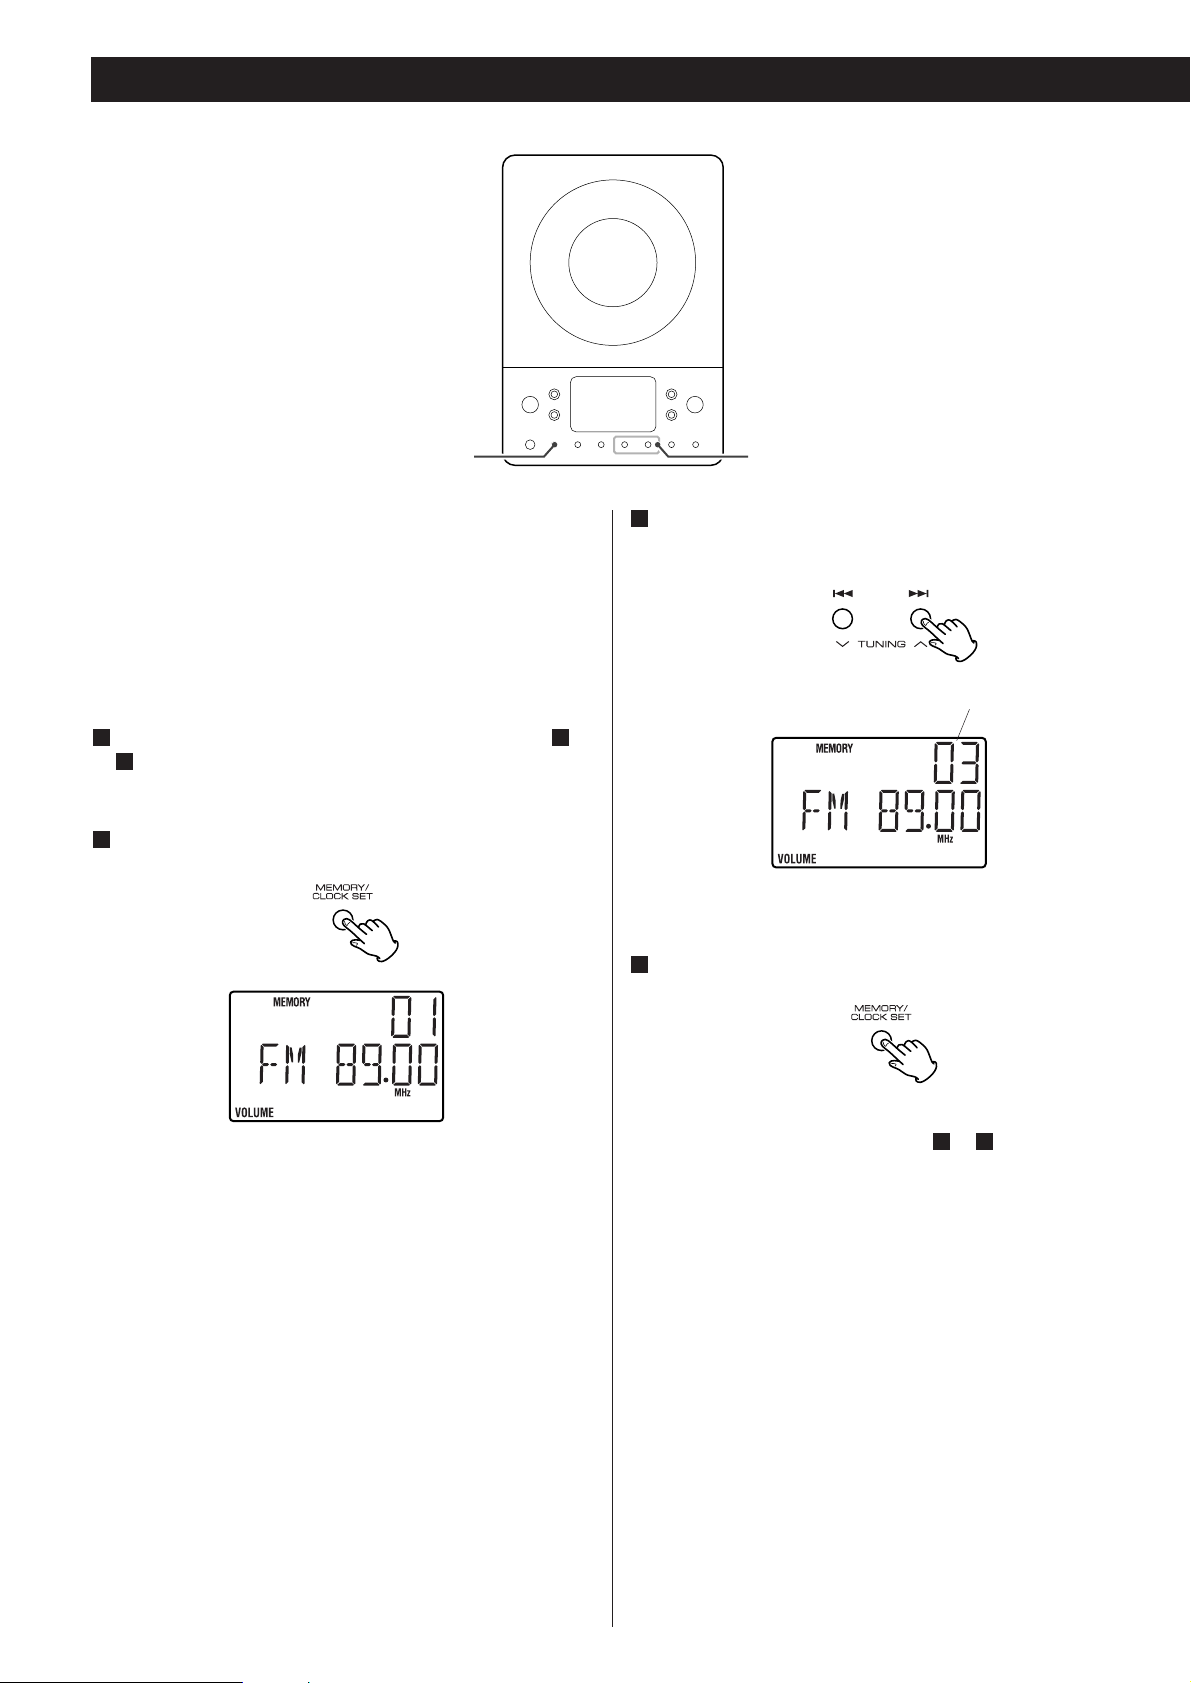
Preset Tuning
TUNINGMEMORY
You can store FM and AM stations into preset channels 1 to 10
respectively.
If the power switch of the subwoofer turned off, the
settings kept in memory (clock, preset stations, timer
setting) will be erased.
Tune in a station you want to listen to (see steps to
of page 15).
3
11
Press the MEMORY button.
2
Within 5 seconds, press the MEMORY button.
4
The station is stored and the MEMORY indicator goes off.
To store more stations, repeat steps to .
41
preset channel
Within 5 seconds, select a preset channel to store the
station using the TUNING buttons.
3

17
ENGLISH
Press the PRESET button repeatedly until the desired
preset station is found.
2
How to select preset stations
Press the FM/AM button to select a band.
1
The Radio Data System (RDS) is a broadcasting service which
allows stations to send additional information along with the
regular radio programme signal.
RDS works on the FM waveband in Europe only.
Tune in an FM RDS station (see steps to of page
15).
The RDS indicator lights, and the Programme Service name
(station’s name) appears on the display.
Press the RDS button.
Each time the RDS button is pressed, the RDS mode is
changed as follows:
PS (Programme Service name)
When you select PS, the frequency will be displayed for 3
seconds, and then PS (station’s name) will be displayed. If
there is no PS data, “NO PS” will be displayed.
PTY (Programme Type)
When you select PTY, the programme type will be displayed.
If there is no PTY data, “NO PTY” will be displayed.
RT (Radio Text)
When you select RT, the news of stations composed of up
to 64 symbols will be displayed. If there is no RT data, “NO
RT” will be displayed.
2
311
RDS
18
RDS (PTY Search)
A station can be searched by this function.
Select FM by pressing the FM/AM button.
Press the PTY button.
“PTY SEL” blinks on the display.
Within 10 seconds, select the desired PTY programme
using the SKIP buttons.
You can select from 29 kinds.
Press the PTY button.
Searching will start.
<
When the programme that you have selected is found,
searching will stop and the programme type will be displayed.
< If the same program type is not found during PTY Search, it
will stop at the beginning frequency.
< If you want to stop searching, press the PTY button.
4
3
2
1
NEWS : brief announcements, events, public opinion,
reports, actual situations.
AFFAIRS : a kind of suggestion including practical
announcements other than news, documents,
discussion, analysis and so on.
INFO : daily information or reference such as weather
forecast, consumer guide, medical assistance and
so on.
SPORT : sports related programs.
EDUCATE : educational and cultural information.
DRAMA : all kinds of radio concert and serial drama.
CULTURE : all aspects of national or local culture including
religious events, philosophy, social science,
language, theatre, and so on.
SCIENCE : programs on natural science and technology
VARIED : popular programs such as quiz, entertainment,
private interview, comedy, satire and so on.
POP M : program on commercial, practical and popular
songs, and sale volume of discs, etc.
ROCK M : practical modern music generally composed and
played by young musicians.
M O R M : popular music usually lasting for less than 5
minutes.
LIGHT M : classical music, instrumental music, chorus, and
light music favored by non-professionals.
CLASSICS : orchestra including great operas, symphony,
chamber music and so on.
OTHER M : other music styles(Rhythm & Blues, Reggae, etc.)
WEATHER : weather reports, forecast
FINANCE : financial reports, commerce, trading
CHILDREN : children’s programs
SOCIAL A : social affairs
RELIGION : religious programs
PHONE IN : program in which the public expresses its view by
phone.
TRAVEL : travel reports
LEISURE : programs concerning recreational activities
JAZZ : jazz music
COUNTRY : country music
NATIONAL : national music
OLDIES : music from the so-called golden of popular music
FOLK M : folk music
DOCUMENT : documentaries
3
1
2 4

19
ENGLISH
Setting the Clock
If the power switch of the subwoofer turned off, the
settings kept in memory (clock, preset stations, timer
setting) will be erased.
If the unit is on, press the POWER switch to turn it off.
1
Press the CLOCK SET button once more.
The “hour” value blinks.
3
Press the SKIP button (.//) to set the current
hour.
4
Press the CLOCK SET button.
The “minute” value blinks.
5
Press the SKIP button (.//) to set the current
minute.
6
Press the CLOCK SET button.
The clock starts.
7
POWER
Press and hold down the CLOCK SET button.
“12 HOUR” or “24 HOUR” blinks. If you want to change the
hour mode, press the .
or/ button.
2
MEMORY/
CLOCK SET
20
Setting the Timer
Adjust the clock before setting the timer.
If the power switch of the subwoofer turned off, the
settings kept in memory (clock, preset stations, timer
setting) will be erased.
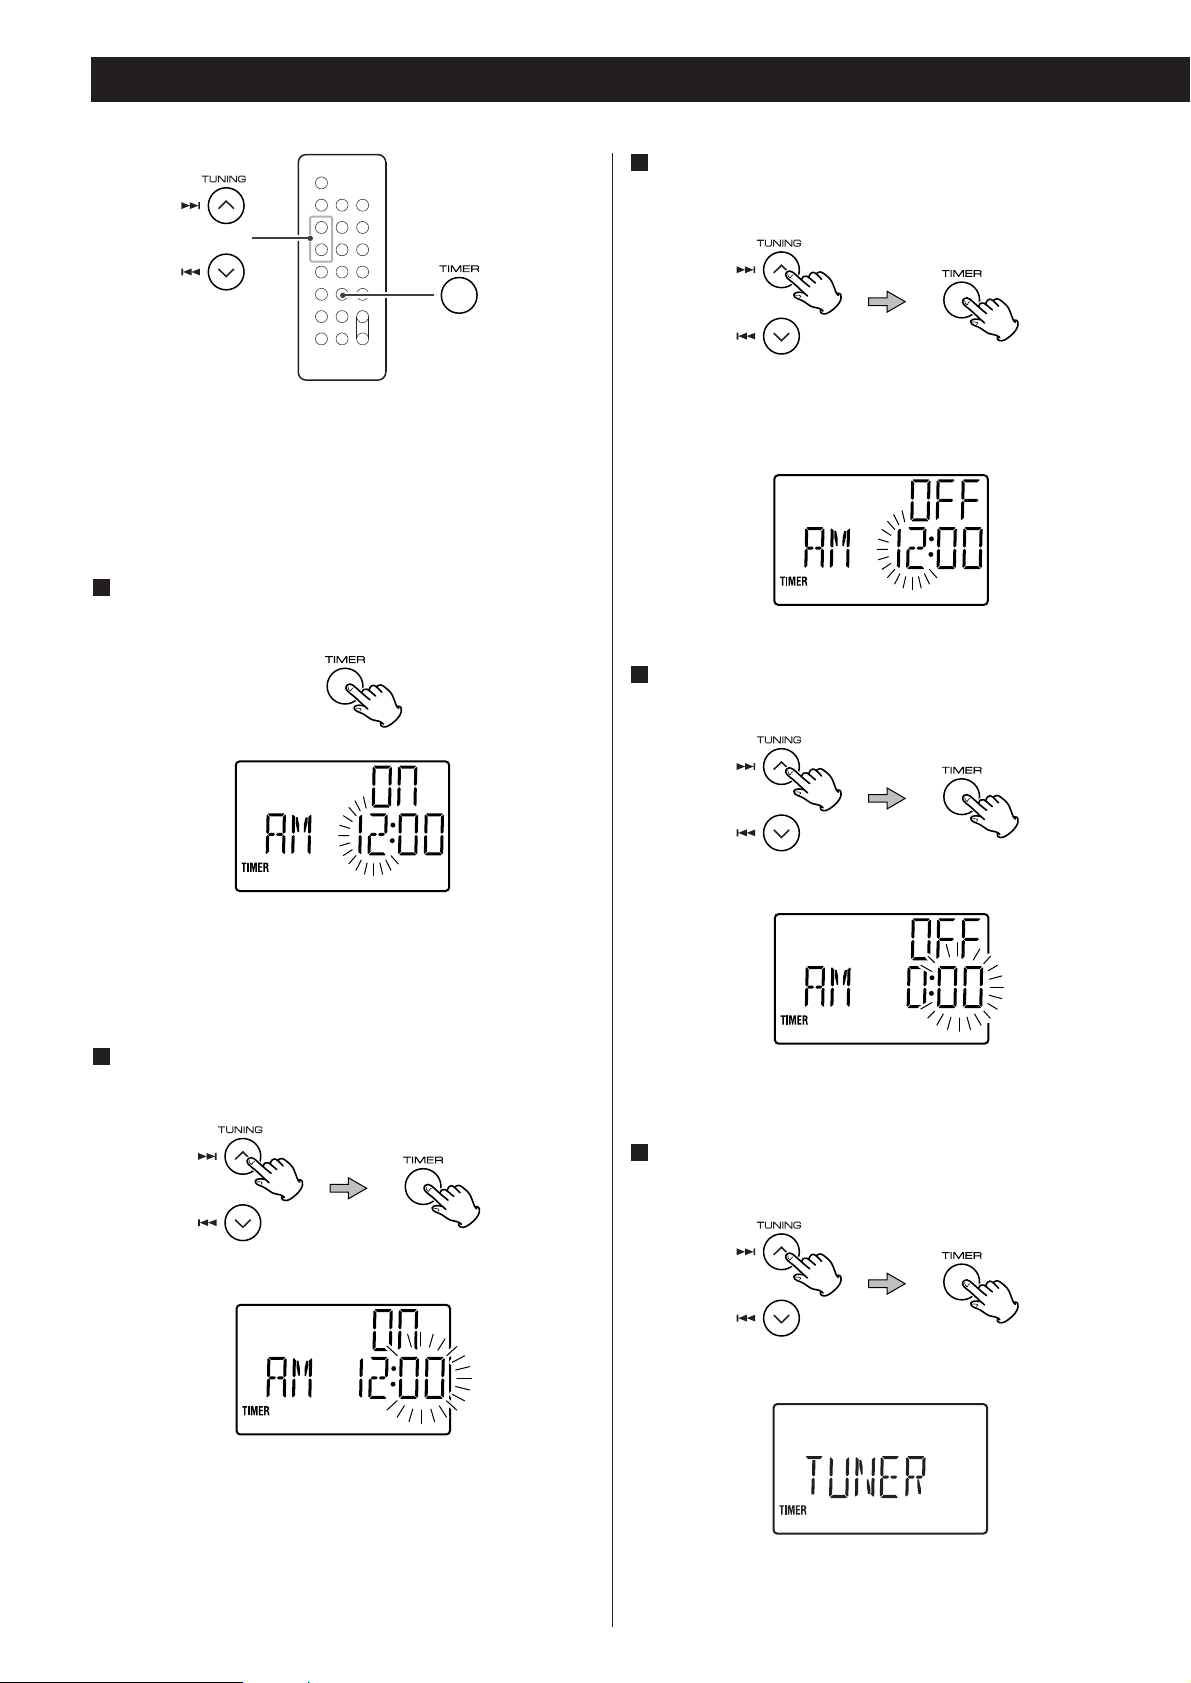
Press and hold the TIMER button until “TIMER” and
“ON” indicators appear on the display.
1
The “hour” value starts flashing.
<
When no button is pressed for 10 seconds, the timer setting
mode will be cancelled.
The “minutes” value starts flashing.
Press the SKIP button (.//) to set the start time
(minute), and then press the TIMER button.
3
“TIMER” and “OFF” indiactors appear on the display and the
“hour” value starts flashing.
Press the SKIP button (.//) to set the start time
(hour), and then press the TIMER button.
2
Press the SKIP button (.//) to set the stop time
(minute), and then press the TIMER button.
5
The “minutes” value starts flashing.
Press the SKIP button (.//) to set the stop time
(hour), and then press the TIMER button.
4
21
ENGLISH
Press the SKIP button (.//) to select a source (CD
or TUNER), and then press the TIMER button.
6
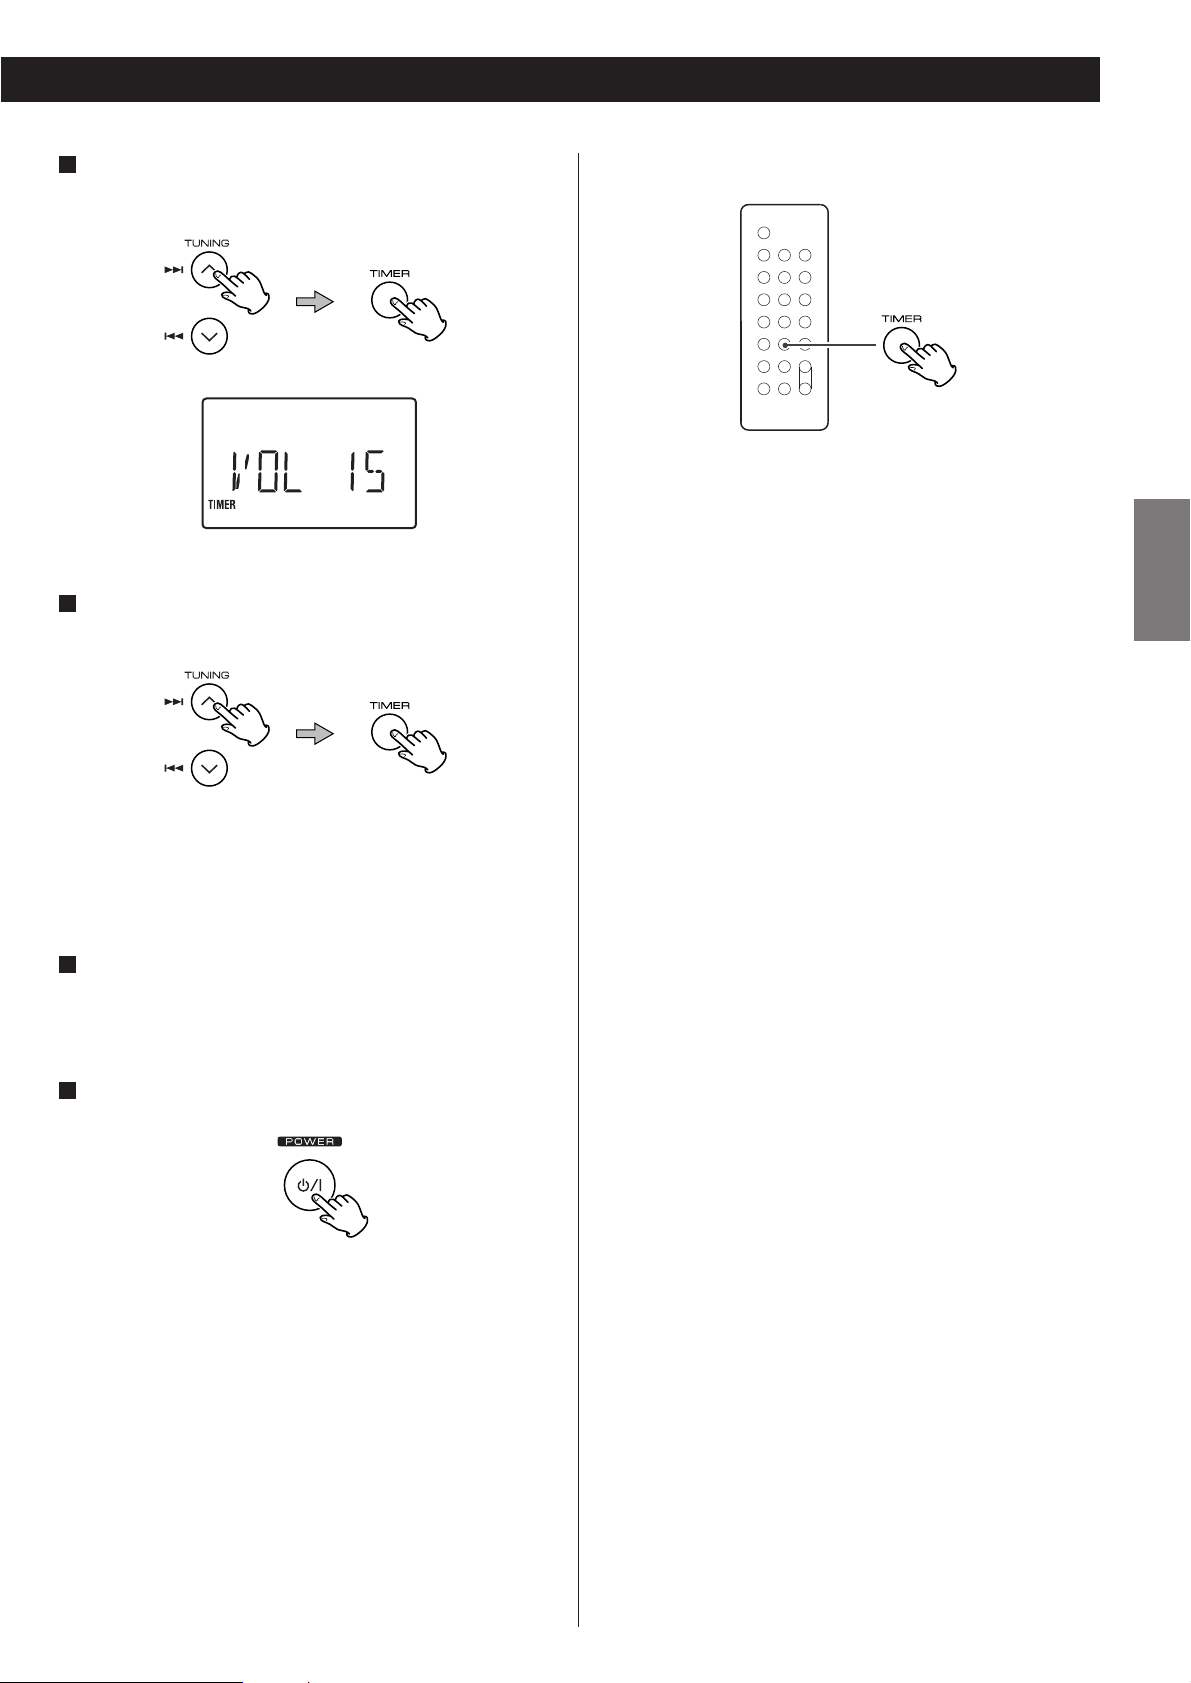
Press the SKIP button (.//) to set the volume, and
then press the TIMER button.
7
The unit will turn on and off at the specified time every day.
Don’t forget to turn the unit off (standby), or the timer
won’t work.
Prepare the source.
When the source is set to “CD”, set a CD.
When the source is set to “TUNER”, tune in a station.
Press the POWER button to turn the unit off (standby).
9
8
Press the TIMER button to turn on or off the timer.
When the timer is turned on, the timer setting is displayed
one by one, and the TIMER indicator lights on the display.
Timer setting ends.
Your timer setting is displayed one by one, and the TIMER
indicator lights on the display.
To turn on or off the timer

22
If you have problems with your system, look through this chart
and see if you can solve the problem yourself before calling your
dealer or TEAC service center.
General
No power
e
Check the connection to the AC power supply. Check and
make sure the AC source is not a switched outlet and that,
if it is, the switch is turned on. Make sure there is power to
the AC outlet by plugging another item such as a lamp or
fan into the outlet.
No sound from speakers.
e
Select the source by pressing the FUNCTION button.
e
Check the connection to the speakers.
e
Adjust the volume.
e
Pull out the headphone’s plug from the PHONES jack.
e
If the VOLUME level indicator is blinking, press the MUTING
button. (When “CD” is selected, press the Play/Pause button
(G
/J) to start playback.)
The sound is noisy.
e
The unit is too close to a TV or similar appliances. Install the
unit apart from them, or turn them off.
Remote control doesn’t work.
e
Press the POWER switch to turn the unit on.
e
When the battery has run out, put in a new one.
e
Use remote control unit within the range (5 m) and point at
the front panel.
e
Clear obstacles between the remote control unit and the
main unit.
e
If a strong light is near the unit, turn it off.
CD Player
Cannot play.
e
Load a disc with the playback side facing away.
e
If the disc is dirty, clean the surface of the disc.
e
A blank disc has been loaded. Load a prerecorded disc.
e
Depending on the disc, etc. it may not be possible to play
back CD-R/RW discs. Try again with another disc.
e
You cannot play back unfinalized CD-R/RW discs. Finalize
such a disc in a CD recorder and try again.
Sound skips.
e
Place the unit on a stable place to avoid vibration and shock.
e
If the disc is dirty, clean the surface of the disc.
e
Don’t use scratched, damaged or warped discs.
Tuner
Cannot listen to any station, or signal is too weak.
e
Tune in the station properly.
e
Rotate the FM or AM antenna for the best reception
position.
Though the broadcast is stereo, it sounds monaural.
e
Press the STEREO/MONO button.
If normal operation cannot be recovered, unplug the
power cord from the outlet and plug it again.
If the power switch of the subwoofer turned off, the
settings kept in memory (clock, preset stations, timer
setting) will be erased.
Beware of condensation
When the unit (or a disc) is moved from a cold to a warm
place, or used after a sudden temperature change, there is a
danger of condensation; vapor in the air could condense on
the internal mechanism, making correct operation erratic or
impossible. To prevent this, or if this occurs, leave the unit for
one or two hours with the power turned on. The unit will
stabilize at the temperature of its surroundings.
Maintenance
If the surface of the unit gets dirty, wipe with a soft cloth or
use diluted mild liquid soap. Never spray liquid directly on this
unit. Apply your cleaner to your cleaning cloth and wipe
gently. Be sure to remove any excess completely. Do not use
thinner, benzene or alcohol as they may damage the surface
of the unit. Allow the surface of the unit to dry completely
before using.
Troubleshooting

23
ENGLISH
Specifications
AMPLIFIER section
Output Power (L+R) . . . . . . . . . . . . . . . . . . . . . . . 5 W + 5 W
Output Power (Subwoofer) . . . . . . . . . . . . . . . . . . . . . . 15 W
Input Sensitivity. . . . . . . . . . . . . . . . . . . . . . . . . . . . . 300 mV
Frequency Response. . . . . . . . . . . . . . . . . . . 50 to 20,000 Hz
TUNER Section (FM)
Frequency Range . . . . . . . . . . . . . . . . . 87.50 to 108.00 MHz
Sensitivity (S/N30dB). . . . . . . . . . . . . . . . . . . . . . . 20 dBµV/m
TUNER Section (AM)
Frequency Range. . . . . . . . . . . . . . . . . . . . . 522 to 1620 kHz
Sensitivity (S/N20dB). . . . . . . . . . . . . . . . . . . . . . . 54 dBµV/m
CD PLAYER Section
Frequency Response . . . . . . . . . . . . . 20 to 20,000 Hz (±1 dB)
Signal-to-Noise Ratio . . . . . . . . . . . . . . . . . . . . . . . . . . 55 dB
Wow and Flutter . . . . . . . . . . . . . . . . . . . . . . . Unmeasurable
SPEAKER
Type . . . . . . . . . . . . . . . . . . . . . . . . . . . . . Full range flat type
Impedance. . . . . . . . . . . . . . . . . . . . . . . . . . . . . . . . . 4 ohms
SUBWOOFER
Impedance. . . . . . . . . . . . . . . . . . . . . . . . . . . . . . . . . 8 ohms
GENERAL
Power Requirements . . . . . . . . . . . . . . . . . . 230 V AC, 50 Hz
Power Consumption . . . . . . 80 W (standby: less than 1.4 W)
Dimension ( W x H x D )
Main Unit . . . . . . . . . . . . . . . . . . . . . . 160 x 226 x 86 mm
L & R Speakers . . . . . . . . . . . . . . . . . . 140 x 226 x 61 mm
Subwoofer. . . . . . . . . . . . . . . . . . . . . 160 x 234 x 330 mm
Weight
Main Unit . . . . . . . . . . . . . . . . . . . . . . . . . . . . . . . 0.96 kg
L & R Speakers . . . . . . . . . . . . . . . . . . . . . . . . 0.6 kg each
Subwoofer . . . . . . . . . . . . . . . . . . . . . . . . . . . . . . . 5.3 kg
Standard Accessories
Remote Control Unit (RC-970) x 1
Subwoofer Cable x 1
Speaker Cable x 2
FM Antenna x 1
AM Antenna x 1
Battery for Remote Control x 1
Wall Mount Adaptor x 3
Wall Mount Screw x 10
Tapered Plastic Wall Anchor x 10
Template for Wall Mounting x 1
Owner’s Manual x 1
Warranty Card x 1
<
Design and specifications are subject to change without
notice.
<
Weight and dimensions are approximate.
<
Illustrations may differ slightly from production models.

24
Sommaire
Nous vous remercions pour l’achat d’un appareil TEAC. Lire
ce manuel avec attention pour obtenir les meilleures
performances possibles de cet appareil.
Avant l’utilisation . . . . . . . . . . . . . . . . . . . . . . . . . . . . . . . . . . 24
Disque Compact . . . . . . . . . . . . . . . . . . . . . . . . . . . . . . . . . . . 25
Raccordement. . . . . . . . . . . . . . . . . . . . . . . . . . . . . . . . . . . . . 26
Connection. . . . . . . . . . . . . . . . . . . . . . . . . . . . . . . . . . . . . . . 26
Montage mural. . . . . . . . . . . . . . . . . . . . . . . . . . . . . . . . . . . . 27
Nom des commandes respectives . . . . . . . . . . . . . . . . . . . . . . 28
Télécommande . . . . . . . . . . . . . . . . . . . . . . . . . . . . . . . . . . . . 29
Opération de base . . . . . . . . . . . . . . . . . . . . . . . . . . . . . . . . . 30
Écoute des CD/MP3 . . . . . . . . . . . . . . . . . . . . . . . . . . . . . . . . 31
Mode de recherche (MP3 seulement) . . . . . . . . . . . . . . . . . . . 33
Lecture programmée. . . . . . . . . . . . . . . . . . . . . . . . . . . . . . . . 34
Lecture répétée. . . . . . . . . . . . . . . . . . . . . . . . . . . . . . . . . . . . 36
Lecture aléatoire . . . . . . . . . . . . . . . . . . . . . . . . . . . . . . . . . . . 36
Écoute de la radio. . . . . . . . . . . . . . . . . . . . . . . . . . . . . . . . . . 37
Accord préréglé . . . . . . . . . . . . . . . . . . . . . . . . . . . . . . . . . . . 38
RDS . . . . . . . . . . . . . . . . . . . . . . . . . . . . . . . . . . . . . . . . . . . . 39
RDS (Recherche PTY). . . . . . . . . . . . . . . . . . . . . . . . . . . . . . . . 40
Réglage de l’horloge. . . . . . . . . . . . . . . . . . . . . . . . . . . . . . . . 41
Réglage de la minuterie . . . . . . . . . . . . . . . . . . . . . . . . . . . . . 42
Dépannage. . . . . . . . . . . . . . . . . . . . . . . . . . . . . . . . . . . . . . . 44
Spécifications . . . . . . . . . . . . . . . . . . . . . . . . . . . . . . . . . . . . . 45
Avant l’utilisation
ATTENTION
Ne pas exposer l'appareil à l'humidité ou aux projections
d'eau; ne pas poser d'objets contenant de l'eau, tels qu'un
vase, ou un liquide quelconque, sur l'appareil.
Ne pas installer l'appareil dans un endroit clos tel qu'une
bibliothèque ou un meuble fermé.
Lire ce qui suit avant d’utiliser l’appareil
<
L’appareil pouvant dégager de la chaleur lorsqu’il fonctionne,
laissez un espace suffisant autour de l’appareil afin de
permettre une ventilation naturelle.
Ne pas obstruer les orifices de ventilation. Laissez au moins 20
cm de libre au-dessus et au moins 5 cm de chaque côté de
l’appareil. Ne placez RIEN au-dessus de l’appareil.
<
La tension d’alimentation doit correspondre à la tension
imprimée sur le panneau arrière, si vous avez des doutes
concernant l’alimentation de l’appareil consultez un
électricien.
<
Choisir l’emplacement de l’appareil soigneusement. Évitez de
l’exposer directement aux rayons solaires ou près d’une
source de chaleur. Évitez aussi des endroits sujet aux
vbrations, poussière excessive, chaleur, froid et humidité.
<
Ne pas installer l’appareil au dessus d’un
amplificateur/récepteur ou n’importe quel appareil
électronique générant de la chaleur.
<
Ne pas oauvrir le boitier scellé celà peut endommager le
circuit ou causer un choc électrique. Si un object pénètre
l’appareil consultez votre dépositaire Teac ou agence de
service.
<
Quand vous débranchez l’appareil, toujours tirez la prise,
jamais le cordon d’alimentation.
< Afin de maintenir le laser propre, ne pas le toucher et ne pas
oubliez de fermer le couvercle quand le CD n’est pas utiliser.
< Ne pas essayez de nettoyer l’appareil avec des dissolvants
chimiques, celà peut endommager le fini. Utilisez un chiffon
propre et sec.
<
Conservez ce manual dans un endroit sûr pour référence
future.
NE PAS DÉPLACER L’APPAREIL DURANT LA LECTURE CD
Durant la lecture, le disque tourne à une grande vitesse. Ne
Pas soulever ou déplacer l’appareil durant la lecture. Celà
peut endommager l’appareil.
QUAND VOUS DÉPLACEZ L’APPAREIL
Quand vous changez l’endroit où l’appareil est installé ou si
vous l’emballez, enlevez le disque. Ensuite, éteignez l’appareil
et débranchez le. Le transport de cet appareil avec un disque
à l’intérieur peut l’endommager.
est une marque de commerce de New
Transducers Ltd.

25
FRANÇAIS
Compatibilité MP3
< Les noms de fichier MP3 doivent comporter exclusivement des
caractères alphanumériques. Cet appareil ne permet pas
d’afficher correctement les symboles ou les caractères de 2
octets (tels que les caractères japonais, chinois, etc.) Veiller
également à ce que les noms de fichiers comportent bien
l’extension “. mp3”.
<
Le disque doit être finalisé pour pouvoir être lu.
<
Le CD-ROM doit être compatible ISO 9660.
<
Si vous enregistrez plus de 200 fichiers ou répertoires MP3 sur
un disque, l’appareil risque de ne pas les lire correctement.
< Format audio mono ou stéréo MPEG-1 Layer 3, 44,1 ou
48 kHz, débit binaire fixe.
< L’audio codé à 128 kb/s sera restitué avec un son proche de la
qualité d’un CD audio normal. Bien que ce lecteur lise des
pistes MP3 à débit binaire plus faible, la qualité du son devient
nettement plus médiocre à des débits plus faibles.
Disque Compact
< Les disques CD-R sont plus sensibles aux effets de la chaleur
et aux rayons ultraviolets que les disques compacts ordinaires.
Il est donc particulièrement important de les ranger dans un
endroit à l'abri de la lumière directe du soleil et de toute
source de chaleur, telle que des radiateurs ou des appareils
électriques, susceptibles de dégager de la chaleur.
<
Il est déconseillé d'utiliser des disques CD-R inscriptibles, la
face portant l'étiquette risquant d'être collante et
d'endommager l'appareil.
<
Ne jamais coller d'étiquette ou de feuille de protection sur le
disque; ne pas utiliser de spray destiné à déposer sur le disque
une couche de protection.
<
Utiliser, pour écrire des informations sur la face portant
l'étiquette, un feutre utilisant une encre à base d'huile. Ne
jamais utiliser de stylo bille ou de stylo à pointe dure, qui
risquerait d'abîmer la surface enregistrée du disque.
<
Ne jamais utiliser de stabilisateurs. L'utilisation, avec cet
appareil, de stabilisateurs pour CD disponibles dans le
commerce, pourrait endommager les mécanismes de
l'appareil et provoquer son dysfonctionnement.
<
Ne pas utiliser de CD ayant une forme irrégulière (octogonale,
en forme de coeur, etc.), ceux-ci risquant d'endommager
l'appareil.
Disques pouvant être lus avec ce lecteur:
• CD audio classiques, portant le logo CD-DA sur l’étiquette:
• Disques CD-R correctement finalisés
Note:
<
Selon la qualité du disque et/ou la qualité de l’enregistrement,
certains disques CD-R risquent de ne pas pouvoir être lus.
<
Cet appareil ne permet pas de lire les disques CD-RW.
<
Les disques protégés contre la reproduction, ainsi que les
disques non-conformes à la norme CD risquent de ne pas
pouvoir être lus correctement par ce lecteur.
Nous déclinons toute responsabilité en cas de dommages
provoqués par la lecture de disques de ce type et pour la
qualité sonore résultante. Si vous rencontrez des difficultés
avec des disques non conformes, contactez directement les
producteurs du disque.
< Placer toujours le disque sur le plateau, la face imprimée sur le
dessus (les disques compacts ne sont enregistrés que sur une
seule face.)
<
Pour sortir un disque de son emballage, appuyer sur la partie
centrale de l'étui et sortir le disque en veillant à bien le tenir
par les bords.
<
Si la surface du disque est sale, l'essuyer soigneusement à
l'aide d'un chiffon doux et sec.
< En cas de doute quant à la manipulation des CD-R, lire les
instructions fournies avec le disque ou contacter directement
le fabricant du disque.
Comment sortir un disque
de son emballage
Comment tenir le disque
<
Ne jamais utiliser de produits chimiques, tels que des sprays,
des liquides antistatiques, de l'essence ou des diluants pour
nettoyer les disques. Ces produits chimiques risquent de
provoquer des dégâts irréparables sur la surface en plastique
du disque.
<
Ranger les disques dans leur étui après utilisation afin d'éviter
de les rayer ou que de la poussière ne se dépose, ceci pouvant
compromettre la lecture par la tête laser.
<
Ne pas exposer les disques à la lumière directe du soleil, à une
température élevée ou à une humidité excessive pendant une
période prolongée. De telles expositions risquent de
provoquer une déformation du disque.

26
Raccordement
Antenne-cadre AM
Placez l’antenne de sorte que le son soit optimal.
Vous pouvez aussi accrocher l’antenne AM au mur, comme
illustré ci-dessous:
A
ATTENTION
Éteignez tous les appareils avant d’effectuer les
raccordements.
Lisez les instructions qui accompagnent chacun des appareils
que vous prévoyez utiliser avec cet appareil.
<
Assurez-vous que chacune des fiches est insérée à fond.
Pour éviter tout bourdonnement ou bruit, n’attachez pas les
cordons de raccordement avec le cordon d’alimentation.
Antenne FM
Alors que l’appareil est en mode FM, faites l’accord sur une
station FM et étendez le fil pour trouver la position de
réception optimale. Il se peut que vous deviez replacer cette
antenne après avoir changé l’emplacement de l’appareil.
B
E
D
C
B
A
F
Appareil Principal
Enceinte (D)
Enceinte (G)
DVD, CD-R, etc.
Subwoofer
LINE OUT
RL

27
FRANÇAIS
Antenne FM extérieure (75Ω)
Antenne FM extérieure
Dans une zone où les signaux FM sont faibles, il faudra
utiliser une antenne FM extérieure asymétrique de 75 ohms,
en la raccordant au transformateur correspondant en option
(non fourni) raccordé à une antenne externe. En général,
une antenne à trois éléments suffira, mais si vous habitez
dans une région où les signaux FM sont très faibles, vous
devrez peut-être utiliser une antenne à 5 éléments ou plus.
Subwoofer
Effectuez le raccordement entre les prises “TO
SUBWOOFER” et “FROM MAIN”, au moyen du câble fourni.
AUX IN
Vous pouvez raccorder à cet appareil un lecteur DVD, un
magnétoscope, etc.
Raccordez l’appareil avec les cordons à broche RCA.
Assurez-vous de raccorder la fiche blanche aux prises
blanches (Gauche) et la fiche rouge aux prises rouges
(Droite).
ENCEINTES
Raccordez la fiche de l’enceinte gauche sur L, et celle de
l’enceinte droite sur R.
<
Si vous utilisez d’autres enceintes que celles fournies avec la
chaîne, leur impédance doit être de 3 ohms ou plus.
< Ne raccordez rien d’autre que des enceintes à ces bornes.
Cordon d’alimentation
Branchez ce cordon d’alimentation dans une prise de
courant.
F
E
D
C
Montage mural
Vous pouvez monter l’appareil principal et/ou les enceintes
gauche et droite sur un mur.
Précautions à prendre
<
N’oubliez pas que la longueur des câbles est d’environ 3 m.
N’essayez pas de monter l’appareil principal et les enceintes à
une trop grande distance du subwoofer.
<
Percez des trous dans une partie de mur solide, tels que sur
un cadre de bois ou dans un mur en béton.
< TEAC met ces supports pratiques à la disposition du
propriétaire de l’appareil. Vous devez toutefois consulter les
réglementations locales en matière de construction et prendre
toutes les précautions nécessaires lorsque vous monterez ces
supports. En cas de doute concernant l’utilisation des
supports fournis, informez-vous auprès d’un vendeur local ou
d’un fournisseur spécialisé en matériaux de construction.
Pour accrocher les supports au mur
Utilisez le gabarit fourni pour déterminer les points de
perçage.
Fixez les supports sur le mur au moyen des vis fournies.
<
Des chevilles coniques en plastique sont fournies. Si vous
décidez d’utiliser ces chevilles, percez un trou guide au moyen
d’une mèche 6 mm, puis insérez la cheville dans le trou guide.
N’utilisez ces chevilles que si elles conviennent au matériau
sur lequel vous allez monter l’appareil. En cas de doute,
informez-vous auprès de votre quincaillerie locale.
Remarque:
Avant de poursuivre, effectuez les raccordements entre
l’appareil principal et les enceintes, en vous référant à la page
26.
Accrochez l’appareil principal et/ou les enceintes aux
languettes de montage.
3
2
1
Appareil principal
Enceinte
2
3
3
2

28
POWER
Appuyez sur cet interrupteur pour allumer ou éteindre (mettre
en attente) l’appareil.
L’appareil principal est alimenté via le subwoofer. Vous devez
d’abord allumer le subwoofer.
FUNCTION
Utilisez cette touche pour sélectionner une source (CD, AUX
ou TUNER).
FM/AM
Utilisez cette touche pour sélectionner la bande AM ou FM.
Capteur de télécommande
Pointez la télécommande vers ce capteur lorsque vous
l’utilisez.
MEMORY/CLOCK SET
En mode CD, utilisez cette touche pour programmer des
plages.
En mode TUNER, utilisez cette touche pour mettre en
mémoire des canaux préréglés.
Cette touche sert également à régler l’horloge.
E
D
C
B
A
REPEAT/PTY
En mode CD, utilisez cette touche pour répéter la lecture.
En mode TUNER FM, utilisez cette touche pour démarrer la
recherche PTY.
STEREO/MONO/MP3
En mode FM TUNER, utilisez cette touche pour sélectionner
stéréo ou monaural.
Pendant la lecture d’un disque MP3, utilisez cette touche pour
chercher le nom d’une plage.
Pendant la lecture d’un CD, utilisez cette touche pour mettre
la function ESP en ou hors service.
Saut (.//) / TUNING
En mode CD, appuyez un instant sur cette touche pour sauter
des plages.
Maintenez cette touche enfoncée pour chercher un passage à
l’intérieur d’une plage.
En mode TUNER, appuyez un instant sur cette touche pour
faire l’accord sur les stations.
En mode d’attente, ces touches servent à régler ou ajuster
l’horloge et la minuterie.
Arrêt (H)
Utilisez cette touche pour arrêter la lecture du CD/MP3.
I
H
G
F
Nom des commandes respectives
Cet appareil consomme une quantité nominale d’énergie
par la prise de courant même lorsque l’interrupteur
d’alimentation (POWER) est en position d’arrêt (OFF).

29
FRANÇAIS
Télécommande
1
2
3
Lecture/Pause (y/J)
Utilisez cette touche pour lancer ou mettre en pause la lecture
du CD/MP3.
Porte du logement à CD
Afficheur
VOLUME
Appuyez sur la touche “+” ou “–” pour régler le volume.
OPEN/CLOSE
Utilisez cette touche pour ouvrir et fermer la porte du
logement à CD.
TIMER
Utilisez cette touche avec les touches Saut pour régler la
minuterie.
BASS
Utilisez ces touches pour augmenter ou réduire le son des
graves.
TREBLE
Utilisez ces touches pour augmenter ou réduire le son des
aigus.
MP3 FOLDER/PRESET
En mode TUNER, utilisez cette touche pour sélectionner les
stations mémorisées sur les canaux préréglés.
Pendant la lecture d’un disque MP3, utilisez cette touche pour
sélectionner un dossier sur le disque.
SLEEP
Utilisez cette touche pour régler la minuterie d’arrêt différé.
SHUFFLE/RDS
Utilisez cette touche pour faire une lecture aléatoire.
En mode TUNER FM, utilisez cette touche pour sélectionner
un mode RDS.
MUTING
Utilisez cette touche pour couper le son.
U
T
S
R
Q
P
O
N
M
L
K
J
Remarque:
Pour simplifier les explications, les présentes instructions font
uniquement référence aux touches et commandes du
panneau avant, sans mentionner l’utilisation de la
télécommande.
Retirez le couvercle du compartiment à piles.
Insérez la pile au lithium (CR2032, 3 V).
Fermez le couvercle.
Changement de pile
Si la portée de la télécommande diminue, cela signifie que la
pile est épuisée. Dans ce cas, remplacez la pile par une neuve.
Précautions à prendre avec les piles
Ne pas chauffer ni démonter les piles, et ne jamais jeter les
piles usées au feu.
3
2
1
La télécommande fournie avec cet appareil permet de le
commander à distance.
Lorsque vous utilisez la télécommande, pointez-la vers le capteur
de signal de télécommande situé sur le panneau avant de
l’appareil.
<
Même lorsque la télécommande est utilisée à l’intérieur de sa
plage effective de fonctionnement, elle risque de ne pas
fonctionner si des objets font obstacle aux signaux entre
l’appareil et la télécommande.
<
Si la télécommande est utilisée à proximité d’autres appareils
qui génèrent des rayons infrarouges, ou si une autre
télécommande à rayons infrarouges est utilisée près de
l’appareil, il risque de mal fonctionner. De même, les autres
appareils risquent aussi de mal fonctionner.
Installation de la pile

30
Opération de base
Sélectionnez une source en appuyant sur la touche
FUNCTION.
3
Lancez la lecture de la source et réglez le volume avec
les touches VOLUME.
4
Coupure du son
Pour couper le son temporairement, appuyez sur la touche
MUTING.
Pour rétablir le son, appuyez de nouveau sur la touche
MUTING.
<
Lorsque le son est coupé, les indicateurs de niveau VOLUME
clignotent.
Casque
Pour l’écoute privée, insérez la fiche du casque dans la prise
PHONES, et réglez le volume au moyen des touches VOLUME.
Le son des enceintes est coupé lorsque la fiche du casque est
insérée dans la prise PHONES.
Minuterie d’arrêt différé
La pression répétée sur la touche SLEEP permet de spécifier
l'intervalle (de 90 à 10 minutes) au terme duquel vous désirez
que l’appareil s’éteigne automatiquement et commute en
mode d’attente.
Chaque pression sur la touche SLEEP modifie de 10 minutes
l’indication du temps.
Allumez le subwoofer.
Appuyez sur l’interrupteur d’alimentation (POWER) de
l’appareil principal.
2
1
90 80 10
………
Désactivation

31
FRANÇAIS
Écoute des CD/MP3 (1)
Appuyez sur la touche FUNCTION pour sélectionner
“CD”.
1
Appuyez sur la touche OPEN/CLOSE.
2
Posez un disque sur l’axe central du lecteur, avec la face
qui porte l’étiquette orientée vers vous.
Enfoncez le disque sur l’axe jusqu’à ce qu’un léger bruit sec
soit émis, indiquant que le disque est correctement installé.
3
< Ne mettez jamais plus d’un disque à la fois dans le
mécanisme.
<
Assurez-vous que le disque est correctement installé sur l’axe
et qu’il est verrouillé en place.
Appuyez sur la touche OPEN/CLOSE pour fermer la
porte du logement à CD.
4
< L’appareil met quelques secondes à charger le disque.
Pendant le chargement, aucune touche n’est opérante.
Patientez jusqu’à ce que le nombre total de plages et le temps
total de lecture du disque s’affichent.
<
Lorsque aucun disque n’est chargé dans le lecteur CD, “NO
DISC” s’affiche.
Lorsqu’un CD est chargé
Appuyez sur la touche PLAY/PAUSE (y
/J) pour lancer
la lecture.
5
La lecture commence à la première plage du disque.
<
Les plages MP3 enregistrées à l’extérieur des dossiers sont
automatiquement mises dans le dossier “ROOT (RACINE)”, et
la lecture démarre à la première plage du dossier RACINE.
<
Une fois la lecture de toutes les plages terminée, l’appareil
s’arrête de lui-même.
Lorsqu’un disque MP3 est chargé
temps total de lecturenombre total de plages
temps total de lecturenombre total de plages
3
1
2 4
5

32
MP3
Écoute des CD/MP3 (2)
La fonction ESP stocke 40 secondes de musique dans une
mémoire tampon de manière qu’il n’y ait pas de coupure
dans le son.
Pendant la lecture d’un CD, appuyez sur la touche MP3 pour
mettre la fonction ESP en ou hors service. Quand on met la
fonction ESP en service, “40 SEC” (40 secondes) apparaît un
bref instant et l’indicateur (ESP) s’allume sur l’affichage.
<
Pendant le remplissage de la mémoire tampon, l’indicateur
(ESP) clignote.
<
Quand l’appareil se trouve sur une surface stable et n’est pas
exposé à des chocs mécaniques, vous pouvez mettre cette
fonction hors service.
<
Pendant la lecture de MP3, cette fonction est toujours en
service.
ESP (Protection électronique contre les chocs)
Pour interrompre la lecture temporairement
(mode de pause)
Pour arrêter la lecture
Appuyez sur la touche d’arrêt (H) pour arrêter la lecture.
Pour sauter à la plage suivante ou précédente
Appuyez sur la touche de lecture/pause (G/J) pendant la
lecture. La lecture s’arrête à la position actuelle. Pour
poursuivre la lecture, appuyez de nouveau sur la touche de
lecture/pause (G
/J).
Pendant la lecture, appuyez sur la touche de saut
(.
ou/) de manière répétée jusqu’à ce que vous
trouviez la plage désirée. La plage sélectionnée est lue depuis
le début.
En mode d’arrêt, appuyez sur la touche de saut (.
ou
/
) de manière répétée jusqu’à ce que vous trouviez la
plage que vous désirez écouter. Appuyez sur la touche de
lecture/pause (G
/J) pour lancer la lecture à partir de la plage
sélectionnée.
< Si vous appuyez sur la touche . pendant la lecture, la
plage en cours de lecture est lue à partir du début. Pour
retourner au début de la plage précédente, appuyez deux fois
sur la touche .
.
<
Pendant la lecture programmée, la plage suivante ou
précédente du programme est lue.
Recherche d’un passage sur une plage
Pendant la lecture, maintenez enfoncée la touche de saut
(.
ou /) et relâchez-la lorsque vous trouvez le passage
que vous désirez écouter.
Saut vers le dossier suivant (MP3)
Appuyez sur la touche MP3 FOLDER pour sauter vers le
dossier suivant.
Pour afficher les informations MP3
Pendant la lecture d’un disque MP3, appuyez sur la touche
MP3 pendant plus de 1 seconde. Les informations sur la plage
actuelle s’affichent comme suit:
FILE (nom de dossier)w
TITLE (*)wARTIST (*)wALBUM (*)
*: informations sur la plage
Appuyez de nouveau sur la touche MP3 pendant plus de 1
seconde pour annuler le mode d’informations MP3.

33
FRANÇAIS
Mode de recherche (MP3 seulement)
Recherche d’une plage dans un dossier
Appuyez deux fois sur la touche MP3.
Le nom du dossier s’affiche.
Appuyez sur la touche de saut (. ou /) pour
trouver le dossier où se trouve la plage que vous
désirez écouter.
Appuyez de manière continue sur la touche de saut
(.
ou/).
Vous pouvez ensuite sélectionner la plage dans le dossier en
appuyant sur la touche de saut (.
ou /).
<
Les plages MP3 enregistrées à l’extérieur des dossiers se
trouvent dans le dossier “ROOT (RACINE)”.
Appuyez sur la touche de lecture/pause (G/J) pour
lancer la lecture.
La lecture commence à la plage sélectionnée
.
< Si vous sautez l’étape , la lecture démarrera à la première
plage se trouvant dans le dossier sélectionné.
3
4
3
2
1
Première lettre du nom de plage
Nom de plage
Recherche d’un nom de plage
Vous pouvez sélectionner une plage en cherchant son nom.
Appuyez une fois sur la touche MP3.
Une lettre (la première lettre d’un nom de plage) et un nom
de plage s’affichent.
1
Appuyez sur la touche de lecture/pause (G/J).
La lecture commence à la plage sélectionnée
.
4
Nombre de plage
Vous pouvez alors sélectionner la plage dont la première lettre
correspond en appuyant sur la touche de saut (
. ou /).
MP3
< Pour annuler le mode de recherche, appuyez sur la touche
STOP (H
).
Sélectionnez la première lettre de la plage que vous
désirez écouter en appuyant sur la touche de saut (.
ou /).
2
Appuyez de manière continue sur la touche de saut
(.
ou/).
3

34
FUNCTION
MEMORY/
CLOCK SET
Vous pouvez programmer jusqu’à 64 plages dans l’ordre désiré.
Les fonctions de lecture aléatoire et de lecture répétée sont
inopérantes pendant la lecture programmée.
Appuyez sur la touche FUNCTION pour sélectionner
“CD”.
1
Appuyez sur la touche MEMORY.
2
“MEMORY” s’allume sur l’afficheur.
<
Pour annuler le mode de lecture programmée, appuyez sur la
touche d’arrêt (H
).
Appuyez à plusieurs reprises sur la touche de saut
(.
ou/) pour sélectionner un dossier d’un disque
MP3, puis appuyez sur la touche MEMORY.
<
Les plages MP3 enregistrées à l’extérieur des dossiers se
trouvent dans le dossier “01” (ROOT/RACINE).
<
Ignorez cette étape si vous faites la lecture d’un CD.
3
Appuyez de manière répétée sur la touche de saut
(.
ou/) pour sélectionner une plage, puis appuyez
sur la touche MEMORY.
La plage est ajoutée au programme, et “P-02” s’affiche.
<
Répétez les étapes et pour ajouter d’autres plages au
programme.
<
Vous pouvez programmer jusqu’à 64 plages.
Lorsque la sélection des numéros de plage est terminée,
appuyez sur la touche de lecture/pause (G
/J) pour
lancer la lecture programmée.
5
43
4
Lecture programmée
< Une fois terminée la lecture de toutes les plages du
programme, ou sur pression de l’une ou l’autre des touches
suivantes, l’indicateur MEMORY s’éteint et le mode de lecture
programmé est annulé:
STOP, FUNCTION, POWER
Le programme est conservé en mémoire jusqu’à ce que vous
appuyiez sur la touche OPEN/CLOSE ou que vous éteigniez
l’appareil. Vous pouvez rétablir la lecture programmée en
appuyant sur la touche MEMORY et sur la touche de
lecture/pause (G
/J ). (Si une autre source était alors
sélectionnée, sélectionnez d’abord le mode CD en appuyant
sur la touche FUNCTION.)

35
FRANÇAIS
MEMORY/
CLOCK SET
Pour vérifier l’ordre de programmation
En mode d’arrêt, appuyez de manière répétée sur la touche
MEMORY. Le numéro de plage et le numéro de programme
apparaissent sur l’afficheur.
Pour ajouter une plage à la fin du programme
En mode d’arrêt, appuyez de manière répétée sur la touche
MEMORY, jusqu’à ce que “00” apparaisse sur l’afficheur.
Sélectionnez un numéro de plage avec la touche de saut
(.
ou/) puis appuyez sur la touche MEMORY. La plage
est ajoutée à la fin du programme.
Pour écraser le programme
En mode d’arrêt, appuyez de manière répétée sur la touche
MEMORY, jusqu’à ce que le numéro du programme à
modifier apparaisse sur l’afficheur.
Sélectionnez un nouveau numéro de plage avec la touche de
saut
(.ou/) puis appuyez sur la touche MEMORY.
Pour effacer un programme
Pour effacer le contenu programmé, appuyez sur les touches
MEMORY et STOP (H
) en mode d’arrêt.
<
Le contenu programmé est également effacé si vous appuyez
sur la touche OPEN/CLAUSE.
< Si vous débranchez l’appareil de sa source d’alimentation, le
contenu programmé est effacé.

36
Lecture aléatoire
Il est possible de faire une lecture aléatoire des plages.
Appuyez sur la touche SHUFFLE pendant la lecture ou en
mode d’arrêt. “SHUFFLE” s’allume alors sur l’afficheur.
<
Si vous appuyez sur la touche / pendant la lecture
aléatoire, la plage suivante est sélectionnée de manière
aléatoire et lue. Si vous appuyez sur la touche .
, la plage
en cours de lecture est lue depuis le début. La lecture d’une
plage déjà lue n’est pas possible pendant la lecture aléatoire.
<
La lecture aléatoire n’est pas possible pendant la lecture
programmée.
< Si vous appuyez sur l’une ou l’autre des touches suivantes, le
mode de lecture aléatoire est annulé:
SHUFFLE, STOP, FUNCTION, POWER, OPEN/CLOSE
Lecture répétée
À chaque pression sur la touche REPEAT, le mode change
comme suit :
Répétition d’une plage
Appuyez une fois sur la touche REPEAT pendant la lecture.
“REPEAT” s’allume.
La plage en cours de lecture est lue de manière répétée. Si
vous appuyez sur la touche de saut (.
ou/ ) et
sélectionnez une autre plage, la plage sélectionnée est lue de
manière répétée.
Il est aussi possible de sélectionner une plage à lire de
manière répétée alors que l’appareil est en mode d’arrêt.
Appuyez sur la touche REPEAT, sélectionnez une plage avec la
touche de saut (.
ou/), puis appuyez sur la touche de
lecture/pause (G
/J) pour lancer la lecture.
Lorsqu’un CD est chargé.
Lorsqu’un disque MP3 est chargé.
REPEAT 1 REPEAT ALL
(désactivation)
REPEAT REPEAT ALL
REPEAT ALBUM
(désactivation)
Répétition de toutes les plages
Toutes les plages sont lues de manière répétée.
Appuyez deux fois sur la touche REPEAT. “REPEAT ALL”
s’allume.
Pendant la lecture programmée, les plages programmées sont
lues de manière répétée.
Répétition de toutes les plages du dossier (MP3)
Toutes les plages du dossier sont lues de manière répétée.
Appuyez trois fois sur la touche REPEAT. “REPEAT ALBUM”
s’allume.
<
Si vous appuyez sur l’une ou l’autre des touches suivantes, le
mode de lecture répétée est annulé:
STOP, FUNCTION, OPEN/CLOSE, POWER

FRANÇAIS
37
Écoute de la radio
3
2
1
STEREO/MONO
Appuyez sur la touche FUNCTION pour sélectionner
“TUNER”.
1
Appuyez sur la touche FM/AM pour sélectionner une
bande.
2
Sélectionnez la station que vous désirez écouter
(sélection automatique).
3
Touche STEREO/MONO
Maintenez enfoncée la touche TUNING Haut ou Bas jusqu’à
ce que l’affichage des fréquences change. Lorsque l’accord
est fait sur une station, le défilement des fréquences s’arrête
de lui-même.
<
Appuyez sur la touche Haut ou Bas pour arrêter la sélection
automatique.
Sélection des stations sur lesquels l’accord automatique
n’est pas possible (sélection manuelle)
Lorsque vous n’appuyez qu’un instant sur la touche Haut ou
Bas, la fréquence ne change que d’une valeur fixe.
Appuyez de manière répétée sur la touche Haut ou Bas
jusqu’à ce que vous trouviez la station que vous désirez
écouter.
La pression sur cette touche fait commuter l’appareil entre le
mode STEREO et le mode MONO.
STEREO:
Les émissions FM diffusées en stéréo sont captées en stéréo et
l’indicateur “STEREO” s’allume.
MONO:
Dans les zones où la réception stéréo est faible, sélectionnez
ce mode.
La réception s’effectue alors en mode monaural, réduisant le
bruit indésirable.
Si la réception est mauvaise
Modifiez l’emplacement de l’antenne AM ou FM pour obtenir
la meilleure réception possible. Il sera peut être aussi
nécessaire de raccorder une antenne extérieure si vous vous
trouvez dans une zone où la réception est extrêmement faible
(voir page 27).

38
Accord préréglé
TUNINGMEMORY
Vous pouvez mettre en mémoire jusqu’à 10 stations FM et AM
respectivement sur les canaux préréglés 1 à 10.
Si vous éteignez le subwoofer, les réglages mis en
mémoire (horloge, stations mémorisées sur des canaux
préréglés, réglage de minuterie) seront effacés.
Réglez la station que vous souhaitez écouter (voir
étapes à de la page 37).
Appuyez sur la touche MEMORY.
2
31
1
Dans les 5 secondes, sélectionnez un canal préréglé
pour y mettre en mémoire la station au moyen des
touches TUNING.
3
La station est mise en mémoire et l’indicateur MEMORY
s’éteint.
Pour mettre d’autres stations en mémoire, répétez les étapes
à .
41
canal préréglé
Dans les 5 secondes, appuyez sur la touche MEMORY.
4

FRANÇAIS
39
Appuyez de manière répétée sur la touche PRESET
jusqu’à ce que vous trouviez la station désirée et
mémorisée sur un canal préréglé.
2
Pour sélectionner les stations mémorisées
sur un canal préréglé
Appuyez sur la touche FM/AM pour sélectionner une
bande.
1
Le système RDS (Radio Data System) est un service de diffusion
qui permet aux stations d’envoyer des informations
supplémentaires en même temps que le programme radio
normal.
Le mode RDS fonctionne sur la bande FM en Europe
uniquement.
Accordez l’appareil sur une station FM RDS (voir étapes
à page 37).
L’indicateur RDS s’allume, et le nom de Programme Service
(nom de la station) apparaît sur l’affichage.
Appuyez sur la touche RDS.
Chaque fois que la touche RDS est appuyé brièvement, le
mode RDS change comme suit:
PS (Programme Service name/affichage du nom de la
station)
Quand on sélectionnne PS, la fréquence est affichée
pendant 3 secondes, puis PS (nom de la station) est affiché.
En l’absence de données PS, l’indication “NO PS” s’affiche.
PTY (Programme Type/Type de programme)
Lorsque vous sélectionnez PTY, le type de programme
s’affiche. En l’absence de données PTY, l’indication “NO
PTY” s’affiche.
RT (Radio Text/Texte Radio)
Lorsque vous sélectionnez RT, les informations des stations
composées au maximum de 64 symboles s’affichent. En
l’absence de données RT, l’indication “NO RT” s’affiche.
2
31
1
RDS

40
RDS (Recherche PTY)
Il est possible de rechercher une station grâce à cette fonction.
Sélectionnez le mode FM en appuyant sur la touche
FM/AM.
Appuyez sur la touche PTY.
“PTY SEL” clignote sur l’affichage.
Dans les 10 secondes qui suivent, sélectionnez le
programme PTY désiré à l’aide de la touche .
ou
/
.
Vous pouvez choisir parmi 29 catégories.
Appuyez sur la touche PTY.
La recherche commence.
<
Lorsque le programme que vous avez choisi est trouvé, la
recherché s’arrête et le type de programme s’affiche.
< Si le même type de programme n’est pas trouvé lors de la
recherche PTY, la fréquence de départ est retrouvée.
< Si vous souhaitez interrompre la recherche, appuyez sur la
touche PTY.
4
3
2
1
3
1
2 4
NEWS (nouvelles) : communiqués, événements, sondages,
reportages, situations vécues.
AFFAIRS (informations générales) : suggestions diverses, telles
que des annonces pratiques, à l’exception des
nouvelles, documents, débats, analyses, etc.
INFO (informations pratiques) : informations pratiques du jour ou
informations de référence, notamment prévisions
météo, guide du consommateur, informations
médicales utiles, etc.
SPORT : émissions sportives.
EDUCATE (éducatif) : informations culturelles et éducatives.
DRAMA (théâtre) :concerts et séries dramatiques radiodiffusés.
CULTURE : émissions portant sur les cultures locales ou
nationales, y compris les émissions religieuses, la
philosophie, les sciences humaines, les langues, le
théâtre, etc.
SCIENCE : émissions sur les sciences de la nature et les
techniques
VARIED (variétés) : émi ssions grand public telles que jeux,
variétés, interviews, émissions comiques ou
satiriques, etc.
POP M (musique de variétés) : émissions de musique, de variété,
ou indication du volume de vente des disques
ROCK M : musique moderne, composée et interprétée
généralement par des jeunes
M.O.R.M. : morceaux grand public, d’une durée généralement
inférieure à 5 minutes
LIGHT M (musique légère) :
musique classique, orchestrale ou chorale, qui
s’adresse à un public de non spécialistes
CLASSICS (musique classique) :
musique d’orchestre, notamment opéra, musique
symphonique ou musique de chambre, etc.
OTHER M (autres styles musicaux) :
autres styles, tels que reggae, rythm’n blues, etc.
WEATHER (météo) : informations et prévisions météorologiques
FINANCE : informations financières, commerciales, boursières
CHILDREN (enfants) : émissions pour enfants
SOCIAL A (société) : vie collective et sociale
RELIGION : émissions à caractère religieux
PHONE IN : émissions au cours desquelles les auditeurs
s’expriment en direct
TRAVEL (voyages) : émissions à caractère touristique
LEISURE : émissions sur les activités de loisirs (bricolage,
couture, etc.)
JAZZ : musique de jazz
COUNTRY : musique country
NATIONAL : musique militaire et patriotique
OLDIES : Tubes de l’âge d’or de la musique
FOLK M : musique folk
DOCUMENT : émissions documentaires

41
FRANÇAIS
Réglage de l’horloge
Appuyez encore une fois sur la touche CLOCK SET.
La valeur de l’heure ”hour” clignote.
3
Appuyez sur la touche . ou / pour spécifier
l’heure actuelle.
4
Appuyez sur la touche CLOCK SET.
La valeur des minutes “minute” clignote.
5
Appuyez sur la touche . ou / pour spécifier les
minutes actuelles.
6
Appuyez sur la touche CLOCK SET.
L’horloge démarre.
7
Si vous éteignez le subwoofer, les réglages mis en
mémoire (horloge, stations mémorisées sur un canal
préréglé, réglage de minuterie) seront effacés.
Si l’appareil est allumé, appuyez sur l’interrupteur
d’alimentation (POWER) pour l’éteindre.
1
MEMORY/
CLOCK SET
POWER
Appuyez de manière continue sur la touche CLOCK SET.
”12 HOUR” ou ”24 HOUR” clignote. Si vous désirez changer
le cycle de l’horloge, appuyez sur la touche .
ou/.
2

42
Réglage de la minuterie
Réglez l’horloge avant de régler la minuterie.
Si vous éteignez le subwoofer, les réglages mis en
mémoire (horloge, stations mémorisées sur un canal
préréglé, réglage de minuterie) seront effacés.
Appuyez de manière continue sur la touche TIMER
jusqu’à ce que les indicateurs “TIMER” et “ON”
apparaissent sur l’afficheur.
1
La valeur de “l’heure” se met à clignoter.
<
Si vous n’appuyez sur aucune touche dans les 10 secondes, le
mode de réglage de minuterie est annulé.
La valeur des minutes “minutes” se met à clignoter.
Appuyez sur la touche . ou / pour spécifier le
moment du début (minutes), puis appuyez sur la touche
TIMER.
3
Les indicateurs “TIMER” et “OFF” apparaissent sur l’afficheur
et la valeur de “l’heure” se met à clignoter.
Appuyez sur la touche . ou / pour spécifier le
moment du début (heure), puis appuyez sur la touche
TIMER.
2
Appuyez sur la touche . ou / pour spécifier le
moment de l’arrêt (minutes), puis appuyez sur la touche
TIMER.
5
La valeur des minutes “minutes” se met à clignoter.
Appuyez sur la touche . ou / pour spécifier le
moment de l’arrêt (heure), puis appuyez sur la touche
TIMER.
4

43
FRANÇAIS
Appuyez sur la touche . ou / pour sélectionner
une source (CD ou TUNER), puis appuyez sur la touche
TIMER.
6
Appuyez sur la touche . ou / pour régler le
volume, puis appuyez sur la touche TIMER.
7
L’appareil se mettra chaque jour sous et hors tension aux
heures spécifiées.
N’oubliez pas de mettre l’appareil hors tension (en
attente), sinon la minuterie ne fonctionnera pas.
Préparez la source.
Quand la source est réglée sur “CD”, mettez un CD en place.
Quand la source est réglée sur “TUNER”, accordez l’appareil
sur une station.
Appuyez sur l’interrupteur POWER pour mettre
l’appareil hors tension (en attente).
9
8
Pour mettre la minuterie en ou hors service, appuyez sur la
touche TIMER.
Quand on met la minuterie en service, les paramètres de son
réglage sont affichés un par un, et l’indicateur TIMER s’allume
sur l’affichage.
Le réglage de la minuterie est alors terminé.
Les paramètres du réglage de la minuterie sont affichés un
par un, et l’indicateur TIMER s’allume sur l’affichage.
Pour mettre la minuterie en ou hors service

44
Dépannage
Si vous avez des problêmes avec l’appareil, veuillez consulter cette
charte et voir si vous pouvez résoudre le problême vous-même
avant de consulter votre dépositaire un centre de service TEAC.
Généralités
Pas d’alimentation
e
Vérifiez que l’appareil est branché sur une prise de courant.
Assurez-vous que la prise de courant n’a pas d’interrupteur.
Si la prise a un interrupteur, assurez-vous qu'il est en
position de marche. Assurez-vous que la prise de courant est
reliée au secteur, en y branchant un autre appareil, tel
qu’une lampe ou un ventilateur.
Aucun son ne sort des enceintes.
e
Sélectionnez la source en appuyant sur la touche FUNCTION.
e
Vérifiez que les enceintes sont correctement raccordées.
e
Réglez le volume.
e
Retirez la fiche du casque si elle est insérée dans la prise
PHONES.
e
Si l’indicateur de niveau VOLUME clignote, appuyez sur la
touche MUTING. (Si “CD” est sélectionné, appuyez sur la
touche de lecture/pause (G
/J) pour lancer la lecture.)
Le son est bruyant.
e
L’appareil est trop près d’un téléviseur ou appareils
semblables. Éloignez l’appareil ou éteignez les autre appareils.
La télécommande ne fonctionne pas.
e
Appuyez sur l’interrupteur d’alimentation (POWER) pour
allumer l’appareil.
e
Si les piles sont faibles changez les.
e
Utilisez la télécommande en dedans de son étendue (5 m) et
pointez là vers le panneau avant.
e
Enlevez tout obstable entre la télécommande et l’unité
principale
e
Si un fluorescent est proche de l’appareil éteignez le.
Lecteur CD
La lecture n’est pas possible.
e
Insérez le disque en plaçant vers l’extérieur sa face de
lecture.
e
Si le disque est sale, nettoyez sa surface.
e
Vous avez inséré un disque vierge. Insérez un disque
préenregistré.
e
Suivant le disque, etc., certains disques CD-R ne peuvent pas
être lus. Essayez avec un autre disque.
e
La lecture des disques CD-R non finalisés n’est pas possible.
S’il s’agit d’un tel disque, finalisez-le avec un enregistreur
CD et réessayez.
Le son n’est pas stable.
e
Placez l’appareil sur un support stable de façon à éviter les
vibrations et les chocs.
e
Si le disque est sale, nettoyez sa surface.
e
Evitez d’utiliser des disques rayés, abîmés ou voilés.
Syntonisateur
Aucune station n’est captée ou le signal est trop faible.
e
Faites l’accord correctement sur la station.
e
Faites pivoter l’antenne AM ou FM pour trouver la position
de réception optimale.
Même si le poste est stéréo, le son est mono.
e
Appuyez sur la touche STEREO/MONO.
Si le fonctionnement normal ne peut être rétabli,
débranchez le cordon d’alimentation de la prise de courant
et rebranchez-le.
Si vous éteignez le subwoofer, les réglages mis en
mémoire (horloge, stations mémorisées sur un canal
préréglé, réglage de minuterie) seront effacés.
Mise en garde sur la condensation
Si l’appareil (ou un disque) est déplacé d’un endroit froid à un
endroit chaud, ou utilisé après un changement soudain de
température, il existe un danger de condensation; des vapeurs
dans l’air peuvent ce condensées sur le mécanisme interne,
empêchant un bon fonctionnement. Pour prévenir çelà, ou s’il
se produit, laissez l’appareil allumé pour une ou deux heures.
L’appareil se stabilisera à la température ambiante.
Entretien
Si la surface de l’appareil devient sale, nettoyer celle-ci à l’aide
d’un chiffon doux ou utiliser un liquide de nettoyage neutre.
La nettoyer entièrement. Ne pas utiliser de diluant, de benzine
ou d’alcool car ils risquent d’endommager la surface de
l’appareil.

45
FRANÇAIS
Spécifications
Section AMPLIFICATEUR
Puissance de sortie (G+D) . . . . . . . . . . . . . . . . . . . 5 W + 5 W
Puissance de sortie (Subwoofer) . . . . . . . . . . . . . . . . . . 15 W
Sensibilité d’entrée . . . . . . . . . . . . . . . . . . . . . . . . . . 300 mV
Réponse fréquence . . . . . . . . . . . . . . . . . . . . 50 à 20 000 Hz
Section TUNER (FM)
Plage de fréquence . . . . . . . . . . . . . . . . 87,50 à 108,00 MHz
Sensibilité (S/B 30dB) . . . . . . . . . . . . . . . . . . . . . . 20 dBµV/m
Section TUNER (AM)
Plage de fréquence . . . . . . . . . . . . . . . . . . . . 522 à 1620 kHz
Sensibilité (S/B 20dB) . . . . . . . . . . . . . . . . . . . . . . 54 dBµV/m
Section LECTEUR CD
Réponse fréquence. . . . . . . . . . . . . . . 20 à 20 000 Hz (±1 dB)
Rapport Signal/Bruit . . . . . . . . . . . . . . . . . . . . . . . . . . . 55 dB
Pleurage et scintillement . . . Inférieurs aux limites mesurables
Section ENCEINTES
Type . . . . . . . . . . . . . . . . . . . . . . . . . . Plat à gamme étendue
Impédance. . . . . . . . . . . . . . . . . . . . . . . . . . . . . . . . . 4 ohms
Subwoofer
Impédance. . . . . . . . . . . . . . . . . . . . . . . . . . . . . . . . . 8 ohms
GÉNÉRALITÉS
Alimentation . . . . . . . . . . . . . . . . . . . . . . . . 230V CA, 50 Hz
Consommation. . . . . . . . . . . 80 W (attente: moins de 1,4 W)
Dimension (L x H x P)
Appareil principal. . . . . . . . . . . . . . . . . 160 x 226 x 86 mm
Enceintes G et D . . . . . . . . . . . . . . . . . 140 x 226 x 61 mm
Subwoofer. . . . . . . . . . . . . . . . . . . . . 160 x 234 x 330 mm
Poids
Appareil principal . . . . . . . . . . . . . . . . . . . . . . . . . 0,96 kg
Enceintes G et D . . . . . . . . . . . . . . . . . . . . . 0,6 kg chaque
Subwoofer . . . . . . . . . . . . . . . . . . . . . . . . . . . . . . . 5,3 kg
Pays d'origine . . . . . . . . . . . . . . . . . . . . . . . . . . . . . . . . Chine
Accessoires fournis
Télécommande (RC-970) x 1
Câble de subwoofer x 1
Câble d’enceinte x 2
Antenne FM x 1
Antenne AM x 1
Pile pour télécommande x 1
Adaptateur pour montage mural x 3
Vis pour montage mural x 10
Cheville conique en plastique pour montage mural x 10
Gabarit pour montage mural x 1
Manuel de l’utilisateur x 1
Carte de garantie x 1
<
La conception et les spécifications sont sujettes à modification
sans préavis.
<
Le poids et les dimensions sont approximatifs.
<
Les illustrations peuvent être légèrement différentes des
modèles fabriqués.

46
Contenido
Gracias por elegir TEAC. Lea este manual con cuidado para
obtener el mejor desempeño de esta unidad.
Antes de usarse . . . . . . . . . . . . . . . . . . . . . . . . . . . . . . . . . . . 46
Discos. . . . . . . . . . . . . . . . . . . . . . . . . . . . . . . . . . . . . . . . . . . 47
Conexión . . . . . . . . . . . . . . . . . . . . . . . . . . . . . . . . . . . . . . . . 48
Montaje en la pared . . . . . . . . . . . . . . . . . . . . . . . . . . . . . . . . 49
Nombres de cada control . . . . . . . . . . . . . . . . . . . . . . . . . . . . 50
Unidad de control remoto. . . . . . . . . . . . . . . . . . . . . . . . . . . . 51
Operación básica . . . . . . . . . . . . . . . . . . . . . . . . . . . . . . . . . . 52
Cómo escuchar los CD/ MP3. . . . . . . . . . . . . . . . . . . . . . . . . . 53
Modo de búsqueda (MP3 solamente) . . . . . . . . . . . . . . . . . . . 55
Reproducción programada . . . . . . . . . . . . . . . . . . . . . . . . . . . 56
Reproducción repetida . . . . . . . . . . . . . . . . . . . . . . . . . . . . . . 58
Reproducción aleatoria . . . . . . . . . . . . . . . . . . . . . . . . . . . . . . 58
Cómo escuchar el radio . . . . . . . . . . . . . . . . . . . . . . . . . . . . . 59
Sintonización preestablecida . . . . . . . . . . . . . . . . . . . . . . . . . . 60
RDS . . . . . . . . . . . . . . . . . . . . . . . . . . . . . . . . . . . . . . . . . . . . 61
RDS (Búsqueda PTY) . . . . . . . . . . . . . . . . . . . . . . . . . . . . . . . . 62
Ajuste del reloj . . . . . . . . . . . . . . . . . . . . . . . . . . . . . . . . . . . . 63
Ajuste del temporizador . . . . . . . . . . . . . . . . . . . . . . . . . . . . . 64
Solución de problemas . . . . . . . . . . . . . . . . . . . . . . . . . . . . . . 66
Especificaciones . . . . . . . . . . . . . . . . . . . . . . . . . . . . . . . . . . . 67
Antes de usarse
es una marca registrada de New Transducers Ltd.
Lea esto antes de poner el aparado en operación
<
La unidad puede calentarse durante su funcionamiento, por
lo que habrá que dejar espacio suficiente alrededor para su
ventilación.
Los orificios de ventilación no deberán obstruirse. Deje al
menos 20 cm de espacio libre encima de cada unidad y 5 cm
en los laterales.
NO coloque ningún objeto encima de la unidad.
<
El voltaje suministrado a la unidad debe corresponder al
voltaje que está impreso en el tablero posterior del subwoofer
suministrado. Si tiene alguna duda respecto a esto, consulte a
un electricista.
<
Elija con cuidado el lugar de instalación para su aparato. No lo
coloque a la luz solar directa o cerca de fuentes que generen
calor. Evite también lugares expuestos a vibraciones y muy
polvorientos, calurosos, fríos o húmedos.
<
No coloque la unidad sobre un amplificador/ receptor o
cualquier otro dispositivo electrónico que genere calor.
< No abra el gabinete ya que esto podría producir daños en los
circuitos o electrochoques. Si se entrara algún objeto en el
interior del aparato, póngase en contacto con su
concesionario o su agencia de servicio.
<
Al desenchufar el cordón del tomacorriente, tire siempre de la
clavija, nunca del cordón.
< Para mantener limpio el sensor del láser, no lo toque, y
siempre mantenga cerrada la puerta del CD.
< No utilice solventes químicos para limpiar el aparato ya que
podría dañar el acabado. Use un paño seco y limpio.
< Guarde este manual en un lugar seguro para usarlo como
referencia en el futuro.
NO MUEVA LA UNIDAD DURANTE LA REPRODUCCIÓN
Durante la reproducción, el disco gira a alta velocidad. NO
levante o mueva la unidad durante la reproducción. El hacerlo
puede dañar el disco o el ensamble del láser.
CUANDO MUEVA ESTA UNIDAD
Cuando cambie de lugar o empaque la unidad para moverla,
asegúrese de retirar el disco. El mover esta unidad con el
disco cargado puede dañar la unidad.
PRECAUCIÓN
No exponga esta unidad a líquidos de ninguna clase.
Mantenga los objetos que contengan líquidos tales como
floreros, vasos de agua, plantas en maceta, etc, lejos de la
parte superior de esta unidad.
No instale este equipo en un espacio confinado, tal como un
librero o algo similar.

47
ESPAÑOL
Compatibilidad MP3
< Los nombres de los archivos MP3 sólo utilizan caracteres
alfanuméricos. Esta unidad no puede mostrar correctamente
ni símbolos ni caracteres de tamaño completo o 2 bytes de
anchura (japonés, chino, etc.). Así mismo, asegúrese de usar la
extensión de archivo “.mp3”.
<
El disco deberá tener cerrada la sesión de grabación para
poderse reproducir.
< El CD-ROM deberá ser compatible con ISO 9660.
<
Si hay más de 200 carpetas o archivos MP3 grabados en el
disco, es posible que la unidad no pueda reproducirlos
correctamente.
<
Formato MPEG-1 Audio Layer 3, mono o estéreo, 44,1 ó
48 kHz, velocidad de transferencia fija.
< El audio codificado a 128 kbps deberá sonar con una calidad
similar a la de los CD-Audio normales. Aunque la unidad
reproducirá las pistas MP3 de menor velocidad, la calidad del
sonido se reducirá considerablemente.
Discos
< Los discos CD-R son más sensibles a los efectos del calor y los
rayos ultravioleta que los CD ordinarios. Es importante que no
se almacenen en una ubicación donde la luz directa del sol
caiga sobre ellos, y que esté lejos de fuentes de calor tales
como radiadores o dispositivos eléctricos que generan calor.
<
No se recomiendan los discos CD-R imprimibles, ya que el
lado de la etiqueta pude estar pegajoso y dañar la unidad.
< No pegue papeles u hojas de protección en los discos y no
use ningún rociador de recubrimiento de protección.
< Use una aguja de punto suave de base de aceite para escribir
la información del lado de la etiqueta. Nunca use una aguja
de punto fino o de punta dura, ya que ésta puede causar
daños sobre el lado grabado.
<
Nunca use un estabilizador. El uso de estabilizadores de CD
disponibles comercialmente con esta unidad dañará los
mecanismos y causará que funcionen mal.
<
No utilice CDs de forma irregular (octagonales, en forma de
corazón, etc.). Los CDs de esta clase pueden dañar la unidad.
Discos que se pueden reproducir en esta unidad:
• CD de audio convencionales que llevan el logotipo
“Compact Disc Digital Audio”:
• Discos CD-R finalizados de manera adecuada
Nota:
<
Dependiendo de la calidad del disco y/ o de la condición de la
grabación, algunos discos CD-R no se pueden reproducir.
<
Los discos CD-RW no se pueden reproducir en esta unidad.
<
Los discos protegidos contra copia y otros discos que no están
conforme a la norma de CD no se pueden reproducir
correctamente en este aparato reproductor.
Si usa dichos discos en esta unidad, TEAC Corporation y sus
subsidiarias no pueden ser responsables de ninguna
consecuencia o garantizar la calidad de reproducción. Si
experimenta problemas con discos que no son estándar, debe
ponerse en contacto con los productores del disco.
< Siempre coloque el disco con el lado de la etiqueta hacia
usted. (Los discos compactos se pueden reproducir o grabar
solamente de un lado)
<
Para retirar un disco de la caja de almacenamiento, oprima en
el centro de la caja y saque el disco hacia arriba,
sosteniéndolo con cuidado por las orillas.
Cómo retirar el disco Cómo sostener el disco
<
Si el disco se ensucia, limpie la superficie radialmente con una
tela suave y seca. No lo limpie con movimientos circulares.
< Si tiene alguna dura respecto al cuidado y manejo de un disco
CD-R, lea las precauciones suministradas con el disco, o
póngase en contacto directamente con el fabricante del disco.
<
Nunca utilice sustancias químicas tales como aerosol para
discos, aerosoles o fluidos antiestáticos, benceno o thinner
para limpiar los discos compactos. Dichas sustancias químicas
causarán un daño irreparable en la superficie plástica del
disco.
<
Los discos se deben regresar a su caja después de utilizarlos
para evitar polvos y rayas, ya que estos podrían causar que
salte el sensor del láser.
<
No exponga los discos a la luz directa del sol o a la humedad
y temperatura alta durante períodos largos. La exposición
prolongada a altas temperaturas puede ondular el disco.

E
D
C
B
A
F
Bocina (I)
Bocina (D)
Unidad Principal
48
Conexión
Antena de bucle AM
Coloque la antena para el mejor sonido.
Si lo desea, puede conectar la antena AM a una pared como
se muestra abajo:
A
PRECAUCIÓN
<
Apague la energía de todos los equipos antes de hacer las
conexiones.
< Lea las instrucciones de cada componente que pretenda
usar con esta unidad.
< Asegúrese de insertar el conector de manera segura. Para
evitar los ruidos y vibraciones, no junte los cables de
conexión con el cable de energía.
Antena FM
Mientras se está en modo FM, sintonice una estación FM y
extienda el cable para encontrar la mejor posición para
recepción. Esta antena puede necesitar volver a colocarse si
mueve la unidad a una nueva ubicación.
B
DVD, CD-R, etc.
Subwoofer
LINE OUT
RL

49
ESPAÑOL
2
Subwoofer
Haga la conexión entre los sockets “TO SUBWOOFER” (A
SUBWOOFER) y “FROM MAIN” (DESDE PRINCIPAL) usando
el cable suministrado.
AUX IN (ENTRADA AUXILIAR)
Puede conectar un reproductor de DVD, VCR, etc. a esta
unidad. Conecte el componente con los cables RCA.
Asegúrese de conectar el terminal blanco en los conectores
blancos (izquierda) y el terminal rojo en los conectores rojos
(derecha).
BOCINAS
Conecte el conector de la bocina izquierda a L (izquierda), y
el conector de la bocina derecha a R (derecha).
<
Cuando use bocinas distintas a las suministradas con el
sistema, la impedancia debe ser de 3 ohms o más.
< No conecte nada distinto a las bocinas a estas terminales.
Cable de energía CA
Conecte este cable de energía CA al socket de pared CA.
F
E
D
C
Antena externa FM (75Ω)
Antena externa FM
En un área donde las señales de FM son débiles, será
necesario usar una antena externa FM de tipo no
balanceado de 75 ohms usando un transformador de
correspondencia opcional (no suministrado) a una antena
externa. Generalmente, una antena de 3 elementos será
suficiente; si vive en un área donde las señales FM son
particularmente débiles, puede ser necesario usar una con 5
o más elementos.
Montaje en la pared
Puede montar la unidad principal y/o las bocinas izquierda y
derecha en la pared.
Precauciones
<
Tenga en cuenta que la longitud de los cables es de
aproximadamente 3 m. No intente montar la unidad principal
y las bocinas demasiado lejos del subwoofer.
<
Haga orificios en un soporte sólido de pared, tal como un
marco de madera o una pared de concreto.
< TEAC suministra estas ménsulas como conveniencia para el
propietario del producto. Consulte los códigos de
construcción locales y tenga toda la precaución necesaria
cuando monte estas ménsulas. Si no está seguro, consulte
con su comerciante local o experto en suministro de
construcción.
Para fijarla en la pared
Use la plantilla suministrada para determinar los puntos de
perforación.
Asegure las ménsulas en la pared usando los tornillos
suministrados.
<
Como conveniencia, se suministra un paquete de anclas de
plástico cubiertas. Si elige usar estas anclas, perfore un orificio
piloto usando un taladro con la broca de 6mm y después
cubra el ancla en el orificio piloto.
Use solamente estas anclas si son adecuadas para los
materiales sobre los que se va a montar la unidad. Consulte
con su ferretería local si no está seguro.
Nota:
Antes de continuar, haga las conexiones entre la unidad
principal y las bocinas refriéndose a la página 22.
Cuelgue la unidad principal y/o las bocinas a las pestañas de
montaje.
3
2
1
2
3
3
2
Bocina
Unidad principal

50
POWER (ALIMENTACIÓN)
Oprima este interruptor para encender o apagar la unidad (en
espera). La unidad principal se alimenta a través del
subwoofer. Primero necesita encender el subwoofer.
FUNCTION (FUNCIÓN)
Use este botón para seleccionar una fuente (CD, AUX, o
TUNER).
FM/AM
Este botón se usa para seleccionar AM o FM.
Sensor remoto
Cuando se opera la unidad de control remoto, apúntela hacia
allá.
MEMORY/CLOCK SET (MEMORIA/ AJUSTE DE RELOJ)
En modo CD, use este botón para programar pistas.
En modo TUNER (SINTONIZADOR), use este botón para
almacenar canales preestablecidos en la memoria.
Este botón también se usa para el ajuste de reloj.
E
D
C
B
A
REPEAT/PTY
En modo CD, use este botón para una reproducción repetida.
En el modo FM TUNER, utilice este botón para iniciar la
búsqueda de PTY.
STEREO/MONO/MP3
En modo de FM TUNER (SINTONIZADOR FM), use este botón
para seleccionar estéreo o monoaural.
Durante la reproducción de un disco MP3, use este botón
para buscar un nombre de pista.
Durante la reproducción de un disco CD, utilice este botón
para activar y desactivar la función ESP.
SKIP (Salto) (.//) /TUNING (SINTONIZACIÓN)
En modo CD, oprima momentáneamente este botón para
saltar pistas.
Sostenga ahí este botón para buscar una parte de la pista.
En modo TUNER, oprima momentáneamente este botón para
sintonizar una estación.
En modo Standby (en espera), estos botones se usan para
ajustar el reloj o el temporizador.
STOP (Detener) (H)
Use este botón para detener la reproducción del CD/MP3.
I
H
G
F
Nombres de cada control
El equipo libera una cantidad nominal de energía de la
salida CA incluso cuando el interruptor POWER está en la
posición OFF (APAGADO).

51
ESPAÑOL
1
2
3
PLAY/PAUSE (Reproducir/pausa) (y/J)
Use este botón para iniciar o dejar en pausa la reproducción
del CD/MP3.
Puerta del CD
Pantalla
VOLUME (VOLUMEN)
Oprima el botón “+” o menos “–” para ajustar el volumen.
OPEN/CLOSE (ABRIR/CERRAR)
Use este botón para abrir y cerrar la puerta del CD.
TIMER (TEMPORIZADOR)
Use este botón junto con los botones Salto para ajustar el
temporizador.
BASS (BAJO)
Use estos botones par ajustar el sonido grave hacia arriba o
hacia abajo.
TREBLE (AGUDOS)
Use estos botones para ajustar los sonidos agudos hacia
arriba y hacia abajo.
MP3 FOLDER/PRESET (CARPETA MP3/PREESTABLECIDO)
En modo TUNER, use este botón para seleccionar estaciones
preestablecidas.
Durante la reproducción de un disco MP3, use este botón
para seleccionar una carpeta en el disco.
SLEEP (DORMIR)
Use este botón para ajustar el temporizador con dormir.
SHUFFLE (ALEATORIO)/RDS
Use este botón para la reproducción aleatoria.
En el modo FM TUNER, utilice este botón para seleccionar un
modo RDS.
MUTING (SILENCIO)
Use este botón para dejar el sonido en silencio.
U
T
S
R
Q
P
O
N
M
L
K
J
Nota:
Para simplificar las explicaciones, las instrucciones se refieren a
los nombres de los botones y los controles en el tablero
frontal, sin hacer mención del uso de la unidad de control
remoto.
Unidad de control remoto
Retire la tapa del compartimiento de batería.
Coloque la batería de litio (CR2032, 3V).
Cierre la tapa.
Reemplazo de batería
Si la distancia requerida entre la unidad de control remoto y la
unidad principal disminuye, la batería se acaba. En este caso,
reemplace la batería por una nueva.
Precauciones respecto a las baterías
<
No caliente o desensamble las baterías y nunca deseche
baterías agotadas tirándolas al fuego.
3
2
1
La unidad de control remoto suministrada permite que la unidad
se opere a distancia.
Cuando se opera la unidad de control remoto, apúntela hacia el
sensor remoto del tablero frontal de la unidad.
<
Incluso si la unida de control remoto se opera dentro del
rango efectivo, la operación de control remoto puede ser
imposible si hay cualquier obstáculo entre la unidad y el
control remoto.
<
Si la unidad de control remoto se opera cerca de otros
productos que generen rayos infrarrojos, o si hay otros
dispositivos de control remoto que usen rayos infrarrojos cerca
de la unidad, puede operar de manera incorrecta. A la inversa,
los otros productos también pueden operar de manera
incorrecta.
Instalación de batería

52
Operación básica
Seleccione una fuente oprimiendo el botón FUNCTION.
3
Reproduzca la fuente y ajuste el volumen usando los
botones VOLUME.
4
Silencio
Para dejar en silencio temporalmente el sonido, oprima el
botón MUTING. Oprima el botón MUTING otra vez para
restaurar el sonido.
<
Mientras muting está activado, parpadea el indicador de nivel
de VOLUME.
Audífonos
Para escuchar de manera privada, inserte el conector de los
audífonos en el conector PHONES, y ajuste el volumen
oprimiendo los botones VOLUME. El sonido de las bocinas se
corta mientras está insertado el conector de los audífonos.
Temporizador con dormir
Al oprimir repetidamente el botón SLEEP se puede ajustar un
intervalo (de 90 abajo hacia 10 minutos), después de lo cual
se apagará la unidad automáticamente y cambiará a modo
Standby (en espera).
Cada vez que oprima el botón SLEEP cambia la indicación de
hora por 10 minutos.
Enciende el subwoofer.
Oprima el interruptor POWER en la unidad principal.
2
1
90 80 10
………
Apagado

53
ESPAÑOL
Cómo escuchar los CD/ MP3 (1)
Oprima el botón FUNCTION para seleccionar “CD”.
1
Oprima el botón OPEN/CLOSE.
2
Coloque un disco en el huso central del reproductor con
la etiqueta impresa viendo hacia usted.
Oprima el disco sobre el huso hasta que se escuche un ligero
“click” indicando que el disco está montado correctamente.
3
< Nunca coloque más de un disco en la unidad.
<
Asegúrese de que el disco esté montado en el huso
correctamente y se haya asentado.
Oprima el botón OPEN/CLOSE para cerrar la puerta del
CD.
4
< Toma algunos segundos para que la unidad cargue el disco.
Ningún botón funcionará durante la carga. Espere hasta que
se desplieguen el número total de pistas y el tiempo total de
reproducción del disco.
<
Cuando no se coloca ningún disco en el reproductor de CD,
en la pantalla aparece “NO DISC” (no hay disco).
Cuando se coloca un disco CD
Oprima el botón PLAY/PAUSE (y
/J) para comenzar la
reproducción.
5
La reproducción comienza desde la primera pista del disco.
<
Las pistas MP3 grabadas de carpetas se colocarán
automáticamente en la carpeta “ROOT”, y la reproducción se
iniciará automáticamente desde la primera pista de dicha
carpeta ROOT.
<
Cuando se ha terminado la reproducción de todas las pistas,
la unidad se detiene automáticamente.
Tiempo total de reproducciónNúmero total de pistas
Cuando se coloca un disco MP3
Número total de carpetasNúmero total de pistas
3
1
2 4
5

54
MP3
Cómo escuchar los CD/ MP3 (2)
Para suspender la reproducción
temporalmente (modo de pausa)
Para detener la reproducción
Oprima el botón Stop (H) para detener la reproducción.
Para saltar a la pista siguiente o a la anterior
Oprima el botón Play/Pause (G/J) durante la reproducción.
La reproducción se detiene en la posición actual. Para retomar
la reproducción, oprima otra vez el botón Play/ Pause (G
/J).
La ESP de 40 segundos almacena la música en una memoria
intermedia para evitar el salto de sonido.
Durante la reproducción de un disco CD, presione el botón
MP3 para activar o desactivar la ESP. Aparecerá brevemente
“40 SEC (40 segundos)”, y en el visualizador se encenderá el
indicador (ESP).
< El indicador (ESP) parpadeará mientras la unidad esté llenando
la memoria intermedia.
<
Cuando la unidad se encuentre en un lugar estable, libre de
goles, usted podrá desactivar esta función.c
<
Durante la reproducción de MP3, esta función estará siempre
activada.
ESP (Protección electrónica contra golpes)
Durante la reproducción, oprima el botón Skip (.o/)
de manera repetida hasta que se encuentre la pista deseada.
La pista seleccionada se reproducirá desde el inicio.
En modo de paro, oprima el botón Skip (.
o/) de
manera repetida hasta que se encuentre la pista que desea
escuchar. Oprima el botón Play/Pause (G
/J) para comenzar
la reproducción de la pista seleccionada.
< Cuando se oprime el botón . durante la reproducción, la
pista que se está reproduciendo comenzará desde el principio.
Para regresar al comienzo de la pista anterior, oprima el
botón .
dos veces.
<
Durante la reproducción programada, se reproduce la pista
siguiente o la anterior en el programa.
Busque una parte de una pista
Durante la reproducción, sostenga oprimido el botón Skip
(.
o/) y libérelo cuando se encuentra la parte que
desea escuchar.
Para saltar a la carpeta siguiente (MP3)
Oprima el botón MP3 FOLDER para saltar a la carpeta
siguiente.
Para visualizar la información de MP3
Durante la reproducción del disco MP3, oprima el botón MP3
durante más de 1 segundo. La información sobre la pista
actual se muestra del siguiente modo:
FILE (nombre de la carpeta)w
TITLE (título*)
w
ARTIST (artista*)wALBUM (álbum*)
*: Información de la pista
Oprima de nuevo el botón MP3 durante más de 1 segundo
para cancelar el modo de información de MP3.

55
ESPAÑOL
Modo de búsqueda (MP3 solamente)
Búsqueda de una pista en una carpeta
Oprima dos veces el botón MP3.
Aparece en la pantalla un nombre de carpeta.
Oprima el botón Skip (. o /) para buscar la
carpeta donde la pista que desea escuchar está incluida.
Sostenga oprimido el botón Skip (.
o /).
Después podrá seleccionar la pista en la carpeta presionando
el botón SKIP (.
o /).
<
Las pistas MP3 grabadas de carpetas irán a la carpeta
“ROOT”.
Oprima el botón Play/Pause (G/J) para comenzar la
reproducción.
La reproducción comienza desde la pista seleccionada.
<
Si salta el paso , la reproducción se iniciará desde la primera
pista de la carpeta seleccionada.
3
4
3
2
1
Letra inicial de un nombre de pista
Nombre de pista
Busque un nombre de pista
Puede seleccionar una pista buscando su nombre.
Oprima una vez el botón MP3.
Aparecen en la pantalla una letra (la letra inicial de un
nombre de pista) y un nombre de pista.
1
Oprima el botón Play/Pause (G/J).
La reproducción comienza desde la pista seleccionada.
4
Número de pista
<
Para cancelar el modo de búsqueda, presione el botón STOP
(H
).
Seleccione la letra inicial de la pista que desea escuchar
oprimiendo el botón Skip (.
o/).
2
Sostenga oprimido el botón Skip (. o /).
3
Después, puede seleccionar la pista que tiene la misma letra
inicial oprimiendo el botón Skip (.
o/).
MP3

56
FUNCTION
MEMORY/
CLOCK SET
Se pueden programar hasta 64 pistas en el orden deseado.
Las funciones de reproducción aleatoria y repetida no funcionan
durante la reproducción programada.
Oprima el botón FUNCTION para seleccionar “CD”.
1
Oprima el botón MEMORY.
2
En la pantalla aparece “MEMORY” (MEMORIA).
< Para cancelar el modo de programa, oprima el botón Stop (H).
Presione repetidamente el botón SKIP (.o/) para
seleccionar una carpeta de un disco MP3, y después
presione el botón MEMORY.
<
Las pistas MP3 grabadas de carpetas irán a la carpeta “01”
(ROOT).
<
Salte este paso cuando se reproduce un disco CD.
3
Reproducción programada
Oprima el botón Skip (.o/) de manera repetida
para seleccionar una pista, y después oprima el botón
MEMORY.
La pista se programa y se despliega “P-02”.
<
Repita los pasos y para programar más pistas.
<
Usted puede programar hasta 64 pistas.
Cuando se completa la selección de los números de
pista, oprima el botón Play/Pause (G
/J) para comenzar
la reproducción programada.
5
43
4
< Cuando ha terminado la reproducción de todas las pistas
programadas, o si se oprime uno de los siguientes botones, el
indicador MEMORY se apagará y se cancelará el modo de
programa:
STOP, FUNCTION, POWER
El programa se mantiene en la memoria hasta que se oprime
el botón OPEN/CLOSE o se interrumpe la energía. Usted
puede regresar a la reproducción programada oprimiendo el
botón MEMORY y el botón Play/Pause (G
/J). (Si se
seleccionó otra fuente, seleccione el modo CD oprimiendo
antes el botón FUNCTION.)

57
ESPAÑOL
MEMORY/
CLOCK SET
Verificación del orden programado
En modo de paro, oprima repetidamente el botón MEMORY.
Se mostrarán en pantalla el número de pista y el número de
programa.
Adición de una pista al final del programa
En el modo de paro, oprima de manera repetida el botón
MEMORY hasta que aparezca “00” en la pantalla. Seleccione
un número de pista utilizando el botón Skip (.
o/) y
después oprima el botón MEMORY. La pista se agrega al final
del programa.
Sobrescribir el programa
En el modo de paro, oprima de manera repetida el botón
MEMORY hasta que aparezca en la pantalla el número de
programa que se va a cambiar. Seleccione un nuevo número
de pista oprimiendo el botón Skip (.
o/ ) después
oprima el botón MEMORY.
Borrado de un programa
Para borrar el contenido programado, oprima el botón
MEMORY y el botón Stop (H
) en el modo de paro.
<
Si se oprime el botón OPEN/CLOSE, también se borrará el
contenido programado.
< Si se desconecta la unidad del suministro de energía, se
borrará el contenido programado.

58
Reproducción aleatoria
Las pistas se pueden reproducir de manera aleatoria. Oprima
el botón SHUFFLE durante la reproducción o cuando esté en
el modo de paro. Después se encenderá “SHUFFLE” en la
pantalla.
<
Si oprime el botón / durante la reproducción aleatoria, la
siguiente pista se seleccionará de manera aleatoria y se
reproducirá. Si oprime el botón .
, la pista reproducida
actualmente se va a reproducir desde el principio. Una pista
no se puede volver a reproducir durante la reproducción
aleatoria.
<
La reproducción aleatoria no funciona durante la
reproducción programada.
<
Si se oprime uno de los siguientes botones, se cancelará el
modo aleatorio:
SHUFFLE, STOP, FUNCTION, POWER, OPEN/CLOSE
Reproducción repetida
Cada vez que se oprime el botón REPEAT, el modo cambia de
la siguiente manera:
Repetir una pista
Oprima el botón REPEAT una vez durante la reproducción. Se
enciende “REPEAT” (REPETIR).
La pista que se está reproduciendo se volverá a reproducir de
manera repetida. Si se oprime el botón Skip (.
o/) y se
selecciona otra pista, la pista que seleccionó se reproducirá de
manera repetida.
También es posible seleccionar una pista que se va a repetir
en el modo de paro. Oprima el botón REPEAT, seleccione una
pista oprimiendo el botón Skip (.
o/) y después oprima
el botón Play/Pause (G
/J) para comenzar la reproducción.
Repetir todas las pistas
Todas las pistas se van a reproducir de manera repetida.
Oprima dos veces el botón REPEAT. Se enciende “REPEAT
ALL” (REPETIR TODO).
Durante la reproducción programada, las pistas programadas
se van a reproducir de manera repetida.
Repetir todas las pistas en una carpeta (MP3)
Todas las pistas en una carpeta se van a reproducir de manera
repetida.
Oprima tres veces el botón REPEAT. Se enciende “REPEAT
ALBUM” (REPETIR ÁLBUM).
<
Si se oprime uno de los siguientes botones, se cancelará el
modo de repetición:
STOP, FUNCTION, OPEN/CLOSE, POWER
Cuando se coloca un disco CD
Cuando se coloca un disco MP3
g
REPEAT 1 REPEAT ALL
ado)
(apa
REPEAT REPEAT ALL
(apagado)
REPEAT ALBUM

ESPAÑOL
59
Cómo escuchar el radio
3
2
1
STEREO/MONO
Al oprimir este botón, se alterna entre modo STEREO (Estéreo)
y modo MONO.
STEREO (Estéreo)
Las transmisiones estéreo de FM se reciben en estéreo y se
encenderá el indicador “STEREO”.
MONO
Para compensar una recepción estéreo FM débil, seleccione
este modo. Ahora, la recepción se forzará para que se
monoaural, reduciendo el ruido no deseado.
Si la recepción es deficiente
Vuelva a colocar la antena AM o FM para la mejor recepción
posible. Puede ser necesario conectar una antena externa en
áreas de recepción extremadamente débil (véase la página
49).
Oprima el botón FUNCTION para seleccionar “TUNER”.
1
Oprima el botón FM/AM para seleccionar una banda.
2
Seleccione la estación que desea escuchar (selección
automática).
3
Mantenga oprimido el botón TUNING Arriba o Abajo hasta
que comience a cambiar el desplegado de frecuencia. Cuando
se sintoniza una estación, el proceso de sintonización se
detendrá automáticamente.
<
Oprima el botón Arriba o Abajo para detener la selección
automática.
Selección de estaciones que no se pueden sintonizar
automáticamente (selección manual)
Cuando el botón Arriba o Abajo se oprime
momentáneamente, la frecuencia cambia en intervalos fijos.
Oprima el botón Arriba o Abajo de manera repetida hasta
que encuentre la estación que desea esuchar.
Botón STEREO/ MONO

60
Sintonización preestablecida
TUNINGMEMORY
Canal preestablecido
Usted puede almacenar las estaciones FM y AM en los canales 1
a 10 preestablecidos, respectivamente.
Si el interruptor de energía del subwoofer está apagado,
los ajustes mantenidos en memoria (reloj, estaciones
preestablecidas, ajuste de temporizador) se borrarán.
Sintonice una emisora que desee oír (véanse los pasos
a de la página 59).
Oprima el botón MEMORY.
2
31
1
En los siguientes 5 segundos, seleccione un canal
preestablecido para almacenar la estación usando los
botones TUNING.
3
La estación se almacena y se apaga el indicador MEMORY.
Para almacenar más estaciones, repita los pasos a .
41
En los siguientes 5 segundos, oprima el botón
MEMORY.
4

ESPAÑOL
61
Oprima el botón PRESET de manera repetida hasta que
se encuentre la estación preestablecida deseada.
2
Cómo seleccionar las estaciones
preestablecidas
Oprima el botón FM/AM para seleccionar una banda.
1
El sistema de datos de radio (RDS) es un servicio de radiodifusión
que permite a las emisoras enviar información adicional junto
con la señal de radio normal.
Este sistema funciona únicamente con la banda de FM
europea.
Sintonice una emisora de FM RDS (véanse pasos a
en página 59).
Se encenderá el indicador RDS, y en el visualizador aparecerá
el nombre de servicio del programa (nombre de la emisora).
Oprima el botón RDS .
Cada vez que pulse el botón RDS, el modo cambiará en el
siguiente orden:
PS (nombre del servicio de programación)
Cuando seleccione PS, la frecuencia se visualizará durante 3
segundos, y después se visualizará el PS (nombre de la
emisora).
Si no hay ningún dato PS, se visualizará “NO PS”.
PTY (tipo de programa)
Indica el tipo de programa. Si no hay ningún dato PTY, se
visualizará “NO PTY”.
RT (texto de radio)
Ofrece noticias de las emisoras en un máximo de 64
símbolos. Si no hay ningún dato RT, se visualizará “NO RT”.
2
311
RDS

62
RDS (Búsqueda PTY)
Esta función permite buscar emisoras por tipo de programa.
Seleccione FM con el botón FM/AM.
Oprima el botón PTY.
“PTY SEL” parpadeará en la pantalla.
En los siguientes 10 segundos, seleccione el tipo de
programa con el botón Skip (.
o/)
Se pueden seleccionar 29 tipos de programa.
Oprima el botón PTY.
Se inicia la búsqueda.
<
Cuando se localiza el programa seleccionado, la búsqueda se
interrumpe y el tipo de programa se visualiza en la pantalla.
< Si no se encuentra el mismo tipo de programa durante la
búsqueda PTY, se detendrá en la frecuencia inicial.
< Si quiere detener la búsqueda, pulse el botón PTY.
4
3
2
1
NEWS : mensajes, convocatorias, opinión pública, informes.
AFFAIRS : temas de actualidad, documentos, debates, análisis,
etc.
INFO : información cotidiana, previsión meteorológica,
consumo, asistencia médica, etc.
SPORT : programas relacionados con el mundo del deporte.
EDUCATE : educación y cultura.
DRAMA : conciertos de radio, series dramáticas.
CULTURE : todos los aspectos culturales de ámbito nacional o
local, celebraciones religiosas, filosofía, ciencias
sociales, lenguaje, teatro, etc.
SCIENCE : programas sobre ciencias naturales y tecnología.
VARIED : programas populares, concursos, variedades,
entrevistas, comedia, humor, etc.
POP M : música comercial, popular, discos vendidos, etc.
ROCK M : música actual, principalmente compuesta e
interpretada por jóvenes artistas.
M O R M : temas de música populares, por lo general de
menos de 5 minutos.
LIGHT M : música clásica, instrumental, coral y ligera
interpretada por artistas no profesionales.
CLASSICS: música clásica, grandes óperas, sinfónica, de cámara,
etc.
OTHER M : otros estilos musicales (Rhythm & Blues, Reggae,
etc.).
WEATHER : informes meteorológicos, previsiones.
FINANCE : información económica, comercial, etc.
CHILDREN : programación infantil.
SOCIAL A : asuntos sociales.
RELIGION : programas religiosos.
PHONE IN : programas con participación del público por
teléfono.
TRAVEL : información sobre viajes.
LEISURE : programas relacionados con las actividades
recreativas.
JAZZ : música de jazz.
COUNTRY : música country.
NATIONAL : música del país.
OLDIES : música de la llamada época dorada del pop.
FOLK M : música folk.
DOCUMENT: documentales.
3
1
2 4

63
ESPAÑOL
Ajuste del reloj
Si el interruptor de energía del subwoofer está apagado,
los ajustes mantenidos en memoria (reloj, estaciones
preestablecidas, ajuste de temporizador) se borrarán.
Si la unidad está encendida, oprima el interruptor
POWER para apagarla.
1
Oprima el botón CLOCK SET una vez más.
Parpadea el valor de ”hora”.
3
Oprima el botón . o / para ajustar la hora actual.
4
Oprima el botón CLOCK SET.
Parpadea el valor de “minuto”.
5
Oprima el botón . o / para ajustar el minuto
actual.
6
Oprima el botón CLOCK SET.
El reloj comienza a funcionar.
7
MEMORY/
CLOCK SET
POWER
Oprima y mantenga asó el botón CLOCK SET.
Parpadea ”12 HOUR” (12 horas) o ”24 HOUR (24 horas)”. Si
desea cambiar el modo de hora, oprima el botón .
o/.
2

64
Ajuste del temporizador
< Ajuste el reloj antes de ajustar el temporizador.
Si el interruptor de energía del subwoofer está apagado,
los ajustes mantenidos en memoria (reloj, estaciones
preestablecidas, ajuste de temporizador) se borrarán.
Oprima el botón TIMER y manténgalo así hasta que
aparezca el indicador “TIMER” (TEMPORIZADOR) y
“ON” (ENCENDIDO) en la pantalla.
1
El valor de “hora” empieza a parpadear.
<
Cuando no se oprime ningún botón durante 10 segundos, el
modo de ajuste del temporizador se va a cancelar.
El valor de “minutos” comienza a parpadear.
Oprima el botón . o / para ajustar la hora de
inicio (minuto), y después oprima el botón TIMER.
3
Los indicadores “TIMER” (TEMPORIZADOR) y “OFF”
(APAGADO) aparecen en la pantalla y el valor de “hora”
comienza a parpadear.
Oprima el botón . o / para ajustar la hora de
inicio (hora), y después oprima el botón TIMER.
2
Oprima el botón . o / para ajustar la hora de fin
(minuto), y después oprima el botón TIMER.
5
El valor de “minutos” comienza a parpadear.
Oprima el botón
.
o /
para ajustar la hora de fin
(hora), y después oprima el botón TIMER.
4

65
ESPAÑOL
Oprima el botón . o / para seleccionar una fuente
(CD o TUNER), y después oprima el botón TIMER.
6
Oprima el botón . o / para ajustar el volumen y
después oprima el botón TIMER.
7
La unidad se encenderá y apagará a la hora especificada.
No se olvide de desconectar la alimentación de la
unidad (espera), o el temporizador no trabajará.
Prepare la fuente.
Cuando la fuente esté ajustada a “CD”, coloque un disco CD.
Cuando la fuente esté ajustada a “TUNER”, sintonice una
emisora.
Presione el botón POWER para desconectar la
alimentación de la unidad (espera).
9
8
Para activar o desactivar el temporizador, presione el botón
TIMER.
Cuando active el temporizador, los ajustes del mismo se
visualizarán uno tras otro, y en el visualizador se encenderá el
indicador TIMER.
El ajuste del temporizador habrá finalizado.
Los ajustes del temporizador se visualizarán uno tras otro, y
en el visualizador se encenderá el indicador TIMER.
Para activar o desactivar el temporizador

66
Solución de problemas
Si tiene algún problema con su sistema, busque en esta tabla y
verá si puede resolver el problema usted mismo antes de llamar a
su distribuidor o al centro de servicio de TEAC.
En general
No hay energía
e
Verifique la conexión al suministro de energía CA. Verifique
y asegúrese que la fuente de CA no es una salida con
interruptor, y si la es, que el interruptor esté encendido.
Asegúrese que haya energía en la salida CA conectando
otro artículo tal como una lámpara o un ventilador.
No hay sonido de las bocinas.
e
Seleccione la fuente oprimiendo el botón FUNCTION.
e
Verifique la conexión a las bocinas.
e
Ajuste el volumen.
e
Saque el conector de los audífonos de la entrada PHONES.
e
Si está parpadeando el indicador de nivel de VOLUME,
oprima el botón MUTING. (Cuando se seleccione “CD”,
oprima el botón Play/Pause (G
/J) para iniciar la
reproducción.)
El sonido es ruidoso.
e
La unidad está demasiado cerca de una TV o aparatos
similares. Instale la unidad lejos de estos o apáguelos.
El control remoto no funciona.
e
Oprima el interruptor POWER para encender la unidad.
e
Si la batería está muerta, cambie la batería por una nueva.
e
Use la unidad de control remoto dentro del rango (5m
/15pies) y apunte hacia el tablero frontal.
e
Quite los obstáculos entre la unidad de control remoto y la
unidad principal.
e
Si hay una luz fuerte cerca de la unidad, apáguela.
Reproductor de CD
No puede reproducir.
e
Cargue un disco con el lado de reproducción hacia afuera.
e
Si el disco está sucio, limpie la superficie de éste.
e
Se ha cargado un disco en blanco. Cargue un disco
pregrabado.
e
Dependiendo del disco, etc. tal vez no sea posible reproducir
discos CD-R. Vuelva a intentarlo con otro disco.
e
No se pueden reproducir discos CD-R no finalizados. Finalice
dicho disco en un grabador de CD y vuelva a intentarlo.
El sonido salta.
e
Coloque la unidad en un lugar estable para evitar la
vibración y los golpes.
e
Si el disco está sucio, limpie la superficie de éste.
e
No use discos rayados, dañados u ondulados.
Sintonizador
No se puede escuchar ninguna estación, o la señal está
demasiado débil.
e
Sintonice la estación de manera adecuada.
e
Gire la antena FM o AM para la mejor posición de
recepción.
Aunque la transmisión es estéreo, suena monaural.
e
Oprima el botón STEREO/MONO.
Si no se puede recuperar la operación normal, desconecte
el cable de energía de la salida y conéctelo otra vez.
Si el interruptor de energía del subwoofer está apagado,
se van a borrar los ajustes guardados en la memoria (reloj,
estaciones preestablecidas, ajuste de temporizador).
Cuidado con la condensación
Cuando la unidad (o un disco) se cambie de un lugar frío a
uno cálido, o se use después de un cambio repentino de
temperatura, existe el peligro de la condensación; el vapor en
el aire se podría condensar en el mecanismo interno,
haciendo que la operación correcta sea errática o imposible.
Para evitar eso, o si ocurre, deje encendida la unidad durante
una o dos horas. La unidad se estabilizará a la temperatura de
sus alrededores.
Mantenimiento
Si la superficie de la unidad se ensucia, limpie con una tela
suave o use jabón líquido suave diluido. Nunca rocíe líquido
directamente sobre esta unidad. Aplique el limpiador a la tela
de limpieza y pásela suavemente. Asegúrese de quitar
cualquier exceso por completo. No use adelgazador, benceno
o alcohol, ya que pueden dañar la superficie de la unidad.
Permita que la superficie de la unidad se seque por completo
antes de usarla.

67
ESPAÑOL
Especificaciones
Sección del AMPLIFICADOR
Energía de salida (I+ D). . . . . . . . . . . . . . . . . . . . . 5 W + 5 W
Energía de salida (subwoofer) . . . . . . . . . . . . . . . . . . . . 15 W
Sensibilidad de entrada . . . . . . . . . . . . . . . . . . . . . . . 300 mV
Respuesta de frecuencia . . . . . . . . . . . . . . . . 50 a 20.000 Hz
Sección del SINTONIZADOR (FM)
Rango de frecuencia . . . . . . . . . . . . . . . 87,50 a 108,00 MHz
Sensibilidad (S/N30dB) . . . . . . . . . . . . . . . . . . . . . 20 dBµV/m
Sección del SINTONIZADOR (AM)
Rango de frecuencia . . . . . . . . . . . . . . . . . . . 522 a 1620 kHz
Sensibilidad (S/N20dB) . . . . . . . . . . . . . . . . . . . . . 54 dBµV/m
Sección del REPRODUCTOR DE CD
Respuesta de frecuencia . . . . . . . . . . . 20 a 20.000 Hz (±1 dB)
Proporción de señal a radio . . . . . . . . . . . . . . . . . . . . . 55 dB
Distorsión y vibración. . . . . . . . . . . . . . . . . . . . . . No medible
Bocinas
Tipo . . . . . . . . . . . . . . . . . . . . Tipo plano de rango completo
Impedancia . . . . . . . . . . . . . . . . . . . . . . . . . . . . . . . . 4 ohms
Subwoofer
Impedancia . . . . . . . . . . . . . . . . . . . . . . . . . . . . . . . . 8 ohms
GENERALIDADES
Requerimientos de energía . . . . . . . . . . . . . 230 V CA, 50 Hz
Consumo de energía . . . . . . 80 W (espera: menos de 1,4 W)
Dimensión (An x Al x P)
Unidad principal . . . . . . . . . . . . . . . . . 160 x 226 x 86 mm
Bocinas I y D . . . . . . . . . . . . . . . . . . . . 140 x 226 x 61 mm
Subwoofer. . . . . . . . . . . . . . . . . . . . . 160 x 234 x 330 mm
Peso
Unidad principal . . . . . . . . . . . . . . . . . . . . . . . . . . 0,96 kg
Bocinas I y D . . . . . . . . . . . . . . . . . . . . . . . . . . 0,6 kg cada
Subwoofer . . . . . . . . . . . . . . . . . . . . . . . . . . . . . . . 5,3 kg
Accesorios estándar
Unidad de control remoto (RC-970) x 1
Cable del subwoofer x 1
Cable de bocinas x 2
Antena FM x 1
Antena AM x 1
Batería para control remoto x 1
Adaptador de montaje en pared x 3
Tornillo de montaje en pared x 10
Ancla de pared de plástico cubierta x 10
Plantilla para montaje en pared x 1
Manual del propietario x 1
Tarjeta de garantía x 1
<
El diseño y las especificaciones están sujetas a cambio sin
previo aviso.
<
El peso y las dimensiones son aproximados.
<
Las ilustraciones pueden diferir ligeramente de los modelos de
producción.

0705
.
MA-0943B
Z
This appliance has a serial number located on the rear panel. Please record
the model number and serial number and retain them for your records.
Model number Serial number
TEAC CORPORATION
3-7-3, Nakacho, Musashino-shi, Tokyo 180-8550, Japan Phone: (0422) 52-5081
TEAC AMERICA, INC. 7733 Telegraph Road, Montebello, California 90640 Phone: (323) 726-0303
TEAC CANADA LTD. 5939 Wallace Street, Mississauga, Ontario L4Z 1Z8, Canada Phone: (905) 890-8008
TEAC MEXICO, S.A. De C.V Campesinos N°184, Colonia Granjas Esmeralda, Delegacion Iztapalapa, CP 09810, México DF Phone: (525) 581-5500
TEAC UK LIMITED Unit 19 & 20, The Courtyards, Hatters Lane, Watford, Hertfordshire, WD18 8TE, U.K. Phone: (0845) 130-2511
TEAC EUROPE GmbH Bahnstrasse 12, 65205 Wiesbaden-Erbenheim, Germany Phone: 0611-71580
TEAC ITALIANA S.p.A. Via C. Cantù 9/A, 20092 Cinisello Balsamo, Milano, Italy Phone: 02-66010500
TEAC AUSTRALIA PTY., LTD. 280 William Street, Melbourne VIC 3000, Australia Phone: (03) 9672-2400
A.B.N. 80 005 408 462
 Loading...