


Siemens KAD63V40TI, KAD63V20TI, KAD63V21TI, KA63DV20TI, KAD63V00TI Operating Manual
...KA..D
|
|
en |
Operating and installation instructions |
||
|
|
|
|
|
|
|
|
|
|
|
|
|
|
|
|
|
|

en Table of contents
Congratulations . . . . . . . . . . . . . . . . . . . . . . . . . . . . . . . . . . . . . . . . . . . . . . . . . . . . . . . . . . . . . . . . . . . . . . . . |
3 |
Safety and warning information . . . . . . . . . . . . . . . . . . . . . . . . . . . . . . . . . . . . . . . . . . . . . . . . . . . . . . . . . . . . |
3 |
Information concerning disposal . . . . . . . . . . . . . . . . . . . . . . . . . . . . . . . . . . . . . . . . . . . . . . . . . . . . . . . . . . . |
4 |
Installation instructions . . . . . . . . . . . . . . . . . . . . . . . . . . . . . . . . . . . . . . . . . . . . . . . . . . . . . . . . . . . . . . . . . . . |
4 |
Installing and connecting the appliance . . . . . . . . . . . . . . . . . . . . . . . . . . . . . . . . . . . . . . . . . . . . . . . . . . . . . |
5 |
Appliances and installation dimensions . . . . . . . . . . . . . . . . . . . . . . . . . . . . . . . . . . . . . . . . . . . . . . . . . . . . . |
6 |
Door opening angle . . . . . . . . . . . . . . . . . . . . . . . . . . . . . . . . . . . . . . . . . . . . . . . . . . . . . . . . . . . . . . . . . . . . . |
6 |
Unscrewing the appliance doors . . . . . . . . . . . . . . . . . . . . . . . . . . . . . . . . . . . . . . . . . . . . . . . . . . . . . . . . . . |
7 |
Unscrewing the handles . . . . . . . . . . . . . . . . . . . . . . . . . . . . . . . . . . . . . . . . . . . . . . . . . . . . . . . . . . . . . . . . . |
8 |
Getting to know your appliance . . . . . . . . . . . . . . . . . . . . . . . . . . . . . . . . . . . . . . . . . . . . . . . . . . . . . . . . . . . |
9 |
Control and display panel . . . . . . . . . . . . . . . . . . . . . . . . . . . . . . . . . . . . . . . . . . . . . . . . . . . . . . . . . . . . . . . . |
10 |
Switching on the appliance . . . . . . . . . . . . . . . . . . . . . . . . . . . . . . . . . . . . . . . . . . . . . . . . . . . . . . . . . . . . . . . |
11 |
Selecting the temperature . . . . . . . . . . . . . . . . . . . . . . . . . . . . . . . . . . . . . . . . . . . . . . . . . . . . . . . . . . . . . . . . |
11 |
Refrigerator compartment . . . . . . . . . . . . . . . . . . . . . . . . . . . . . . . . . . . . . . . . . . . . . . . . . . . . . . . . . . . . . . . . |
11 |
Freezer compartment . . . . . . . . . . . . . . . . . . . . . . . . . . . . . . . . . . . . . . . . . . . . . . . . . . . . . . . . . . . . . . . . . . . . |
11 |
Warning signal . . . . . . . . . . . . . . . . . . . . . . . . . . . . . . . . . . . . . . . . . . . . . . . . . . . . . . . . . . . . . . . . . . . . . . . . . |
11 |
Super cooling . . . . . . . . . . . . . . . . . . . . . . . . . . . . . . . . . . . . . . . . . . . . . . . . . . . . . . . . . . . . . . . . . . . . . . . . . . |
12 |
Super freezing . . . . . . . . . . . . . . . . . . . . . . . . . . . . . . . . . . . . . . . . . . . . . . . . . . . . . . . . . . . . . . . . . . . . . . . . . . |
12 |
Selecting the temperature unit . . . . . . . . . . . . . . . . . . . . . . . . . . . . . . . . . . . . . . . . . . . . . . . . . . . . . . . . . . . . |
12 |
Refrigerator compartment . . . . . . . . . . . . . . . . . . . . . . . . . . . . . . . . . . . . . . . . . . . . . . . . . . . . . . . . . . . . . . . . |
12 |
Vegetable compartment with humidity filter . . . . . . . . . . . . . . . . . . . . . . . . . . . . . . . . . . . . . . . . . . . . . . . . . . |
13 |
Usable capacity . . . . . . . . . . . . . . . . . . . . . . . . . . . . . . . . . . . . . . . . . . . . . . . . . . . . . . . . . . . . . . . . . . . . . . . . |
13 |
Re0arranging the interior . . . . . . . . . . . . . . . . . . . . . . . . . . . . . . . . . . . . . . . . . . . . . . . . . . . . . . . . . . . . . . . . . |
13 |
Freezer compartment . . . . . . . . . . . . . . . . . . . . . . . . . . . . . . . . . . . . . . . . . . . . . . . . . . . . . . . . . . . . . . . . . . . . |
13 |
Features of the freezer compartment . . . . . . . . . . . . . . . . . . . . . . . . . . . . . . . . . . . . . . . . . . . . . . . . . . . . . . . |
13 |
Freezing food . . . . . . . . . . . . . . . . . . . . . . . . . . . . . . . . . . . . . . . . . . . . . . . . . . . . . . . . . . . . . . . . . . . . . . . . . . |
13 |
Purchasing and storing deep0frozen food . . . . . . . . . . . . . . . . . . . . . . . . . . . . . . . . . . . . . . . . . . . . . . . . . . . |
14 |
Thawing frozen food . . . . . . . . . . . . . . . . . . . . . . . . . . . . . . . . . . . . . . . . . . . . . . . . . . . . . . . . . . . . . . . . . . . . . |
14 |
Ice and water dispenser . . . . . . . . . . . . . . . . . . . . . . . . . . . . . . . . . . . . . . . . . . . . . . . . . . . . . . . . . . . . . . . . . . |
14 |
Switching the ice and water dispenser off . . . . . . . . . . . . . . . . . . . . . . . . . . . . . . . . . . . . . . . . . . . . . . . . . . . |
15 |
Water filter . . . . . . . . . . . . . . . . . . . . . . . . . . . . . . . . . . . . . . . . . . . . . . . . . . . . . . . . . . . . . . . . . . . . . . . . . . . . . |
15 |
Specification and performance data sheet . . . . . . . . . . . . . . . . . . . . . . . . . . . . . . . . . . . . . . . . . . . . . . . . . . |
16 |
Tips for saving energy . . . . . . . . . . . . . . . . . . . . . . . . . . . . . . . . . . . . . . . . . . . . . . . . . . . . . . . . . . . . . . . . . . . |
17 |
Operating noises . . . . . . . . . . . . . . . . . . . . . . . . . . . . . . . . . . . . . . . . . . . . . . . . . . . . . . . . . . . . . . . . . . . . . . . . |
17 |
Defrosting . . . . . . . . . . . . . . . . . . . . . . . . . . . . . . . . . . . . . . . . . . . . . . . . . . . . . . . . . . . . . . . . . . . . . . . . . . . . . |
17 |
Switching off and disconnecting the appliance . . . . . . . . . . . . . . . . . . . . . . . . . . . . . . . . . . . . . . . . . . . . . . . |
17 |
Cleaning . . . . . . . . . . . . . . . . . . . . . . . . . . . . . . . . . . . . . . . . . . . . . . . . . . . . . . . . . . . . . . . . . . . . . . . . . . . . . . |
18 |
Light . . . . . . . . . . . . . . . . . . . . . . . . . . . . . . . . . . . . . . . . . . . . . . . . . . . . . . . . . . . . . . . . . . . . . . . . . . . . . . . . . . |
18 |
Changing over the bulbs for refrigerator and freezer compartments . . . . . . . . . . . . . . . . . . . . . . . . . . . . . . |
18 |
Eliminating minor faults yourself . . . . . . . . . . . . . . . . . . . . . . . . . . . . . . . . . . . . . . . . . . . . . . . . . . . . . . . . . . . |
19 |
Appliance self0test . . . . . . . . . . . . . . . . . . . . . . . . . . . . . . . . . . . . . . . . . . . . . . . . . . . . . . . . . . . . . . . . . . . . . . |
21 |
Customer service . . . . . . . . . . . . . . . . . . . . . . . . . . . . . . . . . . . . . . . . . . . . . . . . . . . . . . . . . . . . . . . . . . . . . . . |
21 |

Congratulations
With the purchase of your new fridge0freezer you have opted for a modern, high0quality domestic appliance.
Your fridge0freezer is distinguished by its economical energy consumption.
Each appliance which leaves our factory is inspected thoroughly to ensure that it functions properly and is in perfect condition.
If you have any questions : particularly concerning installation and connection of the appliance : please do not hesitate to contact our customer service.
Further information and a selection of our products can be found on our home page.
Safety and warning information
Before you switch on the appliance
Please read the operating and installation instructions carefully. They contain important information on how to install, use and maintain the appliance.
Keep all documentation for subsequent use or for the next owner.
Technical safety
!Warning
SThis appliance contains a small quantity of environmentally0friendly but flammable R600a refrigerant. Ensure that the tubing of the refrigerant circuit is not damaged during transportation and installation. Leaking refrigerant may cause eye injuries or ignite.
If damage has occurred
-Keep naked flames and/or ignition sources away from the appliance.
-Switch off the appliance and pull out the mains plug.
-Thoroughly ventilate the room for several minutes.
-Notify customer service.
The more refrigerant an appliance contains, the larger the room must be. Leaking refrigerant can form
a flammable gas0air mixture in rooms which are too small.
The room must be at least 1 m3 per 8 g of refrigerant. The amount of refrigerant in your appliance is indicated on the rating plate inside the appliance.
SOnly customer service may change the power cord and carry out any other repairs. Improper installations and repairs may put the user at considerable risk.
SOnly original parts supplied by the manufacturer may be used. The manufacturer guarantees that only these parts satisfy the safety requirements.
en
Importantinformation when using the appliance
SNever use electrical appliances inside the appliance (e.g. heater, electric ice maker, etc.).
Risk of explosion!
SNever use a steam cleaner to defrost or clean the appliance! Steam may come into contact with electrical components and cause a short0 circuit or an electric shock.
SDo not store products which contain flammable propellants (e. g. spray cans) or explosive substances in the appliance.
Risk of explosion!
SDo not stand or support yourself on the base, drawers or doors, etc.
STo clean the appliance, pull out the mains plug or switch off the fuse! Do not pull out the mains plug by tugging the cable.
SBottles which contain a high percentage of alcohol must be sealed and stored in an upright position.
SKeep plastic parts and the door seal free of oil and grease. Otherwise, parts and door seal will become porous.
SNever cover or block the ventilation openings for the appliance.
SPeople who have limited physical, sensory or mental abilities or inadequate knowledge must not use this appliance unless they are supervised or given meticulous instructions.
SDo not store bottled or canned drinks (especially carbonated drinks) in the freezer compartment. Bottles and cans may explode!
SDo not put an ice lolly or ice cube directly from the freezer compartment into your mouth.
Risk of burns from very low temperatures!
SNever touch frozen food with wet hands. Your hands could freeze to the food.
Risk of injury!
3
en
Children in the household
SDo not allow children to play with the appliance!
SIf the appliance features a lock, keep the key out of the reach of children.
General regulations
The appliance is suitable
Sfor refrigerating food,
Sfor freezing food,
Sfor making ice,
Sfor dispensing drinking water.
The appliance is intended for domestic use only.
The appliance is suppressed according to EU Directive 89/336/EEC.
The refrigeration circuit has been checked for leaks.
Information concerning disposal
x Disposal of packaging
The packaging protects your appliance from damage during transit. All utilised materials are environmentally safe and recyclable. Please help us by disposing of the packaging in an environmentally friendly manner.
Please ask your dealer or inquire at your local authority about current means of disposal.
!Warning
Keep children away from packaging and its parts. Danger of suffocation from collapsible boxes and foil!
Old appliances are not worthless rubbish! Valuable raw materials can be reclaimed by recycling old appliances.
This appliance has been identified in accordance with the European directive 2002/96/EG on Waste Electrical and Electronic Equipment - WEEE.
The directive specifies the frame0 work for an EU0wide valid return and recycling of old appliances.
!Warning
Redundant appliances
1.Pull out the mains plug.
2.Cut off the power cord and discard with the mains plug.
Refrigerators contain refrigerants and the insulation contains gases. Refrigerant and gases must be
disposed of professionally. Ensure that tubing of the refrigerant circuit is not damaged prior to proper disposal.
Installation instructions
Transporting
The appliances are heavy and must be secured during transportation and installation.
Because of the weight/dimensions of the appliance and to minimise the risk of injuries and damage to the appliance at least two persons are necessary
to set0up the appliance securely.
Installation location
Install the appliance in a dry, well ventilated room. The installation location should neither be exposed to direct sunlight nor near a heat source, e.g.
a cooker, radiator, etc. If installation next to a heat source is unavoidable, use a suitable insulating plate or observe the following minimum distances to a heat source:
-3 cm to electric or gas cookers.
-30 cm to an oil or solid0fuel cooker.
If installing the appliance next to another refrigerator or freezer, there must be
a minimum gap of 25 mm between the appliances in order to prevent condensation.
If a panel or cupboard is installed above the appliance, ensure that a gap of
30 mm is left so that the appliance can be pulled out of the recess if required.
The air heated on the rear side of the appliance must be allowed to escape unhindered.
Subsurface
Attention!
The appliance is very heavy. Refer to the following appliance weight table (empty weight):
Model with dispenser |
143 kg |
The floor of the installation location must not give way; if required, reinforce floor.
To ensure that the doors can open all the way, observe lateral minimum
distances when installing the appliance in a corner or recess (see chapter •Appliance and installation dimensions").
If the depth of the adjacent kitchen equipment is more than 60 cm, observe lateral minimum distances in order to utilise the full door opening angle (see chapter •Door opening angle").
4
Observe ambient temperature and ventilation
Ambient temperature
The climatic class can be found on the rating plate. It states the room
temperature within which the appliance can be operated. The rating plate is located in the refrigerator compartment at the bottom right side.
Climatic class |
|
Permitted ambient |
|
|
temperature |
|
|
|
SN |
|
+10 °C to 32 °C |
|
|
|
N |
|
+16 °C to 32 °C |
|
|
|
ST |
|
+16 °C to 38 °C |
|
|
|
T |
|
+16 °C to 43 °C |
|
|
|
Ventilation
Never cover the ventilation openings on the rear of the appliance.
Otherwise the refrigerating unit must work harder, increasing the power consumption.
Place the enclosed spacers in the designated holders on the back of the appliance. This ensures that there is a minimum distance between the appliance and the wall.
Installing
and connecting the appliance
SHave a technician install and connect the appliance according to the enclosed installation instructions.
SAfter installing the appliance, wait at least 1 hour until the appliance starts up. During transportation the oil in the compressor may have flowed into the refrigeration system.
SBefore switching on the appliance for the first time, clean the interior of the appliance (see chapter •Cleaning the appliance").
SAlways connect the water before the power.
SApart from statutory national regulations, you should stick to the connection terms relating to the local electricity and water companies.
SDo not remove the transportation protection devices from the shelves and storage compartments until the appliance has been installed.
Water Connection
! Warning
Connect appliance to the drinking water supply only!
Loaded or polluted water may damage your health.
The water may be connected only by a competent fitter according to the local regulations of the appropriate water supply company.
Connect the appliance to a cold water line:
-Minimum pressure: 0.17 Mpa (1.7 bar)
-Maximum pressure: up to 1 MPa (10 bar)
Taste and odour of the water may
be improved by installing the enclosed water filter. In this case observe the different connection conditions
(see chapter •Water filter").
Note
The maximum outside diameter of the water mains (without connecting pieces) is 10 mm.
en
Electrical connection
Do not use extension cables or distributors. This appliance must be connected to a permanently installed socket.
The plug to secure the appliance must be freely accessible. Connect
the appliance to a 220-240 V/50 Hz ac current via a plug which has been properly installed. The socket must be fused with a 10 to 16 A fuse or higher.
If the appliance is to be operated in a non0European country, check on the rating plate whether the indicated voltage and current type correspond to the values of your mains supply.
The rating plate is situated in the bottom right0hand side of the appliance.
The mains connection cable may be replaced by an electrician only.
! Warning!
Never connect the appliance to electronic energy saver plugs
(e. g. Ecoboy: Sava Plug) or to power inverters which convert the direct current to 230 V alternating current (e. g. solar equipment, power supplies on ships).
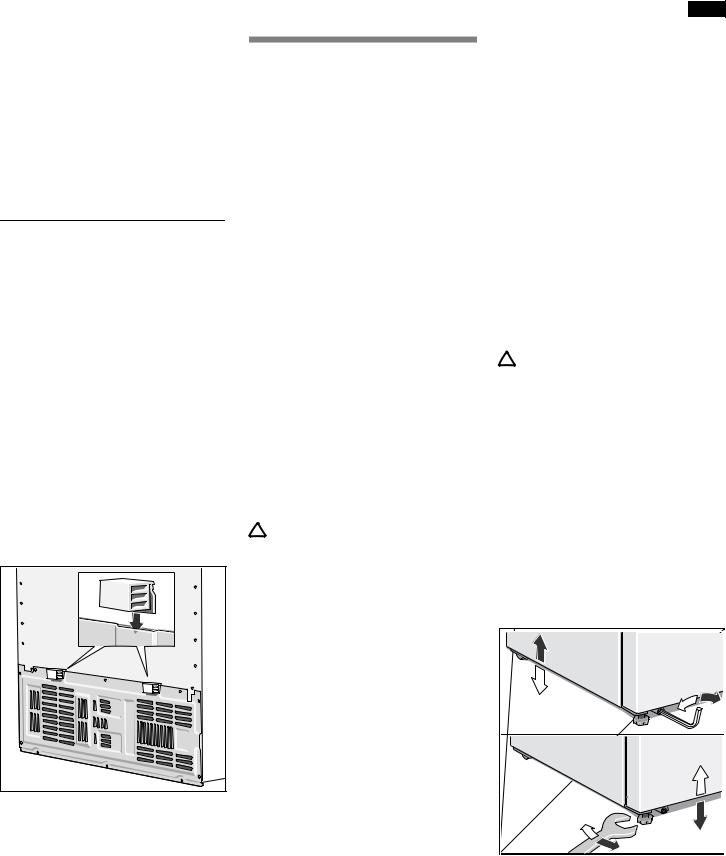
Aligning the appliance
To ensure that the appliance functions correctly, it must be set level with
a spirit level.
If the appliance is not level, water may flow out of the ice maker, ice cubes may be irregular or the doors may not close properly.
SPlace the appliance in the designated location.
SAlign front feet with a hexagon wrench.
SAlign front feet with an allen key.
5

en
Appliances and installation dimensions
Door opening angle
6

Unscrewing
the appliance doors
If the appliance will not fit through the house door, the appliance doors can be unscrewed.
We recommend that installation
is carried out by our customer service.
Attention!
Before you unscrew the positioning aids from the appliance door:
1.Cut off the water supply to the appliance.
2.Switch off the appliance.
3.Pull out the mains plug or switch off the fuse.
Unscrewing the freezer compartment door
en
Attaching the appliance door
Attention!
Before installing the doors in reverse sequence, ensure that the appliance is level in the installation location.
Furthermore, ensure that the water hose is pushed 18 mm into the connecting piece.
Unscrewing the refrigerator compartment door
Unscrew refrigerator compartment door in the same way (the refrigerator compartment door does not have any electrical plug$and$socket connections or a water connection).
7
 Loading...