


5005 / IM2 / A30054-M6522-A801-2-UR19 / overview.fm / 19.12.2005
EN / FR / PL / HU
Euroset 5005
1
8 |
|
|
|
|
|
2 |
|
|
|
|
|
||
7 |
|
|
|
|
|
3 |
|
|
|
|
|
||
|
|
|
|
|
6
5
4
1 |
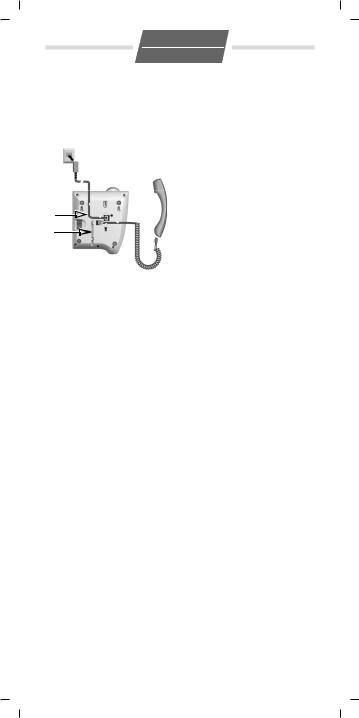
Repertory keys |
1 |
Klawisze prostego |
|
2 |
Recall key |
|
wybierania |
|
3 |
Redial key |
2 |
Klawisz oddzwaniania |
|
4 |
Handset volume control |
3 |
Klawisz ustawiania |
|
|
key |
4 |
Klawisz regulacji głośności |
|
5 |
Pause key |
|
słuchawki |
|
6 |
Speed dial key |
5 |
Klawisz pauzy |
|
7 |
Set key |
6 |
Klawisz szybkiego |
|
8 |
Mute key |
|
wybierania |
|
1 |
Touches d'accès rapide |
7 |
Klawisz ponownego |
|
|
wybierania |
|||
2 |
Touche de double appel |
|
||
8 |
Klawisz wyciszania |
|||
3 |
Touche bis |
|||
|
|
|||
4 |
Touche de réglage du vo- |
1 |
Célhívás gomb |
|
|
lume |
2 |
Megbeszélés gomb |
|
5 |
Touche de pause |
3 |
Újrahívás gomb |
|
6 |
Touche de numérotation |
4 |
Hangos/Halk gomb |
|
|
abrégée |
5 |
Szünet gomb |
|
7 |
Touche Enregistrer |
6 |
Gyorshívás gomb |
|
8 |
Touche de désactivation |
7 |
Mentés gomb |
|
|
du haut-parleur (Mute) |
8 |
Némítás gomb (mute) |
5005 / IM2 / A30054-M6522-A801-2-UR19 / overview.fm / 19.12.2005
EN / FR / PL / HU
Connections
Raccordement
Połączenia
Csatlakozók
1
2
1Table top operation
2Wall mounting
1Pour utilisation sur bureau
2Pour montage mural
1W razie ustawienia na biurku
2Montaż na ścianie
1asztali üzemeltetés
2falra szerelés
5005 / IM2 en-fr-pl-hu / A30054-M6522-A801-2-UR19 / 5005.fm / 13.12.2005
1
EN
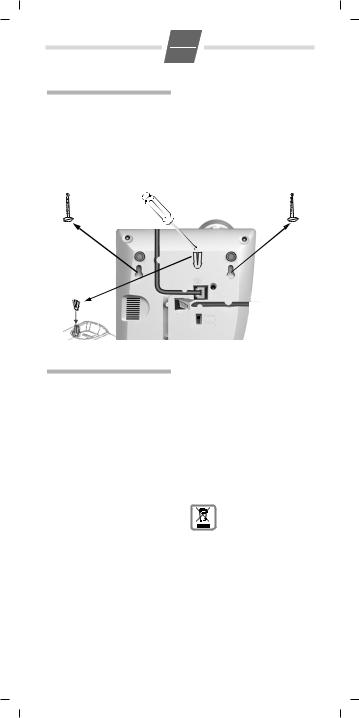
Wall mounting
(see figure)
Once the connecting leads have been connected, you can mount the telephone on the wall:
Drill two dowel holes
(5 mm ) 110mm apart, insert dowels and screw in
Safety precautions
When installing, connecting and operating the telephone, always observe the following precautions:
Only use the jacks and leads supplied.
Only connect the connecting lead to the intended socket.
Only connect approved accessories.
Lay the connecting lead where it will not cause accidents.
Position the telephone on a non-slip surface.
For your safety and protection, the telephone may not be used in the bath or shower rooms (wet locations). The telephone is not splash proof.
Never expose the telephone to sources of heat, direct sunlight or other electrical devices.
countersunk head wood screws with a slight gap to the wall.
On underside of telephone: Lift out handset bracket with screwdriver.
Clip handset bracket into handset shell mounting.
Hang telephone on projecting screw heads.
Protect your telephone from moisture, dust, corrosive liquids and vapours.
Never open up the telephone yourself.
Do not touch the plug contact with pointed or metallic objects.
Do not carry the telephone by the leads.
If you give your telephone to someone else, make sure you also give them
the operating manual.
All electrical and elec-
tronic products should
be disposed of separately from the munici-
pal waste stream via designated collection facilities appointed by the government or the local authorities.
This crossed-out wheeled bin symbol on the product means the product is covered by the European Directive 2002/96/EC. The correct disposal and separate collection of your old appliance will help prevent potential negative consequences for the environment and human health. It is a precondition for reuse and

5005 / IM2 en-fr-pl-hu / A30054-M6522-A801-2-UR19 / 5005.fm / 13.12.2005
2
EN
recycling of used electrical and electronic equipment.
For more detailed information about disposal of your old appliance, please contact your city office, waste disposal service or the shop where you purchased the product.
Setting up the telephone for use
Recommended installation of telephone
Do not expose the telephone to direct sunlight or other sources of heat.
Operate at temperatures of between +5°C and +40°C.
Maintain a distance of at least one metre between the telephone and radio equipment, e.g. radio telephones, radio paging equipment or TV sets. Otherwise, telephone communication could be impaired.
Do not install the telephone in dusty rooms as this can limit the service life of the telephone.
Furniture lacquer and polish can be adversely affected by contact with parts of the unit (e.g. feet).
Dialling and saving numbers
Dialling a number
co Lift handset, dial number.
Last number redial
The last number dialled is automatically saved. c; Lift handset, press
last number redial key.
Repertory and speed dial
You can save 4 numbers (max. 21 digits) as repertory numbers on the 4 repertory keys :and 10 numbers as speed dial numbers on the number keys (max. 21 digits).
Saving (or saving with notebook function)
c? Lift handset, (or with notebook function: during a call) press Set key.
either ... |
As repertory |
: |
Press repertory |
|
key; |
or ... |
As speed dial |
D0...9
Press speed dial key and speed dial number (number key);
o Enter number for repertory or speed dial.
?a Press Set key, (or after the call:) replace handset.
Dialling a repertory number
c:Lift handset, press repertory key.
You can also dial any additional digits.
Dialling a speed dial number
cD Lift handset, press speed dial key.
0...9 Press speed dial number (number key).
Notes on saving and deleting repertory and speed dial numbers
*and #are saved regardless of the set dialling mode but are only dialled with DTMF dialling.
The following steps delete numbers saved to the repertory or speed dial keys:
The number entered is longer than 21 digits
Saving a number will delete the previous content of the memory
5005 / IM2 en-fr-pl-hu / A30054-M6522-A801-2-UR19 / 5005.fm / 13.12.2005
3
EN
Dialling pauses
One or more dialling pauses (not at 1st digit) can be entered using <. Pauses are transferred to the memory and are necessary for certain extension systems (e.g.:
0 <2368).
Dialling a dialling pause within the first 5 digits: The entire number saved is dialled, including the 2-second dialling pause.
Dialling a dialling pause after the first 5 digits: The portion of the number saved after the pause is
only dialled after pressing the <key.
Adjusting the telephone
Setting the handset volume
The handset volume can be set to 2 levels.
EPress Handset volume control key.
Mute
You can deactivate the telephone's microphone. During a call:
J Press mute key.
To reactivate microphone: Press the mute key again.
Setting the ringer
You can set the ringer frequency and volume to 9 levels
(factory default: level 6) or
turn it off.
c?
#
0...9
?
Operation on a PABX
Special functions/Recall key
During an external call, you can make an enquiry or forward the call. To do this, press the recall key >. The subsequent procedure depends on your PABX.
By default, the recall key is set to flash time 1 (pulse/tone switch in "Tone 1" position). For connection to a PABX, it may be necessary to change the flash time (e.g. pulse/tone switch to "Tone 2"). To do this, please refer to the operating instructions for your PABX.
Changing the dialling mode
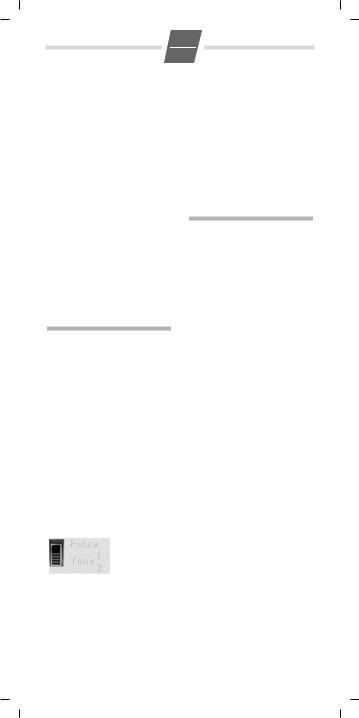
By default, your telephone is set to tone dialling mode (Tone 1). Depending on the dialling mode of your PABX, you may need to set the telephone to pulse dialling (DP). Slide switch on underside of unit:
|
Pulse: |
Pulse dialling mode (DP) |
|
||
|
Tone 1: |
Tone dialling mode, flash time |
|
|
100 ms |
|
Tone 2: |
Tone dialling mode, flash time |
|
||
|
|
280 ms |
Temporary DTMF switching in "Pulse" position
To use functions that require DTMF (e.g. remote control of answering machine), you can set the telephone to DTMF for
the duration of the call without adjusting the switch. After the connection is established:
* Press the star key.
After the connection is broken, the setting reverts to DP.

5005 / IM2 en-fr-pl-hu / A30054-M6522-A801-2-UR19 / 5005.fm / 13.12.2005
4
EN
Operation on public telephone systems
Public telephone systems - in some cases by special order/ request – offer you a range of useful additional services (e.g. call divert, call back on busy, three-party conference etc.). These services can be selected using specified key combinations, which your network provider will notify you of.
You can save the entire key combination, including the number of a fixed call divert destination, to your repertory or speed dial keys just like a normal number.
If your telephone is not working perfectly
Lift handset, no dialling tone: Is the connecting lead correctly plugged into the telephone and the telephone socket?
Dialling tone audible but telephone will not dial: The connection is OK. Is the dialling mode set correctly?
The other party cannot hear you: Mute activated?
Regular pulse noises can be heard during a call: The connection is receiving metering pulses from the exchange, which the telephone cannot interpret. Contact your network operator.
Recall key
In public telephone systems, the recall key is required to use certain additional services; e.g. for "Call back on busy". By default, your telephone is set to tone dialling with a flash time of 100 ms (Tone 1). You may need to adjust the flash time using the slide switch on the underside of the telephone.
Appendix
Care
To clean, wipe with a moist or antistatic cloth only, never with a dry cloth (risk of electrostatic charging and discharge) or strong cleaning agent.
Insert strips
Blank insert strips for the repertory keys can be found on the Internet at http://www.siemens.com/euroset.
Contacts
If you should encounter any problems when operating the telephone connected to a communication system with analogue network access, please contact the network operator responsible or your dealer.
Authorisation
The telephone you have purchased is designed for operation in your country, as marked on the packaging and on the unit.
The CE mark attests to the phone's compliance with the essential requirements of the R&TTE directive.
5005 / IM2 en-fr-pl-hu / A30054-M6522-A801-2-UR19 / 5005.fm / 13.12.2005
1
FR
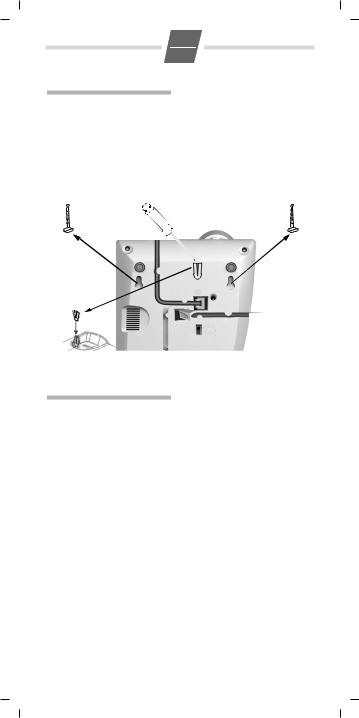
Montage mural
(voir schéma)
Une fois les cordons de raccordement enfichés, vous pouvez fixer le téléphone au mur :
Percer deux trous pour chevilles (5 mm ) espacés de 110 mm, y enfoncer les chevilles et visser les vis à tête conique sans
Consignes de sécurité
Au cours de l'installation, du raccordement et pendant l'utilisation du téléphone, respectez absolument les consignes suivantes :
Utiliser uniquement les fiches et cordons livrés avec l'appareil.
Enficher le cordon de raccordement uniquement dans la prise/douille prévue à cet effet.
Ne jamais raccorder d'accessoire non autorisé.
Disposer le cordon de raccordement de façon à éviter tout risque d'accident.
Placer le téléphone à un endroit où il ne risque pas de glisser.
Pour des raisons de sécurité, le téléphone ne doit pas être utilisé dans un lieu humide (par ex. salle de bain, etc.). Il n'est pas
les enfoncer complètement.
Sous le téléphone : détacher la fixation combiné à l'aide d'un tournevis.
Encliqueter la fixation combiné dans la fente du logement de combiné prévue à cet effet.
Suspendre le téléphone aux vis fixées au mur.
étanche aux projections d'eau.
Ne jamais exposer le téléphone à des sources de chaleur telles que les rayons directs du soleil ou le rayonnement d'appareils électriques.
Protéger le téléphone contre l'humidité, la poussière et les vapeurs et liquides corrosifs.
Ne jamais ouvrir le téléphone sans les conseils d'un spécialiste.
Ne jamais toucher les contacts à fiche avec des objets métalliques et pointus.
Ne jamais porter le téléphone par les cordons.
Lorsque vous confiez votre téléphone à un tiers, joignez-y toujours le mode d'emploi.
 Loading...