


euroset 3020

s
euroset 3020
User Manual
Instrucciones de Manejo

Contents
Telephone characteristics.......................3
Learning to use your telephone............. 3
Installation ................................................ 3
Battery / Power suppl y installation....... 3
Handset cord........................................ 4
Line cord .............................................. 4
Recommendation for Installation ........... 4
Configuration............................................ 5
Display bright ....................................... 5
Backlight............................................... 5
Setting the time ....................................5
Setting the date .................................... 6
Setting the ringer volume..................... 6
Setting the melody ............................... 6
Setting the dialing mode (tone/pulse).. 6
Setting the reception volume ...............7
Area code for long distance call .......... 7
Operator code ......................................7
Mailbox................................................. 8
Other configurations ............................ 8
Receiving calls ......................................... 8
Dialing call numbers ................................9
Using the numeric keypad to make a
call........................................................ 9
Using the memories to make a call ..... 9
Using the List of Received Calls to
make a call ........................................... 9
Using the List of Outgoing Calls to
make a call ........................................... 9
Using the REDIAL key to make a
call........................................................ 9
MUTE key ........................................... 10
Activating/deactivating the MUTE
music.................................................. 10
PAUSE key .........................................10
FLASH Key (special services).......... 10
Memories................................................. 10
Storing phone number in the
memories ........................................... 10
Call Identification ................................... 11
Receiving a call .................................. 11
Indication of received calls................. 11
Consultation of received calls ............ 11
Erasing the received calls.................. 12
Consultation of outgoing calls............ 12
Erasing the outgoing calls ................. 12
Password ................................................ 12
Changing the password..................... 13
Key Lock ................................................. 13
Locking or unlocking the telephone... 13
Temporary unlocking the telephone .. 14
Baby Call................................................. 14
Activating the Baby Call function ....... 14
Deactivating the Baby Call function... 14
Function keys for special services ...... 14
Follow-me .......................................... 15
Call Waiting........................................ 15
Consultation....................................... 15
Conference ........................................ 15
Mailbox............................................... 15
Alarm ....................................................... 15
Programming the alarm ..................... 16
Deactivating the alarm ....................... 16
Quick Reference Guide.…….………….. 17
1
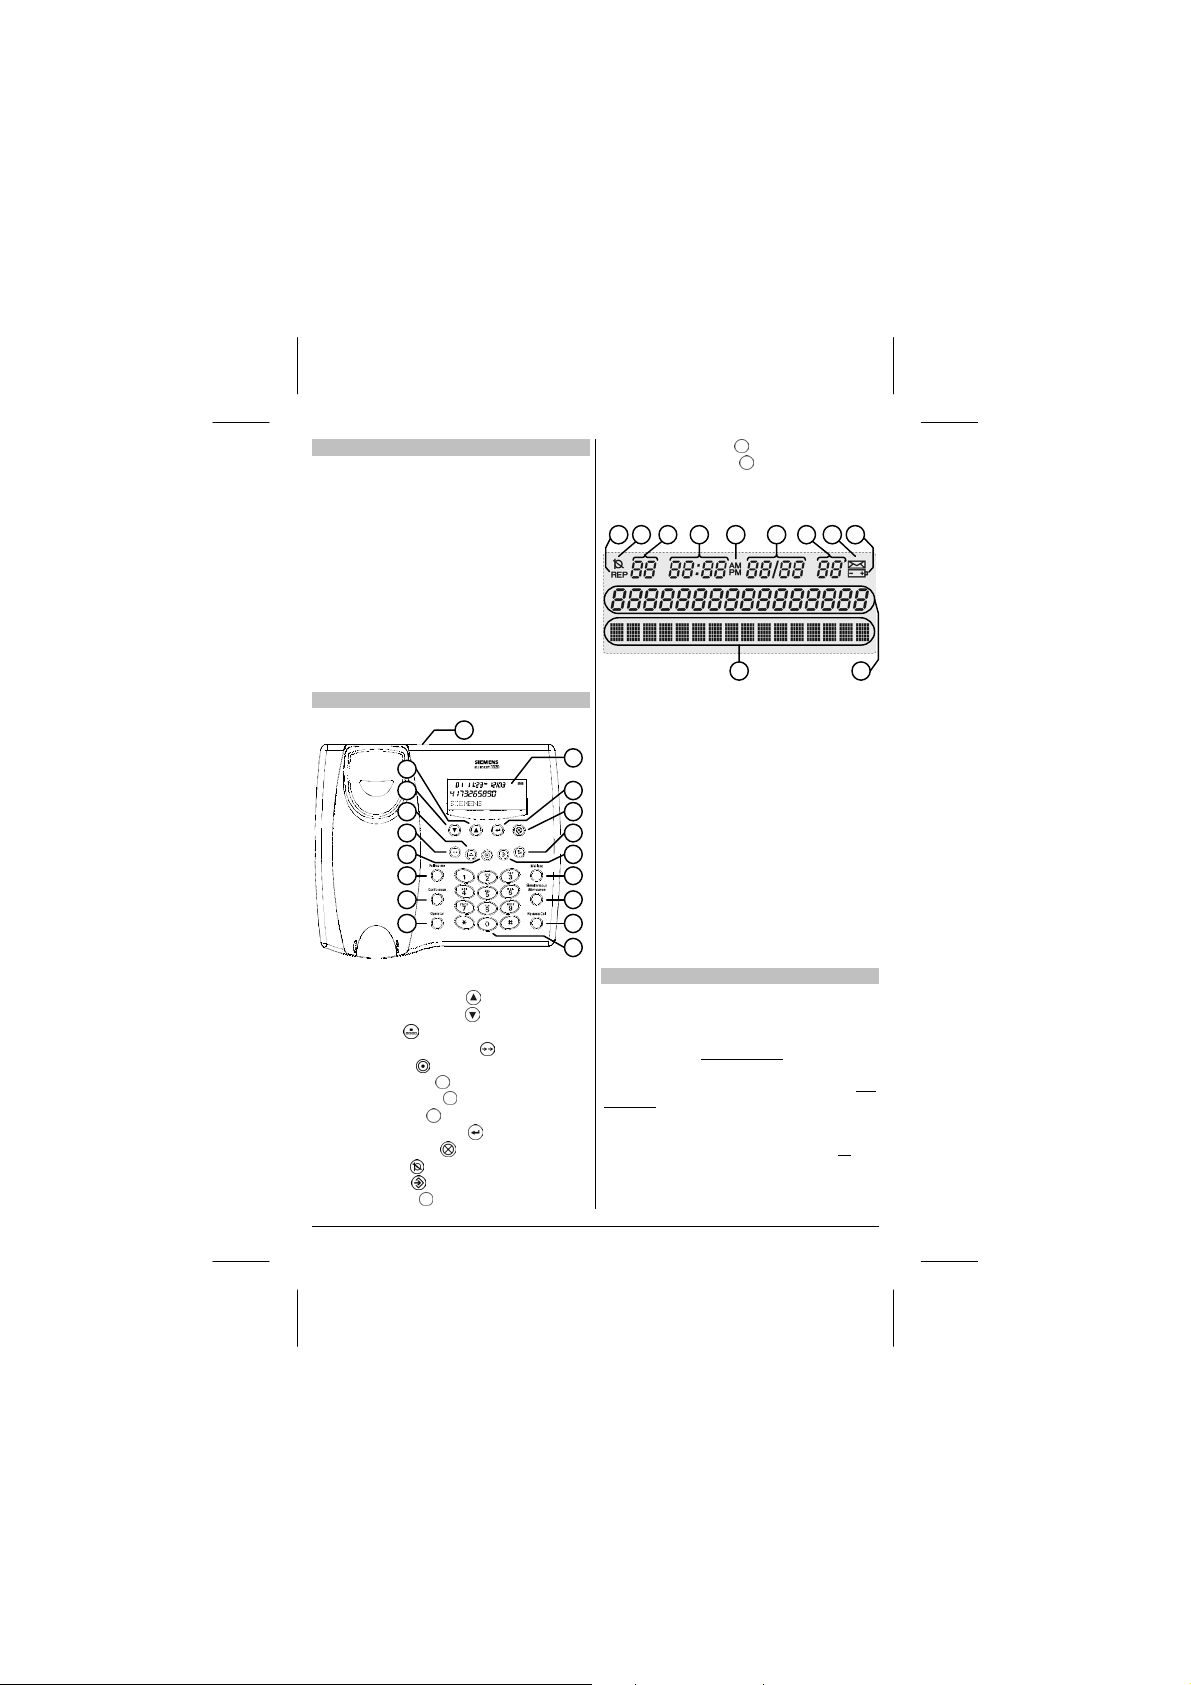
Telephone characteristics
y
This telephone has the following
characteristics:
• Telephone with FSK caller identification
• Telephone with intelligent keys (activates
special services in digital central offices)
• Ring with 3 volumes and 3 melodies
• List of received calls for 99 numbers
• List of originated calls for 99 numbers
• Telephone with 12 memories
• Display illumination (backlight)
Learning to use your telephone
1) Display
2) ARROW key above
3) ARROW key below
4) MEM key
5) REDIAL / PAUSE key
6) FLASH key
7) Follow-me key
8) Conference key
9) Operator key
10) DIAL / SELECT key
11) DEL / EXIT key
12) MUTE key
13) MENU key
14) Mailbox key
18
2
3
4
5
6
7
8
9
1
10
11
12
13
14
15
16
17
(*)
(*)
(*)
3
15) Call Waiting key
16) Release Call key
17) Numeric keypad
(*)
(*)
18) Input for the external power supply
20 2619 27
19) Repeated calls indicator
20) Indicator symbol of MUTE activated
21) Received calls counter
22) Time
23) AM and PM indicator
24) Date
25) Connection time in minutes
26) Indicator symbol of Mailbox
messages
(*)
2521 22 23 24
2829
27) Low battery indicator symbol
28) Field for numeric digits
29) Field for alpha-numeric characters
(*)
depends on the availability of the service b
your local operator
Installation
Battery / Power supply installation
This telephone requires 4 AA type batteries
- small size (not included
supply of 9 Vdc - 200 mA with positive in
the central pin of the connector (not
included).
Do not use the two possibilities at the same
time, because there is risk of damage for
the batteries. Only use the batteries or
) or a power
the
power supply to supply the telephone. If
you are using the power suppl y and a
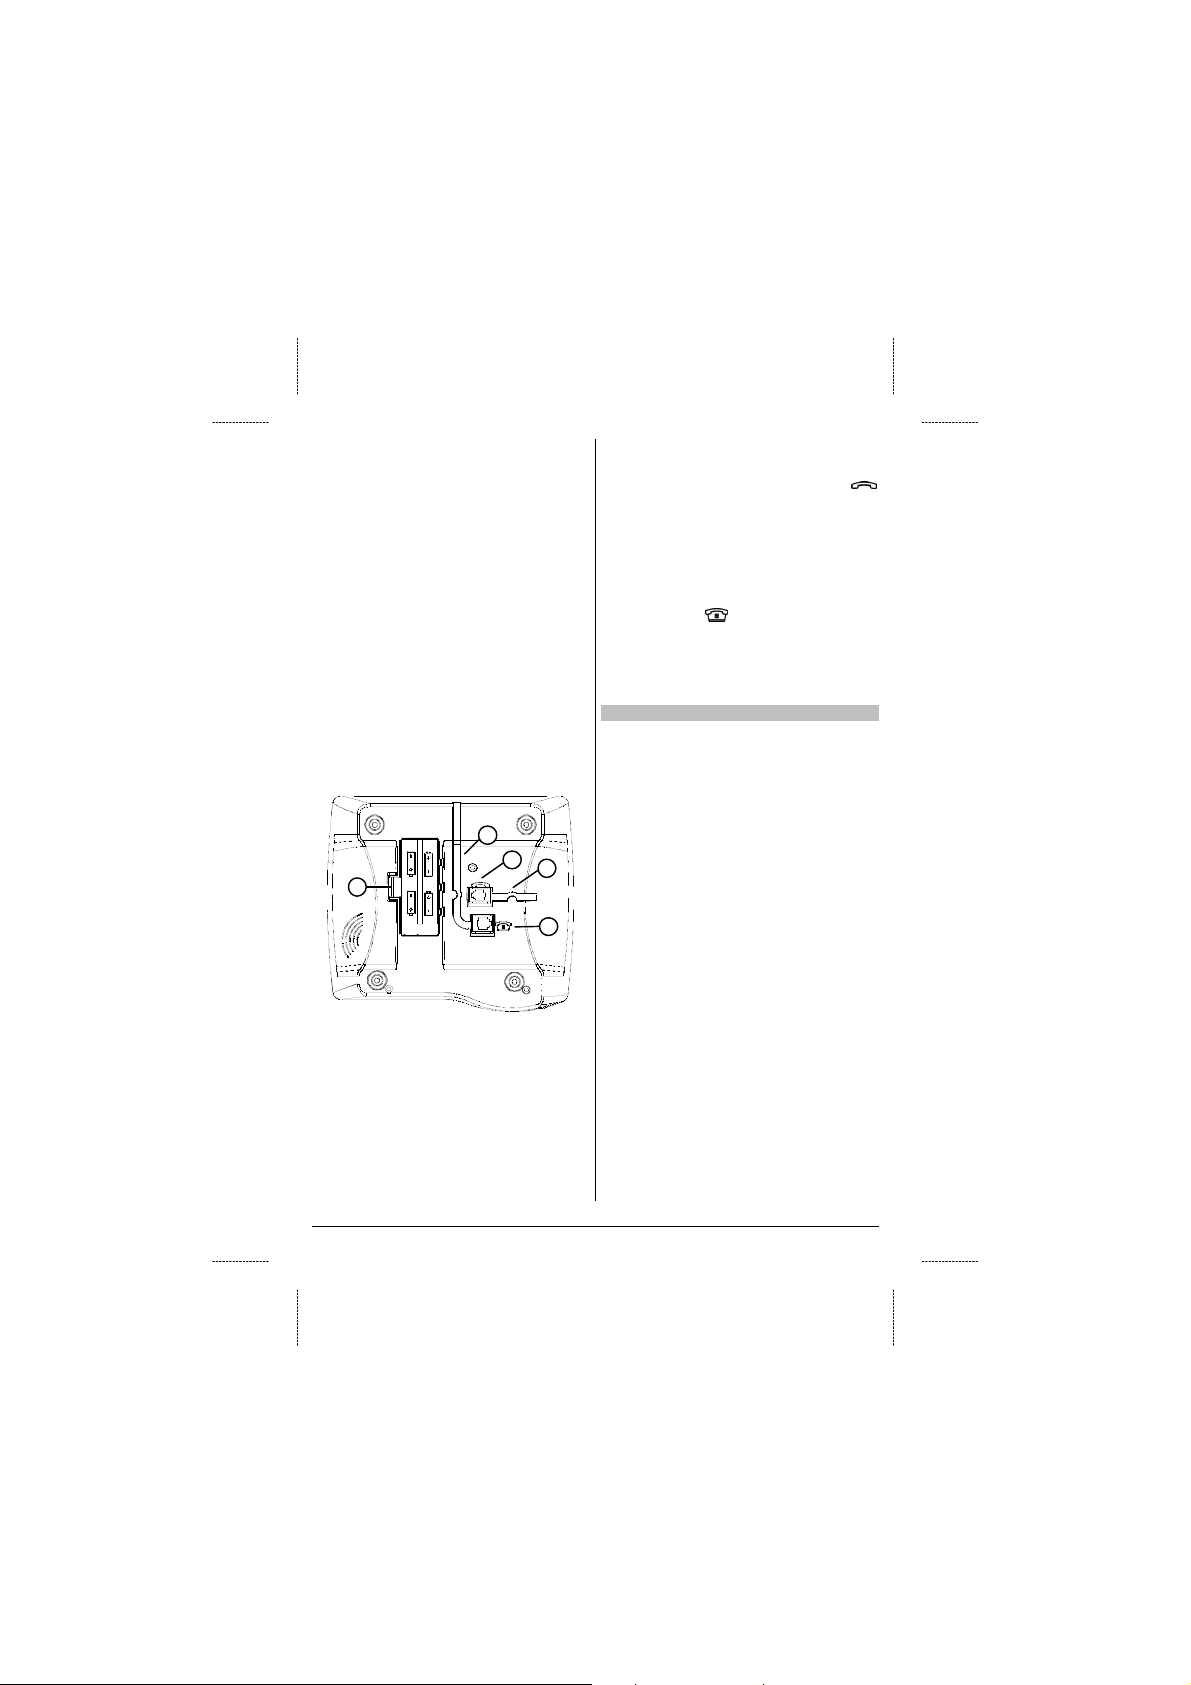
power fault occurs, the telephone will not
be supplied by the power supply.
To install or replace the batteries, follow the
steps below:
• disconnect the equipment from the
telephone line.
• open the battery compartment (position
30).
• install four new batteries, taking care to
observe the correct position (polarity
indicated by the drawing inside the
compartment).
When the batteries are low, needing to be
changed, the display will show the low
battery indicator s ymbol (position 27 on
page 3).
To install the power supply, just connect it
to the telephone (position 18 on page 3)
and to the electric energy network plug.
34
31
30
Note:
• The telephone operates without batteries
or without a power supply to carry out
calls, but the call identification will not
work and the display can switch off.
• When a power supply is used with the
telephone, it is recommended to use the
C39280-Z4-C508 Siemens power supply.
32
33
Handset cord
Connect the long end of the handset cord in
the socket marked with the symbol
(position 31). Insert the cord in the cable
line (position 32) and attach the short end
to the handset.
Line cord
Connect the line cord in the socket marked
with the symbol
(position 33). Insert the
cord in the cable line (position 34). Attach
the other end to the telephone line (RJ11
modular Jack connector).
Recommendation for Installation
Please, observe the following guidelines:
• For your own safety and protection, do
not uses the telephone in places with
overheat or extreme humidity. The
telephone operates at temperatures
between +5ºC and +55ºC and it is not
water-proof.
• Varnished or lacquered furniture may be
marked by some parts of the telephone
such as the rubber feet.
• Place the telephone at least one meter
away from devices such as cordless
telephones or TV sets. These devices
may cause interference in the telephone.
• To clean the telephone, just use a damp
or antistatic cloth. Never use a dry cloth
(danger of electrostatic discharge) or any
abrasive cleaning products.
• When the telephone reaches its end of
service life, dispose of it in a way that
does not cause any harm to the
environment, in accordance with the local
legal requirements.
• Please, dispose of used batteries in
accordance with requirements of
environment protection.
4
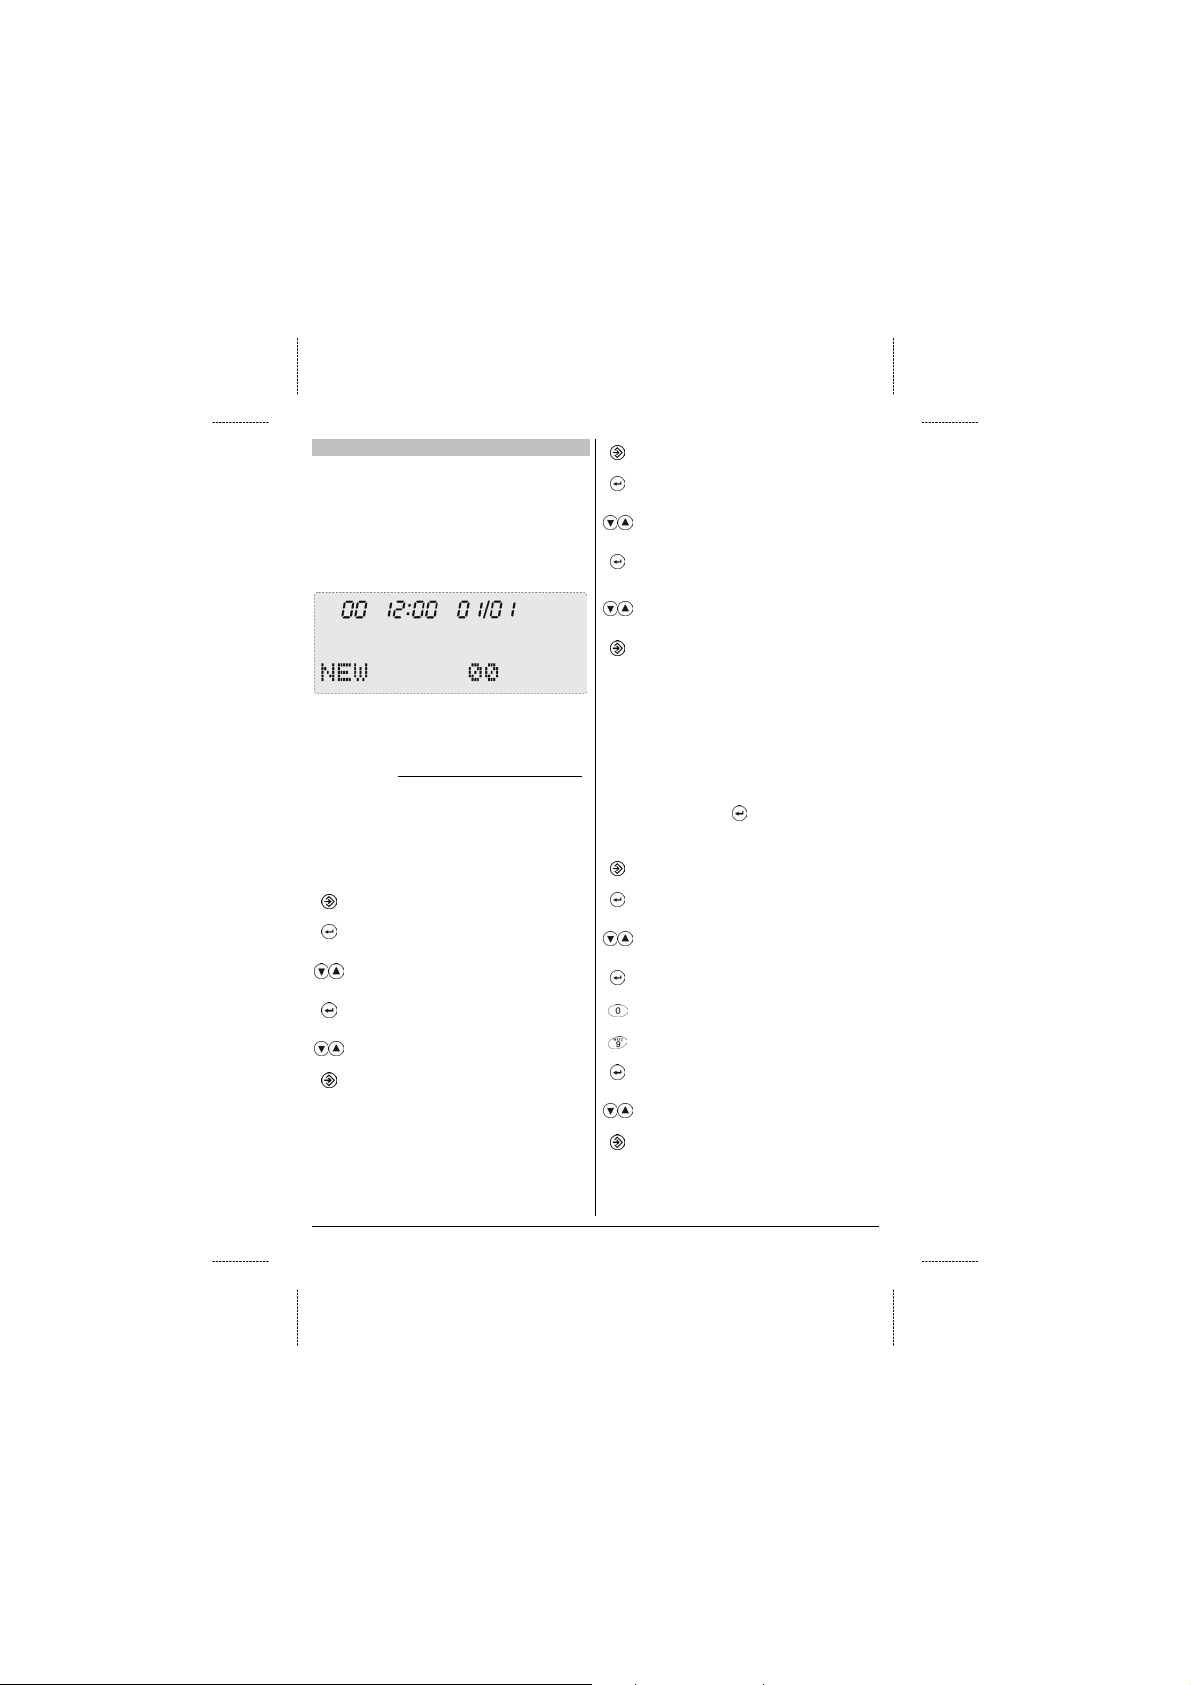
Configuration
(
Once connected to the line, the telephone
will be ready to make and receive calls. In
this initial situation, the display will show
information shown in the figure below,
where NEW 00 is the number of non
answered calls:
In the next items, it will be shown the
description of the possible configurations
made by the telephone menu. To make the
adjustments, the handset must be on hook.
Display bright
To adjust the display bright, proceed in the
following way:
Press the MENU key
Select the CONFIGURATION option
by using the DIAL/SELECT key
Select the Y option by using the
ARROW key
Select the BRIGHT option by using
the DIAL/SELECT key
Select the desired option
using the ARROW key
Press the MENU key
1, 2 or 3) by
Backlight
To activate or deactivate the backlight of
the display, proceed in the following way:
Press the MENU key
Select the CONFIGURATION option
by using the DIAL/SELECT key
Select the Y option by using the
ARROW key
Select the BACKLIGHT option by
using the DIAL/SELECT key
Select the desired option (Y or N) by
using the ARROW key, to activate or
deactivate the backlight
Press the MENU key
Setting the time
To adjust the time of the telephone it is
necessary to access two options of the
CONFIGURATION menu: time adjustment
and visualization format (24h or AM/PM). If
any of these items are already correct, you
can go to the next step by pressing the
DIAL/SELECT key
adjustment procedure:
Press the MENU key
Select the CONFIGURATION option
by using the DIAL/SELECT key
Select the Y option by using the
ARROW key
Select the ENTER TIME option by
using the DIAL/SELECT key
Enter the time with four digits in the
24h format (example: 13:57h - enter
:
1357 digits)
Press the DIAL/SELECT key, until
appears the FORMAT option
Select the desired option (24 HS or
AM PM) by using the ARROW key
Press the MENU key
5
. See the following
Setting the date
gh) by
To adjust the date of the telephone it is
necessary to access more than one option
of the CONFIGURATION menu, to enter
day, month and year. If any of these items
are already correct, you can go to the next
step, without enter anything, by pressing
the DIAL/SELECT key
following date adjustment procedure:
. See the
Press the MENU key
Select the CONFIGURATION option
by using the DIAL/SELECT key
Select the Y option by using the
ARROW key
Select the ENTER MONTH option by
using the DIAL/SELECT key
Enter the number of the month with
:
two digits (example: 06 for June)
Press the DIAL/SELECT key, passing
to the option ENTER DAY
Enter the number of the day with two
:
digits (example: 08)
Press the DIAL/SELECT key, passing
to the option ENTER YEAR
Enter the number of the year with two
:
digits (example: 03 for 2003)
Press the MENU key
Setting the ringer volume
This telephone offers three different ringer
volumes. To adjust, proceed in the
following way:
Press the MENU key
Select the CONFIGURATION option
by using the DIAL/SELECT key
Select the Y option by using the
ARROW key
Select the RINGER VOLUME option
by using the DIAL/SELECT key
Select the desired option (1-low, 2medium, 3-hi
using the ARROW
key
Press the MENU key
Setting the melody
This telephone offers three different
melodies. To adjust, proceed in the
following way:
Press the MENU key
Select the CONFIGURATION option
by using the DIAL/SELECT key
Select the Y option by using the
ARROW key
Select the MELODY option by using
the DIAL/SELECT key
Select the desired option (1, 2 or 3) by
using the ARROW key
Press the MENU key
Setting the dialing mode (tone/pulse)
Your telephone must be programmed for
TONE dialing or PULSE dialing, according
to the telephone line it is connected to. The
default factory setting is the TONE dialing
mode with the flash time of 250 ms
(DTMF).
Checking the dialing mode
:
Press any numeric key. If you can still hear
a dialing tone, change to the other dialing
mode.
Changing the dialing mode
:
To adjust the dialing mode to PULSE or
TONE, proceed in the following way:
6
 Loading...