


INSTRUCTION MANUAL
LCD TV
LCD-32K40TD LCD-42K40TD

IMPORTANT INFORMATION
If a television is not positioned in a sufficiently stable location, it can be potentially hazardous due to falling. Many injuries, particularly to children, can be avoided by taking simple precautions such as:
●Using cabinets or stands recommended by the manufacturer of the television.
●Only using furniture that can safely support the television.
●Ensuring the television is not overhanging the edge of the supporting furniture.
●Not placing the television on tall furniture (for example, cupboards or bookcases) without anchoring both the furniture and the television to a suitable support.
●Not standing the televisions on cloth or other materials placed between the television and supporting furniture.
●Educating children about the dangers of climbing on furniture to reach the television or its controls.
Warning:
To prevent the spread of fire, keep candles or other open flames away from this product at all times.
2
TO THE OWNER
Before operating this LCD TV, read this manual thoroughly and operate the LCD TV properly.
This LCD TV provides many convenient features and functions. Operating the LCD TV properly enables you to manage those features and maintains it in better condition for a considerable time.
Improper operation may result in not only shortening the product-life, but also malfunctions, fire hazard, or other accidents.
If your LCD TV seems to operate improperly, read this manual again, check operations and cable connections and try the solutions in the “Troubleshooting” section on page 45 of this booklet. If the problem still persists, contact the dealer where you purchased the LCD TV or the service center.
Safety Precaution
WARNING : TO REDUCE THE RISK OF FIRE OR ELECTRIC SHOCK, DO NOT EXPOSE THIS APPLIANCE TO RAIN OR MOISTURE.
λInstall the LCD TV in a proper position. If not, it may result in a fire hazard.
λProvide appropriate space on the top, sides and rear of the LCD TV cabinet for allowing air circulation and cooling the LCD TV. Minimum clearance must be maintained. If the LCD TV is to be built into a compartment or similarly enclosed, the minimum distances must be maintained. Do not cover the ventilation slot on the LCD TV. Heat build-up can reduce the service life of your LCD TV, and can also be dangerous.
λIf the LCD TV is not to be used for an extended time, unplug the LCD TV from the power outlet.
SIDE and TOP |
REAR |
10 cm |
|


 6 cm
6 cm
10 cm |
10 cm |
READ AND KEEP THIS OWNER'S MANUAL FOR LATER USE.
Caution In Installing
λHandle the LCD TV carefully when installing it and do not drop.
λLocate set away from heat, excessive dust, and direct sunlight.
λFor correct installation and mounting it is strongly recommended to use a trained, authorized dealer.
Failure to follow correct mounting procedures could result in damage to the equipment or injury to the installer.
NOTE :
When LCD TV is not used for a long period of time, unlighted dots may be observed. This is caused by characteristic of the LCD TV. If this occurs, turn the LCD TV on and leave it on about 1 hour. These dots will gradually disappear.
CAUTION
RISK OF ELECTRIC SHOCK
DO NOT OPEN
CAUTION : TO REDUCE THE RISK OF ELECTRIC SHOCK, DO NOT REMOVE COVER (OR BACK). NO USER-SERVICEABLE PARTS INSIDE. REFER SERVICING TO QUALIFIED SERVICE PERSONNEL.
T H I S S Y M B O L I N D I C AT E S T H AT DANGEROUS VOLTAGE CONSTITUTING A RISK OF ELECTRIC SHOCK IS PRESENT WITHIN THIS UNIT.
THIS SYMBOL INDICATES THAT THERE ARE IMPORTANT OPERATING AND MAINTENANCE INSTRUCTIONS IN THE OWNER'S MANUAL WITH THIS UNIT.
3

SAFETY INSTRUCTIONS
All the safety and operating instructions should be read before the product is operated.
Read all of the instructions given here and retain them for later use. Unplug this LCD TV from AC power supply before cleaning. Do not use liquid or aerosol cleaners. Use a damp cloth for cleaning.
Follow all warnings and instructions marked on the LCD TV.
For added protection to the LCD TV during a lightning storm, or when it is left unattended and unused for long periods of time, unplug it from the wall outlet. This will prevent damage due to lightning and power line surges.
Do not expose this unit to rain or use near water...
for example, in a wet basement, near a swimming
pool, etc...
Do not use attachments not recommended by the manufacturer as they may cause hazards.
Do not place this LCD TV on an unstable cart, stand, or table. The LCD TV may fall, causing serious injury to a child or adult, and serious damage to the LCD TV. Use only with a cart or stand recommended by the manufacturer, or sold with the LCD TV. Wall or shelf mounting should follow the manufacturer's instructions, and should use a mounting kit approved by the manufacturers.
An appliance and cart combination should be moved with care. Quick stops, excessive force, and uneven surfaces may cause the appliance and cart combination to overturn.
Slots and openings in the back and bottom of the cabinet are provided for ventilation, to insure reliable operation of the equipment and to protect it from overheating.
The openings should never be covered with cloth or other materials, and the bottom opening should not be blocked by placing the LCD TV on a rug, or other similar surface. This LCD TV should never be placed near or over a radiator or heat register.
This LCD TV should not be placed in a built-in installation such as a book case unless proper ventilation is provided.
Never push objects of any kind into this LCD TV through cabinet slots as they may touch dangerous voltage points or short out parts that could result in a fire or electric shock. Never spill liquid of any kind on the LCD TV.
Do not place items such as vases containing liquid on top of the LCD TV.
Do not install the LCD TV near the ventilation duct of air-conditioning equipment.
This LCD TV should be operated only from the type of power source indicated on the marking label. If you are not sure of the type of power supplied, consult your authorized dealer or local power company.
Do not overload wall outlets and extension cords as this can result in fire or electric shock. Do not allow anything to rest on the power cord. Do not locate this LCD TV where the cord may be damaged by persons walking on it.
Do not attempt to service this LCD TV yourself as opening or removing covers may expose you to dangerous voltage or other hazards. Refer all servicing to qualified service personnel.
Unplug this LCD TV from wall outlet and refer servicing to qualified service personnel under the following conditions:
a.When the power cord or plug is damaged or frayed.
b.If liquid has been spilled into the LCD TV.
c.If the LCD TV has been exposed to rain or water.
d.If the LCD TV does not operate normally by following the operating instructions. Adjust only hose controls that are covered by the operating instructions as improper adjustment of other controls may result in damage and will often require extensive work by a qualified technician to restore the LCD TV to normal operation.
e.If the LCD TV has been dropped or the cabinet has been damaged.
f.When the LCD TV exhibits a distinct change in performance-this indicates a need for service.
When replacement parts are required, be sure the service technician has used replacement parts specified by the manufacturer that have the same characteristics as the original part. Unauthorized substitutions may result in fire, electric shock, or injury to persons.
Upon completion of any service or repairs to this LCD TV, ask the service technician to perform routine safety checks to determine that the LCD TV is in safe operating condition.
4

TABLE
PREPARATION........................................ |
7 |
PART NAMES AND FUNCTIONS |
7 |
CONNECTING LCD TV...................... |
9 |
CONNECTING AC POWER CORD |
9 |
INSTALLING STAND |
9 |
PREVENTING THE TV FROM |
|
FALLING OVER...................................... |
9 |
CONNECTING OUTDOOR AERIAL |
10 |
CONNECTING A COMPUTER |
10 |
CONNECTING VIDEO EQUIPMENT |
11 |
BEFORE OPERATION.......................... |
12 |
OPERATION OF REMOTE CONTROL |
12 |
OPERATION RANGE |
13 |
REMOTE CONTROL BATTERIES |
|
INSTALLATION |
13 |
MAIN MENU OVERVIEW |
14 |
BASIC OPERATION.................................. |
15 |
TURNING ON/OFF LCD TV |
15 |
SELECTING INPUT SOURCE |
15 |
DISPLAYING INFORMATION BANNER |
15 |
MUTE |
16 |
ECO |
16 |
SURROUND |
16 |
VOLUME CONTROL |
16 |
SOUND MODE |
16 |
SLEEP TIMER |
16 |
STILL |
16 |
PICTURE MODE |
17 |
AUDIO SWITCH |
17 |
CHANNEL AND PROGRAMME |
|
SELECTION |
18 |
WIDE |
19 |
SPORTS |
19 |
SUBTITLE |
20 |
RADIO MODE |
20 |
EPG(DTV Only) |
20 |
TELETEXT.................................. |
22 |
OPERATION OF REMOTE CONTROL 22 |
|
TEXT / TV |
23 |
TEXT REVEAL |
23 |
TEXT CANCEL |
23 |
TEXT INDEX |
23 |
TEXT SUBCODE |
24 |
TEXT SIZE |
24 |
TEXT HOLD |
24 |
TEXT RED/GREEN/YELLOW/BLUE |
24 |
TV SETTING.................................. |
25 |
AUTO TUNING |
25 |
DTV MANUAL TUNING |
26 |
ATV MANUAL TUNING |
26 |
SETTING COLOUR SYSTEM |
27 |
SETTING SOUND SYSTEM |
27 |
FINE TUNING |
27 |
SKIP |
27 |
PROGRAMME EDIT |
28 |
CHANNEL RENAME |
28 |
SETTING FAVOURITE CHANNEL |
29 |
SKIP CHANNEL |
29 |
MOVE CHANNEL |
30 |
DELETE CHANNEL |
30 |
PICTURE MENU.................................. |
31 |
SOUND MENU .................................. |
32 |
T I M E M E N U . . . . . . . . . . . . . . . . . . . . . . . . . . . . . . . . . . |
3 3 |
TIME ZONE |
33 |
CURRENT TIME SETUP |
33 |
OFF TIMER SETUP |
33 |
ON TIMER SETUP |
34 |
SLEEP TIMER SETUP |
35 |
DAYLIGHT SAVING |
35 |
SETUP MENU........................................ |
36 |
SYSTEM SETUP |
36 |
AUTO UPDATE |
37 |
AUTO UPDATE TIME |
37 |
MODEL INFORMATION |
37 |
MANUAL UPDATE |
38 |
LOCK MENU........................................ |
39 |
LOCK SYSTEM |
39 |
CHANGE PASSWORD |
39 |
BLOCK PROGRAMME |
40 |
PARENTAL GUIDANCE(DTV Only) |
40 |
SCREEN SETUP FOR PC MENU.......................... |
41 |
PC SETUP |
41 |
DEALER MODE........................................ |
42 |
APPENDIX......................................................... |
44 |
CLEANING LCD TV |
44 |
FUNCTION OF PRODUCT SAFETY FEATURE 44 |
|
IMPORTANT INFORMATION |
44 |
TROUBLE SHOOTING |
45 |
TECHNICAL SPECIFICATIONS |
46 |
CONFIGURATION OF VGA TERMINAL |
48 |
MAC ADAPTER (Not Supplied) |
48 |
SIGNAL MODE COLUMN (Recommended) |
48 |
UNINSTALLING STAND BASE |
50 |
 is registered trademark of HDMI Licensing, LLC.
Manufactured under license from Dolby Laboratories. "Dolby" and the double-D symbol are trademarks of Dolby Laboratories.
5

Feature and Design
Picture
λHigh Definition LCD Panel
■LCD-32K40TD
1366 x 768 pixel HD LCD Panel with high contrast ratio and wide viewing angle.
■LCD-42K40TD
1920 x 1080 pixel Full HD LCD Panel makes perfect reproduction of 1080p/1080i HD contents in pixel-to-pixel.
This LCD panel also provide high contrast ratio and wide viewing angle.
λVIZON Engine
VIZON Engine, SANYO High Quality Image Processing Technology reproduces clear, dynamic, natural and realistic picture along with HD LCD Panel Technology.
λDynamic AI
The AI (Automatic Image Control) circuit compensates picture contrast and brightness level dynamically and reproduces bright and high-contrast picture. (see page 31)
Sound
λDOLBY DIGITAL
DOLBY DIGITAL
Dolby® Digital is a highly sophisticated and versatile audio encoding/decoding technology.
Dolby Digital technology can transmit mono, stereo (two-channel), or up to 5.1-channel surround sound (discrete* multichannel audio).
λBass Expander
Bass Expander reinforces bass effect to improve overall sound quality. (see page 32).
Feature
λSports Mode
Just by pressing the button, sport mode optimizes picture and sound settings suitable for each sport program. (see page 19)
■OFF
Normal setting.
■Football
Emphasize bright scene and the surrounded cheers.
■Winter Sports
Reduce white saturation of snow. Emphasize primary colours of the skiing suit ,mid and high range of sound.
■Marine Sports
Emphasize blue sky, blue ocean and the sound of waves.
■Indoor Sports
Emphasize red and skin colour, clarify the figures in the dark, and surrounded cheers, sound of bumping bodies. Clear voice of an announcer.
λEPG
Use to view Channel/Programme's information(in a week), programme's brief introduction, Reserve set. (see pages 20-21)
λAmbient light sensor
Ambient light sensor automatically adjusts picture brightness to provide more relaxing view for your eyes. (see pages 16 and 36)
λ Favorite List
Your favorite channel list can be made. (see page 18)
λ STORE Mode
Picture mode will be Dynamic and ECO mode will be OFF in STORE MODE. (see page 36)
Compatibilty
λDVB Broadcast signal
This TV can receive DVB-t and anlog broadcast signal
λHDMI
HDMI provides complete transmission of digital image and sound signals without any quality deterioration.
DVI can be connected to HDMI. (see page 12)
λPC Input
Personal Computer/Laptop can be connected with automatic resolution adjustment.
λTerminals
HDMI for BluRay Player etc. D-SUB 15-pin for PC input etc. Component Video for DVD S-Video/Video for VCR/DVD
Others
λWall Mounting
It's designed for VESA Standard wall hanging bracket.
λLight Commertial Mode
By entering Dealer mode, Volume Lock, Tuning Lock, OSD, RC, AC Power, Music Mode, No Signal Off, PC Control, Baud Rate and Reset can be selected.
Convenient for placing in Hotel, Hospital, School, Store, Bank etc. (see page 42-43)
6

PREPARATION
PART NAMES AND FUNCTIONS
FRONT
 Panel
Panel
Side Control
 Indicator
INDICATORS
 Power Indicator
 ON Timer Indicator

 Infrared Remote Receiver
 ECO Sensor
CARE FOR USING LCD TV
●Do not bump or scratch the panel surface as this causes flaws on the surface of the screen.
●There may be some tiny black dots and/or bright dots on the SCREEN. These dots are normal.
TRADEMARKS
●Apple, Macintosh, and PowerBook are trademarks or registered trademarks of Apple Inc.
●IBM and PS/2 are trademarks or registered trademarks of International Business Machines, Inc.
●Each name of corporations or products in the owner's manual is a trademark or a registered trademark of its respective corporation.
7

PREPARATION
SIDE CONTROL
(Each button on the control panel has the same function with its counterpart on the remote control. )
CHANNEL UP/DOWN (▲▼) buttons
Used to Change channels.
Used to select items.
VOLUME (+/-) buttons
Used to adjust the volume.
Used to adjust the value of the selected item on
On-Screen Menu.
- Used to execute the selected item on
On-Screen Menu.
OK
POWER ON/ OFF button 
-Used to turn the LCD TV on or off.
INPUT MODE button
- Used to select input source: TV/AV1/(S-VIDEO)/ AV2(DVD)/HDMI 1(DVI)/HDMI 2/HDMI 3/PC.
-Used to confirm the selected item on On-Screen Menu.
MENU button
- Open or close the On-Screen Menu.
SIDE TERMINAL
S/PDIF digital audio out Terminal
Connect the digital audio input of a digital audio component.
AV2 Input Terminals
C o n n e c t v i d e o a n d a u d i o outputs from video equipment. DVD/Y terminal is also for composite video input.
●DVD component (RCA type)
●Audio L and R (RCA type)
RS232 Interface
For service use. The user cannot operate the unit through this terminal.
Aerial Jack
Connect the cable with a plug from aerial jack to the aerial socket on the cabinet back.
Headphone Jack
Connect a headphone (stereo) to this jack.
When this jack is inserted, speaker should be muted.
AV1 Input Terminals
Connect video and audio outputs from video equipmenut.
●Composite Video (RCA type)
●Audio L and R (RCA type)
●S-Video (mini DIN 4 type)
Monitor Output Terminals
Connect a television, video recorder or external audio amplifier to these jacks.
●Video (RCA type)
●Audio L and R (RCA type)
PC Input Terminals
Connect computer outputs to these terminals.
● RGB (D-SUB) ● Audio (L/R)
HDMI Input Terminals
Connect all kinds of HDMI output equipment to these terminals.
● HDMI 1(DVI)
●HDMI 2
●HDMI 3
8

CONNECTING LCD TV
CONNECTING AC POWER CORD
This LCD TV uses nominal input voltages of 110-242V AC. This LCD TV automatically selects the correct input voltage. It is designed to work with single-phase power systems. To reduce risk of electric shock, do not plug into any other type of power system. Consult your authorized dealer or service station if you are not sure of the type of power being supplied.
Connect the LCD TV with all peripheral equipment before turning the LCD TV on.
AC POWER CORD
CAUTION
For safety, unplug AC power cord when the LCD TV is not in use.
To the AC Outlet (110 - 242V AC). Pull the AC power cord out from the LCD TV. The AC outlet
must be near this equipment and must be easily accessible.
INSTALLING STAND
Please according to the following procedure to installing stand.
1
3
Be careful of the panel. Suggest to put |
2 |
To align the corresponding pilot holes and fix the |
down the panel side on the cushion or other |
|
stand by screws. |
soft material before installing the stand. |
|
Screws B for LCD-32K40-TD: 4 pcs |
|
|
Screws A for LCD-42K40-TD: 2 pcs |
|
|
Screws B for LCD-42K40-TD: 4 pcs |
Installing of stand is completed.
Screw A
A
B |
B |
Screw B |
|
|
Note: Screws A are just for
LCD-42K40TD
PREVENTING THE TV FROM FALLING OVER
Carry out the steps given below to stabilize the TV that it will be safe in the event of a disaster such as an earthquake, and so that it will not fall over during normal use.
Use the marketed bands and screws C to fasten the TV securely to the TV stand etc.
Screw C
Mounting 


 Mounting
screw C 

 screw C
Band 


 Band
Band
Mounting |
Mounting |
screw C |
screw C |
9

CONNECTING LCD TV
CONNECTING OUTDOOR AERIAL
Cable used for connection (This cable is not supplied with this LCD TV.)
· Aerial Cable
NOTE:
For all aerial circuit problems, please consult your local dealer.
Outdoor Aerial
Aerial Cable
CONNECTING A COMPUTER
Cables used for connection (These cables are not supplied with this LCD TV.)
·PC/VGA Cable (D-SUB 15pin) ·HDMI Cable: HDMI Input
·MAC Adapter (in the case of connecting Macintosh computer)
·Audio Cable [Mini Plug (L/R)]
NOTE:
When connecting the cables, AC Power Cords of both LCD TV and external equipment should be disconnected from AC outlet. Turn LCD TV and peripheral e q u i p m e n t o n b e f o r e y o u r computer is switched on.
IBM- |
Desktop |
Laptop |
|
type |
type |
||
compatible |
|||
computers |
|
|
|
or Macintosh |
|
|
|
computers |
|
|
|
(VGA / SVGA / |
|
|
|
XGA ) |
|
|
Audio Input PC Input (stereo)
MAC Adapter |
Monitor
Output
Audio Output
(stereo)
HDMI Input
HDMI Output
Digital AV Equipment
Note:
You can connect the DVI source to HDMI input terminal by using the DVI to HDMI converter.
10
CONNECTING LCD TV
CONNECTING VIDEO EQUIPMENT
Cables used for connection (These cables are not supplied with this LCD TV.)
·Video Cable(RCA X1), S-Video Cable, Audio Cable (RCA X2) : Video 1 or Video 2
·Video Cable(RCA X3), Audio Cable (RCA X2) : DVD (Component Video)
·Video Cable(RCA X1), Audio Cable (RCA X2) : Monitor Outputs
·HDMI Cable X 3 : HDMI Input
·Coaxial Cable X 1: S/P DIF Output
NOTE : When connecting the cable, AC Power Cords of both LCD TV and external equipment should be disconnected from AC outlet.
Component Video Source
(example)
Connect Hi-Fi or Audio processor to the S/PDIF OUT(Coaxial) terminal on the TV rear.
HiFi System |
Audio Processor |
Video |
S-Video |
|
Coaxial cable |
Cable |
|
|
|
S- |
|
S-Video |
Video Source (example) |
output |
Composite Video |
Audio cable |
|
(RCA x 2) |
||
and Audio Output |
||
|
Audio Amplifier |
L |
|
R |
||
Audio |
||
|
||
Speaker |
Video cable |
|
(stereo) |
||
External |
(RCA x1) |
|
monitor |
|
External Audio
Equipment
V
L , |
|
|
, |
Video and Audio |
|
R |
||
cable (RCA x 3) |
||
|
, Y |
Audio cable |
|
(RCA X 2) |
||
/PB |
|
|
,CB |
DVD |
|
/PR |
||
(RCA X 3) |
||
CR |
||
|
HDMI cable |
HDMI cable |
HDMI cable |
|
|
|
|
|
|
Video Cassette |
Video Disc |
|
Recorder |
Player |
|
DVD Player |
DVD video equipment. (such as DVD player or high-definition TV source)
Digital AV Equipment
MONITOR OUT
Note :
The MONITOR OUT terminal can output audio from all input source and video from ATV, DTV, AV1; and the video from AV2, PC and HDMI can not be outputted.
11

BEFORE OPERATION
OPERATION OF REMOTE CONTROL
|
INPUT button |
|
POWER ON/OFF button |
MUTE button |
|
INFO button |
SPORTS button |
|
STILL button |
A·B button |
|
ECO button |
||
|
||
0-9 NUMBER buttons |
SLEEP TIMER button |
|
|
MENU button |
|
|
BACK button |
|
|
CHANNEL RECALL button |
|
POINT ▲/▼/◄/► buttons |
OK button |
|
VOLUME ( - ) button |
|
|
VOLUME ( + ) button |
CHANNEL UP (▲) button |
|
CHANNEL DOWN (▼) button |
||
EPG button (DTV only) |
FAV ▼ / FAV ▼ button |
|
FAV-LIST button |
||
YELLOW button |
||
GREEN button |
||
|
||
RED button |
BLUE button |
|
PICTURE MODE button |
||
LIST button |
||
SOUND MODE button |
||
TXT/TV button |
||
SURROUND button |
||
TV/Radio button (DTV only) |
||
|
||
SUBTITLE button (DTV only) |
WIDE button |
|
|
 Note:
Note:
In different mode, some buttons have different functions. (For details, please refer to page 22.)
12

BEFORE OPERATION
OPERATION RANGE
Point Remote Control toward LCD TV (Infrared Remote Receiver) whenever pressing the buttons. Maximum operating range for Remote Control is about 16.4’ (5m) in front, about 30° to the left or the right, about 15° for up or down.
Infrared Remote Receiver
 15 15
15 15
30 30
5m
REMOTE CONTROL BATTERIES INSTALLATION
1Remove the battery compartment cover .
3Close the battery compartment cover.
2Insert two size AAA batteries (1.5V) according to "+" and "-" polarity markings inside the battery compartment.
To insure safe operation, please observe the following precautions:
●Use (2) AAA, alkaline batteries.
●Replace two batteries at the same time.
●Do not use a new battery with a used battery.
●Avoid contacting with water or liquid.
●Do not expose the Remote Control to moisture, or heat.
●Do not drop the Remote Control.
●If a battery has leaked on the Remote Control, carefully wipe case clean and install new batteries.
●Risk of explosion if battery is replaced by an incorrect type.
●Dispose of used batteries according to the instructions.
●Do not expose batteries (battery pack or batteries installed) to excessive heat such as sunshine, fire or the like.
13
BEFORE OPERATION
MAIN MENU OVERVIEW
● List of main menus to help you with operations |
|
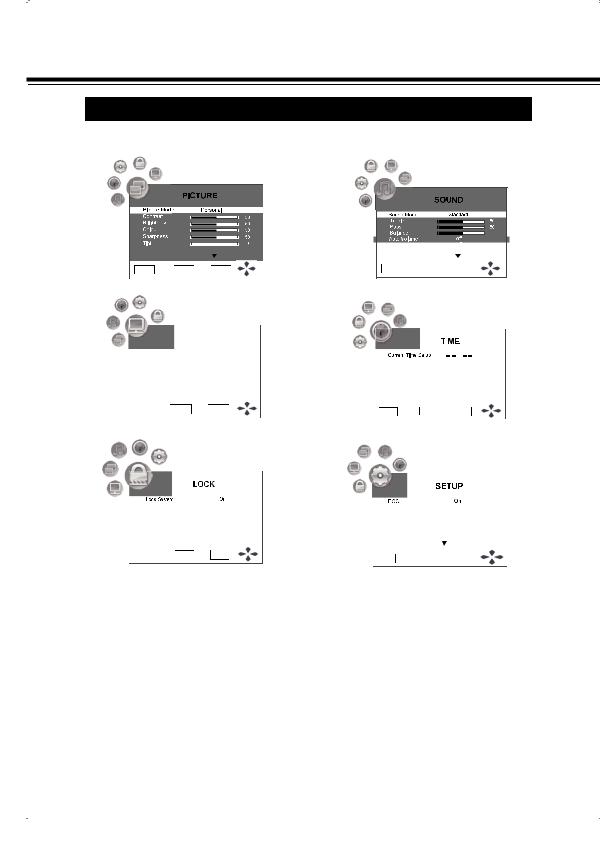
PICTURE MENU |
SOUND MENU |
0
|
|
|
|
|
|
|
|
|
|
|
|
|
|
|
|
|
|
|
|
|
|
|
|
|
|
|
|
|
|
|
|
|
|
|
|
|
|
|
|
|
|
|
|
|
|
|
|
|
|
|
|
|
|
|
|
|
|
|
|
TV SETTING MENU |
|
|
|
|
TIME MENU |
||||||||||||||
|
|
|
|
|
|
|
|
|
|
|
|
|
|
|
|
|
|
|
|
|
|
|
|
|
|
|
|
|
|
|
|
|
|
|
|
|
|
|
|
|
|
|
|
|
|
TV SETTING |
|
|
|
|
|
|
|
|
|
|
|||
|
|
|
|
|
|
|
|
|
|
|
|
|
|
||||||
|
|
|
|
|
|
|
|
|
|
|
|
|
|
|
|
|
|
|
|
|
DTV Manual |
Tuning |
|
|
|
|
|
|
|
|
|
|
|
|
|
|
|||
|
|
|
|
|
|
|
|
|
|
|
|
|
|
|
|||||
|
ATV Manual Tuning |
|
|
|
|
|
|
|
|
|
|
|
|
|
|
||||
|
Programme Edit |
|
|
|
|
|
|
|
|
|
|
|
|
|
|
||||
|
|
|
|
|
|
|
|
|
|
|
|
|
|
|
|
|
|
|
|
|
|
|
|
|
|
|
|
|
|
|
|
|
|
|
|
|
|||
|
BACK |
|
MENU |
|
OK |
|
|
|
|
|
|
|
|
|
|
|
|||
LOCK MENU |
|
|
|
|
SETUP MENU |
||||||||||||||
|
|
|
|
|
|
|
|
|
|
|
|
|
|
|
|
|
|
|
|
|
|
|
|
|
|
|
|
|
|
|
|
|
|
|
|
|
|
|
|
|
|
|
|
|
|
|
|
|
|
|
|
|
|
|
|
|
|
|
|
|
|
|
|
|
|
|
|
|
|
|
|
|
|
|
|
|
|
|
|
|
|
|
|
|
|
|
|
|
|
|
|
|
|
|
|
|
|
|
|
|
|
|
|
|
|
|
|
|
|
|
|
|
|
|
|
|
|
|
|
|
|
|
|
|
|
|
|
|
|
|
|
|
|
|
|
|
|
|
|
|
|
|
|
|
|
|
|
|
|
|
|
|
|
|
|
|
|
|
|
● To navigate through the main menu.
1 |
With the power on, press MENU button and the main menu screen displays. |
2 Press ◄ or ► button to select menu. Press ▼ button to access the menu. |
|
3 |
With the menu, press ▲, ▼, ◄ or ► button to navigate through the options or adjust an option. |
4 |
Press OK button to confirm a selection or enter a sub-menu. |
Press BACK button to return to previous menu. Press MENU button or no operation for a few seconds |
|
|
(the duration can be set) to exit the menu screen directly. |
 Note:
Note:
●Some menu items may be different when the LCD TV works in different mode, and menu items that are not selectable are grayed out.
●PICTURE menu and SOUND menu have more than one pages, please use ▲ or ▼ button to scroll through.
●The illustrations and on-screen displays in this manual are for explanation purpose (some are enlarged, others cropped) and may vary slightly form the actual ones.
14

BASIC OPERATION
TURNING ON / OFF LCD TV
1 Complete the peripheral connections before turning on LCD TV. (Please refer to "CONNECTING LCD TV".)
2
3
Connect LCD TV's AC Power Cord into an AC outlet.
Press POWER ON/OFF button on Side Control of LCD TV or on Remote Control to turn it ON. The POWER indicator will light up (blue). Press POWER ON/OFF button again to shift it to stand-by status, the POWER indicator will become red.
SELECTING INPUT SOURCE
1
2
3
4
Press INPUT button.
Press ▲ or ▼ to select the input source. Options include:
●DTV---Watch the DTV signal.
●ATV---Watch the ATV signal.
●AV1---Watch the signal from the AV1 input terminal.
●AV1-S---Watch the signal from the S-VIDEO input terminal.
●AV2---Watch the signal from the AV2 input terminal.
●AV2-DVD---Watch the signal from the DVD input terminal.
●HDMI1---Watch the signal from the HDMI1 input terminal.
●HDMI2---Watch the signal from the HDMI2 input terminal.
●HDMI3---Watch the signal from the HDMI3 input terminal.
●PC---Watch the signal from the PC input terminal.
Press ◄ , ► or OK button to confirm the selection.
Press BACK button to exit the input source menu.
Note:
●Input source menu will disappear if no operation for 5 seconds and the LCD TV will enter the selected input mode automatically.
●DVI and HDMI share the HDMI jack.
DISPLAYING INFORMATION BANNER
Press INFO button to display the information banner. The information banner displays current status information such as the channel number and signal source.
Depending on the mode, different information is displayed. In DTV mode, more information will be displayed. Below is an example banner in DTV mode.
22 |
In DTV mode, the information banner may contain:
●Channel number and name.
●Current time.
●Current programme name, start and end play time.
●Next programme name and start and end play time.
●TV or Radio.
●Audio mode, audio track
●Signal resolution.
●Subtitle, teletext.
 Note:
Note:
●The above OSD is only served as an example, and it is in DTV mode.
●Information banner content varies, depending on the broadcaster and your settings.
15
BASIC OPERATION
MUTE
Should you wish to mute the sound, press MUTE button. To switch the sound back on, press MUTE button again or press VOLUME(+/-) buttons on Side Control or on Remote Control.
ECO
ECO mode is environmentally friendly mode by adjusting the screen-end power TV unit to reduce power consumption. Press ECO button on Remote Control to set "ECO Off", "ECO On" or "ECO Sensor". And it will attain the best power consumption when "ECO On" is selected.
SURROUND
Press SURROUND button on Remote Control to set "Surround Off" or "Surround On".
VOLUME CONTROL
To adjust the volume value desired by pressing VOLUME(+/-) buttons on Remote Control or on Side Control. The volume dialogue box will appear on the screen for a short while.
VOLUME(+) button to increase volume, and VOLUME(-) button to decrease volume.
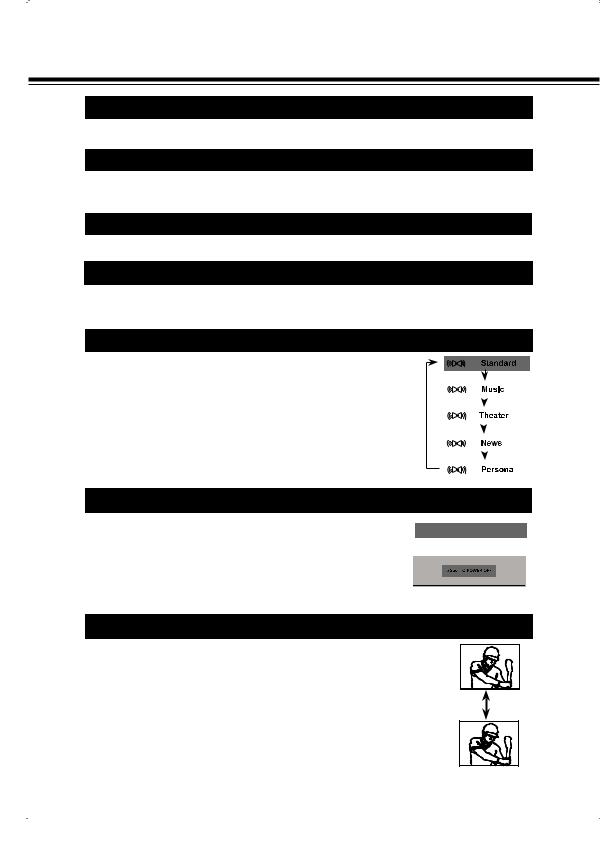
SOUND MODE
Select sound level by pressing SOUND MODE button on Remote Control.
Standard |
Normal sound state preset on LCD TV. |
|
|
|
|
|
Select this mode for music programme. |
|
|
|
|
|
|
|
|
||
Music |
|
|
|
||
|
|
|
|||
|
Select this mode for film programme. |
|
|
|
|
|
|
|
|
||
Theater |
|
|
|
||
|
|
|
|||
|
Select this mode for talk programme. |
|
|
|
|
News |
|
|
|
||
|
|
|
|
||
|
Select this mode for user to call out the preset |
|
|
|
|
Personal |
|
|
|
||
|
sound adjustment in SOUND menu. |
|
|
|
|
|
|
|
|
|
|
SLEEP TIMER
Press SLEEP TIMER button repeatedly to select "Off", "10min", "20min", "30min", "60min", "90min", 120min", "180min" or "240min", shown as Picture 1.
Once SLEEP TIMER has been set, TIMER indicator is light,and the timer will display on the screen to start countdown for 1 minute, shown as Picture 2. And the LCDTV will shift to Stand by status.
STILL
Press STILL button to switch the still function On or Off.
To cancel "Still" function:
Press STILL/ INPUT/ BACK/ POWER/ CHANNEL UP or DOWN button to cancel the function.
 Note:
Note:
●When the still function is On, the picture freezes. However, the sound is not affected.
●If source disconnected ,it will display "No Signal".
●It is released automatically for no operation in 3 minutes.
Sleep Timer : Off
Picture 1
Picture 2
STILL : On
16
 Loading...