


INSTRUCTION MANUAL
ISTRUZIONI PER L’USO
Micro CD Hi-Fi System
Sistema Micro Hi-Fi CD
MAJ-R100
 /ON
/ON
RB-R100
ENGLISH 8 - 35
DEUTSCH 36 - 63
FRANÇAIS 64 - 91
NEDERLANDS 92 - 119
SVENSKA 120 - 147
ITALIANO 148 - 176
ESPAÑOL 177 - 204
PORTUGUÊS 205 - 232
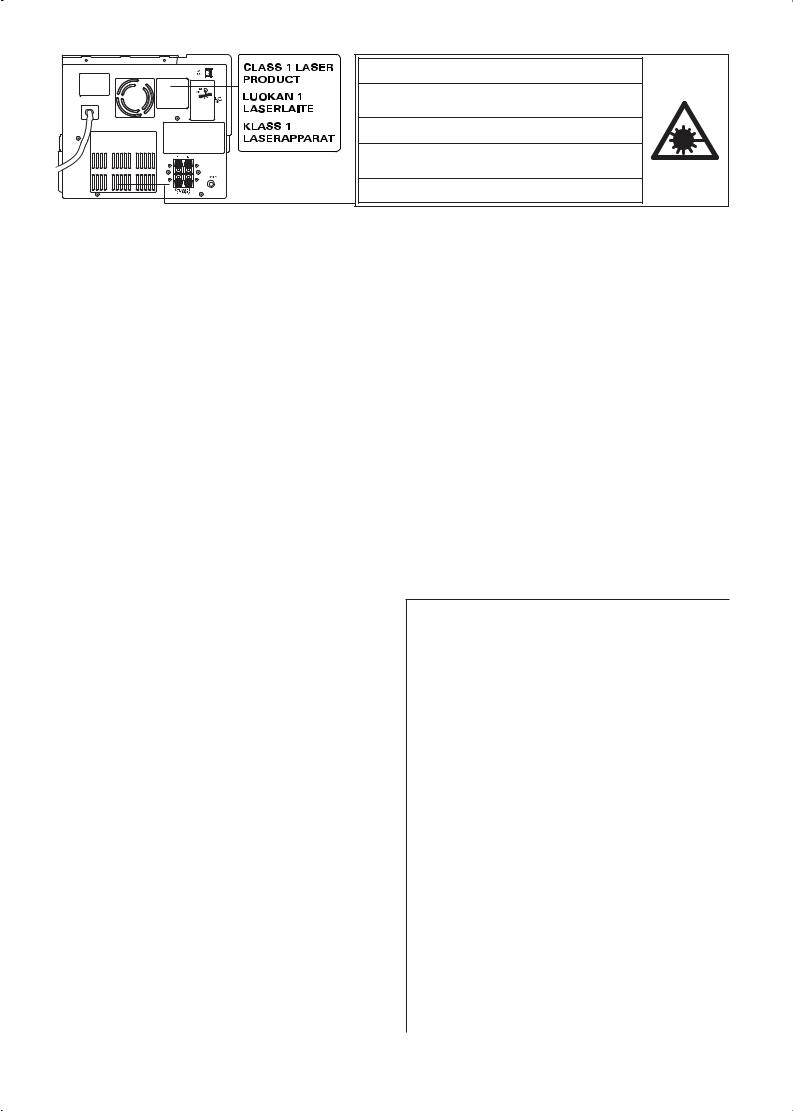
CAUTION - INVISIBLE LASER RADIATION WHEN OPEN AND INTERLOCKS DEFEATED. AVOID EXPOSURE TO BEAM.
ADVARSEL - USYNLIG LASER STRÅLING VED ÅBNING, NÅR SIKKERHEDSAFBRYDERE ER UDE AF FUNKTION, UNDGÅ UDS ÆTTELSE FOR STRÅLING.
VARNING - OSYNLIG LASER STRÅLNING NÄR DENNA DEL ÄR ÖPPNAD OCH SPÄRR ÄR URKOPPLAD. STRÅLEN ÄR FARLIG.
VORSICHT - UNSICHTBARE LASERSTRAHLUNG TRITT AUS, WENN DECKEL GEÖFFNET UND WENN SICHERHEITSVERRIEGELUNG ÜBERBRÜCKT IST. NICHT, DEM STRAHL AUSSETZEN.
VARO - AVATTAESSA JA SUOJALUKITUS OHITETTAESSA OLET ALTTIINA NÄKYMÄTTÖMÄLLE LASERSÄTEILYLLE. ÄLÄ KATSO SÄTEESEEN.
CAUTION - USE OF CONTROLS OR ADJUSTMENTS OR PERFORMANCE OF PROCEDURES OTHER THAN THOSE SPECIFIED HEREIN MAY RESULT IN HAZARDOUS RADIATION EXPOSURE.
ACHTUNG - WENN ANDERE ALS DIE HIER SPEZIFIZIERTEN BEDIENUNGSODER JUSTIEREINRICHTUNGEN BENÜTZT ODER ANDERE VERFAHRENS-WEISEN AUSGEFÜHRT WERDEN, KANN DIES ZU
GEFÄHRLICHER STRAHLUNGSEXPOSITION FÜHREN.
ATTENTION - L’EMPLOI D’ORGANES DE COMMANDE OU DE RÉGLAGE, OU L’EXÉCUTION DE PROCÉDURES, AUTRES QUE CEUX SPÉCIFIÉS DANS
LE MODE D’EMPLOI, PEUT PROVOQUER UNE EXPOSITION DANGEREUSE AU RAYONNEMENT.
OPGELET - HET GEBRUIK VAN REGELAARS OF HET MAKEN VAN AFSTELLINGEN E.D. DIE NIET IN DEZE GEBRUIKSAANWIJZING ZIJN BESCHREVEN KAN LEIDEN TOT SCHADELIJKE STRALINGEN.
VARNING! OM APPARATEN ANVÄNDS PÅ ANNAT SÄTT ÄN VAD SOM BESKEIV I DENNA BRUKSANVISNING, KAN ANVÄNDAREN UTSÄTTAS FÖR OSYNLIG LASERSTRÅLNING, SOM ÖVERSKRIDER GRÄNSEN FÖR LASERKLASS 1.
VAROITUS! LAITTEEN KÄYTTÄMINEN MUULLA KUIN TÄSSÄ KÄYTTÖOHJEESSA MAINITULLA TAVALLA SAATTAA ALTISTAA KÄYTTÄJÄN TURVALLISUUSLUOKAN
1 YLITTÄVÄLLE NÄKYMÄTTÖMÄLLE LASERSÄTEILYLLE.
CAUTELA - L’USO DI COMANDI, AGGIUSTAMENTI O PROCEDIMENTI DIVERSO DA QUELLO QUI SPECIFICATO PUÒ DAR LUOGO AD ESPOSIZIONE A RADIAZIONI PERICOLOSE.
PRECAUCION - EL USO DE CONTROLES O AJUSTES, O PROCEDIMIENTOS DE OPERACION DIFERENTES DE LOS ESPECIFICADOS EN ESTE DOCUMENTO
RESULTARAN EN EXPOSICION PELIGROSA A LA RADIACION.
CUIDADO - O USO DOS CONTROLOS OU AJUSTES OU DESEMPENHOS DE PROCEDIMENTOS OUTROS QUE NÃO OS ESPECIFICADOS NAS INSTRUÇÕES DE OPERAÇÃO PODEM RESULTAR EM PERIGOSAS EXPOSIÇÕES À RADIAÇÃO.
This set complies with the EMC Directive 89/336 and with the LVD Directive 73/23.
Dieses Gerät entspricht der EMC-Direktive 89/336 und der LVD-Direktive 73/23.
Cet appareil est en conformité avec la directive EMC 89/336 et avec la directive BT 73/23.
Dit toestel is in overeenstemming met EMCrichtlijn 89/336 en met LVD-richtlijn 73/23.
Detta set uppfyller EMC-direktivet 89/336 och Lågspänningsdirektivet 73/23.
Questo set aderisce alle direttive EMC 89/336 e alle direttive LVD 73/23.
Este aparato cumple con la Directiva EMC 89/336 y con la Directiva LVD 73/23.
Este conjunto satisfaz a Directiva EMC 89/336 e a Directiva LVD 73/23.
1

[ENGLISH]
Your SANYO product is designed and manufactured with high quality materials and components which can be recycled and reused.
This symbol means that electrical and electronic equipment, at their end-of-life, should be disposed of separately from your household waste.
Please dispose of this equipment at your local community waste collection/recycling centre.
In the European Union there are separate collection systems for used electrical and electronic products.
Please help us to conserve the environment we live in!
[DEUTSCH]
Ihr SANYO Produkt wurde entworfen und hergestellt mit qualitativ hochwertigen Materialien und Komponenten, die recycelt und wiederverwendet werden können.
Dieses Symbol bedeutet, daß elektrische und elektronische Geräte am Ende ihrer
Nutzungsdauer von Hausmüll getrennt entsorgt werden sollen.
Bitte entsorgen Sie dieses Gerät bei Ihrer örtlichen kommunalen
Sammelstelle oder im Recycling Centre.
In der Europäischen Union gibt es unterschiedliche Sammelsysteme für Elektrikund Elektronikgeräte.
Helfen Sie uns bitte, die Umwelt zu erhalten, in der wir leben!
[FRANÇAIS]
Votre produit Sanyo est conçu et fabriqué avec des matériels et des composants de qualité supérieure qui peuvent être recyclés et réutilisés.
Ce symbole signifie que les équipements électriques et électroniques en fin de vie doivent être éliminés séparément des ordures ménagères.
Nous vous prions donc de confier cet équipement à votre centre local de collecte/ recyclage.
Dans l’Union Européenne, il existe des systèmes sélectifs de collecte pour les produits électriques et électroniques usagés.
Aidez-nous à conserver l’environnement dans lequel nous vivons!
Les machines ou appareils électriques et électroniques contiennent fréquemment des matières qui, si elles sont traitées ou éliminées de manière inappropriée, peuvent s’avérer potentiellement dangereuses pour la santé humaine et pour l’environnement.
Cependant, ces matières sont nécessaires au bon fonctionnement de votre appareil ou de votre machine, pour cette raison, il vous est demandé de ne pas vous débarrasser de votre appareil ou machine usagé avec vos ordures ménagères.
[NEDERLANDS]
Sanyo producten zijn ontwikkeld en gefabriceerd uit eerste kwaliteit materialen, de onderdelen kunnen worden gerecycled en weer worden gebruikt.
Het symbool betekent dat de elektrische en elektronische onderdelen wanneer deze
vernietigd gaan worden, dit separaat gebeurt van het normale huisafval.
Zorg ervoor dat het verwijderen van de apparatuur bij de lokaal erkende instanties gaat gebeuren.
In de Europese Unie wordt de gebruikte elektrische en elektronische apparatuur bij de daarvoor wettelijke instanties aangeboden.
Alstublieft help allen mee om het milieu te beschermen.
2

[SVENSKA]
Din SANYO produkt är designad och tillverkad av material och komponenter med hög kvalitet som kan återvinnas och återanvändas.
Denna symbol betyder att elektriska och elektroniska produkter, efter slutanvändande, skall sorteras och lämnas separat från Ditt hushållsavfall.
Vänligen, lämna denna produkt hos Din lokala mottagningstation för avfall/återvinningsstation.
Inom den Europeiska Unionen finns det separata återvinningssystem för begagnade elektriska och elektroniska produkter.
Vänligen, hjälp oss att bevara miljön vi lever i!
[ITALIANO]
Il vostro prodotto SANYO è stato costruito da materiali e componenti di alta qualità, che sono riutilizzabili o riciclabili.
Prodotti elettrici ed elettronici portando questo simbolo alla fine dell’uso devono essere smaltiti separatamente dai rifiuti casalinghi.
Vi preghiamo di smaltire questo apparecchio al deposito comunale.
Nell’Unione Europea esistono sistemi di raccolta differenziata per prodotti elettrici ed elettronici.
Aiutateci a conservare l’ambiente in cui viviamo!
[ESPAÑOL]
Los productos SANYO están diseñados y fabricados con materiales y componentes de alta calidad, que pueden ser reciclados y reutilizados.
Este símbolo significa que el equipo eléctrico y electrónico, al final de su ciclo de vida, no se debe desechar con el resto de los residuos domésticos.
Por favor, deposite su viejo “televisor” en el punto de recogida de residuos o contacte con su administración local.
En la Unión Europea existen sistemas de recogida específicos para residuos de aparatos eléctricos y electrónicos.
Por favor, ayúdenos a conservar el medio ambiente!
[PORTUGUÊS]
O seu produto SANYO foi concebido e produzido com materiais e componentes de alta qualidade que podem ser reciclados e reutilizados.
Este símbolo significa que o equipamento eléctrico e electrónico no final da sua vida útil deverá ser descartado separadamente do seu lixo doméstico.
Por favor, entregue este equipamento no seu ponto local de recolha/reciclagem.
Na União Europeia existem sistemas de recolha separados para produtos eléctricos e electrónicos usados.
Por favor, ajude-nos a conservar o ambiente em que vivemos!
3
Screws (not supplied) |
|
Skruvar (medföljer ej) |
FM aerial |
Schrauben (nicht mitgeliefert) |
Viti (non fournite) |
FM Zimmerantenne |
|
Vis (non fournies) |
|
Tornillos (no incluidas) |
Antenne intérieure FM |
Schroeven (niet bijgeleverd) |
|
Parafusos (nào fornecidos) |
Interne FM-raadantenne |
|
|
3 |
FM inomhusantenn |
1 |
2 |
|
|
Antenna FM per interni
Antena aérea interior de FM
Antena interna FM
AM loop aerial MW-Rahmenantenne Antenne-cadre AM AM-raamantenne Ramantenn för AMmottagning
Antena AM a telaio Antena AM de cuadro Antena AM de quadro
Speaker grill Lautsprechergrill Grille d'haut-parleur Luidsprekerrooster Högtalargrill
Griglia degli altoparlanti Parilla de la Bocina Gerlha decorativa
Headphones Kopfhörer Écouteurs Koptelefoon Hörlurar Cuffie Auriculares Auscultadores
|
|
|
|
|
|
|
|
|
|
|
|
|
|
|
|
|
|
|
|
|
|
|
|
|
|
|
|
|
|
|
|
|
|
|
|
|
|
|
|
|
|
|
|
|
|
|
|
|
|
|
|
|
|
|
|
|
|
|
|
|
|
|
|
|
|
|
|
|
|
|
|
|
|
|
|
|
|
|
|
|
|
|
|
|
|
|
|
|
|
|
|
|
|
|
|
|
|
|
|
|
|
|
|
|
|
|
|
|
|
|
|
|
|
|
|
|
|
|
|
|
|
|
|
|
|
R ch speaker |
L ch speaker |
|||||||||||||||||||
Lautsprecher für den rechten Kanal |
Lautsprecher für den linken Kanal |
|||||||||||||||||||
Enceinte droite |
Enceinte gauche |
|||||||||||||||||||
Rechterkanaalluidspreker |
Linkerkanaalluidspreker |
|||||||||||||||||||
Höger högtalare |
Vänster högtalare |
|||||||||||||||||||
Altoparlante del canale destro |
Altoparlante del canale sinistro |
|||||||||||||||||||
Altavoz del canal derecho |
Altavoz del canal izquierdo |
|||||||||||||||||||
Altifalante do canal direito |
Altifalante do canal esquerdo |
|||||||||||||||||||
BACK LOAD HORN
Fig./Abb./Afb. 1a
4
Less than 30 cm Weniger als 30 cm Moins de 30 cm Korter als 30 cm Kortare än 30 cm Menos di 30 cm Menos de 30 cm Menos que 30 cm
USB memory device |
Video/Auxiliary equipment |
USB-Speicher-Gerät |
Video/zusätzliche Ausrüstung |
Dispositif de mémoire USB |
Équipement vidéo/auxiliaire |
USB-opslagapparaat |
Video/overige apparatuur |
USB minnesenhet |
Video/extra utrustning |
Dispositivo di memoria USB |
Apparecchi Video/Ausiliari |
Dispositivo de memoria USB |
Equipo auxiliar de video |
Dispositivo de memória USB |
Video/Equipmento Auxiliar |
/ON
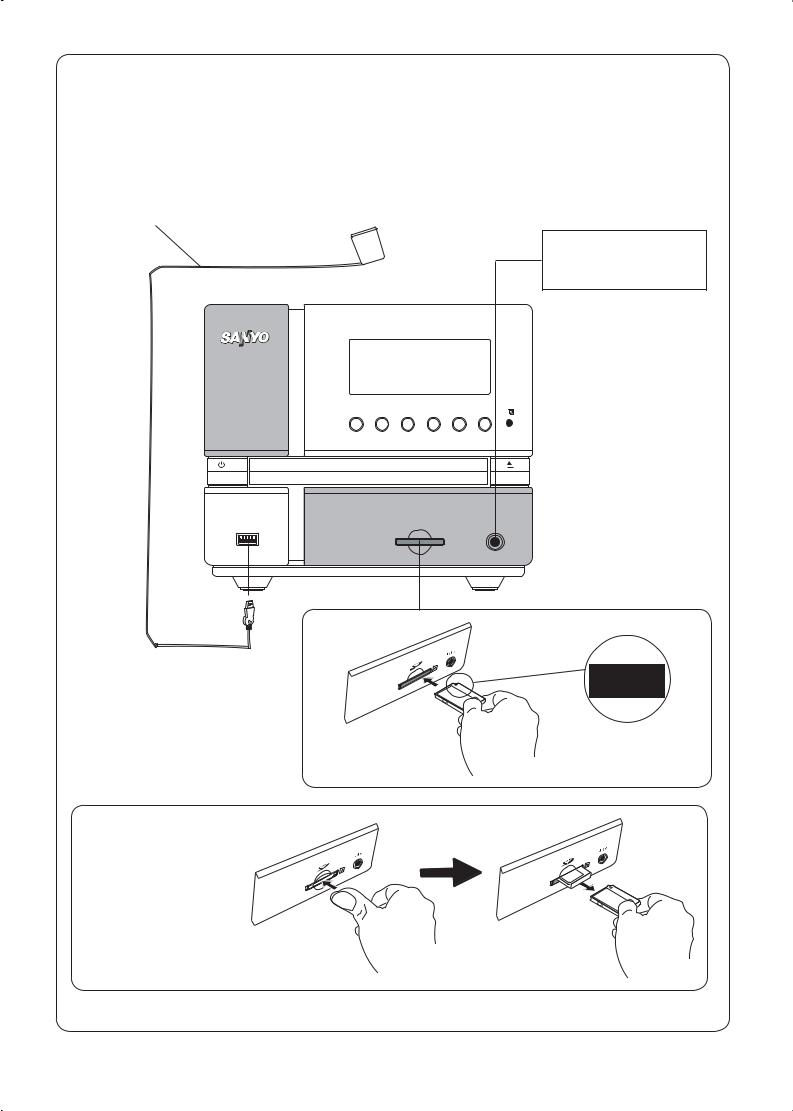
Removing the SD card
De SD-kaart verwijderen
Retrait de la carte SD
Entfernen der SD-Karte
Rimuovere la scheda SD
Retirar o cartão SD
Cómo sacar la tarjeta SD
Ta ut SD-kortet
Fig./Abb./Afb. 1b
5

5 |
6 |
7 8 |
|
|
4 |
|
|
9 |
14 |
|
|
|
|
|
3 |
|
|
10 |
15 |
|
|
|
||
2 |
|
|
11 |
16 |
|
|
17 |
||
1 |
|
|
12 |
18 |
|
|
13 |
|
|
|
Fig./Abb./Afb. 2a |
|
Fig./Abb./Afb. 2b |
|
1
21
20
19
18
17
16
15
14
z/ON OPEN/CLOSE FUNCTION
1 |
2 |
3 |
4 |
5 |
6 |
7 |
8 |
9 |
|
MEMORY |
OVER |
0 |
|
|
DISPLAY |
|
FOLDER/ |
|
PRESET |
|
|
VOL |
|
|
+ |
TUNING/FILE + |
TUNING/FILE - |
||
f |
STOP |
e |
TU/BAND |
_ |
SLEEP |
|
|
|
|
VOL |
|
REPEAT/ |
|
|
FM MODE |
RANDOM SOUND BASS |
|
|
CD |
|
USB |
|
SD |
j j
RB-R100
2
3
4
5
6
7
8
9
10
11
12
13
1
2
Two R03/AAA batteries (not supplied)
Zwei R03/AAA Batterien (nicht mitgeliefert)
Deux piles de format R03/AAA (non fournies)
Twee R03/AAA batterijen (niet bijgeleverd)
Två batterier typ R03/AAA (medföljer ej)
Due batterie R03/AAA (non in dotazione) Dos pilas R03/AAA (no incluidas)
Duas pilhas R03/AAA (não fornecidas)
Fig./Abb./Afb. 3 |
Fig./Abb./Afb. 4 |
6
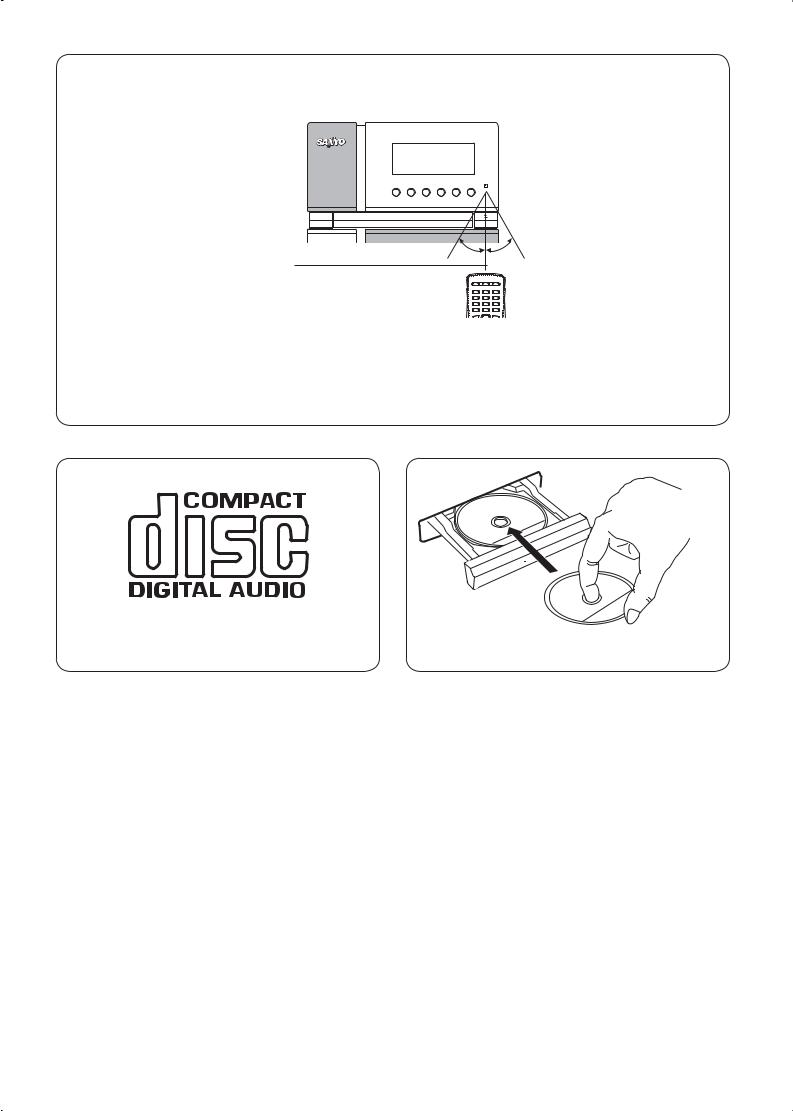
z/ON
Within approx. 7 meters Innerhalb von ungefähr 7 Metern Environ 7 mètres
Binnen ong. 7 meter Inom cirka sju meter Entro 7 metri circa
Dentro de aprox. 7 metros Dentro de aprox. 7 metros
Remote sensor Fernbedienungssensor
Détecteur de télécommande
 Afstandsbedieningssensor
Fjärrkontrollsensor
Sensore a distanza Sensor remoto
30˚ |
|
30˚ |
Sensor remoto |
|
|
|
|
z/ON OPEN/CLOSE FUNCTION |
|
||
1 |
2 |
3 |
|
4 |
5 |
6 |
|
7 |
8 |
9 |
|
0MEMORY OVER
DISPLAY |
FOLDER/ |
PRESET |
|
|
VOL |
Fig./Abb./Afb. 5
Fig./Abb./Afb. 6 |
Fig./Abb./Afb. 7 |
7

ENGLISH
PRECAUTIONS
-The apparatus shall not be exposed to dripping or splashing.
-Do not use where there are extremes of temperature (below 5 °C or exceeding 35 °C), or direct sunlight may strike it.
-Because of the CD player’s extremely low noise and wide dynamic range, there might be a tendency to set the volume on the amplifier unnecessarily high. Doing so may produce an excessively large output from the amplifier which could damage your speakers.
-Sudden changes in the ambient temperature may cause condensation to form on the optical lens inside the unit. If this happens, take out the disc, leave the unit for about 1 hour, and then proceed to operate.
-When carrying the unit, be sure to remove any disc which may be inside and turn the power off. Wait at least 10 seconds, then proceed to operate.
-The system’s speakers use powerful magnets. Do not place time-pieces, credit cards, cassette tapes or video tapes, etc. near the speakers.
-Do not install this equipment in a confined space, such as a bookcase or built in cabinet.
-No object filled with liquids, such as vase, shall be placed on the apparatus.
-Where the mains plug or an appliance coupler is used as the disconnect device, the disconnect device shall remain readily operable.
Note:
This handling description is printed prior to product development.
When a part of the product specification must be changed to improve operability or other functions, priority is given to the product specification itself. In such instances, the instruction manual may not entirely match all the functions of the actual product.
Therefore, the actual product and packaging, as well as the name and illustration, may differ from the manual.
The LCD display shown as an example in this
manual may be different from the actual LCD display.
CONNECTIONS
Note:
-Do not connect the mains lead to an AC outlet until all connections have been made.
-The system is not completely disconnected from the mains when the z/ON button is set to the z position (standby mode).
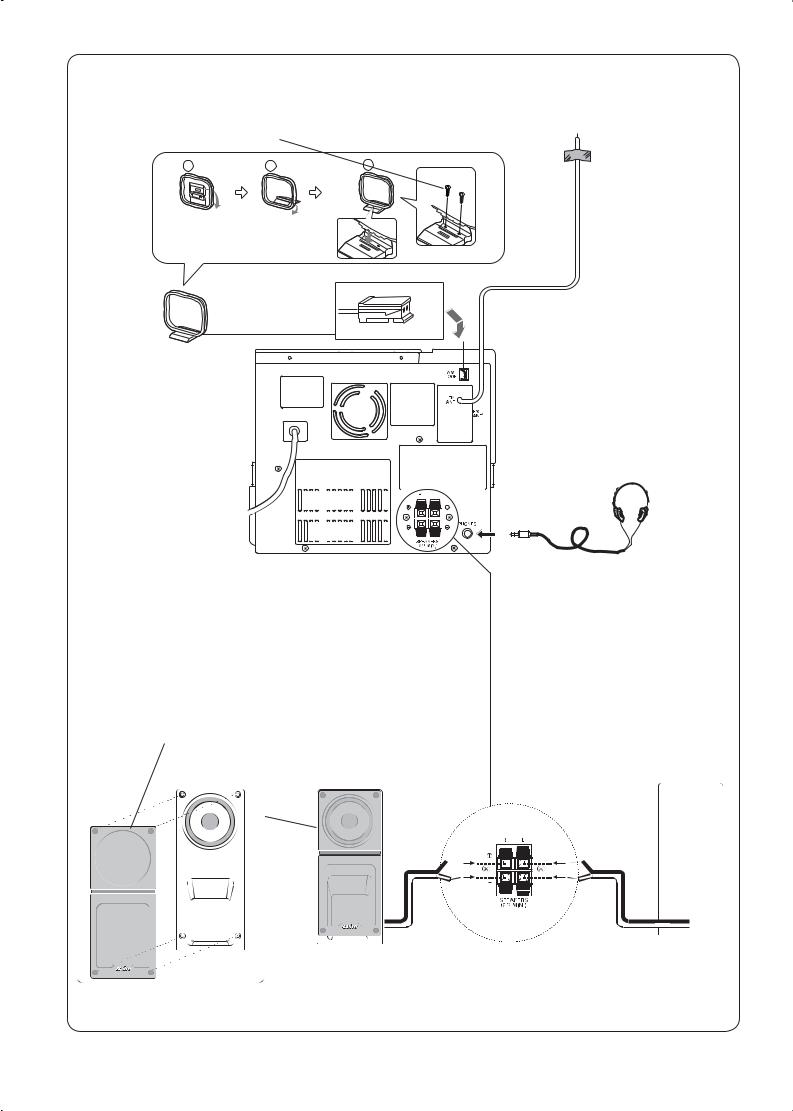
BACK OF THE UNIT (Fig.1a)
Speakers
Connect the left speaker wire to the “L” SPEAKERS terminal and the right speaker wire to the “R” SPEAKERS terminal.
When connecting the speakers, make sure that “+” and “–” polarities are matched properly. Otherwise, the sound may appear to be lacking in the bass range and stability.
Connect the red speaker wire to the red terminal “+” and the black wire to the black terminal “–”. The speaker grill can be removed or attached as desired.
Aerials
FM aerial
In areas close to a transmitter, the simple indoor aerial is sufficient to receive broadcasts. Unwind the aerial wire, then extend it as straight as possible and while listening to the sound from the system, secure it in a position where the best FM reception is found.
AM loop aerial
Assemble the loop aerial as shown in Fig.1a. Unwind the aerial wire, then connect it to the AM LOOP terminal. Place the loop aerial in a position which yields the best AM reception, or attach it to a wall or other surface as shown in Fig.1a.
Headphones
Connect the stereo headphones (not supplied) to the PHONES socket for monitoring or for private listening.
8

FRONT OF THE UNIT (Fig.1b)
USB memory device
Connect the USB memory device (such as Digital voice recorder, etc.) into the USB port. When a memory device, e.g. a card reader, is connected to the USB port via long USB cable, it may interfere to other devices. Please use a cable shorter than 30 cm.
The USB device in which the USB charge function is provided enters "Charge" mode when connected with the unit in the SD mode.
Video/Auxiliary equipment
Connect the audio cable (not supplied) from the audio output socket of a video/auxiliary equipment to the LINE IN socket.
CONTROLS
Front panel (Fig. 2a)
1.USB port (USB)
2.Power button (z/ON)
3.Tuner function/Band select button (TU/BAND)
4.Clock/Timer button (CLOCK/TIMER)
5.LCD display
6.Memory/Enter button (MEMO/ENT)
7.Function select button (FUNCTION)
8.Record select button (REC SELECT)
9.Record button (REC)
10.Remote sensor (IR)
11.Disc tray open/close button (q)
12.SD card loading slot (SD)
13.Line input socket (LINE IN)
Top panel (Fig. 2b)
14.Volume control (VOLUME)
15.Jog mode button (JOG MODE)
16.Play/Pause button (i)
17.Stop/Clear button (n/CLEAR)
18.Skip/Search/Tuning/File/Folder select buttons (f e, -TUNING/FILE+)
Note:
The LCD display cannot show small alphabets and the accented letters (For example: “Á”, “À”, “Ô, “”, “Å” and “Ä”).
REMOTE CONTROLLER
Controls (Fig. 3)
1.Power button (z/ON)
2.Disc tray Open/Close button (OPEN/CLOSE)
3.Function button (FUNCTION)
4.Number buttons (1-9, 0, OVER)
5.Memory button (MEMORY)
6.Folder select/Preset button (FOLDER/PRESET)
7.Volume buttons (VOL +, -)
8.Stop button (n STOP)
9.Sleep button (SLEEP)
10.Bass expander button (BASS)
11.Sound mode select button (SOUND)
12.SD card Play/Pause button (SD i)
13.SD card Record/Record pause button (SD j)
14.USB Record/Record pause button (USB j)
15.USB Play/Pause buttons (USB i)
16.CD Play/Pause buttons (CD i)
17.Repeat/FM mode button (REPEAT/FM MODE)
18.Random play button (RANDOM)
19.Tuner function/Band select buttons (TU/BAND)
20.Display button (DISPLAY)
21.Skip/Search/Tuning/File select buttons (f e, TUNING/FILE-, TUNING/FILE+)
Number buttons (1-9, 0, OVER)
Example:
To select No.3, press 3. To select No.10,
Tuner/Audio CD: press OVER, 1, then 0. MP3/WMA: press OVER, 0, 1, then 0.
To select No.125, press OVER, 1, 2, then 5.
Inserting batteries (Fig. 4)
Note:
Always remove batteries if the remote controller is not to be used for a month or more. Batteries left in it may leak and cause damage.
Remote control range (Fig. 5)
The buttons on the remote controller perform similar function to similarly marked buttons on the front and top panels of the main unit.
9
ADJUSTING THE CLOCK
(Using the main unit)
The clock can be set on either power on or standby mode.
1.Press the CLOCK/TIMER button. Current time appears.
- If in the standby mode, skip step 1.
2.Press the MEMO/ENT button until the “hour” section blinks.
3.Turn the VOLUME control to set the “hour” section.
4.Press the MEMO/ENT button. The “minute” section blinks.
5.Turn the VOLUME control to set the “minute” section.
6.Press the MEMO/ENT button. The clock starts.
Note:
-To display the clock during operation, press the CLOCK/TIMER button briefly. After a few seconds, the original display returns.
-If a power failure occurs or the mains lead is disconnected, the clock display blinks. Reset the clock again.
Changing the clock to the 12-hour display (Using the main unit)
Example: 13:30vPM1:30
1.Disconnect the mains lead and replug again.
2.While holding down the e button on the top panel of the unit, press the CLOCK/TIMER button.
To return to the original setting, repeat the steps above.
BEFORE OPERATION
Turning the power on and off
-Press the z/ON button to turn on the power, the display lights.
-To turn the power off, press the z/ON button again.
-When the mains lead is connected to the AC outlet, the unit will respond to commands from the remote controller.
Direct start function
If the following buttons are pressed when the unit is in the standby mode, the unit turns on automatically and the function is set.
Main unit TU/BAND
Remote controller TU/BAND, USB i, CD i, SD i
Auto power off function
Note:
-This function do effect only under USB, CD, or SD function, stopping mode.
-When the unit is shipped from the factory, this function is off.
1.Press the JOG MODE button.
2.Rotate the VOLUME control to select “AUTO POWER OFF”.
3.Press the MEMO/ENT button.
“AUTO P.OFF” appears on the display.
4.Rotate the VOLUME control to select “10” or “30”.
5.Press the MEMO/ENT button.
-The power turns off when “10” or “30” minutes has elapsed in the stop mode.
Note:
You can select “AUTO P.OFF -- --” to cancel the auto power off function.
10

Selecting the function
Press the FUNCTION button to select the desired function. Each time the button is pressed, the display changes as follows:
CD FUNCTION v USB FUNCTION v
SD FUNCTION v TUNER FUNCTION v LINE FUNCTION v CD FUNCTION v…
The function is automatically selected when CD, SD card or USB memory device playback is started or the TU/BAND button has been pressed.
When the function selection is changed, CD, SD cards or USB memory device playback is automatically stopped.
Adjusting the volume
Turn the VOLUME control (or press the VOL – or VOL + button on the remote controller), the volume level appears on the display (VOL MIN ~ MAX).
Bass expander system
Press the BASS button on the remote controller to select the desired bass boost effect.
BASS ON wv BASS OFF
Using the main unit:
1.Press the JOG MODE button, then rotate the VOLUME control until “BASS” appears on the display.
2.Press the MEMO/ENT button.
3.Rotate the VOLUME control to select “BASS ON” or “BASS OFF”.
4.Press the MEMO/ENT button.
Selecting the sound preset
Press the SOUND button on the remote controller to select the sound mode matching the music
to be listened to: |
|
SOUND POP: |
Pops, etc. |
SOUND CLASSIC: |
Classical music, etc. |
SOUND ROCK: |
Rock music, etc. |
SOUND JAZZ: |
Jazz, etc. |
Using the main unit:
1.Press the JOG MODE button, then rotate the VOLUME control until “SOUND” appears on the display.
2.Press the MEMO/ENT button.
3.Rotate the VOLUME control to select the desired sound mode.
4.Press the MEMO/ENT button.
WHAT TO DO IF…
If the operation of the unit or display is not normal, the unit must be reset. Follow the steps as shown below.
1.Disconnect the mains lead and replug again.
2.Within 5 seconds, while holding down the e button on the top panel of the unit, press the MEMO/ENT button.
3.Resume operations.
11
 Loading...