


DW80R7061US

Dishwasher
User manual
DW80R706* Series
DW8000R_DD68-00211A-00_EN.indd 1 2019-04-24 5:59:10

Contents
Safety information 4
Contents
What you need to know about the safety instructions 4
Important safety symbols 4
Before using your dishwasher 7
Before you start 8
Unpacking your dishwasher 8
Checking parts 9
Unsuitable items for the dishwasher 11
Using your dishwasher 12
Basic use of racks 12
Detergent guidelines 23
Touchpad responsiveness 26
Operations 27
Control panel 27
Cycle overview 30
Simple steps to start your dishwasher 31
Settings 32
Special features 34
Maintenance 35
Cleaning 35
Long-term care 39
Cleaning the drain pump 40
Storing your dishwasher 40
Troubleshooting 41
Check these solutions if your dishwasher… 41
Information codes 47
English2
DW8000R_DD68-00211A-00_EN.indd 2 2019-04-24 5:59:10

Cycle chart 48
Appendix 50
Helping the environment 50
Specications 50
Warranty (U.S.A) 51
Contents
English 3
DW8000R_DD68-00211A-00_EN.indd 3 2019-04-24 5:59:10

SAVE THESE INSTRUCTIONS
Safety information
Safety information
Congratulations on your new Samsung dishwasher. This manual contains important
information on the installation, use, and care of your appliance. Please take time to read
this manual to take full advantage of your dishwasher’s many benets and features.
What you need to know about the safety instructions
Warnings and Important Safety Instructions in this manual do not cover all possible
conditions and situations that may occur. It is your responsibility to use common sense,
caution, and care when installing, maintaining, and operating your dishwasher.
Important safety symbols
What the icons and signs in this user manual mean:
WARNING
Hazards or unsafe practices that may result in severe personal injury or death.
To reduce the risk of re, explosion, electric shock, or personal injury when using your
dishwasher, follow these basic safety precautions:
CAUTION
Hazards or unsafe practices that may result in minor personal injury or property damage.
NOTE
These warning signs are here to prevent injury to you and others.
Please follow them explicitly.
After reading this section, keep it in a safe place for future reference.
English4
DW8000R_DD68-00211A-00_EN.indd 4 2019-04-24 5:59:10

SAVE THESE INSTRUCTIONS
California Proposition 65 Warning
WARNING: Cancer and Reproductive Harm www.P65Warnings.ca.gov
WARNING
When using your dishwasher, follow basic precautions, including the following:
1. Read all instructions before using the dishwasher.
2. Use the dishwasher only for its intended function.
3. Use only detergents or wetting agents recommended for use in a dishwasher and keep
them out of the reach of children.
4. When loading items to be washed:
- locate sharp items so that they are not likely to damage the door seal, and
- load sharp knives with the handles up to reduce the risk of cut-type injuries.
5. Do not wash plastic items unless they are marked “dishwasher safe” or the equivalent.
For plastic items not so marked, check the manufacturer’s recommendations.
6. Do not touch the HEATING ELEMENT during or immediately after use.
7. Do not operate your dishwasher unless all ENCLOSURE panels are properly in place.
8. Do not tamper with the controls.
9. Do not abuse, sit on, or stand on the door or dish rack of the dishwasher.
10. To reduce the risk of injury, do not allow children to play in or on the dishwasher.
11. Under certain conditions, hydrogen gas may be produced in a hot-water system that
has not been used for two weeks or more. HYDROGEN GAS IS EXPLOSIVE. If the hotwater system has not been used for such a period, before using the dishwasher turn
on all hot-water faucets and let the water ow from each for several minutes. This will
release any accumulated hydrogen gas. As the gas is ammable, do not smoke or use
an open ame during this time.
12. Remove the door to the washing compartment when removing an old dishwasher from
service or discarding it.
Safety information
DW8000R_DD68-00211A-00_EN.indd 5 2019-04-24 5:59:10
English 5

SAVE THESE INSTRUCTIONS
Safety information
Safety information
CAUTION
• After unpacking the dishwasher, keep the packaging out of the reach of children.
• The dishwasher is extremely heavy. Do not attempt to move or carry the dishwasher
by yourself. Two or more people are needed to move a dishwasher and avoid potential
injuries.
• As with any equipment using electricity, water, and moving parts, potential hazards
exist.
• Do not install the dishwasher near electrical components. Keep the dishwasher away
from open ames.
• Install and level your dishwasher on an uncarpeted oor that can support its weight.
• Your dishwasher must be properly grounded. Never connect it to an ungrounded outlet.
See page 7 for more information on grounding your dishwasher.
• Connect the ground wire to the green ground connector in the terminal box.
• After the dishwasher is installed, check that the drain hose is properly connected and
that there is no leakage from the hose connectors. If the drain hose is loose, it may
cause property damage.
• The water supply line is susceptible to breakage. As time goes by, it becomes less
exible. Check the line periodically. If it is swollen, torn, cut, or there is a water leak,
replace it immediately.
• To safely operate this appliance, familiarize yourself with its operations and exercise
care when using it.
• Do not put gasoline, solvents, or other flammable materials inside the dishwasher. Do
not wash dishes exposed to these materials.
• Keep your dishwasher detergent out of the reach of children. Detergent has an adverse
effect on human organs. It contains elements for polishing and is corrosive. Avoid
letting the detergent come into contact with your skin and eyes.
• Do not push or place pressure on the door when it is open, as this may damage the
dishwasher or cause harm.
• Do not allow children to play in or on the dishwasher. They may harm themselves or
damage the dishwasher.
• Disconnect the power cable (or set the circuit breaker to off) before servicing your
dishwasher.
• Do not repair, replace, or service any part of your dishwasher yourself. Disassembly,
repairs, and modications are permitted by authorized service technicians only. Work
done by an unauthorized person may void your warranty.
English6
DW8000R_DD68-00211A-00_EN.indd 6 2019-04-24 5:59:10

SAVE THESE INSTRUCTIONS
• Before disposing of your dishwasher, remove the door of the washing compartment or
the door latch so that children or small animals cannot get trapped inside.
• If the dishwasher is left unused for an extended period of time, turn off the water
supply.
• This dishwasher is intended for residential use only.
Before using your dishwasher
WARNING
Tip-Over Hazard
• Do not use the dishwasher until it is correctly installed.
• Do not push down on the dishwasher door when it is open.
• Do not place excessive weight on the dishwasher door when it is
open.
Electric Shock Hazard
Failure to follow these instructions can result in death, re, or electric
shock:
• Electrically ground the dishwasher
• Connect the ground wire to the green ground connector in the
junction box.
• Do not use an extension cord.
Safety information
DW8000R_DD68-00211A-00_EN.indd 7 2019-04-24 5:59:11
English 7

Before you start
Be sure to have your installer follow these instructions closely so that your new
dishwasher works properly and that you’re not at risk of injury when washing dishes.
Unpacking your dishwasher
• Once your new dishwasher has been delivered to you, carefully unpack it and check for
any damage.
Before you start
If the dishwasher has been damaged, make note of it on the waybill and keep a copy.
Do not install the dishwasher, and contact Samsung Customer Service at the number
listed on the next page.
• If there is no damage to the product, you can proceed with the installation. If you are
going to install it yourself, make sure to read through the installation guide and follow
the directions inside.
• After unpacking your dishwasher, keep the packaging out of the reach of children to
ensure their safety.
English8
DW8000R_DD68-00211A-00_EN.indd 8 2019-04-24 5:59:11
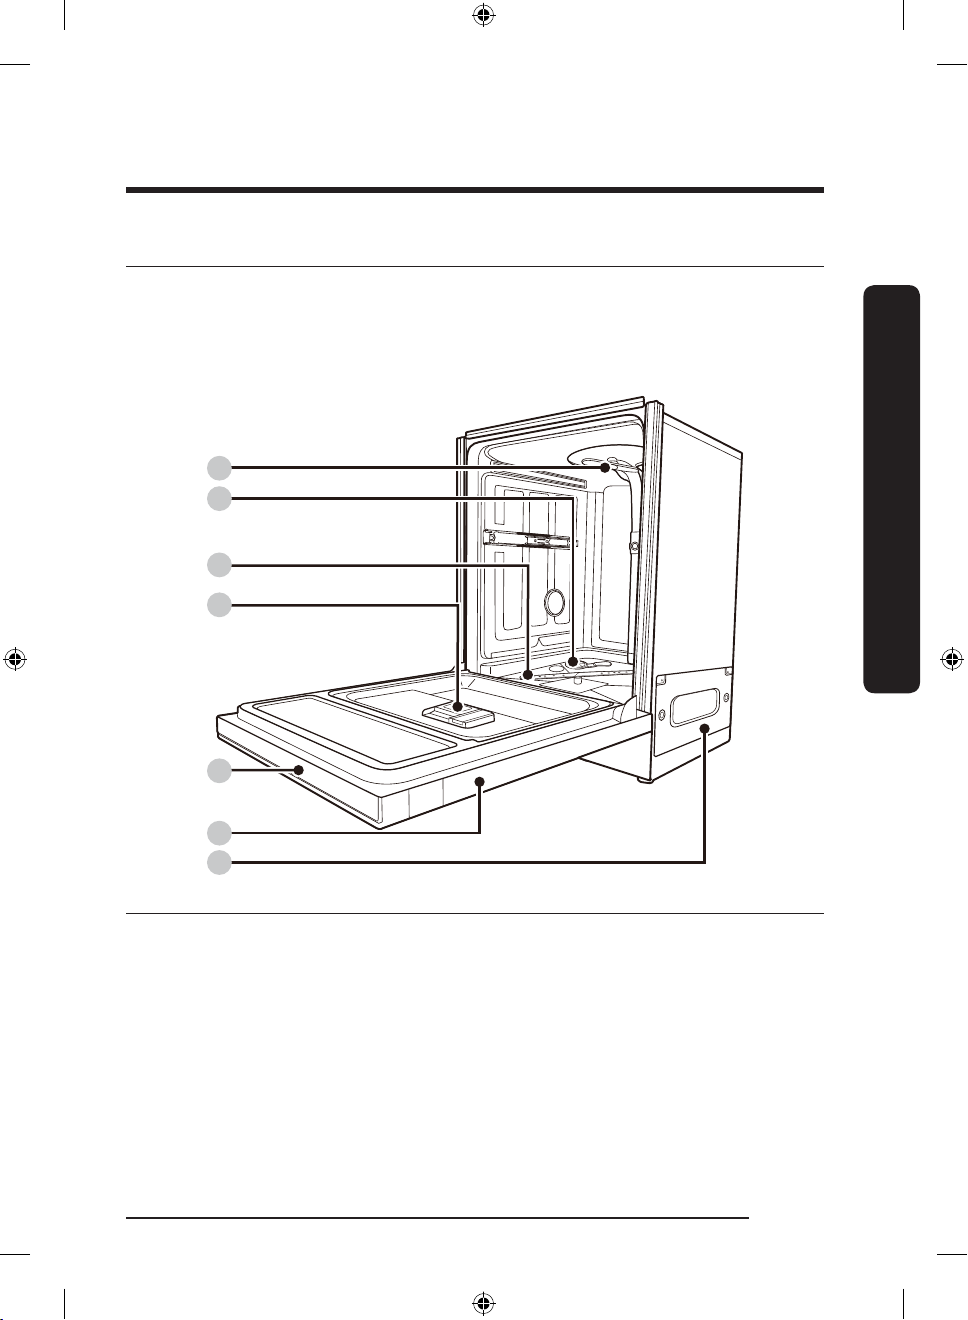
Checking parts
When your dishwasher has been unpacked, make sure you’ve received all the parts shown
below.
If your dishwasher was damaged during shipping, or if you do not have all the parts,
contact Samsung Customer Service at 1-800-SAMSUNG (726-7864).
01
02
03
04
05
Before you start
06
07
01 Top nozzle 02 Storm Wash 03 Lower nozzle
04 Dispenser 05 Control panel 06 Door
07 Base
English 9
DW8000R_DD68-00211A-00_EN.indd 9 2019-04-24 5:59:11
Before you start
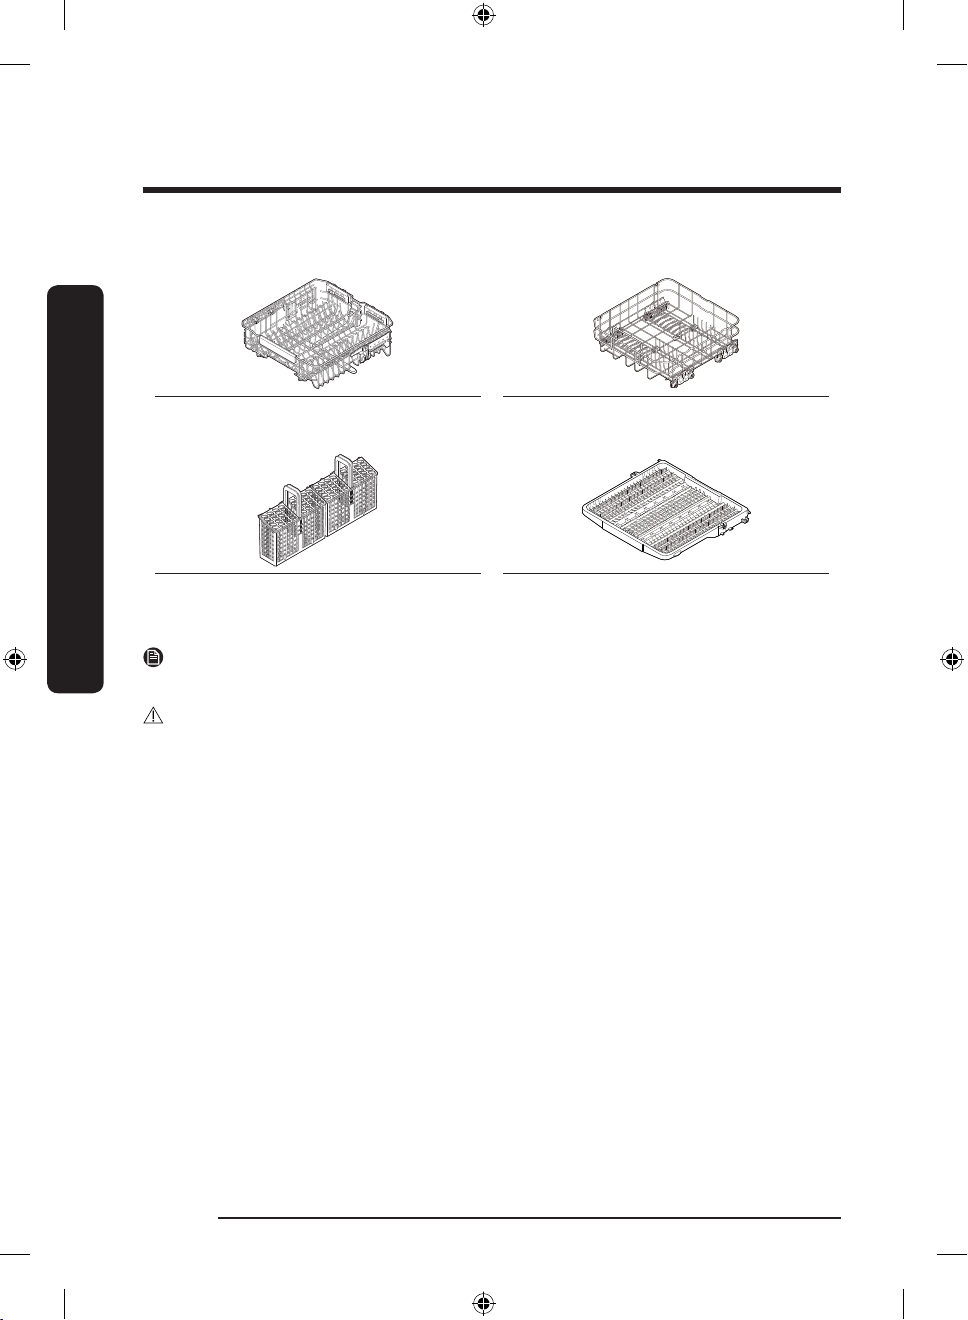
Accessories
Before you start
NOTE
Accessory parts - User/Installation manual, Installation Kit, Kick Plate.
CAUTION
• Do not wash items that are covered with ash, sand, wax, lubricating grease, or paint.
These materials will damage the dishwasher. Ash does not dissolve and will spread
inside the dishwasher.
• Remove food remains such as bones, fruit seeds, etc. and waste such as toothpicks,
paper napkins, etc. from your dishes. Food remains and waste can make noise, cause the
dishwasher to malfunction, and damage your dishes and dishwasher.
Upper rack Lower rack
Cutlery rack 3rd rack
English10
DW8000R_DD68-00211A-00_EN.indd 10 2019-04-24 5:59:12

Unsuitable items for the dishwasher
WARNING
Wash only items such as glass, porcelain, and cutlery which the manufacturer states is
dishwasher safe. Do not wash aluminium (e.g. grease lters). The dishwasher may damage
aluminium, or in extreme cases, cause a severe chemical reaction.
Do not wash the following items in the dishwasher.
• Copper, brass, tin, ivory, and aluminium items or items with adhesive
• Non-heat resistant plastics
• Craft items, antiques, valuable vases, and decorative glassware
• Pottery or glazed-ceramic items
• Wooden cutlery and crockery or items with wooden parts
• Delicate glassware or glassware containing lead crystal. Clouding may occur on the
glassware after frequent washing.
NOTE
Silverware that has contacted food containing sulphur may become discoloured. Food with
sulphuric content include egg yolks, onions, mayonnaise, mustard, sh, sh brine, and
marinades.
Before you start
English 11
DW8000R_DD68-00211A-00_EN.indd 11 2019-04-24 5:59:12

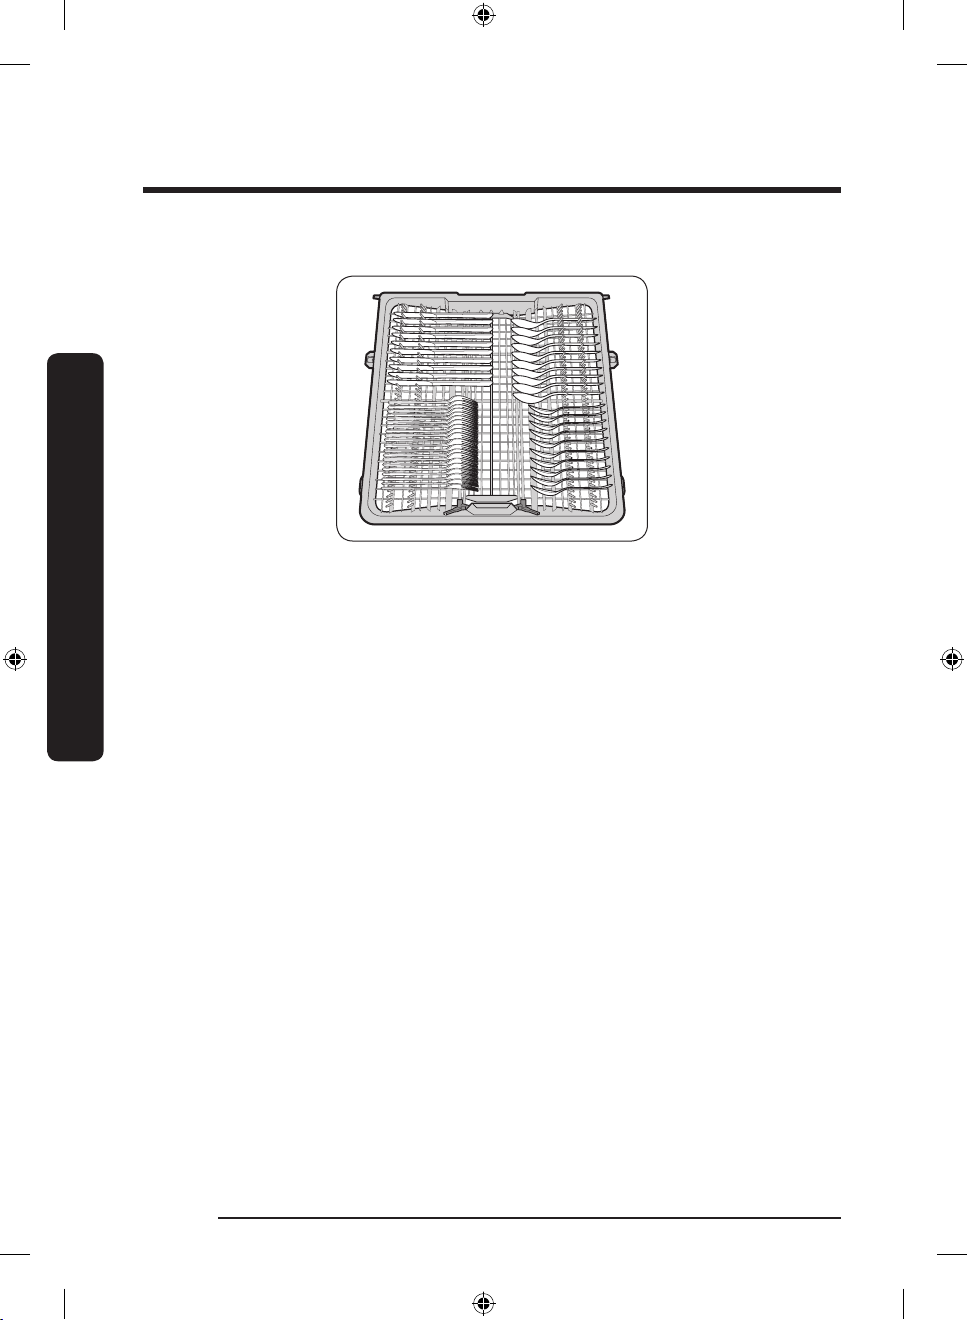
Using your dishwasher
Using your dishwasher
Basic use of racks
Angle of the plate supports
In the Lower rack, you can easily fold down the fold-down tines to make room for
large items such as pots and pans in the Zone Booster area. Remove the rack from the
dishwasher, and then fold down the tines one at a time. See the illustration below.
Lower rack
In the Upper rack, you can adjust the angle of the tines to three different positions to
match the size and shape of your dishes. To adjust the tines, grasp the handle at the front
of the rack, and then push it left or right. See the illustration below.
Upper rack
English12
DW8000R_DD68-00211A-00_EN.indd 12 2019-04-24 5:59:13
Height adjustment
You can adjust the height of the upper rack in your Samsung dishwasher so that the lower
rack can accommodate larger sized dishes. Depending on where you set the upper rack
height, the lower rack can accommodate plates up to 12 in. (30 cm) in diameter and the
upper rack can accommodated plates up to 8 in. (20 cm) in diameter.
To raise the upper rack
Pull the upper rack upwards. The adjustable
handle will latch, and the upper rack will
rise.
To lower the upper rack
Hold both the adjustable handles located at
the left and right sides of the upper rack,
and then evenly press down.
CAUTION
• Adjust the height of the upper rack
before loading dishes into the rack.
Adjusting the rack after loading the
dishes may damage the dishes.
• Make sure to hold both handles when
adjusting, or the dishwasher door may
not close properly.
Using your dishwasher
English 13
DW8000R_DD68-00211A-00_EN.indd 13 2019-04-24 5:59:13
Using your dishwasher
Using your dishwasher
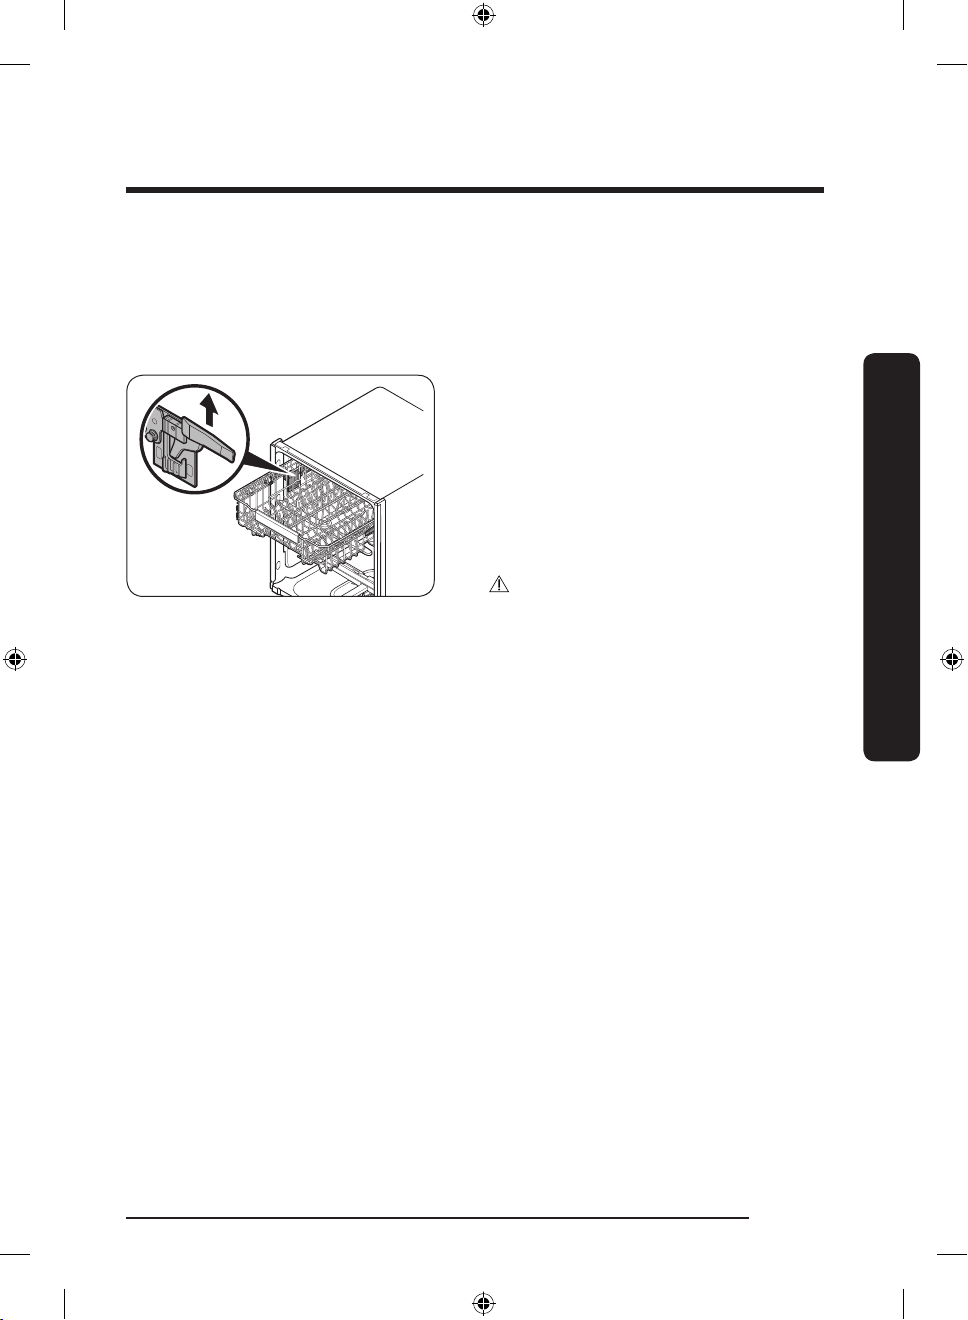
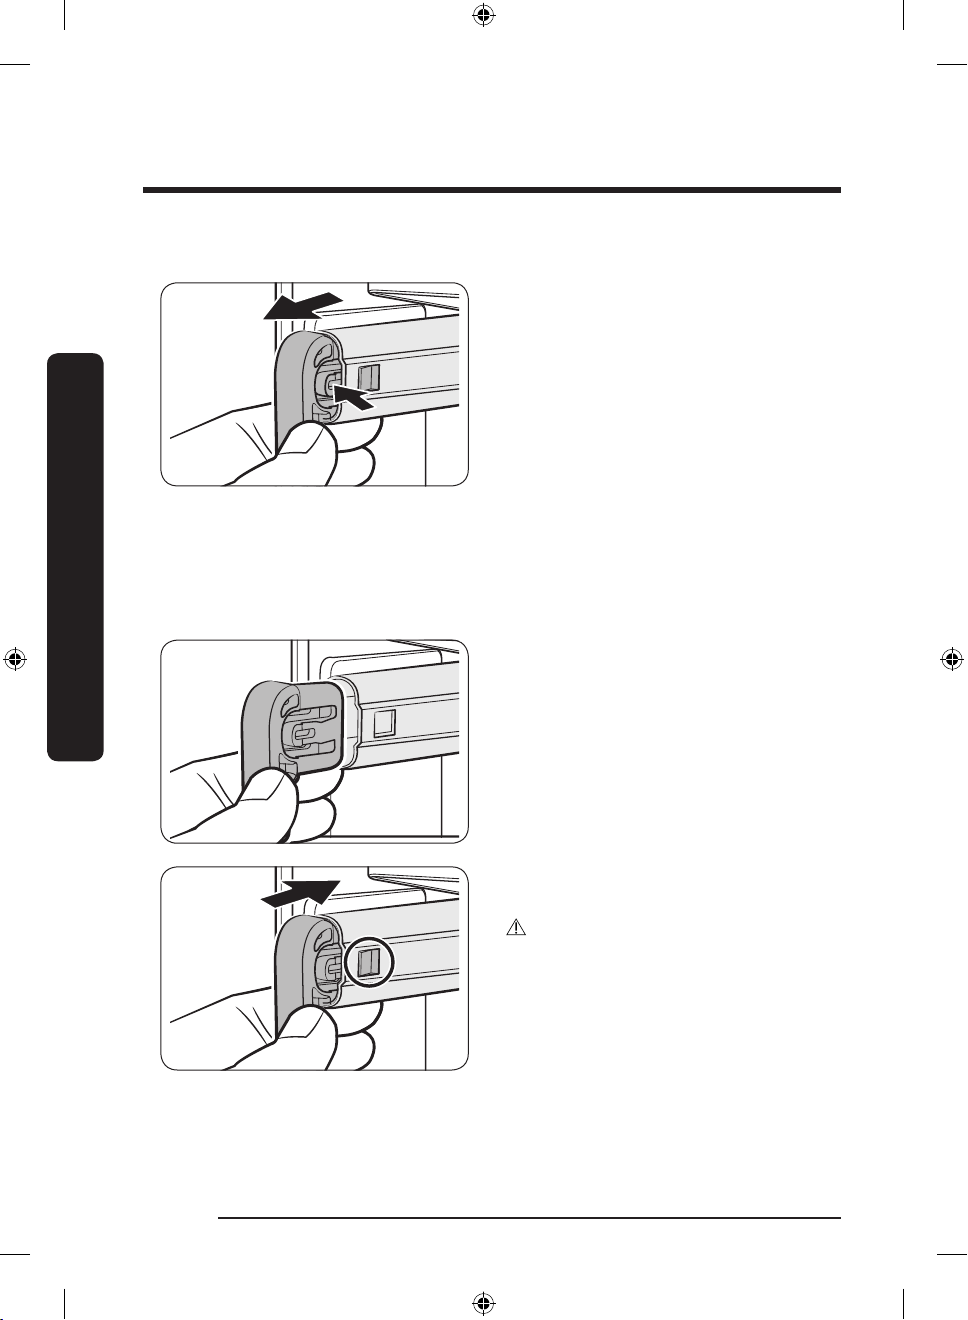
To remove the upper rack
1. Push the hook on the left rail holder
and then the right rail holder.
2. Remove the rail holders from the left
and right rails.
3. Check the position of the shaft (dark
grey in the illustration) on the rail
bracket.
4. Slide the upper rack so that the shaft is
positioned at end of the rail bracket.
English14
DW8000R_DD68-00211A-00_EN.indd 14 2019-04-24 5:59:14

5. Lift the upper rack to remove.
6. Reverse the order of removal to re-
insert the upper rack.
CAUTION
• Do not operate the dishwasher without the upper rack. Otherwise, noises occur and the
dishwasher does not operate properly.
• Because the upper rack is removable, insert the upper rack properly to ensure the
dishwasher operates normally.
• Take care that you do not lose the holder rails during this process.
Using your dishwasher
English 15
DW8000R_DD68-00211A-00_EN.indd 15 2019-04-24 5:59:14
Using your dishwasher
Using your dishwasher
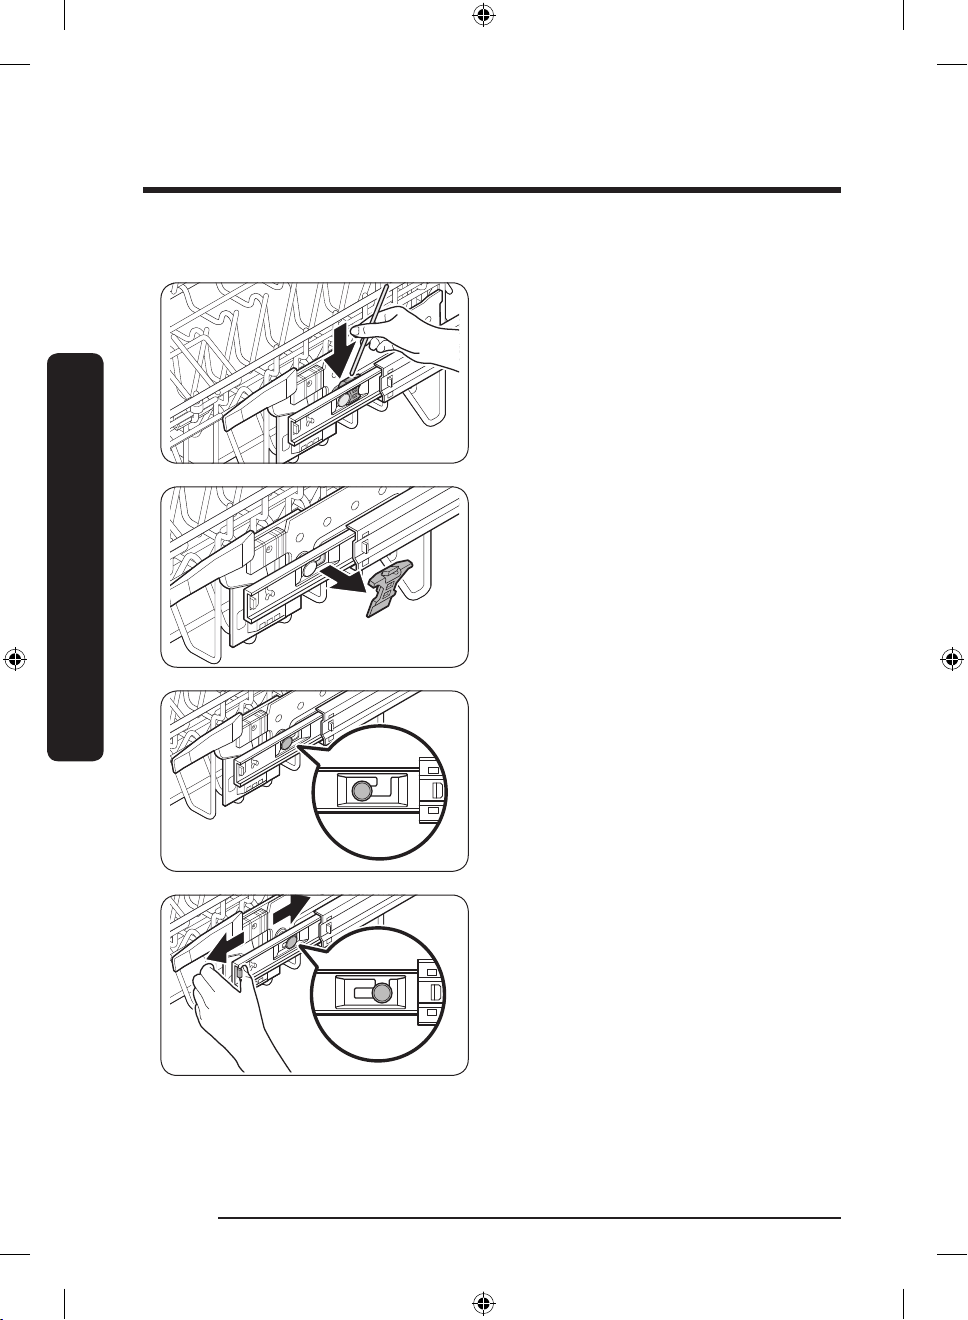
To remove the 3rd Rack
1. Stand facing the dishwasher, and then
pull the 3rd rack out so that the handles
at the ends of the rack supports (dark
grey in the illustration) are even with
the end of the rack.
2. With your right thumb, nd the small
indentation on the inside of the left
rack support that houses the tab for the
handle lock.
3. Push the handle lock tab in (i.e. to your
left) with the tip of your thumb, and
then pull the handle towards you until
it disengages from the support.
4. Repeat this process with the right
handle using your left thumb.
5. When the handles are removed, remove
the 3rd rack from the dishwasher.
6. Reverse the order of removal to
re-insert the 3rd rack.
CAUTION
Make sure the hook-shaped part of the
handle faces downward and the handle
lock (circled) re-engages when reinserting
the handle into the rail.
English16
DW8000R_DD68-00211A-00_EN.indd 16 2019-04-24 5:59:14
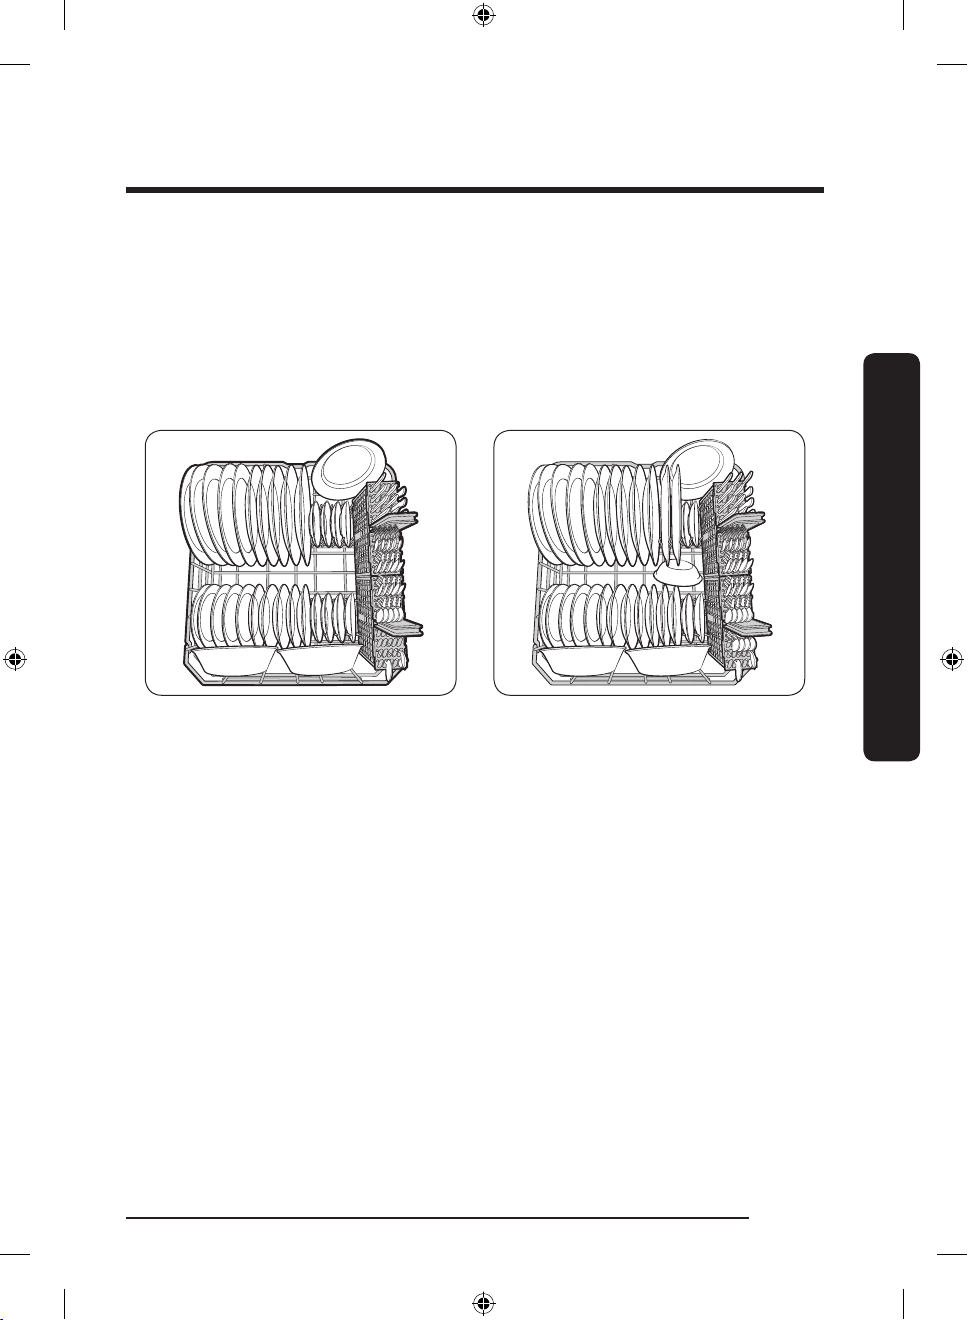
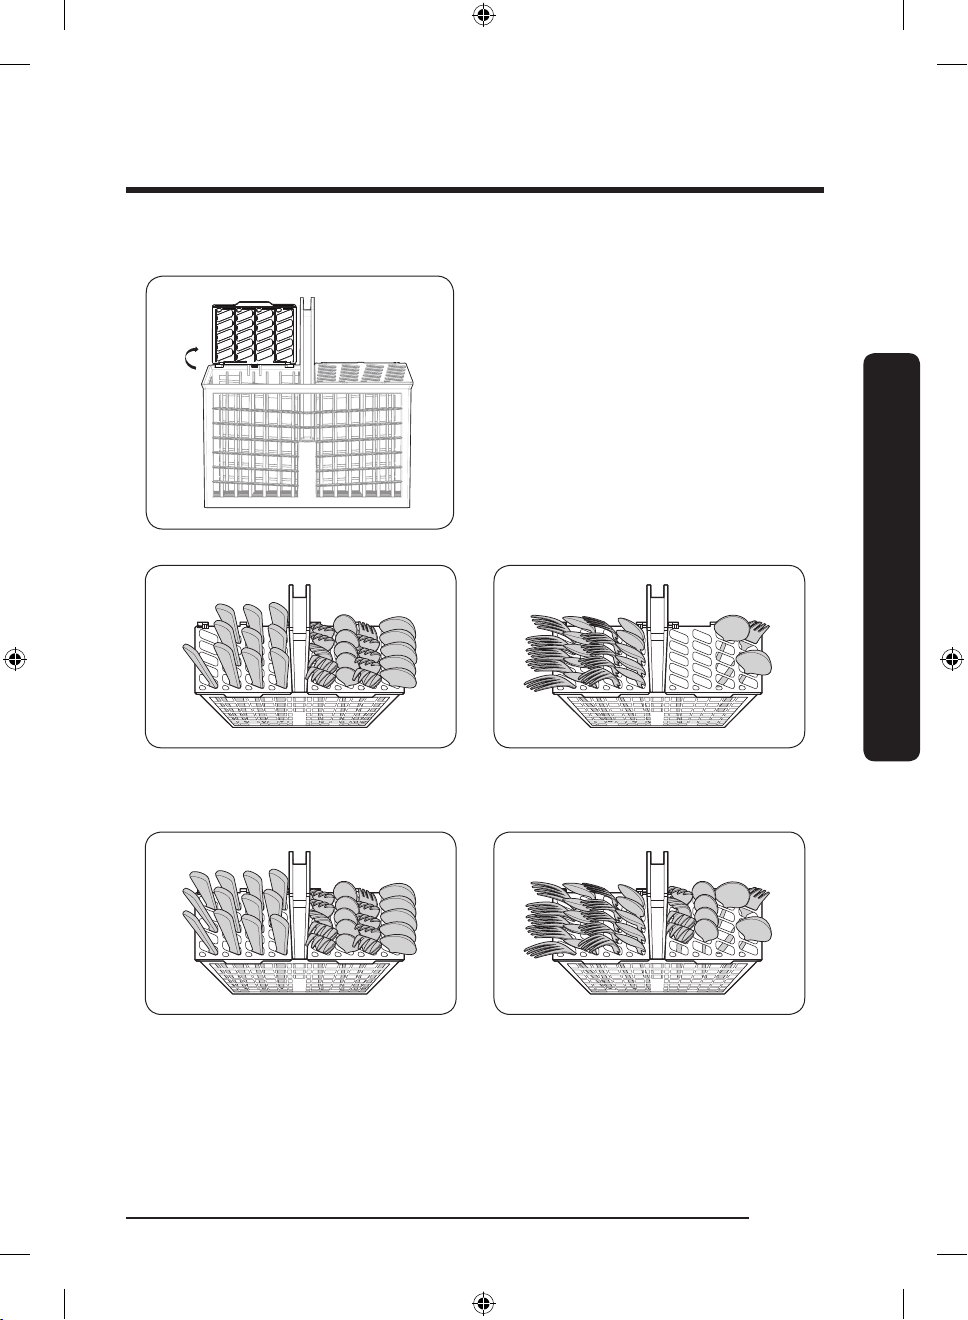
Loading dishes
Loading the lower rack
The lower rack has been especially designed for dinner dishes, soup bowls, plates, pots,
lids, casserole dishes, and plates.
Load large items such as pans and pots into the dishwasher so their open sides face
downwards. We recommend loading cups, stemware, and small plates into the upper rack.
See the recommended loading patterns below.
10 place setting 12 place setting
Using your dishwasher
English 17
DW8000R_DD68-00211A-00_EN.indd 17 2019-04-24 5:59:14
Using your dishwasher
Using your dishwasher
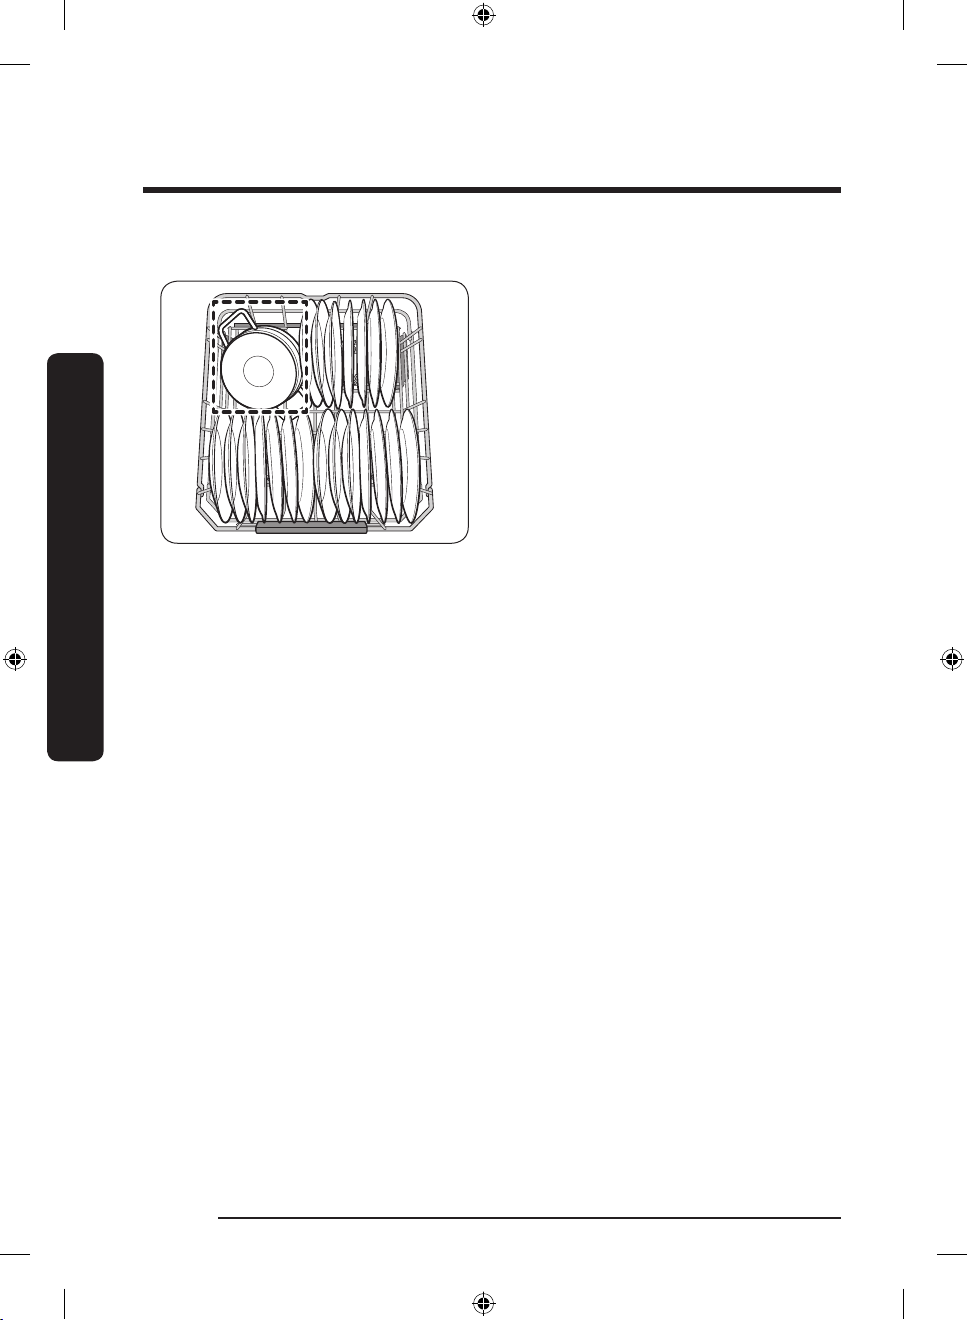
Loading the Storm Wash Area
For more effective cleaning, load large
items into the Storm Wash area on the left
side of the lower rack (Red zone).
When you select Storm Wash, the
dishwasher supplies additional power to
reinforce the water jet in the Storm Wash
area.
Make sure pot handles and other items
do not interfere with the rotation of the
nozzles.
English18
DW8000R_DD68-00211A-00_EN.indd 18 2019-04-24 5:59:15
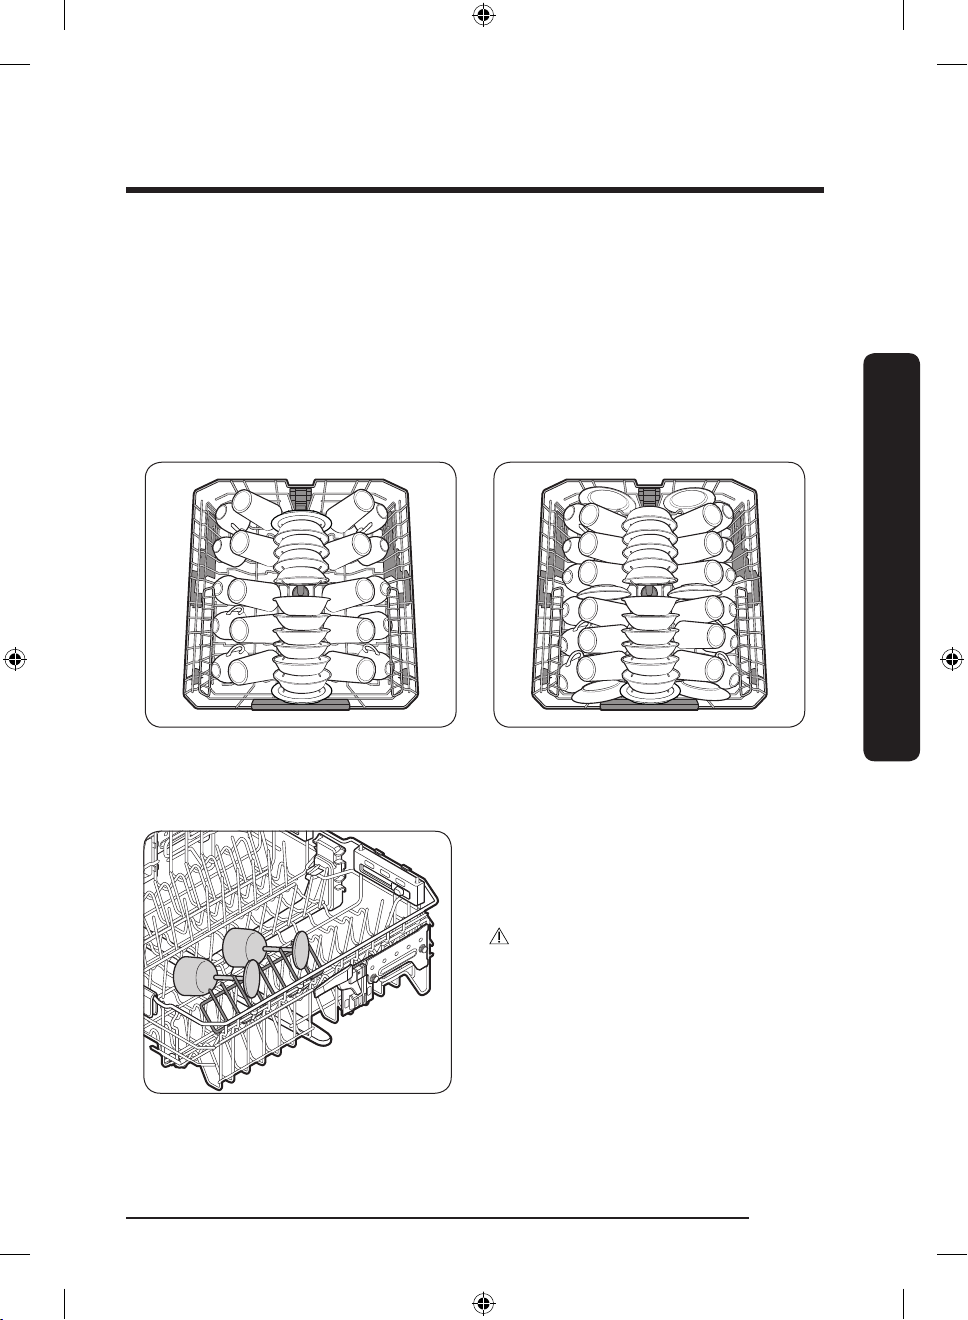
Loading the upper rack
The upper rack has been designed for small plates, mugs, glasses, and plastic items marked
“dishwasher safe”. Load your plates into the dishwasher in two half rows, so that the front
of each plate faces the back of the plate in front of it, and the open sides of the plates at
the center of the dishwasher face each other. See the illustrations below.
Make sure the loaded dishes do not interfere with the rotation of the nozzle which is
located at the bottom of the upper rack. (Check this by rotating the nozzle by hand.)
When loading dishes, pull the upper rack out sufciently so you can load it without striking
the counter above.
10 place setting 12 place setting
Using the glass support
Using your dishwasher
The glass support is especially suited for
wine glasses. Hang wine glasses onto the
pegs of the glass support. Fold the glass
support back when it is not being used.
CAUTION
Do not adjust the level of the upper rack
with the glass support propped up. This will
make it impossible to adjust the upper rack.
English 19
DW8000R_DD68-00211A-00_EN.indd 19 2019-04-24 5:59:15
Using your dishwasher
Using your dishwasher
Loading the 3rd Rack
The cutlery rack is best suited for atware and cooking or serving utensils. You can place
cutlery and utensils randomly or regularly on the cutlery rack.
Removing the Cutlery Rack
The entire cutlery rack can be removed if more space is needed on the upper rack for
larger items. (See the “To remove the 3rd Rack” section on page 16.)
TM
English20
DW8000R_DD68-00211A-00_EN.indd 20 2019-04-24 5:59:15
Loading the Cutlery rack
Left Right
The cutlery rack consists of two
compartments.
You can place each knife, spoon, or fork
separately into the spoon stands in the
basket’s covers to prevent chipping and
discoloration. See the illustrations below.
You can use the cutlery rack with the
cover open. Refer to the illustration on
the left.
10 place setting
Using your dishwasher
Left Right
12 place setting
English 21
DW8000R_DD68-00211A-00_EN.indd 21 2019-04-24 5:59:16
Using your dishwasher
The spoon stands as seen from above with the suggested placement of cutlery items.
Match the numbers in the diagram to the numbers in the list of cutlery items below.
Using your dishwasher
NOTE
DO NOT let any item extend through the bottom.
1 2 3 4 5
1. Forks
2. Tea spoons
3. Dinner spoons
4. Knives
5. Serving spoons and Serving forks
6. Remaining items
English22
DW8000R_DD68-00211A-00_EN.indd 22 2019-04-24 5:59:16
Detergent guidelines
All dishwasher cycles require detergent in the detergent compartment. Apply detergent as
appropriate for the selected cycle to ensure best performance.
WARNING
• Do not consume dishwasher detergent. Avoid breathing in detergent fumes. Dishwasher
detergent contains irritants and caustic chemicals that can induce respiratory conditions.
If you have consumed dishwasher detergent or inhaled detergent fumes, seek medical
attention immediately.
• Keep dishwasher detergent out of children’s reach.
CAUTION
Use dishwasher detergent only. Other types of detergent produce excessive foam, which
may decrease the dishwasher’s performance or cause it to malfunction.
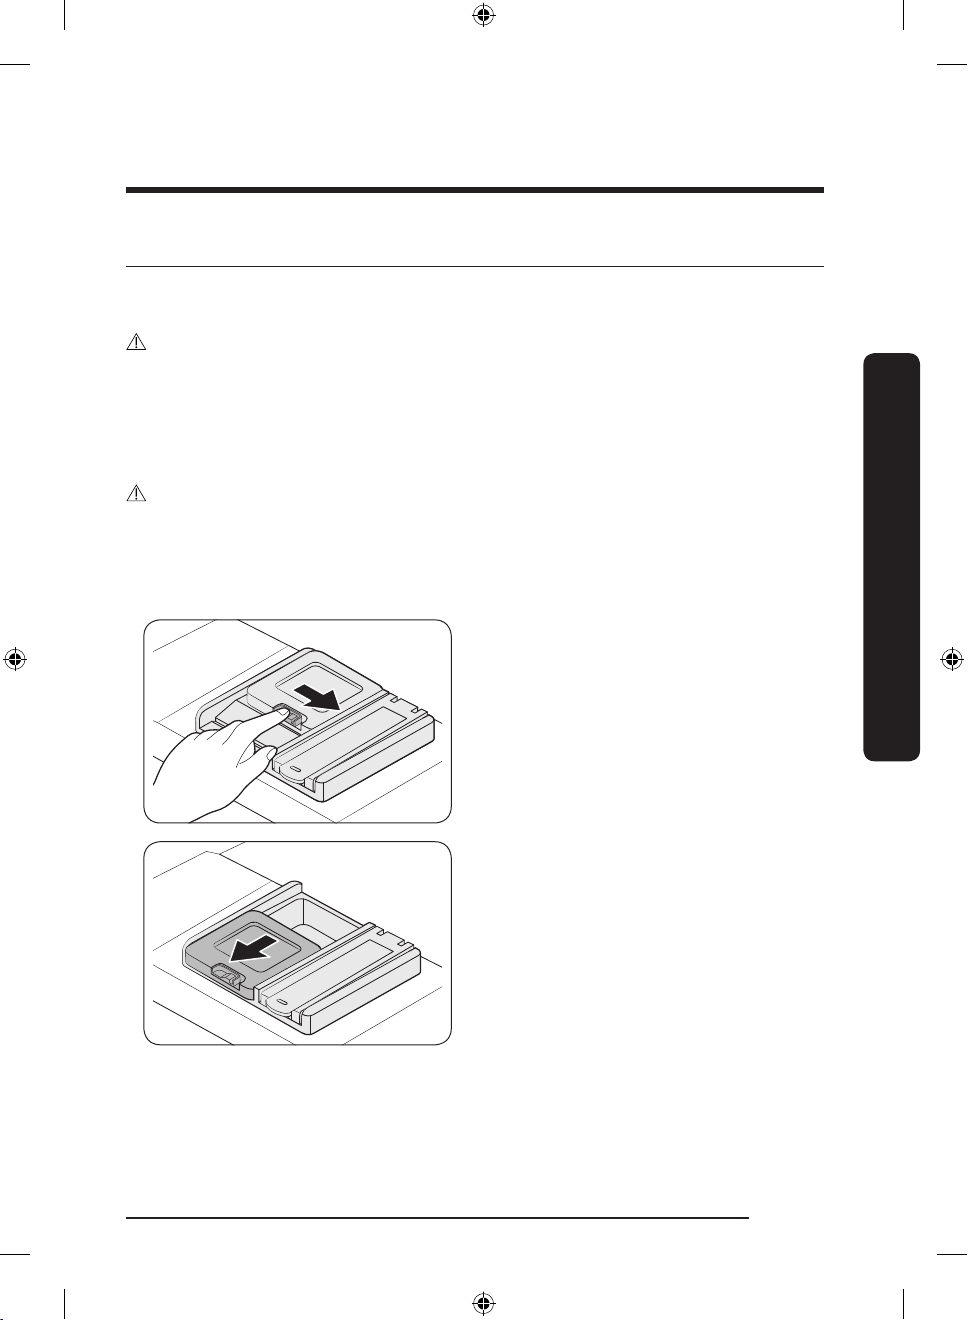
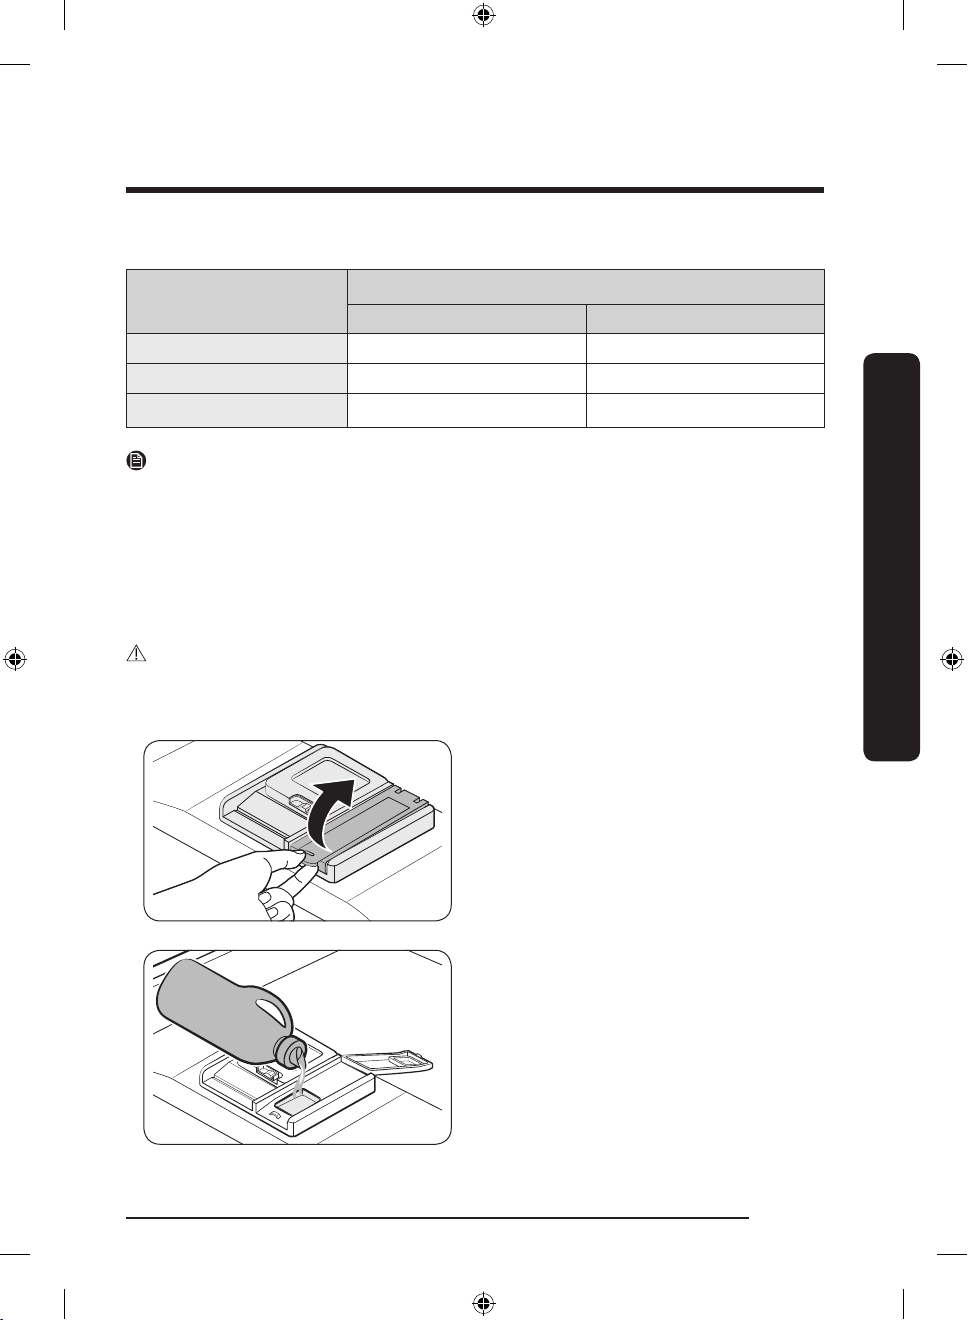
To ll the detergent dispenser
1. Gently press the dispenser ap to
unlock, and then slide it open. Note that
the dispenser ap opens at the end of
each cycle.
Using your dishwasher
English 23
DW8000R_DD68-00211A-00_EN.indd 23 2019-04-24 5:59:16

Using your dishwasher
Using your dishwasher
2. Apply the recommended amount of
detergent to the main compartment.
3. Close the ap, and then press down to
lock.
NOTE
This dishwasher has no separate
compartment for tablet detergent.
4. For better performace, pour a small
amount of detergent onto the door
to clean heavily soiled items more
effectively. The additional detergent
will activate during the pre-wash
process.
English24
DW8000R_DD68-00211A-00_EN.indd 24 2019-04-24 5:59:17
The cover opens automatically to dispense the detergent during the wash.
CYCLE
AMOUNT OF DETERGENT
Main wash dispenser Onto the door for pre-wash
Auto, Normal 3/4 oz (20 g) 1/3 oz (10 g)
Heavy, Express 60 1 oz (30 g) 1/2 oz (15 g)
Delicate 3/4 oz (20 g) 1/5 oz (5 g)
NOTE
The numbers inside the dispenser refer to grams.
Rinse aid
Rinse aid improves the drying performance of the dishwasher. When the Rinse Rell
indicator lights up on the control panel, rell with rinse aid. Only use liquid rinse aid.
Powdered rinse aid will clog the compartment opening and cause the dishwasher to
malfunction.
CAUTION
• Do not apply any type of detergent to the rinse aid compartment.
• Do not over ll the compartment. Excessive rinse aid may overow during a cycle.
1. Pull up the cap of the rinse
compartment to open.
Using your dishwasher
2. Fill the compartment with rinse aid as
specied by the rinse aid manufacturer.
English 25
DW8000R_DD68-00211A-00_EN.indd 25 2019-04-24 5:59:17
Using your dishwasher
Using your dishwasher
NOTE
For more information on setting the rinse
aid amount, see page 32.
3. Press down the circle area of the cap
to close.
Touchpad responsiveness
To prevent the touch-enabled controls from losing responsiveness, follow these
instructions.
• Touch the center of each button with
one nger.
• Do not touch more than one button at a
time, except as directed.
• Clean the surface of the control panel
regularly with a soft, damp cloth.
English26
DW8000R_DD68-00211A-00_EN.indd 26 2019-04-24 5:59:17
Operations
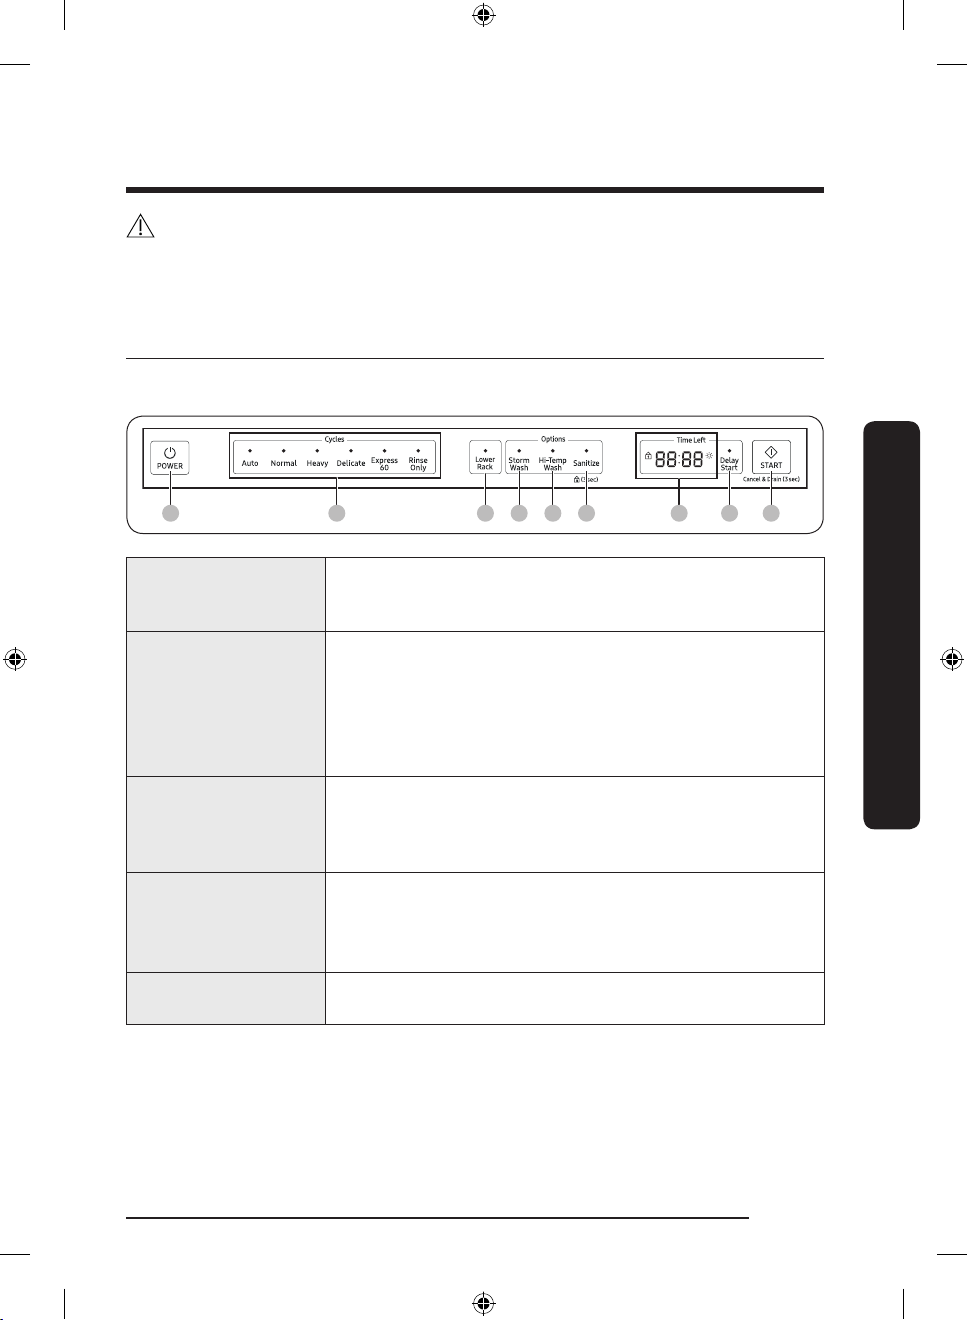
01 02 03 04 05 06 07 08 09
WARNING
To reduce the risk of re, electric shock, or injury to persons, read the IMPORTANT SAFETY
INSTRUCTIONS before operating this appliance.
Control panel
DW80R706* Series
01 POWER
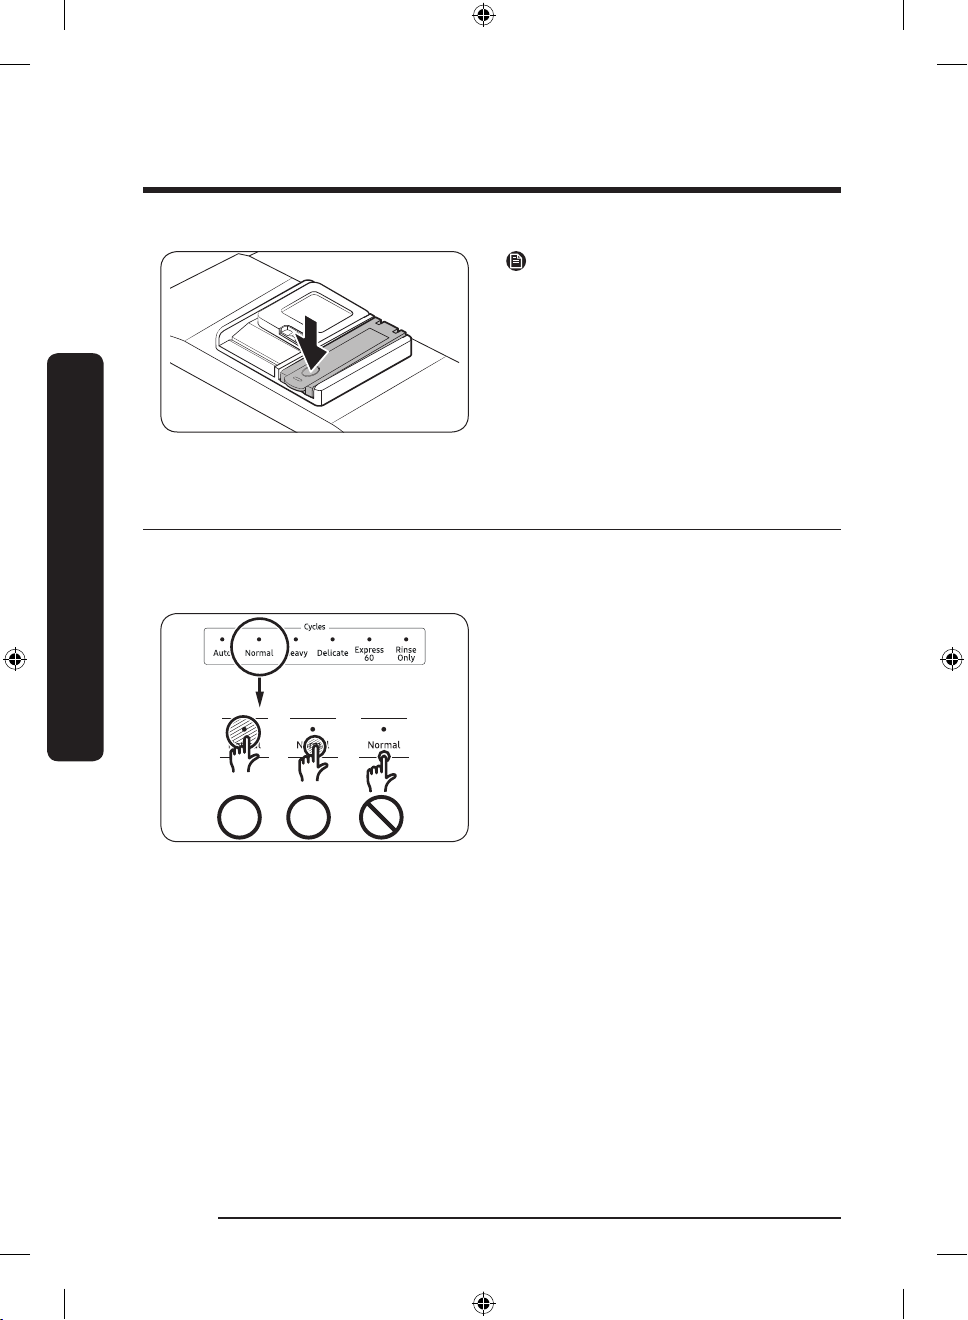
02 Cycle Selector
03 Lower Rack
04 Storm Wash
05 Hi-Temp Wash
When you press the POWER button, the Cycle On light for the
most recently started cycle turns on. When the selected cycle
is complete, the dishwasher powers off automatically.
Select the appropriate wash cycle depending on the soil level
of your dishes. After you select a cycle, the Cycle On light for
that cycle lights.
If you want to change the cycle once it has started, press the
POWER button. Then, turn on the dishwasher again and select
a new cycle.
If selected, only the lower rack nozzle is activated to reduce
both the cycle time and power consumption. Use this cycle to
wash a small load of dishes or glasses in the lower rack. To
wash heavily soiled items, select the Storm Wash option.
Use this option when you want to wash pots and pans, durable
serving bowls, and other large, very dirty, hard to clean dishes.
To use Storm Wash, place the dishes face down in the marked
Storm Wash area in the lower basket.
Raises the main wash temperature to improve cleaning for
loads containing tough, baked-on food.
Operations
DW8000R_DD68-00211A-00_EN.indd 27 2019-04-24 5:59:17
English 27

Operations
Operations
06 Sanitize /
(Control Lock)
07 Display
08 Delay Start
With the Sanitize option selected, the water temperature is
increased to 163 ˚F (73 ˚C) in the nal rinse cycle for high
temperature sanitization.
If you select the Sanitize option, the "Sanitize" lamp blinks
when the water temperature reaches the sanitary temperature
(over 155 ˚F (68 ˚C)), and then remains illuminated until the
Sanitize option ends.
When you open the door or press the POWER button, the
"Sanitize" lamp turns off.
NOTE
The Normal cycle with the Sanitize option selected is NSF
Certied and operates in accordance with NSF/ANSI Standard
184 for Residential Dishwashers. Certied residential
dishwashers are not intended for licensed food establishments.
Your dishwasher is NSF Certied.
Control Lock allows you to lock the buttons on the control
panel so children cannot accidently start the dishwasher by
pressing the buttons on the panel.
To lock and unlock the buttons on the control panel, hold the
Sanitize button down for three (3) seconds when the power
is On.
Displays information about the current cycle including the
cycle time, remaining time, Delay Start settings, and other
cycle-specic information.
If a problem occurs during operation, an information code
appears with a warning sound. Refer to the information codes
on page 47.
Delay a cycle for up to 24 hours in one-hour increments.
To increase the delay start time, press or hold the Delay Start
button. The hour displayed indicates the time at which the
wash will start.
- After setting the delay time, press the START button, and
then close the door to start the cycle.
- To change the delay time after the dishwasher has started,
rst turn the dishwasher off and turn it back on. Then,
select a new cycle and change the delay time settings.
English28
DW8000R_DD68-00211A-00_EN.indd 28 2019-04-24 5:59:18
09 START
Indicators
To start a cycle, press the START button before closing the
door.
Cancel & Drain: To cancel a currently running cycle and drain
the dishwasher, press and hold the START button for three (3)
seconds.
Once the dishwasher is reset, select a cycle and option, and
then press START to restart the dishwasher.
Operations
Control Lock indicator
Rinse Rell indicator Lights up if the dishwasher runs out of rinse aid.
Lights up if Control Lock is activated, and blinks if
any button except for the POWER button is pressed.
Progress displays
DW80R7060 series DW80R7061 series
Wash
Rinse
Dry
End
When the dishwasher is in a wash portion of a cycle,
the rst light is illuminated.
When the dishwasher is in a rinse portion of a cycle,
the second light is illuminated.
When the dishwasher is in a drying portion of a cycle,
the third light is illuminated.
After the dishwasher has completed all portions of a
cycle, all lights are turned off.
English 29
DW8000R_DD68-00211A-00_EN.indd 29 2019-04-24 5:59:18
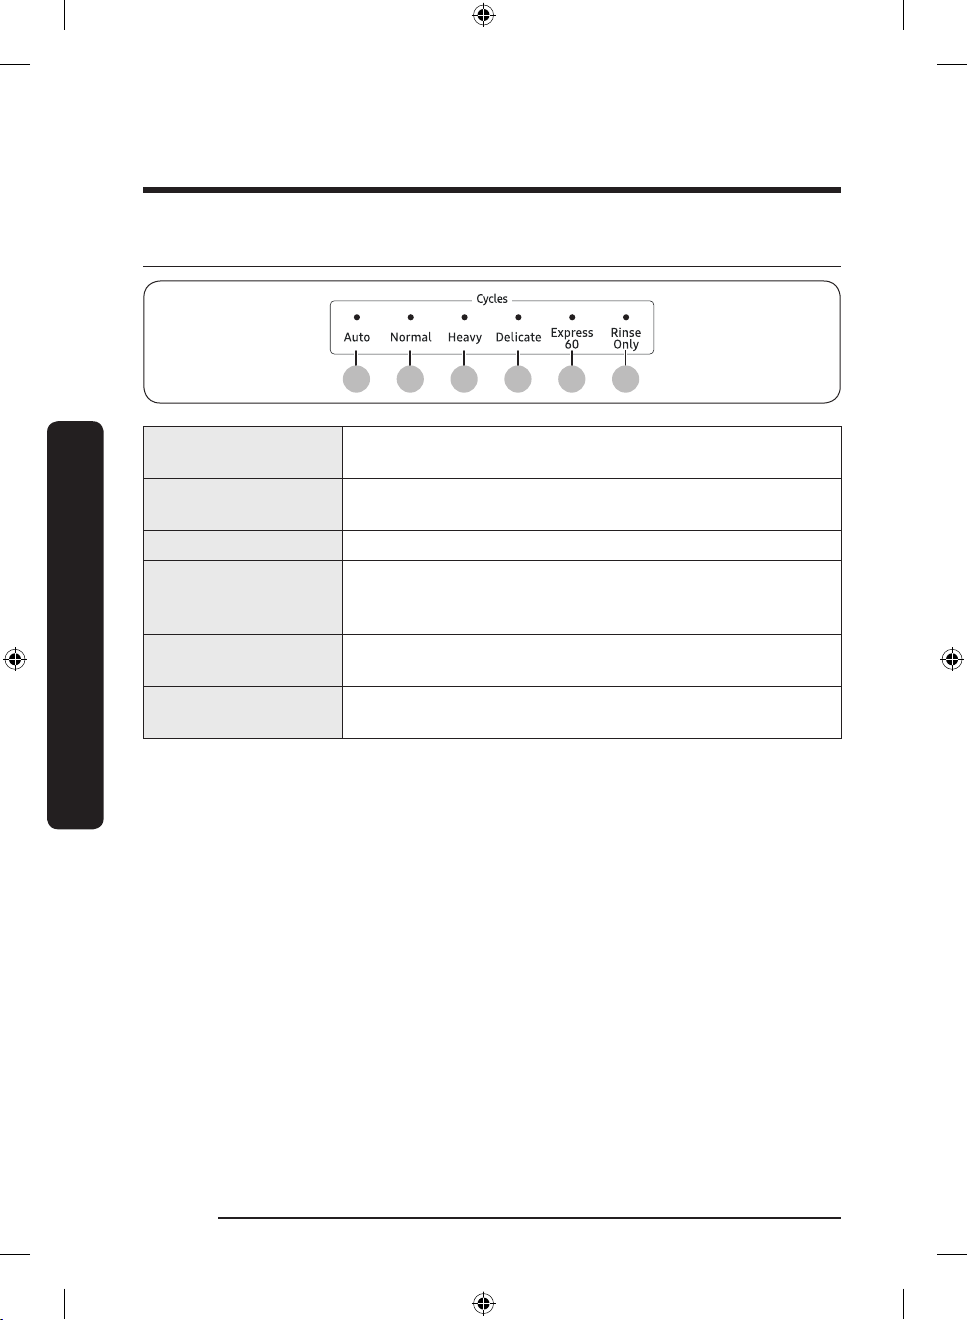
Operations
01 02 03 04 05 06
Cycle overview
Operations
01 Auto
02 Normal
03 Heavy Use this cycle for heavily soiled dishes.
04 Delicate
05 Express 60
06 Rinse Only
This cycle detects the level of soil and automatically initiates
the optimal cycle after a few minutes of operation.
Use this cycle for normally soiled dishes.
The energy-usage label is based on this cycle.
Use this cycle for soiled, fragile items such as ne glassware
and crystal glass (wine glass). Do not use this cycle for other
glassware because clouding or etching may occur.
Use this cycle when you need to wash dishes quickly. It takes
about 1 hour.
Use for rinsing dishes, glasses, and silverware that will not be
washed right away. Do not use detergent.
English30
DW8000R_DD68-00211A-00_EN.indd 30 2019-04-24 5:59:18
 Loading...