


QSD2014 User’s Manual
Rev031309

INDEX
Chapter 1: DVR Features .................................................................................................................................... 1
Chapter 2:Layout .................................................................................................................................................. 2
2.1 Front Panel
2.2 Rear Panel
2.3 Remote Control
Chapter 3: DVR Installation ............................................................................................................................... 4
3.1 Hard Disk Installation
3.2 Connecting Camera and Monitor
3.3 Connecting Power Supply
Chapter 4:Starting the DVR ................................................................................................................................ 5
4.1 Firmware version
4.2 Detecting Installed Hard Drive
4.3 Format Hard Drive
Chapter 5: DVR Menu System ........................................................................................................................... 6
5.1 Browsing the Main Menu
5.2 Menu Directory
5.3 Camera Setup
5.4 Record Setup
5.5 Record Framerate
5.6 Vide o Quality
5.7 Record Schedule
5.8 Sensor Setup
5.9 Motion Detector Setup
5.10 Hard Drive Setup
5.11 Miscellaneous Setup – Change Password
5.12 Miscellaneous Setup – Set Time
5.13 Miscellaneous Setup – Hidden Channel
5.14 Miscellaneous Setup – Image Parameters
5.15 Miscellaneous Setup – Password Enable
5.16 Miscellaneous Setup – Keypad tones
5.17 Miscellaneous Setup- S EQ. DWEL L TIME
5.18 Miscellaneous Setup- VIDEO LOSS SOUND
5.19 RESET MENU
5.20 NTSC/PAL Output Select
..................................................................................................................................................... 2
...................................................................................................................................................... 2
............................................................................................. Error! Bookmark not defined.
.................................................................................................................................... 4
................................................................................................................... 4
............................................................................................................................. 4
........................................................................................................................................... 5
...................................................................................................................... 5
......................................................................................................................................... 5
.............................................................................................................................. 6
.............................................................................................................................................. 6
................................................................................................................................................. 6
.................................................................................................................................................. 7
........................................................................................................................................... 7
................................................................................................................................................. 7
............................................................................................................................................ 8
.................................................................................................................................................. 8
................................................................................................................................... 8
......................................................................................................................................... 9
.................................................................................................... 9
................................................................................................................ 10
.................................................................................................... 10
.................................................................................................. 10
.................................................................................................... 11
......................................................................................................... 11
............................................................................................... 11
........................................................................................... 11
.......................................................................................................................................... 12
.......................................................................................................................... 12
Chapter 6:Record ................................................................................................................................................ 12
6.1 Starting Recording
6.2 Audio Recording
6.3 Stopping Recording
6.4 Estimated Recording Time
....................................................................................................................................... 12
.......................................................................................................................................... 13
..................................................................................................................................... 13
.......................................................................................................................... 13

Chapter 7:Playback ............................................................................................................................................ 14
7.1 Playback Control ......................................................................................................................................... 14
Chapter 8: USB Program .................................................................................................................................. 15
8.1 Software Installation
8.2 Program Interface
8.3 Program Running
8.3.1 HDD Play Mode
8.3.2 FILE Play Mode
Chapter 9: Specification .................................................................................................................................... 18
Chapter 10:Appendix ......................................................................................................................................... 19
10.1 System Connection Layout
10.2 Accessories
Q-See Product W arranty
.................................................................................................................................... 15
........................................................................................................................................ 15
......................................................................................................................................... 16
.............................................................................................................................. 16
.............................................................................................................................. 17
........................................................................................................................ 19
................................................................................................. Error! Bookmark not defined.
....................................................................................................................................... 20

Chapter 1: DVR Features
DVR Features
MPEG4 Compression;
Video Input / Output:4-CH Video Input- 1-CH Video Output;
Good Image quality, High definition;
System Format: NTSC/PAL;
Uses SOC chip with high stability;
QSD2014 User’s Manual
Linux operation Syst em;
Supports Multiple recording Modes: Continuous, Motion Detection, Time Schedule
Supports Event List an d Se arch /Pl ayback by specified time;
Supports Hidden Channel and Playback display;
Missing Video signal Alarm Function;
Password Protection Function;
Supports IR Remote Control;
Supports SATA hard drive up to 500GB;
1
QSD2014 User’s Manual
Power Supply Input
4 BNC video inputs
1 BNC video output
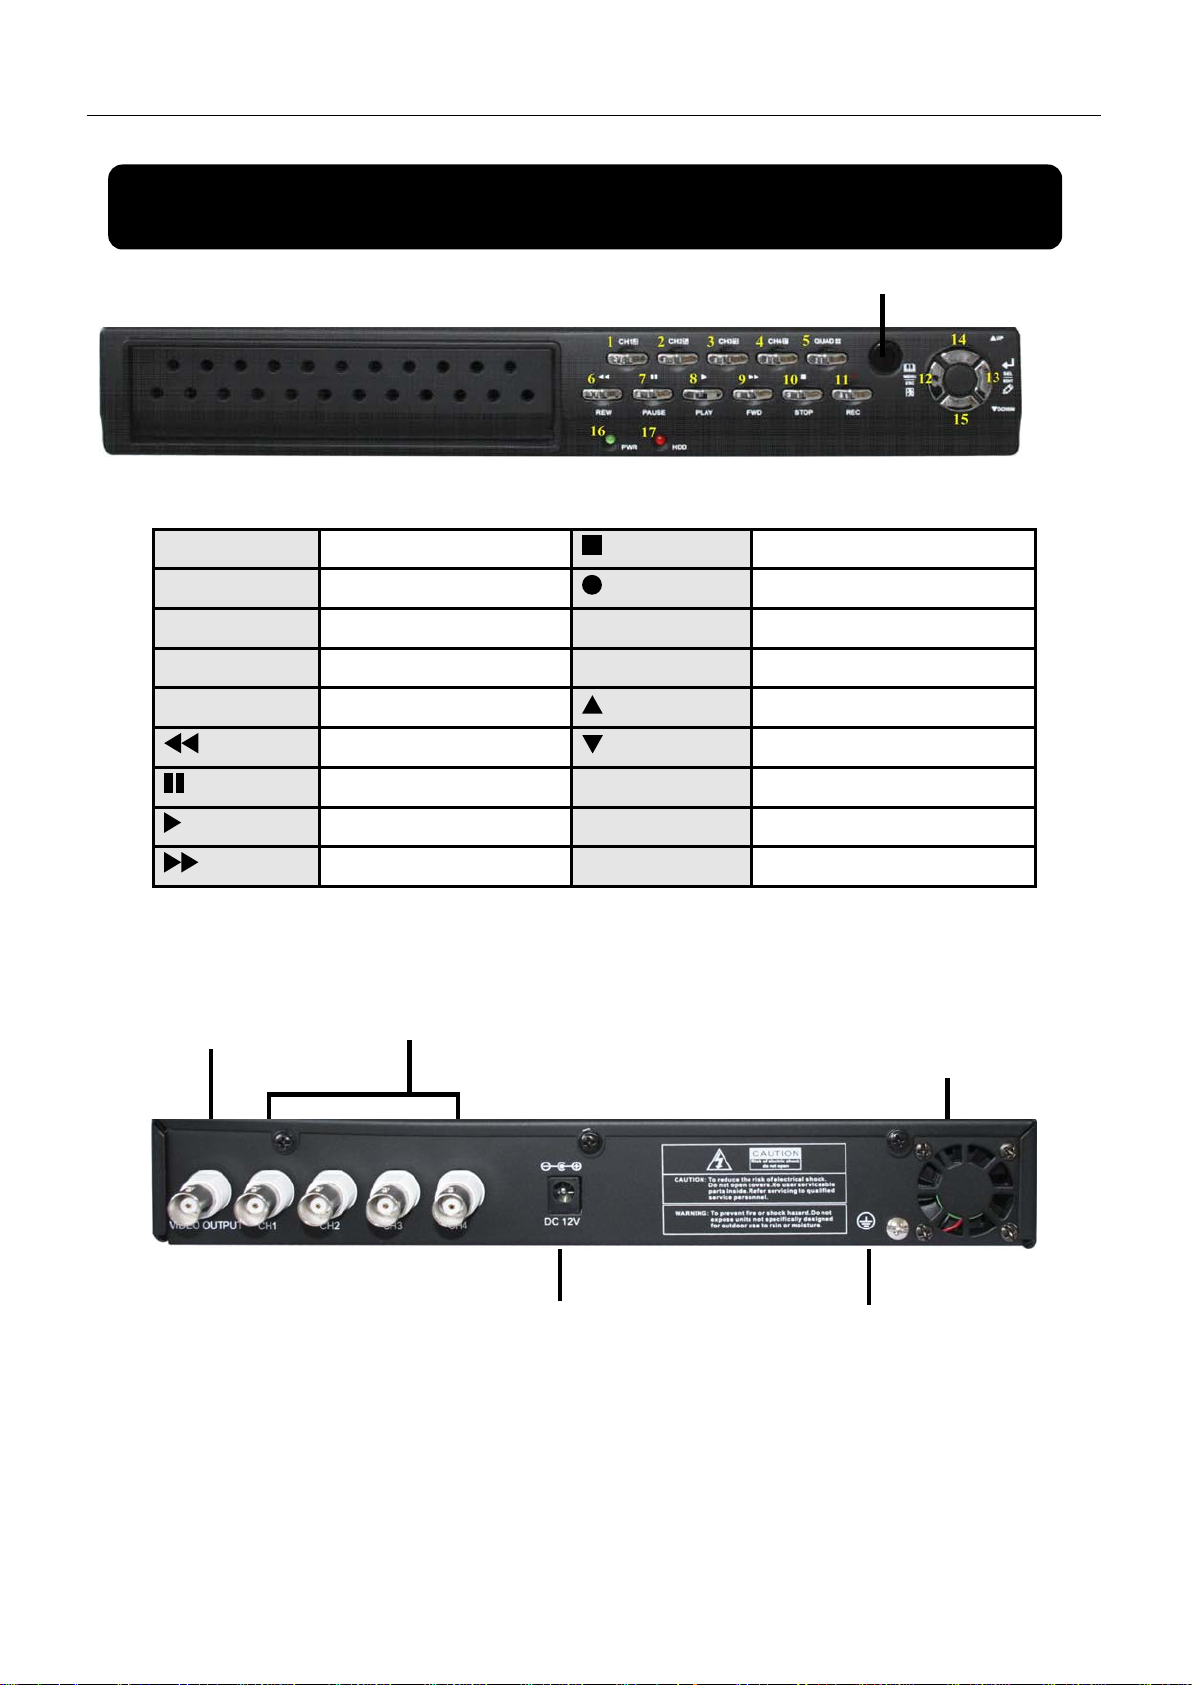
Chapter 2:Layout
2.1 Front Panel
CH1 #1
CH2 #2
CH3 #3
CH4 #4
Quad #5
REW #6
Pause #7
Play #8
Channel #1
Channel #2
Channel #3
Channel #4
Quad View
Rewind/Move Left
Pause
Play recorded video
Stop #10
REC #11
Menu/Esc #12
SEL/Edit #13
Up #14
Down #15
PWR #16
HDD #17
IR Receiver
Stop recording / playing
Record
Enter / exit setup menu
Select / modify item
Move up
Move down
Power indicator LED
Hard drive indicator
FWD #9
2.2 Rear Panel
Forward/Move Right
Fan
Grounding Terminal
USB Port is located on the right side of the case when viewing from the front.
2
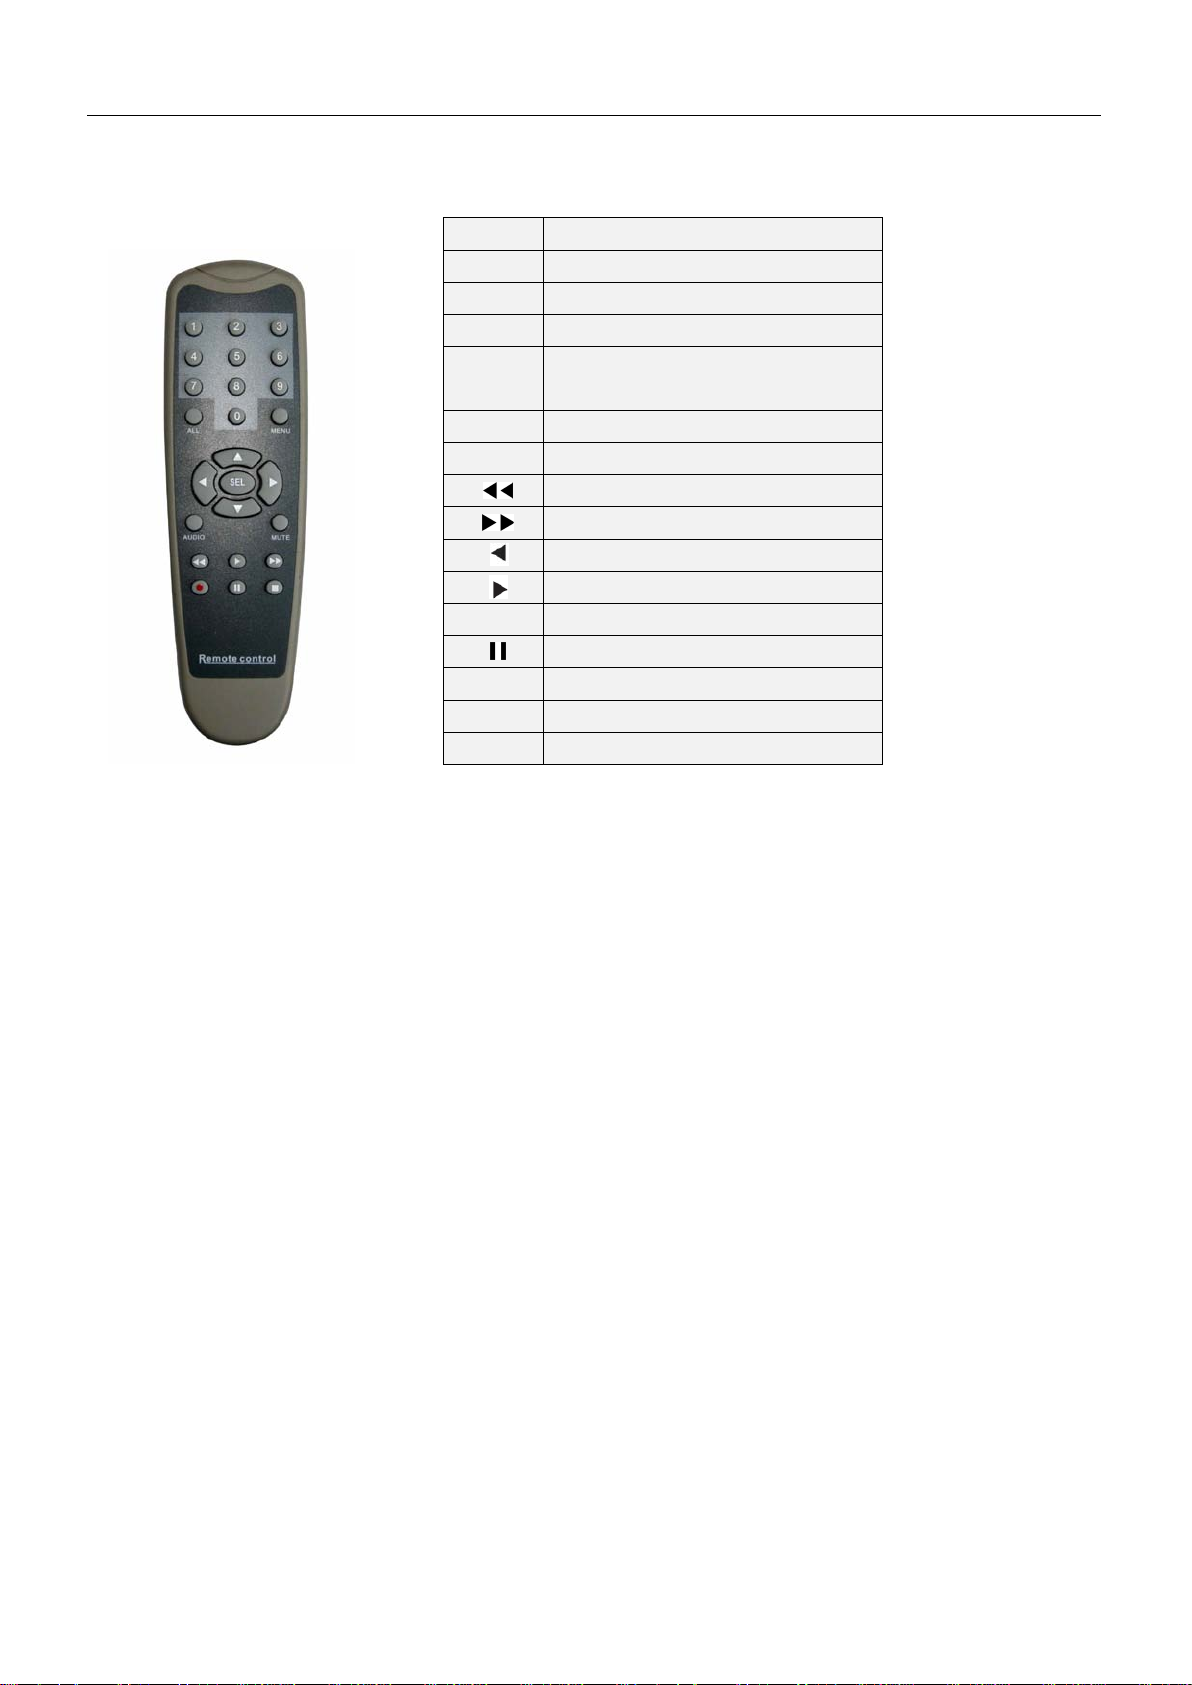
2.3 Remote Control
▲
●
QSD2014 User’s Manual
1-9 Channel Select and numbers 1-9
0 Number
ALL Display all Channels
Menu Enter or Exit Menu
Move Up
▼
SEL Select /Modify Item
■
Audio Audio Input/Output
Mute Mute Audio
Move Down
Rewind/Move Left
Fast Forward
Move Left
Play Recording/Move Right
Record
Pause
Stop Recording/Playback
3

QSD2014 User’s Manual
Chapter 3: DVR Installation
3.1 Hard Disk Installation
Notice: Don’t take out the HDD when DVR is running.
(1) Remove the top cover carefully;
(2) Connect the power cord and data cable to hard drive;
(3) Replace the top cover;
3.2 Connecting Camera and Monitor
Attach the Camera cable to the DVR’s BNC video input s, and DVR’s video output signal to
Monitor’s video input jack respectively (refer to Chapter-2.2 Rear Panel shown)
3.3 Connecting Power Supply
Please only use the power adapter supplied with the DVR.
4

QSD2014 User’s Manual
Chapter 4:Starting the DVR
4.1 Firmware version
4.2 Detecting Installed Hard Drive
MASTER [MAXTOR STM3250310A]
SLAVE……
V2.X
V-EN-BG
2008.XX.XX
After turning on the unit, DVR will boot-up and
display the current version and release date of the
DVR firmware.
During start up, DVR will automatically detect
the installed hard drive and show the hard drive
information.
4.3 Format Hard Drive
CHECKING HDD……
MASTER [MAXTOR STM3250310A]
FORMAT HDD CONFIRM
(SELECT) FORMAT / (MENU) CANCEL?
–NEW–DVR
When detecting a new hard drive, DVR will
automatically prompt you if you need to format the
hard drive before recording.
Please press [SEL] to format, or [MENU] to
cancel, and then start system.
5

QSD2014 User’s Manual
Chapter 5: DVR Menu System
5.1 Browsing the Main Menu
CAMERA SETUP
RECORD SETUP
RECORD FRAMERATE
VIDEO QUALITY HIGH
RECORD SCHEDULE
SENSOR SETUP
HARD DRIVE SETUP
MISCELLANEOUS SETUP
RESET MENU
( ) MOVE (SEL) SELECT (MENU)EXIT
MAIN MENU
5.2 Menu Directory
Camera Setup
When start up is finished, please press [MENU] to
enter the Main Menu.
Record Setup
Main Menu
Record Framerate
Video Quality
Record Schedule
Change Password
Set Time
Hidden Channel
Image Parameters
Sensor Setup
Password Enable
Hard Drive Setup
Miscellaneous Setup
Reset Menu
Keypad Tones
SEQ. DWELL TIM E
VIDEO LOSS SOUN
D
Note: When the DVR is not setup to use a function, the option will not appear in the Menu. e.g. If a
camera channel is set to o ff, the item-“Audio Setup” will not be in the Menu.
5.3 Camera Setup
1 on 2 on
3 on 4 on
( ) Move (SEL) Select (MENU) Esc
Channel Setup
Camera Setup allows you to turn cameras on or off.
Press [▲ ,▼,◄◄ and ►►] button s to select a
channel, and then press [SEL] to modify the setting to
“on” or “off”.
6

QSD2014 User’s Manual
Note:If a channel is disabled in Channel Setup, DVR will not record or set frame rate.
5.4 Record Setup
1 ON 2 NO
3 ON 4 ON
( ) MOVE (SEL) SELECT (MENU) ESC
Record Setup
5.5 Record Framerate
1 3 FPS 2 5FPS
TOTAL 36 FPS
3 25FPS 4 3FPS
( ) MOVE (SEL)+ (
Record Framerate
■ )- (MENU) EXIT
Record Setup allows you to set up recording channels.
Press [▲,▼,◄◄ and ►►] to select a channel, and then
press [SEL] to change the setting to on or off.
If a channel is disabled in Camera Setup, it will not be
recorded, and the characters “NOCAM” will be displayed
on screen.
The total frame rate is 50fps (PAL) or 60fps (NTSC).
You can set the frame rate for each channel to meet your
requirements up to t he 50fps or 60fps limit.
Press [▲,▼,◄◄ and ►►] buttons to select a channel, and then press [SEL] to i ncrease t he valu e or
press [■STOP] to reduce the value.
Note: Higher frame rat e shows smoother video, but requires more hard-drive spac e.
5.6 Video Quality
CAMERA SETUP
RECORD SETUP
RECORD FRAMERATE
VIDEO QUALITY HIGH
RECORD SCHEDULE
SENSOR SETUP
HARD DRIVE SETUP
MISCELLANEOUS SETUP
RESET MENU
( ) MOVE (SEL) SELECT (MENU) ESC
Main Menu
Video Quality has 4 different settings, including:
Highest, High, Normal and Low.
The Higher the video quality, the better the quality
of Images, However higher quality images require
more hard drive space.
Press [SEL] button to change the quality setting.
7

QSD2014 User’s Manual
: Enable or disable motion detection
5.7 Record Schedule
Setting the Record Sched ule a llows y ou t o customize the type of recording you want to use d ependi ng on
the time of day.
AM PM
0… 3… 6… 9… 0… 3…. 6… 9…
( ) MOVE (SEL) SELECT (MENU) EXIT
Record Schedule
NO-RECORD
NORMAL-RECORD
S
SENSOR -RECORD
NO-RECORD [ WHITE ]:DVR will not record during this period.
NORMAL RECORD [ RED]:DVR will record continuously during this period.
SENSOR RECORD [ S ]:DVR will record when sensor or motion is t riggered
Note: In order to activate the r ecor d schedule, please press [ REC] button to start Record schedule,
otherwise, DVR will not start recording.
The time line indicates 24 hours of a day based on
AM/PM (0=12).
Press [▲,▼,◄◄ and ►►] button s to select a
time point, press [SEL] to modify the recording mode.
5.8 Sensor Setup
SENSORED RECORD TIME 30
ALARM ON TIME 05
MOTION DETECTOR SETUP
( ) MOVE (SEL)SELECT (MENU)ESC
SENSOR SETUP
CONT: Continuous alarm until any key is pressed…
OFF: No alarm
Note: Sensored Re cor d Time and Alarm On Ti me are measured in seconds.
Sensor Record Time indicates how long the
recording file remains open after the motion ends.
After this time the next al arm starts a new file.
Alarm on time indicates how long the buzzer
will sound when motion is detect ed.
5.9 Motion Detector Setup
This section allows you to set up motion detection options for each camer a.
Motion Detector Setup
CH1 ON Level 2 Area
CH2 ON Level 2 Area
CH3 ON Level 2 Area
CH4 ON Level 2 Area
( ) MOVE (SEL)SELECT (MENU)ESC
On/off
recording.
Level: Sensitivity for motion detection. There
are 3 levels of sensitivity: Level 1 to 3 with 3 the
highest.
Area: Select detectable area on the screen.
8

QSD2014 User’s Manual
Enter the current password first, and then enter
option allows you to change the system
password key except the
[OFF]
Area Selection:Press [▲,▼,◄◄ and ►►]
buttons to select a block and then press [SEL] button
to set the block to detect motion. The area is
detectable when it is clear, the area is not detectable
when it is covered by shadow.
Press “Stop” button to disable all areas, and press “Quad” but t on to select all areas.
5.10 Hard Drive Setup
Hard Drive Setup
OVERWRITE ENABLED [ON]
MAXTOR STM250310AS
MASTER HDD SIZE 250203MB
MASTER HDD USED 124931MB 50%
MASTER HDD FORMAT
SLAVE HDD SIZE N/A
SLAVE HDD USED N/A
SLAVE HDD FORMAT
( ) MOVE (SEL)SELECT (MENU)EXIT
HDD SIZE:indicates the total capacity of the hard drive installed in the DVR.
HDD USED:indicates the space used in the h ar d disk drive for recording and the percent used.
HDD FORMAT:will erase all video and data on the installed har d dr ive and make it readable by the DVR.
Note: You will be prompted for the password when formatting a hard drive and the default password is “111111”.
OVERWRITE ENABLED:
ON: System overwrites oldest files when hard drive
is full;
OFF: System stops recording when hard drive is full.
5.11 Miscellaneous Setup – Change Password
CHANGE PASSWORD
SET TIME
HIDDEN CHANNEL
IMAGE PARAMETERS
PASSWORD ENABLE
KEYPAD TONES
SEQ. DWELL TIME
VIDEO LOSS SOUND
( ) MOVE (SEL)SELECT (MENU)EXIT
CURRENT PASSWORD
NEW PASSWORD
COMFIRM PASSWORD
Miscellaneous Setup
[- - - - -]
[- - - - -]
[- - - - -]
[ CH1 ]
[ OFF]
[ ON ]
[ 30 ]
[ ON ]
This
password. The password must be six characters. All
keys can be used as a
[MENU] key, which is used to exit.
six characters as your new password, repeat the new
password to confir m.
If you forget your password, please free feel to
contact Q-See tech support for assistance.
9

[OFF]
5.12 Miscellaneous Setup – Set Time
QSD2014 User’s Manual
The system date and ti me for mat is Y YY Y/MM /DD and
( ) MOVE (SEL) SELECT (MENU) ESC
SET TIME
2008/11/11 17:50:01
HH:MM:SS.
Press [◄◄] or [►►] buttons to select a data, press [SEL]
button to modify the data, and press [M ENU] button t o save
and return to previous menu.
5.13 Miscellaneous Setup – Hidden Channel
CHANGE PASSWORD
SET TIME
HIDDEN CHANNEL
IMAGE PARAMETERS
PASSWORD ENABLE
KEYPAD TONES
SEQ. DWELL TIME
VIDEO LOSS SOUND
( ) MOVE (SEL) SELECT (MENU)EXIT
Miscellaneous Setup
[OFF]
[ CH1 ]
[ OFF]
[ ON ]
[ 30 ]
[ ON ]
in monitoring mode. The select ed chan ne l can stil l be
recorded while it’s hidden; but the video will not be
viewable on the live screen.
Press [SEL] to select a channel to hi de.
The system provides a function to hide a channel
5.14 Miscellaneous Setup – Image Parameters
CHANGE PASSWORD
SET TIME
HIDDEN CHANNEL
IMAGE PARAMETERS
PASSWORD ENABLE
KEYPAD TONES
SEQ. DWELL TIME
VIDEO LOSS SOUND
( ) MOVE (SEL) SELECT (MENU) EXIT
Miscellaneous Setup
[ CH1 ]
[ OFF]
[ ON ]
[ 30 ]
[ ON ]
You can adjust the image parameters t o meet
your needs. The cont r ols ar e sh ow n below:
CON:Contrast
BRI:Brightness
HUE:Hue (color)
SAT:Saturation (color)
Press [▲] or[▼] buttons to select the item, a nd
press [
10
] or [ ] buttons to adjust the setting.

When Password Enable is set to “on”, the
must be entered
[OFF]
function allows you to enable or disable
[OFF]
5.15 Miscellaneous Setup – Password Enable
Miscellaneous Setup
CHANGE PASSWORD
SET TIME
HIDDEN CHANNEL
IMAGE PARAMETERS
PASSWORD ENABLE
KEYPAD TONES
SEQ. DWELL TIME
VIDEO LOSS SOUND
( ) MOVE (SEL) SELECT (MENU) EXIT
[ CH1 ]
[ OFF]
[ ON ]
[ 30 ]
[ ON ]
password will be required and
correctly; otherwise, you will not be able to enter the
system.
Entering the password will not be required if you
set to “off” (except of formatting hard drive and menu
reset)
5.16 Miscellaneous Setup – Keypad tones
QSD2014 User’s Manual
CHANGE PASSWORD
SET TIME
HIDDEN CHANNEL
IMAGE PARAMETERS
PASSWORD ENABLE
KEYPAD TONES
SEQ. DWELL TIME
VIDEO LOSS SOUND
( ) MOVE (SEL) SELECT (MENU) EXIT
Miscellaneous Setup
[OFF]
[ CH1 ]
[ OFF]
[ ON ]
[ 30 ]
[ ON ]
This function allows y ou to enable or dis able beeper
sound when pressing [SEL] button to select ON or
OFF.
5.17 Miscellaneous Setup- SEQ. DWELL TIME
CHANGE PASSWORD
SET TIME
HIDDEN CHANNEL
IMAGE PARAMETERS
PASSWORD ENABLE
KEYPAD TONES
SEQ. DWELL TIME
VIDEO LOSS SOUND
( ) MOVE (SEL) SELECT (MENU)EXIT
Miscellaneous Setup
[OFF]
[ CH1 ]
[ OFF]
[ ON ]
[ 30 ]
[ ON ]
Seq. Dwell time and select “on” / “off” to
enable or disable individual camera sequential
display.
1sec, 5sec, 10sec, 15sec, 30sec, or 60sec
Press [◄◄], [►►] buttons to select
Remark: Seq. Dwell Time Option can be
5.18 Miscellaneous Setup- VIDEO LOSS SOUND
CHANGE PASSWORD
SET TIME
HIDDEN CHANNEL
IMAGE PARAMETERS
PASSWORD ENABLE
KEYPAD TONES
SEQ. DWELL TIME
VIDEO LOSS SOUND
( ) MOVE (SEL) SELECT (MENU)EXIT
Miscellaneous Setup
[ CH1 ]
[ OFF]
[ ON ]
[ 30 ]
[ ON ]
This
buzzer sound when pressing [SEL] button to se lect
ON or OFF.
11

the setting for PAL, move the jumper to the right
5.19 RESET MENU
System allows you to reset all your settings to t he DVR factory default. You need to enter your
password to reset the menu.
5.20 NTSC/PAL Output Select
QSD2014 User’s Manual
Change the jumper JS1 to select NTSC or
PAL video output format shown on the silkscreen
shown in the picture on the left. T he picture shows
side for NTSC
6.1 Starting Recording
Press [●REC] button to start the record according to the record schedule you have set. T here will
be a [●] red icon shown in the top left of the screen when recording.
Chapter 6:Record
12

Normal
107
134
201
401
6420
Standard
Quality
50fps
36fps
24fps
12fps
1fps
Highest
64
89
133
267
3200
[
●]:Indicates that the channel is being recorded.
QSD2014 User’s Manual
[A-REC]:
Indicates the current record schedule is set to NORMAL-RECORD mode.
[S-REC]:Indicates the current record schedule is set to SENSOR-RECORD mode.
[N-REC]:Indicates the current record schedule is set to NO-RECORD mode.
[39%]:Indicates the percentage of hard disk space used.
[M]:HDD info ([M] MASTER HDD;[S] SLAVE HDD).
6.2 Audio Recording
[ ]:indicates this video channel is assigned an audio port, and the audio output is on.
[ ]: indicates the audio output is off.
[ ]:indicates the audio is being recorded and the audio output is on.
You could press the [DOWN] button on front panel to mute the audio output, The audio input can
be still recorded while the output is muted.
6.3 Stopping Recording
Press [■STOP] button to stop recording. If password protection function is enabled, system will
prompt you to input password. Only correct password can stop recording process.
6.4 Estimated Recording Time
Estimated record time based on 160GB HDD
Standard Quality 60fps 48fps 32fps 16fps 1fps
Highest 62 78 116 232 3720
NTSC
PAL
Unit: Hour
High 88 110 165 330 5280
Low 120 150 225 450 7200
High 90 125 188 375 4500
Normal 110 153 229 458 5500
Low 123 171 256 513 6150
13

QSD2014 User’s Manual
Chapter 7:Playback
7.1 Playback Control
Press the [►] PLAY button to go into PLAYBACK mode. The newest recorded event will be
played.
SEACH VIDEO
DISK: MASTER SLAVE [NONE]
08/09/19 11:16:31 - 08/09/19 15:05:48
TYPE: EVENT TIME
PLAY: EVENT LIST
00006 T 2008/09/19 15:07:40
00006 T 2008/09/19 14:07:40
00006 T 2008/09/19 13:07:40
00006 T 2008/09/19 12:07:40
00006 T 2008/09/19 11:07:40
00006 T 2008/09/19 10:07:40
00006 T 2008/09/19 09:07:40
( )MOVE (SEL)SELECT
(
► ) PLAY (MENU) PREV MENU
Press the [MENU] button in Playback
mode, the system will list all the recorded
events. The latest record will be on top of the
list. Press the [▲UP]or [▼DOWN] buttons
to select an event and then press [►] to play the
event.
14

1. PTZ Control
11. Convert Streams to AVI file
12. Fast Rewind 60s
3. HDD Play Mode
13. Fast Rewind 10s
4. FILE Play Mode
14. Forward
5. NET Play Mode
15. Stop
6. Event List
16. Playback
7. Program Local Setting
17. Fast Forward 10s
8. Remote DVR Control
18. Fast Forward 60s
9. Shift Storage Device
19. Playback Slider
8.1 Software Installation
QSD2014 User’s Manual
Chapter 8: USB Program
8.2 Program Interface
Button functions:
Insert software CD to your CD-ROM drive;
Open CD directory;
Run “Installation” program;
Follow the setup wizard to finish the installation.
NOTE: Since this DVR does not support PTZ cameras the functions marked as 1 and 2 will not work.
(NO Function)
15

QSD2014 User’s Manual
10. Capture Image
20. Audio Slider
8.3 Program Running
8.3.1 HDD Play Mode
System will detect HDD automatically when you connect DVR to your PC with USB cable. An
icon “ ” will appear in the system tray (right bottom corner of the screen). After seeing this icon,
double-click the “ ” icon on your desktop to run the program.
Note: If you do not strictly follow above-mentioned steps, the program may fail to read recorded files.
Press the “ ” button to open the video event list.
Press the “ ” button to access the program local settings. E.g.: Save location settings for
capture image and AVI record files
16

Press the “ ” button to play video.
QSD2014 User’s Manual
8.3.2 FILE Play Mode
(Only when you have saved files to your PC.)
Press the “ ” button to open a folder, select the file which you want to
Play and double click to play video.
17

QSD2014 User’s Manual
DVR Specification
Video Standard NTSC/PAL
Video Input / Output 4-Channels /1Channels
Pre-view
Recording
Chapter 9: Specification
Items Descriptions
Resolution
Features
Resolution
NTSC:720X480@30fps (Each CH)
PAL:720X576@25fps (Each CH)
Full-D1, 1-Channel/4-Channel
1-channel Playback display
NTSC:720X240@60fps (Total)
PAL:720X288@50fps (Total)
Features Variable Frame Rate
Quality 4 Level (Highest, High, Normal, Low)
Video MPEG4 Compression
Motion Detection Settable Detection Area and Sensitivity
Microprocessor 32-bit RISC Processor
HDD Port Supports SATA HDD up to 500GB
USB Port USB2.0
IR Remote Control Supports IR Remote Control
18

QSD2014 User’s Manual
Chapter 10:Appendix
10.1 System Connection Layout
10.2 Accessories
19

QSD2014 User’s Manual
Q-See Product Warranty
Thank you for choosing our products.
All of our products us er s hav e a condit ional fre e w arrant y repai r ser vice for hardw are w i thin
12 months starting fro m purchas e dat e, and a free exchange service wi thi n on e month (valid for
manufacturing defects). Permanent upgrading service is provided for the software.
Liability Exclusions:
Any product malfunction, abnormalities in operation or damage caused by following
reasons are not within the free service scope of our warranty. Please select payable service.
(1) Equipment damage caused by improper operation
(2) Improper environment and conditions in/on which the equipment operates, e.g., improper
power, environment temperature, humidity and lightening strike etc. that cause equipment
damage.
(3) Damage caused by acts of nature: earthquake and fire etc.
(4) Equipment damage caused by the maintenance of personnel not authorized by our
company.
(5) Products sold ov er 12 months ago.
In order to provide various services to you, please complete registration procedure after
you purchase the product. Cut off or copy User’s Information Card and fax or mail it to us after
the card is filled in. You can also register the product by going to the www.q-see.com website
and clicking on the Register link.
If you have questions:
Contact Us:
Mailing Address: Customer Service:
DPS Inc. Phone: 877-998-3440 x 538
8015 E. Crystal Dr Email: cs@dpsi-usa.com
Anaheim, CA 92807
Website: Tech Support:
Fax: Email: ts@dpsi-usa.com
714-998-3509
http://www.q-see.com Phone: 877-998-3440 x 539
20
 Loading...