


AV Receiver
VSX-530-K Récepteur AV
Receptor AV
Thank you for buying this Pioneer product. This Quick Start Guide includes instructions for basic connections and operations to allow simple use of the receiver. For detailed descriptions of the receiver, see the “Operating Instructions” provided on the included CD-ROM ( ).
).
Merci pour l’achat de ce produit Pioneer. Ce guide rapide contient les instructions relatives aux raccordements et opérations de base permettant une utilisation simple de ce récepteur. Pour des descriptions plus détaillées du récepteur, référezvous au “Mode d’emploi” sur le CD-ROM ( ) fourni.
Muchas gracias por haber adquirido este producto de Pioneer. Esta Guía de inicio rápido incluye instrucciones para hacer las conexiones y operaciones básicas que le permitirán hacer un uso sencillo del receptor. Para conocer una descripción detallada del receptor, consulte el “Manual de instrucciones” suministrado con el CD-ROM ( ) incluido.
What’s in the box
Contenu du carton d’emballage
Contenido de la caja
Remote Control
Télécommande
Mando a distancia
FM wire antenna |
AM loop antenna |
Antenne filaire FM |
Antenne cadre AM |
Antena de hilos de FM |
Antena de cuadro de AM |
CD-ROM (Operating instructions) CD-ROM (Mode d’emploi)
CD-ROM (Manual de instrucciones)
SPEAKER CAUTION Sheet (English only) |
Warranty card |
|||||||||||||||||||||
Note d’avertissement relative aux enceintes (en anglais uniquement) |
Carte de garantie |
|||||||||||||||||||||
Hoja de PRECAUCIONES ACERCA DE LOS ALTAVOCES (solo en inglés) |
Tarjeta de garantía |
|||||||||||||||||||||
|
|
|
|
|
|
|
VSX-530-K |
|
|
|
|
|
|
|
|
|
|
|||||
|
|
|
|
|
|
|
|
|
|
|
|
|
|
|
|
|
||||||
|
|
|
|
|
|
|
|
|
|
|
|
|
|
|
|
|
||||||
|
|
|
|
|
|
|
|
|
|
|
|
|
|
|
|
|
||||||
|
|
|
|
|
|
|
|
|
|
|
|
|
|
|
|
|
|
|
|
|
|
|
|
|
|
|
|
|
|
|
|
|
|
|
|
|
|
|
|
|
|
|
|
|
|
|
|
|
|
|
|
|
|
|
|
|
|
|
|
|
|
|
|
|
|
|
|
|
|
|
|
|
|
|
|
|
|
|
|
|
|
|
|
|
|
|
|
|
|
|
|
|
|
|
|
|
|
|
|
|
|
|
|
|
|
|
|
|
|
|
|
|
|
|
AAA size IEC R03 dry cell batteries x2 |
Safety Brochure |
These quick start guide |
||||||||||||||||||||
Piles à anode sèche AAA IEC R03 x 2 |
Brochure sur la Sécurité |
Le présent Guide de démarrage |
||||||||||||||||||||
Pilas secas AAA, IEC R03 x 2 |
Folleto de Seguridad |
Esta guía de inicio rápido |
||||||||||||||||||||
Quick Start Guide Guide rapide
Guía de inicio rápido
Register your product at
http://www.pioneerelectronics.com (US) http://www.pioneerelectronics.ca (Canada)
Protect your new investment
The details of your purchase will be on file for reference in the event of an insurance claim such as loss or theft.
Receive free tips, updates and service bulletins on your new product
Improve product development
Your input helps us continue to design products that meet your needs.
Receive a free Pioneer newsletter
Registered customers can opt in to receive a monthly newsletter.
Enregistrez votre produit sur le site Web :
http://www.pioneerelectronics.com (États-Unis) http://www.pioneerelectronics.ca (Canada)
Protégez votre nouveau matériel
Les renseignements relatifs à votre matériel seront conservés pour référence en cas de sinistre, tel que la perte ou le vol.
Recevez des conseils, des informations d’entretien et de mise à jour sur votre nouveau matériel
Contribuez au développement de nos produits
Votre participation nous aide à concevoir des produits qui répondent à vos besoins.
Recevez gratuitement le bulletin d’informations de
Pioneer
Les clients enregistrés peuvent, s’ils le désirent, recevoir un bulletin d’informations mensuel.
English
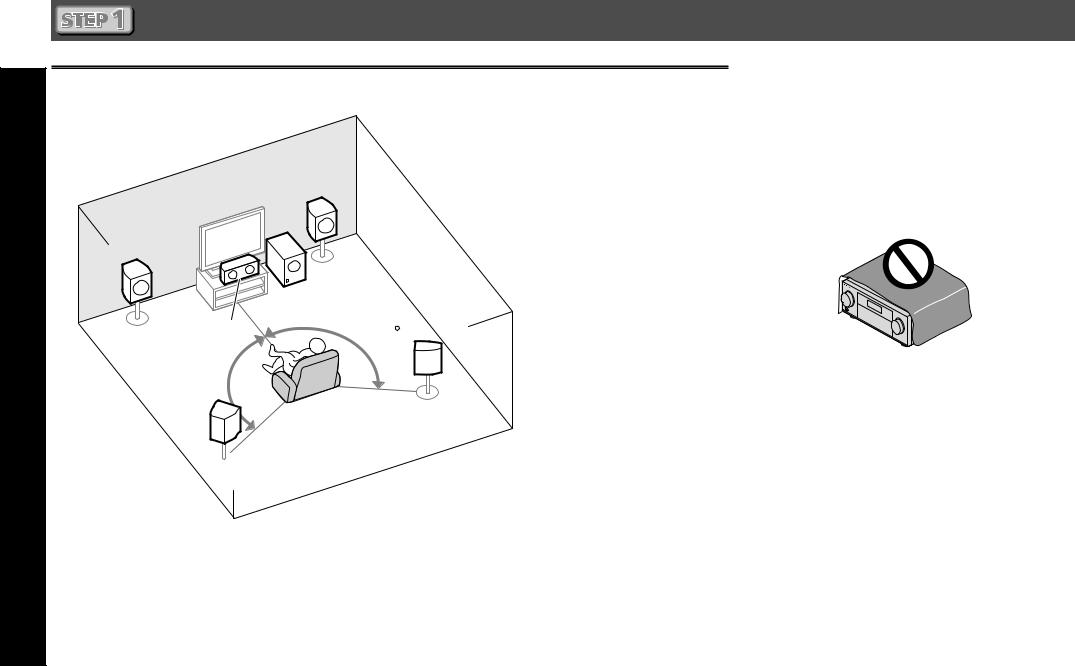
Placing the Speakers |
|
|
L – Front Left |
|
C – Center |
R |
R – Front Right |
|
SL – Surround Left |
L |
SR – Surround Right |
SW – Subwoofer |
|
SW |
|
C |
120 |
120 
SR
 SL
SL
VENTILATION CAUTION
When installing this unit, make sure to leave space around the unit for ventilation to improve heat radiation (at least 40 cm at top, 20 cm at rear, and 20 cm at each side).
WARNING
Slots and openings in the cabinet are provided for ventilation to ensure reliable operation of the product, and to protect it from overheating. To prevent fire hazard, the openings should never be blocked or covered with items (such as newspapers, table-cloths, curtains) or by operating the equipment on thick carpet or a bed.
D3-4-2-1-7b*_A1_En
2
|
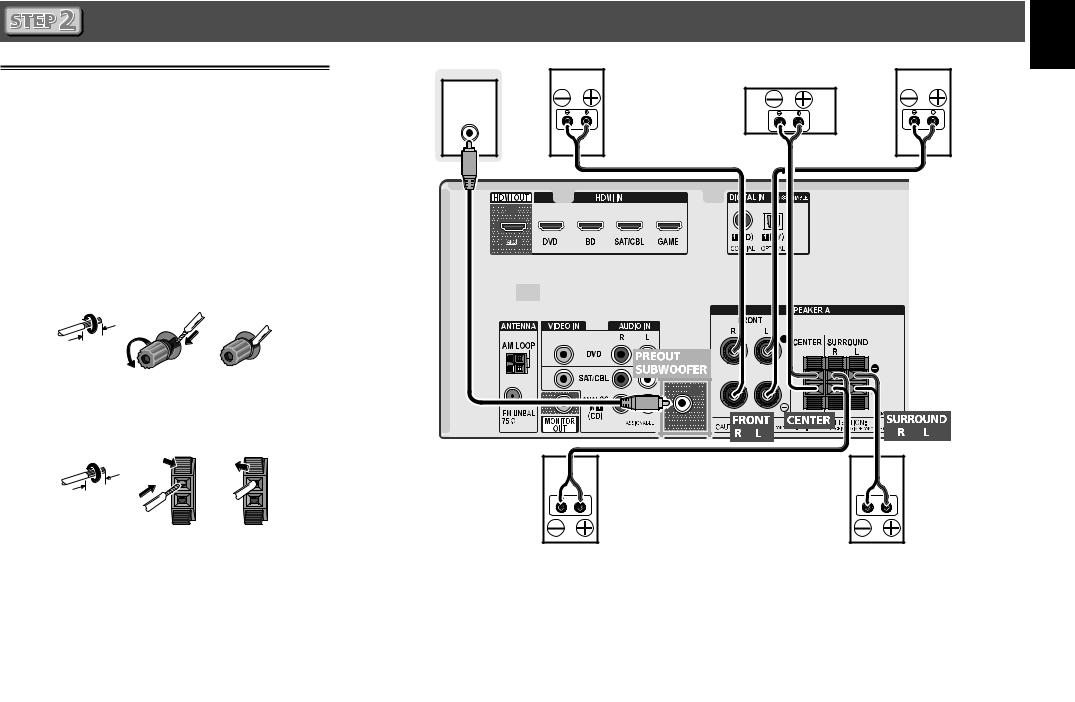
Subwoofer (SW) |
Front Right (R) |
Front Left (L) |
Connecting the speakers |
|
|
Center (C) |
|
|
|
|
1 Be sure to complete all connections before |
LINE LEVEL |
|
|
|
INPUT |
|
|
connecting this unit to the AC power source.
2 You can use speakers with a nominal impedance between 6 and 16 .
3 Connecting the speakers.
Bare wire connections
Front speaker terminals:
1 |
Twist exposed wire strands together. |
|
|
|
|
2 |
Loosen terminal and insert exposed wire. |
|
|
||
3 |
Tighten terminal. |
|
|
|
|
|
1 |
2 |
3 |
|
|
|
10 mm |
|
|
|
|
|
(3/8 in.) |
|
|
|
|
Center and surround speaker terminals: |
|
|
|
||
1 |
Twist exposed wire strands together. |
|
|
|
|
2 |
Push open the tabs and insert exposed wire. |
|
|
||
3 |
Release the tabs. |
|
|
|
|
|
1 |
2 |
3 |
Surround Right |
Surround Left |
|
|
|
|
||
|
|
|
|
(SR) |
(SL) |
|
10 mm |
|
|
|
|
|
(3/8 in.) |
|
|
|
|
 CAUTION
•These speaker terminals carry HAZARDOUS LIVE voltage. To prevent the risk of electric shock when connecting or disconnecting the speaker cables, disconnect the power cord before touching any uninsulated parts.
Español Français English
3

Connecting a TV and playback components
Connecting using HDMI
HDMI/DVI-compatible components |
|
|
|
DVD player, HDD/ |
Blu-ray Disc player, |
Set-top box |
Game console |
DVD recorder |
Blu-ray Disc recorder |
|
|
HDMI OUT |
HDMI OUT |
HDMI OUT |
HDMI OUT
If the TV does not support the HDMI Audio Return Channel function, this connection is required to listen to the TV sound over the receiver.
OSD can only be output from HDMI Out.
HDMI IN
HDMI/DVI-compatible TV
R |
L |
OPTICAL |
ANALOG AUDIO OUT |
DIGITAL AUDIO OUT |
|
Select one
•If the TV supports the HDMI Audio Return Channel function, the sound of the TV is input to the receiver via the HDMI terminal, so there is no need to connect an optical digital cable ( A ). In
this case, set ARC at HDMI Setup to ON  “The HDMI Setup menu” on page 32.
•Please refer to the TV’s operation manual for directions on connections and setup for the TV.
Connecting antennas
|
|
2 |
|
|
AM loop antenna |
FM wire antenna |
4 |
3 |
|
|
1 |
 CAUTION
•Handle the power cord by the plug part. Do not pull out the plug by tugging the cord, and never touch the power cord when your hands are wet, as this could cause a short circuit or electric shock. Do not place the unit, a piece of furniture, or other object on the power cord or pinch the cord in any other way. Never make a knot in the cord or tie it with other cables. The power cords should be routed so that they are not likely to be stepped on. A damaged power cord can cause a fire or give you an electric shock. Check the power cord once in a while. If you find it damaged, ask your nearest Pioneer authorized independent service company for a replacement.
4
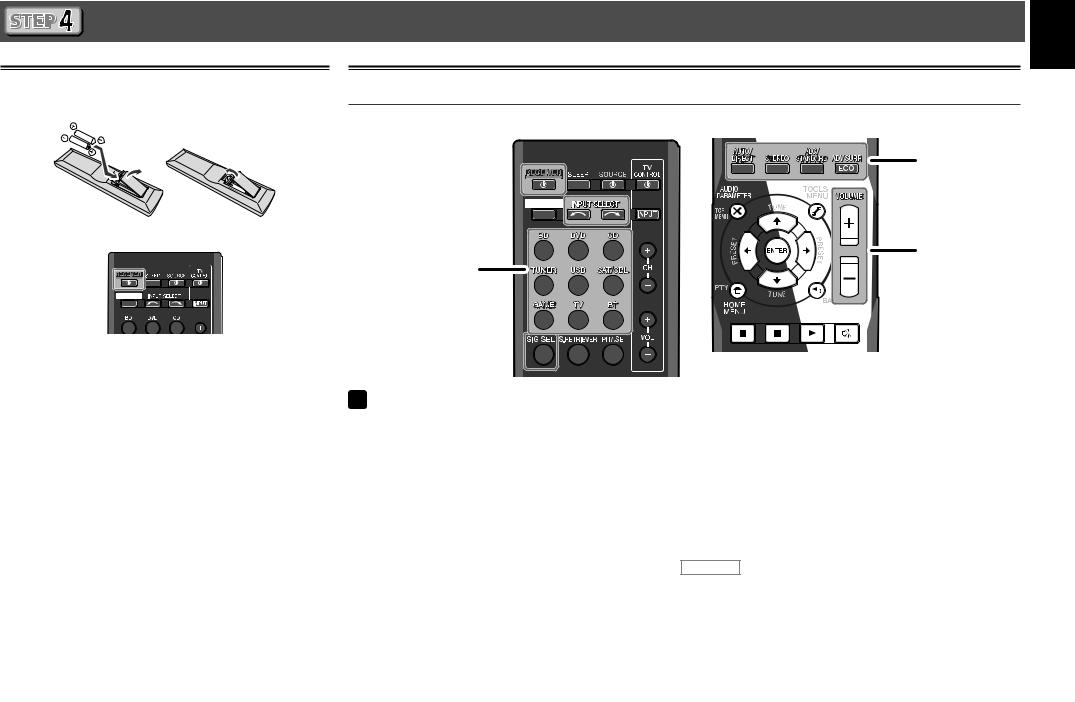
Before you start
1 Put the batteries in the remote control.
2 Switch on the receiver and your TV.
3 Switch the TV input so that it connects to the receiver.
4 Turn the subwoofer on and turn up the volume.
5 Perform manual speaker setup.
Refer to “Manual speaker setup” in the CD-ROM operating instructions  for details on how to perform the setup.
 CAUTION
•Do not use or store batteries in direct sunlight or other excessively hot place, such as inside a car or near a heater. This can cause batteries to leak, overheat, explode or catch fire. It can also reduce the life or performance of batteries.
•When inserting the batteries, make sure not to damage the springs on the battery’s terminals. This can cause batteries to leak or overheat.
•When disposing of used batteries, please comply with governmental regulations or environmental public institution’s rules that apply in your country/area.
English
Basic playback
Playing a source |
Français |
|
LISTENING |
|
MODE |
Español |
|
|
VOLUME |
|
INPUT SELECT |
|
 Note
Note
•When a sound can not be heard from center and rear speakers, press ALC/STANDARD or ADV SURR to change listening modes. E.g.) Press the ADV SURR for several times to select EXT.STEREO.
•In order to listen to the audio from the source component that is connected to this receiver using a coaxial or an optical cable, choose the C1 (coaxial) or O1 (optical) input. (Press SIG SEL.)
•If there’s no sound from the subwoofer:
–When the front speaker is set to LARGE then, in some cases, no sound may come from the subwoofer. Change the front speaker setting to SMALL or change the subwoofer to PLUS and the sound should be restored. If the front speaker has good low range playback capabilities then it is recommended that you do not change the settings. (Refer to “Home Menu” “Manual speaker setup” in the CD-ROM operating instructions  for details)
•If the remote control isn’t responding:
–In order to control the receiver using the remote control, first press RECEIVER .
–In order to control TUNER or USB, first press TUNER or USB.
•If the power suddenly turns off:
–There is a possibly that the speaker cord’s exposed wire is in contact with the rear panel or another exposed wire, triggering the protection circuit. Firmly retwist the speaker’s exposed wire and connect it ensuring that it isn’t sticking out from the unit or the speaker terminal on the speaker.
©2015 PIONEER HOME ELECTRONICS CORPORATION.
All rights reserved.
5
 Loading...