


Speaker System
Enceintes acoustiques
Lautsprechersystem
Sistema di diffusori
Luidsprekersysteem
Sistema de altavoces
PDP-S21-LR PDP-S22-LR
Operating Instructions
Mode d'emploi
Bedienungsanleitung
Istruzioni per l'uso
Gebruiksaanwijzing
Manual de instrucciones
English
Thank you for buying this Pioneer product.
Please read through these operating instructions before using your speaker system so you will know how to make the most of its performance. After you have finished reading the instructions, put them away in a safe place for future reference.
WARNING:
Handling the power cord on this product or cords associated with accessories sold with the product will expoes you to lesd, a chemical known to the State of California and other governmental entities to cause cancer and birth defects or other reproductive harm.
Wash hands after handling.
BEFORE USE
÷The nominal impedance of this speaker system is 8 ohms.
÷In order to prevent damage to the speaker system resulting from input overload, please observe the following precautions:
÷Do not supply power to the speaker system in excess of the maximum permissable input. This can result in damage or a possible fire hazard.
÷When connecting or disconnecting pin-plugs, be sure that amplifier power is OFF.
÷When using a graphic equalizer to emphasize loud sounds of a high frequency range, do not use excessive amplifier volume.
÷Do not force a low-powered amplifier to produce a loud volume of sound (the amplifier’s harmonic distortion will be increased, and you may damage the speaker).
÷An automatic restore-type protective device is incorporated to protect the speakers from excessive input signals or abnormal signals. When an excessive input signal is sent to the speakers, the protective device is activated and loud high-pitched sounds will be prevented. In this case, lower the volume of the plasma display during use. After 5 to 10 seconds, the speakers are restored automatically.
÷Placing a CRT computer screen or CRT monitor near to the speakers may result in interference or color distortion. If this happens, distance the monitor from the speakers.
Notes on Installation Work:
This product is marketed assuming that it is installed by qualified personnel with enough skill and competence. Always have an installation specialist or your dealer install and set up the product.
PIONEER cannot assume liabilities for damage caused by mistake in installation or mounting, misuse, modification or a natural disaster.
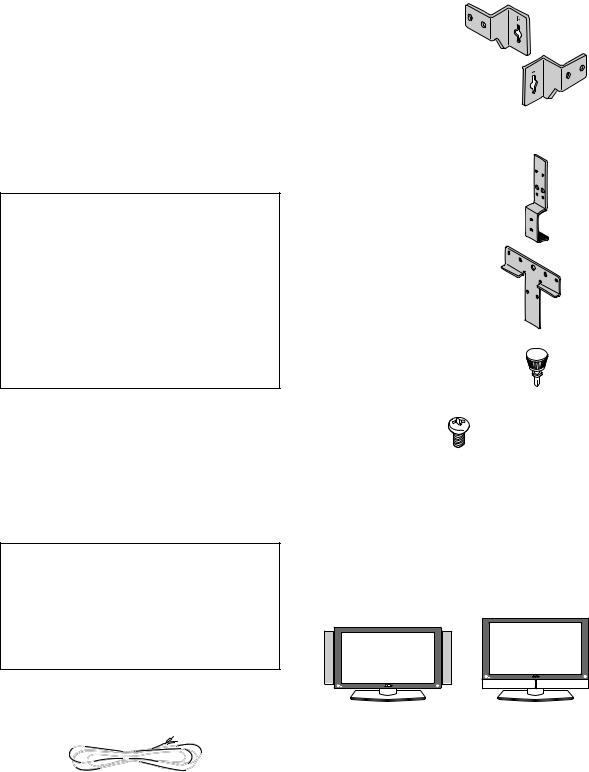
7Speaker mounting fittings (Used when installing the speakers on the right and left sides of the display)
Bracket for installing the speakers on the right x 2
Bracket for installing the speakers on the left x 2
7Speaker mounting fittings (Used when installing the speakers at the bottom of the display)
Bracket for installing the speakers at the bottom x 2 for right and left sides
Bracket for installing the speakers at the bottom x 1 for center
Rivet for installing the speakers at the bottom x 2
7 Speakers mounting screws
x 12
7 Operating Instructions
NOTE:
÷Always use the accessory mounting fittings for installation.
÷When screws other than those enclosed as accessories are used to install the speakers, the speakers may drop off or accidents may be caused. Always use the screws enclosed as accessories.
The customer can select whether to install the speakers on the right and left sides of the display or at the bottom of the display.
CHECKING THE ACCESSORIES
7 Speaker cable x 2
|
|
|
|
When the speakers are installed |
When the speakers are |
||
on the right and left sides |
installed at the bottom |
||
See the description below for details of the installation.
 CAUTION:
÷Attach the plasma display to the stand (PDK-TS05) before installing the speakers. See the Operating Instructions packed together with the stand for how to assemble the stand.
2

INSTALLATION ON THE PLASMA DISPLAY
(WHEN INSTALLING THE SPEAKERS ON THE RIGHT AND LEFT SIDES OF THE DISPLAY)
Perform installation according to the following steps 1to 2.
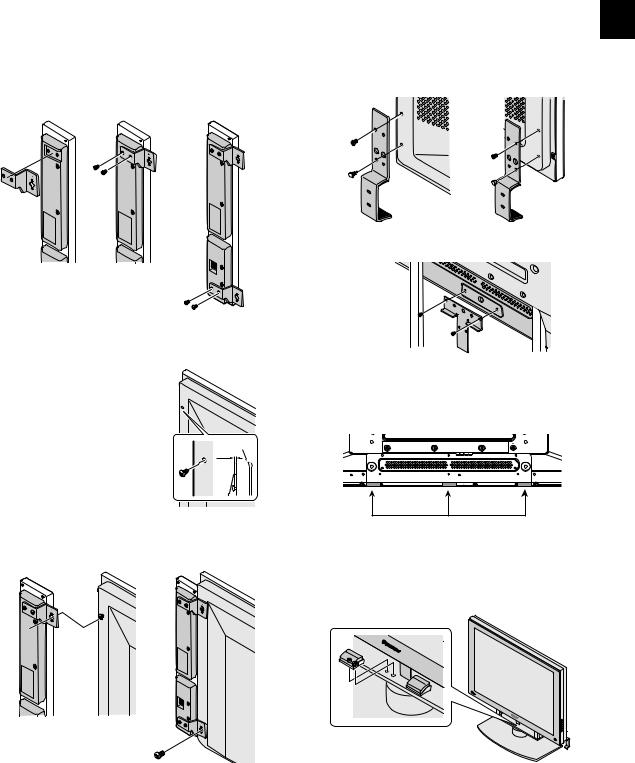
1 Attach the mounting fittings to the speakers.
The illustration below shows the right speaker. Attach the left side mounting fitting in the same way.
1Attach a bracket (R) to the top of the right speaker, as shown.
2Attach another bracket (R) to the bottom of the speaker in the same way.
1 
 2
2
English
INSTALLATION ON THE PLASMA
DISPLAY |
English |
|
(WHEN INSTALLING THE SPEAKERS AT THE BOTTOM |
||
|
||
OF THE DISPLAY) |
|
|
Perform installation according to the following steps 1to 2. |
|
1Attach the mounting fittings to the display.
1Push rivets into each (lower) outside hole of brackets (on
the right and left sides).
2Lightly finger-tighten a screw into the (upper) outside hole of each bracket.
2
2
1 

 1
1
3Insert the screws into the two outside holes of bracket (at the center), and tighten them.
2 Attach the speakers to the display.
The illustration below shows how to attach of the right speaker. Attach the left speaker in the same way.
1 Fix the upper screw temporarily in advance to hang the speaker on the display (In this case, leave a
space of about 5 mm between the
The display
head of the screw and the display).
5mm
2 Hang the speaker on the upper screw.
3 Fix the lower screw temporarily.
4Adjust the position so that the speaker is parallel to the display and then fix the upper and lower screws firmly.
2 |
4 |
3
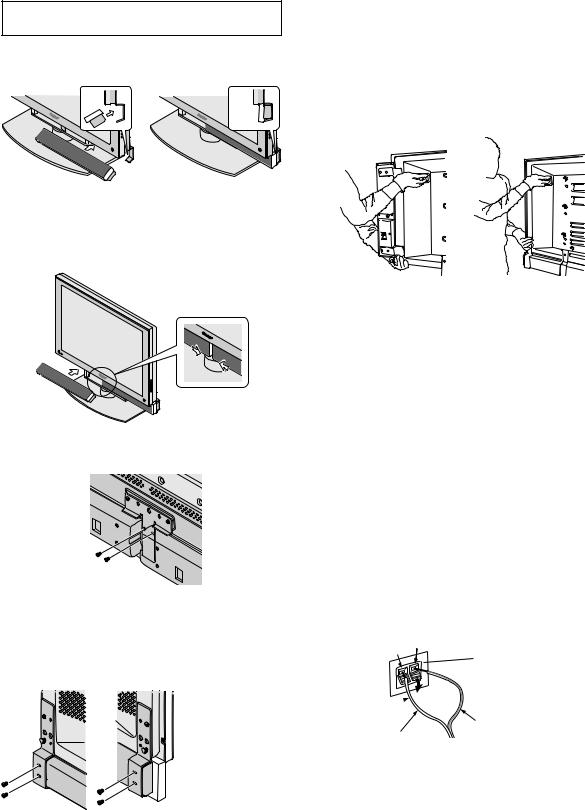
4Attach the speaker cushions supplied with your plasma display.
Lower back side of the plasma
display speaker system
Separate the 3 cushions evenly, making sure you don't cover the screws with the speaker cushions when placing them.
5Align the bosses of the spacer with the holes of the stand and insert them.
3

English
2 Attach the speakers to the display.
Take care to ensure that the display does not hit the speakers in steps 1 and 2 when speakers are installed on the display.
1Place it below the display while inclining one speaker and insert it into the bracket on the right side.
2 Similarly, insert the other speaker into the bracket on the left side.
3Adjust so that the clearance between the speakers is lost and so that the speakers are not shifted to the right or left.
4 Fix the two points in the center of the display with screws.
5Fix the two points on the right and left sides with screws. Adjust so that the speaker system is parallel to the display and then finish securing the screws you had lightly tightened on the mounting fittings.
Make sure the speaker is fit snug against the bracket, then tighten the screws.
NOTE:
÷When attaching the speakers to the plasma display, make sure to tighten all the screws, making sure the speakers are secure and do not shake.
÷When the display is to be moved after speaker installation, do not hold the display by the speakers. Hold the handle of the display and the side or bottom of the display with reference to the figures below when moving the speaker system. Do not hold the speakers and raise the display. This may cause the deformation or damage of products.
When the speakers are installed |
When the speakers are |
on the right and left sides |
installed at the bottom |
÷Make sure not to push on the speaker cover with force, using your fingers or otherwise. The speaker cover can be broken, and damage to the speaker unit may also occur as a result.
CONNECTION TO A PLASMA DISPLAY
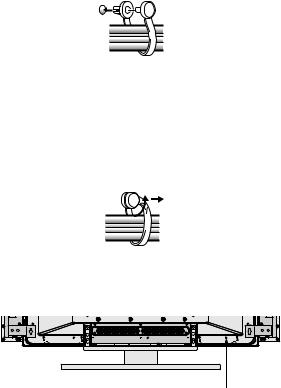
1Connecting the speaker cables
1Switch off the power of the plasma display.
2Connect the input terminals of the speaker system and the speaker output terminals of the plasma display with the accessory speaker cable. Make sure the positive (ª) and negative (·) terminals match when connecting.
1. Push the lever, insert the cable into the hole, and release the lever.
· terminal (black) ªterminal (red)
Input terminal of speaker
|
White with gray line |
White |
|
To the· terminal |
To the ª terminal |
(Speaker input terminals of the speaker system)
4

2.For the output terminals on the plasma display, push the lever, insert the cable into the hole, and release the lever.
ª · · ª
Output terminal of plasma
display
R L
÷After connection to the terminals, pull lightly on the cable to confirm that the tips of the cable are properly connected to the terminals. An imperfect connection can cause sound interruptions and noise.
÷When cable cores stick out and ª and · lines are shortcircuited, an excessive load will be applied to the plasma display and the operation will stop or trouble will be caused.
English
÷ When the polarity is reversed for one speaker (left or right) |
|
at the time of connection to the plasma display, the bass |
|
reproduction will be reduced, the sound positioning will |
English |
is touching the speaker terminal, you may not get any |
|
be lost, and a correct stereo effect will not be obtained. |
|
÷ If you insert the speaker cord too far so that the insulation |
|
sound. |
|
< right > |
< wrong > |
2 How to route cables
Speed clamps are included with the plasma display for tidying your cables and keeping extra cable length out of the way.
When installing the speakers on the right and left sides of the display
Speaker cable |
Wiring clamp |
Speed clamps |
Speaker cable |
When installing the speakers at the bottom of the display
|
|
|
|
|
|
|
|
|
|
|
|
|
|
|
|
|
|
|
|
|
|
|
|
|
|
|
|
|
|
|
|
|
|
|
|
|
|
|
|
|
|
|
|
|
|
|
|
|
|
|
|
|
|
|
|
|
|
|
|
|
|
|
|
|
|
|
|
|
|
|
|
|
|
|
|
|
|
|
|
|
|
|
|
|
|
|
|
|
|
|
|
|
|
|
|
|
|
|
|
|
|
|
|
|
|
|
|
|
|
|
|
|
|
|
|
|
|
|
|
|
|
|
|
|
|
|
|
|
|
|
|
|
|
A speaker cable or system cable is put in |
|||
|
|
|
|
|
|
|
|
|
|
|
|
|
|
|
|
|
|
|
||||
|
|
|
|
|
|
|
|
|
|
|
|
|
|
|
|
|
|
|
the rack using a supplied wiring clamp so |
|||
|
|
|
|
|
|
|
|
|
|
|
|
|
|
|
|
|
|
|
||||
|
|
Speaker cable |
Wiring clamp |
|
|
|
|
Speaker cable |
that it cannot be viewed from the front. |
|||||||||||||
5

English
•Organize cables together using the speed clamps provided with the plasma display.
Insert 1 into an appropriate hole on the rear of the unit, then snap 2 into the back of 1 to fix the clamp.
12
Speed clamps are designed to be difficult to undo once in place. Please attach carefully.
To remove speed clamps
Using pliers, twist the clamp 90° and pull it outward.
In some cases the clamp may have deteriorated over time and may be damaged when removed.
To attach the speed clamps to the main unit
Connect the speed clamps using the 1 hole marked with • below, depending on the situation.
CABINET MAINTENANCE
÷Use a polishing cloth or dry cloth to wipe off dust and dirt.
÷When the cabinet is very dirty, wipe with a soft cloth moistened with water-diluted cleanser; then wipe again with a dry cloth. Do not use furniture wax or cleaners. They may damage the surface of the cabinet.
÷Never use thinner, benzine, insecticide sprays and other chemicals on or near the cabinets, since these will corrode the surfaces.
÷When a chemical cloth is used, read the cautions for the chemical cloth carefully.
SPECIFICATIONS
Cabinet : Bass-reflex type |
|
|
Used speakers (two-way system) : |
|
|
Woofer (for low tones) ............................ |
|
Oval cone type |
Tweeter (for high tones) .................... |
|
2.5 cm dome type |
Nominal impedance ..................................................... |
|
8 Ω |
Frequency Range ..................................... |
|
60 to 20,000 Hz |
Sensitivity ................................ |
82 dB/W (at 1 m distance) |
|
Permissible input : |
|
|
Max. input ............................................................... |
|
13 W |
Rated input .............................................................. |
|
4 W |
Crossover frequency ................................................ |
|
4 kHz |
External Dimensions : |
|
|
PDP-S21-LR (for 50 in. (127 cm)) |
|
|
...................................... |
105 (W) x 634 (H) x 70 (D) mm |
|
PDP-S22-LR (for 43 in. (110 cm)) |
|
|
...................................... |
105 (W) x 559 (H) x 70 (D) mm |
|
Weight : |
|
|
PDP-S21-LR (for 50 in. (127 cm)) .......................... |
1.4 kg |
|
PDP-S22-LR (for 43 in. (110 cm)) .......................... |
1.3 kg |
|
Accessory parts (for 2 speakers) :
.............................................................. Speaker cable x 2
............ Bracket for installing the speakers at the bottom (for right and left side) x 2
............ Bracket for installing the speakers at the bottom (for center) x 1
........................................................ Screw (M5 x 10) x 12
................ Bracket for installing the speakers on the right x 2
.................. Bracket for installing the speakers on the left x 2
............................................................................. Rivet x 2
................................................ Operating Instructions x 1
NOTE:
Specifications and design subject to possible modification without notice, due to improvements.
Published by Pioneer Corporation.
Copyright © 2004 Pioneer Corporation.
All rights reserved.
6

English
English
7
Français
Merci pour votre achat de cet appareil Pioneer.
Veuillez lire attentivement toutes ces instructions de fonctionnement avant d’utiliser votre enceinte acoustique de façon à pouvoir en tirer le meilleur profit. Après lecture complète du livret d’instructions de fonctionnement, le ranger dans un endroit sûr afin de pouvoir vous y reporter facilement en cas de besoin lors de l’utilisation de l’enceinte acoustique.
AVANT USAGE
÷L’impédance nominale de cette enceinte acoustique est de 8 Ω.
÷Afin d’éviter d’endommager l’enceinte acoustique, suite à une surcharge à l’entrée, veuillez observer les précautions suivantes:
÷Ne pas fournir aux haut-parleurs une alimentation supérieure à la valeur maximale admise, sinon l’appareil risque d’être endommagé ou un incendie pourrait éclater.
÷En connectant ou en déconnectant les fiches à plots, s’assurer que l’alimentation de l’amplificateur est coupée.
÷En utilisant un égalisateur graphique pour accentuer les sons forts dans la plage des hautes fréquences, ne pas régler l’amplificateur à un volume excessif.
÷Ne pas contraindre un amplificateur de faible puissance à fonctionner à un volume sonore poussé (la distorsion harmonique de l’amplificateur sera accrue, ce qui risquerait d’endommager le haut-parleur).
÷Un dispositif de protection de type à rétablissement automatique est incorporé pour protéger les haut-parleurs contre tout signal d’entrée excessif ou anormal. Quand un signal d’entrée excessif est envoyé aux haut-parleurs, ce dispositif de protection se met en marche, ce qui permet d’éviter la génération de sons forts et aigus. Dans ce cas, baissez le volume de l’écran plasma pendant l’utilisation. 5 à 10 secondes plus tard, les haut-parleurs reviendront automatiquement à leur état initial.
÷Si un écran d’ordinateur à écran cathodique (CRT) ou un moniteur à écran cathodique (CRT) est placé à proximité des haut-parleurs, il risque de présenter des interférences ou une dénaturation des couleurs. Dans ce cas, éloignez le moniteur des haut-parleurs.
Remarques sur l’installation:
Ce produit est vendu en assumant qu’il sera installé par un personnel suffisamment expérimenté et qualifié. Faites toujours réaliser le montage et l’installation par un spécialiste ou par votre revendeur.
PIONEER ne peut être tenu responsable pour tout dommage causé par une erreur d’installation ou de montage, une mauvaise utilisation ou un désastre naturel.
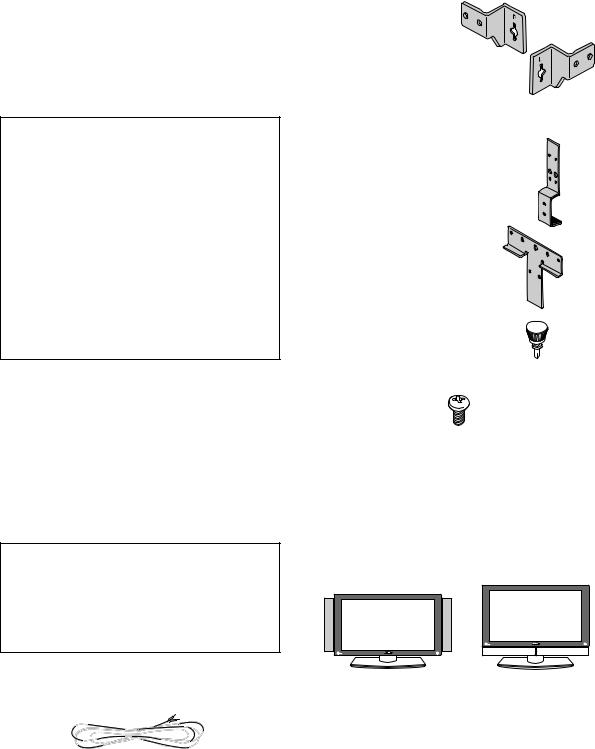
VÉRIFICATION DES ACCESSOIRES
7 Câbles de haut-parleur x 2
7Accessoires de montage pour haut-parleurs (pour installation des haut-parleurs sur les côtés droit et gauche de l’écran)
Support pour installation des haut-parleurs sur la droite x 2
Support pour installation des haut-parleurs sur la gauche x 2
7Accessoires de montage pour haut-parleurs (pour installation des haut-parleurs au bas de l’écran)
Support pour installation des haut-parleurs au bas de l’écran x 2 pour les côtés droit et gauche
Support pour installation des hautparleurs au bas de l’écran x 1 pour le centre
Rivet pour installation des hautparleurs au bas de l’écran x 2
7 Vis pour montage des haut-parleurs
x 12
7 Mode d’emploi
REMARQUE:
÷Utilisez toujours les accessoires de montage fournis pour l’installation.
÷Si des vis autres que celles ci-jointes sont utilisées pour installer les haut-parleurs, ceux-ci peuvent se détacher et tomber, ou des accidents risquent de se produire. Utilisez toujours les vis fournies comme accessoires.
Le client peut choisir d’installer les haut-parleurs soit à droite et à gauche de l’écran, soit au bas de l’écran.
|
|
|
|
Cas où les haut-parleurs sont |
Cas où les haut-parleurs |
||
installés sur les côtés droit et |
sont installés au bas de |
||
gauche |
l’écran |
||
Se référer à la description ci-dessous pour les détails de l’installation.
 ATTENTION:
÷Avant de procéder à l’installation des haut-parleurs, fixez l’écran plasma sur son socle (PDK-TS05). Se référer au mode d’emploi fourni avec le socle pour la procédure d’assemblage.
8
INSTALLATION SUR L’ECRAN PLASMA
(POUR INSTALLATION DES HAUT-PARLEURS À DROITE ET À GAUCHE DE L’ÉCRAN)
Effectuez l’installation selon les étapes 1 à 2 suivantes.
1 Fixez les accessoires de montage sur les haut-parleurs.
L’illustration ci-dessous désigne le haut-parleur de droite. Fixez l’attache de montage du côté gauche de la même façon.
1Fixez un support (R) sur le haut du haut-parleur droit, comme illustré.
2Fixez l’autre support (R) sur le bas du haut-parleur droit de la même façon.
1 
 2
2 
Français
INSTALLATION SUR L’ECRAN PLASMA
(POUR INSTALLATION DES HAUT-PARLEURS AU BAS DE L’ÉCRAN)
Effectuez l’installation selon les étapes 1 à 2 suivantes.
1Fixez les accessoires de montage sur l’écran.
1Poussez les rivets dans chaque trou extérieur (inférieur)
des supports (sur les côtés gauche et droit). |
ais |
|
2 Serrez légèrement la vis avec les doigts dans le trou |
||
extérieur (supérieur) de chaque support. |
ç |
|
Fran |
||
|
||
2 |
|
|
2 |
|
1 

 1
1
3Insérez les vis dans les deux trous extérieurs du support (au centre) et serrez-les.
2 Fixez les haut-parleurs sur l’écran.
L’illustration ci-dessous montre la fixation du haut-parleur de droite. Procédez de la même manière pour celui de gauche.
1A l’avance, fixez la vis du haut en la serrant temporairement afin d’accrocher le haut-parleur
|
sur l’écran (dans ce cas, laissez |
|
|
un espace de 5 mm environ en- |
L’écran |
|
tre la tête de la vis et l’écran). |
5mm |
|
Accrochez le haut-parleur sur la |
|
2 |
|
|
|
vis du haut. |
|
3 |
Fixez la vis du bas en la serrant |
|
|
temporairement. |
|
4Réglez la position de façon à ce que le haut-parleur soit parallèle à l’écran, puis serrez fermement les vis du haut et du bas.
2 |
4 |
3
4Fixez les garnitures pour enceinte, fournies avec votre écran plasma.
Côté arrière inférieur des hautparleurs de l’écran plasma
Séparez les 3 garnitures de façon égale, en veillant à ne pas recouvrir les vis avec les garnitures pour enceinte quand vous les disposez.
5Alignez les parties saillantes de l’entretoise avec les orifices du socle et emboitez-les.
9
Français
2 Fixez les haut-parleurs sur l’écran.
Prenez garde que l’écran ne cogne pas contre les hautparleurs aux étapes 1 et 2 de leur installation sur l’écran.
1Placez l’un des haut-parleurs sous l’écran tout en l’inclinant, puis insérez-le dans le support sur le côté droit.
2 De façon similaire, insérez l’autre haut-parleur dans le support sur le côté gauche.
3Ajuster la position pour éliminer l’espace entre les hautparleurs, et pour que les haut-parleurs ne puissent bouger ni vers la droite ni vers la gauche.
REMARQUE:
÷Lors de la fixation des haut-parleurs sur l’écran plasma, prenez soin de serrer toutes les vis, en vous assurant que les haut-parleurs sont bien immobilisés et qu’ils ne bougent pas.
÷Si l’écran doit être déplacé après l’installation des hautparleurs, évitez de le tenir par les haut-parleurs. Pour déplacer le système de haut-parleurs, soulever l’écran en le tenant par les poignées et par les côtés ou le bas, comme indiqué par les figures ci-dessous. Ne pas soulever l’écran en tenant les haut-parleurs. Il pourrait s’ensuivre une déformation ou des dégâts aux produits.
Pour installation des haut-parleurs |
Pour installation des haut- |
à droite et à gauche de l’écran |
parleurs au bas de l’écran |
÷Veillez à ne pas pousser le couvercle de haut-parleur avec force avec vos doigts ou d’une autre façon. Le couvercle du haut-parleur pourrait en être cassé et des dégâts pourraient survenir sur le haut-parleur.
4Fixez les deux points dans le centre de l’écran à l’aide de vis.
5Fixez les deux points sur les côtés droit et gauche à l’aide de vis. Ajustez de sorte que le haut-parleur soit parallèle à l’écran, puis finissez de serrer les vis que vous aviez seulement serrées légèrement sur les accessoires de montage.
Assurez-vous que le hautparleur est fermement calé contre le support, puis serrez les vis.
BRANCHEMENT A L’ECRAN PLASMA
1Branchez les câbles de haut-parleur.
1Coupez l’alimentation de l’écran plasma.
2Raccordez les bornes d’entrée du système de hautparleurs et les bornes de sortie de l’écran plasma avec un câble de haut-parleur accessoire. Assurez vous qu’en étant connectées, les bornes positives ª et négatives · correspondent.
1.Appuyez sur le levier, insérez le câble dans le trou, puis relâchez le levier.
Borne ª(rouge)
Borne · (noir)
Borne d’entrée du haut-
parleur.
 Blanc à ligne grise
Blanc 
Vers la borne ª
Vers la borne ·
(Bornes d’entrée des haut-parleurs)
10
Français
2.Pour les bornes d’entrée de l’écran plasma, appuyez sur le levier, insérez le câble dans le trou, puis relâcher le levier.
ª · · ª
Bornes d’entrée de
l’écran plasma
R L
÷Après l’avoir connecté aux bornes, tirez légèrement le câble vers vous, afin de vous assurer que les extrémités sont correctement branchées aux bornes. Un branchement incorrect peut être à l’origine de coupures de son ou de bruits.
÷Si des brins du noyau de câble dépassent et les lignes ª et · sont court-circuitées, l’écran plasma sera exposé à une charge excessive et l’opération s’arrêtera ou sera dérangée.
÷Si la polarité est inversée sur un haut-parleur (celui de gauche ou de droite), au moment de la connexion à l’écran plasma, la reproduction des basses sera altérée, l’orientation sonore sera disparaîtra et un effet stéréo correct ne sera pas obtenu.
÷Si vous insérez le cordon de haut-parleur trop loin au point que l’isolant touche la borne de huat-parleur, il est possible qu’aucun son ne soit obtenu.
< correct > |
< incorrect > |
2 Comment cheminer les câbles
Des serre-câbles sont fournis avec l’écran plasma pour mettre de l’ordre dans vos câbles et tenir la longueur de câble supplémentaire non-utilisé à l’écart.
Pour installation des haut-parleurs à droite et à gauche de l’écran
Français
Câble de haut-parleur |
Collier |
Serre-câble rapide |
Câble de haut-parleur |
Pour installation des haut-parleurs au bas de l’écran
|
|
|
|
|
|
|
|
|
|
|
|
|
|
|
|
|
|
|
|
|
|
|
|
|
|
|
|
|
|
|
|
|
|
|
|
|
|
|
|
|
|
|
|
|
|
|
|
|
|
|
|
|
|
|
|
|
|
|
|
|
|
|
|
|
|
|
|
|
|
|
|
|
|
|
|
|
|
|
|
|
|
|
|
|
|
|
|
|
|
|
|
|
|
|
|
|
|
|
|
|
|
|
|
|
|
|
|
|
|
|
|
|
|
|
|
|
|
|
|
|
|
|
|
|
|
|
|
|
|
|
|
|
|
Les câbles de haut-parleurs ou les câbles |
|||
|
|
|
|
|
|
|
|
|
|
|
|
|
|
|
|
|
|
|
||||
|
|
|
|
|
|
|
|
|
|
|
|
|
|
|
|
|
|
|
du système sont placés dans le cadre |
|||
|
|
|
|
|
|
|
|
|
|
|
|
|
|
|
|
|
|
|
derrière l’écran, à l’aide des colliers |
|||
|
|
|
|
|
|
|
|
|
|
|
|
|
|
|
|
|
|
|
fournis, pour qu’ils ne soient pas visibles |
|||
|
|
|
|
|
|
|
|
|
|
|
|
|
|
|
|
|
|
|
||||
|
|
Câble de haut-parleur |
|
Collier |
|
|
|
Câble de haut-parleur |
du devant. |
|||||||||||||
11
Français
•Regroupez les câbles à l’aide des serrecâbles rapides fournis avec l’écran
plasma.
Introduisez 1dans le perçage adéquat à l’arrière de l’appareil, puis fermez le serre-câble en insérant 2 à l’arrière de 1, le
faisant cliquer. |
1 |
2 |
|
Les serre-câbles sont conçus pour être difficiles à défaire, une fois fermés. Nous vous prions de les attacher prudemment.
Pour enlever les serre-câbles.
À l’aide d’une paire de pinces, tordez le serre-câble à 90° et tirez-le vers l’extérieur. Dans certains cas le serre-câble a pu se détériorer avec le temps et peut s’endommager lors de son retrait.
Fixez les serre-câbles rapides à l’appareil principal.
Connectez les serre-câbles en les insérant dans le trou désigné par •, comme indiqué ci-dessous, selon la situation.
ENTRETIEN DU COFFRET
÷Utiliser un chiffon à polir ou un chiffon sec pour essuyer la poussière et éliminer les salissures.
÷Si le coffret est très sale, le frotter avec un chiffon doux imbibé de liquide à nettoyer dilué d’eau. Ensuite, essuyer à nouveau avec un chiffon sec. Ne pas utiliser de cire à meuble ou de produits de nettoyage corrosifs. Ils risqueraient d’endommager la surface du coffret.
÷Ne jamais utiliser non plus de diluant, de benzine, d’insecticides en vaporisateur et autres produits chimiques sur le coffret ou à proximité, car ils risquent de corroder les surfaces.
÷Si l’on utilise un chiffon chimique, lire et observer attentivement les précautions à prendre pour son usage adéquat.
SPECIFICATIONS
Coffret : Type bass-reflex
Haut-parleurs utilisés (système à double voie) :
Haut-parleur de graves ....................... |
Type à cône ovale |
Haut-parleur d’aigus .................. |
Type à dôme de 2,5 cm |
Impédance nominale ................................................... |
8 Ω |
Plage de fréquences ................................. |
60 à 20.000 Hz |
Sensibilité ........................... |
82 dB/W (à 1 m de distance) |
Entrée admissible : |
|
Entrée max. ............................................................ |
13 W |
Entrée nominale ...................................................... |
4 W |
Fréquence de recouvrement ................................... |
4 kHz |
Encombrement : |
|
PDP-S21-LR (pour 50 pouces (127 cm))
........................................ 105 (L) x 634 (H) x 70 (P) mm PDP-S22-LR (pour 43 pouces (110 cm))
........................................ 105 (L) x 559 (H) x 70 (P) mm
Poids : |
|
PDP-S21-LR (pour 50 pouces (127 cm)) ............... |
1,4 kg |
PDP-S22-LR (pour 43 pouces (110 cm)) ............... |
1,3 kg |
Pièces accessoires (pour 2 haut-parleurs) : |
|
..................................................... Câbles de haut-parleur x 2
........... Support pour installation des haut-parleurs au bas de l’écran (pour les côtés droit et gauche) x 2
........... Support pour installation des haut-parleurs au bas de l’écran (pour le centre) x 1
.............................................................. Vis (M5 x 10) x 12
..... Support pour installation des haut-parleurs sur la droite x 2
... Support pour installation des haut-parleurs sur la gauche x 2
............................................................................. Rivet x 2
............................................................... Mode d'emploi x 1
REMARQUE:
Les spécifications et la finition sont susceptibles d’être modifiées sans préavis en vue de l’amélioration.
Publication de Pioneer Corporation. © 2004 Pioneer Corporation.
Tous droits de reproduction et de traduction réservés.
12
 Loading...