


DEH-P4050UB

Operation Manual
CD RECEIVER
DEH-P4050UB
English
Español
Português (B)

Contents
Thank you for buying this Pioneer product.
Please read through these operating instructions so you will know how to operate
your model properly. After you have finished reading the instructions, keep this man-
ual in a safe place for future reference.
Before You Start
About this unit 5
Visit our website 6
Protecting your unit from theft 6
– Removing the front panel 6
– Attaching the front panel 6
About the demo mode 7
Use and care of the remote control 7
– Installing the battery 7
– Using the remote control 7
Operating this unit
What’s What 8
– Head unit 8
– Remote control 9
– Display indication 9
Basic Operations 10
– Power ON/OFF 10
– Selecting a source 10
– Adjusting the volume 11
Tuner 11
– Basic Operations 11
– Storing and recalling broadcast
frequencies 11
– Introduction of advanced
operations 12
– Storing the strongest broadcast
frequencies 12
– Tuning in strong signals 12
Built-in CD Player 13
– Basic Operations 13
– Displaying text information on disc 13
– Selecting tracks from the track title
list 14
– Selecting files from the file name
list 14
– Introduction of advanced
operations 15
– Selecting a repeat play range 15
2
En
– Playing tracks in random order 15
– Scanning folders and tracks 15
– Pausing playback 15
– Using Sound Retriever 16
– Using disc title functions 16
Playing songs on USB portable audio player/
USB memory 17
– Basic Operations 17
– Displaying text information of an audio
file 17
– Selecting files from the file name
list 17
– Introduction of advanced
operations 17
Playing songs on iPod 19
– Basic Operations 19
– Browsing for a song 19
– Displaying text information on
iPod 19
– Introduction of advanced
operations 20
– Playing songs in a random order
(shuffle) 20
– Playing all songs in a random order
(shuffle all) 21
– Selecting songs from album list of
currently playing artist 21
– Operating this unit’s iPod function
from your iPod 21
– Changing audiobook speed 21
Audio Adjustments
Introduction of audio adjustments 22
Using balance adjustment 22
Using the equalizer 22
– Recalling equalizer curves 22
– Adjusting equalizer curves 23
– Fine-adjusting equalizer curve 23
Adjusting loudness 24
Using subwoofer output 24

Contents
English
– Adjusting subwoofer settings 24
Using the high pass filter 25
Boosting the bass 25
Adjusting source levels 25
Initial Settings
Adjusting initial settings 26
Setting the clock 26
Setting the FM tuning step 26
Setting the AM tuning step 26
Switching the warning tone 27
Switching the auxiliary setting 27
Switching the dimmer setting 27
Setting the rear output and subwoofer
controller 27
Switching the feature demo 28
Switching the Ever Scroll 28
Activating the BT AUDIO source 28
Entering PIN code for Bluetooth wireless
connection 28
Displaying system version of Bluetooth
adapter for repair 29
Other Functions
Using the AUX source 30
– About AUX1 and AUX2 30
– AUX1 source: 30
– AUX2 source: 30
– Selecting AUX as the source 30
– Setting the AUX title 30
Turning the clock display on or off 30
Using the external unit 31
– Selecting the external unit as the
source 31
– Basic operation 31
– Using the functions allocated to 1 to 6
keys 31
– Advanced operations 31
Available accessories
Playing songs on iPod 32
– Basic operation 32
– Displaying text information on
iPod 32
– Browsing for a song 32
– Function and operation 32
– Playing songs in a random order
(shuffle) 33
Bluetooth Audio 33
– Basic Operations 33
– Function and operation 33
– Connecting a Bluetooth audio
player 34
– Playing songs on Bluetooth audio
player 34
– Stopping playback 34
– Disconnecting a Bluetooth audio
player 34
– Displaying BD (Bluetooth Device)
address 35
Bluetooth Telephone 35
– Basic Operations 35
– Setting up for hands-free phoning 35
– Making a phone call 36
– Taking a phone call 36
– Introduction of advanced
operations 36
– Connecting a cellular phone 37
– Disconnecting a cellular phone 38
– Registering a connected cellular
phone 38
– Deleting a registered phone 38
– Connecting to a registered cellular
phone 38
– Using the Phone Book 39
– Using the Call History 40
– Making a call by entering phone
number 40
En
3

Contents
– Clearing memory 40
– Setting automatic rejecting 41
– Setting automatic answering 41
– Switching the ring tone 41
– Echo canceling and noise
reduction 41
Multi-CD Player 41
– Basic Operations 41
– Using CD TEXT functions 41
– Introduction of advanced
operations 41
– Using compression and bass
emphasis 42
– Using ITS playlists 43
– Using disc title functions 44
TV tuner 44
– Basic Operations 44
– Storing and recalling broadcast
stations 45
– Storing the strongest broadcast
stations sequentially 45
Additional Information
Error messages 46
Handling guideline of discs and player 47
Dual Discs 48
Compressed audio compatibility 48
USB audio player/USB memory 48
– USB audio player/USB memory
compatibility 48
– USB audio player/USB memory 49
– Compressed audio compatibility 50
iPod 50
– About handling the iPod 50
– About iPod settings 50
Compressed audio files on the disc 51
– Example of a hierarchy 51
Specifications 52
4
En
Before You Start
Section
01
About this unit
CAUTION
! Do not allow this unit to come into contact
with liquids. Electrical shock could result.
Also, damage to this unit, smoke, and overheating could result from contact with liquids.
! Keep this manual handy as a reference for op-
erating procedures and precautions.
! Always keep the volume low enough so that
you can hear sounds from outside the vehicle.
! Protect this unit from moisture.
! If the battery is disconnected or discharged,
the preset memory will be erased and must be
reprogrammed.
About WMA
The Windows Media™ logo printed on the box
indicates that this unit can play back WMA
data.
Windows Media and the Windows logo are trademarks or registered trademarks of Microsoft
Corporation in the United States and/or other
countries.
! This unit may not operate correctly depend-
ing on the application used to encode
WMA files.
About MP3
Supply of this product only conveys a license
for private, non-commercial use and does not
convey a license nor imply any right to use
this product in any commercial (i.e. revenuegenerating) real time broadcasting (terrestrial,
satellite, cable and/or any other media), broadcasting/streaming via internet, intranets and/
or other networks or in other electronic con-
tent distribution systems, such as pay-audio or
audio-on-demand applications. An independent license for such use is required. For details, please visit
http://www.mp3licensing.com.
About AAC
This unit plays back AAC files encoded by
®
iTunes
.
iTunes is a registered trademark of Apple Inc.
Portable audio player compatibility
! Inquire at the manufacturer about your
USB portable audio player/USB memory.
This unit corresponds to the following.
— USB MSC (Mass Storage Class) compliant
portable audio player and memory
— WMA, MP3, AAC and WAV file playback
For details about the compatibility, refer to
USB audio player/USB memor y compatibility
on page 48.
®
iPod
compatibility
This unit can control and listen to songs on an
iPod.
! This unit can control the following iPod
models.
— iPod nano
— iPod fifth generation or later
For maximum performance, we recom-
mend that you use the latest version of the
iPod software.
! When using an iPod, iPod Dock Connector
to USB Cable is required.
! Pioneer CD-IU50 interface cable is also
available. For details, consult your dealer.
! This unit can control previous generations
iPod models with a Pioneer iPod adapter
(e.g. CD-IB100N). In this case, most func-
tions are essentially the same as an iPod
connected to USB interface of this unit.
However, functions related to Audiobooks
and Podcasts cannot be used.
For details concerning operation with the
iPod adapter, refer to Playing songs on iPod
on page 32.
! iPod is a registered trademark of Apple Inc.
English
En
5
Section
01
Before You Start
CAUTION
! Pioneer accepts no responsibility for data lost
on the USB portable audio player/USB memory even if that data is lost while using this
unit.
! Pioneer accepts no responsibility for data lost
on the iPod even if that data is lost while
using this unit.
Visit our website
Visit us at the following site:
http://pioneer.jp/group/index-e.html
! We offer the latest information about
Pioneer Corporation on our website.
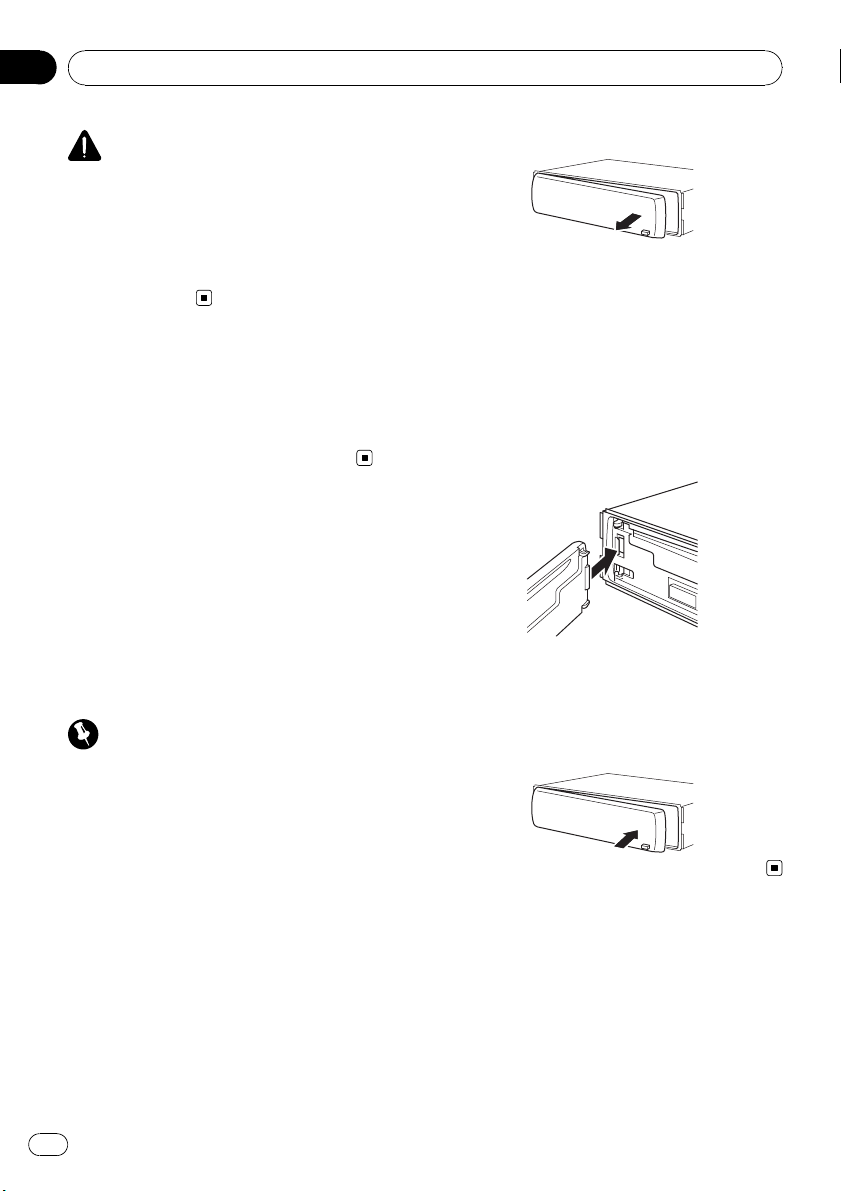
Protecting your unit from
theft
The front panel can be detached to deter theft.
! If the front panel is not detached from the
head unit within five seconds of turning off
the ignition, a warning tone sounds.
! You can turn off the warning tone. See
Switching the warning tone on page 27.
Important
! Handle gently when removing or attaching
the front panel.
! Avoid subjecting the front panel to excessive
shock.
! Keep the front panel out of direct sunlight and
high temperatures.
2 Grab the front panel and remove.
3 Put the front panel into the provided
protective case for safe keeping.
Attaching the front panel
1 Slide the front panel to the left until it
clicks.
Front panel and the head unit are jointed on
the left side. Make sure that the front panel
has been jointed to the head unit.
2 Press the right side of the front panel
until it is firmly seated.
# If you can’t attach the front panel to the head
unit successfully, try again. Front panel may be
damaged if you attach the front panel forcedly.
Removing the front panel
1 Press DETACH to release the front
panel.
6
En
Before You Start
Section
01
About the demo mode
This unit features the feature demo mode.
Important
The red lead (ACC) of this unit should be connected to a terminal coupled with ignition switch
on/off operations. If this is not done, the vehicle
battery may be drained.
Feature demo mode
The feature demo automatically starts when
power to this unit is turned off while the ignition switch is set to ACC or ON. Press DISP
during feature demo operation to cancel the
feature demo mode. Press DISP again to start.
Remember that if the feature demo continues
operating when the car engine is turned off, it
may drain battery power.
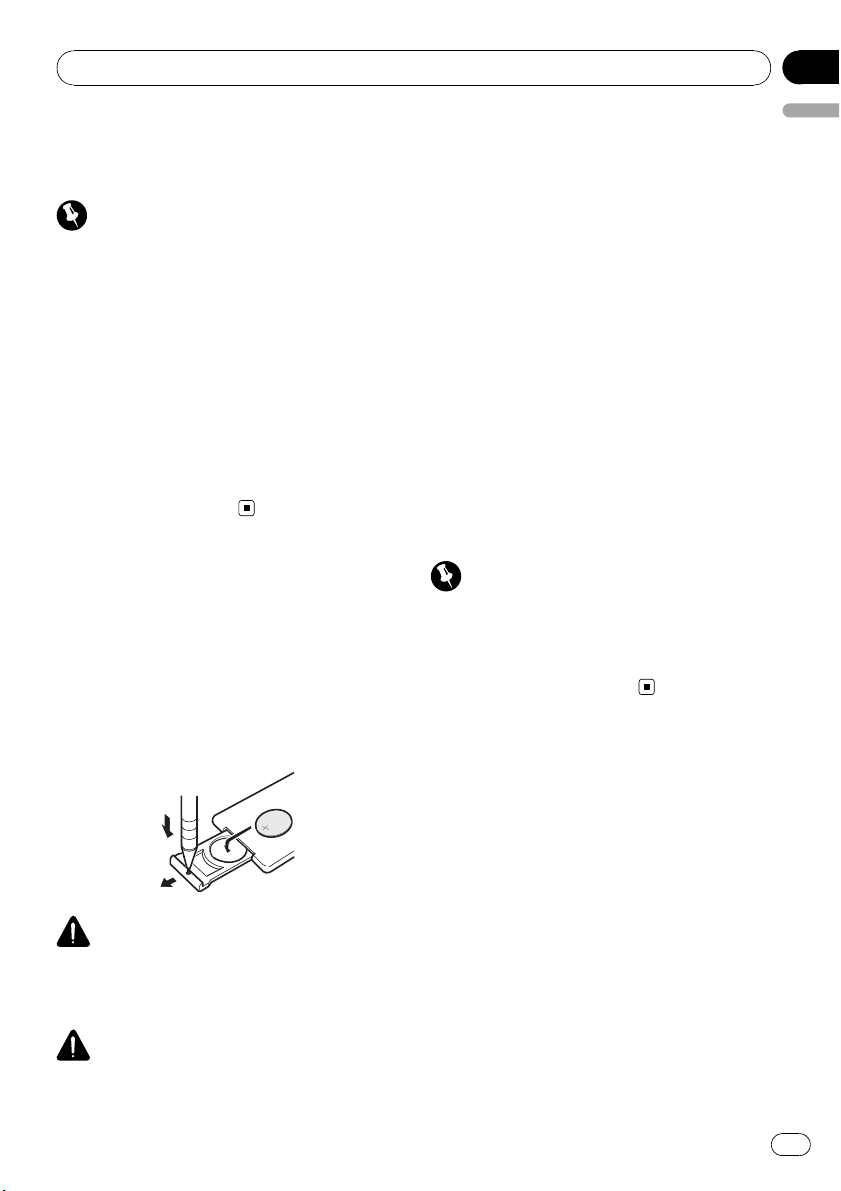
Use and care of the remote
control
Installing the battery
Slide the tray on the back of the remote control out and insert the battery with the plus (+)
and minus (–) poles aligned properly.
! When using for the first time, pull out the
film protruding from the tray.
! Remove the battery if the remote control is not
English
used for a month or longer.
! There is a danger of explosion if the battery is
incorrectly replaced. Replace only with the
same or equivalent type.
! Do not handle the battery with metallic tools.
! Do not store the battery with metallic objects.
! If the battery leaks, wipe the remote control
completely clean and install a new battery.
! When disposing of used batteries, comply
with governmental regulations or environmen-
tal public institutions’ rules that apply in your
country/area.
Using the remote control
Point the remote control in the direction of the
front panel to operate.
! The remote control may not function prop-
erly in direct sunlight.
Important
! Do not store the remote control in high tem-
peratures or direct sunlight.
! Do not let the remote control fall onto the
floor, where it may become jammed under the
brake or accelerator pedal.
WARNING
Keep the battery out of the reach of children.
Should the battery be swallowed, consult a doctor immediately.
CAUTION
! Use one CR2025 (3 V) lithium battery.
En
7
Section
02
Operating this unit
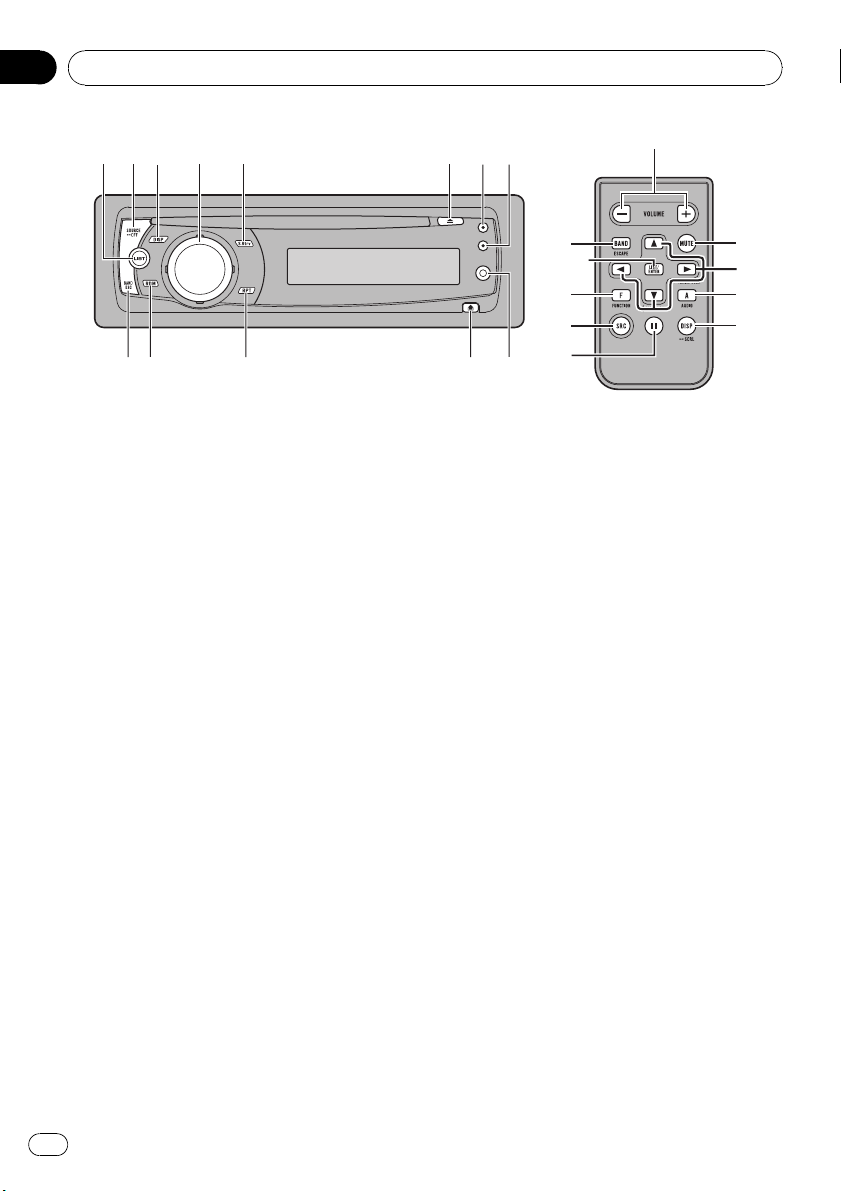
What’s What
Head unit
1 LIST button
Press to display the disc title list, track title
list, folder list, file list or preset channel list
depending on the source.
2 SOURCE/OFF button
This unit is turned on by selecting a source.
Press to cycle through all the available
sources.
3 DISP/BACK/SCRL button
Press to select different displays.
Press and hold to scroll the text information.
Press to return to the previous display when
operating the menu.
Press and hold to return to the main menu
when operating the menu.
4 MULTI-CONTROL
Move to perform manual seek tuning, fast
forward, reverse and track search controls.
Also used for controlling functions.
Turn to increase or decrease the volume.
5 S.Rtrv button
Press to turn Sound Retriever function on or
off.
6 EJECT button
Press to eject a disc.
7 CLOCK button
Press to change to the clock display.
8 SW/BASS button
Press to switch to subwoofer setting menu.
When operating subwoofer menu, press to
switch setting.
Press and hold to switch to bass boost
menu. When operating bass booster, this
button cannot be operated.
9 AUX input jack (3.5 mm stereo jack)
Use to connect an auxiliary device.
a DETACH button
Press to remove the front panel from the
head unit.
b RPT/LOCAL button
Press to switch the repeat play range while
using CD, USB or iPod.
Press to turn local function on or off while
using tuner as the source.
c RDM/iPod button
Press to turn random function on or off
while using CD or USB.
8
En
Operating this unit
Section
02
While using iPod, press this button to shuffle all tracks.
Press and hold to turn iPod remote function
on or off while using an iPod connected
USB connector of this unit.
If using the iPod with an interface adapter
(CD-IB100N), press to switch the shuffle
function.
d BAND button
Press to select among three FM bands and
one AM band.
Press to return to the ordinary display when
operating menu.
Remote control
Operation is the same as when using the buttons on the head unit.
e VOLUME buttons
Press to increase or decrease the volume.
f MUTE button
Press to turn off the sound. To turn on the
sound, press again.
g a/b/c/d buttons
Press to perform manual seek tuning, fast
forward, reverse and track search controls.
Also used for controlling functions.
h AUDIO button
Press to select an audio function.
i DISP button
Press to select different displays.
Press and hold to scroll the text information.
j e button
Press to turn pause on or off.
k FUNCTION button
Press to select functions.
l LIST/ENTER button
Press to display the disc title list, track title
list, folder list, file list or preset channel list
depending on the source.
While in the operating menu, press to control functions.
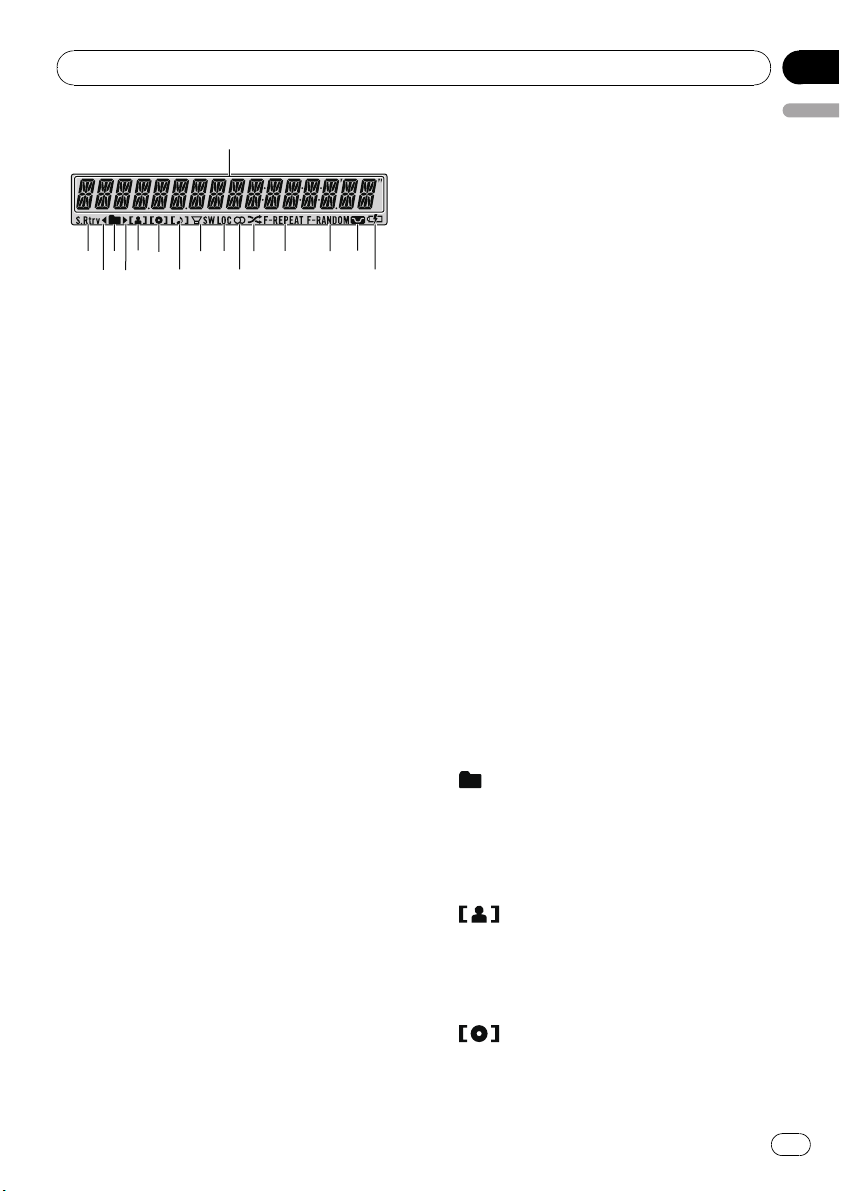
Display indication
1 Main display section
Displays band, frequency, elapsed playback
time and other settings.
! Tuner
Band and frequency are displayed.
! Bulit-in CD player, USB, iPod
Elapsed playback time and literal information are displayed.
2 S.Rtrv indicator
Appears when Sound Retriever function is
on.
3 c indicator
Appears when an upper tier of folder or
menu exists.
4
(folder) indicator
Appears when operating list function.
5 d indicator
Appears when a lower tier of folder or menu
exists.
6
7
(artist) indicator
Appears when the disc (track) artist name is
displayed on the main display section.
Appears when artist search refinement on
iPod browsing function is operated.
(disc) indicator
Appears when the disc (album) name is displayed on the main display section.
English
En
9
Section
02
Operating this unit
Appears when album search refinement on
iPod browsing function is operated.
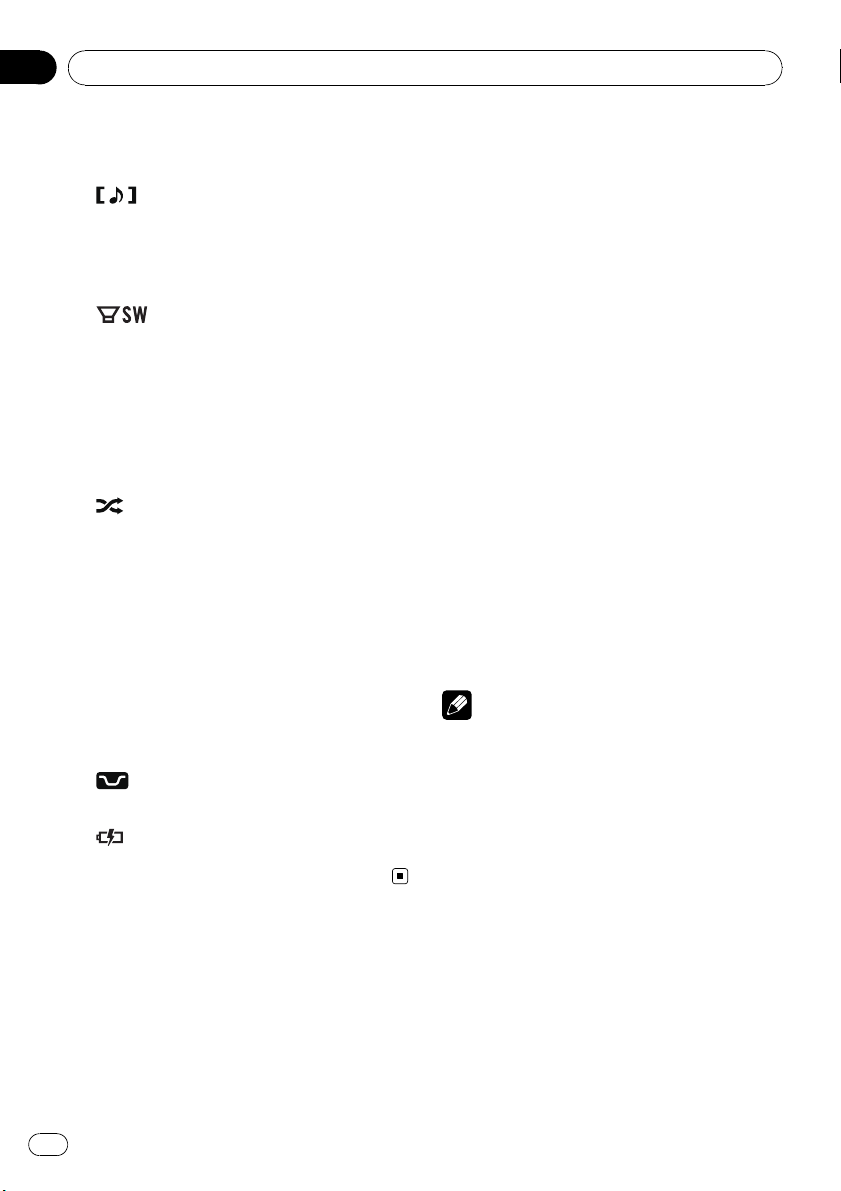
8
9
a LOC indicator
b 5 (stereo) indicator
c
d F-REPEAT indicator
e F-RANDOM indicator
f
g
(song) indicator
Appears when the track (song) name is displayed on the main display section.
Appears when song search refinement on
iPod browsing function is operated.
(subwoofer) indicator
Appears when subwoofer is on.
Appears when local seek tuning is on.
Appears when the selected frequency is
being broadcast in stereo.
(shuffle) indicator
Appears when shuffle function is on while
iPod source is being selected.
Appears when folder repeat is on.
When repeat function is on, only REPEAT is
displayed.
Appears when folder random is on.
When random function is on, only
RANDOM is displayed.
(loudness) indicator
Appears when loudness is on.
(iPod connection) indicator
Appears when the iPod connection is recognized while USB source is being selected.
Basic Operations
Power ON/OFF
Turning the unit on
% Press SOURCE to turn the unit on.
Turning the unit off
% Press OFF and hold until the unit turns
off.
Selecting a source
You can select a source you want to listen to.
To switch to the built-in CD player, load a disc
in the unit (refer to page 13).
% Press SOURCE repeatedly to switch between the following sources.
TUNER (tuner)—TELEVISION (television)—
COMPACT DISC (built-in CD player)—
MULTI CD (multi-CD player)—IPOD (iPod)—
USB (USB)—EXTERNAL (external unit 1)—
EXTERNAL (external unit 2)—AUX1 (AUX1)—
AUX2 (AUX2)—BT AUDIO (BT audio)—
TELEPHONE (BT telephone)
Notes
! In the following cases, the sound source will
not change.
— When no unit corresponding to the se-
lected source is connected.
— When there is no disc or magazine in the
player.
— When the iPod is not connected to this
unit.
— When AUX (auxiliary input) is set to off
(refer to page 27).
— When the BT AUDIO source is set to off
(refer to Activating the BT AUDIO source
on page 28).
! AUX1 is set to on by default. Turn off the AUX1
when not in use (refer to Switching the auxili-
ary setting on page 27).
10
En

Operating this unit
Section
02
! Charging the portable audio player using
car’s DC power source while connecting it to
AUX input may generate noise. In this case,
stop charging.
! External unit refers to a Pioneer product (such
as ones available in the future) that, although
incompatible as a source, enables control of
basic functions with this unit. Two external
units can be controlled with this unit. When
two external units are connected, the external
unit is automatically allocated to external unit
1 or external unit 2 by this unit.
! When this unit’s blue/white lead is connected
to the vehicle’s auto-antenna relay control
terminal, the vehicle’s antenna extends when
this unit’s source is turned on. To retract the
antenna, turn the source off.
Adjusting the volume
% Use VOLUME to adjust the sound
level.
English
Tuner
Basic Operations
Important
If you are using this unit in North, Central or
South America, reset the AM tuning step (see
Setting the AM tuning step on page 26).
% Select a band
Press BAND.
# Band can be selected from among FM1, FM2,
FM3 or AM.
% Manual tuning (step by step)
Push MULTI-CONTROL left or right.
% Seek tuning
Push and hold MULTI-CONTROL left or right
for about one second and release.
# You can cancel seek tuning by pushing
MULTI-CONTROL left or right.
# If you push and hold MULTI-CONTROL left or
right, you can skip stations. Seek tuning starts as
soon as you release MULTI-CONTROL.
Storing and recalling broadcast
frequencies
You can easily store up to six broadcast frequencies for later recall.
! Six stations for each band can be stored in
memory.
1 Press LIST.
Preset screen is displayed.
2 Use MULTI-CONTROL to store the selected frequency in memory.
Turn to change the preset number. Press and
hold to store.
# You can also store the frequency in memory
by pushing and holding MULTI-CONTROL right.
3 Use MULTI-CONTROL to select the desired station.
Turn to change the station. Press to select.
En
11
Section
02
Operating this unit
# You can also change the station by pushing
MULTI-CONTROL up or down.
# To return to the ordinary display, press BAND
or LIST.
# If you do not operate the list within about 30
seconds, the display automatically returns to the
ordinary display.
Introduction of advanced
operations
1 Press MULTI-CONTROL to display the
main menu.
2 Use MULTI-CONTROL to select
FUNCTION.
Turn to change the menu option. Press to select.
3 Turn MULTI-CONTROL to select the
function.
BSM (best stations memory)—LOCAL (local
seek tuning)
Notes
! You can also select the function by pressing
FUNCTION on the remote control.
! To return to the previous display, press BACK.
! To return to the main menu, press and hold
BACK.
! To return to the ordinary display, press BAND.
Tuning in strong signals
Local seek tuning lets you tune in only those
radio stations with sufficiently strong signals
for good reception.
% Press LOCAL repeatedly to select the
desired setting.
FM: OFF—LEVEL 1—LEVEL 2—LEVEL 3—
LEVEL 4
AM: OFF—LEVEL 1—LEVEL 2
The LEVEL 4 setting allows reception of only
the strongest stations, while lower settings let
you receive progressively weaker stations.
Note
You can also perform this operation in the menu
that appears by using MULTI-CONTROL.
Storing the strongest broadcast
frequencies
BSM (best stations memory) lets you automatically store the six strongest broadcast frequencies.
1 Use MULTI-CONTROL to select BSM in
the function menu.
2 Press MULTI-CONTROL to turn BSM on.
The six strongest broadcast frequencies are
stored in the order of their signal strength.
# To cancel, press MULTI-CONTROL again.
12
En
Operating this unit
Section
02
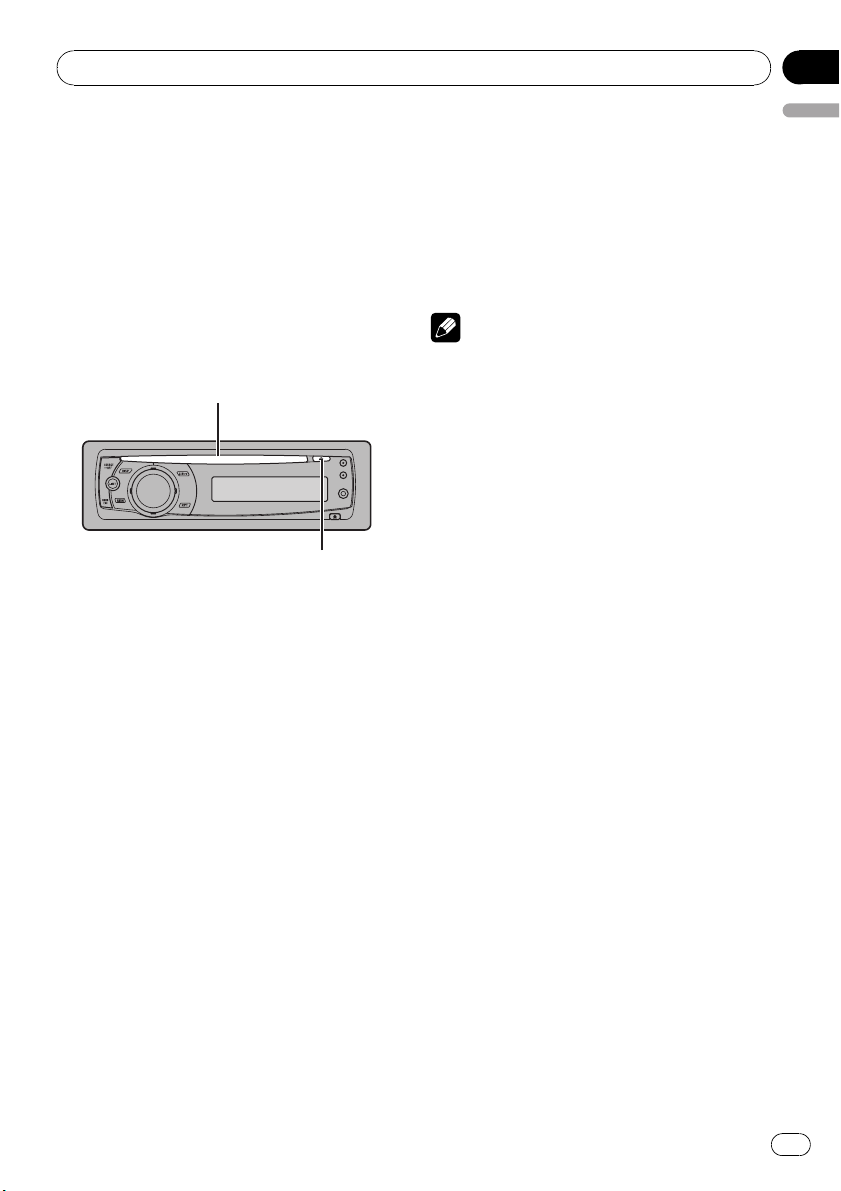
Built-in CD Player
Basic Operations
The built-in CD player can play back audio CD
(CD-DA) and compressed audio (WMA/MP3/
AAC/WAV) recorded on CD-ROM. (Refer to
page 51 for files that can be played back.)
Read the precautions for discs and player on
page 47.
% Insert a disc into the disc loading slot.
Playback will automatically start.
Disc loading slot
EJECT button
# When loading a disc, face the label side of
a disc up.
% Eject a disc
Press EJECT.
% Select a folder
Push MULTI-CONTROL up or down.
# You cannot select a folder that does not have
a compressed audio file recorded in it.
% Select a track
Push MULTI-CONTROL left or right.
% Fast forward or reverse
Push and hold MULTI-CONTROL left or right
for about one second and release.
# When playing compressed audio, there is no
sound on fast forward or reverse.
% Return to root folder
Press and hold BAND.
# If folder 01 (ROOT) contains no files, playback
commences with folder 02.
% Switch between compressed audio and
English
CD-DA
Press BAND.
# This operation is available only when playing
CD-EXTRA or MIXED-MODE CDs.
# If you have switched between compressed
audio and CD-DA, playback starts at the first
track on the disc.
Notes
! The built-in CD player can play back audio CD
and compressed audio recorded on a CD-
ROM. (Refer to page 51 for files that can be
played back.)
! Read the precautions for discs and player on
page 47.
! After a disc has been inserted, press SOURCE
to select the built-in CD player.
! There is sometimes a delay between starting
up disc playback and the sound being issued.
When being read, FORMAT READ is dis-
played.
! If an error message such as ERROR-11 is dis-
played, refer to Error messages on page 46.
! When a CD TEXT disc is inserted, the disc and
track titles automatically begin to scroll in the
display. When Ever Scroll is set to ON at the
initial setting, the disc and track titles scroll
continuously. For mote details about Ever
Scroll, refer to Switching the Ever Scroll on
page 28.
! Playback is carried out in order of file number.
Folders are skipped if they contain no files. (If
folder 01 (ROOT) contains no files, playback
commences with folder 02.)
Displaying text information on
disc
% Press DISP to select the desired text information.
For title entered CD
Play time—disc title
For CD TEXT discs
Play time—disc title—disc artist name—track
title—track artist name
En
13

Section
02
Operating this unit
For WMA/MP3/AAC discs
Play time—folder name—file name—track
title—artist name—album title—comment —
bit rate
For WAV discs
Play time—folder name—file name—sampling frequency
Notes
! You can scroll to the left of the title by pressing
and holding DISP.
! Audio CD that contains certain information
such as text and/or number is CD TEXT.
! If specific information is not recorded on a
disc, title or name is not displayed.
! Depending on the version of iTunes
write MP3 files onto a disc, comment information may not be correctly displayed.
— iTunes is a registered trademark of Apple
Inc.
! Depending on the version of Windows Media
Player used to encode WMA files, album
names and other text information may not be
correctly displayed.
! When playing back VBR (variable bit rate)-re-
corded WMA files, the average bit rate value is
displayed.
! When playing back VBR (variable bit rate)-re-
corded MP3 files, VBR is displayed instead of
bit rate value.
! The sampling frequency shown in the display
may be abbreviated.
! When Ever Scroll is set to ON at the initial set-
ting, text information scrolls continuously in
the display. Refer to Switching the Ever Scroll
on page 28.
®
used to
Selecting tracks from the track
title list
Track title list lets you see the list of track titles
on a CD TEXT disc and select one of them to
play back.
1 Press LIST to switch to the track title list
mode.
2 Use MULTI-CONTROL to select the desired track title.
Turn to change the track title. Press to play.
# You can also change the track title by pushing
MULTI-CONTROL up or down.
# You can also play the track by pushing
MULTI-CONTROL right.
# To return to the ordinary display, press BAND
or LIST.
# If you do not operate the list within about 30
seconds, the display automatically returns to the
ordinary display.
Selecting files from the file
name list
File name list lets you see the list of file names
(or folder names) and select one of them to
playback.
1 Press LIST to switch to the file name list
mode.
Names of files and folders appear in the display.
2 Use MULTI-CONTROL to select the desired file name (or folder name).
Turn to change the name of file or folder.
— when a file is selected, press to play.
— when a folder is selected, press to see a list
of files (or folders) in the seleted folder.
— when a folder is selected, press and hold to
play a song in the selected folder.
# You can also play the file by pushing
MULTI-CONTROL right.
# You can also play a song in the selected folder
by pushing and holding MULTI-CONTROL right.
# To return to the previous list (the folder one
level higher), press BACK. You can also perform
this operation by pushing MULTI-CONTROL left.
# To return to the top tier of list, press and hold
BACK.
# To return to the ordinary display, press BAND
or LIST.
# If you do not operate the list within about 30
seconds, the display automatically returns to the
ordinary display.
14
En
Operating this unit
Section
02
Introduction of advanced
operations
1 Press MULTI-CONTROL to display the
main menu.
2 Use MULTI-CONTROL to select
FUNCTION.
Turn to change the menu option. Press to select.
3 Turn MULTI-CONTROL to select the
function.
REPEAT (repeat play)—RANDOM (random
play)—SCAN (scan play)—PAUSE (pause)—
SOUND RETRIEVER (advanced sound retrie-
ver)—TITLE INPUT (disc title input)
Notes
! You can also select the function by pressing
FUNCTION on the remote control.
! To return to the previous display, press BACK.
! To return to the main menu, press and hold
BACK.
! To return to the ordinary display, press BAND.
! If you do not operate functions except for
TITLE INPUT within about 30 seconds, the display automatically returns to the ordinary display.
! When playing a compressed audio disc or CD
TEXT disc, you cannot switch to disc title input
display.
# When FOLDER (folder repeat) is selected, it is
English
not possible to play back a subfolder of that
folder.
Note
You can also perform this operation in the menu
that appears by using MULTI-CONTROL.
Playing tracks in random order
Tracks in a selected repeat range are played in
random order.
% Press RDM to turn random play on.
Tracks play in a random order.
# To turn random play off, press RDM again.
Note
You can also turn this function on or off in the
menu that appears by using MULTI-CONTROL.
Scanning folders and tracks
Scan play searches the song within the selected repeat range.
1 Use MULTI-CONTROL to select SCAN in
the function menu.
2 Press MULTI-CONTROL to turn scan play
on.
The first 10 seconds of each track is played.
Selecting a repeat play range
% Press RPT repeatedly to select the desired setting.
! DISC – Repeat all tracks
! TRACK – Repeat the current track
! FOLDER – Repeat the current folder
# If you select another folder during repeat play,
the repeat play range changes to disc repeat.
# Performing track search or fast forward/reverse during TRACK (track repeat) changes the
repeat play range to disc/folder.
3 When you find the desired track press
MULTI-CONTROL to turn scan play off.
# If the display has automatically returned to
the playback display, select SCAN again by using
MULTI-CONTROL.
# After scanning of a disc (folder) is finished,
normal playback of the tracks begins.
Pausing playback
% Press e (pause) on the remote control
to turn pause on.
Playback of the current track pauses.
# To turn pause off, press e (pause) again.
En
15
Section
02
Operating this unit
Note
You can also turn this function on or off in the
menu that appears by using MULTI-CONTROL.
Using Sound Retriever
Sound Retriever function automatically enhances compressed audio and restores rich
sound.
% Press S.Rtrv repeatedly to select the desired setting.
S. RTRV OFF (off)—S. RTRV 1—S. RTRV 2
# S. RTRV 2 is more effective than S. RTRV 1.
Note
You can also perform this operation in the menu
that appears by using MULTI-CONTROL.
Using disc title functions
You can input CD titles and display the title.
The next time you insert a CD for which you
have entered a title, the title of that CD is displayed.
Entering disc titles
Use the disc title input feature to store up to
48 CD titles in the unit. Each title can be up to
10 characters long.
6 After entering the title, press and hold
MULTI-CONTROL to store it in memory.
Notes
! Titles remain in memory, even after the disc is
removed from the unit, and are recalled when
the disc is reinserted.
! After data for 48 discs are stored in the mem-
ory, data for a new disc overwrites the oldest
one.
! If you connect a multi-CD player, you can
input disc titles for up to 100 discs.
! When a multi-CD player that does not support
disc title functions is connected, you cannot
enter disc titles in this unit.
1 Play the CD that you want to enter a
title for.
2 Use MULTI-CONTROL to select
TITLE INPUT in the function menu.
3 Press MULTI-CONTROL to display the
title input mode.
4 Turn MULTI-CONTROL to select a letter
of the alphabet.
# You can also perform the same operations by
pushing MULTI-CONTROL up or down.
5 Press MULTI-CONTROL to move the cursor to the next character position.
16
En

Operating this unit
Playing songs on USB portable
audio player/USB memory
For details about the supported device, refer to
Portable audio player compatibility on page 5.
Basic Operations
% Select a folder
Push MULTI-CONTROL up or down.
% Fast forward or reverse
Push and hold MULTI-CONTROL left or right
for about one second and release.
% Select a track
Push MULTI-CONTROL left or right.
% Return to root folder
Press and hold BAND.
Notes
! Optimum performance of this unit may not be
obtained depending on the connected USB
portable audio player/USB memory.
! If folder 01 (ROOT) contains no files, playback
commences with folder 02.
! When the USB portable audio player having
battery charging function is connected to this
unit and the ignition switch is set to ACC or
ON, the battery is charged.
! You can disconnect the USB portable audio
player/USB memory anytime you want to finish listening to it.
! If USB portable audio player/USB memory is
connected to this unit, the source is changed
to USB automatically. If you do not use an
USB device, disconnect it from this unit. Depending on the connected USB device, turning on the ignition switch while USB device is
connected to this unit may change the source
automatically.
Section
02
English
Displaying text information of
an audio file
% Press DISP to select the desired text information.
For WMA/MP3/AAC discs
Play time—folder name—file name—track
title—artist name—album title—comment —
bit rate
For WAV discs
Play time—folder name—file name—sampling frequency
# If the characters recorded on the audio file are
not compatible with the head unit, those characters are not displayed.
# If specific information is not recorded on an
audio file, title or name is not displayed.
# The text information of some audio files may
not be correctly displayed.
Notes
! You can scroll the text information to the left
by pressing and holding DISP.
! When Ever Scroll is set to ON at the initial set-
ting, text information scrolls continuously in
the display. Refer to Switching the Ever Scroll
on page 28.
Selecting files from the file
name list
The operation is the same as that of the builtin CD player. (Refer to Selecting files from the
file name list on page 14.)
Introduction of advanced
operations
1 Press MULTI-CONTROL to display the
main menu.
2 Use MULTI-CONTROL to select
FUNCTION.
Turn to change the menu option. Press to select.
En
17
Section
02
Operating this unit
3 Turn MULTI-CONTROL to select the
function.
REPEAT (repeat play)—RANDOM (random
play)—SCAN (scan play)—PAUSE (pause)—
SOUND RETRIEVER (advanced sound retrie-
ver)
Function and operation
REPEAT, RANDOM, SCAN, PAUSE and
SOUND RETRIEVER operations are basically
the same as that of the built-in CD player.
Function name Operation
Refer to Selecting a repeat play
range on page 15.
However, the repeat play
ranges you can select are different from that of the built-in
CD player. The repeat play
REPEAT
RANDOM
SCAN
PAUSE
SOUND RETRIEVER
ranges of the USB portable
audio player/USB memory are:
! TRACK – Repeat just the
current file
! FOLDER – Repeat the cur-
rent folder
! ALL – Repeat all files
Refer to Playing tracks in ran-
dom order on page 15.
Refer to Scanning folders and
tracks on page 15.
Refer to Pausing playback on
page 15.
Refer to Using Sound Retriever
on page 16.
! If you perform track search or fast forward/re-
verse during TRACK, the repeat play range
changes to FOLDER.
! When FOLDER is selected, it is not possible to
play back a subfolder of that folder.
! After file or folder scanning is finished, nor-
mal playback of the files begins again.
Notes
! You can also select the function by pressing
FUNCTION on the remote control.
! To return to the previous display, press BACK.
! To return to the main menu, press and hold
BACK.
! To return to the ordinary display, press BAND.
! If you select another folder during repeat play,
the repeat play range changes to ALL.
18
En

Operating this unit
Section
02
Playing songs on iPod
For details about the supported iPod, refer to
®
iPod
compatibility on page 5.
Basic Operations
% Fast forward or reverse
Push and hold MULTI-CONTROL left or right
for about one second and release.
% Select a track (chapter)
Push MULTI-CONTROL left or right.
Notes
! When using an iPod, iPod Dock Connector to
USB Cable is required.
! Read the precautions for iPod on page 50.
! While iPod is connected to this unit, PIONEER
(or
(check mark)) is displayed on the iPod.
! If an error message such as ERROR-19 is dis-
played, refer to Error messages on page 46.
! When the ignition switch is set to ACC or ON,
the iPod’s battery is charged while the iPod is
connected to this unit.
! While the iPod is connected to this unit, the
iPod cannot be turned on or off.
! Before connecting the dock connector of this
unit to the iPod, disconnect the headphones
from the iPod.
! The iPod is turned off about two minutes after
the ignition switch is set to OFF.
2 Use MULTI-CONTROL to select a cate-
English
gory.
Turn to change the category; press to select.
PLAYLISTS (playlists)—ARTISTS (artists)—
ALBUMS (albums)—SONGS (songs)—
PODCASTS (podcasts)—GENRES (genres)—
COMPOSERS (composers)—AUDIOBOOKS
(audiobooks)
List for the selected category is displayed.
# You can start playback throughout the selected category by pressing and holding
MULTI-CONTROL. You can also perform this operation by pushing and holding
MULTI-CONTROL right.
# You can also change the category by pushing
MULTI-CONTROL up or down.
# You can also select the category by pushing
MULTI-CONTROL right.
# To return to the previous list, push
MULTI-CONTROL left.
3 Repeat step 2 to find a song you want
to listen to.
# To return to the previous category (one level
higher), press BACK. You can also perform this
operation by pushing MULTI-CONTROL left.
# To return to the top tier of categories, press
and hold BACK.
# To return to the ordinary display, press BAND
or LIST.
# If you do not operate the list within about 30
seconds, the display automatically returns to the
ordinary display.
Browsing for a song
Operations to control an iPod with this unit is
designed to be as close to the iPod as possible
to make operation and song search easy.
! Depending on the number of files in the
iPod, there may be delay when displaying a
list.
! If the characters recorded on the iPod are
not compatible with this unit, those characters are not displayed.
1 Press LIST to switch to the top menu of
the list search.
Displaying text information on
iPod
% Press DISP to select the desired text information.
Play time—song title—artist name—album
title
# If the characters recorded on the iPod are not
compatible with this unit, those characters are
not displayed.
En
19

Section
02
Operating this unit
Notes
! You can scroll the text information to the left
by pressing and holding DISP.
! When Ever Scroll is set to ON at the initial set-
ting, text information scrolls continuously in
the display. Refer to Switching the Ever Scroll
on page 28.
Introduction of advanced
operations
1 Press MULTI-CONTROL to display the
main menu.
2 Use MULTI-CONTROL to select
FUNCTION.
Turn to change the menu option. Press to select.
3 Turn MULTI-CONTROL to select the
function.
REPEAT (repeat play)—SHUFFLE (shuffle)—
SHUFFLE ALL (shuffle all)—LINK SEARCH
(link search)—REMOTE (iPod remote)—
PAUSE (pause)—AUDIOBOOKS SPEED
(audiobook speed)—SOUND RETRIEVER (advanced sound retriever)
Function and operation
PAUSE and SOUND RETRIEVER operations
are basically the same as that of the built-in
CD player.
Function name Operation
Refer to Selecting a repeat play
range on page 15.
However, the repeat play
ranges you can select are different from that of the built-in
REPEAT
PAUSE
SOUND RETRIEVER
Notes
! You can also select the function by pressing
FUNCTION on the remote control.
! To return to the previous display, press BACK.
! To return to the main menu, press and hold
BACK.
! To return to the ordinary display, press BAND.
! If you do not operate functions within about
30 seconds, the display automatically returns
to the ordinary display.
! REMOTE (iPod remote) function is available
only for iPod nano (second generation).
! When REMOTE is on, only REMOTE and
SOUND RETRIEVER can be operated.
CD player. The repeat play
ranges of the iPod are:
! ONE – Repeat the current
song
! ALL – Repeat all songs in
the selected list
Refer to Pausing playback on
page 15.
Refer to Using Sound Retriever
on page 16.
Playing songs in a random
order (shuffle)
1 Use MULTI-CONTROL to select SHUFFLE
in the function menu.
20
2 Press MULTI-CONTROL to display the
setting mode.
3 Use MULTI-CONTROL to select the desired setting.
Turn to change the setting.
! SONGS – Play back songs in the selected
list in random order.
En
Operating this unit
Section
02
! ALBUMS – Play back songs from a ran-
domly selected album in order.
! OFF – Cancel random play.
Playing all songs in a random
order (shuffle all)
% Press iPod to turn shuffle all on.
All songs on the iPod play randomly.
# To turn shuffle all off, set SHUFFLE in the
FUNCTION menu to off.
Note
You can also turn this function on in the menu
that appears by using MULTI-CONTROL.
Selecting songs from album list
of currently playing artist
Album list of the currently selected artist is
displayed. You can select an album or song
from the artist name.
! Depending on the number of files in the
iPod, there may be delay when displaying a
list.
1 Press and hold LIST to turn link search
on.
Searches albums of the artist and displays the
list.
2 Use MULTI-CONTROL to select an album
or song from the list.
For more details about the selecting operation,
refer to step 2 of Browsing for a song on page
19.
Note
You can also turn this function on in the menu
that appears by using MULTI-CONTROL.
Operating this unit’s iPod
function from your iPod
This function is available only for iPod nano
(second generation).
This unit’s iPod function can be operated from
English
your iPod. Sound can be heard from car’s
speaker, and operation can be conducted from
your iPod.
! While this function is in use, even if the
ignition key is turned off, iPod is not turned
off. To turn off power, operate the iPod.
1 Press iPod and hold to turn iPod remote
on.
# To turn this function off, press and hold iPod
again.
# While using this function, play time and titles
are not displayed on this unit.
# Even if this function is performed, track up/
down can be operated from this unit.
# While using this function, browse function
cannot be operated from this unit.
2 Operate the connected iPod to select a
song and play.
Note
You can also turn this function on or off in the
menu that appears by using MULTI-CONTROL.
Changing audiobook speed
While listening to an audiobook on iPod, playback speed can be changed.
1 Use MULTI-CONTROL to select
AUDIOBOOKS SPEED in the function menu.
2 Press MULTI-CONTROL to display the
setting mode.
3 Use MULTI-CONTROL to select the desired setting.
Turn to change the setting.
! FASTER – Playback faster than normal
speed
! NORMAL – Playback in normal speed
! SLOWER – Playback slower than normal
speed
En
21
Section
03
Audio Adjustments
Introduction of audio
adjustments
1 Press MULTI-CONTROL to display the
main menu.
2 Use MULTI-CONTROL to select AUDIO.
Turn to change the menu option. Press to select.
3 Turn MULTI-CONTROL to select the
audio function.
Turn MULTI-CONTROL to switch between the
audio functions in the following order.
FADER/BALANCE (balance adjustment)—
PRESET EQUALIZER (graphic equalizer recall)
—EQ SETTING 1 (graphic equalizer adjust-
ment)—EQ SETTING 2 (graphic equalizer fine
adjustment)—LOUDNESS (loudness)—
SW SETTING 1 (subwoofer on/off setting)—
SW SETTING 2 (subwoofer setting)—
HIGH PASS FILTER (high pass filter)—
BASS BOOST (bass boost)—SRC LV ADJUST
(source level adjustment)
4 Press MULTI-CONTROL to display the
setting mode of each function.
5 Adjust the each function.
Notes
! You can also select the audio function by
pressing AUDIO on the remote control.
! To return to the previous display, press BACK.
! To return to the main menu, press and hold
BACK.
! To return to the ordinary display, press BAND.
! You can select the SW SETTING 2 only when
subwoofer output is turned on in
SW SETTING 1.
! When selecting FM as the source, you cannot
switch to SRC LVADJUST.
! If you do not operate functions within about
30 seconds, the display automatically returns
to the ordinary display.
Using balance adjustment
You can change the fader/balance setting so
that it can provide the ideal listening environment in all occupied seats.
1 Use MULTI-CONTROL to select
FADER/BALANCE.
2 Press MULTI-CONTROL to display the
setting mode.
3 Press MULTI-CONTROL to select the segment you wish to set.
Press MULTI-CONTROL repeatedly to switch
between fader and balance.
4 Turn MULTI-CONTROL to adjust speaker
balance.
Front/rear speaker balance can be adjusted
between FAD F15 and FAD R15.
Left/right speaker balance can be adjusted between BAL L15 and BAL R15.
# You can also perform the same operations by
pushing MULTI-CONTROL up or down.
# FAD 0 is the proper setting when only two
speakers are used.
# When the rear output setting is SUB W, ad-
justing the front/rear speaker balance is not effective. Refer to Setting the rear output and
subwoofer controller on page 27.
Using the equalizer
The equalizer lets you adjust the equalization
to match the car’s interior acoustic characteristics as desired.
Recalling equalizer curves
There are six stored equalizer curves which
you can easily recall at any time. Here is a list
of the equalizer curves.
Display Equalizer curve
POWERFUL Powerful
NATURAL Natural
22
En
Audio Adjustments
Section
03
VOCAL Vocal
CUSTOM Custom
FLAT Flat
SUPER BASS Super bass
! CUSTOM is an adjusted equalizer curve
that you create. If you make adjustments to
an equalizer curve, the equalizer curve setting is memorized in CUSTOM.
! When FLAT is selected, no supplement or
correction is made to the sound. This is
useful to check the effect of the equalizer
curves by switching alternatively between
FLAT and a set equalizer curve.
1 Use MULTI-CONTROL to select
PRESET EQUALIZER.
2 Press MULTI-CONTROL to display the
setting mode.
3 Turn MULTI-CONTROL to select the
equalizer.
# You can also perform the same operations by
pushing MULTI-CONTROL up or down.
Adjusting equalizer curves
The factory supplied equalizer curves, with the
exception of FLAT, can be adjusted to a fine
degree (nuance control).
1 Use MULTI-CONTROL to select
EQ SETTING 1.
2 Press MULTI-CONTROL to display the
setting mode.
3 Press MULTI-CONTROL to select the segment you wish to set.
Press MULTI-CONTROL repeatedly to switch
the segment in the following order:
L (low)—M (mid)—H (high)
4 Turn MULTI-CONTROL to adjust the
level of the equalization band.
+6 to –6 is displayed as the level is increased
or decreased.
# You can also perform the same operations by
pushing MULTI-CONTROL up or down.
# You can then select another band and adjust
the level.
# The equalizer curve with all frequencies set to
0 cannot be adjusted.
Note
A separate CUSTOM curve can be created for
each source. (The built-in CD player and the
multi-CD player are set to the same equalizer adjustment setting automatically.) If you make adjustments, the equalizer curve settings are
memorized in CUSTOM.
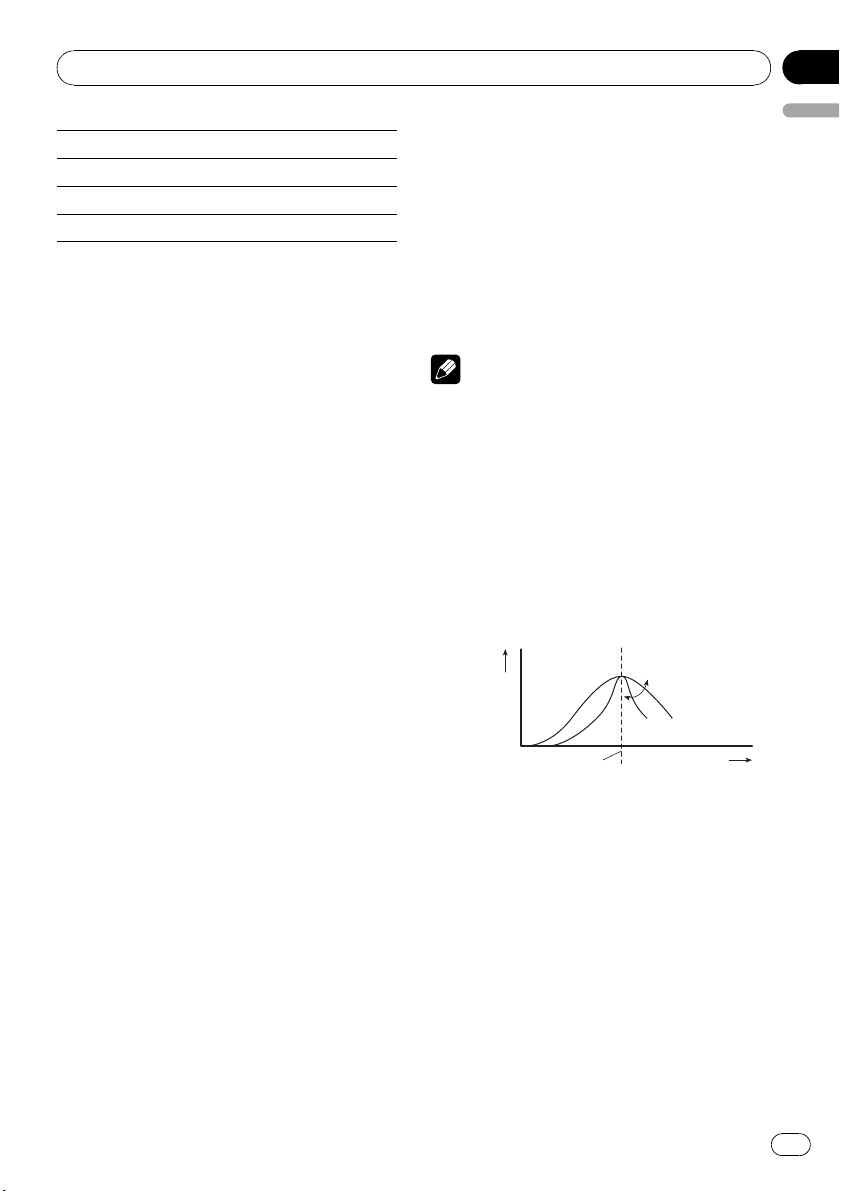
Fine-adjusting equalizer curve
You can adjust the center frequency and the Q
factor (curve characteristics) of each currently
selected curve band (LOW/MID/HI).
Level (dB)
Q=2W
Q=2N
Center frequency
1 Use MULTI-CONTROL to select
EQ SETTING 2.
2 Press MULTI-CONTROL to display the
setting mode.
3 Press MULTI-CONTROL to select the segment you wish to set.
Press MULTI-CONTROL repeatedly to switch
the segment in the following order:
Band—Frequency—Q factor
Frequency (Hz)
English
En
23
Section
03
Audio Adjustments
4 Turn MULTI-CONTROL to adjust the selected segement.
Band
LOW (low)—MID (mid)—HI (high)
Frequency
Low: 40HZ—80HZ—100HZ—160HZ
Mid: 200HZ—500HZ—1KHZ—2KHZ
High: 3KHZ—8KHZ—10KHZ—12KHZ
Q factor
2N—1N—1W—2W
# You can also perform the same operations by
pushing MULTI-CONTROL up or down.
Note
A separate CUSTOM curve can be created for
each source. (The built-in CD player and the
multi-CD player are set to the same equalizer adjustment setting automatically.) If you make adjustments, the equalizer curve settings are
memorized in CUSTOM.
Adjusting loudness
Loudness compensates for deficiencies in the
low- and high-sound ranges at low volume.
1 Use MULTI-CONTROL to select
LOUDNESS.
1 Press SW to display the subwoofer setting mode.
Press SW repeatedly to switch between the
subwoofer setting modes in the following
order.
SW SETTING 1 (subwoofer on/off setting) setting mode—SW SETTING 2 (subwoofer setting) setting mode
2 Select SW SETTING 1 setting mode.
3 Turn MULTI-CONTROL to select the desired setting.
NORMAL (normal phase)— REV (reverse
phase)—OFF (subwoofer off)
# You can also perform the same operations by
pushing MULTI-CONTROL up or down.
Note
You can also switch to this setting mode in the
menu that appears by using MULTI-CONTROL.
Adjusting subwoofer settings
When the subwoofer output is on, you can adjust the cut-off frequency and the output level
of the subwoofer.
! When the subwoofer output is on, you can
select SW SETTING 2.
2 Press MULTI-CONTROL to display the
setting mode.
3 Use MULTI-CONTROL to select the desired setting.
Turn to change the setting.
LOW (low)—MID (mid)—HIGH (high)—OFF
(off)
# You can also perform the same operations by
pushing MULTI-CONTROL up or down.
Using subwoofer output
This unit is equipped with a subwoofer output
which can be turned on or off.
Also, phase can be selected between normal
and reverse.
24
En
1 Press SW to display the subwoofer setting mode.
Press SW repeatedly to switch between the
subwoofer setting modes in the following
order.
SW SETTING 1 (subwoofer on/off setting) setting mode—SW SETTING 2 (subwoofer setting) setting mode
2 Select SW SETTING 2 setting mode.
3 Press MULTI-CONTROL to select the segment you wish to set.
Press MULTI-CONTROL repeatedly to switch
the segment in the following order:
Cut off frequency—Level
Audio Adjustments
Section
03
4 Turn MULTI-CONTROL to adjust the selected segement.
Cut off frequency
50HZ—63HZ—80HZ—100HZ—125HZ
Level
+6 to –24 is displayed as the level is increased
or decreased.
# You can also perform the same operations by
pushing MULTI-CONTROL up or down.
Note
You can also switch to this setting mode in the
menu that appears by using
MULTI-CONTROL.
Using the high pass filter
When you do not want low sounds from the
subwoofer output frequency range to play
from the front or rear speakers, turn on the
HPF (high pass filter). Only frequencies higher
than those in the selected range are output
from the front or rear speakers.
1 Use MULTI-CONTROL to select
HIGH PASS FILTER.
2 Press MULTI-CONTROL to display the
setting mode.
3 Use MULTI-CONTROL to select the desired setting.
Turn to change the setting.
OFF—50HZ—63HZ—80HZ—100HZ—125HZ
# You can also perform the same operations by
pushing MULTI-CONTROL up or down.
2 Turn MULTI-CONTROL to adjust the
English
level.
0 to +6 is displayed as the level is increased or
decreased.
# You can also perform the same operations by
pushing MULTI-CONTROL up or down.
Note
You can also switch to this setting mode in the
menu that appears by using
MULTI-CONTROL.
Adjusting source levels
SLA (source level adjustment) lets you adjust
the volume level of each source to prevent radical changes in volume when switching between sources.
! Settings are based on the FM volume level,
which remains unchanged.
1 Compare the FM volume level with the
level of the source you wish to adjust.
2 Use MULTI-CONTROL to select
SRC LVADJUST.
3 Press MULTI-CONTROL to display the
setting mode.
4 Turn MULTI-CONTROL to adjust the
source volume.
+4 to –4 is displayed as the source volume is
increased or decreased.
# You can also perform the same operations by
pushing MULTI-CONTROL up or down.
Boosting the bass
Bass boost function boosts the bass level of
sound.
1 Press and hold BASS to display
BASS BOOST setting mode.
Notes
! The AM volume level can also be adjusted
with source level adjustments.
! The built-in CD player and the multi-CD player
are set to the same source level adjustment
volume automatically.
! External unit 1 and external unit 2 are set to
the same source level adjustment volume
automatically.
En
25
Section
04
Initial Settings
Adjusting initial settings
1 Press SOURCE and hold until the unit
turns off.
2 Press MULTI-CONTROL and hold until
CLOCK SET appears in the display.
3 Turn MULTI-CONTROL to select one of
the initial settings.
CLOCK SET (clock)—FM STEP (FM tuning
step)—AM STEP (AM tuning step)—
WARNING TONE (warning tone)—AUX1 (aux-
iliary input 1)—AUX2 (auxiliary input 2)—
DIMMER (dimmer)—SW CONTROL (rear out-
put and subwoofer controller)—DEMO MODE
(feature demo)—EVER SCROLL (ever scroll)—
BT AUDIO (Bluetooth audio)—
PIN CODE INPUT (pin code input)—
BT VER INFO (Bluetooth version information)
# You can also perform the same operations by
pushing MULTI-CONTROL up or down.
# You can also select the function by pressing
FUNCTION on the remote control.
# To cancel initial settings, press BAND.
# BT AUDIO, PIN CODE INPUT and
BT VER INFO can be selected only when Bluetooth adapter (e.g., CD-BTB100) is connected to
this unit.
4 Turn MULTI-CONTROL to put a clock
right.
# You can also perform the same operations by
pushing MULTI-CONTROL up or down.
Setting the FM tuning step
The FM tuning step employed by seek tuning
can be switched between 100 kHz, the preset
step, and 50 kHz.
! If seek tuning is performed in 50 kHz steps,
stations may be tuned in imprecisely. Tune
in the stations with manual tuning or use
seek tuning again.
1 Use MULTI-CONTROL to select FM STEP.
2 Press MULTI-CONTROL to display the
setting mode.
3 Turn MULTI-CONTROL to select the FM
tuning step.
Turning MULTI-CONTROL will switch the FM
tuning step between 50 kHz and 100 kHz. The
selected FM tuning step will appear in the display.
# You can also perform the same operations by
pushing MULTI-CONTROL up or down.
Setting the clock
Use these instructions to set the clock.
1 Use MULTI-CONTROL to select
CLOCK SET.
2 Press MULTI-CONTROL to display the
setting mode.
# Press BACK to return to the previous display.
3 Press MULTI-CONTROL to select the segment of the clock display you wish to set.
Each time you press MULTI-CONTROL, one
segment of the clock display is selected.
Hour—Minute
As you select segments of the clock display,
the selected segment blinks.
26
En
Note
The tuning step remains at 50 kHz during manual
tuning.
Setting the AM tuning step
The AM tuning step can be switched between
9 kHz, the preset step, and 10 kHz. When
using the tuner in North, Central or South
America, reset the tuning step from 9 kHz (531
kHz to 1 602 kHz allowable) to 10 kHz (530 kHz
to 1 640 kHz allowable).
1 Use MULTI-CONTROL to select
AM STEP.
Initial Settings
Section
04
2 Press MULTI-CONTROL to display the
setting mode.
3 Turn MULTI-CONTROL to select the AM
tuning step.
Turning MULTI-CONTROL will switch the AM
tuning step between 9 kHz and 10 kHz. The selected AM tuning step will appear in the display.
# You can also perform the same operations by
pushing MULTI-CONTROL up or down.
Switching the warning tone
If the front panel is not detached from the
head unit within four seconds of turning off
the ignition, a warning tone sounds. You can
turn off the warning tone.
1 Use MULTI-CONTROL to select
WARNING TONE.
2 Press MULTI-CONTROL to turn warning
tone on.
# To turn warning tone off, press
MULTI-CONTROL again.
Switching the auxiliary setting
Auxiliary devices connected to this unit can be
activated individually. Set each AUX source to
ON when using. For more information about
connecting or using auxiliary devices, refer to
Using the AUX source on page 30.
1 Use MULTI-CONTROL to select AUX1/
AUX2.
2 Press MULTI-CONTROL to turn AUX1/
AUX2 on.
# To turn AUX off, press MULTI-CONTROL
again.
English
Switching the dimmer setting
To prevent the display from being too bright at
night, the display is automatically dimmed
when the car’s headlights are turned on. You
can turn the dimmer on or off.
1 Use MULTI-CONTROL to select DIMMER.
2 Press MULTI-CONTROL to turn dimmer
on.
# To turn dimmer off, press MULTI-CONTROL
again.
Setting the rear output and
subwoofer controller
This unit’s rear output (rear speaker leads output) can be used for full-range speaker (FULL)
or subwoofer (SUB W) connection. If you
switch the rear output setting to SUB W, you
can connect a rear speaker lead directly to a
subwoofer without using an auxiliary amp.
Initially, the unit is set for rear full-range speaker connection (FULL).
1 Use MULTI-CONTROL to select
SW CONTROL.
2 Press MULTI-CONTROL to display the
setting mode.
# Press BACK to return to the previous display.
3 Use MULTI-CONTROL to select the desired setting.
Turn to change the setting.
SUB W (subwoofer)—FULL (full-range speaker)
# When no subwoofer is connected to the rear
output, select FULL.
# When a subwoofer is connected to the rear
output, set for subwoofer SUB W.
En
27
Section
04
Initial Settings
Notes
! Even if you change this setting, there is no
output unless you turn the subwoofer output
on (refer to Using subwoofer output on page
24).
! If you change this setting, subwoofer output
in the audio menu return to the factory
settings.
Switching the feature demo
The feature demo automatically starts when
power to this unit is turned off while the ignition switch is set to ACC or ON.
1 Use MULTI-CONTROL to select
DEMO MODE.
2 Press MULTI-CONTROL to turn the feature demo on.
# To turn the feature demo off, press
MULTI-CONTROL again.
Notes
! Remember that if the feature demo continues
operating when the car engine is turned off, it
may drain battery power.
! You can also turn on or off feature demo by
pressing DISP while this unit is turned off. For
more details, see About the demo mode on
page 7.
Switching the Ever Scroll
When Ever Scroll is set to ON, recorded text information scrolls continuously in the display.
Set to OFF if you prefer the information to
scroll just once.
1 Use MULTI-CONTROL to select
EVER SCROLL.
2 Press MULTI-CONTROL to turn the Ever
Scroll on.
# To turn the Ever Scroll off, press
MULTI-CONTROL again.
Activating the BT AUDIO source
You need to activate the BT AUDIO source in
order to use a Bluetooth audio player.
! You can only operate this function when
Bluetooth adapter (e.g. CD-BTB100) is connected to this unit.
1 Use MULTI-CONTROL to select
BT AUDIO.
2 Press MULTI-CONTROL to turn the
BT AUDIO source on.
# To turn the BT AUDIO source off, press
MULTI-CONTROL again.
Entering PIN code for
Bluetooth wireless connection
To connect your cellular phone to this unit via
Bluetooth wireless technology, you need to
enter PIN code on your phone to verify the
connection. The default code is 0000, but you
can change this in this function.
! You can only operate this function when
Bluetooth adapter (e.g. CD-BTB100) is connected to this unit.
! With some Bluetooth audio players, you
may be required to enter the Bluetooth
audio player PIN code in advance to set
this unit for a connection.
1 Use MULTI-CONTROL to select
PIN CODE INPUT.
2 Press MULTI-CONTROL to display the
setting mode.
# Press BACK to return to the previous display.
28
En

Initial Settings
Section
04
3 Turn MULTI-CONTROL to select a number.
# You can also perform the same operations by
pushing MULTI-CONTROL up or down.
4 Press MULTI-CONTROL to move the cursor to the next position.
# You can also perform the same operations by
pushing MULTI-CONTROL right.
5 After inputting PIN code (up to 4 digits), press and hold MULTI-CONTROL.
PIN code can be stored in memory.
Displaying system version of
Bluetooth adapter for repair
Should this unit connecting Bluetooth adapter
fails to operate properly and you consult your
dealer for repair, you may be asked to indicate
the system version and Bluetooth module version of the adapter. You can display the versions and confirm them.
! You can only operate this function when
Bluetooth adapter (e.g. CD-BTB100) is connected to this unit.
English
1 Use MULTI-CONTROL to select
BT VER INFO.
2 Press MULTI-CONTROL to display the
setting mode.
# Press BACK to return to the previous display.
3 Use MULTI-CONTROL to select the desired setting.
Turn to change the setting.
System version—Bluetooth module version
# You can also perform the same operations by
pushing MULTI-CONTROL up or down.
En
29

Section
05
Other Functions
Using the AUX source
Up to two auxiliary devices such as VCR or
portable devices (sold separately) can be connected to this unit. When connected, auxiliar y
devices are automatically read as AUX sources
and assigned to AUX1 or AUX2. The relationship between AUX1 and AUX2 sources is explained below.
About AUX1 and AUX2
There are two methods to connect auxiliary devices to this unit.
AUX1 source:
When connecting auxiliar y equipment using a
stereo mini plug cable
% Insert the stereo mini plug into the
input jack on this unit.
For more details, refer to What’s What on page
8.
This auxiliary device is automatically set to
AUX1.
AUX2 source:
When connecting auxiliar y equipment using an
IP-BUS-RCA Interconnector (sold separately)
% Use an IP-BUS-RCA Interconnector such
as the CD-RB20/CD-RB10 (sold separetely)
to connect this unit to auxiliary equipment
featuring RCA output.
For more details, refer to the IP-BUS-RCA Interconnector owner’s manual.
This auxiliary device is automatically set to
AUX2.
# You can only make this type of connection if
the auxiliary device has RCA outputs.
Selecting AUX as the source
% Press SOURCE to select AUX as the
source.
# If the auxiliary setting is not turned on, AUX
cannot be selected. For more details, see Switch-
ing the auxiliary setting on page 27.
Setting the AUX title
The title displayed for the AUX1 or AUX2
source can be changed.
1 After you have selected AUX as the
source, use MULTI-CONTROL and select
FUNCTION to display TITLE INPUT.
2 Enter a title in the same way as the
built-in CD player.
For details concerning operation, refer to Entering disc titles on page 16.
Turning the clock display
on or off
You can turn the clock display on or off.
! Even when the sources are off, the clock
display appears on the display.
% Press CLOCK to turn the clock display
on or off.
Each press of CLOCK turns the clock display
on or off.
# The clock display disappears temporarily
when you perform other operations, but the clock
display appears again after 25 seconds.
30
En
 Loading...