


®
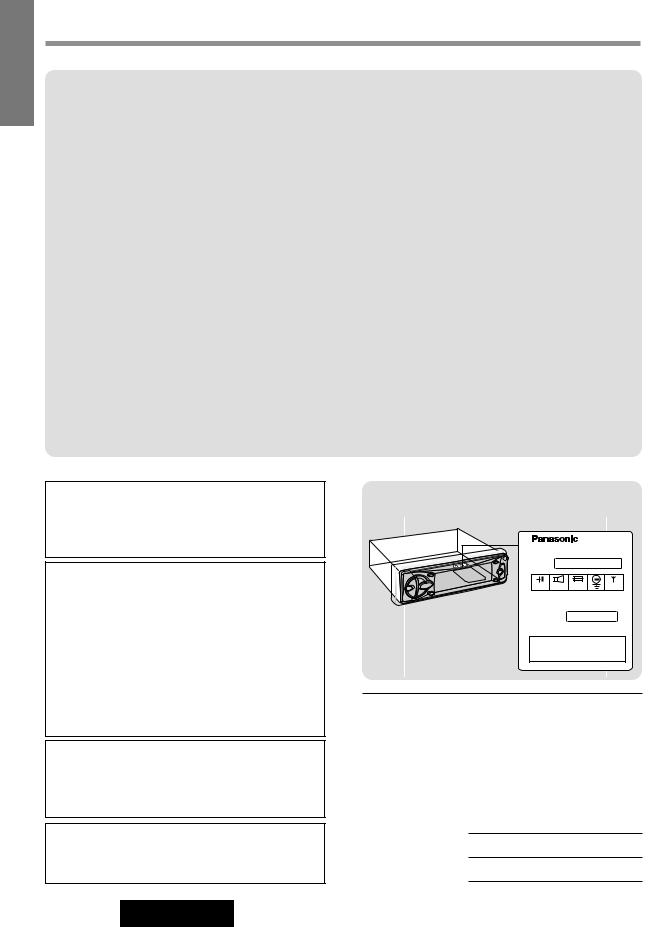
SD/CD Player/Receiver with Dot Matrix LCD and CD Changer Control Lecteur SD - CD - récepteur avec affichage à cristaux liquides à matrice de points et commande de changeur CD Reproductor de CD/SD/receptor con visualizador de matriz de puntos y control de cambiador de CD
REMOTE |
CQ-SRX7000U |
|
SET/ATM |
|
BAND |
VOL P-SET
MENU
TUNE
TRACK
DISC
MUTE
SD/CD RECEIVER WITH FULL DOT MATRIX DISPLAY
OPEN
DISP
D·M
PWR
SOURCE
DIM
SPC
SUB·W
CQ-SRX7000U
TM
TEXT
¡Please read these instructions carefully before using this product and save this manual for future use.
¡Prière de lire ces instructions attentivement avant d’utiliser le produit et garder ce manuel pour l’utilisation ultérieure. ¡Lea con atención estas instrucciones antes de utilizar el producto y guarde este manual para poderlo consultar en el futuro.
E N G L I S H
Safety Information
Radio Frequency Interference
Applies only in U.S.A.
This equipment has been tested and found to comply 15 of the FCC Rules.
¡These limits are designed to provide reasonable
bile installation. This equipment generates, uses, and installed and used in accordance with the instructions, nications. However, there is no guarantee that
this equipment does cause harmful interference to mined by turning the equipment off and on, the user is ence radio technician for help.
FCC Warning:
Any unauthorized changes or modifications to this this device.
This device complies with Part 15 of the FCC Rules: Operation is subject to the following two conditions:
a This device may not cause harmful interference, and
sThis device must accept any interference received, operation.
For Canada:
This Class B digital apparatus complies with Canadian
DO NOT OPEN COVERS AND DO NOT REPAIR YOURSELF. REFER SERVICING TO QUALIFIED PERSONNEL.
Laser products:
Wave length: 780 nm
Laser power: No hazardous radiation is emitted with safety protection.
TO REDUCE THE RISK OF FIRE OR ELECTRIC SHOCK, AND ANNOYING INTERFERENCE, USE ONLY THE INCLUDED COMPONENTS.
2
Label Indication and Location
Model No. |
|
CQ-SRX7000U |
|
N° De Modèle |
|
|
|
1 2 V |
4Ω |
10 A |
FM75Ω |
Manufactured by Matsushita Communication |
|||
Industrial Co., Ltd. |
|
|
|
Yokohama Japan |
Made in Japan |
|
|
Serial No. |
|
|
|
N° De Série |
|
|
|
This device complies with Part 15 of the FCC Rules. Operation is subject to the condition that this device does not cause harmful interference.
Find the model number and serial number on either the back or bottom of the unit. Please record them in the space below and retain this booklet as a permanent record of your purchase to help with identification in case of theft.
MODEL NUMBER |
CQ-SRX7000U |
SERIAL NUMBER
DATE PURCHASED
FROM

Consignes de sécurité
MISE EN GARDE:
POUR RÉDUIRE LES RISQUES D'INCENDIE OU D'ÉLECTROCUTION, N'EXPOSEZ PAS CET APPAREIL À LA PLUIE OU À L'HUMIDITÉ.
ATTENTION:
CET APPAREIL EST UN PRODUIT LASER DE CLASSE 1.
L'UTILISATION DE COMMANDES OU RÉGLAGES OU L'EXÉCUTION D'OPÉRATIONS AUTRES QUE CELLES QUI SONT INDIQUÉES DANS CE DOCUMENT PEUVENT RÉSULTER EN UNE EXPOSITION À UN RAYONNEMENT DANGEREUX.
N'OUVREZ PAS LES COUVERCLES ET N'ESSAYEZ PAS D'EFFECTUER VOUS-MÊME DES RÉPARATIONS. ADRESSEZ-VOUS À UN PERSONNEL QUALI-
Información para seguridad
ADVERTENCIA:
PARA REDUCIR EL RIESGO DE INCENDIOS O SACUDIDAS ELÉCTRICAS, NO EXPONGA ESTE PRODUCTO A LA LLUVIA NI A LA HUMEDAD.
PRECAUCIÓN:
ÉSTE ES UN PRODUCTO LÁSER DE LA CLASE 1.
LA UTILIZACIÓN DE CONTROLES, EL HACER AJUSETES O EL SEGUIR PROCEDIMIENTOS DISTINTOS DE LOS ESPECIFICADOS EN ESTE MANUAL PODRÍA CAUSAR UNA EXPOSICIÓN PELIGROSA A LA RADIACIÓN.
NO ABRA LAS CUBIERTAS NI HAGA REPARACIONES USTED MISMO. SOLICITE LOS TRABAJOS DE SERVICIO AL PERSONAL CALIFICADO.
F R A N
Ç
A
I
S
E S P A
Ñ
O L
Déclaration d'interférence de fréquences radio (Partie 15 des Règlements FCC):
Cet appareil numérique de Classe B est conforme au règlement ICES-003 canadien.
Productos láser:
Longitud de onda: 780 nm
Potencia láser: Con protección de seguridad no se emite radiación peligrosa.
PARA REDUCIR RIESGO DE INCENDIOS O SACUDIDAS ELÉCTRICAS, Y PARA EVITAR LAS INTERFERENCIAS MOLESTAS, UTILICE SOLAMENTE LOS COMPONENTES INCLUIDOS.
ll est recommandé de noter, dans l'espace prévu cidessous, les numéros de modèle et de série inscrits soit à l'arrière soit sons le fond de l'appareil, et de conserver ce manuel comme mémorandum de l'achat afin de permettre l'identification de l'appareil en cas de vol.
NUMÉRO DE MODÈLE CQ-SRX7000U
NUMÉRO DE SÉRIE
DATE DE L'ACHAT
VENDEUR
Busque el número del modelo y el número de serie ya sea en la parte trasera o en el fondo de la unidad. Sírvase anotar dichos números en el espacio siguiente, y mantenga este librete como una anotación permanente de su compra para ayudar en la identificación en el caso de robo.
NÚMERODELMODELO CQ-SRX7000U
NÚMERO DE SERIE
FACHA DE COMPRA
NOMBREDELATIENDA
3
CQ-SRX7000U

E |
Panasonic welcomes you to our ever growing family of electronic product owners. We know that this |
|
N |
product will bring you many hours of enjoyment. Our reputation is built on precise electronic and mechani- |
|
G |
||
cal engineering, manufactured with carefully selected components and assembled by people who take |
||
L |
||
I |
pride in their work. Once you discover the quality, reliability, and value we have built into this product, you |
|
S |
too will be proud to be a member of our family. |
|
H |
|
|
|
|
Use This Product Safely
When Driving
Keep the volume level low enough to be aware of road and traffic conditions.
When Car Washing
Do not expose the product, including the speakers, CDs and SD Memory Card to water or excessive moisture. This could cause electrical shorts, fire, or other damage.
When Parked
Parking in direct sunlight can produce very high temperatures inside your vehicle. Give the interior a chance to cool down before switching the unit on.
Use the Proper Power Supply
This product is designed to operate with a 12 volt, negative ground battery system (the normal system in a North American car.)
Disc Mechanism
Do not insert coins or any small objects. Keep screwdrivers and other metallic objects away from the disc mechanism and disc.
Never load an SD Memory Card into the CD slot. Otherwise the main unit or the SD Memory Card might be damaged.
Use Authorized Servicenters
Do not attempt to disassemble or adjust this precision product. Please refer to the Servicenter list included with this product for service assistance.
For Installation
The product should be installed in a horizontal position with the front end up at a convenient angle, but not more than 30˚.
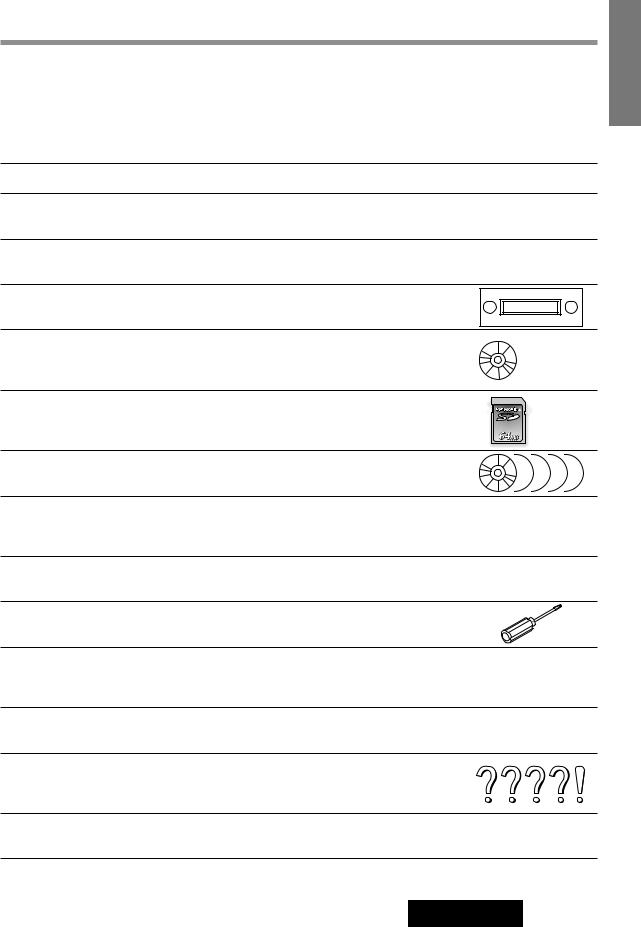
Components
¡Operating instructions. . . . . . . . . . . . . . . . . . . . . . . . . 1 ¡Installation hardware . . . . . . . . . . . . 1 set (a page 40) ¡Power Connector . . . . . . . . . . . . . . . . . . . . . . . . . . . . 1 ¡Remote control unit . . . . . . . . . . . . . . . . . . . . . . . . . . 1 ¡Lithium battery (CR2025) . . . . . . . . . . . . . . . . . . . . . . 1 ¡Warranty card . . . . . . . . . . . . . . . . . . . . . . . . . . . . . . . 1
Before Reading These Instructions
You can operate this unit by pressing buttons on the main unit and the remote control.
These instructions describe buttons that are concerned with operations as follows.
Example) Press [P•SETj] or [P•SETi] / [j] or [i].
(buttons on the main unit / buttons on the remote control)
Some operations can be activated by pressing buttons only on the main unit or only on the remote control. Those cases are described in the instructions.
Example) Press [SPC] on the main unit to change the sound space.
4
CQ-SRX7000U
Contents |
|
Safety Information........................................................................................... |
Page 2 |
Radio Frequency Interference Statement (Part 15 of the FCC Rules)..................... |
2 |
Use this Product Safely ........................................................................................... |
4 |
Components ............................................................................................................ |
4 |
Before Reading These Instructions .......................................................................... |
4 |
¢ Features .......................................................................................................... |
10 |
¢ Remote Control Preparation ......................................................................... |
11 |
Battery Installation and battery notes |
|
¢ General ............................................................................................................ |
12 |
Power, source change, volume, mute, dimmer and display change |
|
¢ Radio ............................................................................................................... |
14 |
Manual and automatic tuning, band selection, direct memory and preset stations |
|
¢ CD Player ........................................................................................................ |
16 |
Loading/ejecting a disc, CD play, track selection, search, repeat, random, scan and |
|
title display selection |
|
¢ SD Player ........................................................................................................ |
18 |
Inserting/ejecting a card, SD play, track selection, search, play list selection, music list |
|
selection, repeat, random and title display selection |
|
¢ CD Changer .................................................................................................... |
22 |
Disc/track selection, search, repeat, random, and scan |
|
¢ Various Settings ............................................................................................. |
24 |
Audio setting, sound space setting, Sub-Woofer output setting, display setting and |
|
function setting |
|
¢ About SD ......................................................................................................... |
38 |
Preparation for SD play and glossary for SD |
|
¢ Installation Guide ........................................................................................... |
40 |
Step-by-step procedures |
|
¢ Anti-Theft System .......................................................................................... |
45 |
Place the removable face plate into case, install removable face plate and security |
|
indicator |
|
¢ Electrical Connections .................................................................................. |
46 |
Cautions and cable wiring diagram |
|
¢ Troubleshooting ............................................................................................. |
49 |
Where to get service help, troubleshooting tips, error display messages and reset |
|
switch |
|
¢ Maintenance ................................................................................................... |
55 |
Care of the unit, notes on CD and notes on SD |
|
¢ Specifications ................................................................................................. |
56 |
E N G L I S H
5
CQ-SRX7000U

E N G L I S H
1
Features
This 1-DIN system is equipped with a CD player, SD player, FM/AM tuner, CD changer controller and high power amplifier with high tone 45 W x 4 channels.
The SD player in this system can play only an SD Memory Card whose music data are compressed in AAC or MP3 method.
An optional software, "RealJukebox for Panasonic" is required in recording or editing operation for SD Memory Cards. Refer to page 38 for more information.
Full-dot colorful expressiveness <3D dot matrix display>
You can select an operation quickly because operation items are shown on the display. You can also enjoy variety of actions and direction.
Various sound control functions
¡Space function of 7-mode DSP (a page 30), Equalizer: HEQ (Human Equalizer) and GEQ (Graphic Equalizer) (a page 24). ¡Super bass sound: DDBC (Digital Dynamic Bass Control) (a page 32), SDBB (Super Dynamic Bass Boost) (a page 26). ¡CD changer control (a page 22).
Anti-theft removable face
You can remove the panel when you leave your car (a page 45)
10
CQ-SRX7000U
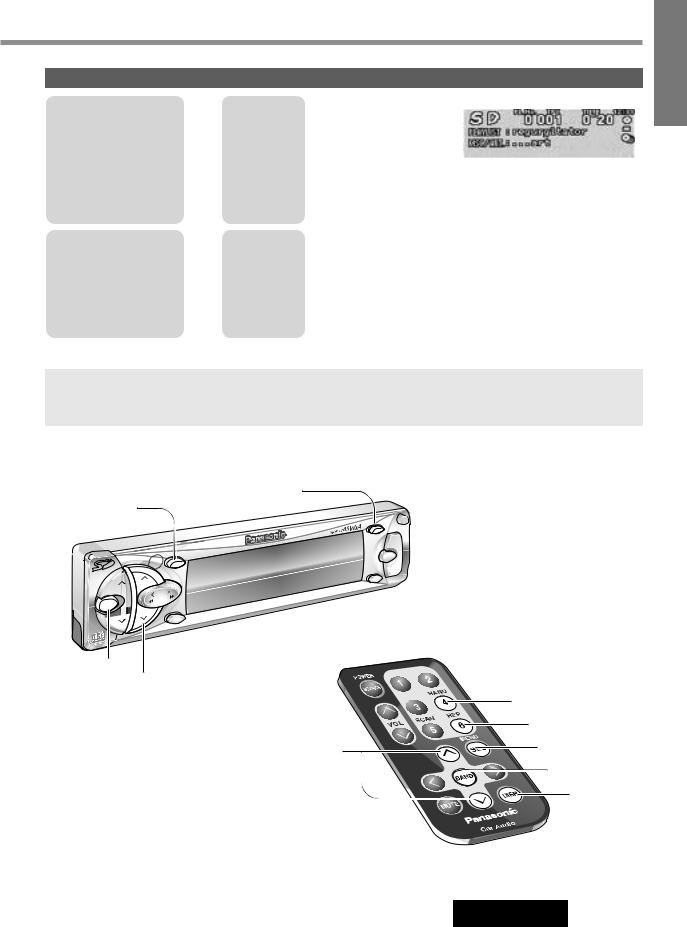
Remote Control Preparation
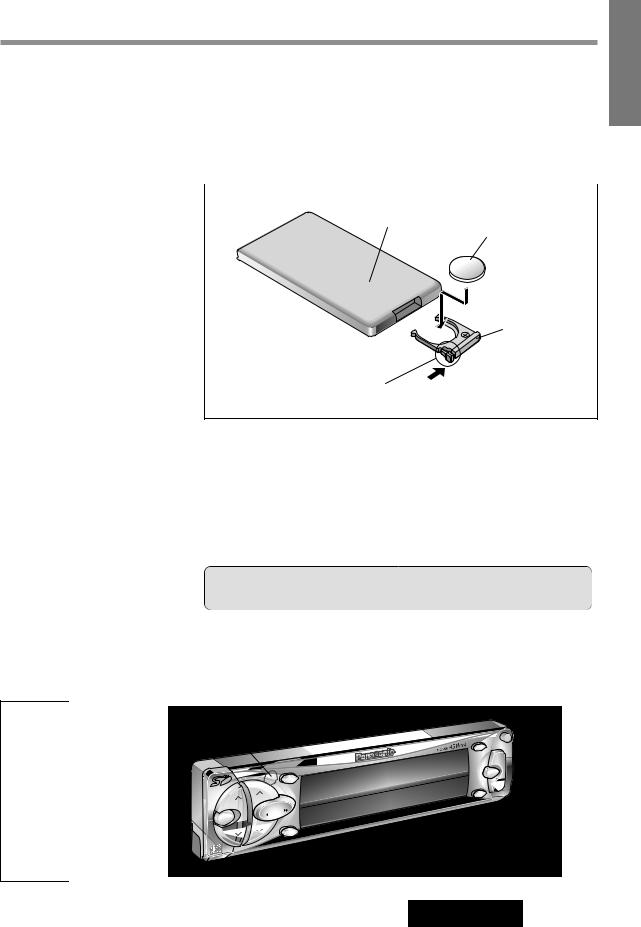
Battery Installation |
1. |
Remove the battery holder. |
|
|
|||
|
|
Take hold of the holder at position B and pull it out by pushing position A in |
|
|
|
the direction shown by the arrow. |
|
|
2. |
Install the battery on the battery holder. |
|
|
|
Set a new battery properly with its (+) side facing up as shown in the figure. |
|
|
3. |
Insert the battery holder. |
|
|
|
Push the battery holder back into its original position. |
|
|
|
|
|
|
|
(Back side) |
|
|
|
|
Lithium battery |
|
|
|
|
|
|
|
|
|
|
|
|
E N G L I S H
21
Position B
Position A |
Battery holder |
|
Battery Notes
Remove and dispose of an old battery immediately. Battery Information:
¡Battery Type: Panasonic lithium battery (CR2025)
¡Battery Life: Approximately 6 months under normal use (at room temperature)
Caution: Improper use of batteries may cause overheating, an explosion or ignition, resulting in injury or a fire. Battery leakage may damage the unit.
¡Do not disassemble or short the battery. Do not throw a battery into a fire. ¡Keep batteries away from children to avoid the risk of accidents.
¡Be careful to the disposal rules when you dispose of batteries.
Point the remote control unit at the main unit's sensor (REMOTE).
VOL
MENU
REMOTE |
SET/ATM |
|
BAND |
P-SET
 TUNE
TUNE 
 TRACK
TRACK
DISC
MUTE
CQ-SRX7000U
|
|
|
|
|
DOT |
MATRIX |
DISPLAY |
|
|
|
|
FULL |
|
||
|
|
|
WITH |
|
|
||
|
|
|
|
|
|
||
|
D REC |
EIVER |
|
|
|
|
|
SD/C |
|
|
|
|
|
||
|
|
|
|
|
|
OPEN
DISP
D·M
PWR
SOURCE
DIM
SPC
SUB·W
11
CQ-SRX7000U
E
N
G
L
I
S
H
3
12
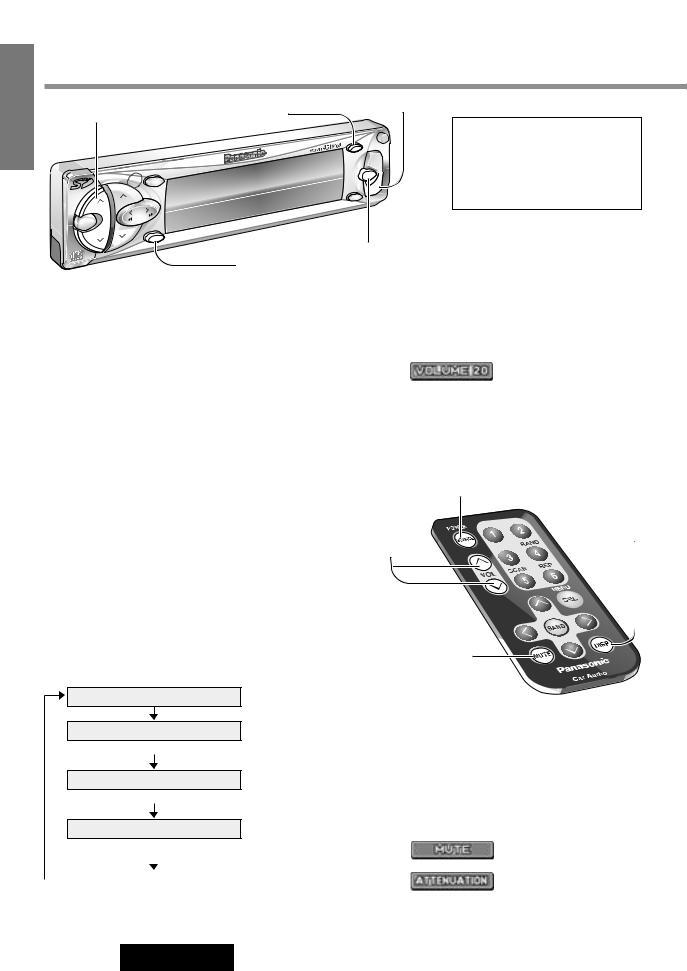
General
[VOL}] [VOL{] (Volume) [DISP] (Display)
|
|
|
|
|
|
|
|
CQ-SRX7000U |
|
REM |
OTE |
SET/ATM |
|
|
|
|
|
|
|
|
|
|
|
|
|
|
|
||
|
|
BAND |
|
|
|
|
|
|
|
P-SET |
|
|
|
|
|
|
|
|
|
VOL |
|
|
|
|
|
|
|
|
|
TUNE |
|
|
|
|
|
|
MATRIX |
DISPLAY |
|
TRACK |
|
|
|
|
|
||||
|
|
|
FULL |
DOT |
|
||||
MENU |
|
|
|
R W |
ITH |
|
|
|
|
|
|
|
SD/CD |
RECEIVE |
|
|
|
|
|
DISC |
|
|
|
|
|
|
|
|
|
|
|
|
|
|
|
|
|
|
|
[DIM] (Dimmer)
DISP
D·M
SOURCE
DIM
SPC
SUB·W
Note : When you use this unit for the first time, a demonstration message appears on the display.
To cancel this display, press
[DISP].
|
[MUTE] |
[SOURCE] (Power/Source) |
|
|
|
||
|
(Mute/Attenuator) |
||
Turn the key in the ignition until the accessory indicator |
Volume |
||
lights. |
|
||
Power |
|
[VOL}] : Up |
|
|
[VOL{] : Down |
||
|
|
||
ON : Press [SOURCE]. |
|
Setting Range : 0 to 40 |
|
Note : When the power is switched on by pressing |
Note : The sound level for each source is |
||
and holding [SOURCE] for more than 2 seconds, a |
|||
stored in memory. |
|||
demonstration message appears on the display. |
|||
(For radio, one volume setting for AM, one vol- |
|||
To cancel this display, press |
[DISP]. |
||
ume setting for all FMs) |
|||
|
|
||
OFF : Press [SOURCE] again for more than 1 second. After turning off the ignition key, A security message is displayed, and the warning alarm that reminds you to take the panel and the SD Memory Card is activated.
(When S-LED is set to ON a page 36)
Source
Press [SOURCE] to change the source.
Radio
[SOURCE] (Power/Source)
[DISP] (Display)
[VOL}] [VOL{]
(Volume)
[MUTE]
(Mute/Attenuator)
CD Player
(When a CD is in the player)
SD Player
(When a SD Memory Card is in the player)
CD Changer
MUTE/ATT (Attenuator)
MUTE/ATT ON : Press [MUTE].
MUTE/ATT OFF : Press again.
Decreasing volume range depends on setting. (MUTE/ATT setting a page 36)
(When a CD changer is connected and magazine is in the changer) |
: No sound |
|||
|
|
|
|
|
|
|
|
|
|
|
AUX In |
|
: Decrease the volume to |
|
|
||||
|
(When AUX-IN setting is set to ON) |
(a page 36) |
1/10 of previous level. |
|
CQ-SRX7000U
Dimmer
Press [DIM] on the main unit to change the dimmer level.
DIMMER 3 |
|
|
DIMMER 2 |
|
|
DIMMER 1 |
||
|
|
|||||||
(Brighter) |
|
|
(Medium) |
|
|
(Darker) |
||
|
|
|
|
|
|
|
|
|
|
|
|
|
|
|
|
|
|
Default : DIMMER 2
(With side marker lights ON) DIMMER 3
(With side marker lights OFF)
Notes :
¡Set the display brightness for each of the cases in which the side marker lights are on and the side marker lights are off. ¡Be sure to connect the illumination lead. (a page 46)
Display Change
When Power is ON
Press [DISP]. |
|
|
|
|
|
|
|
|
|
||||
|
|
|
|
|
Mode & Spectrum |
|
|
|
|
|
|
|
|
Mode Display *1 |
Analyzer Display |
|
|
|
Spectrum Analyzer Display *2 |
The title information can be |
|||||||
|
|
|
|
|
|
*1 |
|||||||
|
|
|
|
|
|
|
|
|
|
|
|
|
displayed in the CD/SD |
|
|
|
|
|
|
|
|
|
|
|
|
|
mode. (a page 17 and 21) |
|
|
|
|
|
|
|
|
|
|
|
|
|
|
|
|
|
|
|
|
|
|
|
|
|
*2 |
If you press a button, the |
|
|
|
|
|
|
|
|
|
|
|
|
|||
|
|
|
|
|
|
|
|
|
|
|
|
|
Mode & Spectrum Analyzer |
Display OFF *3 |
|
|
|
|
Mode & Clock Display |
Display appears for 5 sec- |
|||||||
|
|
|
|
|
|
|
|
|
|
|
|
|
onds. |
|
|
|
|
|
|
|
|
|
|
*3 |
If you press a button, the |
||
|
|
|
|
|
|
|
|
|
|
||||
Notes : |
|
|
|
|
|
|
|
|
light is turned on, the Mode |
||||
|
|
|
|
|
|
|
|
Display appears, and the |
|||||
¡Set the Spectrum Analyzer pattern in a separate procedure. (a page 34) |
light is turned off approxi- |
||||||||||||
¡“ADJUST” is displayed before adjusting the clock. (Adjustment a page 34) |
mately 5 seconds later. |
||||||||||||
Press and hold [DISP] for more than 2 seconds. |
|
|
|
|
|
AUDIO Indicator |
|
||||||
Indicators which are not displayed on Mode Display are displayed. |
|
||||||||||||
(Sound, sound space and SD data information etc.) |
|
|
|
|
|
|
|
|
|||||
Press [DISP] again to cancel. |
|
|
|
|
|
|
|
|
|
||||
|
|
|
|
|
|
|
|
|
|||||
|
|
|
|
|
When Power is OFF |
|
|||||||
Press [DISP]. |
|
|
|
|
|
|
|
|
|
||||
Clock Display |
|
|
|
|
Display OFF |
|
|||||||
|
|
|
|
|
|
|
|
||||||
|
|
|
|
|
|
|
|
|
|
|
|
|
|
|
|
|
|
|
|
|
|
||||||
(Back light is on) |
|
|
|
(Back light is off) |
|
||||||||
E N G L I S H
41
13
CQ-SRX7000U
E N G L I S H
5
Radio
[BAND]
(Auto preset memory)
BAND
VOL
 TUNE
TUNE
 TRACK
TRACK
MENU
DISC
[D · M] (Direct memory)
CQ-SRX7000U
DISPLAY
|
FULL |
DOT |
MATRIX |
WITH |
|
|
|
|
|
|
SD/CD |
RECEIVER |
|
[TUNE]] [TUNE[] (Tune)
[P•SET}] [P•SET{] (Preset station)
OPEN
D·M
PW
SOURCE
DIM
SPC
SUB·W
[SOURCE]
(Source)
1
Radio Mode Display
Band |
Frequency |
|
Stereo Indicator |
Note: The stereo indicator lights during reception of an FM stereo broadcast.
Press [SOURCE] to change to radio mode.
[SOURCE] (Source) |
2 |
|


 [1] to [6] (Preset station)
[BAND] (Auto preset memory)
 []] [[] (Tune)
3
Band
Press [BAND].
FM1
FM2
FM3
AM
[}] [{] |
[TUNE]] / []] : Down |
Press and hold [TUNE[] or [TUNE]] / |
|
(Preset station) |
[[] or []] for more than 0.5 seconds, |
|
|
|
then release. Seeking will start. |
Direct Memory
Your favorite radio station can be memorized in the D·M button and you can call back radio stations just by pressing the
button whatever the current sound source is, even if the power is off. |
Default : FM 87.9 MHz |
Memorize |
Recalling the Direct Memory |
qSelect a band and frequency (step q, w and e on the above.)
wPress and hold [D · M] on the main unit for more than 2 seconds. Frequency blinks once and is saved in the memory.
Press [D · M] on the main unit.
Press [D · M] on the main unit again to cancel and return to the previous source.
Notes:
¡New station is overwritten on existing saved station after following memorization procedure.
¡Only the following operations are practicable while the Direct Memory radio station is being played: turning the power on or off, switching the source, adjusting the volume, turning on or off Mute (Attenuator), adjusting dimmer, switching the display, and loading a disc or a card.
Cancel the Direct Memory function to resume the normal operations.
14
CQ-SRX7000U
One-touch selection of a preset station
E N G L I S H
16
Up to 6 stations each can be saved in the FM1, FM2, FM3 and AM preset station memories.
|
|
|
Select a band and frequency (step q, w and e on the previous page) |
|
|
|
|
q Press and hold [P•SET}] or [P•SET{] / [}] or [{] for more than |
|
|
|
|
2 seconds until the preset number blinks. |
|
|
|
|
w Press [P•SET}] or [P•SET{] / [}] or [{] to select a preset num- |
|
|
|
|
ber. |
|
Manual Preset |
|
|
e Press and hold [P•SET}] or [P•SET{] / [}] or [{] for more than |
|
|
|
|||
|
|
2 seconds to memorize. |
||
Memory |
|
|
The display blinks once, and a receiv- |
|
Manually save a station in |
|
|
||
|
|
ing station is saved in the memory. |
||
the preset memory. |
|
|
Note: Frequency setting can be performed even after selecting a preset num- |
|
|
|
|||
|
|
|
||
|
|
|
ber. |
|
|
|
|
|
|
|
|
|
Entering numbers directly from the remote control |
|
|
|
|
Select a band and frequency (step q, w and e on the previous page) |
|
|
|
|
Press and hold [1] to [6] on the remote control for more than 2 seconds. |
|
|
|
|
|
|
Auto Preset
Memory
Automatically save strong stations in the preset memory.
Select a band (step q, w on the previous page)
Press and hold [BAND] for more than |
Scanning |
|
2 seconds. |
||
|
¡The 6 strongest available stations will be automatically saved in the memory under preset numbers 1 to 6.
¡Once set, the preset stations are sequentially scanned for 5 seconds each. ¡To stop the scanning, press [P•SET}] or [P•SET{] / [}] or [{].
(Pressing [1] to [6] on the remote control also can stop the scanning.)
Note: New stations are overwritten on existing saved stations after following this procedure.
Preset Station
Calling
Select a band (step q, w on the previous page)
Press [P•SET}] or [P•SET{] / [}] or [{] to select the preset number for tuning in the preset station.
Entering numbers directly from the remote control
Press [1] to [6] on the remote control.
15
CQ-SRX7000U

E N G L I S H
7
CD Player
|
|
|
|
|
|
|
CQ-SRX |
7000U |
||
|
|
|
|
|
|
|
|
|
||
REMOTE |
SET/ATM |
|
|
|
|
|
|
|
|
|
|
BAND |
|
|
|
|
|
|
|
|
|
P-SET |
|
|
|
|
|
|
|
|
|
|
VOL |
|
|
|
|
|
|
|
|
|
|
TUNE |
|
|
|
|
|
|
DOT MA |
TRIX DISP |
LAY |
|
TRACK |
|
|
|
|
|
|
||||
|
|
|
WITH |
FULL |
|
|
|
|||
MENU |
|
|
RECE |
IVER |
|
|
|
|
|
|
|
|
SD/CD |
|
|
|
|
|
|
|
|
DISC |
|
|
|
|
|
|
|
|
|
|
|
MUTE |
|
|
|
|
|
|
|
|
|
OPEN
DISP
D·M
PWR
SOURCE
DIM
SPC
SUB·W
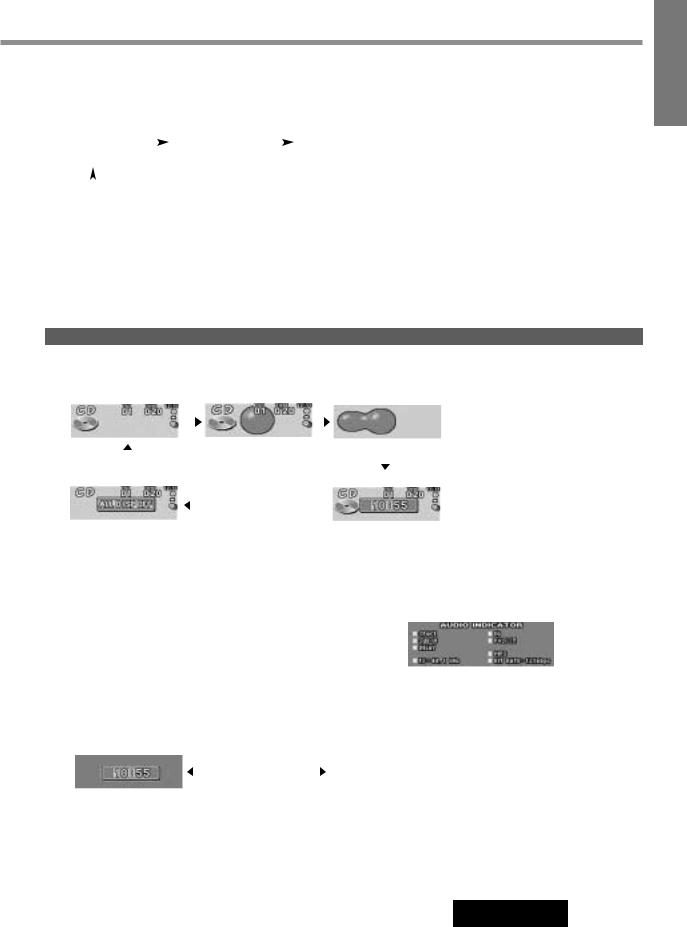
To Stop and Eject the Disc
Press [uCD]
[DISP] (Return)
[BAND] (Set)
1
2
Label Side
Disc Insert
Playback starts. Close the front panel.
Notes :
¡Do not insert a disc when this indicator lights.
¡Loading a CD when the power is off allows the power to be turned on.
¡Ejecting the CD when the unit is in the CD mode allows the power to be turned off.
CD Player Mode Display
[SOURCE]
(Source)
[TRACK 1] [TRACK2] (Track)
[MENU]
(Menu) [P•SET}] [P•SET{] (Select)
|
|
|
|
|
|
|
|
|
|
|
|
|
|
|
|
|
|
|
|
|
|
|
|
|
|
Track Number |
Play Time |
|
|
|
|
||||
|
|
When a CD is inside |
|||
|
|
|
(Blinks during CD play) |
||
|
|
|
|
|
|
Scan, Random and
Repeat Indicator
When CD is in the player
Press [SOURCE] to change to CD player mode and playback starts.
[SOURCE]
(Source)
[5] (Scan)
[}] [{]
(Select)
[BAND]
(Set)
[4] (Random) |
Track Selection |
[6] (Repeat)
[SEL] (Menu)
 []] [[] (Track)
[DISP]
(Return)
[TRACK2] / [[] : Next track
[TRACK1] / []] : Beginning of the current track
Previous track (Press twice.)
Track Search
Press and hold.
[TRACK2] / [[] : Fast forward [TRACK1] / []] : Fast reverse
Cautions:
¡Never load an SD Memory Card into the CD slot. Otherwise the main unit or the SD Memory Card might be damaged.
¡To avoid damaging the front panel, do not push it down or place objects on it while it is open. ¡Do not use irregularly shaped CDs.
¡Do not pinch your finger or hand in the front panel. Do not insert foreign matter into the disc and card slots.
16
CQ-SRX7000U
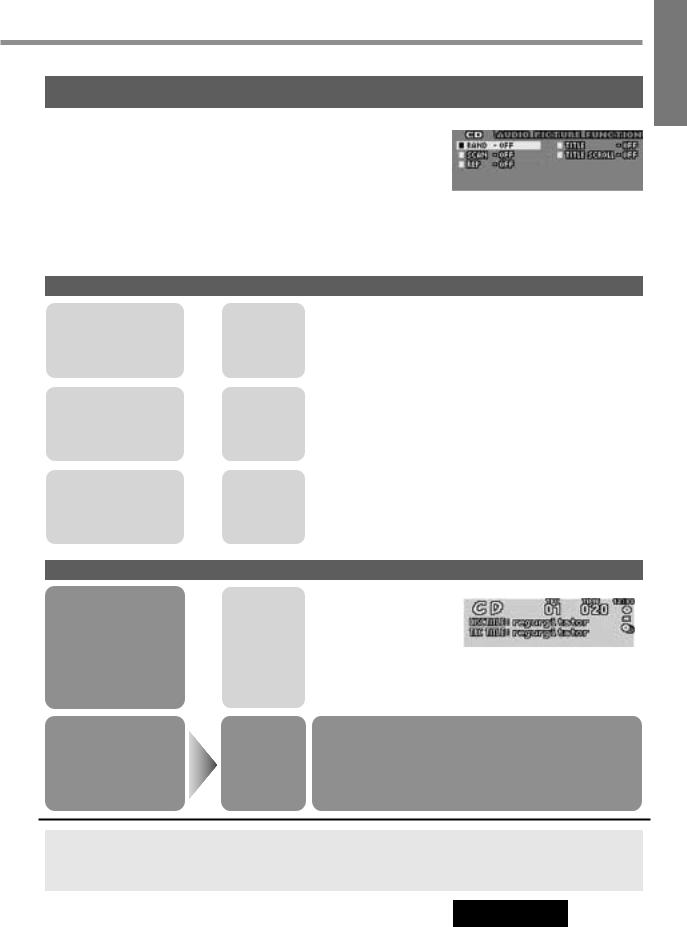
CD Mode Setting from Menu
q Press [MENU] / [SEL] during CD playing. |
CD Menu Display |
|
|
w Press [P•SET}] or [P•SET{] / [}] or [{] to select an item. |
|
ePress [BAND] to switch on or off in turn.
Notes:
¡Operations except setting should be performed after returning to the mode display.
¡If no keys have been pressed for more than 15 seconds, the display returns to the previous one after changing to the menu display.
¡Press [DISP] to return to the regular mode.
Play Setting
|
|
|
|
|
|
: All the available tracks are played in a random |
|
|
|
|
|
|
|
|
|
|
Select |
ON |
||
|
|
|
|
|
|
sequence. |
|
|
|
RAND |
|
|
: Cancel |
|
|
|
|
OFF |
||
|
|
|
|
|
||
|
|
|
|
|
|
|
|
|
|
|
|
|
|
|
|
|
|
|
|
|
|
|
|
|
|
: The first 10 seconds of each track play in |
|
|
|
|
|
|
||
Scan Play |
|
|
Select |
ON |
||
|
|
|
|
|
sequence. |
|
|
|
SCAN |
|
|
||
|
|
|
|
OFF |
: Cancel |
|
|
|
|
|
|
||
|
|
|
|
|
|
|
|
|
|
|
|
|
|
|
|
|
|
|
|
|
|
|
|
|
|
|
: Repeat the current selection. |
|
|
|
|
|
||
|
|
|
Select |
ON |
||
|
|
|
|
|
|
|
|
|
|
REP |
|
OFF |
: Cancel |
|
|
|
|
|
|
|
|
|
|
|
|
|
|
E N G L I S H
81
Title Information
Title Scroll
|
|
|
|
|
|
: Display |
|
|
Select |
|
ON |
||
|
|
|||||
|
|
|
|
: No display |
||
|
|
|
OFF |
|||
|
|
|
|
|
|
|
|
|
TITLE |
|
¡“NO TITLE” is displayed when there is no information. |
||
|
|
|
|
|||
|
|
|
|
¡When the title display is set to ON, the mode display appears. |
||
|
|
|
|
|
|
|
|
|
|
|
|
|
: Continuous scroll |
|
|
Select |
|
ON |
||
|
|
|
|
: Scroll stops after a circle scroll |
||
|
|
|
|
|
OFF |
|
|
|
TITLE SCROLL |
|
|
|
Press and hold [BAND] for more than 2 |
seconds to have an another circle scroll.
Direct Play Setting from Remote Control
Random, scan and repeat can be set by the remote control when the menu is not displayed.
Press [4] (Random) / [5] (Scan) / [6] (Repeat) on the remote control. Press again to cancel.
17
CQ-SRX7000U

E N G L I S H
9
SD Player
|
|
|
|
|
|
|
CQ-SRX |
7000U |
||
|
|
|
|
|
|
|
|
|
||
REMOTE |
SET/ATM |
|
|
|
|
|
|
|
|
|
|
BAND |
|
|
|
|
|
|
|
|
|
P-SET |
|
|
|
|
|
|
|
|
|
|
VOL |
|
|
|
|
|
|
|
|
|
|
TUNE |
|
|
|
|
|
|
DOT MA |
TRIX DIS |
PLAY |
|
TRACK |
|
|
|
|
FULL |
|
||||
|
|
|
WITH |
|
|
|
||||
MENU |
|
|
|
IVER |
|
|
|
|
||
|
SD/CD |
RECE |
|
|
|
|
|
|
||
DISC |
|
|
|
|
|
|
|
|
|
|
|
|
|
|
|
|
|
|
|
|
|
|
MUTE |
|
|
|
|
|
|
|
|
|
DISP
D·M
PWR
SOURCE
DIM
SPC
SUB·W
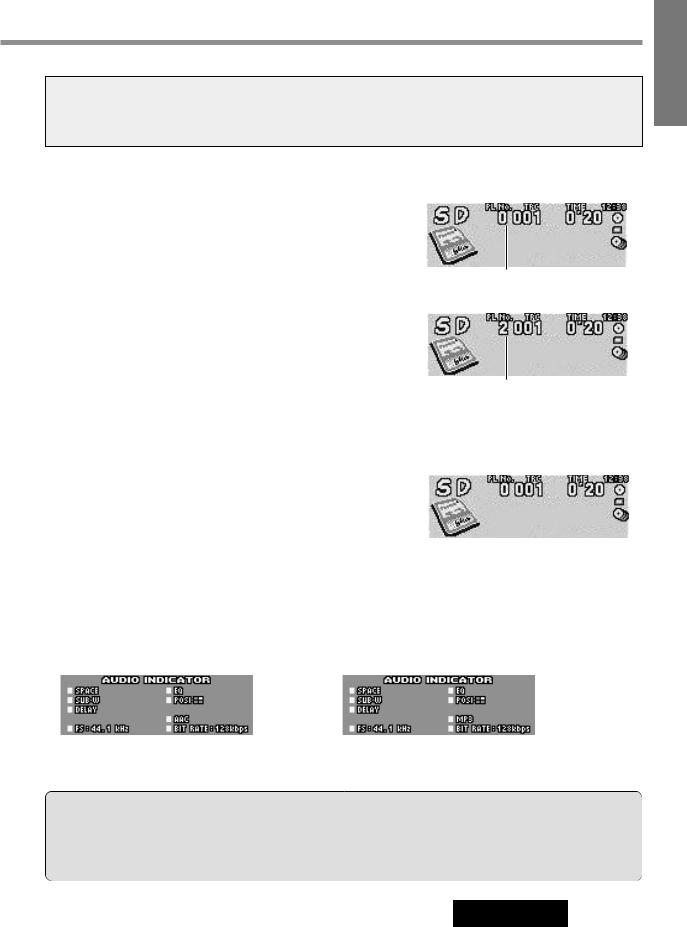
1
 2
2
[OPEN]
Memory Card Insert
qLoad a card by pushing the center of the back of the card until it is locked.
w Playback starts. Close the front panel.
Cut Side
Label Side
Push
[DISP]
(Data information)
Notes :
¡Loading an SD Memory Card when the power is off allows the power to be turned on.
¡Ejecting the SD Memory Card when the unit is in the SD mode allows the power to be turned off.
To Stop and Eject the SD Memory
Card
Press the center of the back of the card to be unlocked.
SD Player Mode Display
Track Number |
Play Time |
CQ-SRX7000U
REMOTE |
SET/ATM |
|
BAND |
VOL |
|
|
|
|
|
TUNE |
|
|
|
|
DISPLAY |
TRACK |
|
|
FULL |
DOT |
MATRIX |
MENU |
|
WITH |
|
|
|
|
|
|
|
||
|
SD/CD |
RECEIVER |
|
|
[SOURCE] |
DISC |
|
|
|
|
|
|
|
|
|
|
(Source) |
[TRACK 1] [TRACK2] (Track)
an SD Memory Card is inside during SD play)
Random and Repeat Indicator
When an SD Memory Card is in the player
[P•SET}] [P•SET{] (Play list select)
[SOURCE] 


(Source)
[}] [{]
(Play list select)
 []] [[] (Track)
[DISP]
(Data information)
18
Press [SOURCE] to change to SD player mode and playback starts.
Track Selection
[TRACK2] / [[] : Next track
[TRACK1] / []] : Beginning of the current track
Previous track (Press twice.)
Track Search
Press and hold.
[TRACK2] / [[] : Fast forward [TRACK1] / []] : Fast reverse
CQ-SRX7000U
¡Refer to the "About SD" (a page 38) and "Notes on SD Memory Card" (a page 56) for the information of the SD
Memory Card.
¡Refer to the Operating Instructions and online help for the PC software “RealJukebox for Panasonic” for the information of the play list etc.
Play List Selection
Press [P•SET}] or [P•SET{] / [}] or [{] to select the play list during SD playing.
Playback of the track in the selected play list starts.
Notes :
¡Same play list will be played continuously after all tracks are played in the selected play list.
¡The play list selection is also available from the menu display (a page 20).
Play List Number
When play list number 2 is selected.
E
N
G
L
I
S
H
10
To Return to All Track Playing
Select play list number “0” to return to the all track playback.
SD Memory Card Data Information
While playing music that was compressed in the AAC compression format
While playing music that was compressed in the MP3 compression format
|
|
|
AAC |
|
|
|
MP3 |
|
|
|
|
|
|
||
|
|
|
compression |
|
|
|
compression |
|
|
|
format |
|
|
|
format |
Bit |
rate |
Bit |
rate |
||||
Cautions:
¡Never load an SD Memory Card into the CD slot. Otherwise the main unit or the SD Memory Card might be damaged.
¡To avoid damaging the front panel, do not push it down or place objects on it while it is open.
¡Confirm that the direction of the card is correct, and that the card is not inverted. Forced loading may cause trouble. ¡Do not pinch your finger or hand in the front panel. Do not insert foreign matter into the disc and card slots.
19
CQ-SRX7000U
N |
|
SD Player (continued) |
|
|
E |
|
|
|
|
G |
|
|
|
|
|
|
|
|
|
L |
|
|
|
|
I |
|
|
|
|
S |
|
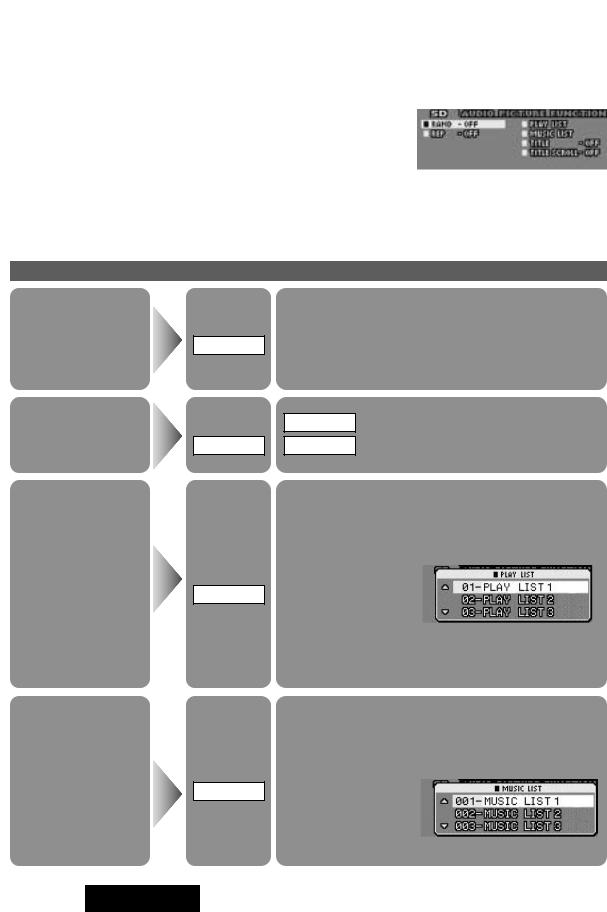
SD Mode Setting from Menu |
|
|
H |
|
|
||
11 |
|
SD playing. |
SD Menu Display |
|
|
|
|
||
{] / [}] or [{] to select an item. or off in turn.
list and music list)
should be performed after returning to the mode display.
for more than 15 seconds, the display returns to the previous one after changing to the
to the regular mode.
Play Setting
Select
RAND
Select
REP
ON |
: All the available tracks are played in a random |
|
sequence. |
OFF |
: Cancel |
¡When play list is playing, all the available tracks from the play list are played in random sequence.
ON : Repeat the current selection.
OFF : Cancel
Music List
When all track playback
Display all tracks in the
SD Memory Card.
When play list playback
Display all tracks in the play list.
20
Select
PLAY LIST
From the play list display,
qSelect your favorite play list with pressing [P•SET}] or
[P•SET{] / [}] or [{].
w Press [BAND] to set.
Playback of the track in the selected play list starts.
¡Select “00-DEFAULT PLAYLIST” to return to the all track playback.
Select
MUSIC LIST
From the music list display,
qSelect your favorite track with pressing [P•SET}] or
[P•SET{] / [}] or [{].
w Press [BAND] to set.
Playback of the selected track starts.
CQ-SRX7000U
Title Information
|
|
|
|
|
|
|
|
: Display |
|
|
|
|
|
Select |
|
ON |
|
||
|
|
|
|
|
|
: No display |
|
||
|
|
|
|
|
OFF |
|
|||
|
|
|
|
|
|
|
|
||
|
|
|
|
TITLE |
|
¡“NO TITLE” is displayed when there is no information. |
|
||
|
|
|
|
|
|
|
|||
|
|
|
|
|
|
¡When the title display is set to ON, the mode display appears. |
|
||
|
|
|
|
|
|
|
|||
|
|
|
|
|
|
|
|
: Continuous scroll |
|
|
|
|
|
Select |
|
ON |
|
||
|
|
|
|
|
|
: Scroll stops after a circle scroll |
|
||
|
Title Scroll |
|
|
|
OFF |
|
|||
|
|
|
|
|
|
|
|||
|
|
|
TITLE SCROLL |
|
|
|
Press and hold [BAND] for more than 2 |
|
|
|
|
|
|
|
|
|
|
||
|
|
|
|
|
|
|
|
seconds to have an another circle scroll. |
|
|
|
|
|
|
|
|
|
|
|
|
|
|
|
|
|
|
|
|
|
|
|
|
|
|
|
|
|
|
|
E N G L I S H
Direct Play Setting from Remote Control
Random and repeat can be set by the remote control when the menu is not displayed. Press [4] (Random) / [6] (Repeat) on the remote control. Press again to cancel.
[DISP] (Return)
[BAND] (Set)
BAND
VOL
 TUNE
TUNE
 TRACK
TRACK
MENU
DISC
MUTE
CQ-SRX7000U
DISPLAY
|
FULL |
DOT |
MATRIX |
WITH |
|
|
SD/CD |
RECEIVER |
|
OPEN
DISP
D·M
PWR
SOURCE
DIM
SPC
SUB·W
[MENU]
(Menu) [P•SET}] [P•SET{] (Select)
|
[4] (Random) |
|
[6] (Repeat) |
[}] [{] |
[SEL] (Menu) |
(Select) |
[BAND] (Set) |
|
|
|
[DISP] (Return) |
21
CQ-SRX7000U
 Loading...