


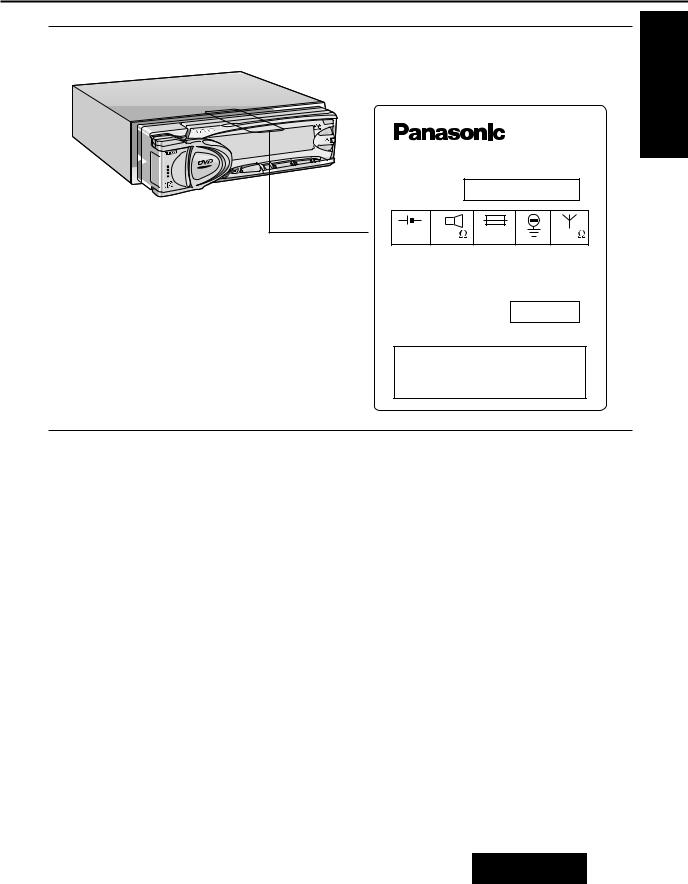
Removable Full Front High-Power DVD Player/Receiver with Changer Control Récepteur/lecteur DVD à puissance élevée avec commande de changeur et panneau avant entièrement amovible Reproductor DVD/receptor de alta potencia con placa frontal completamente removible y control de cambiador
POWER |
< |
F / R |
MUTE |
SOURCE |
|||
SUB TITLE |
RETURN |
|
MENU |
AUDIO |
|
|
TITLE |
|
|
SEL |
|
ANGLE |
|
|
|
REPEAT |
STOP |
PAUSE |
PLAY |
|
|
|
BAND |
1 |
2 |
3 |
|
RANDOM |
|
|
PAGE |
4 |
5 |
6 |
|
SCAN |
|
|
|
7 |
8 |
9 |
|
C.SP |
|
TRACK |
VOLUME |
DISP |
0 |
GRP |
|
CLOCK |
ST/MONO |
TITLE/ |
|
|
|
CHAPTER |
|
CAR DVD PLAYER
CQ-DVR909U |
|
|
|
|
|
|
|
MOS FET |
45Wt4 DVD RECEIVER & ACTIVE DISPLAY |
|
|
OPEN |
|||
|
|
|
|
|
|
|
TILT |
D I G I T A L |
|
|
|
|
|
|
|
|
|
|
|
|
|
|
BAND |
|
|
|
|
|
|
|
APM |
|
|
|
|
|
|
|
POWER |
AUDIO/VIDEO |
|
|
|
|
|
|
SOURCE |
SPEAKER |
MUTE |
|
X TUNE W |
X P•SET W DISP |
|
||
OPEN/CLOSE |
|
REMOTE |
|||||
|
|
X VOL |
W SEL |
6 TRACK 5 |
XDISC W |
D |
|
CQ-DVR909U
Please read these instructions carefully before using this product and save this manual for future use.
ll est recommandé de lire attentivement ce manuel avant d’utiliser I’appareil et le conserver pour référence ultérieure.
Lea con atención este manual de instrucciones antes de utilizar el aparato y guárdelo para consultarlo en el futuro.
|
Panasonic welcomes you to our ever growing family of electronic product owners. We know that this |
|
product will bring you many hours of enjoyment. Our reputation is built on precise electronic and |
|
mechanical engineering, and our products are manufactured with carefully selected components |
|
and assembled by people who take pride in their work. Once you discover the quality, reliability, and |
|
value we have built into this product, you too will be proud to be a member of our family. |
|
|
E |
Features |
N |
|
G |
|
L |
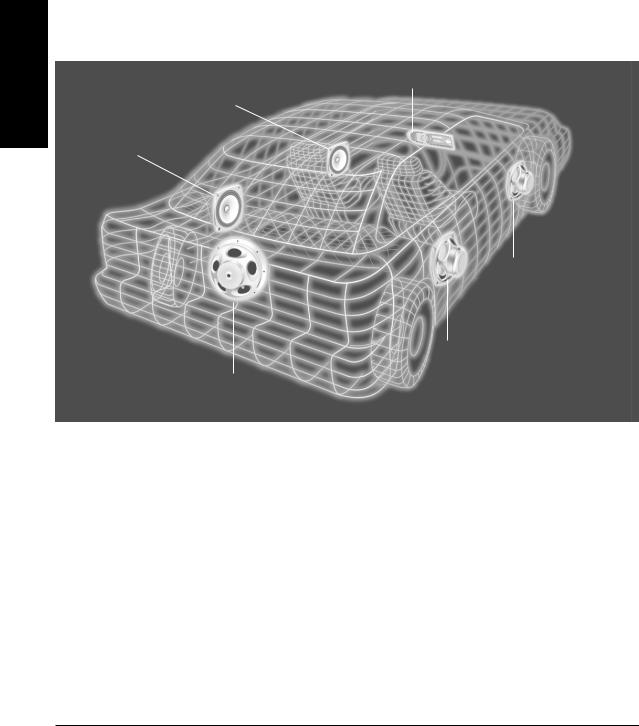
Center speaker |
I |
|
S |
Left front speaker |
H |
|
Left surround speaker
Right front speaker
Right surround speaker
Subwoofer
6-channel Surround Playback Capability (DVD Audio)
Because the main unit is equipped with center (1 channel), front (2 channels) and surround (2 channels) amps, this product is capable of 6-channel surround playback when the system is upgraded with a subwoofer
(1 channel). 6-channel surround playback using the noncompressed high-quality linear PCM system allows you to enjoy realistic sound, like having a concert hall in your car.
(DVD Audio format, etc. are subject to change.)
5.1-channel Surround Playback Capability (DVD Video)
Because the main unit is equipped with center (1 channel), front (2 channels) and surround (2 channels) amps as well as a newly developed AV decoder, this product is capable of Dolby Digital/dts 5.1-channel surround playback when the system is upgraded with a subwoofer (0.1 channel) and a TV monitor.
The sound that is played back independently on each of the 5.1 channels creates an audio environment similar to that of a movie theater in your car.
Center Speaker
The main unit is equipped with a center speaker for vivid reproduction of mid-range and treble, such as vocals. This eliminates the need to purchase and install a separate center speaker in order to listen to multichannel DVD materials.
Find the model number and serial number on either the back or bottom of the unit. Please record them in the spaces below and retain this booklet as a permanent record of your purchase to help with identification in case of theft.
MODEL NUMBER |
|
CQ-DVR909U |
|
SERIAL NUMBER |
|
||
DATE PURCHASED |
|
|
FROM |
|
|
||
2 |
|
|
|
|
|
|
|
CQ-DVR909U |
|
|
|
|
|
||
|
|
|
|
|
|
||
|
|
|
|
|
|
|
|
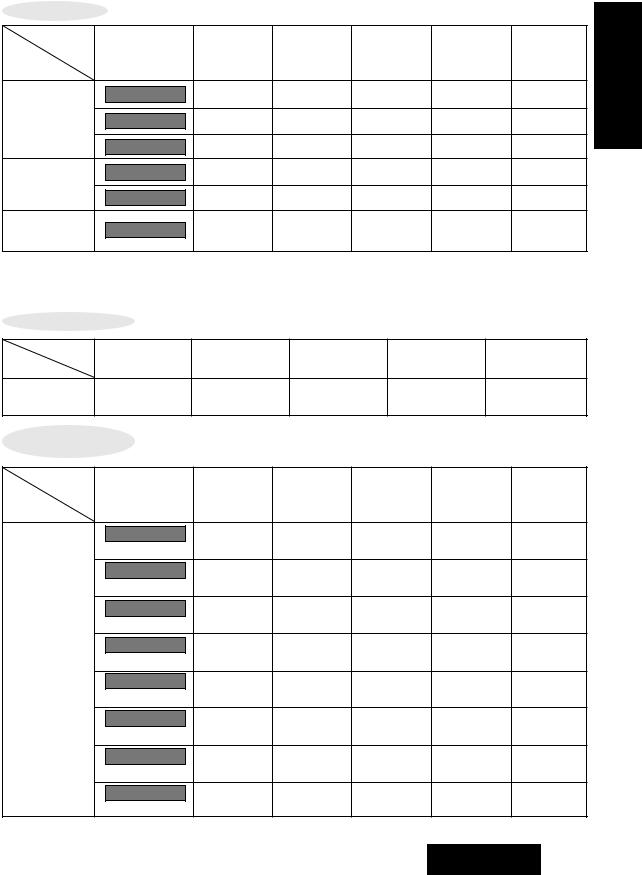
Operation System
Please confirm the difference of operating each source.
Preparation |
|
|
|
|
|
|
|
|
|
|
|
|
|
Radio |
E |
|
|
|
|
|
|
CD Changer |
N |
|
Setting Menu |
DVD Audio |
DVD Video |
Video CD |
CD |
Auxiliary |
G |
|
L |
||||||
|
SP TYPE SEL |
Yes |
Yes |
Yes |
Yes |
Yes |
I |
Setting Up |
S |
||||||
SP LEVEL SEL |
Yes |
Yes |
Yes |
None |
None |
H |
|
the Speaker |
|
||||||
|
SP DELAY |
Yes |
Yes |
None |
None |
None |
|
Setting Up |
TV SELECT |
Yes |
None |
None |
None |
None |
|
the Initial |
TV ASPECT |
Yes |
Yes |
Yes |
None |
None |
|
Setting |
|
||||||
Setting Up |
DOWN MIX SEL |
Yes |
Yes |
None |
None |
None |
|
the Sound |
|
||||||
|
|
|
|
|
|
|
SP TYPE SEL : Set each speaker type and whether they are present or not. ( page 25)
SP LEVEL SEL: Adjust the speaker output levels. ( page 25) SP DELAY : Adjust the speaker delay times. ( page 25)
TV SELECT |
: TV connection setting ( page 39) |
TV ASPECT |
: TV aspect ratio ( page 39) |
DOWN MIX SEL |
: Combining the speaker output ( page 43) |
|
When the surround speakers are not connected. |
|
(Dolby Digital or dts encoded material only) |
Basic Operation
|
|
|
|
|
|
|
Radio |
|
|
DVD Audio |
DVD Video |
Video CD |
|
CD |
CD Changer |
||
Page |
( page 30) |
( page 30) |
( page 30) |
( page 30) |
( page 28) |
|||
( page 40) |
||||||||
|
|
|
|
|
|
|
||
Advanced |
|
|
|
|
|
|
|
|
Operation |
|
|
|
|
|
|
|
|
|
|
|
|
|
|
|
Radio |
|
|
|
|
|
|
|
|
CD Changer |
|
|
Setting Menu |
DVD Audio |
DVD Video |
Video CD |
CD |
Auxiliary |
||
|
DR COMP SEL |
Yes* |
Yes* |
|
None |
None |
None |
|
|
( page 51) |
|
||||||
|
|
|
|
|
|
|
||
|
PROLOGIC SEL |
Yes |
Yes |
|
Yes |
Yes |
Yes |
|
|
( page 43) |
|
||||||
|
|
|
|
|
|
|
||
|
LOUD SEL |
Yes |
Yes |
|
Yes |
Yes |
Yes |
|
|
( page 43) |
|
||||||
Setting Up |
|
|
|
|
|
|
||
BASS SEL |
Yes |
Yes |
|
Yes |
Yes |
Yes |
||
the Sound |
|
|||||||
( page 45) |
|
|||||||
|
|
|
|
|
|
|||
|
TREBLE SEL |
Yes |
Yes |
|
Yes |
Yes |
Yes |
|
|
( page 45) |
|
||||||
|
|
|
|
|
|
|
||
|
BAL // FAD |
Yes |
Yes |
|
Yes |
Yes |
Yes |
|
|
( page 45) |
|
||||||
|
|
|
|
|
|
|
||
|
CENTER VOL |
Yes |
Yes |
|
Yes |
Yes |
Yes |
|
|
( page 45) |
|
||||||
|
|
|
|
|
|
|
||
|
SUB•WFR VOL |
Yes |
Yes |
|
Yes |
Yes |
Yes |
|
|
( page 45) |
|
||||||
|
|
|
|
|
|
|
||
(*Dolby Digital encoded material only)
3
CQ-DVR909U

Contents
E N G L I S H
Before Use
Safety Information . . . . . . . . . . . . . . . . . . . . . . . . . . . . . . . . . . . 6 Meaning of Symbols . . . . . . . . . . . . . . . . . . . . . . . . . . . . . . . . . 20 Discs that can be Played Back . . . . . . . . . . . . . . . . . . . . . . . . . . . 22 Preparing the Remote Control . . . . . . . . . . . . . . . . . . . . . . . . . . . 22
Inserting and Replacing the Batteries. . . . . . . 22
Setting Up the Speakers . . . . . . . . . . . . . . . . . . . . . . . . . . . . . . . 23
Speakers that are Used . . . . . . . . . . . . . . . . . |
23 |
Adjust the Speaker Output Levels . . . . . . . . . |
25 |
Speaker Setup Display . . . . . . . . . . . . . . . . . . |
23 |
Adjust the Speaker Delay Times. . . . . . . . . . . |
25 |
Speaker Setup Procedure. . . . . . . . . . . . . . . . |
23 |
|
|
Set Each Speaker Type and whether They are |
|
|
|
Present or Not . . . . . . . . . . . . . . . . . . . . . . . . |
25 |
|
|
How to Use
Common Operations. . . . . . . . . . . . . . . . . . . . . . . . . . . . . . . . . . 26
Power. . . . . . . . . . . . . . . . . . . . . . . . . . . . . . . |
26 |
Setting the Clock . . . . . . . . . . . . . . . . . . . . . . |
27 |
Audio Source . . . . . . . . . . . . . . . . . . . . . . . . . |
26 |
Opening/Closing the Panel . . . . . . . . . . . . . . . |
27 |
Center Speaker. . . . . . . . . . . . . . . . . . . . . . . . |
26 |
Tilting the Panel . . . . . . . . . . . . . . . . . . . . . . . |
27 |
Volume. . . . . . . . . . . . . . . . . . . . . . . . . . . . . . |
26 |
|
|
Radio Basics . . . . . . . . . . . . . . . . . . . . . . . . . . . . . . . . . . . . . . . 28
Changing the Display . . . . . . . . . . . . . . . . . . . |
28 |
Listening to a Preset Station . . . . . . . . . . . . . |
29 |
Setting Up Station Presets . . . . . . . . . . . . . . . |
29 |
|
|
DVD Audio•Video/Video CD/CD Basics . . . . . . . . . . . . . . . . . . . . . 30
Inserting/Removing the Disc . . . . . |
30 |
Starting Playback . . . . . . . . . . . . . . |
30 |
Changing the Display . . . . . . . . . . . |
31 |
Selecting a Menu Item . . . . . . . . . . |
32 |
Stopping . . . . . . . . . . . . . . . . . . . . |
32 |
Fast Forward/Fast Backward . . . . . |
33 |
Go to Beginning . . . . . . . . . . . . . . . |
33 |
Pause . . . . . . . . . . . . . . . . . . . . . . . |
33 |
Repeat . . . . . . . . . . . . . . . . . . . . . . |
33 |
Starting Playback from a Specific |
|
Group/Track/Title/Chapter . . . . . . . |
34 |
Switching the Audio Language. . . . 35 DVD Menu . . . . . . . . . . . . . . . . . . . 35 Still Forward/Backward . . . . . . . . . 35 Slow Playback . . . . . . . . . . . . . . . . 36 Switching the Subtitle Language . . 36 Switching the Angle . . . . . . . . . . . . 37 Title Menu . . . . . . . . . . . . . . . . . . . 37 Switching between Stereo and
Monaural . . . . . . . . . . . . . . . . . . . . 37 Changing the Initial Settings . . . . . 38
|
: DVD Audio |
|
: DVD Video |
|
: Video CD |
: CD |
4
CQ-DVR909U

How to Use (continued)
CD Changer Basics. . . . . . . . . . . . . . . . . . . . . . . . . . . . . . . . . . . 40
Changing the Display . . . . . . . . . . . . . . . . . . . |
40 |
Random Play . . . . . . . . . . . . . . . . . . . . . . . . . |
41 |
Scan Play . . . . . . . . . . . . . . . . . . . . . . . . . . . . |
41 |
Using Two Changers (Dual changers) . . . . . . |
41 |
Repeat Playback. . . . . . . . . . . . . . . . . . . . . . . |
41 |
|
|
Setting Up the Sound . . . . . . . . . |
. . . |
. . . . . . . . . . . . . . . . . . . . . |
42 |
Signal Format Display . . . . . . . . . . . . . . . . . . |
43 |
Adjusting the Treble . . . . . . . . . . . . . . . . . . . . |
45 |
Listening to Surround Sound. . . . . . . . . . . . . |
43 |
Adjusting the Front/Rear/Left/Right Balance . . . |
45 |
Combining the Speaker Output . . . . . . . . . . . |
43 |
Adjusting the Center Speaker Volume . . . . . . |
45 |
Loudness . . . . . . . . . . . . . . . . . . . . . . . . . . . . |
43 |
Adjusting the Subwoofer Volume |
|
Adjusting the Bass . . . . . . . . . . . . . . . . . . . . . |
45 |
(When Subwoofer is set) . . . . . . . . . . . . . . . . |
45 |
Setting Other Functions . . . . . . . |
. . . |
. . . . . . . . . . . . . . . . . . . . . |
46 |
Signal Sound/Signal Beep (The sound of |
|
MUTE Button Setting . . . . . . . . . . . . . . . . . . . |
49 |
button operation) . . . . . . . . . . . . . . . . . . . . . . |
47 |
Making the Display Easier to See . . . . . . . . . . |
49 |
Making It Easier to Hear Voice Directions from |
Security Indicator. . . . . . . . . . . . . . . . . . . . . . |
49 |
|
the Car Navigation System (In future use) . . . |
47 |
Using the Panel without Changing the Tilt . . . |
49 |
Useful Functions . . . . . . . . . . . . |
. . . |
. . . . . . . . . . . . . . . . . . . . . |
50 |
Dynamic Range Compression . . . . . . . . . . . . |
51 |
Listening to Separate Sources on the Front |
|
Adjusting the Display Brightness (Dimmer) . . |
52 |
and Rear Speakers . . . . . . . . . . . . . . . . . . . . . |
53 |
Lowering the Volume Temporarily |
|
|
|
(Mute/Attenuator) . . . . . . . . . . . . . . . . . . . . . |
53 |
|
|
Reference
Installation . . . . . . . . . . . . . . . . . . . . . . . . . . . . . . . . . . . . . . . . 54
Anti-Theft System . . . . . . . . . . . . . . . . . . . . . . . . . . . . . . . . . . . 61
Wiring Connections . . . . . . . . . . . . . . . . . . . . . . . . . . . . . . . . . . 62
Troubleshooting . . . . . . . . . . . . . . . . . . . . . . . . . . . . . . . . . . . . 66
Disc Notes . . . . . . . . . . . . . . . . . . . . . . . . . . . . . . . . . . . . . . . . 70
Language Code List . . . . . . . . . . . . . . . . . . . . . . . . . . . . . . . . . . 71
Specifications . . . . . . . . . . . . . . . . . . . . . . . . . . . . . . . . . . . . . . 72
Definition of Terms . . . . . . . . . . . . . . . . . . . . . . . . . . . . . . . . . . 73
Components
1. |
Operating Instruction . . . . |
. . . . . . . . . . . . . . . . 1 |
5. |
Power Amplifier Unit . . . . . . . . . . . . . . . . . . . . |
1 |
2. |
Operating Guide . . . . . . . . . |
. . . . . . . . . . . . . . . 1 |
6. |
Remote Control . . . . . . . . . . . . . . . . . . . . . . . . |
1 |
3. |
Supplied Hardware . . . . . . |
1 set ( pages 54, 62) |
7. |
Batteries . . . . . . . . . . . . . . . . . . . . . . . . . . . . . |
2 |
4. |
Power Connector . . . . . . . . |
. . . . . . . . . . . . . . . 1 |
8. |
Warranty Card . . . . . . . . . . . . . . . . . . . . . . . . . |
1 |
5
CQ-DVR909U
E N G L I S H
Safety Information
E |
CAUTION: |
|
I |
|
THIS PRODUCT |
IS A CLASS |
LASER |
||
N |
PRODUCT. HOWEVER THIS PRODUCT USES A |
|||
G |
||||
L |
VISIBLE/INVISIBLE |
LASER BEAM |
WHICH |
|
I |
COULD CAUSE |
HAZARDOUS |
RADIATION |
|
S |
||||
HEXPOSURE IF DIRECTED. BE SURE TO OPERATE THIS PRODUCT CORRECTLY AS INSTRUCTED.
USE OF CONTROLS OR ADJUSTMENTS OR PERFORMANCE OF PROCEDURES OTHER THAN THOSE SPECIFIED HEREIN MAY RESULT IN HAZARDOUS RADIATION EXPOSURE.
DO NOT OPEN COVERS AND DO NOT REPAIR YOURSELF. REFER SERVICING TO QUALIFIED PERSONNEL.
WARNING:
TO REDUCE THE RISK OF FIRE OR ELECTRIC SHOCK, DO NOT EXPOSE THIS PRODUCT TO RAIN OR MOISTURE.
TO REDUCE THE RISK OF FIRE OR ELECTRIC SHOCK, AND ANNOYING INTERFERENCE, USE ONLY THE RECOMMENDED ACCESSORIES.
THIS DEVICE IS INTENDED FOR CONTINUOUS OPERATION!
WARNING:
NOT FOR USE WHERE VIDEO MONITOR IS VISIBLE TO DRIVER TO AVOID RISK OF SERIOUS INJURY OR POSSIBLE VIOLATION OF STATE LAWS.
Apparatus Claims of U.S. Patent Nos. 4,631,603, 4,577,216, and 4,819,098, licensed for limited viewing uses only.
This product incorporates copyright protection technology that is protected by method claims of certain U.S. patents and other intellectual property rights owned by Macrovision Corporation and other rights owners. Use of this copyright protection technology must be authorized by Macrovision Corporation, and is intended for home and other limited viewing uses only unless otherwise authorized by Macrovision Corporation. Reverse engineering or disassembly is prohibited.
Part 15 of the FCC Rules
This unit has been manufactured under the part 15 of the FCC Rules. Do not attempt to make any changes or modifications to this unit.
6
CQ-DVR909U
Label indication and location
|
|
|
|
|
|
|
|
|
|
|
|
|
|
|
OPEN |
|
|
-DVR909 |
|
|
|
|
|
& ACTIVE DISPLAY |
|
|
TILT |
||||
|
CQ |
|
FET 45Wt4 DVD |
RECEIVER |
|
|
|
||||||||
|
|
MOS |
|
|
|
|
|
|
|
|
|
BAND |
|||
|
|
|
|
|
|
|
|
|
|
|
|
|
|
||
|
|
|
|
|
|
|
|
|
|
|
|
|
|
|
APM |
MULTI |
|
|
|
|
|
|
|
|
|
|
|
|
|
|
POWER |
URCE |
|
|
|
|
|
|
|
|
|
|
|
|
|
|
SOURCE |
D I G I T A L |
|
|
|
|
|
|
|
|
|
|
|
P•SET W |
DISP |
REMOTE |
|
|
|
|
|
|
|
X TUNE |
W |
|
X |
|
|||||
|
|
|
|
|
|
|
|
|
|
|
W |
D |
|||
|
|
|
|
|
|
|
|
|
|
|
XDISC |
||||
|
|
MUTE |
|
|
|
|
6 TRACK |
5 |
|
|
|
||||
|
|
|
|
W |
SEL |
|
|
|
|
|
|
||||
AUDIO/V |
IDEO |
|
X VOL |
|
|
|
|
|
|
|
|
|
|
||
|
|
|
|
|
|
|
|
|
|
|
|
|
|||
E
N
G
L
Identification Label I
S
H
Model No.
N˚ De Modèle C Q - D V R 909 U
12V |
4~8 |
15A |
FM75 |
Manufactured by Matsushita Communication
Industrial Co., Ltd.
Yokohama Japan Made in Japan
Serial No.
N˚ De Série
This device complies with Part 15 of the FCC Rules. Operation is subject to the condition that this device does not cause harmful interference.
Use This Product Safely
When Driving
Keep the volume level low enough to be aware of road and traffic conditions.
When Car Washing
Do not expose the product, including its speakers and CDs, to water or excessive moisture. This could cause electrical shorts, fire or other damage.
When Parked
Parking in direct sunlight can produce very high temperatures inside your car. Give the interior a chance to cool down before switching the unit on.
Use the Proper Power Supply
This product is designed to operate with a 12 volt, negative ground battery system (the regular system in a North American car).
Protect the Disc Mechanism
Avoid inserting any foreign objects into the slot of the disc player.
Failure to observe this may cause malfunction due to the precise mechanism of this unit.
Protect the DVD Software
When you leave the car, be sure to eject the disc from this unit and bring it out.
Use Authorized Servicenters
Do not attempt to disassemble or adjust this precision product. Please refer to the Servicenter list included with this product for service assistance.
For Installation
The unit should be installed in a horizontal position with the front end up at a convenient angle, but not more than 30x.
7
CQ-DVR909U
Meaning of Symbols
E N G L I S H
1
< |
< |
Press |
Hold (2 seconds) |
Indicates pressing a |
Indicates pressing a button for |
button. |
an extended period of time. |
This manual primarily explains how to perform operations using the remote When performing an operation directly main unit, do as indicated in this box.
Indicates detailed information about operations and settings.
Indicates that each time you press the button, the display changes as shown.
20
CQ-DVR909U
E
N
G
L
I
S
H
Indicates operations that can only |
Indicates the compatible types of disc. |
2 |
||||||
performed through the main unit. |
|
|
|
|
|
|
|
|
|
|
|
|
|
|
|
CD |
|
|
|
|
|
|
|
|
||
|
|
|
|
|
|
|
||
|
|
|
|
|
|
|
||
|
|
|
|
|
|
|
|
|
|
|
|
|
|
|
|
|
|
|
|
|
|
|
|
|
|
|
|
|
|
|
|
|
|
|
|
21
CQ-DVR909U
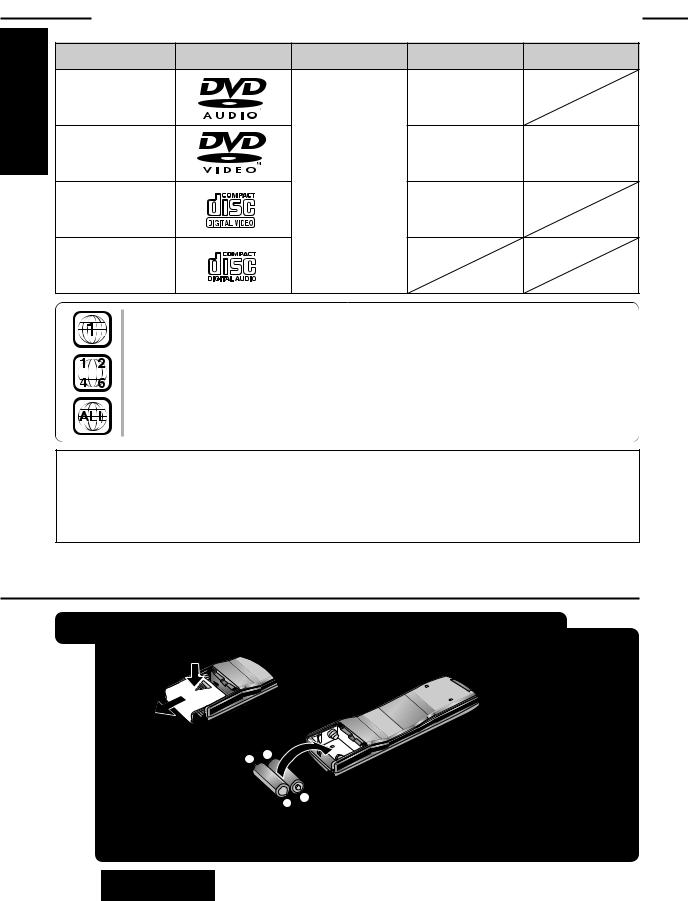
Discs that can be Played Back
E |
Disc |
Mark (logo) |
Disc size |
Video format |
Region number |
N |
|
|
|
|
|
G |
|
|
|
|
|
L |
DVD audio |
|
|
NTSC |
|
I |
|
|
|
||
S |
|
|
|
|
|
H |
|
|
|
|
|
3 |
DVD video |
|
5z(12 cm) |
NTSC |
1 |
|
|
|
All |
||
|
|
|
|
|
|
|
Video CD |
|
3z(8 cm) |
NTSC |
|
|
|
|
|
|
|
|
CD |
|
|
|
|
Region Management Information
Region Management Information: This product is designed and manufactured to respond to the Region Management Information that is recorded on a DVD disc. If the Region number described on the DVD disc does not correspond to the Region number of this product, this product cannot play this disc.
The Region number for this product is “1” and “ALL”.
The following discs cannot be played back on this product.
≥DVD-ROM ≥ DVD-R/DVD-RAM ≥ CD-ROM ≥ VSD ≥ CDV ≥ CD-G ≥ SACD ≥ photo CD ≥ CD-R*
≥some DTS CD discs ≥ CD-EXTRA (audio-only playback possible) ≥ DVDs with a region number other than “1” or “ALL” ≥ discs recorded in PAL format, others.
(*Because this product has its own reading device, CD-R discs can not be played back.)
Preparing the Remote Control
Inserting and Replacing the Batteries
Move a cover with pressing down. |
+ |
- |
|
+ and - terminals are oriented correctly.
- |
+ |
|
≥Type used: 2 AA dry cells (R6PU)
≥Battery life: Approximately 5 months under normal use (when using manganese batteries at
room temperature)
22
CQ-DVR909U
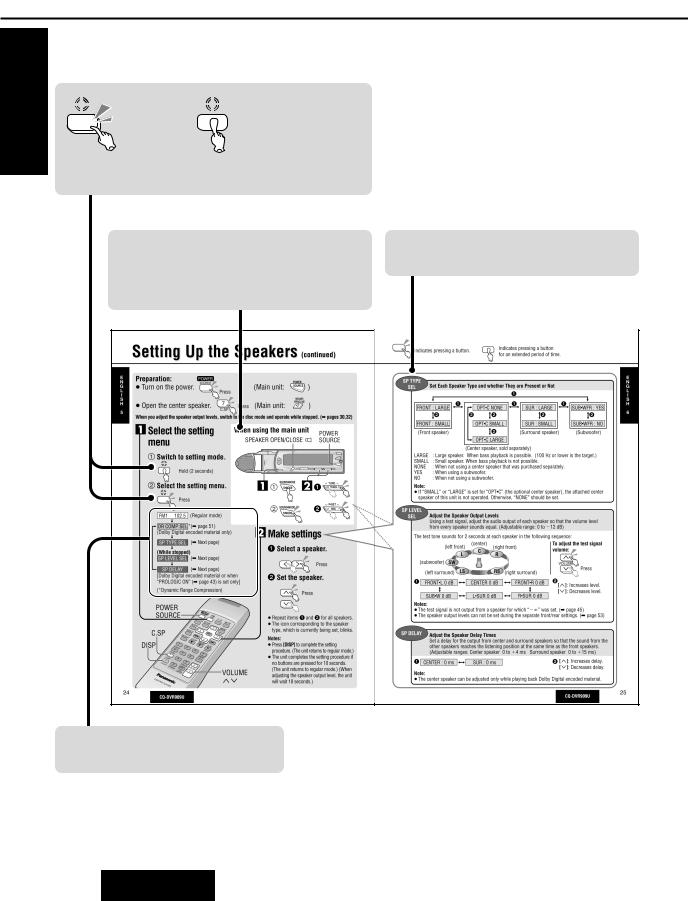
Setting Up the Speakers
Speakers that are Used
Front speakers |
Surround speakers |
Use the type of speakers that are built into the |
Use the type of speaker that is used on the left |
driver’s door and the passenger’s door. |
and right side of the rear of the passenger |
|
cabin, or that is built into the rear deck. |
Center speaker |
Subwoofer |
We recommend you to use the speaker that is built into this unit. When using a separate speaker, install the speaker near the center console of the car, or near the dashboard.
Note:
Because the positioning of the sound from the subwoofer is not as dependent on the installation location as it is with other speakers, the subwoofer can be placed anywhere desired. (A separate subwoofer amplifier is required.)
≥If this unit is going to be used without the installation of the surround speakers or subwoofer, set the speaker setting to suit the speaker system to be used. ( page 24)
Speaker Setup Display
|
|
|
Center speaker |
|
|
|
|
|
|
Left front speaker |
Right front speaker |
||||||
|
(FRONT-L) |
|
(CENTER) |
|
(FRONT-R) |
|
||
|
|
|
|
|
||||
|
|
|
|
|
|
|
|
|
Left surround speaker |
|
|
Right surround speaker |
|||||
(L-SURROUND) |
|
|
|
|
|
(R-SURROUND) |
||
Subwoofer
(SUB-WOOFER)
Speaker Setup Procedure
To reproduce the surround sound correctly, first set and adjust the speakers in the sequence shown below.
1Set each speaker type and whether they are present or not. ( page 24)
2 Adjust the speaker output levels. ( page 24)
3 Adjust the speaker delay times. ( page 24)
After setting 1 through 3, set the sound. ( page 42)
CQ-DVR909U
E
N
G
L
I
S
H
4
23

Setting Up the Speakers (continued)
E N G L I S H
5
Preparation: |
POWER |
|
|
|
POWER |
|
≥Turn on the power. |
SOURCE |
|
|
(Main unit: |
||
|
Press |
|
SOURCE ) |
|||
|
|
|
|
|
||
|
|
|
|
|
SPEAKER |
|
|
|
7 |
|
|
OPEN/CLOSE |
|
≥Open the center speaker. |
Press |
(Main unit: |
) |
|||
C.SP |
||||||
|
|
|
|
|
||
When you adjust the speaker output levels, switch to the disc mode and operate while stopped. ( pages 30,32)
1 Select the setting |
When using the main unit |
POWER |
menu |
SPEAKER OPEN/CLOSE ! |
SOURCE |
|
|
|
1 Switch to setting mode. |
|
|
< |
|
|
Hold (2 seconds)
2 Select the setting menu.

 <
<
Press
FM1 102.5 (Regular mode)
DR COMP SEL *( page 51)
(Dolby Digital encoded material only)
SP TYPE SEL |
|
( Next page) |
(While stopped) |
( Next page) |
|
SP LEVEL SEL |
|
|
|
|
( Next page) |
SP DELAY |
|
|
[Dolby Digital encoded material or when “PROLOGIC ON” ( page 43) is set only]
(*Dynamic Range Compression)
POWER
SOURCE |
|
|
|
|
|
|
|
PO |
|
|||||||
|
|
|
|
|
|
|
SO |
W |
ER |
|||||||
|
|
|
|
|
|
|
|
|
|
|
|
|
|
UR |
||
|
|
|
|
|
|
|
|
|
|
|
|
|
|
|
CE |
|
|
|
|
|
|
|
|
|
|
|
|
|
|
|
SUB |
|
|
|
|
|
|
|
|
|
|
|
|
|
|
|
A |
|
|
|
|
|
|
|
|
|
|
|
|
|
|
|
|
U |
IO |
|
|
C.SP |
|
|
|
|
|
|
|
|
|
|
|
|
S |
|||
|
|
|
|
|
|
|
REPEAT |
|
|
|
EL |
|||||
DISP |
|
|
|
|
|
|
|
|
|
|
||||||
|
|
|
|
|
NDOM |
|
|
|
|
2 |
|
|
|
|
|
|
|
|
|
|
|
|
1 |
|
|
|
|
|
|
|
|
|
|
|
|
|
|
|
RA |
|
|
|
|
|
|
|
|
|
|
|
|
|
|
|
|
4 |
|
|
|
|
|
|
|
|
3 |
BAND |
|
|
|
|
|
|
SC |
|
|
5 |
|
|
|
|
|
|||
|
|
|
|
|
|
|
|
|
|
|
|
|
||||
|
|
|
|
|
AN |
|
|
|
|
|
|
|
|
|||
|
|
|
|
|
7 |
|
|
|
|
|
|
6 |
|
P |
|
|
|
|
|
|
C |
|
|
|
|
|
|
|
|
|
|
||
|
|
|
|
|
8 |
|
|
|
|
|
|
|
AGE |
|
||
|
|
DISP |
|
|
|
|
|
|
|
|
|
|
|
|||
|
C |
|
|
|
|
|
|
9 |
|
|
|
|
|
|||
|
O |
|
|
0 |
T |
|
|
|
|
|
|
|
|
|||
|
C |
|
R |
|
|
|
|
|
|
|
||||||
|
|
K |
A |
K |
|
|
|
|
|
|||||||
|
|
|
|
ST/MONO |
G |
R |
|
VOLUME |
|
|
||||||
|
|
|
|
|
P |
|
|
|||||||||
|
|
|
|
|
|
TITLE |
/ |
|
|
|
|
|
|
|
||
|
|
|
|
|
|
CHAPTER |
|
|
|
|
|
|
|
|
|
|
CAR |
DVD |
|
|
|
|
|
|
|
|
|
|
|
|
|
|
|
|
PLAYER |
|
|
|
|
|
|
|
|
|
|
|
||||
|
|
|
|
|
|
|
|
|
|
|
|
|
||||
24
F
M 
TITLE
VOLUME
"#
1 |
SOUND•MODE |
2 1 |
XTUNE W |
1 S |
TRACK |
||
|
2 SOUND•MODE |
2 |
XP•SETW |
|
XDISC W |
S•MODE
2 Make settings
1 Select a speaker.
Press
2 Set the speaker.
 Press
Press
≥Repeat items 1 and 2 for all speakers.
≥The icon corresponding to the speaker type, which is currently being set, blinks.
Notes:
≥Press [DISP] to complete the setting procedure. (The unit returns to regular mode.)
≥The unit completes the setting procedure if no buttons are pressed for 10 seconds. (The unit returns to regular mode.) (When adjusting the speaker output level, the unit will wait 18 seconds.)
CQ-DVR909U
Indicates pressing a button. |
Indicates pressing a button |
|
for an extended period of time. |
||
|
SP TYPE
SEL
FRONT : LARGE
 2
2
FRONT : SMALL
(Front speaker)
|
|
1 |
|
1 |
OPT•C NONE |
1 |
1 |
|
SUR : LARGE |
SUB•WFR : YES |
|
2 |
2 |
2 |
2 |
|
OPT•C SMALL |
SUR : SMALL |
SUB•WFR : NO |
|
2 |
(Surround speaker) |
(Subwoofer) |
|
OPT•C LARGE |
|
|
(Center speaker, sold separately) |
|
||
:Large speaker. When bass playback is possible. (100 Hz or lower is the target.)
:Small speaker. When bass playback is not possible.
:When not using a center speaker that was purchased separately.
:When using a subwoofer.
:When not using a subwoofer.
”or “LARGE” is set for “OPT•C” (the optional center speaker), the attached center of this unit is not operated. Otherwise, “NONE” should be set.
E N G L I S H
6
SP LEVEL
SEL
from every speaker sounds equal. (Adjustable range: 0 to `12 dB)
The test tone sounds for 2 seconds at each speaker in the following sequence:
(left front) |
(center) |
(right front) |
|
C |
|||
L |
R |
||
|
|||
(subwoofer) SW |
|
|
|
(left surround) LS |
|
RS (right surround) |
To adjust the test signal volume:
VOLUME
Press
1 |
FRONT•L 0 dB |
|
CENTER 0 dB |
|
FRONT•R 0 dB |
2 |
|
|
|
|
|
|
["]: Increases level. |
|
|
|
|
|
|
|
|
|
|
|
|
|
[#]: Decreases level. |
|
SUB•W 0 dB |
|
L•SUR 0 dB |
|
R•SUR 0 dB |
|
Notes:
≥The test signal is not output from a speaker for which “`¶” was set. ( page 45)
≥The speaker output levels can not be set during the separate front/rear settings. ( page 53)
SP DELAY Adjust the Speaker Delay Times
Set a delay for the output from center and surround speakers so that the sound from the other speakers reaches the listening position at the same time as the front speakers.
|
(Adjustable ranges: Center speaker 0 to _4 ms |
Surround speaker 0 to _15 ms) |
|||
1 |
|
|
|
|
2 ["]: Increases delay. |
CENTER : 0 ms |
|
SUR : 0 ms |
|
||
|
|
|
|
|
[#]: Decreases delay. |
Note:
≥The center speaker can be adjusted only while playing back Dolby Digital encoded material.
25
CQ-DVR909U
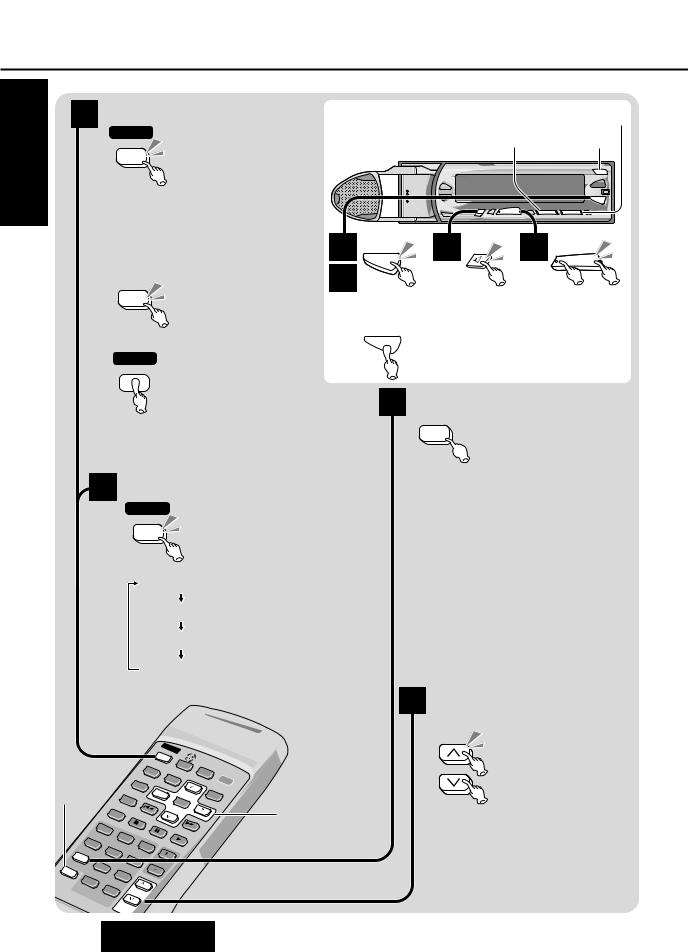
Common Operations
E N G L I S H
7
Before performing any of these operations, turn your car’s ignition switch to “ACC” or “ON”.
A Power |
When using the main unit |
# DISC " |
||||
POWER |
|
|
6TRACK 5 OPEN•TILT |
|||
SOURCE |
|
|
||||
|
Press |
|
|
|
|
|
≥Turn the power on. |
|
|
|
|
|
|
≥The first time that you turn the unit on, |
|
|
|
|
|
|
the radio will begin playing and the |
|
|
|
|
|
|
message “Panasonic Presents……” |
A |
|
SPEAKER |
D |
|
|
(demonstration mode) will be displayed. |
POWERSOURCE |
C OPEN/CLOSE |
|
|||
To cancel the demonstration mode: |
B |
|
|
|
|
|
|
|
|
|
|
||
DISP |
|
|
To turn the |
|
|
|
CLOCK |
Press |
|
power off: |
|
|
|
To turn the power off: |
POWER |
SOURCE |
|
POWER |
|
SOURCE |
|
Hold (1 second)
Note:
≥Loading/ejecting a disc also turns the power on/off. ( page 30)
B Audio Source
POWER
SOURCE
Press
C Center Speaker
7 
C.SP 

 Press
Press
≥Press the button to open and close the center speaker.
≥To open the center speaker through the remote control while playing a DVD or a video CD, hold the button down for more than 2 seconds.
TUNER |
(Radio) |
|
(depends on the disc) |
DVD VIDEO |
|
|
(When a separate |
CHANGER |
|
|
CD/MD changer is connected) |
AUXILIARY |
(Auxiliary source) |
Notes:
≥You can adjust the output level/ volume of the center speaker. ( pages 25, 45)
≥You cannot open or close the center speaker while the panel is open.
C
26
|
|
|
|
|
|
|
|
|
|
|
PO |
|
|
|
|
|
|
|
|
|
|
|
|
|
SO |
W |
ER |
|
|
|
|
|
|
|
|
|
|
|
UR |
||
|
|
|
|
|
|
|
|
|
|
|
|
CE |
|
|
|
|
|
|
|
|
|
|
|
SUB |
|
|
|
|
|
|
|
|
|
|
|
|
A |
|
|
|
|
|
|
|
|
|
|
|
|
|
U |
IO |
|
|
|
DISP |
|
|
|
|
|
|
|
|
|
||||
REPEAT |
|
|
|
|
SEL |
||||||||
|
|
|
|
|
|
|
|
|
|||||
|
|
|
|
|
|
|
|
|
|
P |
|
|
|
|
|
|
|
1 |
|
|
|
|
|
|
|
|
|
|
|
|
RA |
|
|
|
2 |
|
|
|
|
|
|
|
|
|
ND |
OM |
|
|
|
|
|
|
|
|
|
|
|
|
4 |
|
|
|
|
|
3 |
|
BAND |
||
|
|
|
|
|
|
|
|
|
|
||||
|
|
|
SC |
|
5 |
|
|
|
|
|
|
||
|
|
|
|
|
|
|
|
|
|
|
|||
|
|
|
AN |
|
|
|
|
|
|
|
|
||
|
|
|
7 |
|
|
|
|
6 |
|
PA |
GE |
|
|
|
|
C |
|
8 |
|
|
|
|
|
||||
|
|
|
|
|
|
|
|
|
|||||
|
|
|
|
|
|
|
|
|
|
||||
DISP |
|
|
|
|
|
|
|
|
|
|
|||
|
|
|
|
9 |
|
|
|
|
|
|
|||
O |
|
|
0 |
T |
|
|
|
|
|
|
|
|
|
C |
K |
R |
A |
K |
|
|
|
|
|
|
|||
|
|
ST/MONO |
|
|
|
|
|
|
|
|
|||
|
|
|
GRP |
VOLUME |
|
|
|
||||||
|
|
|
|
|
|
|
|||||||
|
|
|
|
TITLE |
/ |
|
|
|
|
|
|||
|
|
|
|
|
|
|
|
|
|
|
|
||
|
|
|
CHAPTER |
|
|
|
|
|
|
|
|
|
|
F
M 
TITLE
D Volume
(Adjustable range: 0 to 40)
:Increases
VOLUME Press the volume.
:Decreases the
"#$%
Press volume.
Note:
≥When you switch the source, the volume that was set last for that source is restored.
(Intelligent Volume)
CQ-DVR909U
|
|
Indicates operations |
|
Indicates pressing |
Indicates pressing a |
that can only be |
|
button for an extended |
performed through |
||
a button. |
|||
period of time. |
the main unit. |
||
|
|||
|
|
|
Setting the Clock
Hold |
F 12 : 00 |
(2 seconds) |
2Switch between the hours and minutes displays, and set both.
: Selects the hours display, |
|
XTUNE |
which begins to blink. |
(Main unit: |
6 TRACK |
|
||
: Selects the minutes display, |
|
NE W |
which begins to blink. |
(Main unit: RACK 5 ) |
|
Increases the number in the |
|
ETW |
selected display. |
(Main unit: ISC W ) |
|
Decreases the number in the |
XP•SETW |
|
selected display. |
(Main unit: |
XDISC |
|
||
3 Finalize the time setting.
DISP
CLOCK  Press
Press
F10 : 35
≥The clock begins to run.
To display the time:
DISP
CLOCK  Press
Press
Press the button repeatedly until the time is displayed.
≥“ADJUST” will be displayed when the clock is not adjusted.
E N G L I S H
8
Opening/Closing the Panel
 Press
Press
Hold
(1 second)
 Press
Press
≥The panel opens.
(When the panel is open, this unit is muted and you can not operate except for some buttons.)
≥The panel closes and returns to the angle of tilt that you have previously set.
≥The panel closes completely, and the tilt setting is cancelled.
You can adjust the tilt of the panel to make it easier to see.
OPEN |
≥To change the tilt of the panel, hold the |
|
button down for more than 1 second. |
Hold |
<The tilting mechanism has three tilt |
|
positions.> |
Note:
≥The panel will open to the angle of tilt that you have previously set whenever you turn the ignition switch to “ACC” or “ON”.
Caution:
≥Do not attempt to manually move or stop or strike the panel or the center speaker.
the
when
to “OFF”.
Tilt 1
Tilt 2
Tilt 3
Open
27
CQ-DVR909U
Radio Basics
E |
1 Select “TUNER” |
G |
|
N |
|
L |
POWER |
I |
|
S |
SOURCE |
|
|
H |
|
9 |
Press |
|
2 Select the band
PLAY
When using the main unit
# P•SET "
1 |
SOURCE |
2 |
|
3 |
X |
TUNE |
W |
|
POWER |
|
|
|
|||
|
|
|
BAND |
|
|
TRACK |
|
APM
BAND  Press
Press
3 Select the station
FM 1 |
FM 2 |
AM 1 |
FM 3 |
|
|
|
|
|
|
|
|
|
|
|
POWE |
|
||
|
|
|
|
|
|
|
|
|
|
|
SOU |
R |
|
|
|
|
|
|
|
|
|
|
|
|
|
|
|
RCE |
|
|
|
|
|
|
|
|
|
|
|
SUB |
|
|
|
F |
|
|
|
|
|
|
|
|
|
A |
|
|
|
|
|
|
|
|
|
|
|
|
|
|
U |
IO |
|
|
|
|
|
|
|
|
|
|
|
|
|
|
|
|
|
M |
|
|
|
|
|
|
|
|
|
|
|
|
|
|
|
|
DISP |
|
|
|
|
|
|
|
|
|
SE |
TITLE |
|||
|
|
REPEAT |
|
|
|
|
L |
|||||||
|
|
|
|
|
|
|
|
|||||||
|
|
|
|
|
1 |
|
|
|
|
|
|
|
|
|
|
|
|
|
RA |
|
|
|
2 |
|
|
|
|
|
|
|
|
|
|
ND |
OM |
|
|
|
|
|
|
|
|
|
|
|
|
|
4 |
|
|
|
|
3 |
|
|
|
|
|
|
|
|
|
|
|
|
|
|
|
|
|
|
||
|
|
|
|
SC |
|
|
5 |
|
|
|
|
Number Buttons |
||
|
|
|
|
|
|
|
|
|
|
|
||||
|
|
|
|
AN |
8 |
|
|
|
|
E |
|
|||
|
|
|
|
7 |
|
|
6 |
|
P |
|
|
|||
|
|
|
|
|
|
|
|
|
|
|
|
|||
|
|
|
C |
|
|
|
|
|
|
|
|
|
||
|
|
|
|
|
|
|
|
|
AG |
|
|
|
||
C |
DISP |
|
|
|
|
9 |
|
|
|
|
|
(1j6) |
||
O |
|
|
0 |
|
T |
|
|
|
|
|
|
|||
C |
|
|
R |
|
|
|
|
|
|
|||||
|
K |
|
A |
|
|
|
|
|
|
|||||
|
|
|
|
|
|
|
|
|
|
|
|
|
||
:Increases the frequency.
Press
: Decreases the frequency.
Press
≥The frequency changes each time one of these buttons is pressed. <step mode>
≥If you hold down the button for more than 0.5 second and then release the button, the tuner will begin scanning frequencies in that direction, and then will stop when it picks up a station. <seek mode>
Changing the Display
DISP |
|
Normal display |
Clock display |
CLOCK |
Press |
(band/ |
|
|
preset number/ |
|
|
|
|
|
|
|
|
frequency) |
|
|
Band |
Preset Number |
|
Display off
Frequency |
Lights when an FM stereo |
broadcast is received. |
F |
ST |
MAIN |
|
R |
|
S•W |
|
28
CQ-DVR909U
Indicates pressing a button. |
Indicates pressing a button |
|
for an extended period of time. |
||
|
Setting Up Station Presets
Storing Presets Manually |
Storing Presets Automatically |
Hold (2 seconds)
≥When the station is stored in the preset, the frequency will blink once.
Using the buttons on the main unit
1Set preset mode.
XP•SETW
DISC W
Hold

 (2 seconds) ≥The preset number blinks.
2Select a preset number.
XP•SETW
XDISC W
 Press
Press
3Select the station.
XTUNE W
TRACK
 Press
Press
4Store the station in the preset.
XP•SETW
DISC W
Hold
(2 seconds)
≥The preset number stops blinking, and the frequency blinks once.
To cancel during setting procedure:
DISP
CLOCK  Press
Press
Hold (2 seconds)
≥Starting from the low end of the frequency spectrum, the unit will begin storing each station that it picks up with clear reception in preset numbers 1 through 6.
≥When a station is stored in a preset, the preset number blinks for about
5 seconds, and then the next preset number is called up. <preset scan mode>
To stop preset scanning:
Select a preset number.


 Press
Press
|
XP•SETW |
|
(Main unit: |
XDISC W |
) |
|
Listening to a Preset Station
|
Using the buttons on the main unit |
|
XP•SETW |
|
XDISC W |
Press |
Press |
|
Select a preset number. |
|
CQ-DVR909U |
E
N
G
L
I
S
H
10
29
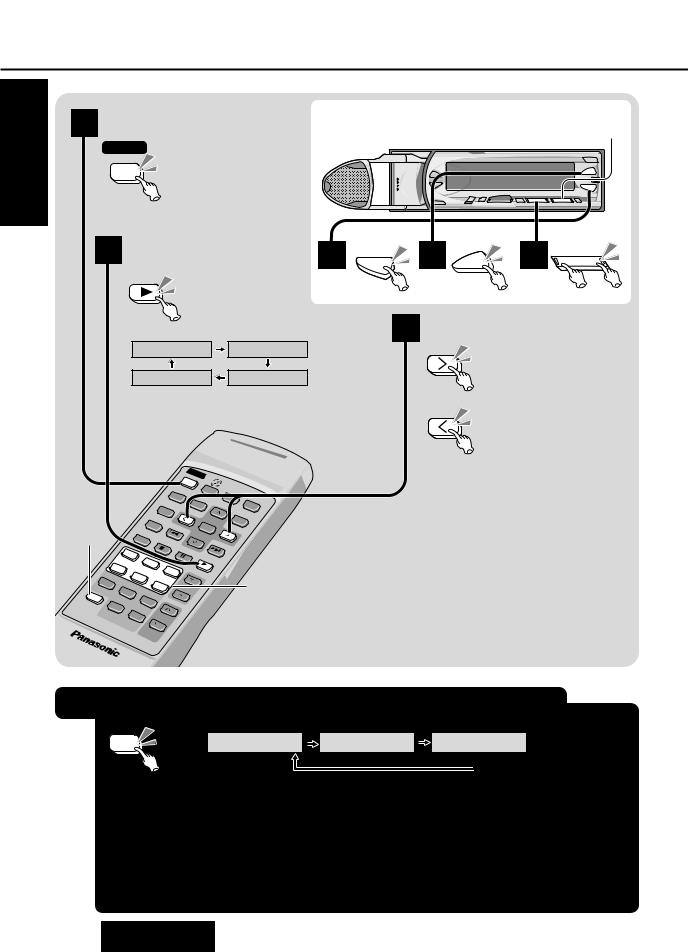
DVD Audio•Video/Video CD/CD Basics
E
N
G
L
I
S
H
11
Perform these operations with the remote control.
Before performing any operation, check the TV connection setting ( page 39) .
Operations vary according to the disc. For details, refer to the guide provided with the disc.
Inserting/Removing the Disc 
side
Starting Playback
|
|
|
|
|
|
|
|
|
|
|
|
|
POWE |
|
|
|
|
|
|
|
|
|
|
|
|
|
|
|
SOU |
R |
|
|
|
|
|
|
|
|
|
|
|
|
|
|
|
RCE |
|
|
|
|
|
|
|
|
|
|
|
|
|
SUB |
|
|
F |
DISP |
|
|
|
|
|
A |
|
|
|
|
|||||
|
|
|
|
|
U |
IO |
|
|
|
||||||
|
|
|
|
|
|
|
|
|
|
|
|
|
|
M |
|
|
|
|
|
|
|
|
|
|
|
|
|
|
|
|
|
|
|
|
|
|
|
|
|
|
|
|
|
|
|
SE |
TITLE |
|
|
|
|
|
|
REPEAT |
|
|
|
L |
|||||
|
|
|
|
|
|
|
|
|
|
|
|||||
|
|
|
|
|
|
1 |
|
|
|
|
|
|
|
|
|
|
|
|
|
|
RA |
|
|
|
2 |
|
|
|
|
|
|
|
|
|
|
|
ND |
OM |
|
|
|
|
|
|
|
|
|
|
|
|
|
|
4 |
|
|
|
|
|
3 |
BAND |
|
||
|
|
|
|
|
|
|
|
|
|
|
|
||||
|
|
|
|
|
SC |
|
5 |
|
|
|
|
|
|
||
|
|
|
|
|
|
|
|
|
|
|
|
|
|||
|
|
|
|
|
AN |
|
|
|
|
|
|
|
|
||
|
|
|
|
|
7 |
|
|
|
|
6 |
|
PA |
GE |
|
|
|
|
|
|
C |
|
8 |
|
|
|
|
|
|
|||
|
|
|
|
|
|
|
|
|
|
|
|
|
|||
|
|
DISP |
|
|
|
|
|
|
|
|
|
|
|||
|
C |
|
|
|
|
9 |
|
|
|
|
|
|
|||
|
O |
|
|
0 |
T |
|
|
|
|
|
|
|
|
||
|
|
C |
K |
R |
A |
K |
|
|
|
|
|
|
|||
|
|
|
|
|
ST/MONO |
GRP |
VOLUME |
|
|
|
|||||
|
|
|
|
|
|
|
|
|
|||||||
|
|
|
|
|
|
TITLE |
/ |
|
|
|
|
|
|||
|
|
|
|
|
|
|
|
|
|
|
|
|
|
||
|
|
|
|
|
CHAPTER |
|
|
|
|
|
|
|
|
|
|
CAR |
DVD |
|
|
|
|
|
|
|
|
|
|
|
|
|
|
|
PLAYER |
|
|
|
|
|
|
|
|
|
|
||||
|
|
|
|
|
|
|
|
|
|
|
|
||||
30
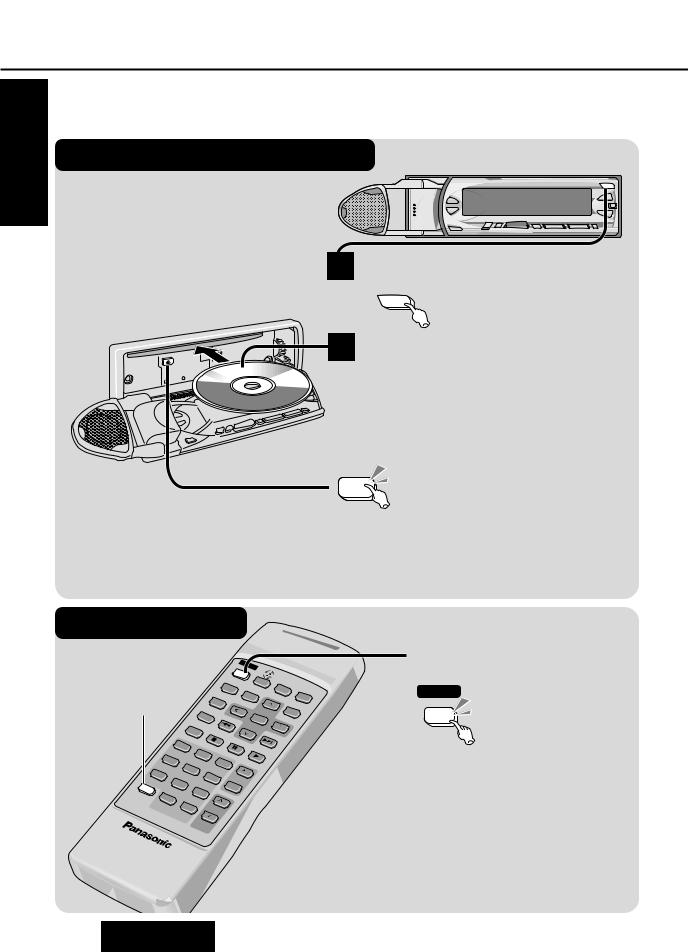
1 the panel
OPEN
TILT 

 Press
Press
2 Insert the disc
(It takes a few seconds to load the disc after the panel opens. If you force to insert the disc by hand, the disc may be damaged.)
≥The panel closes and the disc begins playing.
≥The type of disc is automatically discriminated.
Removing a disc
< 


Press
Cautions:
≥Do not obstruct the opening/closing of the panel.
≥When the panel is fully open (no sound is output), do not apply excessive pressure to the panel or push hard on the buttons on the panel.
Select the disc mode
(Example: “DVD AUDIO”)
POWER
SOURCE
Press
Playback starts.
CQ-DVR909U
Indicates pressing a button. |
Indicates pressing a button |
|
for an extended period of time. |
||
|
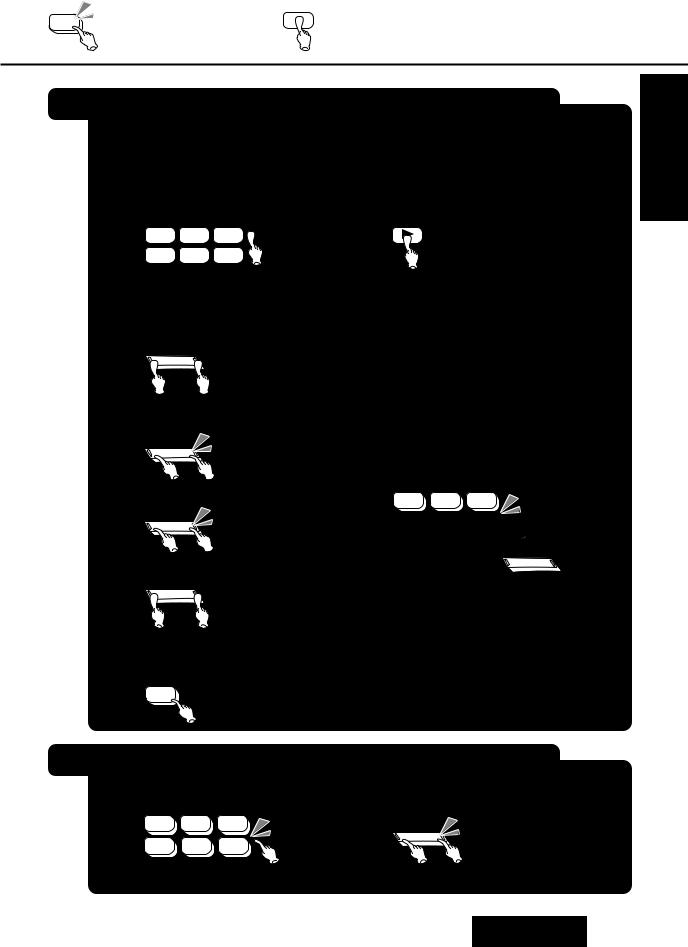
CD
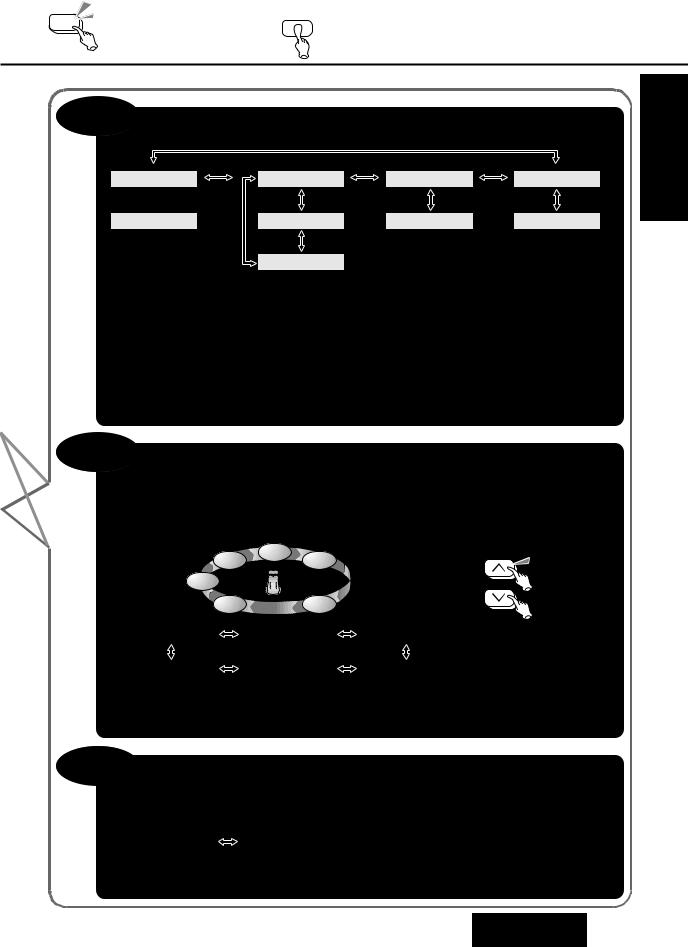
Changing the Display
|
|
|
Press |
|
|
|
|
|
|
|
|
|
|
|
|||
(Group number) |
(Track number) |
|
|
|
|
|
|||||||||||
|
|
|
|
|
|
|
|
|
|
|
|
|
|
|
|
|
|
AUDIO 01`02 |
|
02 00 : 00’ 01 |
|
F 10 : 22 |
|
|
DVD AUDIO |
||||||||||
|
|
|
|
|
|
|
|
|
|
|
|
|
|
|
|
|
|
(Track number) |
|
|
|
|
|
|
|
|
|
|
|
off) |
|||||
|
|
|
|
|
|
|
|
|
|
||||||||
|
|
|
|
|
|
|
|
|
|
|
|||||||
(Title number) |
(Chapter number) |
|
|
|
|
|
|||||||||||
|
|
|
|
|
|
|
|
|
|
|
|
|
|
|
|
|
|
VIDEO 01`003 |
|
003 00 : |
00’ 01 |
|
F 10 : 22 |
|
|
DVD VIDEO |
|||||||||
|
|
|
|
|
|
|
|
|
|
|
|
|
|
|
|
|
|
|
|
|
|
|
|
|
|
|
|
|
|
|
off) |
||||
(Chapter number) |
|
|
|
|
|
|
|
|
|
|
|||||||
|
|
|
|
|
|
|
|
|
|
|
|
|
|
|
|
|
|
VCD |
|
|
|
|
00 : 00’ 01 |
|
F 10 : 22 |
|
|
VCD |
|||||||
|
|
|
|
|
|
|
|
|
|
|
|
|
|
|
|
|
off) |
|
|
|
|
|
|
|
|
|
|
|
|
|
|
|
|
|
|
(Track number)
|
|
|
|
|
|
|
|
|
|
|
|
|
|
|
|
|
|
|
|
|
|
|
|
|
|
CD 01 0’ |
|
01 |
|
|
F 10 : 22 |
|
|
|
CD |
|
||
|
|
|
|
|
|
|
||||||
(Elapsed |
|
|
|
|
|
|
|
|
|
|
|
|
playback time) |
|
|
|
|
|
Sampling |
||||||
|
|
|
|
|
||||||||
|
|
|
|
|
|
|
|
|
|
|
|
|
|
|
|
|
|
|
|
|
|
|
|
|
frequency |
Lights when disc is loaded. |
|
Number of quantization bits ( page 73) ( page 73) |
||||||||||
E
N
G
L
I
S
H
12
DR COMP |
F |
16 20 24 bit |
DIGITAL |
|
|
|
MAIN |
|
|
R |
kHz |
|
S.W |
LFE REP |
Lights when car is moving.
(TV picture does not appear. Turns off when car is stopped and parking brake is applied.)
Notes:
≥When the disc is removed while the unit is in DVD/video CD/CD mode, the power turns off.
≥If a disc is inserted while the power is off, the power turns on.
Lights/blinks during |
Blinks when attempt is |
repeat playback. |
made to perform an |
|
operation prohibited by |
|
this unit or the disc. |
≥During playback of Dolby Digital encoded material, setting “DR COMP ON” will make comparatively quiet sounds easier to hear. ( page 50)
31
CQ-DVR909U
 Loading...