


 Loading...
Nokia PC Suite 4.1
User Guide
and
PC/PDA Connectivity Guide for Nokia 3320 and 3360
The wireless phone described in this guide is approved for use in TDMA and AMPS networks.
Legal notices
Part No. 9353654, Issue No. 1
©2001 Nokia Mobile Phones. All rights reserved. Nokia is a registered trademark of Nokia Corporation. Printed in United States September 12, 2001
Reproduction, transfer, distribution, or storage of part or all of the contents in this document in any form without the prior written permission of Nokia is prohibited.
Nokia, Nokia Connecting People and the Original Accessories logos are trademarks of Nokia Corporation and/or its affiliates.
Nokia operates a policy of continuous development. Nokia reserves the right to make changes and improvements to any of the products described in this document without prior notice.
UNDER NO CIRCUMSTANCES SHALL NOKIA BE RESPONSIBLE FOR ANY LOSS OF DATA OR INCOME OR ANY SPECIAL, INCIDENTAL, CONSEQUENTIAL, OR INDIRECT DAMAGES HOWSOEVER CAUSED.
THE CONTENTS OF THIS DOCUMENT ARE PROVIDED “AS IS.” EXCEPT AS REQUIRED BY APPLICABLE LAW, NO WARRANTIES OF ANY KIND, EITHER EXPRESS OR IMPLIED, INCLUDING, BUT NOT LIMITED TO, THE IMPLIED WARRANTIES OF MERCHANTABILITY AND FITNESS FOR A PARTICULAR PURPOSE, ARE MADE IN RELATION TO THE ACCURACY, RELIABILITY OR CONTENTS OF THIS DOCUMENT. NOKIA RESERVES THE RIGHT TO REVISE THIS DOCUMENT OR WITHDRAW IT AT ANY TIME WITHOUT PRIOR NOTICE.
All rights reserved.
Important safety notes
All the safety instructions in your phone’s user guide and computer also apply when this product is used with the phone.
Remember to make backup copies of all important data to protect against possible loss or alteration.
Do not point the infrared beam at anyone’s eyes or allow it to interfere with other infrared devices.
To disconnect the cable from the phone, hold the connector and remove the cable.
Export Controls
This product contains commodities, technology or software exported from the United States in accordance with the Export Administration regulations. Diversion contrary to U.S. law is prohibited.
FCC/Industry Canada Notice
Your phone may cause TV or radio interference (for example, when using a telephone in close proximity to receiving equipment). The FCC or Industry Canada can require you to stop using your telephone if such interference cannot be eliminated. If you require assistance, contact your local service facility. This device complies with part 15 of the FCC rules. Operation is subject to the condition that this device does not cause harmful interference.
Table of Contents |
|
Legal notices . . . . . . . . . . . . . . . . . . . . . . . . . . . . . . . . . . . . . . . . . . . . . . . . . . . . . . . . . . . . . . . . . . . . . . . . . . . . . . . . . . . . . . . . . . . |
2 |
Important safety notes . . . . . . . . . . . . . . . . . . . . . . . . . . . . . . . . . . . . . . . . . . . . . . . . . . . . . . . . . . . . . . . . . . . . . . . . . . . . . . . . . . . |
2 |
Export Controls . . . . . . . . . . . . . . . . . . . . . . . . . . . . . . . . . . . . . . . . . . . . . . . . . . . . . . . . . . . . . . . . . . . . . . . . . . . . . . . . . . . . . . . . . |
2 |
FCC/Industry Canada Notice . . . . . . . . . . . . . . . . . . . . . . . . . . . . . . . . . . . . . . . . . . . . . . . . . . . . . . . . . . . . . . . . . . . . . . . . . . . . . . |
2 |
1 Introduction. . . . . . . . . . . . . . . . . . . . . . . . . . . . . . . . . . . . . . . . . . . . . . . . . . . . . . . . . . . . . . . . . . . . . . . . . . . . . . . . . 3
System requirements . . . . . . . . . . . . . . . . . . . . . . . . . . . . . . . . . . . . . . . . . . . . . . . . . . . . . . . . . . . . . . . . . . . . . . . . . . . . . . . . . . . . . . . . . 3 Compatible applications. . . . . . . . . . . . . . . . . . . . . . . . . . . . . . . . . . . . . . . . . . . . . . . . . . . . . . . . . . . . . . . . . . . . . . . . . . . . . . . . . . . . . . . 3 Requirements for digital data calls . . . . . . . . . . . . . . . . . . . . . . . . . . . . . . . . . . . . . . . . . . . . . . . . . . . . . . . . . . . . . . . . . . . . . . . . . . . . . . 3 Printing this guide . . . . . . . . . . . . . . . . . . . . . . . . . . . . . . . . . . . . . . . . . . . . . . . . . . . . . . . . . . . . . . . . . . . . . . . . . . . . . . . . . . . . . . . . . . . 3 Abbreviations . . . . . . . . . . . . . . . . . . . . . . . . . . . . . . . . . . . . . . . . . . . . . . . . . . . . . . . . . . . . . . . . . . . . . . . . . . . . . . . . . . . . . . . . . . . . . . . 4 Safety notes . . . . . . . . . . . . . . . . . . . . . . . . . . . . . . . . . . . . . . . . . . . . . . . . . . . . . . . . . . . . . . . . . . . . . . . . . . . . . . . . . . . . . . . . . . . . . . . . 4 Infrared communications . . . . . . . . . . . . . . . . . . . . . . . . . . . . . . . . . . . . . . . . . . . . . . . . . . . . . . . . . . . . . . . . . . . . . . . . . . . . . . . . . . . . . . 4
Enable infrared communications . . . . . . . . . . . . . . . . . . . . . . . . . . . . . . . . . . . . . . . . . . . . . . . . . . . . . . . . . . . . . . . . . . . . . . . . . . . 4 Interruptions to infrared communications . . . . . . . . . . . . . . . . . . . . . . . . . . . . . . . . . . . . . . . . . . . . . . . . . . . . . . . . . . . . . . . . . . .4
2 Install Nokia PC Suite 4.1. . . . . . . . . . . . . . . . . . . . . . . . . . . . . . . . . . . . . . . . . . . . . . . . . . . . . . . . . . . . . . . . . . . . . . 5
Important note for Windows Me users. . . . . . . . . . . . . . . . . . . . . . . . . . . . . . . . . . . . . . . . . . . . . . . . . . . . . . . . . . . . . . . . . . . . . . . . . . . 5 Before installing PC Suite . . . . . . . . . . . . . . . . . . . . . . . . . . . . . . . . . . . . . . . . . . . . . . . . . . . . . . . . . . . . . . . . . . . . . . . . . . . . . . . . . 5 PC Suite installation instructions . . . . . . . . . . . . . . . . . . . . . . . . . . . . . . . . . . . . . . . . . . . . . . . . . . . . . . . . . . . . . . . . . . . . . . . . . . . . . . . 5
Uninstall PC Suite. . . . . . . . . . . . . . . . . . . . . . . . . . . . . . . . . . . . . . . . . . . . . . . . . . . . . . . . . . . . . . . . . . . . . . . . . . . . . . . . . . . . . . . . . . . . 6
3 Nokia Content Copier . . . . . . . . . . . . . . . . . . . . . . . . . . . . . . . . . . . . . . . . . . . . . . . . . . . . . . . . . . . . . . . . . . . . . . . . . 7
Compatible phones . . . . . . . . . . . . . . . . . . . . . . . . . . . . . . . . . . . . . . . . . . . . . . . . . . . . . . . . . . . . . . . . . . . . . . . . . . . . . . . . . . . . . . . . . . .7 Content Copier basics. . . . . . . . . . . . . . . . . . . . . . . . . . . . . . . . . . . . . . . . . . . . . . . . . . . . . . . . . . . . . . . . . . . . . . . . . . . . . . . . . . . . . . . . . 7 Copying information from the source phone . . . . . . . . . . . . . . . . . . . . . . . . . . . . . . . . . . . . . . . . . . . . . . . . . . . . . . . . . . . . . . . . . 8 Nokia Connection Manager . . . . . . . . . . . . . . . . . . . . . . . . . . . . . . . . . . . . . . . . . . . . . . . . . . . . . . . . . . . . . . . . . . . . . . . . . . . . . . .8 Copying information to the target phone . . . . . . . . . . . . . . . . . . . . . . . . . . . . . . . . . . . . . . . . . . . . . . . . . . . . . . . . . . . . . . . . . . . . 9 Nokia Content Copier log . . . . . . . . . . . . . . . . . . . . . . . . . . . . . . . . . . . . . . . . . . . . . . . . . . . . . . . . . . . . . . . . . . . . . . . . . . . . . . . . . 9 Other phones . . . . . . . . . . . . . . . . . . . . . . . . . . . . . . . . . . . . . . . . . . . . . . . . . . . . . . . . . . . . . . . . . . . . . . . . . . . . . . . . . . . . . . . . . . . . . . . 9
4 Nokia PC Composer. . . . . . . . . . . . . . . . . . . . . . . . . . . . . . . . . . . . . . . . . . . . . . . . . . . . . . . . . . . . . . . . . . . . . . . . . . 10
PC hardware setup . . . . . . . . . . . . . . . . . . . . . . . . . . . . . . . . . . . . . . . . . . . . . . . . . . . . . . . . . . . . . . . . . . . . . . . . . . . . . . . . . . . . . |
10 |
Tour of PC Composer . . . . . . . . . . . . . . . . . . . . . . . . . . . . . . . . . . . . . . . . . . . . . . . . . . . . . . . . . . . . . . . . . . . . . . . . . . . . . . . . . . . . . . . . |
10 |
Compose a new ringing tone . . . . . . . . . . . . . . . . . . . . . . . . . . . . . . . . . . . . . . . . . . . . . . . . . . . . . . . . . . . . . . . . . . . . . . . . . . . . . . . . . . |
11 |
Edit a ringing tone . . . . . . . . . . . . . . . . . . . . . . . . . . . . . . . . . . . . . . . . . . . . . . . . . . . . . . . . . . . . . . . . . . . . . . . . . . . . . . . . . . . . . |
11 |
Delete notes and rests . . . . . . . . . . . . . . . . . . . . . . . . . . . . . . . . . . . . . . . . . . . . . . . . . . . . . . . . . . . . . . . . . . . . . . . . . . . . . . . . . . |
11 |
Save your new ringing tone . . . . . . . . . . . . . . . . . . . . . . . . . . . . . . . . . . . . . . . . . . . . . . . . . . . . . . . . . . . . . . . . . . . . . . . . . . . . . . |
11 |
Transfer ringing tone to your phone . . . . . . . . . . . . . . . . . . . . . . . . . . . . . . . . . . . . . . . . . . . . . . . . . . . . . . . . . . . . . . . . . . . . . . . . . . . . |
12 |
Transfer via infrared . . . . . . . . . . . . . . . . . . . . . . . . . . . . . . . . . . . . . . . . . . . . . . . . . . . . . . . . . . . . . . . . . . . . . . . . . . . . . . . . . . . . |
12 |
Ringing tones from MIDI files . . . . . . . . . . . . . . . . . . . . . . . . . . . . . . . . . . . . . . . . . . . . . . . . . . . . . . . . . . . . . . . . . . . . . . . . . . . . . . . . . |
12 |
About Standard MIDI files . . . . . . . . . . . . . . . . . . . . . . . . . . . . . . . . . . . . . . . . . . . . . . . . . . . . . . . . . . . . . . . . . . . . . . . . . . . . . . . |
12 |
Before you begin . . . . . . . . . . . . . . . . . . . . . . . . . . . . . . . . . . . . . . . . . . . . . . . . . . . . . . . . . . . . . . . . . . . . . . . . . . . . . . . . . . . . . . . |
12 |
Edit and save . . . . . . . . . . . . . . . . . . . . . . . . . . . . . . . . . . . . . . . . . . . . . . . . . . . . . . . . . . . . . . . . . . . . . . . . . . . . . . . . . . . . . . . . . . |
13 |
5 Nokia PC Sync . . . . . . . . . . . . . . . . . . . . . . . . . . . . . . . . . . . . . . . . . . . . . . . . . . . . . . . . . . . . . . . . . . . . . . . . . . . . . . 14
Configure PC Sync . . . . . . . . . . . . . . . . . . . . . . . . . . . . . . . . . . . . . . . . . . . . . . . . . . . . . . . . . . . . . . . . . . . . . . . . . . . . . . . . . . . . . . . . . . |
14 |
Set general synchronization properties . . . . . . . . . . . . . . . . . . . . . . . . . . . . . . . . . . . . . . . . . . . . . . . . . . . . . . . . . . . . . . . . . . . . . |
14 |
Set Calendar and Contacts properties . . . . . . . . . . . . . . . . . . . . . . . . . . . . . . . . . . . . . . . . . . . . . . . . . . . . . . . . . . . . . . . . . . . . . . |
14 |
Set PIM properties . . . . . . . . . . . . . . . . . . . . . . . . . . . . . . . . . . . . . . . . . . . . . . . . . . . . . . . . . . . . . . . . . . . . . . . . . . . . . . . . . . . . . |
15 |
[ 1 ]
Synchronizing for the first time . . . . . . . . . . . . . . . . . . . . . . . . . . . . . . . . . . . . . . . . . . . . . . . . . . . . . . . . . . . . . . . . . . . . . . . . . . .15 Understand the basics of Synchronization . . . . . . . . . . . . . . . . . . . . . . . . . . . . . . . . . . . . . . . . . . . . . . . . . . . . . . . . . . . . . . . . . . . . . . .15 Start PC Sync . . . . . . . . . . . . . . . . . . . . . . . . . . . . . . . . . . . . . . . . . . . . . . . . . . . . . . . . . . . . . . . . . . . . . . . . . . . . . . . . . . . . . . . . . .15 View other PC Sync options . . . . . . . . . . . . . . . . . . . . . . . . . . . . . . . . . . . . . . . . . . . . . . . . . . . . . . . . . . . . . . . . . . . . . . . . . . . . . .16 Use a different PIM. . . . . . . . . . . . . . . . . . . . . . . . . . . . . . . . . . . . . . . . . . . . . . . . . . . . . . . . . . . . . . . . . . . . . . . . . . . . . . . . . . . . . . . . . .16
Creating a custom contact list . . . . . . . . . . . . . . . . . . . . . . . . . . . . . . . . . . . . . . . . . . . . . . . . . . . . . . . . . . . . . . . . . . . . . . . . . . . . . . . .16 Outlook users . . . . . . . . . . . . . . . . . . . . . . . . . . . . . . . . . . . . . . . . . . . . . . . . . . . . . . . . . . . . . . . . . . . . . . . . . . . . . . . . . . . . . . . . . .16 Other PIM applications . . . . . . . . . . . . . . . . . . . . . . . . . . . . . . . . . . . . . . . . . . . . . . . . . . . . . . . . . . . . . . . . . . . . . . . . . . . . . . . . . .17 Number format and your PIM application . . . . . . . . . . . . . . . . . . . . . . . . . . . . . . . . . . . . . . . . . . . . . . . . . . . . . . . . . . . . . . . . . . . . . . .18
6 3320/3360 modem setup. . . . . . . . . . . . . . . . . . . . . . . . . . . . . . . . . . . . . . . . . . . . . . . . . . . . . . . . . . . . . . . . . . . . . 19
Download modem driver (windows 95, 98, and Me) . . . . . . . . . . . . . . . . . . . . . . . . . . . . . . . . . . . . . . . . . . . . . . . . . . . . . . . . . . . . . . .19 Getting started (Windows 95, 98, and Me) . . . . . . . . . . . . . . . . . . . . . . . . . . . . . . . . . . . . . . . . . . . . . . . . . . . . . . . . . . . . . . . . . . . . . .19 Establish an infrared connection . . . . . . . . . . . . . . . . . . . . . . . . . . . . . . . . . . . . . . . . . . . . . . . . . . . . . . . . . . . . . . . . . . . . . . . . . .19 Modem installation . . . . . . . . . . . . . . . . . . . . . . . . . . . . . . . . . . . . . . . . . . . . . . . . . . . . . . . . . . . . . . . . . . . . . . . . . . . . . . . . . . . . .20 Install infrared support for Windows 95. . . . . . . . . . . . . . . . . . . . . . . . . . . . . . . . . . . . . . . . . . . . . . . . . . . . . . . . . . . . . . . . . . . . . . . . .20 Infrared and Windows 2000 Professional. . . . . . . . . . . . . . . . . . . . . . . . . . . . . . . . . . . . . . . . . . . . . . . . . . . . . . . . . . . . . . . . . . . . . . . .20 IR and Windows NT Workstation 4.0 . . . . . . . . . . . . . . . . . . . . . . . . . . . . . . . . . . . . . . . . . . . . . . . . . . . . . . . . . . . . . . . . . . . . . . . . . . . 21
7 Configure your data software . . . . . . . . . . . . . . . . . . . . . . . . . . . . . . . . . . . . . . . . . . . . . . . . . . . . . . . . . . . . . . . . . 22
Introduction . . . . . . . . . . . . . . . . . . . . . . . . . . . . . . . . . . . . . . . . . . . . . . . . . . . . . . . . . . . . . . . . . . . . . . . . . . . . . . . . . . . . . . . . . . . . . . .22 Dial-up Networking . . . . . . . . . . . . . . . . . . . . . . . . . . . . . . . . . . . . . . . . . . . . . . . . . . . . . . . . . . . . . . . . . . . . . . . . . . . . . . . . . . . .22 Create a new connection . . . . . . . . . . . . . . . . . . . . . . . . . . . . . . . . . . . . . . . . . . . . . . . . . . . . . . . . . . . . . . . . . . . . . . . . . . . . . . . .22 Connect to the network . . . . . . . . . . . . . . . . . . . . . . . . . . . . . . . . . . . . . . . . . . . . . . . . . . . . . . . . . . . . . . . . . . . . . . . . . . . . . . . . .22 Notes about data calls . . . . . . . . . . . . . . . . . . . . . . . . . . . . . . . . . . . . . . . . . . . . . . . . . . . . . . . . . . . . . . . . . . . . . . . . . . . . . . . . . .23
Other data applications . . . . . . . . . . . . . . . . . . . . . . . . . . . . . . . . . . . . . . . . . . . . . . . . . . . . . . . . . . . . . . . . . . . . . . . . . . . . . . . . . . . . . .23 REMINDERS! . . . . . . . . . . . . . . . . . . . . . . . . . . . . . . . . . . . . . . . . . . . . . . . . . . . . . . . . . . . . . . . . . . . . . . . . . . . . . . . . . . . . . . . . . .23 For America Online (AOL) users . . . . . . . . . . . . . . . . . . . . . . . . . . . . . . . . . . . . . . . . . . . . . . . . . . . . . . . . . . . . . . . . . . . . . . . . . . . . . . . .23 Modify “Locations” . . . . . . . . . . . . . . . . . . . . . . . . . . . . . . . . . . . . . . . . . . . . . . . . . . . . . . . . . . . . . . . . . . . . . . . . . . . . . . . . . . . . .24
8 Connect to devices using Palm® OS (operating system) . . . . . . . . . . . . . . . . . . . . . . . . . . . . . . . . . . . . . . . . . . . . 25
Connections preferences . . . . . . . . . . . . . . . . . . . . . . . . . . . . . . . . . . . . . . . . . . . . . . . . . . . . . . . . . . . . . . . . . . . . . . . . . . . . . . . . . . . . . |
25 |
TCP/IP dial-up and other connections. . . . . . . . . . . . . . . . . . . . . . . . . . . . . . . . . . . . . . . . . . . . . . . . . . . . . . . . . . . . . . . . . . . . . . . . . . . |
25 |
Before you make a data call . . . . . . . . . . . . . . . . . . . . . . . . . . . . . . . . . . . . . . . . . . . . . . . . . . . . . . . . . . . . . . . . . . . . . . . . . . . . . |
25 |
9 Connect to devices using Microsoft PocketPCTM OS (operating system) . . . . . . . . . . . . . . . . . . . . . . . . . . . . . . . 26
Configure a modem connection . . . . . . . . . . . . . . . . . . . . . . . . . . . . . . . . . . . . . . . . . . . . . . . . . . . . . . . . . . . . . . . . . . . . . . . . . . . . . . .26 Use your new modem connection . . . . . . . . . . . . . . . . . . . . . . . . . . . . . . . . . . . . . . . . . . . . . . . . . . . . . . . . . . . . . . . . . . . . . . . . .27 Before you make a digital data call . . . . . . . . . . . . . . . . . . . . . . . . . . . . . . . . . . . . . . . . . . . . . . . . . . . . . . . . . . . . . . . . . . . . . . . .28
10 Index . . . . . . . . . . . . . . . . . . . . . . . . . . . . . . . . . . . . . . . . . . . . . . . . . . . . . . . . . . . . . . . . . . . . . . . . . . . . . . . . . . . . . 29
[ 2 ]

|
Introduction |
1 Introduction |
1 |
This guide provides you with the following information:
•installation instructions for Nokia PC Suite 4.1.
•the Nokia PC Suite 4.1 user guide.
•installation instructions for the Nokia Modem Setup application for 3320 and 3360.
•configuring your data/fax software for digital data calls (using your Nokia phone as a wireless modem).
•SYSTEM REQUIREMENTS
To install and run Nokia PC Suite 4.1, you need:
•Nokia 3320 or 3360 phone
•an Intel-compatible PC running Windows 95®, Windows 98®, Windows Millennium Edition® (ME), or Windows 2000® Professional
•at least 40 megabytes of free disk space
•an infrared port on your desktop PC or laptop computer
•a compatible PC Personal Information Manager (PIM) application for use with Nokia PC Sync
Note: Nokia Content Copier (a component of Nokia PC Suite) supports a variety of Nokia phones, some of which make their connection to a PC via serial cable. For a list of compatible phones and connection methods, please see “Compatible phones” on page 7.
• COMPATIBLE APPLICATIONS
Nokia PC Sync is compatible with the following Personal Information Manager applications:
Manufacturer |
Application name/version |
|
|
Microsoft |
Schedule+ 7.0, 7.5 |
|
Outlook 97, 98, 2000 |
|
Outlook Express |
|
|
IBM |
Lotus Notes 4.5, 4.6, 5.0 |
|
Lotus Organizer 97, GS, 5.0, 6.0 |
|
|
• REQUIREMENTS FOR DIGITAL DATA CALLS
Before you can make digital data calls using your Nokia phone as a wireless modem:
•You must subscribe to digital data services with your service provider.
•Your phone must be powered up, and digital service must be available. Digital data calls are not available when roaming in an analog network.
•Your phone must be connected to your PC or handheld device via Infrared.
•Your data software must be running and must be configured to recognize your Nokia phone as the active modem (instructions to follow later in this document).
Note: This feature is available only if your service provider’s network supports digital data calls. You may also be required to subscribe to digital data services. Please check with your service provider prior to sending or receiving digital data calls.
• PRINTING THIS GUIDE
You may also find it helpful to print this guide for future reference.
No other applications should be running during installation of PC Suite and the modem setup. Therefore, reading this guide using Adobe Acrobat reader during installation is not recommended. Printing a copy of this guide provides you access to the instructions during the installation process.
[ 3 ]
|
|
|
|
Introduction |
• ABBREVIATIONS |
1 |
|||
|
For the purposes of this user guide, the following abbreviations are used: |
|||
|
|
|
|
|
|
Abbreviation |
|
Description |
|
|
|
|
|
|
|
PC |
|
Refers to both desktop and laptop computers |
|
|
|
|
|
|
|
IR |
|
Infrared |
|
|
|
|
|
|
|
PIM |
|
Personal Information Manager (PC-based software program) |
|
|
|
|
|
|
• SAFETY NOTES
1Please make backup copies of all important data to protect against possible loss or alteration.
2When connecting to any other device, read its user guide for detailed safety instructions. Do not connect incompatible products.
3To avoid any potential loss of data, you should not make or receive calls while synchronizing data between the phone and a PC.
4Do not point the IR beam at anyone’s eyes or allow it to interfere with other IR devices.
•INFRARED COMMUNICATIONS
When transferring information between your phone and PC using the various PC Suite applications, an infrared connection between phone and PC is required. The preferable distance between the two devices in an infrared connection is a range of three inches to three feet maximum. There must be no obstructions between the two devices and the IR ports of the two devices have to be pointing at each other.
Your Nokia phone is a Class 1 Laser Product.
Enable infrared communications
It is not necessary to enable infrared communications for users of Windows Millennium Edition (ME) and Windows 2000 prior to using this feature. The infrared port is always active.
If you use Windows 95 or Windows 98, you can use the infrared control panel to activate or deactivate infrared communications. During the PC Suite installation process, the installer application activates infrared communications on your PC. The infrared port on your PC remains active until you deactivate it.
To enable infrared communications on your phone, please refer to the infrared section in your phone’s user guide.
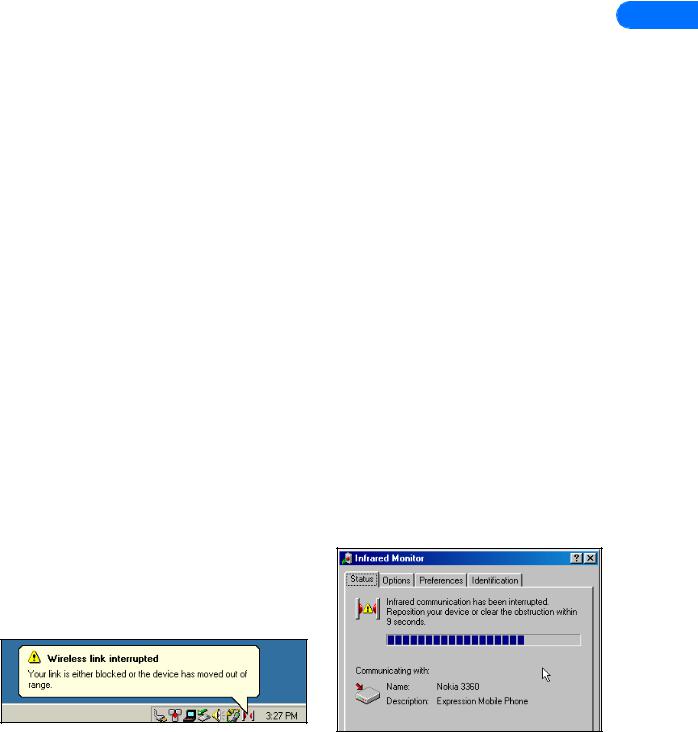
Interruptions to infrared communications
Windows provides visual and audible notification when it senses an interruption to infrared communications between your phone and PC. Windows allows you to re-establish infrared communications between the two devices so it can re-send the data that was being transferred when the interruption occurred.
If the infrared connection between your phone and PC has not been re-established within 15 seconds, a “time-out” occurrs, meaning Windows no longer searches for your phone and terminates the infrared connection.
[ 4 ]

Install Nokia PC Suite 4.1
2 Install Nokia PC Suite 4.1
Nokia PC Suite 4.1 is a collection of powerful tools that you can use to manage your phone’s features and data. PC Suite consists
of the following components: |
2 |
|
•Nokia Content Copier allows you to copy data between two Nokia phones, to back up your phone’s data to your PC, and erase data from your phone.
•Nokia Connection Manager allows you to monitor the IR connection between your phone and PC and switch to a different type of connection (cable vs. infrared) when copying data from one phone to another.
•Nokia PC Composer allows you to create new ringing tones for your phone.
•Nokia PC Sync allows you to synchronize contacts and calendar items between your phone and PIM applications such as Microsoft Outlook and Lotus Organizer.
•IMPORTANT NOTE FOR WINDOWS ME USERS
Your phone also functions as a wireless modem and is designed to be detected by Windows Plug and Play. During the PC Suite installation process, you are prompted to enable infrared communications on your phone, then align the infrared ports of the 2 devices.
Because infrared is always active on your PC (including automatic software installation for Plug and Play devices), the Windows Add New Hardware Wizard detects your phone as a new hardware device during the PC Suite installation. This interferes with the PC Suite software installation process.
Before installing PC Suite
Nokia recommends that Windows Me users perform the modem installation prior to installing PC Suite. Please see “3320/3360 modem setup” on page 19 and perform this task prior to installing Nokia PC Suite. Once you have performed the modem installation, you may continue with the installation instructions below.
• PC SUITE INSTALLATION INSTRUCTIONS
Nokia suggests that you download the setup application to a location of your choosing, rather than trying to run the application from its current location.
Note: Download time for this file (16 mb) may vary, depending on the type of Internet connection you have (dial-up vs. DSL/cable), connection rate, and Internet traffic.
Once the software download is complete:
1Double-click the installation file PC Suite 4.1.exe, located on your hard drive.
2Click Next to accept the location of the temporary installation files, or click Change to select a different location.
3Click Next to begin the software installation wizard, then click Yes to accept the end-user license agreement.
4Review the safety notes, then click Next.
[ 5 ]
5.Click Next to install all PC Suite components, or clear the check boxes of the components you do not want to install.
6Select the language you wish to use with PC Suite, then
click Next.
Note: If you have a PIM application installed on your PC (Outlook, Lotus Organizer, etc.) and you want to use it with Nokia PC Sync, it is recommended that you select the same language used by your PIM.
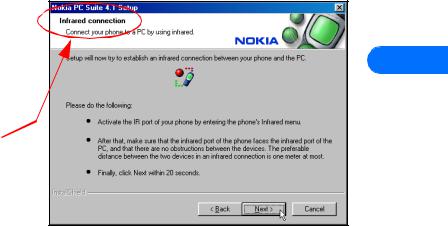
7Follow the instructions provided on the Infrared  connections screen.
8Continue through the installation wizard, then click Finish to restart your PC.
CHANGE LANGUAGE
The language chosen during installation for PC Suite applies to all of the PC Suite components and Help applications. If you
need to change PC Suite to a different language, you must reinstall PC Suite.
Install Nokia PC Suite 4.1
2
• UNINSTALL PC SUITE
If you need to remove PC Suite (including all components), please use Add/Remove Programs (located in Control Panel). Remember to close any PC Suite applications that are running before you begin.
TO REMOVE PC SUITE 4.1:
1Click Start, point to Settings, then click Control Panel.
2Double-click Add/Remove Programs.
3Scroll through the list of installed applications, then click Nokia PC Suite 4.1.
4Click the Add/Remove button.
5Click Remove from the Nokia PC Suite Setup window, then click Next.
6Follow the on-screen instructions until the setup wizard has completed removing the program.
7Restart your computer to complete the removal process.
[ 6 ]

3 Nokia Content Copier
Nokia Content Copier is a powerful application that allows you to perform the following tasks:
•Copy data from a compatible phone to your 3320/3360 (or between 2 Nokia 3320/3360 phones).
•Back up your phone’s data to your PC and then restore the data back to your phone.
•Erase data from your phone.
•COMPATIBLE PHONES
Nokia Content Copier
3
One of the most powerful features of this application is its support of other compatible phones. This capability is especially useful if you are upgrading to a new handset and want to transfer data from your old phone to your new one. You can also use this application to transfer information between other 3320/3360 phones in your family.
The following table shows a list of phones compatible with Nokia Content Copier (other than 3320 and 3360), as well as the method of connection to the PC:
Nokia model: |
Method of connection: |
|
|
5190 |
DAU-9P serial cable |
|
|
6190 |
DAU-9P serial cable |
|
|
7160 |
DLR-3P serial cable and IR (infrared) |
|
|
7190 |
DLR-3P serial cable and IR (infrared) |
|
|
8290 |
IR (infrared) |
|
|
8890 |
IR (infrared) |
|
|
Important: Content Copier does not support copying data between any of the phones listed above. Data can only be read from these phones, then copied to 3320/3360.
Note: Nokia Content Copier does not support certain 5100 and 6100 series phones. For more information on specific models of incompatible phones, please see “Other phones” on page 9.
• CONTENT COPIER BASICS
Nokia Content Copier application utilizes wizards to help you perform the tasks listed above. If you are copying data from one of the compatible phones above using the data cable, please make sure the phone is connected to your PC via cable before you begin.
Content Copier is driven by wizards that lead you through the various tasks. Launch Content Copier from the Start Menu (Start
- Programs - Nokia PC Suite 4 - Content Copier), then select the task you would like to perform. Follow the on-screen instructions to complete the task you want to perform.
The following pages contain basic information and tips on using
Nokia Content Copier.
Note: Please be aware that many of the compatible phones have features not found in 3320/3360. While it may be possible to read this information into your PC and save it, you may not be able to transfer incompatible data types (example: To do list items) to your 3320/3360.
[ 7 ]
Nokia Content Copier
Important: Windows Millennium Edition (ME) users have no way of disabling the Plug and Play software installation of your Nokia phones as a wireless modem. Windows ME launches the Add New Hardware Wizard immediately upon detection of your phone via Infrared. Before proceding with any Content Copier tasks, please click the Add New Hardware Wizard’s Cancel button. 3320/3360 users should have already performed the modem installation instructions, found on
page 19.
Copying information from the source phone |
|
|
|
3 |
|||
If you select either the Copy data from one phone to another or Copy |
|||
data from a phone to a PC options, Content Copier will transfer all |
|||
|
|
||
compatible data types (Phone book, Calendar, To Do, Caller groups, etc.) |
|
|
|
from the compatible phone (or “source” phone). |
|
|
|
•If you are copying the data from the source phone to your Nokia 3320 or 3360, the data is stored in your PC’s memory temporarily. Once you have connected your 3320/3360 (“target” phone) via infrared, Nokia Content Copier transfers the information from temporary storage into your phone.
•If you are copying your phone’s data and want to save it on your PC, Nokia Content Copier guides you through the process of saving the information to a comma-separated value text file (.csv) on your PC’s hard drive.
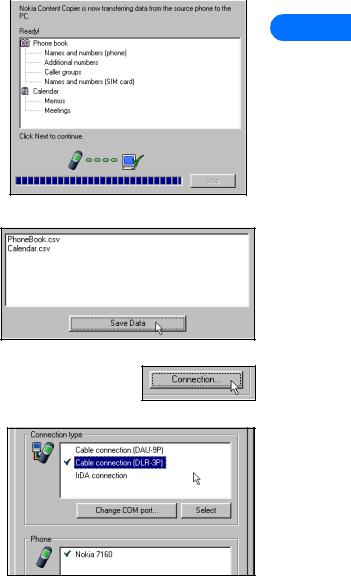
SAVE THE SOURCE PHONE DATA
Once the source phone’s data has been read, Content Copier allows you to save the information to your PC’s hard drive. Click the Save Data button, then navigate to the location on your hard drive where you want to store the information.
Nokia Content Copier automatically names the files for you, based on the type of data that is read from the source phone.
Nokia Connection Manager
You may need to use Nokia Connection Manager to select the type of connection you want Content Copier to use during various stages of the process. For example, if you select Copy data from one phone to another, and the source phone uses a serial cable, click Content Copier’s Connection button to launch Connection Manager. Then select the correct cable option for the source phone.
To switch connection type while using Content Copier:
1Establish the appropriate connection between your phone and PC (via IR, DLR-3P, or DAU9-9P), then click the Connection button.
2Click the desired connection type, then click Select.
3Allow Nokia Connection Manager to detect your phone.
4Click OK to return to Nokia Content Copier.
Note: If your phone is not detected right away, switch to one of the other connection types, then back to the desired connection type. This forces Connection Manager to redetect your phone.
Note: If you are copying data from one phone to another and the source phone uses an infrared connection, stop the infrared connection between phone and PC. Allow the Windows warning message regarding interrupted infrared communications to completely time-out before aligning your 3320/3360 with your PC’s infrared port. By doing so, you allow Connection Manager to detect your 3320/3360 more quickly.
[ 8 ]
Loading...