


Quick Start Guide
Introduction
First Steps
Taking Pictures
Other Functions
Installing Nikon Transfer
Transferring Pictures to a Computer
En
Introduction
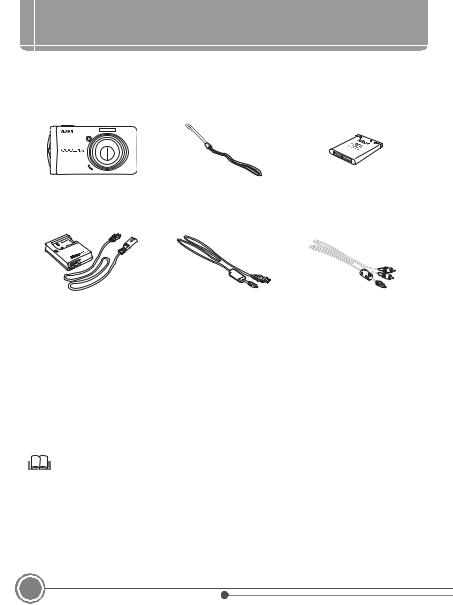
Package Contents
Remove the camera and accessories from the box and confirm that you have all the items listed below.
COOLPIX S520 |
Camera Strap |
Rechargeable Li-ion Battery |
Digital Camera |
|
EN-EL10* |
|
|
(with battery case) |
|
Battery Charger MH-63 |
USB Cable UC-E6 |
Audio Video Cable |
|
|
(with power cable)† |
|
|
EG-CP14 |
• |
Quick Start Guide (this guide) |
• |
Warranty |
|
• |
User’s Manual CD |
• |
Software Suite installer CD |
|
* Charge the battery as shown on page 3.
† Shape of power cable depends on country of use.
NOTE: Memory card not provided. See page 121 of the User’s Manual for a list of approved memory cards.
Viewing the Camera User’s Manual on CD
The User’s Manual can be viewed using Adobe Reader or Adobe Acrobat Reader 5.0 or later, available for free download from the Adobe website.
1 Start the computer and insert the User’s Manual CD.
2Double-click the CD COOLPIX S520 icon in Computer (Windows Vista) or My Computer (Windows XP/2000), or on the desktop (Macintosh).
3Double-click the INDEX.pdf icon to display a language selection screen. Click a language and follow the links to view the User’s Manual.
2
Introduction

First Steps
Step 1 Attach the Camera Strap
Attach the camera strap as shown.
Step 2 Charge the Battery
Charge the Rechargeable Li-ion Battery EN-EL10 (supplied) using the Battery Charger MH-63 (supplied).
2.1 Connect the power cable to the battery charger 1and insert the wall plug into a power outlet 2. The CHARGE lamp will light up 3.


 2 3
2 3  1
1
2.2 Push 1and insert the battery in the battery |
1 |
2 |
charger 2as shown in the picture. |
|
|
2.3 The CHARGE lamp will start to blink. Charging is complete when the CHARGE lamp stops blinking. A fully exhausted battery will recharge in about 100 minutes.
3
First Steps
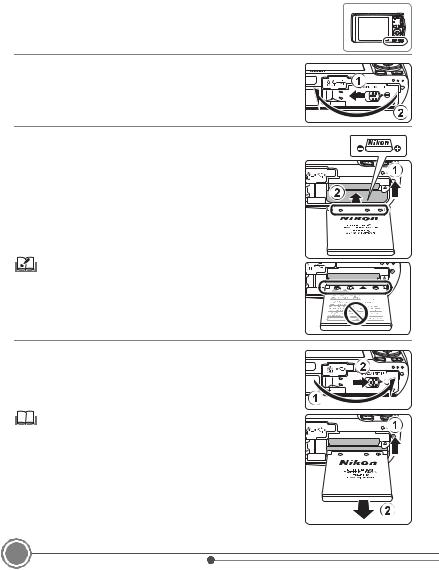
Step 3 Insert the Battery
Insert the fully charged battery into the camera.
3.1 Open the battery-chamber/memory card slot cover.
3.2 Insert the battery. Use the battery to push the orange battery latch up 1as the battery is inserted 2. The battery latch will spring back into place when the battery is fully inserted.
Inserting the Battery
Inserting the battery upside down or backwards could damage the camera. Check to be sure the battery is in the correct orientation.
3.3 Close the battery-chamber/memory card slot cover.
Removing the Battery
Turn the camera off before removing or inserting battery. To eject the battery, open the battery-chamber/memory card slot cover and slide the battery latch in the direction shown 1. The battery can then be removed by hand 2.
Note that the battery may become hot during use; observe due caution when removing the battery.
4
First Steps
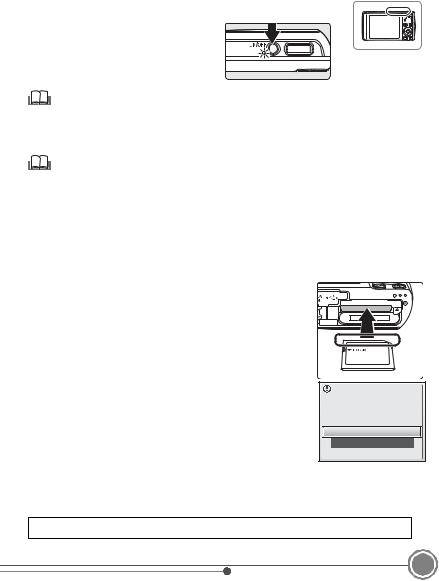
Step 4 Turn On the Camera
Press the power switch to turn on the camera.
Pressing the power switch another time will turn the power OFF.
Power Saving Function
If no operations are performed for about five seconds in shooting mode, the monitor will dim to save power. Using any of the camera controls will reactivate the display. If no operations are performed for about a minute in all modes, the monitor will turn off; after a further three minutes, the camera will turn off automatically.
Memory Cards
Pictures are stored in either the camera’s internal memory (approximately 23 MB) or a memory card. If a memory card has been inserted into the camera, data will be recorded onto the memory card and pictures on the memory card can be playbacked, deleted and transferred. Remove the memory card if you want to use the camera's internal memory.
If desired, a removable Secure Digital (SD) memory card can be used for additional storage. Internal memory is used for recording, deletion, and transfer only if no memory card is inserted.
To insert a memory card: |
|
|
1 If the power-on lamp is lit, press the power switch to turn the camera off. |
|
|
2 |
Open the battery-chamber/memory card slot cover as shown in Step |
|
|
3.1 on the previous page and slide the memory card in until it clicks |
|
|
into place. The camera and memory card may be damaged if the |
|
|
memory card is inserted in the wrong way. After inserting the memory |
|
|
card, close the battery-chamber/memory card slot cover as shown in |
|
|
Step 3.3 on the previous page. |
|
3 |
Turn the camera on. If the message shown at right is displayed in the monitor, |
|
|
the memory card must be formatted before it can be used in the camera. Use |
Card is not formatted. |
|
the multi selector (A6) to highlight Yes and press k. The confirmation dialog |
|
|
Format card? |
|
|
will be displayed. To start formatting, choose Format and press k. |
No |
|
Note that formatting permanently deletes all pictures and other data on the |
|
|
memory card. Before formatting, be sure to make copies of any pictures you |
Yes |
|
|
|
wish to keep.
Do not turn the camera off or remove the battery or memory card until formatting is complete. To remove memory cards, turn the camera off and confirm that the power-on lamp is off. Open the batterychamber/memory card slot cover and press the card in to partially eject the card. The card can then be removed by hand.
A: This icon indicates that more information is available elsewhere in this guide.
5
First Steps
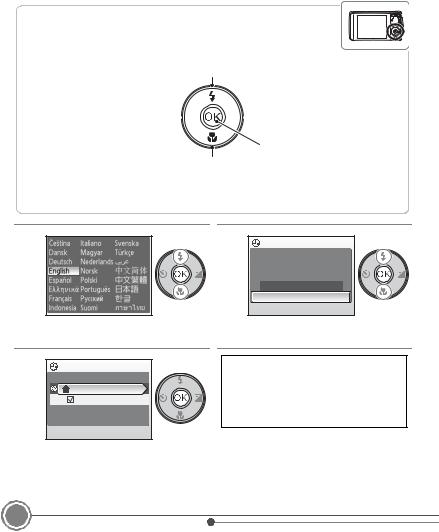
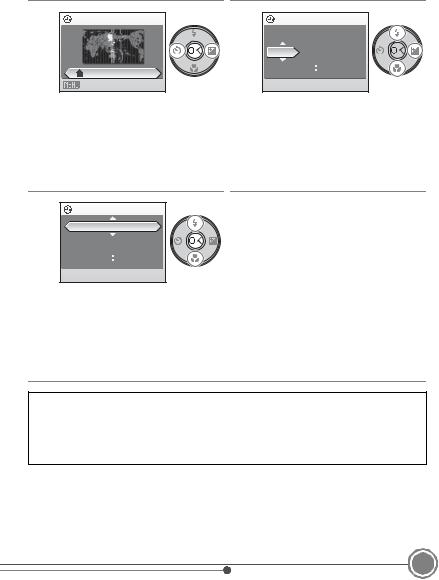
Step 5 Choose a Language and Set the Camera Clock
A language-selection dialog is displayed the first time the camera is turned on. Follow the steps below to choose a language and set the time and date.
The Multi Selector
Use the multi selector to choose and apply settings. Operate the multi selector by pressing it up, down, right, left, or by pressing k.
Move the highlight up.
Return to the previous screen 
 (move the highlight to the left).

 Advance to the next screen (move the highlight to the right).
Apply selection.
Move the highlight down.
In the descriptions that follow, buttons to be pressed are shown in gray.
5.1 |
5.2 |
Date |
|
|
|
|
|
Set time and date? |
|
|
No |
|
|
Yes |
Choose the desired language and press k.
5.3 |
Time zone |
|
|
|
London,Casablanca |
|
Daylight saving |
|
Press k. |
Choose Yes and press k.
The time zone menu is displayed.
If daylight saving time is in effect, press the multi selector down to highlight Daylight saving and press k to select. Press the multi selector up to return to Step 5.3.
The home time zone menu is displayed.
6
First Steps
5.4 |
5.5 |
Date |
|
|
Home time zone |
|
|
|
|
|
|
D |
M |
Y |
|
|
0 1 |
0 1 |
2 0 0 8 |
London,Casablanca |
|
0 0 |
|
0 0 |
|
|
|
|
|
Back |
|
|
|
|
Select your home time zone and press k.
The date menu is displayed.
Edit the date.
Rotate the rotary multi selector, or press up or down, to edit the highlighted item.
Press right to move the cursor in the following order.
D ->M ->Y ->Hour ->Minute ->D M Y
5.6 |
Date |
|
|
|
|
|
|
|
D |
M |
Y |
|
1 5 |
0 5 |
2 0 0 8 |
|
1 5 |
|
1 0 |
Choose the order in which the day, month, and year are displayed and press k.
•The settings are applied and monitor display returns to shooting mode.
•The lens will open at this time.
To change the current date and time, in the Setup Menu go into Date, choose Date and change the settings there.
To change the settings for the time zone or daylight saving time go into Date, choose Time zone and change the settings there.
 Page 104, 107, 108 of the User’s Manual.
7
First Steps
Taking Pictures
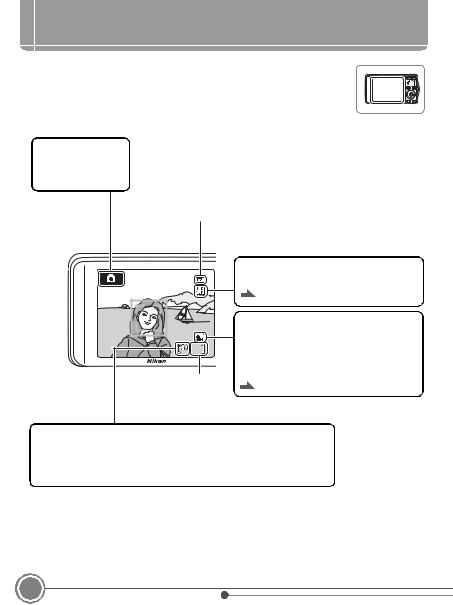
Step 1 Check Indicators in the Monitor
Check the battery level and number of exposures remaining.
|
Battery level indicator |
|
|
Shooting mode |
NO INDICATOR |
|
Battery fully charged. |
Ais displayed in |
|
|
|
B |
|
Battery low; prepare to replace or charge |
|
A (auto) mode. |
|
||
|
the battery. |
||
|
|
|
|
|
|
|
|
|
N |
|
Cannot take pictures. Recharge or |
|
Battery exhausted. |
|
replace with a fully charged battery. |
|
|
|
|
|
Vibration reduction (VR) icon |
|
Reduce the effects of camera shake. |
|
Page 113 of the User’s Manual |
|
Image mode |
|
Display image size and quality set in the |
9 |
image mode menu. |
|
The default setting is yNormal (3264 x |
Number of exposures |
2448) |
remaining |
Page 87 of the User’s Manual |
Internal memory indicator
Pictures will be recorded to internal memory (approximately 23 MB). When a memory card is inserted, Cis not displayed and pictures will be recorded to memory card.
•Information that is displayed on the screen during shooting or playback will be turned off after a few seconds.
8
Taking Pictures
 Loading...