


DIGITAL CAMERA
Quick Start Guide
Connect to a Smartphone |
2 |
Introduction |
4 |
Get Ready |
9 |
AShoot |
17 |
BView |
19 |
Have More Fun |
21 |
For Your Safety |
25 |
Technical Notes |
42 |
 CAUTION
There are important notes about the waterproofing from pages 31 to 34.
Make sure that you read them carefully.
Connect to a Smartphone
Your images. The world. Connected
Welcome to SnapBridge — Nikon’s new family of services to enrich your image experience. SnapBridge eliminates the barrier between
your camera and compatible smart device, through a combination of Bluetooth® low energy (BLE) technology and a dedicated app. The
stories you capture with your Nikon camera and lenses are automatically transferred to the device as they are taken. They can even be uploaded effortlessly to cloud storage services, inviting access across all your devices. You can share your excitement, when and where you want.
Download the SnapBridge app to get started!
Take advantage of the wide-ranging convenience by downloading the SnapBridge app onto your smart device now. Through a few simple steps, this app connects your Nikon cameras with a
compatible iPhone®, iPad® and/or iPod touch® or smart devices running on the AndroidTM operating system. The app is
available free from the website (http:// snapbridge.nikon.com), Apple App Store® and Google PlayTM.
For the latest information on SnapBridge,
visit the Nikon website for your area (page 25).
COOLPIX W100 Model Name: N1530
2 Connect to a Smartphone
The exciting image experience that SnapBridge offers…
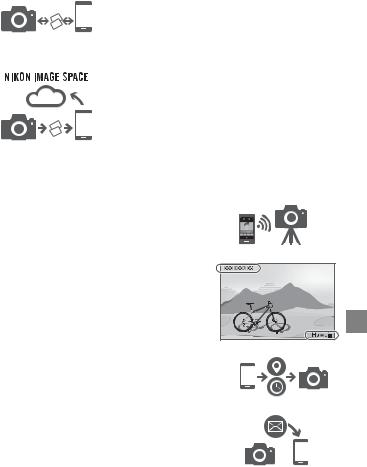
Automatic picture transfer from camera to smart device thanks to the constant connection between the two devices — making online photo sharing easier than ever
Upload of photos and thumbnail images to the
NIKON IMAGE SPACE cloud service
A range of services that enriches your imaging life, including:
• Camera remote control
• Imprinting up to two pieces of credit information (e.g. copyright, comments, text and logos) on pictures
• Automatic update of camera’s date and time info and location info
• Receive camera’s firmware updates
Connect to a Smartphone 3

Introduction
Read “For Your Safety” (pages 25-41) and all other instructions carefully with an adult before using your camera. Keep this manual where it will be read by all who use the camera.
Do the instructions in “Get Ready” (page 9-16) with an adult.
Downloading the “Reference Manual”
The Reference Manual (PDF format) provides more details in various languages on how to use this camera. Use your smart device or computer to refer to it along with this manual. Download the Reference Manual from our Download Center at the URL below.
•The Reference Manual can be viewed using Adobe PDF Reader, iBooks, or other software. Adobe PDF reader can be downloaded from the Adobe website.
Downloading “ViewNX-i”
ViewNX-i is free software that enables you to transfer images and movies to your computer for viewing and editing. Download the software from our Download Center at the URL below.
Visit Our Download Center
Visit the website below to download the Reference Manual and software for this camera.
http://downloadcenter.nikonimglib.com
Scan this image with your smart device’s QR code reader.
4

Nikon User Support
Visit the site below to register your camera and keep up-to-date with the latest product information. You will find answers to frequently asked questions (FAQs) and can contact us for technical assistance.
http://www.europe-nikon.com/support
Introduction 5
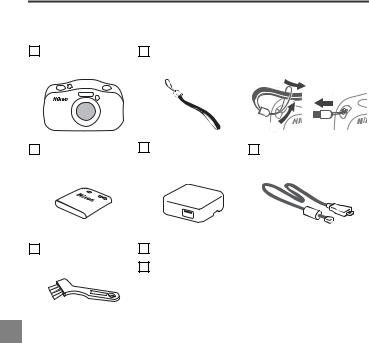
Confirming the Package Contents
In the event that any items are missing, please contact the store where you purchased the camera.
COOLPIX W100 |
Camera Strap1 |
(How to attach) |
Digital Camera |
|
|
|
|
2 |
|
|
3 |
|
|
1 |
EN-EL19 Rechargeable |
EH-73P Charging AC |
UC-E21 USB Cable |
Li-ion Battery |
Adapter2 |
|
Brush3 |
Quick Start Guide (this manual) |
|
Warranty (printed on the back cover of this manual) |
1 Do not swing the camera by the strap. The camera could strike objects or people causing injury and damage to the camera.
2A plug adapter is included if the camera was purchased in a country or region that requires a plug adapter. The shape of the plug adapter varies with the country or region of purchase (page 9).
3 The brush is used for cleaning the waterproof packing.
•Accessories are not waterproof.
•A memory card is not included with the camera. SD, SDHC, and SDXC memory cards are referred to as “memory cards” in this manual.
6 Introduction
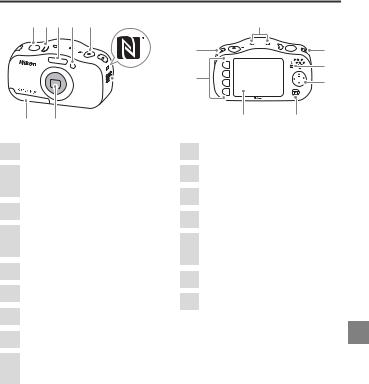
Parts of the Camera
1 |
2 3 |
4 |
5 |
6 |

 7
7
98
1 Shutter-release button
2Power switch/ power-on lamp
3 Flash
4AF-assist illuminator/ self-timer lamp
5 b(movie-record) button
6 N-Mark (NFC antenna)
7 Speaker
8 Lens
|
10 |
|
11 |
11 |
|
16 |
12 |
|
13 |
||
|
||
15 |
14 |
10Microphone
11Eyelet for camera strap
12Charge lamp/flash lamp
13Multi selector
14c(shooting/playback mode) button
15Monitor (Screen)
16Flexible buttons*
9Battery-chamber/ memory card slot cover
* In this document, the flexible buttons are sometimes referred to as “flexible button 1” through “flexible button 4”, in order from top to bottom.
Introduction 7
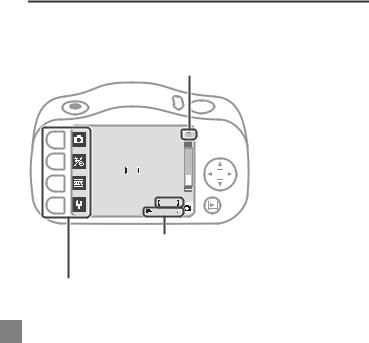
Using the Monitor
Battery level
•F: The battery has enough power remaining.
•G: The battery level is low.
 9 9 9
9 9 9
 Number of images
29 m 0s
that can be taken
Maximum movie recording time
Flexible buttons
Press to select an item shown on the screen.
8 Introduction

Get Ready
Inserting the Battery and Memory Card
1 |
4 |
|
2 |
|
|
3 |
5 |
6 |
|
||
|
Battery |
Memory card |
•Look at the stickers and insert the battery and memory card the right way.
•The first time you insert a memory card that has been used in another device into this camera, make sure to format it with this camera.
Charging the Battery
1Connect the camera to the Charging AC Adapter and to the electrical outlet.
9  8
8


7
If a plug adapter* is included with your camera, securely connect it to the Charging AC Adapter. Once the two are connected, attempting to forcibly remove the plug adapter could damage the product.
*The shape of the plug adapter varies according to the country or region in which the camera was purchased.
This step can be omitted if the plug adapter comes permanently bonded to the Charging AC Adapter.
9

•The battery starts charging, and the charge lamp flashes.
•When the battery is fully charged, the charge lamp turns off.
•Disconnect the Charging AC Adapter from the electrical outlet and then disconnect the cable.
2Close the cover.
•Lay the cover completely flat in the direction indicated by the arrow 0, and fully slide it in a.
0
a

B Notes About Opening and Closing the Cover
•Make sure the camera and your hands are not wet.
•Make sure that there is no debris, etc. inside the battery-chamber/ memory card slot cover.
•Make sure that the battery-chamber/memory card slot cover is firmly closed.
B Notes About Charging and Replacing the Battery
•Only an adult should charge and replace the battery.
•Do not use any USB cable other than the UC-E21. Doing so could result in overheating, fire or electric shock.
•Check the shape and direction of the plugs and do not insert or remove the plugs at an angle.
•Do not, under any circumstances, use another make or model of AC adapter other than EH-73P Charging AC Adapter, and do not use a commercially available USB-AC adapter or a battery charger for a mobile phone. Failure to observe this precaution could result in overheating or in damage to the camera.
•Refer to the information in “For Your Safety” (page 27) and “Caring for the Product” (page 37).
10 Get Ready
Setting the Camera
You can set the camera with or without using a smartphone or tablet.
Setup from a Smartphone or Tablet
• Before setting the camera, install the SnapBridge app (page 2) and enable Bluetooth and Wi-Fi on your smartphone or tablet (called “smart device” from this point on).
•The screens of the camera and smart device may be different from the actual screens.
1 Press the power switch to turn on the camera.
2Press Jor Kon the multi
selector to highlight a language and press O.
3Press Owhen the dialog at right is displayed.
Language
English
Use SnapBridge to send photos to your smart device and share them online.
To skip this screen and set SnapBridge later from
the Network menu, press X.
Get Ready 11
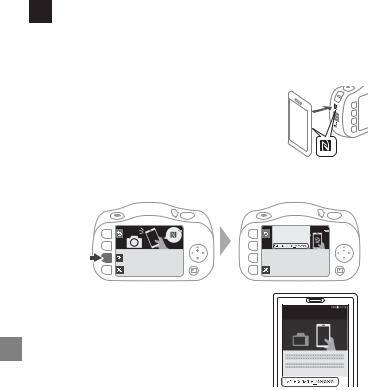
4Pair (i.e., establish a Bluetooth link between) the camera and the smart device.
•Here, connecting the camera and a smart device wirelessly through Bluetooth is called “pairing.”
•Android Devices with NFC Support
After checking that NFC is enabled on the smart device, touch the camera
Y(N-Mark) to the NFC antenna on the smart device to start the SnapBridge app.
•iOS Devices and Android Devices Without NFC Support
- Press O. The camera will wait for a connection.
|
App |
|
SnapBridge |
|
Camera |
NFC enabled devices: touch |
On your smart device, go to the app |
the camera to the smart device. |
store and search for |
Non-NFC enabled devices: press OK. |
SnapBridge. After installing, |
|
open the SnapBridge app. |
-Start the SnapBridge app on the smart device, and follow the onscreen instructions to tap the name of the camera.
Connect to Camera |
Camera name |
12 Get Ready
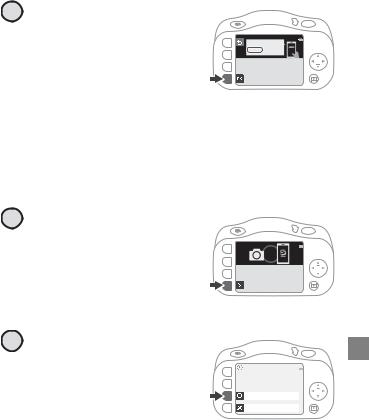
5 Check the authentication code.
• After checking that the camera |
Auth. code |
000000 |
|
and smart device display the |
Confirm that the same |
same six-digit authentication |
authentication code is |
displayed on the smart |
|
device and press OK. |
code, and then follow the
steps below (note that the |
Camera |
|
|
code may not be displayed in |
|
some versions of iOS, but you should follow the steps below even if the code is not displayed).
-On the camera, press O.
-On the smart device, tap Pairing (the name of the button may be different depending on the smart device).
6 Press A when the dialog at right is displayed.
• If the camera displays Could
not connect., press |
Your camera and smart device are |
RReconnect to return to |
connected! |
your smart device as they are taken. |
|
|
SnapBridge will send your photos to |
step 4. To cancel pairing |
|
settings, press SCancel. |
|
7Select whether to add
shooting location |
|
information to the images |
data from smart |
|
Download location |
that you take. |
device? |
|
|
Yes |
|
• To add location data to images, |
|
No |
|
select RYes. Turn on the |
|
location data features in the SnapBridge app and on the smart device (for more information, see the instructions included with the smart device).
Get Ready 13
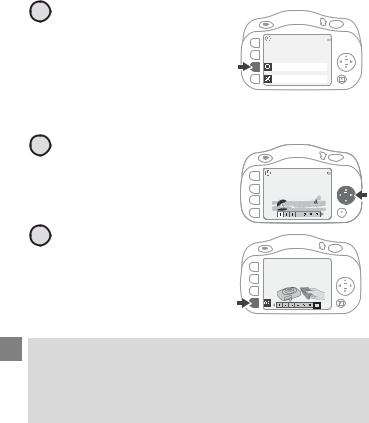
8Select a camera clock
setting.
• If you select RYes, the time is |
Sync clock with smart |
|
automatically set to match the |
device? |
|
|
||
Yes |
||
smart device. Turn on time |
||
|
||
No |
||
syncing in the SnapBridge app. |
|
•If you select SNo, set from
step 4 (page 15) in “Setup from the Camera Menus”.
9Confirm the messages about the waterproofing and press K.
•There are seven message screens.
Waterproofing precautions
10 Confirm the message on the screen shown at right and press O.
•The shooting screen is displayed.
 After drying thoroughly, use
 a cloth to remove any droplets remaining on the areas indicated.
Using a Smart Device for Other Settings
You can use various SnapBridge app features if you pair the camera with a smart device.
See “What SnapBridge Can Do for You” in the “Reference Manual” for details (page 4).
14 Get Ready
Setup from the Camera Menus
The camera clock can be set manually.
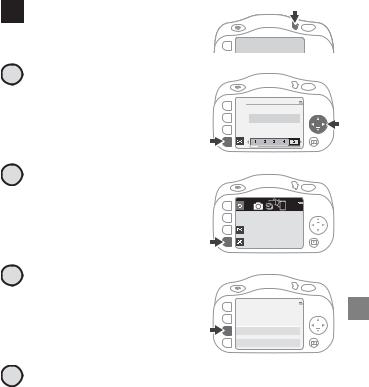
1Press the power switch to turn on the camera.
2Press Jor Kon the multi
selector to highlight a language and press O.
3Press Swhen the dialog at right is displayed.
4Press RYes.
5Select a date format.
Language
English
Use SnapBridge to send photos to your smart device and share them online.
To skip this screen and set SnapBridge later from
the Network menu, press X.
Set time and date?
 Yes
Yes
 No
No
Get Ready 15
 Loading...