


AF-S DX NIKKOR 18-200mm f/3.5-5.6G ED VR 
P. 2
User’s Manual P. 12
Benutzerhandbuch S. 28
Manuel d'utilisation P. 38
Manual del usuario P. 48
Användarhandbok S. 58
Pykoводство пользoвaтеля CTP. 68
Gebruikshandleiding P.78
Manuale d'uso |
P. 88 |
Εγχειρίδιο οδηγιών χρήσης |
Σελ. 98 |
Návod k obsluze |
STR. 108 |
Užívateľská príručka |
STR. 118 |
|
P. 128 |
P. 142
P. 152
Jp
En
De
Fr
Es
Sv
Ru
Nl
It
Gr
Cz
Sk
Sc
Tc
Kr

Jp


2


いこと
使用禁止
|
Jp |
|

太陽光のあたらない所に保管すること
ります。
|
|
|
|
|
|
|
|
|
|
||
|
ことがあります。
3
Jp ■
M/A M
 ON
ON OFF
OFF
LOCK
18
 NORMALACTIVE
M/A M
 ON
ON OFF
OFF
 NORMALACTIVE
A M/A M
ON  OFF
OFF
B
NORMAL ACTIVE
C 


LOCK 18 


1P. 8
2P. 8
3P. 8
4P. 8
5P. 5
6P. 5
0 P. 6
P. 9
cCPU P. 9
dP. 6
eP. 7
fP. 7
gP. 5
4

DX Jp DX D300 D90DX 35mm 1.5
■
3.5 CIPAFX FXDX DX
NORMALACTIVE
NORMAL
ED
■
5
IF IF
などの影響により∞
18mm gLOCK
■ F
F 11/3F
5

Jp ■ A
|
|
||
|
M/A |
M |
|
|
|||
|
|
||
AF |
|
|
|
|
|
||
|
|||
MF |
|
||
M/A
1dM/A
2AF AF
AF-ON0 MF
3AFAF
(P. 11
■
|
|
|
|
|
|
|
|
|
|||
|
|
||
|
|
||
|
|
|


 NORMAL
ACTIVE
NORMAL
ACTIVE
NORMAL
ACTIVE
6

B
ON
OFF
C
ON
NORMAL
ACTIVE
Jp
NORMALNORMAL
OFF ON
AF AF-ON AF
eOFF ON
7

Jp ■ |
■ |
0.6m |
|
|
|
※
|
|
D7000/ |
18mm 1.0m |
D300 / |
|
D200/D100 |
24mm |
|
|
|
24mm/35mm |
D90/D80 |
1.0m |
|
50mm |
D70 / |
|
D5100/D5000/ |
24mm 1.0m |
D3100/D3000/ |
|
D60/D50/D40 |
35mm |
|
|
|
|
D100 20mm18mm
C 
 B
B 


3
A
8

■
CPU c
b
リーナーを少量湿らせ、レンズの中心から外周へ渦巻 状に、拭きムラ、拭き残りのないように注意して拭い てください。
NC
Jp
■
72mm LC-72
HB-35
CL-1018
■
72mm
9

Jp ■
|
F CPU G |
|
AF-S DX |
|
|
|
DX |
18 mm―200 mm |
|
|
1 3.5―5.6 |
|
12 16 3 ED |
|
2 |
76°―8° |
|
|
18 24 35 50 70 135 200mm |
|
|
|
|
IF |
|
|
|
|
|
|
VCM |
|
|
|
∞0.5 m 3 ft |
|
0.5 m |
|
7 |
|
|
|
18 mm f/3.5―22 |
|
200 mm f/5.6―36 |
|
|
72 mm P=0.75 mm
|
77 mm ×96.5 mm |
|
|
|
|
|
565 g |
10
■ |
Jp |
D |
E |
D
E
1 2
11

Notes on Safety Operations
En  CAUTION
Do not disassemble
Touching the internal parts of the camera or lens could result in injury. Repairs should be performed only by qualified technicians. Should the camera or lens break open as the result of a fall or other accident, take the product to a Nikonauthorized service representative for inspection after unplugging the product and/or removing the battery.
Turn off immediately in the event of malfunction
Should you notice smoke or an unusual smell coming from the camera or lens, remove the battery immediately, taking care to avoid burns. Continued operation could result in injury. After removing or disconnecting the power source, take the product to a Nikon-authorized service representative for inspection.
Do not use the camera or lens in the presence of flammable gas
Operating electronic equipment in the presence of flammable gas could result in an explosion or fire.
Do not look at the sun through the lens or viewfinder
Viewing the sun or other strong light sources through the lens or viewfinder could cause permanent visual impairment.
Keep out of reach of children
Particular care should be taken to prevent infants from putting the batteries or other small parts into their mouths.
Observe the following precautions when handling the camera and lens
•Keep the camera and lens unit dry. Failure to do so could result in fire or electric shock.
12

•Do not handle or touch the camera or lens unit with wet hands. Failure to do so could result in
electric shock. |
En |
•When shooting with back-lighting, do not point the lens at the sun or allow sunlight to pass directly down the lens as this may cause the camera to overheat and possibly cause a fire.
•When the lens will not be used for an extended period of time, attach both front and rear lens caps and store the lens away from direct sunlight. Failure to do so could result in a fire, as the lens may focus sunlight onto a flammable object.
13
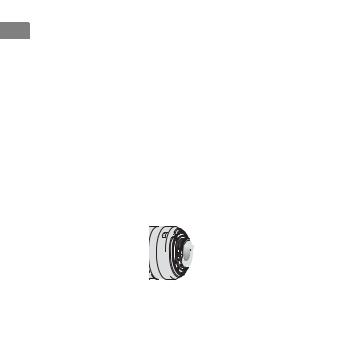
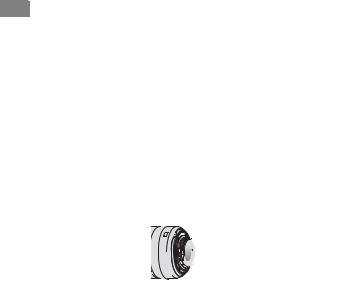
■ Nomenclature
En
M/A M
 ON
ON OFF
OFF
LOCK
18
 NORMALACTIVE
M/A M
 ON
ON OFF
OFF
 NORMALACTIVE
A M/A M
ON  OFF
OFF
B
NORMAL ACTIVE
C 


LOCK 18 


1Lens hood (P. 22)
2Lens hood attachment index (P. 22)
3Lens hood setting index (P. 22)
4Lens hood mounting index (P. 22)
5Zoom ring (P. 16)
6Focal length scale (P. 16)
7Focal length index
8Distance scale
9Distance index line
0Focus ring (P. 17) aMounting index
bLens mount rubber gasket (P. 22)
cCPU contacts (P. 22) dFocus mode switch (P. 17) eVibration reduction ON/
OFF switch (P. 18) fVibration reduction mode
switch (P. 18)
g Zoom lock switch
() : reference page
14

Thank you for purchasing the AF-S DX NIKKOR 18-200mm f/3.5-5.6G ED VR II lens. DX NIKKOR lenses are specially designed for use with Nikon digital-SLR (Nikon DX format) cameras, such as
the D300-series and D90. When mounted on Nikon DX format cameras, the lens picture angle is En equivalent to approximately 1.5×the focal length in 35mm format. Before using this lens, please
read these instructions and refer to your camera’s User’s Manual.
■ Major features
•By enabling vibration reduction, slower shutter speeds (3.5 stops*) can be used, thus increasing the range of usable shutter speeds and zoom positions, particularly when hand-holding the camera. (*The effects of VR on shutter speed are measured according to Camera and Imaging Products Association (CIPA) standards; FXformat lenses are measured using FX-format digital cameras, DX-format lenses using DXformat cameras. Zoom lenses are measured at maximum zoom.)
•It is possible to switch between NORMAL mode, which reduces effects of camera shake under normal shooting conditions, and ACTIVE mode, which reduces effects of
more noticeable camera shake such as that which occurs when taking pictures from a moving vehicle.
In NORMAL mode, the camera automatically distinguishes camera shake from panning motion to reduce the effects of camera shake with horizontal or vertical panning.
•Superior optical performance and rendering characteristics are maximized with the use of three aspherical lens elements and two extra-low dispersion (ED) glass elements, which ensure correction of chromatic aberration. In addition, the rounded aperture produces soft and pleasing blur characteristics in portions of pictures that are out-of-focus.
15

|
■ Focusing, zooming, and depth of |
En |
field |
Before focusing, rotate the zoom ring 5to |
|
|
adjust the focal length until the desired |
|
composition is framed. |
|
If your camera has a depth-of-field preview |
|
(stop-down) button or lever, depth of field can |
|
be previewed through the camera viewfinder. |
•This lens is equipped with the Nikon Internal Focusing (IF) system. As the shooting distance decreases, the focal length also decreases.
•The distance scale does not indicate the precise distance between the subject and the camera. Values are approximate and should be used only as a general guide. When shooting distant landscapes, depth of field may influence operation so that the camera may focus at a position that is closer than infinity.
•When the zoom lock switch gis set to LOCK position at the focal length of 18mm, the zoom ring is locked. When carrying the camera, lock the zoom ring to prevent the lens from extending due to its own weight.
■ Setting the aperture
Use the camera to adjust the aperture setting.
■ Variable maximum apertures
Zooming the lens from 18mm to 200mm decreases the maximum aperture by 1 1/3 stop.
However, there is no need to adjust the aperture setting to achieve correct exposures because the camera automatically compensates for this variable.
16

■ Focusing (Fig. A)
Set your camera’s focus mode selector according to the chart below:
Camera |
Lens’ focus mode switch |
||
focus mode |
M/A |
M |
|
|
Autofocus |
Manual focus |
|
AF |
with manual |
(Focus assist is |
|
|
override |
available.) |
|
MF |
Manual focus |
(Focus assist is |
|
available.) |
|||
|
|||
|
|
|
|
For more information on camera focus modes, refer to your camera’s User’s Manual.
Autofocus with manual override (M/A mode)
1Set the lens focus mode switch dto M/A.
2Autofocus is enabled, but autofocus
operation can be overridden by rotating the separate focus ring 0while pressing the shutter-release button halfway, or by pressing the AF-ON button on the camera body of cameras so equipped.
3 Press the shutter-release button halfway or |
|
the AF-ON button once again to cancel |
|
manual focus and resume autofocus. |
En |
Getting good results with autofocus
Refer to “Notes on using wideor super wideangle AF NIKKOR lenses” (P. 26).
17
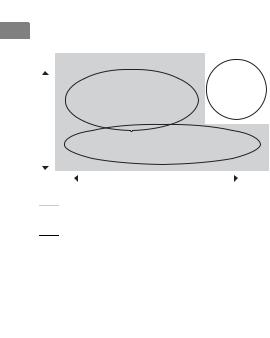
■ Vibration reduction mode
En Basic concept behind vibration reduction
High |
|
|
|
|
|
||
|
|
|
Camera |
||||
|
|
|
|
|
|
||
|
|
|
|
|
|
shakewhen |
|
|
|
|
|
|
|
||
Number |
|
|
Camera shake |
takingpictures |
|||
|
|
fromamoving |
|||||
of |
|
|
|
|
vehicle |
||
|
|
|
|
|
|
||
vibrations |
|
|
|
Panning shots |
|
|
|
|
|
|
|
|
|
|
|
|
|
|
|
|
|
|
|
|
|
|
|
|
|
|
|
Low |
Low |
|
|
|
High |
||
|
Strength of vibrations |
|
|||||
|
|
||||||
|
|
|
|
|
|||

 Set the vibration reduction mode switch to NORMAL.

 Set the vibration reduction mode switch to ACTIVE.
|
Set the vibration |
When taking |
reduction mode switch to |
pictures |
either NORMAL or |
|
ACTIVE. |
|
|
When taking |
Set the vibration |
|
reduction mode switch to |
||
panning shots |
||
NORMAL. |
||
|
||
|
|
|
When taking |
Set the vibration |
|
pictures from a |
reduction mode switch to |
|
moving vehicle |
ACTIVE. |
|
|
|
Setting the vibration reduction ON/ OFF switch (Fig. B)
ON: The effects of camera shake are reduced while the shutterrelease button is pressed halfway and also at the instant the shutter is released. Because vibration is reduced in the viewfinder, auto/manual focusing and exact framing of the subject are easier.
OFF: The effects of camera shake are not reduced.
18

Setting the vibration reduction mode switch (Fig. C)
Set the vibration reduction ON/OFF switch to ON and choose a vibration reduction mode with the vibration reduction mode switch.
NORMAL:The vibration reduction mechanism primarily reduces the effects of camera shake. The effects of camera shake are also reduced with horizontal and vertical panning.
ACTIVE: The vibration reduction mechanism reduces the effects of camera shake, such as that which occurs when taking pictures from a moving vehicle, whether it be normal or more intense camera shake. In this mode, camera shake is not automatically distinguished from panning motion.
Notes on using vibration reduction
• After pressing the shutter-release button
halfway, wait until the image in the |
En |
|
|
viewfinder stabilizes before pressing the |
|
shutter-release button the rest of the way |
|
down. |
|
•Due to the characteristics of the vibration reduction mechanism, the image in the viewfinder may be blurred after the shutter is released. This is not a malfunction.
•When taking panning shots, be sure to set the vibration reduction mode switch to
NORMAL.
If the camera is panned in a wide arc, compensation for camera shake in the panning direction is not performed. For example, only the effects of vertical camera shake is reduced with horizontal panning.
19

•Do not turn the camera off or remove the lens from the camera while vibration
En |
reduction is operating. Failure to observe this |
|
|
|
note could result in the lens sounding and |
|
feeling as if an internal component is loose or |
|
broken when it is shaken. This is not a |
|
malfunction. Turn the camera on again to |
|
correct this. |
•With cameras featuring a built-in flash, vibration reduction does not function while the built-in flash is charging.
•With autofocus cameras featuring an AF-ON button, vibration reduction does not function even when the AF-ON button is pressed.
•When the camera is mounted on a tripod, set the vibration reduction ON/OFF switch eto OFF. However, set the switch to ON when using a tripod without securing the tripod head, or when using a monopod.
20
■ The built-in flash and vignetting
•The built-in flash cannot be used over distances of less than 0.6 m (2.0 ft.).
•To prevent vignetting, do not use the lens hood.
*Vignetting is the darkening of the corners around the image that occurs when light emitted by the flash is obstructed by the lens hood, or by the lens barrel depending upon the focal length or shooting distance.
Cameras |
Supported focal length/ |
|
Shooting distance |
||
|
||
D7000/ |
• 18mm/1 m (3.3 ft.) or greater |
|
D300-series/ |
||
D200/D100 |
• 24mm or longer/No restriction |
|
|
||
|
• 24mm and 35mm/1 m (3.3 ft.) or |
|
D90/D80 |
greater |
|
|
• 50mm or longer/No restriction |
D70-series/ |
|
|
|
D5100/ |
|
En |
|
D5000/ |
• 24mm/1 m (3.3 ft.) or greater |
||
|
|||
D3100/ |
|
||
• 35mm or longer/No restriction |
|
||
D3000/D60/ |
|
||
D50/D40- |
|
|
|
series |
|
|
•The built-in flash on the D100 has an angle of coverage suited to focal lengths of 20mm and greater.
Vignetting occurs at a focal length of 18mm.
•For the latest information on vignetting with this lens, see the camera manual.
21

■ Using the lens hood
The lens hood blocks light rays that have En harmful effects on pictures. It also helps to
protect the glass surface of the lens.
Attaching the hood
• Be sure that the 
 lens hood
 mounting index
  (C) is aligned
 with the lens
•To facilitate attachment or removal of the hood, hold it by the lens hood attachment index (A) rather than its outer edge.
•If the lens hood is not correctly attached, vignetting may occur.
•The lens can be stored with the lens hood attached in the reverse position.
■ Lens care
•Be careful not to allow the CPU contacts c to become dirty or damaged.
•If the lens mount rubber gasket bis damaged, be sure to visit the nearest Nikonauthorized service representative for repair.
•Clean lens surfaces with a blower brush. To remove dirt and smudges, use a soft, clean cotton cloth or lens tissue moistened with ethanol (alcohol) or lens cleaner. Wipe in a circular motion from the center to the outer edge, taking care not to leave traces or touch other parts of the lens.
•Never use organic solvent such as thinner or benzene to clean the lens, as this could cause damage, result in a fire, or cause health problems.
•NC filters are available to protect the front lens element. The lens hood also helps to protect the front of the lens.
22

•When storing the lens in its flexible lens pouch, attach both the front and rear lens caps.
•When the lens is mounted on a camera, do not pick up or hold the camera and lens by the lens hood.
•When the lens will not be used for an extended period of time, store it in a cool, dry place to prevent mold and rust. Be sure to store the lens away from direct sunlight or chemicals such as camphor or naphthalene.
•Do not get water on the lens or drop it in water as this will cause it to rust and malfunction.
•Reinforced plastic is used for certain parts of the lens. To avoid damage, never leave the lens in an excessively hot place.
■ Standard accessories
• 72mm snap-on Front Lens Cap LC-72
• Rear Lens Cap |
En |
|
•Bayonet Hood HB-35
•Flexible Lens Pouch CL-1018
■ Optional accessory
• 72mm screw-on filters
23

■ Specifications
En |
Type of lens: |
G-type AF-S DX Zoom- |
|
NIKKOR lens with built-in CPU |
|
|
|
|
|
|
and Nikon bayonet mount |
|
|
(specially designed for use |
|
|
with Nikon digital-SLR— |
|
|
Nikon DX format—cameras) |
|
Focal length: |
18mm-200mm |
|
Maximum |
f/3.5-5.6 |
|
aperture: |
|
|
Lens |
16 elements in 12 groups |
|
construction: |
(3 aspherical lens and 2 ED |
|
|
lens elements) |
|
Picture angle: |
76º-8º |
|
Focal length |
18, 24, 35, 50, 70, 135, 200mm |
|
scale: |
|
|
Distance |
Output to camera |
|
information: |
|
|
Zoom control: |
Manually via separate zoom |
|
|
ring |
Focusing: Nikon Internal Focusing (IF) system, autofocus using a Silent Wave Motor, manually via separate focus ring
Vibration Lens-shift method using reduction: voice coil motors (VCMs)
Shooting Graduated in meters and feet distance scale: from 0.5 m (3 ft) to infinity (  )
)
Closest |
0.5 m (1.6 ft.) from focal plane |
focusing |
at all zoom settings |
distance: |
|
No. of |
7 pcs. (rounded) |
diaphragm |
|
blades: |
|
Diaphragm: |
Fully automatic |
Aperture |
f/3.5 to f/22 (at 18mm), |
range: |
f/5.6 to f/36 (at 200mm) |
Exposure Via full-aperture method measurement:
Attachment 72 mm (P = 0.75 mm) size:
24

Dimensions: Approximately 77 mm (dia.) × 96.5 mm (extension from the
camera’s lens-mounting En flange)
Weight: Approximately 565 g (19.9 oz)
Specifications and designs are subject to change without notice or obligation on the part of the manufacturer.
25
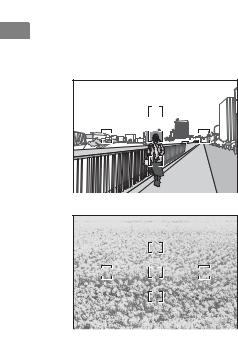
■ Notes on using wideor super wide-angle AF NIKKOR lenses
In the following situations, autofocus may not perform as expected when shooting with wideor
En |
super wide-angle AF NIKKOR lenses. |
|
DA person standing in front of a distant background
1.When the main subject in the focus brackets is relatively small
When a person standing in front of a distant background is positioned within the focus brackets, as shown in Fig. D, the background may be in focus, while the subject is out of focus.
2. When the main subject is a finely
patterned subject or scene
When the subject is finely patterned or of E A field filled with flowers low contrast, such as a field filled with
flowers, as shown in Fig. E, focus may be difficult to acquire using autofocus.
Responses to these types of situations
(1) Focus on a different subject located at the same distance from the camera, apply focus lock, recompose, and shoot.
26

(2)Set the camera’s focus mode to manual focus and focus manually on the subject.
Refer to “Getting Good Results with Autofocus” |
En |
|
|
in the camera’s User’s Manual. |
|
27

En
En
De
Hinweise für sicheren Betrieb
 ACHTUNG
Keinesfalls zerlegen.
Beim Berühren der Innenteile von Kamera oder Objektiv droht Verletzungsgefahr. Überlassen Sie Reparaturen unbedingt ausschließlich qualifizierten Technikern. Kommt es durch einen heftigen Stoß (z.B. Fall auf den Boden) zu einem Bruch von Kamera oder Objektiv, so trennen Sie zunächst das Produkt vom Stromnetz bzw. entnehmen die Batterie(n) und geben es dann an eine autorisierte NikonServicestelle zur Überprüfung ab.
Bei einer Störung sofort die Stromversorgung ausschalten.
Bei Entwicklung von Rauch oder ungewöhnlichem Geruch durch Kamera oder Objektiv entnehmen Sie sofort die Batterie(n); dabei vorsichtig vorgehen, denn es besteht Verbrennungsgefahr. Bei einem Weiterbetrieb unter diesen Umständen droht Verletzungsgefahr.
Nach dem Abtrennen von der Stromversorgung geben Sie das Gerät an eine autorisierte Nikon-Servicestelle zur Überprüfung ab.
Kamera oder Objektiv keinesfalls bei Vorhandensein von brennbarem Gas einsetzen.
Wird elektronisches Gerät bei brennbarem Gas betrieben, so droht u. U. Explosionsoder Brandgefahr.
Keinesfalls durch Objektiv oder Sucher in die Sonne blicken.
Beim Betrachten der Sonne oder anderer starker Lichtquellen durch Objektiv oder Sucher droht eine permanente Schädigung des Sehvermögens.
Dem Zugriff von Kindern entziehen.
Es ist unbedingt dafür zu sorgen, dass Kleinkinder keine Batterien oder andere Kleinteile in den Mund nehmen können.
Beim Umgang mit Kamera und Objektiv unbedingt die folgenden Vorsichtmaßnahmen beachten:
•Schützen Sie die Kamera und das Objektiv vor Feuchtigkeit. Andernfalls droht Brandoder Stromschlaggefahr.
•Handhaben oder berühren Sie die Kamera bzw. das Objektiv keinesfalls mit nassen Händen. Andernfalls droht Stromschlaggefahr.
•Bei Gegenlichtaufnahmen nicht das Objektiv gegen die Sonne richten oder das Sonnenlicht direkt durch das Objektiv eintreten lassen. Dies könnte eine Überhitzung der Kamera verursachen und ein Brand könnte die Folge sein.
•Vor einem längeren Nichtgebrauch des Objektivs bringen Sie den vorderen und hinteren Deckel an und bewahren das Objektiv geschützt vor direkter Sonnenlichteinwirkung auf. Andernfalls droht Brandgefahr wegen möglicher Fokussierung von Sonnenlicht durch das Objektiv auf brennbare Gegenstände.
28

■ Nomenklatur
M/A M
 ON
ON OFF
OFF
LOCK
18
 NORMALACTIVE
M/A M
 ON
ON OFF
OFF
 NORMALACTIVE
A M/A M
ON  OFF
OFF
B
NORMAL ACTIVE
C 


LOCK 18 


1Gegenlichtblende (S. 34)
2Markierung für die Arretierung
der Gegenlichtblende (S. 34) |
De |
|
3 Markierung für die Ausrichtung |
||
|
||
der Gegenlichtblende (S. 34) |
|
|
4 Markierung für das Ansetzen |
|
|
der Gegenlichtblende (S. 34) |
|
|
5 Zoom-Einstellring (S. 31) |
|
|
6 Brennweitenskala (S. 31) |
|
|
7 Markierung der |
|
|
Brennweitenskala |
|
|
8 Entfernungsskala |
|
|
9 Markierung für die |
|
Entfernungseinstellung
0 Entfernungseinstellring (S. 31)
aMarkierung für die Ausrichtung des Objektivs
bDichtungsmanschette (S. 35)
cCPU-Kontakte (S. 35)
dFokusmodusschalter (S. 31)
eBildstabilisatorschalter ON/OFF (S. 32)
fVR-Modus-Schalter (S. 32)
gZoom-Sperrschalter
(): Seitennummer
29

En
En
De
Wir danken Ihnen für das Vertrauen, das Sie Nikon mit dem Kauf des AF-S DX NIKKOR 18-200mm 1:3,5-5,6G ED VR II entgegenbringen. DX-NIKKOR-Objektive sind speziell für die Verwendung mit digitalen Nikon-Spiegelreflexkameras mit DX-Bildformat konstruiert, wie etwa der D300-Serie und der D90. Der Bildwinkel des Objektivs entspricht bei Verwendung an einer DX-Format-Kamera dem eines Objektivs mit der ca. 1,5-fachen Brennweite an einer Kleinbildkamera. Machen Sie sich bitte vor dem Gebrauch dieses Objektivs mit dem Inhalt dieser Bedienungsanleitung und dem Benutzerhandbuch Ihrer Kamera vertraut.
■ Die wichtigsten Merkmale
•Bei eingeschaltetem Bildstabilisator können längere Belichtungszeiten (3,5 Stufen*) verwendet werden. Auf diese Weise kann mit längeren Belichtungszeiten fotografiert werden, insbesondere bei Freihandaufnahmen mit längeren Brennweiten.
(*Die Wirkung des Bildstabilisators (VR) auf die Belichtungszeit wird gemäß CIPA-Standards ermittelt (Camera and Imaging Products Association); FX-Objektive werden an FX-Format-Kameras gemessen, DX-Objektive an DX-Format-Kameras. Zoomobjektive werden bei der längsten Brennweiteneinstellung gemessen.)
•Es sind zwei Bildstabilisatormodi verfügbar: 1der
Modus NORMAL zum Reduzieren von Kameraverwacklungen und 2der Modus ACTIVE zum Reduzieren einer starken Kameraverwacklung, etwa bei Aufnahmen aus einem fahrenden Fahrzeug. Der Bildstabilisator wirkt auch bei Kameraschwenks, da das Objektiv automatisch Schwenks von Kameraverwacklungen unterscheidet, wodurch ein effizientes Funktionieren des Bildstabilisators (im Modus NORMAL) möglich wird.
•Durch zwei ED-Glas-Linsen (extra-low dispersion) wird der Farbfehler effektiv korrigiert. So werden eine außergewöhnlich hohe optische Leistung und Abbildungsqualität erzielt. Die Blende mit abgerundeten Lamellen erzeugt ein sehr natürliches Bokeh bei unscharf abgebildeten Objekten in Vorderund Hintergrund.
30
 Loading...