


AF-S NIKKOR 70-200mm f/4G ED VR
|
|
|
Nano Crystal Coat |
|
Manuale d’uso |
||
User’s Manual |
Návod k obsluze |
||
Benutzerhandbuch |
Užívateľská príručka |
||
Manuel d’utilisation |
Manualul utilizatorului |
||
Manual del usuario |
Посібник користувача |
||
Användarhandbok |
|
||
Pykoводство пользoвaтеля |
|
||
Gebruikshandleiding |
|
||
Manual do utilizador |
Manual bagi Pengguna |
||
Manual do usuário |
|
||
|
|
|
|
|
|
|
|
Jp
En
De
Fr
Es
Sv
Ru
Nl
Pt
Pb
It
Cz
Sk
Ro
Ua
Sc
Tc
Kr
Id
Ar

Jp
A
A
I L
E F
K D
|
A |
|
|
A |
|
E |
|
I |
|
||
|
|||||
|
|
|
|
||
|
|||||
|
|
|
|
|
|
G |
|
A |
|
||
|
|
|
|
||
|
|
||||
|
|
|
|||
C |
|
|
|
||
|
|
||||
|
|
A |
|
||
|
|||||
|
|
|
|
|
|
K |
|
|
|||
|
|||||
|
|
|
|||
|
|
|
|
||
|
|
||||
|
|
A |
|||
|
|||||
C |
|
||||
|
|
||||
|
|||||
|
|
|
|
||
|
A |
|
|||
|
|
|
|
||
J |
|
||||
|
|||||
|
|||||
|
|
||||
|
|
|
|||
|
|
||||
|
|
||||
|
|
|
|
||
|
|
|
|||
|
F |
|
|||
F |
|
||||
|
|||||
|
|||||
|
|
|
|
||
|
|
||||
|
|
|
|||
|
|
|
|||
|
|
|
|
||
F |
|
|
|
|
|
|
|
|
|||
|
|
|
|
||
|
|
|
|
|
|
■ |
Jp |
|||||||||||||||||||||
q w e r t y u i o ! |
||||||||||||||||||||||
|
|
|
|
|
|
|
|
|
|
|
|
|
|
|
|
|
|
|
|
|
|
|
|
|
|
|
|
|
|
|
|
|
|
|
|
|
|
|
|
|
|
|
|
|
|
|
|
|
|
|
|
|
|
|
|
|
|
|
|
|
|
|
|
|
|
|
|
|
|
|
|
|
|
|
|
|
|
|
|
|
|
|
|
|
|
|
|
|
|
|
|
|
|
|
|
|
|
|
|
|
|
|
|
|
|
|
|
|
|
|
|
|
|
|
|
|
|
|
|
|
|
|
|
|
|
|
|
|
|
|
|
|
|
|
|
|
|
|
|
|
|
|
|
|
|
|
|
|
|
|
|
|
|
|
|
|
|
|
|
|
|
|
|
|
|
|
|
|
|
|
|
|
|
|
|
|
|
|
|
|
|
|
|
|
|
|
|
|
|
|
|
|
|
|
|
|
|
|
|
|
|
|
|
|
|
|
|
|
|
|
|
|
|
|
|
|
|
|
|
|
|
|
|
|
|
|
|
|
|
|
|
|
|
|
|
|
|
|
|
|
|
|
|
|
|
|
|
|
|
|
|
|
!1 !2 !3 !4
!5 !6 !7
q ..................................... |
P. 8 |
w ................................ |
P. 5 |
e |
|
r |
|
t ......................................... |
P. 6 |
y ......................................... |
P. 6 |
u |
|
i |
|
o .......... |
P. 10 |
!0CPU ..................................... |
P. 10 |
!1 |
|
.............................................. |
P. 5 |
!8!9
@0
|
|
!2 |
|
.............................................. |
P. 5 |
!3 ........................... |
P. 6 |
!4 |
|
.............................................. |
P. 7 |
!5 ........................................................ |
P. 8 |
!6 ........................... |
P. 8 |
!7 ................................ |
P. 8 |
!8 90° ................................. |
P. 9 |
|
|
!9 ...................................... |
P. 9 |
@0 ................... |
P. 9 |

Jp
• DX D300 D700022°50′— 8° 35mm105—300mm
■
○ ×
|
|
|
|
|||||
|
|
|
|
|
|
|
||
P 2 |
S |
A |
M |
AF 3 |
VR 4 |
|||
|
||||||||
FX /DX |
|
|
|
|
|
|
|
|
F6 F5 F100 F80 |
○ |
○ |
○ |
○ |
○ |
|
○ |
|
U2 U |
|
|
|
|
|
|
|
|
|
|
|
|
|
|
|
|
|
600i S 1 |
○ |
○ |
○ |
○ |
○ |
|
× |
|
|
|
|
|
|
|
|
|
|
F4 F90X F90 F70D |
○ |
○ |
× |
× |
○ |
|
× |
|
|
|
|
|
|
|
|
|
|
Us F60D F50D F-401 |
○ |
○ |
○ |
○ |
× |
|
× |
|
|
|
|
|
|
|
|
|
|
F-801 F-601M |
○ |
○ |
× |
× |
× |
|
× |
|
|
|
|
|
|
|
|
|
|
F3AF F-601 F-501 MF F-601M |
× |
× |
× |
× |
× |
|
× |
|
|
|
|
|
|
|
|
|
|
1 M
2 P AUTO
3 AF
4 VR

■
Jp
•
|
|
|
|
|
|
|
|
|
|
|
|
|
A/M |
M |
|||
|
|
|
|||
|
|
|
|
|
|
FX /DX |
|
|
|
|
|
F6 |
AF |
|
|
|
|
F5 F4 F100 F90X |
|
|
|
||
|
|
||||
F90 F80 F70D |
|
|
|
|
|
U2 U 600i |
MF |
|
|
||
S |
|
|
|||
|
|
|
|
|
|
Us F60D F50D F-801 |
AF |
|
|
||
F-401 F-601M |
MF |
|
F-601M |
||
|
|
|
|
|
|
A/M
z [A/M]
x いはAF AF-ON
•AF AF-ON
FULL 3m

 ∞̶3m 3m

■
Jp
•P. 210
• 遠景撮影でも被写界深度などの影響により∞
■
■
なり、画像に映り込む現象です。
■
4.0
CIPA FX FXDX DX
ON 

OFF
6

ON Jp
NORMAL 

ACTIVE
•P. 4 OFF600i ON
•NORMAL NORMAL
•OFF ON
•OFFON

■
Jp
• ● ̶e
•
•̶
■
|
A |
B |
C |
E |
EC-B |
G1 |
G2 |
G3 |
G4 |
J |
L |
M |
U |
|
|
|
|||||||||||||
|
|
EC-E |
||||||||||||
|
|
|
|
|
|
|
|
|
|
|
|
|
|
|
F6 |
|
|
|
— |
|
— |
— |
— |
— |
— |
|
|
|
|
|
|
|
|
|
|
|
|
|
|
|
|
|
|
|
F5+DP-30 |
|
|
|
○ |
|
|
|
|
|
|
|
|
|
|
|
|
+0.5 |
|
|||||||||||
|
|
|
|
|
|
|
|
|
|
|
|
|||
|
|
|
|
|
|
|
|
|
|
|
|
|
|
|
|
|
|
|
|
|
|
|
|
○ |
|
|
|
|
|
F5+DA-30 |
+1.0 +0.5 ○ +0.5 |
|
–1.0 +0.5 +1.0 |
|
||||||||||
F6
b6 BorE BE 0 BorE F5 No.18
M 1/1
F5 A B E EC-B EC-E J L
■ RT-1
Jp
A
z q
x we
c r
v ty
6 •
b u
|
4 |
7 |
5 |
|
• qwe

Jp |
4 |
|
|
z q |
|||
|
x we r
■
•CPU
• クリーナーを少量湿らせ、レンズの中心から外周へ渦巻状に、拭きムラ、拭き 残りのないように注意して拭いてください。
•NC
■
•67mm LC-67
•LF-4
•HB-60
•CL-1225
10
■
• 67mm
Jp
•RT-1
•AF-I/AF-S TC-14E/TC-14E /TC-17E /TC-20E / TC-20E /TC-20E
F8
■
|
F CPU G AF-S |
|||
|
70mm—200mm |
|
||
|
1 4 |
|
||
|
14 20 ED 3 |
|
||
|
34°20′—12°20′35mm FX |
|
||
|
|
|
||
22°50′—8° DX |
||||
|
||||
|
27°40′—9°50′ IX240 |
|
||
|
70 85 105 135 200mm |
|
||
|
|
|
||
|
|
|
||
|
IF |
|
||
|
||||
|
||||
|
VCM |
|
||
|
∞ 1m |
|
||
|
1m |
|
||
|
9 |
|
||
|
|
|
||
|
f/4—32 |
|
||
|
|
|
||
|
FULL∞ 1m ∞—3m 2 |
|||
|
||||
|
|
|
||
|
67mm P=0.75mm |
|||
|
78mm × 178.5mm |
|
||
|
||||
|
||||
|
|
|
||
|
850g |
|||
11

|
For Your Safety |
En |
ACAUTIONS |
• Do not disassemble. Touching the internal parts of the camera or lens could result |
|
|
in injury. In the event of malfunction, the product should be repaired only by a |
|
qualified technician. Should the product break open as the result of a fall or |
|
other accident, remove the camera battery and/or disconnect the AC adapter |
|
and then take the product to a Nikon-authorized service center for inspection. |
|
• Turn the camera off immediately in the event of malfunction. Should you notice |
|
smoke or an unusual smell coming from the equipment, immediately unplug |
|
the AC adapter and remove the camera battery, taking care to avoid burns. |
|
Continued operation could result in fire or injury. After removing the battery, |
|
take the equipment to a Nikon-authorized service center for inspection. |
|
• Do not use in the presence of flammable gas. Operating electronic equipment in the |
|
presence of flammable gas could result in explosion or fire. |
|
• Do not look at the sun through the lens or the camera viewfinder. Viewing the sun or |
|
other bright light source through the lens or viewfinder could cause permanent |
|
visual impairment. |
|
• Keep out of reach of children. Failure to observe this precaution could result in |
|
injury. |
|
• Observe the following precautions when handling the lens and camera: |
|
- Keep the lens and camera dry. Failure to observe this precaution could result |
|
in fire or electric shock. |
|
- Do not handle the lens or camera with wet hands. Failure to observe this |
|
precaution could result in electric shock. |
|
- Keep the sun well out of the frame when shooting backlit subjects. Sunlight |
|
focused into the camera when the sun is in or close to the frame could cause |
|
a fire. |
|
- If the lens will not be used for an extended period, attach the front and rear |
|
lens caps and store the lens out of direct sunlight. If left in direct sunlight, the |
|
lens could focus the sun’s rays onto flammable objects, causing fire. |
|
• Do not carry tripods with a lens or camera attached. You could trip or accidentally |
|
strike others, resulting in injury. |
|
• Do not leave the lens where it will be exposed to extremely high temperatures, such as in |
|
an enclosed automobile or in direct sunlight. Failure to observe this precaution could |
|
adversely affect the lens’ internal parts, causing fire. |
Notice for Customers in Canada
CAN ICES-3 B / NMB-3 B
12

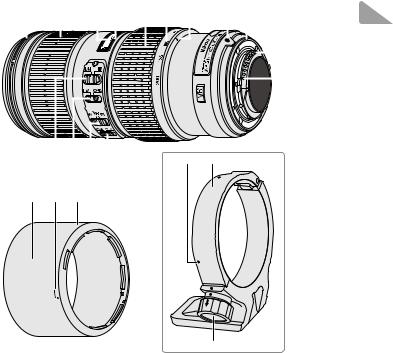
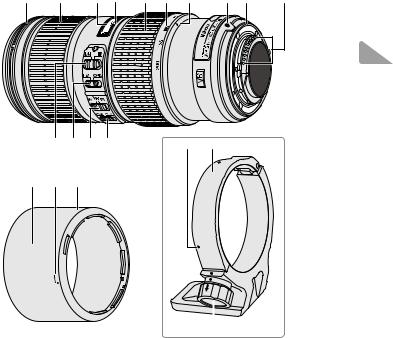
■ Parts of the Lens
q w |
e r t y u |
i o |
! |
En
!1 |
!2 !3 !4 |
!8!9 |
|
|
|
!5 !6 |
!7 |
|
@0
q Lens hood mounting mark....... |
18 |
w Focus ring............................................. |
15 |
e Focus distance indicator |
|
r Focus distance mark |
|
t Zoom ring............................................ |
15 |
y Focal length scale............................ |
15 |
u Focal length mark |
|
i Lens mounting mark |
|
o Rubber lens-mount gasket........ |
20 |
!0CPU contacts...................................... |
20 |
!1Focus-mode switch........................ |
15 |
* Optional. |
|
!2Focus limit switch............................ |
15 |
!3Vibration reduction ON/OFF |
|
switch................................................ |
16 |
!4Vibration reduction mode |
|
switch................................................ |
16 |
!5Lens hood............................................ |
18 |
!6Lens hood alignment mark....... |
18 |
!7Lens hood lock mark..................... |
18 |
!8Position indices (90°) *.................. |
19 |
!9Tripod collar ring *........................... |
19 |
@0Tripod collar ring attachment |
|
knob *................................................ |
19 |
13

Thank you for your purchase of an AF S NIKKOR 70 200mm f/4G ED VR lens. Before using this product, please carefully read both these instructions and the camera manual.
En Note: When mounted on a DX-format digital single-lens reflex camera such as the D7000 or cameras in the D300 series, this lens has an angle of view of 22° 50′ – 8° and a focal length equivalent to 105 – 300 mm (35 mm format).
■ Compatibility
Check marks (“ “) indicate supported features, dashes (“—”) features that are not supported. Some limitations may apply; see the camera manual for details.
|
|
|
Exposure (Shooting) mode |
Function |
|||||
Camera |
|
|
P4 |
S |
A |
|
M |
AF5 |
VR 6 |
Nikon FX-format and DX-format digital single-lens reflex cameras, |
|
|
|
|
|
|
|
||
F6, F5, F100, F/N80-series 1, F/N75-series 1, F/N65-series 1 |
|
|
|
|
|
|
|
||
Pronea 600i/6i 1, Pronea S 2 |
|
|
|
|
|
|
|
|
— |
F4-series, F90X/N90s 1, F90-series/N90 1, F70-series/N70 1 |
|
|
— |
— |
|
— |
|||
F60-series/N60 1, F/N55-series 1, F50-series/N50 1, F 401x/ |
|
|
|
|
|
— |
— |
||
N5005 1, F 401s/N4004s 1, F 401/N4004 1 |
|
|
|
||||||
|
|
|
|
|
|
|
|
|
|
F 801s/N8008s 1, F 801/N8008 1, F 601m/N6000 1 |
|
|
|
— |
— |
— |
— |
||
F3AF, F 601/N6006 1, F 501/N2020 3, Nikon manual focus |
|
|
— |
|
|
|
|||
cameras (excluding F-601m/N6000 1) |
|
|
|
|
|
|
|
||
|
|
|
|
|
|
|
|
|
|
1 N-series cameras and Pronea |
3 |
N2020 sold in U. S. A. and Canada only. |
|||||||
6i sold in U. S. A. only. |
4 |
Includes AUTO and scene (Digital Vari- |
|||||||
2 Exposure mode M (manual) |
|
Program) modes. |
|
|
|
|
|
||
not available. |
5 |
Autofocus. |
|
|
|
|
|
|
|
|
6 |
Vibration reduction. |
|
|
|
|
|
||
■ Focus
Supported focus modes are shown in the following table (for information on camera focus modes, see the camera manual).
|
Camera |
Lens focus mode |
|
Camera |
focus mode |
A/M |
M |
Nikon FX-format and DX-format digital single-lens |
AF |
Autofocus with |
Manual focus |
reflex cameras, F6, F5, F4-series, F100, F90X/N90s *, |
manual override |
with electronic |
|
F90-series/N90 *, F/N80-series *, F/N75-series *, F70- |
|
(AF priority) |
rangefinder |
series/N70 *, F/N65-series *, Pronea 600i/6i *, Pronea S |
MF |
Manual focus (electronic |
|
F60-series/N60 *, F/N55-series *, F50-series/N50 *, |
|
rangefinder available with all |
|
F 801s/N8008s *, F 801/N8008 *, F 601m/N6000 *, |
AF, MF |
cameras except F 601m/ |
|
F 401x/N5005 *, F 401s/N4004s *, F 401/N4004 * |
|
N6000 *) |
|
* N-series cameras and Pronea 6i sold in U. S. A. only.
14

A/M (Autofocus with Manual Override/AF Priority)
To focus using autofocus with manual override (A/M):
z Slide the lens focus-mode switch to A/M. En
x Focus.
If desired, autofocus can be over-ridden by rotating the lens focus ring while the shutter-release button is pressed halfway (or, if the camera is equipped with an AF ON button, while the AF ON button is pressed); note that the ring must be rotated a short distance before autofocus is over-ridden. To refocus using autofocus, press the shutter-release button halfway or press the AF ON button again.
The Focus Limit Switch
This switch determines the focus distance limits for autofocus.

 FULL: Select this option for subjects that may be closer than 3 m (9.84 ft).
∞–3 m: If your subject will always be at distance of at least 3 m (9.84 ft), select this option for faster focusing.
■ Zoom and Depth of Field
Before focusing, rotate the zoom ring to adjust the focal length and frame the photograph. If the camera offers depth-of-field preview (stop down), depth of field can be previewed in the viewfinder (see page 210 for more information).
Note: Note that the focus distance indicator is intended only as a guide and may not accurately show the distance to the subject and may, due to depth of field or other factors, not show ∞ when the camera is focused on a distant object.
■ Aperture
Aperture is adjusted using camera controls.
15

■ Built-in Flash Units
When using the built-in flash on cameras equipped with a built-in flash unit, remove the lens hood to prevent vignetting (shadows created
En where the end of the lens obscures the built-in flash).
■ Vibration Reduction (VR)
Vibration reduction (VR) reduces blur caused by camera shake, allowing shutter speeds up to 4.0 stops slower than would otherwise be the case. This increases the range of shutter speeds available and permits handheld, tripod-free photography in a wide range of situations. The effects of VR on shutter speed are measured according to Camera and Imaging Products Association (CIPA) standards; FX-format lenses are measured using FX-format digital cameras, DX-format lenses using DX-format cameras. Zoom lenses are measured at maximum zoom.
Using the Vibration Reduction ON/OFF Switch
Select ON to enable vibration reduction. Vibration reduction is activated when the shutter-release button is pressed halfway, reducing the effects of camera shake for improved framing and focus.
Select OFF to turn vibration reduction off.
Using the Vibration Reduction Mode Switch
The vibration reduction mode switch is used to select the vibration reduction mode when vibration reduction is on.
Select NORMAL to reduce the effects of vibration when photographing from a fixed position and in other situations with comparatively little camera motion.
Select ACTIVE to reduce the effects of vibration when shooting from a moving vehicle, while walking, and in other situations with active camera motion.
16

Using Vibration Reduction: Notes |
|
• Slide the vibration reduction switch to OFF if the camera does not |
|
support vibration reduction (pg. 14). Leaving vibration reduction on |
En |
may greatly increase the drain on the battery, particularly in the case of |
|
Pronea 600i/6i cameras. |
|
•When using vibration reduction, press the shutter-release button halfway and wait for the image in the viewfinder to stabilize before pressing the shutter-release button the rest of the way down.
•When vibration reduction is active, the image in the viewfinder may be blurred after the shutter is released. This does not indicate a malfunction.
•Slide the vibration reduction mode switch to NORMAL for panning shots. When the camera is panned, vibration reduction applies only to motion that is not part of the pan (if the camera is panned horizontally, for example, vibration reduction will be applied only to vertical shake), making it much easier to pan the camera smoothly in a wide arc.
•Do not turn the camera off or remove the lens while vibration reduction is in effect. If power to the lens is cut while vibration reduction is on, the lens may rattle when shaken. This is not a malfunction, and can be corrected by reattaching the lens and turning the camera on.
•If the camera is equipped with a built-in flash, vibration reduction will be disabled while the flash charges.
•Turn vibration reduction off when the camera is securely mounted on a tripod, but leave it on if the tripod head is not secured or when using a monopod.
17
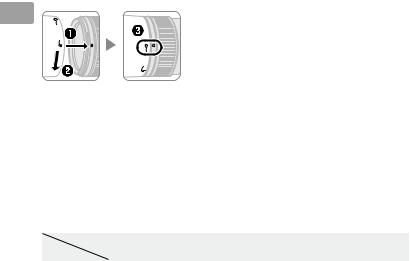
■ The Lens Hood
The lens hoods protect the lens and block stray light that would En otherwise cause flare or ghosting.
Align the lens hood lock mark (—¡) with the lens hood mounting mark (●) on the lens (e).
When attaching or removing the hood, hold it near the  symbol on its base and avoid gripping it too tightly. Vignetting may occur if the hood is not correctly attached.
The hood can be reversed and mounted on the lens when not in use. When the hood is reversed, it can be attached and removed by rotating it while holding it near the lock mark (—¡).
■ Focusing Screens
The following cameras support a variety of focusing screens for use in different situations.
Screen |
|
|
|
|
EC B |
|
|
|
|
|
|
|
|
|
Camera |
|
A |
B |
C |
E |
EC E |
G1 |
G2 |
G3 |
G4 |
J |
L |
M |
U |
F6 |
|
|
|
— |
|
— |
— |
— |
— |
— |
|
|
|
|
F5+DP-30 |
|
|
¡ |
|
|
|
|
|
|
|
|
|
|
|
|
|
(+0.5) |
|
|
||||||||||
|
|
|
|
|
|
|
|
|
|
|
|
|
|
|
F5+DA-30 |
|
|
¡ |
|
|
|
|
¡ |
|
|
|
|
|
|
(+1.0) |
(+0.5) |
(+0.5) |
|
|
(–1.0) |
|
(+0.5) |
(+1.0) |
|
|||||
: |
Recommended. |
|
|
|
|
|
|
|
|
|
|
|
||
¡: |
Vignetting visible in viewfinder (photographs are not affected). |
|
||||||||||||
—: |
Not compatible with camera. |
|
|
|
|
|
|
|||||||
( ): |
Figures in parentheses give the exposure compensation for center- |
|||||||||||||
|
weighted metering. Select “Other screen” for Custom Setting b6 |
|
||||||||||||
|
(“Screen comp.”) when adjusting exposure compensation for the F6; |
|||||||||||||
note that with screens other than B or E, “Other screen” must be selected even when the value for exposure compensation is 0. Exposure compensation for the F5 can be adjusted using Custom Setting 18; see the camera manual for details.
Empty cell: Not suited to use with this lens. Note that type M screens can however be used for photomicrography and macro photography at magnifications of 1 : 1 or higher.
Note: The F5 supports matrix metering with A, B, E, EC B/EC E, J, and L 18 focusing screens only.
■ The Optional RT 1 Tripod Collar Ring
Loosen the tripod collar ring attachment knob to rotate the camera to the desired position and orient the display horizontally or vertically. Note that
your hand may come into contact with the tripod if you rotate the camera En while holding it by the handgrip. Depending on how the camera or
tripod is attached, camera shake may be reduced by attaching the tripod to the camera tripod mount.
AWARNING
Fully tighten the tripod collar ring attachment knob when attaching tripod collar ring. Failure to observe this precaution could result in the tripod collar ring becoming detached from the lens, causing injury.
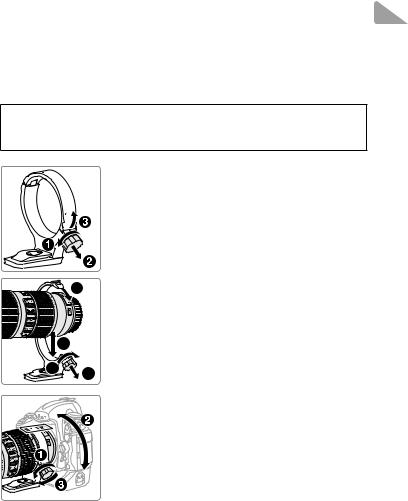
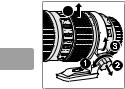
Attaching the Tripod Collar Ring
z Loosen the tripod collar ring attachment knob
(q).
x Open the ring.
Pull the attachment knob toward you (w) and open the ring (e).
6 |
c |
Place the lens in the ring (r). |
v |
Close the ring. |
|
|
Pull the attachment knob toward you (t) and close |
|
4 |
the ring (y). Do not use excessive force, as your |
|
hand could be caught in the ring. |
|
|
|
|
7 |
5 |
b Tighten the attachment knob (u). |
Positioning the Camera
Loosen the attachment knob (q), adjust the position indices to the desired vertical or horizontal orientation (w), and then tighten the attachment knob (e).
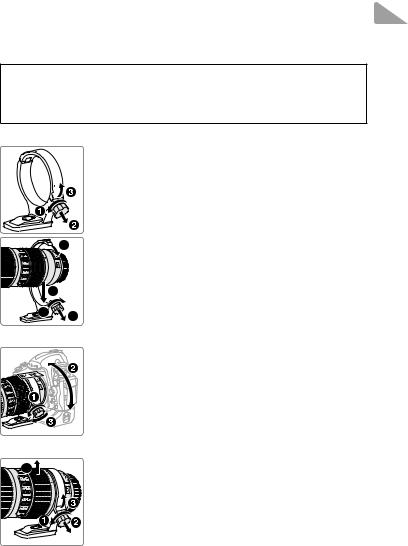
Removing the Tripod Collar Ring
4 |
z |
Loosen the attachment knob (q). |
|
x |
Remove the ring. |
Pulling the attachment knob toward you (w), open (e) and remove the lens (r).
19

■ Lens Care
• Do not pick up or hold the lens or camera using only the lens hood.
• Keep the CPU contacts clean.
En • Should the rubber lens-mount gasket be damaged, cease use immediately and take the lens to a Nikon-authorized service center for repair.
•Use a blower to remove dust and lint from the lens surfaces. To remove smudges and fingerprints, apply a small amount of ethanol or lens cleaner to a soft, clean cotton cloth or lens-cleaning tissue and clean from the center outwards using a circular motion, taking care not to leave smears or touch the glass with your fingers.
•Never use organic solvents such as paint thinner or benzene to clean the lens.
•The lens hood or NC filters can be used to protect the front lens element.
•Attach the front and rear caps before placing the lens in its flexible pouch.
•If the lens will not be used for an extended period, store it in a cool, dry location to prevent mold and rust. Do not store in direct sunlight or with naphtha or camphor moth balls.
•Keep the lens dry. Rusting of the internal mechanism can cause irreparable damage.
•Leaving the lens in extremely hot locations could damage or warp parts made from reinforced plastic.
■ Supplied Accessories
•67 mm snap-on Front Lens Cap LC 67
•Rear Lens Cap LF 4
•Bayonet Hood HB 60
•Flexible Lens Pouch CL 1225
■ Compatible Accessories
•67 mm screw-on filters
•Tripod collar ring RT 1
•AF-I/AF-S Teleconverters TC-14E/TC-14E II/TC-17E II */TC-20E */ TC-20E II */TC-20E III *
* Autofocus is available only with cameras that offer f/8 support.
20
■ Specifications
Type |
Type G AF-S lens with built-in CPU and F mount |
|
Focal length |
70 – 200 mm |
En |
Maximum aperture |
f/4 |
|
Lens construction |
20 elements in 14 groups (including 3 ED lens elements and lens |
|
|
elements with Nano-Crystal coatings) |
|
Angle of view |
• Nikon film SLR and FX-format D-SLR cameras: 34° 20′ – 12° 20′ |
|
|
• Nikon DX-format D-SLR cameras: 22° 50′ – 8° |
|
|
• IX240 system cameras: 27° 40′ – 9° 50′ |
|
Focal length scale |
Graduated in millimeters (70, 85, 105, 135, 200) |
|
Distance information |
Output to camera |
|
Zoom |
Manual zoom using independent zoom ring |
|
Focusing |
Nikon Internal Focusing (IF) System with autofocus |
|
|
controlled by Silent Wave Motor and separate focus ring |
|
|
for manual focus |
|
Vibration reduction |
Lens shift using voice coil motors (VCMs) |
|
Focus distance |
1 m to infinity (∞) |
|
indicator |
|
|
|
|
|
Minimum focus |
1 m (3.28 ft) from focal plane at all zoom positions |
|
distance |
|
|
|
|
|
Diaphragm blades |
9 (rounded diaphragm opening) |
|
Diaphragm |
Fully automatic |
|
Aperture range |
f/4 to f/32 |
|
Metering |
Full aperture |
|
Focus limit switch |
Two positions: FULL (∞ – 1 m) and ∞ – 3 m |
|
Filter-attachment size |
67 mm (P = 0.75 mm) |
|
Dimensions |
Approx. 78 mm maximum diameter × 178.5 mm (distance |
|
|
from camera lens mount flange) |
|
Weight |
Approx. 850 g (30.0 oz) |
|
Nikon reserves the right to change the specifications of the hardware described in this manual at any time and without prior notice.
21

Für Ihre Sicherheit
ASICHERHEITSHINWEISE
• Nicht auseinanderbauen. Das Berühren der Innenteile von Kamera oder Objektiv könnte zu Verletzungen führen. Im Falle einer Fehlfunktion sollte das Produkt De auschließlich von einem qualifizierten Fachmann repariert werden. Sollte das
Produkt aufgrund eines Herunterfallens oder eines Unfalles aufbrechen, entfernen Sie den Kamera-Akku und/oder trennen Sie den Netzadapter vom Netz und bringen Sie das Produkt zur Inspektion zum Nikon-Kundendienst.
•Schalten Sie die Kamera im Falle einer Fehlfunktion unverzüglich ab. Wenn Sie Rauch oder einen ungewöhnlichen Geruch aus Ihrer Ausrüstung wahrnehmen, trennen Sie sofort den Netzadapter vom Netz und entfernen Sie den Kamera-Akku. Geben Sie dabei acht, dass Sie sich nicht verbrennen. Ein weiterer Betrieb könnte zu einem Brand oder zu Verletzungen führen. Nach Entfernen des Akkus bringen Sie die Ausrüstung zur Inspektion zum Nikon-Kundendienst.
•Nicht in Gegenwart von entflammbarem Gas verwenden. Der Betrieb von Elektrogeräten in Gegenwart von entflammbarem Gas könnte zu einer Explosion oder zu einem Brand führen.
•Blicken Sie nicht durch das Objektiv oder den Kamerasucher in die Sonne. Das Betrachten der
Sonne oder einer anderen hellen Lichtquelle durch das Objektiv oder den Sucher kann zu permanenten Sehstörungen führen.
•Außerhalb der Reichweite von Kindern aufbewahren. Ein Nichtbeachten dieser Vorsichtsmaßnahme kann zu Verletzungen führen.
•Beachten Sie die folgenden Vorsichtsmaßnahmen beim Umgang mit Kamera und Objektiv:
-Halten Sie Objektiv und Kamera stets trocken. Ein Nichtbeachten dieser Vorsichtsmaßnahme kann zu Feuer oder Stromschlägen führen.
-Bedienen Sie die Kamera oder das Objektiv nicht mit nassen Händen. Ein Nichtbeachten dieser Vorsichtsmaßnahme kann zu Stromschlägen führen.
-Halten Sie die Sonne sicher außerhalb des Bildbereiches, wenn Sie Motive im Gegenlicht aufnehmen. Sonnenlicht, das in der Kamera fokussiert wird, wenn sich die Kamera im oder nah beim Bildmotiv befindet, kann zu einem Brand führen.
-Wird das Objektiv für längere Zeit nicht verwendet, bringen Sie den vorderen und hinteren Objektivdeckel an und lagern Sie das Objektiv an einem Ort ohne direkte Sonneneinstrahlung. Wird es in direktem Sonnenlicht gelagert, könnte das Objektiv die Sonnenstrahlen auf entflammbare Objekte fokussieren und Sie so entzünden.
•Tragen Sie Stative nicht mit aufgesetzter Kamera oder aufgesetztem Objektiv. Es besteht die Gefahr zu stolpern oder versehentlich andere Personen zu stoßen, was zu Verletzungen führen kann.
•Lagern Sie das Objektiv nicht an Orten, an denen es extrem hohen Temperaturen ausgesetzt ist, wie beispielsweise in einem geschlossenen Auto oder direkt in der Sonne. Andernfalls können die internen Teile des Objektivs nachteilig beeinflusst werden und es könnte zu einem Brand kommen.
22
■ Objektivkomponenten
q w |
e r t y u |
i o |
! |
De
!1 !2 !3 !4
!5 !6 !7
q Markierung für das Ansetzen der |
|
Gegenlichtblende................................ |
28 |
w Entfernungseinstellring.......................... |
25 |
e Entfernungsskala |
|
r Markierung für Entfernungseinstellung |
|
t Zoomring........................................................ |
25 |
y Brennweitenskala....................................... |
25 |
u Markierung für Brennweitenskala |
|
i Markierung für die Ausrichtung des |
|
Objektivs |
|
o Dichtungsmanschette............................ |
30 |
!0CPU-Kontakte................................................ |
30 |
!1Fokusmodusschalter................................ |
25 |
!8!9
|
|
@0 |
|
|
|
||
|
|
* Optional. |
|
!2Fokusbegrenzungsschalter.................. |
25 |
||
!3Bildstabilisator AN/AUS-Schalter....... |
26 |
||
!4Bildstabilisator-Modusschalter........... |
26 |
||
!5Gegenlichtblende...................................... |
28 |
||
!6Markierung für die Ausrichtung der
Gegenlichtblende................................ |
28 |
!7Markierung für die Arretierung der |
|
Gegenlichtblende................................ |
28 |
!8Positionsmarkierungen (90°) *............ |
29 |
!9Stativschelle *................................................ |
29 |
@0Stativschellen-Befestigungsgriff *..... |
29 |
23

|
Vielen Dank, dass Sie sich für ein AF S NIKKOR 70-200 mm 1:4G ED VR |
|
Objektiv entschieden haben. Bitte lesen Sie vor der Verwendung dieses |
|
Produktes sowohl diese Anleitung als auch das Handbuch der Kamera |
|
sorgfältig. |
De |
Hinweis: Wenn das Objektiv mit einer digitalen Spiegelreflexkamera mit DX-Format wie |
der D7000 oder einer Kamera der D300-Serie verwendet wird, hat es einen Blickwinkel |
|
|
von 22° 50′– 8°, der einer Brennweite von 105 – 300 mm beim Kleinbildformat |
|
entspricht. |
■ Kompatibilität
Haken (» «) zeigen unterstützte Funktionen, Striche (»—«) nicht unterstützte Funktionen an. Es können Einschränkungen gelten; beachten Sie das Handbuch der Kamera für Einzelheiten.
|
Belichtungssteuerung |
Funktion |
|||||
Kamera |
P2 |
S |
A |
|
M |
AF 3 |
VR4 |
Digitale Nikon-Spiegelreflexkameras (FXund DX-Format), F6, F5, |
|
|
|
|
|
|
|
F100, F80-Serie, F75-Serie, F65-Serie |
|
|
|
|
|
|
|
Pronea 600i, Pronea S 1 |
|
|
|
|
|
|
— |
F4-Serie, F90X, F90-Serie, F70-Serie |
|
|
— |
|
— |
|
— |
F60-Serie, F55-Serie, F50-Serie, F 401x, F 401s, F 401 |
|
|
|
|
|
— |
— |
F 801s, F 801, F 601m |
|
|
— |
|
— |
— |
— |
F3AF, F 601, F 501, Nikon-MF-Kameras (außer F-601m) |
|
|
|
— |
|
|
|
1Manuelle Belichtungssteuerung (M) nicht verfügbar.
2Schließt AUTO-Modus und Motivprogramme ein.
3Autofokus.
4Bildstabilisator.
■ Scharfeinstellung
Unterstützte Fokusmodi werden in der folgenden Tabelle aufgeführt (Beachten Sie das Handbuch der Kamera für Informationen zu den Fokusmodi der Kamera).
|
Kamara- |
Objektiv-Fokusmodus |
||
Kamera |
Fokusmodus |
A/M |
M |
|
|
|
Autofokus mit |
Manueller |
|
Digitale Nikon-Spiegelreflexkameras (FXund DX- |
|
Priorität der |
||
|
Fokus mit |
|||
Format), F6, F5, F4-Serie, F100, F90X, F90-Serie, F80- |
AF |
manuellen |
||
elektronischer |
||||
Serie, F75-Serie, F70-Serie, F65-Serie, Pronea 600i, |
|
Scharfeinstellung |
||
Pronea S |
|
(AF-Priorität) |
Einstellhilfe |
|
|
|
|||
|
MF |
Manueller Fokus (elektronische |
||
F60-Serie, F55-Serie, F50-Serie, F 801s, F 801, |
AF, MF |
Einstellhilfe bei allen Kameras |
||
F 601m, F 401x, F 401s, F 401 |
außer F 601m verfügbar) |
|||
|
||||
24

A/M (Autofokus mit Priorität der manuellen Scharfeinstellung/ AF-Priorität)
Mit Autofokus mit Priorität der manuellen Scharfeinstellung (A/M) fokussieren:
z Stellen Sie den Objektiv-Fokusmodusschalter auf A/M.
De
xFokussieren Sie.
Falls gewünscht, kann der Autofokus übersteuert werden, indem Sie den Fokussierring drehen, während der Auslöser bis zum zweiten Druckpunkt gedrückt gehalten wird (oder, falls die Kamera mit einer AF ON-Taste ausgestattet ist, während die AF ON-Taste gedrückt gehalten wird). Beachten Sie, dass der Aufokus erst ab einem gewissen Drehweg außer Kraft gesetzt wird. Um mit dem Autofokus erneut zu fokussieren, drücken Sie wieder den Auslöser bis zum ersten Druckpunkt oder die AF ON-Taste.
Der Fokusbegrenzungsschalter
Dieser Schalter bestimmt die Begrenzung der Entfernungseinstellung für den Autofokus.

 FULL: Wählen Sie diese Option für Motive, die näher als 3 Meter liegen.
∞–3 m: Wählen Sie diese Option für schnelleres Scharfstellen, wenn sich Ihr Motiv stets in einer Entfernung von mindestens 3 Metern befindet.
■ Zoom und Tiefenschärfe
Drehen Sie, bevor Sie fokussieren, den Zoomring, um die Brennweite einzustellen und einen Bildausschnitt zu wählen. Verfügt die Kamera über eine Abblendtaste, kann die Tiefenschärfe im Sucher im Voraus bewertet werden (siehe Seite 210 für weitere Informationen).
Hinweis: Beachten Sie, dass die Entfernungsskala nur als Orientierungshilfe dient und eventuell nicht die genaue Entfernung zum Motiv anzeigt und eventuell aufgrund der Tiefenschärfe oder anderer Faktoren ∞ nicht anzeigt, wenn die Kamera auf ein entferntes Motiv fokussiert hat.
■ Blende
Die Blende wird mit den Bedienelementen der Kamera eingestellt.
25

■ Integrierte Blitzgeräte
Entfernen Sie die Gegenlichtblende, wenn Sie das integrierte Blitzgerät der Kamera verwenden (sofern vorhanden), da die Gegenlichtblende sonst einen Schatten ins Motiv werfen würde.
De ■ Bildstabilisator (VR)
Der Bildstabilisator (VR) reduziert die aus unruhiger Kamerahaltung resultierende Verwacklungsunschärfe und ermöglicht dadurch um bis zu 4,0 Lichtwertstufen längere Belichtungszeiten als normal. Dies vergrößert den Bereich der nutzbaren Belichtungszeiten und erlaubt Freihandaufnahmen ohne Stativ in zahlreichen Aufnahmesituationen. Die Wirkung des Bildstabilisators (VR) auf die Belichtungszeit wird gemäß CIPA-Standards ermittelt (Camera and Imaging Products Association); FXObjektive werden an FX-Format-Kameras gemessen, DX-Objektive an DX- Format-Kameras. Zoomobjektive werden bei der längsten Brennweiteneinstellung gemessen.
Verwendung des Bildstabilisator AN/AUS-Schalters
Wählen Sie ON (EIN), um den Bildstabilisator zu aktivieren. Der Bildstabilisator wird aktiviert, wenn der Auslöser bis zum ersten Druckpunkt gedrückt wird; er verringert die Effekte einer Kamera-Verwacklung für verbesserte Motivwahl und Scharfstellung.
Wählen Sie OFF (AUS), um den Bildstabilisator auszuschalten.
Verwendung des Bildstabilisator-Modusschalters
Der Bildstabilisator-Modusschalter wird verwendet, um den Bildstabilisator-Modus auszuwählen, wenn der Bildstabilisator aktiviert ist.
Wählen Sie NORMAL aus, um die Vibrationseffekte beim Fotografieren von einer festen Position aus und in anderen Situationen, in denen die Kamera kaum bewegt wird, zu verringern.
Wählen Sie ACTIVE aus, um die Vibrationseffekte bei der Aufnahme aus einem fahrenden Fahrzeug heraus, beim Gehen und in anderen Situationen, in denen die Kamera häufig bewegt wird, zu verringern.
26

Verwendung des Bildstabilisators: Hinweise
•Schieben Sie den Bildstabilisatorschalter auf OFF, wenn die Kamera den Bildstabilisator nicht unterstützt (S. 24). Bleibt der Bildstabilisator
eingeschaltet, kann sich der Akku schneller entladen, besonders bei Pronea 600i-Kameras.
• Drücken Sie bei Verwendung des Bildstabilitsators den Auslöser bis zum De ersten Druckpunkt und warten Sie, bis sich das Bild im Sucher
stabilisiert, bevor Sie den Auslöser vollständig drücken.
•Wenn der Bildstabilisator aktiv ist, ist das Bild im Sucher möglicherweise verschwommen, wenn der Auslöser gedrückt wurde. Dies stellt keine Fehlfunktion dar.
•Schieben Sie den Schalter für den Bildstabilisator (VR) auf NORMAL, wenn Sie die Kamera beim Fotografieren verschwenken wollen. Beim Schwenk kompensiert der Bildstabilisator (VR) nur die Bewegungskomponenten, die nicht in Schwenkrichtung verlaufen (wird die Kamera beispielsweise horizontal geschwenkt, kompensiert der Bildstabilisator nur die senkrechten Bewegungen). So können Sie problemlos die Kamera mit einer fließenden Bewegung in einem weiten Bogen schwenken.
•Schalten Sie die Kamera nicht ab und entfernen Sie nicht das Objektiv, solange der Bildstabilisator aktiv ist. Wenn die Stromversorgung des Objektivs unterbrochen wird, solange der Bildstabilisator aktiv ist, könnte das Objektiv klappern, wenn es geschüttelt wird. Dies stellt keine Fehlfunktion dar und kann dadurch beseitigt werden, dass das Objektiv wieder angesetzt und die Kamera eingeschaltet wird.
•Verfügt die Kamera über ein eingebautes Blitzgerät, wird der Bildstabilisator deaktiviert, solange das Blitzgerät sich auflädt.
•Schalten Sie den Bildstabilisator ab, wenn die Kamera fest auf einem Stativ aufsitzt, lassen Sie ihn jedoch angeschaltet, wenn der Stativkopf nicht feststehend ist oder wenn Sie ein Einbein verwenden.
27

■ Die Gegenlichtblende
Die Gegenlichtblende schützt das Objektiv und verhindert das Eindringen von Streulicht, das ansonsten zu Kontrastverlust oder Geisterbildern führen würde.
De |
Richten Sie die Markierung für die Arretierung der |
|
Gegenlichtblende (—¡) an der objektivseitigen |
|
Markierung für das Ansetzen der Gegenlichtblende |
|
(●) aus (e). |
Halten Sie die Gegenlichtblende beim Anbringen oder Abnehmen in der Nähe des  -Symbols an der Basis fest und umfassen Sie sie nicht zu fest. Bei falschem Anbringen der Gegenlichtblende kann es zu Vignettierungen kommen.
Die Gegenlichtblende kann umgekehrt auf dem Objektiv angebracht werden, wenn sie nicht verwendet wird. Bei umgekehrter Gegenlichtblende kann diese durch Drehen entfernt werden, während sie nahe der Markierung für die Arretierung (—¡) gefasst wird.
■ Einstellscheiben
Die folgenden Kameras unterstützen eine Anzahl Einstellscheiben für die Verwendung in verschiedenen Situationen.
|
Scheibe |
|
|
|
|
EC B |
|
|
|
|
|
|
|
|
Kamera |
|
A |
B |
C |
E |
EC E |
G1 |
G2 |
G3 |
G4 |
J |
L |
M |
U |
F6 |
|
|
— |
|
— |
— |
— |
— |
— |
|
|
|
|
|
F5+DP-30 |
|
|
¡ |
|
|
|
|
|
|
|
|
|
|
|
|
|
(+0,5) |
|
|
||||||||||
|
|
|
|
|
|
|
|
|
|
|
|
|
|
|
F5+DA-30 |
|
|
¡ |
|
|
|
|
¡ |
|
|
|
|
|
|
(+1,0) |
(+0,5) |
(+0,5) |
|
|
(–1,0) |
|
(+0,5) |
(+1,0) |
|
|||||
: |
Empfohlen. |
|
|
|
|
|
|
|
|
|
|
|
|
|
¡: |
Vignettierung im Sucher sichtbar (Bilder sind nicht betroffen). |
|
|
|
||||||||||
—: |
Nicht mit der Kamera kompatibel. |
|
|
|
|
|
|
|
|
|
||||
( ): |
Zahlen in Klammern geben die Belichtungskorrektur für mittenbetonte Messung |
|||||||||||||
|
an. Wählen Sie bei der F6 die Option »Andere« für die Individualfunktion b6 (»Einst. |
|||||||||||||
|
scheibe.«), um die Belichtungskorrektur für eine Einstellscheibe anzupassen. |
|
|
|||||||||||
|
Beachten Sie, dass bei Verwendung anderer Einstellscheiben als Typ B oder E auch |
|||||||||||||
|
dann »Andere« ausgewählt werden muss, wenn keine Belichtungskorrektur erfolgt. |
|||||||||||||
|
An der F5 kann die Belichtungskorrektur mit der Individualfunktion 18 eingestellt |
|||||||||||||
|
werden. Beachten Sie das Kamerahandbuch für weitere Einzelheiten. |
|
|
|||||||||||
Leere Zelle: Nicht für die Verwendung mit diesem Objektiv geeignet. Beachten Sie jedoch, dass Scheiben vom Typ M für Fotomikrografie und Makrofotografie mit Abbildungsmaßstäben von 1 : 1 oder höher verwendet werden können.
Hinweis: Bei der F5 steht die Matrixmessung nur mit den Einstellscheiben A, B, E, EC-B, EC-E, J und L zur Verfügung.
28

■ Die optionale Stativschelle RT 1
Lösen Sie an Ihrem Stativ die Befestigung des Kragenrings, um die Kamera in die gewünschte Position zu drehen, und richten Sie den Monitor horizontal oder vertikal aus. Achten Sie darauf, dass Sie mit Ihrer Hand nicht das Stativ berühren, wenn Sie die Kamera drehen und sie
dabei am Handgriff festhalten. Je nachdem, wie die Kamera oder das De Stativ befestigt wird, können Verwacklungen reduziert werden, wenn Sie
das Stativ am Stativanschluss der Kamera montieren.
AWARNUNG
Ziehen Sie den Befestigungsgriff der Stativschelle fest an, wenn Sie die Stativ schelle anbringen. Bei Nichtbeachtung dieser Vorsichtsmaßnahme könnte sich die Stativschelle vom Objektiv lösen und eine Verletzung verursachen.
Anbringen der Stativschelle
6
|
4 |
7 |
5 |
|
zLockern Sie den Befestigungsgriff der Stativschelle (q).
xÖffnen Sie die Schelle.
Ziehen Sie den Befestigungsgriff zu sich (w) und öffnen Sie die Schelle (e).
c Setzen Sie das Objektiv in die Schelle ein (r).
vSchließen Sie die Schelle.
Ziehen Sie den Befestigungsgriff zu sich (t) und schließen Sie die Schelle (y). Wenden Sie keine übermäßige Kraft an, da Sie mit Ihrer Hand in der Schelle hängen bleiben könnten.
b Ziehen Sie den Befestigungsgriff fest (u).
Positionieren der Kamera
Lockern Sie den Befestigungsgriff (q), richten Sie die Positionsmarkierungen auf die gewünschte vertikale oder horizontale Richtung (w) aus und ziehen Sie den Befestigungsgriff (e) fest.
29
Abnehmen der Stativschelle
4 |
z |
Lockern Sie den Befestigungsgriff (q). |
|
x Nehmen Sie die Schelle ab. |
|
De |
|
Ziehen Sie den Befestigungsgriff zu sich (w), öffnen |
|
Sie die Schelle (e) und nehmen Sie das Objektiv |
|
|
|
heraus (r). |
■ Pflege des Objektivs
•Halten oder heben Sie das Objektiv oder die Kamera nicht an der angesetzten Gegenlichblende.
•Halten Sie die CPU-Kontakte sauber.
•Sollte die Dichtungsmanschette beschädigt werden, setzen Sie den Gebrauch sofort aus und bringen Sie das Objektiv zum Nikon-Kundendienst zur Reparatur.
•Verwenden Sie zum Entfernen von Staub und Verunreinigungen vom Objektiv einen Blasebalg. Um Schmierflecke und Fingerabdrücke zu entfernen, bringen Sie eine kleine Menge Ethanol oder Objektivreiniger auf ein weiches, sauberes Baumwolltuch oder ein Objektivreinigungstuch auf und reinigen Sie das Objektiv mit Kreisbewegungen von der Mitte nach außen. Achten Sie dabei darauf, dass keine Schmierflecke verbleiben, und dass sie das Glas nicht mit den Fingern berühren.
•Verwenden Sie niemals organische Lösungsmittel wie Verdünner oder Waschbenzin zur Reinigung des Objektivs.
•Zum Schutz der Frontlinse kann die Gegenlichtblende oder ein Klarglasfilter (NC) verwendet werden.
•Bringen Sie den vorderen und den hinteren Objektivdeckel auf dem Objektiv an, bevor sie es in seiner Tasche verstauen.
•Wenn das Objektiv für längere Zeit nicht verwendet wird, lagern Sie es an einem kühlen, trockenen Ort, um Schimmel und Korrosion zu vermeiden. Lagern sie das Objektiv nicht direkt in der Sonne oder mit Mottenkugeln aus Naphtha oder Kampfer.
•Halten Sie das Objektiv stets trocken. Eindringendes Wasser kann zur Korrosion innenliegender Teile und irreparablen Schäden führen.
•Das Lagern des Objektiv an sehr heißen Orten kann Teile aus verstärktem Plastik beschädigen oder verformen.
■ Im Lieferumfang enthaltenes Zubehör
•Vorderer Objektivdeckel LC 67 mit Schnappverschluss (67 mm)
•Hinterer Objektivdeckel LF 4
•Bajonett-Gegenlichtblende HB 60
•Objektivbeutel CL 1225
30
 Loading...