

Page 1

be certain.
m
MTS 85X Damper Test System
Operation
100-257-537 A
Page 2

Copyright information © 2012 MTS Systems Corporation. All rights reserved.
Trademark information MTS, TestStar, and TestWare are a registered trademarks of MTS Systems
Corporation within the United States. Station Manager and MTS Landmark are
trademarks of MTS Systems Corporation within the United States. These
trademarks may be protected in other countries.
Microsoft is a registered trademarks of Microsoft Corporation. All other
trademarks or service marks are property of their respective owners.
Publication information
Manual Part Number Publication Date
100-257-537 A
(Original instructions)
April 2012
2
Page 3

Contents
Technical Support 5
How to Get Technical Support 5
Before You Contact MTS 5
If You Contact MTS by Phone 6
Problem Submittal Form in MTS Manuals 7
Preface 9
Before You Begin 9
Conventions 9
Documentation Conventions 9
Introduction 11
Other MTS Manuals 12
Typical Test System Configuration 13
Test Controller 14
Servohydraulic and Mechanical Components 15
Interlocks 16
Safety 17
General Safety Practices 17
Safety Practices Before Operating the System 19
Safety Practices While the System Is in Operation 22
Getting Started 25
System Startup 25
Test Setup 27
Operation 29
Initial Setup 30
Install the Specimen 31
Damper System Operation
3
Page 4

Run the Test 34
793 Controller Operation Overview 35
About Running Tests 35
Understanding Files Used for Testing 35
Test Desktop 35
Monitoring Tes t Information 36
Perform a Practice Test 39
About Setting Up a Practice Test 39
Steps to Run a Test 40
Routine Maintenance 45
Decommission 51
4
Damper System Operation
Page 5

Technical Support
How to Get Technical Support
Start with your
manuals
Technical support
methods
MTS web site
www.mts.com
E-mail techsupport@mts.com
Telephone MTS Call Center 800-328-2255
Fax 952-937-4515
The manuals supplied by MTS provide most of the information you need to use
and maintain your equipment. If your equipment includes MTS software, look
for online help and README files that contain additional product inform ation.
If you cannot find answers to your technical questions from these sources, you
can use the internet, e-mail, telephone, or fax to contact MTS for assistance.
MTS provides a full range of support services after your system is installed. If
you have any questions about a system or product, contact MTS in one of the
following ways.
The MTS web site gives you access to our technical support staff by means of a
Technical Support link:
www.mts.com > Contact MTS > Service & Technical Support
Weekdays 7:00 A.M. to 5:00 P.M., Central Time
Please include “Technical Support” in the subject line.
Before You Contact MTS
MTS can help you more efficiently if you have the following information
available when you contact us for support.
Know your site
number and system
number
Damper System Operation Technical Support
The site number contains your company number and identifies your equipment
type (material testing, simulation, and so forth). The number is usually written on
a label on your MTS equipment before the system leaves MTS. If you do not
have or do not know your MTS site number, contact your MTS sales engineer.
Example site number: 571167
When you have more than one MTS system, the system job number identifies
which system you are calling about. You can find your job number in the papers
sent to you when you ordered your system.
Example system number: US1.42460
5
Page 6

Know information from
prior technical
If you have contacted MTS about this problem before, we can recall your file.
You will need to tell us the:
assistance
• MTS notification number
• Name of the person who helped you
Identify the problem Describe the problem you are experiencing and know the answers to the
following questions:
• How long and how often has the problem been occurring?
• Can you reproduce the problem?
• Were any hardware or software changes made to the system before the
problem started?
• What are the model numbers of the suspect equipment?
• What model controller are you using (if applicable)?
• What test configuration are you using?
Know relevant
computer information
Know relevant
If you are experiencing a computer problem, have the following information
available:
• Manufacturer’s name and model number
• Operating software type and service patch information
• Amount of system memory
• Amount of free space on the hard drive in which the application resides
• Current status of hard-drive fragmentation
• Connection status to a corporate network
For software application problems, have the following information available:
software information
• The software application’s name, version number, build number, and if
available, software patch number. This information is displayed briefly
when you launch the application, and can typically be found in the “About”
selection in the “Help” menu.
• It is also helpful if the names of other non-MTS applications that are
running on your computer, such as anti-virus software, screen savers,
keyboard enhancers, print spoolers, and so forth are known and available.
If You Contact MTS by Phone
Technical Support
6
Your call will be registered by a Call Center agent if you are calling within the
United States or Canada. Before connecting you with a technical support
specialist, the agent will ask you for your site number, name, company , company
address, and the phone number where you can normally be reached.
If you are calling about an issue that has already been assigned a notification
number, please provide that number. You will be assigned a unique notification
number about any new issue.
Damper System Operation
Page 7

Identify system type To assist the Call Center agent with connecting you to the most qualified
technical support specialist available, identify your system as one of the
following types:
• Electromechanical materials test system
• Hydromechanical materials test system
• Vehicle test system
• Vehicle component test system
• Aero test system
Be prepared to
Prepare yourself for troubleshooting while on the phone:
troubleshoot
• Call from a telephone when you are close to the system so that you can try
implementing suggestions made over the phone.
• Have the original operating and application software media available.
• If you are not familiar with all aspects of the equipment operation, have an
experienced user nearby to assist you.
Write down relevant
Prepare yourself in case we need to call you back:
information
• Remember to ask for the notification number.
• Record the name of the person who helped you.
• Write down any specific instructions to be followed, such as data recording
or performance monitoring.
After you call MTS logs and tracks all calls to ensure that you receive assistance and that action
is taken regarding your problem or request. If you have questions about the status
of your problem or have additional information to report, please contact MTS
again and provide your original notification number.
Problem Submittal Form in MTS Manuals
Use the Problem Submittal Form to communicate problems you are experiencing
with your MTS software, hardware, manuals, or service which have not been
resolved to your satisfaction through the technical support process. This form
includes check boxes that allow you to indicate the urgency of your problem and
your expectation of an acceptable response time. We guarantee a timely
response—your feedback is important to us.
The Problem Submittal Form can be accessed:
• In the back of many MTS manuals (postage paid form to be mailed to MTS)
• www.mts.com > Contact Us > Problem Submittal Form (electronic form to
be e-mailed to MTS)
Damper System Operation Technical Support
7
Page 8

Technical Support
8
Damper System Operation
Page 9

Preface
DANGER
WARNING
CAUTION
Before You Begin
Safety first! Before you attempt to use your MTS product or system, read and understand the
Conventions
Conventions
safety information provided with your system. Like an automobile, your test
system is very useful—but if misused, it is capable of deadly force. You should
always maintain a healthy respect for it.
Improper installation, operation, or maintenance of MTS equipment in your test
facility can result in hazardous conditions that can cause severe personal injury or
death and damage to your equipment and specimen. Again, read and understand
the safety information provided with your system before you continue. It is very
important that you remain aware of hazards that apply to your system.
Documentation Conventions
The following paragraphs describe some of the conventions that are used in your
MTS manuals.
Hazard conventions As necessary, hazard notices may be embedded in this manual. These notices
contain safety information that is specific to the task to be performed. Hazard
notices immediately precede the step or procedure that may lead to an associated
hazard. Read all hazard notices carefully and follow the directions that are given.
Three different levels of hazard notices may appear in your manuals. Following
are examples of all three levels.
Note For general safety information, see the safety information provided with
your system.
Danger notices indicate the presence of a hazard with a high level of risk which,
if ignored, will result in death, severe personal injury, or substantial property
damage.
Warning notices indicate the presence of a hazard with a medium level of risk
which, if ignored, can result in death, severe personal injury, or substantial
property damage.
Caution notices indicate the presence of a hazard with a low level of risk which,
if ignored, could cause moderate or minor personal injury, equipment damage, or
endanger test integrity.
Damper System Operation Preface
9
Page 10

Conventions
Manual formats This manual is available as an electronic document in the Portable Document
Hypertext links The electronic document has many hypertext links displayed in a blue font. All
Notes Notes provide additional information about operating your system or highlight
easily overlooked items. For example:
Note Resources that are put back on the hardware lists show up at the end of
the list.
Special terms The first occurrence of special terms is shown in italics.
Illustrations Illustrations appear in this manual to clarify text. It is important for you to be
aware that these illustrations are examples only and do not necessarily represent
your actual system configuration, test application, or software.
File (PDF) format. It can be viewed on any computer that has Adobe Acrobat
Reader installed. This manual can also be a file on a CD. This manual can be
distributed in paper format. This manual might be available online at
www.mts.com.
blue words in the body text, along with all contents entries and index page
numbers, are hypertext links. When you click a hypertext link, the application
jumps to the corresponding topic.
10
Preface
Damper System Operation
Page 11

Introduction
This manual provides operating procedures and safety practices for operation of
an MTS Damper test system configured with an MTS test controller, an MTS
load frame, and an MTS Hydraulic Power Unit. It also contains a general
description of the typical system components.
An MTS test system can be designed for a wide variety of testing applications.
To provide maximum flexibility for operation, the information in thi s ma nual is
written for a typical system and should be used as a guide for general operation
and not a procedure for a specific test.
Level of operator
expertise
Level of specialist
expertise
This manual is intended for a trained operator who has gotten an introduction to
system operation and maintenance procedures. The operator should also be
familiar with known hazards and the contents of the manuals. The operator needs
to be able to perform basic controller tasks such as selecting control modes,
starting and stopping hydraulic pressure, and starting and stopping tests.
Some of the information in this manual is intended for a specialist. In addition to
all the requirements of an operator, the specialist should be familiar with
networking protocols. The specialist should be trained on Station Manager and
Station Builder and have a thorough working knowledge of MTS 793 controllers
including configuration files and hardware installation files. The specialist
should be trained on MPT and have a working knowledge of test design.
Assumptions This manual assumes the load frame is configured with any special fixturing (for
example the side load actuators or water cooling) before starting any operating
procedure. The load frame product manual contains the information to configure
the frame and its fixturing.
This manual assumes the controller has been loaded with the appropriate
configuration file and HWI file by a specialist who understands controller setup
and applications. This manual assumes the test to be performed has been
designed and set up by a specialist and is saved for selection.
This manual assumes the system and its subcomponents are operating properly.
The customer is allowed to perform preventive maintenance. However, any
repair or troubleshooting of a non-functioning system or its subcomponents is to
be performed by qualified MTS Service Engineers. If the system is not operating
properly, call MTS Systems for assistance; contact information can be found on
the back cover.
Damper System Operation Introduction
11
Page 12

Other MTS Manuals
Other MTS Manuals
Because MTS systems can be configured with a variety of similar products, this
operation manual covers general operation. Operation specific for a given
product will be covered in its product manual. For example, you might be
instructed to position the crosshead to accommodate the specimen height and
grips or fixtures. For detailed information about how to position the crosshead,
you would refer to your load unit or load frame product manual. Another
example, during specimen installation you might be instructed to grip the
specimen in the upper and lower grips. For detailed information about how to
grip the specimen, you would refer your grip product manual.
These product manuals can be found on the MTS System Documentation CD.
This CD contains an electronic copy of the MTS manuals that pertain to your test
system. The manuals on the System Documentation CD can include hardware,
hydraulic, mechanical, and electromechanical component product manuals
depending on the specific products that comprise your system. In some cases,
assembly drawings and parts lists might also be included. Operation, safety, and
maintenance information that pertain to these products is found in the associated
product manual. For 85X Damper Systems depending on system configuration,
these products can include:
• Series 505G2 SilentFlo™ Hydraulic Power Unit (part number 100227352)
• Model 293.24 Hydraulic Service Manifold (part number 100046709)
• Series 111 Accumulator (part number 011553304)
• Model 850 Load Unit (part number 015203501)
• Model 852 Load Unit (part number 100254839)
• Series 252 Servovalve (part number 011182906)
• Damper Software (part number 015194700)
• MTS FlexTest® Models 40/60/100/200 Controller Hardware (part number
100187204)
Controller and application software manuals are typically included on the
software CD distribution disc(s).
Note When manuals are provided in electronic form, the electronic form can
be on physical media such as a pdf file on a CD or online at
www.mts.com. Some manuals can also be supplied in hardcopy (paper)
form.
12
Introduction
Damper System Operation
Page 13
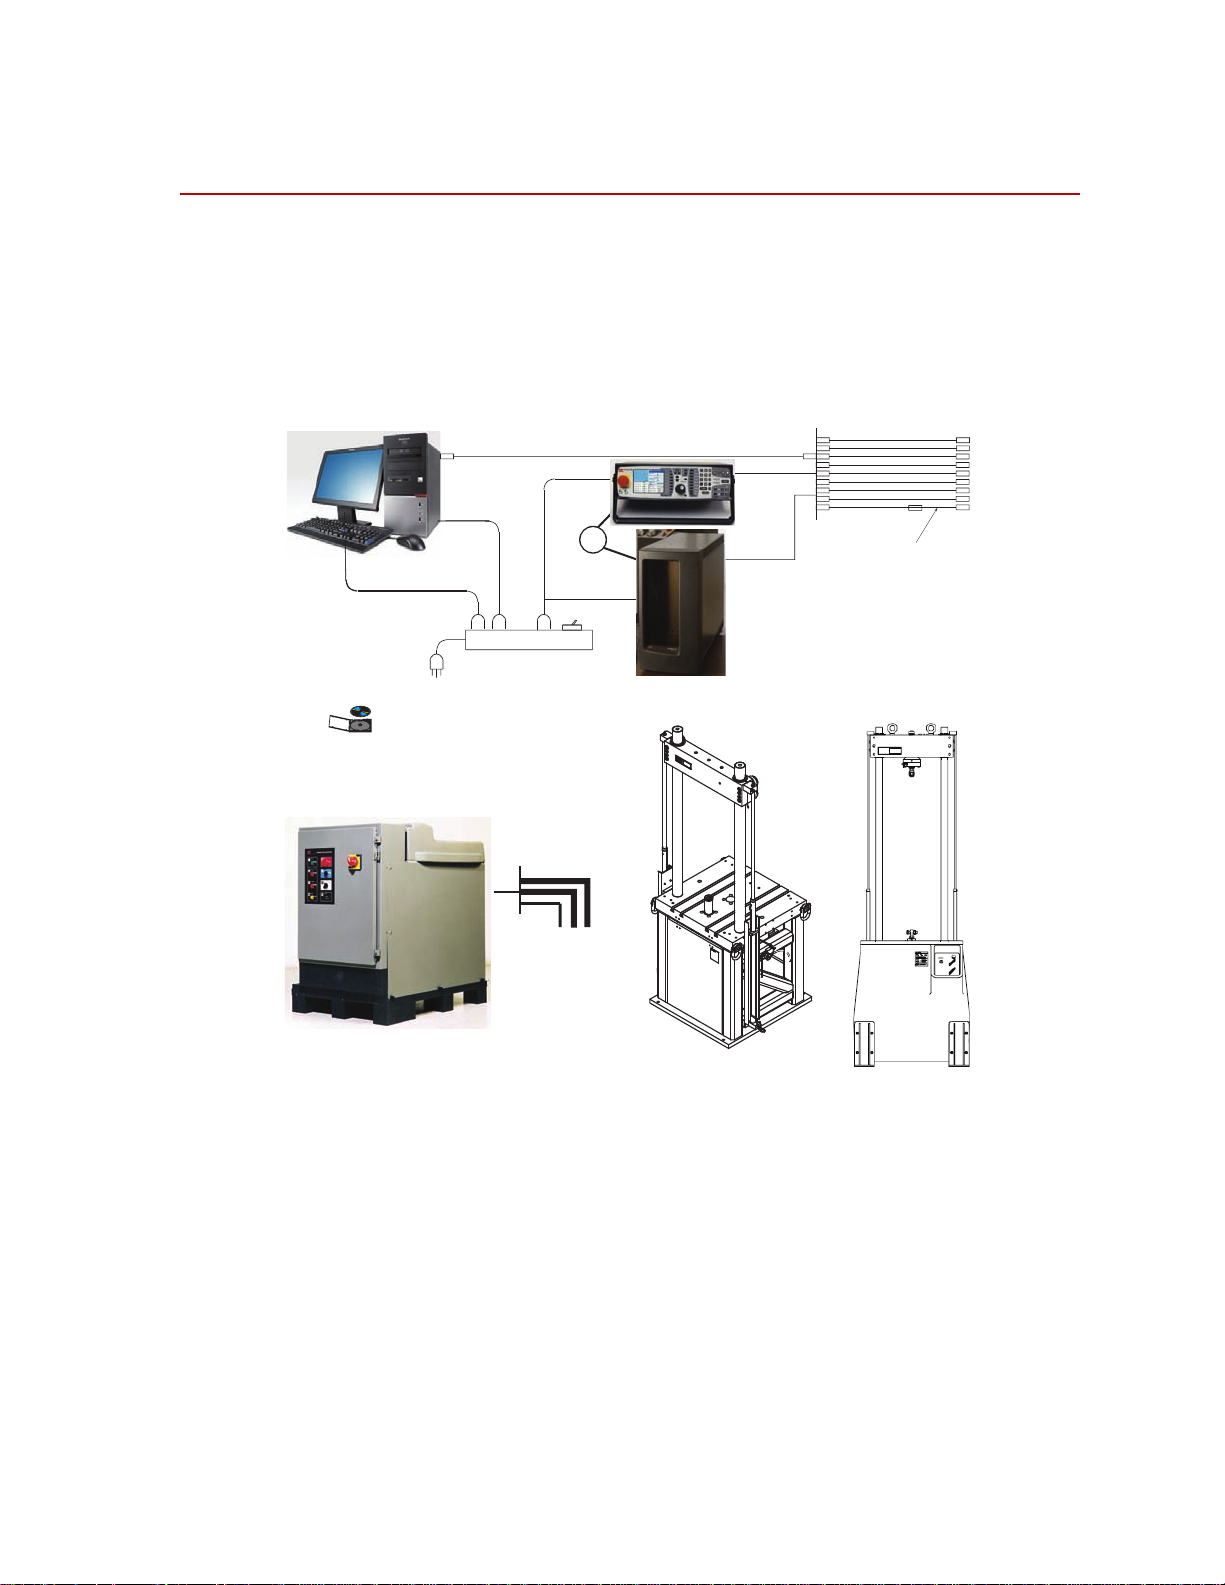
Typical Test System Configuration
Outlet Strip
Cables
PC Link
Line Supply
PC Workstation
MTS Documentation
Hose connections to
HSM:
• Pressure
• Return
• Drain
Hydraulic Power Unit
PRD
or
Test Controller
Software (typical):
• TestSuite System Software
• TestSuite Applications
• TestSuite Utilities
Load Frames (typical)
Transducer
ID Cable
The following illustration shows the common MTS 85X Damper System
components.
Typical Test System Configuration
Damper System Operation Introduction
13
Page 14

Typical Test System Configuration
Test Controller
The test controller can be either a FlexTest SE Basic, FlexTest SE Plus, FlexTest
GT , or FlexTest 40/60/100/200.
Note Because the FlexTest 40 is the most common test controller used on the
The FlexT est 40, FlexTest SE Plus, and FlexTest SE 2-Channel are single station
PC-based digital controllers. The FlexTest 60/100/200 controllers are PC-based
multi-station digital controllers. In more complex testing situatio ns, the multistation controller controls many channels on a number of independent stations;
with one or more of the stations being a load frame based test system. These test
controllers typically consist of:
• A PC running Series 793 Software (except the FlexTest SE Basic).
• A chassis equipped with Series 493 or Series 494 electronics.
• A handset (optional) for load frame control during specimen loading and
MTS Landmark System, this manual will primarily focus on that
controller.
unloading. The handset is also used for setup and can initiate tests at the
load frame.
• The Station Manager application running on the PC as the primary test
interface.
• A software application (such as MultiPurpose TestWare) to provide the
command and data acquisition functions of running a test.
The FlexTest SE Basic is nonautomated and operates from the front panel
controls.
14
Introduction
Damper System Operation
Page 15

Typical Test System Configuration
Servohydraulic and Mechanical Components
The following paragraphs briefly describe the servohydraulic and mechanical
components that are typical supplied with the MTS Landmark System.
Load frame There are a variety of load frames that can be supplied with the system. The load
frame is the mechanical foundation of the test system in which the load cell
transducer, specimen fixturing or grips, and hydraulic actuator are mounted.
The load frame can be configured with hydraulic-controlled crosshead locks and
lifts that allow convenient crosshead positioning during specimen installation.
(Manual crosshead locks and lifts and manual crosshead locks and hydraulic lifts
are also available.)
Hydraulic actuator The hydraulic actuator is typically mounted in the base of the load frame; some
load frames can have crosshead mounted actuators. It is the force-generating and/
or positioning device in the system. Hydraulic fluid is applied to either side of the
actuator's piston to cause its piston rod to extend or retract.
Servovalve(s) The servovalve converts a control signal (from the test controller) to control the
direction and amount of fluid flow to the actuator. This regulated hydraulic fluid
flow controls the displacement or force being applied to the test specimen.
Hydraulic power
supply
The hydraulic power unit (HPU) provides pressurized hydraulic fluid to the
servovalve. An HPU typically includes a reservoir for the hydraulic fluid, a pump
to pressurize the hydraulic fluid, a motor to run the pump, a heat exchanger to
cool the hydraulic fluid, and sensors to monitor the level, pressure, and
temperature of the hydraulic fluid.
Transducer(s) The load cell transducer, mounted underneath the load frame crosshead, is used
to measure the polarity and magnitude of the force that is applied to the
specimen.
The extensometer is a sensor attached to a specimen that measures a dimensional
change (gage length or strain) that occurs in the specimen while being tested.
Extensometers use a Wheatstone bridge circuit to detect the dimensional
changes. Extensometers are an option purchased separately.
The L VDT (linear variable dif ferential transformer) transducer is mounted inside
the hydraulic actuator. The LVDT is used to measure the position (or
displacement) of the actuator piston rod.
Specimen fixtures or
grips
Either fixtures or grips are used to hold the specimen in alignment with the force
train during the test. The force train is comprised of the servohydraulic and
mechanical components which receive the forces applied by the hydraulic
actuator. Fixtures or grips are options purchased separately.
Test area enclosure Protective enclosures should be used when you work with hazardous test
specimens (for example, ejected fluids if a damper breaks, brittle or fragmenting
materials, or materials that are internally pressurized). The enclosure is also
intended to limit access during a test. Test area enclosures are an option
purchased separately.
Damper System Operation Introduction
15
Page 16

Interlocks
Interlocks
The test controller incorporates interlock circuitry that can automatically stop a
test when a system problem, specimen failure, or an operator error could result in
unwanted or unexpected actuator movement. The test controller interlock
circuitry will cause one of two interlocks to occur in response to specific
conditions encountered during testing. These interlocks are:
• Hydraulic Interlock – stops the program and removes hydraulic pressure
from the system.
• Program Interlock – stops the current test program when certain test
parameters are not met or are exceeded.
The following table lists the possible types of interlock conditions for the test
controller.
Condition Cause Type of Interlock
Emergency Stop
Program Aux
Hydraulic event
Mechanical event
End-of Count
Underpeak
Error
Upper Limit
Lower Limit
* These interlocks can be set to indicate only. For further information on configuring these interlocks,
refer to the test controller documentation.
Emergency Stop or E-Stop button pressed Hydraulic
Open circuit at the Prog Intlk rear panel connector Program
Fault in the performance of hydraulic components Hydraulic
Fault in the performance of mechanical components Hydraulic
Completion of a preset number of cycles in the current test
program
Selected signal fails to reach a preset minimum or maximum
level
When the control channel's DC error signal exceeds a preset
maximum level
Transducer feedback signal exceeds a preset minimum or
maximum level
Hydraulic or
Program
Hydraulic with
indicator option
Hydraulic with
indicator option
Hydraulic with
indicator option
*
*
*
16
Introduction
Damper System Operation
Page 17

Safety
General Safety Practices
This section provides information about safety issues that pertain to
servohydraulic systems in general. These issues include statements to the
intended use and foreseeable misuse of the system, the hazard zone, definition for
the graphical hazard labeling that is affixed to your product, and other (more
general) safety information that relates to the high-pressure and highperformance characteristics of MTS servohydraulic systems.
Intended use MTS test systems are designed to generate motions and forces and impart these
motions and forces into a test specimen.
Foreseeable misuse When you prepare to operate the system and during system operation, ensure the
following:
• Do not use or allow personnel to operate the system who are not
experienced, trained, or educated in the inherent dangers associated with
high-performance servo hydraulics and who are not experienced, trained, or
educated with regard to the intended operation as it applies to this test
system.
• Do not disable safety components or features (including limit detectors,
light curtains, or proximity switches/detectors).
• Do not attempt to operate the system without appropriate personal safety
equipment (for example, hearing, hand, and eye protection).
• Do not apply energy levels that exceed the maximum energies and velocities
for the system design.
• Do not test a specimen that exceeds the minimum (if applicable) or
maximum allowable mass.
• Do not use specimens that are combustible, flammable, pressurized,
chemically harmful, or explosive.
• Do not exceed the performance of a test area enclosure. For example,
particles can fly up and there is no cover on the test area enclosure, or
particles flying off can have higher energy than the test area enclosure
shielding performance (for example when springs are tested with struts).
• Do not use humans as specimens or allow humans to ride in or on the test
specimen or the test system for any purpose unless the system is man-rated
and all associated safety conditions are strictly enforced.
• Do not modify the system or replace system components using parts that are
not MTS component parts or effect repairs using parts or components that
are not manufactured to MTS specifications.
• Do not operate the system in an explosive atmosphere.
Damper System Operation Safety
17
Page 18

• Do not use the system in a test area where uncontrolled access to the test
system is allowed when the system is in operation
• Do not operate the system unless an interlock is installed to monitor supply
pressure into the HSM and initiate a system interlock if a low or no pressure
event occurs.
If you have system related responsibilities (that is, if you are an operator, service
engineer, or maintenance person), study safety information carefully before you
attempt to perform any test system procedure.
You should receive training on this system or a similar system to ensure a
thorough knowledge of your equipment and the safety issues that are associated
with its use. In addition, gain an understanding of system functions by studying
the other manuals supplied with your test system. Contact MTS for information
about the content and dates of training classes that are offered.
It is very important that you study the following safety information to ensure that
your facility procedures and the system’s operating environment do not
contribute to or result in a hazardous situation. Remember, you cannot eliminate
all the hazards associated with this system, so you must learn and remain aware
of the hazards that apply to your system at all times. Use these safety guidelines
to help learn and identify hazards so that you can establish appropriate training
and operating procedures and acquire appropriate safety equipment (such as
gloves, goggles, and hearing protection).
Each test system operates within a unique environment which includes the
following known variables:
• Facility variables (facility variables include the structure, atmosphere, and
utilities)
• Unauthorized customer modifications to the equipment
• Operator experience and specialization
• Test specimens
Because of these variables (and the possibility of others), your system can
operate under unforeseen circumstances that can result in an operating
environment with unknown hazards.
Improper operation or maintenance of your system can result in hazardous
conditions that can cause death, personal injury, or damage to the equipment or to
the specimen. Common sense and a thorough knowledge of the system’s
operating capabilities can help to determine an appropriate and safe approach to
its operation.
Hazard placards Hazard placards contain specific safety information and are affixed directly to the
system components.
Each placard describes a system-related hazard. When possible, international
symbols (icons) are used to graphically indicate the type of hazard and the
placard label indicates its severity. In some instances, the placard might contain
text that describes the hazard, the potential result if the hazard is ignored, and
general instructions about how to avoid the hazard. Refer to the product
18
Safety
Damper System Operation
Page 19

information manuals for a description of hazard placards associated with the
various products that comprise the MTS Landmark System.
Safety Practices Before Operating the System
Before you apply power to the test system, review and complete all of the safety
practices that are applicable to your system. The goal, by doing this, is to
improve the safety awareness of all personnel involved with the system and to
maintain, through visual inspections, the integrity of specific system
components.
Read all manuals Study the contents of this manual and the other manuals provided with your
system before attempting to perform any system function for the first time.
Procedures that seem relatively simple or intuitively obvious may require a
complete understanding of system operation to avoid unsafe or dangerous
situations.
Make sure the
servovalve
configuration is
correct for the test
Locate and read
hazard placards/labels
Locate lockout/tagout
points
Know facility safe
procedures
Locate Emergency
Stop buttons
Know controls Before you operate the system for the first time, make a trial run through the
If the load frame can be configured with one of two (or more) servovalve
combinations, be sure all manifold valves, solenoid valves, or other hand valves
are in the appropriate position. Refer to the load frame product manual.
Find, read, and follow the hazard placard instructions located on the equipment.
These placards are placed strategically on the equipment to call attention to areas
such as known crush points and electrical voltage hazards.
Know where the lockout/tagout point is for all of the supply energies associated
with your system. This includes the hydraulic, pneumatic, electric, and water
supplies (as appropriate) for your system to ensure that the system is isolated
from these energies when required.
Most facilities have internal procedures and rules regarding safe practices within
the facility. Be aware of these safe practices and incorporate them into your daily
operation of the system.
Know the location of all the system Emergency Stop buttons so that you can
stop the system quickly in an emergency . Ensure that an Emergency Stop button
is located within 2 meters (6 feet) of the operator at all times.
operating procedures with the power off. Locate all hardware and software
controls and know what their functions are and what adjustments they require. If
any control function or operating adjustment is not clear, review the applicable
information until you understand it thoroughly.
Have first aid available Accidents can happen even when you are careful. Arrange your operator
schedules so that a properly trained person is always close by to render first aid.
In addition, ensure that local emergency contact information is posted clearly and
in sight of the system operator.
Know potential crush
and pinch points
Damper System Operation Safety
Be aware of potential crush and pinch points on your system and keep personnel
and equipment clear of these areas. Be aware that many of the dynamic (moving)
system assemblies have been painted yellow. Understand that yellow paint
represents a system component that is capable of motion.
19
Page 20

Remember, when hydraulic power is interrupted on a servohydraulic system, it is
likely that stored accumulator pressure will persist for some time within the
system. In addition, it is likely that as stored energy dissipates, gravity will cause
portions of the system to move.
Be aware of
component movement
with hydraulics off
Know electrical
hazards
Keep bystanders
safely away
A load frame crosshead can slowly drift down the columns if the locks are turned
off and when hydraulic pressure is turned off. The crosshead can damage any test
fixtures, grips, and specimen in its path. Unlock the crosshead only to reposition
it. Always lock the crosshead after you have repositioned it and never leave the
crosshead unlocked.
The actuator rod can also drift down when hydraulics are turned off hitting
anything in its path. This uncommanded movement is because of oil movement
between the pressure/return ports and oil blow by across the piston hub. Be aware
that this can happen and clear the area around the actuator rod when hydraulics
are turned off.
When the system electrical power is turned on, minimize the potential for
electrical shock hazards. Wear clothing and use tools that are properly insulated
for electrical work. Avoid contact with exposed wiring or switch contacts.
Whenever possible, turn off electrical power when you work on or in proximity
to any electrical system component. Observe the same precautions as those given
for any other high-voltage machinery.
Make sure that all electrical components are adequately grounded. Grounds must
remain connected and undisturbed at all times.
Keep bystanders at a safe distance from all equipment. Never allow bystanders to
touch specimens or equipment while the test is running.
Wear proper clothing Do not wear neckties, shop aprons, loose clothing or jewelry, or long hair that
could get caught in equipment and result in an injury. Remove loose clothing or
jewelry and restrain long hair.
Remove flammable
fluids
Know compressed gas
hazards
Remove flammable fluids from their containers or from components before you
install the container or component. If desired, you can replace the flammable
fluid with a non-flammable fluid to maintain the proper proportion of weight and
balance.
Most servohydraulic systems contain accumulators that require a high-pressure
gas precharge (pressures that exceed 138 bar [2000 psi]). In addition, some
systems can contain devices, such as static supports, that are pneumatically
operated. High-pressure devices are potentially dangerous because a great
amount of energy is available in the event of an uncontrolled expansion or
rupture.
Observe the following safety practices when you work with high-pressure air or
gases:
• When you charge an accumulator, follow all the charging instructions
provided in the appropriate product information manuals. When precharging
accumulators, properly identify the type of gas to be used and the type of
accumulator to be precharged.
20
Safety
Damper System Operation
Page 21

• Use only dry-pumped nitrogen to precharge nitrogen-charged accumulators.
(Dry-pumped nitrogen can also be labeled “oil pumped” or “dry water
pumped.”) Do not use compressed air or oxygen for precharging: the
temperature increase caused by rapid gas compression can result in highly
explosive conditions when hydraulic fluid is in the presence of oxygen or
compressed air.
• Always follow the recommended bleeding procedures before you remove or
disassemble components that contain pressurized gas. When you bleed a gas
or remove a fitting, hose, or component that contains a gas, remember that
many gases cannot support life. Therefore, as the ratio of released gas to
oxygen increases, so does the potential for suffocation.
• Wear appropriate safety devices to protect your hearing. Escaping air or gas
can create a noise level that can damage your hearing.
• Ensure that all pressurized air or gas is bled out of a pneumatic or gas-
charged device before you start to disassemble it. A thorough understanding
of the assembly and its pressurized areas is necessary before you undertake
any maintenance. Refer to the appropriate product information for the
correct bleeding procedure.
It may not be obvious or intuitive which bolts or fittings are used to restrain
a pressurized area. On some assemblies, you must remove a cover plate to
gain access to the structural bolts. Sometimes, to protect you from a rapid
release of trapped gases, a small port is exposed when you remove this
cover plate. Exposing this port ensures that the gas precharge is fully bled
before disassembly. However, th is is not the recommended procedure for
bleeding a pneumatic or gas-charged device, because it can expose you to
the dangers of escaping compressed gas and particulates that are expelled
from the chamber or around the seals. Do not assume that cover plates and
ports are installed in all the critical locations.
Check bolt ratings and
torques
Practice good
housekeeping
Consult MTS when in doubt about the safety or reliability of any system-related
procedure or modification that involves devices that contain any type of
compressed gas.
To ensure a reliable product, fasteners (such as bolts and tie rods) used in MTSmanufactured systems are torqued to specific requirements. If a fastener is
loosened or the configuration of a component within the system is modified, refer
to the system and component assembly drawings (located on the System
Documentation CD) to determine the correct fastener, fastener rating, and torque.
Overtorquing or undertorquing a fastener can create a hazardous situation due to
the high forces and pressures present in MTS test systems.
On rare occasions, a fastener can fail even when it is correctly installed. Failure
usually occurs during torquing, but it can occur several days later. Failure of a
fastener can result in a high velocity projectile. Therefore, it is a good practice to
avoid stationing personnel in line with or below assemblies that contain large or
long fasteners.
Keep the floors in the work area clean. Hydraulic fluid that is spilled on any type
of floor can result in a dangerous, slippery surface. Do not leave tools, fixtures,
or other items not specific to the test, lying about on the floor, system, or decking.
Damper System Operation Safety
21
Page 22

Protect hoses and
cables
Protect electrical cables from spilled hydraulic fluid and from excessive
temperatures that can cause the cables to harden and eventually fail. Ensure that
all cables have appropriate strain relief devices installed at the cable and near the
connector plug. Do not use the connector plug as a strain relief.
Protect all system hoses and cables from sharp or abrasive objects that can cause
the hose or cable to fail. Use a cable cover or cable tray where cables are in traffic
locations. Never walk on hoses or cables or move heavy objects over them.
Route hoses and cables away from areas that expose them to possible damage.
Provide proper
hydraulic fluid
filtration.
Protect accumulators
from moving objects.
If the system is equipped with a non-MTS hydraulic power unit, ensure proper
filtration to the hydraulic distribution system and testing component s. Particles
present in hydraulic fluid and cause erratic or poor system response.
Protect accumulators with supports or guards. Do not strike accumulators with
moving objects. This could cause the accumulator(s) to separate from the
manifold resulting in equipment damage and personal injury.
Record changes If you change any operating procedure, write the change and the date of the
change in the appropriate manual.
Provide test area
enclosure
Do not exceed the
Maximum Supply
Pressure
Do not disable safety
devices
Use appropriately
sized fuses
Use protective enclosures and special laboratory layouts when you work with
hazardous test specimens (for example, brittle or fragmenting materials or
materials that are internally pressurized). Also use protective enclosures to limit
access to a running system.
Make sure that hydraulic supply pressure is limited to the maximum pressure
defined by the system operating limits. Read and review “System Operating
Limits” for the system.
Your system may have active or passive safety devices installed to prevent
system operation if the device indicates an unsafe condition. Do not disable such
devices as it may result in unexpected system motion.
Whenever you replace fuses for the system or supply, ensure that you use a fuse
that is appropriately sized and correctly installed. Undersized or oversized fuses
can result in cables that overheat and fuses that explode. Either instance creates a
fire hazard.
Provide adequate
lighting
Provide means to
access out-of-reach
components
Ensure adequate lighting to minimize the chance of operation errors, equipment
damage, and personal injury. You need to see what you are doing.
Make sure you can access system components that might be out of reach while
standing on the floor. For example, ladders or scaffolding might be required to
reach load cell connectors on tall load units.
Safety Practices While the System Is in Operation
Wear appropriate
personal protection
Safety
22
Wear eye protection when you work with high-pressure hydraulic fluid,
breakable specimens, or when anything characteristic to the specimen could
break apart.
Damper System Operation
Page 23

W ear ear protection when you work near electric motors, pumps, or other devices
that generate high noise levels. Some systems can create sound pressure levels
that exceed 70 dbA during operation.
W ear appropriate personal protection equipment (gloves, boots, suits, respirators)
whenever you work with fluids, chemicals, or powders that can irritate or harm
the skin, respiratory system, or eyes.
Provide test area
enclosure
Specimen temperature
changes
Handle chemicals
safely
Know servohydraulic
system interlocks
Use protective enclosures and special laboratory layouts when you work with
hazardous test specimens (for example, brittle or fragmenting materials or
materials that are internally pressurized). Also use protective enclosures to limit
access to a running system.
During cyclic testing, the specimen temperature can become hot enough to cause
burns. Wear personal protection equipment (gloves) when handling specimens.
Whenever you use or handle chemicals (for example, cleaning fluids, hydraulic
fluid, batteries, contaminated parts, electrical fluids, and maintenance waste),
refer to the appropriate MSDS documentation for that material and determine the
appropriate measures and equipment required to handle and use the chemical
safely. Ensure that the chemical is disposed of appropriately.
Interlock devices should always be used and properly adjusted. Interlock devices
are designed to minimize the chance of accidental damage to the test specimen or
the equipment. Test all interlock devices for proper operation immediately before
a test. Do not disable or bypass any interlock devices as doing so could allow
hydraulic pressure to be applied regardless of the true interlock condition. The
Reset/Override button is a software function that can be used to temporarily
override an interlock while attempting to start the hydraulic power unit and gain
control of the system.
Know system limits Never rely on system limits such as mechanical limits or software limits to
protect you or any personnel. System limits are designed to minimize the chance
of accidental damage to test specimens or to equipment. T est all limits for proper
operation immediately before a test. Always use these limits and adjust them
properly.
Do not disturb sensors Do not bump, wiggle, adjust, disconnect, or otherwise disturb a sensor (such as
an accelerometer or extensometer) or its connecting cable when hydraulic
pressure is applied.
Ensure secure cables Do not change any cable connections when electrical power or hydraulic pressure
is applied. If you attempt to change a cable connection while the system is in
operation, an open control loop condition can result. An open control loop
condition can cause a rapid, unexpected system response which can result in
severe personal injury, death, or damage to equipment. Also, ensure that all
cables are connected after you make any changes in the system configuration.
Stay alert A void long periods of work without adequate rest. In addition, avoid long periods
of repetitious, unvarying, or monotonous work because these conditions can
contribute to accidents and hazardous situations. If you are too familiar with the
work environment, it is easy to overlook potential hazards that exist in that
environment.
Damper System Operation Safety
23
Page 24

Contain small leaks Do not use your fingers or hands to stop small leaks in hydraulic or pneumatic
hoses. Substantial pressures can build up, especially if the hole is small. These
high pressures can cause the oil or gas to penetrate your skin, causing painful and
dangerously infected wounds. Turn off the hydraulic supply and allow the
hydraulic pressure to dissipate before you remove and replace the hose or any
pressurized component.
Stay clear of moving
equipment/avoid crush
points
Know the causes of
unexpected actuator
motions
Do not use RF
transmitters
Stay clear of mechanical linkages, connecting cables, and hoses that move
because you can get pinched, crushed, tangled, or dragged along with the
equipment. High forces generated by the system can pinch, cut, or crush anything
in the path of the equipment and cause serious injury. Stay clear of any potential
crush points. Most test systems can produce sudden, high-force motion. Never
assume that your reactions are fast enough to allow you to escape injury when a
system fails.
The high force and velocity capabilities of MTS actuators can be destructive and
dangerous (especially if actuator motion is unexpected). The most likely causes
of unexpected actuator response are operator error and equipment failure due to
damage or abuse (such as broken, cut, or crushed cables and hoses; shorted wires;
overstressed feedback devices; and damaged components within the servocontrol
loop). Eliminate any condition that could cause unexpected actuator motion.
Keep radio frequency (RF) transmitters away from the workstation computers,
remote terminals, and electronics consoles. Intense RF fields can cause erratic
operation of the more sensitive circuits in the system.
24
Safety
Damper System Operation
Page 25

Getting Started
System Startup
Before system startup, you should be familiar with the test fixtures, test
controller or electrical console, PC workstation, hydraulic power unit, and other
system components. This includes reading all of the sections in this Operation
Manual and the various additional documents supplied with the system. If
applicable, also read the vendor manuals supplied with the system. Observe all
safety practices and operating procedures to ensure proper use of the system.
Control console The console power can be turned on after verifying that the following installation
procedures have been completed:
• cable connections are made and secured with proper strain relief,
• the power source is ready,
System Startup
• the components are properly grounded, and
• the hydraulic power unit is shut off.
PC workstation The cabling between the test controller and the computer should be checked for
proper routing and secured using attachment screws where necessary. It is
important that the physical integrity of these connections be maintained to ensure
safe and accurate operation of the system. When turning on power to the
computer, be sure that auxiliary equipment is also turned on at the appropriate
time. Refer to the test controller documentation for information regarding the
rear panel connectors provided for computer-controlled operation.
Hydraulic power unit Ensure that electrical power is supplied to the HPU. Then turn on the HPU in low
pressure and check for leakage or improper operation. The cooling water supply
should also be checked for leakage or improper operation. When first starting up
the system or after the system has been idle for an extended period of time, run
the HPU for about 30 minutes or until the hydraulic fluid is up to
operating temperature.
Actuators After checking the electrical and hydraulic power unit connections, the actuator
position control electronics (the Set Point control on the selected controller)
should be checked for signal polarity and control. This is accomplished by
performing the following steps:
1. Clear the area around the piston rod of obstructions.
2. Select the desired control mode (typically displacement).
3. Clear any active interlocks.
4. Apply hydraulic pressure by completing the following steps:
Damper System Operation Getting Started
25
Page 26

System Startup
A. Press the Hydraulic Pressure Low switch to start the HPU and apply
low hydraulic pressure to the actuator (the Off indicator will extinguish
and the Low indicator will light).
B. Observe the actuator for any movement caused by hydraulic fluid
pressurizing the system. Ensure that the actuator stabilizes before
proceeding.
C. Press the Hydraulic Pressure High switch to apply high hydraulic
pressure to the actuator (the Low indicator will extinguish and the
High indicator will light).
5. Slowly adjust the Set Point control on the controller and observe piston
movement. The direction and response should be appropriate for the system
configuration. The system phase can be determined as follows:
• If the Set Point control is adjusted in a negative direction and the
actuator retracts, then the system is set for a positive phase.
• If the Set Point control is adjusted in a negative direction and the
actuator extends, then the system is set for a negative phase.
26
Getting Started
Damper System Operation
Page 27

Test Setup
Test Setup
Before setting up or operating the test system, the hardware component
configuration must be defined, control settings (or test parameters) should be
calculated, and test setup decisions must be made. This section describes some of
the factors to consider when completing these pre-operation procedures.
Define the hardware
configuration
Define the test
parameters
Select test setup
methods
Determine the
crosshead position
Defining the test configuration involves determining how the mechanical
components will be set up and what optional fixturing is necessary, These
selections must be made before power is applied to the test system. This is
performed by the operator.
Before defining the test parameters, the test control mode should be known and
the maximum and minimum test forces or displacements should be determined.
The maximum and minimum desired forces/displacements will be used in the
calculation of the detector settings and program scaling. These test parameters
should be defined before beginning the operating procedure. Additional
information can be found in the test controller’s documentation. This is
performed by a specialist.
There are steps in the operating procedure that are optional or that provide
optional setup/adjustment substeps. These include zeroing transducer outputs and
adjusting the servo loop controls. This information should be reviewed and any
necessary setup decisions should be made before beginning the operating
procedure. Usually these steps are prompted for the operator by the test program.
Additional information can be found in the test controller’s documentation. This
is performed by a specialist.
For balanced system operation, the load frame crosshead must be positioned so
that the based-mounted actuator piston rod will be at approximately midstroke
when the specimen is installed into its upper and lower fixtures/grips. This is
performed by the operator.
Damper System Operation Getting Started
27
Page 28

Test Setup
28
Getting Started
Damper System Operation
Page 29

Operation
This section covers hardware operation for an MTS 85X Damper system.
Hardware operation consists of load frame setup and specimen installation.
All other system operation is performed on the computer through the system
controller software. Refer to the controller documentation for information on test
definition, system tuning for the test to be performed, and hydraulic pressure
operation.
This section is intended for an operator that has had an introduction to system
operation, is aware of known hazards and understands the manual contents.
Damper System Operation Operation
29
Page 30

Initial Setup
Initial Setup
The initial setup tasks include the following:
• Determine what types of fixtures/grips will be needed to secure the
specimen into the load frame.
• Determine the position of the load frame crosshead.
• Prepare the fixtures/grips, specimen, and data acquisition transducers.
• Ensure that the load cell is properly rated for the test and that it is aligned
with the actuator.
• Ensure the appropriate servovalve configuration is set up properly.
• Ensure that the servovalve and feedback control cables are properly
connected.
Detailed information on these tasks can be found in the load frame product
manual.
30
Operation
Damper System Operation
Page 31

Install the Specimen
WARNING
The procedure to install a specimen varies due to the variety of test fixtures,
grips, and the type of specimen being installed. This section should be considered
a guideline. You need to modify this procedure to suit your equipment.
For first time operation, it is recommended to install a dummy specimen and use
it for the initial test settings. This minimizes the chance of unintentional damage
to the actual test specimen.
Following is a procedure for a typical shock absorber installation. There are other
possible installation configurations; see the load frame product manual for
additional information.
Prerequisite You should have the necessary fixturing installed to the force transducer and
actuator. You should also have the controller set up to use the Set Point control.
And, you should have a test program defined.
Install the Specimen
Be careful when working in a crush zone.
The crosshead could drop suddenly cru shing hands, damaging grips, and
smashing specimens.
• Ensure you have hydraulic pressure on before unlocking the crosshead.
• The Lift Control must be in the stop “O” position before you unlock the
crosshead.
• The crosshead cannot securely clamp greasy or wet columns. Keep them
clean and dry.
• Air in the lifts will make the crosshead move roughly. If it moved roughly
when last used, bleed the lifts before unlocking the crosshead.
• Bleed the lifts before unlocking the crosshead if the sealed side of the
hydraulic supply has been opened.
You might need to prepare the specimen for installation. For example, suppose
you are testing a shock absorber and the test is designed to begin with the shock
at mid-displacement. You need to determine the displacement of the shock and
mark the mid-displacement point of the shock’s actuator.
1. Be sure that the Lock Control is in the lock crosshead position.
Be sure that the Lift Control is in the stop crosshead position.
2. Turn on system electrical power. Do no t turn on hydraulic pressure yet.
3. If necessary, reset any active interlocks at the test controller.
4. Set the Hydraulic Flow switch on the control panel to Low. This slows the
actuator movement when using the Set Point control.
Damper System Operation Operation
31
Page 32

Install the Specimen
WARNING
5. Turn on low hydraulic pressure; turn on high hydraulic pressure if low
pressure is not available.
6. If there is a specimen in the load unit, remove it.
Note The actuator starting position depends on the type of test being set up.
7. Ensure the control panel Set Point control is enabled by the controller
software. Adjust the Set Point control to move the actuator to its start
position (usually mid-displacement).
8. This step pressurizes the lift actuators. The crosshead may have shifted
position while hydraulic pressure was turned off.
Note Cap screws clamp the crosshead to the columns during shipping and
maintenance. They must be loosened before moving the crosshead.
Briefly turn the Lift Control to the lift crosshead position to apply a slight
upward pressure to the crosshead. Then return the lift control to the stop
position.
9. Use the Lock Control to unclamp crosshead. Wait 30 seconds for the
pressure in the crosshead locks to drop to zero.
Do not leave a crosshead unlocked.
It can drift slowly down when hydraulic pressure is turned off and damage
any test fixtures, grips, and specimen in its path.
Unlock the crosshead only to reposition it. Always lock the crosshead after you’ve
repositioned it.
10. Use the Lift Control to move the crosshead to a point where you can install
the specimen (or specimen fixture) into the upper grip or fixture without
obstruction.
11. Use the Lock Control to clamp the crosshead to its current position. The
clamped symbol is shown at the right. Wait 30 seconds for the locks to fully
clamp the columns.
12. Install the specimen into the upper grip or fixture. Depending on your test
requirements, zero the force transducer signal to remove the tare weight
from the signal.
Note Always lower the crosshead to where you want it. The pressure
remaining in the lift cylinders after raising the crosshead can slightly shift
its alignment. Lowering the crosshead to its final position removes this
pressure and improves alignment.
13. Use the Lock Control to unclamp the crosshead. Wait 30 seconds for the
pressure in the crosshead locks to drop to zero.
32
Operation
14. Use the Lift Control to move the crosshead to a position where you can
mount the lower end of the specimen (or specimen fixture) into the lower
grip or fixture.
Damper System Operation
Page 33

Install the Specimen
You can use the Set Point control to fine tune the alignment of the specimen
and actuator positions.
15. Use the Lock Control to clamp the crosshead to its current position. The
clamped symbol is shown at the right. Wait 30 seconds for the locks to fully
clamp the columns.
16. Install the specimen into the lower grip or fixture.
17. You may need to reposition the crosshead to accommodate the starting
position of the specimen.
A. Use the Lock Control to unclamp the crosshead.
B. Use the Lift Control to lower the crosshead until the specimen is in or
near its starting position (you can fine tune the starting position in Step
D).
C. Use the Lock Control to clamp the crosshead to its current position.
D. If needed, you can use the Set Point control to fine tune the starting
position of the specimen.
18. Depending on the test requirements, zero the displacement signal.
19. Set the Hydraulic Flow switch on the control panel to High. This returns
the actuator flow to its normal condition.
Damper System Operation Operation
33
Page 34

Run the Test
Run the Test
Note Before you can start a test, the test must be set up by a specialist. This
would include:
• The system software is started and the appropriate configuration file
and HWI file loaded.
• The test control mode is selected.
• The test program is defined.
• The forces and/or displacements to be achieved during the test are
calculated and limits defined and set.
• The signals that should be monitored during the test are defined.
Once everything is set up, you are ready to run the test.
1. Ensure the following are true:
• Interlocks are cleared.
• High hydraulic pressure is applied to the station.
• The test specimen is installed.
• Limits are set and actions are assigned.
• The test program is set up.
• The scope and meters are set up to monitor the test as desired.
2. Start the test.
On the Station Controls panel, press the Program Run button to start the
test.
3. Continue the test to completion.
Some tests will run to completion and stop automatically by preset
interlocks (e.g., preset count, exceeded limit, specimen failure tripping the
error detector) or by a computer-cycled stop function. If desired, the test can
also be stopped periodically using the preset count feature of the test
controller. To stop the test manually, press the Program Stop but ton to end
the test.
Record any necessary data and, if desired, resume the test by pressing the
Program Run switch. When the test is complete, ensure that the test
controller is in the program stop condition (press the Program Stop switch,
if necessary). Remove the test specimen and record any additional data.
When no additional testing is to be performed, press the Hydraulic Pressure
Off switch to turn off the HPU.
34
Operation
Damper System Operation
Page 35

793 Controller Operation Overview
T est data
file
Your
Project
Station Manager
application
Station Config file with
Parameter set
T est design application
(for example, BTW or
MPT)
Test design
file
Test data
file
You start the test from the Station Control panel of the Station Manager application. Test Data files are
generated according to the type of test design application you used to create the test design file.
The test design file, along with the
generated test data, are automatically
stored in the selected (or default) Project
folder.
PAR
This section is intended to give you information on how to run 793 Software and
help you learn how to use your system. It is not intended to provide a step-bystep procedure to perform a specific test. Specific tests are usually performed by
special application software programs such as the MTS Damper Software for
testing elastomers and shock absorbers (refer to MTS manual part number 015194-700). Tests can also be designed within MPT to perform custom testing on
customer supplied samples or specimens.
About Running Tests
Understanding Files Used for Testing
During the testing phase, the Station Manager application controls how the parts
of the system work together to maintain precision servo control. Command is
typically provided by an application such as Basic TestWare or MultiPurpose
TestWare.
About Running Tests
Test Desktop
Damper System Operation 793 Controller Operation Overview
With the Station Manager application window controls, you can perform the
following to run tests:
• Load and reload stations
• Configure limit and error detectors
• Control hydraulic pressure to the test station
35
Page 36

About Running Tests
Windows typically open while running a test.
The windows shown here all display some element of status while a test is
in progress, and can be displayed on the desktop until the test is complete.
This example shows an MPT test in progress.
Meters display the numeric value of
selected signals.
The Station Manager application main
window displays interlock and limit
status; counters; run, stop, and hold
status; and generated messages.
The Scope displays the waveforms
of selected signals.
• Manage the execution of the Basic TestWare and MultiPurpose TestWare
applications
• Monitor signals on the built-in scopes and meters
Monitoring Test Information
MTS Series 793 Software includes several features for monitoring test signals
and test progress.
793 Controller Operation Overview
36
Damper System Operation
Page 37

About Running Tests
This sample procedure includes a group process
labeled “Cooling Cycles,” which contains four
nested processes (with indented label names,
“Trigger at 75C,” and so forth.)
Name displays the assigned process label
Current displays the current value of the counter
Target displays the assigned number of times
the process should execute (or repeat), or the
number of cycles to be executed.
MPT Counters
Run time counter The Run Time counter displays the elapsed time of the current test since the last
time it was reset.
Channel counters Channel Counters display a cumulative count of segments or cycles that have
been applied to a specific channel since the start of the test.
Sequence counters Sequence Counters display the progress of individual processes within the test.
They can be especially useful for procedures that contain nested groups, because
you can configure them to show test progress within the nested structure of the
procedure.
Input signals The Station Signals panel displays all of the input signals of the station with their
Damper System Operation 793 Controller Operation Overview
Meters display The Meters window can display up to 16 meters per station simultaneously. The
current values.
following data can be displayed for any defined input signal:
• Timed data
• Peak/valley data
37
Page 38

About Running Tests
Marker delta display
Marker coordinates
display
Scope display The Scope window in the Station Manager application is an oscilloscope. You
• Mean/amplitude data
• Maximum/minimum values
Meters can be aligned on the desktop vertically, horizontally, or in a grid. Meter
displays can be sized to your preference.
can use it to plot signals against time, frequency, and against each other. You can
create up to four scopes per station, and add up to four signal pairs per scope.
Note For a description of individual controls and indicators on the Scope, see
the MTS Series 793 Control Software manual (PN 100-147-130).
You can adjust trace time and scaling in the same way you can with an
oscilloscope. You can also select auto-scaling and resetting.
You can use the Program Control feature of the scope to automatically start the
scope when you start the test.
You can also use the scope to plot one channel versus another, and to plot in the
frequency domain rather than the time domain.
Data point display box The scope also allows you to pan trace history, and for Series 793 Software
version 4.0 or later, you can also pick and view individual data points.
When you place the cursor on the trace, it becomes a crosshairs. With the
crosshairs, you can select individual data points on the trace and see their precise
coordinates on the axes in the associated display box.
38
793 Controller Operation Overview
Damper System Operation
Page 39

Perform a Practice Test
About Setting Up a Practice Test
This section includes step-by-step instructions for performing a practice test. The
purpose of this procedure is simply to help you learn how to use your system.
While performing this test you will:
• Select a Project at the beginning of the test, and review test data stored in the
Project at the end of the test.
• Set limits and manually position the actuator to install the specimen.
• Apply hydraulic power to the test system.
• Adjust force tuning controls.
• Monitor test signals on the Meters and Scope.
• Create a test design file with the Basic TestWare application.
Perform a Practice Test
If MTS has set up
your controller
If you are going to set
up your controller
• Start and stop the test.
Before you can perform this test, you need to determine the setup status of your
system.
MTS customers typically receive their Series 793 Controller in the following
state:
• An initial Project, station configuration file, and parameter set has been
created.
• The sensors are calibrated and the servovalve is adjusted.
• The displacement tuning parameters are optimized. (The force tuning
parameters can also be optimized, but typically need to be adjusted for
individual specimens, and often between tests.)
If MTS has performed these activities for your controller, you can run a practice
test.
If MTS has not performed these activities for your controller, you must perform
the following activities before performing the test.
If you are installing Series 793 Software on your system and setting up your
controller yourself, you'll need to do the following before performing the practice
test:
• Install Series 793 Software
• Set up a Project (typically performed during software installation)
• Create a station configuration file
• Calibrate the sensors
• Perform servovalve adjustments
Damper System Operation 793 Controller Operation Overview
39
Page 40

Perform a Practice Test
WARNING
Steps to Run a Test
• Tune the system
To perform the Series 793 Software installation, see the Installation Instructions
readme file on the Series 793 System Software CD, and follow the installation
wizard.
To perform the remaining tasks, see the MTS Series 793 Tuning and Calibration
manual.
You may also find it necessary to see the following manuals:
• MTS Series 793 Utility Software manual—To setup or edit the hardware
interface file to reflect any hardware changes to your system.
• MTS Series 793 Control Software manual—To find detailed information
about using Series 793 Software controls.
• Other MTS manuals—You can receive additional MTS manuals that
provide instructions for maintaining and operating your test system.
Improper controller setup can result in unexpected actuator movement.
Unexpected actuator movement can injure personnel and damage test
equipment.
Ensure that your controller is set up properly before attempting to perform a test.
1. Power up the controller chassis and PC.
2. Start the Station Manager application and select a Project.
A. From your desktop, start the Station Manager application:
Start > Programs > MTS 793 Software name (for example, FlexTest
GT) > Station Manager
B. As the Station Manager application loads, you will be prompted to
select a Project. Select the existing Project that was created for your
system.
3. Apply hydraulic pressure.
When you power up your controller, the hydraulic interlock will be set.
Perform the following on the Station Controls panel:
A. Clear system interlocks.
793 Controller Operation Overview
40
Click Reset. If the interlock indicator lights again, determine the cause
of the interlock and correct it before proceeding.
B. If HPU controls are present, click the (Low) and then
(High) buttons.
Damper System Operation
Page 41

Perform a Practice Test
WARNING
C. If HSM controls are present, click the (Low) and then
(High) buttons.
4. Adjust force tuning.
A. From the toolbar, select an access level of Tuning (or higher). Y ou will
have to enter the password created at installation.
B. From the Application control bar, select the Function Generator.
C. Select the following settings in the Function Generator.
Control Setting
Channel
Control Mode
Command Type
Target Setpoint
Amplitude
Frequency
Wav e Shape
Compensator
Channel 1
Force
Cyclic
0 kN
10% of full scale
1 Hz
Ramp
None
D. From the Station Manager application toolbar, select the Scope.
A crush zone exists between the actuator and any equipment in the path of
its movement.
A crush zone exists between the actuator and any equipment in the path of
its movement. Immediate and unexpected actuator response is possible
when you apply hydraulic pressure to your system.
Stay clear of the actuators when applying hydraulic pressure. Do not place any
part of your body in the path of a moving actuator.
E. Install a dummy specimen that has a compliance similar to the test
specimen.
• From the Station Controls panel toolbar, click the Manual Command
icon .
• Click to select the Enable Manual Command check box.
• Select the Displacement control mode.
Damper System Operation 793 Controller Operation Overview
41
Page 42

Perform a Practice Test
Ringing
Overshoot
The middle waveform is
the optimum waveform. In
some cases the
waveform will have no
overshoot or ringing.
Gain (P)
Rate (D)
Low High
High
• Adjust the Manual Command slider to position the actuator while
installing the specimen.
• Switch to the Force control mode.
F. Adjust the P Gain and D Gain tuning controls.
• Start the Function Generator by clicking the Program Run control
and observe the resulting waveform on the Scope.
• From the Display menu, select Station Setup.
• From the tree view, expand Channels, then select Channel 1.
• Click the Tuning icon to displ ay the tun ing adjustment controls.
• Increase the P Gain control until you see a little overshoot and a little
ringing on the Scope.
• Slowly increase the D Gain control to reduce the overshoot and
ringing. Keep in mind that small adjustments of D can have large
effects on your system.
• Repeat P Gain and D Gain adjustments until you achieve an optimum
waveform
5. Install the test specimen.
A. Select the Displacement control mode for test specimen installation.
B. Install the test specimen.
793 Controller Operation Overview
42
• Turn on the Manual Command control on the Station Contr ols panel.
Damper System Operation
Page 43

Perform a Practice Test
• Adjust Manual Command to position the actuator as required.
C. Switch to the force control mode.
6. Set test limits and actions.
From the Station Controls panel, click the Detectors icon.
Set upper and lower limits and associated actions to accommodate your test
as desired.
For instance, you may want to adjust displacement limit detectors to limit
piston rod travel. This stops the test when the specimen is on the threshold
of complete failure.
Also, you may want to adjust force limit detectors to stop the test if the
piston rod applies an excessive amount of force to the specimen. This
minimizes the chance of inadvertent damage to the load cell and specimen.
Finally, you may want to adjust error detectors to stop the test if the error
between command and feedback becomes excessive. This stops the test
when your station can no longer deliver programmed loads.
7. Set up the test monitor.
Set up the Meters and Scope as desired to monitor test signals.
8. Set up a test program.
A. From the Application control bar, select Basic TestWare.
B. In the Command tab, set the following:
Note Ensure that the Target Setpoint and Amplitude values are appropriate for
your particular specimen.
Control Setting
Type
Channel
Control Mode
Target Setpoint
Amplitude
Frequency
Wav e Shape
Cyclic
Channel 1
Force
Guideline: 25% of full scale
Guideline: 10% of full scale
1 Hz
Sine Tapered
Compensator
Start Action
Done Action
None
Disabled
Disabled
C. In the Data Acquisition tab, set the following:
Damper System Operation 793 Controller Operation Overview
43
Page 44

Perform a Practice Test
Control Setting
Type
Signals Included
Time Between
Points
Buffer Size
Buffer Type
Timed
Channel 1 Output
default
2048
Linear
D. In the Data File tab, set the following:
Control Setting
Destination File
Data Header
Data File Mode
Data File Format
Test Default
Enter “First Test”
Append
Plain
E. Close the Test Setup window.
9. Start the test.
A. Ensure that the following are true:
• Interlocks are cleared
• High hydraulic pressure is applied to the station
• Load tuning parameters are optimized
• The test specimen is installed
• Limits are set and actions are assigned
• The test program is set up
• The scope and meters are set up to monitor the test as desired
B. On the Station Controls panel, press the Program Run button to start
the test. When desired, press the Program Stop button to end the te st.
10. Review test data.
A. Start the Project Manager application and select the current Project.
B. Click on the BTW folder to view the name of the associated data file.
C. Click on the data file to review its contents in the view pane.
793 Controller Operation Overview
44
Damper System Operation
Page 45

Routine Maintenance
WARNING
WARNING
High pressure fluids can be present in the test system.
High-pressure hydraulic fluid can cause cuts and burns.
Ensure that you establish and follow standard lock out/tag out safety procedures
and the test system is hydraulically isolated before you perform routine
maintenance procedures on the test system.
Also ensure that you allow the system to rest a minimum of 20 minutes from the
time the system is hydraulically isolated before you attempt to perform
maintenance on hydraulic components.
Hazardous electrical current can be present in the test system.
Coming in contact with high voltage electrical current can cause death or
severe burns and injury.
Overview Routine maintenance can extend the operating life of your test system by using
How to schedule
maintenance
Ensure that you establish and follow standard lockout/tagout safety procedures
and that the test system is electrically isolated before you perform routine
maintenance procedures on the test system.
regular inspections and simple procedures, such as filter changes, to minimize
wear and component failure.
Note Y ou can adjust the time frame for performing these procedures based on
the operating requirements of your system.
This section contains a maintenance schedule table. Procedures for these
maintenance requirements are found in the associated product manuals. The table
includes schedules for a typically configured system. The maintenance schedule
table lists the recommended routine maintenance procedures. Procedures that
you can perform without special training are listed in the shaded columns of the
table. Procedures that require special training are listed in the unshaded columns;
you should contact MTS to perform these procedures.
The following paragraphs provide additional guidelines relating to routine
maintenance.
Maintenance is scheduled based on system operating time. Use machine
operating time or calendar time to help you schedule maintenance procedures, as
shown in the table.
Damper System Operation Routine Maintenance
45
Page 46

As a guideline, for a test system that operates eight hours per day, one week will
equal 40 hours, and one month will equal 160 hours. For a test system that
operates up to 24 hours per day, one week will equal 160 hours and one month
will equal 720 hours.
When to perform
visual checks
Routine maintenance procedures that are scheduled on a daily or weekly basis
usually involve visual checks only, and should not interfere with the operation of
your test system. These checks will help you assess which procedures must be
performed before running the next test. For example, the dirty filter indicator on
the HPU signals that it is time to clean or change the filter.
You can perform these visual checks at the start of each day and incorporate them
into your preparations to run a test.
Note It is highly unlikely (unless you are running an extremely long durability
type of test) that you should need to stop a test simply to perform a
routine maintenance procedure.
Changing the intervals You can change the time in terval for performing maintenance checks, based on
the operating conditions for your system. Operating conditions that affect the
maintenance schedule include air quality, temperature, humidity, how often you
run tests, and whether you use a pump room or a hydraulic power unit to supply
hydraulic fluid to the system. Keep a log to observe trends in your system, then
adjust your maintenance schedule as needed. For example, you might find that
you do not have to perform daily checks of the hydraulic fluid, and decide to
check it once a week instead.
Additional
maintenance
Because of the variations in system configurations, the maintenance schedule
table lists the typical procedures for the associated products. Additional
maintenance procedures might be required depending on the specific product
model. Refer to the product manuals for complete maintenance information.
Additional maintenance procedures can be required whenever you notice
decreased system performance. An example of this type of maintenance is
servovalve filter replacement. Many of these procedures require additional
training and should be performed by MTS service personnel.
Information about analyzing hydraulic fluid is contained in the MTS Fluid Care
Guide that accompanies each hydraulic power unit, and in the appendices of
maintenance manuals
Routine Maintenance
46
Damper System Operation
Page 47

.
Calendar time
Daily 1
week1month2months3months6months1year2year
5 +
years
Running time - Hours 8 40 160 320 500 1000 2,000 4,000 10,000
Hazard labels
Inspect for
legibility
Replace as
required
Hydraulic Hoses
Inspect for
leaks and
wear
Replace MTS
Hydraulic Fluid
Sensory
Check
Particle count MTS
X
-
X
X
Analyze for
contamination
Load Frame
Set initial
accumulator
check interval
Check
accumulator
N
2
Clean actuator
rod and
columns
Inspect
actuator for
leakage
Adjust
Servovalve
mechanical
null
Change
servovalve
filter.
MTS
X
X
precharge
X
X
After the valve balancing
procedure (electrical
compensation) has been
completed and the results are
judged unsatisfactory.
When servovalve performance has
deteriorated.
Damper System Operation Routine Maintenance
47
Page 48

Calendar time Daily 1
week1month2months3months6months1year2year
5 +
years
Running time - Hours 8 40 160 320 500 1000 2,000 4,000 10,000
Maintain
airmount
pressures
Check HSM
filters
(replace as
required)
Series 505 Hydraulic
Power Unit
Check
functionality
of warning
and interlock
devices
Conduct
external
inspection of
the heat
exchanger
Replace fluid
filter
Inspect
incoming
power lines
for loose
connections
or defects
When the load frame sits unevenly .
X
X MTS
X
X
MTS
Check autocooling circuit
functionality
Check water
hoses
Replace PLC
battery
Routine Maintenance
48
X
X
MTS
Damper System Operation
Page 49

Calendar time Daily 1
week1month2months3months6months1year2year
5 +
years
Running time - Hours 8 40 160 320 500 1000 2,000 4,000 10,000
Controller
Check cooling
Perform shunt
calibration
Verify
controller
calibration
Verify Safety Circuits
Check E-Stops X
Check limits X
Check test
area guard
interlocks
Check
actuator
speed control
(if applicable)
X
X
MTS
X
X
Damper System Operation Routine Maintenance
49
Page 50

Routine Maintenance
50
Damper System Operation
Page 51

Decommission
The decommissioning process is performed when the system is going to be
moved or taken out of service. Disassembly is required when performing either
of these tasks.
1. Remove specimen(s) and fixtures. Large grips should be removed if the load
2. Move the actuator piston rod down to its lowest position, fully into that
3. If the unit has hydraulic lifts move the crosshead to its lowest position and
4. If there are hydraulic grips on the unit, ensure that the hydraulic pressure is
frame is going to be tipped over.
cushion.
torque the manual crosshead locking bolts. However, if the unit is going to
be moved, the crosshead might need to be locked at a higher position to
accommodate moving the unit.
If the unit has manual locks select a crosshead position that will
accommodate moving the unit and torque the manual locking bolts.
relieved from the grip and release ports and hoses on both grips.
On large grips, position the wedge chambers to the lowest positions, similar
to the unit’s piston rod as noted above.
If the unit has a remote 685 grip supply, cycle the grip/release handles while
reducing the pressure setting to release all pressure from the grips and hoses.
Turn off the 685 grip control and disconnect electrical power. Remove the
hoses.
If the unit has an integrated grip control (318 and Landmark) on the frame
control panel move the grip/release handle to the null position and release
the pressure using the pressure release valves on the grip manifold under the
control panel.
5. Turn off the HSM.
6. Turn off the HPU or shut off valves if the unit is connected to a hard line
distribution system. Allow time for pressure to bleed off before closing the
return shut off valve.
7. Remove the accumulator charging pressure from all accumulators.
8. Hydraulic locks can retain stored pressure. Manually bleed them if the unit
is going to be stored or disassembled.
9. Isolate the system hydraulically .
To isolate the system from hydraulic power requires that the hydraulic
supply valve or control is closed. Depending on your system’s
configuration, there is either a manual valve that must be moved to its Off
position or an electronically controlled supply valve that must be turned off.
Electronically controlled valves are either turned off using local controls or
the system software interface controls.
Damper System Operation Decommission
51
Page 52

10. Isolate the system from electrical power.
When the system electronics, control software, and the system PC are
powered down, turn off the system’s main electrical supply and disconnect
all cables.
Residual hydraulic pressure can produce a high pressure spray.
You could be cut by this spray or hydraulic fluid could be forced into your
skin.
Do not start this procedure unless the system has been isolated from hydraulic
pressure for at least 20 minutes. Always be cautious when you loosen any
hydraulic connection or remove bolts or screws from any hydraulic component.
Always allow fluid pressure to dissipate slowly until completely vented before
continuing to loosen. Always wear gloves and appropriate eye protection.
11. Remove all accessible hydraulic hoses.
The system does not have hydraulic reservoirs that must be drained.
However, each hose and hard line will potentially have trapped oil in it.
When removing the hydraulic components, ensure that you have drain pans
and towels available that are sufficient to handle the drain volume of the
item you are disconnecting. Use safe practices when removing hydraulic
components and allow any trapped or latent pressure to dissipate safely
through a loosened connection before removing the component. Cap each
hose, port, and hardline component.
12. Dispose of all hydraulic fluid in accordance with all local codes regarding
hazardous materials handling and disposal.
13. Disconnect all cables from the controller.
14. There are two configurations for the controller: contained in an upright
console (perform step A) or floorstanding (perform step B).
A. Upright consoles are lifted by an overhead lifting devise using supplied
lift rings. If necessary, install lift rings in the threaded bores at the top
of the control cabinet. If not already installed, the lift rings are typically
stored inside the cabinet or in receptacles at the rear of the cabinet. Rig
and lift the cabinet and set aside.
B. Floorstanding controllers can be lifted onto a suitable cart and moved
to a desired location.
52
Decommission
Damper System Operation
Page 53

Electrical components and parts can contain hazardous chemicals and
compounds.
Improper disposal of hazardous chemicals and compounds can cause
injury and death to people, animals, and plants. In addition, it can cause
contamination of the soil, air, and water.
Always refer to local codes that govern the disposal of potentially hazardous
materials and follow these codes for the proper handling and disposal of these
materials.
Damper System Operation Decommission
53
Page 54

54
Decommission
Damper System Operation
Page 55

Page 56

m
MTS Systems Corporation
14000 Technology Drive
Eden Prairie, Minnesota 55344-2290 USA
Toll Free Phone: 800-328-2255
(within the U.S. or Canada)
Phone: 952-937-4000
(outside the U.S. or Canada)
Fax: 952-937-4515
E-mail: info@mts.com
Internet: www.mts.com
ISO 9001 Certified QMS
 Loading...