


 MLX-OW5000-NC00017449_MLX-OW5000-NC00017449
 22/06/10 09:58 PAGE1
www.moulinex.com
FR
EN
DE
ES
IT
PL
CS
SK
HU
BG
TR
RO

MLX-OW5000-NC00017449_MLX-OW5000-NC00017449 22/06/10 09:58 PAGE2
2
 MLX-OW5000-NC00017449_MLX-OW5000-NC00017449
 22/06/10 09:58 PAGE3
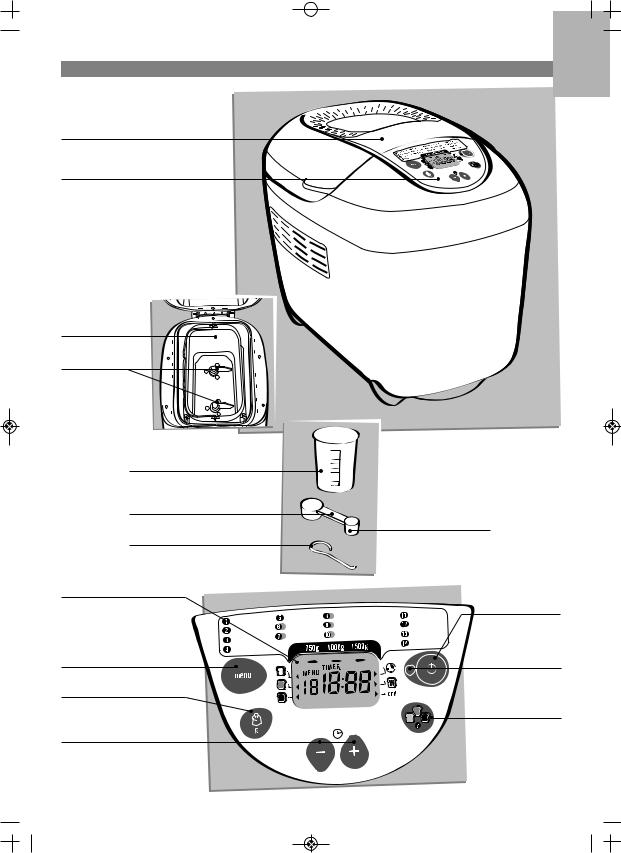
 DESCRIPTION
A - couvercle avec hublot
B - tableau de bord
C - cuve à pain
D - mélangeurs
E - gobelet gradué
f1 - cuillère à soupe F - dosette double 
f2 - cuillère à café
G - accessoire “crochet”
pour retirer les mélangeurs
b1 - écran de visualisation
FR
b6 - choix des programmes
b3 - sélection du poids
b4 - touches de réglage
du départ différé
et du réglage de temps pour le programme 14
Basique |
Rapide |
Riche en oméga 3 |
Confiture |
|
Sans gluten |
Damper |
Pasta |
||
Français |
||||
Sans sel |
Cake |
Pâte levée |
||
Complet |
||||
|
|
|||
|
|
Cuisson |
||
Sucré |
|
|
||
|
|
|
b2bouton départ/arrêt
b7voyant de fonctionnement
b5sélection
de la couleur de la croûte
3

 MLX-OW5000-NC00017449_MLX-OW5000-NC00017449
 22/06/10 09:58 PAGE4
 CONSIGNES DE SECURITE
PARTICIPONS À LA PROTECTION DE L’ENVIRONNEMENT !
 Votre appareil contient de nombreux matériaux valorisables ou recyclables.
  Confiez celui-ci dans un point de collecte pour que son traitement soit effectué.
•Lisez attentivement le mode d’emploi avant la première utilisation de votre appareil : une utilisation non conforme au mode d’emploi dégagerait le fabriquant de toute responsabilité.
•Pour votre sécurité, cet appareil est conforme aux normes et règlementations applicables (Directives Basse Tension, compatibilité Electromagnétique, matériaux en contact avec des aliments, environnement…).
•Cet appareil n'est pas destiné à être mis en fonctionnement au moyen d'une minuterie extérieure ou par un système de commande à distance séparé.
•Cet appareil n’est pas prévu pour être utilisé par des personnes (y compris les enfants) dont les capacités physiques, sensorielles ou mentales sont réduites, ou des personnes dénuées d’expérience ou de connaissance, sauf si elles ont pu bénéficier, par l’intermédiaire d’une personne responsable de leur sécurité, d’une surveillance ou d’instructions préalables concernant l’utilisation de l’appareil. Il convient de surveiller les enfants pour s’assurer qu’ils ne jouent pas avec l’appareil.
•Utilisez un plan de travail stable à l'abri des projections d'eau et en aucun cas dans une niche de cuisine intégrée.
•Vérifiez que la tension d’alimentation de votre appareil corresponde bien à celle de votre installation électrique. Toute erreur de branchement annule la garantie.
•Branchez impérativement votre appareil sur une prise de courant reliée à la terre. Le non respect de cette obligation peut provoquer un choc électrique et entraîner éventuellement des lésions graves. Il est indispensable pour votre sécurité que la prise de terre corresponde aux normes d’installation électrique en vigueur dans votre pays. Si votre installation ne comporte pas de prise de courant reliée à la terre, il est impératif que vous fassiez intervenir, avant tout branchement, un organisme agréé qui mettra en conformité votre installation électrique.
•Votre appareil est destiné uniquement à un usage domestique et à l’intérieur de la maison.
•Votre appareil a été conçu pour un usage domestique seulement. Il n’a pas été conçu pour être utilisé dans les cas suivants qui ne sont pas couverts par la garantie:
-dans des coins de cuisines réservés
au personnel dans des magasins, bureaux et autres environnements professionnels,
-dans des fermes,
-par les clients des hôtels, motels et autres environnements à caractère résidentiel,
-dans des environnements de type chambres d’hôtes.
•Débranchez votre appareil dès que vous cessez de l’utiliser et lorsque vous voulez le nettoyer.
•N'utilisez pas l'appareil si :
-celui-ci a un cordon endommagé ou défectueux.
-l'appareil est tombé et présente
des détériorations visibles ou des anomalies de fonctionnement.
Dans chacun de ces cas, l'appareil doit être envoyé au centre SAV le plus proche afin d'éviter tout danger. Consulter la garantie.
•Si le câble d'alimentation est endommagé, il doit être remplacé par le fabricant, son service après-vente ou des personnes de qualification similaire afin d'éviter un danger.
•Toute intervention autre que le nettoyage et l’entretien usuel par le client doit être effectuée par un centre service agréé.
•Ne mettez pas l’appareil, le câble d’alimentation ou la fiche dans l’eau ou tout autre liquide.
•Ne laissez pas pendre le câble d’alimentation à portée de mains des enfants.
•Le câble d’alimentation ne doit jamais être à proximité ou en contact avec les parties chaudes de l’appareil, près d’une source de chaleur ou sur angle vif.
•Ne déplacez pas l'appareil pendant son fonctionnement.
•Ne pas toucher le hublot pendant et juste après le fonctionnement. La température du hublot peut être élevée.
•Ne débranchez pas l'appareil en tirant sur le cordon.
•N'utilisez qu'une rallonge en bon état, avec une prise reliée à la terre, et avec un fil conducteur de section au moins égale au fil fourni avec le produit.
•Ne placez pas l'appareil sur d'autres appareils.
•N'utilisez pas l'appareil comme source de chaleur.
•N'utilisez pas l'appareil pour cuire d'autres préparations que des pains et des confitures.
•Ne placez jamais de papier, carton ou plastique dans l'appareil et ne posez rien dessus.
•S'il arrivait que certaines parties du produit s'enflamment, ne tentez jamais de les éteindre avec de l'eau. Débranchez l'appareil. Etouffez les flammes avec un linge humide.
•Pour votre sécurité, n’utilisez que des accessoires et des pièces détachées adaptés à votre appareil.
•Tous les appareils sont soumis à un contrôle qualité sévère. Des essais d’utilisation pratiques sont faits avec des appareils pris au hasard, ce qui explique d’éventuelles traces d’utilisation.
•En fin de programme, utilisez toujours des gants de cuisine pour manipuler la cuve ou les parties chaudes de l’appareil. L’appareil devient très chaud pendant l’utilisation.
•N’obstruez jamais les grilles d’aération.
•Faites très attention, de la vapeur peut s’échapper lorsque vous ouvrez le couvercle en fin ou en cours de programme.
•Lorsque vous êtes en programme n°11 (confiture, compote) faites attention au jet de vapeur et aux projections chaudes à l’ouverture du couvercle.
•Ne dépassez pas les quantitées indiquées dans les recettes.
Ne dépassez pas 1500 g de pâte au total.
Ne dépassez pas 900 g de farine et 13 g de levure.
•Le niveau de puissance accoustique relevé sur ce produit est de 55 dBa.
4

 MLX-OW5000-NC00017449_MLX-OW5000-NC00017449
 22/06/10 09:59 PAGE5
 INTRODUCTION
CONSEILS ET ASTUCES POUR RÉUSSIR VOS PAINS
1. Lisez attentivement le mode d’emploi : on ne fait pas son pain dans cet appareil comme on le fait à la main !
2. Tous les ingrédients utilisés doivent être à température ambiante (sauf indication contraire), et doivent être pesés avec précision.
Mesurez les liquides avec le gobelet gradué fourni. Utilisez la dosette double fournie pour mesurer d'un côté les cuillères à café et de l'autre les cuillères à soupe. Des mesures incorrectes se traduiront par de mauvais résultats.
3. Utilisez des ingrédients avant leur date limite de consommation et conservez-les dans des endroits frais et secs.
4. La précision de la mesure de la quantité de farine est importante. C’est pourquoi la farine doit être pesée à l’aide d’une balance de cuisine. Utilisez de la levure de boulangerie active déshydratée en sachet. Sauf indication contraire dans les recettes, n'utilisez pas de levure chimique. Lorsqu’un sachet de levure est ouvert, il doit être utilisé sous 48 heures.
5. Afin d’éviter de perturber la levée des préparations, nous vous conseillons de mettre tous les ingrédients dans la cuve dès le début et d’éviter d’ouvrir le couvercle en cours d’utilisation (sauf indication contraire). Respecter précisément l’ordre des ingrédients et les quantités indiquées dans les recettes. D’abord les liquides ensuite les solides. La levure ne doit pas entrer en contact avec les liquides ni avec le sel.
ORDRE GÉNÉRAL À RESPECTER :
Liquides (beurre, huile, œufs, eau, lait) Sel
Sucre
Farine première moitié Lait en poudre
Ingrédients spécifiques solides Farine deuxième moitié Levure
 AVANT LA PREMIERE UTILISATION
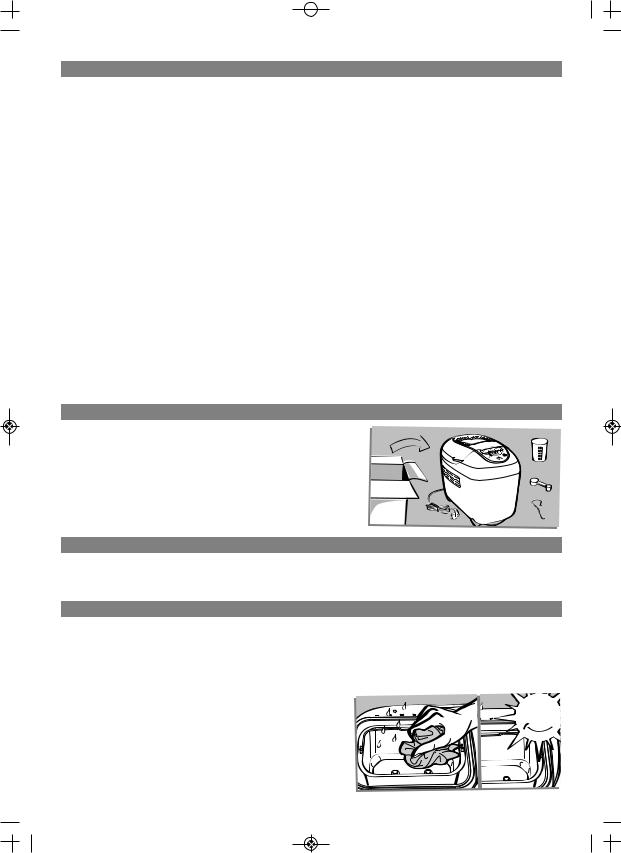
•Enlevez tous les emballages, autocollants ou accessoires divers à l’intérieur comme à l’extérieur de l’appareil - A.
•Nettoyez tous les éléments et l'appareil avec un linge humide.
A 
 MISE EN SERVICE DE L’APPAREIL
•Déroulez le cordon et branchez-le sur une prise électrique reliée à la terre.
•Une légère odeur peut se dégager lors de la première utilisation.
 NETTOYAGE ET ENTRETIEN
•Débranchez l'appareil.
•Nettoyez tous les éléments, l'appareil et l'intérieur de la cuve avec une éponge humide.
Séchez soigneusement - B.
•Lavez la cuve et les mélangeurs à l’eau chaude savonneuse.
Si les mélangeurs restent dans la cuve, laissez tremper 5 à 10 mn.
•Si besoin, démontez le couvercle pour le nettoyer à l’eau chaude.
•Ne lavez aucune partie au lave vaisselle.
•N’utilisez pas de produit ménager, ni tampon abrasif, ni alcool.
Utilisez un chiffon doux et humide.
•N’immergez jamais le corps de l’appareil ou le couvercle.
B
5
 MLX-OW5000-NC00017449_MLX-OW5000-NC00017449
 22/06/10 09:59 PAGE6
 DEMARRAGE RAPIDE
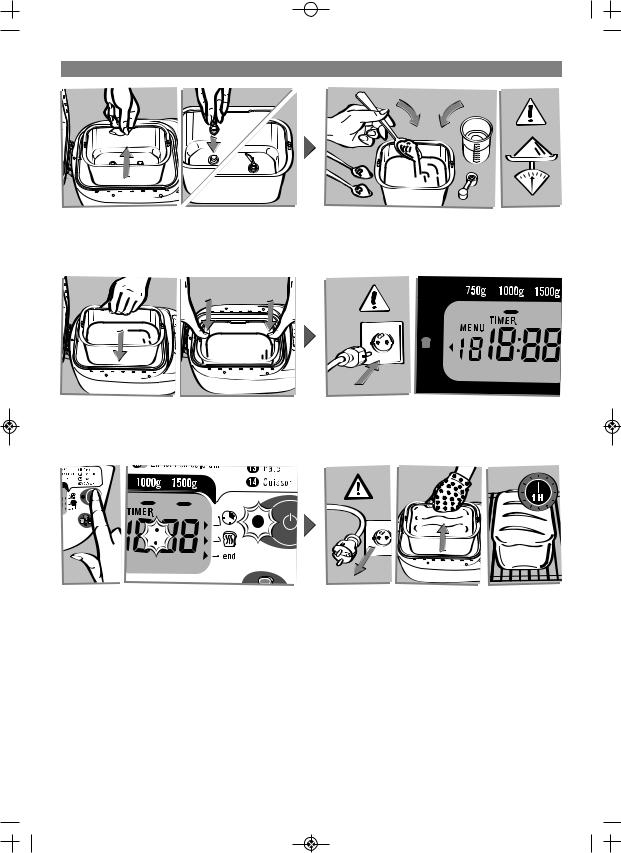
Retirez la cuve à pain en soulevant la poignée et en tirant d’avant en arrière pour déclipser chaque coté l’un après l’autre.
Adaptez ensuite les mélangeurs.
Introduisez la cuve à pain. Appuyez sur la cuve d’un coté puis de l’autre pour l’enclencher sur l’entraineur et de manière à ce qu’elle soit bien clipsée des 2 côtés.
Appuyez sur la touche  .
.
Le témoin de fonctionnement s’allume. Les 2 points de la minuterie clignotent. Le cycle commence.
Ajoutez les ingrédients dans la cuve dans l’ordre préconisé.
Assurez-vous que tous les ingrédients soient pesés avec exactitude.
Branchez la machine à pain. Après le signal sonore, le programme 1 s’affiche par défaut, soit 1000 g dorage moyen.
A la fin du cycle de cuisson, débranchez la machine à pain. Retirez la cuve à pain en tirant sur la poignée. Utilisez toujours des gants isolants car la poignée de la cuve est chaude ainsi que l’intérieur du couvercle. Démoulez le pain à chaud et placez-le 1 h sur une grille pour refroidir.
Pour faire connaissance avec votre machine à pain nous vous suggérons d’essayer la recette du PAIN BASIQUE pour votre premier pain.
PAIN BASIQUE (programme 1) |
INGRÉDIENTS c à c > cuillère à café - c à s > cuillère à soupe |
||
|
|
|
|
DORAGE = MOYEN |
- HUILE = 2 c à s |
- LAIT EN POUDRE = 2,5 c à s |
|
|
- EAU = 325 ml |
- FARINE = 600 g |
|
POIDS = 1000 g |
|||
- SEL = 2 c à c |
- LEVURE = 1,5 c à c |
||
|
|||
TEMPS = 3:20 |
- SUCRE = 2 c à s |
|
|
|
|
|
|
6
 MLX-OW5000-NC00017449_MLX-OW5000-NC00017449
 22/06/10 09:59 PAGE7
 UTILISEZ VOTRE MACHINE A PAIN
Basique |
Rapide |
Riche en oméga 3 |
Confiture |
|
Français |
Sans gluten |
Damper |
||
Pasta |
||||
Complet |
Sans sel |
Cake |
||
Pâte levée |
||||
Sucré |
|
|
||
|
|
Cuisson |
||
|
|
|
Pour chaque programme,
un réglage par défaut s’affiche. Vous devrez donc sélectionner
manuellement les réglages souhaités.
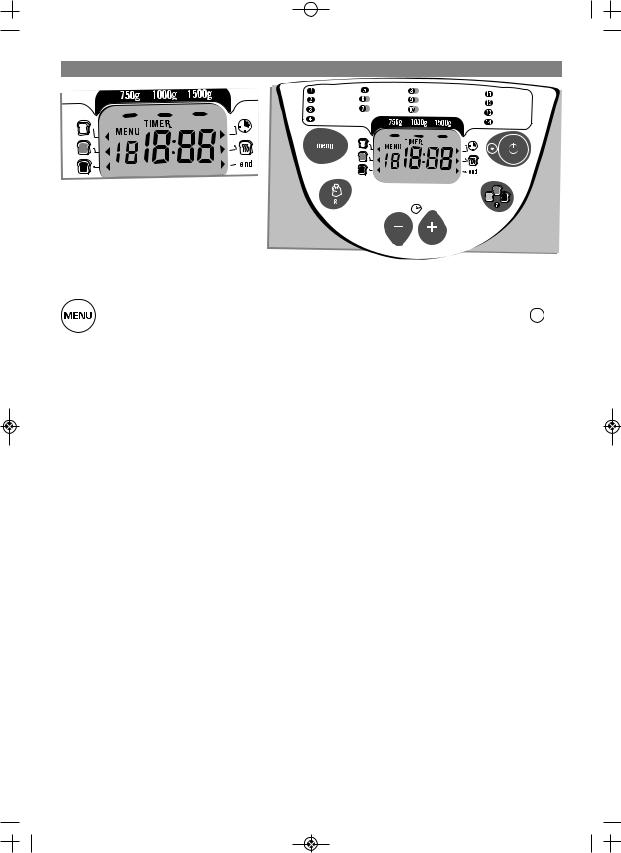
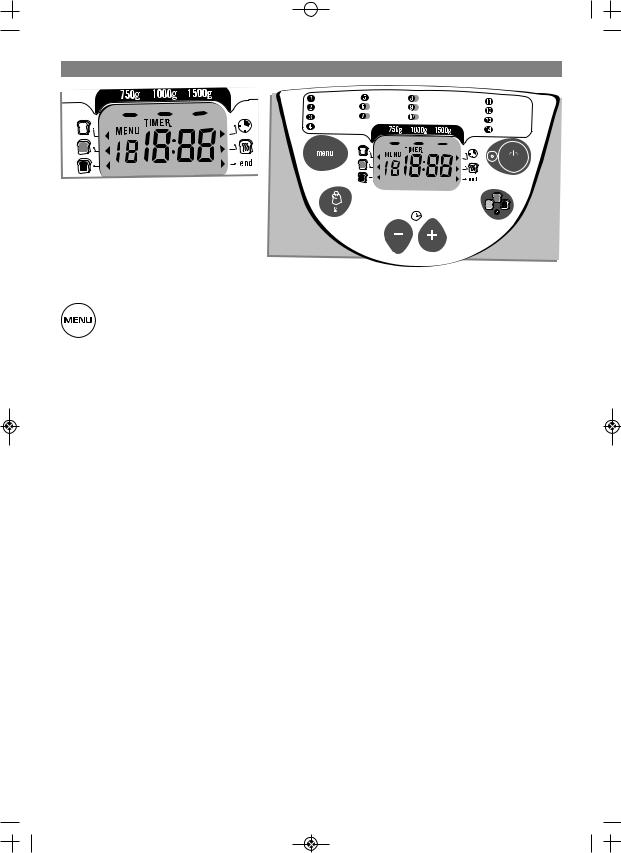
SÉLECTION D’UN PROGRAMME
Le choix d’un programme déclenche une suite d’étapes, qui se déroulent automatiquement les unes après les autres.
La touche MENU vous permet de choisir un certain nombre de programmes différents. Le temps correspondant au programme s’affiche. Chaque fois que vous appuyez sur la touche 
 , le numéro dans le panneau d’affichage passe au programme suivant et ainsi de 1 à 14 :
1 |
> pain basique |
5 |
> pain rapide |
9 |
> damper |
13 |
> pâtes levées |
2 |
> pain français |
6 |
> pain sans gluten |
10 |
> cake |
14 |
> cuisson seule |
3 |
> pain complet |
7 |
> pain sans sel |
11 |
> confiture |
|
|
4 |
> pain sucré |
8 |
> pain riche en oméga 3 |
12 |
> pasta |
|
|
1.Le programme Pain basique permet d’effectuer la plupart des recettes de pain utilisant de la farine de blé.
2.Le programme Pain français correspond à une recette de pain blanc traditionnel français.
3.Le programme Pain complet est à sélectionner lorsqu’on utilise de la farine pour pain complet.
4.Le programme Pain sucré est adapté aux recettes qui contiennent plus de matière grasse et de sucre. Si vous utilisez des préparations pour brioches ou pains au lait prêtes à l’emploi, ne dépassez pas 1000 g de pâte au total.
5.Le programme Pain Rapide est spécifique à la recette du pain RAPIDE. Pour ce programme le réglage du poids et de la couleur ne sont pas disponibles.
6.Le pain sans gluten est à préparer exclusivement à partir de préparations prêtes à l’emploi sans gluten. Il convient aux personnes intolérantes au gluten (maladie de coeliaque) présent dans plusieurs céréales (blé, orge, seigle, avoine, kamut, épeautre, etc...). Reportez-vous aux recommandations spécifiques indiquées sur le paquet. La cuve devra être systématiquement nettoyée afin qu’il n’y ait pas de risque de contamination avec d’autres farines. Dans le cas d’un régime strict sans gluten, assurez-vous que la levure utilisée soit
également sans gluten. La consistance des farines sans gluten ne permet pas un mélange optimal. Il faut donc rabattre la pâte des bords lors du pétrissage avec une spatule en plastique souple. Le pain sans gluten sera de consistance plus dense et de couleur plus pâle que le pain normal.
7.Le pain est un des aliments qui apporte la plus grande contribution journalière en sel. La réduction de la consommation de sel permet de réduire les risques cardio-vasculaires.
8.Ce pain est riche en acide gras Oméga 3 grâce à une recette équilibrée et complète sur le plan nutritionnel. Les acides gras Oméga 3 contribuent au bon fonctionnement du système cardiovasculaire.
9.Le damper s'inspire d'une recette australienne traditionnellement cuite sur des pierres chaudes. Elle donne un pain compact légèrement brioché.
10.Permet la confection des pâtisseries et gâteaux avec de la levure chimique.
11.Le programme Confiture cuit automatiquement la confiture dans la cuve.
12.Le programme 12 pétrit uniquement. Il est destiné aux pâtes non levées. Ex : nouilles.
13.Le programme pâtes levées ne cuit pas. Il corres-
7

 MLX-OW5000-NC00017449_MLX-OW5000-NC00017449
 22/06/10 09:59 PAGE8
pond à un programme de pétrissage et de pousse pour toutes les pâtes levées. Ex : la pâte
à pizza.
14.Le programme cuisson permet de cuire uniquement de 10 à 70 mn, réglable par tranche de 10 mn en dorage clair, moyen ou foncé. Il peut être sélectionné seul et être utilisé :
a) en association avec le programme pâtes levées,
b) pour réchauffer ou rendre croustillants des pains déjà cuits et refroidis,
c) pour finir une cuisson en cas de panne de courant prolongée pendant un cycle de pain.
La machine à pain ne doit pas être laissée sans surveillance lors de l’utilisation du programme 14.
Pour interrompre le cycle avant la fin, arrêtez manuellement le programme par un appui long sur la touche  .
.
SÉLECTION DU POIDS DU PAIN
Le poids du pain se règle par défaut sur 1000 g. Le poids est donné à titre indicatif. Se référer au détail des recettes pour plus de précisions. Les programmes 5, 9, 11, 12, 13, 14 ne possèdent pas le réglage du poids. Appuyez sur la touche  pour régler le poids choisi 750 g, 1000 g ou 1500 g. Le témoin visuel s’allume en face du réglage choisi. Attention : certaines recettes ne permettront pas de réaliser un pain de 750g. Se référer au livre de recettes.
SÉLECTION DE LA COULEUR DE LA CROÛTE (DORAGE)
La couleur de la croûte se règle par défaut sur MOYEN. Les programmes 5, 9, 11, 12, 13 ne possèdent pas le réglage de la couleur. Trois choix sont possibles : CLAIR/MOYEN/FONCÉ.
Si vous souhaitez modifier le réglage par défaut, appuyez sur la touche 
 jusqu’à ce que le témoin visuel s’allume en face du réglage choisi.
DÉPART / ARRÊT
Appuyez sur la touche  pour mettre l’appareil en marche. Le compte à rebours commence. Pour arrêter le programme ou annuler la programmation différée, appuyez 5 secondes sur la touche
  .
.
 LES CYCLES
Un tableau pages 12-13 vous indique la décomposition des différents cycles suivant le programme choisi.
PÉTRISSAGE |
> REPOS |
> LEVÉE |
> CUISSON |
> |
MAINTIEN AU CHAUD |
Permet de |
Permet à la |
Temps pendant |
Transforme |
|
Permet de garder le pain |
former la |
pâte de se |
lequel la levure |
la pâte en mie |
|
chaud après la cuisson. |
structure de la |
détendre |
agit pour faire |
et permet |
|
Il est toutefois |
pâte et donc |
pour améliorer |
lever le pain |
le dorage et |
|
recommandé |
sa capacité |
la qualité |
et développer |
le croustillant |
|
de démouler le pain |
à bien lever. |
du pétrissage. |
son arôme. |
de la croûte. |
|
dès la fin de la cuisson. |
PÉTRISSAGE : la pâte se trouve dans le 1er ou 2ème cycle de pétrissage ou en période de brassage entre les cycles de levées. Au cours de ce cycle, et pour les programmes 1, 2, 3, 4, 6, 7, 8, 9, 10, vous avez la possibilité d’ajouter des ingrédients : fruits secs, olives, lardons etc… Un signal sonore vous indique à quel moment intervenir.
Reportez-vous au tableau récapitulatif des temps de préparation pages 12-13 et à la colonne “extra”. Cette colonne indique le temps qui sera affiché sur l’écran de votre appareil lorsque le signal sonore retentira. Pour savoir plus précisément au bout de combien de temps se produit le signal sonore, il suffit de retrancher le temps de la colonne “extra” au temps total de cuisson.
Ex : “extra” = 2:51 et “temps total” = 3:13, les ingrédients peuvent être rajoutés au bout de 22 mn.
LEVÉE : la pâte se trouve dans le 1er 2ème ou 3ème cycle de levée.
CUISSON : le pain se trouve dans le cycle final de cuisson. Un témoin visuel s’allume en face “END” indiquant la fin du cycle.
 MAINTIEN AU CHAUD : pour les programmes 1, 2, 3, 4, 5, 6, 7, 8, 9, 10, vous pouvez laisser la préparation dans l’appareil. Un cycle de maintien au chaud d'une heure s'enchaîne automatiquement après la cuisson.
Un témoin visuel s’allume en face  . L’afficheur reste à 0:00 pendant l’heure de maintien au chaud. Un bip retentit à intervalles réguliers.
En fin de cycle l’appareil s’arrête automatiquement après l’émission de 3 bips.
8

 MLX-OW5000-NC00017449_MLX-OW5000-NC00017449
 22/06/10 09:59 PAGE9
 PROGRAMME DIFFERE
Vous pouvez programmer l’appareil afin d’avoir votre préparation prête à l’heure que vous aurez choisie, jusqu’à 15 h à l’avance.
Les programmes 5, 6, 9, 10, 11, 12, 13, 14 n'ont pas le programme différé.
Cette étape intervient après avoir sélectionné le programme, le niveau de dorage et le poids. Le temps du programme s'affiche. Calculez l’écart de temps entre le moment où vous démarrez le programme et l’heure à laquelle vous souhaitez que votre préparation soit prête. La machine inclut automatiquement la durée des cycles du programme. A l’aide des touches  et , affichez le temps trouvé (
 vers le haut et
  vers le bas). Les appuis courts permettent un défilement par tranche de 10 mn + bip court. Avec un appui long, le défi-
CONSEILS PRATIQUES
En cas de coupure de courant : si en cours de cycle, le programme est interrompu par une coupure de courant ou une fausse manœuvre, la machine dispose d’une protection de 7 mn pendant lesquelles la programmation sera sauvegardée. Le cycle reprendra où il s’est arrêté. Au-delà de ce temps, la programmation est perdue.
Si vous enchaînez deux programmes, attendez 1 h avant de démarrer la deuxième préparation.
Pour démouler votre pain : il peut arriver que les mélangeurs restent coincés dans le pain lors du démoulage.
lement est continu par tranche de 10 mn.
Ex : il est 20 h et vous voulez votre pain prêt à 7 h 00 le lendemain matin. Programmez 11 h 00 à l’aide
des touches |
et |
|
. Appuyez sur la touche |
|
|
. |
Un signal sonore est émis. Le témoin visuel |
s’af- |
|||||
fiche en face |
et les 2 points du minuteur cligno- |
|||||
tent. Le compte à rebours commence. Le voyant de fonctionnement s’allume.
Si vous faites une erreur ou souhaitez modifier le réglage de l’heure, appuyez longuement sur la
touche |
|
jusqu’à ce qu’elle émette un signal |
|
sonore. Le temps par défaut s’affiche. Renouvelez l’opération.
Certains ingrédients sont périssables. N'utilisez pas le programme différé pour des recettes contenant : lait frais, œufs, yaourts, fromage, fruits frais.
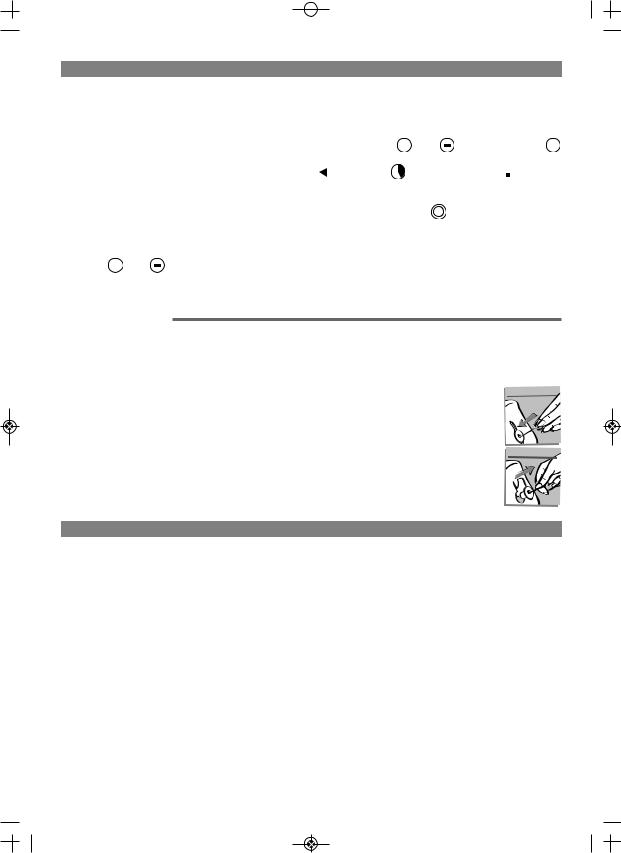
Dans ce cas, utilisez l’accessoire “crochet” de la façon suivante :
>une fois le pain démoulé, couchez-le encore chaud sur le côté et maintenez-le avec la main munie d’un gant isolant, 1
>insérez le crochet dans l’axe  du mélangeur (dessin 1),
>tirez délicatement pour retirer 


 le mélangeur (dessin 2),
>répétez l’opération pour l’autre 2 mélangeur, 

>redressez le pain et laissez-le 

 refroidir sur une grille.


 LES INGREDIENTS
LES MATIÈRES GRASSES ET HUILES : les matières grasses rendent le pain plus moelleux et plus savoureux. Il se gardera également mieux et plus longtemps. Trop de gras ralentit la levée. Si vous utilisez du beurre, émiettez-le en petits morceaux pour le répartir de façon homogène dans la préparation ou faites-le ramollir. Ne pas incorporer le beurre chaud. Evitez que le gras ne vienne en contact avec la levure, car le gras pourrait empêcher la levure de se réhydrater.
ŒUFS : les œufs enrichissent la pâte, améliorent la couleur du pain et favorisent un bon développement de la mie. Si vous utilisez des œufs, réduisez la quantité de liquide en conséquence. Cassez l’œuf et compléter avec le liquide jusqu’à obtenir la quantité de liquide indiquée dans la recette. Les recettes ont été prévues pour un œuf moyen de 50 g, si les œufs sont plus gros,
ajouter un peu de farine ; si les œufs sont plus petits, il faut mettre un peu moins de farine.
LAIT : vous pouvez utilisez du lait frais ou du lait en poudre. Si vous utilisez du lait en poudre, ajoutez la quantité d’eau initialement prévue. Si vous utilisez du lait frais, vous pouvez également ajouter de l’eau : le volume total doit être égal au volume prévu dans la recette. Le lait a aussi un effet émulsifiant qui permet d’obtenir des alvéoles plus régulières et donc un bel aspect de la mie.
EAU : l’eau réhydrate et active la levure. Elle hydrate également l’amidon de la farine et permet la formation de la mie. On peut remplacer l’eau, en partie ou totalement par du lait ou d’autres liquides. Utilisez des liquides à température ambiante.
9

 MLX-OW5000-NC00017449_MLX-OW5000-NC00017449
 22/06/10 09:59 PAGE10
FARINES : le poids de la farine varie sensiblement en fonction du type de farine utilisé. Selon la qualité de la farine, les résultats de cuisson du pain peuvent également varier. Conservez la farine dans un contenant hermétique, car la farine réagira aux fluctuations des conditions climatiques, en absorbant de l’humidité ou au contraire en en perdant. Utilisez de préférence une farine dite “de force”, “panifiable” ou “boulangère” plutôt qu’une farine standard. L’addition d’avoine, de son, de germe de blé, de seigle ou encore de grains entiers à la pâte à pain, vous donnera un pain plus lourd et moins gros.
L'utilisation d'une farine T55 est recommandée, sauf indication contraire dans les recettes. Nos recettes sont optimisées pour l'emploi d'une farine commune T55. Dans le cas d'utilisation de mélanges de farines spéciales pour pain ou brioche ou pain au lait, ne dépassez pas 1000g de pâte au total.
Le tamisage de la farine influe aussi sur les résultats : plus la farine est complète (c’est à dire qu’elle contient une partie de l’enveloppe du grain de blé), moins la pâte lèvera et plus le pain sera dense.
Vous trouverez également, dans le commerce, des préparations pour pains prêtes à l'emploi. Reportezvous aux recommandations du fabricant pour l'utilisation de ces préparations. De façon générale, le choix du programme se fera en fonction de la préparation utilisée. Ex : Pain complet - Programme 3.
SUCRE : privilégiez le sucre blanc, roux ou du miel. N’utilisez pas de sucre raffiné ou en morceaux. Le sucre nourrit la levure, donne une bonne saveur au pain et améliore le dorage de la croûte.
SEL : il donne du goût à l’aliment, et permet de réguler l’activité de la levure. Il ne doit pas entrer en contact avec la levure. Grâce au sel, la pâte est ferme, compacte et ne lève pas trop vite. Il améliore aussi la structure de la pâte.
CONSEILS PRATIQUES
LEVURE : la levure de boulangerie existe sous plusieurs formes : fraîche en petits cubes, sèche active à réhydrater ou sèche instantanée. La levure est vendue en grandes surfaces (rayons boulangerie ou ultrafrais), mais vous pouvez aussi acheter la levure fraîche chez votre boulanger. Sous forme fraîche ou sèche instantanée, la levure doit être directement incorporée dans la cuve de votre machine avec les autres ingrédients. Pensez toutefois à bien émietter la levure fraîche entre vos doigts pour faciliter sa dispersion. Seule la levure sèche active (en petites sphérules) doit être mélangée à un peu d’eau tiède avant d’être utilisée. Choisir une température proche de 37 °C, en deçà elle sera moins efficace, au-delà elle risque de perdre son activité. Veillez à bien respecter les doses prescrites et pensez à multiplier les quantités si vous utilisez de la levure fraîche (voir le tableau d’équivalences ci-dessous).
Équivalences quantité/poids entre levure sèche et levure fraîche :
Levure sèche (en c.c.) |
|
|
|
|
||||
1 |
1,5 |
2 |
2,5 |
3 |
3,5 |
4 |
4,5 |
5 |
Levure fraîche (en g) |
|
|
|
|
||||
9 |
13 |
18 |
22 |
25 |
31 |
36 |
40 |
45 |
LES ADDITIFS (OLIVES, LARDONS ETC) : vous pouvez personnaliser vos recettes avec tous les ingrédients additionnels que vous souhaitez en prenant soin :
>de bien respecter le signal sonore pour l’ajout d’ingrédients, notamment les plus fragiles,
>les graines les plus solides (comme le lin ou le sésame) peuvent être incorporées dès le début du pétrissage pour faciliter l’utilisation de la machine (départ différé par exemple),
>de bien égoutter les ingrédients très humides (olives), >de fariner légèrement les ingrédients gras pour
une meilleure incorporation,
>de ne pas les incorporer en trop grande quantité, au risque de perturber le bon développement de la pâte.
La préparation du pain est très sensible aux conditions de température et d’humidité. En cas de forte chaleur, il est conseillé d’utiliser des liquides plus frais qu’à l’accoutumée. De même, en cas de froid, il est possible qu’il soit nécessaire de faire tiédir l’eau ou le lait (sans jamais dépasser 35°C).
Il est aussi parfois utile de vérifier l’état de la pâte en milieu de pétrissage : elle doit former une boule homogène qui se décolle bien des parois.
>s’il reste de la farine non incorporée, c’est qu’il faut mettre un peu plus d’eau,
>sinon, il faudra éventuellement ajouter un peu de farine.
Il faut corriger très doucement (1 cuillère à soupe maxi à la fois) et attendre de constater l’amélioration ou non avant d’intervenir de nouveau.
Une erreur courante est de penser qu’en ajoutant de la levure le pain lèvera davantage. Or, trop de levure fragilise la structure de la pâte qui lèvera beaucoup et s’affaissera lors de la cuisson. Vous pouvez juger de l’état de la pâte juste avant la cuisson en tâtant légèrement du bout des doigts : la pâte doit offrir une légère résistance et l’empreinte des doigts doit s’estomper peu à peu.
10
 MLX-OW5000-NC00017449_MLX-OW5000-NC00017449
 22/06/10 09:59 PAGE11
 GUIDE DE DEPANNAGE
Vous n’obtenez pas le résultat attendu ? Ce tableau vous aidera à vous repérer.
Pain |
Pain affaissé |
Pain |
Croûte |
Côtés bruns |
Côtés |
|
après avoir |
pas assez |
pas assez |
mais pain |
et dessus |
||
trop levé |
||||||
trop levé |
levé |
dorée |
pas assez cuit |
enfarinés |
||
|
La touche  a été actionnée pendant la cuisson
Pas assez de farine
Trop de farine
Pas assez de levure
Trop de levure
Pas assez d’eau
Trop d’eau
Pas assez de sucre
Mauvaise qualité de farine
Les ingrédients ne sont pas dans les bonnes proportions (trop grande quantité)
Eau trop chaude
Eau trop froide
Programme inadapté
 GUIDE DE DEPANNAGE TECHNIQUE
PROBLEMES |
|
|
SOLUTIONS |
||
|
|
||||
Les mélangeurs restent coincés dans la cuve |
• Laisser tremper avant de les retirer. |
||||
|
|
|
|
||
Les mélangeurs restent coincés dans le pain |
• Huiler légèrement les mélangeurs avant d’incorporer |
||||
les ingrédients dans la cuve ou utiliser l’accessoire |
|||||
|
|
|
pour démouler le pain (page 9) |
||
|
|
|
|
||
Après appui sur |
|
rien ne se passe |
• La machine est trop chaude. Attendre 1 heure entre 2 cyles. |
||
|
• Un départ différé a été programmé. |
||||
|
|
|
|||
|
|
|
|
||
Après appui sur |
|
le moteur tourne |
• La cuve n’est pas insérée complètement. |
||
|
|||||
|
|||||
mais le pétrissage ne se fait pas |
• Absence de mélangeurs ou mélangeurs mal mis en place. |
||||
|
|
|
|
|
|
|
|
|
• Vous avez oublié d’appuyer sur |
|
après la programmation |
|
|
|
|
||
|
|
|
|
||
Après un départ différé, le pain n’a pas |
du départ différé. |
||||
|
|
|
|||
assez levé ou rien ne s’est passé |
• La levure est entrée en contact avec le sel et/ou l’eau. |
||||
|
|
|
• Absence de mélangeurs. |
||
|
|
|
|
||
|
|
|
• Une partie des ingrédients est tombée à côté de la cuve : |
||
|
|
|
laissez refroidir la machine et nettoyez l’intérieur de la machine |
||
Odeur de brûlé |
|
|
avec une éponge humide et sans produit nettoyant. |
||
|
|
|
• La préparation a débordé : trop grande quantité d’ingrédients, |
||
|
|
|
notamment de liquide. Respecter les proportions des recettes. |
||
|
|
|
|
|
|
11

 MLX-OW5000-NC00017449_MLX-OW5000-NC00017449
 22/06/10 09:59 PAGE12
PROG. |
DORAGE |
TAILLE |
TEMPS |
1er |
REPOS |
2ème |
1ère |
3ème |
2ème |
4ème |
3ème |
CUISSON |
EXTRA |
MAINTIEN |
|
|
|
|
PETRISSAGE |
|
PETRISSAGE |
LEVEE |
PETRISSAGE |
LEVEE |
PETRISSAGE |
LEVEE |
|
|
AU CHAUD |
|
|
|
(h) |
|
|
|
|
|
|
|
|
|
|
(h) |
|
|
|
|
|
|
|
|
|
|
|
|
|
|
|
|
|
750 |
3:15 |
|
|
|
|
|
|
|
|
0:55 |
2:55 |
1:00 |
|
1 |
1000 |
3:20 |
|
|
|
|
|
|
|
|
1:00 |
3:00 |
1:00 |
|
|
1500 |
3:25 |
|
|
|
|
|
|
|
|
1:05 |
3:05 |
1:00 |
|
|
|
|
|
|
|
|
|
|
|
|
|
|
|
1 |
|
750 |
3:15 |
|
|
|
|
|
|
|
|
0:55 |
2:55 |
1:00 |
2 |
1000 |
3:20 |
0:05:00 |
0:05:00 |
0:15:00 |
0:40:00 |
0:00:10 |
0:25:00 |
0:00:15 |
0:50:00 |
1:00 |
3:00 |
1:00 |
|
|
|
1500 |
3:25 |
|
|
|
|
|
|
|
|
1:05 |
3:05 |
1:00 |
|
|
|
|
|
|
|
|
|
|
|
|
|
|
|
|
|
750 |
3:15 |
|
|
|
|
|
|
|
|
0:55 |
2:55 |
1:00 |
|
3 |
1000 |
3:20 |
|
|
|
|
|
|
|
|
1:00 |
3:00 |
1:00 |
|
|
1500 |
3:25 |
|
|
|
|
|
|
|
|
1:05 |
3:05 |
1:00 |
|
|
|
|
|
|
|
|
|
|
|
|
|
|
|
|
|
750 |
3:34 |
|
|
|
|
|
|
|
|
1:05 |
3:17 |
1:00 |
|
1 |
1000 |
3:39 |
|
|
|
|
|
|
|
|
1:10 |
3:22 |
1:00 |
|
|
1500 |
3:44 |
|
|
|
|
|
|
|
|
1:15 |
3:27 |
1:00 |
|
|
|
|
|
|
|
|
|
|
|
|
|
|
|
2 |
|
750 |
3:34 |
|
|
|
|
|
|
|
|
1:05 |
3:17 |
1:00 |
2 |
1000 |
3:39 |
0:05:00 |
0:05:00 |
0:12:00 |
1:05:00 |
0:02:00 |
0:30:00 |
x |
0:30:00 |
1:10 |
3:22 |
1:00 |
|
|
|
1500 |
3:44 |
|
|
|
|
|
|
|
|
1:15 |
3:27 |
1:00 |
|
|
|
|
|
|
|
|
|
|
|
|
|
|
|
|
|
750 |
3:34 |
|
|
|
|
|
|
|
|
1:05 |
3:17 |
1:00 |
|
3 |
1000 |
3:39 |
|
|
|
|
|
|
|
|
1:10 |
3:22 |
1:00 |
|
|
1500 |
3:44 |
|
|
|
|
|
|
|
|
1:15 |
3:27 |
1:00 |
|
|
|
|
|
|
|
|
|
|
|
|
|
|
|
|
|
750 |
3:37 |
|
|
|
|
|
|
|
|
1:00 |
3:17 |
1:00 |
|
1 |
1000 |
3:42 |
|
|
|
|
|
|
|
|
1:05 |
3:22 |
1:00 |
|
|
1500 |
3:47 |
|
|
|
|
|
|
|
|
1:10 |
3:27 |
1:00 |
|
|
|
|
|
|
|
|
|
|
|
|
|
|
|
3 |
|
750 |
3:37 |
|
|
|
|
|
|
|
|
1:00 |
3:17 |
1:00 |
2 |
1000 |
3:42 |
0:05:00 |
0:05:00 |
0:15:00 |
1:10:00 |
0:02:00 |
0:20:00 |
x |
0:40:00 |
1:05 |
3:22 |
1:00 |
|
|
|
1500 |
3:47 |
|
|
|
|
|
|
|
|
1:10 |
3:27 |
1:00 |
|
|
|
|
|
|
|
|
|
|
|
|
|
|
|
|
|
750 |
3:37 |
|
|
|
|
|
|
|
|
1:00 |
3:17 |
1:00 |
|
3 |
1000 |
3:42 |
|
|
|
|
|
|
|
|
1:05 |
3:22 |
1:00 |
|
|
1500 |
3:47 |
|
|
|
|
|
|
|
|
1:10 |
3:27 |
1:00 |
|
|
|
|
|
|
|
|
|
|
|
|
|
|
|
|
|
750 |
3:45 |
|
|
|
|
|
|
|
|
1:00 |
3:17 |
1:00 |
|
1 |
1000 |
3:50 |
|
|
|
|
|
|
|
|
1:05 |
3:22 |
1:00 |
|
|
1500 |
3:55 |
|
|
|
|
|
|
|
|
1:10 |
3:27 |
1:00 |
|
|
|
|
|
|
|
|
|
|
|
|
|
|
|
4 |
|
750 |
3:45 |
|
|
|
|
|
|
|
|
1:00 |
3:17 |
1:00 |
2 |
1000 |
3:50 |
0:10:00 |
0:05:00 |
0:18:00 |
0:30:00 |
x |
0:40:00 |
0:02:00 |
1:00:00 |
1:05 |
3:22 |
1:00 |
|
|
|
1500 |
3:55 |
|
|
|
|
|
|
|
|
1:10 |
3:27 |
1:00 |
|
|
|
|
|
|
|
|
|
|
|
|
|
|
|
|
|
750 |
3:45 |
|
|
|
|
|
|
|
|
1:00 |
3:17 |
1:00 |
|
3 |
1000 |
3:50 |
|
|
|
|
|
|
|
|
1:05 |
3:22 |
1:00 |
|
|
1500 |
3:55 |
|
|
|
|
|
|
|
|
1:10 |
3:27 |
1:00 |
|
|
|
|
|
|
|
|
|
|
|
|
|
|
|
5 |
- |
1000 |
1:20 |
x |
x |
0:13 |
x |
x |
x |
x |
0:22 |
0:45 |
non |
1:00 |
|
|
|
|
|
|
|
|
|
|
|
|
|
|
|
|
|
750 |
2:15 |
|
|
|
|
|
|
|
|
1:00 |
2:05 |
1:00 |
|
1 |
1000 |
2:20 |
|
|
|
|
|
|
|
|
1:05 |
1:10 |
1:00 |
|
|
1500 |
2:25 |
|
|
|
|
|
|
|
|
1:10 |
2:15 |
1:00 |
|
|
|
|
|
|
|
|
|
|
|
|
|
|
|
6 |
|
750 |
2:15 |
|
|
|
|
|
|
|
|
1:00 |
2:05 |
1:00 |
2 |
1000 |
2:20 |
0:05 |
x |
0:10 |
x |
x |
x |
x |
1:00 |
1:05 |
1:10 |
1:00 |
|
|
|
1500 |
2:25 |
|
|
|
|
|
|
|
|
1:10 |
2:15 |
1:00 |
|
|
|
|
|
|
|
|
|
|
|
|
|
|
|
|
|
750 |
2:15 |
|
|
|
|
|
|
|
|
1:00 |
2:05 |
1:00 |
|
3 |
1000 |
2:20 |
|
|
|
|
|
|
|
|
1:05 |
1:10 |
1:00 |
|
|
1500 |
2:25 |
|
|
|
|
|
|
|
|
1:10 |
2:15 |
1:00 |
|
|
|
|
|
|
|
|
|
|
|
|
|
|
|
11

 MLX-OW5000-NC00017449_MLX-OW5000-NC00017449
 22/06/10 09:59 PAGE13
PROG. |
DORAGE |
TAILLE |
TEMPS |
1er |
REPOS |
2ème |
1ère |
3ème |
2ème |
4ème |
3ème |
CUISSON |
EXTRA |
MAINTIEN |
|
|
|
|
PETRISSAGE |
|
PETRISSAGE |
LEVEE |
PETRISSAGE |
LEVEE |
PETRISSAGE |
LEVEE |
|
|
AU CHAUD |
|
|
|
(h) |
|
|
|
|
|
|
|
|
|
|
(h) |
|
|
|
|
|
|
|
|
|
|
|
|
|
|
|
|
|
750 |
3:37 |
|
|
|
|
|
|
|
|
1:05 |
3:17 |
1:00 |
|
1 |
1000 |
3:42 |
|
|
|
|
|
|
|
|
1:10 |
3:22 |
1:00 |
|
|
1500 |
3:47 |
|
|
|
|
|
|
|
|
1:15 |
3:27 |
1:00 |
|
|
|
|
|
|
|
|
|
|
|
|
|
|
|
7 |
|
750 |
3:37 |
|
|
|
|
|
|
|
|
1:05 |
3:17 |
1:00 |
2 |
1000 |
3:42 |
0:05:00 |
0:05:00 |
0:15:00 |
1:05:00 |
0:02:00 |
0:30:00 |
x |
0:30:00 |
1:10 |
3:22 |
1:00 |
|
|
|
1500 |
3:47 |
|
|
|
|
|
|
|
|
1:15 |
3:27 |
1:00 |
|
|
|
|
|
|
|
|
|
|
|
|
|
|
|
|
|
750 |
3:37 |
|
|
|
|
|
|
|
|
1:05 |
3:17 |
1:00 |
|
3 |
1000 |
3:42 |
|
|
|
|
|
|
|
|
1:10 |
3:22 |
1:00 |
|
|
1500 |
3:47 |
|
|
|
|
|
|
|
|
1:15 |
3:27 |
1:00 |
|
|
|
|
|
|
|
|
|
|
|
|
|
|
|
|
|
750 |
3:45 |
|
|
|
|
|
|
|
|
1:05 |
3:22 |
1:00 |
|
1 |
1000 |
3:50 |
|
|
|
|
|
|
|
|
1:10 |
3:27 |
1:00 |
|
|
1500 |
3:55 |
|
|
|
|
|
|
|
|
1:15 |
3:32 |
1:00 |
|
|
|
|
|
|
|
|
|
|
|
|
|
|
|
8 |
|
750 |
3:45 |
|
|
|
|
|
|
|
|
1:05 |
3:22 |
1:00 |
2 |
1000 |
3:50 |
0:05:00 |
0:05:00 |
0:18:00 |
1:10:00 |
0:02:00 |
x |
x |
1:00:00 |
1:10 |
3:27 |
1:00 |
|
|
|
1500 |
3:55 |
|
|
|
|
|
|
|
|
1:15 |
3:32 |
1:00 |
|
|
|
|
|
|
|
|
|
|
|
|
|
|
|
|
|
750 |
3:45 |
|
|
|
|
|
|
|
|
1:05 |
3:22 |
1:00 |
|
3 |
1000 |
3:50 |
|
|
|
|
|
|
|
|
1:10 |
3:27 |
1:00 |
|
|
1500 |
3:55 |
|
|
|
|
|
|
|
|
1:15 |
3:32 |
1:00 |
|
|
|
|
|
|
|
|
|
|
|
|
|
|
|
9 |
- |
1000 |
1:00 |
x |
x |
0:08:00 |
x |
x |
x |
x |
0:10:00 |
0:42 |
0:55 |
1:00 |
|
|
|
|
|
|
|
|
|
|
|
|
|
|
|
|
|
750 |
1:20 |
|
|
|
|
|
|
|
|
1:05 |
1:15 |
1:00 |
|
1 |
1000 |
1:25 |
|
|
|
|
|
|
|
|
1:10 |
1:20 |
1:00 |
|
|
1500 |
1:30 |
|
|
|
|
|
|
|
|
1:15 |
1:25 |
1:00 |
|
|
|
|
|
|
|
|
|
|
|
|
|
|
|
10 |
|
750 |
1:20 |
|
|
|
|
|
|
|
|
1:05 |
1:15 |
1:00 |
2 |
1000 |
1:25 |
0:10:00 |
x |
x |
0:05:00 |
x |
x |
x |
x |
1:10 |
1:20 |
1:00 |
|
|
|
1500 |
1:30 |
|
|
|
|
|
|
|
|
1:15 |
1:25 |
1:00 |
|
|
|
|
|
|
|
|
|
|
|
|
|
|
|
|
|
750 |
1:20 |
|
|
|
|
|
|
|
|
1:05 |
1:15 |
1:00 |
|
3 |
1000 |
1:25 |
|
|
|
|
|
|
|
|
1:10 |
1:20 |
1:00 |
|
|
1500 |
1:30 |
|
|
|
|
|
|
|
|
1:15 |
1:25 |
1:00 |
|
|
|
|
|
|
|
|
|
|
|
|
|
|
|
11 |
- |
- |
1:05 |
x |
x |
0:05:00 |
x |
x |
x |
x |
0:10:00 |
0:50 |
- |
non |
|
|
|
|
|
|
|
|
|
|
|
|
|
|
|
12 |
- |
- |
0:15 |
0:03:00 |
0:12:00 |
x |
x |
x |
x |
x |
x |
x |
- |
non |
|
|
|
|
|
|
|
|
|
|
|
|
|
|
|
13 |
- |
- |
1:25 |
0:05:00 |
0:05:00 |
0:15:00 |
x |
x |
x |
x |
1:00:00 |
x |
- |
non |
|
|
|
|
|
|
|
|
|
|
|
|
|
|
|
|
1 |
|
|
|
|
|
|
|
|
|
|
|
|
|
|
|
|
0:10 |
|
|
|
|
|
|
|
|
0:10 |
|
|
|
|
|
|
|
|
|
|
|
|
|
|
|
||
14 |
|
|
par |
|
|
|
|
|
|
|
|
par |
|
|
2 |
- |
tranche |
|
|
|
|
|
|
|
|
tranche |
- |
non |
|
|
|
|
de |
|
|
|
|
|
|
|
|
de |
|
|
|
|
|
10 mn |
|
|
|
|
|
|
|
|
10 mn |
|
|
|
3 |
|
|
|
|
|
|
|
|
|
|
|
||
|
|
|
|
|
|
|
|
|
|
|
|
|
|
|
|
|
|
|
|
|
|
|
|
|
|
|
|
|
|
Remarque : la durée totale n’inclut pas le temps de maintien au chaud pour les programmes 1 à 10 inclus.
12
 MLX-OW5000-NC00017449_MLX-OW5000-NC00017449
 22/06/10 09:59 PAGE14
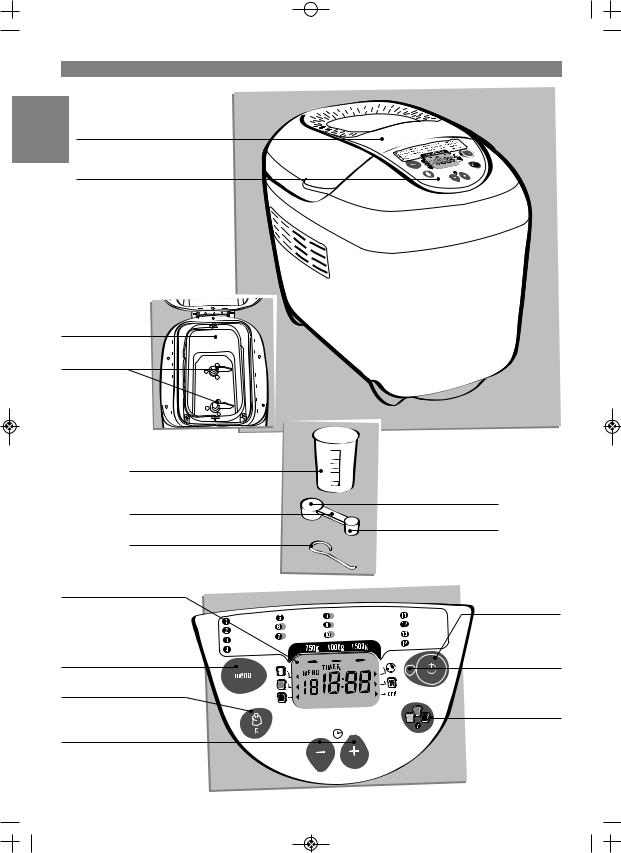
 DESCRIPTION
EN A - lid with window
B - control panel
C - bread pan
D - kneading
paddles
E - graduated beaker
F - double doser
G - hook accessory for lifting
out kneading paddles
f1 - tablespoon measure
f2 - teaspoon measure
b1 - display screen
b6 - choice of programmes
b3 - weight selection
b4 - buttons for setting
delayed start and adjusting the time for programme 14
Basique |
Rapide |
Riche en oméga 3 |
Confiture |
|
Sans gluten |
Damper |
Pasta |
||
Français |
||||
Sans sel |
Cake |
Pâte levée |
||
Complet |
||||
|
|
|||
|
|
Cuisson |
||
Sucré |
|
|
||
|
|
|
b2 - on/off button
b7 - operating indicator light
b5 - browning selection button
14

 MLX-OW5000-NC00017449_MLX-OW5000-NC00017449
 22/06/10 09:59 PAGE15
 SAFETY RECOMMENDATIONS
LET’S HELP TO PROTECT THE ENVIRONMENT!
 Your appliance contains many materials that can be reused or recycled.
  Take it to a collection point so it can be processed.
• Carefully read the instructions before using your |
a similarly qualified person in order to avoid a haz- |
|
appliance for the first time: the manufacturer does |
ard. |
|
not accept responsibility for use that does not com- |
• All interventions other than cleaning and everyday |
|
ply with the instructions. |
||
• For your safety, this product conforms to all applica- |
maintenance by the customer must be performed |
|
by an authorised service centre. |
||
ble standards and regulations (Low Voltage Directive, |
• Do not immerse the appliance, power cord or plug |
|
Electromagnetic Compatibility, Food Compliant |
||
Materials, Environment, …). |
in water or any other liquid. |
|
• This appliance is not intended to be operated by |
• Do not leave the power cord hanging within reach of |
|
means of an external timer or separate remote-con- |
children. |
|
trol system. |
• The power cord must never be close to or in contact |
|
• This appliance is not intended for use by persons |
with the hot parts of your appliance, near a source of |
|
(including children) with reduced physical, sensory or |
heat or over a sharp corner. |
|
mental capabilities, or lack of experience and knowl- |
• Do not move the appliance when in use. |
|
edge, unless they have been given supervision or |
||
|
||
instruction concerning use of the appliance by an |
• Do not touch the viewing window during and just |
|
adult responsible for their safety. Children should be |
after operation. The window can reach a high tem- |
|
supervised to ensure that they do not play with the |
perature. |
|
appliance. |
• Do not pull on the supply cord to unplug the appli- |
|
• Use the appliance on a stable work surface away |
||
ance. |
||
from water splashes and under no circumstances in |
• Only use an extension cord that is in good condition, |
|
a cubby-hole in a built-in kitchen. |
||
• Make sure that the power it uses corresponds to your |
has an earthed socket and is suitably rated. |
|
• Do not place the appliance on other appliances. |
||
electrical supply system. Any error in connection will |
||
cancel the guarantee. |
• Do not use the appliance as a source of heating. |
|
• It is compulsory to connect your appliance to a |
||
• Do not use the appliance to cook any other food |
||
socket with an earth. Failure to respect this require- |
||
than breads and jams. |
||
ment can cause electric shock and possibly lead to |
||
|
||
serious injury. It is essential for your safety for the earth |
• Do not place paper, card or plastic in the appliance |
|
connection to correspond to the standards for elec- |
and place nothing on it. |
|
trical installation applicable in your country. If your |
• Should any part of the appliance catch fire, do not |
|
installation does not have an outlet connected to |
||
earth, it is essential that before making any connec- |
attempt to extinguish it with water. Unplug the appli- |
|
tion, you have a certified organisation intervene to |
ance. Smother flames with a damp cloth. |
|
bring your electrical installation into conformance. |
• For your safety, only use accessories and spare parts |
|
• This product has been designed for domestic use |
designed for your appliance. |
|
only. Any commercial use, inappropriate use or fail- |
• All appliances undergo strict quality control. Practical |
|
ure to comply with the instructions, the manufacturer |
||
usage tests are performed on randomly selected |
||
accepts no responsibility and the guarantee will not |
||
appliances, which would explain any slight traces of |
||
apply. |
||
use. |
||
• This appliance is intended for domestic household |
||
• At the end of the programme, always use oven |
||
use only. It is not intended to be used in the following |
||
gloves to handle the pan or hot parts of the appli- |
||
applications, and the guarantee will not apply for: |
||
ance. The appliance gets very hot during use. |
||
- staff kitchen areas in shops, offices and |
||
|
||
other working environments; |
• Never obstruct the air vents. |
|
- farm houses; |
• Be very careful, steam can be released when you |
|
- by clients in hotels, motels and other |
||
residential type environments; |
open the lid at the end of or during the programme. |
|
- bed and breakfast type environments. |
• When using programme No. 11 (jam, compotes) |
|
• Unplug the appliance when you have finished using |
||
watch out for steam and hot spattering when open- |
||
it and when you want to clean it. |
ing the lid. |
|
• Do not use the appliance if: |
• Do not exceed the quantities indicated in the |
|
- the supply cord is defective or damaged, |
recipes. |
|
- the appliance has fallen to the floor and shows vis- |
Do not exceed a total of 1500 g of dough, |
|
ible signs of damage or does not function correctly. |
Do not exceed a total of 900 g of flour and 13 g of |
|
In either case, the appliance must be sent to the |
yeast. |
|
nearest approved service centre to eliminate any |
• The measured noise level of this product is 55 dBA. |
|
risk. See the guarantee documents. |
||
|
||
• If the power supply cord is damaged, it must be |
|
|
replaced by the manufacturer or its service agent or |
|
15
 MLX-OW5000-NC00017449_MLX-OW5000-NC00017449
 22/06/10 09:59 PAGE16
 INTRODUCTION
TIPS FOR MAKING GOOD BREAD
1. Please read these instructions carefully: the method for making bread with this appliance is not the same as for hand-made bread.
2. All ingredients used must be at room temperature (unless otherwise indicated) and must be weighed exactly. Measure liquids with the graduated beaker supplied. Measure liquids with the graduated beaker supplied. Use the double doser supplied to measure teaspoons on one side and tablespoons on the other. All spoon measures are level and not heaped. Incorrect measurements give bad results.
3. For successful bread making using the correct ingredients is critical. Use ingredients before their use-by date and keep them in a cool, dry place.
4. It is important to measure the quantity of flour precisely. That is why you should weigh out flour using a kitchen scale. Use packets of flaked dried yeast (sold in the UK as Easy Bake or Fast Action Yeast). Unless otherwise indicated in the recipe, do not use baking powder. Once a
packet of yeast has been opened, it should be sealed, stored in a cool place and used within 48 hours.
5. To avoid spoiling the proving of the dough, we advise that all ingredients should be put in the bread pan at the start and that you should avoid opening the lid during use (unless otherwise indicated). Carefully follow the order of ingredients and quantities indicated in the recipes. First the liquids, then the solids. Yeast should not come into contact with liquids, sugar or salt.
GENERAL ORDER TO BE FOLLOWED:
Liquids (butter, oil, eggs, water, milk) Salt
Sugar
Flour, first half Powdered milk
Specific solid ingredients Flour, second half
Yeast
 BEFORE YOU USE YOUR APPLIANCE FOR THE FIRST TIME
•Remove the accessories and any stickers either inside or on the outsid of the appliance - A.
•Clean all of the parts and the appliance itself using a damp cloth.
A 
 USING YOUR APPLIANCE
•Fully unwind the power cord and plug it into an earthed socket.
•A slight odour may be given off when used for the first time.
 CLEANING AND MAINTENANCE
•Unplug the appliance.
•Clean all the parts, the appliance itself and the inside of the pan with a damp cloth.
Dry thoroughly - B.
•Wash the pan and kneading paddles in hot soapy water.
If the kneading paddles remain stuck in the pan, let it soak for 5 to 10 min.
•If necessary, remove the cover to clean it in hot water.
•Do not wash any part in a dishwasher.
•Do not use household cleaning products, scouring pads or alcohol.
Use a soft, damp cloth.
•Never immerse the body of the appliance or the lid.
B
16

 MLX-OW5000-NC00017449_MLX-OW5000-NC00017449
 22/06/10 09:59 PAGE17
 QUICK-START
Lift out the bread pan by lifting the handle and pulling forwards and backwards to unclip the two sides, one by one.
Fit the kneading paddles.
Place the bread pan in the breadmaker. Replace the bread trough and press on one side then the other to engage the mixer drives and clip it in on both sides.
Press the  button.
The indicator light will come on.
The timer colon flashes. and the timer will count down. The operating indicator lights up.
The cycle will start.
Put the ingredients in the pan in exactly the order recommended.
Make sure that all ingredients are weighed with precision.
Close the lid. Plug in the bread maker. After you hear the beep, programme 1 settings are displayed by default, i.e. 1000 g, medium browning.
Unplug the breadmaker at the end of the cooking or warming cycle. Lift the bread pan out of the breadmaker by pulling on the handle. Always use oven gloves as the pan handle is hot, as is the inside of the lid. Turn out the hot bread and place it on a rack for at least 1 hour to cool.
To get to know your breadmaker, we suggest trying the BASIC BREAD recipe for your first loaf.
BASIC WHITE BREAD (programme 1) |
INGREDIENTS tsp > teaspoon - tbsp > tablespoon |
||
|
|
|
|
BROWNING = MEDIUM |
- OIL = 2 tbsp |
- POWDERED MILK = 2.5 tbsp |
|
|
- WATER = 325 ml |
- WHITE BREAD FLOUR = 600 g |
|
WEIGHT = 1000 g |
|||
- SALT = 2 tsp |
- YEAST = 1,5 tsp |
||
|
|||
TIME = 3:20 |
- SUGAR = 2 tbsp |
|
|
|
|
|
|
17
 MLX-OW5000-NC00017449_MLX-OW5000-NC00017449
 22/06/10 09:59 PAGE18
 USING YOUR BREADMAKER
Basique |
Rapide |
Riche en oméga 3 |
Confiture |
|
Français |
Sans gluten |
Damper |
||
Pasta |
||||
Complet |
Sans sel |
Cake |
||
Pâte levée |
||||
Sucré |
|
|
||
|
|
Cuisson |
||
|
|
|
A default setting is displayed for each programme.
You will therefore have to select the desired settings manually.
SELECTING A PROGRAMME
Choosing a programme triggers a series of steps which are carried out automatically one after another.
The MENU button enables you to choose a certain number of different programmes. The time corresponding to the programme is displayed. Every time you press the  , The number on the display panel switches to the next programme from 1-14
1 |
> basic white bread |
5 |
> fast bread |
9 |
> damper |
13 |
> leavened dough |
2 |
> French bread |
6 |
> gluten-free bread |
10 |
> cake |
|
(pizza for example) |
3 |
> whole wheat bread |
7 |
> salt-free bread |
11 |
> jams and |
14 |
> cooking only |
4 |
> sweet bread |
8 |
> bread rich |
|
compotes |
|
|
|
|
|
in omega 3 |
12 |
> pasta |
|
|
1.The Basic white Bread programme is used to make most bread recipes using white wheat flour.
2.The French Bread programme corresponds to a traditional French crusty white bread recipe.
3.Whole wheat Programme is used to make whole wheat bread using whole wheat flour.
4.The Sweet Bread programme is for recipes containing more sugar and fat such as brioches and milk breads. If you are using special flour blends for brioche or rolls, do not exceed 1 kg of dough in total.
5.The Fast Bread programme is specifically for the FAST bread recipe. The weight and browning settings are not available in this programme.
6.Gluten-free bread is to be made exclusively from gluten-free ready-made mixes. It is suitable for persons with celiac disease, making them intolerant of the gluten present in many cereals (wheat, rye, barley, oats, Kamut, spelt wheat etc.). Refer to the specific recommendations on the packet. The trough must always be thoroughly cleaned to avoid any risk of contamination with other flours. In the case of a strictly gluten-free diet, take care that the yeast used is also gluten-free. The consistency of gluten-free
flours does not yield an ideal dough. The dough sticks to the sides and must be scraped down with a flexible plastic spatula during kneading. Gluten-free bread will be of a denser consistency and paler than normal bread.
7.Bread is one of greatest contributors to our daily salt intake. Reducing salt consumption can help reduce the risks of cardio-vascular problems.
8.This bread is rich in omega 3 fatty acids, thanks to a complete and nutritionally balanced recipe.
Omega 3 fatty acids contribute to the proper function of the cardiovascular system.
9.The damper is based on a traditional Australian recipe, cooked on hot stones. It produces a compact, slightly brioche-like bread.
10.Can be used to make pastries and cakes with baking powder.
11.The Jams programme automatically cooks jams and compots (stewed fruits) in the pan.
12.Programme 12 only kneads. It is for unleavened pasta, like noodles for example.
13.The Leavened Dough programme does not bake. It is a kneading and rising programme for all leavened doughs such as pizza dough, rolls, sweet buns.
18

 MLX-OW5000-NC00017449_MLX-OW5000-NC00017449
 22/06/10 09:59 PAGE19
14.The cooking programme is limited to 10 to 70 min. only, adjustable in steps of 10 min, with light medium or dark browning.
It can be selected alone and used:
a)with the Leavened Dough programme,
b)to reheat cooked and cooled breads or to make them crusty,
c)to finish cooking in case of a prolonged electricity cut during a bread baking cycle.
The breadmaker should not be left unattended when using programme 14.
To interrupt the cycle before it is finished, the programme can be stopped manually by holding down the button  .
.
SELECTING THE WEIGHT OF THE BREAD
The bread weight is set by default at 1000 g. This weight is shown for informational purposes. See the recipes for more details. Programmes 5, 9, 11, 12, 13, 14 do not have weight settings. Press the  button to set the chosen product – 750 g, 1000 g or 1500 g. The indicator light against the selected setting comes on. Attention : certain recipes cannot be used to make a 750-g loaf. Refer to the recipe book.
SELECTING THE COLOUR OF THE CRUST (BROWNING)
By default, the colour of the crust is set at MEDIUM. Programmes 5, 9, 11 do not have a colour setting. Three choices are possible: LIGHT/MEDIUM/DARK.
If you want to change the default setting, press the 
 button until the indicator light facing the desired setting comes on.
START/STOP
Press the  button to switch the appliance on. The countdown begins.
To stop the programme or to cancel delayed programming, hold down on the  button for 5 seconds.
 CYCLES
On pages 22-23 is a table showing the steps in the various cycles according to the chosen programme.
KNEADING |
> REST |
> RISING |
> BAKING |
> |
WARMING |
For forming |
Allows the |
Time during |
Transforms the |
|
Keeps the bread warm |
the dough’s |
dough |
which the yeast |
dough into |
|
after baking. |
structure so |
to rest to |
works to let the |
bread |
|
It is recommende that |
that it can rise |
improve knea- |
bread rise and |
and gives it a |
|
the bread should be |
better. |
ding quality. |
to develop its |
golden, crusty |
|
turned out promptly after |
|
|
aroma. |
crust. |
|
baking, however. |
KNEADING: the dough is in the 1st or 2nd kneading cycle or in a stirring period between rising cycles. During this cycle, and for programmes 1, 2, 3, 4, 6, 7, 8, 9, 10 you can add ingredients: dried fruit or nuts, olives, bacon pieces, etc.
A beep indicates when you can intervene. See the summary table for preparation times (page 22-23) and the “extra” column.
This column indicates the time that will be displayed on your appliance’s screen when the beep sounds. For more precise information on how long before the beep sounds, subtract the “extra” column time from the total baking time.
For example: “extra” = 2:51 and “total time” = 3:13, the ingredients can be added after 22 min.
RISING: the dough is in the 1st, 2nd or 3rd rising cycle.
BAKING: the bread is in the final baking cycle. The word “end” lights to indicate the end of the cycle.
 WARMING: for programmes 1, 2, 3, 4, 5, 6, 7, 8, 9, 10, you can leave your preparation in the appliance. A one-hour warming cycle automatically follows baking. The
  indicator lights.
The display remains at 0:00 for one hour of warming. The appliance beeps at regular intervals. At the end of the cycle, it stops automatically after 3 beeps. To stop the warming programme, unplug the appliance.
19
 MLX-OW5000-NC00017449_MLX-OW5000-NC00017449
 22/06/10 09:59 PAGE20
 DELAYED START PROGRAMME
You can programme the appliance up to start 15 hours in advance to have your preparation ready at the time you want. This function cannot be used on programmes 5, 6, 9, 10, 11, 12, 13, 14.
This step comes after selecting the programme, browning level and weight. The programme time is displayed. Calculate the time difference between the moment when you start the programme and the time at which you want your preparation to be ready.
The machine automatically includes the duration of the programme cycles.
Using the  and buttons, display the calculated time (
 up and
  down).
Short presses change the time by intervals of 10 min
PRACTICAL ADVICE
If there is a power cut: if, during the cycle, the programme is interrupted by a power cut or mishandling, the machine has a 7-min protection time during which the settings are saved. The cycle starts again where it stopped. Beyond that time, the settings are lost.
If you plan to run a second programme bake a second loaf, open the lid and wait 1 hour before beginning the second preparation.
To turn out your loaf of bread: it may happen that the kneading paddles remain stuck in the loaf when it is turned out. In this case, use the hook accessory
+ a short beep. Holding the button down gives continuous scrolling of 10-min intervals.
For example, it is 8 pm and you want your bread to be ready for 7 am the next morning. Programme 11:00 using the  and buttons. Press the
  button. A beep is emitted. The facing indicator light
switches on and the timer colon  blinks. The
countdown begins. The ON light switches on.
If you make a mistake or want to change the time
setting, hold down the |
|
button until it makes a |
|
beep. The default time is displayed. Start the operation again.
With the delayed start programme do not use recipes which contain fresh milk, eggs, soured cream, yoghurt, cheese or fresh fruit as they could spoil or stale overnight.
as follows:
>once the loaf is turned out, lay it on its side while still hot and hold it down with one hand, wearing an oven glove,
>with the other hand, insert the hook 1
in the axis of the kneading paddle (drawing 1),
> pull gently to release the kneading paddle (drawing 2),
> repeat for the second kneading paddle
2
> turn the loaf upright and stand on a grid to cool.
 INGREDIENTS
FATS AND OILS: fats make the bread softer and tastier. It also stores better and longer. Too much fat slows down rising. If you use butter, cut it into tiny pieces so that it is distributed evenly throughout the preparation, or soften it. You can substitute 15g butter for 1 tablespoon of oil. Do not add hot butter. Keep the fat from coming into contact with the yeast, as fat can prevent yeast from rehydrating. Do not use low fat spreads or butter substitutes.
EGGS: eggs make the dough richer, improve the colour of the bread and encourage the development of the soft, white part. If you use eggs, reduce the quantity of liquid you use proportionally. Break the egg and top up with the liquid until you reach the quantity of liquid indicated in the recipe. Recipes are designed for one 50 g size egg; if your eggs are bigger, add a little flour; if they are smaller, use less flour.
MILK: recipes use either fresh or powdered milk. If using powdered milk, add the quantity of water stated in the recipe. It enhances the flavour and improves the keeping qualities of the bread. For recipes using fresh milk, you can substitute some of it with water but the total volume must equal the quantity stated in the recipe. Semi-skimmed or skimmed milk is best to avoid bread having a close texture. Milk also has an emulsifying effect which evens out its airiness, giving the soft, white part a better aspect.
WATER: water rehydrates and activates the yeast. It also hydrates the starch in the flour and helps the soft, white part to form. Water can be totally or partially replaced with milk or other liquids. Use liquids at room temperature.
FLOUR: the weight of the flour varies significantly
20
 MLX-OW5000-NC00017449_MLX-OW5000-NC00017449
 22/06/10 09:59 PAGE21
depending on the type of flour used. Depending on the quality of the flour, baking results may also vary. Keep flour in a hermetically sealed container, as flour reacts to fluctuations in atmospheric conditions, absorbing moisture or losing it. Use “strong flour”, “bread flour” or “baker’s flour” rather than standard flour. Adding oats, bran, wheat germ, rye or whole grains to the bread dough will give a smaller, heavier loaf of bread.
Using T55 flour is recommended unless otherwise specified in the recipe. Our recipes are optimised for the use of standard T55 flour. If you are using special flour blends for bread, brioche or rolls, do not exceed 1 kg of dough in total.
Sifting the flour also affects the results: the more the flour is whole (i.e. the more of the outer envelope of the wheat it contains), the less the dough will rise and the denser the bread. You can also find ready-to-use bread preparations on the market. Follow the manufacturer’s instructions when using these preparations. Usually, the choice of the programme will depend on the preparation used. For example: Wholemeal bread - Programme 3.
SUGAR: use white sugar, brown sugar or honey. Do not use unrefined sugar or lumps. Sugar acts as food for the yeast, gives the bread its good taste and improves browning of the crust. Artificial sweeteners cannot be substituted for sugar as the yeast will not react with them.
SALT: salt gives taste to food and regulates the yeast’s activity. It should not come into contact with the yeast. Thanks to salt, the dough is firm, compact and does not rise too quickly. It also improves the structure of the dough. Use ordinary table salt. Do not use coarse salt or salt substitutes.
YEAST: baker’s yeast exists in several forms: fresh in
PRACTICAL ADVICE
small cubes, dried and active to be rehydrated or dried and instant. Fresh yeast is sold in supermarkets (bakery or fresh produce departments), but you can also buy fresh yeast from your local baker’s. In its fresh or instant dried form, yeast should be added directly to the baking pan of your breadmaker with the other ingredients. Remember to crumble the fresh yeast with your fingers to make it dissolve more easily. Only active dried yeast (in small granules) must be mixed with a little tepid water before use. Choose a temperature close to 37°C, less and it will not rise as well, more will make it lose its rising power. Keep to the stated amounts and remember to multiply the quantities if you use fresh yeast (see equivalents chart below).
Equivalents in quantity/weight between dried yeast and fresh yeast:
Dried yeast (in tsp.) |
|
|
|
|
||||
1 |
1,5 |
2 |
2,5 |
3 |
3,5 |
4 |
4,5 |
5 |
Fresh yeast (in g) |
|
|
|
|
|
|||
9 |
13 |
18 |
22 |
25 |
31 |
36 |
40 |
45 |
ADDITIVES (OLIVES, BACON PIECES, ETC.): you can add a personal touch to your recipes by adding whatever ingredients you want, taking care:
>to add following the beep for additional ingredients, especially those that are fragile such as dried fruit,
>to add the most solid grains (such as linseed or sesame) at the start of the kneading process to facilitate use of the machine (delayed starting, for example),
>to thoroughly drain moist ingredients (olives),
>to lightly flour fatty ingredients for better blending,
>not to add too large a quantity of additional ingredients, especially cheese, fresh fruit and fresh vegetables, as they can affect the development of the dough,
>to finely chop nuts as they can cut through the loaf structure and reduce the cooked height.
Bread preparation is very sensitive to temperature and humidity conditions. In case of high heat, use liquids that are cooler than usual. Likewise, if it is cold, it may be necessary to warm up the water or milk (never exceeding 35°C). Any liquid used should be tepid, about 20 to 25°C (except for Super Fast Bread which should be 35 to 40°C max.).
It can also sometimes be useful to check the state of the dough during the second kneading: it should form an even ball which comes away easily from the walls of the pan.
> if not all of the flour has been blended into the dough, add a little more water,
>if the dough is too wet and sticks to the sides, you may need to add a little flour.
Such corrections should be undertaken very gradually (no more than 1 tablespoon at a time) and wait to see if there is an improvement before continuing.
A common error is to think that adding more yeast will make the bread rise more. Too much yeast makes the structure of the bread more fragile and it will rise a lot and then fall while baking. You can determine the state of the dough just before baking by touching it lightly with your fingertips: the dough should be slightly resistant and the fingerprint should disappear little by little.
21

 MLX-OW5000-NC00017449_MLX-OW5000-NC00017449
 22/06/10 09:59 PAGE22
PROG. |
BROWN- |
WEIGHT |
TOTAL |
1st |
REST |
2nd |
1st |
3rd |
2nd |
4th |
3rd |
COOKING |
EXTRA |
KEEP |
|
ING |
|
TIME |
KNEADING |
|
KNEADING |
RISING |
KNEADING |
RISING |
KNEADING |
RISING |
|
|
HOT |
|
|
|
(h) |
|
|
|
|
|
|
|
|
|
|
(h) |
|
|
|
|
|
|
|
|
|
|
|
|
|
|
|
|
|
750 |
3:15 |
|
|
|
|
|
|
|
|
0:55 |
2:55 |
1:00 |
|
1 |
1000 |
3:20 |
|
|
|
|
|
|
|
|
1:00 |
3:00 |
1:00 |
|
|
1500 |
3:25 |
|
|
|
|
|
|
|
|
1:05 |
3:05 |
1:00 |
|
|
|
|
|
|
|
|
|
|
|
|
|
|
|
1 |
|
750 |
3:15 |
|
|
|
|
|
|
|
|
0:55 |
2:55 |
1:00 |
2 |
1000 |
3:20 |
0:05:00 |
0:05:00 |
0:15:00 |
0:40:00 |
0:00:10 |
0:25:00 |
0:00:15 |
0:50:00 |
1:00 |
3:00 |
1:00 |
|
|
|
1500 |
3:25 |
|
|
|
|
|
|
|
|
1:05 |
3:05 |
1:00 |
|
|
|
|
|
|
|
|
|
|
|
|
|
|
|
|
|
750 |
3:15 |
|
|
|
|
|
|
|
|
0:55 |
2:55 |
1:00 |
|
3 |
1000 |
3:20 |
|
|
|
|
|
|
|
|
1:00 |
3:00 |
1:00 |
|
|
1500 |
3:25 |
|
|
|
|
|
|
|
|
1:05 |
3:05 |
1:00 |
|
|
|
|
|
|
|
|
|
|
|
|
|
|
|
|
|
750 |
3:34 |
|
|
|
|
|
|
|
|
1:05 |
3:17 |
1:00 |
|
1 |
1000 |
3:39 |
|
|
|
|
|
|
|
|
1:10 |
3:22 |
1:00 |
|
|
1500 |
3:44 |
|
|
|
|
|
|
|
|
1:15 |
3:27 |
1:00 |
|
|
|
|
|
|
|
|
|
|
|
|
|
|
|
2 |
|
750 |
3:34 |
|
|
|
|
|
|
|
|
1:05 |
3:17 |
1:00 |
2 |
1000 |
3:39 |
0:05:00 |
0:05:00 |
0:12:00 |
1:05:00 |
0:02:00 |
0:30:00 |
x |
0:30:00 |
1:10 |
3:22 |
1:00 |
|
|
|
1500 |
3:44 |
|
|
|
|
|
|
|
|
1:15 |
3:27 |
1:00 |
|
|
|
|
|
|
|
|
|
|
|
|
|
|
|
|
|
750 |
3:34 |
|
|
|
|
|
|
|
|
1:05 |
3:17 |
1:00 |
|
3 |
1000 |
3:39 |
|
|
|
|
|
|
|
|
1:10 |
3:22 |
1:00 |
|
|
1500 |
3:44 |
|
|
|
|
|
|
|
|
1:15 |
3:27 |
1:00 |
|
|
|
|
|
|
|
|
|
|
|
|
|
|
|
|
|
750 |
3:37 |
|
|
|
|
|
|
|
|
1:00 |
3:17 |
1:00 |
|
1 |
1000 |
3:42 |
|
|
|
|
|
|
|
|
1:05 |
3:22 |
1:00 |
|
|
1500 |
3:47 |
|
|
|
|
|
|
|
|
1:10 |
3:27 |
1:00 |
|
|
|
|
|
|
|
|
|
|
|
|
|
|
|
3 |
|
750 |
3:37 |
|
|
|
|
|
|
|
|
1:00 |
3:17 |
1:00 |
2 |
1000 |
3:42 |
0:05:00 |
0:05:00 |
0:15:00 |
1:10:00 |
0:02:00 |
0:20:00 |
x |
0:40:00 |
1:05 |
3:22 |
1:00 |
|
|
|
1500 |
3:47 |
|
|
|
|
|
|
|
|
1:10 |
3:27 |
1:00 |
|
|
|
|
|
|
|
|
|
|
|
|
|
|
|
|
|
750 |
3:37 |
|
|
|
|
|
|
|
|
1:00 |
3:17 |
1:00 |
|
3 |
1000 |
3:42 |
|
|
|
|
|
|
|
|
1:05 |
3:22 |
1:00 |
|
|
1500 |
3:47 |
|
|
|
|
|
|
|
|
1:10 |
3:27 |
1:00 |
|
|
|
|
|
|
|
|
|
|
|
|
|
|
|
|
|
750 |
3:45 |
|
|
|
|
|
|
|
|
1:00 |
3:17 |
1:00 |
|
1 |
1000 |
3:50 |
|
|
|
|
|
|
|
|
1:05 |
3:22 |
1:00 |
|
|
1500 |
3:55 |
|
|
|
|
|
|
|
|
1:10 |
3:27 |
1:00 |
|
|
|
|
|
|
|
|
|
|
|
|
|
|
|
4 |
|
750 |
3:45 |
|
|
|
|
|
|
|
|
1:00 |
3:17 |
1:00 |
2 |
1000 |
3:50 |
0:10:00 |
0:05:00 |
0:18:00 |
0:30:00 |
x |
0:40:00 |
0:02:00 |
1:00:00 |
1:05 |
3:22 |
1:00 |
|
|
|
1500 |
3:55 |
|
|
|
|
|
|
|
|
1:10 |
3:27 |
1:00 |
|
|
|
|
|
|
|
|
|
|
|
|
|
|
|
|
|
750 |
3:45 |
|
|
|
|
|
|
|
|
1:00 |
3:17 |
1:00 |
|
3 |
1000 |
3:50 |
|
|
|
|
|
|
|
|
1:05 |
3:22 |
1:00 |
|
|
1500 |
3:55 |
|
|
|
|
|
|
|
|
1:10 |
3:27 |
1:00 |
|
|
|
|
|
|
|
|
|
|
|
|
|
|
|
5 |
- |
1000 |
1:20 |
x |
x |
0:13 |
x |
x |
x |
x |
0:22 |
0:45 |
no |
1:00 |
|
|
|
|
|
|
|
|
|
|
|
|
|
|
|
|
|
750 |
2:15 |
|
|
|
|
|
|
|
|
1:00 |
2:05 |
1:00 |
|
1 |
1000 |
2:20 |
|
|
|
|
|
|
|
|
1:05 |
1:10 |
1:00 |
|
|
1500 |
2:25 |
|
|
|
|
|
|
|
|
1:10 |
2:15 |
1:00 |
|
|
|
|
|
|
|
|
|
|
|
|
|
|
|
6 |
|
750 |
2:15 |
|
|
|
|
|
|
|
|
1:00 |
2:05 |
1:00 |
2 |
1000 |
2:20 |
0:05 |
x |
0:10 |
x |
x |
x |
x |
1:00 |
1:05 |
1:10 |
1:00 |
|
|
|
1500 |
2:25 |
|
|
|
|
|
|
|
|
1:10 |
2:15 |
1:00 |
|
|
|
|
|
|
|
|
|
|
|
|
|
|
|
|
|
750 |
2:15 |
|
|
|
|
|
|
|
|
1:00 |
2:05 |
1:00 |
|
3 |
1000 |
2:20 |
|
|
|
|
|
|
|
|
1:05 |
1:10 |
1:00 |
|
|
1500 |
2:25 |
|
|
|
|
|
|
|
|
1:10 |
2:15 |
1:00 |
|
|
|
|
|
|
|
|
|
|
|
|
|
|
|
22

 MLX-OW5000-NC00017449_MLX-OW5000-NC00017449
 22/06/10 09:59 PAGE23
PROG. |
BROWN- |
WEIGHT |
TOTAL |
1st |
REST |
2nd |
1st |
3rd |
2nd |
4th |
3rd |
COOKING |
EXTRA |
KEEP |
|
ING |
|
TIME |
KNEADING |
|
KNEADING |
RISING |
KNEADING |
RISING |
KNEADING |
RISING |
|
|
HOT |
|
|
|
(h) |
|
|
|
|
|
|
|
|
|
|
(hn) |
|
|
|
|
|
|
|
|
|
|
|
|
|
|
|
|
|
750 |
3:37 |
|
|
|
|
|
|
|
|
1:05 |
3:17 |
1:00 |
|
1 |
1000 |
3:42 |
|
|
|
|
|
|
|
|
1:10 |
3:22 |
1:00 |
|
|
1500 |
3:47 |
|
|
|
|
|
|
|
|
1:15 |
3:27 |
1:00 |
|
|
|
|
|
|
|
|
|
|
|
|
|
|
|
7 |
|
750 |
3:37 |
|
|
|
|
|
|
|
|
1:05 |
3:17 |
1:00 |
2 |
1000 |
3:42 |
0:05:00 |
0:05:00 |
0:15:00 |
1:05:00 |
0:02:00 |
0:30:00 |
x |
0:30:00 |
1:10 |
3:22 |
1:00 |
|
|
|
1500 |
3:47 |
|
|
|
|
|
|
|
|
1:15 |
3:27 |
1:00 |
|
|
|
|
|
|
|
|
|
|
|
|
|
|
|
|
|
750 |
3:37 |
|
|
|
|
|
|
|
|
1:05 |
3:17 |
1:00 |
|
3 |
1000 |
3:42 |
|
|
|
|
|
|
|
|
1:10 |
3:22 |
1:00 |
|
|
1500 |
3:47 |
|
|
|
|
|
|
|
|
1:15 |
3:27 |
1:00 |
|
|
|
|
|
|
|
|
|
|
|
|
|
|
|
|
|
750 |
3:45 |
|
|
|
|
|
|
|
|
1:05 |
3:22 |
1:00 |
|
1 |
1000 |
3:50 |
|
|
|
|
|
|
|
|
1:10 |
3:27 |
1:00 |
|
|
1500 |
3:55 |
|
|
|
|
|
|
|
|
1:15 |
3:32 |
1:00 |
|
|
|
|
|
|
|
|
|
|
|
|
|
|
|
8 |
|
750 |
3:45 |
|
|
|
|
|
|
|
|
1:05 |
3:22 |
1:00 |
2 |
1000 |
3:50 |
0:05:00 |
0:05:00 |
0:18:00 |
1:10:00 |
0:02:00 |
x |
x |
1:00:00 |
1:10 |
3:27 |
1:00 |
|
|
|
1500 |
3:55 |
|
|
|
|
|
|
|
|
1:15 |
3:32 |
1:00 |
|
|
|
|
|
|
|
|
|
|
|
|
|
|
|
|
|
750 |
3:45 |
|
|
|
|
|
|
|
|
1:05 |
3:22 |
1:00 |
|
3 |
1000 |
3:50 |
|
|
|
|
|
|
|
|
1:10 |
3:27 |
1:00 |
|
|
1500 |
3:55 |
|
|
|
|
|
|
|
|
1:15 |
3:32 |
1:00 |
|
|
|
|
|
|
|
|
|
|
|
|
|
|
|
9 |
- |
1000 |
1:00 |
x |
x |
0:08:00 |
x |
x |
x |
x |
0:10:00 |
0:42 |
0:55 |
1:00 |
|
|
|
|
|
|
|
|
|
|
|
|
|
|
|
|
|
750 |
1:20 |
|
|
|
|
|
|
|
|
1:05 |
1:15 |
1:00 |
|
1 |
1000 |
1:25 |
|
|
|
|
|
|
|
|
1:10 |
1:20 |
1:00 |
|
|
1500 |
1:30 |
|
|
|
|
|
|
|
|
1:15 |
1:25 |
1:00 |
|
|
|
|
|
|
|
|
|
|
|
|
|
|
|
10 |
|
750 |
1:20 |
|
|
|
|
|
|
|
|
1:05 |
1:15 |
1:00 |
2 |
1000 |
1:25 |
0:10:00 |
x |
x |
0:05:00 |
x |
x |
x |
x |
1:10 |
1:20 |
1:00 |
|
|
|
1500 |
1:30 |
|
|
|
|
|
|
|
|
1:15 |
1:25 |
1:00 |
|
|
|
|
|
|
|
|
|
|
|
|
|
|
|
|
|
750 |
1:20 |
|
|
|
|
|
|
|
|
1:05 |
1:15 |
1:00 |
|
3 |
1000 |
1:25 |
|
|
|
|
|
|
|
|
1:10 |
1:20 |
1:00 |
|
|
1500 |
1:30 |
|
|
|
|
|
|
|
|
1:15 |
1:25 |
1:00 |
|
|
|
|
|
|
|
|
|
|
|
|
|
|
|
11 |
- |
- |
1:05 |
x |
x |
0:05:00 |
x |
x |
x |
x |
0:10:00 |
0:50 |
- |
no |
|
|
|
|
|
|
|
|
|
|
|
|
|
|
|
12 |
- |
- |
0:15 |
0:03:00 |
0:12:00 |
x |
x |
x |
x |
x |
x |
x |
- |
no |
|
|
|
|
|
|
|
|
|
|
|
|
|
|
|
13 |
- |
- |
1:25 |
0:05:00 |
0:05:00 |
0:15:00 |
x |
x |
x |
x |
1:00:00 |
x |
- |
no |
|
|
|
|
|
|
|
|
|
|
|
|
|
|
|
|
1 |
|
|
|
|
|
|
|
|
|
|
|
|
|
|
|
|
0 to 10 |
|
|
|
|
|
|
|
|
0 to 10 |
|
|
|
|
|
|
|
|
|
|
|
|
|
|
|
||
14 |
2 |
- |
in steps |
|
|
|
|
|
|
|
|
in steps |
- |
no |
of |
|
|
|
|
|
|
|
|
of |
|||||
|
|
|
10 min. |
|
|
|
|
|
|
|
|
10 min. |
|
|
|
3 |
|
|
|
|
|
|
|
|
|
|
|
|
|
|
|
|
|
|
|
|
|
|
|
|
|
|
|
|
Note: for programmes 1 to 10 inclusive, total time does not include the keep hot time.
23

 MLX-OW5000-NC00017449_MLX-OW5000-NC00017449
 22/06/10 09:59 PAGE24
 TROUBLESHOOTING GUIDE
Not getting the expected results? This table will help you.
|
|
|
|
|
|
Pain |
Pain affaissé |
Pain |
|
Croûte |
Côtés bruns |
|
Côtés |
||
|
|
|
|
|
|
|
après avoir |
pas assez |
|
|
pas assez |
mais pain |
|
et dessus |
|
|
|
|
|
|
|
trop levé |
|
|
|
||||||
|
|
|
|
|
|
|
trop levé |
levé |
|
|
dorée |
pas assez cuit |
|
enfarinés |
|
|
|
|
|
|
|
|
|
|
|
||||||
|
|
|
|
|
|
|
|
|
|
|
|
|
|||
|
|
|
|
|
|
|
|
|
|
|
|
|
|||
The |
|
button was pressed |
|
|
|
|
|
|
|
|
|
|
|||
|
|
|
|
|
|
|
|
|
|
||||||
|
|
|
|
|
|
|
|
|
|
||||||
during baking |
|
|
|
|
|
|
|
|
|
|
|
||||
|
|
|
|
|
|
|
|
|
|
|
|
||||
Not enough flour |
|
|
|
|
|
|
|
|
|
|
|
||||
|
|
|
|
|
|
|
|
|
|
|
|
||||
Too much flour |
|
|
|
|
|
|
|
|
|
|
|
||||
|
|
|
|
|
|
|
|
|
|
|
|
||||
Not enough yeast |
|
|
|
|
|
|
|
|
|
|
|
||||
|
|
|
|
|
|
|
|
|
|
|
|
||||
Too much yeast |
|
|
|
|
|
|
|
|
|
|
|
||||
|
|
|
|
|
|
|
|
|
|
|
|
||||
Not enough water |
|
|
|
|
|
|
|
|
|
|
|
||||
|
|
|
|
|
|
|
|
|
|
|
|
||||
Too much water |
|
|
|
|
|
|
|
|
|
|
|
||||
|
|
|
|
|
|
|
|
|
|
|
|
||||
Not enough sugar |
|
|
|
|
|
|
|
|
|
|
|
||||
|
|
|
|
|
|
|
|
|
|
|
|
||||
Poor quality flour |
|
|
|
|
|
|
|
|
|
|
|
||||
|
|
|
|
|
|
|
|
|
|
|
|
||||
Wrong proportions |
|
|
|
|
|
|
|
|
|
|
|
||||
of ingredients (too much) |
|
|
|
|
|
|
|
|
|
|
|||||
|
|
|
|
|
|
|
|
|
|
|
|
||||
Water too hot |
|
|
|
|
|
|
|
|
|
|
|
||||
|
|
|
|
|
|
|
|
|
|
|
|
||||
Water too cold |
|
|
|
|
|
|
|
|
|
|
|
||||
|
|
|
|
|
|
|
|
|
|
|
|
||||
Wrong programme |
|
|
|
|
|
|
|
|
|
|
|
||||
|
|
|
|
|
|
|
|
|
|
|
|
|
|
|
|
|
|
|
|
|
|
|
|
|
|
|
|
|
|
|
|
|
|
TECHNICAL TROUBLESHOOTING GUIDE |
|
|
|
|
|||||||||
|
|
|
|
|
|
|
|
|
|
|
|
|
|
||
PROBLEMS |
|
|
|
SOLUTIONS |
|
|
|
|
|
|
|
||||
|
|
|
|
|
|
|
|
|
|
|
|
|
|||
The kneading paddles remains stuck |
|
• Let it soak before removing it. |
|
|
|
||||||||||
in the bread trough |
|
|
|
|
|
|
|||||||||
|
|
|
|
|
|
|
|
|
|
|
|||||
|
|
|
|
|
|
|
|
|
|
|
|
|
|||
The kneading paddles remains stuck |
|
• Lightly oil the kneading paddles before mixing the ingredients |
|||||||||||||
|
in the bread pan or use the accessory to turn out the loaf |
||||||||||||||
in the loaf |
|
|
|
||||||||||||
|
|
|
(page 20) |
|
|
|
|
|
|
|
|||||
|
|
|
|
|
|
|
|
|
|
|
|
|
|
|
|
|
|
|
|
|
|
|
|
|
|
|
|
|
|
||
After pressing on |
|
|
, nothing happens |
|
• The machine is too hot. Wait 1 hour between 2 cycles. |
|
|||||||||
|
|
|
• A delayed start has been programmed. |
|
|||||||||||
|
|
|
|
|
|
|
|
|
|||||||
|
|
|
|
|
|
|
|
|
|
|
|
|
|
||
After pressing on |
|
|
, the motor is on |
|
• The pan has not been correctly inserted. |
|
|||||||||
|
|
||||||||||||||
|
|
||||||||||||||
but no kneading takes place |
|
• Kneading paddles missing or not installed properly. |
|
||||||||||||
|
|
|
|
|
|
|
|
|
|
|
|
|
|
|
|
After a delayed start, |
|
• You forgot to press on |
|
|
after programming. |
|
|||||||||
|
|
||||||||||||||
|
|
||||||||||||||
|
• The yeast has come into contact with salt and/or water. |
||||||||||||||
the bread has not risen enough |
|
||||||||||||||
or nothing happens |
|
|
|
• Kneading paddles missing. |
|
|
|
||||||||
|
|
|
|
|
|
|
|
|
|
|
|||||
|
|
|
|
|
|
|
|
|
|
|
|
|
|||
|
|
|
|
|
|
|
|
• Some of the ingredients have fallen outside the pan: let the |
|||||||
|
|
|
|
|
|
|
|
machine cool down and clean the inside of the machine |
|||||||
Burnt smell |
|
|
|
with a damp sponge and without any cleaning product. |
|||||||||||
|
|
|
• The preparation has overflowed: the quantity of ingredients |
||||||||||||
|
|
|
|
|
|
|
|
||||||||
|
|
|
|
|
|
|
|
used is too great, notably liquid. Follow the proportions |
|
||||||
|
|
|
|
|
|
|
|
given in the recipe. |
|
|
|
|
|||
|
|
|
|
|
|
|
|
|
|
|
|
|
|
|
|
24
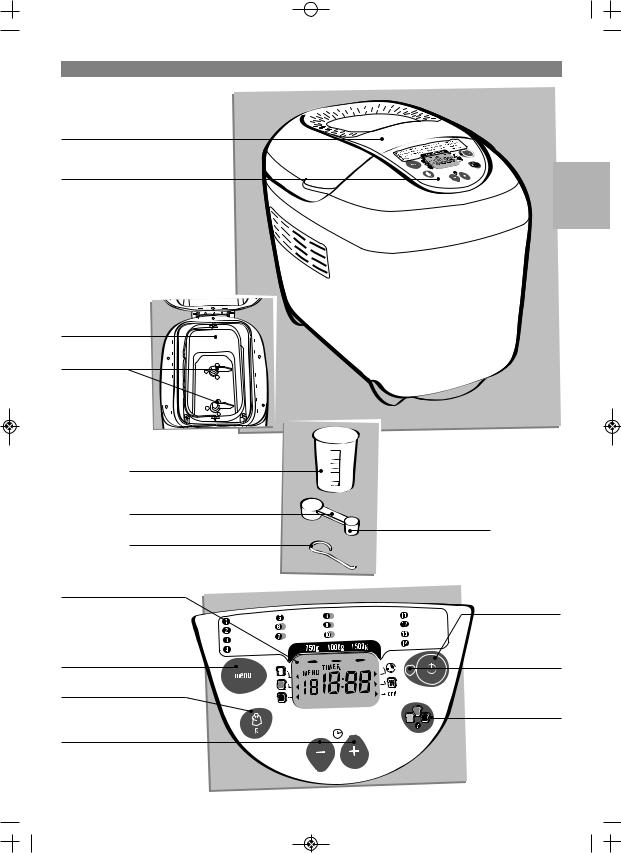
 MLX-OW5000-NC00017449_MLX-OW5000-NC00017449
 22/06/10 09:59 PAGE25
 BESCHREIBUNG
A - abnehmbarer Deckel
mit Sichtfenster
B - Bedienfeld
DE
C – Backform
D - Mischhaken
E - Messbecher
f1 - Esslöffel F - Messlöffel 
f2 - Teelöffel
G - Zubehörteil „Haken“ zum Entfernen der Mischhaken
b1 - Anzeigefenster
b6 - Programmwahl
b3 - Brotgröße
b4 - Zeiteinstelltasten
für das Programm 14
Basique |
Rapide |
Riche en oméga 3 |
Confiture |
|
Sans gluten |
Damper |
Pasta |
||
Français |
||||
Sans sel |
Cake |
Pâte levée |
||
Complet |
||||
|
|
|||
|
|
Cuisson |
||
Sucré |
|
|
||
|
|
|
b2Start /
Stopp-Taste
b7Betriebs-
kontrollleuchte
b5Einstellung des
Bräunungsgrades der Kruste
25

 MLX-OW5000-NC00017449_MLX-OW5000-NC00017449
 22/06/10 09:59 PAGE26
 SICHERHEITSHINWEISE
DENKEN SIE AN DEN UMWELTSCHUTZ!
 Das Gerät enthält wertvolle Rohstoffe, die wieder verwertet werden können.
 Geben Sie Ihr Gerät deshalb bitte bei einer Sammelstelle Ihrer Stadt oder Gemeinde ab.
•Die Gebrauchsanleitung vor der ersten Benutzung aufmerksam lesen. Ein unsachgemäßer Gebrauch entbindet den Hersteller von seiner Haftung und die Garantie erlischt. Entfernen Sie vor der ersten Inbetriebnahme alle Verpackungen und Aufkleber innerhalb und außerhalb des Gerätes und entnehmen Sie das Zubehör.
•Für Ihre Sicherheit entspricht dieses Produkt allen gängigen Standards (Niederspannungsrichtlinie, elektromagnetische Verträglichkeit, Lebensmittelverordnung, Umweltschutz,...).
•Dieses Gerät ist ausschließlich für den Haushaltsgebrauch bestimmt.
•Das Gerät ist nicht für den gewerblichen Gebrauch bestimmt. Bei unsachgemäßem Gebrauch erlischt die Garantie.
•Dieses Gerät ist nicht dazu geeignet, mit einem Timer oder einer gesonderten Fernbedienung in Betrieb genommen zu werden.
•Überlassen Sie niemals unbeaufsichtigt Kindern oder Personen das Gerät, wenn deren physische oder sensorische Fähigkeiten oder Mangel an Erfahrung und Wissen sie am sicheren Gebrauch hindern. Sie müssen stets überwacht werden und zuvor unterwiesen sein. Kinder müssen beaufsichtigt werden, um sicher zu gehen, dass sie nicht mit dem Gerät spielen.
•Verwenden Sie eine stabile, vor Wasserspritzern geschützte Arbeitsfläche, die sich auf keinen Fall in der Nische einer Einbauküche befinden darf.
•Überprüfen Sie, dass die Gerätespannung mit der Netzspannung übereinstimmt. Durch einen falschen Anschluss erlischt die Garantie.
•Das Gerät nur an eine geerdete Steckdose anschließen. Zuwiderhandlungen können Stromschläge zur Folge haben und unter Umständen schwere Verletzungen verursachen. Für Ihre Sicherheit ist es wichtig, dass die Steckdose den geltenden Elektrovorschriften Ihres Landes entspricht. Wenn Sie keine geerdete Steckdose haben, müssen Sie vor Gerätegebrauch unbedingt Ihr Stromnetz von einer zugelassenen Stelle anpassen lassen.
•Ziehen Sie nach jeder Benutzung und vor jeder Reinigung des Gerätes den Netzstecker. Lassen Sie das Gerät vor der Reinigung abkühlen.
•Benutzen Sie das Gerät nicht, wenn :
-dessen Stromkabel beschädigt oder fehlerhaft ist,
-das Gerät auf den Boden gefallen ist und sichtbare Schäden aufweist oder Funktionsstörungen auftreten.
In diesen Fällen muss das Gerät zur nächsten autorisierten Servicestelle gebracht werden, um jedwede Gefahr zu vermeiden. Bitte lesen Sie sich die Garantiebedingungen durch.
•Wenn das Anschlusskabel dieses Gerätes beschädigt wird, muss es durch den Hersteller oder seinen Kundendienst oder eine ähnlich qualifizierte Person ersetzt werden, um Gefährdungen zu vermeiden.
•Das Netzkabel nicht herabhängen lassen, Kinder könnten daran ziehen.
•Das Gerät, das Kabel oder den Stecker nie in Wasser oder andere Flüßigkeiten tauchen.
•Jeder Eingriff, außer der normalen Reinigung und Pflege durch den Kunden, muss durch den Kundendienst erfolgen.
•Das Gerät außen und innen mit einem feuchten Schwamm auswaschen und sorgfältig trocknen. Backform und Knethaken mit heißem Wasser reinigen. Deckel abnehmen und mit heißem Wasser reinigen und sorgfältig trocknen. Teile nicht in der Spülmaschine reinigen. Keine haushaltsüblichen Reinigungsmittel, Topfkratzer oder Brennspiritus verwenden. Gehäuse und Deckel nie in Wasser tauchen.
Keine Reinigungssprays (Backofen Spray) verwenden.
•Das Netzkabel nicht in die Nähe oder in Kontakt mit heißen Geräteteilen, Hitzequellen oder scharfen Kanten bringen.
•Bewegen Sie das Gerät nicht während es in Betrieb ist.
•Das Sichtfenster während und direkt nach dem Betrieb nicht berühren. Das Sichtfenster kann sehr heiß werden.
•Das Gerät nicht durch Ziehen am Stromkabel vom Stromnetz trennen.
•Bewegen Sie das Gerät nicht solange es heiß ist.
•Nur geerdete Verlängerungskabel in gutem Zustand benutzen, deren Durchmesser mindestens so groß ist wie der des Gerätekabels. Das Kabel muss so verlegt werden, dass niemand darüber stolpern kann.
•Das Gerät darf nicht auf andere Geräte gestellt werden.
•Das Gerät darf nicht als Wärmequelle benutzt werden.
•Das Gerät nicht unter leicht entflammbare Gegenstände (z. B. Gardienen, Vorhänge, Regale) stellen.
•Keine anderen Gerichte als Teig und Marmelade in dem Gerät zubereiten.
•Legen Sie nie Papier, Karton oder Plastik ins Innere des Gerätes und stellen Sie nichts darauf ab.
•Wenn Teile des Gerätes Feuer fangen, nie mit Wasser löschen. Das Gerät ausstecken und die Flammen mit einem feuchten Tuch ersticken.
•Verwenden Sie für Ihre Sicherheit nur Zubehör und Ersatzteile, die für dieses Gerät bestimmt sind.
•Jedes Gerät unterliegt einer strengen Qualitätskontrolle. Mit in Stichproben entnommenen Geräten werden praktische Gebrauchsversuche durchgeführt. Deshalb können einzelne Geräte Gebrauchsspuren aufweisen.
•Am Ende des Programms zur Herausnahme der Form oder zum Berühren heißer Flächen immer Ofenhandschuhe tragen. Das Gerät wird während des Gebrauchs sehr heiß.
Vorsicht im Umgang mit heißen Speisen.
•Die Belüftungsschlitze nie verstopfen.
•Vorsicht. Am Ende oder während des Programms kann beim Öffnen des Deckels Dampf austreten.
•Achten Sie bei Programm 11 (Marmelade, Kompott) darauf, dass beim Öffnen des Deckels Dampf oder heiße Spritzer entstehen können.
Achtung: überlaufender Teig, der das Heizelement berührt, kann sich entzünden.
•Die Mengenangaben in den Rezepten nicht überschreiten. Das Gesamtgewicht von 1500 g Teig nicht überschreiten. 900 g Mehl und 13 g Hefe nicht überschreiten.
•Der an diesem Gerät gemessene Geräuschpegel liegt bei 55 dBa.
26
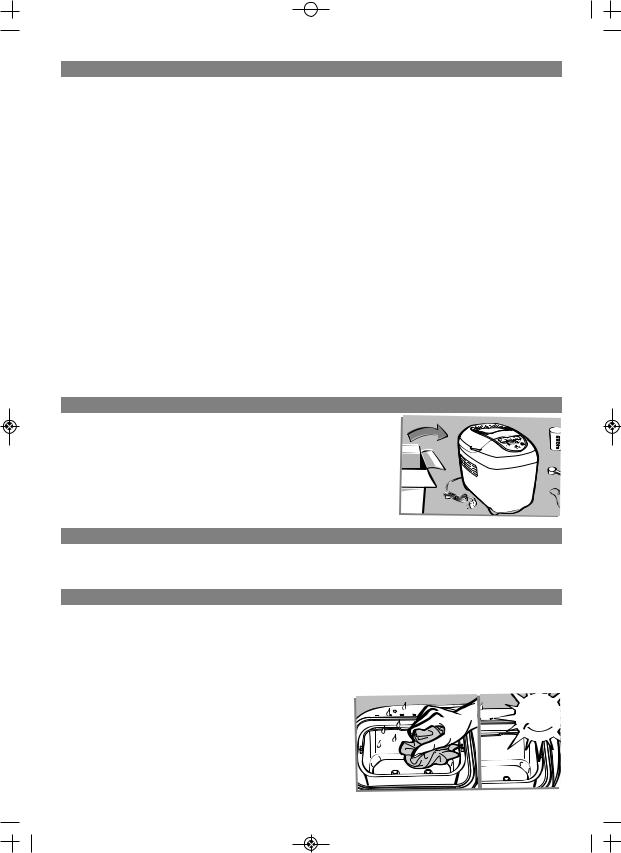
 MLX-OW5000-NC00017449_MLX-OW5000-NC00017449
 22/06/10 09:59 PAGE27
 VORWORT
HINWEISE UND TIPPS - SO GELINGEN IHRE BROTE
1. Die Gebrauchsanleitung aufmerksam durchlesen: Das Brotbacken mit dem Backautomaten ist anders als die „manuelle“ Methode!
2. Alle Zutaten müssen zimmerwarm sein (ausgenommen gegenteilige Angabe) und genau abgewogen werden. Messen Sie die Flüssigkeiten mit dem mitgelieferten Messbecher ab. Der doppelseitige Messlöffel besitzt auf einer Seite das Esslöffelund auf der anderen Seite das Kaffeelöffel-Maß.
Falsche Messmengen beeinträchtigen das Backergebnis.
3. Die Zutaten vor Ablauf ihres Verfalldatums verwenden und an einem kühlen und trockenen Ort lagern.
4. Die Mehlmenge muss genau abgewogen sein, das ist wichtig. Am besten eine Küchenwaage dazu verwenden. Nehmen Sie Trockenhefe (in der Tüte). Kein Backpulver verwenden, außer, das Rezept schreibt es vor. Eine geöffnete Tüte Trockenhefe muss binnen 48 Stunden aufgebraucht werden.
5. Damit der Teig ungestört aufgehen kann, sollten alle Zutaten von Anfang an in die Backform gegeben werden, um den Deckel während des Betriebs nicht mehr aufmachen zu müssen (ausgenommen gegenteilige Angabe). Halten Sie die Reihenfolge der Zutatenzugabe genau ein sowie die in den Rezepten genannten Mengenangaben. Als erstes die flüssigen und danach die festen Zutaten einfüllen. Die Hefe darf weder mit den Flüssigkeiten noch mit dem Salz in Berührung kommen.
EINZUHALTENDE REIHENFOLGE :
Flüssigkeiten (Butter, Öl, Eier, Wasser, Milch) Salz
Zucker
Mehl, erste halbe Menge Milchpulver
Zusätzliche feste Zutaten Mehl, zweite halbe Menge Trockenhefe
 VOR DER ERSTEN INBETRIEBNAHME
•Verpackungen, Aufkleber und gesamtes Zubehör innerhalb und außerhalb des Gerätes entfernen - A.
•Reinigen Sie alle mitgelieferten Bestandteile sowie das Gerät selbst mit einem feuchten Schwamm.
 INBETRIEBNAHME DES GERÄTES
A
•Rollen Sie das Stromkabel ab und schließen Sie es an eine geerdete Steckdose an.
•Während des ersten Gebrauchs kann sich ein leichter Geruch entwickeln.
 REINIGUNG UND PFLEGE
•Ziehen Sie den Netzstecker des Geräts.
•Reinigen Sie alle Elemente, das Gerät und das Innere der Form mit einem feuchten Schwamm. Sorgfältig trocknen - B.
•Reinigen Sie die Backform sowie den Mischhaken mit heißem Wasser und Geschirrspülmittel.
Wenn der Mischhaken sich nicht lösen lässt, weichen Sie ihn 5 bis 10 Minuten in Wasser ein.
•Demontieren Sie bei Bedarf den Deckel, um ihn mit heißem Wasser zu reinigen.
•Die Bestandteile nicht in der Spülmaschine reinigen.
•Weder haushaltsübliche Reinigungsmittel, Topfkratzer noch Brennspiritus verwenden.
Nur mit einem weichen und feuchten Tuch reinigen.
•Das Gerätegehäuse oder den Deckel niemals in Wasser tauchen.
B
27
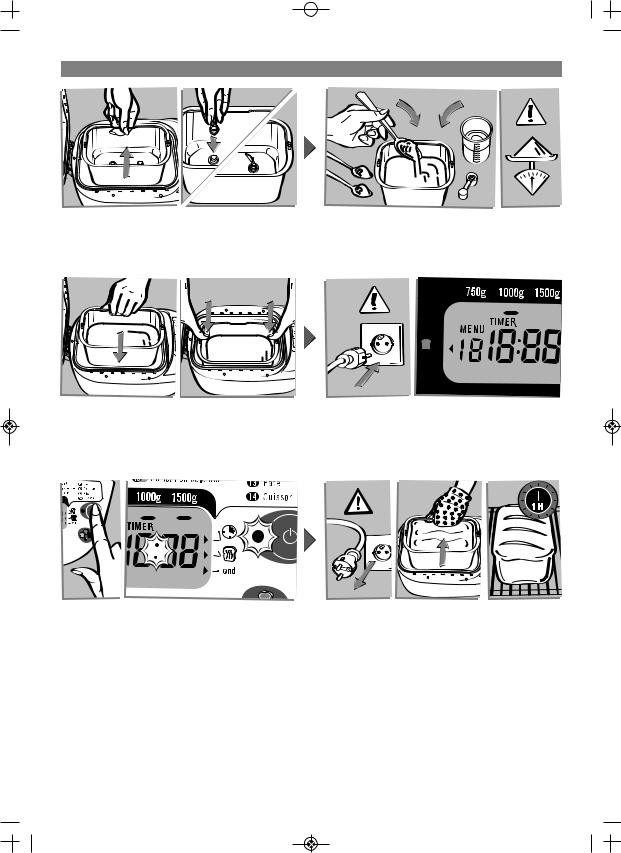
 MLX-OW5000-NC00017449_MLX-OW5000-NC00017449
 22/06/10 09:59 PAGE28
 SCHNELLANLEITUNG
Brotbackform am Griff nehmen und senkrecht herausziehen. Nach vorne und hinten bewegen, um die Arretierungen an den beiden Seiten nacheinander zu lösen. Anschließend den Mischhaken einsetzen.
Backform einsetzen und den Antrieb einrasten lassen. Nacheinander auf die beiden Seiten der Backform drücken, um sie auf dem Antrieb einrasten zu lassen. Beide Seiten der Form sollten gut arretiert sein.
Drücken Sie auf  .
.
Die Betriebskontrollleuchte geht an.
Der Doppelpunkt blinkt;
Der Backzyklus beginnt.
Die Zutaten in der genannten Reihenfolge in die Backform geben.
Zutaten präzise abwiegen.
Den Brotbackautomaten anschließen. Stecker in die Steckdose stecken und den Brotbackautomaten einschalten. Es ertönt ein Summer und im Anzeigefenster erscheint danach Programm 1 (Standardprogramm), d.h. Brotgröße 1000 g, Kruste mittelbraun.
Am Ende des Backzyklus ziehen Sie den Netzstecker. Sie nehmen die Backform am Griff heraus. Achtung! Griff und Deckelinnenseite sind heiß. Verwenden Sie stets Ofenhandschuhe. Brot aus der Form nehmen und 1 Stunde auf einem Kuchengitter abkühlen lassen.
Damit Sie sich mit Ihrem Brotbackautomaten vertraut machen, empfehlen wir Ihnen, dieses Brot-Grundrezept nachzubacken.
BROT-GRUNDREZEPT (Programm 1) |
ZUTATEN TL > Teelöffel - EL > Esslöffel |
||
|
|
|
|
KRUSTENFARBE = MITTEL |
- ÖL = 2 EL |
- MILCHPULVER = 2,5 EL |
|
|
- WASSER = 325 ml |
- MEHL = 600 g |
|
BROTGRÖSSE = 1000 g |
|||
- SALZ = 2 TL |
- HEFE = 1,5 TL |
||
|
|||
ZEIT = 3:20 |
- ZUCKER = 2 EL |
|
|
|
|
|
|
28

 MLX-OW5000-NC00017449_MLX-OW5000-NC00017449
 22/06/10 09:59 PAGE29
 GEBRAUCH IHRES BROTBACKAUTOMATEN
Basique |
Rapide |
Riche en oméga 3 |
Confiture |
|
Français |
Sans gluten |
Damper |
||
Pasta |
||||
Complet |
Sans sel |
Cake |
||
Pâte levée |
||||
Sucré |
|
|
||
|
|
Cuisson |
||
|
|
|
Für jedes Programm wird
eine Voreinstellung angezeigt. Die gewünschten Einstellungen werden manuell vorgenommen.
PROGRAMMWAHL
Mit der Programmwahl werden verschiedene Stufen ausgelöst, die Schritt für Schritt automatisch ablaufen.
Mit der MENÜ-Taste haben Sie die Wahl unter einer Anzahl verschiedener Programme.
Die jeweilige Programmzeit wird angezeigt. Mit jedem Drücken der Taste 
 erscheint im Anzeigefeld die nächste Nummer im Menü von 1 bis 14:
1 |
> Grundrezept |
5 |
> Brot (sehr schnell) |
9 |
> Damperbrot |
13 |
> Hefeteig |
2 |
> Französisches Brot |
6 |
> Glutenfreies Brot |
10 |
> Kuchen |
14 |
> nur Backen |
3 |
> Vollkornbrot |
7 |
> Salzfreies Brot |
11 |
> Marmelade |
|
|
4 |
> Süßes Brot |
8 |
> An Omega 3 reiches Brot |
12 |
> Pasta |
|
|
1.Das Grundrezept-Programm eignet sich zum Backen der meisten Brotrezepte mit Weizenmehl.
2.Das Programm „Französisches Brot“ entspricht einem Rezept für traditionelles französisches Weißbrot.
3.Das Programm „Vollkornbrot“ wird für Rezepte gewählt, die Vollkornmehl vorschreiben.
4.Das Programm „Süßes Brot“ backt Brot mit höherem Fettund Zuckergehalt. Bei Gebrauch von Backmischungen für Brioches und Milchbroten darf eine Gesamtteigmenge von 1000 g nicht überstiegen werden.
5.Das Programm „Brot sehr schnell“ ist die besondere Einstellung für das Brotrezept SEHR SCHNELL. Bei diesem Programm können Gewicht und Färbung der Kruste nicht eingestellt werden.
6.Für Glutenfreies Brot dürfen nur backfertige glutenfreie Backmischungen verwendet werden. Dieses Brot ist für Personen mit Glutenunverträglichkeit (Zöliaki) geeignet. Gluten ist in zahlreichen Getreidesorten (Weizen, Gerste, Roggen, Hafer, Kamut, Dinkel...) enthalten. Beachten Sie die Anweisungen auf dem Paket. Die Backform muss stets gereinigt werden, damit sie nicht mit anderen Mehlarten in Berührung kommt. Bei strenger glutenfreier Diät muss darauf geachtet werden, dass auch die verwendete Hefe kein Gluten enthält. Die Konsistenz
von glutenfreien Mehlen ermöglicht keine optimale Durchmischung. Deshalb muss der Teig beim Kneten mit einem biegsamen Plastikspatel von den Rändern gelöst werden. Glutenfreies Brot hat eine dichtere Konsistenz und eine hellere Färbung als herkömmliches Brot.
7.Brot ist eines der salzhaltigsten Nahrungsmittel in der täglichen Ernährung. Durch eine Verringerung der Salzzufuhr kann das Risiko kar- dio-vaskulärer Erkrankungen gesenkt werden.
8.Dieses Brot ist dank seiner ernährungstechnisch ausgewogenen und vollwertigen Rezeptur reich an Omega 3 Fettsäuren. Omega 3 Fettsäuren unterstützen das reibungslose Funktionieren des kardio-vaskulären Systems.
9.Das Rezept für Buschbrot kommt aus Australien, wo dieses Brot traditionell auf heißen Steinen gebacken wird. Buschbrot ist kompakt und ähnelt einer Brioche.
10.Zur Zubereitung von Torten und Kuchen mit Trockenhefe.
11.Das Marmeladen-Programm bereitet automatisch Marmeladen zu.
12.Das Programm 12 knetet nur und ist für Teige bestimmt, die nicht aufgehen sollen, z.B. Nudelteig.
29

 MLX-OW5000-NC00017449_MLX-OW5000-NC00017449
 22/06/10 09:59 PAGE30
13.Das Programm „Hefeteig“ backt nicht. Diese Einstellung knetet den Teig und lässt ihn ruhen, damit er aufgehen kann, z.B. für Pizzateig.
14.Dieses Backprogramm bietet Backzeiten von 10 bis 70 Minuten, die jeweils im 10-Minuten-Takt eingestellt werden können. Für die Bräunungsgrade hell, mittel oder dunkel. Es kann allein ausgewählt werden, oder:
a)in Verbindung mit dem Programm für Hefeteig.
b)zum Aufbacken oder Nachbacken von bereits gebackenen
und abgekühlten Broten.
c)zum Fertigbacken eines unterbrochenen Backzyklus, z.B. bei längerem Stromausfall.
Den Brotbackautomaten bei laufen dem Programm 14 nicht unbeaufsichtigt lassen.
Zur manuellen Unterbrechung des Backzyklus vor dem Ende der Backzeit schalten Sie das Programm mit einem längeren Druck auf die Taste  ab.
ab.
EINSTELLUNG DER BROTGRÖßE
Die Brotgröße steht standardmäßig auf 1000 g. Es handelt sich um eine Grundeinstellung. Einzelheiten ersehen Sie den jeweiligen Rezepten. Die Programme 5, 9, 11, 12 ,13 und 14 haben keine Einstellung der Brotgröße. Drücken Sie die Taste  , um das gewünschte Produkt auf 750 g, 1000 g oder 1500 g einzustellen. Das Hinweislicht leuchtet neben der ausgewählten Größe auf. Achtung : manche Rezepte ergeben Brote von 750g. Bitte beziehen Sie sich auf das Rezeptbuch.
EINSTELLUNG DER KRUSTENFARBE (BRÄUNUNGSGRAD)
Der Bräunungsgrad der Kruste ist standardmäßig auf MITTELBRAUN eingestellt. Die Programme 5, 9, und 11 haben keine Einstellung des Bräunungsgrads.
Drei Bräunungsgrade stehen zur Auswahl: HELL/MITTEL/DUNKEL. Zum Ändern der Standardeinstellung drücken Sie auf die Taste 
 , bis das Hinweislicht neben der ausgewählten Krustenfarbe leuchtet.
START/STOPP
Den Brotbackautomaten mit einem Druck von die Taste  einschalten. Der Countdown beginnt. Um das Programm zu stoppen oder eine zeitversetzte Programmierung (Timer-Funktion) zu löschen, drücken Sie 5 Sekunden auf die Taste
  .
.
 PROGRAMM-ZYKLEN
Auf dem Schema auf den Seiten 34-35 ist der Ablauf der verschiedenen Zyklen je nach eingestelltem Programm abzulesen.
KNETEN |
> RUHEN |
> GEHEN |
> BACKEN |
> |
WARMHALTEN |
Verleiht dem |
Der Teig |
In dieser Zeit wirkt |
Der Teig |
|
Zum Warmhalten nach |
Teig Struktur, |
entspannt sich |
die Hefe, der Teig |
bekommt eine |
|
dem Backzyklus. Es ist |
damit er gut |
und verbessert |
geht auf und |
knusprige und |
|
jedoch ratsam, das Brot |
aufgeht. |
damit die Güte |
entwickelt |
goldbraune |
|
gleich nach dem Backen |
|
des Knetvorgangs. |
sein Aroma. |
Kruste. |
|
zu entfernen. |
KNETEN: Der Teig befindet sich im ersten oder zweiten Knetstadium oder wird zwischen den Gehzyklen durchgeknetet. Während dieses Zyklus können Sie für die Programme 1, 2, 3, 4, 6, 7, 8, 9 und 10 weitere Zutaten, z.B. Trockenfrüchte, Oliven, Speck, usw. zufügen. Sie werden durch einen Alarmton darauf hingewiesen. Siehe Tabelle mit der Zusammenfassung der Vorbereitungszeiten (Seite 34-35) und Spalte „Extra“.
Diese Spalte nennt die Zeit, die im Anzeigefenster steht, wenn der Alarmton zu hören ist. Um genauer zu wissen, nach welcher Zeit dieser Alarm ertönt, genügt es, die Zeitangabe in der Spalte „Extra“ von der Gesamtbackzeit abzuziehen.
Beispiel: „Extra“ = 2:51 und „Gesamtzeit“ = 3:13, die Zutaten können nach 22 Minuten zugefügt werden.
GEHEN : Der Teig geht im ersten, zweiten oder dritten Zyklus.
BACKEN : Das Brot befindet sich im letzten Backzyklus. Wenn das Kontrolllämpchen gegenüber von „END“ aufleuchtet, ist der Backzyklus beendet.
 WARMHALTEN : Bei den Programmen 1, 2, 3, 4, 5, 6, 7, 8, 9 und 10 können Sie das Backgut im Gerät lassen. Nach Ende des Backzyklus schaltet der Brotbackautomat automatisch auf Warmhalten (1 Stunde). Das Kontrolllämpchen gegenüber von
  leuchtet auf. Während dem Warmhaltemodus steht im Anzeigefenster 0:00 und ein Piepsignal ertönt in regelmäßigen Abständen.
Am Ende des Gerätezyklus erfolgt eine automatische Abschaltung und es ertönen 3 Piepsignale.
30
 Loading...