


WHAT TO DO IF YOUR APPLIANCE DOES NOT WORK?
Check:
•that it is plugged in and switched on at the mains socket
•the connection and fuse.
•that the accessories are correctly fitted on to the drive.
•that the lids and handles are correctly fitted.
•when using the bowl assembly (B), that the Liquidiser drive cover (A1) is locked.
•when using the Liquidiser, ensure that the tab on the lid is correctly locked under the handle
If your appliance still does not work or if you have any product problems or queries, please contact our Customer Relations Team first for expert help and advice:
HELPLINE:
UK 0845 602 1454 Ireland (01) 4751947
or consult our website www.moulinex.co.uk
ACCESSORIES & REPLACEMENTS
The accessories contained with the model that you have just bought are shown on the label that appears on the top of the packaging.
You can buy the following accessories or replacements by mail order from our approved Moulinex Service Centre (at the telephone number above). They are also available on our website.
Accessories
French fries disc (disc E)
Grating disc for coconut & parmesan (disc G)
Coarse grating disc (disc C)
Thick slicing disc (disc H)
Fine grating disc (A)
Thin slicing disc (D)
Grinder
Mini-chopper
Accessories
Whisk
Plastic kneader blade
Citrus press
Liquidiser jug
Metal blade
Emulsifying disc
Juice extractor
Spatula
Storage basket
 Environment protection first!
 Your appliance contains valuable materials which an be recovered or recycled.
  Leave it at a local civic waste collection point.
Odacio 3 Food Processor
Instructions and Recipes
Recipes by Glenis Noble, produced by M4 Design Company, ©Groupe SEB Moulinex 06/05 |
0 891 855 |
Models DFC1 DFC2 DFC3 |
|
|
|
|
|
|

Thank you for choosing a product from the Moulinex range. This product is intended exclusively for preparing food.
DESCRIPTION
|
A |
Motor unit |
|
F1 |
Whisk drive |
|
|
||||
|
A1 |
Liquidiser drive cover |
|
F2 |
Whisk – |
|
|
||||
|
A2 |
Liquidiser drive |
|
G |
Emulsifying disc - |
|
|||||
|
A3 |
Bowl accessory drive |
|
|
(Optional additional accessory) |
||||||
|
A4 |
Release button for Liquidiser drive |
|
H |
Citrus press |
|
|||||
|
|
cover (A1) |
|
H1 |
Cone |
|
|
||||
|
A5 |
Speed selector: 0 = Stop, |
|
|
|
||||||
|
|
H2 |
Filter basket |
|
|||||||
|
|
1 or 2 = Continuous operation, |
|
|
|||||||
|
|
|
H3 |
Citrus press spindle |
|
||||||
|
|
Pulse = Intermittent |
|
|
|||||||
|
|
|
I |
*Liquidiser |
|
||||||
|
B |
Bowl assembly |
|
|
|||||||
|
|
I1 |
Measuring cup |
|
|||||||
|
B1 |
Pusher with measuring section |
|
|
|||||||
|
|
I2 |
Lid |
|
|
||||||
|
B2 |
Lid with feeder tube |
|
|
|
||||||
|
|
I3 |
Jug |
|
|
||||||
|
B3 |
Bowl |
|
|
|
||||||
|
|
I4 |
Detachable handle |
|
|||||||
|
B3a |
Bowl drive |
|
|
|||||||
|
B3b |
Nut |
|
I4a |
Handle release button |
|
|||||
|
B3c |
Rubber seal |
|
J |
*Juice extractor - |
|
|||||
|
B4 |
Detachable handle |
|
|
(Optional additional accessory) |
||||||
|
B4a |
Handle release button |
|
J1 |
Pusher |
|
|
||||
|
C |
Spindle |
|
J2 |
Lid |
|
|
||||
|
|
|
|
|
|
|
J3 |
Lid seal |
|
|
|
|
Accessories depending on model |
|
|
|
|||||||
|
|
|
J4 |
Filter band |
|
|
|||||
|
D |
Blades |
|
J5 |
Filter holder |
|
|||||
|
D1 |
Metal blade |
|
K |
*Mini-chopper - |
|
|||||
|
D2 |
Plastic kneader blade |
|
|
(Optional additional accessory) |
||||||
|
E |
Grating/Slicing discs |
|
K1 |
Lid |
|
|
||||
|
E1 |
Disc holder |
|
K2 |
Bowl |
|
|
||||
|
E2 |
Discs: |
|
L |
*Grinder |
|
|
||||
|
|
. fine grating (A) |
|
|
(Optional additional accessory) |
||||||
|
|
. thin slicing (D) |
|
L1 |
Lid |
|
|
||||
|
|
. coarse grating (C) |
|
L2 |
Bowl |
|
|
||||
|
|
. thick slicing (H) |
|
M |
Spatula |
|
|
||||
|
F |
Balloon Whisk |
|
N |
Storage basket for accessories |
||||||
|
|
|
|
|
|
|
|
|
|
|
|
Accessories supplied by model |
|
|
|
|
|
|
|
|
|||
|
|
|
|
DFC1 |
|
DFC2 |
DFC3 |
||||
|
|
|
|
|
|
|
|
||||
|
RETRACTABLE CORD |
|
|
|
|
|
|
|
|||
|
LIQUIDISER WITH LID (I) |
|
* |
|
|
|
|
||||
|
METAL BLADE (D1) |
|
|
|
|
|
|
|
|||
|
SPATULA (M) |
|
|
|
|
|
|
|
|||
|
SLICING/GRATING DISCS (E2ADCH) |
|
|
AD |
|
|
AD |
ADCH |
|||
|
EMULSIFYING DISC (G) |
|
|
|
|
|
|
* |
|||
|
BALLOON WHISK (F) |
|
* |
|
|
* |
|
||||
|
PLASTIC BLADE (D2) |
|
|
|
|
|
|
|
|||
|
CITRUS-PRESS (H) |
|
* |
|
|
* |
|
||||
|
|
|
|
|
|
|
|
|
|||
Please Note:
Accessories marked * are available as an optional additional purchase. Please see back cover for details of where to purchase.
A |
|
B |
|
C |
|
|
|
|
B1 |
A1 |
|
|
|
|
A2 |
|
|
|
|
|
|
|
|
C |
|
|
B3a |
|
B4 |
|
|
|
|
|
|
|
B3 |
|
|
|
|
|
|
B3b |
|
|
I1 |
|
|
D |
|
|
|
K1 |
|
|
I2 |
|
K |
|
|
I3 |
|
|
|
|
|
|
|
E1 |
|
|
|
K2 |
E |
I |
2 |
|
|
|
|
|
||
|
|
|
|
|
E2 |
|
|
|
L1 |
|
|
|
1 |
L |
|
|
|
|
|
F1 |
|
|
|
L2 |
F |
|
|
|
|
|
|
|
|
|
|
F2 |
|
|
|
|
|
J1 |
|
|
G |
|
J2 |
|
M |
|
|
|
||
|
|
|
|
|
|
J |
J3 |
|
|
|
|
|
|
|
|
|
J4 |
|
N |
H |
|
|
|
|
|
|
|
|
|
H2 |
|
J5 |
|
|
|
|
|
|
|
H3 |
|
|
|
|
1 |
2 |

WHAT THE ACCESSORIES ARE USED FOR
Shown below are the main tasks that you would use the accessories for. Please note that some of the accessories fit onto the spindle.
Metal Blade
Basic attachment for mixing, chopping, kneading, making breadcrumbs, crushing biscuits and batters. You can also use it for blending and puréeing instead of the liquidiser, but the texture for soups is not usually as smooth. The blade is fitted onto the spindle.
Plastic Kneader Blade
For kneading and mixing. Ideal for making bread, pastry, biscuits
and cakes. The blade is fitted onto the spindle.
Grating Disc
Use for grating cheese, vegetables and fruit. The appropriate disc is fitted to the holder and then placed onto the spindle. (A) fine grating and (C) coarse grating plus optional Parmesan grating disc. With all grating a piece of unprocessed food always remains between the holder and lid, this
is normal.
Slicing Disc
For slicing vegetables and fruit. The appropriate disc is fitted to the holder and then placed onto the spindle.
2 discs - (D) fine slicing and (H) coarse slicing. The fine disc gives wafer thin slicing but the coarse disc gives food sliced to about 2-3 mm thickness.
Balloon Whisk Attachment
For whisking egg whites, meringues (2 to 7 egg whites) and whipped cream (up to 0.5 litre). Making mayonnaise and mousses. Note: for whipping egg whites the total time taken is about 11/2 - 2 minutes instead of seconds.
Emulsifying disc
(Available as an additional accessory)
For whisking egg whites, meringues (2 to 7 egg whites) and whipped cream (up to 0.5 litre). Making mayonnaise and mousses. Note: for whipping egg whites the total time taken is about 11/2 - 2 minute instead of seconds.
Citrus Press
Ideal for all sorts of citrus fruits including lemons, oranges and grapefruits.
Liquidiser Jug
Ideal for blending and puréeing soups and sauces, making frothy milkshakes and cocktails, pureeing soft fruits or cooked vegetables and fruit, making batters. Maximum capacity of total ingredients 1.5 litre.
Centrifugal Juice Extractor
(Available as an additional accessory DFC4)
Suitable for extracting juice from fruit and vegetables such as apples, pineapples, grapes, carrots, and celery. This accessory has its own lid and food pusher.
Mini Chopper
Chops cloves of garlic, herbs, parsley, ham, small amounts of bread or French bread for breadcrumbs, nuts (quantities up to 80g) and prepares baby food. Note: It is not able to grind coffee beans or hard spices.
Grinder
(Available as an additional accessory)
Grinds spices, pepper and dried fruits in seconds.
French Fries disc
(Available as an additional accessory)
Easily cuts thin cut ‘American style’ fries from potatoes.
SAFETY RECOMMENDATIONS
•Always read the instructions for use carefully before using your
appliance for the first time:
This product has been designed for domestic use only. The manufacturer accepts no responsibility, and the guarantee will not apply, for any commercial use, inappropriate use or failure to comply with the instructions.
•Do not leave the appliance within reach of children without supervision. Young children or severely disabled persons must always be supervised when using this appliance.
•Check that the voltage rating of your appliance corresponds to that of your household electrical wiring system.
•This appliance is manufactured to conform to the Low Voltage Electrical Equipment (Safety) Regulations 1989 and is designed to comply with BS 3456. It complies with the requirements of the EEC Directive (89/336/EEC). Any connection error will render the guarantee void.
•Never leave your appliance to operate unattended.
•Unplug your appliance as soon as you have finished using it (also in the event of a power cut) and when you are cleaning it.
•Never use your appliance if it is not working correctly or if it has been damaged. If this happens, contact an approved Moulinex Service Centre (see list in service booklet).
•Do not place the appliance, the power cable or the plug under running water or in any other liquid.
•Do not allow the power cable to hang down within reach of children.
•The power cable must never be close to a heat source or resting on sharp edges.
•If the power cable or the plug are damaged, do not use the appliance. To avoid any risk, these must be replaced by an approved Moulinex Service Centre (see list in service booklet).
•Do not use the appliance for juicing if the filter holder on the juice extractor is damaged.
•For your own safety, use only Moulinex accessories and spare parts which are suitable for your appliance.
•Always use the pushers to push food down the feeder tubes, never use your fingers, a fork, a spoon, a knife or other utensils.
•Only remove the accessories when the appliance has come to a complete stop.
•Do not introduce any utensil (spoon, spatula...) through the feeder tube.
•Do not place any utensil containing metal in a microwave oven.
•Use the accessories one at a time.
•Handle the metal blade and discs with great care: they are extremely sharp.
•You must remove the blades (D) and spindle (C) before emptying the bowl of its content.
•Empty the chopping bowl or liquidiser jug before detaching the handle.
•Never touch the parts when they are moving.
•Do not run your appliance empty.
•Do not allow long hair, scarves, ties etc. to dangle over accessories during operation.
Never use or plug in your appliance if:
•Its power cord is faulty or damaged.
•The appliance has been dropped.
•It has visible damage or operating faults. In such cases, to avoid any danger, contact your Approved Service Centre to have the appliance repaired, as special tools are required.
Using your appliance
•Before using for the first time, wash all accessory parts in warm, soapy water. Rinse and dry.
•Place the motor unit on a stable, flat, clean and dry surface.
•Plug the appliance in.
•Speed selector (A5). Choose the setting required (see table page 14, or recipe).
•Pulse (intermittent operation): turn knob (A5) to the “pulse” position - using a succession of pulses can give you better control when preparing certain foods.
•Continuous operation: turn knob (A5) to position “1” or “2”.
•Stop: turn knob (A5) to position “0”.
•Before using the liquidiser drive (A2): ensure that there is no accessory fitted on the bowl and accessory drive.
3 |
4 |
ASSEMBLING AND DISMANTLING THE BOWL
1
B3a
B3c
B3b
B4a
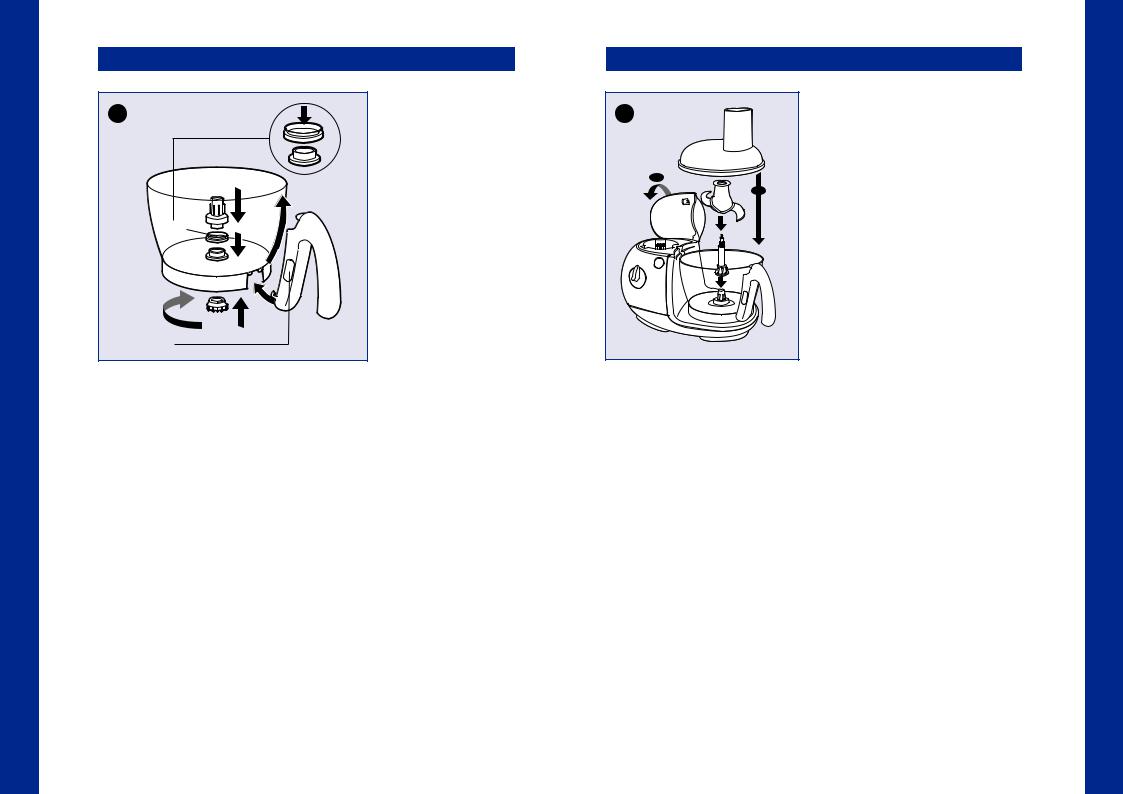
FITTING DETACHABLE PARTS
Assembling/Dismantling the bowl (B3) - (diagram 1)
The bowl can be used with the following accessories (depending on model):
Blades (D), grating/slicing discs (E), whisk (F), emulsifying disc (G), citrus press (H), juice extractor (J).
•If not already in position, fit the rubber seal (B3c) in the bottom of the bowl. Ensure that the thin lip of the seal faces upwards.
•Fit the drive (B3a).
•Fit the nut (B3b) and tighten it to lock the assembly.
•Dismantle the assembly for cleaning after each use.
Fitting/Dismantling the bowl handle (B4) and the liquidiser jug handle (I4)
For ease of cleaning and storage, the bowl handle (B4) and liquidiser jug handle (I4) are detachable.
•To fit the handle, position it against the lugs of the bowl/jug.
•Slide the handle upwards until it clicks.
•To detach the handle, press the release button (B4a) or (I4a) and slide the handle downwards.
(Note: Whether you are using the Liquidiser jug (l3) or the bowl (B3) you will need to ensure that the respective handle and lid have been fitted correctly.)
5
FUNCTIONS OF YOUR FOOD PROCESSOR
2
2
1
MIXING/BLENDING/CHOPPING/ KNEADING - (DIAGRAM 2)
Accessories used (depending on model)
•Bowl assembly (B), spindle (C) and blades (D):
•Metal blade (D1) for mixing or chopping.
•Plastic kneading blade (D2) for kneading or blending, pastry and cake making
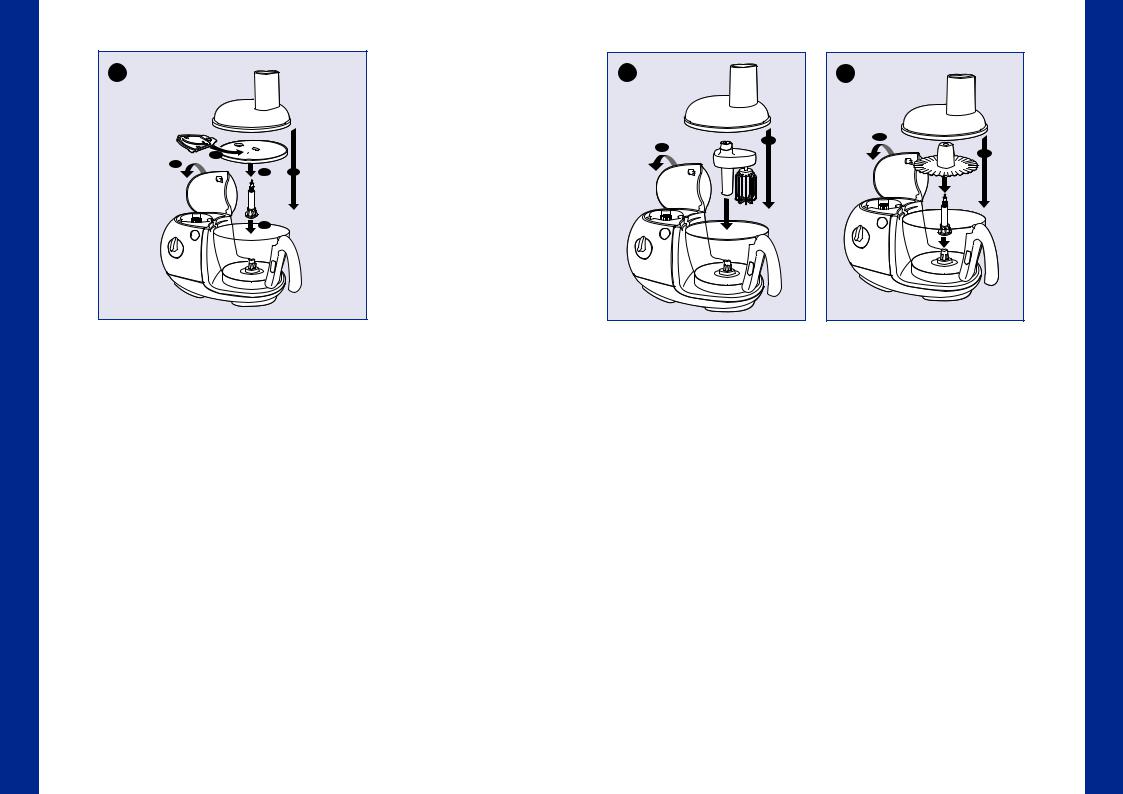
Fitting the Bowl
Press the release button (A4) to open the Liquidiser drive cover (A1).
•Fit the bowl (B3) on the Bowl accessory drive (A3).
•Fit the spindle (C) on to the bowl drive (B3a).
•Slide the metal blade (D1) or the plastic kneading blade (D2) onto the spindle (C), pushing it down to the bottom of the bowl.
•Put the ingredients in the bowl.
•Fit the lid (B2) on the bowl.
•Close the Liquidiser drive cover (A1). You should hear an audible click.
Note: If the lid and handle are not correctly fitted on to the bowl, the appliance will not start.
To unlock the blades (D) from the spindle (C):
•Place the bowl assembly on a stable flat worktop.
•Carefully lift the blade (D) off the spindle (C).
Usage and practical tips
Blending
•Turn the speed selector (A5) to position “2” to start the appliance.
You can blend up to 1 litre of soup or stewed fruit in 20 sec.
Chopping
•Turn the speed selector (A5) to position “2” to start the appliance or, for better control over the chopping, use the “pulse” position.
•In 15 to 30 sec., you can chop up to 600g of food:
•hard produce: cheese, dried fruits, certain vegetables (carrots, celery...).
•soft produce: certain vegetables (onions, spinach...).
•raw or cooked meat (boned with gristle removed and diced).
•raw or cooked fish...
KNEADING/MIXING
•Turn the speed selector (A5) to position “2” to start the appliance.
•When kneading, stop the appliance as soon as the pastry/dough starts to form a ball.
You can:
•knead up to 1.2 kg of pastry/dough (biscuit, shortcrust, and bread) in approximately 60 sec.
•mix up to 1 litre of pancake, waffle batter, etc. in 1min to 11/2 min.
•mix up to 1.5 kg of light cake mixture (biscuit, sponge) in 11/2 min to 31/2 min.
6
3
1
5
2 4
3
GRATING/SLICING/FRENCH FRIES - (Diagram 3)
Accessories used
•Bowl assembly (B), spindle (C) and grating/slicing discs (E)
Fitting the Grating/Slicing/
French Fries Discs
•Press the release button (A4) to open the Liquidiser drive cover (A1).
•Fit the bowl (B3) on the Bowl accessory drive(A3).
•Fit the required disc (E2) on to the disc holder (E1).
•Fit the spindle (C) on the bowl drive (B3a), then the disc holder (E1) on to the spindle (C).
•Fit the lid (B2) on the bowl.
•Close the Liquidiser drive cover (A1). You should hear a click.
Usage and practical tips
•Cut the food into pieces approximately 8cm high and a maximum of 4cm width
•Push the food through the feeder tube using the pusher (B1).
•Turn the speed selector (A5) to position “1” for slicing or “2” for grating.
The slicing/grating discs (depending on model):
•slice thickly (use disc H), slice thinly (use disc D): potatoes, onions, cucumbers, beetroot, apples, carrots, and cabbage...
•coarsely grate (use disc C), finely grate (use disc A): celery, potatoes, carrots, cheeses...
7
4a |
|
4b |
|
1 |
2 |
|
2 |
1 |
|
|
BEATING/WHISKING/EMULSIFYING - (DIAGRAM 4A AND 4B)
Accessories used (depending on model)
•Bowl assembly (B) and balloon whisk
(F)or
•Bowl assembly (B), emulsifying disc
(G)and spindle (C).
Fitting the balloon whisk and emulsifying disc accessories
•Press the release button (A4) to open the Liquidiser drive cover (A1).
•Fit the bowl (B3) on the Bowl accessory drive(A3).
To use the balloon whisk (F):
• fit it on to the bowl drive (B3a).
To use the emulsifying disc (G):
•fit the spindle (C) on to the bowl drive (B3a).
•slide the emulsifying disc on to the spindle.
Then: - Place the ingredients in the bowl.
•Fit the lid (B2) on the bowl.
•Close the Liquidiser drive cover (A1). You should hear a click.
Usage and practical tips
•Turn the speed selector (A5) to position “1” or “2” to start the appliance.
•Do not use the balloon whisk or the emulsifying disc to knead dough or to mix cake mixtures, instead use the plastic kneading blade.
•You can prepare: mayonnaise, sauces, egg whites (up to 7 eggs maximum), whipped cream
(up to 0.5 litre).
8
 Loading...