


 Loading...
Instructions for Use
Leica TP1020
Tissue Processor
Instructions for Use
Leica TP1020
V 2.9 RevC, English – 12/2013
Order No. 14 0422 80101 RevC
Always keep this manual with the instrument! Read carefully before working with the instrument.

NOTE
The information, numerical data, notes and value judgments contained in this manual represent the current state of scientific knowledge and state-of-the-art technology as we understand it following thorough investigation in this field.
We are under no obligation to update the present manual periodically and on an ongoing basis according to the latest technical developments, nor to provide our customers with additional copies, updates etc. of this manual.
To the extent permitted in accordance with the national legal system as applicable in each individual case, we shall not be held liable for erroneous statements, drawings, technical illustrations etc. contained in this manual. In particular, no liability whatsoever is accepted for any financial loss or consequential damage caused by or related to compliance with statements or other information in this manual.
Statements, drawings, illustrations and other information as regards contents or technical details of the present Instructions for Use are not to be considered as warranted characteristics of our products.
Leica Biosystems Nussloch GmbH Heidelberger Str. 17 - 19
D-69226 Nussloch Germany
Phone: +49 (0)6224 143-0
Fax: +49 (0)6224 143-268
Internet: http://www.LeicaBiosystems.com
These are determined only by the contract provisions agreed between ourselves and our customers.
Leica reserves the right to change technical specifications as well as manufacturing processes without prior notice. Only in this way is it possible to continuously improve the technology and manufacturing techniques used in our products. This document is protected under copyright laws. Any copyrights of this document are retained by Leica Biosystems Nussloch GmbH.
Any reproduction of text and illustrations (or of any parts thereof) by means of print, photocopy, microfiche, web cam or other methods
–including any electronic systems and media
–requires express prior permission in writing by Leica Biosystems Nussloch GmbH.
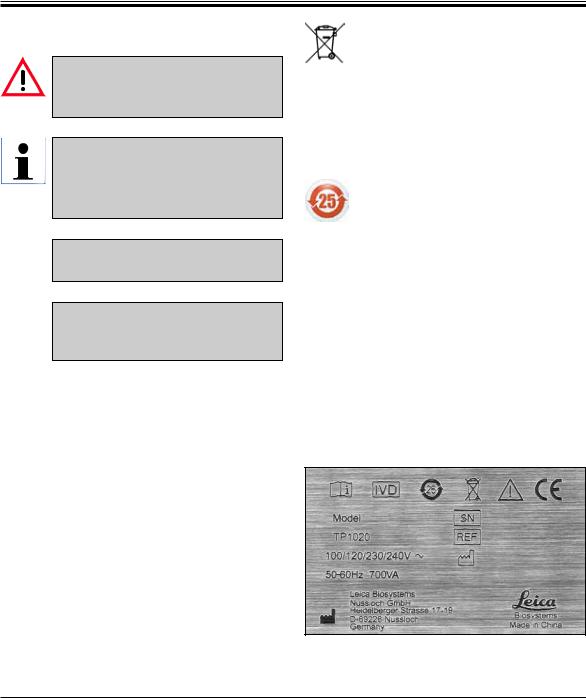
For the instrument serial number and year of manufacture, please refer to the type plate at the rear side of the instrument.
© Leica Biosystems Nussloch GmbH
Assembly contracted to Leica Microsystems Ltd. Shanghai.
Leica TP1020 |
3 |

Table of contents
1. |
Important Information.............................................................................................................................. |
7 |
|
2. |
Safety |
.......................................................................................................................................................... |
9 |
|
2.1 |
Safety notes ................................................................................................................................................... |
9 |
|
2.2 ........................................................................................................................................................ |
Warnings |
9 |
3. |
Instrument .....................................................................................Components and Specifications |
13 |
|
|
3.1 ............................................................................................................................................. |
Technical data |
13 |
|
3.2 ................................................................................................................... |
Description of the instrument |
15 |
|
3.3 ............................................................................................................... |
Standard delivery—packing list |
16 |
|
3.4 ............................. |
Overview of the Leica TP1020 - with additional wax bath (optional accessory) |
19 |
|
3.5 ............................................................... |
General overview Leica TP1020 - with fume control system |
21 |
|
3.6 ............................................................................. |
Accessories supplied together with the instrument |
23 |
|
3.6.1 .............................................................................................................................. |
Standard tissue basket |
23 |
|
3.6.2 ........................................................................................................................... |
Glass beaker with holder |
23 |
3.6.3Aluminum container with holder (instruments with vacuum function only or
|
|
as an optional accessory)......................................................................................................................... |
24 |
|
3.6.4 |
Wax bath...................................................................................................................................................... |
25 |
4. |
Initial Operation...................................................................................................................................... |
26 |
|
|
4.1 |
Unpacking instructions.............................................................................................................................. |
26 |
|
4.2 |
Installation site requirements................................................................................................................... |
29 |
|
4.3 |
Electrical connection................................................................................................................................. |
30 |
|
4.3.1 |
Checking the voltage selector setting..................................................................................................... |
30 |
|
4.3.2 |
Adjusting the voltage selector.................................................................................................................. |
31 |
|
4.3.3 |
Connecting the power cable..................................................................................................................... |
32 |
|
4.4 |
Switching on the instrument..................................................................................................................... |
33 |
|
4.5 |
Setting the time .......................................................................................................................................... |
33 |
|
4.6 |
Installing the accessories......................................................................................................................... |
34 |
|
4.6.1 |
Installing the wax baths............................................................................................................................. |
34 |
|
4.6.2 |
Connecting the wax baths......................................................................................................................... |
35 |
|
4.6.3 |
Fastening the wax bath connection cables (instruments with fume control system only)............ |
36 |
|
4.6.4 |
Installing the reagent stations.................................................................................................................. |
36 |
5. |
The User Interface.................................................................................................................................. |
37 |
|
6. |
Programming the Instrument................................................................................................................ |
43 |
|
|
6.1 |
General description.................................................................................................................................... |
43 |
|
6.1.1 |
Special characteristics of two-basket programs.................................................................................. |
44 |
|
6.2 |
Setting-up / editing programs................................................................................................................... |
45 |
|
6.2.1 |
Selecting programming mode................................................................................................................... |
45 |
|
6.2.2 |
Selecting the program................................................................................................................................ |
45 |
|
6.2.3 |
Selecting the number of baskets.............................................................................................................. |
45 |
|
6.2.4 |
Selecting the starting station.................................................................................................................... |
46 |
|
6.2.5 |
Activating the vacuum function (instruments with vacuum function only)...................................... |
46 |
|
|
|
|
4 |
|
Instructions for Use V 2.9 RevC, English – 12/2013 |
|

Table of contents
|
6.2.6 |
Selecting infiltration times per station.................................................................................................... |
47 |
|
6.2.7 |
Displaying total program duration............................................................................................................ |
48 |
|
6.2.8 |
Leaving the programming mode............................................................................................................... |
48 |
7. |
Preparations for Tissue Processing................................................................................................... |
49 |
|
|
7.1 |
Filling the reagent stations........................................................................................................................ |
49 |
|
7.2 |
Filling the wax baths................................................................................................................................... |
50 |
|
7.3 |
Inserting the tissue basket........................................................................................................................ |
52 |
8. |
Operating the Instrument in the Manual Processing Mode........................................................... |
54 |
|
|
8.1 |
Lifting and lowering the tissue basket..................................................................................................... |
54 |
|
8.2 |
Moving the tissue basket to the next station......................................................................................... |
55 |
|
8.3 |
Activating the vacuum function (instruments with vacuum function only)...................................... |
56 |
9. |
Operating the Instrument in the Automatic Processing Mode...................................................... |
57 |
|
|
9.1 |
Starting a program...................................................................................................................................... |
57 |
|
9.1.1 |
Immediate start........................................................................................................................................... |
57 |
|
9.1.2 |
Delayed start................................................................................................................................................ |
59 |
|
9.2 |
Editing and modifying programs while a processing cycle is in progress........................................ |
63 |
|
9.3 |
Display end of processing time................................................................................................................ |
63 |
|
9.4 |
Pausing a process...................................................................................................................................... |
64 |
|
9.5 |
Resuming a paused process..................................................................................................................... |
65 |
|
9.6 |
Stopping or terminating a process........................................................................................................... |
65 |
|
9.7 |
End of an automatic process.................................................................................................................... |
66 |
|
9.8 |
Remove the specimens.............................................................................................................................. |
67 |
|
9.9 |
Finishing your daily work........................................................................................................................... |
67 |
10. |
Warning and Error Codes – Troubleshooting.................................................................................... |
68 |
|
|
10.1 |
Warning codes............................................................................................................................................ |
68 |
|
10.2 |
Error codes................................................................................................................................................... |
70 |
|
10.3 |
"POWER FAILURE" and "WRONG STATION" messages........................................................................ |
72 |
|
10.4 |
Measures to remove specimen material in case of prolonged power failure................................. |
73 |
|
10.5 |
"ABORT" message....................................................................................................................................... |
75 |
11. |
Cleaning................................................................................................................................................... |
76 |
|
12. |
Maintenance........................................................................................................................................... |
78 |
|
|
12.1 |
General maintenance instructions........................................................................................................... |
78 |
|
12.2 |
Wax bath...................................................................................................................................................... |
79 |
|
12.2.1 |
Altering the standard working temperature........................................................................................... |
79 |
|
12.2.2 |
Reset after excess temperature shutdown............................................................................................ |
80 |
|
12.3 |
Replacing the fuses.................................................................................................................................... |
81 |
Leica TP1020 |
5 |

Table of contents
13. |
Optional accessories............................................................................................................................. |
82 |
|
|
13.1 |
Three-level tissue basket.......................................................................................................................... |
82 |
|
13.2 |
Basket removal device............................................................................................................................... |
83 |
|
13.3 |
Basket holder for second tissue basket.................................................................................................. |
84 |
13.4Connecting the fume outlet tube (optional accessory for instruments
|
|
with fume control system)......................................................................................................................... |
87 |
|
13.5 |
Inserting the activated carbon filters (optional on instruments with fume control system).......... |
88 |
14. |
Ordering Information.............................................................................................................................. |
89 |
|
|
14.1 |
Accessories................................................................................................................................................. |
89 |
15. |
Appendix.................................................................................................................................................. |
90 |
|
|
15.1 |
Modifying the instrument configuration.................................................................................................. |
90 |
|
15.2 |
Reagents appropriate for use with the instrument............................................................................... |
93 |
|
15.3 |
Factory-set programs................................................................................................................................. |
94 |
16. |
Warranty and Service............................................................................................................................ |
98 |
|
17. |
Decontamination Certificate ............................................................................................................... |
99 |
|
6 |
Instructions for Use V 2.9 RevC, English – 12/2013 |
1. Important Information
Symbols used in the text and their meaning
Dangers, warnings and cautions appear in a gray box and are marked by a warning triangle  .
.
Notes,
i.e. important information for the user, appear in a gray box and are marked with the symbol  .
.
(5)Numbers in parentheses refer to item numbers in illustrations.
Function keys to be pressed on the in- ENTER strument touch screen are written in
bold-print capital letters.
Manufacturer
Date of Manufacture
Observe the instructions for use!
Order No.
Serial number
In vitro diagnostics (IVD) medical device
This product fulfills the requirements of the Council's Directive 98/79/EC concerning in vitro diagnostics (IVD) medical devices.
Symbol for labeling electrical and electronic equipment in accordance with Section 7 of the German Electrical and Electronic Equipment Act (ElektroG). ElektroG is the law regarding the sale, return and environmentally sound disposal of electrical and electronic equipment.
Environmental protection symbol of the China RoHS directive. The number in the symbol indicates the "Environmentfriendly Use Period" of the product. The symbol is used if a substance restricted in China is used in excess of the maximum permitted limit.
Instrument type
All information provided in these Instructions for Use applies only to the instrument type indicated on the title page.
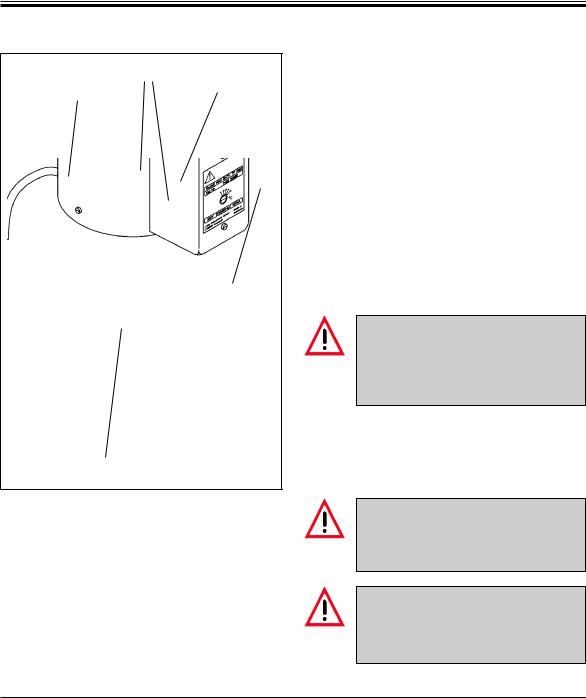
A nameplate indicating the instrument serial number is attached to the rear side of the instrument (Fig. 1 is provided as an example only).
Fig. 1
Leica TP1020 |
7 |
1.Important Information
Qualification of personnel
•The Leica TP1020 may be operated only by trained laboratory personnel.
•Alllaboratorypersonneldesignatedtooperatethe
Leica instrument must read these Instructions for Use carefully and must be familiar with all technical features of the instrument before attempting to operate it.
Designated use
The instrument has been designed so that it is safe to use by the operator as well as for processing speci- mens—provided that it is operated according to these Instructions for Use.
The Leica TP1020 is a modular automated tissue processor designed for the following laboratory applications:
•Fixation
•Dehydration
•Paraffin infiltration
of histological tissue specimens.
The Leica TP1020 must be operated exclusively with the reagents listed in chapter 15.
Any other use of the instrument is considered improper! Failure to adhere to these instructions may result in an accident, personal injury, damage to the instrument or accessory equipment.
8 |
Instructions for Use V 2.9 RevC, English – 12/2013 |
2. Safety
Make sure to comply with the safety instructions and warnings in this chapter.
Make sure to read these instructions, even if you are already familiar with the operation and use of other Leica products.
2.1Safety notes
These Instructions for Use includes important information related to the operating safety and maintenance of the instrument.
The Instructions for Use are an important part of the product, and must be read carefully prior to startup and use and must always be kept near the instrument.
This instrument has been built and tested in accordance with the following safety regulations on electrical measuring, control, regulating and laboratory devices.
To maintain this condition and ensure safe operation, the user must observe all notes and warnings contained in these Instructions for Use.
If additional requirements for accident prevention and environmental protection exceeding the scope of these Instructions for Use are imposed by laws/ regulations of the country of operation, these Instructions for Use must be supplemented by appropriate instructions to ensure compliance with such requirements.
For current information about applicable standards, please refer to the CE declaration for the instrument and to our Internet site: www.LeicaBiosystems.com
The protective devices on both instrument and accessories may neither be removed nor modified. Only authorized and qualified service personnel may repair the instrument and access the instrument's internal components.
2.2Warnings
The safety devices installed in this instrument by the manufacturer only constitute the basis for accident prevention. Primarily responsible for accident-free operation is above all the institution which owns the instrument and, in addition,
the designated personnel who operates, services or repairs the instrument.
To ensure trouble-free operation of the instrument, make sure to comply with the following instructions and warnings.
Leica TP1020 |
9 |

2.Safety
Transport and installation
•Keep in mind Chapter 3, "Technical data"!
•During transport, keep the instrument upright!
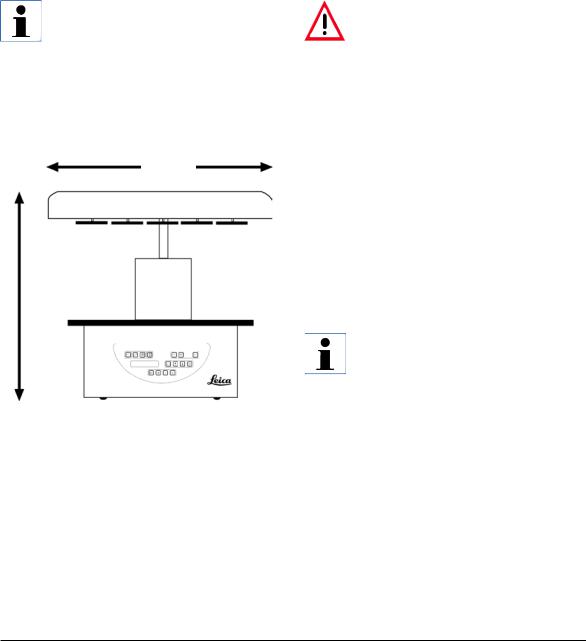
•When transporting the instrument, do not lift it up by the carousel cover!
•Do not operate the instrument in rooms with explosion hazard.
•Caution! The voltage selector is factory preset. Before connecting the instrument to the power supply, make sure this setting is correct for your laboratory's electrical connection values. The socket for connecting the power cable is sealed with an adhesive tape indicating the factory preset voltage for your particular instrument.
•Connecting the instrument to the power with the voltage selector set at a wrong value can cause severe damage to the instrument!
•When adjusting the voltage selector setting, the instrument must be disconnected from the power supply.
•The instrument may only be connected to the power with the cable supplied together with the instrument and it may only be connected to grounded sockets.
Working with the instrument
•The carousel may not be rotated manually! Severe damage will result from doing so!
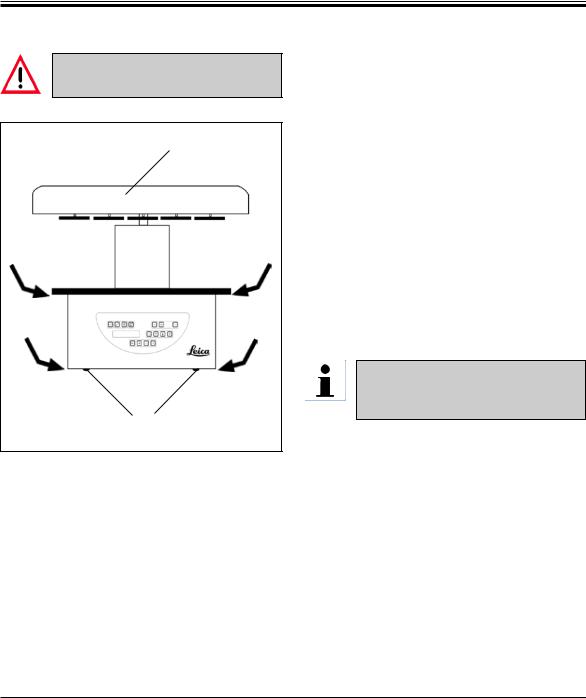
•Caution when lowering the carousel! Keep your fingers out of the space between the
container lid and the upper rim of the container!
•Caution! In case of a power failure, the carousel automatically descends into a station.
•Instruments equipped with vacuum function may only be operated with the aluminum
containers supplied together with the instrument. Glass beakers used in combination with the vacuum accessories have a high hazard potential when damaged!
•While operating the instrument, no liquid may enter in contact with any of the electrical
connections or the interior of the instrument.
•Make sure to observe the level indicators on the reagent containers and wax baths.
•Warning! Use caution when handling solvents! Make sure the premises are adequately ventilated! Explosion hazard!
•Spilled reagents have to be wiped away immediately. In case of long-term exposure, the
instrument surfaces are only conditionally resistant to solvents.
10 |
Instructions for Use V 2.9 RevC, English – 12/2013 |
2. Safety
Working with the instrument (continued)
•Always observe worker's protection rules and use adequate protective gear (gloves, laboratory coats).
•The heated wax baths may only be used with paraffin. Under no circumstances may they be filled with solvents. When solvents heat, a highly explosive mixture builds up!
•Caution! The interior containers of the wax baths become very hot when the heating function is activated! Do not touch the gray upper rim of the containers with your hands! Burn hazard!
•Caution when handling hot paraffin! Burn hazard!
Cleaning
•Turn off the power switch before cleaning the instrument.
•Caution! The interior containers of the wax baths become very hot when the heating function is activated! Do not touch the gray upper rim of the containers with your hands! Burn hazard!
•Caution when handling hot paraffin! Burn hazard!
•When cleaning the instrument, no liquid may enter in contact with any of the electrical connections or the interior of the instrument.
•Spilled reagents have to be wiped away immediately. In case of long-term exposure, the
instrument surfaces are only conditionally resistant to solvents.
•To clean the painted surfaces, the container platform and the control panel, do not use solvents containing acetone or xylene; neither use abrasive cleaning powders! Only mild household detergents may be used! The lacquered surfaces and the control panel are not resistant to xylene or acetone!
Leica TP1020 |
11 |
2.Safety
Maintenance
•Only authorized and qualified service personnel may access the internal components of the instrument for service and repair!
•Before replacing the fuses, turn off the power switch and unplug the instrument!
•Burnt-out fuses may only be replaced by fuses of the same type and specification. For appropriate brands and specifications, see Chapter 3 "Technical Data".
Wax baths
•If the excess temperature repeatedly - please call Leica Technical Service. DO NOT continue to use the wax bath.
•Check if the wax bath works trouble-free. Use of defective wax baths has to be discontinued for safety reasons!
•Empty the wax baths completely before the paraffin cools! When cooling down, the paraffin contracts, which can cause damage to the wax bath.
Activated carbon filter (optional accessory)
•Warning! Fire hazard! If a filter becomes saturated with solvent, there is a potential fire risk!
It is important that the activated carbon filters are changed at factory recommended intervals.
12 |
Instructions for Use V 2.9 RevC, English – 12/2013 |

3. Instrument Components and Specifications
3.1 Technical data
Type |
|
TP1020 |
Approvals |
............UL / cUL / VDE |
|
Electrical data |
|
|
Nominal voltage.................................................................................................... |
100 / 120 / 230 /240 V AC ±10 % |
|
Rate frequency........................................................................................................................................... |
|
50 - 60 Hz |
Power fuses (Type MDA; Bussmann)................................................................... |
2x T 10.0 A L250 V, UL listed |
|
Nominal capacity............................................................................................................................................ |
|
700 VA |
Classifications according to IEC-1010/EN61010-1: |
|
|
Protective class......................................................................................................................................................... |
|
I |
Pollution degree........................................................................................................................................................ |
|
2 |
Overvoltage category............................................................................................................................................. |
|
II |
Heat emission (max.)..................................................................................................................................... |
|
700 J/s |
Operating temperature range............................................................................................................... |
|
5 °C – 40 °C |
Relative humidity................................................................................................................. |
80 % non-condensing |
|
Dimensions |
|
|
Carousel lid................................................................................................................................................. |
|
820 mm Ø |
Height.................................................................................................................................................... |
|
595 - 780 mm |
Pitch diameter of rollers....................................................................................................................... |
|
610 mm Ø |
Weight |
|
|
Net weight (including accessories)............................................................................................................... |
|
60 kg |
Net weight, including packaging material.............................................................................................. |
|
116 kg |
Wax baths |
|
|
Quantity:............................................................................................................................................. |
|
2 (optionally 3) |
Capacity:............................................................................................................................................................... |
|
1.8 l |
Nominal voltage / rated frequency:........................................................................................ |
|
230 V AC, 50-60 Hz |
Nominal capacity per station:...................................................................................................................... |
|
150 VA |
Temperature setting range..................................................................................................... |
|
45 °C – 65 °C ±3 K |
Excess temperature shutdown ........................................................................................................... |
|
85 °C±5 K |
Leica TP1020 |
13 |

3. |
Instrument Components and Specifications |
|
|
|
|
Technical data (continued) |
|
|
Reagent stations |
|
|
Number.................................................................................................... |
10 (9 when 3rd wax bath is installed) |
|
Capacity............................................................................................................................................................ |
1.8 l |
|
Tissue basket |
|
|
Quantity:......................................................................................................................................... |
1 (optionally 2) |
|
Capacity:............................................................................................................. |
100 cassettes (optionally: 200) |
|
Programs |
|
|
Quantity:................................................................................................................................. |
9, freely selectable |
|
Programmable time per station................................................................................................... |
99 hrs. 59 min. |
|
Delayed start time of processing:................................................................................................... |
up to 9 days |
|
Dripping time:...................................................................................................................................... |
60 seconds |
|
Vacuum function (types 3, 5, 7, 8 and 11 only, see Chapter 3.3) |
|
|
Pressure differential.............................................................................. |
max. 500 hPa ±10 % (approx. 0.5 bar) |
|
14 |
Instructions for Use V 2.9 RevC, English – 12/2013 |

3. Instrument Components and Specifications
3.2Description of the instrument
The Leica TP1020 is an automatic tissue processor designed for laboratory applications. It is used for the fixation, dehydration and infiltration of histological tissue samples with fixatives, alcohol, solvents and paraffin wax.
The reagent stations numbered 1 - 10 are used to contain reagents. Station 10 may be replaced with an optional third wax bath. Stations 11, 12, and if used 10, are heated, temperature controlled wax baths that can be filled with either wax pellets or molten paraffin wax.
Embedding cassettes used to hold the tissue samples, are placed into the tissue basket. The basic instrument is designed for a single tissue basket. An optional second basket can be added. The basket, or baskets, are moved clockwise from station to station.
To ensure thorough infiltration the basket containing the tissue samples is agitated, by moving up and down, at each station. This function can be switched off at any time.
During processing as the tissue basket moves from station to station there is a delay period of sixty (60) seconds during which time the basket is suspended above the station. Excess liquid can drip down during this process. This ensures that there is minimal reagent carryover from station to station.
All instrument functions are activated through the control panel. Real time is displayed via LCD. The instrument can be operated in manual and automatic processing mode. Automatic processing is controlled via 9 different programs which can be individually set up, altered and edited.
If a power failure occurs, the specimens are protected from drying out - even when overnight processing has been selected, since in case of a power failure the tissue basket will always be immersed into a station. Once the power is restored, processing will be resumed where it had been interrupted. After a long-term power failure, critical excess immersion time in a station will be visually displayed.
Leica TP1020 |
15 |

3.Instrument Components and Specifications
3.3Standard delivery—packing list
The Leica TP1020 is available in eleven different configurations, which are described below. All variants also include accessories as described in the table on page 17.
If the vacuum function or extraction is required for the intended processes to be carried out using this instrument, this information must be included in the original order.
It is not possible to retrofit any instrument variant for use with vacuum function or extraction!
Variant 1 |
|
Order No. |
One basket operation / standard tissue basket. |
|
|
Without vacuum / without fume control. |
|
|
1 |
Basic instrument |
14 0422 30543 |
12 Glass beakers with handle |
14 0422 42545 |
|
2 |
Wax baths, (1.8 liters) |
14 0422 30665 |
1 |
Standard tissue basket |
14 0422 30585 |
Variant 2 |
|
|
Two basket operation (double-loading)/standard tissue baskets. |
|
|
Without vacuum / without fume control. |
|
|
1 |
Basic instrument |
14 0422 31418 |
11 Glass beakers with handle |
14 0422 42545 |
|
3 |
Wax baths, (1.8 liters) |
14 0422 30665 |
2 |
Standard tissue baskets |
14 0422 30585 |
Variant 3
One basket operation / standard tissue basket.
With vacuum / without fume control.
1 |
Basic instrument |
|
14 0422 30536 |
10 Aluminum reagent containers for vacuum |
14 0422 42545 |
||
10 |
Reagent container carriers |
|
14 0422 42545 |
2 |
Wax baths, (1.8 liters) |
|
14 0422 30665 |
1 |
Standard tissue basket |
|
14 0422 30585 |
Variant 4 |
|
|
|
One basket operation / standard tissue basket. |
|
|
|
Without vacuum / with fume control system. |
|
|
|
1 |
Basic instrument |
|
14 0422 30537 |
12 Glass beakers with handle |
|
14 0422 42545 |
|
2 |
Wax baths, (1.8 liters) |
|
14 0422 30665 |
1 Standard tissue basket |
|
14 0422 30585 |
|
1 Tubing band clamp |
|
14 0422 31973 |
|
|
|
|
|
16 |
|
Instructions for Use V 2.9 RevC, English – 12/2013 |
|
|
3. Instrument Components and Specifications |
|
|
Standard delivery continued |
|
Variant 5 |
Order No. |
One basket operation/standard tissue basket. With vacuum/with fume control system.
1 |
Basic instrument |
14 0422 30535 |
10 Aluminum reagent containers for vacuum |
14 0422 42545 |
|
10 |
Reagent container carriers |
14 0422 42545 |
2 |
Wax baths, (1.8 liters) |
14 0422 30665 |
1 |
Standard tissue basket |
14 0422 30585 |
1 Tubing band clamp |
14 0422 31973 |
|
Variant 6
Two basket operation (double-loading)/standard tissue baskets. Without vacuum/with fume control system.
1 |
Basic instrument |
14 0422 31416 |
11 Glass beakers with handle |
14 0422 42545 |
|
3 |
Wax baths, (1.8 liters) |
14 0422 30665 |
2 |
Standard tissue baskets |
14 0422 30585 |
1 Tubing band clamp |
14 0422 31973 |
|
Variant 7
Two basket operation (double-loading)/standard tissue baskets. With vacuum/with fume control system.
1 |
Basic instrument |
14 0422 31412 |
9 Aluminum reagent containers for vacuum |
14 0422 42545 |
|
9 |
Reagent container carriers |
14 0422 42545 |
3 |
Wax baths, (1.8 liters) |
14 0422 30665 |
2 |
Standard tissue baskets |
14 0422 30585 |
1 Tubing band clamp |
14 0422 31973 |
|
Variant 8
Two basket operation (double-loading)/standard tissue baskets. With vacuum/without fume control system. Connection for optional third wax bath includes second tissue basket carrier.
1 |
Basic instrument |
14 0422 31414 |
9 Aluminum reagent containers for vacuum |
14 0422 42545 |
|
9 |
Reagent container carriers |
14 0422 42545 |
3 |
Wax baths, (1.8 liters) |
14 0422 30665 |
2 |
Standard tissue baskets |
14 0422 30585 |
Variant 9 |
|
|
Basic Instrument for processing with chloroform as clearing reagent |
|
|
1 |
Basic instrument |
14 0422 42238 |
12 Glass beakers with handle |
14 0422 42545 |
|
2 Wax baths for chloroform |
14 0422 32001 |
|
1 |
Standard tissue basket |
14 0422 30585 |
|
|
|
Leica TP1020 |
|
17 |

3.Instrument Components and Specifications
Standard delivery continued
Variant 10
One basket operation/standard tissue basket. With fume control system and accessories.
1 |
Basic instrument |
14 91020 US01 |
12 Glass beakers with handle |
14 0422 42545 |
|
2 |
Wax baths, (1.8 liters) |
14 0422 30665 |
1 |
Standard tissue basket |
14 0422 30585 |
1 Tubing band clamp |
14 0422 31973 |
|
1 |
Activated carbon filter - Standard |
14 0422 30673 |
1 |
Activated carbon filter - Xylene |
14 0422 30674 |
1 Exhaust hose, diameter 50 mm, 4 m long |
14 0422 31975 |
|
Variant 11
One basket operation/standard tissue basket. With vacuum, fume control system and accessories.
1 |
Basic instrument |
14 91020 US02 |
10 Aluminum reagent containers for vacuum |
14 0422 42545 |
|
10 |
Reagent container carriers |
14 0422 42545 |
2 |
Wax baths, (1.8 liters) |
14 0422 30665 |
1 |
Standard tissue basket |
14 0422 30585 |
1 Tubing band clamp |
14 0422 31973 |
|
1 |
Activated carbon filter - Standard |
14 0422 30673 |
1 |
Activated carbon filter for formaldehyde |
14 0422 30674 |
1 Exhaust hose, diameter 50 mm, 4 m long |
14 0422 31975 |
|
All instrument variants of the Leica TP1020 come with the following accessories: |
|
|
4 Replacement fuses T 10.0 A L250 V |
14 0600 00759 |
|
1 Set of power cables |
14 0411 45754 |
|
|
1 Power cable for Germany |
14 0411 13558 |
|
1 Power cable for the USA/Canada/Japan |
14 0411 13559 |
|
1 Power cable for UK ST/BU F-5A |
14 0411 27822 |
1 |
Screwdriver 5.5 x 200 |
14 0170 10702 |
1 |
Crank handle, size 4, mounted |
14 0222 30663 |
1 |
Instructions for Use for Leica TP1020 |
14 0422 80001 |
You will find the standard accessories and - in case you ordered them - further parts in the upper portion of the packing box.
Compare the delivered parts with the packing list and your actual order. If you find any discrepancies, please contact your local Leica sales organization immediately.
18 |
Instructions for Use V 2.9 RevC, English – 12/2013 |
3. Instrument Components and Specifications
3.4Overview of the Leica TP1020 - with additional wax bath (optional accessory)
Carousel cover
Reagent station lid
Glass container with holder
Beaker carrier with fill level marks
Container station platform
Tissue basket holder
Standard tissue basket
Wax bath
Notch for wax bath connection cable
 Control panel
Fig. 2
Leica TP1020 |
19 |
3.Instrument Components and Specifications
Overview of the Leica TP1020 - with additional wax bath (optional accessory, continued)
Continued
12 |
Connections |
|
|
for wax baths |
|
11 |
(connection |
|
socket for station |
||
|
||
10 |
10 with cap (not |
|
pictured) closed) |
Voltage selector
Wax bath plug
Mains switch
Socket for power cable
Fig. 3 - TP1020 - rear side
20 |
Instructions for Use V 2.9 RevC, English – 12/2013 |

3. Instrument Components and Specifications
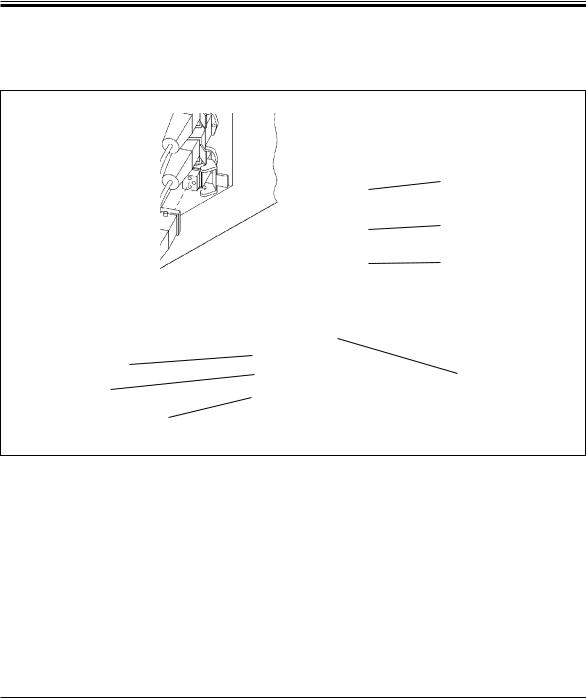
3.5General overview Leica TP1020 - with fume control system
Plexiglas fume containment shield
Fig. 4
Leica TP1020 |
21 |
3.Instrument Components and Specifications
General overview Leica TP1020 - with fume control system (continued)
Activated carbon filter receptacle
Hose clamp
Fume outlet tube  (optional accessory)
Fig. 5
22 |
Instructions for Use V 2.9 RevC, English – 12/2013 |
3. Instrument Components and Specifications
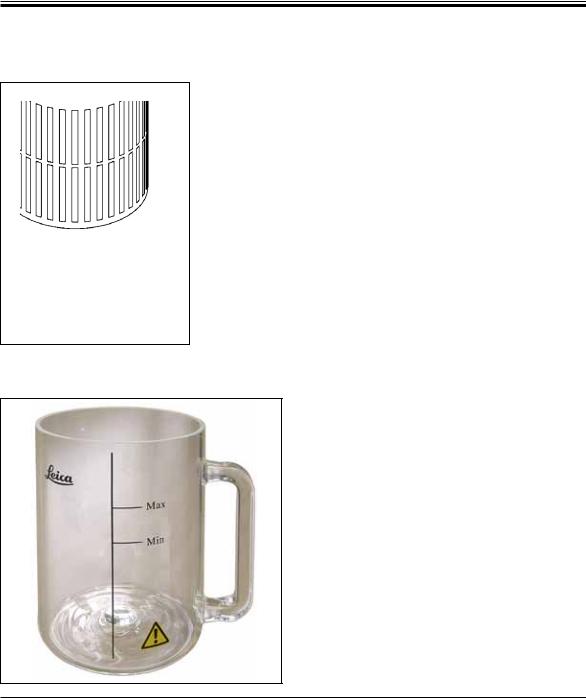
3.6 Accessories supplied together with the instrument 3.6.1 Standard tissue basket
Holding capacity: 100 cassettes
Tissue cassettes are loosely arranged in the basket. The maximum capacity is 100 cassettes. The cassettes are stacked in the basket. So that the infiltration process is not disturbed, no cassette may lie on top of the stack. The maximum filling level must be reduced. Depending on the size of the specimens and the use of foam supports or paper towels, the minimum filling level can also be used as the maximum filling level. For processing 100 cassettes, the maximum filling level for the reagents is approximately 1200 ml.
Fig. 6
3.6.2 Glass beaker with holder
Holding capacity: |
1.8 l |
The reagent container consists of a glass beaker with holder.
The wall of the beaker has two marks (Min, Max) that specify the minimum and maximum level in the container.
The level must not
exceed the Max mark or fall below the Min mark during filling.
Fig. 7
Leica TP1020 |
23 |
3.Instrument Components and Specifications
3.6.3Aluminum container with holder
(instruments with vacuum function only or as an optional accessory)
Max
Min
Holding capacity: |
1.8 l |
Instruments equipped with vacuum function are supplied with aluminum containers instead of glass containers.
In aluminum containers the level indications marks are located on the inside of the container.
When filling the container make sure the filling level is not below the minimum or above the maximum level indication mark.
Fig. 8
24 |
Instructions for Use V 2.9 RevC, English – 12/2013 |
3. Instrument Components and Specifications
3.6.4 Wax bath
5
2 |
4 |
|
1
3 |
Fig. 9 |
|
Holding capacity: |
1.8 l |
Nominal supply voltages: |
230V AC |
|
50 - 60 Hz |
Nominal capacity (heating): |
150 VA |
Temperature setting range: |
45 - 65 °C ±3 K |
Excess temperature switch-off |
|
mechanism: |
at 85 °C ±5 K |
If the actual temperature rises above the range of normal working temperature, an excess temperature switch-off mechanism responds. The wax bath heating is disconnected. The yellow signal lamp is extinguished. Use of the wax bath can be resumed only after a cooling down period. For cooling down, disconnect the wax bath connector plug from the socket at the rear of the instrument, or switch off the main switch.
The wax baths are equipped with heating. While the heating is functioning, the yellow pilot lamp lights (1).
The handle (2) is insulated. The outside wall (3) is likewise thermally insulated. However, it becomes hot to the touch in heating operation. Despite this, burn hazard exists when touching it.
Caution! The interior container (4) of the wax bath becomes very hot when the heating function is activated! Do not touch the gray upper rim of the containers with your hands! Risk of injury!
The inside of the interior container (4) is coated with Teflon. The interior container gets very hot. It has minimum and maximum level indicator marks (5).
If the excess temperature switch-off mechanism reacts several times, call Technical Service without delay. DO NOT continue to use the wax bath.
Empty the wax baths completely before the paraffin cools! When cooling down, the paraffin contracts, which can cause damage to the wax bath.
Leica TP1020 |
25 |
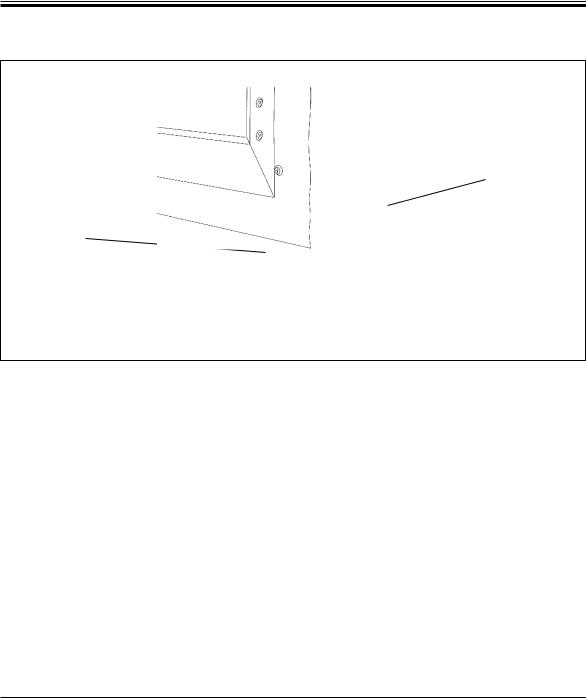
4.Initial Operation
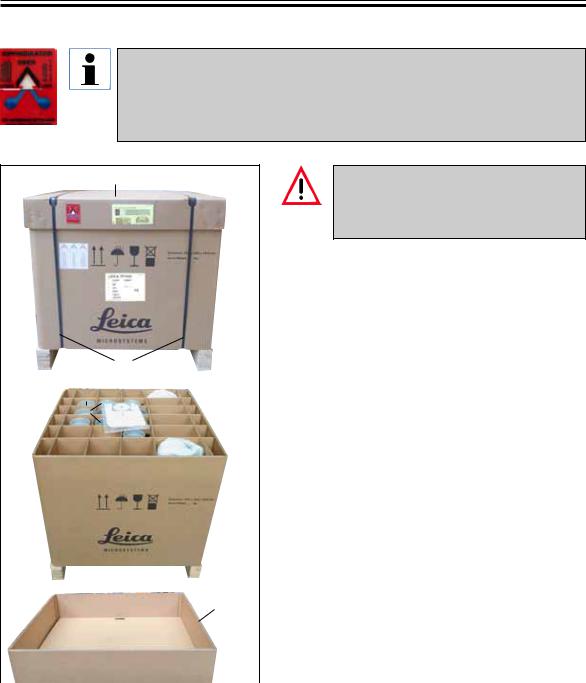
4.1Unpacking instructions
When the instrument arrives, check the tilt indicator (Fig. 10) on the package. If the arrowhead is blue, the shipment was transported laying flat, was tilted at too great an angle or fell over during transport.
Note this on the shipping documents and check the shipment for possible damage.
If obviously there is damage, please contact your freight forwarder immediately.
Fig. 10
2
|
1 |
|
||
|
|
|
4 |
|
4 |
|
|
5 |
|
3 |
||||
|
||||
|
4 |
|||
|
|
|
||
|
|
|
4 |
|
Caution when removing the metal strips! There is a risk of injury when opening them (the strip has sharp edges and is under tension)!
•To remove the metal strips (1), you need metal shears and suitable gloves. Stand next to the crate and cut the strips at the location shown (see Fig 10a "" above).
•Lift the lid (2) off of the crate.
•Remove the Instructions for Use (3) and packing list.
•Removeallaccessories(4) from the compartments of the cardboard grid (5).
•When all parts have been removed, lift them upwards and out and remove the intermediate bottom (6) underneath.
•Lift the outer carton ring (7) upwards and out.
|
7 |
|
|
6 |
|
|
|
Fig. 10a |
|
|
|
|
|
|
26 |
|
Instructions for Use V 2.9 RevC, English – 12/2013 |
8
9
13 |
|
|
12
 14
14
15
11 (not visible) 10
Fig. 10b
4. Instrument Setup
•Remove the wooden ledge (8) sideways from the interior box (9).
•Remove the interior box (9) in an upward movement.
•To lift up the instrument (using 2 persons), take it by the reagent container platform or by the lower end of the housing (see Fig. 10b,"" "" below) and lift it from the base plate (10).
•Installtheinstrumentonastablelaboratorybench.
Four rollers (11) under the instrument housing permit rotating the instrument on the bench.
•Removethespongerubbertransportsafetydevice
(12) from under the carousel cover (13).
•Depending on the instrument version, 4 foam transport anchors (14) may have to be removed between the Plexiglas plates (15).
When transporting the instrument, do NOT lift it up by the carousel cover!
For safe transport of the instrument, we recommend keeping the original packaging.
Leica TP1020 |
27 |
4.Initial Operation
Unpacking (continued)
When transporting the instrument, do not lift it up by the carousel cover!
11
12
Fig. 11
•To lift up the instrument take it by the reagent container platform or by the lower end of the housing (Fig. 11) and lift it from the base plate (8).
•Place the instrument on a stable laboratory table.
Four rollers (12) under the instrument housing permit rotating the instrument on the bench.
•Remove the sponge rubber transport safety device (9) from under the carousel cover (11).
For further secure transport of the instrument we recommend you keep the original packaging material.
28 |
Instructions for Use V 2.9 RevC, English – 12/2013 |
|
|
|
|
4. Instrument Setup |
|
|
|
|
|
4.2 Installation site requirements |
|
|
||
|
|
|
|
|
|
|
Because of the quantity of solvents |
|
The instrument may not be operated in |
|
|
used for processing specimens and the |
|
hazardous locations. |
|
|
solvent concentrations that build up, |
|
|
|
|
|
|
|
|
|
we recommend installing instrument |
The installation site has to fulfill the following |
|
|
|
versions without a fume control system |
||
|
|
or active carbon filter in the labora- |
conditions: |
|
|
|
tory's fume hood. |
|
|
|
|
|
• Stable and plane installation surface. |
|
|
|
|
||
|
|
|
• Minimum installation surface dimensions: |
|
|
|
|
||
|
|
820 mm |
850 x 850 mm, |
|
|
|
|
• Roomtemperatureconsistentlybetween+5 °C |
|
|
|
|
and +40 °C, |
|
|
|
|
• Relative humidity should not exceed 80%. |
|
|
|
|
Necessary conditions for electrical connection |
|
|
|
|
- Grounded wall outlet near enough so it can |
|
780 mm |
|
|
||
|
|
be reached with the power cable supplied |
||
|
|
|
||
|
|
|
||
|
|
|
together with the instrument. |
|
|
|
|
|
|
|
|
|
|
If you wish to install the basket holder |
|
|
|
|
for a second tissue basket, you should |
|
|
|
|
do that now. |
|
|
|
|
For mounting instructions, see Chap- |
|
|
|
|
ter 13 "Optional Accessories". |
|
|
|
|
|
|
|
|
|
|
|
|
Fig. 12 |
|
|
Leica TP1020 |
29 |
4.Initial Operation
4.3Electrical connection
4.3.1 Checking the voltage selector setting
|
|
|
|
1 |
3 |
|
230 |
||
|
|
|||
|
|
|||
|
|
|
|
|
2
230 V
Fig. 13
The voltage selector is located in a shell (3) above the power switch (2) at the rear of the instrument. The actual selected voltage can be seen in the window (1).
•Check if the setting showing in the window
(1) corresponds to the nominal voltage in your laboratory.
•Remove the adhesive tape.
If the setting is correct proceed at 4.3.3.
If the setting does not correspond to the nominal voltage in your laboratory, the voltage selector MUST be adjusted to match your laboratory's electrical setting prior to connecting the instrument to the mains.
Important! The voltage selector is factory preset.
Before connecting the instrument to the power supply, make sure this setting is correct for your laboratory's electrical connection values.
The socket for connecting the power cable is sealed with an adhesive tape indicating the factory preset voltage for your particular instrument.
Connecting the instrument to the power with the voltage selector set at a wrong value can cause severe damage to the instrument!
30 |
Instructions for Use V 2.9 RevC, English – 12/2013 |
Loading...