


LEICA X1
Instructions

1.2
1.5 |
1.6 |
1.7 |
1.8 |
1.1 |
|
|
|
|
|
1.1 |
|
|
|
||||
|
|
|
1.3 |
|||
|
|
|||||
1.4 |
1.4a |
1.11c |
1.11b |
1.11a |
1.11 |
1.10 |
1.9 |
1.171.18
1.16 |
|
|
|
|
|
|
|
|
|
|
|
|
|
1.19 |
||
|
|
|
|
|
|
|
|
|
|
|
|
|
||||
|
|
|
|
|
|
|
|
|
|
|||||||
1.15 |
1.28 |
|||||||||||||||
|
|
|
|
|
|
|
|
|
|
|
|
|
|
1.20 |
||
|
|
|
|
|
|
|
|
|
|
|
|
|
|
|||
1.14 |
|
|
|
|
|
|
|
|
|
|
|
|||||
|
|
|
|
|
||||||||||||
|
|
|
|
|
|
|
|
|
|
|
|
|
|
|
|
|
1.13 |
1.29 |
|||||||||||||||
|
|
|
|
|
|
|
|
|
|
|
|
|
|
|
|
|
1.12 |
|
|
|
|
|
|
|
|
|
|
|
|
|
|
|
|
|
|
|
|
|
|
|
|
|
|
|
|
|
|
|
|
|
|
|
|
|
|
|
|
|
|
|
|
|
|
|
|
|
|
|
|
|
|
|
|
|
|
|
|
|
|
|
|
|
|
|
|
|
|
|
|
|
|
|
|
|
|
|
|
|
|
|
|
|
|
|
|
|
|
|
|
|
|
|
|
|
|
|
|
|
|
|
|
|
|
|
|
|
|
|
|
|
|
|
|
|
|
1.27 1.26 1.25 1.24 1.23 1.22 1.21
1.38
1.37 |
|
1.39 |
|
1.30a |
1.30 |
1.31 |
1.32 |
1.40
1.36a 1.36
1.33 1.34 1.35

This is a Class B product based on the standard of the Voluntary Control Council for Interference from Information Technology Equipment (VCCI). If this is used near a radio or television receiver in a domestic environment, it may cause radio interference. Install and use the equipment according to the instruction manual.
FCC Note: (U.S. only)
This equipment has been tested and found to comply with the limits for a Class B digital device, pursuant to Part 15 of the FCC Rules. These limits are designed to provide reasonable protection against harmful interference in a residential installation. This equipment generates, uses, and can radiate radio frequency energy and, if not installed and used in accordance with the instructions, may cause harmful interference to radio communications. However, there is no guarantee that interference will not occur in a particular installation. If this equipment does cause harmful interference to radio or television reception, which can be determined by turning the equipment off and on, the user is encouraged to try to correct the interference by one or more of the following measures:
•Reorient or relocate the receiving antenna.
•Increase the separation between the equipment and receiver.
•Connect the equipment into an outlet on a circuit different from that to which the receiver is connected.
•Consult the dealer or an experienced radio/TV technician for help.
FCC Caution:
To assure continued compliance, follow the attached installation instructions and use only shielded interface cables with ferrite core when connecting to computer or peripheral devices.
Any changes or modifications not expressly approved by the party responsible for compliance could void the user’s authority to operate this equipment.
Trade Name: |
LEICA |
|
Model No.: |
LEICA X1 |
|
Responsible party/ |
|
|
Support contact: |
Leica Camera Inc. |
|
|
1 Pearl Count, Unit A |
|
|
Allendale, New Jersey 07401 |
|
|
Tel.: +1 |
201 995 0051 232 |
|
Fax: +1 |
201 995 1684 |
|
e-mail: olesin@aol.com |
|
This device complies with Part 15 of the FCC Rules. Operation is subject to the following two conditions:
(1) This device may not cause harmful interference, and (2) this device must accept any interference received, including interference that may cause undesired operation.
This Class B digital apparatus complies with Canadian ICES-003
LEICA X1
Tested To Comply
With FCC Standards
FOR HOME OR OFFICE USE

LEICA X1
Instructions
Foreword |
Scope of delivery |
Dear Customer,
We wish you a great deal of pleasure and success using your new LEICA X1. The high-performance LEICA DC ELMARIT 24 mm f/2.8 ASPH. lens will give you excellent picture quality.
Thanks to its fully automatic programmed exposure control mode and autoflash feature, the LEICA X1 provides uncomplicated photography. Alternatively, you can take over picture composition yourself at any time using the manual settings.
You can select from numerous special functions to improve the picture quality even in very difficult exposure conditions.
Please read these instructions so that you can make the most of your LEICA X1’s capabilities.
Before using your LEICA X1 for the first time, please check that the accessories supplied are complete.
A.Battery LEICA BP-DC8 (Order No. 18 706)
B.Battery case
(Order No. 423-089.003-012)
C.Battery charger BC-DC8 with interchangeable plugs (Order No. 423-089.803-008)
D.USB cord
(Order No. 423-089.003-022)
E.Leather carrying strap (Order No. 439-612.060-000)
F.Lens cap
(Order No. 423-089.003-024)
G.Camera registration card with TAN to download Adobe® Photoshop® Lightroom® (after registering the camera on the Leica Camera AG homepage)
These instructions are printed on 100 % chlorine free bleached paper, whose high-quality manufacturing process protects the water and is environmentally friendly.
70

The CE identification of our products documents adherence to the
fundamental requirements of the valid EU guidelines.
Warning messages
•Modern electronic components react sensitively to electrostatic discharge. As people can easily pick up charges of tens of thousands of volts, by walking on synthetic carpets for example, a discharge can occur when you touch your LEICA X1, particularly if it is placed on a conductive surface. If only the camera housing is affected, this discharge is harmless to the electronics. However, despite built-in safety circuits, the outer contacts, such as those on the base of the camera, should not be touched if at all possible for safety reasons.
•For any cleaning of the contacts, do not use an optical micro-fiber cloth (synthetic); use a cotton or linen cloth instead. Before touching the contacts, you can make sure you discharge any electrostatic charge by deliberately touching a heating or water pipe (conductive, earthed material). You can also avoid soiling and oxidization of the contacts by storing your LEICA X1 in a dry place with the lens or bayonet cover fitted.
•You should exclusively use the recommended accessories to prevent faults, short circuits or electric shock.
•Do not attempt to remove parts of the body (covers); specialist repairs can be carried out only at authorized service centers.
Legal notes
•Please ensure that you observe copyright laws. The recording and publication of pre-recorded media such as tapes, CDs, or other published or broadcast material may contravene copyright laws.
•This also applies to all of the software supplied.
•The SD, HDMI, and USB logos are registered trademarks.
•Other names, company or product names referred to in this manual are trademarks or registered trademarks of the relevant companies.
Disposal of electrical and electronic equipment
(Applies within the EC, and for other European countries with segregated waste collection systems)
This device contains electrical and/or electronic components and should therefore not be disposed of in general household waste! Instead it should be disposed of at a recycling collection point provided by the local authority. This costs you nothing.
If the device itself contains replaceable (rechargeable) batteries, these must be removed first and, if necessary, also be disposed of in line with the relevant regulations.
Your local authority or waste disposal authority, or the store where you bought this device, can provide you with further information on this issue.
71
Table of contents
FCC Note . . . . . . . . . . . . . . . . . . . . . . . . . . . . 68
Foreword . . . . . . . . . . . . . . . . . . . . . . . . . . . . 70
Scope of delivery . . . . . . . . . . . . . . . . . . . . . . 70
CE Notice . . . . . . . . . . . . . . . . . . . . . . . . . . . . 71
Warning messages . . . . . . . . . . . . . . . . . . . . . 71
Legal notes . . . . . . . . . . . . . . . . . . . . . . . . . . 71
Disposal of electrical and electronic
equipment . . . . . . . . . . . . . . . . . . . . . . . . . . 71
Designation of parts . . . . . . . . . . . . . . . . . . . 74
Displays in the monitor . . . . . . . . . . . . . . . . . 76 In record mode . . . . . . . . . . . . . . . . . . . . . 76 In review mode . . . . . . . . . . . . . . . . . . . . . 79 Menu items . . . . . . . . . . . . . . . . . . . . . . . . 80
Using the LEICA X1 for the first time . . . . . . . 81
Preparation . . . . . . . . . . . . . . . . . . . . . . . . . . 82 Attaching the carrying strap . . . . . . . . . . . 82 Charging the battery . . . . . . . . . . . . . . . . . 82 Inserting/Removing the battery . . . . . . . . 85 Charge level displays . . . . . . . . . . . . . . . . 86 Inserting and removing the memory card . . 86
The most important settings/controls . . . . . 88 Switching the camera on/off . . . . . . . . . . 88 Selecting the record and review modes . . 88 Shutter release button . . . . . . . . . . . . . . . 88 Menu control . . . . . . . . . . . . . . . . . . . . . . . 89
Presets . . . . . . . . . . . . . . . . . . . . . . . . . . . . . . 91 Menu language . . . . . . . . . . . . . . . . . . . . . 91 Date . . . . . . . . . . . . . . . . . . . . . . . . . . . . . . 91 Time . . . . . . . . . . . . . . . . . . . . . . . . . . . . . . 91 Automatic stand-by mode . . . . . . . . . . . . . 92 Key acknowledgement (response)
and shutter sounds . . . . . . . . . . . . . . . . . 92 Monitor brightness . . . . . . . . . . . . . . . . . . 92 Switching the displays . . . . . . . . . . . . . . . . 92 Monitor timeout mode . . . . . . . . . . . . . . . 93 Switching the monitor off . . . . . . . . . . . . . 93 Automatic review of the last picture . . . . . 93
Basic picture settings . . . . . . . . . . . . . . . . . . 94 JPG-image resolution . . . . . . . . . . . . . . . . . 94 File format/compression rate . . . . . . . . . . 94 White balance . . . . . . . . . . . . . . . . . . . . . . 94 Fixed presets . . . . . . . . . . . . . . . . . . . . . . 94 Manual setting by metering . . . . . . . . . . . 94 Direct color temperature setting . . . . . . . 95 Fine-tuning white balance settings . . . . . 95 ISO sensitivity . . . . . . . . . . . . . . . . . . . . . . 95
Image properties/contrast, sharpness,
color saturation . . . . . . . . . . . . . . . . . . . . 96 Color rendition . . . . . . . . . . . . . . . . . . . . . 96
Record mode . . . . . . . . . . . . . . . . . . . . . . . . . 97 Basic photography settings . . . . . . . . . . . . 97 Focusing . . . . . . . . . . . . . . . . . . . . . . . . . . 97 Autofocus . . . . . . . . . . . . . . . . . . . . . . . . 97 AF metering modes . . . . . . . . . . . . . . . . 97 1 point modes . . . . . . . . . . . . . . . . . . . 98 11 point modes . . . . . . . . . . . . . . . . . . 98 Spot mode . . . . . . . . . . . . . . . . . . . . . 99 Face detection mode . . . . . . . . . . . . . 99 AF Assist Lamp . . . . . . . . . . . . . . . . . . . 99 Manual focusing . . . . . . . . . . . . . . . . . 100 Manual focus assist function . . . . . . 100
Exposure metering and control . . . . . . . . . . 101 Exposure metering modes . . . . . . . . . . . . 101 Multi-field metering . . . . . . . . . . . . . . . . 101 Center-weighted metering . . . . . . . . . . . 101 Spot metering . . . . . . . . . . . . . . . . . . . . 101 The histogram . . . . . . . . . . . . . . . . . . . . . 102 Exposure control . . . . . . . . . . . . . . . . . . . 102 Programmed automatic exposure mode 103 Shifting program mode . . . . . . . . . . . . 103 Speed priority mode . . . . . . . . . . . . . . . 104 Aperture priority mode . . . . . . . . . . . . . 104 Manual mode . . . . . . . . . . . . . . . . . . . . 105 Metering memory-lock . . . . . . . . . . . . . 106 Exposure compensation . . . . . . . . . . . . . 106 Automatic exposure bracketing . . . . . . . . 107
72
Flash photography . . . . . . . . . . . . . . . . . . . . 108 Taking photographs with the built-in
flash unit . . . . . . . . . . . . . . . . . . . . . . . . 108 Flash modes . . . . . . . . . . . . . . . . . . . . . . 108 Automatic flash activation . . . . . . . . . . . 108 Automatic flash and pre-flash activation 109 Manual flash activation . . . . . . . . . . . . . 109 Manual flash and pre-flash activation . .109
Automatic flash activation with
slower shutter speeds . . . . . . . . . . . . .109 Automatic flash and pre-flash activation
with slower shutter speeds . . . . . . . . . 109 Studio mode . . . . . . . . . . . . . . . . . . . . . 110 Flash range . . . . . . . . . . . . . . . . . . . . . . . 110
Synchronization to the end
of the exposure . . . . . . . . . . . . . . . . . . . 110 Flash exposure compensation . . . . . . . . . 111 Using external flash units . . . . . . . . . . . . . 111
Additional Functions . . . . . . . . . . . . . . . . . . . 112 Selecting the exposure frequency . . . . . . 112 Self-timer . . . . . . . . . . . . . . . . . . . . . . . . . 112 Formatting the memory card or the
internal memory . . . . . . . . . . . . . . . . . . 113 Working color space . . . . . . . . . . . . . . . . 114 Copying image data from the internal
memory to a memory card . . . . . . . . . . 114 Creating new folder numbers . . . . . . . . . 114 User Profile . . . . . . . . . . . . . . . . . . . . . . . 115 Image stabilization . . . . . . . . . . . . . . . . . . 115
Review mode . . . . . . . . . . . . . . . . . . . . . . . . 116 Selecting review modes . . . . . . . . . . . . . . 116 Selecting pictures . . . . . . . . . . . . . . . . . . 116 Enlarging the picture/Simultaneous
review of 16 pictures . . . . . . . . . . . . . . 117 Selecting the trimming . . . . . . . . . . . . . . . 117 Deleting pictures . . . . . . . . . . . . . . . . . . . 118 Deleting single pictures . . . . . . . . . . . . . 118 Deleting all pictures . . . . . . . . . . . . . . . . 118 Protecting/Unprotecting pictures . . . . . . 119 Review of Portrait-format pictures . . . . . 120 Playback with HDMI equipment . . . . . . . . 121
Miscellaneous . . . . . . . . . . . . . . . . . . . . . . . 121
Transferring data to a computer . . . . . . . 121
Connecting and transferring data with
the camera as an external drive . . . . . 121 Connecting and transferring data using
card readers . . . . . . . . . . . . . . . . . . . . 122
Working with DNG raw data . . . . . . . . . . 123
Installing Adobe® Photoshop® Lightroom® 123
Installing firmware updates . . . . . . . . . . . 123
Accessories . . . . . . . . . . . . . . . . . . . . . . . 124 Transport case . . . . . . . . . . . . . . . . . . . 124 Ever-ready case . . . . . . . . . . . . . . . . . . 124 System case . . . . . . . . . . . . . . . . . . . . . 124 Bright Line Finder 36 mm . . . . . . . . . . . 124 Handgrip . . . . . . . . . . . . . . . . . . . . . . . 125 Flash units . . . . . . . . . . . . . . . . . . . . . . . 125 HDMI cable . . . . . . . . . . . . . . . . . . . . . . 125
Replacement parts . . . . . . . . . . . . . . . . . 125 Precautions and care instructions . . . . . . 126 General precautions . . . . . . . . . . . . . . . 126 Care instructions . . . . . . . . . . . . . . . . . . . 127 For the camera . . . . . . . . . . . . . . . . . . . 127 For the lens . . . . . . . . . . . . . . . . . . . . . . 127 For the battery . . . . . . . . . . . . . . . . . . . 127 For the charger . . . . . . . . . . . . . . . . . . . 128 For memory cards . . . . . . . . . . . . . . . . . 128 Storage . . . . . . . . . . . . . . . . . . . . . . . . . 129
Technical data . . . . . . . . . . . . . . . . . . . . . . . 130
Leica Academy . . . . . . . . . . . . . . . . . . . . . . 132
Leica on the Internet . . . . . . . . . . . . . . . . . . 132
Leica information service . . . . . . . . . . . . . . 132
Leica customer service . . . . . . . . . . . . . . . . 132
73

Designation of parts
Front view (optional Hand Grip attached, flash retracted)
1.1Eyelets for carrying strap
1.2Self timer LED/AF assist light
1.3Lens
1.4Hand Grip (optional) with a. Fastening screw
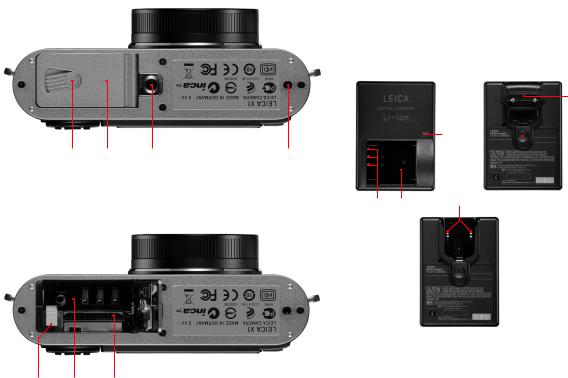
Top view
1.5Flash
1.6Attachment thread protection ring
1.7Main switch with detent positions for
–OFF (camera switched off)
–S (single shot)
–C (continuous shooting)
– (self timer)
1.8Shutter release button
1.9Aperture dial with
–A Detent position for automatic aperture control (speed priority)
1.10Shutter speed dial with
–A Detent position for automatic shutter speed control (aperture priority)
1.11Flash (hot) shoe with a. Control contacts
b. Center (firing) contact c. Hole for locking pin
Rear view
1.12INFO button for
–selecting monitor displays in record and review modes
–resetting manually displaced AF metering frame to center
–calling up display for set resolution, compression, white balance, and image stabilization status (after pressing ≥1 s, disappears after approx. 5 s)
1.13ISO button for calling up the sensitivity menu
1.14WB button for calling up the white balance menu
1.15DELETE/FOCUS button for
–calling up the delete menu
–calling up the focus metering mode menu
–activating AF metering area frame
1.16PLAY button for
–activating (continuous) review mode
–returning to full 1:1 picture display
1.17Focus status LED
(only lights up when the shutter release button is pressed to pressure point, not with manual focusing)
a. Flashing: |
Focusing not possible |
b. Permanently lit: Focusing and exposure set and locked
1.18Setting wheel for
– manual focusing
– scrolling menu list
– scrolling through picture memory
1.19Door over USB and HDMI sockets
74
1.20Setting dial for
–scrolling in menu and submenu item lists
–setting an exposure compensation, exposure bracketing, flash exposure bracketing value
–scrolling through picture memory
–enlarging/reducing the pictures viewed
1.21


 /Direction button for
–calling up exposure compensation, exposure bracketing, and flash exposure compensation menus
–scrolling in menu and submenu item lists
–scrolling through picture memory
–moving the AF metering area frame
1.22 /Direction button for
–calling up flash mode menu
–accessing submenus
–scrolling through picture memory
1.23MENU/SET button for
–calling up the menu
–saving menu settings and exiting submenus and menus
1.24


 /Direction button for
–calling up focus mode menu
–scrolling in menu and submenu item lists
–scrolling through picture memory
–moving the AF metering area frame
1.25 /Direction button for
–calling up self timer menu
–exiting submenus and menus without saving menu settings
–moving the AF metering area frame
1.26 LED indicating data loading for review mode/recording image data
(appears only briefly in all modes, permanently lit when monitor is switched off)
1.27 Monitor
View from the right (door open)
1.28USB socket
1.29HDMI socket
Bottom view
1.30Battery compartment/Memory card slot door with a. Locking lever
1.31Tripod thread A1/4, DIN 4503 (1/4”)
1.32Hole for Hand Grip guide pin
(door open)
1.33Battery locking slider
1.34Battery compartment
1.35Memory card slot
Charger
1.36Battery bay with a. Contacts
1.37Status LED
1.38Interchangeable power plug
1.39Plug locking button
(Interchangeable power plug removed)
1.40 Contact pins
75
Displays in the monitor
2.1 In record mode
2.1.1 |
2.1.2 |
2.1.3 |
|
|
|
2.1.4 |
2.1.5 |
|
|
|||||||||||
2.1.25 |
|
|
|
|
|
|
|
|
|
|
|
|
|
|
|
|
|
|
|
2.1.6 |
|
|
|
|
|
|
|
|
|
|
|
|
|
|
|
|
|
|
|
||
|
|
|
|
|
|
|
|
|
|
|
|
|
|
|
|
|
||||
2.1.24 |
|
|
|
|
|
|
|
|
|
|
|
|
|
|
|
|
|
|
|
2.1.7 |
|
|
|
|
|
|
|
|
|
|
|
|
|
|
|
|
|
||||
|
|
|
|
|
|
|
|
|
|
|
|
|
|
|
|
|||||
|
|
|
|
|
|
|
|
|
|
|
|
|
|
|
|
|
|
|
2.1.8 |
|
|
|
|
|
|
|
|
|
|
|
|
|
|
|
|
|
|
|
|
||
|
|
|
|
|
|
|
|
|
|
|
|
|
|
|
|
|
|
|
2.1.9 |
|
|
|
|
|
|
|
|
|
|
|
|
|
|
|
|
|
|
|
|
||
|
|
|
|
|
|
|
|
|
|
|
|
|
|
|
|
|
|
|
2.1.10 |
|
|
|
|
|
|
|
|
|
|
|
|
|
|
|
|
|
|
|
|
||
2.1.23 |
|
|
|
|
|
|
|
|
|
|
|
|
|
|
|
|
|
|
2.1.11 |
|
|
|
|
|
|
|
|
|
|
|
|
|
|
|
|
|
|
|
|||
|
|
|
|
|
|
|
|
|
|
|
|
|
|
|
|
|
|
|
2.1.13 |
|
2.1.22 |
|
|
|
|
|
|
|
|
|
|
|
|
|
|
|
|
|
|
|
|
|
|
|
|
|
|
|
|
|
|
|
|
|
|
|
|
|
||||
|
|
|
|
|
|
|
|
|
|
|
|
|
|
|
|
|
|
|
|
|
|
|
|
|
|
|
|
|
|
|
|
|
|
|
|
|
|
|
|
|
|
|
|
|
|
|
|
|
2.1.18 |
|
|
2.1.16 |
|
|
|
|
|
|||||
2.1.21 |
2.1.20 |
2.1.17 |
2.1.15 |
2.1.14 |
|
|
||||||||||||||
2.1.12
2.1.19
2.1.202.1.17
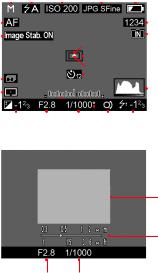
2.1.1Exposure mode
a.P: Programmed automatic exposure mode
b.A: Aperture priority mode
c.T: Speed priority mode
d.M: Manual setting of shutter speed and aperture
2.1.2 Flash mode
(for built-in and external flash units, flashes in red if flash is not ready, otherwise white)
a. : Automatic flash activation
b. : Automatic flash activation with pre-flash
c. : Manual flash activation
d. : Manual flash activation with pre-flash
e. : Automatic flash activation with slower shutter speeds
f. : Automatic flash activation with pre-flash and slower shutter
speeds
g.  : Fixed flash power to release slave flash lights
2.1.3ISO sensitivity
(appears in the place of 2.1.2 when flash is switched off)
a.ISO100
b.ISO200
c.ISO400
d.ISO800
e.ISO1600
f.ISO3200
2.1.4File format/Compression rate
a.JPG Super fine
b.JPG fine
c.DNG+ JPG Super fine
d.DNG+ JPG fine
2.1.5Battery charge level
a. : Sufficient capacity
b. : Falling capacity
c. : Insufficient capacity
d. : Replacement or recharging necessary
76

2.1.6 Frame counter
Number of pictures remaining
(If memory capacity is low, the 0 flashes as a warning)
2.1.7 Indication that internal memory is used to store images
(when no memory card is inserted)
2.1.8 Spot autofocus metering field
(alternatively to 2.1.9)
2.1.9Normal autofocus metering field
2.1.10Indication that spot exposure metering is switched on
2.1.11Self-timer
(alternatively to 2.1.9 – 2.1.12)
a. : 2 seconds delay
b. : 12 seconds delay
2.1.12Enlarged central section of the image
(appears only with manual focusing)
2.1.13 Histogram
(appears only when activated)
2.1.14Flash exposure compensation set, including compensation value
2.1.15Indication of program shift option/for setting the slowest shutter
speeds with the setting dial
(appears only with programmed automatic exposure mode/only when shutter speed dial is set to 2+)
2.1.16 Indication of shifted pair of values
(appears only with programmed automatic exposure mode and after shifting)
2.1.17 Shutter speed
(appears immediately with manual setting, i.e. with speed priority and manual modes, after tapping the shutter release button with automatic setting, i.e. with programmed automatic exposure and aperture priority modes, red after pressing the shutter release button to the pressure point when the setting range is exceeded with programmed automatic exposure, aperture priority and speed priority modes, otherwise white)
2.1.18 Light balance
(alternatively to 2.1.19, appears only with manual setting of shutter speed and aperture)
2.1.19 Distance scale
(appears only with manual focusing, with meter and feet graduations)
2.1.20 Aperture value
(appears immediately with manual setting, i.e. with aperture priority and manual modes, after tapping the shutter release button with automatic setting, i.e. with programmed automatic exposure and speed priority modes, red after pressing the shutter release button to pressure point when the setting range is exceeded with programmed automatic exposure, aperture priority and speed priority modes, otherwise white)
2.1.21 Exposure compensation set, including compensation value
(not with manual setting of shutter speed and aperture)
2.1.22 Exposure metering method
a.  : Center-weighted exposure metering
c.. : Spot metering
2.1.23Automatic exposure bracketing activated
2.1.24Image stabilization
2.1.25Focusing mode
a.AF: Autofocus
b. : Autofocus including near zone
c.MF: Manual focusingb. : Multi-field metering
77

Displays in the monitor
2.1 In record mode
2.1.26INFO screen with settings for
–Resolution
–File format/Compression rate
(see 2.1.4)
– White balance
(Symbols with additional *– if white balance fine tuning is set)
a.No display: automatic setting
b. : For tungsten lighting
c. : For daylight
d. : For electronic flash units
e. : For cloudy conditions
f. : For shady conditions
g. : For manual setting 1
h. : For manual setting 1
i. : for Color temperature setting
–Color bias (Preset Film setting)
–Image stabilization
78
2.2In review mode
2.2.1 |
2.2.2 |
2.2.3 |
2.2.4 2.2.5 |
|
|||||||||||||||
2.2.19 |
|
|
|
|
|
|
|
|
|
|
|
|
|
|
|
|
|
|
2.2.6 |
|
|
|
|
|
|
|
|
|
|
|
|
|
|
|
|||||
|
|
|
|
|
|
|
|
|
|
|
|
|
|
||||||
2.2.18 |
|
|
|
|
|
|
|
|
|
|
|
|
|
|
2.2.7 |
||||
|
|
|
|
|
|
|
|
|
|
|
|
|
|
||||||
|
|
|
|
|
|
|
|
|
|
|
|
|
|
|
|
|
|
|
|
2.2.17 |
|
|
|
|
|
|
|
|
|
|
|
|
|
|
|
|
|
|
|
|
|
|
|
|
|
|
|
|
|
|
|
|
|
|
|
|
|
|
|
2.2.16 |
|
|
|
|
|
|
|
|
|
|
|
|
|
|
|
|
|
|
|
|
|
|
|
|
|
|
|
|
|
|
|
|
|
|
|
|
|
|
|
2.2.15 |
|
|
|
|
|
|
|
|
|
|
|
|
|
|
|
|
|
|
2.2.8 |
|
|
|
|
|
|
|
|
|
|
|
|
|
|
|
|
|
|
||
2.2.14 |
|
|
|
|
|
|
|
|
|
|
|
|
|
|
|
||||
|
|
|
|
|
|
|
|
|
|
|
|
|
|
||||||
|
|
|
|
|
|
|
|
|
|
|
|
|
|
|
|
|
|
|
|
2.2.13 |
|
|
|
|
|
|
|
|
|
|
|
|
|
|
|
|
|
|
|
|
|
|
|
|
|
|
|
|
|
|
|
|
|
|
|
|
|
|
|
|
|
|
|
|
|
|
|
|
|
|
|
|
|
|
|||||
|
|
|
|
|
|
|
|
|
|
|
|
|
|
|
|
|
|
|
|
2.2.12 |
2.2.11 |
2.2.10 |
2.2.9 |
|
|
||||||||||||||
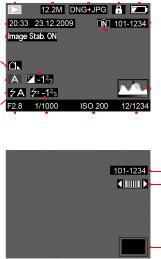
2.2.6Folder/picture number
2.2.7Indication that internal memory is used to store images
(when no memory card is inserted)
2.2.8 Histogram
(see 2.1.13)
2.2.9Continuous picture numbers/total number of pictures on memory card
2.2.10ISO se nsitivity
(see 2.1.3)
2.2.11Shutter speed
2.2.12Aperture
2.2.13Flash exposure compensation
2.2.14Flash mode
(see 2.1.2, No display: picture without flash)
2.2.1Review mode indication
2.2.2Resolution
2.2.3File format/Compression rate
(see 2.1.4)
2.2.4Protected picture
2.2.5Battery charge level
(see 2.1.5)
|
2.2.15 Exposure mode |
2.2.6 |
(see 2.1.1) |
2.2.20 |
2.2.16 Exposure compensation |
|
(see 2.1.14) |
2.2.17 White balance
(see 2.1.26)
2.2.18 Image stabilization
2.2.21
2.2.19Date and time for picture shown
2.2.20Indication to use setting wheel for changing pictures with enlarged section
2.2.21Position of enlarged section in picture
79
Menu items
3.1 |
Resolution |
File size |
3.2 |
Compression |
File format/Compression rate |
|
|
|
3.3 |
AUTO ISO Settings |
Auto ISO settings |
3.4 |
Metering Mode |
Exposure metering |
|
|
|
3.5 |
Continuous |
Series exposure frequency |
3.6 |
AF Assist Lamp |
Low light AF function |
|
|
|
3.7 |
MF Assist |
Monitor image enlargement |
3.8 |
Image Stabilization |
Anti camera shake settings |
|
|
|
3.9 |
Preset Film |
Color bias settings |
3.10 |
Sharpening |
Picture sharpness |
3.11 |
Saturation |
Picture saturation |
3.12 |
Contrast |
Picture contrast |
3.13 |
Ext. Viewfinder |
Monitor off for external viewfinder |
3.14 |
Flash Sync |
Firing at start or end of exposure |
|
|
|
3.15 |
Monitor Brightness |
Settings |
3.16 |
Rec. Histogram |
Graphic indication of brightness |
|
|
distribution |
|
|
|
3.17 |
Play Histogram |
Graphic indication of brightness |
|
|
distribution |
3.18 |
Reset Picture Numbering |
Settings |
3.19 |
Auto Review |
Automatic review of the last picture |
|
|
taken |
3.20 |
Auto Power Off |
Operation time out |
|
|
|
3.21 |
Auto LCD Off |
Monitor image time out |
3.22 |
Color Space |
Working color space |
|
|
|
3.23 |
Date |
Date settings |
3.24 |
Time |
Time settings |
|
|
|
3.25 |
Shutter Volume |
Menu language |
3.26 |
Acoustic Signal |
Acknowledgement tones/ |
|
|
Signal for memory card capacity limit |
|
|
|
3.27 |
Language |
Menu language |
3.28 |
Auto Rotate Display |
Automatic upright review |
|
|
|
3.29 |
HDMI |
Slide show settings |
3.30 |
Protect |
Delete protection menu |
|
|
|
3.31 |
Copy |
Data transfer from internal memory |
|
|
to card |
3.32 |
Format |
Memory card or internal memory |
|
|
formatting |
|
|
|
3.33 |
Firmware Version |
Info only |
3.34 |
User Profile |
User-specific profile |
80
Using the LEICA X1 for the first time
You will need the following items:
•Camera
•Battery (A)
•Battery charger (B) with appropriate power plug (C)
•Memory card (not included in scope of delivery)
Presets
1.Attach the appropriate power plug to the charger (see p. 84).
2.Place the battery (A) in the battery charger (B) to charge it (see p. 85).
3.Attach the charger to a power outlet (see p. 85).
4.Set the main switch (1.7) to OFF (see p. 88).
5.Place the charged battery in the camera (see p. 85).
6.Insert a memory card (see p. 86).
7.Remove the lens cap (F).
8.Set the main switch (1.7) to S (see p. 88).
9.Set the desired menu language (see p. 91).
10.Set the date and time (see p. 91).
Taking photographs
11.Set
a.both shutter speed (1.10) and aperture (1.9) dials to A (see p. 102),
b.Focusing mode to AF (see p. 97),
c.Exposure metering mode to  (see p. 101).
The settings recommended above ensure simple, quick and reliable photography for your first shots with the LEICA X1. Details on the various modes/functions can be found in the relevant sections on the pages indicated.
12.Press the shutter release button (1.8) to the first pressure point to activate focusing and exposure metering (see p. 88).
13.Press the shutter release button all the way down to take the photograph.
Viewing pictures
1.Press the PLAY button (1.16).
2.Press left or right direction buttons (1.25/1.22) to view other pictures.
Enlarging pictures
Turn the setting dial (1.20) clockwise for an enlarged view of the displayed picture (see p. 117).
Deleting pictures
Press the DELETE/FOCUS button (1.15) and, in the menu appearing, se-
lect the desired function.
81
Preparation |
|
|
Charging the battery |
|
|
|
The LEICA X1 is supplied with the required power by a lithium ion battery (A). |
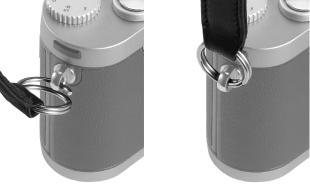
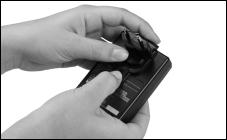
Attaching the carrying strap |
|
|
|
|
|
|
Attention: |
|
|
|
• Only the battery type specified and described in this manual, and/or |
|
|
||
|
|
|
battery types specified and described by Leica Camera AG, may be used |
|
|
|
in this camera. |
|
|
|
• This battery may only be used in the units for which it is designed and |
|
|
|
may only be charged exactly as described below. |
|
|
|
• Using this battery contrary to the instructions and using non-specified |
|
|
|
battery types can under certain circumstances result in an explosion. |
|
|
|
• The batteries may not be exposed to sunlight, heat, humidity or moisture |
|
|
|
for long periods. Likewise, the battery may not be placed in a microwave |
|
|
|
oven or a highpressure container to prevent a risk of fire or explosion. |
|
|
|
• Never throw batteries into a fire as this can cause them to explode! |
|
|
|
• Humid or wet batteries may not be charged or used in the camera under |
|
|
|
any circumstances. |
|
|
||
|
|
|
• Always ensure that the battery contacts are clean and freely accessible. |
|
|
|
Whilst lithium ion batteries are proof against short circuits, they should |
|
|
|
still be protected against contact with metal objects such as paper clips |
|
|
|
or jewelry. A short-circuited battery can get very hot and cause severe |
|
|
|
burns. |
|
|
|
• If a battery is dropped, check the casing and the contacts immediately |
|
|
|
for any damage. Using a damaged battery can damage the camera. |
82

•In case of noise, discoloration, deformation, overheating of leaking fluid, the battery must be removed from the camera or charger immediately and replaced. Continued use of the battery carries a risk of overheating, resulting in fire and/or explosion.
•In case of leaking fluid or a smell of burning, keep the battery away from sources of heat. Leaked fluid can catch fire.
•Only the charger specified and described in this manual, or other chargers specified and described by Leica Camera AG, may be used. The use of other chargers not approved by Leica Camera AG can cause damage to the batteries and, in extreme cases, serious or life-threatening injuries.
•The charger supplied should be used exclusively for charging this battery type. Do not attempt to use it for other purposes.
•Ensure that the mains outlet used is freely accessible.
•The charging process generates a certain amount of heat. Therefore, it must not be take place in small and closed, i.e. unventilated containments.
•The battery and charger may not be opened. Repairs may only be carried out by authorized workshops.
•Ensure that the batteries cannot be accessed by children. Swallowing batteries can cause asphyxiation.
First aid:
•If battery fluid comes into contact with the eyes, there is a risk of blinding. Rinse out the eyes thoroughly with clean water immediately. No not rub the eyes.
Seek medical attention immediately.
•If leaked fluid gets onto the skin or clothing, there is a risk of injury. Wash the affected areas with clean water. There is no need to seek medical attention.
Notes:
•The battery can only be charged outside the camera.
•Batteries should be charged before the camera is used for the first time.
•The battery must have a temperature of 0°-35°C to be charged (otherwise the charger will not turn on, or will turn off again).
•Lithium ion batteries can be charged at any time, regardless of their current charge level. If a battery is only partly discharged when charging starts, it is charged to full capacity more quickly.
•Lithium ion batteries should only be stored when partially charged, i.e. not when fully discharged or fully charged. For very long storage periods, they should be charged for around 15 minutes twice a year to prevent total discharge.
•The batteries and the charger heat up during the charging process. This is normal and not a malfunction.
•A new battery only reaches its full capacity after it has been fully charged and – by use in the camera - discharged again 2 or 3 times. This discharge procedure should be repeated around every 25 cycles.
83
•Rechargeable lithium ion batteries generate power through internal chemical reactions. These reactions are also influenced by the external temperature and humidity. To ensure a maximum service life of the battery, it should not be exposed to constant extremes (high or low) of temperature (e.g. in a parked car in the summer or winter).
•Even when used under optimum conditions, every battery has a limited service life! After several hundred charging cycles, this becomes noticeable as the operating times get significantly shorter.
•Defective batteries should be disposed of according to the respective instructions (see p. 71) at a collection point to ensure proper recycling.
•The replaceable battery provides power to a back-up battery that is permanently fitted in the camera. This back-up battery retains the set date and time for up to 3 days. If this back-up battery becomes discharged it must be recharged by inserting a charged, main battery. Once the replaceable battery has been inserted, the full capacity of the back-up battery is recovered after about 60 hours. This process does not require the camera to be turned on. However, you will have to set the date and time again in this situation.
•Remove the battery if you will not be using the camera for a long period of time. When doing so, turn the camera off using the main switch first (see p. 88). Otherwise, after several weeks the battery could become totally discharged, i.e. the voltage is sharply reduced as the camera still consumes a small amount of current (for saving your settings) even when it is turned off.
Preparing the charger (A)
The charger must be equipped with the right plug (1.38) for the local power outlets.
To attach the plug,
The appropriate plug type is pushed onto the charger until it clicks into place.
To remove a plug, simultaneously
a.press the locking button (1.39) and
b.pull the attached plug off upwards from its normal position.
Note:
The charger automatically switches to the prevailing mains voltage.
84
Charging the battery
1.Connect the charger to a power outlet.
2.Insert the battery into the charger by
a.positioning it with its contacts face down and pointing at the counterparts (1.36a) in the battery bay, and
b.pushing it down until it lies flat in the bay.
Charge status indications
Correct loading is indicated by the status LED (1.37) glowing red, when it turns green the battery is completely charged.
Inserting the battery in the camera/
Removing the battery from the camera
1.Set the main switch (1.7) to OFF.
2.Open the battery/memory card compartment door (1.30) by turning the locking lever (1.30a) clockwise. The spring-loaded door then opens automatically.
3.Insert the battery into the compartment with its contacts towards the back of the camera. Push it into the compartment (1.34) until the light gray spring locking catch (1.33) moves over the battery to hold it in place.
4.Close the battery/memory card compartment cover and turn the locking lever anti-/clockwise.
85
 Loading...