


KitchenAid 5KSM175PSECZ, 5KSM175PSECR, 5KSM175PSECP, 5KSM175PSECL, 5KSM175PSECB Owner's Manual
...
5KSM125, 5KSM175PS 5K45SS, 5KSM45


English........................................................................ |
5 |
Deutsch.................................................................... |
23 |
Français.................................................................... |
41 |
Italiano...................................................................... |
59 |
Nederlands............................................................... |
77 |
Español..................................................................... |
95 |
Português............................................................... |
113 |
Ελληνικά.................................................................. |
131 |
Svenska.................................................................. |
149 |
Norsk...................................................................... |
167 |
Suomi...................................................................... |
185 |
Dansk...................................................................... |
203 |
Íslenska................................................................... |
221 |
Русский................................................................... |
239 |
Polski...................................................................... |
257 |
Český....................................................................... |
275 |
Türkçe...................................................................... |
293 |
..................................................................... |
311 |


TABLE OF CONTENTS
PARTS AND FEATURES 6 Parts and accessories 6
STAND MIXER SAFETY 7 Important safeguards 7 Electrical requirements 9 Electrical equipment waste disposal 9
USING THE STAND MIXER 10 Speed control guide 10 Accessory guide 11 Attaching/removing the bowl 11 Lifting/lowering the motor head 12 Attaching/removing the flat beater, Flex Edge beater*,
wire whip, or dough hook 12 Beater to bowl clearance 14 Placing/removing the pouring shield* 14 Using the pouring shield* 15 Operating the speed control 16 Optional attachments 16
TIPS FOR GREAT RESULTS 18 Egg whites 18 Whipped cream 18 Mixing tips 19
CARE AND CLEANING 20 TROUBLESHOOTING 21 WARRANTY AND SERVICE 22
* Included with select models only. Also available as optional accessory.
<![endif]>ENGLISH
| 5

PARTS AND FEATURES
PARTS AND ACCESSORIES
Attachment hub |
|
|
|
Attachment knob |
|
Motor head |
Pouring shield* |
|
Motor head |
||
|
||
|
locking lever |
|
Speed |
(not shown) |
|
|
||
control |
|
|
lever |
|
Beater shaft
3 L stainless steel bowl*
Beater height adjustment
screw (not shown)
Dough hook
Bowl**
Bowl clamping plate
Flat beater |
Flex Edge beater* |
Wire whip |
*Included with select models only. Also available as optional accessory.
**The bowl design and material depend on the Stand Mixer model.
6 | PARTS AND FEATURES

STAND MIXER SAFETY
| <![if ! IE]> <![endif]>ENGLISH |
IMPORTANT SAFEGUARDS
When using electrical appliances, basic safety precautions should always be followed, including the following:
1.Read all instructions.
2.To protect against risk of electrical shock,
do not put Stand Mixer in water or other liquid.
3.Unplug Stand Mixer from outlet when not in use, before putting on or taking off parts, and before cleaning.
4.Never leave the Stand Mixer unattended while it is in operation.
STAND MIXER SAFETY | 7

STAND MIXER SAFETY
5.This appliance can be used by children aged from
8 years and above and persons with reduced physical, sensory or mental capabilities or lack of experience and knowledge if they have been given supervision
or instruction concerning use of the appliance in a safe way and understand hazards involved.
Children shall not play with the appliance. Cleaning and user maintenance shall not be made by children without supervision.
6.Avoid contacting moving parts. Keep hands, hair, clothing, as well as spatulas and other utensils away from beater during operation to reduce the risk of injury to persons and/or damage to the Stand Mixer.
7.Do not operate Stand Mixer with a damaged
cord or plug or after the Stand Mixer malfunctions, or is dropped or damaged in any manner. Return appliance to the nearest Authorised Service Centre for examination, repair or electrical
or mechanical adjustment.
8.The use of attachments not recommended or sold
by KitchenAid may cause fire, electric shock, or injury.
9.Do not use the Stand Mixer outdoors.
10.Do not let the cord hang over edge of table or counter.
11.Remove flat beater, wire whip or dough hook from Stand Mixer before washing.
SAVE THESE INSTRUCTIONS
This product is designed for household use only.
8 | STAND MIXER SAFETY

STAND MIXER SAFETY
ELECTRICAL REQUIREMENTS
|
Wattage: |
|
WARNING |
||
300 Watts for models 5KSM125 |
||
|
and 5KSM175PS |
|
|
||
|
275 Watts for models 5K45SS |
|
|
and 5KSM45 |
|
|
Voltage: 220-240 V |
|
|
Hertz: 50-60 Hz |
|
|
NOTE: If the plug does not fit in the |
|
Electrical Shock Hazard |
||
outlet, contact a qualified electrician. |
||
Plug into an earthed outlet. |
Do not modify the plug in any way. |
|
Do not use an adapter. |
||
Do not remove earth prong. |
||
Do not use an extension cord. If the |
||
Do not use an adapter. |
||
power supply cord is too short, have a |
||
Do not use an extension cord. |
qualified electrician or serviceman install |
|
an outlet near the appliance. |
||
Failure to follow these instructions |
|
|
can result in death, fire, or |
|
|
electrical shock. |
|
|
|
|
ELECTRICAL EQUIPMENT WASTE DISPOSAL
Disposal of packing material
The packing material is 100% recyclable and is marked with the recycle symbol  . The various parts of the packing must therefore be disposed of responsibly and in full compliance
with local authority regulations governing waste disposal.
Scrapping the product
-This appliance is marked in compliance with European Directive 2012/19/EU, Waste Electrical and Electronic Equipment (WEEE).
-By ensuring this product is disposed of correctly, you will help prevent potential negative consequences for the environment and human health, which could otherwise be caused
by inappropriate waste handling of this product.
- The symbol  on the product or on the accompanying documentation indicates that it should not be treated as domestic waste but must be taken to an appropriate collection Centre for the recycling of electrical and electronic equipment.
For more detailed information about treatment, recovery and recycling of this product, please contact your local city office, your household waste
disposal service or the shop where you purchased the product.
<![endif]>ENGLISH
STAND MIXER SAFETY | 9

USING THE STAND MIXER
SPEED CONTROL GUIDE
All speeds have the Soft Start feature which automatically starts the Stand Mixer at a lower speed to help avoid ingredient splash-out and “flour puff” at start-up, then quickly increases to the selected speed for optimal performance.
SPEED |
ACTION |
ATTACHMENT DESCRIPTION |
1 |
STIR |
For slow stirring, combining, mashing, |
|
|
starting all mixing procedures. Use to add |
|
|
flour and dry ingredients to batter, and to add |
|
|
liquids to dry ingredients. Do not use Speed |
|
|
1 to mix or knead yeast doughs. |
2 |
SLOW |
For slow mixing, mashing, faster stirring. Use |
|
MIXING |
to mix and knead yeast doughs, heavy batters |
|
|
and candies, start mashing potatoes or other |
|
|
vegetables, cut shortening into flour, mix thin |
|
|
or splashy batters. |
4 |
MIXING, |
For mixing semi-heavy batters, such |
|
BEATING |
as cookies. Use to combine sugar and |
|
|
shortening and to add sugar to egg whites |
|
|
for meringues. Medium speed for cake mixes. |
6 |
BEATING, |
For medium fast beating (creaming) |
|
CREAMING |
or whipping. Use to finish mixing cake, |
|
|
doughnut, and other batters. High |
|
|
speed for cake mixes. |
8 |
FAST BEATING, |
For whipping cream, egg whites, and |
|
WHIPPING |
boiled frostings. |
10 |
FAST |
For whipping small amounts of cream, |
|
WHIPPING |
egg whites, or for final whipping of |
|
|
mashed potatoes. |
NOTE: The speed control lever can be set between the speeds listed in the above chart to obtain speeds 3, 5, 7, and 9 if a finer adjustment is required. Do not exceed Speed 2 when preparing yeast doughs as this may cause damage to the Stand Mixer.
10 | USING THE STAND MIXER
USING THE STAND MIXER
ACCESSORY GUIDE
ACCESSORY |
USES |
Flat beater and |
Cakes, creamed frostings, |
Flex Edge beater* |
candies, cookies, pie pastry, |
for normal to heavy |
biscuits, meat loaf, |
mixtures: |
mashed potatoes |
Wire whip for |
Eggs, egg whites, heavy cream, |
mixtures that need |
boiled frostings, sponge cakes, |
air incorporated: |
mayonnaise, some candies |
Dough hook for mixing |
Breads, rolls, pizza dough, buns |
and kneading yeast |
|
doughs: |
|
* Included with select models only. Also available as optional accessory.
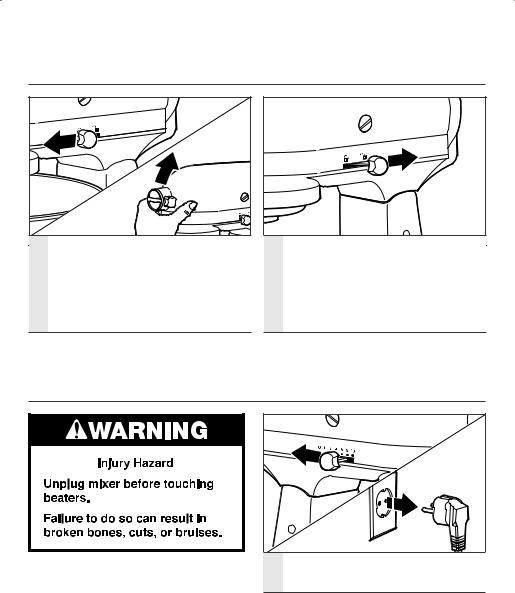
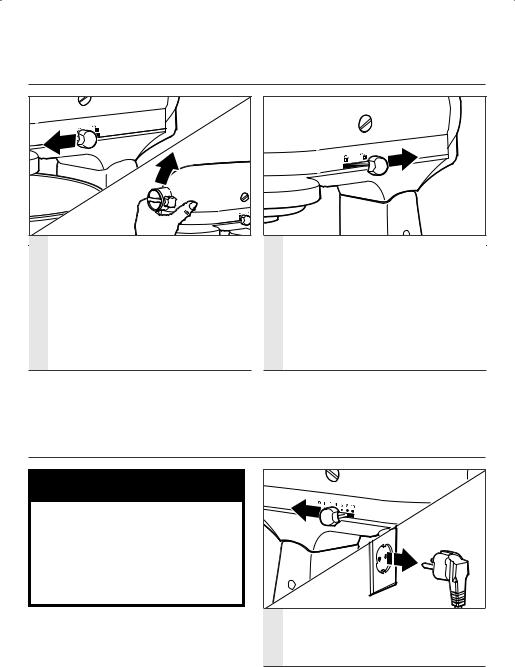
ATTACHING/REMOVING THE BOWL
<![endif]>ENGLISH
1 |
To attach bowl: Turn speed control |
to “0”. Unplug Stand Mixer. |
Place bowl on bowl clamping 3 plate. Turn bowl gently in
clockwise direction.
2 |
Hold the locking lever in the UNLOCK |
position and tilt motor head back. |
To remove bowl: Repeat steps 1
4 and 2. Turn bowl gently counterclockwise.
USING THE STAND MIXER | 11
USING THE STAND MIXER
LIFTING/LOWERING THE MOTOR HEAD
To lift motor head: Push the locking lever to the UNLOCK position and
1 lift the head. Once lifted, the lever will automatically go back in LOCK position to keep the head lifted.
To put down motor head: Push the locking lever to UNLOCK and gently bring the head down. The locking
2 lever will automatically go back in LOCK position when the head is down. Before mixing, test lock by attempting to raise motor head.
NOTE: Motor head should always be in LOCK position when using the Stand Mixer.
ATTACHING/REMOVING THE FLAT BEATER, FLEX EDGE BEATER*, WIRE WHIP, OR DOUGH HOOK
1 |
To attach accessory: Turn speed |
control to “0”. Unplug Stand Mixer. |
* Included with select models only. Also available as optional accessory.
12 | USING THE STAND MIXER

USING THE STAND MIXER
2 |
Hold the locking lever in the UNLOCK |
position and tilt motor head back. |
| <![if ! IE]> <![endif]>ENGLISH |
Slip accessory onto beater shaft and 3 press upward as far as possible. Then, turn accessory to the right, hooking accessory over the pin on the shaft.
To remove accessory: Repeat steps 1 and 2. Press accessory upward
4 as far as possible and turn to the left. Then pull accessory from the beater shaft.
USING THE STAND MIXER | 13

USING THE STAND MIXER
BEATER TO BOWL CLEARANCE
Your Stand Mixer is adjusted at the factory so the flat beater just clears the bottom of the bowl. If, for any reason, the flat beater hits the bottom of the bowl or is too far away from the bowl, you can correct clearance easily.
1 |
Turn speed control to “0”. Unplug |
Stand Mixer. |
Lift motor head. Turn screw slightly counterclockwise (left) to raise flat beater or clockwise (right) to lower
2 flat beater. Make adjustment with flat beater, so it just clears surface of bowl. If you over adjust the screw, the bowl lock lever may not lock into place.
NOTE: When properly adjusted, the flat beater will not strike on the bottom or side of the bowl. If the flat beater or the wire whip is so close that it strikes the bottom of the bowl, coating may wear off the beater or wires on whip may wear.
PLACING/REMOVING THE POURING SHIELD*
To place pouring shield: Turn speed control to “0”. Unplug Stand Mixer.
1 Attach your chosen accessory. See “Attaching/removing the flat beater, wire whip, or dough hook” section.
From the front of the Stand Mixer, slide the pouring shield over the
2 bowl until the shield is centered. The bottom rim of the shield should fit within the bowl.
* Included with select models only. Also available as an optional accessory.
14 | USING THE STAND MIXER

USING THE STAND MIXER
<![if ! IE]><![endif]>ENGLISH
To remove pouring shield:
3 Turn speed control to “0”. Unplug Stand Mixer.
Lift the front of the pouring shield
4 clear of the bowl rim and pull forward. Remove attachment and bowl.
USING THE POURING SHIELD*
Use the pouring shield to avoid having ingredients splashing out of the bowl when mixing, as well as to easily pour ingredients in the bowl while mixing.
For best results, rotate the shield so the motor head covers the
1 U-shaped gap in the shield. The pouring chute will be just to the right of the attachment hub as you face the Stand Mixer.
2 |
Pour the ingredients into the bowl |
through the pouring chute. |
* Included with select models only. Also available as an optional accessory.
USING THE STAND MIXER | 15

USING THE STAND MIXER
OPERATING THE SPEED CONTROL
NOTE: The Stand Mixer may warm up during use. Under heavy loads with extended mixing time, the top of the unit may become hot. This is normal.
Plug Stand Mixer into proper electrical outlet. Always set speed
1 control lever on lowest speed to start, then gradually increase speed to avoid splashing ingredients. See “Speed control guide” chart.
Do not scrape bowl while Stand Mixer is operating. The bowl and beater are 2 designed to provide thorough mixing
without frequent scraping. Scraping the bowl once or twice during mixing is usually sufficient.
OPTIONAL ATTACHMENTS
KitchenAid offers a wide range of optional attachments such as food grinders or pasta makers. They may be attached to the Stand Mixer attachment power shaft, as shown here.
1 |
To attach: Turn speed control |
to “0”. Unplug Stand Mixer. |
Loosen attachment knob by turning 2 it counterclockwise. Remove
attachment hub cover.
16 | USING THE STAND MIXER

USING THE STAND MIXER
<![if ! IE]><![endif]>ENGLISH
|
Insert attachment shaft housing into |
|
|
|
attachment hub, making certain that |
|
|
|
attachment power shaft fits into |
|
Tighten attachment knob by turning |
3 |
square attachment hub socket. It may |
4 |
|
be necessary to rotate attachment |
clockwise until attachment is |
||
|
back and forth. When attachment |
|
completely secured to Stand Mixer. |
|
is in proper position, the pin on the |
|
|
|
attachment will fit into the notch |
|
|
|
on the hub rim. |
|
|
5 Plug into proper electrical outlet.
6 |
To remove: Turn speed control |
to “0”. Unplug Stand Mixer. |
USING THE STAND MIXER | 17

USING THE STAND MIXER
Loosen attachment knob by
7 turning it counterclockwise. Rotate attachment slightly back and forth while pulling out.
Replace attachment hub cover.
8 Tighten attachment knob by turning it clockwise.
NOTE: See the Use and Care Guide of each specific attachment for recommended speed settings and operating times.
TIPS FOR GREAT RESULTS
EGG WHITES
Place room temperature egg whites in clean, dry bowl. Attach bowl and wire whip. To avoid splashing, gradually turn to designated speed and whip to desired stage.
AMOUNT |
SPEED |
1 egg white |
GRADUALLY to 10 |
2 or more egg whites |
GRADUALLY to 8 |
Whipping stages
With your KitchenAid Stand Mixer, egg whites whip quickly. Avoid over whipping.
WHIPPED CREAM
Pour cold whipping cream into chilled bowl. Attach bowl and wire whip. To avoid splashing, gradually turn to designated speed and whip to desired stage.
AMOUNT |
SPEED |
less than 200 ml (3/4 cup) |
GRADUALLY to 10 |
more than 200 ml (3/4 cup) |
GRADUALLY to 8 |
Whipping stages
Watch cream closely during whipping. Because your KitchenAid Stand Mixer whips so quickly, there are just a few seconds between whipping stages.
18 | TIPS FOR GREAT RESULTS

TIPS FOR GREAT RESULTS
MIXING TIPS
Mixing time
Your KitchenAid Stand Mixer will mix faster and more thoroughly than most other electric mixers. Therefore, the mixing time in most recipes must be adjusted to avoid over beating.
To help determine the ideal mixing time, observe the batter or dough and mix only until it has the desired appearance described in your recipe, such as “smooth and creamy.” To select the best mixing speeds, use the “Speed control guide” section.
Adding ingredients
The standard procedure to follow when mixing most batters, especially cake and cookie batters, is to add:
1/3 dry ingredients 1/2 liquid ingredients 1/3 dry ingredients 1/2 liquid ingredients 1/3 dry ingredients
Use Speed 1 until ingredients have been blended. Then gradually increase to desired speed.
Always add ingredients as close to side of bowl as possible, not directly into moving beater. The pouring shield can be used to simplify adding ingredients.
NOTE: If ingredients in very bottom of bowl are not thoroughly mixed, the beater is not far enough into the bowl. See the “Beater to bowl clearance” section.
Cake mixes
When preparing packaged cake mixes, use Speed 4 for medium speed and Speed 6 for high speed. For best results, mix for the time stated on the package directions.
Adding nuts, raisins, or candied fruits
Solid materials should be folded in the last few seconds of mixing on Speed 1. The batter should be thick enough to keep the fruit or nuts from sinking to the bottom of the pan during baking. Sticky fruits should be dusted with flour for better distribution in the batter.
Liquid mixtures
Mixtures containing large amounts of liquid ingredients should be mixed at lower speeds to avoid splashing. Increase speed only after mixture has thickened.
Kneading yeast doughs
ALWAYS use the dough hook to mix and knead yeast doughs. Use Speed 2 to mix or knead yeast doughs. Use of any other speed creates high potential for unit failure.
Do not use recipes calling for more than 900 g (7 cups) all-purpose flour or 800 g (6 cups) whole-wheat flour when making dough in a 4.3 L bowl.
Do not use recipes calling for more than 1 kg (8 cups) all-purpose flour or 800 g (6 cups) whole-wheat flour when making dough in a 4.8 L bowl.
<![endif]>ENGLISH
TIPS FOR GREAT RESULTS | 19

CARE AND CLEANING
 WARNING
Electrical Shock Hazard Plug into an earthed outlet. Do not remove earth prong. Do not use an adapter.
Do not use an extension cord.
Failure to follow these instructions can result in death, fire, or electrical shock.
Bowl, pouring shield*, white flat beater, Flex Edge beater*, and white dough hook may be washed in a
2 dishwasher. Or, clean them thoroughly in hot sudsy water and rinse completely before drying.
Do not store beaters on shaft.
Always be sure to unplug Stand Mixer before cleaning. Wipe Stand Mixer with a soft, damp cloth. Do not use
1 household/commercial cleaners. Wipe off beater shaft frequently, removing any residue that may accumulate. Do not immerse in water.
IMPORTANT: The wire whip is not dishwasher-safe. Clean it thoroughly
3 in hot sudsy water and rinse completely before drying. Do not store wire whip on shaft.
* Included with select models only. Also available as an optional accessory.
20 | CARE AND CLEANING
TROUBLESHOOTING
 WARNING
Electrical Shock Hazard Plug into an earthed outlet. Do not remove earth prong. Do not use an adapter.
Do not use an extension cord.
Failure to follow these instructions can result in death, fire, or electrical shock.
Please read the following before calling your service centre.
1.The Stand Mixer may warm up during use. Under heavy loads with extended mixing time periods, you may not be able to comfortably touch the top of the unit. This is normal.
2.The Stand Mixer may emit a pungent odor, especially when new. This is common with electric motors.
3.If the flat beater hits the bowl, stop the Stand Mixer. See the “Beater to bowl clearance” section.
If your Stand Mixer should malfunction or fail to operate, please check the following:
•Is the Stand Mixer plugged in?
•Is the fuse in the circuit to the Stand Mixer in working order? If you have a circuit breaker box, be sure the circuit is closed.
•Turn off the Stand Mixer for 10-15 seconds, then turn it back on. If the Stand Mixer still does not start,
allow it to cool for 30 minutes before turning it back on.
•If the problem is not due to one of the above items, see the “Warranty and service” section.
<![endif]>ENGLISH
TROUBLESHOOTING | 21

WARRANTY AND SERVICE
KITCHENAID STAND MIXER WARRANTY
Length of Warranty: |
KitchenAid Will Pay |
KitchenAid Will Not Pay For: |
|
|
For: |
|
|
|
|
|
|
Europe, Middle East |
The replacement |
A. Repairs when Stand Mixer |
|
and Africa: |
parts and repair |
is used for operations other |
|
For Artisan models |
labour costs to |
than normal household |
|
5KSM125 and 5KSM175PS: |
correct defects |
food preparation. |
|
five years full warranty |
in materials or |
B. Damage resulting from |
|
from date of purchase. |
workmanship. |
||
accident, alterations, |
|||
|
Service must |
||
For models 5K45SS and |
misuse, abuse, or |
||
be provided by |
|||
installation/operation not |
|||
5KSM45: two years full |
an Authorised |
||
in accordance with local |
|||
warranty from date of |
KitchenAid Service |
||
electrical codes. |
|||
purchase. |
Centre. |
||
|
|||
|
|
|
KITCHENAID DOES NOT ASSUME ANY RESPONSIBILITY FOR INDIRECT DAMAGES.
CUSTOMER SERVICE
In U.K. and Ireland:
For any questions, or to find the nearest KitchenAid Authorised Service Centre, please find our contact details below.
NOTE: All service should be handled locally by an Authorised KitchenAid Service Centre.
Contact number for U.K. and Northern Ireland:
Tollfree number 0800 988 1266 (calls from mobile phones are charged standard network rate) or call 0194 260 5504
Contact number for Ireland:
Tollfree number +44 (0) 20 8616 5148
E-mail contact for U.K. and Ireland:
Go to www.kitchenaid.co.uk, and click on the link “Contact Us” at the bottom of the page.
Address for U.K. and Ireland: KitchenAid Europa, Inc.
PO BOX 19
B-2018 ANTWERP 11 BELGIUM
Number for general questions: 


In other countries:
For all product related questions and after sales matters, please contact your dealer to obtain the name of the nearest Authorised KitchenAid Service/Customer Centre.
For more information, visit our website at:
www.KitchenAid.co.uk
www.KitchenAid.eu
©2016 All rights reserved. KITCHENAID and the design of the Stand Mixer are trademarks in the U.S. and elsewhere.
22 | WARRANTY AND SERVICE

INHALTSVERZEICHNIS
TEILE UND MERKMALE 24 Teile und Merkmale 24
SICHERHEITSHINWEISE FÜR DIE KÜCHENMASCHINE 25 Wichtige Sicherheitshinweise 25 Elektrische Voraussetzungen 27 Entsorgung von Elektrogeräten 27
BEDIENEN DER KÜCHENMASCHINE 28 Auswählen der richtigen Geschwindigkeit 28 Zubehörübersicht 29 Anbringen und Entfernen der Schüssel 29 Heben und Senken des Motorkopfes 30 Anbringen und Entfernen von Flachrührer,
Flexi-Rührer*, Schneebesen oder Knethaken 30 Abstand zwischen Schüssel und Flachrührer 32 Anbringen und Entfernen des Spritzschutzes mit Einfüllschütte* 32 Verwendung des Spritzschutzes mit Einfüllschütte* 33 Verwendung der Geschwindigkeitsregelung 34 Optionales Zubehör 34
TIPPS FÜR TOLLE ERGEBNISSE 36 Eiweiß 36 Schlagsahne 36 Hinweise zum Rühren 37
PFLEGE UND REINIGUNG 38 PROBLEMBEHEBUNG 39 GARANTIE UND KUNDENDIENST 40
<![endif]>DEUTSCH
* Nur im Lieferumfang bestimmter Modelle enthalten. Auch separat erhältlich.
| 23

TEILE UND MERKMALE
TEILE UND MERKMALE
Zubehörknopf
Zubehörnabe
Motorkopf
Geschwindigkeits kontrollhebel
Höheneinstellschraube
für Rührbesen
(ohne Abbildung)
Schüsselverriegelungsplatte
Spritzschutz*
Motorkopfverriegelungshebel des Rührkopfes (nicht abgebildet)
Schlagwelle
3-L-Edelstahlschüssel*
Knethaken
Schüssel**
Flachrührer |
Flexi-Rührer* |
Schneebesen |
*Nur im Lieferumfang bestimmter Modelle enthalten. Auch separat erhältlich.
**Design und Material der Schüssel richten sich nach dem Modell der Küchenmaschine.
24 | TEILE UND MERKMALE

SICHERHEITSHINWEISE FÜR DIE KÜCHENMASCHINE
Ihre Sicherheit und die Sicherheit anderer sind von großer Wichtigkeit.
Im vorliegenden Handbuch und an Ihrem Gerät sind zahlreiche Sicherheitshinweise zu nden. Lesen und beachten Sie bitte immer alle diese Sicherheitshinweise.
Dies ist das Warnzeichen.
Dieses Zeichen weist Sie auf mögliche Gefahren hin, die zum Tode oder zu Verletzungen führen können.
Alle Sicherheitshinweise stehen nach diesem Zeichen oder dem Wort „GEFAHR“ oder „WARNUNG“. Diese Worte bedeuten:
 GEFAHR
 WARNUNG
Sie können schwer oder tödlich verletzt werden, wenn Sie diese Hinweise nicht unmittelbar beachten.
Sie können schwer oder tödlich verletzt werden, wenn Sie diese Hinweise nicht beachten.
Alle Sicherheitshinweise erklären Ihnen die Art der Gefahr und geben Hinweise, wie Sie die Verletzungsgefahr verringern können, aber sie informieren Sie auch über die Folgen, wenn Sie diese Hinweise nicht beachten.
WICHTIGE SICHERHEITSHINWEISE
Beim Gebrauch von Elektrogeräten müssen immer folgende grundlegende Sicherheitsmaßnahmen beachtet werden:
1.Lesen Sie alle Hinweise.
2.Die Küchenmaschine nicht ins Wasser oder in andere Flüssigkeiten stellen, um die Gefahr eines elektrischen Schlags zu vermeiden.
3.Den Stecker ziehen, wenn die Küchenmaschine nicht benötigt wird, bevor Teile anoder abmontiert werden oder bevor die Küchenmaschine gereinigt wird.
4.Lassen Sie die Küchenmaschine während der Verwendung niemals unbeaufsichtigt.
<![endif]>DEUTSCH
SICHERHEITSHINWEISE FÜR DIE KÜCHENMASCHINE | 25

SICHERHEITSHINWEISE FÜR DIE KÜCHENMASCHINE
5.Dieses Gerät kann von Kindern ab 8 Jahren und Personen mit eingeschränkten körperlichen, sensorischen oder geistigen Fähigkeiten, aber auch von unerfahrenen und unwissenden Personen verwendet werden, sofern diese das Gerät unter Aufsicht verwenden oder von einer anderen Person
über die sichere Verwendung des Gerätes unterwiesen wurden und sich der damit verbundenen Gefahren bewusst sind. Kinder sollten nicht mit dem Gerät spielen. Kinder sollten das Gerät nur unter Aufsicht reinigen und pflegen.
6.Berühren Sie keine sich bewegenden Teile. Weder Hände, Haar, Kleidung sowie Spachtel oder andere Utensilien dürfen während des Einsatzes der Küchenmaschine Kontakt mit dem Rührer haben. Auf diese Weise können Verletzungen sowie eine Beschädigung der Küchenmaschine vermieden werden.
7.Die Küchenmaschine nicht betreiben, wenn das Netzkabel oder der Netzstecker beschädigt oder Fehlfunktionen aufgetreten sind, oder wenn die Küchenmaschine heruntergefallen ist oder beschädigt wurde. Übergeben Sie das Gerät zur Überprüfung, Reparatur oder elektrischen bzw. mechanischen Neueinstellung an das nächstgelegene autorisierte Wartungszentrum.
8.Die Verwendung von nicht von KitchenAid empfohlenem Zubehör kann zu einem Brand, Stromschlag oder zu Verletzungen führen.
9.Die Küchenmaschine nicht im Freien verwenden.
10.Das Netzkabel nicht über die Tischkante oder über die Kante der Arbeitsplatte hängen lassen.
11.Den Flachrührer, den Schneebesen und den Knethaken vor der Reinigung von der Küchenmaschine abnehmen.
HEBEN SIE DIESE ANLEITUNG GUT AUF.
Dieses Produkt ist ausschließlich für die Verwendung im Haushalt vorgesehen.
26 | SICHERHEITSHINWEISE FÜR DIE KÜCHENMASCHINE

SICHERHEITSHINWEISE FÜR DIE KÜCHENMASCHINE
ELEKTRISCHE VORAUSSETZUNGEN
|
Leistung: |
|
WARNUNG |
||
300 W bei den Modellen 5KSM125 |
||
|
und 5KSM175PS |
|
|
||
|
275 W bei den Modellen 5K45SS |
|
|
und 5KSM45 |
|
|
Spannung: 220-240 V |
|
|
Hertz: 50-60 Hz |
|
|
HINWEIS: Wenn der Stecker nicht in |
|
|
||
Stromschlaggefahr |
die Steckdose passt, wenden Sie sich |
|
Stecken Sie das Kabel in eine geerdete |
an einen qualifizierten Elektriker. Ein |
|
Steckertausch sollte nur von einem |
||
Steckdose. |
Fachmann vorgenommen werden. Keine |
|
Entfernen Sie den Erdungskontakt |
Adapter verwenden. |
|
Kein Verlängerungskabel benutzen. Falls |
||
nicht. |
||
Keinen Adapter benutzen. |
das Netzkabel zu kurz ist, lassen Sie |
|
von einem Fachmann eine zusätzliche |
||
Kein Verlängerungskabel benutzen. |
Steckdose in der Nähe des Aufstellortes |
|
des Gerätes einbauen. |
||
|
||
Nichtbeachtung dieser Instruktionen |
|
|
kann zu Tod, Feuer oder Stromschlag |
|
|
führen. |
|
|
|
|
<![endif]>DEUTSCH
ENTSORGUNG VON ELEKTROGERÄTEN
Entsorgen des Verpackungsmaterials
Das Verpackungsmaterial ist zu 100 % wiederverwertbar und mit dem Recycling-Symbol  versehen. Die verschiedenen Komponenten der Verpackung müssen daher verantwortungsvoll und in Über einstimmung mit den geltenden Gesetzen und Vorschriften zur Abfallentsorgung entsorgt werden.
Entsorgen des Produkts am Ende seiner Lebensdauer
-In Übereinstimmung mit den Anforderungen der EU-Richtlinie 2012/19/EU zu Elektround ElektronikAltgeräten (WEEE) ist dieses Gerät mit einer Markierung versehen.
-Sie leisten einen positiven Beitrag
für den Schutz der Umwelt und die
Gesundheit des Menschen, wenn Sie dieses Gerät einer gesonderten Abfallsammlung zuführen.
Im unsortierten Siedlungsmüll könnte ein solches Gerät durch unsachgemäße Entsorgung negative Folgen haben.
- Das Symbol  am Produkt oder der beiliegenden Anleitung bedeutet, dass es nicht als Hausmüll entsorgt werden darf, sondern bei einer zuständigen Sammelstelle für die
Entsorgung von Elektround Elektronik geräten abgegeben werden muss.
Einzelheiten zu Behandlung, Verwertung und Recycling des Produktes erhalten Sie bei Ihrer Gemeindeverwaltung, Ihrem Abfallunternehmen oder dem Händler, bei dem Sie das Produkt gekauft haben.
SICHERHEITSHINWEISE FÜR DIE KÜCHENMASCHINE | 27

BEDIENEN DER KÜCHENMASCHINE
AUSWÄHLEN DER RICHTIGEN GESCHWINDIGKEIT
Für alle Geschwindigkeiten wird die Funktion Soft Start angeboten, bei der die Küchenmaschine automatisch mit einer niedrigeren Geschwindigkeit anläuft, damit keine Zutaten verspritzt werden oder Mehl herausstiebt. Danach wird die Geschwindigkeit schnell bis zur für optimale Leistung erforderlichen Sollgeschwindigkeit erhöht.
GESCHWINDIGKEIT |
VORGANG ZUBEHÖR |
BESCHREIBUNG |
1 |
RÜHREN |
Zum Umrühren und Vermengen |
|
|
sowie zu Beginn aller |
|
|
Rührvorgänge. Zum Hinzufügen |
|
|
von Mehl und trockenen Zutaten |
|
|
zum Teig sowie für die Zugabe |
|
|
von Flüssigkeiten zu trockenen |
|
|
Zutaten. Die Geschwindigkeit 1 |
|
|
nicht zum Mischen oder Kneten |
|
|
von Hefeteig verwenden. |
2 |
LANGSAMES |
Zum langsamen Mischen, |
|
MISCHEN |
Vermengen und zum schnelleren |
|
|
Umrühren. Zum Mischen |
|
|
und Kneten von Hefeteig, |
|
|
schweren Teigen und Massen |
|
|
für Süßwaren, zur Herstellung |
|
|
von Kartoffelbrei oder anderen |
|
|
Gemüsebreien, für die Zugabe |
|
|
von Backfett zu Mehl, zum |
|
|
Mischen von dünnen oder |
|
|
flüssigen Teigen. |
4 |
MISCHEN |
Zum Mischen von mittelschweren |
|
UND |
Teigen, beispielsweise für Kekse. |
|
SCHLAGEN |
Zum Vermischen von Zucker |
|
und Backfett sowie für die |
|
|
|
|
|
|
Zugabe von Zucker zu Eiweiß |
|
|
für die Herstellung von Baisers. |
|
|
Mittlere Geschwindigkeit für |
|
|
Kuchenfertigmischungen. |
6 |
VERRÜHREN |
Zum mittelschnellen Rühren |
|
UND |
(Aufschäumen) oder Schlagen. |
|
SCHLAGEN |
Zum abschließenden Rühren |
|
von Kuchenteig, Doughnut- |
|
|
|
|
|
|
Teig und anderen Teigen. |
|
|
Hohe Geschwindigkeit für |
|
|
Kuchenfertigmischungen. |
8 |
SCHNELLES |
Zum Schlagen von Schlagsahne, |
|
VERRÜHREN |
Eiweiß und aufgekochten |
|
UND |
Zuckergüssen. |
|
|
|
|
SCHLAGEN |
|
10 |
SCHNELLES |
Zum Schlagen kleiner Mengen |
|
SCHLAGEN |
Schlagsahne, Eiweiß oder zum |
|
|
abschließenden Rühren von |
|
|
Kartoffelbrei. |
HINWEIS: Mit den Zwischeneinstellungen 3, 5, 7 und 9 kann bei Bedarf eine Feinabstufung erzielt werden. Bei Hefeteigen höchstens mit Drehzahlstufe 2 arbeiten, sonst könnte die Küchenmaschine beschädigt werden.
28 | BEDIENEN DER KÜCHENMASCHINE

BEDIENEN DER KÜCHENMASCHINE
ZUBEHÖRÜBERSICHT
ZUBEHÖR |
VERWENDUNG |
Flachrührer und Flexi- |
Kuchen, Kuchenguss, Süßwaren, |
Rührer* für normale bis |
Plätzchen, Pastetenteig, Gebäck, |
schwere Mischungen: |
Hackfleisch, Stampfkartoffeln |
Schneebesen zum |
Eier, Eiweiß, Schlagsahne |
Schlagen von |
(Doppelrahm), gekochter Kuchenguss, |
(Mischungen, die Luft |
Biskuits, Mayonnaise, einige Süßwaren |
enthalten müssen): |
|
Knethaken zum Mischen |
Brote, Brötchen, Pizzateig |
und Kneten von |
|
Hefeteigen für: |
|
<![endif]>DEUTSCH
* Nur im Lieferumfang bestimmter Modelle enthalten. Auch separat erhältlich.
ANBRINGEN UND ENTFERNEN DER SCHÜSSEL
Befestigen der Schüssel:
1 DieGeschwindigkeitssteuerung auf „O” setzen. Ziehen Sie den Netzstecker der Küchenmaschine.
Setzen Sie die Schüssel auf die
3 Schüsselverriegelungsplatte. Drehen Sie die Schüssel vorsichtig im Uhrzeigersinn.
Halten Sie den Verriegelungshebel in 2 der geöffneten Stellung und kippen
Sie den Motorkopf nach hinten.
Abnehmen der Schüssel:
4 Wiederholen Sie dann die Schritte
1 und 2. Drehen Sie die Schüssel vorsichtig gegen den Uhrzeigersinn.
BEDIENEN DER KÜCHENMASCHINE | 29
BEDIENEN DER KÜCHENMASCHINE
HEBEN UND SENKEN DES MOTORKOPFES
So heben Sie den Motorkopf:
Drücken Sie den Verriegelungshebel in die geöffnete Stellung und heben
1 Sie den Motorkopf an. Sobald der Kopf angehoben ist, kehrt der Hebel in die geschlossene Stellung zurück, sodass der Kopf angehoben bleibt.
So senken Sie den Motorkopf:
Drücken Sie den Verriegelungshebel in die geöffnete Stellung und senken Sie den Motorkopf vorsichtig ab. Der
2 Verriegelungshebel kehrt nach dem Absenken des Kopfes automatisch in die geschlossene Stellung zurück. Prüfen Sie den Verschluss vor dem Mischen, indem Sie versuchen, den Motorkopf anzuheben.
HINWEIS: Beim Verwenden der Küchenmaschine muss sich der Motorkopf stets in der verriegelten Position befinden.
ANBRINGEN UND ENTFERNEN VON FLACHRÜHRER, FLEXI-RÜHRER*, SCHNEEBESEN ODER KNETHAKEN
 WARNUNG
Verletzungsgefahr
Vor dem Berühren des Zubehörs grundsätzlich den Stecker ziehen.
Andernfalls können Knochenbrüche, Schnittoder andere Verletzungen verursacht werden.
So bringen Sie ein Werkzeug an: Die
1 Geschwindigkeitssteuerung auf „O” setzen. Ziehen Sie den Netzstecker der Küchenmaschine.
* Nur im Lieferumfang bestimmter Modelle enthalten. Auch separat erhältlich.
30 | BEDIENEN DER KÜCHENMASCHINE
 Loading...