


HB720 series
instructions instrucciones
120V 60Hz
380W Max

English 2 - 9
Français 10 - 18
Español 19 - 28
1 |
|
|
2 |
|
bk |
3 |
|
|
|
|
|
4 |
|
2 |
|
|
5 |
5 |
2 |
|
|
|
1 |
bl
|
3 |
6 |
|
bm
7 |
9 |
|
|
|
7 |
8

bn |
|
bt |
|
|
|
|
5 |
6 |
|
|
|
bo |
|
|
bp |
|
ck |
|
|
|
|
4 |
|
bq |
|
|
br

 cl
cl
7
bs
bq
cm

cn


 cp
cp
co


 cs
cs
cq


cr
9 |
bl |
 8
8  bk
bk
English
IMPORTANT SAFEGUARDS
When using electrical appliances, basic safety precautions should always be followed to reduce the risk of fire, electrical shock and/or personal injury including the following:
•READ ALL INSTRUCTIONS.
•After removing the packaging, make sure the product is complete and undamaged. If in doubt, do not use the appliance and contact a qualified professional only.
•The plastic bag containing the appliance should be kept away from children as it may represent a suffocation hazard.
•To protect against fire, electric shock and injury to persons, never immerse the power handle, cord or plug in water or other liquids.
•Unplug from outlet when hand blender left unattended, not in use, before putting on or taking off parts and before cleaning.
•Do not operate any appliance with a damaged cord or plug or after the appliance malfunctions, or is dropped or damaged in any manner. Return the appliance to the nearest authorized service facility for examination, repair or adjustment.
•The use of accessory attachments not recommended or sold by the appliance manufacturer may cause fire, electric shock or injury.
•Do not use outdoors.
•Do not let cord hang over edge of table or counter, or touch hot surfaces (including the stove).
•Do not place on or near a hot gas or electric burner, or in a heated oven (including the stove).
•Avoid contacting moving parts.
•Never touch the blades while the hand blender is plugged in.
•Keep fingers, hair, clothing and utensils away from moving parts.
•Never blend hot oil or fat.
2
•For safest use it is recommended to let hot liquids cool to room temperature before blending.
•This appliance is not intended for use by persons (including children) with reduced physical, sensory or mental capabilities, or lack of experience and knowledge, unless they have been given supervision or instruction concerning use of the appliance by a person responsible for their safety.
•This appliance should not be used by children and care should be taken when used near children.
•Only use the appliance for its intended domestic use. Kenwood will not accept any liability if the appliance is subject to improper use, or failure to comply with these instructions.
•The maximum rating is based on the attachment that draws the greatest load. Other attachments may draw less power.
•When mixing liquids, especially hot liquids, use a tall container or make small quantities at a time to reduce spillage.
•Remove the chopper blade before emptying the bowl.
•Never remove the cover until the chopper blade has completely stopped.
•Always hold the chopper blade by the finger grip away from the cutting blades, both when handling and cleaning.
•Blade is sharp. Handle carefully.
•To reduce the risk of injury, never place cutting blade on base without first putting bowl properly in place.
•Be certain cover is securely locked in place before operating appliance.
•Do not attempt to defeat the cover interlock mechanism.
•Keep hands and utensils away from the cutting blade while chopping food and out of the container while blending to reduce the risk of severe injury to persons or damage to the food chopper. A scraper may be used but only when the food chopper is not running. important
•With heavy mixtures to ensure long life of your appliance, don’t use your hand blender for longer than 50 seconds in any four minute period.
3
•Don’t use the whisk attachment for longer than 3 minutes in any 10 minute period.
•Do not attempt to use the ice crusher attachment without fitting to the beaker.
•Do not touch the sharp blades.
•Remove the processing/ice crusher blade before emptying the beaker.
•Never remove the cover until the processing/ice crusher blade has completely stopped.
•Always hold the blades by the finger grip away from the cutting blades, both when handling and cleaning.
•Do not exceed the maximum quantities specified in the recommended usage chart.
•Do not process hard foods such as coffee beans, spices or chocolate in the beaker as they may damage the blade.
SAVE THESE INSTRUCTIONS For Household use only
before plugging in
Make sure your electricity supply is the same as the one shown on the underside of the appliance.
•This appliance has a polarized plug (one blade is wider than the other.) To reduce the risk of electrical shock this plug will fit in a polarized outlet only one way. If the plug does not fit fully in the outlet, reverse the plug. If it still does not fit, contact a qualified electrician. Do not attempt to modify the plug in any way.
4
before using your Kenwood appliance
λRead these instructions carefully and retain for future reference.
λRemove all packaging and any labels. Throw away the blade covers from the triblade and the chopper blade as they are to protect the blade during manufacture and transit only. Take care as the blades are very sharp.
λWash all parts - see “care and cleaning”.
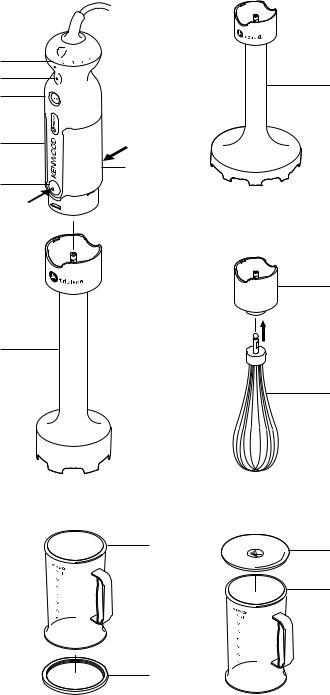
key
hand blender
1 variable speed control
2 on button
3 turbo button
4 power handle
5 blender shaft release buttons
6 blender shaft with fixed triblade.
beaker (if supplied)
7 beaker
8 rubber ring base
9 beaker lid
bk soup blender (if supplied) whisk (if supplied)
bl whisk collar bm wire whisk
chopper (if supplied) bn chopper cover
bo finger grip
bp chopper blade bq bowl
br rubber ring base bs bowl lid
masher (if supplied) bt masher collar
ck masher foot cl masher paddle
ice crusher attachment (if supplied)
cm ice crusher cover cn ice crusher blade co ice crusher bowl cp processing blade cq 1 liter beaker
cr rubber ring base cs beaker lid
to use the hand blender
λYou can blend soups, sauces, milk shakes, mayonnaise and baby food etc.
for beaker blending (if beaker supplied)
λFit the rubber ring base on the bottom of the beaker. (This stops the beaker sliding on the worktop).
λDon’t fill the beaker more than 2/3rds full.
λAfter blending you can fit the lid to the top of the beaker.
Note
If no beaker is supplied in your pack, select a suitably sized container. We would recommend a tall, straight sided vessel with a diameter slightly larger than the foot of the hand blender to allow movement of the ingredients but tall enough to prevent splashing.
for saucepan blending
λFor safest use it is recommended to take the pan off the heat and let hot liquids cool to room temperature before blending.
λUse the soup blender (if supplied) to quickly process soups etc., directly in the saucepan. Alternatively use the hand blender.
λDo not use the soup blender to process uncooked vegetables.
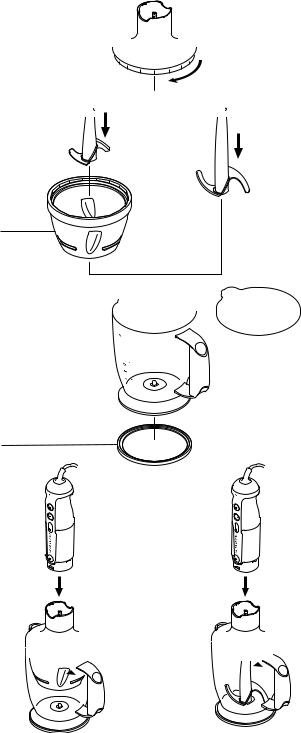
1 Fit the blender shaft to the power handle 1 – push to lock.
2 Plug in.
3 Place the food into the beaker or a similar container, then holding the beaker steady, select the required speed then press the on button. (Select a low speed for slower blending and to minimise splashing and a higher speed or turbo for faster blending).
λ To avoid splashing, place the blade in the food before switching on.
λ Don’t let liquid get above the join between the power handle and blender shaft.
λ Move the blade through the food and use a mashing or stirring action to incorporate the mixture.
5

λYour hand blender is not suitable for ice crushing.
λIf your blender gets blocked, unplug before clearing.
4 After use release the on or turbo button. Unplug and press the release buttons 2 to remove the blender shaft from the power handle.
to use the whisk
λYou can whip light ingredients such as egg whites; cream and instant desserts.
λDon’t whisk heavier mixtures such as margarine and sugar - you’ll damage the whisk.
1 Push the wire whisk into the whisk collar 3.
2 Fit the power handle to the whisk collar. Push to lock.
3 Place your food in a bowl.
λ Don’t whisk more than 4 egg whites or 400ml (3⁄4pt) cream.
4Plug in. To avoid splashing, select speed 1 then press the on button. To whisk on a faster speed, select a higher speed or press the Turbo
button. Move the whisk clockwise.
λDon’t let liquid get above the whisk wires.
5After use release the on or turbo button, unplug and dismantle.
to use the chopper (if
supplied)
λYou can chop meat, vegetables, herbs, bread, biscuits and nuts.
λDon’t chop hard foods such as coffee beans, ice cubes, spices or
chocolate - you’ll damage the blade.
1Remove any bones and cut food into 1-2cm (1⁄2-1”) cubes.
2Fit the rubber ring base on the bottom of the chopper bowl. (This stops the bowl sliding on the worktop.)
3Fit the chopper blade over the pin in the bowl 4.
4Add your food.
5Fit the chopper cover, turn and lock
5.
6Fit the power handle to the chopper cover - push to lock.
7Plug in. Hold the bowl steady. Then press the turbo button. Alternatively press the turbo button in short bursts to achieve a pulsing action.
8After use, unplug and dismantle.
processing guide
food |
maximum |
approx. time |
|
|
amount |
(in seconds) |
|
|
|
|
|
Meat |
250g |
(9 oz) 10-15 |
|
|
|
|
|
Herbs |
30g (1 oz) |
10 |
|
|
|
|
|
Nuts |
200g |
(7 oz) 10-15 |
|
|
|
|
|
Bread |
1 slice |
5-10 |
|
|
|
|
|
Hardboiled |
3 |
|
3-5 |
eggs |
|
|
|
Onions |
200g |
(7 oz) pulse |
|
to use the masher (if supplied)
λThe masher can be used to mash cooked vegetables such as potatoes, swede and carrot.
λDon’t mash hard or uncooked foods - you may damage the unit.
1Cook the vegetables and drain.
2Fit the masher collar to the masher
foot by turning in a clockwise drection 6.
3Turn the masher upside down and fit
the paddle over the central hub and turn anti clockwise to locate 7. (If the collar isn’t fitted then the
paddle doesn’t secure in place).
4Fit the power handle to the masher assembly - push to lock.
5Plug in.
6Place the masher in the saucepan or bowl etc., and select speed 1 on the variable control and then press the on button. Move the masher in an up and down movement throughout the mix until the desired result is achieved.
7After use release the on button and unplug.
8Press the blender shaft release buttons to release the masher assembly.
9Remove the paddle from the masher by turning clockwise.
10Unscrew the collar from the masher foot.
important
λ Never use the masher in a saucepan over direct heat. Always remove the saucepan from the heat and allow to cool slightly.
λ Do not tap the masher on the side of the cooking vessel during or after mashing. Use a spatula to scrape excess food away.
6
λFor best results when mashing never fill a saucepan etc., more than half full with food.
to use the ice crusher attachment
1Fit the rubber ring base cr on the bottom of the beaker. (This stops the beaker sliding on the worktop).
2Place the ice crusher bowl co into the beaker.
3Locate the ice crusher blade cn to the centre hole in the bottom of the ice crusher bowl and press it down.
4Add the ice cubes into the bowl. Do not overfill the bowl and for best result do not process more than 250g/9 oz (12 ice cubes) at a time.
5Fit the ice crusher cover cm, turn and lock 8.
6Fit the power handle to the cover - push to lock 9.
7Plug in. Hold the beaker steady. Then press the turbo button. Alternatively press the turbo button in short bursts to achieve a pulsing action.
8After use, unplug and take apart for cleaning.ice crushing
chopping/blending in 1 liter beaker
1Fit the rubber ring base cr on the bottom of the beaker. (This stops the beaker sliding on the worktop).
2Fit the blade cp over the centre pin of the beaker cq.
3Place the food in the beaker to be blended.
4Fit the ice crusher cover cm, turn and lock bk.
5Fit the power handle to the cover - push to lock bl.
6Plug in. Hold the beaker steady. Then press the turbo button. Alternatively press the turbo button in short bursts to achieve a pulsing action.
7After use, unplug and take apart for cleaning.
8After blending you can fit the lid cs to the top of the beaker.
7
 Loading...