


Kenwood DDX5015DAB, DDX515BT, DDX7015BTM, DDX715WBTM, DDX5015BT Manual
...DDX7015BT DDX515BT
DDX7015BTM DDX515BTM
DDX5015DAB DDX715WBT
DDX5015BT DDX715WBTM
MONITOR WITH DVD RECEIVER
INSTRUCTION MANUAL
This instruction manual is used to describe models listed below. Model availability and features (functions) may differ depending on the country and sales area.
•Region 2 (DVD Region Code 2 area)
•Region 3 (DVD Region Code 3 area)
•Region 4 (DVD Region Code 4 area)
•Region 5 (DVD Region Code 5 area)
© 2014 JVC KENWOOD Corporation |
|
B5A-0376-00 (MN/M2N/XN/NN) |
|

CONTENTS
BEFORE USE............................................................ |
2 |
How to reset your unit.................................................... |
3 |
INITIAL SETTINGS .................................................. |
4 |
BASICS .................................................................... |
6 |
Component names and functions ............................. |
6 |
Common operations ....................................................... |
8 |
Common screen operations......................................... |
9 |
Selecting the playback source................................... |
11 |
DISCS .................................................................... |
12 |
USB........................................................................ |
17 |
iPod/iPhone ......................................................... |
18 |
APPs...................................................................... |
22 |
Pandora¨ (Only for DDX7015BT Region 4/ |
|
DDX5015DAB/DDX5015BT/DDX715WBT |
|
Region!4) .............................................................. |
23 |
AUPEO! ................................................................. |
25 |
TUNER................................................................... |
27 |
DIGITAL RADIO (DAB) |
|
(Only for DDX5015DAB)...................................... |
31 |
OTHER EXTERNAL COMPONENTS ...................... |
35 |
Using external audio/video playersÑAV-IN ........ |
35 |
Using a rear view camera ............................................ |
35 |
Using a smartphoneÑHDMI/MHL........................... |
37 |
Watching a TV.................................................................. |
37 |
Using the external navigation unit .......................... |
38 |
BLUETOOTH ......................................................... |
39 |
SETTINGS.............................................................. |
47 |
Settings for using applications of iPod/iPhone/ |
|
Android .............................................................................. |
47 |
Sound adjustment ......................................................... |
48 |
Adjustment for video playback................................. |
50 |
Changing the display design ..................................... |
52 |
Customizing the <TOP MENU> screen ................. |
53 |
Customizing the system settings ............................. |
53 |
Setting menu items ....................................................... |
55 |
REMOTE CONTROLLER ........................................ |
58 |
CONNECTION/INSTALLATION ............................ |
61 |
REFERENCES......................................................... |
70 |
Maintenance .................................................................... |
70 |
More information ........................................................... |
70 |
Error message list ........................................................... |
74 |
Troubleshooting ............................................................. |
75 |
Specifications................................................................... |
77 |
How to read this manual:
¥Illustrations of DDX7015BT Region 3 are mainly used for explanation. The displays and panels shown in this manual are examples used to provide clear explanations of the operations. For this reason, they may be different from the actual displays or panels.
¥This manual mainly explains operations using the buttons on the monitor panel and touch panel. For operations using the remote controller (RC-DV340: supplied only for DDX7015BT Region 3/DDX7015BT Region 5/DDX7015BTM/DDX515BT/DDX515BTM/DDX715WBT Region 3/DDX715WBTM), see page!58.
¥< > indicates the various screens/menus/operations/settings that appear on the touch panel.
¥[ ] indicates the buttons on the touch panel.
¥Indication language: English indications are used for the purpose of explanation. You can select the indication language from the <Setup> menu. (Page!57)
¥Updated information (the latest Instruction Manual, system updates, new functions, etc.) is available from <http://www.kenwood.com/cs/ce/>.
BEFORE USE
IMPORTANT
To ensure proper use, please read through this manual before using this product. It is especially important that you read and observe WARNINGS and CAUTIONS in this manual. Please keep the manual in a safe and accessible place for future reference.
!WARNINGS: (To prevent accidents and damage)
¥DO NOT install any unit or wire any cable in a location where;
Ðit may obstruct the steering wheel and gearshift lever operations.
Ðit may obstruct the operation of safety devices such as air bags.
Ðit may obstruct visibility.
¥DO NOT operate the unit while driving.
If you need to operate the unit while driving, be sure to look around carefully.
¥The driver must not watch the monitor while driving.
The marking of products using lasers
The label is attached to the chassis/case and says that the component uses laser beams that have been classified as Class 1. It means that the unit is utilizing laser beams that are of a weaker class. There is no danger of hazardous radiation outside the unit.
For Kazakhstan (DDX7015BTM/DDX515BTM/ DDX715WBTM)
"#$# %&'($()*+,%- (.+/-0/'(1) ,#2(1%$/- ,# 3$%4+$4+ 5/$6(7/$)#.
2
BEFORE USE
For DDX7015BTM/DDX515BTM/DDX715WBTM
Declaration of Conformity with regard to the EMC Directive 2004/108/EC
Declaration of Conformity with regard to the R&TTE Directive 1999/5/EC
Declaration of Conformity with regard to the RoHS Directive 2011/65/EU
Manufacturer:
JVC KENWOOD Corporation
3-12 Moriya-cho, Kanagawa-ku, Yokohama-shi, Kanagawa, 221-0022, Japan
EU Representative:
JVCKENWOOD NEDERLAND B.V. Amsterdamseweg 37, 1422 AC UITHOORN, The Netherlands
English
Hereby, JVC KENWOOD declares that this unit ÒDDX7015BTM/DDX515BTM/DDX715WBTMÓ is in compliance with the essential requirements and other relevant provisions of Directive 1999/5/EC.
TŸrk•e
Bu vesileyle JVC KENWOOD, ÒDDX7015BTM/ DDX515BTM/DDX715WBTMÓ Ÿnitesinin,1999/5/ EC Direktifinin ba"lõca gereksinimleri ve diğer ilgili hŸkŸmleri ile uyumlu olduğunu beyan eder.
For Turkey
Bu ŸrŸn 28300 sayõlõ Resmi GazeteÕde yayõmlanan Atik Elektrikli ve Elektronik E"yalarin KontrolŸ Yšnetmeliğe uygun olarak Ÿretilmi"tir.
Eski Elektrik ve Elektronik Ekipmanlarõn İmha Edilmesi Hakkõnda Bilgi (ayrõ atõk toplama sistemlerini kullanan Ÿlkeleri i•in uygulanabilir)
SembollŸ (Ÿzerinde •arpõ i"areti olan •šp
kutusu) ŸrŸnler ev atõklarõ olarak atõlamaz. Eski elektrik ve elektronik ekipmanlar,
bu ŸrŸnleri ve ŸrŸn atõklarõnõ geri dšnŸ"tŸrebilecek bir tesiste
değerlendirilmelidir. Ya"adõğõnõz bšlgeye en yakõn geri dšnŸ"Ÿm tesisinin yerini šğrenmek i•in yerel makamlara mŸracaat edin. Uygun geri dšnŸ"Ÿm ve atõk imha yšntemi sağlõğõmõz ve •evremiz Ÿzerindeki zararlõ etkileri šnlerken kaynaklarõn korunmasõna da yardõmcõ olacaktõr.
!Cautions on the monitor:
¥The monitor built into this unit has been produced with high precision, but it may have some ineffective dots. This is inevitable and is not considered defective.
¥Do not expose the monitor to direct sunlight.
¥Do not operate the touch panel using a ball-point pen or similar tool with a sharp tip.
Touch the buttons on the touch panel with your finger directly (if you are wearing a glove, take it off).
¥When the temperature is very cold or very hot...
ÐChemical changes occur inside, causing malfunction.
ÐPictures may not appear clearly or may move slowly. Pictures may not be synchronized with the sound or picture quality may decline in such environments.
For safety...
¥Do not raise the volume level too much, as this will make driving dangerous by blocking outside sounds, and may cause hearing loss.
¥Stop the car before performing any complicated operations.
Temperature inside the car...
If you have parked the car for a long time in hot or cold weather, wait until the temperature in the car becomes normal before operating the unit.
Ρ How to reset your unit
If the unit fails to operate properly, press the reset
button.
DDX7015BT/DDX7015BTM
DDX5015DAB/DDX5015BT/DDX515BT/
DDX515BTM
DDX715WBT/DDX715WBTM
ENGLISH 3
INITIAL SETTINGS
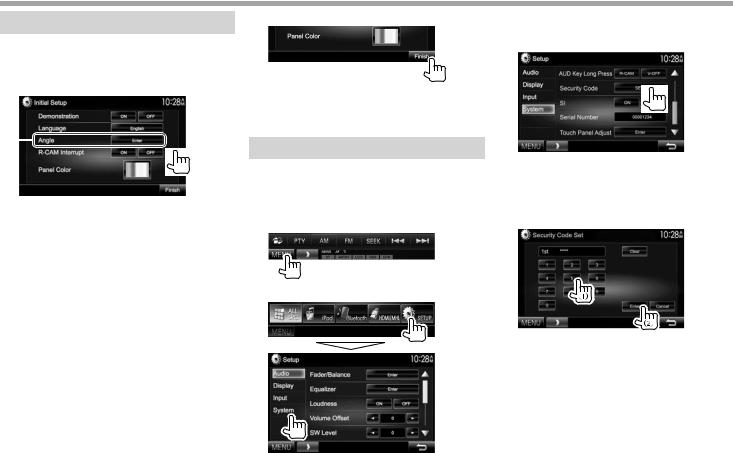
Initial setup
When you power on the unit for the first time or reset the unit, the initial setting screen appears.
¥You can also change the settings on the <Setup> screen. (Page!55)
1
*
<Demonstration> |
Activate or deactivate the |
(Page!56) |
display demonstration. |
<Language> |
Select the text language |
(Page!57) |
used for on-screen |
|
information. |
|
¥ Set <GUI Language> |
|
to display the operation |
|
buttons and menu items |
|
in the selected language |
|
([Local]) or English |
<Angle>* |
([English]). |
Adjust the panel angle. |
|
(Page!8) |
|
<R-CAM |
Select [ON] when |
Interrupt> |
connecting the rear view |
(Page!56) |
camera. |
<Panel Color> |
Select the color of the |
(Page!52) |
buttons on the monitor |
|
panel. |
2 Finish the procedure.
The <TOP MENU> screen is displayed.
* Only for DDX7015BT/DDX7015BTM/DDX715WBT/DDX715WBTM.
Setting the security function
Ρ Registering the security code
You can set a security code to protect your receiver system against theft.
1Display the <TOP MENU> screen.
On the source control screen:
2 Display the <System> setting screen.
3Display the <Security Code Set> screen.
¥Press [K] repeatedly to change the page on the <System> menu screen.
¥To clear the registered security code, perform steps 1 and 2, then press [CLR] in <Security Code>.
4Enter a four-digit number (1), then confirm the entry (2).
¥Press [Clear] to delete the last entry.
¥Press [Cancel] to cancel the setting.
5Repeat step 4 to confirm your security code.
Now, your security code is registered.
¥When the unit is being reset or disconnected from the battery, you are required to enter the security code. Enter the correct security code, then press
[Enter].
4

INITIAL SETTINGS
Ρ Activating the security function
You can activate the security function to protect your receiver system against theft.
1Display the <System> setting screen.
On the <TOP MENU> screen:
¥Press [K] repeatedly to change the page on the <System> menu screen.
2
The security indicator on the monitor panel flashes when the vehicle ignition is off.
To deactivate the security function: Select [OFF] for <SI>.
Clock settings
1Display the <TOP MENU> screen.
On the source control screen:
2 Display the <Setup> screen.
3 Display the <Clock> screen.
4 Set the clock time.
<NAV>*1 |
Synchronizes the clock time with |
|
the connected navigation unit. |
<Radio Data |
Synchronizes the clock time with |
System>*2 |
FM Radio Data System. |
<DAB>*3 |
Synchronizes the clock time with |
|
the digital radio (DAB). |
<OFF> |
Sets the clock manually. (See |
|
below.) |
When selecting <OFF>:
Adjust the hour (1), then adjust the minute (2). ¥ Press [Reset] to set the minute to Ò00Ó.
5 Finish the procedure.
*1 Appears only when the navigation unit is connected.
*2 Only for DDX7015BT/DDX7015BTM/DDX5015BT/DDX515BT/ DDX515BTM/DDX715WBT/DDX715WBTM.
*3 Only for DDX5015DAB.
ENGLISH 5
BASICS
Component names and functions
!Caution on the volume setting:
Digital devices produce very little noise compared with other sources. Lower the volume before playing these digital sources to avoid damaging the speakers by sudden increase of the output level.
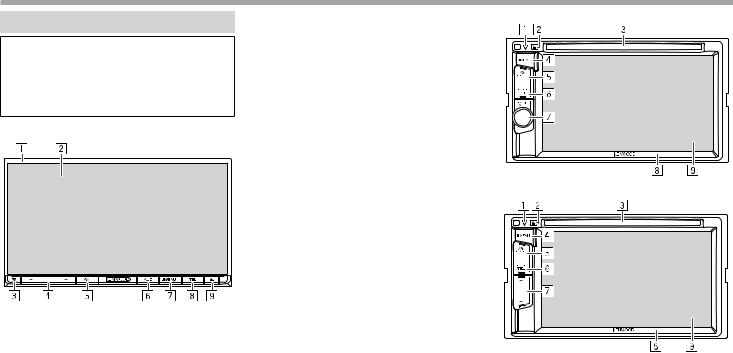
DDX7015BT/DDX7015BTM
1Monitor panel*
2Screen (touch panel)
3Reset button/Power indicator/Security indicator
¥Resets the unit. (Page 3)
¥Lights up while the unit is turned on.
¥Flashes when the security function is activated. (Page 5)
4Volume K/Jbutton
Adjusts the audio volume. (Page 8)
5 |
AV/AV OUT button |
DDX5015DAB/DDX5015BT |
|
¥ Displays the current source screen. (Press) |
|
|
¥ The function of the button when held varies |
|
|
depending on the <AV Key Long Press> |
|
|
setting. (Page 57) |
|
6 |
AUD/V.OFF button |
|
|
¥ Displays the <Equalizer> screen. (Press) |
|
|
(Page 48) |
|
|
¥ The function of the button when held varies |
|
|
depending on the <AUD Key Long Press> |
|
|
setting. (Page 57) |
|
7 |
B!MENU button |
|
¥Displays the <TOP MENU> screen. (Press) (Page 10)
|
¥ Turns on the power. (Press) (Page 8) |
DDX515BT/DDX515BTM |
|
¥ Turns off the power. (Hold) (Page 8) |
|
8 |
TEL/VOICE button |
|
|
¥ Displays the phone control screen. (Press) |
|
|
(Page 43) |
|
|
¥ Activates voice dialing. (Hold) (Page 44) |
|
9 |
M(Eject) button |
|
|
¥ Ejects the disc. (Tilts the monitor panel fully.) |
|
|
¥ Opens/closes the monitor panel. |
|
* You can change the color of the buttons on the monitor panel. (Page 52)
1 Reset button/Power indicator/Security indicator ¥ Resets the unit. (Page 3)
¥ Lights up while the unit is turned on.
¥ Flashes when the security function is activated. (Page 5)
2 M(Eject) button Ejects the disc.
3 Loading slot
6
BASICS
4B!MENU button
¥Displays the <TOP MENU> screen. (Press) (Page 10)
¥Turns on the power. (Press) (Page 8)
¥Turns off the power. (Hold) (Page 8)
5AV/AV OUT button
¥Displays the current source screen. (Press)
¥The function of the button when held varies depending on the <AV Key Long Press> setting. (Page 57)
6TEL/VOICE button
¥Displays the phone control screen. (Press) (Page 43)
¥The function of the button when held varies depending on the <TEL Key Long Press> setting. (Page 57)
7For DDX5015DAB/DDX5015BT: Volume/ATT/ AUDIO knob
¥Attenuates the sound. (Press) (Page 8)
¥Adjusts the audio volume. (Turn) (Page 8)
¥Displays the <Equalizer> screen. (Hold) (Page 48)
For DDX515BT/DDX515BTM: Volume K/J button
Adjusts the audio volume. (Page 8)
8Monitor panel*
9Screen (touch panel)
*You can change the color of the buttons on the monitor panel. (Page 52)
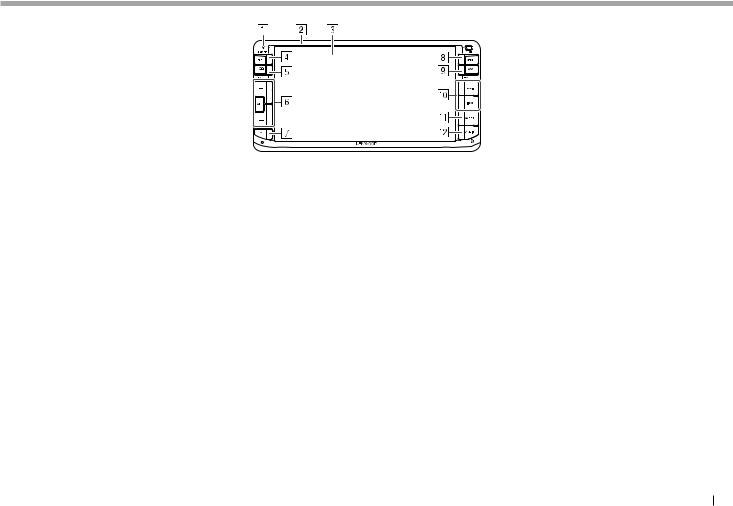
DDX715WBT/DDX715WBTM
1Power indicator/Security indicator
¥Lights up while the unit is turned on.
¥Flashes when the security function is activated. (Page 5)
2Monitor panel*
3Screen (touch panel)
4TEL/VOICE button
¥Displays the phone control screen. (Press) (Page 43)
¥Activates voice dialing. (Hold) (Page 44)
5 / V.OFF button
¥Displays the phone book. (Press) (Page!43)
¥The function of the button when held varies depending on the <P.BOOK Key Long Press> setting. (Page 57)
6Volume +/− button
Adjusts the audio volume. (Page 8) ATT button
Attenuates the sound. (Page 8)
7M(Eject) button
¥Ejects the disc. (Tilts the monitor panel fully.)
¥Opens/closes the monitor panel.
8B!MENU button
¥Displays the <TOP MENU> screen. (Press) (Page 10)
¥Turns off the power. (Hold) (Page 8)
¥Turns on the power. (Press) (Page 8)
9AV/AV OUT button
¥Displays the current source screen. (Press)
¥Displays the screen of the external component connected to the AV-OUT terminal. (Hold) (Page!66)
pS/Tbutton
Functions the same as [S]/[T] on the touch panel when playing a source.
qAPPS button
Displays the App screen. (Page!22)
wAUDIO button
¥Displays the <Equalizer> screen. (Press) (Page 48)
*You can change the color of the buttons on the monitor panel. (Page 52)
ENGLISH 7
BASICS
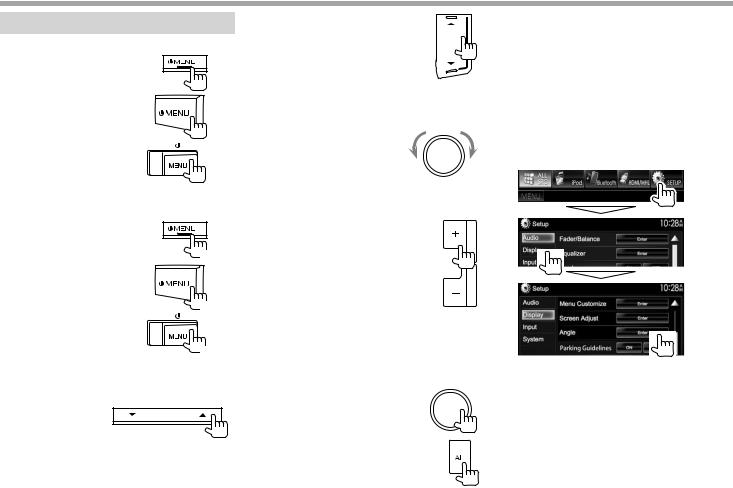
Common operations
Ρ Turning on the power
DDX7015BT/DDX7015BTM
DDX5015DAB/DDX5015BT/
DDX515BT/DDX515BTM
DDX715WBT/DDX715WBTM
Ρ Turning off the power
DDX7015BT/DDX7015BTM
(Hold)
DDX5015DAB/DDX5015BT/ DDX515BT/DDX515BTM
(Hold)
DDX715WBT/DDX715WBTM
(Hold)
Ρ Adjusting the volume
To adjust the volume (00 to 35) DDX7015BT/
DDX7015BTM
DDX515BT/DDX515BTM
Press Jto increase, and press Kto decrease.
¥Holding the button increases/decreases the volume continuously.
DDX5015DAB/DDX5015BT
Turn to the right to increase, and turn to the left to decrease.
DDX715WBT/DDX715WBTM
Press + to increase, and press Ð to decrease.
¥Holding the button increases/decreases the volume continuously.
To attenuate the sound (only for DDX5015DAB/ DDX5015BT/DDX715WBT/DDX715WBTM)
DDX5015DAB/DDX5015BT
DDX715WBT/DDX715WBTM
The ATT indicator lights up.
To cancel the attenuation: Press the same button again.
ΡAdjusting the panel angle (only for DDX7015BT/DDX7015BTM/ DDX715WBT/DDX715WBTM)
1Display the <Angle Adjust> screen.
On the <TOP MENU> screen:
¥Press [K] repeatedly to change the page on the <Display> menu screen.
8
BASICS
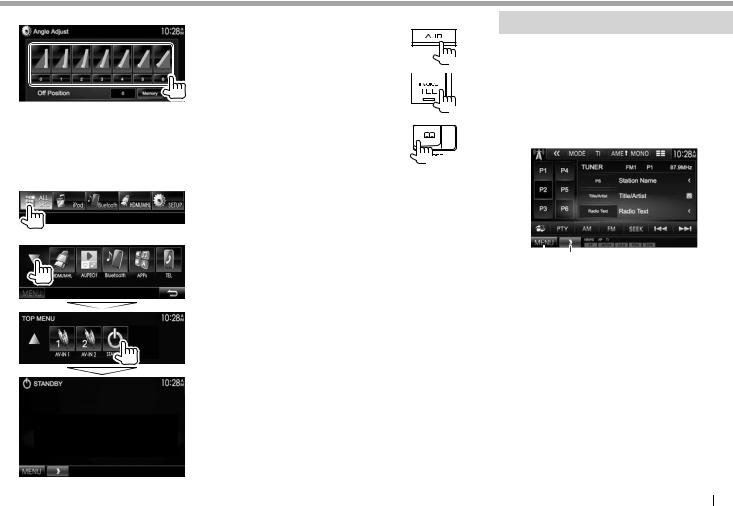
2 Select an angle (0 Ð 6).
¥To set the current position as the power off position, select [Memory].
ΡPutting the unit in standby
1Display all <TOP MENU> items.
On the <TOP MENU> screen:
2
Ρ Turning off the screen
DDX7015BT/DDX7015BTM*1
(Hold)
DDX5015DAB/DDX5015BT/ DDX515BT/DDX515BTM*2
(Hold)
DDX715WBT/DDX715WBTM*3
(Hold)
To turn on the screen: Press AV/AV!OUT on the monitor panel, or touch the display.
*1 This operation works only when <AUD Key Long Press> is set to [V-OFF]. (Page!57)
*2 This operation works only when <TEL Key Long Press> is set to [V-OFF]. (Page!57)
*3 This operation works only when <P.BOOK Key Long Press> is set to [V-OFF]. (Page!57)
Common screen operations
Ρ Common screen descriptions
You can display other screens any time to change the source, show the information, or change the settings, etc.
Source control screen
Performs source playback operations.
¥The operation buttons vary depending on the selected source.
1
2
3 4
Common operation buttons:
1Displays other operation buttons.
¥Disabled when there are no other buttons.
2Switches between the normal source control screen and easy control screen. (Page!10)
3Displays the <TOP MENU> screen. (Page!10)
¥Pressing B!MENU on the monitor panel also displays the <TOP MENU> screen.
4Displays/hides short-cut buttons. (Page!11)
Continued on the next page...
ENGLISH 9
BASICS
Easy control screen |
<Setup> screen |
|
|
Pressing [ ] switches between the normal source |
Changes the detailed settings. (Page 55) |
|
|
control screen and easy control screen. |
|
|
|
The easy control screen allows you to control the |
|
|
|
source easily with simple buttons. |
|
|
|
¥ The displayed buttons vary depending on the |
|
1 |
3 |
selected source. |
|
|
|
|
|
2 |
4 |
|
Common operating buttons: |
|
|
|
1 |
Selects the menu category. |
|
|
2 |
Displays the <TOP MENU> screen. |
|
|
3 |
Changes the page. |
|
|
4 |
Returns to the previous screen. |
|
<TOP MENU> screen
Displays the source control screen and settings screen.
¥You can arrange the items to display on the <TOP MENU> screen.(Page 53)
1
2 |
3 |
Common operating buttons:
1Changes the playback source. (Page 11)
2Displays all playback sources and items. (Page!11)
3Displays the <Setup> screen. (See the right column.)
Ρ Touch screen operations
1
3 4
2
1Displays the video control menu while playing a video.
2Displays the source control screen while playing a video.
¥ The operation buttons disappear when the screen is touched or when no operation is done for about 5 seconds.
3Goes to the previous chapter/track.*
4Goes to the next chapter/track.*
* Not available for video from an external component.
10
BASICS
Selecting the playback source
On the <TOP MENU> screen:
¥You can change the page to display more items by pressing [J]/[K].
[NAV]*1 |
Displays the navigation screen |
|
when a navigation unit is |
[DISC] |
connected. (Page!38) |
Plays a disc. (Page 12) |
|
[TUNER] |
Switches to the radio broadcast. |
[DAB]*2 |
(Page 27) |
Switches to the digital audio |
|
[iPod] |
broadcast (DAB). (Page!31) |
Plays an iPod/iPhone. (Page 18) |
|
[USB] |
Plays files on a USB device. |
[HDMI/MHL] |
(Page 17) |
Plays a device connected to |
|
|
the HDMI/MHL input terminal. |
|
(Page 37) |
Switches to the Pandora broadcast. (Page 23) Switches to the AUPEO! application. (Page 25)
Plays a Bluetooth audio player. (Page 45)
Switches to the App screen from the connected iPod touch/iPhone/ Android device. (Page 22)
[TEL] Displays the phone control screen. (Page 43)
[AV-IN1][AV-IN2]
Switches to an external component connected to the AVIN1 or iPod/AV-IN2 input terminal. (Page 35)
*1 When no navigation unit is connected, ÒNo NavigationÓ appears. *2 Only for DDX5015DAB.
*3 Only for DDX7015BT Region 4/DDX5015DAB/DDX5015BT/ DDX715WBT Region 4.
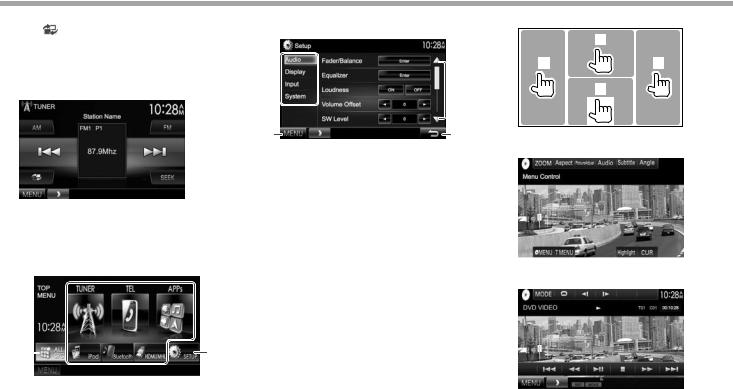
ΡSelecting the playback source on the <TOP MENU> screen
¥You can change the items (other than [SETUP]) to display on the <TOP MENU> screen. (Page!53)
Ρ Using short-cut buttons
While displaying the source control screen or the <Setup> screen, you can use the short-cut buttons to go to the items on the <TOP MENU> screen indicated below.
To display the short-cut buttons
On the source control screen:
On the <Setup> screen:
¥When the navigation screen is displayed, pressing [  ] displays the source control screen.
To hide the short-cut buttons: Press [  ].
].
ENGLISH 11
DISCS
Playing a disc
¥If a disc does not have a disc menu, all tracks on it will be played repeatedly until you change the source or eject the disc.
¥For playable disc types/file types, see page 71.
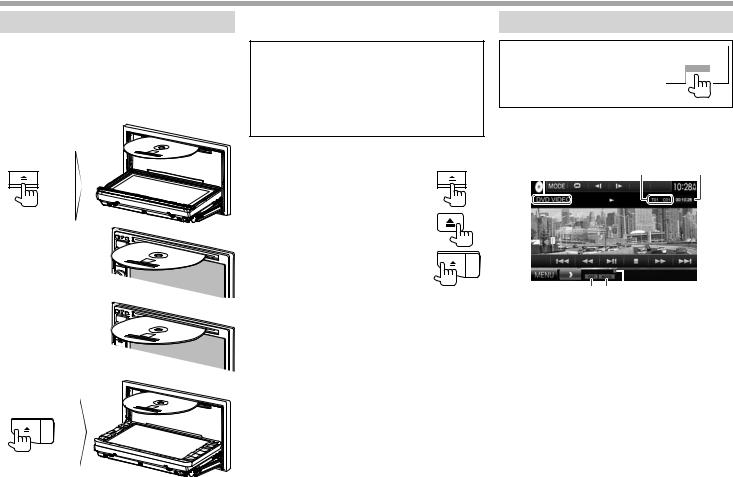
Ρ Inserting a disc
Insert a disc with the label side facing up.
DDX7015BT/
DDX7015BTM
DDX5015DAB/
DDX5015BT
DDX515BT/
DDX515BTM
DDX715WBT/
DDX715WBTM
The source changes to ÒDISCÓ and playback starts.
¥The IN indicator lights up while a disc is inserted.
¥If Ò Ó appears on the screen, the unit cannot accept the operation you have tried to do.
ÐIn some cases, without showing Ò ,Ó operations will not be accepted.
¥When playing back a multi-channel encoded disc, the multi-channel signals are downmixed to stereo.
Ρ Ejecting a disc
DDX7015BT/DDX7015BTM
DDX5015DAB/DDX5015BT/
DDX515BT/DDX515BTM
DDX715WBT/DDX715WBTM
¥When removing a disc, pull it horizontally.
¥You can eject a disc when playing another AV source.
¥If the ejected disc is not removed within
60 seconds, the disc is automatically inserted again into the loading slot to protect it from dust.
Closing the monitor panel (only for DDX7015BT/ DDX7015BTM/DDX715WBT/DDX715WBTM)
After removing the disc, press Mon the monitor panel. The monitor panel closes.
Playback operations
When the operation buttons are not displayed on the screen, touch the area shown on the illustration.
¥To change settings for video playback, see page 50.
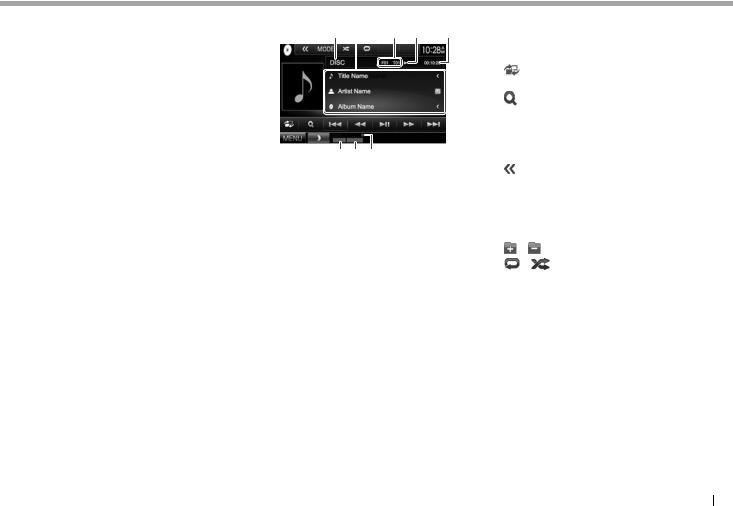
Ρ Indications and buttons on the source control screen
For video playback
1 |
2 |
3 |
4 5 6
Playback information
¥The information displayed on the screen differs depending on the type of disc/file being played back.
1Media type
2Current playback item information (title no./ chapter no./folder no./file no./track no.)
3Playing time
4Playback mode (Page!15)
5File type
6IN indicator
12
DISCS
Operation buttons
¥Available buttons on the screen and operations differ depending on the type of disc/file being played back.
[  ] [O] [N]
[S] [T]
[IW] [o]
[ ]
]
[MODE]
[ ] [
] [ ] [Playlist]
[  ] [
] [ ]
]
[  ] [
] [ ] [PBC]
[MENU]
Displays the folder/track list. (Page!14)
Reverse/forward search during playback.
¥Selects a chapter/track. (Press)
¥Reverse/forward search. (Hold)
Starts/pauses playback. Stops playback.
Displays other operation buttons.
¥Disabled when there are no other buttons.
Changes the settings for disc playback on the <DISC Mode> screen. (Page!16)
Selects playback mode. (Page!15)
Displays the Original Program/ Playlist screen.
Plays in frame-by-frame. Selects a folder.
Activates or deactivates the VCD PBC (Playback Control) function.
Displays the <TOP MENU> screen.
For audio playback
1 2 3 4 5
6 7 8
Playback information
¥The information displayed on the screen differs depending on the type of disc/file being played back.
1Media type
2Track/file information
¥Pressing [<] scrolls the text if not all of the text is shown.
3Current playback item information (folder no./file no./track no.)
4Playback status
5Playing time
6Playback mode (Page!15)
7File type
8IN indicator
Operation buttons
¥Available buttons on the screen and operations differ depending on the type of disc/file being played back.
[ |
] |
|
Displays the easy control screen. |
|
|
|
(Page!10) |
[ |
] |
|
Displays the folder/track list. |
[S] [T] |
(Page!14) |
||
Selects a track. |
|||
[O] [N] |
Reverse/forward search. |
||
[IW] |
|
Starts/pauses playback. |
|
[ |
] |
|
Displays other operation buttons. |
|
|
|
¥ Disabled when there are no other |
[MODE] |
|
buttons. |
|
|
Changes the settings for disc |
||
|
|
|
playback on the <DISC Mode> |
|
|
|
screen. (Page!16) |
[ |
] [ |
] |
Selects a folder. |
[ |
] [ |
] |
Selects playback mode. (Page!15) |
[o] |
|
|
Stops playback. |
[MENU] |
|
Displays the <TOP MENU> screen. |
|
ENGLISH 13
DISCS
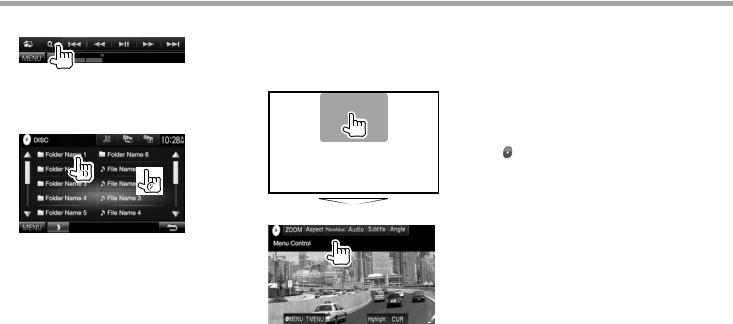
Ρ Selecting a folder/track on the list
1
2Select the folder (1), then the item in the selected folder (2).
¥Repeat the procedure until you select the desired track.
¥You can change the page to display more items by pressing [J]/[K].
¥Press [  ] to open the folder containing the current track.
¥Press [  ] to return to the root folder.
¥Press [  ] to return to the upper layer.
Ρ Video menu operations
You can display the video menu screen during video playback.
¥The operation buttons disappear when the screen is touched or when no operation is done for about 5 seconds.
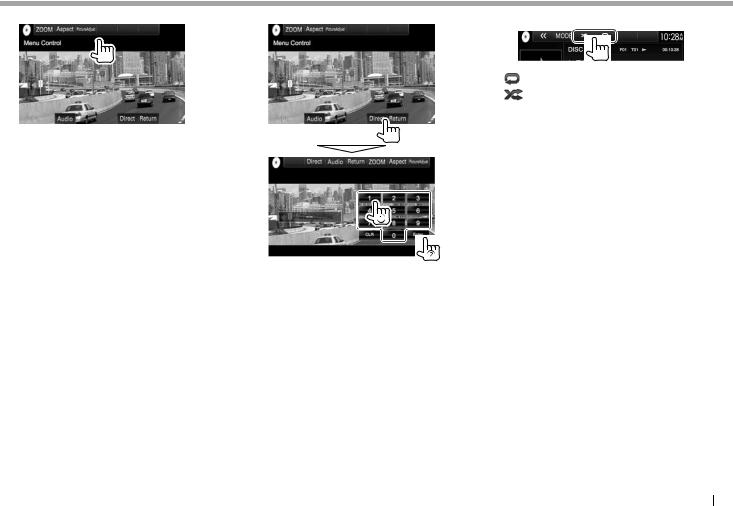
For video playback except VCD
¥Available buttons on the screen and operations differ depending on the type of disc/file being played back.
[ZOOM] |
Displays the picture size selection |
[Aspect] |
screen. (Page!51) |
Selects the aspect ratio. |
|
[PictureAdjust] |
(Page!51) |
Displays the picture adjustment |
|
[Audio] |
screen. (Page!50) |
Selects the audio type (or channel |
|
[Subtitle] |
for DVD-VR). |
Selects the subtitle type. |
|
[Angle] |
Selects the view angle. |
[ !MENU] |
Displays the disc menu. |
[T MENU] |
Displays the disc menu (DVD). |
[Highlight] |
Switches to the direct disc menu |
|
mode. Touch the target item to |
|
select. |
|
¥ To restore the screen, press AV |
[CUR] |
on the monitor panel. |
Displays the menu/scene |
|
|
selection screen. |
|
¥ [J] [K] [H] [I]: Selects an item. |
|
¥ [Enter]: Confirms the selection. |
|
¥ [Return]: Returns to the |
|
previous screen. |
14
DISCS
For VCD
[ZOOM] |
Displays the picture size selection |
[Aspect] |
screen. (Page!51) |
Selects the aspect ratio. |
|
[PictureAdjust] |
(Page!51) |
Displays the picture adjustment |
|
[Audio] |
screen. (Page!50) |
Selects the audio channel (ST: |
|
[Return] |
stereo, LL: left, RR: right). |
Displays the previous screen or |
|
[Direct] |
menu. |
Displays/hides the direct selection |
|
|
buttons. (See the right column.) |
To select a track directly on a VCD
¥When you enter a wrong number, press [CLR] to delete the last entry.
Ρ Selecting playback mode
[ |
] |
Selects Repeat playback mode. |
[ |
] |
Selects Random playback mode. |
¥Available playback modes differ depending on the type of disc/file being played back.
¥You cannot activate the repeat mode and the random mode at the same time.
¥Each time you press the button, the playback mode changes. (The corresponding indicator lights up.)
ÐAvailable items differ depending on the type of disc/file being played back.
C-REP |
Repeats current chapter. |
T-REP |
Repeats current title/program. |
REP |
Repeats current track. |
FO-REP |
Repeats all tracks of the |
FO-RDM |
current folder. |
Randomly plays all tracks of |
|
|
the current folder, then tracks |
RDM |
of the next folders. |
Randomly plays all tracks. |
To cancel Repeat/Random playback: Press the button repeatedly until the indicator disappears.
ENGLISH 15
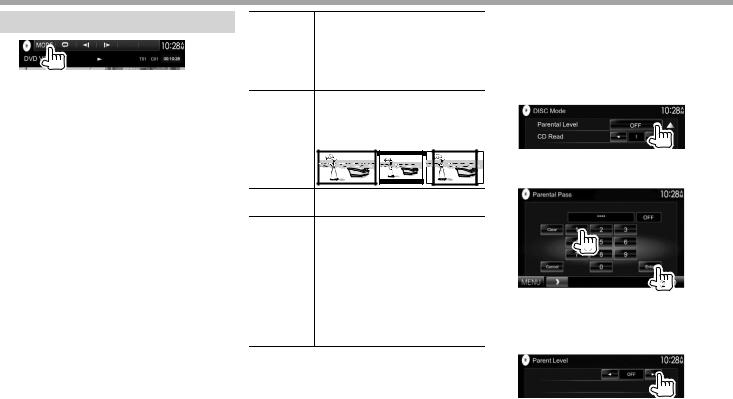
DISCS
Settings for disc playback
¥Available items shown on the <DISC Mode> screen differ depending on the type of disc/file being played back.
Ρ Setting items
<Menu |
Select the initial disc menu language. |
|
Language>* |
(Initial: English) (Page!73) |
|
<Subtitle |
Select the initial subtitle language |
|
Language>* |
or turn subtitles off (Off). (Initial: |
|
|
English) (Page!73) |
|
<Audio |
Select the initial audio language. |
|
Language>* |
(Initial: Original) (Page!73) |
|
<Dynamic |
You can change the dynamic range |
|
Range |
while playing using Dolby Digital |
|
Control>* |
software. |
|
|
¥ |
Wide: Select this to enjoy a |
|
|
powerful sound at a low volume |
|
|
level with its full dynamic range. |
|
¥ |
Normal: Select this to reduce the |
|
|
dynamic range a little. |
|
¥ |
Dialog (Initial): Select this to |
|
|
reproduce movie dialog more |
|
|
clearly. |
<Angle |
Select whether to display the angle |
||
Mark> |
mark. |
|
|
|
¥ |
ON (Initial): Select this to display |
|
|
|
the angle mark. |
|
|
¥ |
OFF: Select this to hide the angle |
|
|
|
mark. |
|
<Screen |
Select the monitor type to watch a |
||
Ratio>* |
wide screen picture on the external |
||
|
monitor. |
|
|
|
16:9 (Initial) 4:3 LB |
4:3 PS |
|
<Parental |
Set the parental level. |
|
|
Level>* |
(See the right column.) |
|
|
<CD Read> |
Select the files to play on a disc |
||
|
containing music files. You cannot |
||
|
change the setting when a disc is |
||
|
inserted. |
|
|
¥1 (Initial): Automatically distinguishes between audio file discs and music CDs.
¥2: Forces to play as a music CD. No sound can be heard if an audio file disc is played.
* You can change these settings only while playback is stopped.
Setting the parental lock
The parental lock cannot be set during DVD playback.
1Display the <Parental Pass> screen.
On the <DISC Mode> screen:
¥Press [K] repeatedly to change the page on the <DISC Mode> screen.
2Enter the 4-digit parental pass code (1), and press [Enter] (2).
¥To clear the entry, press [Clear].
¥To cancel setting the code, press [Cancel].
3Adjust the parental level (<OFF>, <Level!1> to <Level 8>).
To deactivate the parental lock: Select [OFF] for <Parental Level>.
16

USB
Connecting a USB device
You can connect a USB mass storage class device such as a USB memory, Digital Audio Player etc. to the unit.
¥For details about connecting USB devices, see page 65.
¥You cannot connect a computer or portable HDD to the USB input terminal.
¥For playable file types and notes on using USB devices, see page 72.
When a USB device is connected...
The source changes to ÒUSBÓ and playback starts.
¥All tracks in the USB device will be played repeatedly until you change the source.
To disconnect the USB device safely:
Press [M], then disconnect the USB device after ÒNo DeviceÓ appears.
Playback operations
When the operation buttons are not displayed on the screen, touch the area shown on the illustration.
¥To change settings for video playback, see page 50.
ΡIndications and buttons on the source control screen
1 2 3 4
5 |
6 7 |
Playback information
¥The information displayed on the screen differs depending on the type of file being played back.
1Track/file information
¥Pressing [<] scrolls the text if not all of the text is shown.
2Current playback item information (folder no./file no.)
3Playback status
4Playing time
5Jacket picture (Shown while playing if the file has tag data that includes the jacket picture)
6Playback mode (See the right column.)
7File type
Operation buttons
¥Available buttons on the screen and operations differ depending on the type of file being played back.
[ |
] |
Displays the easy control screen. |
|
|
(Page!10) |
[ |
] |
Displays the list selection screen. |
|
|
(Page!18) |
[S] [T] Selects a track.
[O] [N] |
Reverse/forward search. |
|
[IW] |
Starts/pauses playback. |
|
[ |
] |
Displays other operation buttons. |
|
|
¥ Disabled when there are no other |
[MODE] |
buttons. |
|
Changes the picture display time |
||
|
|
setting on the <USB Mode> screen. |
|
|
(Page!18) |
[ |
] [ ] |
Selects a folder. |
[ |
] |
Selects repeat playback mode.*1 *2 |
|
|
¥ REP: Repeats the current track/file. |
|
|
¥ FO-REP: Repeats all tracks/files |
|
|
in the current folder or specified |
[ |
] |
category. |
Activates random playback mode.*1 *2 |
||
|
|
¥ RDM: |
|
|
Ð When selecting the track/file from |
|
|
the folder, randomly plays all |
|
|
tracks/files of the current folder, |
|
|
then the tracks/files of the next |
|
|
folder. |
|
|
Ð When selecting the track/file from |
|
|
the category, randomly plays |
|
|
all tracks/files of the specified |
[M] |
|
category. |
|
Disconnects the USB device safely. |
|
[MENU] |
Displays the <TOP MENU> screen. |
|
*1 To cancel random or repeat mode, press the button repeatedly until the indicator disappears.
*2 You cannot activate the repeat mode and the random mode at the same time.
ENGLISH 17
USB
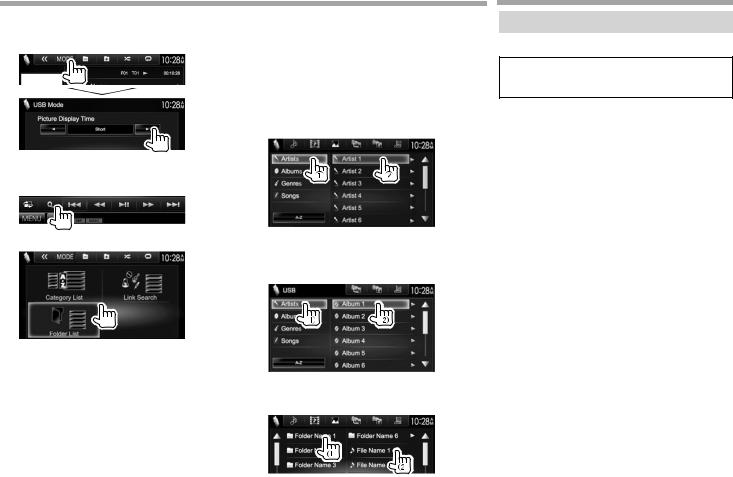
Ρ Setting <Picture Display Time>
Set the interval between slides during slide-shows of the picture files.
¥On the <Category List>/<Folder List>: You
can switch the file type to list: Press [  ] to list audio files, [
  ] to list video files, or [
  ] to list still picture files.
¥On the <Category List>/<Link Search>: To list the items in alphabetical order, press [A-Z], then select the first character.
From <Category List>:
Select the category (1), then the item in the selected category (2).
Ρ Selecting a track in a list
1
2 Select the list.
3Select the track.
¥You can change the page to display more items by pressing [J]/[K].
¥Press [  ] to return to the root folder.
¥Press [  ] to return to the upper layer.
¥Press [  ] to open the folder containing the current track.
¥If you want to play all tracks in the folder, press [I] on the right of the desired folder.
From <Link Search>:
Select the tag type (1) to display a list of content that contains the same tag as the track/ file currently being played, then the item (2).
From <Folder List>:
Select the folder (1), then the item in the selected folder (2).
iPod/iPhone
Preparation
Ρ Connecting iPod/iPhone
¥For details about connecting iPod/iPhone, see page 65.
¥For playable iPod/iPhone types, see page 73.
Connect your iPod/iPhone according to your purpose or the type of iPod/iPhone.
Wired connection
¥To listen to music: USB Audio cable for iPod/ iPhone
ÐFor iPod/iPhone except for iPod nano (7th Generation)/iPod touch (5th Generation)/iPhone 5S/iPhone 5C/iPhone 5: KCA-iP102 (optional accessory)
ÐFor iPod nano (7th Generation)/iPod touch (5th Generation)/iPhone 5S/iPhone 5C/iPhone 5: KCA-iP103 (optional accessory)
¥To watch video and listen to music: USB Audio and Video cable for iPod/iPhone
ÐFor iPod/iPhone except for iPod nano (7th Generation)/iPod touch (5th Generation)/iPhone 5S/iPhone 5C/iPhone 5: KCA-iP202 (optional accessory)
ÐFor iPod nano (7th Generation)/iPod touch (5th Generation)/iPhone 5S/iPhone 5C/iPhone 5, use the HDMI cable KCA-HD100 (optional accessory) and KCA-iP103 (optional accessory) through a Lightning-Digital AV adapter (accessory of the iPod/iPhone)
18
iPod/iPhone
Bluetooth connection
Pair the iPod/iPhone through Bluetooth. (Page!39)
¥For iPod nano (7th Generation)/iPod touch (5th Generation)/iPhone 5S/iPhone 5C/iPhone 5: To watch video, connect your iPod/iPhone to the HDMI/MHL input terminal using KCA-HD100 (optional accessory). (Page!65)
¥For iPod/iPhone except for iPod nano (7th Generation)/iPod touch (5th Generation)/iPhone 5S/iPhone 5C/iPhone 5: You cannot watch video with a Bluetooth connection.
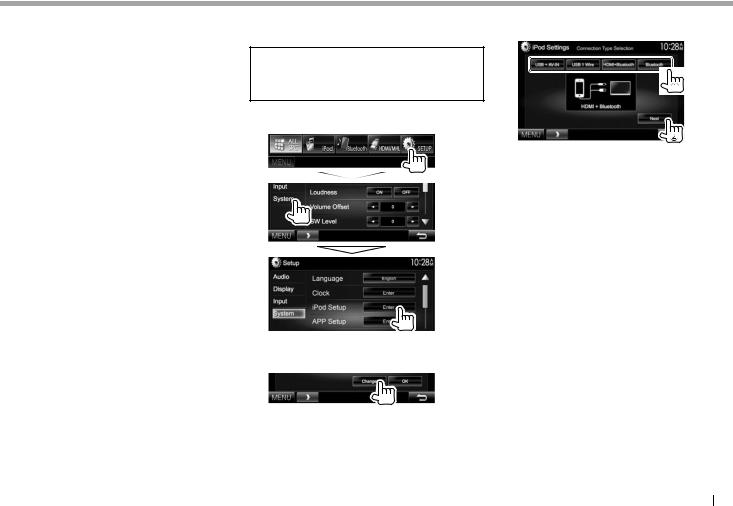
Ρ Selecting the iPod/iPhone device to |
3 Select the connection method (1), then |
play and connection method |
press [Next] (2). |
When connecting the iPod/iPhone device for first time, the setup screen (for connection, etc.)
appears. Follow the procedure on the setup screen to configure the settings.
1Display the <iPod Settings> screen.
On the <TOP MENU> screen:
¥If [Enter] for <iPod Setup> cannot be selected, put the unit in standby. (Page!9)
2
¥If you do not need to change the settings, press [OK] to exit from the setup screen.
<USB + |
Select this when the iPod/ |
AV-IN> |
iPhone is connected using |
|
KCA-iP202 (optional accessory). |
<USB 1 Wire> Select this when the iPod/ iPhone is connected using KCA-iP102 (optional accessory) or KCA-iP103 (optional accessory).
<HDMI + Select this when the iPod/ Bluetooth> iPhone is connected using
HDMI cable KCA-HD100 (optional accessory) and KCA-iP103 (optional accessory) through a Lightning-Digital AV adapter (accessory of the iPod/ iPhone).
<Bluetooth> Select this when the iPod/ iPhone is connected via Bluetooth.
¥When selecting <USB + AV-IN> or <USB 1 Wire>, go to step 5.
Continued on the next page...
ENGLISH 19
iPod/iPhone
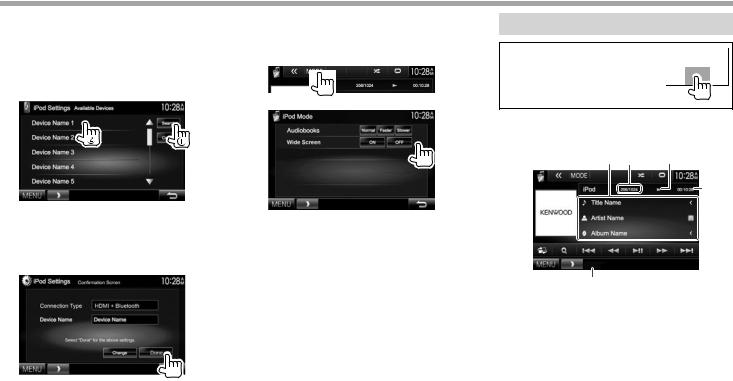
4When selecting <HDMI + Bluetooth> or
<Bluetooth> as the connection method, the device selection screen appears. Search for the available iPod/iPhone devices (1), select the target device from the list (2), then press [Next].
Ρ Selecting preference settings for iPod/ iPhone playback
When the source is ÒiPodÓ...
1
2
Playback operations
When the operation buttons are not displayed on the screen, touch the area shown on the illustration.
¥To change settings for video playback, see page 50.
ΡIndications and buttons on the source control screen
1 2 3 4
¥You can change the page to display more items by pressing [J]/[K].
¥If the device is already listed, skip step 1.
¥To stop searching, press [Cancel].
5 Confirm the settings.
<Audiobooks> |
Select the speed of audio |
|
books. |
<Wide |
¥ [ON]: Select this to display |
Screen>* |
video compatible with |
|
wide-screen display in wide- |
|
screen. |
¥[OFF]: Select this to deactivate.
* You cannot change the setting when iPod/iPhone is connected.
5
6
Playback information
1Song/video information
¥Pressing [<] scrolls the text if not all of the text is shown.
2Track no./Total track number
3Playback status
4Playing time
5Artwork (Shown if the song contains artwork)
6Playback mode (Page!21)
20
iPod/iPhone
Operation buttons
[ ] Displays the easy control screen. (Page!10)
[ |
] |
Displays the audio/video file list. (See |
|
|
|
the right column.) |
|
[S] [T] Selects an audio/video file. |
|||
[O] [N] |
Reverse/forward search. |
||
[IW] |
Starts/pauses playback. |
||
[ |
] |
Displays other operation buttons. |
|
|
|
¥ Disabled when there are no other |
|
[MODE] |
|
buttons. |
|
Changes the settings for iPod/iPhone |
|||
|
|
playback on the <iPod Mode> |
|
|
|
screen. (Page!20) |
|
[ |
] |
Selects repeat playback mode. |
|
|
|
¥ |
1: Functions the same as |
|
|
|
Repeat One. |
|
|
¥ |
All: Functions the same as |
|
|
¥ |
Repeat All. |
[ |
] |
: Cancels the repeat mode. |
|
Selects random playback mode.* |
|||
|
|
¥ |
: Functions the same as Shuffle |
|
|
|
Songs. |
|
|
¥ |
Album: Functions the same as |
|
|
|
Shuffle Albums. |
[MENU] |
Displays the <TOP MENU> screen. |
||
*To cancel random mode, press the button repeatedly until the indicator disappears.
ΡSelecting an audio/video file from the menu
1
2Select the menu ( : audio or
  : video) (1), a category (2), then a desired item (3).
¥Select an item in each layer until you reach and select the desired file.
¥You can change the page to display more items by pressing [J]/[K].
¥Press [All E] to play all songs/videos.
¥Press [A-Z] to sort the list in alphabetical order.
¥Press [  ] to return to the top layer.
¥Press [  ] to return to the upper layer.
Audio menu:
Video menu:
¥Available categories differ depending on the type of your iPod/iPhone.
ENGLISH 21
APPs
You can use an App of the connected iPod touch/ iPhone/Android on this unit.
¥For Apps you can use on this unit, visit <http://www.kenwood.com/cs/ce>.
Preparation
1Connect the iPod touch/iPhone/Android.
¥For wired connection, see page!65 for iPod touch/iPhone or page!66 for Android.
ÐTo view video, connect the device using KCA-iP202 or KCA-HD100 (optional accessory).
¥For Bluetooth connection, see page 41.
2Select the iPod touch/iPhone/Android device to use and connection method on the <APP Settings> screen. (Page 47)
When connecting the device for the first time, the setup screen (for connection, etc.) appears. Follow the procedure on the setup screen to configure the settings.
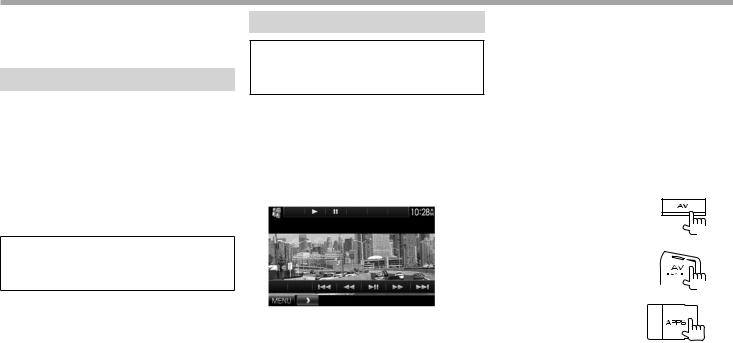
Using an App
When the operation buttons are not displayed on the screen, touch the screen to show them.
¥To change settings for video playback, see page 50.
Ρ Playback operations
1Start the App on your iPod touch/iPhone/ Android.
2 Select ÒAPPsÓ as the source. (Page!11)
ΡOperation buttons on the source control screen
[I] |
Starts playback. |
[W] |
Pauses playback. |
[S] [T] Selects an audio/video file. |
|
[O] [N] |
Reverse/forward search. |
[IW] |
Starts/pauses playback. |
[MENU] |
Displays the <TOP MENU> screen. |
¥You can operate some functions of the App on the touch panel.
¥For some applications such as navigation applications, the operation buttons and information are not shown. You can perform the operations on the touch panel, such as scrolling the map.
ÐIf Ò Ó appears on the screen, the unit cannot accept the touch operation you have tried to do.
¥You can also play back the audio/video using iPod/iPhone/Android itself instead of the unit.
ΡSwitching to the App screen while listening to another source
DDX7015BT/DDX7015BTM*
(Hold)
DDX5015DAB/DDX5015BT/
DDX515BT/DDX515BTM*
(Hold)
DDX715WBT/DDX715WBTM
To return to the source control screen: Press the same button again.
*This operation works only when <AV Key Long Press> is set to [APPs]. (Page!57)
22
Pandora® (Only for DDX7015BT Region 4/DDX5015DAB/DDX5015BT/DDX715WBT Region 4)
You can stream Pandora from iPod touch/iPhone, Android or BlackBerry devices.
¥Install the latest version of the Pandora application on your iPod touch/iPhone/Android/ BlackBerry.
Preparation
Connect the device, then start the Pandora application.
1Connect the device.
¥For Android/BlackBerry: Pair the Android/ BlackBerry device through Bluetooth. (Page!39)
¥For iPod touch/iPhone: Connect iPod touch/ iPhone. (Page!18)
2Select the device to use and connection method on the <APP Settings> screen. (Page!47)
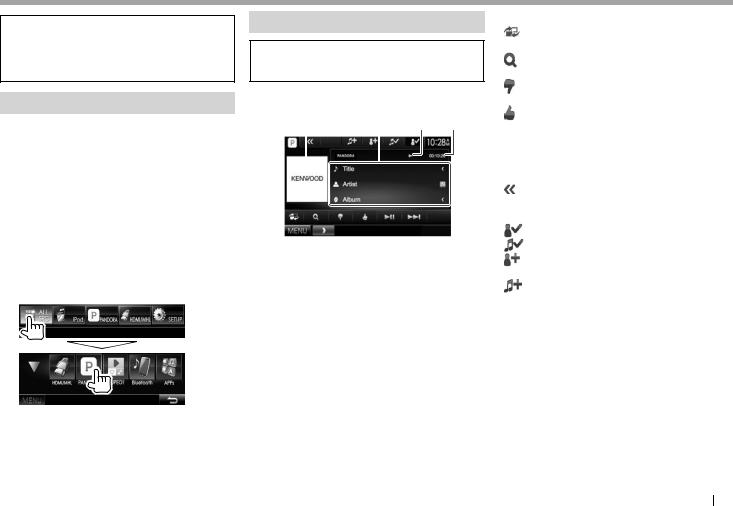
3Select ÒPANDORAÓ as the source.
On the <TOP MENU> screen:
Playback operations
You can operate Pandora using the remote controller. Only playing, pausing, and skipping are available.
Ρ Indications and buttons on the source control screen
1 2 3 4
Playback information
1Picture data
2Track information
¥Pressing [<] scrolls the text if not all of the text is shown.
3Playback status
4Playing time
Operation buttons
[ ] Displays the easy control screen. (Page!10)
[ |
] |
Displays the list selection screen. |
|
|
|
(Page 24) |
|
[ |
] |
Thumbs down to the current track |
|
|
|
and skips to the next track. |
|
[ |
] |
Registers the current track as a |
|
favorite. |
|||
[IW] |
|||
Starts/pauses playback. |
|||
[T] |
Skips the current track. |
||
|
|
¥ Not available when the Pandora |
|
|
|
skip reaches its limit. |
|
[ ] |
Displays other operation buttons. |
¥Disabled when there are no other buttons.
[ |
] |
Bookmarks the artist. |
[ |
] |
Bookmarks the current track. |
[ |
] |
Adds the current artist to the Station |
|
|
List. |
[ |
] |
Adds the current track to the Station |
|
|
List. |
[MENU] |
Displays the <TOP MENU> screen. |
|
The Pandora application is started.
ENGLISH 23
Pandora®
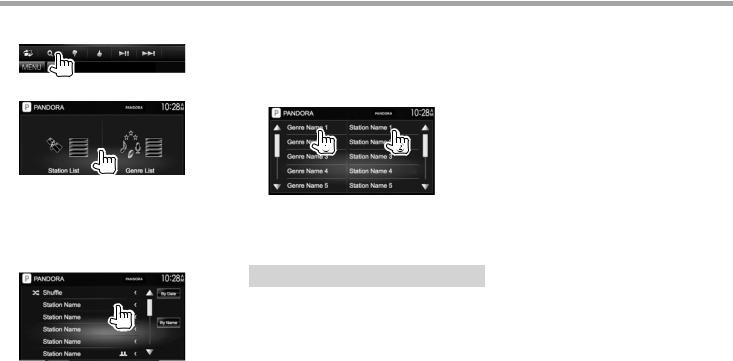
Ρ Selecting a station from the list
1 Display the list selection screen.
2Select the list type.
<Station List> Selects from the station names (Station List).
<Genre List> Selects from the genre names (Genre List).
3Select a station from the list.
On the Station List
[Shuffle] Plays all the songs in the registered stations randomly.
[By Date] Sorts the list in reverse chronological order.
[By Name] Sorts the list in alphabetical order.
¥You can change the page to display more items by pressing [J]/[K].
¥The  indicator appears on the left of the item when Shuffle is activated. (All songs on the registered stations are played randomly.)
¥The  indicator appears on the right of the item when the station is shared.
On the Genre List
Select a genre (1), then a station (2).
¥You can change the page to display more items by pressing [J]/[K].
¥The selected station is added to the Station List.
Requirements for Pandora¨
iPhone or iPod touch
¥Install the latest version of the Pandora application on your iPhone or iPod touch. (Search for ÒPandoraÓ in the Apple iTunes App Store to find and install the most recent version.)
¥Connect iPod touch/iPhone to this unit with a cable or via Bluetooth.
ÐWhen connecting with a cable: Use KCA-iP202, KCA-HD100, KCA-iP102 (optional accessory) or KCA-iP103 (optional accessory).
ÐWhen connecting via Bluetooth, the following profiles must be supported.
ÐSPP (Serial Port Profile)
ÐA2DP (Advanced Audio Distribution Profile)
Androidª
¥Visit Google play and search for ÒPandoraÓ to install.
¥Bluetooth must be built in and the following profiles must be supported.
ÐSPP (Serial Port Profile)
ÐA2DP (Advanced Audio Distribution Profile)
BlackBerry¨
¥Visit www.pandora.com from the built in browser to download the Pandora application.
¥Bluetooth must be built in and the following profiles must be supported.
ÐSPP (Serial Port Profile)
ÐA2DP (Advanced Audio Distribution Profile)
NOTE
¥Ensure you are logged in to your smartphone application. If you do not have a Pandora account, you can create one for free from your smartphone or at www.pandora.com.
¥Pandora is available only in the U.S./Australia/New Zealand.
¥Because Pandora is a third-party service, the specifications are subject to change without prior notice. Accordingly, compatibility may be impaired or some or all of the services may become unavailable.
¥Some functions of Pandora cannot be operated from this unit.
¥For issues using the application, contact Pandora at pandora-support@pandora.com
¥Establish an Internet connection using LTE, 3G, EDGE, or WiFi.
24
 Loading...