


 Loading...
INSTRUCTIONS
CAMCORDER
GZ-HD320BEK GZ-HD300AEK/BEK/REK
EN
Dear Customers
Thank you for purchasing this camcorder. Before use, please read the safety information and precautions contained
in pages 6 and 7 to ensure safe use of this product.
ENGLISH

Easy Start Guide
Charge the battery before recording
Turn off the camcorder and attach the battery pack.
Access lamp
blinks: Accessing files
Do not remove the AC adapter, the battery pack or the microSD card when the lamp is blinking.
Battery Pack
AC Adapter To AC Outlet
(110V to 240V)
Power/charge lamp blinks: Charging
goes out: Charging finished
Open the cover
The battery pack is not charged at the time of purchase.
CAUTION
•Be sure to use JVC battery packs. If you use any other battery packs besides JVC battery packs, safety and performance can not be guaranteed.
Grip Adjustment
Adjust the strap and fasten.
• Fasten the strap when you grip the |
Grip Strap |
|
|
camcorder. |
|
• When carrying the camcorder, |
Fasten |
please be careful not to drop it. |
EN

Date/Time Setting
QOpen the LCD monitor to turn on the camcorder
Power button
LCD monitor
R Select10 seconds[YES] within
Slide your finger up and down on the sensor. Then touch OK.
•When the message disappears, press the power button for at least 2 seconds to turn off the power, and then press it again for at least 2 seconds.
•Touch the sensors with your finger. The sensors do not function if you touch them with your finger nail or with gloves on.
S Select [CLOCK SETTING]
TSelect the city closest to the area where you use the camcorder
USelect [ON] if daylight saving time is observed
V Set the date and time
Touch sensor: Sets the date and time }: Moves the cursor to the right
OK: Clock starts
EN

Video recording
CAUTION
Before recording an important scene, it is recommended to conduct a trial recording.
Q
R
Slide the mode switch to select ! (video) mode
Select recording mode (REC)
The mode changes when you press the button.
The auto recording indicator appears.
S Start recording
Remaining space on the hard disk
Video Quality |
Record-standby |
|
Press the START/STOP button to start recording,
and press it again to stop.
Recording
EN

Playing back
Q Select playback mode (PLAY)
The mode changes when you press the button.
R
S
Select the desired file
Select F (Touch OK)
Index screen
Playback screen
To perform operations such as forward search or reverse search (Z p. 21)
To view files on TV (Z p. 24)
CAUTION
Do not forget to make copies after recording!
•To copy files onto discs (Z p. 27)
•To dub files to a VCR/DVD recorder (Z p. 29)
•To edit files on your computer (Z p. 30)
EN

Safety Precautions
IMPORTANT (for owners in the U.K.) Connection to the mains supply in the United Kingdom.
DO NOT cut off the mains plug from this equipment.
If the plug fitted is not suitable for the power points in your home or the cable is too short to reach
a power point, then obtain an appropriate safety approved extension lead or consult your dealer. BE SURE to replace the fuse only with an identical approved type, as originally fitted, and to replace the fuse cover.
If nonetheless the mains plug is cut off be sure to remove the fuse and dispose of the plug immediately, to avoid possible shock hazard by inadvertent connection to the mains supply.
If this product is not supplied fitted with a mains plug then follow the instructions given below: DO NOT make any connection to the Larger Terminal coded E or Green.
The wires in the mains lead are coloured in accordance with the following code:
Blue to N (Neutral) or Black
Brown to L (Live) or Red
If these colours do not correspond with the terminal identifications of your plug, connect as follows: Blue wire to terminal coded N (Neutral) or coloured black.
Brown wire to terminal coded L (Live) or coloured Red. If in doubt — consult a competent electrician.
WARNING: TO PREVENT FIRE OR SHOCK HAZARD, DO NOT EXPOSE THIS UNIT TO RAIN OR MOISTURE.
CAUTIONS:
•To prevent shock, do not open the cabinet. No user serviceable parts inside. Refer servicing to qualified personnel.
•When you are not using the AC adapter for a long period of time, it is recommended that you disconnect the power cord from AC outlet.
NOTES:
•The rating plate and safety caution are on the bottom and/or the back of the main unit.
•The serial number plate is on the battery pack mount.
•The rating information and safety caution of the AC adapter are on its upper and lower sides.
WARNING:
The battery pack, the camcorder with battery installed, and the remote control with battery installed should not be exposed to excessive heat such as direct sunshine, fire or the like.
CAUTION:
The mains plug shall remain readily operable.
Caution on Replaceable lithium battery
The battery used in this device may present a fire or chemical burn hazard if mistreated.
Do not recharge, disassemble, heat above 100°C or incinerate.
Replace battery with Panasonic, Sanyo, Sony or Maxell CR2025.
Danger of explosion or Risk of fire if the battery is incorrectly replaced.
•Dispose of used battery promptly.
•Keep away from children.
•Do not disassemble and do not dispose of in fire.
When the equipment is installed in a cabinet or on a shelf, make sure that it has sufficient space on all sides to allow for ventilation (10 cm or more on both sides, on top and at the rear).
Do not block the ventilation holes.
(If the ventilation holes are blocked by a newspaper, or cloth etc. the heat may not be able to get out.) No naked flame sources, such as lighted candles, should be placed on the apparatus.
When discarding batteries, environmental problems must be considered and the local rules or laws governing the disposal of these batteries must be followed strictly.
The apparatus shall not be exposed to dripping or splashing.
Do not use this equipment in a bathroom or places with water.
Also do not place any containers filled with water or liquids (such as cosmetics or medicines, flower vases, potted plants, cups etc.) on top of this unit.
(If water or liquid is allowed to enter this equipment, fire or electric shock may be caused.)
Do not point the lens directly into the sun. This can cause eye injuries, as well as lead to the malfunctioning of internal
circuitry. There is also a risk of fire or electric shock.
CAUTION!
The following notes concern possible physical damage to the camcorder and to the user.
Carrying or holding the camcorder by the LCD monitor can result in dropping the unit, or in a malfunction.
Do not use a tripod on unsteady or unlevel surfaces. It
could tip over, causing serious damage to the camcorder.
CAUTION!
Connecting cables (Audio/Video, S-Video, etc.) to the camcorder and leaving it on top of the TV is not recommended, as tripping on the cables will cause the camcorder to fall, resulting in damage.
CAUTION:
To avoid electric shock or damage to the unit,
first firmly insert the small end of the power
cord into the AC Adapter until it is no longer
wobbly, and then plug the larger end of the power cord into an AC outlet.
EN

Information for Users on Disposal of Old Equipment and Batteries
Battery
Products Notice:
The sign Pb below the symbol for batteries indicates that this
battery contains lead.
[European Union]
These symbols indicate that the electrical and electronic equipment and the battery with this symbol should not be disposed of as general household waste at its end-of-life. Instead, the products should be handed over to the applicable collection points for the recycling of electrical and electronic equipment as well as batteries for proper treatment, recovery and recycling in accordance with your national legislation and the Directive 2002/96/EC and 2006/66/EC.
By disposing of these products correctly, you will help to conserve natural resources and will help to prevent potential negative effects on the environment and human health which could otherwise be caused by inappropriate waste handling of these products.
For more information about collection points and recycling of these products, please contact your local municipal office, your household waste disposal
service or the shop where you purchased the product. Penalties may be applicable for incorrect disposal of this waste, in accordance with national legislation.
[Business users]
If you wish to dispose of this product, please visit our web page www.jvc-europe.com to obtain information about the take-back of the product.
[Other Countries outside the European Union]
These symbols are only valid in the European Union. If you wish to dispose of these items, please do so in accordance with applicable national legislation or other rules in your country for the treatment of old electrical and electronic equipment and batteries.
SOME DO’S AND DON’TS ON THE SAFE USE OF EQUIPMENT
This equipment has been designed and manufactured to meet international safety standards but, like any electrical equipment, care must be taken if you are to obtain the best results and safety is to be assured. DO read the operating instructions before you attempt to use the equipment.
DO ensure that all electrical connections (including the mains plug, extension leads and interconnections between pieces of equipment) are properly made and in accordance with the manufacturer’s instructions. Switch off and withdraw the mains plug when making or changing connections.
DO consult your dealer if you are ever in doubt about the installation, operation or safety of your equipment. DO be careful with glass panels or doors on equipment.
DON’T continue to operate the equipment if you are in any doubt about it working normally, or if it is damaged in any way — switch off, withdraw the mains plug and consult your dealer.
DON’T remove any fixed cover as this may expose dangerous voltages.
DON’T leave equipment switched on when it is unattended unless it is specifically stated that it is designed for unattended operation or has a standby mode. Switch off using the switch on the equipment and make sure that your family knows how to do this. Special arrangements may need to be made for infirm or handicapped people. DON’T use equipment such as personal stereos or radios so that you are distracted from the requirements of road safety. It is illegal to watch television whilst driving. DON’T listen to headphones at high volume, as such use can permanently damage your hearing.
DON’T obstruct the ventilation of the equipment, for example with curtains or soft furnishings. Overheating will cause damage and shorten the life of the equipment. DON’T use makeshift stands and NEVER fix legs with wood screws — to ensure complete safety always fit the manufacturer’s approved stand or legs with the fixings provided according to the instructions.
DON’T allow electrical equipment to be exposed to
rain or moisture.
ABOVE ALL
•NEVER let anyone especially children push anything into holes, slots or any other opening in the case — this could result in a fatal electrical shock;
•NEVER guess or take chances with electrical equipment of any kind — it is better to be safe than sorry!
Remember that this camcorder is intended for private consumer use only.
Any commercial use without proper permission is prohibited. (Even if you record an event such as a show, performance or exhibition for personal enjoyment, it is strongly recommended that you obtain permission beforehand.)
Trademarks
•“AVCHD” and the “AVCHD” logo are trademarks of Panasonic Corporation and Sony Corporation.
•Manufactured under license from Dolby Laboratories. Dolby and the double-D symbol are trademarks of Dolby Laboratories.
•x.v.Colour™ is a trademark of
Sony Corporation. 

•HDMI is a trademark of HDMI 

 Licensing, LLC.


•Windows® is either registered trademark or trademark of Microsoft Corporation in the United
States and/or other countries.
• Macintosh is a registered trademark of Apple Inc.
• iTunes, iMovie, iPhoto are trademarks of Apple Inc., registered in the U.S. and other countries.
• YouTube and the YouTube logo are trademarks and/or registered trademarks of YouTube LLC.
• Other product and company names included in this instruction manual are trademarks and/or registered trademarks of their respective holders.
EN

Contents |
|
GETTING STARTED |
|
Index......................................................... |
10 |
Indications on LCD Monitor................... |
12 |
Accessories............................................. |
14 |
Preparing the Remote Control...................... |
14 |
Necessary Settings before Use............. |
15 |
Charging the Battery Pack............................ |
15 |
Date/Time Setting......................................... |
15 |
Language Setting.......................................... |
16 |
Other Settings......................................... |
17 |
Using a microSD Card.................................. |
17 |
RECORDING/PLAYBACK |
|
Recording Files....................................... |
18 |
Video Recording............................................ |
18 |
Still Image Recording.................................... |
19 |
Zooming........................................................ |
20 |
LED Light...................................................... |
20 |
Checking the Remaining Battery Power........ |
20 |
Checking the Remaining Space on the |
|
Recording Media.......................................... |
20 |
Playing Back Files................................... |
21 |
Video Playback ............................................. |
21 |
Still Image Playback...................................... |
22 |
Manual Recording................................... |
23 |
Changing to Manual Recording Mode........... |
23 |
Manual Setting in Menu................................ |
23 |
USING WITH TV |
|
Viewing Files on TV................................. |
24 |
Connection with TV....................................... |
24 |
Playback Operation....................................... |
25 |
EDITING |
|
Managing Files........................................ |
26 |
Capturing a Still Image from a Video............. |
26 |
Deleting Files................................................ |
26 |
COPYING |
|
Copying Files........................................... |
27 |
Using a BD/DVD Burner................................ |
27 |
Dubbing Files to a VCR/DVD Recorder......... |
29 |
PC OPERATION |
|
Creating a Disc Using a PC.................... |
30 |
Using with a Portable Media Player....... |
35 |
Turning on the Export Mode.......................... |
35 |
Changing the Export Setting......................... |
35 |
Transferring the Files to PC........................... |
35 |
Uploading Files to Websites................... |
36 |
Turning on the Upload Mode......................... |
36 |
Uploading Files............................................. |
36 |
FURTHER INFORMATION |
|
Changing the Menu Settings.................. |
37 |
Troubleshooting...................................... |
37 |
Warning Indications................................ |
39 |
Specifications.......................................... |
40 |
Cautions................................................... |
42 |
Terms........................................................ |
44 |
EN

How to use the Touch Sensor
After the menu is displayed on the LCD monitor:
QSlide your finger up and down on the sensor.
RSelect [SET]. (Touch OK.)
ATo select an on-screen button appearing on the left side, touch the portion of the sensor next to the on-screen button.
BTo select an on-screen button appearing at the bottom of the screen, touch the buttons underneath them.
Read these INSTRUCTIONS to enjoy your CAMCORDER.
For more details on the operations, refer to the GUIDEBOOK in the supplied CD-ROM.
In order to view the GUIDEBOOK,
Adobe® Acrobat® ReaderTM or Adobe® Reader® must be installed.
Adobe® Reader® can be loaded from Adobe’s web site:
http://www.adobe.com/
NOTE
Select your desired language with a single click.
The model name is indicated on the bottom of your camcorder.
Read This First!
Make a backup of important recorded data
It is recommended to copy your important recorded data to a DVD or other recording media for storage. JVC will not be responsible for any lost data.
Make a trial recording
Before the actual recording of important data, make a trial recording and play back the recorded data to check that the video and sound have been recorded correctly.
Reset the camcorder if it does not operate correctly
Close the LCD monitor and remove the power supply (battery pack or AC adapter) from the camcorder, then reattach it.
Precautions on handling batteries
•Be sure to use the JVC BN-VF808U/ VF815U/VF823U battery packs. This product includes patented and other proprietary technology and is made to be used with the JVC battery and not with other batteries. JVC cannot guarantee safety or performance of this product when it is operated by other batteries.
•If the camcorder is subjected to electrostatic discharge, turn off the power before using it again.
If a malfunction occurs, stop using the camcorder immediately and consult your nearest JVC dealer
•Recorded data may be erased while the camcorder is being repaired or inspected. Back up all data before requesting repairs or inspections.
Because camcorders may be used for demonstration in a shop, the
demonstration mode is set to on by default
To deactivate the demonstration mode, set [DEMO MODE] to [OFF].
EN

GETTING STARTED
Index
NOTE
• Be careful not to cover 3, 4, 5, and 6 during shooting.
• The LCD monitor can rotate 270°.
10 EN
Camcorder
! Power Button
# HDMI Mini Connector (Z p. 24) $ Component Connector (Z p. 24) % DISPLAY Button (Z p. 13)
& Speaker
( Ventilation hole
)Zoom Lever (Z p. 20) Speaker Volume Control
* SNAPSHOT Button (Z p. 19)
+ Touch Sensor
, OK Button
- MENU Button
. Mode Switch [!, #]
/UPLOAD Button (Z p. 36) TITLE Button
0 EXPORT Button (Z p. 35)
1DIRECT DISC Button (Z p. 28) INFO Button (Z p. 20)
2 PLAY/REC Button (Z p. 18, 19, 21, 22)
3 LED Light (Z p. 20)
4 Remote Sensor
5 Lens
6 Stereo Microphone
7 DC Connector
8 START/STOP Button (Z p. 18)
9 AV Connector (Z p. 25, 29) : USB Connector (Z p. 27, 31)
; Tripod Mounting Socket < microSD Card Slot
= Battery Release Button
Remote Control
Q Infrared Beam Transmitting Window R ZOOM (T/W) Buttons (Zoom in/Out) S Up Button
T Skip Backward Button U Left Button
V Back Button
W PLAYLIST Button
X START/STOP Button
Y S.SHOT (SNAPSHOT) Button
Z INFO Button
a Skip Forward Button
b PLAY/PAUSE/SET Button c Right Button
d Next Button
e Down Button
f INDEX Button*
gDISP Button
*Each time you press INDEX, the screen switches as shown below:
! mode:
Index Screen « Group Index Screen
# mode:
Index Screen « Date Index Screen
Tripod Mounting
Align the camcorder stud hole with the tripod stud, and the mounting socket with the screw, and then rotate the camcorder clockwise to mount it to the tripod.
NOTE
Do not use a tripod on unsteady or unlevel surfaces. It could tip over, causing serious damage to the camcorder.
EN 11

Indications on LCD Monitor
During both Video and Still Image |
|
During Video Recording Only |
||||||||||||||||||||||||||||||||||||||||||
Recording |
|
|
|
|
|
|
|
|
|
|
|
|
|
|
|
|
|
|
|
|
|
|
|
|
|
|
||||||||||||||||||
|
|
|
|
|
|
|
|
|
|
|
|
|
|
|
|
|
|
|
|
|
|
|
|
|
|
|||||||||||||||||||
|
|
|
|
|
|
|
|
|
|
|
|
|
|
|
|
|
|
|
|
|
|
|
|
|
|
|
|
|
|
|
|
|
|
|
|
|
|
|
|
|
|
|
|
|
|
|
|
|
|
|
|
|
|
|
|
|
|
|
|
|
|
|
|
|
|
|
|
|
|
|
|
|
|
|
|
|
|
|
|
|
|
|
|
|
|
|
|
|
|
|
|
|
|
|
|
|
|
|
|
|
|
|
|
|
|
|
|
|
|
|
|
|
|
|
|
|
|
|
|
|
|
|
|
|
|
|
|
|
|
|
|
|
|
|
|
|
|
|
|
|
|
|
|
|
|
|
|
|
|
|
|
|
|
|
|
|
|
|
|
|
|
|
|
|
|
|
|
|
|
|
|
|
|
|
|
|
|
|
|
|
|
|
|
|
|
|
|
|
|
|
|
|
|
|
|
|
|
|
|
|
|
|
|
|
|
|
|
|
|
|
|
|
|
|
|
|
|
|
|
|
|
|
|
|
|
|
|
|
|
|
|
|
|
|
|
|
|
|
|
|
|
|
|
|
|
|
|
|
|
|
|
|
|
|
|
|
|
|
|
|
|
|
|
|
|
|
|
|
|
|
|
|
|
|
|
|
|
|
|
|
|
|
|
|
|
|
|
|
|
|
|
|
|
|
|
|
|
|
|
|
|
|
|
|
|
|
|
|
|
|
|
|
|
|
|
|
|
|
|
|
|
|
|
|
|
|
|
|
|
|
|
|
|
|
|
|
|
|
|
|
|
|
|
|
|
|
|
|
|
|
|
|
|
|
|
|
|
|
|
|
|
|
|
|
|
|
|
|
|
|
|
|
|
|
|
|
|
|
|
|
|
|
|
|
|
|
|
|
|
|
|
|
|
|
|
|
|
|
|
|
|
|
|
|
1. 11. 2009 |
1 6 : 5 5 |
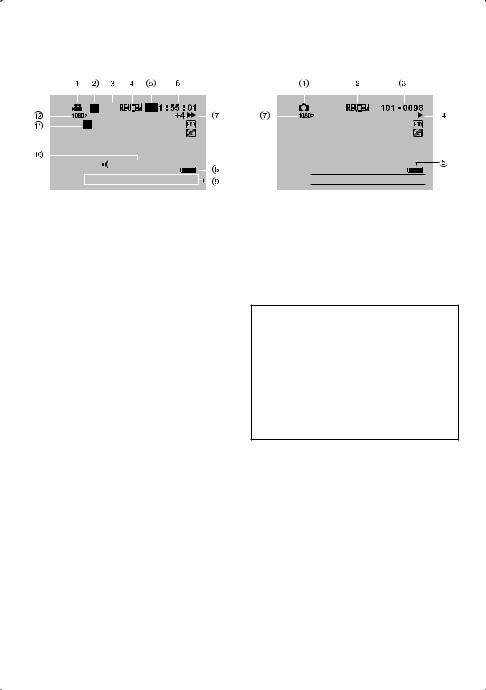
!Selected Recording Mode Indicator (Z p. 23)
@: Auto Mode 3: Manual Mode
# Effect Mode Indicator
$ Tele Macro Mode Indicator % LED Light Indicator (Z p. 20) & Scene Select Indicator
( Zoom Indicator (Z p. 20)
) Recording Medium Indicator
*Drop Detection Indicator (Appears when [DROP DETECTION] is set to [OFF].)
+ White Balance Indicator , Monitor Backlight Indicator - Battery Indicator
. Date/Time (Z p. 15)
/ Face Detection Indicator (Z p. 18, 19) 0 Manual Focus Adjustment Indicator 1 Backlight Compensation Indicator
2Brightness Control Indicator
.: Photometry Area Control Indicator
3 Shutter Speed
! Mode Indicator
# EXPORT Mode Indicator (Z p. 35) $ Counter
% Upload Mode Indicator (Z p. 36) & Video Quality
( Remaining Time
)MREC: (Appears during recording.) MQ: (Appears during record-standby
mode.)
*Digital Image Stabilizer (DIS) Indicator (Appears when [DIS] is set to [OFF].)
+ Shooting Indicator (Z p. 18) , Wind Cut Indicator
- Event Indicator
. x.v.Colour™
During Still Image Recording Only
! Mode Indicator
# Focus Indicator (Z p. 19) $ Image Size
%Image Quality: FINE (fine) or STD (standard)
& Remaining Number of Shots ( Shooting Indicator (Z p. 19) ) Shutter Mode Indicator
* Self-Timer Indicator
12 EN
During Video Playback |
|
During Still Image Playback |
||||||||||||||||||||||||
|
|
|
|
|
|
|
|
|
|
|
|
|
|
|
|
|
|
|
|
|
|
|
|
|
|
|
|
|
|
|
|
|
|
|
|
|
|
|
|
|
|
|
|
|
|
|
|
|
|
|
|
|
|
|
|
|
|
|
|
|
|
|
|
|
|
|
|
|
|
|
|
|
|
|
|
|
|
|
|
|
|
|
|
|
|
|
|
|
|
|
|
|
|
|
|
|
|
|
|
|
|
|
|
|
|
|
|
|
|
|
|
|
|
|
|
|
|
|
|
|
|
|
|
|
|
|
|
|
|
|
|
|
|
|
|
|
|
|
|
|
|
|
|
|
|
|
|
|
|
|
|
|
|
|
|
|
|
|
|
|
|
|
|
|
|
|
8 |
|
|
|
|
|
|
|
|
|
|
|
|
|
|
|
|
|
|
|
|
|
|
|
1. 11. 2009 |
1 6 : 5 5 |
|
|||
|
|
|||||
|
|
|
|
|
|
|
! Mode Indicator
# Wipe/Fader Effect Indicator
$Playlist Playback Indicator (Appears when playing back a playlist.)
% Quick Review Indicator (Z p. 18) & Video Quality
( Counter
)Playback Mode
F: Playback Q: Pause
K: Forward Search
J: Reverse Search QF: Forward Slow-Motion PQ: Reverse Slow-Motion
(The number on the left shows speed.)
* Battery Indicator
+ Date/Time (Z p. 15) , Volume Level Indicator - x.v.Colour™
. Output with 1080p
 1. 11. 2009 1 6 : 5 5

! Mode Indicator
# Quick Review Indicator (Z p. 19) $ Folder/File Number
% Slide Show Playback Indicator & Battery Indicator
( Date/Time (Z p. 15) ) Output with 1080p
Switching indication modes on LCD monitor
Each time you touch DISPLAY, indications on LCD monitor switch as shown below:
In recording mode:
All indications/Indications for selected functions
In playback mode:
All indications/Only date and time/No indications
EN 13

Accessories
AP-V20M |
|
BN-VF808U |
|
AC Adapter |
Power Cord |
Battery Pack |
Component Cable |
|
|
|
CR2025 |
|
|
RM-V751U |
|
AV Cable |
USB Cable |
Remote Control |
Lithium Battery |
|
|
|
Pre-installed in the |
|
|
|
remote control. |
CD-ROM
NOTE
Make sure to use the provided cables for connections. Do not use any other cables.
Preparing the Remote Control
A battery is included inside the remote control at the time of purchase.
Remove the insulation sheet before use.
Beam Effective Area
Remote Sensor
Effective distance:
Max. 5 m
NOTE
The transmitted beam may not be effective or may cause incorrect operation when the remote sensor is directly exposed to sunlight or powerful lighting.
To Reinsert the Battery
Pull out the battery holder by pressing the lock tab.
Lock Tab
Lithium Battery (CR2025)
14 EN
Loading...