


 Loading...
LYT2677-001A-M
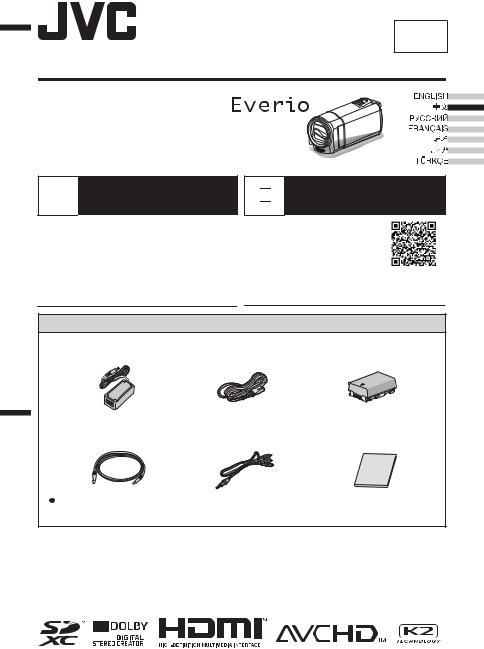
Basic User Guide
EN
CAMCORDER
GZ-E110 D
 Detailed User Guide
For more details on operating this product, please refer to the “Detailed User Guide” at the following website.
ohttp://manual3.jvckenwood.com/ index.html/
 Mobile User Guide
When you are outside, refer to the “Mobile User Guide”. Mobile User Guide can be viewed with standard browser for Android tablet and iPhone.
ohttp://manual3asia/ .jvckenwood.com/mobile/
Verifying the Accessories
AC Adapter |
Power Cord |
Battery Pack |
AC-V10M |
(x 2) |
BN-VG109 |
USB Cable |
AV Cable |
Basic User Guide |
(Type A - Mini Type B) |
QAM1322-001 |
(this manual) |
 Please consult your JVC dealer or the nearest JVC service center when purchasing a new AV cable.
Dear Customers
Thank you for purchasing this JVC product.
Before use, please read the Safety Precautions and Cautions on p. 2 and p. 10 to ensure safe use of this product.

Safety Precautions
WARNING:TO PREVENT FIRE OR SHOCK HAZARD, DO NOT EXPOSE THIS UNIT TO RAIN OR MOISTURE.
CAUTIONS:
•If you notice smoke or a peculiar smell coming from this unit or AC Adapter, shut it down and unplug it immediately. Continue using the unit or AC Adapter under these conditions could lead to fire or electric shock. Contact your JVC dealer. Do not attempt to repair the malfunction yourself.
•To prevent shock, do not open the cabinet. No user serviceable parts inside. Refer servicing to qualified personnel.
•When you are not using the AC adapter for a long period of time, it is recommended that you disconnect the power cord from AC outlet.
•In certain areas, use the conversion plug depending on the type of your AC wall outlet.
NOTES:
•The rating plate and safety caution are on the bottom and/or the back of the main unit.
•The serial number plate is on the battery pack mount.
•The rating information and safety caution of the AC adapter are on its upper and lower sides.
WARNING:
The battery pack, this unit with battery installed, and the remote control with battery installed should not be exposed to excessive heat such as direct sunlight, fire or the like.
CAUTION:
The mains plug shall remain readily operable.
•Remove the mains plug immediately if this unit functions abnormally.
CAUTION:
To avoid electric shock or damage to the
unit, first firmly insert
the small end of the power cord into the
AC Adapter until it is no longer wobbly, and
then plug the larger
end of the power cord into an AC outlet.
Caution on Replaceable lithium battery
The battery used in this device may present a fire or chemical burn hazard if mistreated.
Do not recharge, disassemble, heat above 100°C or incinerate.
Replace battery with Panasonic, Sanyo, Sony or Maxell CR2025.
Danger of explosion or Risk of fire if the battery is incorrectly replaced.
•Dispose of used battery promptly.
•Keep away from children.
•Do not disassemble and do not dispose of in fire.
When the equipment is installed in a cabinet or on a shelf, make sure that it has sufficient space on all sides to allow for ventilation (10 cm or more on both sides, on top and at the rear).
Do not block the ventilation holes.
(If the ventilation holes are blocked by a newspaper, or cloth etc. the heat may not be able to get out.)
No naked flame sources, such as lighted candles, should be placed on the apparatus.
When discarding batteries, environmental problems must be considered and the local rules or laws governing the disposal of these batteries must be followed strictly.
The apparatus shall not be exposed to dripping or splashing.
Do not use this equipment in a bathroom or places with water.
Also do not place any containers filled with water or liquids (such as cosmetics or medicines, flower vases, potted plants, cups etc.) on top of this unit. (If water or liquid is allowed to enter this equipment, fire or electric shock may be caused.)
CAUTIONS:
•Be sure to use the supplied AC adapter.
•Do not use the supplied AC adapter with other devices.
Make a backup of important recorded data
JVC will not be responsible for any lost data.
It is recommended to copy your important recorded data to a disc or other recording media for storage once every 3 months.
2EN
Do not point the lens directly into the sun. This can cause eye injuries, as well as lead to the malfunctioning of internal circuitry. There is also a risk of fire or electric shock.
CAUTION!
The following notes concern possible physical damage to this unit and to the user.
Carrying or holding this unit by the LCD monitor can result in dropping the unit, or in a malfunction. Do not use a tripod on unsteady or unlevel surfaces. It could tip over, causing serious damage to the unit.
CAUTION!
Connecting cables (Audio/Video, etc.) to this unit and leaving it on top of the TV is not recommended, as tripping on the cables will cause the unit to fall, resulting in damage.
If this symbol is shown, it is only valid in the European Union.
This product is licensed under the AVC Patent Portfolio License for the personal use of a consumer or other uses in which it does not receive remuneration to
(i)encode video in compliance with the AVC standard (“AVC Video”) and/or
(ii)decode AVC Video that was encoded by a consumer engaged in a personal activity and/or was obtained from a video provider licensed to provide AVC Video. No license is granted or shall be implied for any other use. Additional information may be obtained from MPEG LA, L.L.C.
See http://www.mpegla.com
Remember that this unit is intended for private consumer use only.
Any commercial use without proper permission is prohibited. (Even if you record an event such as a show, performance or exhibition for personal enjoyment, it is strongly recommended that you obtain permission beforehand.)
Trademarks
•AVCHD and AVCHD logo are trademarks of Panasonic Corporation and Sony Corporation.
•HDMI(High-Definition Multimedia Interface) and HDMI logo are either registered trademarks or trademarks of HDMI Licensing, LLC in the
United States and/or other countries.
•Manufactured under license from Dolby Laboratories. Dolby and the double-D symbol are trademarks of Dolby Laboratories.
•SDXC logo is a trademark of SD-3C, LLC.
•Windows® is either registered trademark or trademark of Microsoft Corporation in the United States and/or other countries.
•Macintosh is a registered trademark of Apple Inc.
•iMovie and iPhoto are trademarks of Apple Inc., registered in the U.S. and other countries.
•Intel, Intel Core, and Pentium are trademarks or registered trademarks of Intel Corporation or its subsidiaries in the United States and other countries.
•Android™ is a trademark of Google Inc.
•Other product and company names included in this instruction manual are trademarks and/or registered trademarks of their respective holders.
•Marks such as ™ and ® have been omitted in this manual.
EN 3
Contents
Safety Precautions |
2 |
|
|
|
|
Recording |
|
||
...............Names of Parts and Functions |
4 |
|
Video Recording .................................... |
8 |
Grip Belt Adjustment .............................. |
4 |
|
|
|
|
|
|
Playback |
|
Getting Started |
|
|
||
|
|
Playing Back/Deleting Files on this Unit |
9 |
|
Charging the Battery Pack ..................... |
5 |
|
||
..............................Inserting an SD Card |
6 |
|
Further Information |
|
..........................................Clock Setting |
7 |
|
Cautions ............................................... |
10 |
Video Quality .......................................... |
7 |
|
Recordable Time/Specifications .......... |
12 |
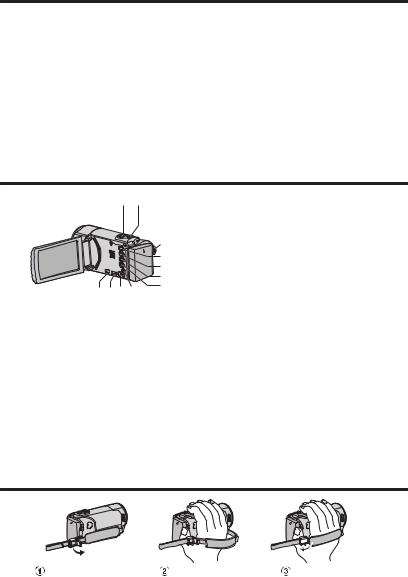
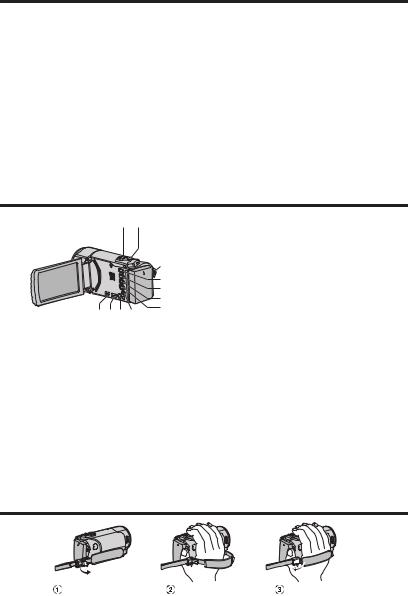
Names of Parts and Functions
|
1 2 |
|
E UP/< Button |
|||
|
|
|
|
UP |
: |
Scrolls/moves cursor on the |
|
|
|
|
|
|
icons upward |
|
|
3 |
|
< |
: Reverse search |
|
|
|
4 |
F DOWN/> Button |
|||
|
|
6 |
|
DOWN |
: Scrolls/moves cursor on the |
|
|
|
5 |
|
|
|
icons downward |
|
|
7 |
|
> |
|
|
|
a098 |
|
|
: Forward search |
||
A Zoom/Volume Lever / Index (u) |
G OK/INFO Button |
|||||
|
(p. 8, p. 9) |
|
|
Confirms the selection. / Displays |
||
B i.AUTO (Intelligent Auto) Button |
|
information as follows. |
||||
|
(p. 8) |
|
|
Recording : Displays the remaining |
||
|
START/STOP Button (Video |
|
|
Playback |
time and battery power. |
|
C |
|
|
: Displays file information |
|||
|
Recording) (p. 8) / |
|
|
|
|
such as recording date. |
|
d/e (Play/Pause) Button (Video |
H |
AV Connector |
|||
|
Playback) (p. 9) |
|
|
|||
D L (Play/Record) Button |
|
I |
MENU Button |
|||
|
|
|||||
|
Switches between recording and |
J |
HDMI Mini Connector |
|||
|
|
|
|
|
|
|
|
playback modes. (p. 9) |
|
K USB Connector |
|||
Grip Belt Adjustment
Open the lever on the |
Adjust the length |
Close the lever |
strap lock |
of the belt |
|
4EN
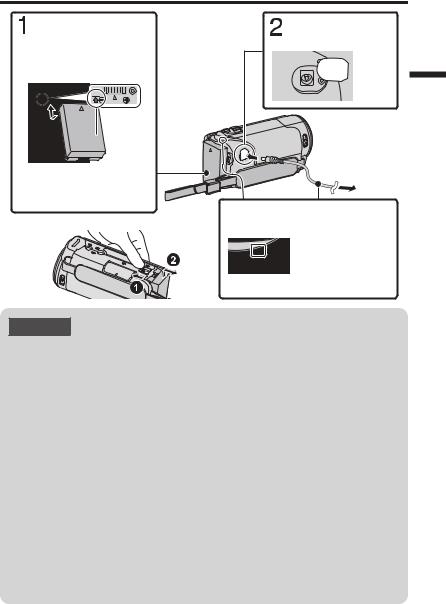
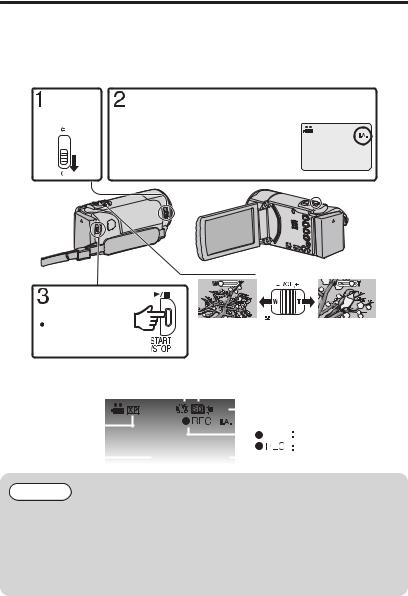
Charging the Battery Pack
Attach the battery pack. |
Connect the DC |
|
connector. |
 The battery pack is not charged at the time of purchase.
 Mark
Mark
 Align the top of the battery with the mark on this unit, and slide in until the battery clicks into place.
 To detach the battery pack
(Base)
 Cover
Cover
AC Adapter
To AC Outlet (110 V to 240 V)
 Plug in the power.
Charging Lamp
Charging in progress: 
 Blinks
Charging finished:
Goes out
 If the charging lamp is blinking fast or twice, refer to the “Caution” below.
CAUTION
Be sure to use JVC battery packs.
0 If you use any other battery packs besides JVC battery packs, safety and performance cannot be guaranteed.
0 Charging time: Approx. 2 h 50 m (using supplied battery pack)
*The charging time is when the unit is used at 25°C . If the battery pack is charged outside the room temperature range of 10°C to 35°C, charging may take a longer time or it may not start. CHARGE lamp blinks 2 times in a slow cycle for notification if the battery charge does not start. In such case, leave the battery for a while, and charge the battery again. Also, please note that the recordable and playable time may be shortened under some usage conditions, such as at low temperature.
0In case of the battery is not used for a long period of time or at the time of purchase, the charging time will be longer than usual.
If you use the battery before charging is completed, the power may not turned on. Please use after charging is completed.
0If malfunctions (overcurrent, overvoltage, transmission error, etc) occur, or if any battery manufactured other than JVC is attempted for battery charge, charging stops. In these cases, the CHARGE lamp blinks quickly for notification.
0You can record or play back videos while the AC adapter is connected. (Battery charging cannot be performed during recording or playback.)
Remove the battery when the unit is to be used for a long time. Performance of the battery may drop if it is left attached to the unit.
EN 5
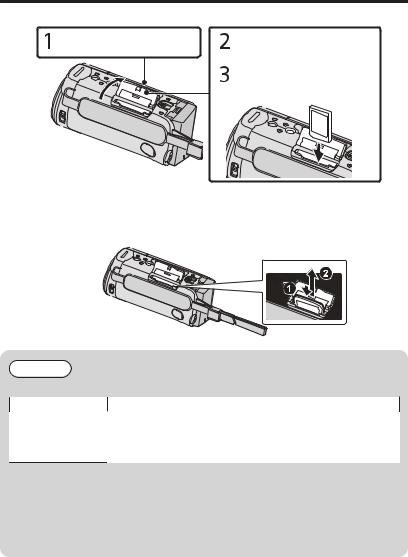
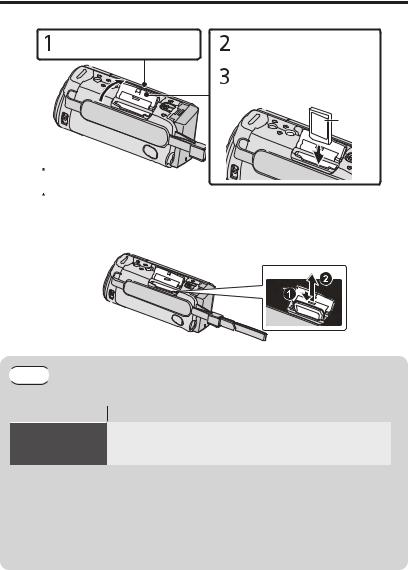
Inserting an SD Card
Insert a commercially available SD card before recording.
Close the LCD monitor. |
Open the cover. |
(Base) |
Insert an SD card. |
|
 Label
Label
 Turn off the power of this unit before inserting or removing an SD card.
 When the LCD monitor is closed, the unit turns off.
oTo remove the SD card
Push the SD card inward once, then pull it out straight.
(Base)
NOTE
Operations are confirmed on the following SD cards.
|
|
Manufacturer |
Panasonic, TOSHIBA, SanDisk |
Video A |
Class 4 or higher compatible SDHC card (4 GB to 32 GB)/ |
|
Class 4 or higher compatible SDXC card (64 GB to 128 GB) |
|
(When recording with video quality [UXP], Class 6 or higher is |
|
recommended.) |
0Using SD cards (including SDHC/SDXC cards) other than those specified above may result in recording failure or data loss.
0To protect the data, do not touch the terminals of the SD card.
0When using an SDXC card, check its compatibility with the OS of your computer by referring to the Detailed User Guide.
0This unit is not guaranteed to operate with all SD cards, even when using the ones specified above. Some SD cards may not work due to specification changes, etc.
6EN

Clock Setting
To select/move cursor towards up/left or down/right, press the button UP/< or DOWN/>.
1 Open the LCD monitor.
0The unit turns on. When the LCD monitor is closed, the unit turns off.
|
|
|
|
|
2 |
Select [YES] and press OK when |
|||
|
[SET DATE/TIME!] is displayed. |
|||
|
|
|
|
|
|
|
|
SET DATE/TIME! |
|
|
|
YES |
NO |
|
|
|
|
|
|
|
|
|
|
|
Video Quality
3 Set the date and time.
CLOCK SETTING |
|
|
|||
|
DATE |
|
|
|
TIME |
24 |
12 |
2014 |
|
10 |
00 |
0Press UP/< or DOWN/> to adjust the setting value and press OK to confirm it. The cursor moves to the next item.
0Repeat this step to input the day, month, year, hour, and minute.
|
|
4 |
Press UP/< or DOWN/> to select |
OK.the region where you live and press |
0Timedifferencebetweentheselectedcityandthe GMT (Greenwich Mean Time) is displayed.
oTo return to the previous screen
Press MENU.
This unit can perform recording in both high and standard definition. By default, it is set to high definition (XP).
oTo change the setting
A Press MENU.
B Press UP/< or DOWN/> to select [VIDEO QUALITY] and press OK/INFO. C Press UP/< or DOWN/> to select the video quality.
D Press OK/INFO. (Setting complete)
High Definition |
UXP |
Higher video quality |
||
|
XP |
|
|
|
|
SP |
|
|
|
|
EP |
|
|
|
|
|
|
|
|
Standard Definition |
SSW |
More recording time |
||
|
SEW |
|||
* For the approximate video recording time, refer to p. 12.
EN 7
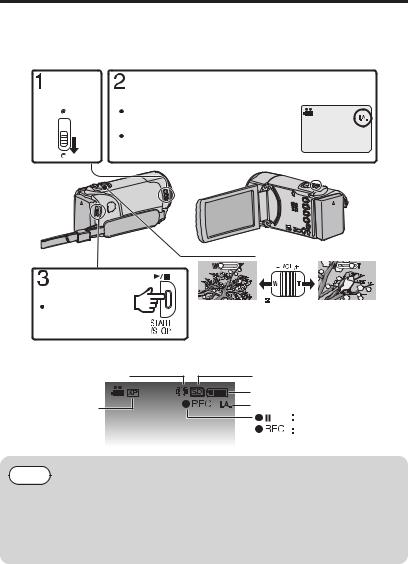
Video Recording
You can record without worrying about the setting details by using the Intelligent Auto mode. Settings such as exposure and focus will be adjusted automatically to suit the shooting conditions.
* In case of specific shooting scenes such as person etc., its icon is displayed on the screen.
Before recording an important scene, it is recommended to conduct a trial recording.
Open the |
Check if the recording mode is PIntelligent Auto. |
lens cover. |
|
 If the mode is HManual, press the S button to switch.
 The mode changes between Intelligent
Auto and Manual with every press.
|
|
Zooming |
Start recording. |
|
|
Press again to stop. |
(Wide angle) |
(Telephoto) |
oIndications during video recording
Image Stabilizer |
|
|
|
|
|
|
|
|
|
|
|
|
|
|
Recording Media |
||||
|
|
|
|
|
|
|
|
|
|
|
|
|
|
||||||
|
|
|
|
|
|
|
|
|
|
|
|
|
|
|
|
|
Battery Indicator |
||
Video Quality |
|
|
|
|
|
|
|
|
|
|
|
|
|
|
|
Intelligent Auto |
|||
|
|
|
|
|
|
|
|
|
|
|
|
|
|
|
|||||
|
|
|
|
|
|
|
|
|
|
|
|
||||||||
|
|
|
|
|
|
|
|
|
|
|
|
|
|
|
|||||
|
|
|
|
|
|
|
|
|
|
|
|
|
|
|
|
|
|
|
Record-Standby |
Scene Counter |
|
|
|
|
0:00:00 [000:22] |
|
|
|
|
|
Recording in Progress |
||||||||
|
|
|
|
|
|
Remaining Recording Time |
|||||||||||||
|
|
|
|
|
|
||||||||||||||
NOTE
0The estimated recording time of the supplied battery pack is approximately 45 minutes.
0Do not remove the battery pack, AC adapter, or SD card when the access lamp is lighted. The recorded data may become unreadable.
0This unit turns itself off automatically to conserve power when it is not operated for 5 minutes. (only when using the battery pack)
0The angle of view may change when the image stabilizer is turned on or off.
8EN
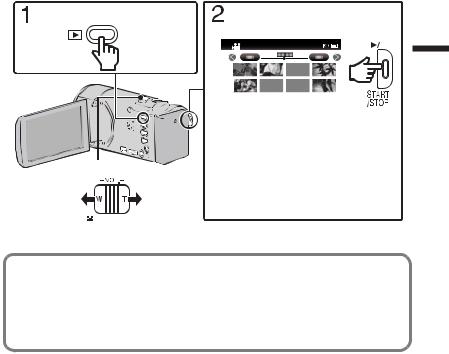
Playing Back/Deleting Files on this Unit
Select and play back the recorded videos from an index screen (thumbnail display).
Select the playback mode. |
Select the desired video and press |
|||
|
d/e. |
|||
|
|
|
|
|
|
|
|
|
|
Volume adjustment |
|
||
Turn down the |
|
Turn up the |
|
|
|
||
volume |
|
|
volume |
 To select/move cursor towards up/left or down/right, press the button UP/< or DOWN/>.
 Press the d/e button to stop (pause) playback.
 To return to the index screen, slide along the
  (zoom) lever while playback is paused.
0 Press L again to return to the recording mode.
oTo delete selected files from the index screen
APress MENU, select [DELETE] and press OK.
B Select [FILE SELECT] and press OK.
CPress UP/< or DOWN/> to select files and press OK.
0 Rappears.
DPress MENU, select [EXECUTE] and press OK to confirm deletion.
E After deleting is complete, press OK.
oUsable operation buttons/levers during playback
|
During video playback |
During video pause |
START/STOP d/e |
Pause |
Playback |
Zoom u |
- |
Stop (returns to thumbnail display) |
Zoom T / Vol.+ |
Increases volume level |
- |
Zoom W / Vol.- |
Decreases volume level |
- |
UP/< |
Reverse search |
Frame-by-frame playback in reverse |
|
|
direction |
DOWN/> |
Forward search |
Frame-by-frame playback in forward |
|
|
direction |
EN 9

Cautions
Troubleshooting
If you encounter problems with this unit, check the following before requesting service.
1.Refer to the “Troubleshooting” section in the
“Detailed User Guide”.
If you have difficulties operating the unit, refer to the detailed descriptions in the “Detailed User Guide”.
•http://manual3.jvckenwood.com/index.html/
2.This unit is a microcomputer-controlled device. Electrostatic discharge, external noise and interference (from a TV, a radio, etc.) might
prevent it from functioning properly.
In such a case, reset the unit.
A Turn off the power. (Close the LCD monitor.) B Remove the AC adapter and battery pack from
this unit, reattach them, open the LCD monitor and this unit powers on automatically.
3.If the above do not solve the problem, consult your nearest JVC dealer or JVC service center.
Battery Pack
The supplied battery pack is a |
Terminals |
|
lithium-ion battery. Before using |
|
|
the supplied battery pack or an |
|
|
optional battery pack, be sure |
|
|
to read the following cautions: |
|
|
• To avoid hazards |
|
|
... do not |
burn. |
|
... do not |
short-circuit the terminals. Keep it away |
|
from metallic objects when not in use. When |
||
transporting, carry the battery in a plastic bag. |
||
... do not modify or disassemble. |
|
|
... do not |
expose the battery to temperatures |
|
exceeding 60°C, as this may cause the battery to overheat, explode or catch fi re.
... use only specifi ed chargers.
• To prevent damage and prolong service life
... do not subject to unnecessary shock.
... charge within the temperature range of 10°C to 35°C. Cooler temperatures require longer charging time, or in some cases stop charging at all. Warmer temperatures prevent complete charging, or in some cases stop charging at all.
... store in a cool, dry place. Extended exposure to high temperatures will increase natural discharge and shorten service life.
...keep a 30% battery level ( ) if the battery pack is not to be used for a long period of time. In addition, fully charge and then fully discharge the battery pack every 6 months, then continue to store it at
a 30% battery level ( ).
).
... remove from charger or powered unit when not in use, as some machines use current even when switched off.
... do not drop or subject to strong impact.
Recording Medium
•Be sure to follow the guidelines below to prevent corruption or damage to your recorded data.
•Do not bend or drop the recording medium, or subject it to strong pressure, jolts or vibrations.
•Do not splash the recording medium with water.
•Do not use, replace, or store the recording medium in locations that are exposed to strong static electricity or electrical noise.
•Do not turn off the camcorder power or remove the battery or AC adapter during shooting, playback, or when otherwise accessing the recording medium.
•Do not bring the recording medium near objects that have a strong magnetic fi eld or that emit strong electromagnetic waves.
•Do not store the recording medium in locations with high temperature or high humidity.
•Do not touch the metal parts.
•When formatting or erasing data using the camcorder, the data won't be erased completely. When handing over your camcorder and/or
SD card, you are recommended to erase all of the data by either performing “FORMAT” or “FACTORY PRESET” operation on this unit, using commercially available software, or by physically destroying the camcorder.
10 EN
LCD Monitor
•To prevent damage to the LCD monitor, DO NOT
... push it strongly or apply any shocks.
... place the camcorder with LCD monitor on the
bottom.
• To prolong service life
... avoid rubbing it with coarse cloth.
While the LCD monitor screen has more than 99.99% effective pixels, 0.01% of the pixels may be bright spots (red, blue, green) or dark spots. This is not a malfunction. The spots will not be recorded.
Main Unit
• For safety, DO NOT
... open the camcorder’s chassis.
... disassemble or modify the unit.
... allow inflammables, water or metallic objects to enter the unit.
... remove the battery pack or disconnect the power supply while the power is on.
... leave the battery pack attached when the camcorder is not in use.
... place naked flame sources, such as lighted candles, on the apparatus.
... expose the apparatus to dripping or splashing.
... leave dust or metal objects adhered to the power plug or an AC wall outlet.
... insert any objects in the camcorder.
• Avoid using the unit
... in places subject to excessive humidity or dust.
... in places subject to soot or steam such as near a cooking stove.
... in places subject to excessive shock or vibration.
... near a television set.
... near appliances generating strong magnetic or electric fields (speakers, broadcasting antennas, etc.).
... in places subject to extremely high (over 40°C) or extremely low (under 0°C) temperatures.
•DO NOT leave the unit
... in places of over 50°C.
... in places where humidity is extremely low (below 35%) or extremely high (above 80%).
... in direct sunlight.
... in a closed car in summer.
... near a heater.
... in high places such as on a TV. Leaving the unit in high places while a cable is connected may result in a malfunction if the cable is caught and the unit falls onto the floor.
•To protect the unit, DO NOT
... allow it to become wet.
... drop the unit or strike it against hard objects.
... subject it to shock or excessive vibration during transportation.
... keep the lens directed at extremely bright objects for long periods.
... expose the lens to direct sunlight.
... swing it excessively when using the hand strap.
... swing the soft camcorder case excessively when the camcorder is inside it.
... store the camcorder in a dusty or sandy area.
... cover camcorder with a towel, cloth and so on.
•To prevent the unit from dropping,
•Fasten the grip belt securely.
•When using the camcorder with a tripod,
attach the camcorder to the tripod securely. If the camcorder drops, you may be injured and the camcorder may be damaged.
When a child uses the unit, there must be parental guidance.
EN 11

Recordable Time/Specifications
You can check the video recording time by pressing the OK/INFO button. Approximate Video Recording Time
|
|
|
|
|
|
|
|
|
|
|
|
|
|
Quality |
|
|
|
|
|
SDHC/SDXC Card |
|
|
|
|
|
||
|
4 GB |
|
8 GB |
|
16 GB |
|
32 GB |
|
64 GB |
|
128 GB |
|
|
|
|
|
|
|
|
|
|
||||||
UXP |
|
20 m |
|
40 m |
1 h 20 m |
2 h 50 m |
5 h 40 m |
11 h 30 m |
|
||||
XP |
|
30 m |
|
1 h |
2 h |
4 h |
8 h 10 m |
16 h 20 m |
|
||||
SP |
|
40 m |
|
1 h 20 m |
2 h 50 m |
5 h 50 m |
11 h 30 m |
23 h 10 m |
|
||||
EP |
|
1 h 40 m |
|
3 h 30 m |
7 h 10 m |
14 h 40 m |
28 h 50 m |
57 h 50 m |
|
||||
SSW |
|
1 h 20 m |
|
2 h 40 m |
5 h 30 m |
11 h 20 m |
22 h 20 m |
44 h 50 m |
|
||||
SEW |
|
2 h 50 m |
|
5 h 40 m |
11 h 30 m |
23 h 30 m |
46 h 10 m |
92 h 40 m |
|
||||
0The recordable time is only a guide. The actual recording time may be longer or shorter than the time indicated above.
|
|
Camera |
|
|
|
Power supply |
Using AC adapter: DC 5.2 V, Using battery pack: DC 3.5 V - 3.6 V |
Power |
2.2 W (when [MONITOR BRIGHTNESS] is set to [3] (standard)) |
consumption |
Rated Current Consumption: 1A |
Dimensions |
50 mm x 55 mm x 111 mm |
|
(W x H x D: excluding grip belt) |
Weight |
Approx. 185 g (camera only), |
|
Approx. 210 g (including supplied battery pack) |
The specifications and appearance of this product are subject to changes for further improvement without prior notice.
For more information, please refer to the Detailed User Guide.
http://manual3.jvckenwood.com/index.html/
©2013 JVC KENWOOD Corporation |
|
1013MZR-SW-VM |
AG |
12 EN
LYT2677-001A-M
CS
GZ-E110 D

访问以下网站的“ ”
ohttp://manual3.jvckenwood.com/ index.html/

“ ”
Android tablet iPhone
ohttp://manual3asia/ .jvckenwood.com/mobile/
|
! |
|
BD.W21N |
)y!3* |
CO.WH21: |
VTC |
! |
BW |
B !.! |
C |
RBN2433.112 |
BW |
KWD |
KWD |
JVC
p. 2 p. 10
; |
|
|
|
|
|
|
|
|
; |
|
! |
211 |
! |
|
!Qbobtpojd Tbozp Tpoz! !Nbyfmm!
DS3136!
!KWD!
21!dn!
;
0
;
;
;
;
KWD
2CS
" |
|
|
|
|
|
|
|
|
|
|||
|
|
|
|
|
|
|
|
BWDIE |
BWDIE |
Qbobtpojd |
||
|
|
|
|
|
|
|
|
Tpoz |
|
|
||
|
|
|
|
|
|
|
|
IENJ |
|
|
IENJ |
|
" |
|
|
|
|
IENJ!Mjdfotjoh-!MMD |
|||||||
|
|
|
|
0 |
|
|
|
|
||||
|
|
|
|
|
0 |
|
|
|
! |
|
|
|
|
|
|
|
|
|
|
|
|
|
|
||
|
|
|
|
|
|
|
|
|
|
|
|
|
|
|
|
|
|
|
|
|
!Epmcz!Mbcpsbupsjft! |
||||
|
|
|
|
|
|
|
|
Epmcz |
|
!E |
!Epmcz! |
|
|
|
|
|
|
|
|
|
Mbcpsbupsjft! |
|
|
||
|
|
|
|
|
|
|
|
|
||||
|
|
|
|
|
|
|
|
TEYD |
|
TE.4D-! |
|
|
|
|
|
|
|
|
|
|
|
|
|||
|
|
|
|
|
|
|
|
Xjoepxt!! |
!Njdsptpgu!Dpsqpsbujpo! |
|||
|
|
|
|
|
|
|
|
|||||
|
|
|
|
|
|
|
|
|||||
|
|
|
|
|
|
|
|
! |
|
|
|
|
|
|
|
|
|
|
|
|
Nbdjoupti! |
!Bqqmf!Jod/! |
|||
|
|
|
|
|
|
|
|
|||||
|
|
|
|
BWD |
|
|
||||||
|
|
|
|
|
|
|
jNpwjf |
jQipup Bqqmf!Jod/ |
||||
|
|
|
|
|
|
|
|
|||||
j |
BWD |
|
|
|
Joufm |
Joufm!Dpsf |
Qfoujvn |
|||||
|
|
|
|
|
|
|
|
|||||
|
BWD |
0 |
|
|
|
|
|
|
|
|
||
jj |
BWD |
|
|
|
|
UN |
Hpphmf!Jod/ |
|||||
|
|
|
|
|
|
0 |
|
Boespje!! |
||||
|
|
|
|
|
|
|
|
|
|
|
|
|
|
|
|
|
BWD |
|
|
|
|
|
|
|
|
|
|
|
|
|
|
|
|
|
|
UN |
® |
|
|
|
|
NQFH!MB-M/M/D/ |
|
|
|
|
|
!! |
|
||
|
|
|
iuuq;00xxx/nqfhmb/dpn |
|
|
|
|
|
|
|
|
|
|
|
|
|
|
|
|
|
|
|
|
|
|
CS 3
|
2 |
|
|
|
|
|
|
||
........................... |
4 |
|
......................................... |
8 |
......................................... |
4 |
|
|
|
|
|
|
||
|
|
|
|
|
|
|
|
/ .................. |
9 |
|
5 |
|
||
|
|
|
||
|
|
|
||
SD ...................................... |
6 |
|
|
|
|
|
10 |
||
......................................... |
7 |
|
||
......................................... |
7 |
|
/ ........................... |
12 |
|
|
|
||||
|
|
1 2 |
|
E UP/< |
|
|
|
|
|
|
UP |
/ |
|
|
|
|
3 |
< |
|
|
|
|
|
F DOWN/> |
|||
|
|
|
4 |
|||
|
|
|
6 |
DOWN / |
||
|
|
|
5 |
> |
|
|
|
|
a098 |
7 |
|
||
|
|
|
G OK/INFO |
|||
A / / u p. |
8 |
|||||
|
||||||
p. 9 |
|
|
|
|
/ |
|
|
|
|
|
|
||
B i.AUTO p. 8 |
|
|
||||
C START/STOP |
|
|
||||
|
|
|||||
p. 8 / |
|
|
H AV |
|
||
|
|
|||||
d/e |
/ |
|
|
I MENU |
||
p. 9 |
|
|
|
|||
D L / |
|
J HDMI |
||||
|
K USB |
|||||
p. 9 |
|
|
|
|
|
|
4CS

221!W 351!W
JVC
0JVC
02 50
* 25 10°C 35°C
CHARGE 2
0 再使用。
0JVCCHARGE
CS 5
SD
SD
TE
o SD


SD
|
|
|
|
Panasonic, TOSHIBA, SanDisk |
|
A |
Class 4 |
SDHC 4 GB 32 GB / |
|
Class 4 |
SDXC 64 GB 128 GB |
|
[UXP] Class |
|
0SD SDHC/SDXC
0SD
0SDXC
0SD SD SD
6CS

/ / /UP/< DOWN/>
1
0 也随之关闭。
2 [ / ][ ] OK
0
!!
 !!
!!
!!
3
24 12 2014 10  00
00
0UP/< DOWN/>OK
0 和分钟。
4 UP/< DOWN/>OK
0GMT
o MENU
XP
o
A MENU
B UP/< DOWN/> [ ] OK/INFO C UP/< DOWN/>
D OK/INFO
|
|
|
||
|
UXP |
|
||
|
XP |
|
|
|
|
SP |
|
|
|
|
EP |
|
|
|
|
|
|
|
|
|
SSW |
|
|
|
|
SEW |
|
||
* p. 12
CS 7
条件自动调整。
*
P
H S
o
 0:00:00 [000:22]
045
0SD
05
8CS
/
d0e
|
|
|
|
|
|
|
|
|
|
|
|
|
|
|
0 |
0 |
0 |
|
|
VQ0= |
|
EPXO0? |
|
|
!d0e
!u
0 L
o A MENU [ ] OK
B [ ] OK
o /
C UP/< DOWN/> OK
0 R
D MENU [ ] OK
E OK
|
|
|
START/STOP d/ |
|
|
e |
|
|
u |
- |
|
T / Vol.+ |
|
- |
W / Vol.- |
|
- |
UP/< |
|
|
DOWN/> |
|
|
CS 9
/// !21 ! !46 !
2!
///
!!
|
http://manual3.jvckenwood.com/index.html/ /// |
41!& X |
3! |
! |
7 |
41!& X
///
!!
A!
B! ///
4!
KWD! KWD!
|
|
|
/// |
|
|
/// |
! |
|
|
! |
|
/// |
|
|
/// |
!71 ! |
0 TE |
///
///
10 CS
!61
46&! 91&!
!
::/::!&
1/12!&
!
!
!
!51
!1
CS 11
/
OK/INFO
|
|
|
|
|
|
|
|
|
|
|
|
|
|
SDHC/SDXC |
|
|
|
4 GB |
|
8 GB |
|
16 GB |
32 GB |
64 GB |
128 GB |
|
|
|
|
||||||
UXP |
20 |
|
40 |
1 |
20 |
2 50 |
5 40 |
11 30 |
|
|
|
|
|
|
|
|
|
XP |
30 |
|
1 |
2 |
|
4 |
8 10 |
16 20 |
|
|
|
|
|
|
|
|
|
SP |
40 |
|
1 20 |
2 |
50 |
5 50 |
11 30 |
23 10 |
|
|
|
|
|
|
|
|
|
EP |
1 40 |
3 30 |
7 |
10 |
14 40 |
28 50 |
57 50 |
|
|
|
|
|
|
|
|
|
|
SSW |
1 20 |
2 40 |
5 |
30 |
11 20 |
22 20 |
44 50 |
|
|
|
|
|
|
|
|
|
|
SEW |
2 50 |
5 40 |
11 30 |
23 30 |
46 10 |
92 40 |
||
|
|
|
|
|
|
|
|
|
0 |
||||||||
|
|
|
|
|
|
|
|
|
|
|
|
|
|
|
|
|
|
|
|
|
||||||
|
|
AC DC 5.2 V DC 3.5 V - 3.6 V |
||||||
|
2.2 W [ ] [3] |
|
||||||
|
|
1A |
|
|
|
|||
|
|
50 mm x 55 mm x 111 mm |
|
|
||||
|
x x |
|
|
|||||
|
|
185 g |
|
|
|
|||
|
|
|
210 g |
|
|
|
||
http://manual3.jvckenwood.com/index.html/
©2013 JVC KENWOOD Corporation |
|
1013MZR-SW-VM |
AG |
12 CS

LYT2677-001A-M
Краткое руководство пользователя
RU
ВИДЕОКАМЕРА
GZ-E110 D
 Подробное руководство пользователя
Чтобы получить дополнительную информацию о том, как обращаться с данным изделием, см. „Подробное руководство пользователя“ на указанном ниже веб-сайте.
ohttp://manual3.jvckenwood.com/ index.html/
 Моб. Рук. Ползов-ля
Находясь вдали от компьютера, используйте „Моб. Рук. Ползов-ля“. Моб. Рук. Ползов-ля можно просматривать с помощью стандартного браузера для планшета
Android и iPhone.
ohttp://manual3asia/ .jvckenwood.com/mobile/
Проверка комплектующих
Адаптер переменного тока |
Шнур питания |
Аккумуляторный блок |
|
AC-V10M |
(x 2) |
BN-VG109 |
|
USB-кабель |
Аудио/видео кабель |
Краткое руководство |
|
пользователя |
|||
(Тип A - Тип Mini B) |
QAM1322-001 |
||
(данное руководство) |
 При покупке нового кабеля аудио/видео, пожалуйста, обратитесь к дилеру JVC или в ближайший сервисный центр JVC.
Уважаемые клиенты!
Благодарим вас за покупку данного продукта JVC.
Перед использованием прочитайте информацию по технике безопасности и мерам предосторожности, которая изложена на стр. 2 и стр. 10, чтобы гарантировать безопасное использование данного продукта.

Техника безопасности
BHИMAHИE: ДЛЯ ПPEДOTВPAЩEHИЯ OПACHOCTИ BOCПЛAMEHEHИЯ ИЛИ ЭЛEKTPИЧECKOГO УДAPA HE ПOДBEPГAЙTE ДAHHЫЙ AППAPAT BOЗДEЙCTBИЮ ДOЖДЯ ИЛИ BЛAГИ.
ПРЕДОСТЕРЕЖЕНИЯ:
•Если вы заметили дым или почувствовали специфический запах, идущий из камеры или сетевого адаптера, сразу выключите камеру и выключите адаптер из сети. Последующее использование камеры или сетевого адаптера в таком состоянии может привести к пожару или поражению электрическим током. Обратитесь к вашему дилеру JVC. Не пытайтесь самостоятельно устранить неисправность.
•Для пpeдoтвpaщeния элeктpичecкoгo yдapa нe oткpывaйтe кopпyc. Bнyтpи нeт дeтaлeй для oбcлyживaния пoльзoвaтeлeм. Oбpaщaйтecь зa oбcлyживaниeм тoлькo к квaлифициpoвaннoмy пepcoнaлy.
•Если Вы не будете пользоваться сетевым адаптером в течение длительного времени, рекомендуется отсоединить шнур от розетки.
•В некоторых регионах, в зависимости от типа сетевой розетки, следует использовать вилкупереходник.
ПРИМЕЧАНИЯ:
•Табличка с техническими данными и меры предосторожности расположены на нижней и/или задней стороне основного устройства.
•Пластинка с серийным номером установлена на месте установки батарейного блока.
•Технические характеристики и предупреждения по безопасности сетевого адаптера указаны на его верхней и нижней сторонах.
BHИMAHИE:
Аккумуляторный блок, камера с установленной батареей и пульт дистанционного управления с установленной батареей не должны подвергаться воздействию повышенного тепла, например, прямых солнечных лучей, огня и т. п.
ПРЕДОСТЕРЕЖЕНИЕ:
Сетевой штепсель по-прежнему будет в рабочем состоянии.
•Если аппарат не функционирует должным образом, немедленно выньте сетевой штепсель.
ПРЕДОСТЕРЕЖЕНИЕ:
Чтобы избежать электрического шока и повреждения
системы, сначала плотно установите
маленький конец 

 шнура в сетевой адаптер, так, чтобы он был неподвижен, после
чего подключите больший конец шнура к розетке.
Предостережение о заменяемой литиевой батарее
При неправильном использовании батарея, используемая в этом приборе, может вызвать опасность воспламенения или химического ожога. Запрещается подзаряжать, разбирать, нагревать до температуры выше 100°С и сжигать батареи.
Замените элемент питания на CR2025 производства Panasonic, Sanyo, Sony или Maxell. Опасность взрыва или риск возгарания при некорректной замене батарей.
•Правильно утилизируйте использованные батареи.
•Храните батареи в недоступном для детей месте.
•Не разбирайте и не бросайте батареи в огонь.
При установке прибора на стеллаже или полке, убедитесь, что со всех сторон создано достаточное пространство для вентиляции (по 10 и более сантиметров с обеих сторон, сверху и сзади).
Не блокируйте вентиляционные отверстия. (Если вентиляционные отверстия заблокированы газетой, одеждой и т. п., тепло не может отводиться.)
Нельзя ставить на аппаратуру источники открытого пламени, такие как горящие свечи. При выбрасывании использованных батарей должны учитываться проблемы защиты окружающей среды и необходимо строго соблюдать местные правила и законы, регулирующие утилизацию этих батарей.
Аппаратуру необходимо защищать от капель и попадания брызг.
Не используйте прибор в ванной или в тех местах, где много воды.
Не устанавливайте также на аппаратуре любые сосуды, наполненные водой или любой другой жидкостью (тaкие, кaк косметичеcкие cредcтва или медикaменты, вазы для цветов, комнaтные рacтения, чашки и т. п.). (Если внутрь прибора попадет вода или другая жидкость, это может стать причиной возгорания или поражения электричеcким током.)
ПРЕДОСТЕРЕЖЕНИЯ:
•Обязательно используйте прилагающийся адаптер переменного тока.
•Не используйте этот адаптер с другими устройствами.
Сделайте резервную копию важных записанных данных
Компания JVC не несет ответственности за утрату данных. Рекомендуется копировать важные записанные данные на диск или другой носитель записи для хранения каждые 3 месяца.
2RU
Loading...