


NS-24EM51A14

User Guide
24” Widescreen LED Monitor
NS-24EM51A14
Before using your new product, please read these instructions to prevent any damage.

Contents
Introduction . . . . . . . . . . . . . . . . . . . . . . . . . . . . . . . . . . . . . . . . . . . . . . . . . . . . .1
Safety Precautions . . . . . . . . . . . . . . . . . . . . . . . . . . . . . . . . . . . . . . . . . . . . . . .1
WARNINGS: . . . . . . . . . . . . . . . . . . . . . . . . . . . . . . . . . . . . . . . . . . . . . . . . . . . . . . 1
CAUTION: . . . . . . . . . . . . . . . . . . . . . . . . . . . . . . . . . . . . . . . . . . . . . . . . . . . . . . . 1
Features . . . . . . . . . . . . . . . . . . . . . . . . . . . . . . . . . . . . . . . . . . . . . . . . . . . . . . . . .2
Package contents . . . . . . . . . . . . . . . . . . . . . . . . . . . . . . . . . . . . . . . . . . . . . . . . 2
Front view . . . . . . . . . . . . . . . . . . . . . . . . . . . . . . . . . . . . . . . . . . . . . . . . . . . . . . . 2
Rear view . . . . . . . . . . . . . . . . . . . . . . . . . . . . . . . . . . . . . . . . . . . . . . . . . . . . . . . . 2
Setting up your monitor . . . . . . . . . . . . . . . . . . . . . . . . . . . . . . . . . . . . . . . . . .2
Installing the stand base . . . . . . . . . . . . . . . . . . . . . . . . . . . . . . . . . . . . . . . . . 2
Removing the stand to mount the monitor on a wall . . . . . . . . . . . . . . 3
Making connections . . . . . . . . . . . . . . . . . . . . . . . . . . . . . . . . . . . . . . . . . . . . . .3
Using the on screen display (OSD) . . . . . . . . . . . . . . . . . . . . . . . . . . . . . . . .4
Maintaining . . . . . . . . . . . . . . . . . . . . . . . . . . . . . . . . . . . . . . . . . . . . . . . . . . . . . .5
Care . . . . . . . . . . . . . . . . . . . . . . . . . . . . . . . . . . . . . . . . . . . . . . . . . . . . . . . . . . . . . 5
Safety Tips . . . . . . . . . . . . . . . . . . . . . . . . . . . . . . . . . . . . . . . . . . . . . . . . . . . . . . . 5
Troubleshooting . . . . . . . . . . . . . . . . . . . . . . . . . . . . . . . . . . . . . . . . . . . . . . . . .5
Troubleshooting questions . . . . . . . . . . . . . . . . . . . . . . . . . . . . . . . . . . . . . . 5
Specifications . . . . . . . . . . . . . . . . . . . . . . . . . . . . . . . . . . . . . . . . . . . . . . . . . . . .7
Supported Timing Modes . . . . . . . . . . . . . . . . . . . . . . . . . . . . . . . . . . . . . . . . 7
Legal notices . . . . . . . . . . . . . . . . . . . . . . . . . . . . . . . . . . . . . . . . . . . . . . . . . . . . .7
One-year limited warranty . . . . . . . . . . . . . . . . . . . . . . . . . . . . . . . . . . . . . . . .9
ii
www.insigniaproducts.com

24” Widescreen LED Monitor
Introduction
Congratulations on your purchase of this
high-resolution multi-scan color monitor. This color
monitor represents the state of the art in monitor
design, and is designed for reliable and trouble-free
performance. Please read this guide thoroughly
before installation.
Safety Precautions
This monitor is manufactured and tested on the
principle that a user’s safety comes first. However,
improper use or installation may result in danger to
the monitor as well as to the user. Carefully go over
the following warnings before installation and keep
this guide handy.
WARNINGS:
• Only operate this monitor with the power source
indicated on the label on the back of the monitor.
If you’re unsure of the power available in your
home, consult your local dealer or power
company.
• Do not try to repair the monitor yourself as it
contains no user serviceable parts. The monitor
should only be repaired by a qualified technician.
• Do not remove the monitor cover. There are
high-voltage parts inside that may cause electric
shock, even when the power cord is
disconnected.
• Stop using the monitor if the cover is damaged.
Have it checked by a service technician.
• Put your monitor only in a clean, dry environment.
Unplug the monitor immediately if gets wet and
consult your service technician.
• Always unplug the monitor before cleaning it.
Clean the cover with a clean, dry cloth. Apply
non-ammonia based cleaner onto the cloth, not
directly onto the glass screen.
• Keep the monitor away from magnetic objects,
motors, other TVs, and transformers.
• Do not place heavy objects on the cable or power
cord.
• The AC power wall plug you use for this TV should
be located near the TV and should be easily
accessible to unplug the TV.
• Due to safety concerns, if a VESA mounting kit is
purchased separately, please make sure that the
mounting kit is UL-Listed.
CAUTION:
Damage requiring service
Unplug this monitor from the power outlet and
refer servicing to qualified service personnel under
the following conditions:
• When the power supply cord or plug is damaged
or frayed.
• If liquid has been spilled or objects have fallen
into your monitor.
• If your monitor has been exposed to rain or water.
• If your monitor does not operate normally by
following the operating instructions. Adjust only
those controls that are covered by the operating
instructions, because incorrect adjustment of
other controls may result in damage and will
often require extensive work by a qualified
technician to restore your monitor to its normal
operation.
• If your monitor has been dropped or damaged in
any way.
• When your monitor exhibits a distinct change in
performance.
Condensation
Moisture will form on the monitor if it is brought
from cool surroundings into a warm room or if the
temperature of the room rises suddenly. When this
happens, the monitor’s performance may be
impaired. To prevent this, let the monitor stand in
its new surroundings for about an hour before
switching it on, or make sure that the room
temperature rises gradually. Condensation may also
form during the summer if the monitor is exposed
to the breeze from an air conditioner. In such cases,
change the location of the monitor.
www.insigniaproducts.com
1
NS-24EM51A14 24” Widescreen LED Monitor
1234
5
POWER IN
AC
HDMI
DVI VGA
Features
Package contents
• 24” Widescreen LED monitor
•Power cable
•VGA cable
•Quick Setup Guide
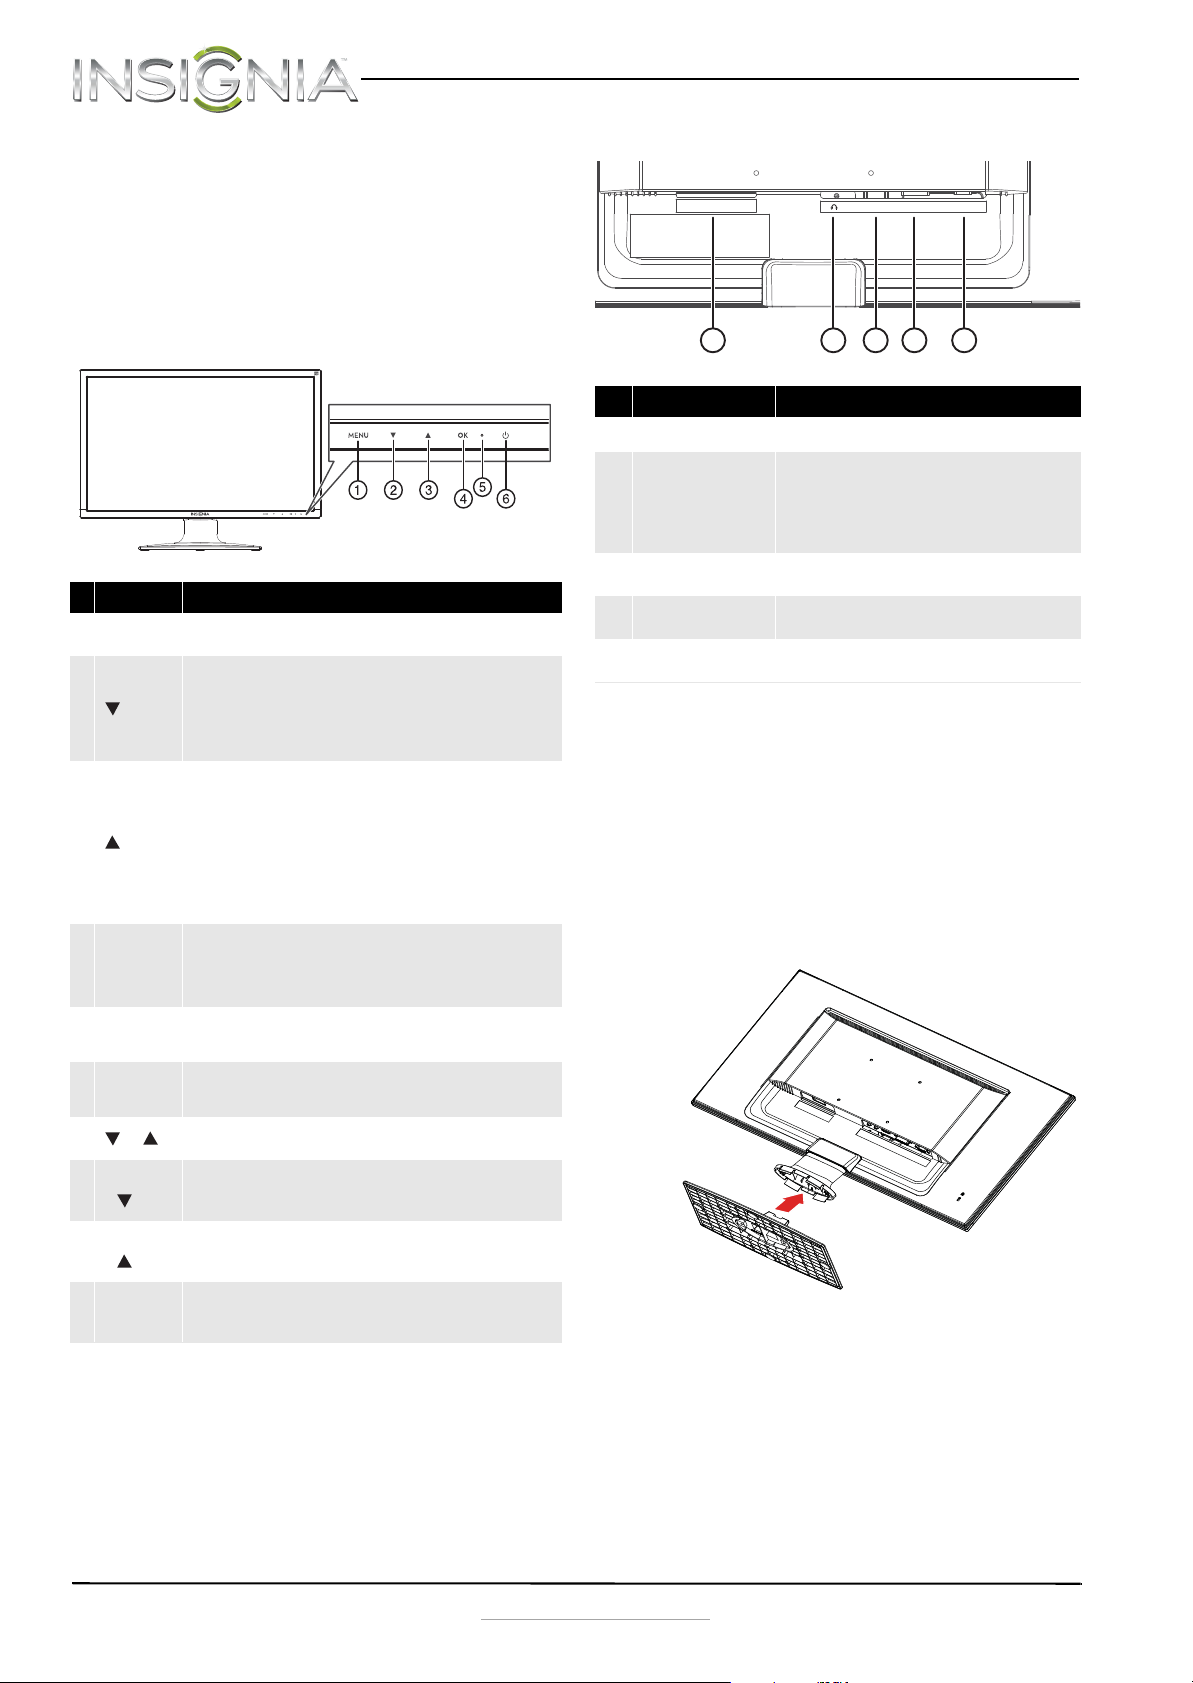
Front view
# Component Description
1MENU
2
3
4 OK
LED
5
indicator
Power
6
On/Off
+
MENU
+
MENU
+
MENU + OK
Press to open the on screen display (OSD) menu and enter menu
mode. Press again to exit the OSD and return to display mode.
In menu mode, press to scroll down or decrease settings in the OSD
menus.
In normal operation, press to access the Color Vision Mode menu.
In normal operation mode, when using a VGA connection, push and
hold for three seconds to auto adjust the image.
In menu mode, press to scroll up or increase settings in the OSD
menus.
In normal operation, press to access the Audio Adjust menu.
In normal operation mode, when using an HDMI connection, push
and hold this button for three seconds to automatically switch from
mute to unmute.
Note: The Audio Adjust menu is only available when using an HDMI
connection.
In menu mode, press to confirm a selection or setting in the OSD
menus.
In normal operation, press to enter the input select menu. You can
choose VGA, DVI, HDMI, or Auto.
Turns blue when the monitor is on. Turns off when the monitor is
turned off.
Press to turn the monitor on. Press again to turn the monitor off.
In normal operation, press simultaneously to reset contrast,
brightness, and backlight.
In normal operation, press simultaneously to lock/unlock the power
button functionality. (So the monitor cannot be turned on or off
with the Power button.)
In normal operation, press simultaneously to lock/unlock the MENU
button functionality. With the MENU button locked, only the
POWER button will work.
In normal operation, press simultaneously to switch between
similar PC timings (for example 720 x 400 @70 Hz and 640 x 400 @
70 Hz).
Rear view
# Item Description
1 Power connector
2 Headphone jack
3HDMI jack
4 DVI jack
5VGA jack
Plug the AC power cord into this connector.
Plug an optional headphone into this jack.
Note: The headphone jack only provides an audio
signal if you are using an HDMI connection and the
audio is enabled for the HDMI output of your
computer.
If your computer has an HDMI jack, connect an HDMI
cable (not included) to your computer and this jack.
If your computer has a DVI jack, connect a DVI cable
(not included) to your computer and this jack.
If your computer has a VGA jack, connect the VGA
cable (included) to your computer and this jack.
Setting up your monitor
Installing the stand base
To install the stand base:
1 Remove the monitor from the box and lay it face
down on a table, with a soft cloth or towel
beneath it to protect the screen.
2 Insert the base into the stand column until it
clicks into place.
2
www.insigniaproducts.com
 Loading...