


User Guide
5 MP High Definition Digital Camcorder with 3.0" LCD Monitor
NS-DCC5HB09

Insignia NS-DCC5HB09
5 MP High Definition Digital Camcorder with 3.0" LCD Monitor
Contents
Introduction . . . . . . . . . . . . . . . . . . . . . . . . . . . . . . . . . . . . . . . . . . . . . . . . . . . . . . . . . . . . . . . . . 2 Safety information . . . . . . . . . . . . . . . . . . . . . . . . . . . . . . . . . . . . . . . . . . . . . . . . . . . . . . . . . . . . 3 Features. . . . . . . . . . . . . . . . . . . . . . . . . . . . . . . . . . . . . . . . . . . . . . . . . . . . . . . . . . . . . . . . . . . . 3
Package contents . . . . . . . . . . . . . . . . . . . . . . . . . . . . . . . . . . . . . . . . . . . . . . . . . . . . . . . . . . . . . . . . . . .3 Front . . . . . . . . . . . . . . . . . . . . . . . . . . . . . . . . . . . . . . . . . . . . . . . . . . . . . . . . . . . . . . . . . . . . . . . . . . . . .3 Back . . . . . . . . . . . . . . . . . . . . . . . . . . . . . . . . . . . . . . . . . . . . . . . . . . . . . . . . . . . . . . . . . . . . . . . . . . . . .4 Side . . . . . . . . . . . . . . . . . . . . . . . . . . . . . . . . . . . . . . . . . . . . . . . . . . . . . . . . . . . . . . . . . . . . . . . . . . . . .4 Using the LCD . . . . . . . . . . . . . . . . . . . . . . . . . . . . . . . . . . . . . . . . . . . . . . . . . . . . . . . . . . . . . . . . . . . . .4
Setting up your camcorder. . . . . . . . . . . . . . . . . . . . . . . . . . . . . . . . . . . . . . . . . . . . . . . . . . . . . . 5
Installing the battery . . . . . . . . . . . . . . . . . . . . . . . . . . . . . . . . . . . . . . . . . . . . . . . . . . . . . . . . . . . . . . . . .5 Inserting or removing a memory card . . . . . . . . . . . . . . . . . . . . . . . . . . . . . . . . . . . . . . . . . . . . . . . . . . .5
Getting started . . . . . . . . . . . . . . . . . . . . . . . . . . . . . . . . . . . . . . . . . . . . . . . . . . . . . . . . . . . . . . . 6
Turning on your camcorder. . . . . . . . . . . . . . . . . . . . . . . . . . . . . . . . . . . . . . . . . . . . . . . . . . . . . . . . . . . .6 Taking a picture . . . . . . . . . . . . . . . . . . . . . . . . . . . . . . . . . . . . . . . . . . . . . . . . . . . . . . . . . . . . . . . . . . . .6 Recording a movie . . . . . . . . . . . . . . . . . . . . . . . . . . . . . . . . . . . . . . . . . . . . . . . . . . . . . . . . . . . . . . . . . .6 Recording sound . . . . . . . . . . . . . . . . . . . . . . . . . . . . . . . . . . . . . . . . . . . . . . . . . . . . . . . . . . . . . . . . . . .7
Working with movies . . . . . . . . . . . . . . . . . . . . . . . . . . . . . . . . . . . . . . . . . . . . . . . . . . . . . . . . . . 7
Selecting the resolution for movies. . . . . . . . . . . . . . . . . . . . . . . . . . . . . . . . . . . . . . . . . . . . . . . . . . . . . .7 Using digital zoom . . . . . . . . . . . . . . . . . . . . . . . . . . . . . . . . . . . . . . . . . . . . . . . . . . . . . . . . . . . . . . . . . .7 Selecting the exposure for movies . . . . . . . . . . . . . . . . . . . . . . . . . . . . . . . . . . . . . . . . . . . . . . . . . . . . . .7 Using the built-in light . . . . . . . . . . . . . . . . . . . . . . . . . . . . . . . . . . . . . . . . . . . . . . . . . . . . . . . . . . . . . . . .7 Using Night Mode for low-light movies . . . . . . . . . . . . . . . . . . . . . . . . . . . . . . . . . . . . . . . . . . . . . . . . . . .8 Adjusting the sharpness for movies . . . . . . . . . . . . . . . . . . . . . . . . . . . . . . . . . . . . . . . . . . . . . . . . . . . . .8 Adjusting the white balance for movies . . . . . . . . . . . . . . . . . . . . . . . . . . . . . . . . . . . . . . . . . . . . . . . . . .9 Using motion stabilization for movies . . . . . . . . . . . . . . . . . . . . . . . . . . . . . . . . . . . . . . . . . . . . . . . . . . . .9 Using motion detection to record movies . . . . . . . . . . . . . . . . . . . . . . . . . . . . . . . . . . . . . . . . . . . . . . . . .9 Selecting an effect for movies. . . . . . . . . . . . . . . . . . . . . . . . . . . . . . . . . . . . . . . . . . . . . . . . . . . . . . . . .10 Watching a movie . . . . . . . . . . . . . . . . . . . . . . . . . . . . . . . . . . . . . . . . . . . . . . . . . . . . . . . . . . . . . . . . . .10 Deleting movies . . . . . . . . . . . . . . . . . . . . . . . . . . . . . . . . . . . . . . . . . . . . . . . . . . . . . . . . . . . . . . . . . . .10 Using movie thumbnails . . . . . . . . . . . . . . . . . . . . . . . . . . . . . . . . . . . . . . . . . . . . . . . . . . . . . . . . . . . . .11 Repeating movies. . . . . . . . . . . . . . . . . . . . . . . . . . . . . . . . . . . . . . . . . . . . . . . . . . . . . . . . . . . . . . . . . .12 Locking or unlocking movies . . . . . . . . . . . . . . . . . . . . . . . . . . . . . . . . . . . . . . . . . . . . . . . . . . . . . . . . .12 Watching movies on a PC . . . . . . . . . . . . . . . . . . . . . . . . . . . . . . . . . . . . . . . . . . . . . . . . . . . . . . . . . . .13 Viewing pictures and movies on an HDTV . . . . . . . . . . . . . . . . . . . . . . . . . . . . . . . . . . . . . . . . . . . . . . .13 Viewing pictures or movies on a non-HDTV. . . . . . . . . . . . . . . . . . . . . . . . . . . . . . . . . . . . . . . . . . . . . .13
Working with pictures. . . . . . . . . . . . . . . . . . . . . . . . . . . . . . . . . . . . . . . . . . . . . . . . . . . . . . . . . 13
Taking close up pictures . . . . . . . . . . . . . . . . . . . . . . . . . . . . . . . . . . . . . . . . . . . . . . . . . . . . . . . . . . . . .13 Using digital zoom . . . . . . . . . . . . . . . . . . . . . . . . . . . . . . . . . . . . . . . . . . . . . . . . . . . . . . . . . . . . . . . . .14 Selecting the resolution for pictures . . . . . . . . . . . . . . . . . . . . . . . . . . . . . . . . . . . . . . . . . . . . . . . . . . . .14 Selecting the exposure for pictures . . . . . . . . . . . . . . . . . . . . . . . . . . . . . . . . . . . . . . . . . . . . . . . . . . . .14 Using Night Mode for low-light pictures . . . . . . . . . . . . . . . . . . . . . . . . . . . . . . . . . . . . . . . . . . . . . . . . .14 Adjusting the sharpness for pictures . . . . . . . . . . . . . . . . . . . . . . . . . . . . . . . . . . . . . . . . . . . . . . . . . . .15 Adjusting the white balance for pictures . . . . . . . . . . . . . . . . . . . . . . . . . . . . . . . . . . . . . . . . . . . . . . . . .15 Combining two pictures into one . . . . . . . . . . . . . . . . . . . . . . . . . . . . . . . . . . . . . . . . . . . . . . . . . . . . . .16 Adding photo frames to pictures. . . . . . . . . . . . . . . . . . . . . . . . . . . . . . . . . . . . . . . . . . . . . . . . . . . . . . .16 Selecting the flash setting for pictures . . . . . . . . . . . . . . . . . . . . . . . . . . . . . . . . . . . . . . . . . . . . . . . . . .17 Using the self-timer for pictures . . . . . . . . . . . . . . . . . . . . . . . . . . . . . . . . . . . . . . . . . . . . . . . . . . . . . . .17 Taking a sequence of pictures . . . . . . . . . . . . . . . . . . . . . . . . . . . . . . . . . . . . . . . . . . . . . . . . . . . . . . . .17 Taking pictures with bright backgrounds. . . . . . . . . . . . . . . . . . . . . . . . . . . . . . . . . . . . . . . . . . . . . . . . .18 Adding the date to pictures. . . . . . . . . . . . . . . . . . . . . . . . . . . . . . . . . . . . . . . . . . . . . . . . . . . . . . . . . . .18 Selecting an effect for pictures . . . . . . . . . . . . . . . . . . . . . . . . . . . . . . . . . . . . . . . . . . . . . . . . . . . . . . . .18 Viewing pictures . . . . . . . . . . . . . . . . . . . . . . . . . . . . . . . . . . . . . . . . . . . . . . . . . . . . . . . . . . . . . . . . . . .19 Deleting pictures. . . . . . . . . . . . . . . . . . . . . . . . . . . . . . . . . . . . . . . . . . . . . . . . . . . . . . . . . . . . . . . . . . .19 Using picture thumbnails . . . . . . . . . . . . . . . . . . . . . . . . . . . . . . . . . . . . . . . . . . . . . . . . . . . . . . . . . . . .20 Locking or unlocking pictures . . . . . . . . . . . . . . . . . . . . . . . . . . . . . . . . . . . . . . . . . . . . . . . . . . . . . . . . .20 Viewing pictures in a slideshow . . . . . . . . . . . . . . . . . . . . . . . . . . . . . . . . . . . . . . . . . . . . . . . . . . . . . . .21
Working with voice recordings . . . . . . . . . . . . . . . . . . . . . . . . . . . . . . . . . . . . . . . . . . . . . . . . . . 21
Playing voice recordings. . . . . . . . . . . . . . . . . . . . . . . . . . . . . . . . . . . . . . . . . . . . . . . . . . . . . . . . . . . . .21 Deleting voice recordings . . . . . . . . . . . . . . . . . . . . . . . . . . . . . . . . . . . . . . . . . . . . . . . . . . . . . . . . . . . .22 Repeating voice recordings . . . . . . . . . . . . . . . . . . . . . . . . . . . . . . . . . . . . . . . . . . . . . . . . . . . . . . . . . .22 Transferring MP3s to your camcorder . . . . . . . . . . . . . . . . . . . . . . . . . . . . . . . . . . . . . . . . . . . . . . . . . .23 Listening to MP3s. . . . . . . . . . . . . . . . . . . . . . . . . . . . . . . . . . . . . . . . . . . . . . . . . . . . . . . . . . . . . . . . . .23 Repeating MP3s. . . . . . . . . . . . . . . . . . . . . . . . . . . . . . . . . . . . . . . . . . . . . . . . . . . . . . . . . . . . . . . . . . .23 Using an earphone . . . . . . . . . . . . . . . . . . . . . . . . . . . . . . . . . . . . . . . . . . . . . . . . . . . . . . . . . . . . . . . . .24
Configuring your camcorder. . . . . . . . . . . . . . . . . . . . . . . . . . . . . . . . . . . . . . . . . . . . . . . . . . . . 24
Default camcorder settings. . . . . . . . . . . . . . . . . . . . . . . . . . . . . . . . . . . . . . . . . . . . . . . . . . . . . . . . . . .24
www.insignia-products.com |
1 |

Insignia NS-DCC5HB09 5 MP High Definition Digital Camcorder with 3.0" LCD Monitor
Setting the time . . . . . . . . . . . . . . . . . . . . . . . . . . . . . . . . . . . . . . . . . . . . . . . . . . . . . . . . . . . . . . . . . . .24 Displaying or hiding camcorder status information. . . . . . . . . . . . . . . . . . . . . . . . . . . . . . . . . . . . . . . . .25 Turning sound effects on or off . . . . . . . . . . . . . . . . . . . . . . . . . . . . . . . . . . . . . . . . . . . . . . . . . . . . . . . .25 Formatting the built-in memory or a memory card . . . . . . . . . . . . . . . . . . . . . . . . . . . . . . . . . . . . . . . . .25 Selecting the TV system type. . . . . . . . . . . . . . . . . . . . . . . . . . . . . . . . . . . . . . . . . . . . . . . . . . . . . . . . .26 Selecting the on-screen menu language . . . . . . . . . . . . . . . . . . . . . . . . . . . . . . . . . . . . . . . . . . . . . . . .27 Restoring default settings. . . . . . . . . . . . . . . . . . . . . . . . . . . . . . . . . . . . . . . . . . . . . . . . . . . . . . . . . . . .27 Transferring files to a PC . . . . . . . . . . . . . . . . . . . . . . . . . . . . . . . . . . . . . . . . . . . . . . . . . . . . . . . . . . . .27
Maintaining. . . . . . . . . . . . . . . . . . . . . . . . . . . . . . . . . . . . . . . . . . . . . . . . . . . . . . . . . . . . . . . . . 27 Troubleshooting . . . . . . . . . . . . . . . . . . . . . . . . . . . . . . . . . . . . . . . . . . . . . . . . . . . . . . . . . . . . . 28 Specifications. . . . . . . . . . . . . . . . . . . . . . . . . . . . . . . . . . . . . . . . . . . . . . . . . . . . . . . . . . . . . . . 28 Installing the device driver software . . . . . . . . . . . . . . . . . . . . . . . . . . . . . . . . . . . . . . . . . . . . . . 28 Accessing the User Guide . . . . . . . . . . . . . . . . . . . . . . . . . . . . . . . . . . . . . . . . . . . . . . . . . . . . . 28 One-Year Limited Warranty . . . . . . . . . . . . . . . . . . . . . . . . . . . . . . . . . . . . . . . . . . . . . . . . . . . . 31
Introduction
Congratulations on your purchase of a high-quality Insignia product. Your NS-DCC5HB09 represents the state of the art in digital camcorder design and is designed for reliable and trouble-free performance.
2 |
www.insignia-products.com |

Insignia NS-DCC5HB09 5 MP High Definition Digital Camcorder with 3.0" LCD Monitor
Safety information
•Do not drop, puncture, or disassemble your camcorder. This voids your warranty.
•Avoid contact with water, and make sure that your hands are dry before using your camcorder.
•Do not expose your camcorder to high temperature or leave it in direct sunlight. High temperature or the heat from direct sunlight may damage your camcorder.
•For your protection, do not use your camcorder during a storm or when lightning is present.
•Do not use your camcorder while driving or riding a vehicle (such as a bicycle). An accident may occur.
•Do not use the flash close to eyes. Damage to vision may result.
•Keep your camcorder out the reach of small children or infants.
•Do not use the battery if it shows signs of leakage or distortion.
•Make sure that you replace the battery with one of the same type. Using a different type battery can lead to an explosion.
•Dispose of used batteries according to local hazardous waste regulations.
Features
•5 mega-pixel sensor
•H.264 technology that compresses video to let you store more movies than traditional camcorders
•Up to 11 mega-pixel quality pictures
•Movie recording at an HD resolution of 1280 × 720
•HDMI port for connecting an HDTV
•AV OUT port for connecting a non-HDTV or earphone
•High-speed mini-USB 2.0 port for connecting a PC
•Automatic and manual exposure and color balance controls
•8× digital zoom for enlarging pictures and movies
•Built-in memory that lets you store pictures and movies without using an SD memory card
•SD memory card slot that lets you increase storage capacity
Package contents
•Digital camcorder
•USB cable
•AV cable
•HDMI cable
•Adapter
•Lithium-ion rechargeable battery
•Quick Start Guide
•CD with device driver and User Guide
•Wrist strap
•Pouch
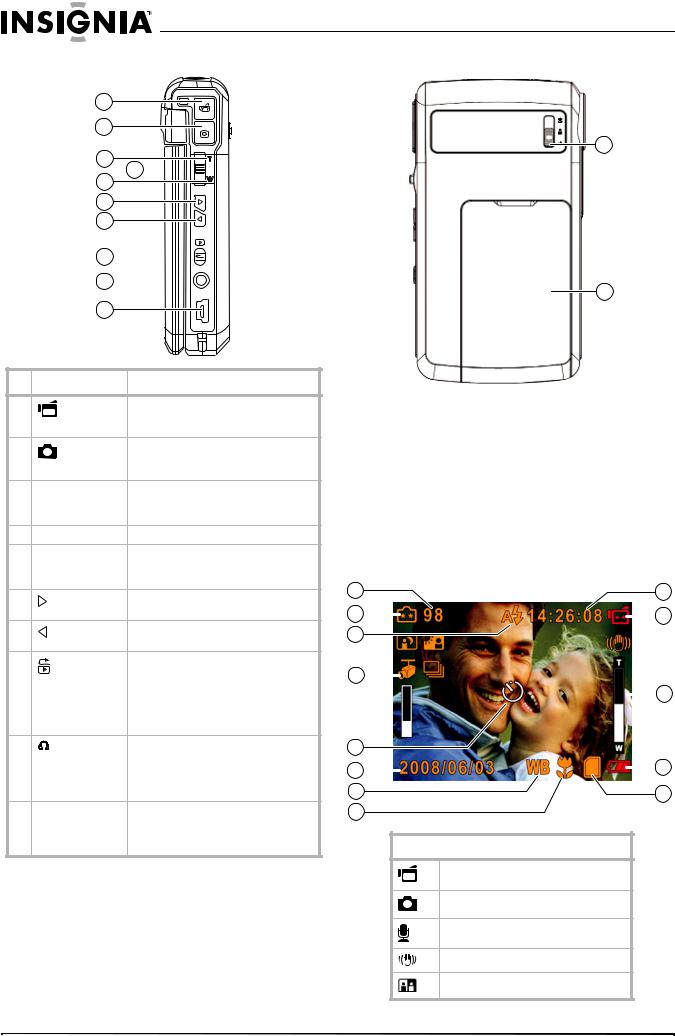
Front
2
3
4 |
6 |
5
# |
Component |
Description |
||
|
|
|
|
|
1 |
Microphone |
Records sound as you record movies |
||
|
|
|
or records voice. For more |
|
|
|
|
information, see “Recording sound” on |
|
|
|
|
page 7. |
|
|
|
|
|
|
2 |
|
|
Press down for one second to turn |
|
|
|
|||
Power button |
||||
|
your camcorder on or off. |
|||
|
|
|
||
|
|
|
|
|
3 |
Lens |
Focuses the image when taking |
||
|
|
|
pictures or movies. |
|
|
|
|
|
|
4 |
LED |
Lights green when connected to a PC |
||
|
|
|
in PC camera mode. |
|
|
|
|
Lights red when connected to a PC in |
|
|
|
|
mass storage mode. |
|
|
|
|
Blinks during self-timer mode. |
|
|
|
|
|
|
5 |
HDMI port |
Connect an HDTV to this port so you |
||
|
|
|
can view your pictures and movies on |
|
|
|
|
the HDTV. For more information, see |
|
|
|
|
“Viewing pictures and movies on an |
|
|
|
|
HDTV” on page 13. |
|
|
|
|
|
|
6 |
LCD panel |
Lets you view pictures and movies |
||
|
|
|
while you are capturing them. Lets you |
|
|
|
|
view stored pictures and movies. |
|
|
|
|
Displays camcorder status |
|
|
|
|
information. |
|
www.insignia-products.com |
3 |
Insignia NS-DCC5HB09 5 MP High Definition Digital Camcorder with 3.0" LCD Monitor
Back
1
2
3
4 OK
OK
5
6
7
8
9
 TV
TV
10
# |
Component |
Description |
1 |
Movie |
Press to record a movie. For more |
|
information, see “Recording a movie” |
|
|
shutter button |
on page 6. |
2 |
Picture |
Press to take a picture. For more |
|
information, see “Taking a picture” on |
|
|
shutter button |
|
|
page 6. |
|
|
|
|
3 |
T (up) button |
In record mode, press to zoom in. |
|
|
In menu mode, press to move up or to |
|
|
make selections. |
4 |
OK button |
Press to open the Record menu. |
5 |
W (down) button |
In record mode, press to zoom out. |
|
|
In menu mode, press to move down or |
|
|
to make selections. |
6 |
(right) button |
Press to move right in menus or to |
|
make selections. |
|
|
|
|
7 |
(left) button |
Press to move left in menus or to make |
|
selections. |
|
|
|
|
8 |
Record/Play |
Press to toggle between Record mode |
|
and Playback mode. |
|
|
button |
When a menu is open, press to close |
|
|
the menu and return to Record mode. |
|
|
In Playback mode, press to return to |
|
|
the previous page. |
9 |
/TV port |
Connect the earphone or a non-HDTV |
|
|
to this port. For more information, see |
|
|
“Viewing pictures or movies on a |
|
|
non-HDTV” on page 13 or “Using an |
|
|
earphone” on page 24. |
10 |
Mini-USB 2.0 port |
Connect the USB cable to this port and |
|
|
a USB port on a PC. For more |
|
|
information, see “Watching movies on |
|
|
a PC” on page 13. |
Side
1
2
|
# |
Component |
Description |
||||||||
|
|
|
|
|
|
|
|
|
|
|
|
|
1 |
Macro switch |
In record mode, press to select Macro |
||||||||
|
|
|
|
|
mode, Portrait mode, or Normal mode. |
||||||
|
|
|
|
|
For more information, see “Taking |
||||||
|
|
|
|
|
close up pictures” on page 13. |
||||||
|
|
|
|
|
|
|
|
|
|
|
|
|
2 |
Battery cover |
Remove this cover to insert the battery |
||||||||
|
|
|
|
|
or a memory card. For more |
||||||
|
|
|
|
|
information, see “Installing the |
||||||
|
|
|
|
|
battery” on page 5 or “Inserting or |
||||||
|
|
|
|
|
removing a memory card” on page 5. |
||||||
Using the LCD |
|
|
|
|
|
|
|
||||
1 |
|
|
|
9 |
|||||||
2 |
|
|
|
|
|
|
|
|
10 |
||
|
|
|
|||||||||
|
|
|
|
|
|
||||||
3 |
|
|
|
|
|
|
|
|
|
|
|
4 |
|
|
|
|
|
|
|
|
|
11 |
|
|
|
|
|
|
|
|
|
|
|||
5 |
|
|
|
|
|
|
|
||||
|
|
|
|
|
|||||||
|
|
|
|
|
|
|
|
|
|
||
6 |
|
|
|
|
|
12 |
|||||
|
|
|
|
||||||||
|
|
|
|||||||||
7 |
|
|
|
13 |
|||||||
8 |
|
|
|
|
|
|
|
|
|
|
|
Record mode icons
Movie Record mode
Picture Record mode
Voice Record mode
Motion Stabilization mode
Two-in-One mode
4 |
www.insignia-products.com |
Insignia NS-DCC5HB09 5 MP High Definition Digital Camcorder with 3.0" LCD Monitor
Record mode icons
Photo Frame mode
Multi-Snap mode
Night mode
Backlight mode
LCD icons
#Icon
1Number of images that can still be taken at the current resolution.
2Picture resolution:
 (high) /
  (standard) /
  (low)
(low)
3
A (auto flash on)
 (flash on)
 (red-eye reduction on)
  (light on)
4
(motion detection on)
5
(self-timer on)
6Date and Time in YYYY/MM/DD HH:MM format
7WB (white balance on)
8
(macro mode on)
9Recording time that can still be taken at the current resolution.
10Movie resolution:
Movie:  (HD) /
  (D1) /
  (VGA) /
  (QVGA)
118× digital zoom
12Battery indicator:
 (battery charge full)
 (medium charge)
 (battery charge low)
  (battery charge depleted)
13
(memory card inserted)
Setting up your camcorder
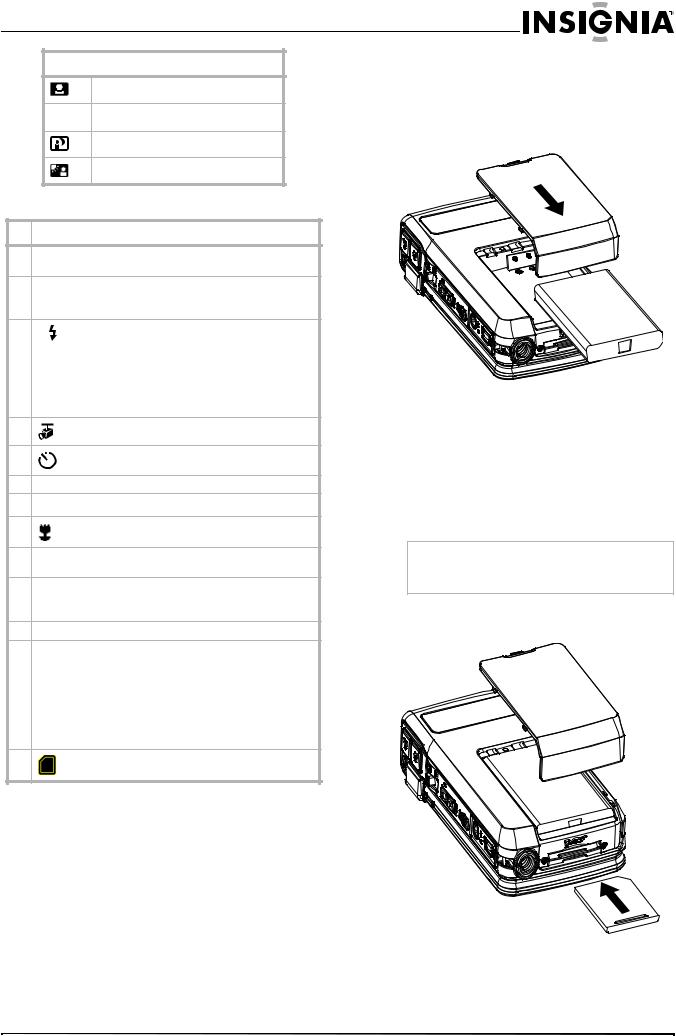
Installing the battery
To install the battery:
1 Slide the battery cover off your camcorder.
2Insert the battery into the battery compartment. Make sure that the + and – symbols on the battery match the + and – symbols in the battery compartment.
3Replace the battery cover.
Inserting or removing a memory card
Your camcorder has built-in memory for storing pictures and movies. You can increase the memory storage by using an SD memory card.
Note
When a memory card is inserted, your camcorder stores pictures and movies on the memory card instead of storing them in the built-in memory.
To insert or remove a memory card:
1 Slide the battery cover off of your camcorder.
2Insert an SD memory card into the memory card slot.
3Replace the battery cover.
www.insignia-products.com |
5 |
Insignia NS-DCC5HB09 5 MP High Definition Digital Camcorder with 3.0" LCD Monitor
To remove a memory card:
1Slide the battery cover off of your camcorder.
2Push in on the memory card. The card pops out slightly.
3Pull the card out of the slot.
4Replace the battery cover.
Protecting an SD memory card
You can “protect” an SD memory card to prevent the recording or deletion of pictures or movies.
To protect an SD memory card:
•Slide the protection tab into the protected position.
Protected Unprotected
Getting started
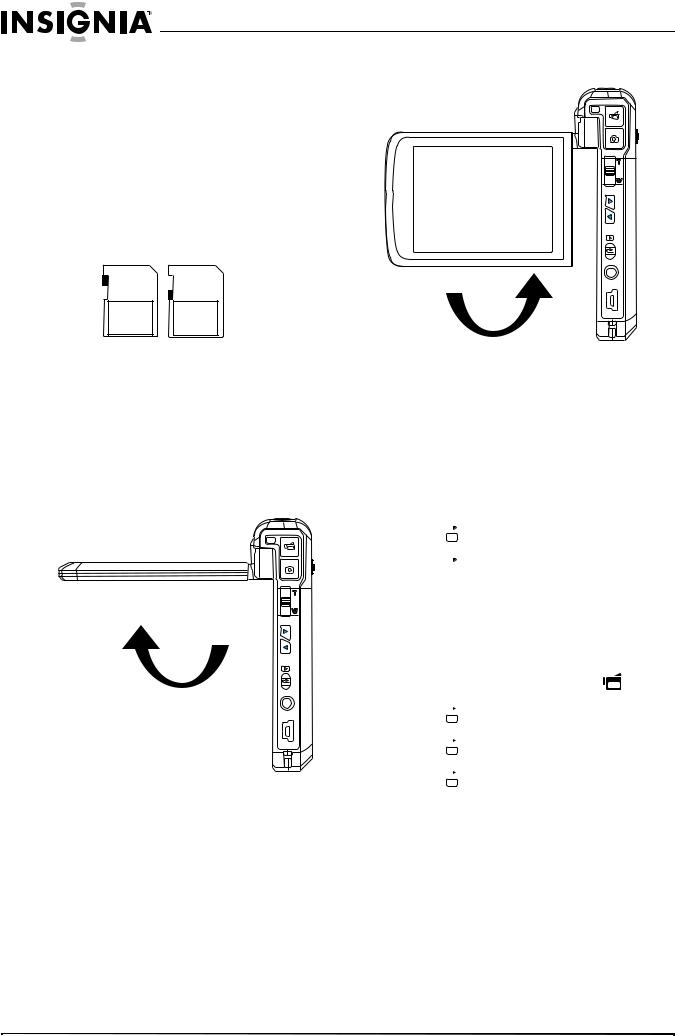
Turning on your camcorder
To turn on your camcorder:
1Press down and hold  (Power) for one second.
Or
Open the LCD panel 90°.
OK
90°
 TV
TV
2Rotate the LCD panel 90° counter-clockwise so you can view pictures and movies.
OK
90°  TV
TV
3To turn off your camcorder, press down and hold  (Power) for one second.
Or
Return the LCD to its original (closed) position.
Taking a picture
To take a picture:
1Turn on your camcorder.
2Aim the camera lens, then press  (Picture Shutter).
3Press  (Record/Play) once to view the picture.
4Press  again to return to record mode.
Recording a movie
To record a movie:
1Turn on your camcorder.
2If you want to record the movie in HD resolution, press  to switch to HD mode.
3 Aim the camera lens, then press |
(Movie |
Shutter). |
|
4Press  (Record/Play) once to stop recording.
5Press  (Record/Play) again to view the moive.
6Press  (Record/Play) again to return to record mode.
6 |
www.insignia-products.com |
Insignia NS-DCC5HB09 5 MP High Definition Digital Camcorder with 3.0" LCD Monitor
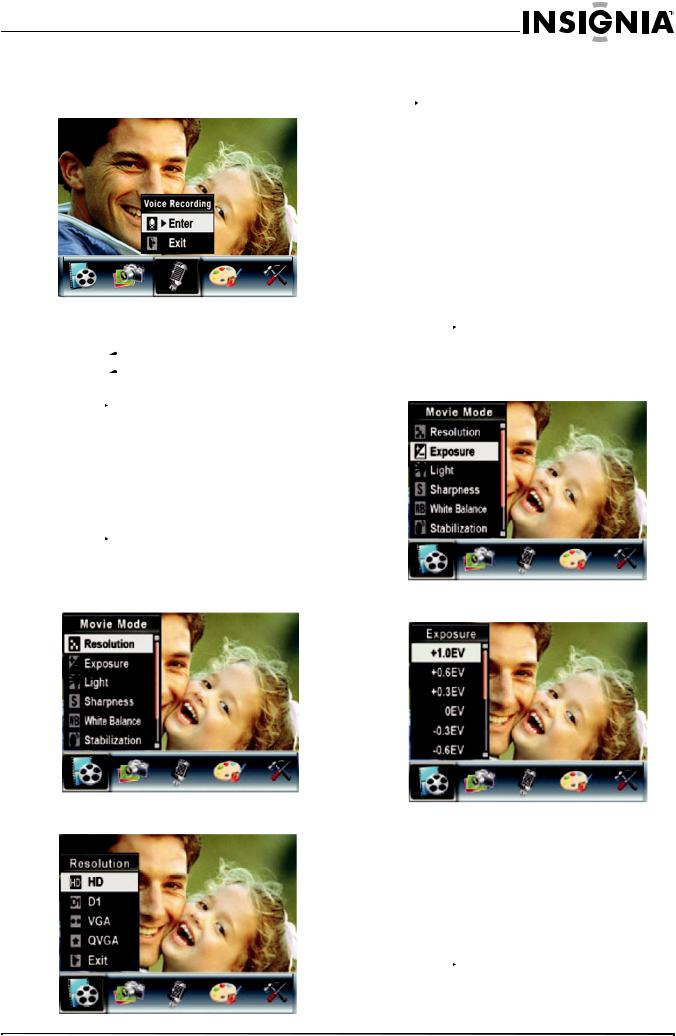
Recording sound
To record sound:
1 Press OK to open the record menu.
5Press T (up) or W (down) to select HD, D1, VGA, or QVGA, then press OK to save your selection and close the menu. To exit without
changing the resolution, select Exit or press
 (Record/Play).
2Press  or
or  to select Voice Recording.
3Press T (up) or W (down) to select OK, then press OK.
4Press  (Movie Shutter) to start recording.
5Press  (Movie Shutter) again to stop recording.
6Press  (Record/Play) to playback the recording.
Working with movies
Using digital zoom
You can zoom on scenes to get close up when recording movies movies.The zoom selection are from 1× to 8×.
To use digital zoom:
•Press T to zoom in or press W to zoom out.
Selecting the exposure for movies
Your camcorder adjusts the image exposure automatically. You can manually adjust the exposure for special pictures.
To select the exposure for movies:
1Press  (Record/Play) to switch to record mode.
2Press OK. The record menu opens.
3Press  or
or  to select Movie Mode.
Selecting the resolution for movies
You can record movies in any of four resolutions.
To select the resolution for movies:
1Press  (Record/Play) to switch to record mode.
2Press OK. The record menu opens.
3Press  or
or  to select Movie Mode.
4Press T (up) or W (down) to select
Resolution, then press OK.
4Press T (up) or W (down) to select Exposure, then press OK.
5Press T (up) or W (down) to select an exposure setting. The new exposure setting is previewed.
6Press OK to save your selection and close the menu.
Using the built-in light
Your camcorder has a built-in light you can use to increase the light level in low-light settings.
To use the built-in light:
1Press  (Record/Play) to switch to record mode.
2Press OK. The record menu opens.
www.insignia-products.com |
7 |

Insignia NS-DCC5HB09 5 MP High Definition Digital Camcorder with 3.0" LCD Monitor
3 Press  or
or  to select Movie Mode.
4Press T (up) or W (down) to select Light, then press OK.
5Press T (up) or W (down) to select on or off, then press OK to save your selection and close the menu.
Using Night Mode for low-light movies
The Night Mode option uses a longer exposure to capture more detail of the movie background.
To use Night Mode for low-light movies:
1Press  (Record/Play) to switch to record mode.
2Press OK. The record menu opens.
3Press  or
or  to select Movie Mode.
4Press T (up) or W (down) to select Night Mode, then press OK.
5Press T (up) or W (down) to select On or Off, then press OK to save your selection and close the menu.
Adjusting the sharpness for movies
You can use the sharpness to soften or sharpen images to achieve different effects.
To adjust the sharpness for movies:
1Press  (Record/Play) to switch to record mode.
2Press OK. The record menu opens.
3Press  or
or  to select Movie Mode.
4Press T (up) or W (down) to select
Sharpness, then press OK.
5 Press T (up) or W (down) to select a sharpness level. The new sharpness setting is previewed.
6 Press OK to save your selection and close the menu.
8 |
www.insignia-products.com |
Insignia NS-DCC5HB09 5 MP High Definition Digital Camcorder with 3.0" LCD Monitor
Adjusting the white balance for movies
You camcorder adjusts the color balance automatically. You can manually adjust the color balance for special movie effects.
To adjust the white balance for movies:
1Press  (Record/Play) to switch to record mode.
2Press OK. The record menu opens.
3Press  or
or  to select Movie Mode.
4Press T (up) or W (down) to select Auto,
Daylight, Fluorescent, or Tungsten. The new white balance setting is previewed.
5Press OK to save your selection and close the menu.
Using motion stabilization for movies
Motion stabilization increases stablilty and helps avoid blurry movies.
Notes
•The captured screen will be smaller when motion stabilization is turned on.
•Digital Zoom is disabled when motion stabilization is turned on.
To use motion stabilization for movies:
1Press  (Record/Play) to switch to record mode.
2Press OK. The record menu opens.
3 Press  or
or  to select Movie Mode.
4Press T (up) or W (down) to select
Stabilization, then press OK.
5Press T (up) or W (down) to select On or Off, then press OK to save your selection and close the menu.
Using motion detection to record movies
When the Motion Detect option is turned on, your camcorder starts recording after it detects three seconds of motion (movement). It stops recording after three seconds of no motion.
To use motion detection to record movies:
1Press  (Record/Play) to switch to record mode.
2Press OK. The record menu opens.
3Press  or
or  to select Movie Mode.
www.insignia-products.com |
9 |
 Loading...