


User Guide | Guide de l’utilisateur | Guía del Usuario
DVD Executive Shelf System Lecteur de DVD de salon haut de gamme Sistema de audio tipo ejecutivo con DVD
NS-A2111

Welcome
Congratulations on your purchase of a high-quality Insignia product. Your NS-A2111 represents the state of the art in DVD executive shelf systems, and is designed for reliable and trouble-free performance.
Contents
Introduction . . . . . . . . . . . . . . . . . . . . . . . . . . . . . . . . . . . . . . . . 4 Safety information . . . . . . . . . . . . . . . . . . . . . . . . . . . . . . . . . . . 4 Features . . . . . . . . . . . . . . . . . . . . . . . . . . . . . . . . . . . . . . . . . . 7 Accessories . . . . . . . . . . . . . . . . . . . . . . . . . . . . . . . . . . . . . 7 Front panel. . . . . . . . . . . . . . . . . . . . . . . . . . . . . . . . . . . . . . 8 Back panel . . . . . . . . . . . . . . . . . . . . . . . . . . . . . . . . . . . . . . 9 Remote control . . . . . . . . . . . . . . . . . . . . . . . . . . . . . . . . . 10 Setting up your DVD executive shelf system. . . . . . . . . . . . . . 12 Overview . . . . . . . . . . . . . . . . . . . . . . . . . . . . . . . . . . . . . . 12 Connecting your TV . . . . . . . . . . . . . . . . . . . . . . . . . . . . . . 12 Connecting your amplifier . . . . . . . . . . . . . . . . . . . . . . . . . 14 Using your DVD executive shelf system . . . . . . . . . . . . . . . . . 14 Getting started . . . . . . . . . . . . . . . . . . . . . . . . . . . . . . . . . . 14 Using basic features . . . . . . . . . . . . . . . . . . . . . . . . . . . . . 15 Using advanced features . . . . . . . . . . . . . . . . . . . . . . . . . . 16 Playing an MP3 disc . . . . . . . . . . . . . . . . . . . . . . . . . . . . . 21 Playing a JPG photo disc. . . . . . . . . . . . . . . . . . . . . . . . . . 22 Accessing the DVD setup menu . . . . . . . . . . . . . . . . . . . . 22 Using the AM/FM radio . . . . . . . . . . . . . . . . . . . . . . . . . . . 26 Troubleshooting. . . . . . . . . . . . . . . . . . . . . . . . . . . . . . . . . . . . 27 Specifications . . . . . . . . . . . . . . . . . . . . . . . . . . . . . . . . . . . . . 28 Warranty . . . . . . . . . . . . . . . . . . . . . . . . . . . . . . . . . . . . . . . . . 31
Français . . . . . . . . . . . . . . . . . . . . . . . . . . . . . . . . 33 Español. . . . . . . . . . . . . . . . . . . . . . . . . . . . . . . . . 67
www.insignia-products.com |
3 |

Welcome
Introduction
Features:
•Standby function and clock time on/off function
•Compatible with DVD/CD/CD-R/MP3 discs
•Optical fiber/coaxial digital audio output and simulated audio output
•DVD component output/S-Video output
•Bass/treble independent adjustment features
•Four EQ sound effect modes
•360-degree intelligent digital volume adjustment coder
•External two-way audio input–directly connect a computer to enjoy networked digital audio
•Quartz phase-lock FM/AM digital tuner
•Search and Save radio stations automatically
•High sensitivity for signal reception, 60 FM/AM radio station preset memories
•Built-in 2.1, 3-way speaker output: 10W × 2, 25W × 1 (RMS)
Safety information
•Read these instructions.
•Keep these instructions.
•Heed all warnings.
•Follow all instructions.
•Do not use this product near water.
•Clean only with a dry cloth.
•Do not block any ventilation openings. Install according to the instructions in this guide.
•Do not install this product near any heat sources such as radiators, heat registers, stoves, or other devices (including amplifiers) that produce heat.
•Do not defeat the safety purpose of the polarized plug. The polarized plug has two blades with one wider than the other. The wide blade is provided for your safety. If the provided plug does not fit into your power outlet, have an electrician replace of the obsolete outlet.
•Protect the power cord from being walked on or pinched, especially the plugs.
•Use only accessories specified by Insignia.
4 |
www.insignia-products.com |

Welcome
•Use only with the cart, stand, tripod, bracket, or
table specified by Insignia, or sold with the product. When a cart is used, use caution when moving the cart to avoid injury from the cart tipping over.
• Unplug this product during lightning storms or when unused for long periods of time.
•Refer all servicing to qualified service personnel. Service is required when the product has been damaged in any way, such as damage to the power cord, liquid spilling onto the product, exposure to rain or moisture, abnormal operation, or the product having been dropped.
•When you use headphones, keep the volume at a moderate level. If you use the headphones continuously at high volume, your hearing may become damaged.
•Do not overload any power outlet, or extension cords. Overloading can result in fire or electric shock.
•Do not expose this product to dripping or splashing, and no objects filled with liquids should be placed on it.
•Keep your fingers clear of the disc tray as it closes, or serious injury could result.
•Do not place heavy objects on the product, or step on it. The product may fall, causing serious injury to you and damage to the device.
•Do not try to play a cracked, deformed, or repaired disc. These discs are easily broken and may cause serious injury to you and damage to the product.
•If the product begins to emit smoke or strong odor, immediately disconnect the power cord from the power outlet. Wait until the smoke or odor stops, then ask your dealer for an inspection and repair. Not turning off power may create a risk of fire.
•During a thunderstorm, unplug the power cable.
•This product contains lead, which is a harmful substance. When disposing this product, follow the disposal regulations in your area.
Warning
This product uses a laser system. To prevent direct exposure to the laser beam, do not open the enclosure. Visible and invisible laser radiation exists when the enclosure is opened and interlocks are defeated. Do not stare into the beam.
To use this product properly, read this user guide and keep it for future reference. If this product requires maintenance, contact an authorized service center.
Use of controls or adjustments or performance of procedures other than those specified in this user guide may result in hazardous radiation exposure.
www.insignia-products.com |
5 |

Welcome
Notice: There is no guarantee that interference will not occur in a particular installation. If this equipment causes harmful interference to radio or television reception, which can be determined by turning the equipment off and on, you should correct the interference by doing one of the following:
•Reorient or relocate the receiving antenna.
•Increase the separation between the equipment and receiver.
•Connect the equipment into an outlet on a circuit different from that which the receiver is connected to.
•Call technical support or an experienced radio/TV technician for help.
Warning
Advanced servicing should be done by qualified service personnel only. To reduce the risk of electric shock, do not perform any service other than that specified in this user guide.
CAUTION:TO REDUCE THE RISK OF
ELECTRIC SHOCK, DO NOT REMOVE
COVER (OR BACK). NO USER-SERVICEABLE
PARTS INSIDE. REFER SERVICING TO
QUALIFIED SERVICE PERSONNEL.
The lightning flash with arrowhead symbol, within an equilateral triangle, is intended to alert the user to the presence of uninsulated, dangerous voltage within the product’s enclosure that may be of sufficient magnitude to constitute a risk of electric shock.
The explanation point within an equilateral triangle is intended to alert the user to the presence of important operating and maintenance (service) instructions in the literature accompanying the appliance.
The symbol for Class II (double insulation)
Warning
To reduce the risk of fire or electric shock, do not expose this appliance to rain or moisture. Dangerous high voltages are present inside the enclosure. Do not open the cabinet. Refer servicing to qualified personnel only. To prevent electric shock, match the wide blade of the polarized plug to the wide slot in the power outlet, then fully insert the plug.
6 |
www.insignia-products.com |
Welcome
Keep records of your purchase
In the spaces provided below, record the serial number and other information of your product. You can find the serial number on the back panel of your product.
|
|
|
|
|
|
|
|
|
|
|
|
|
|
|
|
|
|
|
|
|
|
|
|
|
|
|
|
|
|
|
|
|
|
|
|
|
|
|
|
Date of purchase |
|
|
|
Serial number |
|
||
|
|
|
|
|
|
|
|
Where purchased |
|
|
|
Model number |
NS-A2111 |
||
|
|
|
|
|
|
|
|
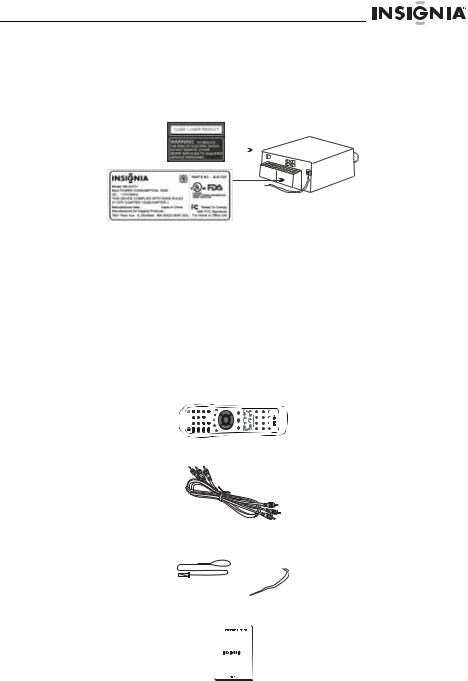
Features
Accessories
•Remote control
3 |
6 |
9 |
|
> |
2 |
5 |
8 |
|
|
|
|
|
< |
< |
1 |
4 |
7 |
0 |
|
|
|
|
|
< |
•Audio/Video (A/V) cable
•AM/FM antenna
•User Guide
+ + +
|
|
|
7 |
|
|
|
|
www.insignia-products.com |
|||

Welcome
Front panel
1 |
Power On/Off |
2 |
Prev/Next (CH-/CH+) |
3 |
Disc door |
4 |
Play/Pause |
5 |
Eject/Stop |
6 |
AM/FM |
7 |
Remote control sensor |
8 |
Display |
9 |
Volume Up/Down |
8 |
www.insignia-products.com |
Welcome
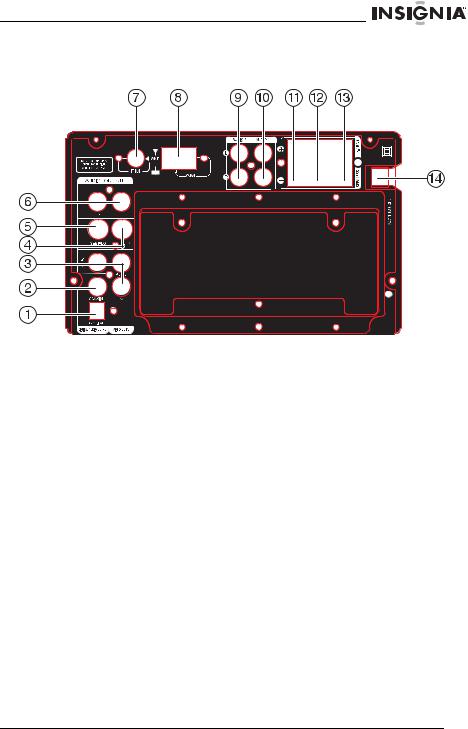
Back panel
1Optical fiber output
2Coaxial output
3Pb/Cb, Y, Pr/Cr component output
4Video output
5S-Video output
6L/R front audio output
7FM antenna jack
8AM antenna jack
9Audio 2 input
10Audio 1 input
11Right speaker output
12Left speaker output
13Subwoofer output
14Power supply input
www.insignia-products.com |
9 |

Welcome
Remote control
Note
•Make sure that there are batteries (2 AAA batteries required) in your remote control and that you point the remote control at the sensor on the front of the system.
•The remote control’s range is about 23 feet (7 meters).
•If the line of sight between the remote control and the system’s sensor is obstructed, the signal may be blocked.
•The remote control may be affected by strong interference signals, such as power supplies and other strong, high-frequency signals.
|
|
|
|
|
|
|
|
|
|
|
|
|
|
|
|
STANDBY |
|
|
|
EJECT |
|
|
|
|
|
|
|
|
|
|
||||||||||
|
|
|
|
|
|
|
|
|
|
|
|
|
|
|
|
|
|
|
|
|
|
|
|
|
|
|
|
|
|
|
|
|
|
|
|
|
|
|||
|
|
|
|
|
|
|
|
|
|
|
|
MUTE |
|
1 |
|
|
2 |
3 |
|
|
|
|
|
|
|
|
|
|
|
|
||||||||||
|
|
|
|
|
|
|
|
|
|
|
|
|
|
|
|
|
|
|
|
|
|
|
|
|
|
|||||||||||||||
|
|
|
|
|
|
|
|
|
|
|
FM/AM |
|
4 |
|
|
5 |
6 |
|
|
|
|
|
|
|
|
|
|
|
|
|||||||||||
|
|
|
|
|
|
|
|
|
|
|
|
|
|
|
|
|
|
|
|
|
|
|
|
|
||||||||||||||||
|
|
|
|
|
|
|
|
|
|
|
AUDIO IN |
|
7 |
|
|
8 |
9 |
|
|
|
|
|
|
|
|
|
|
|
|
|||||||||||
|
|
|
|
|
|
|
|
|
|
|
|
|
|
|
|
|
|
|
|
|
|
|
||||||||||||||||||
|
|
|
|
|
|
|
|
|
|
|
|
|
|
|
|
|
|
0 |
|
|
|
|
|
|
|
|
|
|
|
|
|
|
|
|
|
|
|
|
|
|
|
|
|
|
|
|
|
|
|
|
|
|
OSD |
|
|
|
|
|
|
|
|
T/F |
|
|
|
|
|
|
|
|
|
|
|
||||||||
|
|
|
|
|
|
|
|
|
|
|
|
|
|
|
|
|
|
|
|
|
|
|
|
|
|
|
|
|
|
|||||||||||
|
|
|
|
|
|
|
|
|
|
|
|
|
|
|
|
|
|
|
|
|
|
|
|
|
|
|
|
|
|
|
|
|
|
|
||||||
|
|
|
|
|
|
|
|
|
|
|
|
|
|
|
|
MENU |
SUB. LANG(L/R) |
|
|
|||||||||||||||||||||
|
|
|
|
|
|
|
|
|
|
|
TITLE |
|
|
|
|
|
|
|
|
|
|
ANGLE |
|
|
||||||||||||||||
|
|
|
|
|
|
|
|
|
|
|
|
|
|
|
|
|
|
|
|
< |
|
|
|
|
|
|
|
|
|
|
|
|
|
|
|
|
|
|||
|
|
|
|
|
|
|
|
|
|
|
|
|
|
|
|
|
|
|
|
|
|
|
|
|
|
|
|
|
|
|
|
|
|
|
|
|
||||
|
|
|
|
|
|
|
|
|
|
|
|
|
|
|
|
|
|
|
|
|
|
|
|
|
|
|
|
|
|
|
|
|
|
|
|
|
||||
|
|
|
|
|
|
|
|
|
|
|
|
|
|
|
|
|
|
|
|
|
|
|
|
|
|
|
|
|
|
|
||||||||||
|
|
|
|
|
|
< |
|
|
ENTER |
> |
|
|
|
|
|
|
|
|
|
|
|
|
||||||||||||||||||
|
|
|
|
|
|
|
|
|
|
|
|
|
|
|
|
|
|
|
|
< |
|
|
|
|
|
|
|
|
|
|
|
|
|
|
|
|
|
|||
|
|
|
|
|
|
|
|
|
|
|
|
|
|
SETUP |
|
REPEAT |
REP AB |
|
|
|||||||||||||||||||||
|
|
|
|
|
|
|
|
|
|
|
|
|
|
|
TU+ |
|
|
|
|
|
|
|
|
|
|
|
|
|
|
|
|
|
|
|
|
|
||||
|
|
|
|
|
|
|
|
|
|
|
|
|
|
|
|
|
|
|
|
|
|
|
|
|
|
|
|
|
|
|
|
|
|
|
||||||
|
|
|
|
|
|
|
|
|
|
|
|
|
|
|
|
|
|
|
|
|
CH+ |
|
|
|
|
|
|
|
|
|
|
|
||||||||
|
|
|
|
|
|
|
|
|
|
|
|
|
|
|
|
|
|
|
|
|
|
|
|
|
|
|
|
|
|
|
|
|||||||||
|
|
|
|
|
|
|
|
|
|
|
|
|
|
|
|
|
|
|
|
|
|
CH- |
|
|
|
|
|
|
|
|
|
|
|
|
|
|
|
|||
|
|
|
|
|
|
|
|
|
|
|
|
|
|
|
|
TU- |
|
|
|
|
|
|
|
|
|
|
|
|
|
|
|
|
|
|
|
|||||
|
|
|
|
|
|
|
|
|
|
|
|
|
|
|
|
|
|
|
|
|
|
|
|
|
|
|
|
|
|
|
|
|
|
|
|
|
|
|
|
|
|
|
|
|
|
|
|
|
|
|
|
|
|
|
|
|
|
|
PROGRAM |
|
CLEAR |
|
MO/ST |
|
|
||||||||||||||||
|
|
|
|
|
|
|
|
|
|
|
|
|
CLOCK |
SEARCH |
|
SAVE |
|
|
|
|||||||||||||||||||||
|
|
|
|
|
|
|
|
|
|
|
|
|
|
|
|
|
|
|
|
|
|
|
|
|
|
|
|
|
|
|
|
|
||||||||
|
|
|
|
|
|
|
|
|
|
|
|
|
|
|
|
|
|
|
|
|
|
|
|
|
|
|
|
|
|
|
|
|||||||||
|
|
|
|
|
|
|
|
|
|
|
|
|
|
EQ |
BAS+ |
|
|
|
TRE+ |
|
VOL+ |
|
|
|||||||||||||||||
|
|
|
|
|
|
|
|
|
|
|
|
|
|
|
|
|
|
+ |
|
|
+ |
+ |
|
|
|
|
|
|
|
|
|
|
|
|
||||||
|
|
|
|
|
|
|
|
|
|
|
|
|
|
|
|
|
|
|
|
|
|
|
|
|
|
|
|
|
|
|
|
|||||||||
RESET BASTRE- VOL-
NS-A2111
10 |
www.insignia-products.com |
Welcome
1 |
STANDBY |
2 |
MUTE |
3 |
FM/AM |
|
|
|
|
|
|
4 |
AUDIO IN |
5 |
OSD |
6 |
TITLE |
|
|
|
|
|
|
7 |
MENU |
8 |
SUB. |
9 |
SETUP |
|
|
|
|
|
|
10 |
TU+ (Tune |
11 |
(Play/Pause) |
12 |
TU- (Tune down, fast |
|
up, fast |
|
|
|
review) |
|
forward) |
|
|
|
|
|
|
|
|
|
|
13 |
(Stop) |
14 |
CLOCK |
15 |
SEARCH/PROGRAM |
|
|
|
|
|
|
16 |
EQ |
17 |
BAS+ |
18 |
RESET |
|
|
|
|
|
|
19 |
BAS- |
20 |
EJECT |
21 |
Number buttons |
|
|
|
|
|
|
22 |
T/F |
23 |
ANGLE |
24 |
LANG(L/R) |
|
|
|
|
|
|
25 |
(Direction |
26 |
ENTER |
27 |
REP AB |
|
arrows) |
|
|
|
|
|
|
|
|
|
|
28 |
REPEAT |
29 |
CH+ (Channel up, |
30 |
CH- (Channel down, |
|
|
|
next chapter/track) |
|
previous |
|
|
|
|
|
chapter/track) |
|
|
|
|
|
|
31 |
MO/ST |
32 |
SAVE/CLEAR |
33 |
VOL+ |
|
(Mono/ |
|
|
|
|
|
Stereo) |
|
|
|
|
|
|
|
|
|
|
34 |
TRE+ |
35 |
VOL- |
36 |
TRE- |
|
|
|
|
|
|
www.insignia-products.com |
11 |

Welcome
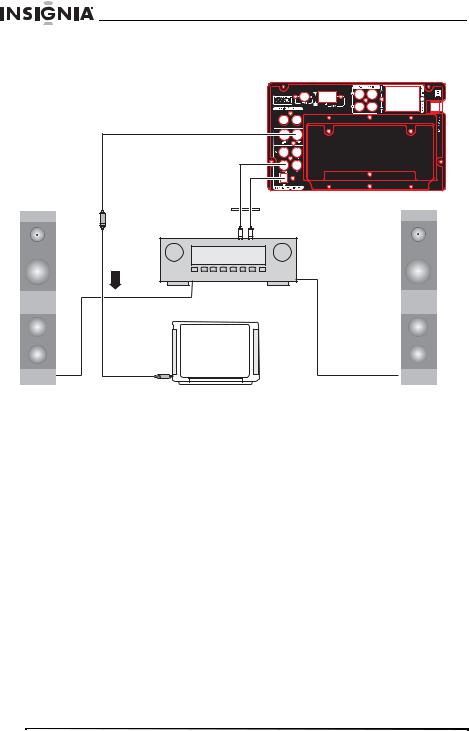
Setting up your DVD executive shelf system
Overview
•Refer to the following figure to connect your audio equipment.
•Make sure that all connections are correct and secure.
•Connect the Power supply last.
TAPE |
Connecting your TV
•If your TV has A/V inputs, connect this system to your TV with A/V cables, and set the TV to the A/V input.
•If your TV has an S-Video input, use the S-Video input to connect the system and TV (higher quality image than A/V).
•If your TV has component inputs, use three connection cables to connect the system and TV (higher quality image than S-Video).
12 |
www.insignia-products.com |

Welcome
Pb/Cb Pr/Cr
Note
•Turn off and unplug both the system and the TV before you connect them to each other.
•If there are multiple connections between the system and your TV, select one and unplug others to avoid affecting the quality of images and sound.
•Do not switch on and off or press the power switch frequently. Wait three seconds between turning the power on and off.
•Do not connect the digital optical or coaxial output jack of this system with the analog signal input jack.
www.insignia-products.com |
13 |
Welcome
Connecting your amplifier
Setting up digital audio output
1Connect the optical and coaxial output jack to the amplifier.
2During disc play or after stopping, press Setup on the remote control to open the System setup page.
3Press the direction buttons to open the Audio setup page, then move the cursor to Digital Output.
4Select SPDIF/RAW or SPDIF/PCM, then press Enter to finish.
5Press Setup again to exit Setup.
Using your DVD executive shelf system
Getting started
Before turning on the system, make sure that all of the connections are correct and secure.
1Plug the power plugs into the power outlet, then press the Power button on the front panel to turn on the system. At this time, the system is in Standby mode, the Red Indicator light on the front panel is on, and the display shows the current time.
14 |
www.insignia-products.com |

Welcome
2Press the STANDBY, FM/AM, ENTER, AUDIO IN, or EJECT buttons on the remote control or the STOP, FM/AM, or EJECT buttons on the front panel to exit Standby mode. The player enters the mode corresponding to the button you pressed.
Note
Standby mode is a power-saving mode. However, when you are not going to use the system for a long time, turn off the main power.
3After exiting Standby mode, press EJECT on the remote control or front panel to open the disc tray, insert a disc, then press EJECT again. The system starts to play.
Using basic features
Using navigation buttons
•Press Enter to enable selected items.
•While in Play mode, press STOP to stop playback. The TV screen displays the Welcome screen. Press Enter to begin playing from the stopped time. During Play mode, if you press STOP twice and then press ENTER, the disc is played from the beginning.
•While in Play mode, press PLAY/PAUSE to pause playback. Press the button again or press ENTER once to resume playback.
•While in VCD mode, press MENU on the remote control to open or close the PBC status. While in DVD mode, press the MENU button on the remote control to go into the Root Menu status.
Note
Some burned discs do not have a Menu feature.
•While playing songs, press the number buttons to directly select the songs you want to play.
•While in Play mode, press TU+ or TU- to fast forward or fast review. The available speeds are: FORWARD X2, FORWARD X4, FORWARD X8, FORWARD X16, PLAY BACKWARD X2, BACKWARD X4, BACKWARD X8, BACKWARD X16, and PLAY (normal).
•While in Play mode, press CH- to skip to the previous chapter or song, or press CH+ to skip to the next chapter or song.
Note
When in FM/AM mode, these buttons switch to the previous or next channels.
www.insignia-products.com |
15 |

Welcome
Adjusting volume
To adjust the volume:
1Press VOL-/+ to turn the volume up or down.
2While in Play mode, press Mute to turn off all audio. Press the button again or press VOL +/- to restore volume.
Status display
While a disc is playing, press OSD and the TV screen displays the following:
•VCD disc display: Single Elapsed, Single Remain, Total Elapsed, Total Remain, Off
•DVD disc display: Title Elapsed, Title Remain, Chapter Elapsed, Chapter Remain, Off
Using advanced features
Changing soundtracks
To change soundtracks:
•While playing VCDs or DVCDs, press MO/ST to select one of the output modes, such as Mono Left, Mono Right, Mix-Mono, and Stereo. Press the button once to switch one soundtrack.
Note
While playing DVDs or SVCDs, this button doesn’t work.
Selecting a language
To select a language:
•While in Play mode, press LANG(L/R) to select from up to eight languages for dialog. Select English, French, Spanish,
Chinese, Japanese, Korean, Russian, or Thai. (This only applies to discs like DVD and SVCD that are recorded in multiple languages.)
Selecting the subtitle language
To select the subtitle language:
1If the DVD that you are playing was recorded in multiple subtitles, you can select up to seven subtitles by pressing SUB. Select
English, French, Spanish, Chinese, Japanese, Korean, or Thai.
16 |
www.insignia-products.com |

Welcome
Selecting the time/frequency
To select the time/frequency:
1While in Play mode, press T/F on the remote control. If a VCD is inserted, the TV screen displays: Disc Go To: --:--, Track Go To: --:--, Select Track: --/XX, or if a DVD is inserted, the TV screen displays: Title: XX/XX Chapter: /XX, Title: XX/XX Time : : , Chapter XX/XX Time : :.
2You can press the arrow buttons to move the cursor to the time position, then input the corresponding numbers by pressing the number buttons (the optional time range depends on the volume of the disc). The system begins playing at the specified time.
•VCD example: The screen displays Disc Go To: --/--. To select 55 minutes 20 seconds, enter 5, 5, 2, 0.
•DVD example: The screen displays Title: XX/XX Time : : . To select 1 hour, 30 minutes, and 20 seconds, enter 1, 3, 0, 2, 0.
Using Repeat mode
To use Repeat mode:
1While in Play mode, press REPEAT to select the content to repeat.
•For DVDs, repeatedly press Repeat to select from Chapter,
Title, and All.
•For VCDs, repeatedly press Repeat to select from Track and
All.
•For CDs, repeatedly press Repeat to select from Track, All, and Random.
•For MP3, JPG, and other media files,press Repeat to select from Repeat One, Repeat Folder, and Folder.
Using A-B Repeat mode
To use A-B Repeat:
1While in Play mode, press REP AB once at the beginning of the section to mark the start (A).
2Press the REP AB button at the end of the section to mark the end (B). The player automatically returns to A and starts playing to B.
3Press REP AB again to exit.
www.insignia-products.com |
17 |

Welcome
Viewing the title directory listing
To view a DVD directory listing:
1If the playing DVD contains a directory column, press TITLE to view the items contained in this disc.
2Use the direction buttons to select the items you want to play, or use the number buttons to directly select.
Changing equalizer modes
To change the equalizer mode:
1While in Play mode, press EQ to select between four sound field effects.
2While in FM or AUDIO-IN mode, press EQ repeatedly to cycle through the effect modes. EQ1, EQ2, EQ3, EQ4, and EQ OFF are displayed on the front panel to show which mode is active.
3While in DVD mode, press EQ repeatedly to cycle through the effect modes. EQ1, EQ2, EQ3, EQ4, and EQ OFF are displayed on the front panel, and ROCK, POP, JAZZ, CLASSIC, and OFF are displayed on the TV to show which mode is active.
Using the clock
Setting the time
When your system is in Standby mode, the display shows the current time.
To set the time:
1Press CLOCK on the remote control and select to t--:--, then enter the current time by pressing the number buttons. Press CLOCK again to select between am and pm.
For example, if the current time is 11:30 a.m., enter 1, 1, 3, 0 when am appears on the screen, then the system saves your setting. If the current time is 11:30 p.m., press CLOCK again so that pm appears on the screen, enter 1, 1, 3, 0, then the system saves your setting.
Setting auto standby time
You can set the auto standby time of the system, so the system turns off after a specified amount of time.
18 |
www.insignia-products.com |
Welcome
To set the auto standby time:
1Press CLOCK on the remote control, select S - - -, then input the desired standby time. The longest standby time that the system supports is 120 minutes.
For example, if you want to go into Standby mode after 30 minutes, enter 0, 3, 0. The system goes into Standby mode after 30 minutes.
Setting the auto-on time
You can set the time that the system automatically turns on.
To set the auto-on time:
1Press CLOCK on the remote control, select O--:--, then enter the time you want.
For example, if the current time is 11:30 a.m., and you want the system to turn on at 10:30 p.m., press CLOCK again so pm appears on the screen, then enter 1, 0, 3, 0. The system will turn on at 10:30 p.m.
Note
Setting auto-on time makes the clock display time relative to the current time.
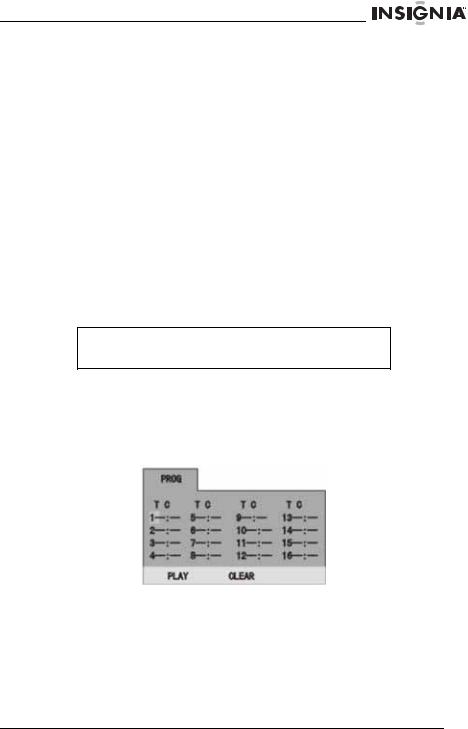
Programming playback
To program playback:
1If you are playing a DVD, press PROGRAM. The DVD program playback screen opens.
www.insignia-products.com |
19 |

Welcome
- OR -
If you are playing a VCD, press PROGRAM. The VCD program playback screen opens.
Note
If the player is in PBC ON mode, pressing PROGRAM turns off PBC, then proceeds to the programming screens.
2Enter numbers using the number buttons on the remote control, and use the arrow buttons to move the cursor.
3When you are done entering the numbers, press the arrow buttons to move the cursor to PLAY, then press ENTER. The program plays.
Selecting external audio input
To select an external audio source:
•After connecting external sound source components to your system, you can press AUDIO IN to select either Audio 1 or Audio 2 to select those components as your audio source.
Resetting the system
To reset the system and return all settings to default values:
•Press RESET. The system returns all settings to their original (default) values.
Main-channel tone adjustment
To adjust the audio tone:
•While listening to any audio source, adjust the bass or treble by pressing BAS+/- or TRE +/- on the remote control.
20 |
www.insignia-products.com |
Welcome
Selecting scene angles for a DVD
To change scene angles:
•While in Play mode, repeatedly press ANGLE to switch angles. (Your DVD must support multiple angles.)
Selecting a DVD title menu
DVD discs with more than one movie, background data, and/or songs are given the name TITLE, while more sections are displayed under each TITLE, called Chapters. Chapters can contain Songs.
To select a DVD title menu:
1While playing DVD discs, press the TITLE button. The TITLE menu appears on the TV screen. (Available for DVDs that contain more than one title menu.)
2Press the direction buttons to move the cursor to the desired title menu, then press the ENTER button to play it. If the title menu is represented by numbers, then press the number buttons to select it directly.
Playing an MP3 disc
To play an MP3 disc:
1Press Eject on the panel or remote control to open the tray, insert an MP3 disc, then press EJECT again to close the tray.
The system reads the disc, then the TV displays the following figure:
Kbps
Contents area
2Press the direction keys to move the cursor to a directory, then press ENTER to enter the directory.
3Press the direction buttons to enter the subdirectory or the file area, select a song with the cursor, then press the ENTER button to play the song.
•To select other songs under the current directory during playback, press the |<< or |>> buttons.
www.insignia-products.com |
21 |

Welcome
•To change directories during playback, press the left direction button to move the icon to the directory symbol, press the up/down direction button to select other directories, then press the Enter button.
Playing a JPG photo disc
1Place the JPG disc into the tray. The system reads the disc, then the main directory is displayed on the TV screen.
Kbps
Root directory area
2Press the direction button to move the cursor to the corresponding directory, press the ENTER button to enter the next layer, and so on, until the desired photo is found for play.
•During playback, use the number buttons or CH+/- to select photos.
•JPG photos may distort at the edge of some TV sets. This is caused by the TV and not your system.
•This system can play digital photo discs with the extension.JPG, and also supports photos created with Adobe Photoshop.
•Press REP AB to play selected photos repeatedly.
Accessing the DVD setup menu
To access the DVD menu:
1Press SETUP.
2Press the direction buttons to switch between the different setup pages.
3Press the direction buttons to move the cursor to the position you want, then press ENTER to enter the subdirectory.
4Press ENTER again to enter the next subdirectory.
Note
In any menu, you can press the up and down direction buttons to move the cursor and press ENTER to enter the selected items. Pressing SETUP exits System setup.
22 |
www.insignia-products.com |

Welcome
Using the General setup page
•TV DISPLAY
•Select NORMAL/PS, NORMAL/LB, or WIDE.
•If the source image is 4:3 aspect ratio, the screen will display it at 4:3 (NORMAL) regardless of the format you select.
•The DVD screen format is changeable. When the screen is displayed at 4:3 aspect ratio, and the display format of the source DVD is 16:9, the image will be compressed to fit the 4:3 aspect ratio.
•ANGLE MARK
•Turn on to have the angle mark displayed on the screen whenever the DVD has multi-angle scenes available.
•OSD LANG
•You can select ENG (English), FR (French), or SP (Spanish) for the setup menus.
•CAPTIONS
•If your DVD contains Closed Captions, select ON to display the captions, or select OFF to hide the captions.
•SCREEN SAVER
•Select ON to enable the screen saver after a certain amount of time, whenever disc playback is stopped or no disc is in the player. Select OFF to disable the screen saver.
•Whenever the screen saver is active, your player changes to a power saving mode, which saves power and prolongs the lifespan of the player.
•Whenever the screen saver is active, press any button to temporarily turn it off.
•LAST MEMORY
•Select ON to enable the player to remember the last played location of the disc. Select OFF to turn the memory off.
•S/W VERSION
•Select this option to display the model number and firmware version the player is using.
www.insignia-products.com |
23 |

Welcome
Using the Audio setup page
SPEAKER SETUP
•Downmix
•LT/RT—Audio output from Left and Right channels
•STEREO—Stereo audio output
•V SURR—Virtual Surround Sound. When the disc has been recorded in Dolby 5.1, the main speakers can output the sound in a Surround Sound-like effect.
•FRONT SPEAKER—Controls the volume of the front speaker.
•SUBWOOFER SPEAKER—Controls the volume of the subwoofer.
SPDIF SETUP
•When playing DOLBY, DTS, or MPEG discs, the optical or coaxial digital audio jack outputs SPDIF/RAW format. The connected amplifier must be able to decode the digital signal.
Using the Video setup page
•COMPONENT
•Select the video output mode S-VIDEO or YUV.
•(Note: If select the S-Video, the TV mode will be no effect.)
24 |
www.insignia-products.com |

Welcome
•TV MODE
• Select the TV mode P-SAN or INTERLACED.
Note
If the COMPONENT setting is S-VIDEO, then this TV
MODE setting has no effect.
•QUALITY
•Adjust the video output settings, including SHARPNESS,
BRIGHTNESS, CONTRAST, GAMMA, HUE, SATURATION, and LUMA DELAY.
Using the Preference setup page
•TV TYPE
•Select the TV signal type to fit your display device. Select
PAL, MULTI, or NTSC.
•PBC
•Select ON to enable the PBC for the VCD when you insert a VCD. Select OFF to not show the PBC.
•AUDIO
•Select the audio language for DVD playback (availability depends on the DVD): English, French, Spanish,
Chinese, Japanese, Korean, Russian or Thai.
•SUBTITLE
•Press SUBTITLE repeatedly to select a subtitle language, and to turn the subtitle menu on or off. This feature is not available on all discs.
•DISC MENU
•Select the DVD menu language you want for the DVD’s own menus (availability depends on the DVD): English, French,
Spanish, Chinese, Japanese, Korean, Russian or Thai.
•If the language you selected isn’t available on the DVD, then the disc’s default language will be active.
www.insignia-products.com |
25 |

Welcome
•PARENTAL
•Select the maximum movie rating that can be watched without a password. This feature enables parents to prevent their children from watching inappropriate material. Before changing the rating level, make sure the password is unlocked, or you can’t change parental settings. For more information, see “Using the Password setup page” on page 26.
•COUNTRY REGION
•Select the DVD region of the DVDs you want to play. Select
CHINA, FRANCE, HONGKONG, JAPAN, TAIWAN, OBR, or USA.
•DEFAULT
•Select to reset all preferences to their original factory settings.
Using the Password setup page
•PASSWORD
•Select this option to change the password. You must know the old password in order to change it. The original factory password is 138900.
Using the AM/FM radio
1In Auto-on or Play modes, press FM/AM on the remote control to enter FM band, or press this button again to enter AM band.
2Enter the frequency:
•To directly input the frequency, press T/F on the remote control, then input the frequency that you want. The range of FM frequencies is from 87 MHz to 108 MHz. The range of AM frequencies is from 520 KHz to 1720 KHz.
•Press the TU+/- buttons to adjust the frequency up or down a step. The FM increments are 0.05 MHz and the AM increments are 10 KHz.
•Select saved stations by pressing the number buttons. For example, press 2, 5 to select the 25th saved station. Press the CH- or CH+ buttons to switch to the next saved station.
•To Automatically search for frequencies, press SEARCH. The system starts searching frequencies from low to high frequency. The located frequencies are automatically saved. Press this button again to stop searching.
3Press SAVE to save the frequency. A lock icon appears on the display. For example, if you want to save 99.3 MHz in the 28th save slot, press 2, 8, press the T/F button to input 9 9 3, then press the Save button.
26 |
www.insignia-products.com |

Welcome
4To select Mono or Stereo while in FM mode, press the MO/ST button. When you select Stereo, the display shows a
stereo signal. If the signal is not strong enough, you cannot select
Stereo.
Note
Stereo is not available in AM mode.
5Press ENTER to exit FM/AM mode and enter disc play mode.
6Change the antenna direction to find the strongest signal for each station.
Troubleshooting
Note
In most cases, whether the DVD player can work correctly depends on the disc you are trying to play. Some features listed in the instruction manual may not work properly due to disc problems.
For your convenience, we have listed some methods to solve common problems you may encounter when using the system. If the problem occurs repeatedly, contact your nearest maintenance center.
Problem |
Cause and solution |
|
|
Cannot operate the system |
• Check the batteries in the remote control to see if |
with the remote control |
they need to be replaced. |
|
• Use the remote control within 6 meters from the |
|
system, and direct the remote control to the front |
|
panel of the system. |
|
|
Cannot play discs |
• Make sure that the disc is placed on the tray with |
|
the label facing up. |
|
• Play discs compatible with the DVD player. |
|
• Switch off the player for a while and switch on |
|
again. |
|
• Parental control rating is set. Remove or change |
|
the rating. |
|
|
No disc menu is displayed |
Check if a menu is recorded. |
|
|
Play mode is different from |
If the disc has no corresponding function codes, some |
what has been chosen in |
features selected in the Setup menu may not work |
the Setup menu |
properly. |
|
|
Picture distortion or no color |
The TV system or video output of the system is not the |
displayed |
same as the TV set. Reset the TV system. |
|
|
No picture is produced or |
The setup of the video output does not match the way |
picture is produced |
the system is connected with the TV set. Set up and |
asynchronously |
configure correctly. |
www.insignia-products.com |
27 |

|
|
|
|
|
|
Welcome |
|
|
|
|
|
|
|||
|
|
|
|
|
|||
|
Problem |
|
Cause and solution |
|
|||
|
|
|
|
|
|||
|
The picture distorts or is out |
• When playing discs that are severely scratched or |
|
||||
|
of sync |
|
have interior defects, or when the system is |
|
|||
|
|
|
|
|
|
affected by strong outer electromagnetic fields, this |
|
|
|
|
|
|
|
problem occurs and normal operation of this |
|
|
|
|
|
|
|
system is affected. |
|
|
|
|
|
|
|
• Turn off the power for a while and turn it on again. |
|
|
|
|
|
|
|
• Use a non-defective disc, and the system resumes |
|
|
|
|
|
|
|
working normally. |
|
|
|
|
|
|
|
• Unusually defective discs may shorten the service |
|
|
|
|
|
|
|
life of this system. |
|
|
|
|
|
|
|||
|
No sound |
|
Cancel mute mode or turn up the volume. |
|
|||
Specifications |
|||||||
|
|
|
|||||
|
Disc type |
DVD, CD, CD-R, and MP3 |
|||||
|
|
|
|||||
|
Video format |
MPEG 2 for DVD, MPEG 1 for VCD |
|||||
|
|
|
|||||
|
Audio format |
MPEG 1, MPEG 2, PCM: STEREO |
|||||
|
|
|
|||||
|
Signal output |
Video system: NTSC, PAL, AUTO |
|||||
|
|
|
|
|
Video output: 1.0 V p-p |
||
|
|
|
|
|
Simulated audio output: 2 CH 1-2V |
||
|
|
|
|
|
RMS: 10W×2 + 25W×1 |
||
|
|
|
|||||
|
Output joint |
Component output, S-Video output, Video output, Stereo, |
|||||
|
|
|
|
|
optical fiber, and coaxial digital audio output |
||
|
|
|
|||||
|
Audio joint |
Audio 1 and Audio 2 |
|||||
|
|
|
|||||
|
Power supply |
AC 110 V ±10% 60 Hz |
|||||
|
|
|
|||||
|
Maximum power |
120 W |
|||||
|
|
|
|||||
|
Frequency power |
+/- 3 dB (20 Hz-20 KHz) |
|||||
|
|
|
|||||
|
Operating condition |
Temperature: 41-95°F (5-35°C) |
|||||
|
|
|
|
|
Operating status: Level |
||
|
|
|
|||||
|
Audio signal-to-noise |
≥80 dB weight A |
|||||
|
|
|
|
|
|
|
|
Note
These specifications are for reference only, and are subject to change without prior notice.
28 |
www.insignia-products.com |

Welcome
If at any time you should need to dispose of this system, note that waste electrical products should not be disposed of with household waste. Recycle where facilities exist. Check with your local authority or retailer for recycling advice.
(Waste Electrical and Electronic Equipment Directive)
Legal Notices
FCC
This device complies with Part 15 of the FCC Rules. Operation of this product is subject to the following two conditions: (1) this device may not cause harmful interference, and (2) this device must accept any interference received, including interference that may cause undesired operation.
Safety certification
This executive shelf system is made and tested to meet safety standards of the FCC, requirements and compliance with safety performance of the U.S. Department of Health and Human Services, and also with FDA Radiation Performance Standards 21 CFR Subchapter J.
Copyright
© 2007 Insignia. Insignia and the Insignia logo are trademarks of Best Buy Enterprise Services, Inc. Other brands and product names are trademarks or registered trademarks of their respective holders. Specifications and features are subject to change without notice or obligation.
Support number: (877) 467-4289
URL: www.insignia-products.com
www.insignia-products.com |
29 |

Welcome
30 |
www.insignia-products.com |
 Loading...