


 Loading...
OFFICEJET 4500
OFFICEJET ADVANTAGE 4500
User Guide
K710

HP Officejet 4500 (G510)/ HP Officejet 4575 (K710)/HP Officejet Advantage 4500 (K710) All-in-One series
User Guide

Copyright information
© 2011 Copyright Hewlett-Packard Development Company, L.P.
Hewlett-Packard Company notices
The information contained in this document is subject to change without notice.
All rights reserved. Reproduction, adaptation, or translation of this material is prohibited without prior written permission of Hewlett-Packard, except as allowed under copyright laws.
The only warranties for HP products and services are set forth in the express warranty statements accompanying such products and services. Nothing herein should be construed as constituting an additional warranty. HP shall not be liable for technical or editorial errors or omissions contained herein.
Acknowledgements
Windows, Windows XP, and Windows Vista are U.S. registered trademarks of Microsoft Corporation.
ENERGY STAR and the ENERGY STAR mark are registered U.S. marks.
Safety information
Always follow basic safety precautions when using this product to reduce risk of injury from fire or electric shock.
1.Read and understand all instructions in the documentation that comes with the device.
2.Observe all warnings and instructions marked on the product.
3.Unplug this product from wall outlets before cleaning.
4.Do not install or use this product near water, or when you are wet.
5.Install the product securely on a stable surface.
6.Install the product in a protected location where no one can step on or trip over the line cord, and the line cord cannot be damaged.
7.If the product does not operate normally, see Solve a problem.
8.There are no user-serviceable parts inside. Refer servicing to qualified service personnel.
Accessibility
The device provides a number of features that make it accessible for people with disabilities.
Visual
The device software is accessible for users with visual impairments or low
vision through the use of your operating system's accessibility options and features. It also supports most assistive technology such as screen readers, Braille readers, and voice-to-text applications. For users who are color blind, colored buttons and tabs used in the software and on the device control panel have simple text or icon labels that convey the appropriate action.
Mobility
For users with mobility impairments, the device software functions can be executed through keyboard commands. The software also supports Windows accessibility options such as StickyKeys, ToggleKeys, FilterKeys, and MouseKeys. The device doors, buttons, paper trays, and paper guides can be operated by users with limited strength and reach.
Support
For more details about the accessibility of this product and HP's commitment to product accessibility, visit HP's Web site at www.hp.com/accessibility.
For accessibility information for the Mac OS X, visit the Apple Web site at www.apple.com/accessibility.

Contents
1 |
Get started |
|
|
Accessibility................................................................................................................................ |
9 |
|
Eco-Tips.................................................................................................................................... |
10 |
|
Understand the device parts..................................................................................................... |
10 |
|
Front view........................................................................................................................... |
10 |
|
Printing supplies area......................................................................................................... |
11 |
|
Back view............................................................................................................................ |
11 |
|
Use the product control panel................................................................................................... |
12 |
|
Overview of buttons and lights........................................................................................... |
12 |
|
Change product settings..................................................................................................... |
13 |
|
Select the mode............................................................................................................ |
13 |
|
Change product settings............................................................................................... |
14 |
|
Types of messages............................................................................................................. |
14 |
|
Status messages.......................................................................................................... |
14 |
|
Warning messages....................................................................................................... |
14 |
|
Error messages............................................................................................................ |
14 |
|
Critical error messages................................................................................................. |
15 |
|
Finding the device model number............................................................................................ |
15 |
|
Select print media..................................................................................................................... |
15 |
|
Recommended papers for printing and copying................................................................. |
15 |
|
Recommended papers for photo printing........................................................................... |
17 |
|
Tips for selecting and using media..................................................................................... |
17 |
|
Load an original on the scanner glass...................................................................................... |
18 |
|
Load an original in the automatic document feeder (ADF)....................................................... |
19 |
|
Load media............................................................................................................................... |
19 |
|
Maintain the device................................................................................................................... |
21 |
|
Clean the scanner glass..................................................................................................... |
21 |
|
Clean the exterior .............................................................................................................. |
22 |
|
Clean the automatic document feeder (ADF) (Some models only).................................... |
22 |
|
Turn off the device.................................................................................................................... |
24 |
2 |
|
|
|
Print documents........................................................................................................................ |
25 |
|
Print documents (Windows)................................................................................................ |
25 |
|
Print documents (Mac OS X).............................................................................................. |
26 |
|
Print brochures......................................................................................................................... |
26 |
|
Print brochures (Windows)................................................................................................. |
26 |
|
Print brochures (Mac OS X)................................................................................................ |
26 |
|
Print on envelopes.................................................................................................................... |
27 |
|
Print on envelopes (Windows)............................................................................................ |
27 |
|
Print on envelopes (Mac OS X).......................................................................................... |
27 |
|
Print a Web page...................................................................................................................... |
28 |
|
Print a Web page (Windows).............................................................................................. |
28 |
|
Print a Web page (Mac OS X)............................................................................................ |
28 |
1
|
Print photos.............................................................................................................................. |
29 |
|
Print photos on photo paper (Windows)............................................................................. |
29 |
|
Print photos on photo paper (Mac OS X)........................................................................... |
29 |
|
Print on special and custom-sized paper.................................................................................. |
30 |
|
Print on special or custom-sized paper (Windows)............................................................ |
30 |
|
Print on special or custom-sized paper (Mac OS X)........................................................... |
31 |
|
Print borderless documents...................................................................................................... |
31 |
|
Print borderless documents (Windows).............................................................................. |
32 |
|
Print borderless documents (Mac OS X)............................................................................ |
32 |
3 |
Scan |
|
|
Scan an original........................................................................................................................ |
34 |
|
Scan an original from the product control panel................................................................. |
34 |
|
Edit a scanned document using optical character recognition (OCR) software....................... |
35 |
4 |
Copy |
|
|
Copy documents....................................................................................................................... |
36 |
|
Change copy settings............................................................................................................... |
36 |
5 |
Fax |
|
|
Send a fax................................................................................................................................ |
38 |
|
Send a basic fax................................................................................................................. |
38 |
|
Send a fax manually from a phone..................................................................................... |
39 |
|
Send a fax using monitor dialing........................................................................................ |
40 |
|
Send a fax from memory.................................................................................................... |
41 |
|
Schedule a fax to send later............................................................................................... |
41 |
|
Send a fax to multiple recipients......................................................................................... |
42 |
|
Send a fax in Error Correction Mode.................................................................................. |
42 |
|
Receive a fax............................................................................................................................ |
43 |
|
Receive a fax manually...................................................................................................... |
43 |
|
Set up backup fax............................................................................................................... |
44 |
|
Reprint received faxes from memory.................................................................................. |
45 |
|
Poll to receive a fax............................................................................................................ |
45 |
|
Forward faxes to another number...................................................................................... |
46 |
|
Set the paper size for received faxes................................................................................. |
46 |
|
Set automatic reduction for incoming faxes........................................................................ |
47 |
|
Block junk fax numbers...................................................................................................... |
47 |
|
Add numbers to the junk fax list................................................................................... |
48 |
|
Remove numbers from the junk fax list........................................................................ |
48 |
|
Print a Junk Fax Report................................................................................................ |
48 |
|
Receive faxes to your computer (Fax to PC and Fax to Mac)............................................ |
49 |
|
Fax to PC and Fax to Mac requirements...................................................................... |
49 |
|
Activate Fax to PC and Fax to Mac.............................................................................. |
49 |
|
Modify Fax to PC or Fax to Mac settings...................................................................... |
50 |
|
Turn off Fax to PC or Fax to Mac................................................................................. |
50 |
2
Contents |
|
Change fax settings.................................................................................................................. |
50 |
Configure the fax header.................................................................................................... |
51 |
Set the answer mode (Auto answer).................................................................................. |
51 |
Set the number of rings before answering.......................................................................... |
51 |
Change the answer ring pattern for distinctive ring............................................................ |
52 |
Set the fax error correction mode....................................................................................... |
52 |
Set the dial type.................................................................................................................. |
53 |
Set the redial options.......................................................................................................... |
53 |
Set the fax speed................................................................................................................ |
53 |
Set the fax sound volume................................................................................................... |
54 |
Fax over Internet Protocol (FoIP)............................................................................................. |
54 |
Use reports............................................................................................................................... |
55 |
Print fax confirmation reports.............................................................................................. |
55 |
Print fax error reports.......................................................................................................... |
56 |
Print and view the fax log................................................................................................... |
56 |
Clear the fax log................................................................................................................. |
57 |
Print the details of the last fax transaction.......................................................................... |
57 |
Print a Caller ID History Report.......................................................................................... |
58 |
6 Work with ink cartridges |
|
Information about ink cartridges............................................................................................... |
59 |
Check the estimated ink levels................................................................................................. |
60 |
Handle the ink cartridges.......................................................................................................... |
61 |
Replace the ink cartridges........................................................................................................ |
61 |
Store printing supplies.............................................................................................................. |
65 |
Advanced ink cartridge maintainance....................................................................................... |
65 |
Align the ink cartridges....................................................................................................... |
65 |
Clean the ink cartridges...................................................................................................... |
67 |
7 Solve a problem |
|
HP support................................................................................................................................ |
69 |
Obtain electronic support.................................................................................................... |
70 |
HP support by phone.......................................................................................................... |
70 |
Before you call.............................................................................................................. |
70 |
Phone support period................................................................................................... |
71 |
Telephone support numbers......................................................................................... |
71 |
After the phone support period..................................................................................... |
73 |
General troubleshooting tips and resources............................................................................. |
73 |
Solve printing problems............................................................................................................ |
74 |
The device shuts down unexpectedly................................................................................. |
74 |
Error message appears on control-panel display............................................................... |
74 |
Alignment fails.................................................................................................................... |
74 |
The device is not responding (nothing prints)..................................................................... |
74 |
Device takes a long time to print........................................................................................ |
75 |
Blank or partial page printed............................................................................................... |
75 |
Something on the page is missing or incorrect................................................................... |
76 |
Placement of the text or graphics is wrong......................................................................... |
76 |
The device prints half a page, then ejects the paper.......................................................... |
77 |
3
Poor print quality and unexpected printouts............................................................................. |
77 |
Solution 1: Use genuine HP cartridges............................................................................... |
77 |
Solution 2: Check the paper............................................................................................... |
77 |
Solution 3: Wait a short period of time (if possible)............................................................ |
78 |
Solution 4: Check the print settings.................................................................................... |
78 |
Step 1: Check the print quality settings........................................................................ |
79 |
Step 2: Check the Print in Grayscale setting................................................................ |
79 |
Solution 5: Check estimated ink levels and replace low or empty ink cartridges............... |
80 |
Solution 6: Print and evaluate a diagnostic report and troubleshoot defects...................... |
80 |
Print Quality Diagnostic Report.................................................................................... |
81 |
Self-Test Report............................................................................................................ |
85 |
Solution 7: Clean the ink cartridges.................................................................................... |
87 |
Solution 8: Align the ink cartridges..................................................................................... |
88 |
Solution 9: Replace the problem ink cartridge.................................................................... |
88 |
Solution 10: Service the product......................................................................................... |
88 |
Clean the area around the ink nozzles..................................................................................... |
89 |
Solve paper-feed problems...................................................................................................... |
91 |
Solve copy problems................................................................................................................ |
92 |
No copy came out............................................................................................................... |
93 |
Copies are blank................................................................................................................. |
93 |
Documents are missing or faded........................................................................................ |
93 |
Size is reduced................................................................................................................... |
94 |
Copy quality is poor ........................................................................................................... |
94 |
Copy defects are apparent................................................................................................. |
94 |
The device prints half a page, then ejects the paper.......................................................... |
95 |
Paper mismatch.................................................................................................................. |
95 |
Solve scan problems................................................................................................................ |
95 |
Scanner did nothing............................................................................................................ |
95 |
Scan takes too long............................................................................................................ |
96 |
Part of the document did not scan or text is missing.......................................................... |
96 |
Text cannot be edited......................................................................................................... |
97 |
Error messages appear...................................................................................................... |
97 |
Scanned image quality is poor .......................................................................................... |
97 |
Scan defects are apparent................................................................................................. |
98 |
Solve fax problems................................................................................................................... |
99 |
The fax test failed............................................................................................................... |
99 |
Solve wired (Ethernet) network problems (some models only).............................................. |
111 |
General network troubleshooting...................................................................................... |
111 |
Network port created does not match device IP address (Windows)............................... |
112 |
4
Contents |
|
Solve wireless problems (some models only)........................................................................ |
112 |
Basic wireless troubleshooting......................................................................................... |
112 |
Advanced wireless troubleshooting.................................................................................. |
113 |
Step 1: Make sure your computer is connected to your network................................ |
113 |
Step 2: Make sure that the HP device is connected to your network......................... |
114 |
Step 3: Check to see if the firewall software is blocking communication.................... |
115 |
Step 4: Make sure the HP device is online and ready................................................ |
116 |
Step 5: Make sure the wireless version of the HP device is set as the default printer |
|
driver (Windows only)................................................................................................. |
116 |
Step 6: Make sure the HP Network Devices Support service is running (Windows |
|
only)............................................................................................................................ |
117 |
Add hardware addresses to a wireless access point (WAP)...................................... |
117 |
Configure your firewall to work with HP devices..................................................................... |
118 |
Solve device management problems..................................................................................... |
119 |
Embedded Web server cannot be opened....................................................................... |
120 |
The EWS is only available in English............................................................................... |
120 |
Troubleshoot installation issues............................................................................................. |
121 |
Hardware installation suggestions.................................................................................... |
121 |
Software installation suggestions..................................................................................... |
122 |
Understand the Printer Status Report and Self-Test Report.................................................. |
122 |
Understand the network configuration page (some models only).......................................... |
124 |
Clear jams............................................................................................................................... |
125 |
Clear paper jams.............................................................................................................. |
126 |
Avoid paper jams.............................................................................................................. |
127 |
A Technical information |
|
Warranty information.............................................................................................................. |
128 |
Hewlett-Packard limited warranty statement.................................................................... |
129 |
Ink cartridge warranty information.................................................................................... |
130 |
Device specifications.............................................................................................................. |
131 |
Physical specifications...................................................................................................... |
131 |
Product features and capacities....................................................................................... |
131 |
Processor and memory specifications.............................................................................. |
131 |
System requirements........................................................................................................ |
132 |
Network protocol specifications (Some models only)....................................................... |
132 |
Embedded Web server specifications (some models only).............................................. |
133 |
Media specifications......................................................................................................... |
133 |
Understand supported sizes....................................................................................... |
133 |
Understand supported media types and weights....................................................... |
135 |
Set minimum margins................................................................................................. |
136 |
Guidelines for two-sided (duplex) printing............................................................ |
137 |
Print resolution.................................................................................................................. |
137 |
Print specifications............................................................................................................ |
137 |
Copy specifications........................................................................................................... |
137 |
Fax specifications............................................................................................................. |
138 |
Scan specifications........................................................................................................... |
139 |
Operating environment..................................................................................................... |
139 |
Electrical requirements..................................................................................................... |
139 |
Acoustic emission specification........................................................................................ |
139 |
5
Regulatory information........................................................................................................... |
140 |
FCC statement.................................................................................................................. |
141 |
Notice to users in Korea................................................................................................... |
141 |
VCCI (Class B) compliance statement for users in Japan................................................ |
141 |
Notice to users in Japan about the power cord................................................................ |
142 |
Noise emission statement for Germany........................................................................... |
142 |
LED indicator statement................................................................................................... |
142 |
Notice to users of the U.S. telephone network: FCC requirements.................................. |
143 |
Notice to users of the Canadian telephone network......................................................... |
143 |
Notice to users in the European Economic Area.............................................................. |
145 |
Notice to users of the German telephone network........................................................... |
145 |
Australia wired fax statement........................................................................................... |
145 |
Regulatory information for wireless products................................................................... |
145 |
Exposure to radio frequency radiation........................................................................ |
146 |
Notice to users in Brazil.............................................................................................. |
146 |
Notice to users in Canada.......................................................................................... |
146 |
Notice to users in Taiwan........................................................................................... |
146 |
European Union regulatory notice.............................................................................. |
147 |
Regulatory model number................................................................................................ |
147 |
Declaration of conformity.................................................................................................. |
148 |
Environmental product stewardship program......................................................................... |
151 |
Paper use......................................................................................................................... |
151 |
Plastics............................................................................................................................. |
151 |
Material safety data sheets............................................................................................... |
151 |
Recycling program............................................................................................................ |
151 |
HP inkjet supplies recycling program............................................................................... |
151 |
Disposal of waste equipment by users in private households in the European |
|
Union................................................................................................................................ |
152 |
Power consumption.......................................................................................................... |
152 |
Chemical Substances....................................................................................................... |
153 |
RoHS notices (China only)............................................................................................... |
153 |
Third-party licenses................................................................................................................ |
154 |
HP Officejet 4500 Desktop............................................................................................... |
155 |
HP Officejet 4500 / HP Officejet 4575 / HP Officejet Advantage 4500............................. |
158 |
HP Officejet 4500 Wireless............................................................................................... |
165 |
B HP supplies and accessories |
|
Order printing supplies online................................................................................................. |
172 |
Supplies.................................................................................................................................. |
172 |
Supported ink cartridges................................................................................................... |
172 |
HP media.......................................................................................................................... |
173 |
6
Contents |
|
|
C |
Additional fax setup |
|
|
Set up faxing (parallel phone systems).................................................................................. |
174 |
|
Choose the correct fax setup for your home or office....................................................... |
175 |
|
Case A: Separate fax line (no voice calls received)......................................................... |
177 |
|
Case B: Set up the device with DSL................................................................................. |
178 |
|
Case C: Set up the device with a PBX phone system or an ISDN line............................ |
179 |
|
Case D: Fax with a distinctive ring service on the same line............................................ |
179 |
|
Case E: Shared voice/fax line.......................................................................................... |
180 |
|
Case F: Shared voice/fax line with voice mail.................................................................. |
181 |
|
Case G: Fax line shared with computer modem (no voice calls received)....................... |
182 |
|
Set up the device with a computer dial-up modem..................................................... |
183 |
|
Set up the device with a computer DSL/ADSL modem.............................................. |
184 |
|
Case H: Shared voice/fax line with computer modem...................................................... |
185 |
|
Shared voice/fax with computer dial-up modem......................................................... |
185 |
|
Shared voice/fax with computer DSL/ADSL modem.................................................. |
187 |
|
Case I: Shared voice/fax line with answering machine.................................................... |
188 |
|
Case J: Shared voice/fax line with computer modem and answering machine................ |
189 |
|
Shared voice/fax line with computer dial-up modem and answering machine........... |
190 |
|
Shared voice/fax line with computer DSL/ADSL modem and answering |
|
|
machine...................................................................................................................... |
192 |
|
Case K: Shared voice/fax line with computer dial-up modem and voice mail.................. |
193 |
|
Serial-type fax setup............................................................................................................... |
195 |
|
Test fax setup......................................................................................................................... |
196 |
D Network setup (some models only) |
|
|
|
Change basic network settings............................................................................................... |
197 |
|
View and print network settings........................................................................................ |
197 |
|
Turn the wireless radio on and off (some models only).................................................... |
197 |
|
Change advanced network settings....................................................................................... |
197 |
|
Set link speed................................................................................................................... |
198 |
|
To View IP settings........................................................................................................... |
198 |
|
To Change IP settings...................................................................................................... |
198 |
|
Set up the device for wireless communication (some models only)....................................... |
199 |
|
Understand 802.11 wireless network settings.................................................................. |
199 |
|
To set up wireless communication using the device control panel with wireless setup |
|
|
wizard............................................................................................................................... |
200 |
|
To set up wireless communication using the installer (Windows).................................... |
201 |
|
To set up wireless communication using the installer (Mac OS X)................................... |
201 |
|
Connect the device using an ad hoc wireless network connection.................................. |
201 |
|
To turn off wireless communication.................................................................................. |
202 |
|
To print a wireless test page............................................................................................. |
202 |
|
Reset wireless settings..................................................................................................... |
202 |
|
Change the connection method........................................................................................ |
202 |
|
Guidelines for ensuring wireless network security............................................................ |
203 |
|
To add hardware addresses to a WAP....................................................................... |
203 |
|
Other guidelines......................................................................................................... |
203 |
|
Guidelines for reducing interference on a wireless network............................................. |
203 |
|
Uninstall and reinstall the software......................................................................................... |
203 |
E |
Device management tools |
|
|
Toolbox (Windows)................................................................................................................. |
206 |
7
Use the HP Solution Center (Windows)................................................................................. |
206 |
HP Utility (Mac OS X)............................................................................................................. |
206 |
Embedded Web server (some models only).......................................................................... |
207 |
F Errors (Windows) |
|
Fax Memory Full..................................................................................................................... |
209 |
Device Disconnected.............................................................................................................. |
209 |
Ink Alert................................................................................................................................... |
209 |
Cartridge Problem.................................................................................................................. |
210 |
Solution 1: Install the ink cartridges correctly................................................................... |
210 |
Solution 2: Turn the product off and on............................................................................ |
212 |
Solution 3: Clean the electrical contacts........................................................................... |
212 |
Solution 4: Replace the ink cartridge................................................................................ |
212 |
Paper Mismatch...................................................................................................................... |
212 |
The cartridge cradle cannot move.......................................................................................... |
212 |
Paper Jam.............................................................................................................................. |
212 |
Paper Jam.............................................................................................................................. |
212 |
The printer is out of paper...................................................................................................... |
213 |
Printer Offline.......................................................................................................................... |
213 |
Printer Paused........................................................................................................................ |
213 |
Document failed to print.......................................................................................................... |
213 |
General printer error............................................................................................................... |
213 |
Align cartridge......................................................................................................................... |
214 |
Index............................................................................................................................................ |
215 |
8

1 Get started
This guide provides details about how to use the device and to resolve problems.
•Accessibility
•Eco-Tips
•Understand the device parts
•Use the product control panel
•Finding the device model number
•Select print media
•Load an original on the scanner glass
•Load an original in the automatic document feeder (ADF)
•Load media
•Maintain the device
•Turn off the device
 NOTE: If you are using the device with a computer running Windows XP Starter Edition, Windows Vista Starter Edition, or Windows 7 Starter Edition, some features might not be available. For more information, see Operating system compatibility.
Accessibility
The device provides a number of features that make it accessible for people with disabilities.
Visual
The device software is accessible for users with visual impairments or low vision through the use of your operating system's accessibility options and features. It also supports most assistive technology such as screen readers, Braille readers, and voice-to-text applications. For users who are color blind, colored buttons and tabs used in the software and on the device control panel have simple text or icon labels that convey the appropriate action.
Mobility
For users with mobility impairments, the device software functions can be executed through keyboard commands. The software also supports Windows accessibility options such as StickyKeys, ToggleKeys, FilterKeys, and MouseKeys. The device doors, buttons, paper trays, and paper guides can be operated by users with limited strength and reach.
Support
For more details about the accessibility of this product and HP's commitment to product accessibility, visit HP's Web site at www.hp.com/accessibility.
For accessibility information for Mac OS X, visit the Apple Web site at www.apple.com/ accessibility.
Get started |
9 |
Chapter 1
Eco-Tips
HP is committed to helping customers reduce their environmental footprint. HP has provided the Eco-Tips below to help you focus on ways to assess and reduce the impact of your printing choices. In addition to specific features in this product, please visit the HP Eco Solutions Web site for more information on HP's environmental initiatives.
www.hp.com/hpinfo/globalcitizenship/environment/
•Duplex printing: Use Paper-saving Printing to print two-sided documents with multiple pages on same sheet to reduce paper usage. For more information, see Two-sided printing (duplexing).
•Smart Web printing (Windows): The HP Smart Web Printing interface includes a Clip Book and Edit Clips window where you can store, organize, or print clips you have gathered from the Web. For more information, see Print a Web page.
•Energy Savings Information: To determine the ENERGY STAR® qualification status for this product, see Power consumption.
•Recycled Materials: For more information regarding recycling of HP products, please visit:
www.hp.com/hpinfo/globalcitizenship/environment/recycle/
Understand the device parts
This section contains the following topics:
•Front view
•Printing supplies area
•Back view
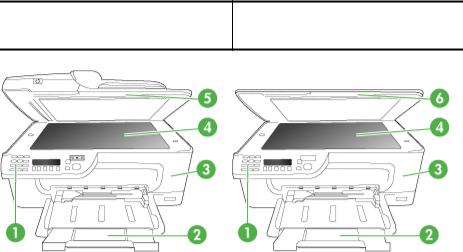
Front view
HP Officejet 4500 / HP Officejet 4575 /
HP Officejet 4500 Wireless / HP Officejet HP Officejet 4500 Desktop Advantage 4500
10 Get started

1Control panel
2Main tray
3Cartridge access door
4Scanner glass
5Automatic document feeder
6Scanner lid
Printing supplies area
HP Officejet 4500 / HP Officejet 4575 /
HP Officejet 4500 Wireless / HP Officejet HP Officejet 4500 Desktop Advantage 4500
1Cartridge access door
2Ink cartridges
Back view
HP Officejet 4500 / HP Officejet 4575 /
HP Officejet 4500 Wireless / HP Officejet HP Officejet 4500 Desktop Advantage 4500
Understand the device parts |
11 |
Chapter 1
1 |
Universal serial bus (USB) port |
|
|
2 |
Ethernet port (HP Officejet 4500 / HP Officejet 4575 / HP Officejet Advantage 4500 only) |
|
|
3 |
Power input |
|
|
4 |
1-LINE (fax) |
|
|
5 |
2-EXT (phone) |
|
|
Use the product control panel
This section contains the following topics:
•Overview of buttons and lights
•Change product settings
•Types of messages
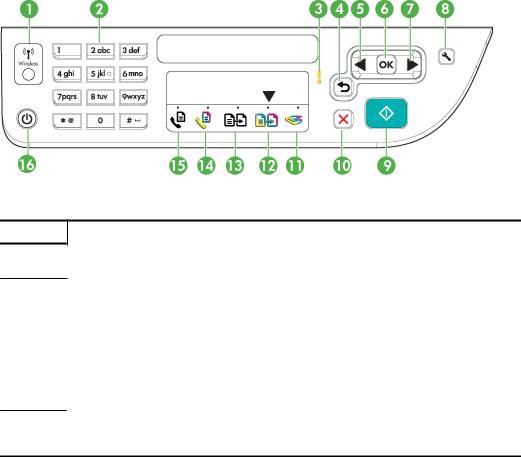
Overview of buttons and lights
The following diagram and related table provide a quick reference to the device control panel features.
Label |
Name and Description |
1Wireless button (HP Officejet 4500 Wireless): Turns the 802.11 wireless feature on or off. The button is lit when the wireless feature is on.
2 |
Keypad: Enters values. |
3 |
Attention light: Indicates an error condition. |
|
|
4 |
Back button: Reverts back to its previous setting or upper level menu. |
|
|
5 |
Left arrow button: Navigates forward through settings in the menus. |
|
|
6 |
OK button: Selects the current menu or setting. |
|
|
7 |
Right arrow button: Navigates in reverse through settings in the menus. |
8Setup: Presents the Setup menu for generating reports and other maintenance settings, and for accessing the Help menu. The topic that you select from the Help menu opens a help window on your computer screen.
12 Get started
(continued)
Label |
Name and Description |
9 |
Start: Initiates a copy, fax, or scan job. Pressing Start processes the job according to the function |
|
selected. |
|
|
10 |
Cancel: Stops a job, exits a menu, or exits settings. |
|
|
11 |
Scan function indicator |
|
|
12 |
Copy Color function indicator |
|
|
13 |
Copy B&W function indicator |
|
|
14 |
Fax Color function indicator |
|
|
15 |
Fax B&W function indicator |
16Power: Turns the device on or off. The Power button is lit when the device is on. The light blinks while performing a job.
When the device is turned off, a minimal amount of power is still supplied. To completely disconnect the power supply, turn the device off, and then unplug the power cord.
Change product settings
You use the control panel to change the product’s mode and settings, print reports, or get help for the product.
TIP: If the product is connected to a computer, you can also change the product settings using software tools available on your computer, such as the Toolbox (Windows), the HP Utility (Mac OS X), or the embedded Web server (EWS). For more information about these tools, see Device management tools.
This section contains the following topics:
•Select the mode
•Change product settings
Select the mode
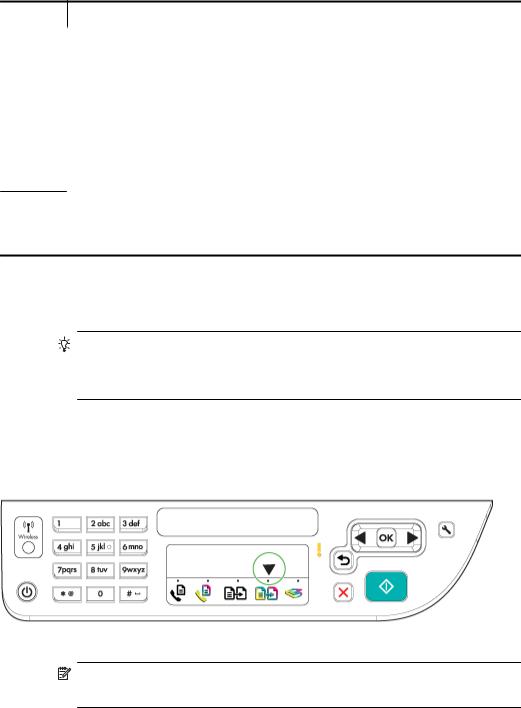
The mode indicator arrow on the control panel shows the mode currently selected for the product.
NOTE: After selecting a mode and changing settings, press  (Start button) to start the job.
Use the product control panel |
13 |

Chapter 1
To select a different mode
Press left arrow  or right arrow
  to select the desired mode, and then press OK.
To change settings for a mode
1.After selecting a mode, press the arrow buttons to scroll through the available settings available, and then press OK to select the setting you want to change.
2.Press the arrow buttons to change the settings, and then press OK.
 NOTE: Use the left arrow
  button or
  button when you want to delete an incorrect entry on the display.
Change product settings
To change the product settings or print reports, use the options available in the Setup menu:
1.Press the  (Setup) button
2.Press the arrow buttons to scroll through the menus.
3.Press OK to select menus or options.
 NOTE: Use the left arrow
  button or
  button when you want to delete an incorrect entry on the display.
Types of messages
While using the product, messages will appear on the control panel display. These messages provide information about the product's activity. While some types of messages just provide information about the product's status, other types of messages might require that you take the appropriate action (often specified in the message itself) before the product can continue functioning.
Status messages
Status messages reflect the current state of the device. They inform you of normal operation and require no action to clear them. They change as the state of the device changes. Whenever the device is ready, not busy, and has no pending warning messages, the status message READY appears if the device is turned on.
Warning messages
Warning messages inform you of events that require your attention, but they do not prevent the device from operating. An example of a warning message is a low ink warning. These messages appear until you resolve the condition.
Error messages
Error messages communicate that some action must be performed, such as adding media or clearing a media jam. These messages are usually accompanied by a blinking red Attention light. Take the appropriate action to continue printing.
14 Get started

If the error message shows an error code, press the Power button to turn off the device, and then turn it on again. In most situations, this action solves the problem. If the message persists, your device might need service. For more information, see Solve a problem.
Critical error messages
Critical error messages inform you of a device failure. Some of these messages can be cleared by pressing the Power button to turn off the device, and then turning it on again. If a critical error persists, service is required. For more information, see Solve a problem.
Finding the device model number
In addition to the model name that appears on the front of the device, this device has a specific model number. You can use this number to help determine which supplies or accessories are available for your product, as well as when obtaining support.
The model number is printed on a label located inside the device, near the ink cartridges area.
Select print media
The device is designed to work well with most types of office media. It is best to test a variety of print media types before buying large quantities. Use HP media for optimum print quality. Visit the HP Web site at www.hp.com for more information about HP media.
HP recommends plain papers with the ColorLok logo for printing and copying of everyday documents. All papers with the ColorLok logo are independently tested to meet high standards of reliability and print quality, and produce documents with crisp, vivid color, bolder blacks & dry faster than ordinary plain papers. Look for papers with the ColorLok logo in a variety of weights and sizes from major paper manufacturers.
This section contains the following topics:
•Recommended papers for printing and copying
•Recommended papers for photo printing
•Tips for selecting and using media
Recommended papers for printing and copying
If you want the best print quality, HP recommends using HP papers that are specifically designed for the type of project you are printing.
Select print media |
15 |

Chapter 1
Depending on your country/region, some of these papers might not be available.
HP Brochure Paper |
These papers are glossy-coated or matte-coated on both sides for two- |
|
HP Superior Inkjet |
sided use. They are the perfect choice for near-photographic |
|
reproductions and business graphics for report covers, special |
||
Paper |
||
presentations, brochures, mailers, and calendars. |
||
|
||
|
|
|
HP Bright White Inkjet |
HP Bright White Inkjet Paper delivers high-contrast colors and sharp |
|
Paper |
text. It is opaque enough for two-sided color usage with no show- |
|
|
through, which makes it ideal for newsletters, reports, and flyers. It |
|
|
features ColorLok Technology for less smearing, bolder blacks and |
|
|
vivid colors. |
|
|
|
|
HP Printing Paper |
HP Printing Paper is a high-quality multifunction paper. It produces |
|
|
documents that look and feel more substantial than documents printed |
|
|
on standard multipurpose or copy paper. It features ColorLok |
|
|
Technology for less smearing, bolder blacks and vivid colors. It is acid- |
|
|
free for longer lasting documents. |
|
|
|
|
HP Office Paper |
HP Office Paper is a high-quality multifunction paper. It is suitable for |
|
|
copies, drafts, memos and other everyday documents. It features |
|
|
ColorLok Technology for less smearing, bolder blacks and vivid colors. |
|
|
It is acid-free for longer lasting documents |
|
|
|
|
HP Office Recycled |
HP Office Recycled Paper is a high-quality multifunction paper made |
|
Paper |
with 30% recycled fiber. It features ColorLok Technology for less |
|
|
smearing, bolder blacks and vivid colors. It is acid-free for longer lasting |
|
|
documents. |
|
HP Premium |
These papers are heavy two-sided matte papers perfect for |
|
Presentation Paper |
presentation, proposals, reports and newsletters. They are |
|
HP Professional Paper |
heavyweight for an impressive look and feel. |
|
|
||
|
|
|
HP Premium Inkjet |
HP Premium Inkjet Transparency Film makes your color presentations |
|
Transparency Film |
vivid and even more impressive. This film is easy to use and handle and |
|
|
dries quickly without smudging. |
|
|
|
|
HP Advanced Photo |
This thick photo paper features an instant-dry finish for easy handling |
|
Paper |
without smudging. It resists water, smears, fingerprints, and humidity. |
|
|
Your prints have a look and feel comparable to a store processed photo. |
|
|
It is available in several sizes, including A4, 8.5 x 11 inch, 10 x 15 cm |
|
|
(4 x 6 inch), 13x18 cm (5 x7 inch) and two finishes – glossy or soft gloss |
|
|
(satin matte). It is acid-free for longer lasting documents. |
|
|
|
|
HP Everyday Photo |
Print colorful, everyday snapshots at a low cost, using paper designed |
|
Paper |
for casual photo printing. This affordable, photo paper dries quickly for |
|
|
easy handling. Get sharp, crisp images when you use this paper with |
|
|
any inkjet printer. Available in semi-gloss finish in 8.5 x11 inch, A4, 4 x |
|
|
6 inch and 10 x 15 cm. It is acid-free for longer lasting documents. |
|
|
|
|
HP Iron-On Transfers |
HP Iron-on Transfers (for color fabrics or for light or white fabrics) are |
|
|
the ideal solution for creating custom T-shirts from your digital photos. |
|
|
|
To order HP papers and other supplies, go to www.hp.com/buy/supplies. If prompted, choose your country/region, follow the prompts to select your product, and then click one of the shopping links on the page.
 NOTE: At this time, some portions of the HP Web site are available in English only.
HP Photo Value Packs:
16 Get started
HP Photo Value Packs conveniently package Original HP ink cartridges and HP Advanced Photo Paper to save you time and take the guesswork out of printing affordable professional photos with your HP printer. Original HP inks and HP Advanced Photo Paper have been designed to work together so your photos are long lasting and vivid, print after print. Great for printing out an entire vacation’s worth of photos or multiple prints to share.
Recommended papers for photo printing
If you want the best print quality, HP recommends using HP papers that are specifically designed for the type of project you are printing.
Depending on your country/region, some of these papers might not be available.
HP Advanced Photo Paper
This thick photo paper features an instant-dry finish for easy handling without smudging. It resists water, smears, fingerprints, and humidity. Your prints have a look and feel comparable to a store processed photo. It is available in several sizes, including A4, 8.5 x 11 inch, 10 x 15 cm (4 x 6 inch), 13 x 18 cm (5 x 7 inch) and two finishes – glossy or soft gloss (satin matte). It is acid-free for longer lasting documents.
HP Everyday Photo Paper
Print colorful, everyday snapshots at a low cost, using paper designed for casual photo printing. This affordable, photo paper dries quickly for easy handling. Get sharp, crisp images when you use this paper with any inkjet printer. Available in semi-gloss finish in 8.5 x 11 inch, A4, 4 x 6 inch and 10 x 15 cm. It is acid-free for longer lasting documents.
HP Photo Value Packs:
HP Photo Value Packs conveniently package Original HP ink cartridges and HP Advanced Photo Paper to save you time and take the guesswork out of printing affordable professional photos with your HP printer. Original HP inks and HP Advanced Photo Paper have been designed to work together so your photos are long lasting and vivid, print after print. Great for printing out an entire vacation’s worth of photos or multiple prints to share.
To order HP papers and other supplies, go to www.hp.com/buy/supplies. If prompted, choose your country/region, follow the prompts to select your product, and then click one of the shopping links on the page.
 NOTE: At this time, some portions of the HP Web site are available in English only.
Tips for selecting and using media
For the best results, observe the following guidelines.
•Always use media that conforms to the device specifications. For more information, see Media specifications.
•Load only one type of media at a time into a tray or automatic document feeder (ADF) (some models only).
•When loading the trays and ADF (some models only), make sure the media is properly loaded. For more information, see Load media or Load an original in the automatic document feeder (ADF).
Select print media |
17 |
Chapter 1
•Do not overload the tray or ADF (some models only). For more information, see Media specifications.
•To prevent jams, poor print quality, and other printing problems, avoid loading the following media in the trays or ADF (some models only):
◦Multipart forms
◦Media that is damaged, curled, or wrinkled
◦Media with cutouts or perforations
◦Media that is heavily textured, embossed, or does not accept ink well
◦Media that is too lightweight or stretches easily
◦Media that contains staples or clips
 NOTE: To scan, copy, or fax documents that contain pages that do not conform to these guidelines, use the scanner glass. For more information, see Load an original on the scanner glass.
Load an original on the scanner glass
You can copy, scan, or fax up to letteror A4-size originals by loading them on the glass.
 NOTE: Many of the special features will not work correctly if the glass and lid backing are not clean. For more information, see Maintain the device.
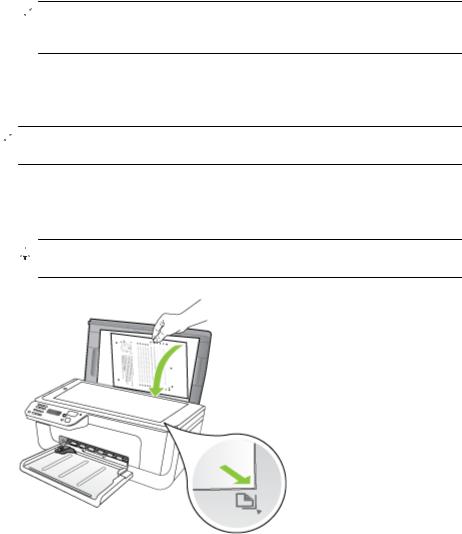
To load an original on the scanner glass
1.Lift the scanner lid.
2.Load your original print side down.

 TIP: For more help on loading an original, refer to the engraved guides along the edge of the glass.
18 Get started
3. Close the lid.
Load an original in the automatic document feeder (ADF)
 NOTE: The ADF is available for some models only.
You can copy, scan, or fax a one-sided, singleor multiple-page, A4or letter-size document by placing it in the document feeder tray.
 CAUTION: Do not load photos in the ADF; this might cause damage to your photos.
 NOTE: Two-sided legal-size documents cannot be scanned, copied, or faxed using the ADF.
NOTE: Some features, such as the Fit to Page copy feature, do not work when you load your originals in the ADF. You must load your originals on the glass.
The document feeder tray holds a maximum of 50 sheets of plain paper.
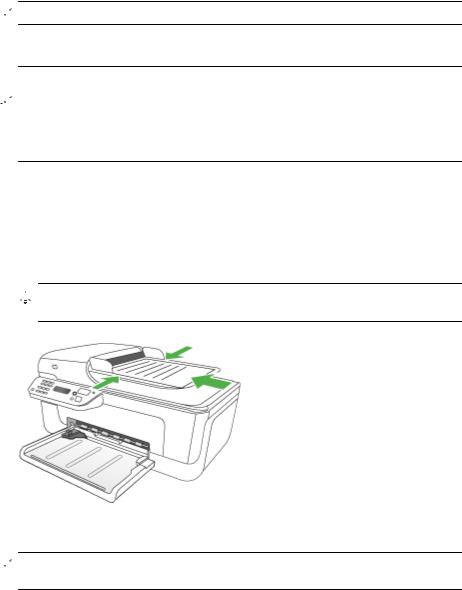
To load an original in the document feeder tray
1.Load your original, with the print side up, into the document feeder tray. Place the pages so that the top edge of the document goes in first. Slide the media into the automatic document feeder until you hear a beep or see a message on the display indicating that the loaded pages were detected.

 TIP: For more help on loading originals in the automatic document feeder, refer to the diagram engraved in the document feeder tray.
2. Slide the width guides inward until they stop at the left and right edges of the media.
 NOTE: Remove all originals from the document feeder tray before lifting the lid on the device.
Load media
This section provides instructions for loading media into the device.
Load media |
19 |
Chapter 1
To load media
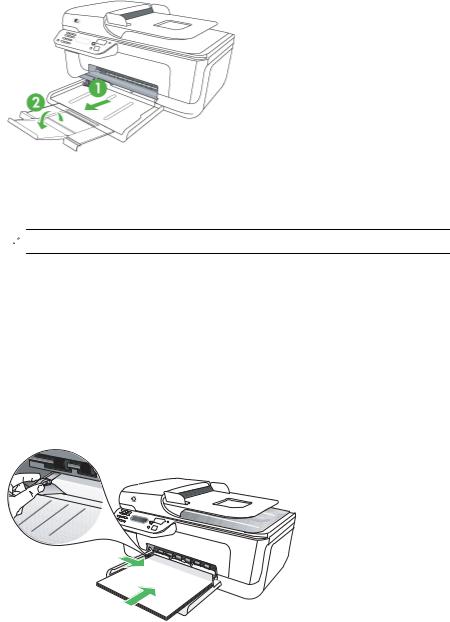
1. Pull out the tray extender.
2.Insert the media print-side down along the right of the main tray. Make sure the stack of media aligns with the right and back edges of the tray, and does not exceed the line marking in the tray.
 NOTE: Do not load paper while the device is printing.
•Envelopes: Load envelopes with the flaps facing up to the right or the back of the tray. Depending on the type of envelope you are loading, the flap hinge should be on the left or towards the back of the tray.
•Photo paper: If the photo paper has a tab along one edge, make sure the tab is pointing towards the back of the product.
•Transparencies: Insert transparencies with the rough side down and the adhesive strip pointing towards the back of the product.
•Custom-sized media: Use only custom-sized media that is supported by the device. For more information, see Media specifications.
3.Slide the media guides in the tray to adjust them for the media size that you have loaded.
20 Get started
Maintain the device
This section provides instructions for keeping the device in top working condition. Perform these maintenance procedures as necessary.
•Clean the scanner glass
•Clean the exterior
•Clean the automatic document feeder (ADF) (Some models only)
Clean the scanner glass
 NOTE: Dust or dirt on the scanner glass, scanner lid backing, or scanner frame can slow down performance, degrade the quality of scans, and affect the accuracy of special features such as fitting copies to a certain page size.
To clean the scanner glass
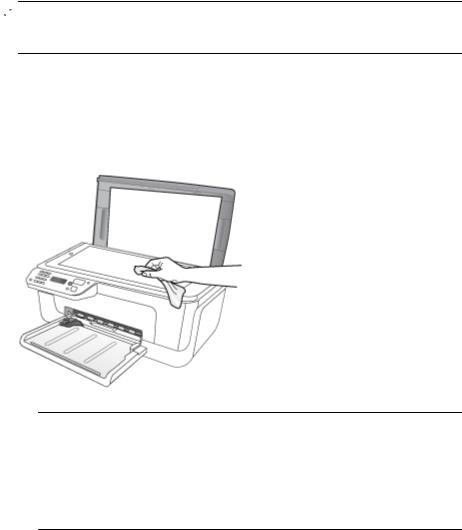
1.Turn off the device.
2.Lift the scanner lid.
3.Clean the glass by using a soft, lint-free cloth that has been sprayed with a mild glass cleaner. Dry the glass with a dry, soft, lint-free cloth.
 CAUTION: Use only glass cleaner to clean the scanner glass. Avoid cleaners that contain abrasives, acetone, benzene, and carbon tetrachloride, all of which can damage the scanner glass. Avoid isopropyl alcohol because it can leave streaks on the glass.
CAUTION: Do not spray the glass cleaner directly on the glass. If too much glass cleaner is applied, the cleaner could leak under the glass and damage the scanner.
4. Close the scanner lid, and turn on the device.
Maintain the device |
21 |
Chapter 1
Clean the exterior
 WARNING! Before cleaning the device, turn off the power and unplug the power cord from the electrical socket.
Use a soft, damp, lint-free cloth to wipe dust, smudges, and stains off of the case. The exterior of the device does not require cleaning. Keep fluids away from the interior of the device, as well as from the device control panel.
Clean the automatic document feeder (ADF) (Some models only)
 NOTE: The ADF is available for some models only.
If the automatic document feeder picks up multiple pages or if it does not pick up plain paper, you can clean the rollers and separator pad. Lift the automatic document feeder cover to access the pick assembly inside the automatic document feeder, clean the rollers or separator pad, and then close the cover.
If you have lines or dust appearing on scanned documents or faxes, clean the plastic strip in the ADF.
To clean the rollers or separator pad
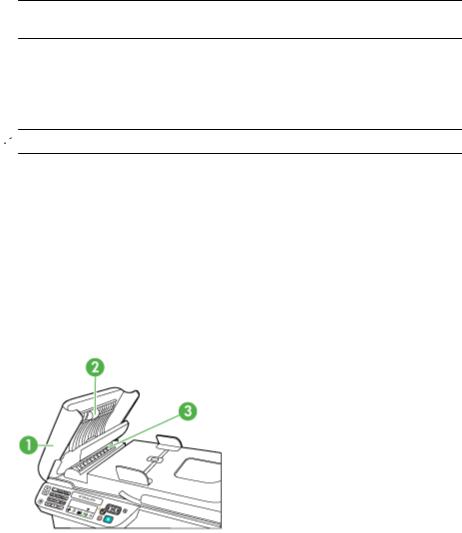
1.Remove all originals from the document feeder tray.
2.Lift the automatic document feeder cover (1).
This provides easy access to the rollers (2) and separator pad (3), as shown below.
1 |
Automatic document feeder cover |
|
|
2 |
Rollers |
|
|
3 |
Separator pad |
|
|
3.Lightly dampen a clean lint-free cloth with distilled water, then squeeze any excess liquid from the cloth.
22 Get started
4.Use the damp cloth to wipe any residue off the rollers or separator pad.
 NOTE: If the residue does not come off using distilled water, try using isopropyl (rubbing) alcohol.
5.Close the cover of the automatic document feeder.
To clean the plastic strip inside the automatic document feeder
1.Turn off the device and unplug the power cord.
 NOTE: Depending how long the device is unplugged, the date and time might be erased. You might need to reset the date and time later, when you plug the power cord back in.
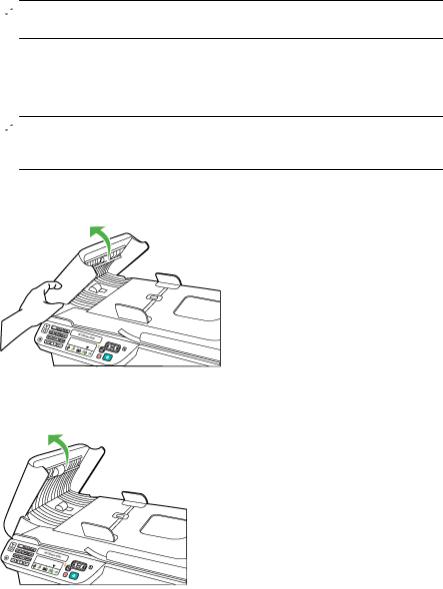
2.Lift the cover of the automatic document feeder until it stops, and then gently pry the cover to release the catch.
3. Continue lifting the automatic document feeder cover to the vertical position.
Maintain the device |
23 |
Chapter 1
4. Lift the automatic document feeder mechanism.
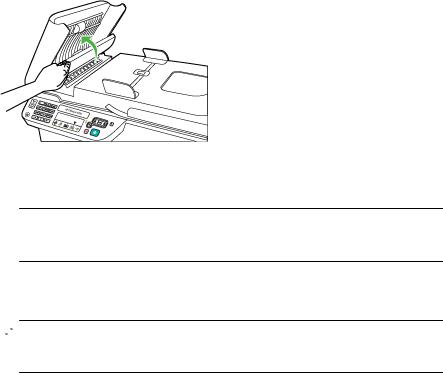
5.Clean the plastic strip with a soft cloth or sponge slightly moistened with a nonabrasive glass cleaner.
 CAUTION: Do not use abrasives, acetone, benzene, or carbon tetrachloride on the plastic strip, since they can damage it. Do not place or spray liquid directly on the plastic strip. The liquid might seep under the glass and damage the device.
6.Gently lower the automatic document feeder mechanism to avoid dislodging the plastic strip, and then close the cover of the automatic document feeder.
7.Plug in the power cord, and then turn on the device.
 NOTE: If you still see dust or lines on scans after cleaning the plastic strip, you may need to order a new plastic strip. For more information, see Solve a problem.
Turn off the device
Turn off the product by pressing the  (power) button located on the product. Wait until the power light turns off before unplugging the power cord or turning off a power strip. If you improperly turn off the product, the print carriage might not return to the correct position causing problems with the ink cartridges and print quality issues.
24 Get started

2 Print
Most print settings are automatically handled by the software application. You need to change the settings manually only when you want to change print quality, print on specific types of paper, or use special features. For more information about selecting the best print media for your documents, see Select print media.
This section contains the following topics:
•Print documents
•Print brochures
•Print on envelopes
•Print a Web page
•Print photos
•Print on special and custom-sized paper
•Print borderless documents
Print documents
 NOTE: With certain types of paper, you can print on both sides of a sheet of paper (called “two-sided printing” or “duplex printing”). For more information, see Two-sided printing (duplexing).
Follow the instructions for your operating system.
•Print documents (Windows)
•Print documents (Mac OS X)
Print documents (Windows)
1.Load paper in the tray. For more information, see Load media.
2.On the File menu in your software application, click Print.
3.Select the product you want to print to.
4.If you need to change settings, click the button that opens the Properties dialog box. Depending on your software application, this button might be called Properties,
Options, Printer Setup, Printer, or Preferences.
5.Click a type of print task in the Printing Shortcuts list. The preset default settings for the shortcuts are displayed.
6.If you change any settings on the Printing Shortcuts tab, you can save your custom settings as a new printing shortcut:
a. Select the shortcut, and then click Save As.
b. To delete a shortcut, select the shortcut, and then click Delete.

 TIP: You can change more options for the print job by using the features available on the other tabs in the dialog box.
7.Click OK.
8.Click Print or OK to begin printing.
Print 25

Chapter 2
Print documents (Mac OS X)
1.Load paper in the tray. For more information, see Load media.
2.From the File menu in your software application, choose Print.
3.Make sure the product you want to use is selected.
4.Change the print settings for the option provided in the pop-up menus, as appropriate for your project.
 NOTE: Click the blue disclosure triangle next to the Printer selection to access these options.
5.Click Print to begin printing.
Print brochures
Follow the instructions for your operating system.
 NOTE: To set print settings for all print jobs, make the changes in the printer driver.
For more information about the features of the Windows printer driver, see the online help for the driver. For more information about printing from a specific application, see the documentation that came with the application.
•Print brochures (Windows)
•Print brochures (Mac OS X)
Print brochures (Windows)
1.Load paper in the tray. For more information, see Load media.
2.On the File menu in your software application, click Print.
3.Select the product you want to print to.
4.If you need to change settings, click the button that opens the Properties dialog box. Depending on your software application, this button might be called Properties,
Options, Printer Setup, Printer, or Preferences.
5.Select Brochure Printing – Borderless in the Printing Shortcuts list. The default settings are displayed.
6.Change any other print settings.

 TIP: You can change more options for the print job by using the features available on the other tabs in the dialog box.
7.Click Print to begin printing.
Print brochures (Mac OS X)
1.Load paper in the tray. For more information, see Load media.
2.From the File menu in your software application, choose Print.
3.Make sure the product you want to use is selected.
26 Print
Loading...